emc® vplex™ d m m - emccomputersystems.biz 1: overview 4 emc vplex data mobility and migrations...
TRANSCRIPT

Implementation Planning and Best Practices Technical Notes
EMC® VPLEX™ Data Mobility and Migrations Implementation Planning and Best Practices
Extent Migrations Device Migrations Batch Migrations Updated for GeoSynchrony 6.0 and VS6 Hardware Platform
Abstract
This technical note is targeted for EMC field personnel, partners, and customers who will be configuring, installing, and supporting VPLEX. An understanding of these technical notes requires a good working knowledge of SAN technologies, LAN/WAN technologies, block storage, VPLEX concepts, and all the components that bring the solution together.
August 2016

2 EMC VPLEX Data Mobility and Migrations Implementation Planning and Best Practices Technical Notes
Copyright © 2016 EMC Corporation. All rights reserved. Published in the USA.
Published August 2016
EMC believes the information in this publication is accurate as of its publication date. The information is subject to change without notice.
The information in this publication is provided as is. EMC Corporation makes no representations or warranties of any kind with respect to the information in this publication, and specifically disclaims implied warranties of merchantability or fitness for a particular purpose. Use, copying, and distribution of any EMC software described in this publication requires an applicable software license.
EMC2, EMC, and the EMC logo are registered trademarks or trademarks of EMC Corporation in the United States and other countries. All other trademarks used herein are the property of their respective owners.
For the most up-to-date listing of EMC product names, see EMC Corporation Trademarks on EMC.com.
EMC VPLEX Data Mobility Implementation Planning and Best Practices Technical Notes
Part Number H13548

Chapter 1: Overview
Contents
Chapter 1 Overview 5
VPLEX Mobility Overview ............................................................................................ 6
Reasons to Deploy VPLEX for Data Migrations ........................................................ 6
Comparing Migration Processes ............................................................................. 7
Storage, Application, and Host Upgrades ................................................................... 7
How Data Mobility Works ............................................................................................ 7
Use Cases................................................................................................................... 8
Data Mobility ......................................................................................................... 8
Technology Refresh ................................................................................................ 9
Chapter 2 Data Mobility 11
Extent Migration ....................................................................................................... 12
Device Migration ...................................................................................................... 12
Batch Migration ........................................................................................................ 12
Migration Jobs .......................................................................................................... 12
Data Mobility with the Migration Wizard ................................................................... 12
Chapter 3 Data Migrations 14
About Data Migrations .............................................................................................. 15
One Time Migrations ................................................................................................ 15
Migration Limitations ............................................................................................... 15
Batch Migrations ...................................................................................................... 16
General procedure to perform data migration ...................................................... 16
About Rebuilds ......................................................................................................... 16
Rebuilds for Thin Provisioned Storage .................................................................. 17
Chapter 4 Considerations 18
Best Practices ........................................................................................................... 19
What is transfer size? ............................................................................................... 19
How does transfer size affect performance? .............................................................. 19
Job transfer speed (as referenced in the VPLEX GUI) ................................................. 20
Appendix A Example One-Time Data Migration 21
One-Time Data Migrations ........................................................................................ 22
Start a One-Time Device or Extent Data Migration ................................................ 22
Monitor a Migration’s Progress ............................................................................ 23

Chapter 1: Overview
4 EMC VPLEX Data Mobility and Migrations Implementation Planning and Best Practices Technical Notes
VPLEX CLI Commands for Data Migrations ............................................................ 23
Example Data Migration Operation ...................................................................... 24
Appendix B Example Batch Migration 29
Batch Migrations ...................................................................................................... 30
Batch Plan Prerequisites ...................................................................................... 30
Check a Batch Migration Plan .............................................................................. 31
Modify a batch migration file ............................................................................... 32
Start a Batch Migration ........................................................................................ 32
Pause/Resume a Batch Migration ........................................................................ 32
Cancel a Batch Migration ..................................................................................... 32
Monitor a Batch Migration’s Progress .................................................................. 32
View a Batch Migration’s Status ........................................................................... 33
Appendix C Example Distributed Migration 34
VPLEX Distributed Device Migrations ........................................................................ 35
Distributed Device Details .................................................................................... 37
Extent Details ...................................................................................................... 38
Extent Migration .................................................................................................. 40
GUI Method ......................................................................................................... 40

Chapter 1: Overview
Chapter 1 Overview
This chapter presents the following topics:
VPLEX Mobility Overview ......................................................................................... 6
Storage, Application, and Host Upgrades ................................................................. 7
How Data Mobility Works ......................................................................................... 7
Use Cases ................................................................................................................ 8

Chapter 1: Overview
6 EMC VPLEX Data Mobility and Migrations Implementation Planning and Best Practices Technical Notes
VPLEX Mobility Overview
EMC VPLEX federates data located on heterogeneous storage arrays to create dynamic, distributed, highly available data centers. VPLEX may be used to:
Move data non-disruptively between EMC and non-EMC storage arrays without any downtime for the host.
VPLEX moves data transparently and the virtual volumes retain the same identities and the same access points to the host. The host does not need to be reconfigured.
Collaborate over distance. AccessAnywhere provides cache-consistent active-active access to data across VPLEX clusters.
Multiple users at different sites can work on the same data while maintaining consistency of the dataset.
Protect data in the event of disasters or failure of components in your data centers.
With VPLEX, you can withstand failures of storage arrays, cluster components, an entire site failure, or loss of communication between sites (when two clusters are deployed) and still keep applications and data online and available.
Saves Money: Customers can do the migrations themselves, saving migration services costs & they continue to save on all future migrations
Enables Non-Disruptive Migrations Forever: Migrations with vplex eliminate mandatory scheduled application downtime for storage array refreshes
Minimizes Remediation: No host remediation is needed when refreshing arrays
Eliminates Risks: With vplex, the migration process is 100% reversible – if performance or other factors dictate, vplex can non-disruptively re-link the server(s) to the old array(s)
Accelerates Array Time-to-Value: With vplex, the new infrastructure can be put to use immediately (versus traditional migration methods)
Provides 100% Uptime: Vplex leverages non-disruptive upgrades across SW versions and HW platforms
Delivers Value Beyond Migrations: After the migration is complete, vplex provides a continuously available infrastructure with active-active data access
Saves Time: Operations staff is freed up to focus on other it initiatives versus spending time on migrations
Reasons to Deploy VPLEX for Data Migrations

Chapter 1: Overview
Figure 1. Migration Process Comparison
One of the first and most common use cases for storage virtualization in general is that it provides a simple transparent approach for array replacement. Standard migrations off an array are time consuming due to the requirement of coordinating planned outages with all necessary applications that don’t inherently have the ability to have new devices provisioned and copied to without taking an outage. Additional host remediation may be required for support of the new array which may also require an outage.
VPLEX eliminates all these problems and makes the array replacement completely seamless and transparent to the servers. The applications continue to operate uninterrupted during the entire process. Host remediation is not necessary as the host continues to operate off the Virtual Volumes provisioned from VPLEX and is not aware of the change in the backend array. All host level support requirements apply only to VPLEX and there are no necessary considerations for the backend arrays as that is handled through VPLEX.
If the solution incorporates RecoverPoint and the RecoverPoint Repository, Journal and Replica volumes reside on VPLEX virtual volumes then array replacement is also completely transparent to even to RecoverPoint. This solution results in no interruption in the replication so there is no requirement to reconfigure or resynchronize the replication volumes.
Storage, Application, and Host Upgrades
VPLEX enables the easy addition or removal of storage, applications, and hosts.
When VPLEX encapsulates back-end storage, the block-level nature of the coherent Cache allows the upgrade of storage, applications, and hosts.
You can configure VPLEX so that all devices within VPLEX have uniform access to all storage blocks.
How Data Mobility Works
Comparing Migration Processes
Chapter 1: Overview
8 EMC VPLEX Data Mobility and Migrations Implementation Planning and Best Practices Technical Notes
Mobility moves data from a source extent or device to a target extent or device.
When a mobility job is started, VPLEX creates a temporary RAID 1 device above each source device or extent to be migrated.
The target extent or device becomes a mirror leg of the temporary device, and synchronization between the source and the target begins.
The data mobility operation is non-disruptive. Applications using the data continue to write to the volumes during the mobility operation. New I/Os are written to both legs of the device.
The following rules apply to mobility operations:
The target extent/device must be the same size or larger than the source extent/device.
The target device cannot be in use (no virtual volumes created on it).
The target extent cannot be in use (no devices created on it).
You can control the transfer speed of the data mobility operation.
Higher transfer speeds complete the operation more quickly, but have a greater impact on host I/O.
Slower transfer speeds have less impact on host I/O, but take longer to complete.
You can change the transfer speed of a job while the job is in the queue or in progress. The change takes effect immediately.
Starting in GeoSynchrony 5.0, the thinness of a thinly provisioned storage volume is retained through a mobility operation. Prior to 5.0, you must specify that rebuilds should be thin at the time you provision the thin volume.
Refer to the EMC VPLEX CLI Guide or the online help for more information on thin provisioning of volumes.
Use Cases
The source and target arrays can be in the same data center (VPLEX Local) or in different data centers separated by up to 10ms with VPLEX Metro.
With VPLEX, source and target arrays can be heterogeneous.
When you use VPLEX to move data, the data retains its original VPLEX volume identifier during and after the mobility operation. No change in volume identifiers eliminates application cut over. The application continues to use the “same” storage, unaware that it has moved.
There are many types and reasons to move data:
Move data from a “hot” storage device.
Move applications from one storage device to another.
Data Mobility

Chapter 1: Overview
Move operating system files from one storage device to another.
Consolidate data or database instances.
Move database instances.
Move storage infrastructure from one physical location to another.
With VPLEX, you no longer need to spend significant time and resources preparing to move data and applications. You don’t have to accept a forced outage and restart the application after the move is completed.
Instead, a move can be made instantly between sites, over distance, and the data remains online and available during the move - no outage or downtime is required.
Considerations before moving data include the business impact and the type of data to be moved, site locations, total amount of data, and schedules.
In typical IT environments, migrations to new storage arrays (technology refreshes) require that data used by hosts be copied to a new volume on the new array. The host must then be reconfigured to access the new storage. This process requires downtime for the host.
Migrations between heterogeneous arrays can be complicated and may require additional software or functionality. Integrating heterogeneous arrays in a single environment is difficult and requires a staff with a diverse skill set.
Figure 1 shows the traditional view of storage arrays with servers attached at the redundant front end and storage (Array-1 and Array-2) connected to a redundant fabric at the back end.
Figure 2. Traditional View of Storage Arrays
When VPLEX is inserted between the front-end and back-end redundant fabrics, VPLEX appears to be the target to hosts and the initiator to storage.
This abstract view of storage becomes very powerful when it comes time to replace the physical array that is providing storage to applications.
Technology Refresh

Chapter 1: Overview
10 EMC VPLEX Data Mobility and Migrations Implementation Planning and Best Practices Technical Notes
With VPLEX, because the data resides on virtual volumes, it can be copied non-disruptively from one array to another without any downtime. The host does not need to be reconfigured; the physical data relocation is performed by VPLEX transparently and the virtual volumes retain the same identities and the same access points to the host.
In Figure 2, the virtual disk is made up of the disks of Array-1 (Source) and Array-2 (Target). The site administrator has determined that Array-1 has become obsolete and should be replaced with a new array. Array-2 is the new storage array. Using Mobility Central, the administrator:
Adds Array-2 array into the VPLEX cluster.
Assigns a target extent from the new array to each extent from the old array.
Instructs VPLEX to perform the migration.
VPLEX copies data from Array-1 to Array-2 while the host continues its access to the virtual volume without disruption. After the copy of Array-1 to Array-2 is complete, Array-1 can be decommissioned.
Figure 3. VPLEX Technology Refresh
Because the virtual machine is addressing its data to the abstracted virtual volume, its data continues to flow to the virtual volume with no need to change the address of the data store.
Although this example uses virtual machines, the same is true for traditional hosts. Using VPLEX, the administrator can move data used by an application to a different storage array without the application or server being aware of the change. This allows you to change the back-end storage arrays transparently - without interrupting I/O.

Chapter 2: Data Mobility
Chapter 2 Data Mobility
This chapter presents the following topics:
VPLEX Mobility Overview ......................................................................................... 6
Storage, Application, and Host Upgrades ................................................................. 7
How Data Mobility Works ......................................................................................... 7
Use Cases ................................................................................................................ 8

Chapter 2: Data Mobility
12 EMC VPLEX Data Mobility and Migrations Implementation Planning and Best Practices Technical Notes
Extent Migration
Extent migration is the process of non-disruptively moving an extent from one storage volume to another. An extent migration should be used when:
Relocating an extent from a “hot” storage volume shared by other busy extents
“Defragmenting” a storage volume to create contiguous free space
Source and target arrays have a similar configuration, that is, the same number of storage volumes, identical capacities, and so on
Device Migration
Device migration is the process of non-disruptively moving a device from one set of extents to another. A device migration should be used when:
Migrating data between dissimilar arrays. For example, a storage administrator might need to slice or combine extents on a target array’s storage volumes to create devices that match the capacities of existing devices on the source array
Relocating a “hot” device from one type of storage to another
Relocating a device from an array behind one VPLEX in a VPLEX Metro cluster to an array behind a different VPLEX Cluster (a VPLEX exclusive)
Batch Migration
A batch migration is a group of extent or device migrations that are executed as a single migration job. A batch migration should be used for:
Non-disruptive technology refreshes and lease rollovers
Non-disruptive cross VPLEX Metro device migration, that is, moving data to an array at a different site (a VPLEX exclusive)
Migration Jobs
The best practice is to monitor the migration's effect on the host application and to adjust down the transfer size if it is too high.
Consider pausing migrations during the day and resuming them at night or during off-peak hours to reduce the potential performance impact.
Consider committing migration jobs shortly after they complete to avoid double writes to both the source and target RAIDs, which could potentially affect performance.
Data Mobility with the Migration Wizard

Chapter 2: Data Mobility
EMC VPLEX enables the connectivity to heterogeneous storage arrays providing seamless data mobility and the ability to manage storage provisioned from multiple heterogeneous arrays from a single interface within a data center. Data Mobility and Mirroring are supported across different array types and vendors.
VPLEX Metro configurations enable migrations between locations over synchronous distances. In combination with, for example, VMware and Distance vMotion or Microsoft Hyper-V, it allows you to transparently relocate Virtual Machines and their corresponding applications and data over synchronous distance. This provides you with the ability to relocate, share and balance infrastructure resources between data centers.
The EMC Simple Support Matrix (ESSM) – Simplified version of the ELab Navigator
Note: Please refer to the ESSM for additional support updates.
Figure 4. Application and Data Mobility
All Directors in a VPLEX cluster have access to all Storage Volumes making this solution what is referred to as an N -1 architecture. This type of architecture allows for multiple director failures without loss of access to data down to a single director.
During a VPLEX Mobility operation any jobs in progress can be paused or stopped without affecting data integrity. Data Mobility creates a mirror of the source and target devices allowing the user to commit or cancel the job without affecting the actual data. A record of all mobility jobs are maintained until the user purges the list for organizational purposes.

Chapter 3: Data Migrations
14 EMC VPLEX Data Mobility and Migrations Implementation Planning and Best Practices Technical Notes
Chapter 3 Data Migrations
This chapter presents the following topics:
About Data Migrations ........................................................................................... 15
One Time Migrations ............................................................................................. 15
Migration Limitations ............................................................................................ 15
Batch Migrations ................................................................................................... 16
About Rebuilds ...................................................................................................... 16
Chapter 3: Data Migrations
About Data Migrations
There are two types of data migrations:
One time migrations - Begin an extent or device migration immediately when the “dm migration start” command is used.
Batch migrations - Are run as batch jobs using re-usable migration plan files. Multiple device or extent migrations can be executed using a single command.
One Time Migrations
One time migrations include:
Extent migrations - Extent migrations move data between extents in the same cluster. Use extent migrations to:
Move extents from a “hot” storage volume shared by other busy extents
Defragment a storage volume to create more contiguous free space
Perform migrations where the source and target have the same number of volumes with identical capacities
Device migrations - Devices are RAID 0, RAID 1, or RAID C devices built on extents or on other devices. Device migrations move data between devices on the same cluster or between devices on different clusters. Use device migrations to:
Migrate data between dissimilar arrays
Relocate a “hot” volume to a faster array
Relocate devices to new arrays in a different cluster
Migration Limitations
Device migrations between distributed devices are not supported.
Devices must be removed from consistency groups before they can be migrated.
Target device must be the same size or larger than the source device or extent. If the target is larger in size than the source, the extra space can be utilized using storage volume expansion.
Target device must not have any existing volumes on it.
Note: When migrating between clusters remember that all device migrations are synchronous. If there is I/O to the devices being migrated, any latency may have a significant performance impact to your environment.

Chapter 3: Data Migrations
16 EMC VPLEX Data Mobility and Migrations Implementation Planning and Best Practices Technical Notes
Batch Migrations
Batch migrations migrate multiple extents or devices. Create batch migrations to automate routine tasks:
Use batched extent migrations to migrate arrays within the same cluster where the source and destination have the same number of LUNs and identical capacities.
Use batched device migrations to migrate to dissimilar arrays (user must configure the destination’s capacities to match the capacity and tier of the source array), and to migrate devices between clusters in a VPLEX Metro.
Up to 25 local and 25 distributed migrations can be in progress at the same time. Any migrations beyond those limits are queued until an existing migration completes.
Note: Devices must be removed from consistency groups before they can be migrated.
Use the following general steps to perform extent and device migrations:
1. Create and check a migration plan (batch migrations only).
2. Start the migration.
3. Monitor the migration’s progress.
4. Pause, resume, or cancel the migration (optional).
5. Commit the migration. Commit transfers the source virtual volume/device/extent to the target.
If the virtual volume on top of a device has a system-assigned default name, committing a device migration renames the virtual volume after the target device.
6. Clean up (optional).
For extent migrations: dismantle the source devices or destroy the source extent and unclaim its storage-volume.
7. Remove the record of the migration.
About Rebuilds
Rebuilds synchronize data from a source drive to a target drive. When differences arise between legs of a RAID, a rebuild updates the out-of-date leg.
There are two types of rebuild behavior:
A full rebuild copies the entire contents of the source to the target.
A logging rebuild copies only changed blocks from the source to the target.
Local mirrors are updated using a full rebuild (local devices do not use logging volumes).
General procedure to perform data migration

Chapter 3: Data Migrations
In VPLEX Metro configurations, all distributed devices have an associated logging volume. Logging volumes keep track of blocks written during an inter-cluster link outage.
After a link or leg is restored, the VPLEX system uses the information in logging volumes to synchronize mirrors by sending only changed blocks across the link.
Logging volume rebuilds also occur when a leg of a disaster recovery RAID 1 (DR1) becomes unreachable, but recovers quickly.
If a logging volume is unavailable at the time that a leg is scheduled to be marked out-of-date (via the log), the leg is marked as fully out-of-date, causing a full rebuild.
The unavailability of a logging volume matters both at the time of recovery (when the system reads the logging volume) and at the time that a write failed on one leg and succeeded on another (when the system begins writes to the logging volume).
Note: If no logging volume is available, an inter-cluster link restoration will cause a full rebuild of every distributed device to which there were writes while the link was down.
Thin provisioning allows storage to migrate onto a thinly provisioned storage volumes while allocating the minimal amount of thin storage pool capacity.
Thinly provisioned storage volumes can be incorporated into RAID 1 mirrors with similar consumption of thin storage pool capacity.
VPLEX preserves the unallocated thin pool space of the target storage volume by detecting zeroed data content before writing, and suppressing the write for cases where it would cause an unnecessary allocation. VPLEX requires the user to specify thin provisioning for each back-end storage volume. If a storage volume is thinly provisioned, the "thin-rebuild" attribute must be to "true" either during or after claiming.
Note: If a thinly provisioned storage volume contains non-zero data before being connected to VPLEX, the performance of the migration or initial RAID 1 rebuild is adversely affected. System volumes are supported on thinly provisioned LUNs, but these volumes must have thin storage pool resources available, at maximum capacity. System volumes must not compete for this space with user-data volumes in the same pool. If the thin storage allocation pool runs out of space and this is the last redundant leg of the RAID 1, further writing to a thinly provisioned device causes the volume to lose access to the device, resulting in data unavailability
Rebuilds for Thin Provisioned Storage

Chapter 4: Considerations
18 EMC VPLEX Data Mobility and Migrations Implementation Planning and Best Practices Technical Notes
Chapter 4 Considerations
This chapter presents the following topics:
Best Practices ........................................................................................................ 19
What is transfer size? ............................................................................................ 19
How does transfer size affect performance? ........................................................... 19
Job transfer speed (as referenced in the VPLEX GUI) ............................................... 20

Chapter 4: Considerations
Best Practices
Migration and front-end performance will primarily depend on:
Back-end storage layout (physical disks, RAID type, number of connections)
Migration transfer-size setting
Rebuild-type setting
Bandwidth available on the WAN COM link
Up to 25 local and global migrations can be in progress at any given time
o 25 is a shared limit for local and global combined
A local migration occurs within a cluster
A global migration occurs between clusters (Metro)
Other migrations will be queued and started once a rebuild slot opens up
Application write block size should match or be a factor of 4K
Host HBA limits
Amount of competing host traffic
Backend array configuration (disks and RAID striping)
Array's write limit to the durable media/disk (not the deferred write speed!)
PCI port bandwidth configured for backend and frontend I/O on VPLEX
Best case (no FE or BE bottlenecks) a VS2 Engine can do upwards of 3 GB/s sequential reads and 4 GB/s sequential writes. Say at 3 GB/s that would be over 5 TB/hour to do a producer/consumer read/write stream. Of course, that assumes all things optimal...
Note: Need to look at a note for over-extended arrays and migration jobs
What is transfer size?
Transfer size is the region of a source element that is temporarily locked, read, and written on the target. The default value is 128 KB. It can be as small as 4 KB (the block size of devices) and as large as 32 MB although not recommend to exceed 2 MB. The size can be changed during a migration, will take effect immediately, and is persistent for future migrations.
How does transfer size affect performance?
A larger transfer size:

Chapter 4: Considerations
20 EMC VPLEX Data Mobility and Migrations Implementation Planning and Best Practices Technical Notes
Results in a higher-performance migration but the tradeoff is that there will be more performance impact on FE I/O, especially for VPLEX Metro migrations
Is set for devices where the priorities are data protection or migration performance
A smaller transfer size:
Results in the migration taking longer but will have lower impact on FE I/O in terms of the response time to the host
Is set for devices where the priority is FE storage response time
Job transfer speed (as referenced in the VPLEX GUI)
The transfer speed determines the maximum number of bytes of data transferred at a time from the source to the target. When creating a mobility job, you can control this transfer speed. The higher the speed, the greater the impact on host I/O. A slower transfer speed results in the mobility job taking longer to complete, but has a lower impact on host I/O. Monitor the mobility job's progress and its effect on host I/O. If the job is progressing too slowly, or I/O is greatly impacted, adjust the transfer speed accordingly. You can change the transfer speed of a job while the job is in the queue or in progress. The change takes effect immediately.
By default, the GUI transfer speed is set to lowest, which translates to 128 KB. This transfer speed provides good throughput while maintaining the best front-end performance in most environments. The following table shows the mapping between the GUI transfer speed and the transfer-size attribute used in the CLI.
It is advisable to avoid the use of higher transfer speeds during times of heavy application activity.

Chapter 4: Considerations
Appendix A Example One-Time Data Migration
This chapter presents the following topics:
One-Time Data Migrations ..................................................................................... 22

Chapter 4: Considerations
22 EMC VPLEX Data Mobility and Migrations Implementation Planning and Best Practices Technical Notes
One-Time Data Migrations
A one-time data migration moves data between the specified source and targets as soon as the “dm start migration” command is used.
To start a one-time device or extent migration:
1. Use the drill down command to display the components of the source, (including extents) of a view, virtual volume or device, down to the storage-volume level: VPlexcli:/clusters/cluster-1> drill-down –o virtual-
volumes/Symm1254_7B7_1_vol
virtual-volume: Symm1254_7B7_1_vol (cluster-1)
local-device: Symm1254_7B7_1 (cluster-1)
extent: extent_Symm1254_7B7_1
storage-volume: Symm1254_7B7
2. Identify the extent or device used by the source storage volume.
3. Use the ll /clusters/cluster/storage-elements/extents or ll /clusters/cluster/devices command to display available extents or devices.
4. Identify an unused extent or device as the destination.
5. Navigate to the appropriate migration context. For device migrations, navigate to device migration context: VPlexcli:/> cd data-migrations/device-migrations
For extent migrations, navigate to extent migration context:
VPlexcli:/> cd data-migrations/extent-migrations
6. Use the “dm migration start” command to start a migration. The syntax for the command is:
dm migration start --name <name of migration>
--transfer-size [40 KB-128 MB]
--from source extent or device
--to destination extent or device
o The --name argument is used to track the migration’s progress, and to manage (cancel, commit, pause, resume) the migration.
o Use the optional --transfer-size argument to specify the size of the area set aside in cache to service the migration. A bigger transfer size means smaller space available for host I/O.
Range: 40 K - 128 M. Default: 128 K. This must be a multiple of 4K.
o Specify the --from device or extent by name if that name is unique in the global namespace. Otherwise, specify a full pathname.
o Specify the --to device or extent by name if that name is unique in the global namespace. Otherwise, specify a full pathname.
For example:
Start a One-Time Device or Extent Data Migration

Chapter 4: Considerations
VPlexcli:/data-migrations/device-migrations> dm migration start
--name migrate_012 –from device_012 --to device_012a --transfer-
size 12M
Note: Setting too large a transfer size may result in data unavailability. Only vary from the default when performance implications are fully understood.
Note: If host I/O activity is high, setting a large transfer size may impact host I/O.
Use the ls command to display the migration’s status.
VPlexcli:/> ls data-migrations/device-migrations/ migrate_012
Name Value
--------------- ----------------------------
from-cluster cluster-1
percentage-done 10
source device_012
source-exported false
start-time Fri May 28 13:32:23 MDT 2010
status in progress
target device_012a
target-exported false
to-cluster cluster-2
transfer-size 12M
type full
Use the following commands to create and manage your migrations.
batch-migrate cancel
batch-migrate check-plan
batch-migrate clean
batch-migrate commit
batch-migrate create-plan
batch-migrate pause
batch-migrate remove
batch-migrate resume
batch-migrate start
batch-migrate summary
dm migration cancel
dm migration clean
dm migration commit
dm migration pause
dm migration remove
dm migration resume
dm migration start
Monitor a Migration’s Progress
VPLEX CLI Commands for Data Migrations

Chapter 4: Considerations
24 EMC VPLEX Data Mobility and Migrations Implementation Planning and Best Practices Technical Notes
For this example, we will initiate the migration of the data on the source devices that reside on the Source Array-1 to the Target devices on Array-2. The migration operation is transparent to the ESXi servers and the virtual machines that reside on the datastores.
The actual data movement from source to target is performed in the following manner:
Convert the source volume from a RAID 0 to a RAID 1 configuration
Add the target device as a mirror
Synchronize the mirror
When fully synchronized, promote the target device to be the primary copy
Remove the source device to convert it back to a RAID 0 configuration
This procedure may be performed manually; however, the best practice is to use the batch migration procedure that automates the steps.
1. On the VPLEX console, create a batch migration plan. A plan is a file that identifies the source and target devices and other attributes. When the session is created, it is assigned a session name.
A session can be created manually by creating and editing the plan file; however, for this example we will use the following command to create the plan file automatically. Note in this example, the wildcard character “*” was used to specify the source and target devices.
cd /clusters/cluster-2/devices batch-migrate create-plan –f
Datastore* -t Target_Dev* /tmp/batch_mig_plan
The following is an example of the command dialog.
View the file created by the above command. This file defines the migration session details and is used by subsequent commands. In a root window on the SMS console, execute the following command.
vi /tmp/batch_mig_plan
The following is an example of the file that was created.
2. Check the plan and then start the migration session. The check-plan command validates the migration plan. Starting the migration will convert the
Example Data Migration Operation

Chapter 4: Considerations
source device to a RAID 1 device, add the target device as a mirror, and start the synchronization process.
batch-migrate check-plan /tmp/batch_mig_plan
batch-migrate start /tmp/batch_mig_plan
The following is an example of the command dialog.
3. Verify the status of the migration. The following command will show the status of all active device migration sessions.
cd /data-migrations/device-migrations
ll
The following is an example of the dialog. Here we see the migration is in progress and 7 percent complete.
Display the device configuration. You will see that the migration process converts the source device to a RAID 1 configuration and adds the target as a mirror. Use the following command to view the configuration of the device. Note the source devices are renamed MIGRATE_<Session name>. Also, note the status of the device shows a degraded state during synchronization. This is normal until the mirror is fully synchronized.
cd clusters/cluster-2/devices
ll
The following is an example of the command dialog.
Determine how long the migration will take. Execute the following command to display details about the source device that was renamed MIGRATE_BR0_0.
cd /cluster/cluster-2/devices/MIGRATE_BR0_0
ll
Chapter 4: Considerations
26 EMC VPLEX Data Mobility and Migrations Implementation Planning and Best Practices Technical Notes
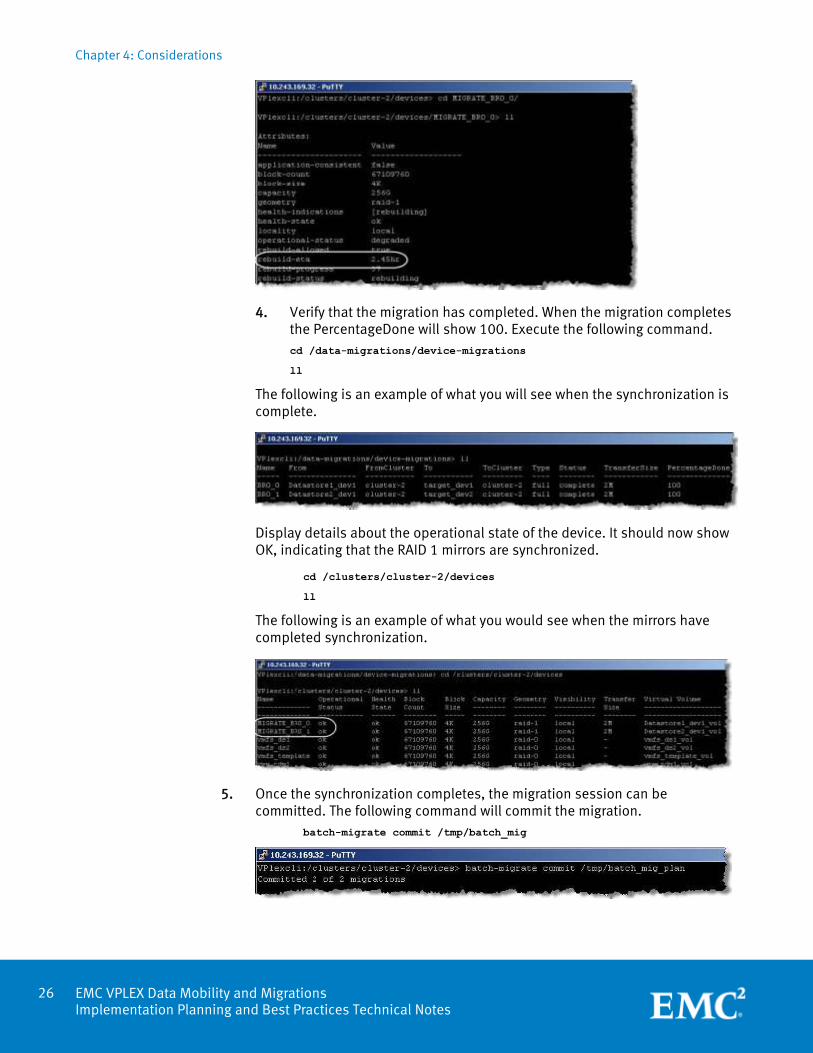
4. Verify that the migration has completed. When the migration completes the PercentageDone will show 100. Execute the following command. cd /data-migrations/device-migrations
ll
The following is an example of what you will see when the synchronization is complete.
Display details about the operational state of the device. It should now show OK, indicating that the RAID 1 mirrors are synchronized.
cd /clusters/cluster-2/devices
ll
The following is an example of what you would see when the mirrors have completed synchronization.
5. Once the synchronization completes, the migration session can be committed. The following command will commit the migration.
batch-migrate commit /tmp/batch_mig

Chapter 4: Considerations
After committing, both the source and target devices are now visible with the target device being associated with the virtual volume that is presented to the ESX cluster.
Also note the migration session will show as committed.
cd /data-migrations/device-migrations
ll
6. The next step of the batch migration is the clean. This dismantles the source device down to the storage volume and the source storage device is changed to an unclaimed state. Using the rename option will cause the target volume to assume the name of the source volume. The following command will clean up the migration.
batch-migrate clean –-rename-targets /tmp/batch_mig
In the following example note that the migration target device assumed the name of the source device and it is now associated with the virtual device. Also note that the source device was removed.
Verify the source device is now “unclaimed”.
cd /clusters/cluster-2/storage-elements/storage-volumes
ll

Chapter 4: Considerations
28 EMC VPLEX Data Mobility and Migrations Implementation Planning and Best Practices Technical Notes
7. The final step of the batch migration is to remove all information about the migration session from the VPLEX. The following command will remove all information about the completed migration session from the VPLEX.
batch-migrate remove /tmp/batch_mig
The following is an example of the command dialog. Note that the session information is now gone.
Note: Try to schedule data migrations during off-peak-hours to minimize the impact of an increased workload on the back end. If needed, you may stop (or pause) migrations during hours of production and then resume those jobs during off-peak-hours.

Chapter 4: Considerations
Appendix B Example Batch Migration
This chapter presents the following topics:
Batch Migrations ................................................................................................... 30

Chapter 4: Considerations
30 EMC VPLEX Data Mobility and Migrations Implementation Planning and Best Practices Technical Notes
Batch Migrations
Batch migrations are run as batch jobs from reusable batch migration plan files. Migration plan files are created using the create-plan command.
A single batch migration plan can be either for devices or extents, but not both.
Note: Note: Migrations consume cache resources. Running multiple migrations concurrently may impact host I/O.
Use batch migrations to:
Retire storage arrays (off-lease arrays) and bring new ones online
Migrate devices to a different class of storage array
There are two additional steps to prepare for a batch migration:
Create a batch migration plan file
Test the batch migration plan file
The following prerequisites are required for batch migrations:
The source and targets are both devices and extents. Migrations between devices and extents are not supported.
Extents must be claimed (extent migrations) or local devices must be configured (device migrations) on the target array.
The structure of the target is the same as the structure of the source.
For extent migrations, both source and target extents must be in the same cluster.
Create a Batch Migration Plan
The batch-migrate create-plan command creates a migration plan using the specified sources and targets. The syntax for the command is:
batch-migrate create-plan --file migration-filename --sources sources --targets
targets --force
--file - Specify the migration-filename filename only if that name is unique in the global namespace. Otherwise, specify a full pathname.
--sources - Pathname(s) of the source extents or devices as a comma-separated list. Each element may contain wildcards.
For extent migrations, source extents must be in the same cluster.
--targets - Pathname(s) of the target extents or devices as a comma-separated list.
For extent migrations, target extents must be in the same cluster as the source extents.
--force - If a plan file with the same name already exists, forces the old plan to be overwritten.
Batch Plan Prerequisites

Chapter 4: Considerations
In the following example, the batch--migrate create-plan command creates a batch migration named ‘MigDev-test.txt’ to:
Migrate two devices at cluster-1 to two devices at cluster-2
Overwrite an existing plan with the same name: VPlexcli:/> batch-migrate create-plan --file MigDev-test.txt --sources
/clusters/cluster-1/devices/base0,/clusters/cluster-1/devices/base1 --targets
/clusters/cluster-2/devices/dev1723_618, /clusters/cluster-2/devices/dev1723_61C
Extents matching source pattern: base0, base1
Extents matching target pattern: dev1723_61C, dev1723_618
Creating file /var/log/VPlex/cli/MigDev-test.txt as migration plan file.
Wrote file /var/log/VPlex/cli/MigDev-test.txt. Please review and edit this file,
and run this command in the check-plan phase afterward.
In the following example, the batch-migrate create-plan command creates a batch migration to migrate all devices at cluster-1 to cluster-2:
VPlexcli:/> batch-migrate create-plan migrate.txt --sources /clusters/cluster-
1/devices/* --targets /clusters/cluster-2/devices/*
The batch-migrate check-plan --file file-name command checks the specified batch migration plan for the following:
Block-size of source and target extents is equal (4 K bytes)
Capacity of target extent is equal or bigger than the source extent's capacity
Device migrations:
o Target device has no volumes on it
o Source device has volumes on it
Extent migrations:
o Target extent is claimed and ready for use
o Source extent is in use
If the migration plan contains errors, a description of the errors is displayed, and the plan check will fail. For example:
VPlexcli:/> batch-migrate check-plan --file MigDev-test.txt
Checking migration plan file /var/log/VPlex/cli/MigDev-test.txt.
Target device '/clusters/cluster-2/devices/dev1723_61C' has a volume.
Target device '/clusters/cluster-2/devices/dev1723_618' has a volume.
Plan-check failed, 2 problems.
Once the batch migration file has been corrected, repeat the process of check and modify until the batch migration plan passes the plan check. For example:
VPlexcli:/> batch-migrate check-plan --file migrate.txt
Checking migration plan file /temp/migration_plans/migrate.txt.
Plan-check passed.
Check a Batch Migration Plan

Chapter 4: Considerations
32 EMC VPLEX Data Mobility and Migrations Implementation Planning and Best Practices Technical Notes
To modify a batch migration file, do one of the following: Use the batch-migrate create-plan command, specify the same filename, and use the --force option to overwrite the old plan with the new one.
Factors to consider when specifying the transfer-size:
For VPLEX Metro configurations with narrow inter-cluster bandwidth, set the transfer size lower so the migration does not impact inter-cluster I/O.
The region specified by transfer-size is locked during migration. Host I/O to or from that region is held. Set a smaller transfer-size during periods of high host I/O.
When a region of data is transferred, a broadcast is sent to the system. Smaller transfer-size mean more broadcasts, slowing the migration.
Use the batch-migrate start --transfer-size [40K-128M] --file filename command to start the specified batch migration:
VPlexcli:/> batch-migrate start --file migrate.txt --transfer-size 2M
Started 4 of 4 migrations.
Active batch migrations (a migration that has been started) can be paused and resumed.
Pause an active batch migration to release bandwidth for host I/O during periods of peak traffic.
Resume the batch migration during periods of low I/O.
Use the batch-migrate pause --file filename command to pause the specified active migration. For example:
VPlexcli:/data-migrations/device-migrations> batch-migrate pause --file
migrate.txt
Use the batch-migrate resume --file filename command to resume the specified paused migration. For example:
VPlexcli:/data-migrations/device-migrations> batch-migrate resume --file
migrate.txt
Cancel an active batch migration to return the source volumes to their state prior to the start of the migration.
Use the batch-migrate cancel --file filename command to cancel the specified migration. For example:
VPlexcli:/data-migrations/device-migrations> batch-migrate cancel --file
migrate.txt
Note: In order to re-run a canceled migration plan, the batch-migrate remove filename command must be used to remove the records of the migration.
Use the batch-migrate summary filename --verbose command to monitor the progress of the specified batch migration:
Modify a batch migration file
Start a Batch Migration
Pause/Resume a Batch Migration
Cancel a Batch Migration
Monitor a Batch Migration’s Progress
Chapter 4: Considerations
VPlexcli:/data-migrations/device-migrations> batch-migrate summary filename
--verbose
For example:
VPlexcli:/data-migrations/device-migrations> batch-migrate summary --file
migrate.txt --verbose
Use the batch-migrate summary filename command to display the status of the specified batch migration. For example:
VPlexcli:/> batch-migrate summary migrate.txt
Processed 10 migrations from batch migration BR0:
committed: 0
complete: 10
in-progress: 0
paused: 0
error: 0
cancelled: 0
no-record: 0
View a Batch Migration’s Status

Chapter 4: Considerations
34 EMC VPLEX Data Mobility and Migrations Implementation Planning and Best Practices Technical Notes
Appendix C Example Distributed Migration
This chapter presents the following topics:
VPLEX Distributed Device Migrations ..................................................................... 35

Chapter 4: Considerations
VPLEX Distributed Device Migrations
Recapping, “distributed devices” are configured by using storage from both clusters, and are therefore used only in a VPLEX Metro system. A distributed device's components must be created from storage in both clusters (e.g. “remote mirror”). As you may know a “distributed device” has the below composition. Note each cluster contains one leg (leg-2 is highlighted) of the distributed device, and a virtual volume sits on top of that. The virtual volume is always the top layer and basically represents the cache coherency layer. The virtual volume is exported to hosts via the storage view on both clusters (1 & 2), though not required.
Distributed device members (referred to as “legs”) cannot be migrated at the device level instead the migration must occur one level below, at the “extent” layer. The following sections walk the user through the migration of one leg of a distributed device. The same methodology can be applied to either side of the distributed device, simultaneously or not. Whether the VPLEX storage is provisioned using the zoning topology known as “cross connect” is NOT a factor in the success/failure of the process, as the migration process occurs dynamically below the devices representing the distributed device. As will be shown, during the migration process the volume (in this example an ESX Datastore) is online and supporting active VM’s.
1. Test Environment
Figure 5 is a screenshot of the Virtual Center. The test VPLEX distributed device is shown as a vmfs5 “datastore” assigned to a VM. So the VPLEX Distributed Device has active host side I/O and is exported via a VPLEX storage view on both ESX clusters.

Chapter 4: Considerations
36 EMC VPLEX Data Mobility and Migrations Implementation Planning and Best Practices Technical Notes
Figure 5. Test Environment
2. VPLEX Environment
For this test the VPLEX Metro cluster is at version 5.2, though the same methodology shown here is valid for version 5.1 and 5.0.1 as well.
Note: the same “distributed” device is exported on both clusters “VNX2511_ALS_VMFSTEST_LUN71_1_vol”.
Figure 6. CLU-1 Storage View ESX Cluster

Chapter 4: Considerations
Figure 7. CLU-2 Storage View for ESX Cluster
Note the “leg-1” source device is: device_VNX2587_SOURCE_LUN2_12014Jan06_102917 Note the “leg-2” source device is: device_VNX2587_SOURCE_LUN2_1_vol
Figure 8. Distributed Device Map
Distributed Device Details

Chapter 4: Considerations
38 EMC VPLEX Data Mobility and Migrations Implementation Planning and Best Practices Technical Notes
CLU-1
VPlexcli:/clusters/cluster-1/storage-elements/extents> ls extent_VNX2587_ALS_LUN2_1
/clusters/cluster-1/storage-elements/extents/extent_VNX2587_ALS_LUN2_1:
Name Value
----------------------------- ------------------------------------------------
application-consistent false
block-count 4456448
block-offset 0
block-size 4K
capacity 17G
description -
health-indications []
health-state ok
io-status alive
itls 0x500014424007d930/0x500601683ce01490/3,
0x500014424007d930/0x500601613ce01490/3,
0x500014424007d920/0x500601693ce01490/3,
0x500014424007d920/0x500601603ce01490/3,
0x500014424007d320/0x500601603ce01490/3,
0x500014424007d320/0x500601693ce01490/3,
0x500014424007d330/0x500601613ce01490/3,
0x500014424007d330/0x500601683ce01490/3,
0x500014425007d320/0x500601693ce01490/3,
0x500014425007d330/0x500601613ce01490/3,
(16total)
locality -
name extent_VNX2587_ALS_LUN2_1
operational-status ok
storage-volume VNX2587_ALS_LUN2
storage-volumetype normal
system-id SLICE:b007d3d887397b6c
underlying-storage-block-size 512
use used
used-by [device_VNX2587_SOURCE_LUN2_1]
vendor-specific-name DGC
Extent Details

Chapter 4: Considerations
CLU-2
VPlexcli:/clusters/cluster-2/storage-elements/extents> ls extent_VNX2511_ALS_LUN72_1 /clusters/cluster-2/storage-elements/extents/extent_VNX2511_ALS_LUN72_1:
Name Value
----------------------------- ------------------------------------------------
application-consistent false
block-count 4456448
block-offset 0
block-size 4K
capacity 17G
description -
health-indications []
health-state ok
io-status alive
itls 0x5000144240128820/0x5006016c46e0655a/11,
0x5000144240128820/0x5006016546e0655a/11,
0x5000144240128830/0x5006016446e0655a/11,
0x5000144240128830/0x5006016d46e0655a/11,
0x50001442502d7e20/0x5006016c46e0655a/11,
0x50001442502d7e30/0x5006016d46e0655a/11,
0x50001442502d7e20/0x5006016546e0655a/11,
0x50001442502d7e30/0x5006016446e0655a/11,
0x50001442402d7e20/0x5006016c46e0655a/11,
0x50001442402d7e20/0x5006016546e0655a/11,
(12 total)
locality -
name extent_VNX2511_ALS_LUN72_1
operational-status ok
storage-volume VNX2511_ALS_LUN72
storage-volumetype normal
system-id SLICE:b012883c92189e48
underlying-storage-block-size 512
use used
used-by [device_VNX2587_SOURCE_LUN2_1]
vendor-specific-name DGC

Chapter 4: Considerations
40 EMC VPLEX Data Mobility and Migrations Implementation Planning and Best Practices Technical Notes
Extent migrations are also referred to as extent mobility jobs. Using Extent Mobility Jobs you can:
Non-disruptively move data between source and target extents
Non-disruptively data mobility between source and target arrays
Free up the original extent for repurposing elsewhere
The following process illustrates VPLEX extent mobility using distributed device extents.
1. Browse to the “Mobility Central” view. Select move within (or across) Cluster(s)
2. Choose “Extent Mobility Jobs”, “Cluster-1”, and “Any Status” options. Then “Create Extent Mobility Jobs”
3. In the “Select Cluster” view, choose Cluster-1 as the source extent owner.
Extent Migration
GUI Method

Chapter 4: Considerations
4. Skip the “Select Storage Volume” view
5. From the “Available Extents” view, click on the desired source “extents”

Chapter 4: Considerations
42 EMC VPLEX Data Mobility and Migrations Implementation Planning and Best Practices Technical Notes
6. In the “Create Source-Target Mappings” view, choose the source and target extent as shown by using the “Auto-Generate Mappings” button.
8. In the “Setup-Up Job & Start Jobs” view, name your migration jobs and set the Transfer Speed. (both optional)

Chapter 4: Considerations
9. From the “View Results” page you will see the jobs have been started and running.
10. From the “Monitoring” tab, click the “Add Rebuild Status” button.
11. Monitor the extent mobility jobs until completed.

Chapter 4: Considerations
44 EMC VPLEX Data Mobility and Migrations Implementation Planning and Best Practices Technical Notes
10. After the migrations have completed, you have the opportunity to “commit” your changes to move forward or “cancel” to roll back any changes made. Once the migration has been committed it cannot be cancelled.
11. The last step is to clean up the migration after it has been committed. This is done by highlighting the mobility jobs and clicking the “remove” button at the bottom left of the screen.
12. The original source extents have now been replaced with the new target extents. The migration is complete and the production VM was never taken out of production during the complete process.