email - · pdf fileepmp will now run minimized in your system tray and send emails. setup...
TRANSCRIPT

Support: 416‐860‐7199 / 1‐800‐561‐7361 | [email protected] ‐1‐
ONTARIO CHIROPRACTIC ASSOCIATION
PATIENT MANAGEMENT PROGRAM PUTTING EXPERIENCE INTO PRACTICE
PMP Email
PMP offers functionality for emailing patient communication. These email options include:
Appointment Reminders. This increases patient communication by sending reminders to patients informing them of upcoming appointments with practitioners in your office. This function can be used for single or multiple dates and by single practitioner or the whole clinic
Appointment Calendar and List. These options are available while booking appointments using F2 ‐ Add an Appt or from the Patient Information Appointments tab
Statements. Statements can be emailed to patients while posting activity, from the Patient Information Account Activity tab and as a group using the Patient Query
Merge Letters. This feature allows you to create letters for groups of patients that personalize specific fields and choose the patients that receive the letters by specific criteria using the Patient Query.
Setup Prior to using email features there is some preliminary setup required. You must turn on your ePMP program and configure your outgoing email account that details which address emails will be sent from. You must also edit the existing templates or create new templates of your own that will populate the body of the emails.
Turn On ePMP
Your computer must be configured start the email sending module named ePMP. This is a one‐time setup procedure.
Go to the Setup menu, Computer Defaults. In the bottom left checkmark This machine only, sends emails, then click Accept.
Networked offices: Do this procedure on one computer only.
On the Are you sure screen click Yes. Read the PMP Message screen and click OK.

Support: 416‐860‐7199 / 1‐800‐561‐7361 | [email protected] ‐2‐
If you receive a User Account Control (UAC) screen
remove the checkmark from Protect my computer and data from unauthorized program activity. Click Ok.
A black screen will appear then the PMP eMail Server screen will appear briefly ‐ be patient, it will minimize itself.
Click OK on the Startemailserver screen.
ePMP will now run minimized in your system tray and send emails.
Setup Outgoing Email Account
Go to the Utilities menu, Email. Select Email Accounts Management.
You can set up multiple accounts for sending emails.

Support: 416‐860‐7199 / 1‐800‐561‐7361 | [email protected] ‐3‐
Click Add to create a new email address or Edit to change existing information.
A yellow hint box has been added that assists you in completing this screen. Click the box to close the hint. Complete the required fields.
Refer to the charts below for settings for popular email carriers. Please note: The settings below are guidelines only and providers may have different options.
If you do not see your email or Internet Service Provider (ISP) below contact them for setup information.
Provider Hotmail / Live Rogers Gmail Bellnet Email Account Name
You choose You choose You choose You choose
SMTP Server
smtp.live.com smtp.broadband.rogers.com
smtp.gmail.com smtpa.bellnet.ca
Username [email protected] or [email protected]
Port Use Standard or 25 Use Standard or 25 or 587
Use Standard or 587 465 (Required)
SSL/TLS Yes (SSL) Yes (SSL) Yes (TLS) Yes (SSL)
Limit 100 per day 100 per hour not defined 250 per day
Website http://support.microsoft .com/kb/287604
http://support.google.com /mail/bin/answer.py? hl=en&answer=13287
http://service.sympatico.ca /index.cfm?content_id=1067 &method=content.view

Support: 416‐860‐7199 / 1‐800‐561‐7361 | [email protected] ‐4‐
Provider Yahoo Cogeco Shaw MTS Email Account Name
You choose You choose You choose You choose
SMTP Server
smtp.mail.yahoo.com smtp.cogeco.ca different for each region smpt.live.com
Username Username
[email protected] username [email protected]
Alternate Port(s)
Use Standard or 465 Use Standard or 25 Use Standard or 25 Use Standard or 587
SSL/TLS Yes (SSL) Yes (SSL) No Yes (SSL)
Limit 100 per hour not defined not defined Undisclosed
Website http://help.yahoo.com http://www.cogeco.ca/ web/on/en/residential/ support/faq.php?id=29
http://www.shaw.ca/ Support/Internet/Email/ Email‐Setup/Use‐Email‐Client/
http://www.mts.ca/mts /personal/support/internet /email/
Most email programs have limits on the number of emails that can be sent per hour, day, week, etc. Familiarize yourself with the limits so that you do not receive rejections for exceeding your maximum. You may wish to set up more than one account and vary the account when sending group emails.
Click Save Changes, and OK.
Once you have completed the Outgoing Email Setup screen click Send Test Email followed by Test. Read the Test Result. Hopefully your email was successful. If your test was not successful use the error list below for troubleshooting.
Test Email Errors
Below is a list of error messages that may be received if your Outgoing Email Setup is incorrect when you use the Send Test Email button:
Socket error #11001 Host not found – this is incorrect information in the SMTP field. Check the chart above or contact your ISP/email provider
Socket error # 10060 Connection timed out – incorrect information in the Port field. Check the chart above or contact your ISP/email provider
Access denied – Username or Password incorrect. Check your typing and/or details. Contact your ISP/email provider
Arithmetic exception or From Address not verified – some ISP/email providers will not allow a different Reply to Address than the User Name. Correct the reply address to be the same as the user name.

Support: 416‐860‐7199 / 1‐800‐561‐7361 | [email protected] ‐5‐
Setup Default Email Templates
Emails sent to patients require text in the body of the email. Templates have been included that you can customize for your office or you can create your own. You can edit them during the sending process or in advance.
To create / edit templates in advance go to the File menu, Wordprocessor. Select File, Open. Double click a template. Email templates names begin with em_.
Default templates have been included to offer a starting point so you can create emails that are appropriate for your office. Edit the body of each email template so the information represents your clinic.
1. To add Merge fields go to the Merge menu and select Initialize for Patient Merge. You will now see a merge box in the upper right (1). This is where you select additional merge fields. Be cautious and don’t overdo it. If you select merge fields that are not populated in a patient’s file the field will be blank in the email.
2. Merge fields appear with red brackets, i.e. <<FIRST>>. 3. Don’t forget to change the office / doctor information. 4. Click File, Save.
You can make a template for each practitioner with different information. When you select that practitioner for emails the template will be the default selection ‐ we call this ‘sticky’.
5. Continue to edit/create other types of templates.
Remember when saving new templates that email templates names must begin with em_.Note: Merge fields must be enabled (step 1) for templates to email. An error listing “file not a merge file” will result from templates without merge fields enabled.

Support: 416‐860‐7199 / 1‐800‐561‐7361 | [email protected] ‐6‐
Email Appointment Reminders Go to the Utilities menu, Email, Email Reminders. Choose the practitioner or Clinic.
The Email Reminders screen has five requirements:
1. Appointment Date Calendar
Click onto appointment dates on the calendar. You can select one or more dates for reminders. Consider that you do not want the reminder sent too far in advance. Appointment dates selected appear on the right of the calendar.
2. Selection Filters Checkmark option for patients that do and do not want email reminders. These fields are found in Patient Information on the Info 2 tab.
3. Load an email template * Select a template to use from the drop down box. These should have been created in advance but if not you may choose Edit or New to create the template now.
4. Outgoing eMail Account * Select an account from the drop down box. This needs to be set up in advance from the Utilities menu, Email, Email Accounts Management.
5. Subject * Type a subject line for your email.
Support: 416‐860‐7199 / 1‐800‐561‐7361 | [email protected] ‐7‐
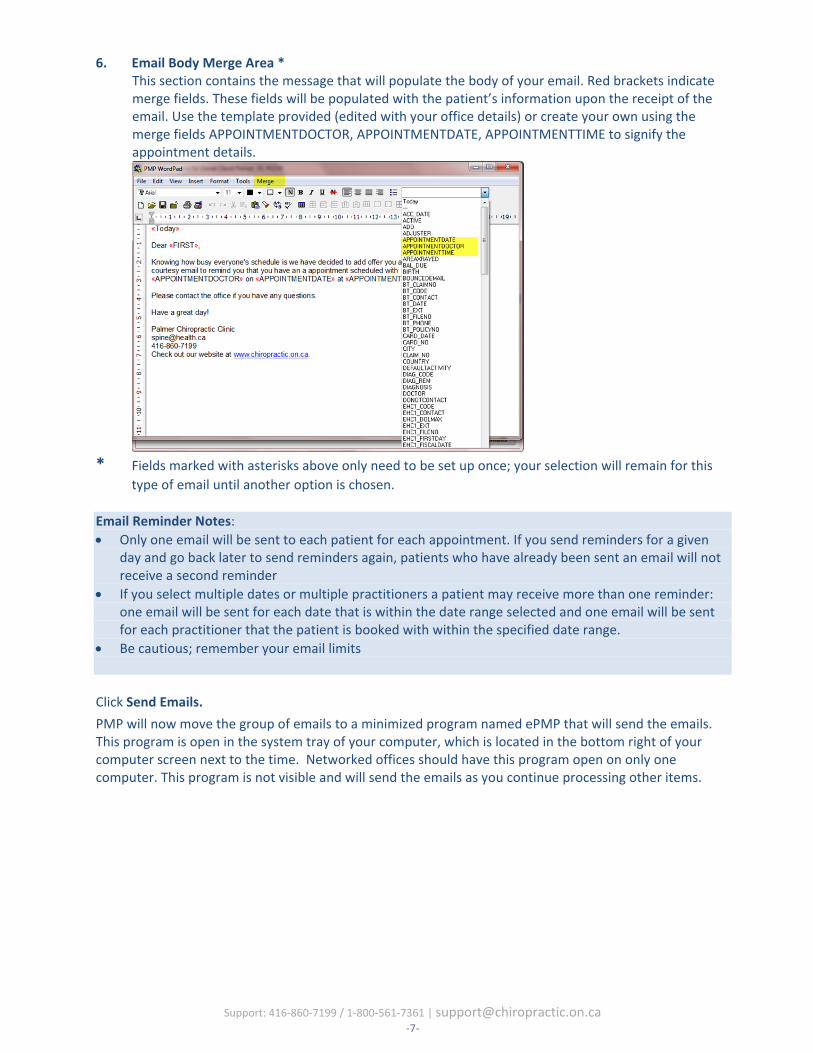
6. Email Body Merge Area * This section contains the message that will populate the body of your email. Red brackets indicate merge fields. These fields will be populated with the patient’s information upon the receipt of the email. Use the template provided (edited with your office details) or create your own using the merge fields APPOINTMENTDOCTOR, APPOINTMENTDATE, APPOINTMENTTIME to signify the appointment details.
* Fields marked with asterisks above only need to be set up once; your selection will remain for this
type of email until another option is chosen.
Email Reminder Notes:
Only one email will be sent to each patient for each appointment. If you send reminders for a given day and go back later to send reminders again, patients who have already been sent an email will not receive a second reminder
If you select multiple dates or multiple practitioners a patient may receive more than one reminder: one email will be sent for each date that is within the date range selected and one email will be sent for each practitioner that the patient is booked with within the specified date range.
Be cautious; remember your email limits
Click Send Emails.
PMP will now move the group of emails to a minimized program named ePMP that will send the emails. This program is open in the system tray of your computer, which is located in the bottom right of your computer screen next to the time. Networked offices should have this program open on only one computer. This program is not visible and will send the emails as you continue processing other items.

Support: 416‐860‐7199 / 1‐800‐561‐7361 | [email protected] ‐8‐
Email Appointment Calendars & Lists Using the F2 – Add an Appointment function now offers the option of emailing an appointment calendar or list once appointments have been scheduled. Email Calendar and Email Appointment List buttons are also located on the Patient information Appointments tab. Note: If your patient does not have an email address in patient information a box will appear asking for one. Type the email in and it will be stored in the patient file for future use. The Email Appointment Calendar and Email Appointment List screens offer similar options to the print choices.

Support: 416‐860‐7199 / 1‐800‐561‐7361 | [email protected] ‐9‐
Email Statements The ability to email patient statements appears in 3 locations:
1. On the Patient Activity screen during posting
2. On the Patient Information Account / Activity tab
3. On the Utilities menu, under Email, Email Statements using Query. This is a group statement option.

Support: 416‐860‐7199 / 1‐800‐561‐7361 | [email protected] ‐10‐
All options will open the following screen. Note: Group statements will offer the patient selection option prior to opening this screen.
1. Date From / Date To This area controls the dates on the statements (same as existing print statements).
2. Include activity ONLY from these [Doctors] Choose transactions to put on the statement that were done by these doctors only (same as existing print statements).
3. Select a Comment Choose a default comment or type your own (same as existing print statements).
4. Load an email template Select a template to use from the drop down box. These should be created in advance or choose Edit or New.
5. Outgoing eMail Account Select an account from the drop down box. This needs to be set up in advance from the Utilities menu, Email, Email Accounts Management.
6. Subject Type a subject line for your email.
7. Merge Letter Area This section will populate the message body of your email. All text between red brackets are merge fields. These fields will be populated with the patient’s information upon the receipt of the email.

Support: 416‐860‐7199 / 1‐800‐561‐7361 | [email protected] ‐11‐
Email Merge Letters This is a great new feature that allows you to create letters to groups of patients that will personalize specific fields and choose the patients that get the letters by specific criteria.
You can create recall, new patient, new office information, orthotic reminders and birthday letters, to name a few.
Start by editing / creating the template, details on page 2.
Save the template with a filename starting with em_. For instance: em_Checkup.
Close out of the wordprocessor.
Go to the Utilities menu, Email, Email by Patients (merge). Choose the practitioner or clinic. Click the button Fill the List using Patient Query. You will now be in the Patient Query screen; you may have seen this screen before under the Reports menu.

Support: 416‐860‐7199 / 1‐800‐561‐7361 | [email protected] ‐12‐
This is where you select the patients who will receive the email based upon certain criteria. The recall type letter we are using above will require us to select patients that have not been in the office for a certain period of time.
Place a check mark beside Last Visit Date <= (less than or before) and type in a date. This date should be at least three months ago so that you are not capturing patients that have been in recently or have an appointment booked.
Place a check mark beside has Email and one beside “Do not Contact” is NOT checkmarked. Click Accept.
Using query fields to define and choose appropriate patients:
Many items that are available in the query are fields that exist in the Patient Information tabs. When using the query for email it is important to consider the use of some fields that will define and accurately choose patients for the communication being sent.
The table below shows selections we suggest you consider when using the query.
Field: Why:
has Email These patients have an email address on file. You should check this option to include only patients that have an email address.
does NOT have Email Use this option to find out who you need email addresses for
Phone Reminders is checkmarked
These patients would prefer a reminder phone call
Phone Reminders is NOT checkmarked
Patients that do not want or did not specify that a phone call reminder is preferable
Email Reminders is checkmarked
These patients would prefer a reminder email
Email Reminders is NOT checkmarked
Patients that do not want or did not specify that an email reminder is preferable
Do not Contact is checkmarked
These patients do not want to receive contact from your office. NOTE: Contact your accountant or bookkeeper regarding patient privacy when contacting a patient about an outstanding account balance
Do not Contact is NOT checkmarked
These patients are okay to receive contact. To protect your patient’s privacy you should always choose this option to eliminate patients that request no contact

Support: 416‐860‐7199 / 1‐800‐561‐7361 | [email protected] ‐13‐
Troubleshooting Failed & Unsent Emails The email system has a Queue Management section that lists all emails. It is found under Utilities, Email. This area offers the option to view all emails that were, or are ready to be sent. The Status column indicates the outcome of the email.
You can filter this report by All Records, Failed, or Sent.
Failed
Use the Failed filter to locate any emails that were not sent due to errors. Click onto a failed email and select the Edit Failed Email button.
Click Retry sending to resend this email.
Note: If you make changes to the outgoing email account you will need to re‐select the account to update the email with the new settings.
Emails Not Being Sent
If you have emails that have a status of Ready to go that have a date before today your ePMP program may not be open.
The ePMP program can be found as a blue icon with the letters “eM” in the system tray in the bottom right of your computer screen.

Support: 416‐860‐7199 / 1‐800‐561‐7361 | [email protected] ‐14‐
Depending upon your computer’s settings, locate the icon directly on your system tray (figure 1) or from within the Show hidden icons screen that opens when clicking the up arrow (figure 2). Figure 1
Figure 2
If the icon is not visible in the system tray the program may have been closed. Refer to page 2 for instructions to turn ePMP on.
Email Log The Email Log is a report that can be filtered to determine the history or status of email. This report will assist you in troubleshooting the status of emails.