eloqua basics tutorials.pdf
TRANSCRIPT

ELOQUA FUNDAMENTALS: EFFECTIVE EMAIL MARKETING CAMPAIGNS
EXERCISE GUIDE

FUNDAMENTALS
COPYRIGHT STATEMENT The software and documentation comprising this system are the property of Eloqua Corporation. All copyright, patent, trade secret, and other intellectual property rights in the software and documentation comprising this system are, and shall remain, the valuable property of Eloqua. The use, disclosure, or reproduction of the software and documentation comprising this system is strictly prohibited, except under written license from Eloqua or its licensors, and the unauthorized copying of these materials also constitutes a violation of law. © 2011 Eloqua. All rights reserved. Trademark Information Eloqua is a registered trademark of Eloqua Corporation. Eloqua and the Eloqua logo are registered trademarks of Eloqua Corporation. Disclaimer Eloqua Corporation will not be held responsible for any errors or omissions contained in this documentation. However, an effort will be made to correct any such error or omission within a reasonable period of time following its detection. Export Control Each Party agrees to (a) comply with all applicable laws regarding export or re-export of the Confidential Information, technical data, or derivatives of such items; and (b) not to export or re-export any such items to a destination or end user for which applicable law, including Canadian or U.S. law, requires an export license or other approval without first having obtained such license or approval.
2 of 91 | Eloqua Education Services

ELOQUA
TABLE OF CONTENTS
Chapter 1: Contacts Segmentation & Distribution Lists Exercise 1.1 Manually Add Contact to Database………. 10 Exercise 1.2 Create Contact Group…………………….…… 12 Exercise 1.3 Download Files ………………………………….. 12
Exercise 1.4 Upload Contact List……………………………. 15 Exercise 1.5 Create Contact Filter…………………………... 17 Exercise 1.6 Build a Distribution List……………………….. 21
Chapter 2: HTML Emails & Template Emails Demo Create Email Group…………………………….. 23 Exercise 2.1 Create Email Folders ………………………….. 23
Exercise 2.2 Upload HTML Email………………………….…. 25 Exercise 2.3 Edit HTML Email…………………………………. 26 Exercise 2.4 Test Send Email …………………………………. 27
Exercise 2.5 Batch Send HTML Email……………………… 29 Exercise 2.6 Create Template Email ………………………. 31
Exercise 2.7 Edit Template Email …………………………… 33 Exercise 2.8 Test Send Template Email …………………. 34
Chapter 3: Email Personalization Demo View & Edit Signature Layout …………….. 37 Exercise 3.1 Insert Signature Layout into Email……….. 38 Demo Edit Agent Settings ………………………….... 39 Exercise 3.2 Test Send Email with Signature Layout... 40 Exercise 3.3 Copy Template Email ………………………….. 41
Demo ADC Rule…………………………………………… 43 Exercise 3.4 Insert ADC into Copied Email ……………… 45 Exercise 3.5 Test Send Email ………………………………… 47 Exercise 3.6 Quicksend Send Email to Instructor …… 48
Chapter 4: Email Reporting Exercise 4.1 Locate Email Metrics & Dashboards ……. 50
Eloqua Education Services | 3 of 91

FUNDAMENTALS
Chapter 5: Hypersites & Generic Landing Pages
Exercise 5.1 Create Generic Landing Page ……………… 53 Exercise 5.2 Copy Email & Add Link to Hypersite……… 54
Chapter 6: Form Landing Pages Exercise 6.1 Create New Form ………………………………. 57 Exercise 6.2 Create Form Landing Page Layout ………. 61 Exercise 6.3 Publish Form Landing Page to Hypersite.. 64 Exercise 6.4 Review Form Submission in Form Data…. 64 Exercise 6.5 Email with Link to Form Landing Page ….. 65
Chapter 7: Form Automation Exercise 7.1 Confirmation Page Processing Step …….. 67 Exercise 7.2 Add Save to Contact Table Step …………. 69 Exercise 7.3 Update Existing Record or Data Object … 70 Exercise 7.4 Add Send Email Step ………………………….. 72 Exercise 7.5 Add Email Notification Step ………………… 73 Exercise 7.6 Add the Add to Contact Group Step ……. 74 Exercise 7.7 Test Form Processing Steps ………………. 76
Chapter 8: Alternate Versions of Forms
Exercise 8.1 Create New Layout (Basic Layout) ………. 78 Exercise 8.2 Update Processing Steps ……………………. 79 Exercise 8.3 Embed Form in Generic Landing Page …… 80
Chapter 9: Copy Forms Exercise 9.1 Copy Form ………………………………………… 82 Exercise 9.2 Modify Layout …………………………………… 83 Exercise 9.3 Publish to Form Landing Page ……………. 85
Review ………………………………………..…………………………………. 87
4 of 91 | Eloqua Education Services

ELOQUA
AGENDA DAY 1 During Day 1 of Fundamentals, you:
Segment Contacts in Your Database
Build a Distribution List
Organize Emails
Upload & Edit an HTML Email
Create an Email Based on a Template
Deploy Emails to a Segment of the Database
Use Personalization in an Email
Copy an Email
Test Emails
Pull Email Reports
DAY 2
During Day 2 of Fundamentals, you:
Create a Generic Landing Page
Create a Form
Create a Form Landing Page Layout
Review Form Submissions
Add Automation to a Form
Create an Alternate Version of a Form
Copy a Form
*NOTE: Some items from Day 1 may carry over to Day 2 depending on the class pace .
Eloqua Education Services | 5 of 91

FUNDAMENTALS
Intro: Why Eloqua?
Eloqua assists in bridging the divide between the sales and marketing teams. It provides
marketing the tools to execute simple campaigns such as single asset marketing offers or
complex multi-channel campaigns such as event and campaign management, lead
scoring and nurturing and passing qualified leads to sales.
6 of 91 | Eloqua Education Services

ELOQUA
Chapter 1: Contacts Segmentation & Distribution Lists Objectives
By the end of this chapter you will be able to:
Manually add a contact to the database
Create a contact group
Upload a contact list
Create a contact filter
Build a distribution list
What are Data Entities? At its foundation Eloqua is a marketing database made up of prospects, contacts,
companies and visitors. As you are just getting started with Eloqua, you’ll find that
Contacts are the entity you use for most marketing activities.
Prospects are unique individuals in the database who do not have an email address.
Contacts are individuals with an email address and a known level of permission
(subscribed/unsubscribe). All Contacts must have an email address and are automatically
deduplicated by email address.
Eloqua Education Services | 7 of 91

FUNDAMENTALS
Companies store information about companies and can be linked to both prospects and
contacts.
Visitor Records are also referred to as Profiles. This is where digital body language is
captured. All of the information from IP address, cookie and tracking script is captured
in the Profile. Multiple Visitor Records can be linked to one Contact.
Each data entity has a distinct data table to store information. The
Contact Data Table allows for up to 250 Contact Fields, such as F
Name, Last Name, Email Address, etc.
irst
8 of 91 | Eloqua Education Services

ELOQUA
How do you add Contacts to the database?
There are 4 main ways to add Contacts to the database:
1. Manually Enter
2. List Upload
3. Form Submission
4. CRM Update
Eloqua Education Services | 9 of 91

FUNDAMENTALS
Exercise 1.1 Manually Add Contact to Database
1. Communicate > Email Marketing > Contacts
2. Make sure the sub-tabs are highlighted as Contacts : Contacts
3. Use the Quick Search to search for yourself
4. Get Started Bar – Contacts drop down > Add New Contact
5. Enter email address you can check during class
6. Save
7. Search for yourself in Quick Search again
10 of 91 | Eloqua Education Services

ELOQUA
What is Segmentation?
Segmentation refers to the ability to locate a portion of the database in order to target
that particular slice of the database. Two segmentation tools covered in this class:
1. Contact Groups
2. Contact Filters
What is a Contact Group?
A Contact Group is a way to organize a set of Contacts who share an
attribute. Contact Groups make it easier to locate contacts in the
future. By placing Contacts into a bucket it is easier to find them in
the future.
Eloqua Education Services | 11 of 91

FUNDAMENTALS
Exercise 1.2 Create Contact Group
1. Communicate > Email Marketing > Contacts
2. Get Started bar – Contacts drop down > New Contact Group
3. Name the Group using the naming convention
4. Place in your class Folder
5. Save
6. Highlight the sub tabs as Contacts : Groups
7. Open class folder by clicking black “+” and locate your Group
Exercise 1.3 Download Files (Contacts & HTML)
1. Go to http://trainingdocs.eloqua.com
2. Click on Eloqua Fundamentals
3. Click on Upload Contacts
4. Save to Desktop, Open file
5. Add self to file and save as CSV
6. Return to the Training Docs Window
7. Click One zipped file link under HTML Sample
8. Save to your Desktop
9. Unzip folder (specific instructions follow)
FYI: How to Unzip a File Internet Explorer - Windows 1. Save the One zipped file document to your Desktop
2. Choose Open when the Download Complete window opens
3. If you get a pop-up warning, choose Allow
4. Choose Extract All Files
12 of 91 | Eloqua Education Services

ELOQUA
5. Select destination and click Extract
FYI: How to Unzip a File Mozilla Firefox - Windows 1. Double click on One zipped file link
2. Move radio button to “Save File” then click OK
3. Downloads window opens, right-click on HTMLEmailSample.zip
and choose Open
4. Choose Extract All Files
5. Select destination and click Extract
FYI: How to Unzip a File Mozilla Firefox - Mac Download HTML Sample Folder from http://trainingdocs.eloqua.com
1. Double click on One zipped file link
2. Move radio button to “Save File” then click OK
3. Downloads window opens, Ctrl+click on HTMLEmailSample.zip
and choose Open
4. From the Finder window Ctrl+click choose Open With and then
Archive Utility
Eloqua Education Services | 13 of 91

FUNDAMENTALS
What is a Contact Upload?
A Contact Upload is the function that allows you to add new Contacts to your database or
update existing Contacts via file upload.
14 of 91 | Eloqua Education Services

ELOQUA
Exercise 1.4 Upload Contact List
1. Communicate > Email Marketing > Contacts
2. Get Started Bar – Contacts drop down > Upload Contacts
3. Enter a Name for your upload
4. Click Next
5. Click Browse to locate the Contacts download on your Desktop
6. Click Upload and Preview Data
7. Scroll down in the preview to check that your information is the
last line of data
8. Click Next
9. Check that all fields are mapped correctly (i.e. First Name to
First Name, etc.)
10. Click Next
11. Click on the empty field next to Contact Group to open Search
Window
12. Place a check mark next to your Contact Group under Recent
Items
13. Check to see that the upper right hand corner of the Contact
Group Search window now shows your Selected Contact Group
14. Click OK
15. Click Next
16. Add your email address to the Notification Email are of the
Summary screen
17. Click Finish
Eloqua Education Services | 15 of 91

FUNDAMENTALS
What is a Contact Filter? A Contact Filter is a dynamic search tool that searches the
database for contacts who meet a set of criteria and returns real
time results.
Contact Filters use a combination of three types of criteria (Contact
Field, Activity, and Inactivity) as well as wildcards (*) and Boolean
values to create a powerful filtering tool. Each filter can contain up to 15 separate
criteria.
16 of 91 | Eloqua Education Services

ELOQUA
Exercise 1.5 Create Contact Filter
Step One: Add Single Contact Field Based Criteria 1. Communicate > Email Marketing > Contacts
2. Highlight the sub-tabs to read Contacts : Filters
3. Click the drop down next to the Class Folder
4. Choose Create New Folder
5. Name your folder
6. Save, then Close
7. Get Started Bar – Contacts drop down > New Contact Filter
8. Name Filter and place in your folder
9. Drag-and-drop Contact Field from the Field Based Filters area
10. Click in the empty field to the right of “Contact where the
value in”
11. Search for “Industry”
12. Use the drop down arrow next to Industry to Select Item
13. Click OK
14. Keep “does” and “Equal” “and type in an Industry name
15. Click Apply
16. Save Filter
Eloqua Education Services | 17 of 91

FUNDAMENTALS
Step Two: Add Field Criteria Using Single Select List 17. Drag-and-drop Contact Field from the Field Based Filters area
18. Click in the empty field to the right of “Contact where the value
in”
19. Search for “State”
20. Use the drop down arrow next to “State of Province” to Select
Item
21. Click OK
22. Keep “does” and change “Equal” to “Have a value in”
23. Click in the empty field to the right of “Have a value in” which
opens the “Create Quick List” Window
24. Click on the field next to “Populate from a Select List”
25. Search for “State” and choose Select Item from the drop down
arrow next to State
26. Click OK
27. Place a check mark next to all States or Provinces you wish to
filter on, then click Populate
28. Click Save and then Close
29. Click Apply
30. Save Filter
Step Three: Add Activity Based Filter Criteria
31. Drag-and-drop Clicked an E-mail from the Activity Based
Filters area
32. Add the number 1 to the right of “Contacts who have clicked at
least”
33. Type the number 2 after “Within the past” and then choose 2
weeks
34. Click Apply
35. Save Filter
18 of 91 | Eloqua Education Services

ELOQUA
Step Four: Boolean Values & Unique Contacts
36. Click the Refresh button bottom center of
screen to locate Unique Contacts for this
Filter
37. Change the Boolean Value to OR
38. Click Refresh Button once more to see the change in number
of Unique Contacts
39. Save
NOTE: If you want to combine the two Boolean Values (i.e. use both AND as well as OR)
switch to Advanced Mode. Then you can build complex logic, such as
(Criteria 1 AND Criteria 2) OR Criteria 3
Eloqua Education Services | 19 of 91

FUNDAMENTALS
What is a Distribution List? Distribution Lists are used to define which contacts in the database
receive an email; contacts can be added to the List or excluded from it.
Distribution lists can be built using Contact Groups, Contact Filters and
Individual Contacts.
Distribution Lists are smart….
What if you accidentally add a
Contact more than once to an
Included section?
What if you sent out this exact email
last week to some of the people on
the Included area of this distribution
list?
What if a Contact is in both the
Included and Excluded areas of the
list… which do you think trumps?
Eloqua has you covered and automatically helps you stay in compliance with
unsubscribes. Eloqua places any Contacts who are un-marketable, such as unsubscribed
or hard bounceback status, and places them in the System Exclude area of the
distribution Excluded area.
20 of 91 | Eloqua Education Services

ELOQUA
Exercise 1.6 Build a Distribution List 1. Communicate > Email Marketing > Email
2. Highlight the Lists sub-tab
3. Click the drop down next to the Class Folder
4. Choose Create New Folder
5. Name your folder
6. Save, then Close
7. Get Started bar – Create & Send drop down > Create
Distribution List
8. Choose Select Contacts in the New Distribution List window
9. Name distribution list and place in your folder
10. Save
NOTE: Many times in Eloqua when you click Save, you are presented with additional
options. It is best to choose Save and then Close, rather than Save & Close.
11. In the Included section, click Contact Group Members
12. Click Add Contact Group
13. Place a check mark next to your Contact Group
14. Click OK
15. Close the Contact Group Members pop-up window
16. In the Included area, click on Search for Individuals
17. Click Add Contact
18. Search for your Instructor
19. Place check mark next to his or her name and click OK
20. Close the Search for Individuals pop-up window
21. Save Distribution List
22. Expand the Excluded Members area of the distribution list by
clicking on the header title
23. Click on Filter Contacts in the Excluded area
24. Click on Add Contact Filter
25. Place a check mark next to your Contact Filter and click OK
26. Close the Excluded Filter Contacts pop-up window
27. Save Distribution List
28. To locate the total possible recipients for this distribution list,
click Update
Eloqua Education Services | 21 of 91

FUNDAMENTALS
Chapter 2: HTML Emails & Template Emails Objectives
By the end of this chapter you will be able to:
Create an Email Folder
Upload a HTML Email
Edit a HTML Email
Create a Template Email
Edit a Template Email
Test Send an Email
Batch Send an Email
How are Emails Organized in Eloqua?
In Eloqua, emails are stored in Email Folders and Email Groups.
Email Folder = Plain Manila Folder
Email Group = Folder with Paper Sticking Out
22 of 91 | Eloqua Education Services

ELOQUA
Both Email Folders and Email Groups organize. Email Groups have POWER, they allow
for:
• Roll-up Reporting
• Application of Default Header/Footer
• Granular Subscription Management
In the email area, you cannot move emails between Email Groups because of the
reporting that is tied into where the email is stored. This means it is very important
when you are creating or copying an email to choose the email group carefully.
DEMO Instructor Creates Email Group
1. Communicate > Email Marketing > Emails
2. Get Started Bar – Create & Send drop down > Create Email
Group
3. Name Group and place in Email Group Root
4. Save
Note: Remember Email Groups are generally created by Admins because of the Email
Group Super Powers…
Exercise 2.1 Create Email Folder
5. Locate class Email Group – If you do not see the Group, refresh
the left navigation panel of your screen (Right click and choose
Refresh in IE or in Mozilla choose This Frame > Reload This
Frame)
6. Click drop down next to class Email Group and choose Create
New Folder
7. Name Folder and Save
Eloqua Education Services | 23 of 91
Email Folder Email Group

FUNDAMENTALS
What types of emails does Eloqua support? There are two types of emails supported by Eloqua. They are HTML emails and Template
emails. HTML emails are uploaded from outside of Eloqua and then edited inside of
Eloqua. Template emails are created from scratch inside of Eloqua without needing to
know how to read or write HTML.
When working within emails in Eloqua you need to decide what type of link is
appropriate for each hyperlink. You can choose between Direct and Redirect Links.
24 of 91 | Eloqua Education Services

ELOQUA
Exercise 2.2 Upload HTML Email
Step One: Load Content 1. Communicate > Email Marketing > Emails
2. Get Started Bar – Create & Send drop down > Create HTML
Email from Upload
3. Name Email
4. Associate with class Email Group
5. Browse for HTML folder and locate Sample-HTML-Email file
6. Click Next
Step Two: Set Email Details 7. Choose your folder from the drop down
8. Enter Subject line
9. Type your information into the Display Name and Display
Address fields
10. Click Next
Step Three: Manage Content 11. Review images imported with HTML file
12. Click Next
13. Choose status of Redirect for all Links
14. Click Next
15. Review Email in Preview pane
16. Click Next
Steps 4 & 5: Preview and Check Email 17. Enter your email address in field to be sent a TEST email of
this HTML email
18. Click Check Email
19. Once the Email Checker finishes, review results
20. Click Finish
Eloqua Education Services | 25 of 91

FUNDAMENTALS
Exercise 2.3 Edit HTML Email
Step One: Open Email Editor 1. Communicate > Email Marketing > Emails
2. To open the Email Editor, double click on your email name at
the top of My Recent Items
Step Two: Edit Text & Add Field Merge 3. Delete “Welcome to Fundamentals” and insert your own
headline text
4. Place cursor next to “Hello” and add one space
5. With cursor blinking next to “Hello” click Insert Field (bottom
of editor)
6. Choose a First Name field merge from the drop down
7. Click Insert
8. Delete all of the left column text under this greeting line
9. Type in a sentence such as “Click here to see more.”
Step Three: Insert Hyperlink to Webpage 10. Highlight “Click here” and click Insert/Edit Hyperlink
11. Keep “Send to Webpage” and on the next line add
www.eloqua.com after the http://
12. Place a check mark next to Insert as Redirect Link
13. Click Insert
14. Save email
Step Four: Insert Image and Edit ALT Tag 15. Move cursor under text and click Insert/Edit Image
16. Search the database for an image and then click Select
17. Click OK
18. Click on image to select it and click Insert/Edit Image again to
view Image Properties
19. Scroll down and type in a Text Alternative or ALT Tag
20. Click Save and then Close
21. Save email
26 of 91 | Eloqua Education Services
ELOQUA
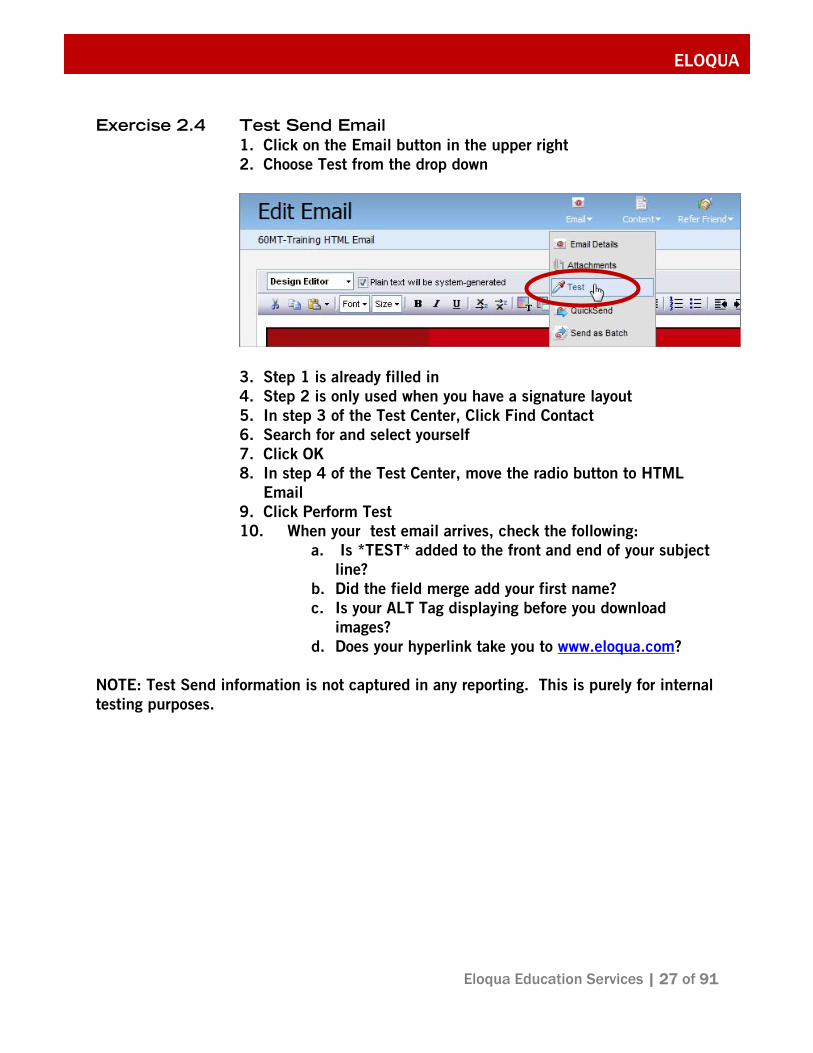
Exercise 2.4 Test Send Email 1. Click on the Email button in the upper right
2. Choose Test from the drop down
3. Step 1 is already filled in
4. Step 2 is only used when you have a signature layout
5. In step 3 of the Test Center, Click Find Contact
6. Search for and select yourself
7. Click OK
8. In step 4 of the Test Center, move the radio button to HTML
9. Click Perform Test
10. When your test email arrives, check the following:
a. Is *TEST* added to the front and end of your subject
line?
b. Did the field merge add your first name?
c. Is your ALT Tag displaying before you download
images?
d. Does your hyperlink take you to www.eloqua.com?
NOTE: Test Send information is not captured in any reporting. This is purely for internal
testing purposes.
Eloqua Education Services | 27 of 91
FUNDAMENTALS
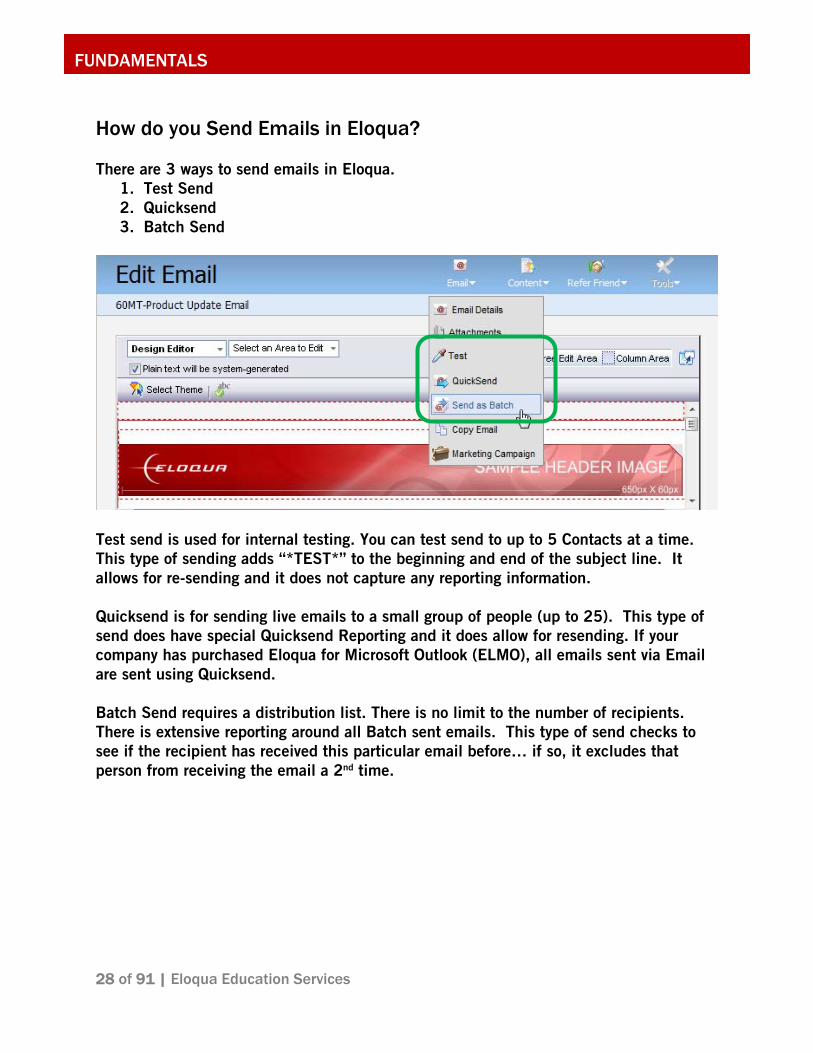
How do you Send Emails in Eloqua?
There are 3 ways to send emails in Eloqua.
1. Test Send
2. Quicksend
3. Batch Send
Test send is used for internal testing. You can test send to up to 5 Contacts at a time.
This type of sending adds “*TEST*” to the beginning and end of the subject line. It
allows for re-sending and it does not capture any reporting information.
Quicksend is for sending live emails to a small group of people (up to 25). This type of
send does have special Quicksend Reporting and it does allow for resending. If your
company has purchased Eloqua for Microsoft Outlook (ELMO), all emails sent via Email
are sent using Quicksend.
Batch Send requires a distribution list. There is no limit to the number of recipients.
There is extensive reporting around all Batch sent emails. This type of send checks to
see if the recipient has received this particular email before… if so, it excludes that
person from receiving the email a 2nd time.
28 of 91 | Eloqua Education Services

ELOQUA
Exercise 2.5 Batch Send HTML Email 1. Communicate > Email Marketing > Emails
2. Click on the drop down arrow next to your email under My
Recent Items
3. Select Send as Batch
4. Step one of the Email Batch Wizard is prefilled because we
chose the Send as Batch option located in the drop down next
to this email – Click Next
5. Click in the Distribution List Field to open Search window
6. Search for your list, click on drop down arrow next to your list
and choose Select Item
7. Click OK
8. Click Next
9. The system pulls information on who is eligible to be sent this
email from your distribution list – Review recipients
10. Click Next
11. Click Next again to skip Step 3 in the wizard (you do not need
to worry about the Personalize step until after you learn about
Signature Layouts)
12. In step 4, keep the radio button on “Commence Immediately”
13. Click Next
14. Review and then click Finish
Eloqua Education Services | 29 of 91

FUNDAMENTALS
How do You Build Template Emails?
Template emails are the Do-It-Yourself (DIY) emails. You build this type
of email in 3 layers.
1st Choose Your Template
2nd Choose Your Theme
Think of theme like your style sheet. The theme applies visual graphics and assigns
fonts, color and text sizes.
3rd Add Your Content
In Template emails you have two types of areas to add content: Red Zones and Blue
Zones. Red Zones allow you to add text, hyperlinks, images and more. Blue Zones allow
you to add Activity Driven Content (ADC) which is discussed later in this guide.
NOTE: Blue Zones are only available in the Intermediate and Advanced Templates. If
you want to use ADC, make sure you select one of the appropriate template.
30 of 91 | Eloqua Education Services

ELOQUA
Exercise 2.6 Create Template Email
– Create & Send drop down > Create Email
from Template
tep One: Template Selection
Email Group
Intermediate Template
6. Click Next
1. Communicate > Email Marketing > Emails
2. Get Started bar
S 3. Name your email
4. Associate your email with the class
5. Choose the
Step Two: Set Email Details
from inside of the class Email Group
r information for Display Name and Display Address
0. Click Next
7. Choose your Folder
8. Enter Subject line
9. Type in you
1
Eloqua Education Services | 31 of 91

FUNDAMENTALS
Step Three: Manage Content
t Side) theme with the red
eader
11. Click Select Theme
12. Choose the BP-Two Column (Righ
h
13. Click OK
14. Go to the Select an Area to Edit drop down and choose
tent after you have finished
izard and the email is saved)
Step Four & Five: Preview & Check Email
18. Do not run the Email Checker, just click Finish
save time. You
lso have access to the Email Checker from the Test Send window.
e Email Wizard and then do the
ajority of your editing from the Email Editor window.
Headline
15. Type in a headline for this email
16. Click Next (You add most of the con
the W
17. Review the Preview and Click Next
NOTE: The Email Checker checks the links and underlying HTML code in an email.
Since you have not done much to this email yet, you skip this step to
a
NOTE: It is recommended that you complete the Templat
m
32 of 91 | Eloqua Education Services

ELOQUA
Exercise 2.7 Edit Template Email
YSIWYG – What You See Is What You Get)
uble click on your email name at
e top of My Recent Items
tep Two: Edit Text & Add Field Merge
ct an Area to Edit drop down
blinking next to “Hello” click Insert Field (bottom
t Name field merge from the drop down
elect an Area to Edit drop down and choose
. Type in a sentence such as “Click here to see more.”
tep Three: Insert Hyperlink to Webpage
xt line add your
k mark next to Insert as Redirect Link
4. Save email
tep Four: Insert Image and Edit ALT Tag
database for an image and then click Select
t it and click Insert/Edit Image again to
ext Alternative or ALT Tag
nd then Close
1. Save email
Step One: Open Email Editor (W 1. Communicate > Email Marketing > Emails
2. To open the Email Editor, do
th
S 3. Choose Greeting from the Sele
4. Type in “Hello” then a space
5. With cursor
of editor)
6. Choose a Firs
7. Click Insert
8. Return to the S
Main Message
9
S 10. Highlight “Click here” and click Insert/Edit Hyperlink
11. Keep “Send to Webpage” and on the ne
corporate web address after the http://
12. Place a chec
13. Click Insert
1
S 15. Move cursor under text and click Insert/Edit Image
16. Search the
17. Click OK
18. Click on image to selec
view Image Properties
19. Scroll down and type in a T
20. Click Save a
2
Eloqua Education Services | 33 of 91

FUNDAMENTALS
Exercise 2.8 Test Send Template Email
pper right
down
, click Recent Email Addresses and
4 of the Test Center, move the radio button to HTML
8. ST* added to the front and end of your subject
T Tag displaying before you download
d. Does your hyperlink take you to your corporate site?
1. Click on the Email button in the u
2. Choose Test from the drop
3. Step 1 is already filled in
4. Step 2 is only used when you have a signature layout
5. In step 3 of the Test Center
choose your email address
6. In step
7. Click Perform Test
When your test email arrives, check the following:
a. Is *TE
line?
b. Did the field merge add your first name?
c. Is your AL
images?
34 of 91 | Eloqua Education Services

ELOQUA
Chapter 3: Email Personalization
bjectives
y the end of this chapter you will be able to:
ut
Layout into an Email
nto a Copied Email
end Emails using Quick Send
O B
View a Signature Layo
Edit Agent Settings
Insert Signature
Copy an Email
Insert Activity Driven Content i
Send Emails using Test Send
S
Eloqua Education Services | 35 of 91

FUNDAMENTALS
What is a Signature Layout?
at pull in an
Eloqua Agent’s information to make the email appear to come from them.
A Signature Layout is a collection of field merges, images and hyperlinks th
Signature Rules are a more advanced use of Signature Layouts. Signature Rules
determine which Eloqua User’s information to pull into the Signature Layout based on
criteria associated with the recipient. For example, if the email recipient is in Texas, use
e Texas’ Salesperson’s information in the Signature Layout.
you only see a place holder that says
Signature Layout ###” like in the image below.
th
When you Insert a Signature Layout into an email,
“
Note: Auto-Responder Emails are emails that the system sends out automatically. T
type of email does NOT support Signature Layouts. The em
his
ail fails to send when a
ignature Layout is placed into an Auto Responder Email. S
36 of 91 | Eloqua Education Services

ELOQUA
Demo View & Edit Signature Layout
ed bar - Signature drop down > Manage Signature
open
ature Field to insert from drop down
nsert
7. Save
1. Communicate > Email Marketing > Emails
2. Get Start
Layouts
3. Double click on Signature layout to
4. Place cursor and click Insert Field
5. Select a Sign
6. Click I
Eloqua Education Services | 37 of 91
FUNDAMENTALS
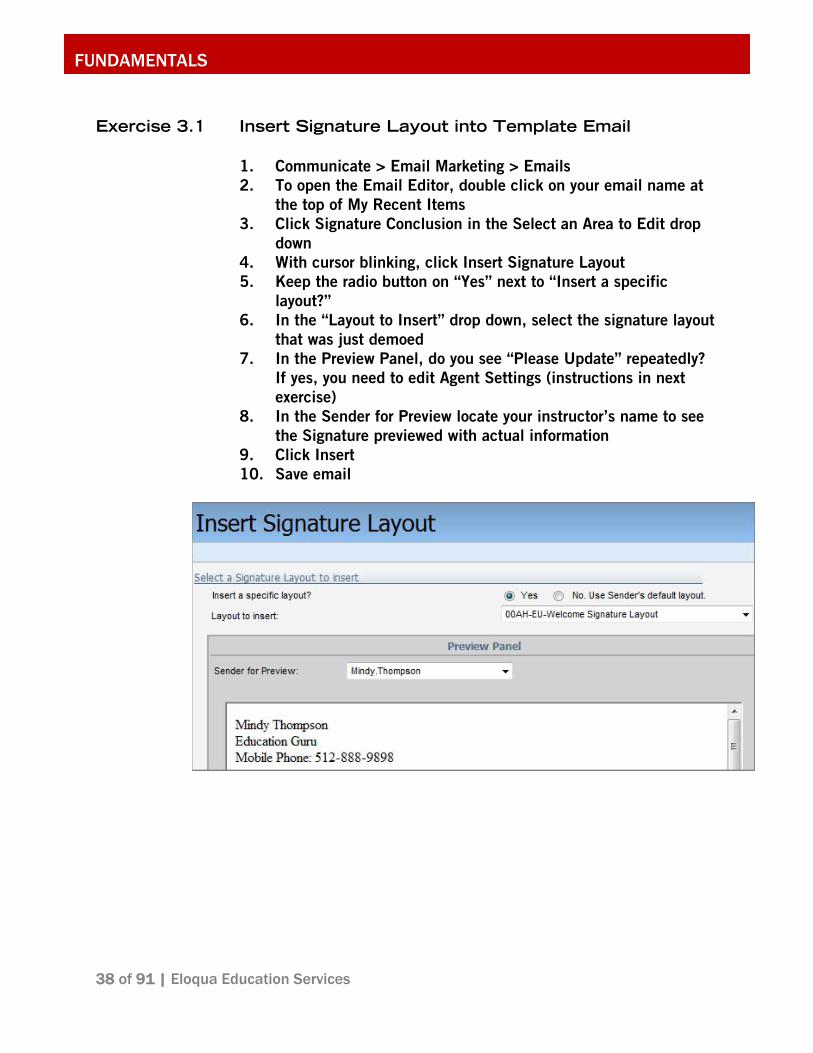
Exercise 3.1 Insert Signature Layout into Template Email
uble click on your email name at
ignature Conclusion in the Select an Area to Edit drop
radio button on “Yes” next to “Insert a specific
t” drop down, select the signature layout
?
need to edit Agent Settings (instructions in next
name to see
previewed with actual information
10. ave email
1. Communicate > Email Marketing > Emails
2. To open the Email Editor, do
the top of My Recent Items
3. Click S
down
4. With cursor blinking, click Insert Signature Layout
5. Keep the
layout?”
6. In the “Layout to Inser
that was just demoed
7. In the Preview Panel, do you see “Please Update” repeatedly
If yes, you
exercise)
8. In the Sender for Preview locate your instructor’s
the Signature
9. Click Insert
S
38 of 91 | Eloqua Education Services

ELOQUA
Demo Edit Agent Settings
gin Info header update four fields with your
e
Email Address
eader General Info (Signature
s
ing, update those as well
ly-To Address
RL
Business Phone
7. ave
1. Setup > My Settings
2. Click Edit Agent Settings
3. Under the Lo
information
a. Display Nam
b. First Name
c. Last Name
d.
4. Save
5. Scroll down and click on the h
Fields) to expand this section
6. Update the fields listed here and if there are additional field
in the Signature Layout you are us
a. Email Rep
b. Company
c. Website U
d. Job Title
e.
S
NOTE: Edit Agent Settings (under Setup > My Settings) is also where you go if you need
to change your password or if you want to check which time zone you are in according to
ur Eloqua install. yo
Eloqua Education Services | 39 of 91

FUNDAMENTALS
Exercise 3.2 Test Send Email with Signature Layout
der My Recent
pper right
down
d
e Signature Layout – Locate your User # in the drop
, click Recent Email Addresses and
4 of the Test Center, move the radio button to HTML
10.
ture layout?
T Tag displaying before you download
r hyperlink take you to the Eloqua Benchmark
Report?
1. Communicate > Email Marketing > Email tab
2. Open the email with your signature layout un
Items by double clicking on the email name
3. Click on the Email button in the u
4. Choose Test from the drop
5. Step 1 is already filled in
6. Step 2 determines which Eloqua User’s information is pulle
into th
down
7. In Step 3 of the Test Center
choose your email address
8. In Step
9. Click Perform Test
When your test email arrives, check the following:
a. Did your information populate in the signa
b. Did the field merge add your first name?
c. Is your AL
images?
d. Does you
40 of 91 | Eloqua Education Services

ELOQUA
Why Copy an Email?
d repurposing it.
ving
o an Email Group you
cannot move it to a different Email Group.
xercise 3.3 Copy Template Email
op down arrow next to your email under My
m the drop down
rect Email Group is prefilled
. Click Copy Email
ils
der within the class Email Group
ight ) and then Edit Email to return to
the WYSIWYG Editor
own
click
a new hyperlink
.eloqua.com/benchmark
Save time by copying an email an
Whenever you copy an email it is important to remember to change
the subject line in the Email Details. Also, make sure you are sa
the copied email to the Email Group where you want it to live.
Remember, once an email is created/saved t
E
Step One: Copy Email 1. Communicate > Email Marketing > Emails
2. Click on the dr
Recent Items
3. Choose Copy fro
4. Rename email
5. Check that the cor
6
Step Two: Edit Email Details 7. Click Email button (upper right) and then Email Deta
8. Choose the sub-fol
9. Edit Subject Line
10. Edit Sender Information if necessary
11. Click Content (upper r
Step Three: Edit Email 12. Click Headline in the Select an Area to Edit drop d
13. Delete current headline and type in new headline
14. Highlight the hyperlinked text and click Insert/Edit Hyperlink
15. Click Unlink at the bottom of the Insert/Edit Hyperlink screen
16. Highlight the “Click here” text that is now unlinked and
Insert/Edit Hyperlink once more to add
17. Type in www
19. Save email
est practice: Whenever you copy an email make sure you change the subject line.
est practice: Always unlink before trying to change or replace a hyperlink.
18. Click Insert
B
B
Eloqua Education Services | 41 of 91

FUNDAMENTALS
What is Activity Driven Content (ADC)?
example, if State or Province field equals Texas then show
the piece of content below.
Activity Driven Content is a piece of content placed into an email based on data on the
recipient’s contact record. For
An ADC Rule is the collection of criteria and content which is based on specific values in
Contact field.
a
Every ADC Rule must have a piece of default content. This is the content that is shown
the email recipient who does not fit any of the outlined criteria.
Therefore you have HTML email ADC Rules
nd you have Template email ADC Rules.
emplate does not have any Blue Zones and, therefore, does not support ADC.
to
ADC can be added to both HTML emails and Template emails. ADC Rules are created
specifically for one email type or the other.
a
If you are using a Template email, you must have Blue Zones. This means the email
must use either the Intermediate or Advanced Template. The Simple (or one column)
T
42 of 91 | Eloqua Education Services

ELOQUA
Demo ADC Rule
Step One: Create ADC and Choose Default Content
– Tools & Content Components > Activity
late email and move the radio button to correct email
he Default Content field to search for a piece of
or “default state”
this drop down you can Edit and Preview Content
1. Communicate > Email Marketing > Email tab
2. Get Started bar
Driven Content
3. Click New Activity Driven Content Rule
4. Decide if this Rule is to be inserted into a HTML email or a
Temp
type
5. Name the ADC Rule
6. Click in t
Content
7. Search for a piece of content by searching f
(or click Create New to build new content)
8. Click on drop down next to content and choose Select Item
(Also from
Sections)
9. Click OK
10. Click Save (Do not click Save & Close. If you do you have to re-
pen your ADC Rule in order to define the criteria)
o
Eloqua Education Services | 43 of 91

FUNDAMENTALS
Step Two: Add Criterion
n (along the button)
ct
ame field
down next to “State or Province” and choose
iation
rt
ext to the content you wish to select and
lect Item
Rule
s
24. Save and then Close ADC Rule
11. Click the new button Add Criterio
12. Leave the Entity type as Conta
13. Click in the Field N
14. Search for “State”
15. Click on drop
Select Item
16. Click OK
17. Next to “Is Equal to” type in a State abbrev
18. Click on the field next to Content to Inse
19. Search for content for the state chosen
20. Click on drop down n
choose Se
21. Click OK
22. Save Criterion and then Close to return to ADC
23. Continue adding Criterion for different State
44 of 91 | Eloqua Education Services

ELOQUA
Exercise 3.4 Insert ADC
Step One: Add ADC to Copied Email
der My Recent
the Blue Zone (right hand column of your Template
e ADC Rule the instructor just demoed
ct
32. ave email
25. Communicate > Email Marketing > Email tab
26. Open the email with your signature layout un
Items by double clicking on the email name
27. Click in
Email)
28. Click Add ADC
29. Search for th
30. Click Sele
31. Click OK
S
DC and use the Remove button along the top of the editor window.
Note: If you ever need to remove or replace ADC, open up the Email Editor, click on the
A
Eloqua Education Services | 45 of 91

FUNDAMENTALS
Step Two: Preview ADC
ved your email, click the Content button
e selected ADC Rule
click the Content button (upper
ght) and choose Edit Email
33. After you have Sa
(upper right)
34. Choose Preview Email
35. On the right hand side of Preview is a drop down for viewing
the different pieces of content within th
36. Preview each of the pieces of Content
37. To return to the Email Editor,
ri
Note: Preview is not the most reliable way to check how the email displays in an email
box. Use Test Send or run a Deliverability Test for the most reliable results. in
46 of 91 | Eloqua Education Services

ELOQUA
Exercise 3.5 Test Send Email
nder My Recent Items by
pper right
down
d
e Signature Layout – Locate your User # in the drop
, click Recent Email Addresses and
4 of the Test Center, move the radio button to HTML
10.
f the ADC content is displaying in your TEST
email?
1. Communicate > Email Marketing > Email tab
2. Open the email with ACD inserted u
double clicking on the email name
3. Click on the Email button in the u
4. Choose Test from the drop
5. Step 1 is already filled in
6. Step 2 determines which Eloqua User’s information is pulle
into th
down
7. In Step 3 of the Test Center
choose your email address
8. In Step
9. Click Perform Test
When your test email arrives, check the following:
a. Which o
Eloqua Education Services | 47 of 91

FUNDAMENTALS
Exercise 3.6 Quicksend Send Email to Instructor
nder My Recent Items by
ight
ctor
tes in the Signature
the Sender information
8. Click Send Email
1. Communicate > Email Marketing > Email tab
2. Open the email with ACD inserted u
double clicking on the email name
3. Click on the Email button in the upper r
4. Choose Quicksend from the drop down
5. In Step 1, choose the instructor’s email address from Recent
Email Addresses or click Find Contact and search for instru
6. In Step 2, locate your User # from the drop down. This is
determining whose information popula
Layout and in
7. Skip Step 3
48 of 91 | Eloqua Education Services

ELOQUA
Chapter 4: Email Reporting
bjectives
t
Pull an Email Batch Executive Overview Report
ine effectiveness, measure where you are now, track progress, prove value and
ail Updates so that your favorite reports are emailed to you at a
r form, then use
sset
rlink
tinct opens
at one tree (email group
etrics) and finally the entire forest (email overview metrics).
O A the end of this section, you will be able to
Explain Key Functions of Reporting
Pull Reports on the Email Dashboard
Pull Reports on the Email Group Dashboard
Why Use Reporting?
Reporting in Eloqua provides you with a broad spectrum of metrics so that you can
etermd
more.
Reports & dashboards are available to all Eloqua users and as you find favorite reports
ou can set up Emy
scheduled time.
There are three main places where you can find reports & dashboards:
1. Eloqua Today: Saved reports, custom dashboards & overview dashboards
2. Report Console: Searchable area that gives access to all reports & dashboards
(Evaluate > Reporting > Report Console)
3. Asset Level: Go to a particular asset, such as a particular email o
the drop down arrow to locate the dashboard for that a
When looking at emails, there are several important metrics:
• Open Rate: Every email that has had images downloaded
d on a hype• Click Through Rate: Every email where the recipient has clicke
• Email Effectiveness Rate: Non-distinct click throughs/ non-dis
• Received Rates: Number sent minus number of bouncebacks
These metrics can be seen at the email level, the email group level and the entire install
vel. You start by looking at one leaf (i.e. email metrics), then le
m
Eloqua Education Services | 49 of 91

FUNDAMENTALS
Exercise 4.1 Locate Email Metrics & Dashboards
ail?
1. Go to the Email area and locate your Template email
2. Click on the drop down arrow and select Email Dashboard
gh rate for our Email Group?
2. Locate our Email Group
3. Click on the drop down arrow and select Email Group Dashboard
ils in
luate > Reporting > Report Console)
Executive Overview report
nge of “last week”
. Click View Report
What is the open and click through rate for your Template em
What is the open and click throu
1. Go to the Email area
What is the current open and click through rate for all of the Ema
the database?
1. Go to the Report Console (Eva
2. Search for “batch executive”
3. Click on Email Batch
4. Choose the time ra
5
50 of 91 | Eloqua Education Services

ELOQUA
Chapter 5: Hypersites & Generic Landing Pages Objectives At the end of this section, you will be able to
Create a Generic Landing Page
Add a Hyperlink to a Hypersite into an Email
What is a Hypersite?
A hypersite is a domain which can host landing pages.
Admins create hypersites. However, any Eloqua user with access to the Hypersites area
(Communicate > Hypersites) can create Generic or PURL Landing Pages. Form Landing
Pages are created in the Forms area (Automate > Forms).
All three types of landing pages can…
• Support Field Merges (For example, First Name)
• Host Pre-Populating Forms
• Be Created Without IT Involvement
Eloqua Education Services | 51 of 91

FUNDAMENTALS
How are Hypersites & Landing Pages Organized?
In the Hypersites area (Communicate > Hypersites), landing pages are organized first by
which hypersite they live. Then inside of that hypersite, they are listed in the following
order:
• PURL (Personalized URL) pages (start with [#])
• Form Landing Pages (start with “/forms/”)
• Generic Landing pages (start with “/content/”)
If you are looking for a Generic Landing Page you need to go to Communicate >
Hypersites. Then click the “+” next to the hypersite where your landing page lives. Then
scroll past all of the PURL and Form landing pages.
How are URLs Built for Landing Pages? All URLs start with the hypersite you select. What appears after the hypersite tells you
what kind of landing page you are viewing. PURL pages include a number. Form Landing
Pages start with the hypersite and then follow with “/form/Form_Layout_Name.” Generic
Landing Page URLs start with the hypersite and then follow with
“/content/Name_of_Generic_Landing_Page.” For example:
a. PURL LP: www.feedback.eloqua.com/mindylou?elqPURLPage=456
b. Form LP: www.feedback.eloqua.com/forms/60MTProductFeedback
c. Generic LP: www.feedback.eloqua.com/content/60MTInfoCenter
52 of 91 | Eloqua Education Services

ELOQUA
Exercise 5.1 Create Generic Landing Page
1. Communicate > Hypersites > Hypersites tab
2. Get Started bar > Hypersite Options drop down > Select New
Generic Landing Page
3. From the list of available Hypersites, select the site that has been
assigned to you for this class then click Select Hypersite.
4. Enter the Generic Landing Page Name.
*This name appears in the URL
5. Click Save - The page refreshes and the HTML Editor appears.
6. Design your Generic Landing Page using the WYSIWYG editor.
If you want to use HTML code created outside of Eloqua, click
Switch to Source Mode to access the Source Mode editor.
7. Add text, images, alt tags and field merges as instructed in
class
8. Click Save
9. Preview your Generic Landing page by clicking the created URL
in the Generic Landing Page Name in URL field
*Note that the URL contains “/content/”*
Eloqua Education Services | 53 of 91

FUNDAMENTALS
NOTE: Under Hypersite Options on the Get Started bar there is the option to Create New Hypersite.
This creates a brand new domain and requires IT setup. Only Admins should choose the Create New
Hypersite option.
Exercise 5.2 Copy Email & Add Link to Hypersite
1. Copy an existing email
2. Rename Email and place in Email Group
3. Go to Email Details (Email button > Email Details)
4. In the Email Details, edit Subject line, Display Name and place
in sub-folder within the Email Group if appropriate
5. Type “Click Here” and highlight it
6. Click Insert/Edit Hyperlink
7. Change ‘When link is clicked’ drop down to Send to
Hypersite/Hosted Form
8. Next to Select Hypersite, choose the hypersite where your
generic landing page is saved
9. Move the radio button to Generic Landing Page and use that
drop down to locate your landing page
10. Click Insert
11. Save email
12. Test send to self and click on hyperlink
Does the hyperlink send to the correct Form Landing Page?
NOTE: Whenever you are inserting a hyperlink to a landing page created within Eloqua (i.e.
Generic, Form, or PURL pages) use the “Send to Hypersite/Hosted Form” option.
When using the Send to Hypersite/Hosted Form hyperlink you must select which hypersite your
landing page is stored on, then select the type of landing page (PURL, Form or Generic) and
finally use that drop down to locate your landing page.
54 of 91 | Eloqua Education Services

ELOQUA
Chapter 6: Forms & Form Landing Pages Objectives At the end of this chapter, you will be able to
Create a new Form
Create a Form Landing Page Layout
Publish a Form Landing Page to a Hypersite
Review Form Submissions in the Form Data Area
Add a Hyperlink in an Email to a Form Landing Page
How do Web Forms Work in Eloqua? There are two kinds of forms in Eloqua: Internal and External Forms. Internal Forms are
created and hosted inside of Eloqua and all of the information is captured and processed
inside of Eloqua. External Forms are created and hosted outside of Eloqua and then the
data submitted is pushed into Eloqua where it can be processed.
Every form includes a Form Data area and Form Processing Steps. Every Internal Form
also includes Form Layout(s), which is the visitor facing side of the form.
Let’s follow the data. Someone visits your web form and clicks Submit.
1st Stop: Form Data area
2nd Stop: Form Processing Steps
3rd Stop: Database
The Form Data area is like an Island. All of the data submitted into a form is captured
into the Form Data area. However, until you set up Processing Steps, that data remains
only in the Form Data area .
Eloqua Education Services | 55 of 91

FUNDAMENTALS
Form Processing Steps are like speedboats that can move data from the Form Data area
out to the database at large AND automate certain processes such as sending a
confirmation email to every person who submits a form. Form Processing Steps are
covered in the next chapter.
56 of 91 | Eloqua Education Services

ELOQUA
Exercise 6.1 Create New Form
1. Automate > Forms > Forms Tab
2. Get Started bar > Manage Forms and select New Form
3. Type in a Form Display Name
Write down the name of your form here:_______________________
4. Place the form in your class folder
5. Enable this form for International Language Support
Select the appropriate radio button. (Yes)
6. Indicate that This Form is hosted by Eloqua (only). Select the
appropriate radio button. (No)
7. Click Create Form
Eloqua Education Services | 57 of 91

FUNDAMENTALS
What’s in a Form?
The Form Name, International Language Support and Form hosting information above
makes up the Form Details. This information remains available to you by navigating to
the form and double clicking on the Form Name under My Recent Items or from within
the Form folder tree. The Form Data area is created as soon as you click Create Form. This is also accessible
from the drop down arrow next to the form name.
58 of 91 | Eloqua Education Services

ELOQUA
What is a Form Layout?
Now that you have the shell of your form, you need a Form Layout to determine the look
of the form and what information this form captures.
There are two templates to choose from when building a form layout. They are:
1. Landing Page Template
2. Basic Template
The Landing Page template works as a stand along landing page with a unique URL.
This page exists in order to push people to the page to fill out the form. The Basic Form
Template is just the “guts” of the form. There is no formatting, only the form fields and
the submit button. The Basic Template is meant to be embedded onto a Generic or
PURL Landing Page.
Eloqua Education Services | 59 of 91

FUNDAMENTALS
How do you Add Form Fields to a Form Layout?
Once you have created your Form Layout, there is an area of the screen that says “Click
here to start Adding Form Fields.” When you click in that area it activates the buttons
along the bottom of the Form Layout Editor. These buttons allow you to add different
types of form fields.
After you add a form field, it is a best practice to double click on the form field to open
the Additional Field Properties. This is the area where you can edit the following:
• Field Name as it appears in Reports
• Form Field Type (Text box, Check box, Single Select List)
• Field Width & Height
• Is the Form Field Required?
• Validation
• Prepopulation
60 of 91 | Eloqua Education Services

ELOQUA
Exercise 6.2 Create Form Landing Page Layout Now that you’ve configured the Form Details, you can create the layout, also known as
the Form Landing Page (Visitor Facing).
Step One: Form Layout Name, Template & Theme
1. Open your form by double clicking on the form name under My
Recent Items
2. Click Layouts button and select New Standard Layout
3. Enter a Form Layout Display Name
Write down the Form Layout Name here: _____________________
4. Select a Form Template. – choose Landing Page
5. Click Add
The Layout Template updates to include a header, footer, left
and right column.
6. Select a Form Theme (In training install search for “ef” and select
“EF Theme – Working”)
7. Click OK
NOTE: Your Form has a name. Your Form Layout has a name. It is the Form Layout
name that is used to build the URL for the Form Landing Page. It is important to jot
down the form layout name so that when you are searching for your form landing page to
insert a hyperlink into an email, you know what name appears at the end of the URL.
Eloqua Education Services | 61 of 91

FUNDAMENTALS
Step Two: Add Form Fields
Activate the form fields menu by clicking in the box that says “Click
here to start adding form fields”
NOTE: Once you click in this area of the layout, you have access to
the form field buttons along the bottom of the editor.
1. Click Add Contact Form Fields - Select from the list of available
fields to add the following:
a. First Name
b. Last Name
c. Email Address
2. Double click on each field to access the Additional Field
Properties window
a. Check the Field Name and Field Type
b. Make these three fields Required
c. Once required, make the First and
Last Name fields say Yes, Any Entry
is Valid
d. Validate Email Address by saying
“No. Data is verified” and map to
Email Address
e. Make all three fields pre-populating
and check that the fields map to the correct contact record
field
f. To save changes to Additional Field Properties, use the black
X in the upper right corner.
62 of 91 | Eloqua Education Services
ELOQUA
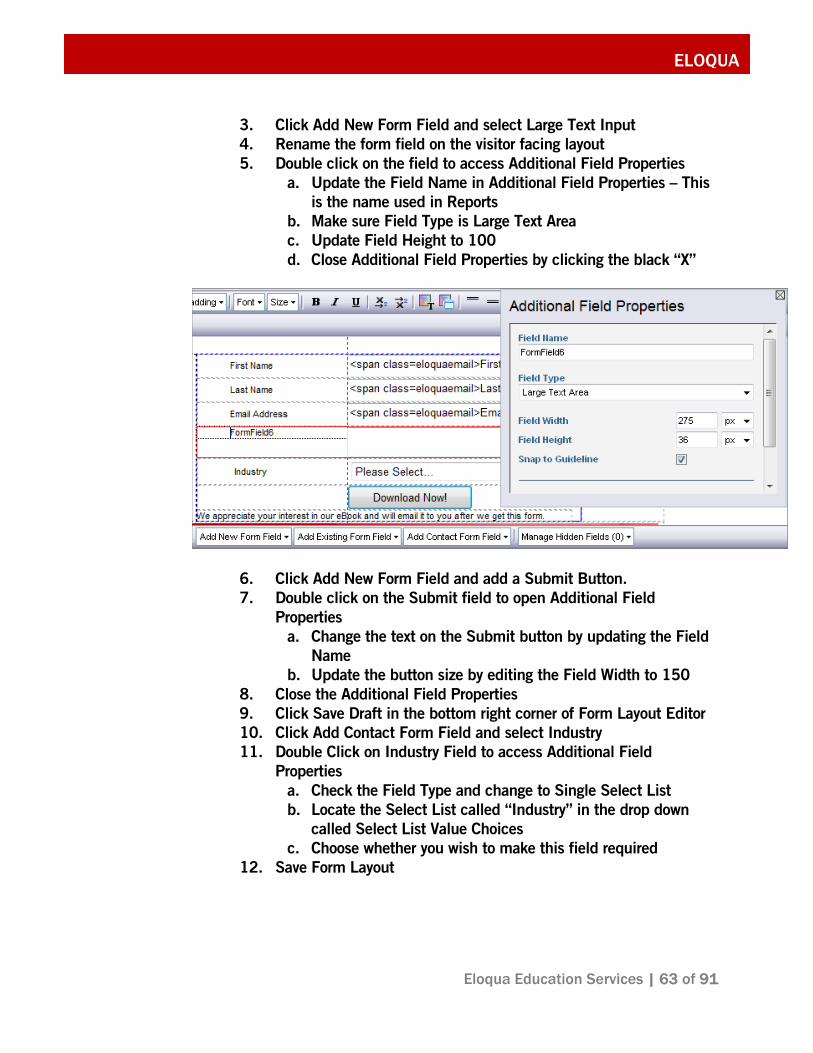
3. Click Add New Form Field and select Large Text Input
4. Rename the form field on the visitor facing layout
5. Double click on the field to access Additional Field Properties
a. Update the Field Name in Additional Field Properties – This
is the name used in Reports
b. Make sure Field Type is Large Text Area
c. Update Field Height to 100
d. Close Additional Field Properties by clicking the black “X”
6. Click Add New Form Field and add a Submit Button.
7. Double click on the Submit field to open Additional Field
Properties
a. Change the text on the Submit button by updating the Field
Name
b. Update the button size by editing the Field Width to 150
8. Close the Additional Field Properties
9. Click Save Draft in the bottom right corner of Form Layout Editor
10. Click Add Contact Form Field and select Industry
11. Double Click on Industry Field to access Additional Field
Properties
a. Check the Field Type and change to Single Select List
b. Locate the Select List called “Industry” in the drop down
called Select List Value Choices
c. Choose whether you wish to make this field required
12. Save Form Layout
Eloqua Education Services | 63 of 91

FUNDAMENTALS
Exercise 6.3 Publish Form Landing Page to Hypersite
1. Save the Form Layout while inside the Form Layout Editor
2. Click Publish to Landing Page
3. Select the hypersite to publish to – Use the one assigned to you by
your instructor
4. The Landing Page Name is prefilled with your Form LAYOUT
Name, this appears as the tail of your URL
5. Enter a Browser Title which appears as the title at the top of the
web browser window or browser tab
6. Click Publish Form
7. Preview your form by clicking the Form Landing Page URL
8. Complete and Submit the Form
Exercise 6.4 Review Form Submission in Form Data
1. Locate Form under My Recent Items
2. Click on drop down arrow next to your Form name and select Form
Data
3. Form Submission Data report appears
NOTE: Even without configuring Processing Steps all form submissions are captured in the
Form Data area.
NOTE: It is possible to delete submissions from the form data area so that test submissions
do not enter into your reporting metrics.
64 of 91 | Eloqua Education Services

ELOQUA
Exercise 6.5 Create Email with Hyperlink to Form Landing Page
1. Communicate > Email Marketing > Email Tab
2. Copy an existing email (Click drop down next to email and
choose Copy)
3. Rename Email and place in appropriate Email Group,
4. Go to Email Details edit Subject line
5. Type in “Click here to view Form Landing Page” and highlight
the text
6. Click Insert/Edit Hyperlink.
7. Change ‘When link is clicked” drop down to Send to
Hypersite/Hosted Form
8. Next to Select Hypersite, choose the hypersite for where your
form landing page is published (Exercise 8.3)
9. Move the radio button to Form Landing Page and use that drop
down to locate your landing page
10. Click Insert
11. Save email
12. Quicksend to self
13. Click on hyperlink and submit the form
14. Go to the Form Data area to review the form submission (Locate
your form under My Recent Items > Click on drop down arrow >
Choose Form Data)
Eloqua Education Services | 65 of 91

FUNDAMENTALS
Chapter 7: Add Automation to Form Landing Page
Objectives
At the end of this chapter, you will be able to
Edit the Confirmation Page Processing Step
Add the Save to Contact Table Step
Add the Update Existing Record or Data Object Step
Add the Send Email Step
Add the Email Notification Step
Add the Add to Contact Group Step
Test the Form Processing Steps
In this Chapter you configure the six most commonly used form processing steps:
• Confirmation Page
• Save to Contact Table
• Update Existing Record or Data Object
• Send Email
• Email Notification
• Add to Contact Group
66 of 91 | Eloqua Education Services

ELOQUA
Exercise 7.1 Configure Confirmation Page Processing Step
By default the Confirmation Page Processing Step is automatically created for every
form. It is best to check the configuration before adding additional processing steps.
1. Automate > Forms > Forms tab
2. Under My Recent Items double click on your Form name to open
the Form Details
3. Click on Processing Steps button in the upper right and Select
List Processing Steps
4. Double click on Confirmation Page to edit the Configuration
5. Locate the name of the Confirmation Page (Default) and type
the name into the Description line at the top of the edit
window
6. Save and Close
NOTE: If you want to create a custom confirmation page, you can click NEW instead of
choosing from the drop down of already created pages. Please do not set your
confirmation page as the default. Also do not edit the Default confirmation page as this
is the page that all forms link to by default.
Eloqua Education Services | 67 of 91

FUNDAMENTALS
To preview a Confirmation Page, select it from the drop down and click Edit. Then scroll
down to the bottom of the Edit window and choose Preview.
NOTE: Adding the name of the Confirmation Page to the Description line in the Edit window
above means that, the page name now appears on the List Processing Steps screen. This
helps to tell a story of what the processing steps are doing without having to open each step.
68 of 91 | Eloqua Education Services

ELOQUA
Exercise 7.2 Add Save to Contact Table Processing Step
This processing step adds brand new contacts into the database.
1. Open your Form
2. Click the Processing Steps button and select Add Processing
Step
3. Select the Save to Contact Table processing step
4. Click Add
5. In the Description line type “Save Net New Contacts”
6. Under Required Parameters, match Email Address to the Form
Field of Email Address
7. Leave Contact Type and Overwrite Existing as they are
8. Click Save then Close
Eloqua Education Services | 69 of 91

FUNDAMENTALS
Exercise 7.3 Add Update Existing Record or Data Object Step
This processing step updates existing contacts with all of the form fields that you map to
contact record fields. All of these updates follow the logic applied from the Contact
Update Rule. If there are form fields that you do not map in this processing step, that
information is not pushed into the database; it is only be captured in the Form Data area.
1. Open your Form
2. Click the Processing Steps button and select Add Processing
Step
3. From the drop down select the Update Existing Record or Data
Object processing step
4. Click Add
5. Select DND – Contact Update Rules.
This contact update rule has been configure to only update
certain contact fields if the data submitted through the
matched form field is not blank.
6. Match Email Address to the Form Field called Email Address
7. From the Append an Optional Parameter list, select a field that
is on your form layout
8. Click Append (green plus sign button)
9. Make sure the field maps to the appropriate Contact Field in
the Eloqua database.
10. Repeat steps 7-9 for all fields on your form
11. Click Save and then Close
70 of 91 | Eloqua Education Services

ELOQUA
NOTE: Many processing steps can be set up with Conditions. At the bottom of the edit
window if you see the “This Processing Step Gets Executed” header with "Always"
selected, this means you could configure this step to be conditional instead.
Eloqua Education Services | 71 of 91

FUNDAMENTALS
Exercise 7.4 Add Send Email Processing Step
This step sends a specific email to the form submitter. This email is sent out within 15
minutes of the form submission.
1. Open your Form
2. Click the Processing Steps button and select Add Processing
Step
3. From the drop down choose the Send Email processing step
4. Click Add
5. Under the Required Parameters section, match Email Address
to the Form Field called Email Address
6. On the Email line, keep Source Type as Constant (i.e. the same
email is sent to everyone who submits this form)
7. Click on the field that says (none) to search for your email
8. In the search window, locate your email, click on the drop
down arrow and choose Select Item
9. Click OK to close the Search window
10. Type the name of the Email you chose into the Description line
11. Keep the Allow Resending Line as is (set to Yes)
12. Click Save and Close.
72 of 91 | Eloqua Education Services

ELOQUA
Exercise 7.5 Add Email Notification Step
This step sends an email to a specified email address of an Eloqua User to give them
notification of every form submission.
HINT: The term Notification is always a clue that the email is to an internal user.
1. Open Form
2. Click Processing Steps button and choose Add Processing Step
3. Select the Email Notification processing step
4. Click Add
5. In the Description Line, type in the name of the person who
you want to receive this notification (Bob, Catering Coordinator)
6. On the Recipient Email Address line keep Source Type as
Constant and type in the recipient’s email address (For class,
type in your own email address)
7. Leave the remaining Required Parameters as they are
8. Under Optional Parameters, click Append next to Custom
Subject Line
9. Change Source Type to Constant
10. Type a Subject that is informative to the recipient
11. Click Save and then Close
Eloqua Education Services | 73 of 91

FUNDAMENTALS
Exercise 7.6 Add the Add to Contact Group Step This processing step adds the contact associated with the form submission to a specified
contact group. This is extremely helpful for future segmentation and targeting.
1. Open Form
2. Click Processing Steps button and choose Add Processing Step
3. Select the Add to Contact Group processing step
4. Click Add
5. Match Email Address to the Form Field containing email
address
6. Next to Contact Group make sure Source Type is Constant
7. Click in the blank Value field next to Contact Group to open the
Search window
8. Search for your Contact Group, click on drop down arrow next
to your Contact Group and choose Select Item
9. Click OK to exit the Search window
10. In the Description line, type in the name of the Contact Group
you selected
11. Click Save and then Close
74 of 91 | Eloqua Education Services

ELOQUA
NOTE: Your Processing Steps List should now show six processing steps with
descriptions for each.
To access the Processing Steps List, open your form and click on the Processing Steps
button (upper right). Then select List Processing Steps.
Processing Step Review Which of the 6 most commonly used processing steps answers each of the following
questions?
1. How do you save a brand new Contact to the database?
2. How do you control what data is updated in the database?
3. What if you want to send an email to everyone who submits the form?
4. What if you want to send an email to an internal Eloqua user?
5. How would you add everyone who submits the form to a particular Contact
Group? Answ
er K
ey:
1. S
ave
to C
onta
ct T
able
2. U
pdate
Existin
g R
ecord
or D
ata
Obje
ct
3. S
end E
4. E
mail N
otific
atio
n
5. A
dd to
Conta
ct G
roup
6.Confirm
atio
n P
age
6. Which step is set up by default for every form?
Eloqua Education Services | 75 of 91

FUNDAMENTALS
Exercise 7.7 Test Form
Step One: Test Processing Steps
1. Automate > Forms > Forms tab
2. Double click on Form name under My Recent Items
3. Click Layouts button in upper right and choose List Layouts
4. Click on URL for Form Landing Page Layout
5. Submit form with a fictional person (For the email address use
the domain @eloquafundamentals.com to make sure no one is
accidentally emailed)
6. Did you see the default confirmation page? (I.e. Did the
Confirmation Page step work?)
7. Go to Communicate > Email Marketing > Contacts and search
for the fictional form submit…Was this new fictional contact
added into the database? (I.e. Did the Save to Contact Table
step work?)
8. Open the Contact record to see the fictional form submit…
Were the fields such as first name and last name updated? (I.e.
Did the Update Existing Record step work?)
9. Did you receive an Email Notification letting you know that the
form was submitted? (I.e. Did the Email Notification step
work?)
10. Go to Communicate > Email Marketing > Contacts > sub tabs
highlighted as Contacts : Groups. Locate the Contact Group you
linked in the form processing steps… Is the fictional submit
now part of that Contact Group? (I.e. Did the Add to Contact
Group step work?)
Step Two: Test Pre-populating & Required Fields
1. In your inbox, locate the email containing the link to the form
landing page (From Exercise 8.5)
2. Click on the hyperlink to your Form Landing Page
3. Are the first and last name pre-populating?
4. What happens if you enter your name in the email address field?
5. Enter a fictional job title for yourself… then go search for your
Contact record. Did this new job title populate the database?
76 of 91 | Eloqua Education Services

ELOQUA
Chapter 8: Create an Alternate Form Layout Objectives At the end of this chapter, you will be able to
Create an Alternate Layout (Basic Layout)
Update Processing Steps
Embed the Basic Form in a Generic Landing Page
Why are Alternate Form Layouts Helpful? Alternate Form Layouts are helpful when you want to have multiple visitor experiences
for the same core form. Remember a form includes the Form Details, Form Data area,
Processing Steps and Layouts. Sometimes it is appropriate to have multiple layouts all
pushing data into the same Form Data area and using the same Processing Steps.
For example, if you want to have a form in multiple languages. You
could have multiple layouts all using the same Form Data area and the
same Processing steps. You might also work with a Partner who is
willing to send their contacts to your form landing page, as long as the
page has their branding and logo. An alternate layout is an easy way
to accomplish this.
Eloqua Education Services | 77 of 91

FUNDAMENTALS
Another scenario when Alternate Layouts are helpful are if you want to have a Form
Landing Page and also have a Basic Form that you can embed onto a Generic or PURL
Landing Page.
Exercise 8.1 Create a New Form Layout (Basic Form)
Step One: Form Layout Name, Template & Theme
1. Open your form by double clicking on the form name under My
Recent Items
2. Click Layouts button upper right and select New Standard Layout
3. Enter a Form Layout Display Name
Write down the Form Layout Name here: _____________________
4. Select a Form Template. – choose BASIC
5. Click Add
NOTE: You do not need to apply a Theme to a Basic form. The theme is for the look and
feel and, therefore, only is appropriate for the Landing Page Template.
78 of 91 | Eloqua Education Services

ELOQUA
Step Two: Add Form Fields
Activate the form fields menu by clicking in the box that says “Click
here to start adding form fields”
1. Click Add Existing Form Fields and choose Add All
2. Double click on each of the fields to access the Additional Field
Properties to review. Pre-population and required status does not
always transfer between layouts.
3. Click on a form field you wish to remove from this layout and click
Remove on the top edit bar
4. Add a new Contact Field that is not on the other form layout
5. Click Add New Form Field and choose Submit Button
6. Save Draft
Exercise 8.2 Update Processing Steps
1. Open your Form
2. Click Processing Steps button and choose List Processing
Steps
3. Double click on the Update Existing Record or Data Object
processing step
4. Append any additional fields added to the layout
5. Save and then Close
Eloqua Education Services | 79 of 91

FUNDAMENTALS
Exercise 8.3 Embed Form (Basic Layout) into Generic Landing Page
1. Communicate > Hypersites > Hypersites tab
2. Expand the hypersite you used by clicking on the black +
3. Scroll down to the URLs that start with /content/ and then locate
your generic landing page
4. Double click to open the Editor window
5. Place cursor where you wish to embed form and click Insert Form
6. Next to Form Name locate your form
7. Next to Layout Name locate the Basic Layout of your form
8. Click Insert
9. Save the generic landing page
10. Click on URL at top of Editor window to view Generic Landing
Page with form
80 of 91 | Eloqua Education Services

ELOQUA
Chapter 9: Copy and Repurpose a Form Objectives
At the end of this section, you will be able to
Copy a Form
Modify the Form Layout
Publish to Form Landing Page
Why Copy Forms?
When you copy a form, it copies the Form Details, all of the Form
Layouts and the Form Processing Steps. This is a huge time saver.
Instead of starting from scratch you simply have to re-purpose the
processing steps and layouts.
Key things to keep in mind when you copy a form:
1. Rename the form
2. Open all layouts and Rename all layouts
3. Revise the content in the form layouts
4. If the Layout is a Landing Page Layout, Republish with a new URL
5. Update Processing Steps
NOTE: Remember that the Form has a name and each Form Layout has a different
name. If the form layout is a landing page, the Layout Name is the end of the URL.
Eloqua Education Services | 81 of 91

FUNDAMENTALS
Exercise 9.1 Copy Form
1. Automate > Forms > Forms tab
2. Locate an existing form
3. From that form’s drop down arrow, select Copy Form
4. Enter a new Form Display Name
Write down form name here: _______________________________
5. Copy and paste the Form Display Name into the HTML Name line
6. Enable this form for International Language Support (Yes)
7. Indicate that this form is hosted by Eloqua Only (No)
8. Click Save.
82 of 91 | Eloqua Education Services

ELOQUA
Exercise 9.2 Modify Copied Form Layout
1. Open your form
2. Click the Layouts button (upper right) and select List Layouts
3. Click the Layout name for the Landing Page layout to open the
Layout Editor
4. Type in a new name for the Form Layout Display Name
NOTE: The Form Layout Display Name is the end of your URL. You must have a new
name in order for the URL to know which layout you want to display.
5. Click where it says “Click here to activate” in order to access
the Form Field buttons along the bottom of the Form Layout
Editor
6. Delete a form field by using the Remove button along the top
editor bar
Eloqua Education Services | 83 of 91

FUNDAMENTALS
7. Add a new field (Country) from the Add Contact Form Field
8. Double click on the field to open Additional Field Properties
9. Change the Field Type to Select List
10. In the Select List Value Choices drop down choose the Country
select list
11. Click black X on Additional Field Properties to close and save
12. Save Draft
NOTE: If you need to move a form field up or down, use the arrows on the
top Editor bar .
84 of 91 | Eloqua Education Services

ELOQUA
Exercise 9.3 Publish to Form Landing Page
1. Inside the Form Layout Editor, click Publish to Form Landing Page.
The Publish Layout to Form Landing Page window appears.
2. Select an available site to publish to.
For this exercise select the site that has been assigned to you for use during this class.
3. Enter a Browser Title.
This appears as the title in the web browser window.
4. Publish the form.
Click the Publish button. The form layout is then published to a form landing page
on the Internet and is now accessible via the generated Form Landing Page URL.
To preview your form in the browser, click the generated Form Landing Page URL.
5. Complete and Submit the Form.
Eloqua Education Services | 85 of 91

FUNDAMENTALS
Which Processing Steps Need Updating? When you copy a form, it is important to update the processing steps. Some steps may
not need to be changed. For instance the Save to Contact Table step and the
Confirmation step may not need to be revised. You still want to add new contacts into
the database and you still want every form submitter to see a Confirmation Page. If the
form you copied used a custom Confirmation Page, then this step may need to be
updated.
If you change any form fields, then you need to go in and revise the Update Existing
Record step. Otherwise, the new fields you added to the form layout are only being
captured in the Form Data area and not being updated in the database as a whole.
If you are going to use the Send Email step you need to attach a different email that has
the appropriate message for this form.
If you are going to keep the Email Notification step, you may need to change which
internal resource is being sent the notification. Remember this step sends an email for
every form submission, so if you are expecting a high volume of submissions this step
should not be used.
Finally, each form should have its own Contact Group. That way in the future you can
segment based on what forms a Contact completed. So you need to update the Add to
Contact Group step with a different Contact Group.
86 of 91 | Eloqua Education Services

ELOQUA
Review – Note Taking Data Entities:
What are the 4 data entities?
To be considered a Contact, there must be an ____________ .
Multiple ____________ Records can be linked to a single Contact to give a more
complete look at digital body language.
There is a maximum of ________ fields available in the Contact Record.
Segmentation:
What are the two ways you learned to segment the database?
1.
2.
Which of these is considered more dynamic? Why?
With Contact Filters you can have a maximum of __________ criteria.
There are 3 types of criteria, they are:
1.
2.
3.
Eloqua Education Services | 87 of 91

FUNDAMENTALS
Distribution Lists:
Where do we find Distribution Lists? Email area or
Contact area?
Why might some contacts be pushed into the Exclude
area of the Distribution list automatically?
What is a hard bounceback?
Emails:
What are the super powers of Email Groups?
1.
2.
3.
Can you move emails to a different Email Group after they are placed into a Group?
What are the 2 types of emails Eloqua supports?
1.
2.
88 of 91 | Eloqua Education Services

ELOQUA
Emails (cont.):
There are 3 ways to send an email: Test, Quicksend and Batch.
Which one of these sends a live email to a maximum of 25 Contacts? ________________
Which one requires a distribution list? _____________________
Which one is limited to only 5 recipients and has zero reporting? ____________________
There are 3 layers to a template email, what are they in the order you use them to build
the email?
1.
2.
3.
The Theme determines what in the template email? _______________________________
How do you get to the Email Details area?
What is stored in Email details?
Hyperlinks:
If you are inserting a hyperlink in an email to your corporate website, should it be direct
or redirect?
If you are inserting a hyperlink to a PDF or 3rd party website, should the link be direct or
redirect?
True or False… If you are inserting a hyperlink to a Generic Landing Page you use the
“Send to Webpage” option.
Eloqua Education Services | 89 of 91

FUNDAMENTALS
Hypersites:
What is a hypersite? ______________________________
Would any Eloqua user want to create a new hypersite?
_____________________________
What are the 3 kinds of landing pages?
1.
2.
3.
Forms:
What information does the Form Data area capture?
Why is the Form Data area compared to an island?
Where do we find the form data area?
What are some of the things processing steps do?
Which is the only step set up by default for every new form?
Which step sends an email to the form submitter?
90 of 91 | Eloqua Education Services

Eloqua Education Services | 91 of 91
ELOQUA
Forms (cont.):
Which step adds brand new contacts to the database?
Which step uses an Update Rule to apply logic to how data is updating the database?
There are 2 types of form layouts. Which one would you embed into a Generic Landing
Page?
When you add a form field to a form layout, it is a best practice to double click on the
form field… Why?
What tasks can be completed in the Additional Field Properties window?
When you copy a form, what is copied inside of the form?
What kinds of things do you need to do when you copy a form?