elite dry bath incubator - cleaver scientific€¦ · used onthe cube dry bath incubator to...
TRANSCRIPT

Instruction Manual The Cube Dry Bath Incubator
TCDB-01 TCDB-02
Version 16062014

dryBATH
1
Packing list
TCDB-01 TCDB-02
- 1 x Single Block The Cube Dry Bath Incubator or
1 x Dual Block The Cube Dry Bath Incubator - 1 x Power Cord for The Cube Dry Bath Incubator - 1 x The Cube Dry Bath Incubator Instruction Manual
Signed: Date:

dryBATH
2
Table of Contents Packing list 2 Warning 3 Safety Information 4 Product Specifications 7 Product Description 8 Introduction 9
Overview 9 Controls and Features 9
Installation Instructions 11 Operation Instructions 11 Temperature Calibration 13 Data Log Software Instructions 15 Function Control Software Instructions 18 Troubleshooting Guide 21 Maintenance 21 Ordering information 22 Warranty 24

dryBATH
3
Warning The Cleaver Scientific Cube Dry Bath Incubators have been tested and found to comply with the safety limits for CE regulations. These limits are designed to provide reasonable protection against harm when the equipment is operated in a commercial environment. This equipment generates, uses, and can radiate radio frequency energy, and if not installed and used in accordance with the instruction manual, may cause harmful interference to radio communications. Operation of this equipment in a residential area is likely to cause harmful interference in which case the user will be required to correct the interference at their expense. Changes or modifications not expressly approved by the party responsible for compliance could void the user’s authority to operate the equipment. It is strongly recommended for the user to read carefully the following points before this equipment is operated. 1. Read and follow carefully the manual instructions. 2. Do not alter the EQUIPMENT. Failure to adhere to these directions could
result in personal and/ or laboratory hazards, as well as invalidate the equipment warranty.
3. Use a properly grounded electrical outlet of correct voltage and current handling capacity.
4. Disconnect from the power source before maintenance and servicing. Refer servicing to qualified personnel.
5. In the event a solution is accidentally spilled into the instrument, disconnect the grounded plug and the user must carry out appropriate procedure or contact their supplier. Replace damaged parts.
6. Do not use in the presence of flammable or combustible material; fire or explosion may result. This device contains components, which may ignite such materials.
7. Refer maintenance and servicing to qualified personnel. 8. Ensure that the system is connected to the electrical source according to
the local and national electrical codes. Failure to properly connect may create a fire or shock hazard.
9. Ensure the appropriate used materials and correct operation to avoid possible hazards of explosion, implosion or release of toxic or flammable gases arising from the materials being heated.
10. Always use the block lifter to remove hot blocks, and wear appropriate

dryBATH
4
protection to avoid burning your hand. 11. The unit shall be operated only by qualified personnel.
Safety Information Use high level precautions against any electrical device. Before connecting with the electrical supply, check the supply voltage is within the range stated at the rating label, and this device must be earthed. Place the unit in a safe and dry location not touching any surrounding material. Follow safety precautions for chemicals and dangerous materials. If needed, please contact a qualified service representative of your supplier. Environmental Conditions Ensure the instrument is installed and operated strictly in the following
conditions: ≤95% RH, 75 KPa-106 Kpa, Altitude not to exceed 2000 meters
Avoiding Electrical Shock Follow the guidelines below to ensure safe operation of the unit. The MP power supply series has been designed for use with shielded wires thus minimizing any potential shock hazard to the user. We recommend against the use of unshielded wires. To avoid electrical shock: 1. In case of spillage, any parts of the cable or power supply must be dried out
for a period of time and restored to NORMAL CONDITION before the operation.
3. WAIT at least 5 seconds after stopping a run before handling output leads or connected apparatus.
4. ALWAYS make sure that hands, work area, and instruments are dry before making any connections or operating the power supply.
5. ONLY connect the power cord to a properly grounded AC outlet, using the power cord provided with the power supply.
Avoiding Damage to the Instrument 1. Do not attempt to operate the device if damaged.

dryBATH
5
2. Protect this unit from physical damage, corrosive agents and extreme temperatures (direct sunlight etc).
3. For proper ventilation, leave at least 10 cm of space behind the instrument, and at least 5 cm of space on each side.
4. Do not operate the dry bath incubator in high humidity environments (> 95%), or where condensation may occur.
5. When the power supply series is taken into a cold room environment, the
unit can be operated immediately. However, when the power supply series is removed from the cold room environment, let the unit equilibrate to room temperature for a minimum of 2 hours before using it.
6. Before using any cleaning or decontamination method except those recommended by the manufacturer, users should check with the manufacturer that the proposed method will not damage the equipment Equipment Operation Follow the guidelines below to ensure safe operation of the unit: 1. Check the displayed temperature figure and external temp. Probe to see if it
is over the temperature scale. 2. NEVER access any HAZARDOUS LIVE parts. 3. Do not apply lids or covers on the tube heated inside The Cube Dry Bath
Incubator to prevent possible hazards of explosion and damages.

dryBATH
6
Symbols The symbols used on The Cube Dry Bath Incubator are explained below.
Used on The Cube Dry Bath Incubator to indicate an area where a potential electrical shock hazard may exist. Used on The Cube Dry Bath Incubator to indicate a warning. Consult the manual to avoid possible personal injury or instrument damage.
ATTENTION: Hot surface!
Used on The Cube Dry Bath Incubator to indicate a disposal instruction. DO NOT dispose of this unit into commercial waste disposal when this unit has reached the end of its lifetime. To ensure the utmost protection of the global environment and minimize pollution, please recycle this unit.

dryBATH
7
Product Specifications Controller Digital Microprocessor Controller Display LCD Display Heating Power 200W for TCDB-01; 300W for TCDB-02 Power Rating 1.0A for TCDB-01; 1.6A for TCDB -02 Temperature Control Range 5°C above ambient to 150°C Temperature Increment 0.1°C Temperature Calibration Yes Temperature Uniformity@37°C ± 0.2°C Temperature Accuracy@37°C ± 0.2°C Timer 0 ~ 99hrs 59mins Safety Device Leak proof heating chamber Operating Temperature Ambient ~ 40°C Heating Chamber Material Molded Aluminum Alloy Chamber Block Material Aluminum Block Type Standard and customized are available Data Log RS 232 (Max. 2.5 meter long) Rated Voltages 110V~ or 220V~; 50/60Hz Unit Dimension 152 x 150 x 135 mm (W x L x H) for TCDB-01
152 x 230 x 135 mm (W x L x H) for TCDB-02 Weight 2.1 kg for TCDB-01; 2.8 kg for TCDB -02

dryBATH
8
Product Description Both single and dual block Cube Dry Bath Incubators use interchangeable heating block modules for a variety of biological applications, including restriction enzyme digestion, denaturing DNA, BUN, melting agar, coagulation studies, hybridization and Hot Start thermo-cycled reaction. Due to its molded aluminum alloy chamber, it can also be used as a mini water bath. The Cube Dry Bath series incorporates a PID controller for easy temperature selection, rapid heat up and excellent stability. Temperature may be set in 0.1°C increments from 5°C above ambient to 150°C. A timer may be set from 0 to 99hrs 59mins. In addition to the optional Data Logging software package, another optional Function Control software package is available. This allows control of the dry bath incubator via a computer. Features: Microprocessor controller with LCD display Rapid temperature increase rate Easy to use temperature calibration Leak proof molded aluminum alloy heating chamber RS 232 data log Single and Dual block modes Optional Data Logging software package is available Optional Control software package is available

dryBATH
9
Introduction Overview Single and dual block Cube Dry Bath Incubators offer excellent temperature control and deliver accurate and reliable experimental results from one experiment to another. The Cube Dry Bath Incubators are also space compact instruments with competitive pricing offerings, user friendly with great value. More importantly, The Cube Dry Bath Incubators are RoHS compliant and designed to comply with the CE regulation.
TCDB-01 TCDB-02
Controls and Features Please refer to following page for the location of the following controls and features.
Front of Unit

dryBATH
10
Rear of Unit
1. Key – to increase either temperature or time value
2. Key – to decrease either temperature or time value
3. Key – activate or stop the unit.
4. Key – to select setting of temperature or timer mode 5. Heating –This LED light indicates temperature is increasing. 6. AC Power Switch – to switch the unit power On/OFF 7. AC Power Cord and Fuse Holder – Power Cord Socket and Fuse Holder 8. RS232 Connected Port – for Data Log

dryBATH
11
Installation Instructions The Cube Dry Bath Incubator is actually an already installed instrument. As long as it is placed on a sturdy and level surface in a safe, dry place, and one or two heating aluminum block(s) is/are inserted into the bath or simply water, as a water bath, it is ready for operation. Operation Instructions 1. Place The Cube Dry Bath Incubator on a sturdy and level surface in a safe,
dry place, away from laboratory traffic. 2. Ensure that the AC power switch is OFF, then plug the three-pronged power
cord into a grounded three-prong AC outlet of the appropriate voltage (115V or 220V as indicated on the rating sticker near the AC cord on the back of the unit).
3. Select suitable module block(s) or appropriate water volume and put it /
them into the The Cube Dry Bath Incubator. 4. Turn the AC power ON. 5. Run temperature calibration procedure when using the instrument first time
(see page 13).
6. Press Key whilst temperature figure on the LCD display is flashing,
and then press or Key to adjust the desired temperature.
7. If setting heating time is required, press Key whilst timer figure on the
LCD display is flashing, and then press Key or Key to adjust timer in HH:MM format upon your request. Temperature control will stop automatically when timer is up.
dryBATH
12
8. Press the Key to start heating.
9. If it is necessary to adjust timer during heating, press again to deactivate heating.
10. Press Key again to stop the unit. Operation Protection Mechanism Protection Mechanism Description
Warning : Temperature over 5°C
During operating, if the displayed temp. value is over 5°C than the set temp value, “Warning: Temperature over 5°C” will be displayed with alarm, and the instrument will be shot down automatically.
SSR Failure
If temp. value raises automatically within 1 minute after power on the instrument and without pressing START Key to start heating, “SSR Failure” will be displayed with alarm. This problem is due to SSR.

dryBATH
13
Temperature Calibration
The Cube Dry Bath Incubator with the optional block(s) has been calibrated as a set. But, the different kinds of block will not have the same result and may have different influences. For optimum accuracy temperature control or while changing with different kinds of block, The Cube Dry Bath Incubator should be calibrated in accordance with the procedure outlined below.
1. Insert a 45 mm calibrated laboratory Thermometer into the thermometer holding port, which is on the block.
2. Please press and hold the Key while switching on the unit with the OFF/ON key, and don’t release until display between 1000 ~ 1500 located
on the upper left area of display is presented. Then release Key immediately; The Cube Dry Bath Incubator is now under Calibrated Mode.
3. Press Key first to enable the alteration of temperature parameter.
Use or Key to preset display value, to the point you want to
assess temperature accuracy. And then press Key. 4. When the temperature reach the setting point. Display will show “Stabling”
on lower left area, at the same time, timer will automatically countdown for 30 minutes to make sure the whole system reaching heat balance. When timer is up, the temperature figure become flashing and display shows “Ready for Calibration”.
5. Press key and adjust display value to the same figure as thermometer.
And then press Key.

dryBATH
14
6. Adjust display value to the same figure as thermometer. And then press
Key. 7. The calibration procedure is finished. Please wait for few more minutes that
microprocessor will auto adjust temperature.

dryBATH
15
Data Log Software Instructions NOTE: All rights reserved by Cleaver Scientificco., ltd. Installation Instruction 1. Insert the CD into CD ROM and press the setup.exe in the Installer Folder
for installation. 2. Follow up the instructions shown on the computer screen to complete the
installation.
Operation Instruction 1. Start TCDB-01-LOG software program and then the below screen will be
shown. There are two main sections, View Chart, and View History in this software.

dryBATH
16
2. View Chart Section:
Serial Port No. Communication port selections between computer and The Cube
Dry Bath Incubator
Link Status Indication whether The Cube Dry Bath Incubator is linked with
computer or not
EXIT To exit this software
Temp. SV The set temperature value
Temp. PV The real temperature value being measured
Temp. SV ON / OFF To show the temp set value on the table or not
Temp. PV ON / OFF To show the real time temp value on the table or not
REC. period To set up how frequent the operation data is recorded
REC. period ON / OFF To start or stop recording
CLEAR CHART OFF To clear up the curves in the table
3. View History Section:
Serial Port No. Communication port selections between computer and The Cube
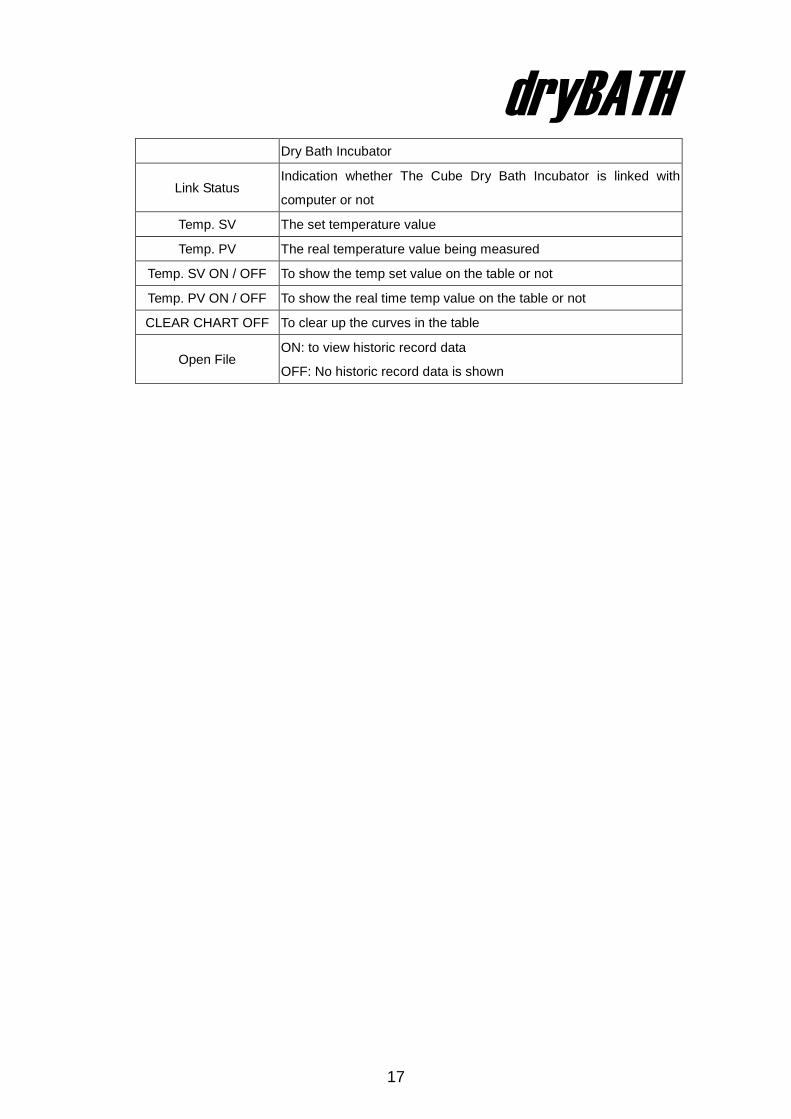
dryBATH
17
Dry Bath Incubator
Link Status Indication whether The Cube Dry Bath Incubator is linked with
computer or not
Temp. SV The set temperature value
Temp. PV The real temperature value being measured
Temp. SV ON / OFF To show the temp set value on the table or not
Temp. PV ON / OFF To show the real time temp value on the table or not
CLEAR CHART OFF To clear up the curves in the table
Open File ON: to view historic record data
OFF: No historic record data is shown

dryBATH
18
Function Control Software Instructions NOTE: All rights reserved by Cleaver Scientificco., ltd. Installation Instruction 1. Insert the CD into CD ROM and press the setup.exe in the Installer Folder
for installation. 2. Follow up the instructions shown on the computer display screen to
complete the installation.
Operation Instruction 1. Start TCDB-01 software program and then the below screen will be shown.
There are two main sections, View Chart, and View History in this software.
2. View Chart Section:
Serial Port No. Communication port selections between computer and The Cube
Dry Bath Incubator

dryBATH
19
Link Status Indication whether The Cube Dry Bath Incubator is linked with
computer or not
STOP For The Cube Dry Bath Incubator ON / OFF control
EXIT To exit this software
Temp. SV The set temperature value
Temp. PV The real temperature value being measured
Timer SV (Min) To set operation time
Time RUN (Min) To indicate how many minutes The Cube Dry Bath Incubator is
being operated
Temp. SV ON / OFF To show the temp set value on the table or not
Temp. PV ON / OFF To show the real time temp value on the table or not
REC. period To set up how frequent the operation data is recorded
REC. period ON / OFF To start or stop recording
Enlarge the record table
Move the record table
3. View History Section:
Serial Port No. Communication port selections between computer and The Cube
Dry Bath Incubator
Link Status Indication whether the The Cube Dry Bath Incubator is linked with

dryBATH
20
computer or not
STOP To stop the software and instrument
EXIT To exit this software
Temp. SV The set temperature value
Temp. PV The real temperature value being measured
Timer SV (Min) To set operation time
Time RUN (Min) To indicate how many minutes The Cube Dry Bath Incubator is
being operated
Temp. SV ON / OFF To show the temp set value on the table or not
Temp. PV ON / OFF To show the real time temp value on the table or not
CLEAR CHART OFF To clear up the curves in the table
Open File ON: to view historic record data
OFF: No historic record data is shown
Enlarge the record table
Move the record table

dryBATH
21
Troubleshooting Guide
Many operating problems may be solved by carefully reading and following the instructions in this manual accordingly. Some suggestions for troubleshooting are given below. Should these suggestions not resolve the problem, please contact our SERVICE DEPARTMENT or a distributor in your region for assistance. If troubleshooting service is required, please include a full description of the problem.
Problem Recommendations
LED does not light up
Check the FUSE
Ensure that the AC power switch is ON
Check the three-pronged power cord are properly plugged into a
grounded three-prong AC outlet of the appropriate voltage
Maintenance
The Cube Dry Bath Incubator may be cleaned with a moist cloth containing a mild soap solution. The chamber and blocks are aluminum and may be cleaned with any of the commercial aluminum cleaners on the market.
dryBATH
22
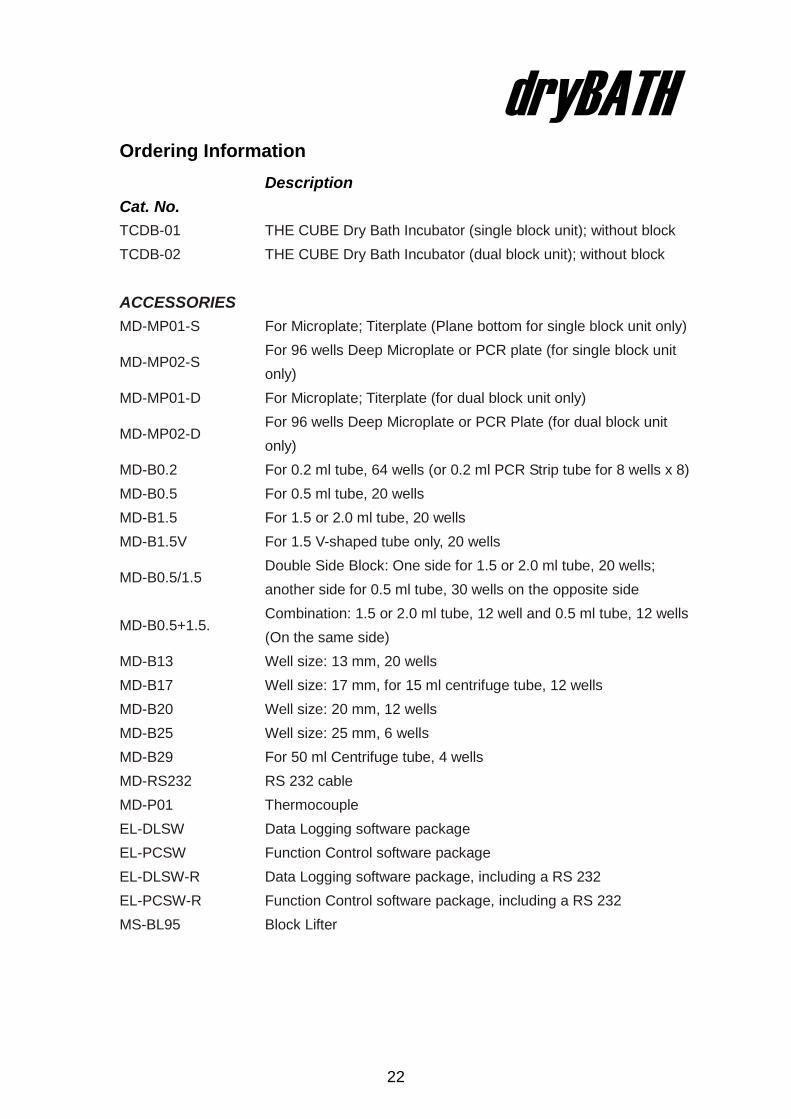
Ordering Information Cat. No.
Description
TCDB-01 THE CUBE Dry Bath Incubator (single block unit); without block TCDB-02 THE CUBE Dry Bath Incubator (dual block unit); without block
ACCESSORIES
MD-MP01-S For Microplate; Titerplate (Plane bottom for single block unit only)
MD-MP02-S For 96 wells Deep Microplate or PCR plate (for single block unit only)
MD-MP01-D For Microplate; Titerplate (for dual block unit only)
MD-MP02-D For 96 wells Deep Microplate or PCR Plate (for dual block unit only)
MD-B0.2 For 0.2 ml tube, 64 wells (or 0.2 ml PCR Strip tube for 8 wells x 8) MD-B0.5 For 0.5 ml tube, 20 wells MD-B1.5 For 1.5 or 2.0 ml tube, 20 wells MD-B1.5V For 1.5 V-shaped tube only, 20 wells
MD-B0.5/1.5 Double Side Block: One side for 1.5 or 2.0 ml tube, 20 wells; another side for 0.5 ml tube, 30 wells on the opposite side
MD-B0.5+1.5. Combination: 1.5 or 2.0 ml tube, 12 well and 0.5 ml tube, 12 wells (On the same side)
MD-B13 Well size: 13 mm, 20 wells MD-B17 Well size: 17 mm, for 15 ml centrifuge tube, 12 wells MD-B20 Well size: 20 mm, 12 wells MD-B25 Well size: 25 mm, 6 wells MD-B29 For 50 ml Centrifuge tube, 4 wells MD-RS232 RS 232 cable MD-P01 Thermocouple EL-DLSW Data Logging software package EL-PCSW Function Control software package EL-DLSW-R Data Logging software package, including a RS 232 EL-PCSW-R Function Control software package, including a RS 232 MS-BL95 Block Lifter

dryBATH
23
Note: 1. Dimension of Standard Aluminum Block is approximately W104 x L79 x D50
mm. 2. Customized Aluminum block is also available.

dryBATH
24
Warranty
The Cleaver Scientific Ltd. products have a warranty against manufacturing and
material faults of twelve months from date of customer receipt.
If any defects occur during this warranty period, CSL will repair or replace the
defective parts free of charge.
This warranty does not cover defects occurring by accident or misuse or defects
caused by improper operation.
Units where repair or modification has been performed by anyone other than CSL or
an appointed distributor or representative are no longer under warranty from the time
the unit was modified.
Units which have accessories or repaired parts not supplied by CSL or its associated
distributors have invalidated warranty.
CSL cannot repair or replace free of charge units where improper solutions or
chemicals have been used. For a list of these please see the Care and Maintenance
subsection.
If a problem does occur then please contact your supplier or CSL on:-
Cleaver Scientific Ltd.
Unit 4 Triton Park
Brownsover Road
Swift Valley
Rugby, UK.
Tel: +44 (0)1788 565300
Fax: +44 (0)1788 552822Email:
[email protected] ver 16.6.2014