electronic proportional (ep) control for heavy duty … · 3 eaton ep control for heavy duty series...
TRANSCRIPT

Electronic Proportional (EP) Control for
Heavy Duty Series 2 Piston PumpsModel 33Model 39
Model 46Model 54Model 64

2EATON EP Control for Heavy Duty Series 2 Piston Pumps Installation E-PUPI-TI002-E September 2002
Table of Contents
Introduction . . . . . . . . . . . . . . . . . . . . . . . . . . . . . . . . . . . . . . . . . . . . . . . . . . . . . . . 3
Identification of Components . . . . . . . . . . . . . . . . . . . . . . . . . . . . . . . . . . . . . . . . . 4
Required Tools for Installation . . . . . . . . . . . . . . . . . . . . . . . . . . . . . . . . . . . . . . . . . 4
EP Control Kits . . . . . . . . . . . . . . . . . . . . . . . . . . . . . . . . . . . . . . . . . . . . . . . . . . . . 5
Installation Dimensions . . . . . . . . . . . . . . . . . . . . . . . . . . . . . . . . . . . . . . . . . . . . . 6
Disassembly . . . . . . . . . . . . . . . . . . . . . . . . . . . . . . . . . . . . . . . . . . . . . . . . . . . . . . 7
Reassembly . . . . . . . . . . . . . . . . . . . . . . . . . . . . . . . . . . . . . . . . . . . . . . . . . . . . . . . 10
Neutral Adjustment . . . . . . . . . . . . . . . . . . . . . . . . . . . . . . . . . . . . . . . . . . . . . . . . . 12
Interconnect Schematic . . . . . . . . . . . . . . . . . . . . . . . . . . . . . . . . . . . . . . . . . . . . . 16
Troubleshooting . . . . . . . . . . . . . . . . . . . . . . . . . . . . . . . . . . . . . . . . . . . . . . . . . . . 18
Troubleshooting Reference Settings . . . . . . . . . . . . . . . . . . . . . . . . . . . . . . . . . . . . 23
Information contained in this publication is accurate as of the publication dateand is subject to change without notice. Performance values are typical values.Customers are responsible for selecting products for their applications usingnormal engineering methods.
3EATON EP Control for Heavy Duty Series 2 Piston Pumps
Installation E-PUPI-TI002-E September 2002
Introduction
The following information describes the installation of the Electronic Proportional(EP) Control for Eaton® Heavy Duty Series 2 piston pumps. Review this informationto become familiar with the procedures required before beginning any installation.
In order to assure the most reliable installation and operation of any electronic control, propercomponent selection and installation procedures
must be followed with respect to interconnection wiring harnesses, inputcommand signal devices, fusing, and input power switching.
Appropriate industry practices must be followed to prevent damage of andshorting of all electrical and electronic components caused by environmentalhazards and application specific hazards. Typical hazards that damage thewiring harnesses or other components are abrasion, moving objects, and heatfrom the engine or exhaust system. Moisture can damage poorly sealedconnectors and/or components, causing short circuits and other problems likecorrosion.
A switch must be installed in line with (+ battery) power to the electronicmodule, so that power may quickly be disconnected in case of emergency(component failure or inadvertent commands). A fuse rated at the maximummodule operating current (3 Amp) must be installed in the + battery line to theelectronic module.
All the electrical connections to the EP Control electronic module must bedisconnected prior to performing any electrical welding on the vehicle ormachine.The electronic module and/or the hydraulic pump are not to be used as a connection point for electrical welding equipment.
During initial start-up and/or checkout of the machine after service, themachine must be placed on jack stands to prevent inadvertent movement.
The reliable operation and suitability of this product is dependent upon how it is applied and the other components used in the system. The systemintegrator must review all aspects of the application and all of thecomponents used to assure proper operation and reliability.
CAUTION

4EATON EP Control for Heavy Duty Series 2 Piston Pumps Installation E-PUPI-TI002-E September 2002
Identification of Components
3 ea. 1.75" - 10-24 Button HeadCap Screws
3 ea. #10 Lockwashers
ElectronicModule
5 ea. 2.75" - 5/16"-18 Hex Head Cap Screws Torque to 22 ±2 lbf-ft.
Solenoid CoilSubassembly
Solenoid TubeSubassemblyTorque to 22 ±2 lbf-ft.
Solenoid TubeSubassemblyTorque to 22 ±2 lbf-ft. Control Valve Gasket
Valve Assembly
• 1/8" Bit Socket or Hex Key
• 1/4" Bit Socket or Hex Key
• 1/2" Open-End Wrench or 1/2” Socket
• 9/16" Open-End Wrench
• 3/4" Open-End Wrench
• Flat Blade Screwdriver
• 12 VDC Power Supply or Battery
• Voltage Ohm Meter (VOM)
• Charge Pressure Gauge
Required tools for Installation:

5EATON EP Control for Heavy Duty Series 2 Piston Pumps
Installation E-PUPI-TI002-E September 2002
MODEL INPUT VALVE ELECTRONICKIT NO. CODE REF. KIT DESCRIPTION SIGNAL ASSEMBLY MODULE VOLTAGE
9900040-000 EE EP Ctrl Kit HD Series 2 1-6V 4993054-012 111520-016 12/24 V33/64: 1-6 V input
9900042-000 EG EP Ctrl Kit HD Series 2 ±4-20 mA 4993054-012 111520-020 12/24 V 33/64: ±4-20 mA input
9900043-000 EC EP Ctrl Kit HD Series 2 — 4993054-012 — 12 V 33/64: 12 V coils w/o electronics
9900044-000 ED EP Ctrl Kit HD Series 2 — 4993054-024 — 24 V 33/64: 24 V coils w/o electronics
990830-000 EP Crtl Electronic 1-6 V — 111520-016 — Module 1-6 V
990832-000 EP Crtl Electronic ±4-20 mA — 111520-020 — Module ±4-20 mA
Note: All kits using Eaton Electronic Modules use 12 V coils.
EP Control Kits

6EATON EP Control for Heavy Duty Series 2 Piston Pumps Installation E-PUPI-TI002-E September 2002
A
B
78,7[3.10]
121,3[4.78]
97,8 ± 1,0[3.85 ±.04]2x
POWER SUPPLY
COMMAND INPUT SIGNAL 74,4 ± 0,8[2.93] ± .03
PROPORTIONAL
SOLENOID 2
PROPORTIONAL
SOLENOID 1NEUTRAL
ADJUSTMENT
Note: If operating temperaturewill exceed 85˚C this module must be mounted remote fromthe pump.
2x Manual Override: Push to activate manual override.
Installation Dimensions
DIM. DIM.MODEL DISPLACEMENT A B
33 54,4 cm3/rev 199,4 41,0[3.32] in3/rev [7.85] [1.61]
39 63,7 cm3/rev 199,4 41,0[3.89] in3/rev [7.85] [1.61]
46 75,4 cm3/rev 199,4 41,0[4.59] in3/rev [7.85] [1.61]
54 89,2 cm3/rev 212,9 52,1[5.44] in3/rev [8.38] [2.05]
64 105,5 cm3/rev 212,9 52,1[6.44] in3/rev [8.38] [2.05]
7EATON EP Control for Heavy Duty Series 2 Piston Pumps
Installation E-PUPI-TI002-E September 2002
Installation
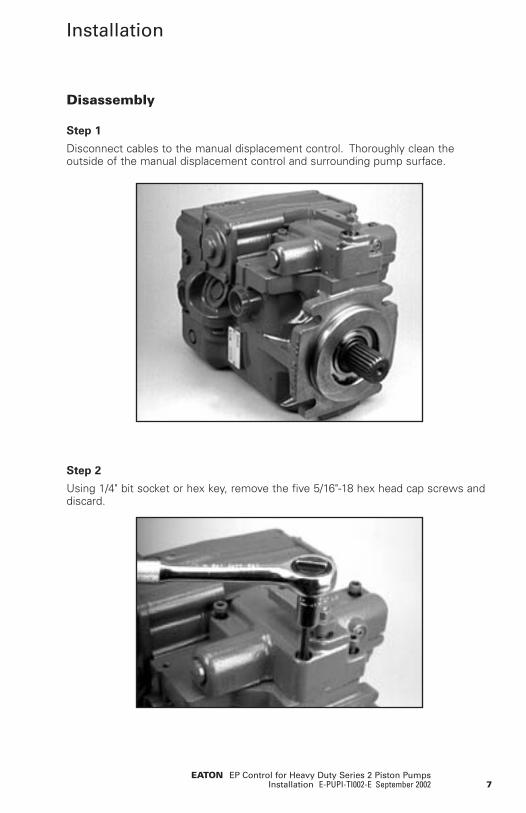
Disassembly
Step 1
Disconnect cables to the manual displacement control. Thoroughly clean theoutside of the manual displacement control and surrounding pump surface.
Step 2
Using 1/4" bit socket or hex key, remove the five 5/16"-18 hex head cap screws anddiscard.

8EATON EP Control for Heavy Duty Series 2 Piston Pumps Installation E-PUPI-TI002-E September 2002
Step 3
Remove manual displacement control. Caution must be used so that contaminantsdo not enter the pump.
Step 4
Remove and discard the control valve gasket.
Installation

9EATON EP Control for Heavy Duty Series 2 Piston Pumps
Installation E-PUPI-TI002-E September 2002
Step 5
Caution must be used so that the swashplate link remains seated on the swash-plate pin.
Step 6
In most cases it will not be necessary to remove the control orifices that are stakedin the pump housing. Only remove if the orifice size needs to be changed. Theorifice size is stamped on the flat plate orifices in the pressure, servo-1, and servo-2ports.
S2
P
S1
Installation
10EATON EP Control for Heavy Duty Series 2 Piston Pumps Installation E-PUPI-TI002-E September 2002
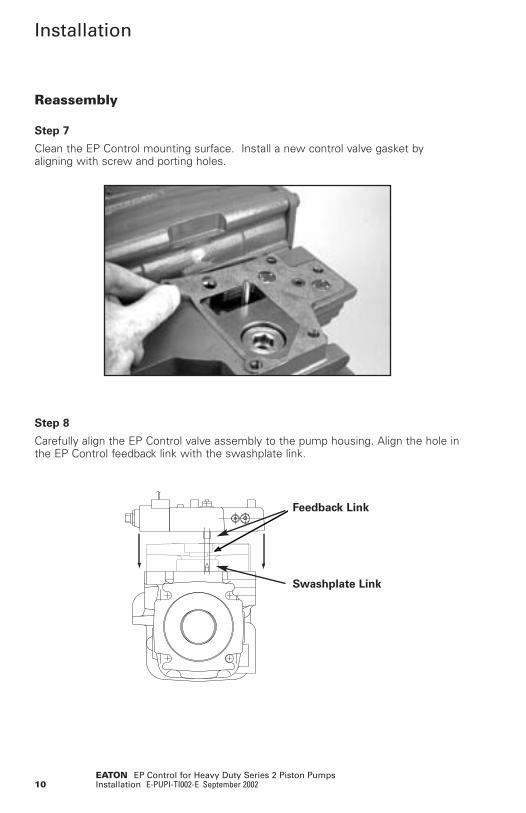
Step 8
Carefully align the EP Control valve assembly to the pump housing. Align the hole inthe EP Control feedback link with the swashplate link.
Reassembly
Step 7
Clean the EP Control mounting surface. Install a new control valve gasket byaligning with screw and porting holes.
Feedback Link
Swashplate Link
Installation

11EATON EP Control for Heavy Duty Series 2 Piston Pumps
Installation E-PUPI-TI002-E September 2002
Step 9
Carefully lower the valve assembly straight down onto the pump, guiding the EPControl feedback link onto the swashplate link. The EP Control feedback link mustengage the swashplate link.
Step 10
Using 1/4" bit socket or hex key, install the five 5/16"-18 hex head cap screws on thepump. Torque to 22 (+2) lb·ft.
Installation
12EATON EP Control for Heavy Duty Series 2 Piston Pumps Installation E-PUPI-TI002-E September 2002
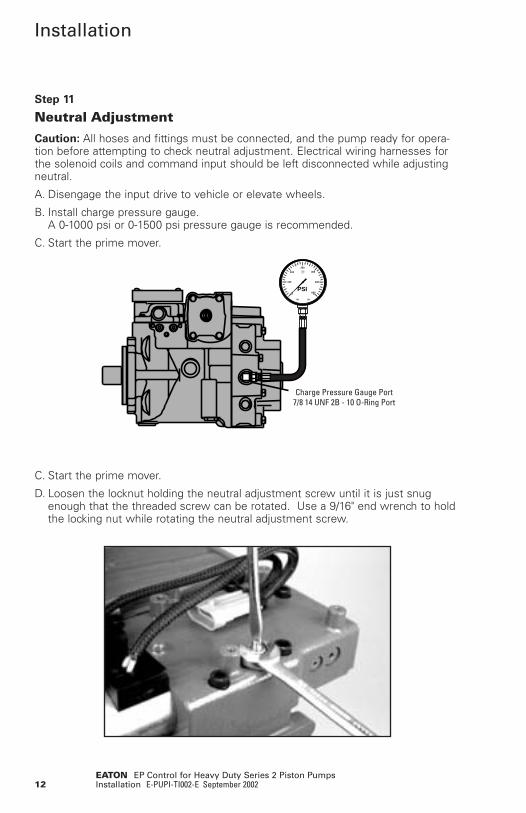
Step 11
Neutral Adjustment
Caution: All hoses and fittings must be connected, and the pump ready for opera-tion before attempting to check neutral adjustment. Electrical wiring harnesses forthe solenoid coils and command input should be left disconnected while adjustingneutral.
A. Disengage the input drive to vehicle or elevate wheels.
B. Install charge pressure gauge. A 0-1000 psi or 0-1500 psi pressure gauge is recommended.
C. Start the prime mover.
300
200 400
100 500
0 600PSI
Charge Pressure Gauge Port7/8 14 UNF 2B - 10 O-Ring Port
C. Start the prime mover.
D. Loosen the locknut holding the neutral adjustment screw until it is just snugenough that the threaded screw can be rotated. Use a 9/16" end wrench to holdthe locking nut while rotating the neutral adjustment screw.
Installation
13EATON EP Control for Heavy Duty Series 2 Piston Pumps
Installation E-PUPI-TI002-E September 2002
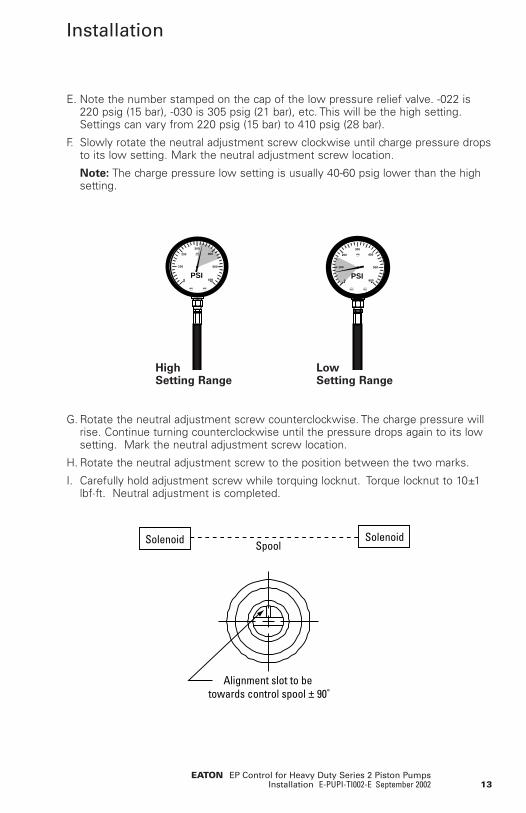
E. Note the number stamped on the cap of the low pressure relief valve. -022 is220 psig (15 bar), -030 is 305 psig (21 bar), etc. This will be the high setting.Settings can vary from 220 psig (15 bar) to 410 psig (28 bar).
F. Slowly rotate the neutral adjustment screw clockwise until charge pressure dropsto its low setting. Mark the neutral adjustment screw location.
Note: The charge pressure low setting is usually 40-60 psig lower than the highsetting.
300
200 400
100 500
0 600PSI
300
200 400
100 500
0 600PSI
High Setting Range
LowSetting Range
G. Rotate the neutral adjustment screw counterclockwise. The charge pressure willrise. Continue turning counterclockwise until the pressure drops again to its lowsetting. Mark the neutral adjustment screw location.
H. Rotate the neutral adjustment screw to the position between the two marks.
I. Carefully hold adjustment screw while torquing locknut. Torque locknut to 10±1lbf·ft. Neutral adjustment is completed.
Alignment slot to be towards control spool ± 90˚
Spool Solenoid Solenoid
Installation

14EATON EP Control for Heavy Duty Series 2 Piston Pumps Installation E-PUPI-TI002-E September 2002
Step 12
Connect the four-pin connector of the EP Control electronic module and thesolenoids. The connectors must be latched securely.
Step 13
Carefully position the EP Control electronic module. Tuck all cables under theelectronic module. Caution: Avoid pinching cables at mounting points.
Installation

15EATON EP Control for Heavy Duty Series 2 Piston Pumps
Installation E-PUPI-TI002-E September 2002
Step 14
Install the three lockwashers and three 10-24 button head cap screws. Torque thethree screws to 40-48 lbf·in.
Step 15
If applicable, disconnect power to the input device. Connect the command inputdevice to the three-pin connector on the EP Control electronic module.
Step 16
Disconnect electrical power to the vehicle or system. Connect the electrical powersource to the two-pin connector on the EP Control electronic module. Install a 3Amp SLO-BLO® fuse per the Interface Diagram on page 16.
Step 17
The pump is now ready to return to operation.
Installation

16EATON EP Control for Heavy Duty Series 2 Piston Pumps Installation E-PUPI-TI002-E September 2002
A +
B -
POWERSUPPLYCONNECTOR(2-Pin)see chart
CustomerSuppliedComponents Valve
Assembly
ElectronicModule Proportional
Solenoid 1
SolenoidConnector
Proportional Solenoid 2
S1
S2P
MechanicalSwashplateFeedback
Supply Orifice(Optional)
Servo Orifices(Optional)
A
B
C
COMMANDINPUT SIGNALCONNECTOR(3-Pin)see chart
Battery or Power Supply
FUSE
On/Off Switch
+ -
A
B
C
D
Interconnect Schematic
Power Supply Connector
PINS WIRE COLOR SIGNAL
A Red + Supply VoltageB Black Supply Return
Fuse Rating
3 Amp SLO-BLO® (Time Delay) fuse for 12-24 Vdc system - customer supplied
Command Input Signal Connector
COMMAND INPUT SIGNAL PINS WIRE COLOR SIGNAL
A Black Ref Low - 1 Vdc1 to 6 Vdc Potentiometric B Green Command (wiper)
C Red Ref Hi - 6 VdcA Orange Loop Return
±4-20 mA Current Loop B White Loop InC No Connection Required*
*EP Control Electronic Module Mating Connector Kit 990762-000 contains plug used to seal mating end connector.

17EATON EP Control for Heavy Duty Series 2 Piston Pumps
Installation E-PUPI-TI002-E September 2002
Pump Displacement vs. Input Signal
Typical Control Characteristics
Full Stroke Port B Flow*
Full Stroke Port A Flow*
Minimum Neutral RangeA
B C D E
*Note: Actual flow direction depends on pump type and rotation
A B C D E(MAX) (MIN) (MIN) (MAX)
Command Input Signal1-6 Vdc 1.5 Vdc 3.3 Vdc 3.5 Vdc 3.7 Vdc 5.5 Vdc±4-20 mA -20 mA -4.5 mA 0 mA +4.5 mA +20 mAShaft RotationCCW Solenoid #2 Neither Solenoid #1
Flow OUT port “B” No flow Flow OUT port “A”CW Solenoid #2 Neither Solenoid #1
Flow OUT port “A” No Flow Flow OUT port “B”Note: The +20 mA command input signal configuration operates the pumpin one direction. The customer has to change the polarity on the -20 mAsignal to operate the pump in the opposite direction.

18EATON EP Control for Heavy Duty Series 2 Piston Pumps Installation E-PUPI-TI002-E September 2002
Troubleshooting
No Flow in Either Defective Power Check Power Input. Disconnect the two-pin power Direction Connection, or supply connector from the EP Control electronic module.
Loose Wires Inspect the two connectors for corrosion, loose wires or broken wires. Measure the DC voltage acrosspins “A” and “B” at the connector. The reading shouldbe between 9 to 30 Vdc.
Command Signal Check Command Input Signal. Disconnect the three-pin Missing command input device connector from EP Control
electronic module. Inspect the two connectors forcorrosion, loose contacts, loose wires and broken wires.If 1-6 Vdc joystick or potentiometer is used, measure theDC voltage across pins “A” and “B” at the connector.Move the joystick or potentiometer position. The voltagereading will be approximately 2.5 volts DC at joystickneutral or the half range position of the potentiometer.The DC voltage will be approximately 5 volts at one end ofthe joystick or potentiometer travel. At the opposite endof travel the DC voltage will be approximately zero. If ±4-20 mA current loop input is used, measure the DCvoltage across pins “A” and “B” at the connector. TheDC voltage reading should be approximately zero at zeroinput current which occurs at command input neutral.The DC voltage reading should be approximately ±5 voltsfor input command currents of ±20 mA respectively.
Defective Check Solenoid Coil. Disconnect the two-pin power Solenoid Coil supply and the three-pin command input device
connectors from the EP Control electronic module.Inspect the connectors for corrosion, loose contacts,loose wires and broken wires. Remove the EP Controlelectronic module. Reverse Steps 12-14 on pages 14 and15. Disconnect the two mating four-pin connectors.Measure the coil resistance across the designated pinsat the solenoid four-pin connector. Refer to the Solenoid4-pin Connector chart on page 22 for typical readings.
Defective Check Electronic Module. Disconnect the two-pin power Electronic Module supply and the three-pin command input device
connectors from the EP Control electronic module.Inspect the connectors for corrosion, loose contacts,loose wires and broken wires. Remove the EP Controlelectronic module. Reverse Steps 12-14 on pages 14 and15. Caution: The engine or motor driving the pump shouldnot be running. Connect command input device andpower to the module. Measure the current to the coil atthe four-pin connector. Activate the input device end toend and at neutral. Monitor the current on one coil, andthen on the other. Refer to Command Input Device charton page 22 for typical readings.
SYMPTOM CAUSE ACTION
19EATON EP Control for Heavy Duty Series 2 Piston Pumps
Installation E-PUPI-TI002-E September 2002
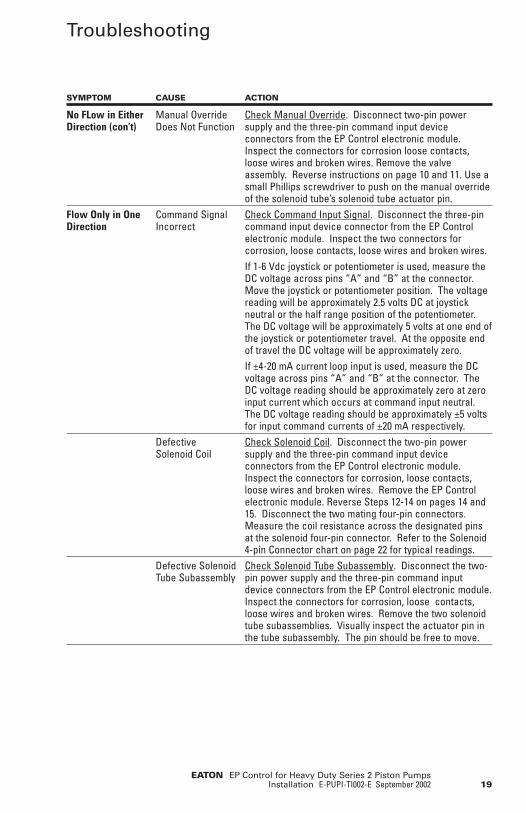
No FLow in Either Manual Override Check Manual Override. Disconnect two-pin power Direction (con’t) Does Not Function supply and the three-pin command input device
connectors from the EP Control electronic module.Inspect the connectors for corrosion loose contacts,loose wires and broken wires. Remove the valveassembly. Reverse instructions on page 10 and 11. Use asmall Phillips screwdriver to push on the manual overrideof the solenoid tube’s solenoid tube actuator pin.
Flow Only in One Command Signal Check Command Input Signal. Disconnect the three-pin Direction Incorrect command input device connector from the EP Control
electronic module. Inspect the two connectors forcorrosion, loose contacts, loose wires and broken wires.If 1-6 Vdc joystick or potentiometer is used, measure theDC voltage across pins “A” and “B” at the connector.Move the joystick or potentiometer position. The voltagereading will be approximately 2.5 volts DC at joystickneutral or the half range position of the potentiometer.The DC voltage will be approximately 5 volts at one end ofthe joystick or potentiometer travel. At the opposite endof travel the DC voltage will be approximately zero. If ±4-20 mA current loop input is used, measure the DCvoltage across pins “A” and “B” at the connector. TheDC voltage reading should be approximately zero at zeroinput current which occurs at command input neutral.The DC voltage reading should be approximately ±5 voltsfor input command currents of ±20 mA respectively.
Defective Check Solenoid Coil. Disconnect the two-pin power Solenoid Coil supply and the three-pin command input device
connectors from the EP Control electronic module.Inspect the connectors for corrosion, loose contacts,loose wires and broken wires. Remove the EP Controlelectronic module. Reverse Steps 12-14 on pages 14 and15. Disconnect the two mating four-pin connectors.Measure the coil resistance across the designated pinsat the solenoid four-pin connector. Refer to the Solenoid4-pin Connector chart on page 22 for typical readings.
Defective Solenoid Check Solenoid Tube Subassembly. Disconnect the two-Tube Subassembly pin power supply and the three-pin command input
device connectors from the EP Control electronic module.Inspect the connectors for corrosion, loose contacts,loose wires and broken wires. Remove the two solenoidtube subassemblies. Visually inspect the actuator pin inthe tube subassembly. The pin should be free to move.
SYMPTOM CAUSE ACTION
Troubleshooting

20EATON EP Control for Heavy Duty Series 2 Piston Pumps Installation E-PUPI-TI002-E September 2002
Flow Only in One Defective Check Electronic Module. Disconnect the two-pin power Direction (con’t) Electronic Module supply and the three-pin command input device
connectors from the EP Control electronic module.Inspect the connectors for corrosion, loose contacts,loose wires and broken wires. Remove the EP Controlelectronic module. Reverse Steps 12-14 on pages 14 and15. Caution: The engine or motor driving the pump shouldnot be running. Connect command input device andpower supply to the electronic module. Measure thecurrent to the coil at the four-pin connector. Activate theinput device end to end and at neutral. Monitor thecurrent on one coil, and then on the other. Refer toCommand Input Device chart on page 22 for typicalreadings.
Flow in Neutral Command Signal Check Command Input Signal. Disconnect the three-pin Incorrect command input device connector from the EP Control
electronic module. Inspect the two connectors forcorrosion, loose contacts, loose wires and broken wires.If 1-6 Vdc joystick or potentiometer is used, measure theDC voltage across pins “A” and “B” at the connector.Move the joystick or potentiometer position. The voltagereading will be approximately 2.5 volts DC at joystickneutral or the half range position of the potentiometer.The DC voltage will be approximately 5 volts at one end ofthe joystick or potentiometer travel. At the opposite endof travel the DC voltage will be approximately zero. If ±4-20 mA current loop input is used, measure the DCvoltage across pins “A” and “B” at the connector. TheDC voltage reading should be approximately zero at zeroinput current which occurs at command input neutral.The DC voltage reading should be approximately ±5 voltsfor input command currents of ±20 mA respectively.
Neutral Out of Check Neutral Adjustment. Disconnect the two-pin Adjustment power supply and the three-pin command input device
connectors from the EP Control electronic module.Inspect the connectors for corrosion, loose contacts,loose wires and broken wires. Remove the EP Controlelectronic module. Reverse Steps 12-14 on pages 14 and15. Disconnect the two four-pin solenoid connectors.Follow instructions for setting neutral on page 12 Step 10.
Flow Limited, Command Signal Check Command Input Signal. Disconnect the three-pin Cannot Achieve Incorrect command input device connector from the EP Control Full Pump Stroke electronic module. Inspect the two connectors for
corrosion, loose contacts, loose wires and broken wires.If 1-6 Vdc joystick or potentiometer is used, measure theDC voltage across pins “A” and “B” at the connector.Move the joystick or potentiometer position. The voltagereading will be approximately 2.5 volts DC at joystickneutral or the half range position of the potentiometer.The DC voltage will be approximately 5 volts at one end ofthe joystick or potentiometer travel. At the opposite endof travel the DC voltage will be approximately zero.
SYMPTOM CAUSE ACTION
Troubleshooting

21EATON EP Control for Heavy Duty Series 2 Piston Pumps
Installation E-PUPI-TI002-E September 2002
Flow Limited, Command Signal If ±4-20 mA current loop input is used, measure the DC Cannot Achieve Incorrect voltage across pins “A” and “B” at the connector. The Full Pump Stroke DC voltage reading should be approximately zero at zero (con’t) input current which occurs at command input neutral.
The DC voltage reading should be approximately ±5 voltsfor input command currents of ±20 mA respectively.
Defective Check Electronic Module. Disconnect the two-pin power Electronic Module supply and the three-pin command input device
connectors from the EP Control electronic module.Inspect the connectors for corrosion, loose contacts,loose wires and broken wires. Remove the EP Controlelectronic module. Reverse Steps 12-14 on pages 14 and15. Caution: The engine or motor driving the pumpshould not be running. Connect command input deviceand power supply to the electronic module. Measure thecurrent to the coil at the four-pin connector. Activate theinput device end to end and at neutral. Monitor thecurrent on one coil, and then on the other. Refer toCommand Input Device chart on page 22 for typicalreadings.
Manual Override Check Manual Override. Disconnect the two-pin power Does Not Function supply and the three-pin command input device
connectors from the EP Control electronic module.Inspect the connectors for corrosion loose contacts,loose wires and broken wires. Remove the valveassembly. Reverse instructions on page 10 and 11. Use asmall Phillips screwdriver to push on the manual overrideof the solenoid tube’s actuator pin should move the spool.
Does Not Return Command Signal Check Command Input Signal. Disconnect the three-pin to Neutral Incorrect command input device connector from the EP Control
electronic module. Inspect the two connectors forcorrosion, loose contacts, loose wires and broken wires.If 1-6 Vdc joystick or potentiometer is used, measure theDC voltage across pins “A” and “B” at the connector.Move the joystick or potentiometer position. The voltagereading will be approximately 2.5 volts DC at joystickneutral or the half range position of the potentiometer.The DC voltage will be approximately 5 volts at one end ofthe joystick or potentiometer travel. At the opposite endof travel the DC voltage will be approximately zero. If ±4-20 mA current loop input is used, measure the DCvoltage across pins “A” and “B” at the connector. TheDC voltage reading should be approximately zero at zeroinput current which occurs at command input neutral.The DC voltage reading should be approximately ±5 voltsfor input command currents of ±20 mA respectively.
Neutral Out of Check Neutral Adjustment. Disconnect the two-pin Adjustment power supply and the three-pin connectors from the
EP Control electronic module. Inspect the connectors forcorrosion, loose contacts, loose wires and broken wires.Remove the EP Control electronic module. Reverse Steps12-14 on pages 14 and 15. Disconnect the two solenoidfour-pin connectors. Follow instructions for settingneutral on page 12 Step 10.
SYMPTOM CAUSE ACTION
Troubleshooting
22EATON EP Control for Heavy Duty Series 2 Piston Pumps Installation E-PUPI-TI002-E September 2002
Troubleshooting Reference Settings
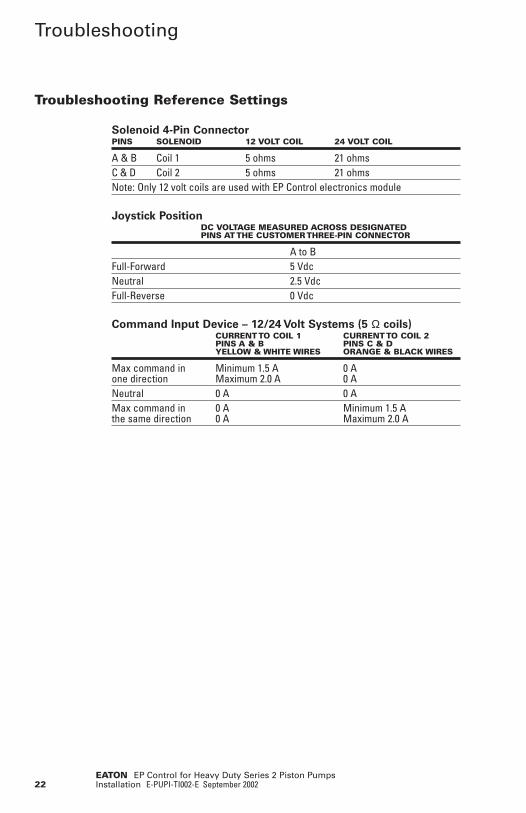
Solenoid 4-Pin ConnectorPINS SOLENOID 12 VOLT COIL 24 VOLT COIL
A & B Coil 1 5 ohms 21 ohmsC & D Coil 2 5 ohms 21 ohmsNote: Only 12 volt coils are used with EP Control electronics module
Joystick PositionDC VOLTAGE MEASURED ACROSS DESIGNATED PINS AT THE CUSTOMER THREE-PIN CONNECTOR
A to BFull-Forward 5 VdcNeutral 2.5 VdcFull-Reverse 0 Vdc
Command Input Device – 12/24 Volt Systems (5 Ω coils)CURRENT TO COIL 1 CURRENT TO COIL 2 PINS A & B PINS C & DYELLOW & WHITE WIRES ORANGE & BLACK WIRES
Max command in Minimum 1.5 A 0 Aone direction Maximum 2.0 A 0 ANeutral 0 A 0 AMax command in 0 A Minimum 1.5 Athe same direction 0 A Maximum 2.0 A
Troubleshooting

© 2002 Eaton CorporationAll Rights ReservedPrinted in USADocument No. E-PUPI-TI002-ESupersedes 04-10-0002-EN-0901 September 2002
Eaton14615 Lone Oak RoadEden Prairie, MN 55344Telephone: 952 937-9800Fax: 952 974-7130www.hydraulics.eaton.com
Eaton20 Rosamond RoadFootscrayVictory 3011AustraliaTele: (61) 3 9319 8222Fax: (61) 3 9318 5714
Eaton46 New Lane, HavantHampshire PO9 2NBEnglandTele: (44) 23 92 486 451Fax: (44) 23 92 487 110