electronic payment (epayment)
TRANSCRIPT

ELECTRONIC PAYMENT
(EPAYMENT)
USER GUIDE FOR CUSTOMSHOUSE
BROKERS AND IMPORTERS

ii
TABLE OF CONTENTS
NOTE.............................................................. 3
Purpose .......................................................... 4
Introduction ..................................................... 5
epayment process flow ................................... 6
How to Pay Declarations with ePayment ........ 7
Payment Order Amendments ....................... 17

Electronic Payment (e-Payment)
User Guide
3
NOTE
The views expressed in this volume are those of the authors and do not necessarily reflect the
views of the United Nations Secretariat. The designations employed and the presentation of the
material do not imply the expression of any opinion whatsoever on the part of the United Nations
Secretariat concerning the legal status of any country, territory, city or area, or of its authorities,
or concerning the delimitation of its frontiers or boundaries.
This is not an official UNCTAD
document.

Electronic Payment (e-Payment)
User Guide
4
PURPOSE
The United Nations Conference on Trade and Development (UNCTAD) as part of its ASYCUDA
Programme has developed applications, which allows the Electronic Data Interchange (EDI)
between Customs Administrations and the trading community or other trade related entities.
The purpose of this document is to provide guidance to brokers and customs officers on the use
of the electronic payment “e-Payment” facility on ASYCUDA.

Electronic Payment (e-Payment)
User Guide
5
INTRODUCTION
An e-payment system is a method of payment of transactions through an electronic medium,
without the use of checks or cash. It’s also called an electronic payment system or online
payment system.

Electronic Payment (e-Payment)
User Guide
6
E-PAYMENT PROCESS FLOW
The following diagram illustrates the exchange of information between the Broker, ASYCUDA
World and the Bank during the e-Payment process. Each step is identified by a number, which
indicates the order of execution.

Electronic Payment (e-Payment)
User Guide
7
HOW TO PAY DECLARATIONS WITH E-PAYMENT
User: Customs Broker/Importer
1. Create New Payment Order
To create a new Payment Order access the Document Library and follow the path
ASYCUDA > Accounting & Payment > Reports > Payment Order as show in the image
bellow.
’
Figure 1: Accessing Payment order
Right click on the Payment Order e-Document, and select the option ‘New’ from the
menu that will appear.
Figure 2: Accessing Payment order

Electronic Payment (e-Payment)
User Guide
8
2. Add Declarations
A new Payment Order e-document will open with the declarant’s code, name and address populated. Proceed to input the Company Code (TIN) belonging to the Importer then press the tab button on your keyboard. To include the declaration you wish to pay enter the Registration Reference of the document in the fields: Customs Office, Year of Registration, Registration Serial and Registration Number. Then press the ‘Tab’ button on your keyboard. The Declarant Reference, Model and Assessed Amount fields will automatically populate. These fields
are identified with the number in the image below. To add the declaration to the list of declarations to be paid, click on the "Add Declaration" icon identified with the number
. Repeat this procedure to include as many declarations as you wish to pay.
Once all declarations to be paid have been included, ‘Verify’ the document by clicking
the icon identified with the number . To save the Payment Order click the ‘Generate’
icon identified with the number .
Figure 3: Creating Payment order

Electronic Payment (e-Payment)
User Guide
9
The window shown below will appear with the assigned payment order reference that
will be used to make the payment at the bank. To proceed click the check icon.
Figure 4: Creating Payment order
Add declarations and other duties, fees and taxes to a created Payment
Order
To add new declarations and other duties, fees and taxes, retrieve the payment order by
following the path ASYCUDA> Accounting and Payment > Reports > Payment Order.
Right click on the payment order e-document and the select the option Click on ‘Find’.
Figure 5: Retrieving Payment order

Electronic Payment (e-Payment)
User Guide
10
The Payment Order finder will appear. Input the relevant search criteria in the fields
provided. It is recommended that the Reference Year and Reference Number be used as
the key search criteria. These fields identified with the number in the image below.
To generate the search click on the magnifying glass icon identified with the number
.
Figure 6: Retrieving Payment order
The search result will be displayed by the finder as shown below. Right click on the
document to be modified and select the option ‘Update’.
Figure 7: Modifying Payment order
Electronic Payment (e-Payment)
User Guide
11
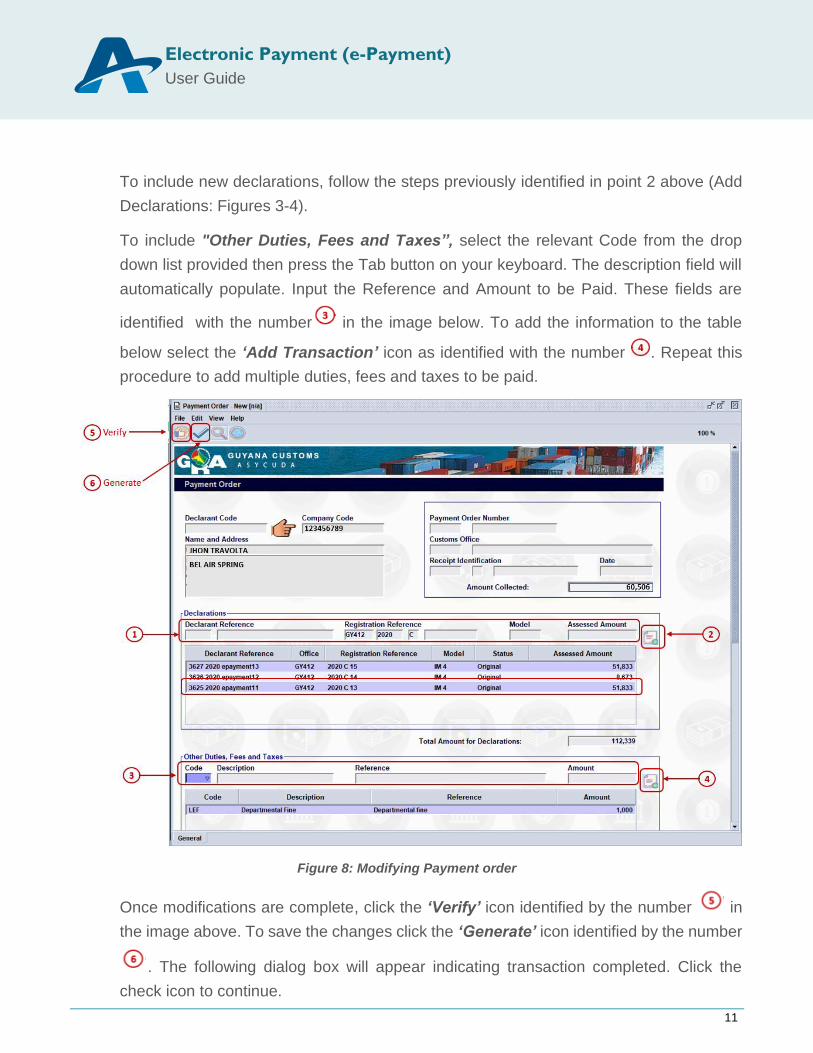
To include new declarations, follow the steps previously identified in point 2 above (Add
Declarations: Figures 3-4).
To include "Other Duties, Fees and Taxes”, select the relevant Code from the drop
down list provided then press the Tab button on your keyboard. The description field will
automatically populate. Input the Reference and Amount to be Paid. These fields are
identified with the number in the image below. To add the information to the table
below select the ‘Add Transaction’ icon as identified with the number . Repeat this
procedure to add multiple duties, fees and taxes to be paid.
Figure 8: Modifying Payment order
Once modifications are complete, click the ‘Verify’ icon identified by the number in
the image above. To save the changes click the ‘Generate’ icon identified by the number
. The following dialog box will appear indicating transaction completed. Click the
check icon to continue.

Electronic Payment (e-Payment)
User Guide
12
Figure 9: Modifying Payment order
3. Mark the Payment Order as “Ready to Pay”
To mark the document as ready to pay, retrieve the document using the finder, right click
on the payment order to view the available options and select ‘Proceed to Pay’.
Figure 10: Proceed to Pay
The below dialog box will appear indicating transaction completed. Click the check icon
to continue.

Electronic Payment (e-Payment)
User Guide
13
Figure 11: Proceed to Pay
Right click on the search result displayed by the finder and select the option ‘Print Pre-
Form’.
Figure 12: Print Pre-Form
The following dialog box will appear requesting confirmation of the action. Click the check
icon to continue.
Figure 13: Print Pre-Form

Electronic Payment (e-Payment)
User Guide
14
The pre-form will appear in the format of a pdf document as shown below.
Figure 14: Print Pre-Form
4. Make a Deposit and/or Transfer to the Bank.
Please note that the ‘Bank Payment Reference’ will be used to process the payment at
your respective commercial bank.
Figure 15: Bank Payment Reference

Electronic Payment (e-Payment)
User Guide
15
5. Bank Sends Payment to ASYCUDA World
The Bank will collect the money using the Payment Order pre-form and send the payment
to ASYCUDA World with the reference to perform the reconciliation of payment.
6. ASYCUDA World Reconciles Payment with Payment Order Reference
Once the payment has been made to your commercial bank, the bank will send the said
payment to ASYCUDA World, and the system will carry out the reconciliation as follows:
• Change the status of the Payment Order to ‘Paid’
Figure 16: Status
• Generate the corresponding receipt which must be printed by the broker/importer.
To print the AW receipt locate the Payment order using the finder. Right click on
the search result and select the option ‘Print’.

Electronic Payment (e-Payment)
User Guide
16
Figure 17: Printing Receipt
A dialog box will appear requesting confirmation of the action. Click the check icon to
continue.
Figure 18: Printing Receipt

Electronic Payment (e-Payment)
User Guide
17
The receipt will appear in the form of a pdf document as shown below.
Figure 19: Printing Receipt
• Change the status of declarations related to payment
PAYMENT ORDER AMENDMENTS
1. Payment Order status
A Payment Order can be modified after the option ‘Proceed to Pay’ has been
selected. The operation ‘Undo Proceed to Pay’ may be used to facilitate the
necessary changes.
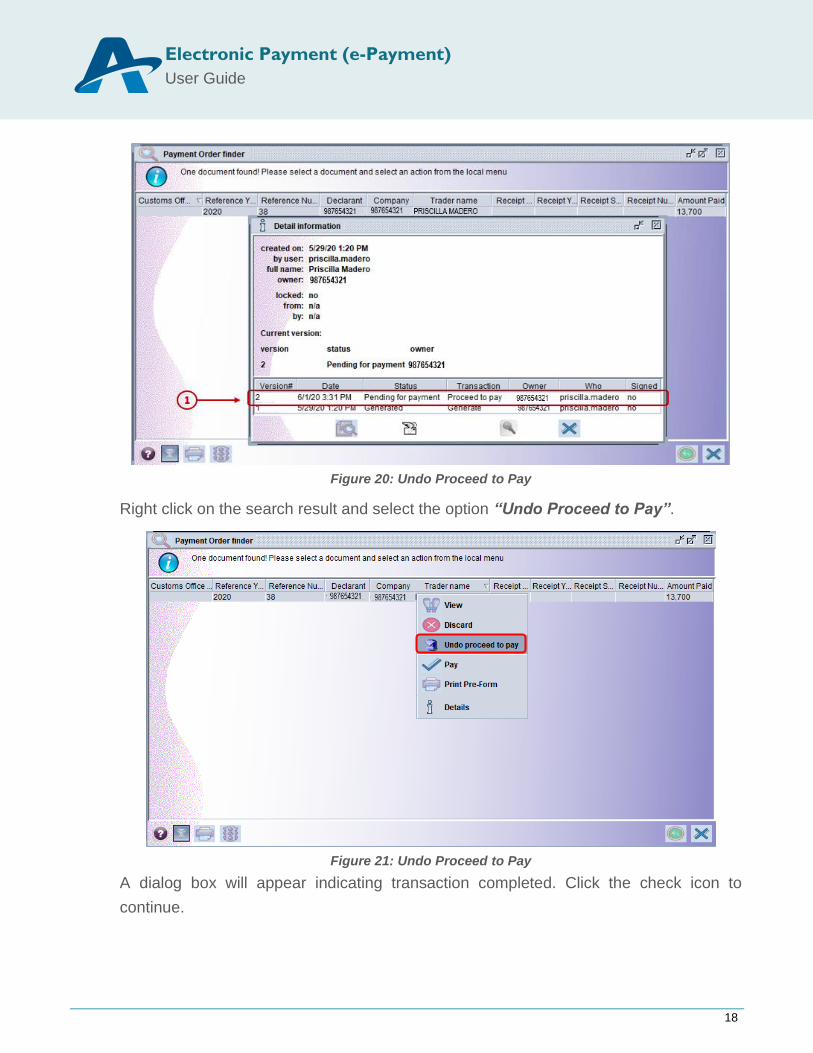
2. Undo Proceed to Pay
To use the operation “Undo Proceed to Pay” first locate your Payment Order
using the finder. Right click on the search result and select the option ‘Details’.
Then verify that the status of the Payment Order reflects ‘Pending for payment’
as illustrated in the image below.
Electronic Payment (e-Payment)
User Guide
18
Figure 20: Undo Proceed to Pay
Right click on the search result and select the option “Undo Proceed to Pay”.
Figure 21: Undo Proceed to Pay
A dialog box will appear indicating transaction completed. Click the check icon to
continue.

Electronic Payment (e-Payment)
User Guide
19
Figure 22: Undo Proceed to Pay
The status of the Payment Order will be changed to ‘Generated’ as shown in the image
below.
Figure 23: Undo Proceed to Pay
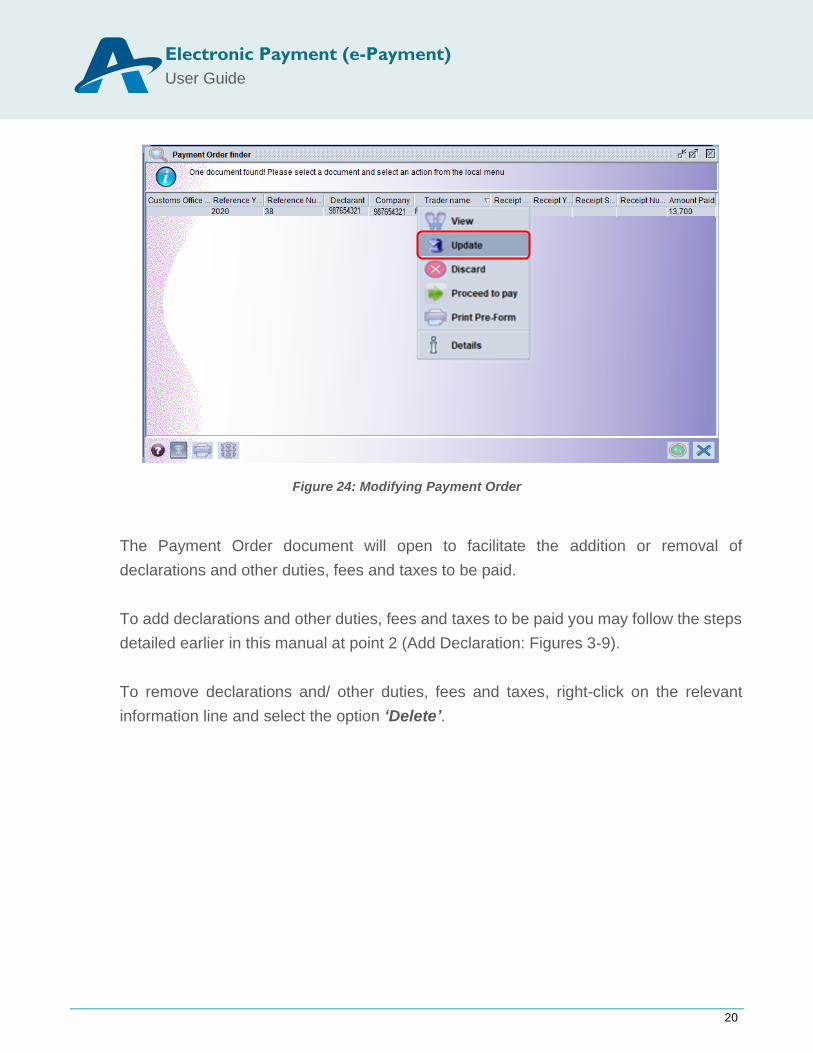
Right click on the search result displayed by the finder and select the option ‘Update’ to
make the necessary modifications.
Electronic Payment (e-Payment)
User Guide
20
Figure 24: Modifying Payment Order
The Payment Order document will open to facilitate the addition or removal of
declarations and other duties, fees and taxes to be paid.
To add declarations and other duties, fees and taxes to be paid you may follow the steps
detailed earlier in this manual at point 2 (Add Declaration: Figures 3-9).
To remove declarations and/ other duties, fees and taxes, right-click on the relevant
information line and select the option ‘Delete’.

Electronic Payment (e-Payment)
User Guide
21
Figure 25: Modifying Payment Order
To save the changes, select the ‘Verify’ icon identified at number then select the
‘Generate’ icon identified at number .

Electronic Payment (e-Payment)
User Guide
22
Figure 26: Modifying Payment Order
A dialog box will appear indicating transaction completed. Click the check icon to
continue.
Figure 27: Modifying Payment Order
Once modifications are completed the payment order may be submitted for payment.
Locate the Payment Order using the finder, right click on the search result and select the
option ’Proceed to pay’.

Electronic Payment (e-Payment)
User Guide
23
Figure 28: Modifying Payment Order
A dialog box will appear indicating transaction completed. Click the check icon to
continue.
Figure 29: Modifying Payment Order
The status of the Payment Order will be updated to ‘Pending for Payment’. You may
proceed to print the Pre-form by following the steps previously identified in this guide
(Figures 12-14). Then submit the Payment Order for processing at the respective
commercial bank.
If you require any further clarification or assistance please make contact the AW National
Project Team at Telephone Number 227-6060/ 227-8222 Ext 3601-3612
END OF GUIDE

Electronic Payment (e-Payment)
User Guide
24