eggs benedict 1 melt the butter in a small saucepan, · a boil, add 1 teaspoon salt and 1...
TRANSCRIPT
20
Eggs Benedict
Preparation time: 15 minutesCooking time: 15 minutesServes 2
Start the weekend in style with this classic brunch dish. Hollandaise hasareputationforbeingdifficult, but follow this method and you’ll have a rich, smooth sauce without any stress. Choose the freshest eggs possible—look for the carton with the longest use-by date. The fresher the egg, the more the white and yolk will cling together as it poaches.
7 tablespoons (100 g) unsalted butter, plus extra for spreading
6 large (UK medium) eggs½ tsp plus 1 tbsp white wine vinegar½ lemon1 tsp salt1 pinch cayenne pepper, plus
extra to serve2 English muffins2 slices cooked hamsalt and pepper
Simple-and-Classic-EN-7811-2018-09-24-PP001-505.indd 20 26/09/2018 12:24
21Breakfast & Brunch
5
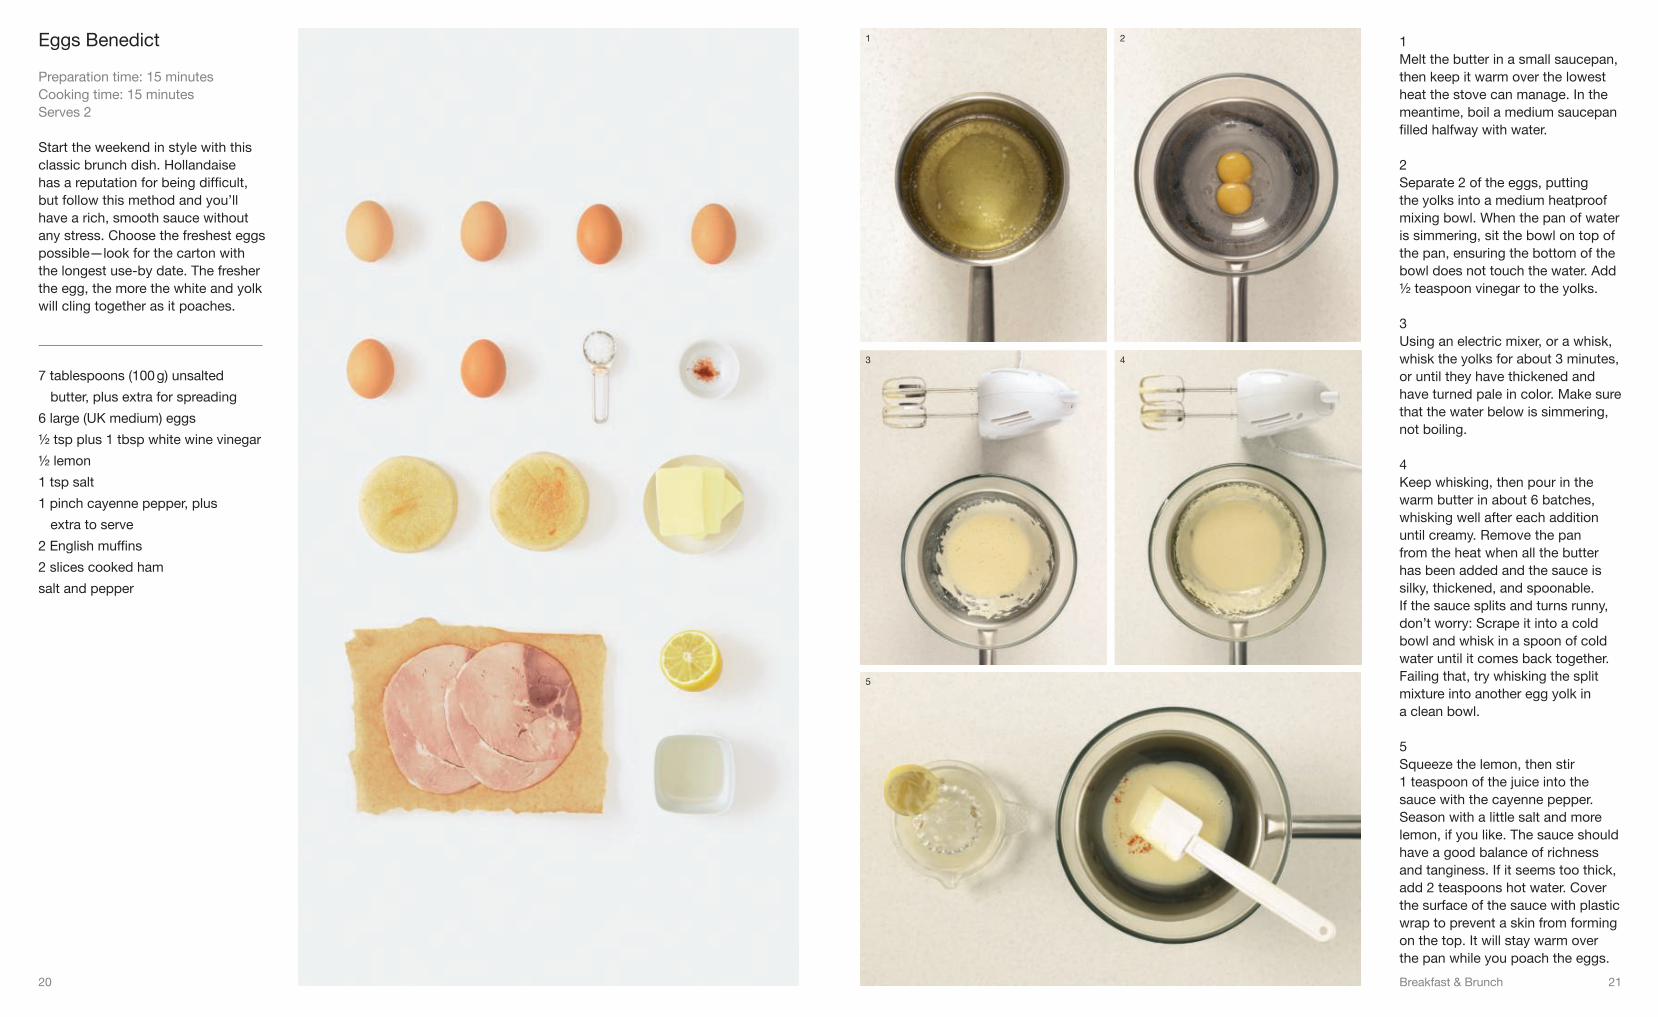
1 Melt the butter in a small saucepan, then keep it warm over the lowest heat the stove can manage. In the meantime, boil a medium saucepan filled halfway with water.
2 Separate 2 of the eggs, putting the yolks into a medium heatproof mixing bowl. When the pan of water is simmering, sit the bowl on top of the pan, ensuring the bottom of the bowl does not touch the water. Add ½ teaspoon vinegar to the yolks.
3Using an electric mixer, or a whisk, whisk the yolks for about 3 minutes, or until they have thickened and have turned pale in color. Make sure that the water below is simmering, not boiling.
4 Keep whisking, then pour in the warm butter in about 6 batches, whisking well after each addition until creamy. Remove the pan from the heat when all the butter has been added and the sauce is silky, thickened, and spoonable. If the sauce splits and turns runny, don’t worry: Scrape it into a cold bowl and whisk in a spoon of cold water until it comes back together. Failing that, try whisking the split mixture into another egg yolk in a clean bowl.
5 Squeeze the lemon, then stir 1 teaspoon of the juice into the sauce with the cayenne pepper. Season with a little salt and more lemon, if you like. The sauce should have a good balance of richness and tanginess. If it seems too thick, add 2 teaspoons hot water. Cover the surface of the sauce with plastic wrap to prevent a skin from forming on the top. It will stay warm over the pan while you poach the eggs.
1 2
3 4
Simple-and-Classic-EN-7811-2018-09-24-PP001-505.indd 21 26/09/2018 12:24

22 Eggs Benedict
9
7
6To poach the eggs, half-fill a saucepan with hot water. Bring to a boil, add 1 teaspoon salt and 1 tablespoon vinegar, then turn the heat down to a very gentle simmer, with a bubble rising to the surface every now and then. Crack 1 egg into a cup. Fill a bowl with cold water and set to one side for later. Using a slotted spoon, stir the water in the pan into a whirlpool.
7 Gently slide the egg from the cup into the middle of the swirling water. Don’t worry if it looks messy to begin with—it will become a neater, rounder shape as it spins and cooks.
8 Keep the water at a gentle simmer for 3 minutes, until the white is set and the yolk is still soft. Don’t disturb the egg as it cooks. Now use the slotted spoon to carefully lift the egg from the pan and into the bowl of cold water. Poach the remaining eggs and set them aside in the water as each one is cooked.
9 Slice the muffins in two, then toast them and spread with butter. Fold half a piece of ham onto each piece of muffin. Return the eggs to the hot water to reheat briefly, then lift them out one by one with the slotted spoon. Hold a paper towel under the spoon for a few seconds to absorb any drips of water (these could make the muffins soggy). Ease the egg on top of the ham, then repeat with the rest of the eggs.
10 Spoon over plenty of the hollandaise sauce and enjoy immediately, sprinkled with a little more cayenne, if you like.
6
8
Simple-and-Classic-EN-7811-2018-09-24-PP001-505.indd 22 26/09/2018 12:24
10
Simple-and-Classic-EN-7811-2018-09-24-PP001-505.indd 23 26/09/2018 12:24

186
Spicy Shrimp, Fennel & Chile Linguine
Preparation time: 10 minutesCooking time: 15 minutesServes 2, easily doubled
This recipe is a regular in my home all year round. In the winter, I brown off good sausage meat instead of the shrimp (prawns), then simmer the sauce with canned tomatoes.
6 oz (175 g) linguine (or any other long pasta shape)
1 large or two smaller fennel bulbs2 tbsp extra virgin olive oil,
plus extra for drizzling2 cloves garlic1 large red chile1 handful fresh flat-leaf parsley 1 lemon ¼ tsp fennel seeds (optional)3½ oz (100 g) cherry tomatoes7 oz (200 g) uncooked jumbo/tiger
shrimp (large prawns), shelled and deveined, thawed if frozen
salt and pepper
Simple-and-Classic-EN-7811-2018-09-24-PP001-505-HS.indd 186 09/10/2018 13:09
187Simple Dinners
3
2
1 1 Bring a large saucepan of salted water to a boil. Add the pasta, then once it has collapsed into the water, stir it and let boil for 8–10 minutes, until just tender.
IS MY PASTA COOKED?Forget flinging a piece on the wall to see if it sticks. The easiest way to tell if pasta is cooked is to bite it. It should be tender, but with the slightest resistance in the middle— al dente—neither chewy nor soggy.
2 While the pasta cooks, cut the fennel bulb in half and remove any tough outer layers. You can also remove the core, if you like. Thinly slice the fennel. Reserve the feathery leaves, if there are any.
3 Heat the oil in a large skillet or frying pan, then add the fresh fennel. Fry for 10 minutes over medium heat, stirring often, until softened and sweet, and turning golden in places.
DEFROSTING FROZEN SHRIMPTo defrost frozen shrimp quickly, put them into a large bowl and cover with cold water. Let stand for a few minutes, then drain off the water and repeat. Pat dry and use immediately.
Simple-and-Classic-EN-7811-2018-09-24-PP001-505.indd 187 26/09/2018 12:48

188 Spicy Shrimp, Fennel & Chile Linguine
6
4 While you wait, thinly slice the garlic and chile. Seed the chile first, if you like. The easiest way to do this is by scraping out the middle with a teaspoon. Coarsely chop the parsley and cut the lemon into quarters.
5 Add the garlic, chile, fennel seeds, if using, and cherry tomatoes to the pan. Turn the heat up a little. Cook for 2 minutes or until fragrant and the tomato skins are starting to pop. Now add the shrimp and cook for about 3 minutes or until the shrimp have changed color all the way through.
6 Reserve a cup of the pasta cooking water, then drain the pasta in a colander.
7 Add the pasta, 5 tablespoons of the cooking water, the parsley, and any fennel leaves to the shrimp pan, then squeeze in the juice from 2 of the lemon wedges. Season generously with salt and pepper and toss everything together. Adjust to taste by adding more lemon juice, salt, and pepper, if needed. Serve drizzled with a little more oil and the remaining lemon wedges for squeezing.
5
4
Simple-and-Classic-EN-7811-2018-09-24-PP001-505-HS.indd 188 09/10/2018 13:09
7
Simple-and-Classic-EN-7811-2018-09-24-PP001-505.indd 189 26/09/2018 12:48
204
Roast Chicken with Tarragon Sauce
Preparation time: 10 minutes Cooking time: 1 hour 20 minutesServes 4–6
Ideal for a spring Sunday, this chicken will have everyone asking for more (and it’s all cooked in one pan, too). Tarragon, classic with chicken and creamy dishes, can also be replaced with flat-leaf parsley or chervil. Cook two chickens together if your family has a big appetite.
1 (3¼-lb/1.5-kg) chicken1 onion1 lemon1 handful fresh tarragon 1 tbsp unsalted butter1 lb 10 oz (750 g) baby (new) potatoes1 tbsp olive oil9 oz (250 g) asparagus spears or
trimmed green (French) beansscant ½ cup (100 ml) dry
white wine⅔ cup (150 ml) heavy (double) cream1¼ cups (300 ml) chicken broth (stock)1 cup (150 g) frozen young or baby
peas (petit pois)salt and pepper
Simple-and-Classic-EN-7811-2018-09-24-PP001-505.indd 204 26/09/2018 12:52
205Weekend Cooking
43
2
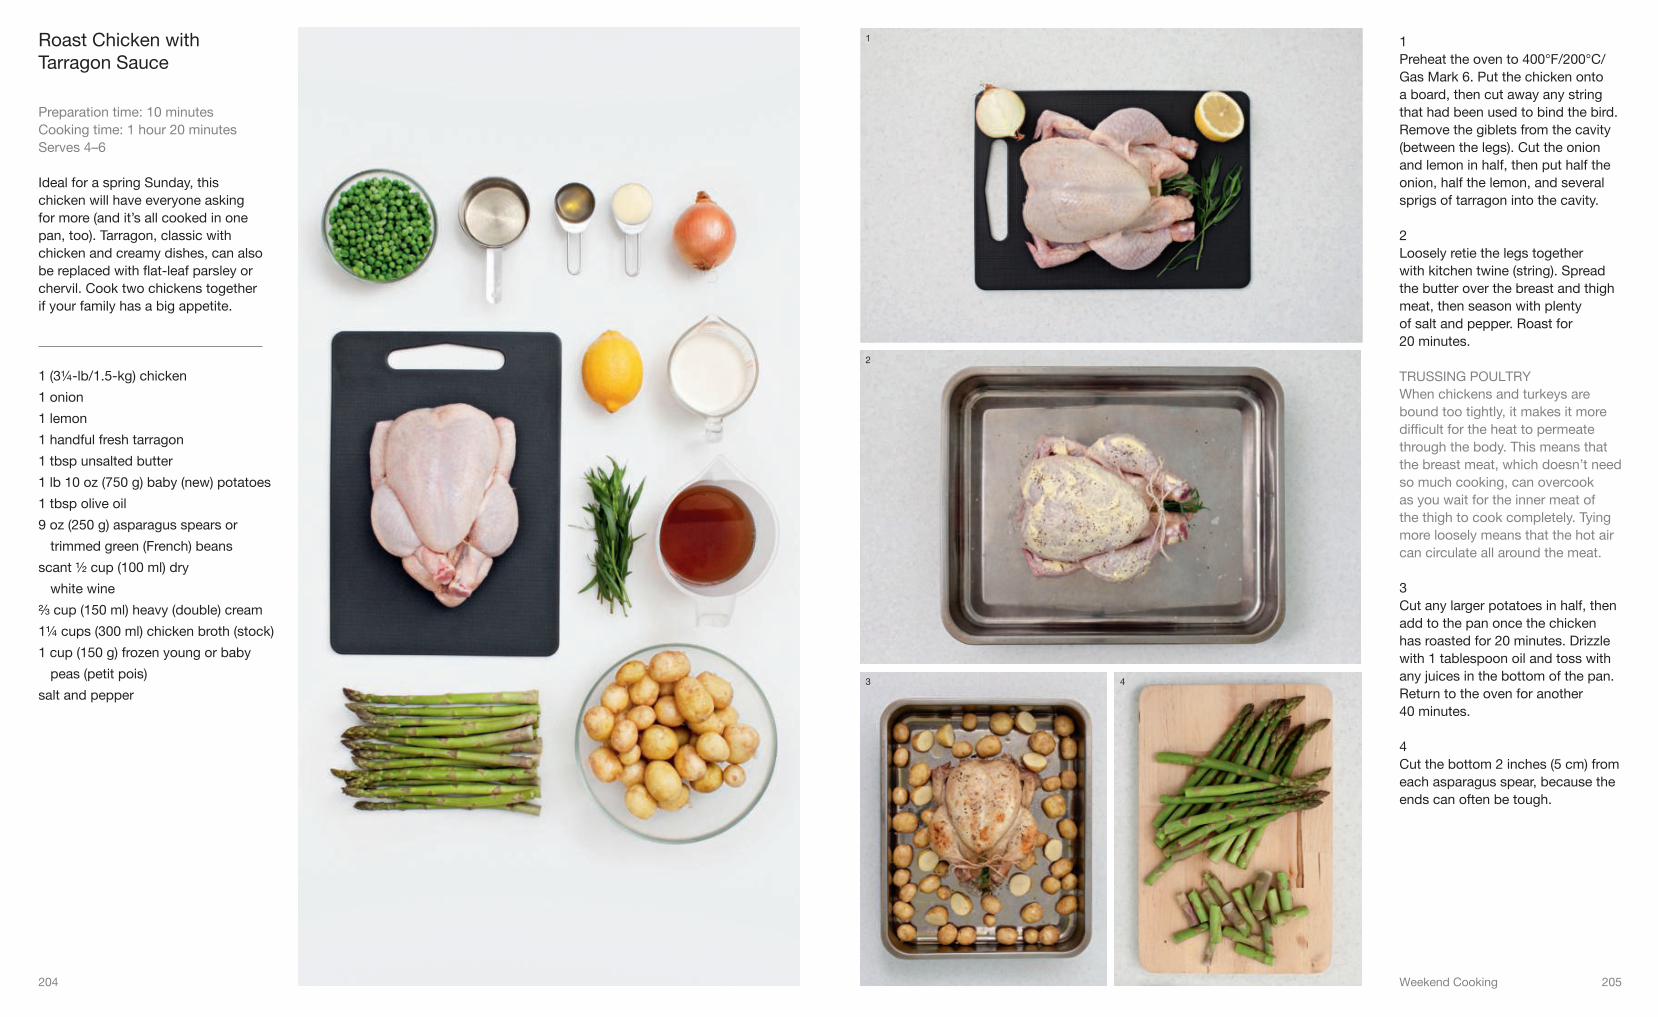
1 1Preheat the oven to 400°F/200°C/Gas Mark 6. Put the chicken onto a board, then cut away any string that had been used to bind the bird. Remove the giblets from the cavity (between the legs). Cut the onion and lemon in half, then put half the onion, half the lemon, and several sprigs of tarragon into the cavity.
2Loosely retie the legs together with kitchen twine (string). Spread the butter over the breast and thigh meat, then season with plenty of salt and pepper. Roast for 20 minutes.
TRUSSING POULTRYWhen chickens and turkeys are bound too tightly, it makes it more difficult for the heat to permeate through the body. This means that the breast meat, which doesn’t need so much cooking, can overcook as you wait for the inner meat of the thigh to cook completely. Tying more loosely means that the hot air can circulate all around the meat.
3 Cut any larger potatoes in half, then add to the pan once the chicken has roasted for 20 minutes. Drizzle with 1 tablespoon oil and toss with any juices in the bottom of the pan. Return to the oven for another 40 minutes.
4 Cut the bottom 2 inches (5 cm) from each asparagus spear, because the ends can often be tough.
Simple-and-Classic-EN-7811-2018-09-24-PP001-505.indd 205 26/09/2018 12:52

206 Roast Chicken with Tarragon Sauce
7
6
55When the chicken is golden and cooked, and the potatoes are tender, transfer everything to a large platter. Put into the (turned-off) oven, leaving the door slightly open, to keep the chicken warm as it rests.
TESTING IF A WHOLE CHICKEN IS COOKED Your chicken is ready if the legs wobble freely at the hip joints—this indicates that the meat has cooked and contracted in the thickest part of the chicken, making the legs loose. Another way to test is to insert the point of a sharp knife or a skewer into the thickest part of the thigh. If the juices come out clear or with no trace of pink, it is cooked.
6While the chicken rests, it’s time to make the sauce and cook the green vegetables. Spoon the excess fat from the pan. Put the roasting pan over low heat, then add the wine and bubble for 1 minute. Add the cream and broth (stock).
7Add the asparagus (or beans) to the pan, then simmer for 3 minutes. Add the peas, then return to a boil until the vegetables are just tender.
8Coarsely chop the rest of the tarragon and stir it into the sauce. Season the sauce to taste—add a splash of the juice from the remaining lemon half, if you like. Serve the chicken with the potatoes, vegetables, and sauce.
Simple-and-Classic-EN-7811-2018-09-24-PP001-505.indd 206 26/09/2018 12:52
8
Simple-and-Classic-EN-7811-2018-09-24-PP001-505.indd 207 26/09/2018 12:52

360
For the pastry1 large (UK medium) egg2 sticks (225 g) soft butter1 tsp vanilla extractscant ½ cup (50 g) confectioners’
(icing) sugar, plus extra to serve (optional)
½ tsp fine salt2¾ cups (350 g) all-purpose (plain)
flour, plus extra for rolling
For the lemon curd filling8 large (UK medium) eggs 1½ sticks (175 g) butter1 cup (200 g) superfine (caster)
sugar5 large lemons
Tarte au Citron (Lemon Tart) Preparation time: about 1 hour 10 minutes (including blind baking), plus chilling and coolingBaking time: 5 minutes Serves 12
I turn to classic lemon tart again and again for a dessert that works for just about any meal. The lemon curd filling is sharp, fresh, and citrussy, and the pastry is a crisp, sweet shell (case) that’s simple to make, with no need to worry about overmixing. There’s enough dough for two tarts, so put half in the freezer.
Simple-and-Classic-EN-7811-UPDATED-2018-10-22-PP001-505-HS.indd 360 22/10/2018 13:07
361Desserts
1 To make the dough, first separate the egg (see page 343). You will only need the yolk. In a large bowl, beat the butter until it is soft and smooth. Next, add the egg yolk, vanilla, sugar, and salt.
2 Beat together until evenly combined and creamy. Sift in the flour, then work it into the creamed mixture until you have a clumpy but evenly mixed dough with hardly any dry flour left at the bottom of the bowl.
MAKE IT IN A PROCESSORIt’s easy to make the dough by hand, but if you have a food processor, then simply process the butter by itself until creamy. Blend in the yolk, vanilla, sugar, and salt, then finish with the flour.
3 Turn out the dough onto the work surface and make a smooth ball. It will seem soft, even a little sticky. Shape into 2 equal-sized disks, then wrap in plastic wrap (clingfilm). Chill one piece for at least 30 minutes (you need it to be firm but not hard, or it will crack as it rolls), and reserve the other for another time. It can be frozen for up to 1 month.
4 Preheat the oven to 400°F/200°C/Gas Mark 6 and use the dough to line a 9-inch (23-cm) loose-bottomed tart pan. Before rolling, flour the work surface and rolling pin. Press shallow ridges across the dough, then rotate it by a quarter turn. Repeat this until the dough is about ½ inch (2 cm) thick. If any cracks do appear, pinch them together.
1
2
4
3
Simple-and-Classic-EN-7811-2018-09-24-PP001-505.indd 361 26/09/2018 13:09
362 Tarte au Citron
5Now roll out the dough to a circle. Roll the pin evenly over the dough, going forward and backward in only one direction. If you roll it in several directions, the dough may roll unevenly and stretch, which causes shrinking. Turn it by a quarter turn every few rolls, until it is just large enough to line the tart pan, allowing about a 1-inch (2.5-cm) overhang.
6 Flip the farthest edge of the dough over the rolling pin, then lift it and carefully drape it over the pan. Taking it a section at a time, gently push the dough down and into the corner of the pan so it sits at a clean right angle. Pinch off a small ball of excess dough and use it to press the dough into the ridges of the pan.
7 Trim the excess dough away with a roll of the rolling pin across the top of the pan. Pinch the dough between your finger and thumb so that its edge meets the top of the pan, or better still, comes slightly higher (if your dough does shrink, it will still be the same size as the pan). Prick the bottom all over with a fork, right down to the metal. Lift onto a baking sheet and chill for 10 minutes in the freezer until hard, or longer in the refrigerator if you have time.
ANY HOLES?If any holes or tears appear, dampen a little piece of the leftover dough and press it into the hole or tear. If cracks appear during baking, smooth a blob of dough over the hot pastry, bake for a few minutes to set, and it will melt and form a delicate seal. Be careful when doing this, though, because too much pressure on the edge of a baked pastry shell (case) can cause crumbling—this is only for emergency measures!
6
7
5
Simple-and-Classic-EN-7811-UPDATED-2018-10-22-PP001-505-HS.indd 362 22/10/2018 13:08
363Desserts
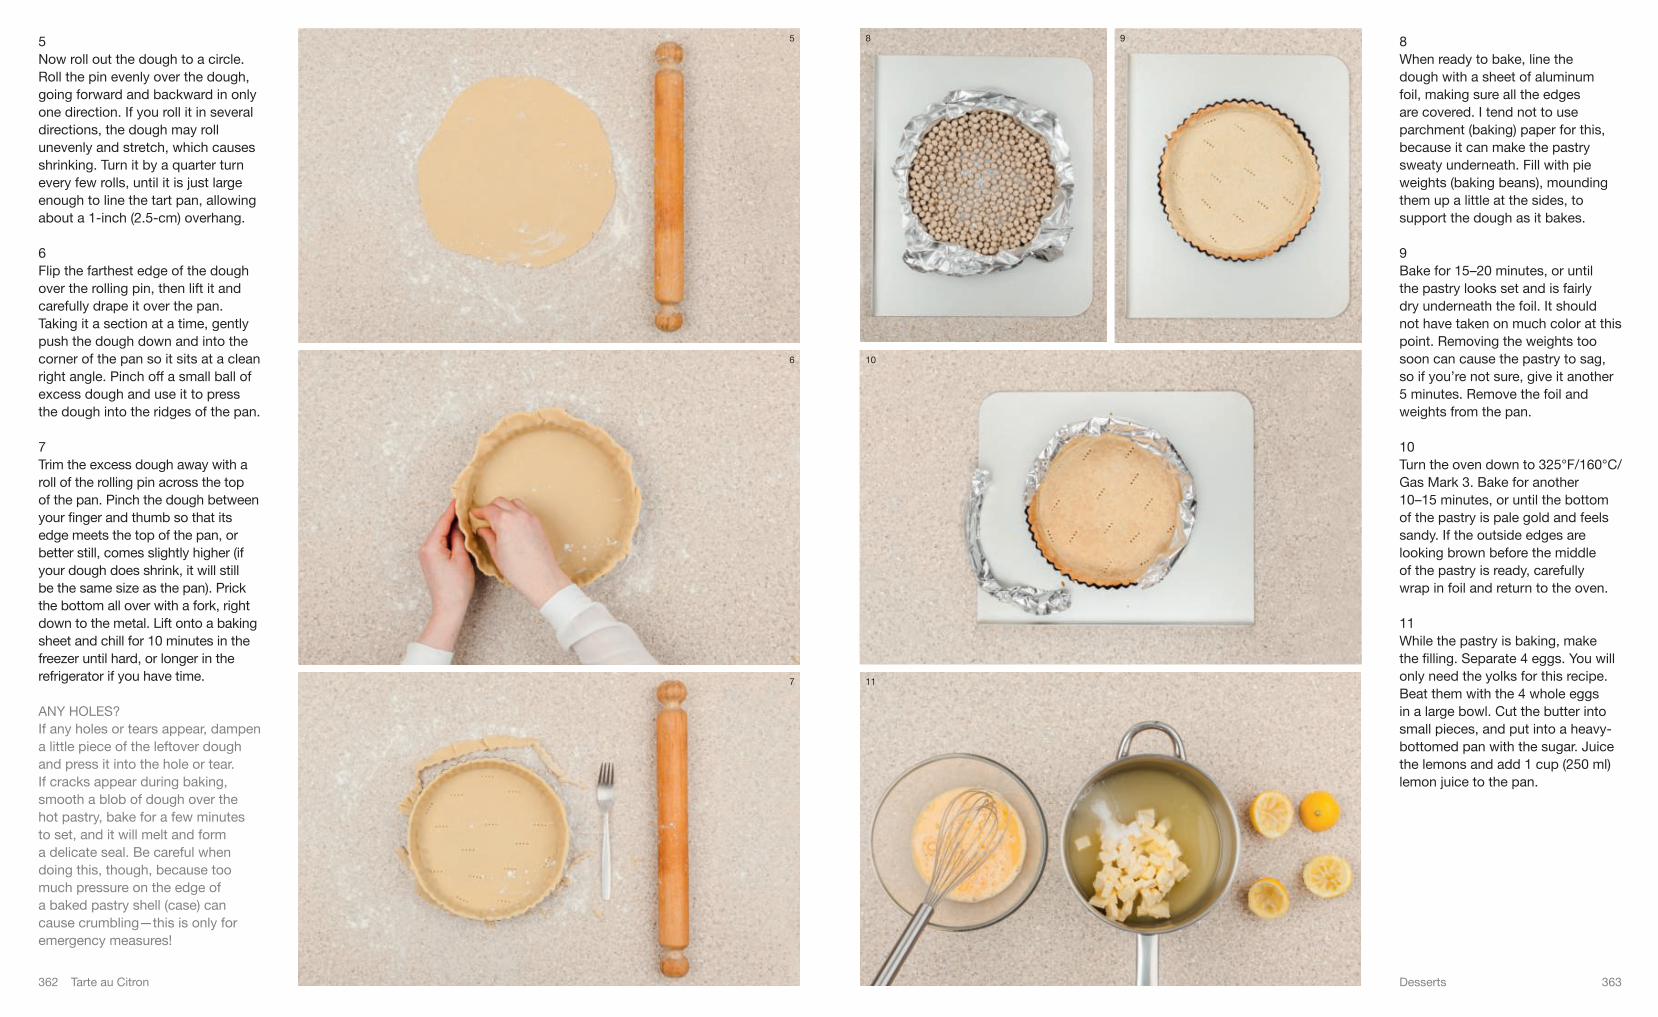
8 When ready to bake, line the dough with a sheet of aluminum foil, making sure all the edges are covered. I tend not to use parchment (baking) paper for this, because it can make the pastry sweaty underneath. Fill with pie weights (baking beans), mounding them up a little at the sides, to support the dough as it bakes.
9 Bake for 15 –20 minutes, or until the pastry looks set and is fairly dry underneath the foil. It should not have taken on much color at this point. Removing the weights too soon can cause the pastry to sag, so if you’re not sure, give it another 5 minutes. Remove the foil and weights from the pan.
10Turn the oven down to 325°F/160°C/ Gas Mark 3. Bake for another 10 –15 minutes, or until the bottom of the pastry is pale gold and feels sandy. If the outside edges are looking brown before the middle of the pastry is ready, carefully wrap in foil and return to the oven.
11 While the pastry is baking, make the filling. Separate 4 eggs. You will only need the yolks for this recipe. Beat them with the 4 whole eggs in a large bowl. Cut the butter into small pieces, and put into a heavy-bottomed pan with the sugar. Juice the lemons and add 1 cup (250 ml) lemon juice to the pan.
8
10
9
11
Simple-and-Classic-EN-7811-2018-09-24-PP001-505.indd 363 26/09/2018 13:10

364 Tarte au Citron
12 Gently melt the butter and sugar into the lemon juice. Once melted, begin to whisk the eggs with one hand, and simultaneously pour the hot lemon mixture onto them with the other. Pour slowly at first so that the eggs don’t get too hot too quickly and scramble.
13Return the mixture to the pan and cook it over medium heat for 3 – 5 minutes, or until thickened and smooth. Try to avoid letting it boil, and keep stirring all the time, concentrating on the edges of the pan where it is hottest.
14 Pour the lemon curd into the cooked pastry shell (case), then bake again for 5 minutes, which just helps the curd to set.
15Transfer the tart to a cooling rack, let cool completely, then chill until ready to serve. Sprinkle with confectioners’ (icing sugar), if you like.
LEMON MERINGUE PIETo transform the tart into a lemon meringue pie, follow the meringue technique on page 357, beating 4 of the leftover egg whites with 1 cup (200 g) superfine (caster) sugar. Whisk 1 teaspoon cornstarch (cornflour) into the thick finished meringue. Dollop evenly over the warm lemon filling, then spread it up to and slightly over the pastry edges, peaking the meringue in dramatic curls as you go. Bake at 400°F/200°C/Gas Mark 6 for 20 minutes or until golden, let cool for at least 1 hour, then serve warm or cold on the day of making.
13
12
14
Simple-and-Classic-EN-7811-UPDATED-2018-10-22-PP001-505-HS.indd 364 22/10/2018 13:08
15
Simple-and-Classic-EN-7811-2018-09-24-PP001-505.indd 365 26/09/2018 13:11
438
Fudgy Cheesecake Brownies
Preparation time: 20 minutesBaking time: 30 – 35 minutesMakes 16
A swirl of cheesecake topping gives these brownies a different look, and a delicious, creamy contrast to the dark fudginess beneath. Prefer a simple brownie? Just leave out the cheesecake topping and jump to step 8. And yes, the batter will give that shiny, papery crust we all love. Turn the page for more flavor options.
For the brownies1¾ sticks (200 g) butter, plus extra
for greasing 7 oz (200 g) bittersweet (dark)
chocolate, about 60% cocoa solids (see note)
4 large (UK medium) eggs1½ cups (300 g) superfine (caster)
sugar1 cup (125 g) all-purpose
(plain) flour½ cup (50 g) unsweetened cocoa
powder ½ tsp salt
For the cheesecake toppinggenerous ¾ cup (200 g) regular
(full-fat) cream (soft) cheese, room temperature
1 large (UK medium) egg2 tbsp superfine (caster) sugar 1 tsp vanilla extract
Simple-and-Classic-EN-7811-2018-09-24-PP001-505.indd 438 26/09/2018 13:22
439Baking
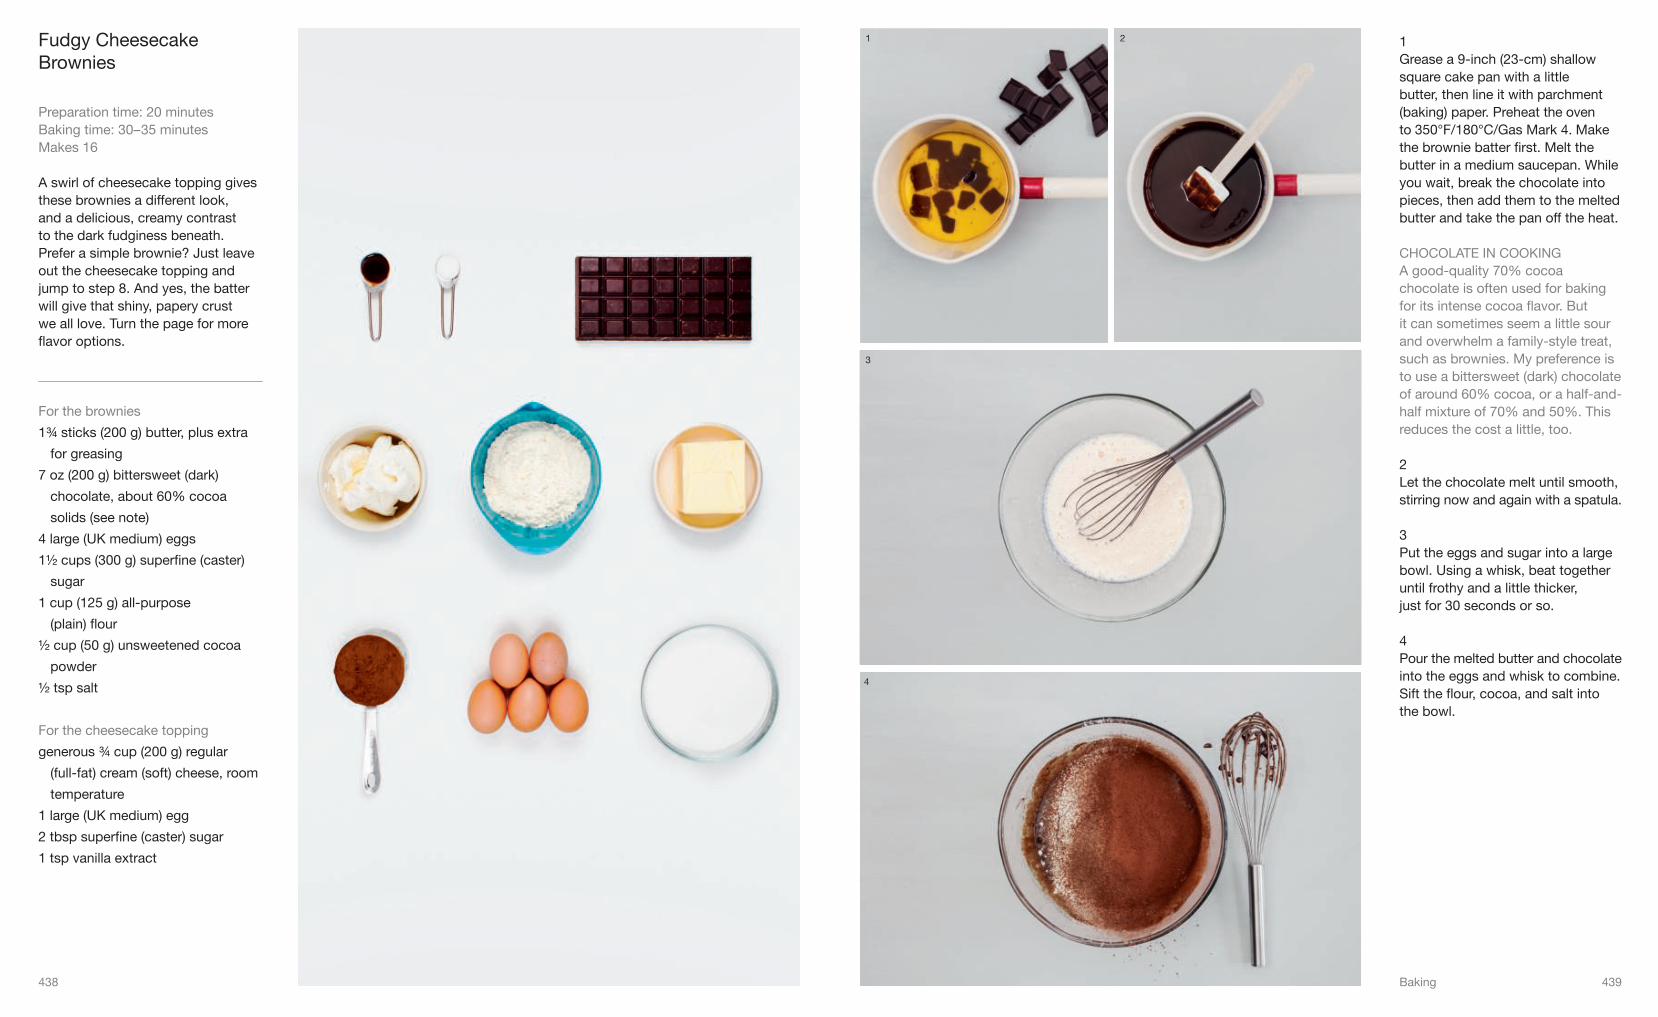
1Grease a 9-inch (23-cm) shallow square cake pan with a little butter, then line it with parchment (baking) paper. Preheat the oven to 350°F/180°C/Gas Mark 4. Make the brownie batter first. Melt the butter in a medium saucepan. While you wait, break the chocolate into pieces, then add them to the melted butter and take the pan off the heat.
CHOCOLATE IN COOKINGA good-quality 70% cocoa chocolate is often used for baking for its intense cocoa flavor. But it can sometimes seem a little sour and overwhelm a family-style treat, such as brownies. My preference is to use a bittersweet (dark) chocolate of around 60% cocoa, or a half-and-half mixture of 70% and 50%. This reduces the cost a little, too.
2Let the chocolate melt until smooth, stirring now and again with a spatula.
3Put the eggs and sugar into a large bowl. Using a whisk, beat together until frothy and a little thicker, just for 30 seconds or so.
4Pour the melted butter and chocolate into the eggs and whisk to combine. Sift the flour, cocoa, and salt into the bowl.
2
3
1
4
Simple-and-Classic-EN-7811-2018-09-24-PP001-505.indd 439 26/09/2018 13:22

440 Fudgy Cheesecake Brownies
5Beat together using your (already chocolaty) whisk, until smooth and thick. Scoop about ⅓ cup (5 tablespoons) of the batter from the bowl and set aside, then scrape the rest into the prepared pan and smooth the top.
6Now make the topping. Put the cream cheese into a large bowl, and add the egg, sugar, and vanilla. Whisk until smooth and creamy.
7Spoon the cheese mixture over the brownie batter in the pan, then spread it into a thin layer using the back of a spoon or a spatula. Spoon the reserved brownie batter over the cheesecake topping. Drag a skewer, toothpick, or the tip of a knife through the cheesecake layer to create feathery swirls.
8Bake for 30 – 35 minutes, or until the brownie has risen all over and jiggles just a little in the middle when you gently shake the pan. This is vital for a fudgy result. Let cool completely in the pan, then cut into squares. They’ll keep in an airtight container for several days.
VARIATIONSAdd different flavors at step 5, and omit the cheesecake topping.
Classic Walnut Brownies: Fold 1 cup (100 g) chopped walnuts into the batter.
Sour Cherry & White Chocolate Brownies: Fold in ½ cup dried cherries and ⅓ cup (50 g) chopped white chocolate.
Peanut Butter Brownies: Warm 4 tablespoons peanut butter in a saucepan, then spoon it over the raw batter and swirl in with a knife.
6
5
7
Simple-and-Classic-EN-7811-2018-09-24-PP001-505.indd 440 26/09/2018 13:22
8
Simple-and-Classic-EN-7811-2018-09-24-PP001-505.indd 441 26/09/2018 13:22

Simple-and-Classic-EN-7811-2018-09-24-PP001-505.indd 4 26/09/2018 12:23
Introduction 6
Breakfast & Brunch 15Soups & Salads 59Made for Sharing 95Simple Dinners 143Weekend Cooking 199Sides 273Desserts 307Baking 383
Planning a Menu 506Index 508
Simple-and-Classic-EN-7811-2018-09-24-PP001-505.indd 5 26/09/2018 12:23