edgun digital measuring system · -wide range of operating temperatures - 40º / + 85 ºС; -lower...
TRANSCRIPT

EDGUN DIGITAL MEASURING SYSTEM
EDgun is proud to introduce a new innovative manometer; the EDgun Digital
Measuring System (EDMS). The new EDMS is much more than a gauge that
reads pressure. This system is designed to interface with the user on many
levels. The EDMS will provide constant feedback on pressure, efficiency, shot
count and the gun's performance. This groundbreaking device will help the user
get the most out of the Pre-Charged Pneumatic airgun.
EDMS Hardware
The EDMS built around the MSP430AFE251
microcontroller with low power consumption.
Controller MSP430AFE251 relates to the line of
microcontrollers series AFE2xx from Texas
Instruments. This microcontroller is a high-performance
device and equipped with a built-in delta-sigma module
of a second-order converter with a dynamic range of more than 100 dB. This series
of microcontrollers characterized by extreme accuracy and minimum power
consumption.
The gauge uses a solid ceramic pressure sensor made of
aluminum oxide ceramics from Metallux (Switzerland).
On one of the inner sides of the sensor is a thick-film
membrane. The housing contains contacts for connecting
the wire leads. High accuracy of the sensor achieved
through laser matching of the resistive bridge and
temperature compensation. As a result, the error of the
output signal is ± 0.1 mV/V. Monolithic ceramic pressure sensors manufactured by
Metallux, have stable output, possess resistance against various environments.
Metallux sensors possess excellent mechanical properties widely used in analog
measuring systems, and in pressure monitoring systems. These sensors commonly
used in high-performance automobiles by famous manufacturers such as Audi and
BMW.
The EDMS uses the Winstar OLED display with a resolution of 64x32 pixels.
Displays built on OLED technology have several advantages over conventional
LCD and VFD technologies.

OLED Display Features:
- OLED emits light, no backlight needed
-Wide viewing angle (over 175 degrees)
-Fast response speed
-High brightness
-High contrast
-Wide range of operating temperatures - 40º / + 85 ºС;
-Lower energy consumption;
-Readable in sunlight.
1. EDMS Menu Layout Browsing the menu of the gauge the EDMS, at first glance, seems overly
complicated, however with some patience and this manual the user will find
the new system extremely helpful.
The logic of the manometer will work intuitively. After the user gains
experience with the system, the information from the EDMS will provide the
owner with valuable data that will help get the most out of the airgun.

Push the button
Wait with the button pushed
Wait

The "Filling" mode displays the pressure in the Bar or PSI. This
works from any menu item except "Shots left" mode.
"Filling" mode displays the number of shots left. Works from the
menu item "Shots left"
"Shot" mode. After the shot, the dynamic
pressure difference before and after the shot is
displayed. The thermodynamic equilibrium is
established in the reservoir, the image is inverted and the fixed flow value is
displayed in Bar or Psi
The statistics on the shots are not accumulated (at the first start after
replacing the battery and resetting the statistics). It is displayed in the
menu "Shots left" and "Statistics"
The pressure fell below the minimum. Displayed in the menu "Shots
left"
Battery low
1. Activating the gauge
Turn on the pressure gauge by briefly pressing the button.
If the battery charge level falls below the threshold, the following image is
displayed:
And the gauge will turn off.
Initially after turning on the animated screensaver is displayed:
125BAR
5SHOT
13.2BARSHOT SHOT FIX
12.3BAR
-

After the animation finished, the menu item of the gauge is displayed. The EDMS
mode will be where the user left it during its last use. This feature designed in the
system so the user can choose their favorite setting and return to it without needing
to scroll through the menu.
The operating cycle of the manometer consists of three stages-modes:
1. Operating mode, the screen is on
The pressure gauge displays the current data, and after 5-7 seconds it
turns off the screen and goes to the second stage "Operating mode, the
screen is off."
Each press of the button prolongs the time of the manometer in the first
stage.
2. Operating mode, the screen is off
a. The pressure gauge continues to function for another 40 seconds with
the screen off (that is, it records the pressure change and, if any, turns on the
screen).
b. Pressing the button brings you to the first stage and activates the screen.
c. If the stage time has expired, then the stage 3 - the "sleep" mode is
engaged.
3. Sleep mode stage
d. The pressure gauge goes into reduced consumption mode. The
pressure sensor is not interrogated, the screen is off. That is, if the
pressure changes (shot or pumping), the pressure gauge will not show
a display.
e. Exit the sleep mode by pressing the button.
2. Menu of the gauge
The layout of the title menu is shown in the picture:
1 2 3 4 5

Glossary of Terms:
1. Display of the pressure value.
2. Displays of the number of remaining shots
3. Flow display for the last shot (Bar or Psi)
4. Statistics display.
5. Settings.
Navigating the menu
To switch between the menu items, press the button
Нажатие
кнопки
After the menu item is displayed, the current value for this item is
displayed.
95BAR
Pressing the button when the value is displayed returns to the
current menu item.
Pressing and holding the button while displaying the value will
show the current menu item and then cycle through the display
mode of this menu item.
For example, in the "Pressure value display" menu item, when you press and hold
the button while the pressure value is displayed, you will cycle the pressure units
bar or PSI.
уд
ер
жа
ни
е
153

The selected menu item held from the previous use, and the next time it
starts, the display begins with the last display used. Exception - menu item
"Settings."
If the button held more than 10 seconds, the gauge is turned off. This feature
prevents the possibility of accidentally pressing the pressure gauge button in
(i.e. in the gun case) and completely discharging the battery.
1. Menu item "Display pressure value"
Displays the pressure in the current unit (Bar or PSI)
When the button is held down, the pressure value is displayed, the
current unit is cyclically changed
The selected unit applies to all output data in other menu items.
If the current pressure level is less than 5 bar or 80 PSI, the corresponding
symbol
<5 <80BAR PSI
2. Menu item "Display of the number of remaining shots"
Displays the forecast for the stock of shots.
If you hold the button while the menu item is displayed, the current forecast is
cyclically changed: MIN - minimum quantity (pessimistic), MAX - maximum
amount (optimistic), AVG - average (most probable) shot stock

If there is still no data to analyze (you have not made a single shot
yet), a dash is displayed
-
If the current pressure becomes less than the set as deafult Pmin
(120 Bar by default, the user can change this value independently
in the settings), a warning is displayed
Please pay attention Please pay attention to the following feature: when
the pressure rises, the temperature rises, when the pressure drops, the
temperature drops. Thus, when the air pumped into the reservoir, the
temperature inside it grows, and when you shoot your gun, it falls.
As a result, We decided to artificially limit the "monitoring" time for
changing the pressure to give the user the opportunity to receive data without
long waiting.
Thus, if you are conducting "tempo" shooting, the gauge will not be able to
track the actual pressure drop (without taking into account the temperature
dependence), and there may be errors in calculating the remaining number of
shots.
The EDMS will predict the efficiency based on the gun's current usage. Like
a car predicts the number of miles left in your tank as you're driving. The
anticipated miles will change if you travel on the highway versus stop and go
city driving. The same methodology applies to the EDMS tracking.The
EDMS understands the ratio of pressure increase and heat. Therefore the
EDMS slightly overstates the pressure drop per shot. And if, for example, to
make ten shots and sum up the pressure drops for each shot, this amount will
be slightly more significant than the difference between the initial pressure
and the pressure after the 10th shot, because as long as ten shots fired, the
tank continuously exchanged heat with the environment.

To whom the foregoing seemed difficult, simple advice, for a more accurate
assessment of the number of shots, let the tank level the temperature, that is,
do not shoot quickly ☺
3 The menu item "Displays the usage for the last shot"
The pressure difference before and after the shot is displayed.
Please pay attention, that the "air consumption per shot" is shown in the units
you have chosen and is not a universal value, but only shows the pressure drop in
the tank in this particular rifle, when firing at specific settings, with the chosen
ammunition.
4 Menu item "Statistics display"
The flow statistics are displayed.
The user holds the button while the menu item displayed on the EDMS. The
current mode of statistics display cyclically changed: MIN is the minimum
value of the air consumption for the shot, MAX is the maximum value of the
air consumption for the shot, AVG is the average value of the air consumption
for the shot..
If there is still no data to analyze (you have not made a single shot
yet), a dash is displayed
-

That is, if you change any component, the data will also change. Therefore, we
recommend that you reset the statistics to zero, in case you are rebuilding your gun
(change speed, ammo, install new Pmin, and so on), so that the gauge displays the
correct data.
5 Menu item "Settings"
Please pay attention that the settings of this item menu are intentionally
made to be different from the logic of the rest of the menu items to minimize
possible random changes.
Adjust the pressure gauge settings.
Pressing and holding the button while displaying the value will
display the current menu item and then cycle through the menu
items
1 2 3 4 5
1. Limit of the pressure
Default setting item. Displays the value of the minimum threshold
for pressure Pmin in current units. By default, the gauge is set to
120 bar when assembling the pressure gauge.
120Pmin BAR

2. Setting up the limit of the pressure
3.
Please pay attention, that to use this menu item and change the minimum
pressure, you must first pressurize in the tank.
The release of the button on this menu item will select the feature
After selecting a menu item, the picture "Cancel or confirm"
Pressing the button will cancel the action (setting the threshold)
and return to the default setting item (Pmin display). That is, if you
accidentally come here, by clicking the button, then click it again,
automatically, you just exit the menu, nothing will change.
After waiting (that is, you understand what you are doing and do
not press the button, but wait until the pressure gauge confirms the
change), a message displayed.
OK
The current pressure level stored as the pressure threshold Pmin.
The pressure gauge turns off.
If the user wants to change the default factory setting (120 BAR), then this
procedure must be followed. First, determine the minimum bar setting desired.
Second, fill the air reservoir to the desired setting on the EDMS. Then go back to
the menu "SETTINGS." and change the value. For example, the desired setting is
100 bar. Reduce the air reservoir to 100 bar, go into settings and choose this
pressure range.

4. Resetting the statistics.
Release the button on this menu item to select this menu item.
After selecting a menu item, the picture "Cancel or confirm"
Pressing the button will cancel the action (reset the statistics) and return to the
default settings item (Pmin display).
After waiting, a message is displayed
OK
Statistics are reset, the gauge is turned off.
5. Setting the "zero" of the pressure sensor.
Please pay attention: The ceramic sensor ("sensor") sealed with an O-ring.
In the event of failure of the O-ring, the pressure gauge will begin to leak air. To
replace the O-ring, you will need to unscrew the sensor mounting nut, pull out the
sensor, replace the O-ring and install the sensor back, and tighten the sensor
pressure nut. Chances are you will not set the EDMS on the O-ring to the exact
pressure as the factory. This change of seating the O-ring can lead to errors. If this
rare failure occurs, there is a zero reset menu
Release the button on this menu item to select this menu item.
After selecting a menu item, the picture "Cancel or confirm"
Pressing the button will cancel the action (zero setting) and return to the
default setting item (Pmin display).
After waiting, a message is displayed
OK
The current pressure level is taken as zero; the pressure gauge is turned
off. Note that this action should be done at zero pressure. Otherwise, the
actual pressure in the reservoir will be taken as zero.
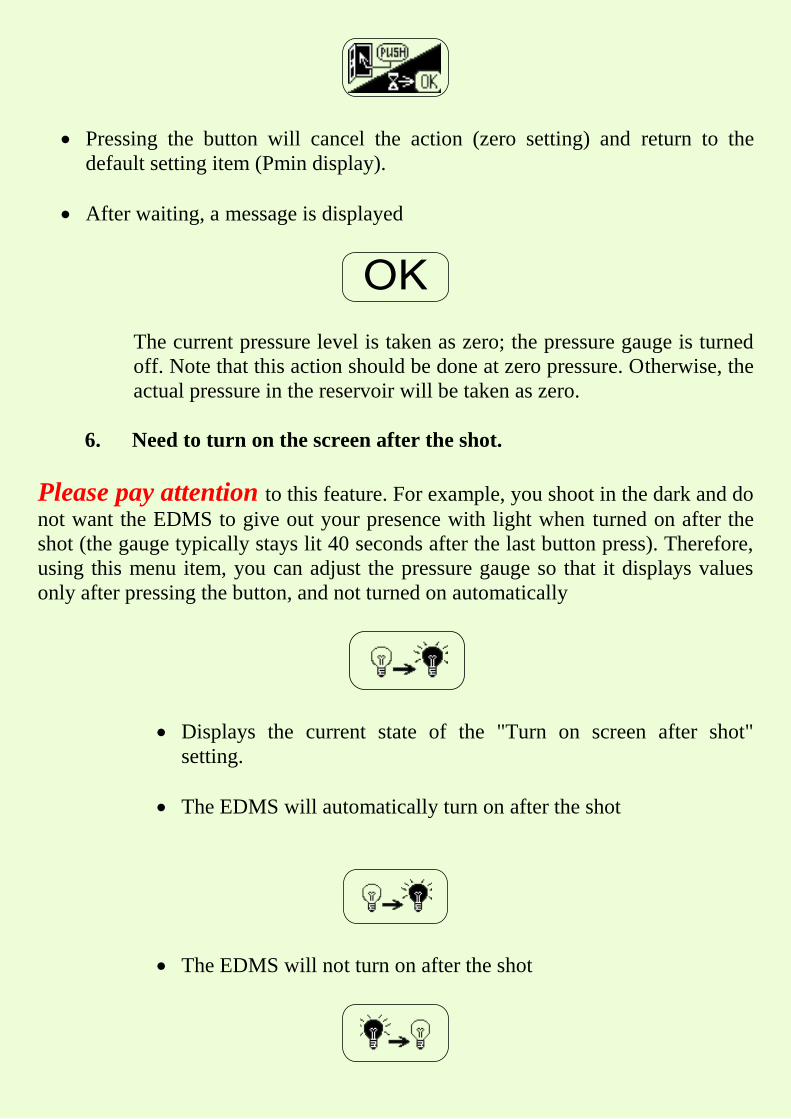
6. Need to turn on the screen after the shot.
Please pay attention to this feature. For example, you shoot in the dark and do
not want the EDMS to give out your presence with light when turned on after the
shot (the gauge typically stays lit 40 seconds after the last button press). Therefore,
using this menu item, you can adjust the pressure gauge so that it displays values
only after pressing the button, and not turned on automatically
Displays the current state of the "Turn on screen after shot"
setting.
The EDMS will automatically turn on after the shot
The EDMS will not turn on after the shot

The release of the button on this menu item changes the setting
value.
Mode “Filling”
If the pressure increase is detected, the EDMS screen is
automatically turned on (if it is in the second stage of "Operating
mode, the screen is off, " and the current pressure level displayed
in the existing units.
125BAR
If the menu item "Showing the amount of shot left" was selected
and there are statistical data in the memory of the gauge, the
current pressure "in shots."
5SHOT
Mode “Shot”
If a sudden decrease in pressure is detected, the current flow rate
of the shot is displayed
12,3SHOT BAR
After stabilizing the pressure, a drawdown is made (the image is
inverted)
12,3SHOT FIX BAR
The gauge screen automatically turned on if the "Screen after shot"
setting is set.
Please pay attention If you fill the tank from a minimum to a maximum (a
substantial pressure difference), the air in the tank will be heated. If one were to
close the valve on the filling hose immediately, the tank begins to cool down and
the pressure in it to fall.
If the pressure drop rate of pressure is higher than 1 bar in 0.25 seconds, then the
pressure gauge switches to the pressure drop measurement mode after the shot and
fixes this value.
If this value is close to the average pressure drop per shot (AVG), which is already
in the memory of the EDMS (after the previous series of shots), it will add to the
statistics, and the best reading will not be available.
The easiest way to avoid this phenomenon is after a filling not to close the valve for
a few seconds and allow the air in the tank to cool a little while being connected to
the air in the air source (5-15 seconds, depends on the pressure drop and the volume
of the vessel). Filling a PCP air tank slowly is an excellent practice to follow on all
regulated guns.
It is essential to make the first shot correctly for the EDMS to record your gun's
efficiency accurately. Before you start, it's better to reset the statistics. Statistics
must reset when changing the rifle's settings, change the caliber, change the speed,
or switch to other bullets.
Please pay attention how to replace the battery.
1. To replace the battery, you will need an empty syringe with a volume of at least
5 cm3.
2. Removing the sticker from the side of the gauge is necessary.
3. Insert the nozzle of the syringe (not the needle) into the hole on the side surface
of the pressure gauge, so that it fits tightly into the hole, push the plunger and catch
the cap. When creating excess pressure under the cap, it flies out of its place.
4. Replace the battery and assemble the pressure gauge in the reverse order.
5. The gauge cover is cap inserted into its place, the window in the cap is aligned
on the screen and snaps on the edges.
• If you need to rotate the screen (board with a display), for example, to align it
for your specific rifle, it is better to take it out (like when changing the battery), turn
it to the desired angle and insert it. Pay attention that under the battery there was no
twisted wire (double thickness).

• After installing the battery, the screen is tested (all pixels are turned on), and
then:
HW:2.3
SW:1.0
Where:
HW: 2.3 (hardware) – version of the printed circuit board
SW: 1.0 (software) – version of the software
Please pay attention, that when replacing the battery, you will need to remove
the printed circuit board from the shell of the gauge, if you touch the contacts, you
can short-circuit them, this does not lead to a breakdown of the pressure gauge, but
the controller may "hang up."
In this case, you either need:
1. Remove and insert the battery.
2. Or short circuit the two contacts of the comb for programming (shown in
red arrows).
Employees of "EDgun" company hope that our new product will be an excellent
tool for you in the knowledge of your weapons and will allow you to customize it
more carefully.
Thank you for the continued support of EDgun, customers are our most important
asset. – Eduard