edeposit scanner installation procedures - rmbank.com · welc 1 table of contents getting started...
TRANSCRIPT

Updated 12.15.17
SCANNER INSTALLATION PROCEDURESfor eDeposit
Introducing your new

Welcome to Rocky Mountain Bank 1
Table of Contents
GETTING STARTEDMinimum System Requirements .............................................1
SCANNER INSTALLATION FOR SMARTSOURCE SCANNERS 2
SCANNER INSTALLATION FOR PANINI VISIONX SCANNERS 19
BROWSER SECURITY SETTINGS 30
SCANNER REGISTRATION 34
APPENDIX AUninstalling Previous Drivers ..................................................39
APPENDIX BTop Five Errors Experienced During an eDeposit Install and the Most Common Solutions..........................................42
GETTING STARTEDThis manual is intended to provide instructions for installing the scanners for use with eDeposit.
MINIMUM SYSTEM REQUIREMENTSBefore using eDeposit, your workstation should meet the following minimum requirements:
▶ Pentium 4 2.0 GHz processor (recommend 3.0 GHz due to processing required for CAR/LAR)
▶ Windows or Windows 7-10
▶ 512 MB RAM
▶ 40 GB hard drive
▶ Network card
▶ Broadband internet access
▶ USB 2.0 port
▶ Windows Internet Explorer 9 or greater
▶ Screen resolution (display) at 1024 x 768
▶ User ID and password (See your system administrator if you do not have these)
▶ A check scanner connected to your workstation
▶ eDeposit is not compatible with Macs
RETURN TO CONTENTS

Introducing your new Scanner Installation Guide for eDeposit. Welcome to Rocky Mountain Bank2 3
SCANNER INSTALLATION FOR SMARTSOURCE SCANNERS
Note: If you have a VisionX scanner, skip ahead to page 19.
RETURN TO CONTENTSRETURN TO CONTENTS
THE STEPS FOR COMPLETING THE INSTALLER FILE ARE AS FOLLOWS:This must be performed as a Windows administrator.
Note: If you have previous check scanner drivers installed on your machine, you will need to uninstall these before proceeding. Please refer to Appendix A at the end of the document for instructions on how to do this.
1. Launch your browser and go to the bank’s homepage - Rocky Mountain Bank (https://www.rmbank.com).
2. From your bank homepage, mouse over the Business menu.

Introducing your new Scanner Installation Guide for eDeposit. Welcome to Rocky Mountain Bank4 5
3. Select Treasury Management > Collections & Deposits or eDeposit from the drop-down.
RETURN TO CONTENTSRETURN TO CONTENTS
4. Click on Scanner Driver Download.
5. Select the CAPI scanner driver.
6. Select Save As.

Introducing your new Scanner Installation Guide for eDeposit. Welcome to Rocky Mountain Bank6 7
7. Be sure the drop down specifies Desktop. Select Save.
RETURN TO CONTENTSRETURN TO CONTENTS
8. Check to see if you have a 32 bit or 64 bit version of Windows. To do so, click on your start menu, then right click on Computer and choose Properties. The Window that opens may say 32 or 64 bit under “System Type.” If it does not specify either way, you have a 32 bit operating system.

Introducing your new Scanner Installation Guide for eDeposit. Welcome to Rocky Mountain Bank8 9
9. Repeat the same process to download the SmartSource driver. Make sure you choose the correct one based on your version of Windows. Choose SmartSource for 32 bit versions of Windows and SmartSource-64bit for 64 bit versions of Windows
10. Make sure your scanner cable is disconnected from your computer.
11. Double click on the CAPI 8.8.9.zip file on the desktop.
Note: It is important to install the CAPI program before you install the SmartSource driver.
RETURN TO CONTENTSRETURN TO CONTENTS
12. Double click on the CAPI folder.
13. Double click on Setup file. (Right click, run as Administrator)

Introducing your new Scanner Installation Guide for eDeposit. Welcome to Rocky Mountain Bank10 11
14. Select Next.
15. Select Standard Installation and Next.
RETURN TO CONTENTSRETURN TO CONTENTS
16. Select Next.
17. Select OK.

Introducing your new Scanner Installation Guide for eDeposit. Welcome to Rocky Mountain Bank12 13
18. Select OK.
19. Select Finish.
RETURN TO CONTENTSRETURN TO CONTENTS
20. You will be prompted to restart. Save any open programs you have and click OK.
21. After you’ve rebooted your computer, double click on the Scanner Driver SmartSource folder on your Desktop.
22. Double Click the setup program. (Right click, run as Administrator)

Introducing your new Scanner Installation Guide for eDeposit. Welcome to Rocky Mountain Bank14 15
23. Click Next.
RETURN TO CONTENTSRETURN TO CONTENTS
24. Click Install.
25. Click Finish.
26. Plug in the scanner to the computer and the power source.
Note: The SmartSource program that was just installed will need to be running anytime you wish to scan checks. The following section describes how to setup this program to run automatically every time you start windows. If you do not wish to have this program run automatically, you will need to remember to run the SmartSource program from your desktop each time you go to scan your checks. If do not wish to have this program run at startup, please skip ahead to page 30 for instructions on the required browser settings and scanner registration.
27. After installing the drivers, Right click on the SmartSource Startup icon on the desktop and choose Copy.

Introducing your new Scanner Installation Guide for eDeposit. Welcome to Rocky Mountain Bank16 17
28. Then open the Start menu, go under All Programs, and find the Startup folder. Right click on Startup and chose Explore all Users.
RETURN TO CONTENTSRETURN TO CONTENTS
29. In the Startup folder you’ve just opened, right click and choose Paste Shortcut.
30. You should then see our SmartSource icon in this folder; it will now run whenever you start your machine.

Welcome to Rocky Mountain Bank18 19
You can see if the program is running by checking the task bar for the icon:
31. Go to page 30 for instructions on our required browser settings and how to register your scanner.
RETURN TO CONTENTS
SCANNER INSTALLATION FOR PANINI VISIONX SCANNERS
Note: If you have a SmartSource scanner, go back to page 2.

Introducing your new Scanner Installation Guide for eDeposit. Welcome to Rocky Mountain Bank20 21
THE STEPS FOR COMPLETING THE INSTALLER FILE ARE AS FOLLOWS:This must be performed as a Windows administrator.
Note: If you have previous check scanner drivers installed on your machine, you will need to uninstall these before proceeding. Please refer to Appendix A at the end of the document for instructions on how to do this.
1. Launch your browser and go to the bank’s homepage - Rocky Mountain Bank (https://www.rmbank.com).
2. From your bank homepage, mouse over the Business menu.
RETURN TO CONTENTSRETURN TO CONTENTS
3. Select Treasury Management > Collections & Deposits from the drop-down.
4. Click on Scanner/Driver Download.
Introducing your new Scanner Installation Guide for eDeposit. Welcome to Rocky Mountain Bank22 23
5. Check to see if you have a 32 bit or 64 bit version of Windows. To do so click on your start menu, then right click on Computer and choose Properties. The Window that opens may say 32 or 64 bit. If it does not specify you have a 32 bit operating system.
RETURN TO CONTENTSRETURN TO CONTENTS
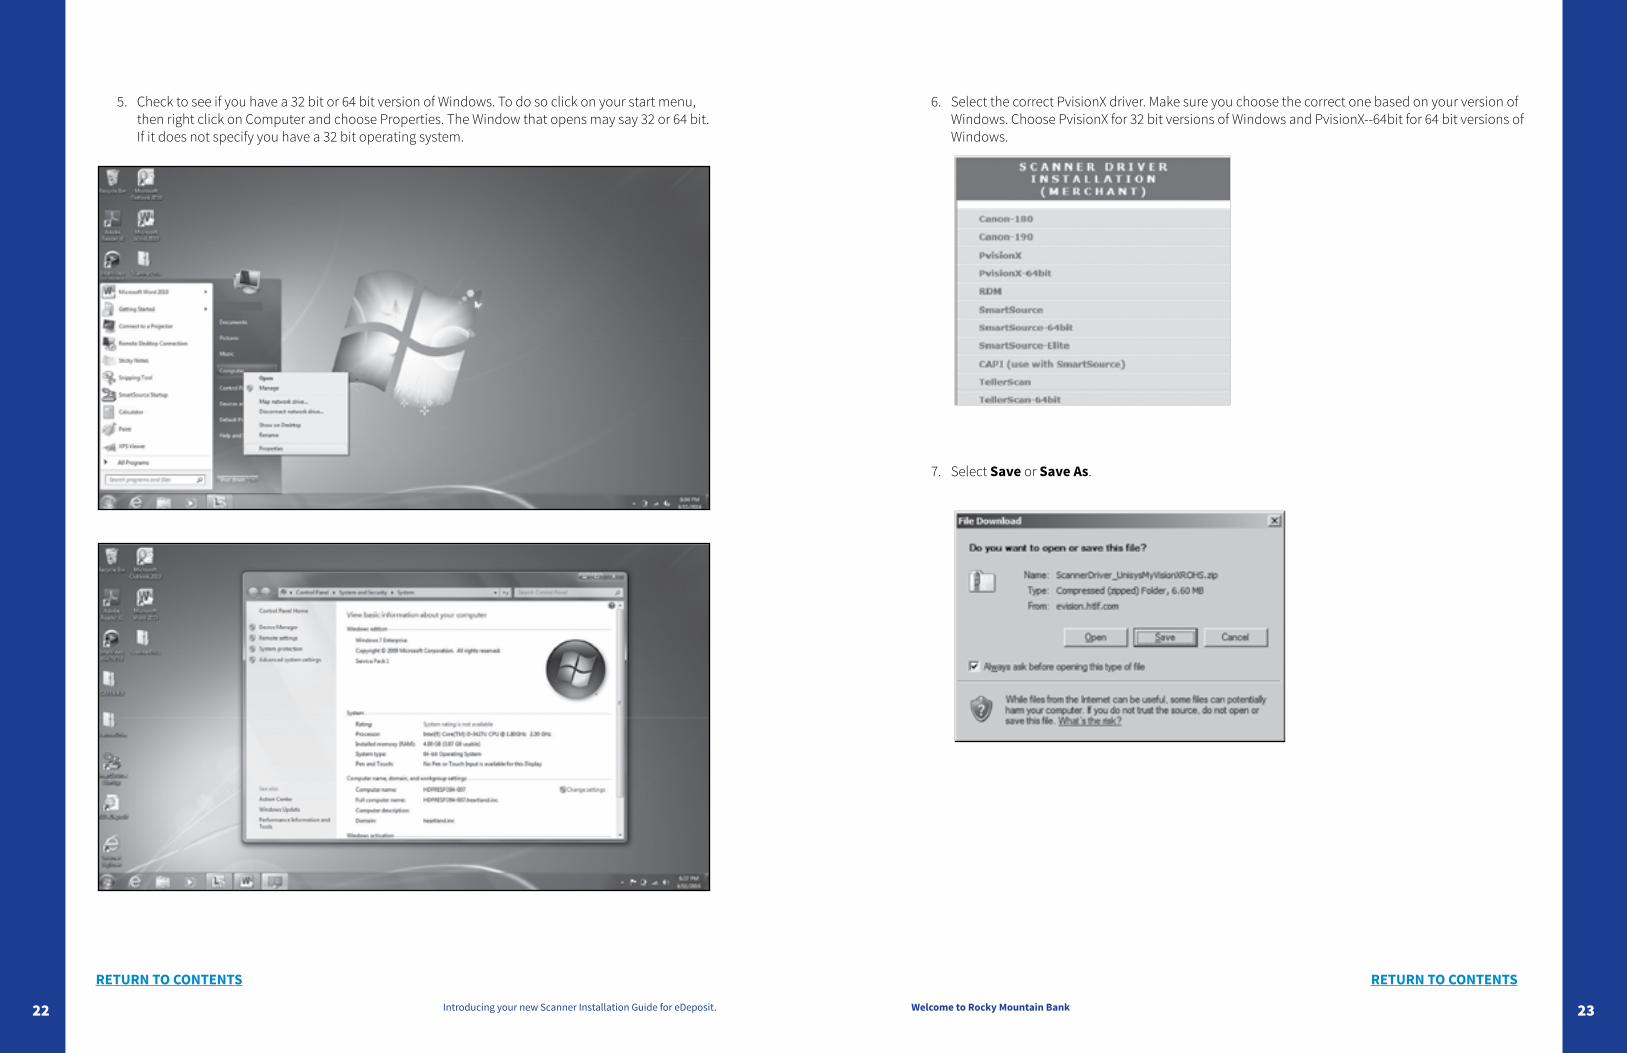
6. Select the correct PvisionX driver. Make sure you choose the correct one based on your version of Windows. Choose PvisionX for 32 bit versions of Windows and PvisionX--64bit for 64 bit versions of Windows.
7. Select Save or Save As.

Introducing your new Scanner Installation Guide for eDeposit. Welcome to Rocky Mountain Bank24 25
8. Be sure the drop down specifies Desktop. Select Save.
9. Click on Close.
RETURN TO CONTENTSRETURN TO CONTENTS
10. Double click on the ScannerDriver file on the desktop.
11. Double click on the Setup.exe file and follow the instructions to complete installation. (Right click, run as Administrator)

Introducing your new Scanner Installation Guide for eDeposit. Welcome to Rocky Mountain Bank26 27
12. Select Next.
13. Select Install.
RETURN TO CONTENTSRETURN TO CONTENTS
14. Select Next.
15. Make sure your scanner cable is disconnected from your computer and click OK.

Introducing your new Scanner Installation Guide for eDeposit. Welcome to Rocky Mountain Bank28 29
16. Select Next.
RETURN TO CONTENTSRETURN TO CONTENTS
17. Select Next.
18. Select Finish.
19. Vision X scanners will have one more popup box that will come up; once completed click Finish.
20. The screen below will be displayed again, close it.
21. Plug in the scanner to the computer and the power source.
22. Proceed to the next page for browser security and scanner registration instructions.

Introducing your new Scanner Installation Guide for eDeposit. Welcome to Rocky Mountain Bank30 31
BROWSER SECURITY SETTINGSWithin Internet Options, add the External Web Server’s domain to the Trusted Sites list (i.e. https://evision.htlf.com).
ADDING EXTERNAL WEB SERVER TO TRUSTED SITE LIST1. Launch Internet Explorer to your homepage.
2. Select Tools from the drop-down menu.
3. Select Internet Options.
4. Select Security Tab.
5. Click on Trusted Sites.
6. Select Sites.
RETURN TO CONTENTSRETURN TO CONTENTS
7. Enter the address of the domain (https://evision.htlf.com).
8. Select Add.
9. Choose OK.
10. Select Custom Level.

Introducing your new Scanner Installation Guide for eDeposit. Welcome to Rocky Mountain Bank32 33
11. Set the level to Medium Low.
12. Press Reset. It will ask if you are sure you want to make the changes, Click Yes.
13. Set the Download Signed ActiveX Controls and Access Data Sources Across Domains to Enable.
• Display Mixed content set to Enable
RETURN TO CONTENTSRETURN TO CONTENTS
14. Choose OK twice.
15. Select Tools from the drop down menu.
16. Select Compatibility Settings.
17. Add HTLF.com to the Compatibility View list.

Introducing your new Scanner Installation Guide for eDeposit. Welcome to Rocky Mountain Bank34 35
SCANNER REGISTRATION1. Launch Internet Explorer and go to the bank’s homepage - Rocky Mountain Bank
(https://www.rmbank.com).
2. From your bank homepage, click the Login button.
RETURN TO CONTENTSRETURN TO CONTENTS
3. Select eDeposit in the left column of the pop-up window. The eDeposit login screen will open in a new window.
4. Enter your User ID and press Login.
NOTE: Your user name is included in the welcome letter under step #1
5. You will be prompted to begin Multi-Factor Authentication. Click on Begin Setup.
6. Select a picture and add a personal phrase, then click Continue Setup.

Introducing your new Scanner Installation Guide for eDeposit. Welcome to Rocky Mountain Bank36 37
7. Answer the security questions, and then click Continue Setup.
8. Register your computer (optional), and then click Continue Setup.
NOTE: If the computer is registered, each time the user logs in, he or she will not be required to answer the security questions. If they delete history or clear their cache it will remove the cookie that is placed when a customer registers the computer. They would have to answer questions then.
If the user chooses not to register the computer, he or she will have to answer the security questions each time he or she logs in.
RETURN TO CONTENTSRETURN TO CONTENTS
9. Verify that all information entered is correct, enter the password, and click Submit.
10. Click on the Registration tab.

Introducing your new Scanner Installation Guide for eDeposit. Welcome to Rocky Mountain Bank38 39
11. The information on this screen will automatically be populated. Be sure that the Scanner type is correct. If it is not, arrow down the drop down menu until the correct scanner is selected. Click Register.
RETURN TO CONTENTS
RETURN TO CONTENTS
12. Wait for confirmation that the machine has successfully registered.
Installation is now complete. Refer to the eDeposit User Guide for instructions on operating the system.
APPENDIX A
UNINSTALLING PREVIOUS DRIVERSIf you have drivers for a check scanner installed from a previous setup, you’ll need to uninstall these drivers before you can install the drivers from our site. This is true even if you are using the same physical device you had previously.
1. Click on the start menu and choose Control Panel.
2. Choose Uninstall a program under Programs and Features.
Introducing your new Scanner Installation Guide for eDeposit. Welcome to Rocky Mountain Bank40 41
3. Find the driver that corresponds with your previous scanner setup and right click on the item. Then choose Uninstall. In some cases there may be more than one item to uninstall.
Note: If you’re uninstalling a SmartSource you may see the following message.
Click Yes to All.
RETURN TO CONTENTSRETURN TO CONTENTS
Note: If you’re uninstalling a SmartSource, you will also need to delete the SCO folder on their hard drive.
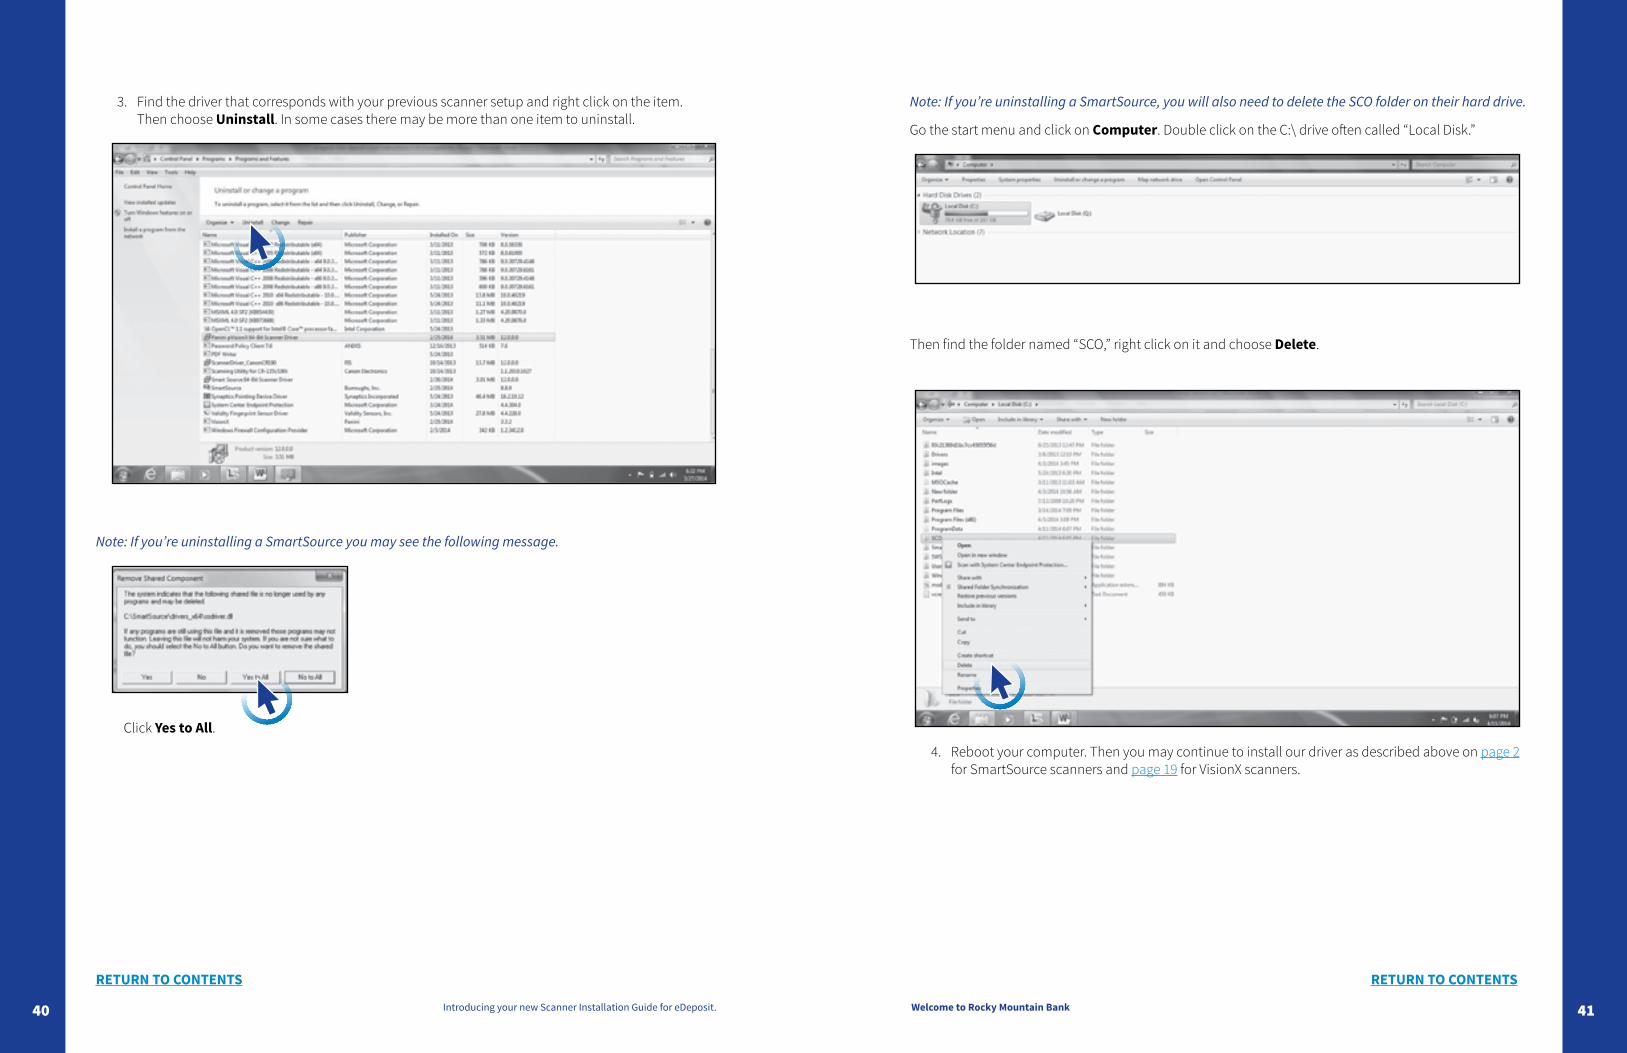
Go the start menu and click on Computer. Double click on the C:\ drive often called “Local Disk.”
Then find the folder named “SCO,” right click on it and choose Delete.
4. Reboot your computer. Then you may continue to install our driver as described above on page 2 for SmartSource scanners and page 19 for VisionX scanners.

APPENDIX B
TOP FIVE ERRORS EXPERIENCED DURING AN EDEPOSIT INSTALL AND THE MOST COMMON SOLUTIONS
1. Error 1720 or 1722 during driver install – Unzip the install files to a separate folder and rerun the setup. Make sure you are signed in as a Windows Administrator.
2. When installing the driver you see Please contact your Administrator or you are asked for a password – Make sure you are signed in as a Windows Administrator. You must be signed in as an Administrator until the first time you start the scanner. Just having the administrator put their password in during the installation will not be enough.
3. When trying to scan a check you see, Active X Control Failed to Load Please Check Browser Security settings – This error is often caused by an issue with the driver, not the browser. Make sure the driver is fully installed (you see both items listed on the programs list). Make sure there is not another scanner driver installed. Make sure the correct driver is installed for that scanner (32 bit vs. 64 bit). Make sure you are not using the 64 bit version of Internet Explorer.
4. When trying to scan a check you see, Device Library Failed to load. – This is the most common error, and can be caused by many different things: Unplug the USB cable from the back of the computer and plug it back in to a different port. If that does not work, restart the computer. This might also happen if you click on the “Start Scan” button too quickly when using a VisionX scanner. For VisionX’s, make sure to wait for the scanner to “wake up,” it will make noise as it runs it’s rollers for a few seconds.
Check that “protected mode” is not checked under the compatibility view settings window or under the Trusted Sites tab (under the Tools/Internet options/Trusted Sites menu). Make sure the driver is installed fully, if one of the two parts of the driver doesn’t install fully it might cause this error.
5. When trying to scan a check you see, Communication Failure with Device. – This is usually a physical issue with the scanner or cords. Make sure the scanner is plugged in to the computer and to the wall for power. Sometimes the connection can come loose even if the cables look secure. Have the customer unplug and re-plug every cable. Restarting the computer may also help. This is also the most likely error you’ll receive if the scanner itself is non-functional, but most cases of this error are solved by reseating the cables
RETURN TO CONTENTS
42