edb postgres enterprise manager installation guide€¦ · · 2017-06-20edb postgres™...
TRANSCRIPT

EDB Postgres™ Enterprise Manager
Installation Guide Version 7
June 1, 2017

Copyright © 2013 - 2017 EnterpriseDB Corporation. All rights reserved.
2
EDB Postgres Enterprise Manager™ Installation Guide
by EnterpriseDB® Corporation
Copyright © 2013 - 2017 EnterpriseDB Corporation. All rights reserved.
EnterpriseDB Corporation, 34 Crosby Drive, Suite 100, Bedford, MA 01730, USA
T +1 781 357 3390 F +1 978 589 5701 E [email protected] www.enterprisedb.com
EnterpriseDB, Postgres Plus, Postgres Enterprise Manager, and DynaTune are trademarks of EnterpriseDB Corporation. Other names may be trademarks of their respective owners. © 2017.
EDB Postgres Enterprise Manager Installation Guide
Copyright © 2013 - 2017 EnterpriseDB Corporation. All rights reserved.
3
Table of Contents
1 Introduction ................................................................................................................. 5
1.1 What's New ......................................................................................................... 6
1.2 Typographical Conventions Used in this Guide ................................................. 6
2 Postgres Enterprise Manager™ - Overview ............................................................... 7
2.1 Supported Platforms............................................................................................ 9
2.2 Hardware Pre-Requisites .................................................................................. 10
2.3 Software Pre-Requisites .................................................................................... 10
3 Installing Postgres Enterprise Manager™ ................................................................ 12
3.1 Installing the PEM Server ................................................................................. 13
3.1.1 Installing the PEM Server and ApacheHTTPD on the Same Host ............... 15
3.1.2 Installing the PEM Server and ApacheHTTPD on Separate Hosts .............. 28
3.1.2.1 Specifying a Database Host .................................................................. 36
3.1.2.2 Installing Web Services ........................................................................ 44
3.1.3 Installing the PEM Server on an Existing Postgres Server ........................... 48
3.1.3.1 Preparing the Postgres Server ............................................................... 48
3.1.3.1.1 Installing the sslutils Extension ............................................................. 49
3.1.3.1.2 Creating a Service Script or Registering the Service...................... 51
3.1.3.2 Invoking the PEM Server Installer ....................................................... 53
3.2 Using the PEM Web Interface .......................................................................... 66
3.3 Installing a PEM Agent ..................................................................................... 69
3.3.1 Using the Graphical Installer to Install an Agent .......................................... 69
3.3.2 Installing an Agent with an RPM Package ................................................... 78
3.3.2.1 Configuring an Agent after an RPM Installation .................................. 80
3.3.3 PEM Agent Privileges................................................................................... 82
3.4 Invoking the Server or Agent Installers from the Command Line ................... 84
3.4.1 Invoking the PEM Server Installer in Unattended Mode.............................. 84
3.4.2 Invoking the PEM Agent Installer in Unattended Mode .............................. 87
3.4.3 Invoking the PEM Server Installer in Text Mode ......................................... 89
3.4.4 Invoking the PEM Agent Installer in Text Mode ......................................... 93
4 Adding Postgres Instances to PEM ........................................................................... 96
4.1 Logging on to the PEM Server ......................................................................... 96
4.2 Registering a Database Server .......................................................................... 98

EDB Postgres Enterprise Manager Installation Guide
Copyright © 2013 - 2017 EnterpriseDB Corporation. All rights reserved.
4
4.3 Verifying the Connection and Binding ........................................................... 106
5 Installing the SQL Profiler Plugin .......................................................................... 107
5.1 Installing SQL Profiler .................................................................................... 108
5.2 Configuring SQL Profiler ............................................................................... 114
6 Upgrading and Uninstalling PEM Components ..................................................... 116
7 Server Management ................................................................................................ 119
7.1 Controlling the PEM Server or PEM Agent on Linux .................................... 119
7.2 Controlling the PEM Server or PEM Agent on Windows .............................. 121
7.3 Controlling the Apache Server ........................................................................ 122
7.4 Modifying the pg_hba.conf File ..................................................................... 124
7.5 Managing PEM Authentication ...................................................................... 126
7.6 Modifying PEM to Use a Proxy Server .......................................................... 127
8 Agent Configuration ............................................................................................... 129
9 Troubleshooting ...................................................................................................... 133
9.1 Connect to Server Error .................................................................................. 133
10 Appendix A, Linux Service Script (Sample) .......................................................... 134
11 Appendix B, Replacing SSL Certificates................................................................ 141
11.1 Updating Agent SSL Certificates.................................................................... 144

EDB Postgres Enterprise Manager Installation Guide
Copyright © 2013 - 2017 EnterpriseDB Corporation. All rights reserved.
5
1 Introduction
Postgres Enterprise Manager™ (PEM) is designed to assist database administrators,
system architects, and performance analysts when administering, monitoring, and tuning
PostgreSQL and Advanced Server database servers. PEM has been designed to manage
and monitor a single server or multiple servers from a single console, allowing complete
control over monitored databases.
This document provides step-by-step instructions to guide you through the installation of
Postgres Enterprise Manager™.
Throughout this guide, the term Postgres refers to either a PostgreSQL or an Advanced
Server installation, where either is appropriate.

EDB Postgres Enterprise Manager Installation Guide
Copyright © 2013 - 2017 EnterpriseDB Corporation. All rights reserved.
6
1.1 What's New
The following features have been added to Postgres Enterprise Manager 6.0 to create
Postgres Enterprise Manager 7.0:
PEM version 7.0 has undergone a dramatic, full-featured upgrade that provides
the functionality of PEM 6.0 in a user-friendly format that runs in your favorite
browser.
1.2 Typographical Conventions Used in this Guide
Certain typographical conventions are used in this manual to clarify the meaning and
usage of various commands, statements, programs, examples, etc. This section provides a
summary of these conventions.
In the following descriptions a term refers to any word or group of words that are
language keywords, user-supplied values, literals, etc. A term’s exact meaning depends
upon the context in which it is used.
Italic font introduces a new term, typically, in the sentence that defines it for the
first time.
Fixed-width (mono-spaced) font is used for terms that must be given
literally such as SQL commands, specific table and column names used in the
examples, programming language keywords, etc. For example, SELECT * FROM emp;
Italic fixed-width font is used for terms for which the user must
substitute values in actual usage. For example, DELETE FROM table_name;
A vertical pipe | denotes a choice between the terms on either side of the pipe. A
vertical pipe is used to separate two or more alternative terms within square
brackets (optional choices) or braces (one mandatory choice).
Square brackets [ ] denote that one or none of the enclosed term(s) may be
substituted. For example, [ a | b ], means choose one of “a” or “b” or neither
of the two.
Braces {} denote that exactly one of the enclosed alternatives must be specified.
For example, { a | b }, means exactly one of “a” or “b” must be specified.
Ellipses ... denote that the proceeding term may be repeated. For example, [ a |
b ] ... means that you may have the sequence, “b a a b a”.

EDB Postgres Enterprise Manager Installation Guide
Copyright © 2013 - 2017 EnterpriseDB Corporation. All rights reserved.
7
2 Postgres Enterprise Manager™ - Overview
Postgres Enterprise Manager™ (PEM) consists of components that provide the
management and analytical features of PEM:
PEM Server: The PEM server is used as the data repository for monitoring data
and as a server to which both agents and clients connect. The PEM server
consists of an instance of PostgreSQL and an associated database for storage of
monitoring data, and a server that provides web services for the client.
PEM Client: The PEM web interface allows you to manage and monitor Postgres
servers and utilize PEM extended functionality. The client software is installed
with the PEM server installer, and is accessed via your choice of web browser.
PEM Agent: The PEM agent is responsible for executing tasks and reporting
statistics from the agent host and monitored Postgres instances to the PEM server.
A single PEM agent can monitor multiple installed instances of Postgres that
reside on one or many hosts.
The PEM Agent installer creates two executables: the PEM worker
(pemworker.exe) and the PEM agent (pemagent.exe). Each PEM worker has
a corresponding PEM agent that you can use to start or stop the PEM worker.
The PEM agent will also restart the PEM worker should it terminate
unexpectedly.
The PEM worker log file contains information related to PEM worker activity
(probe activities, heartbeat responses, etc.), and is stored in
/var/log/pem/worker.log.
SQL Profiler plugin: This plugin to the Postgres server is used to generate the
monitoring data used by the SQL Profiler tool within the PEM client. Installation
of the SQL Profiler plugin is optional, but the plugin must be installed into each
instance of Postgres you wish to profile. The SQL Profiler may be used with any
supported version of an EnterpriseDB distribution of a PostgreSQL server or an
Advanced Server (not just those managed through the PEM server). See Chapter 5
for details and supported versions.
The architectural diagram below (Figure 2.1) illustrates the relationship between the
various servers and workstations involved in a typical PEM installation.

EDB Postgres Enterprise Manager Installation Guide
Copyright © 2013 - 2017 EnterpriseDB Corporation. All rights reserved.
8
Figure 2.1 - A typical PEM installation.

EDB Postgres Enterprise Manager Installation Guide
Copyright © 2013 - 2017 EnterpriseDB Corporation. All rights reserved.
9
2.1 Supported Platforms
The PEM server is supported on:
64-bit Windows:
Windows Server 2012 R2
Windows Server 2016
64-bit Linux:
CentOS 6.x and 7.x
Debian 7.x (EPAS and PostgreSQL 9.6) and 8.x (PostgreSQL only)
OEL 6.x and 7.x
Red Hat Enterprise Linux 6.x and 7.x
SLES 12.x
Ubuntu 14.04 and 16.04
The PEM server is supported on these platforms, using Advanced Server or PostgreSQL
backing databases (version 9.2 and higher).
The PEM agent is supported on any Linux or Windows platform on which Advanced
Server or PostgreSQL version 9.2 or higher is supported.
The PEM client is supported on the following browsers:
Google Chrome
Mozilla Firefox
Internet Explorer
Apple Safari
PostgreSQL Version Support
PEM can manage and monitor:
PostgreSQL versions 9.2 and higher
Advanced Server 9.2 and higher
SQL Profiler
SQL Profiler for Postgres Enterprise Manager™ is supported on Advanced Server
EnterpriseDB distributions of PostgreSQL version 9.2 and above.

EDB Postgres Enterprise Manager Installation Guide
Copyright © 2013 - 2017 EnterpriseDB Corporation. All rights reserved.
10
2.2 Hardware Pre-Requisites
For optimum speed when monitoring servers and rendering dashboards, we recommend
installing PEM on a system with at least:
4 CPU cores
8 GB of RAM
100 GB of Storage
Additional disk space is required for data storage. Please note that resource usage will
vary based on which probes are defined and enabled, and the activity level on the
monitored databases. Monitoring server resources (as you use PEM) will let you know
when you need to expand your initial system configuration.
2.3 Software Pre-Requisites
SELinux Permissions
Before installing the PEM Server on a system that is running SELinux, you must set
SELinux to permissive mode.
The following example works on Redhat Enterprise Linux, Fedora Core or CentOS
distributions; use comparable commands that are compatible with your Linux distribution
to set SELinux to permissive mode during installation and return it to enforcing
mode when installation is complete.
Before installing the PEM Server, set SELinux to permissive mode with the command:
# setenforce Permissive
When the installation is complete, return SELinux to enforcing mode with the
command:
# setenforce Enforcing
Firewall Restrictions
Please note that you must adjust your firewall to allow communication between PEM
components.
EDB Postgres Enterprise Manager Installation Guide
Copyright © 2013 - 2017 EnterpriseDB Corporation. All rights reserved.
11
RPM Installation of PEM Agent - Pre-requisites for RHEL or CentOS 7.x
Before installing the PEM agent on a CentOS 7.x host, you must ensure that the host
contains the wxbase and epel-release packages. To install the packages, open a
command line, assume root privileges, and invoke the commands:
yum install epel-release
yum install wxbase
Windows Permissions
If you are installing PEM components on Windows, you may be required to invoke the
PEM installers with Administrative privileges. To invoke an installer using
Administrator privileges, right click on the installer icon and select Run as
Administrator from the context menu.
Supported Locales
At this time, the PEM server and client support a locale of English(US) en_US and
use of a period (.) as a language separator character. Using an alternate locale, or a
separator character other than a period may result in errors.
Windows Server IE Security
If you are using Internet Explorer on a Windows Server host to access monitored servers
with the PEM web interface, you must disable Internet Explorer's Enhanced Security to
take advantage of PEM functionality. If you do not wish to disable IE Enhanced
Security, we recommend that you use an alternate browser (such as Chrome).

EDB Postgres Enterprise Manager Installation Guide
Copyright © 2013 - 2017 EnterpriseDB Corporation. All rights reserved.
12
3 Installing Postgres Enterprise Manager™
You can use a graphical installer or StackBuilder to add the Postgres Enterprise
Manager™ server, client, or agent to a host. Graphical installers are available from the
EnterpriseDB website at:
http://www.enterprisedb.com/download-postgres-enterprise-manager
The PEM server installer installs and configures the PEM server, a PEM agent, and the
PEM client. The PEM agent that is installed by the PEM server is capable of monitoring
multiple servers that reside on the same host, or on remote hosts; please note that PEM
functionality on remote hosts will be limited.
To take full advantage of PEM features, a PEM agent must reside on the same host as the
monitored server. You can use an RPM package or the graphical installer to add the PEM
agent to a host. For detailed information about using an RPM package to install the PEM
agent, see Section 3.3.2.
SQL Profiler must be installed on the host of each server that will be monitored by PEM.
The PEM server installer:
pem_server-7.x.x-x-platform.ext
The PEM agent installer:
pem_agent-7.x.x-x-platform.ext
The SQL Profiler plug-in:
sqlprofiler-pg-7.x.x-x-platform.ext
Where:
platform
platform is the name of the platform on which you will install the component.
ext
ext is the file extension associated with the platform on which you will install the
component.

EDB Postgres Enterprise Manager Installation Guide
Copyright © 2013 - 2017 EnterpriseDB Corporation. All rights reserved.
13
3.1 Installing the PEM Server
At the heart of each PEM installation is the server. In a production environment, the
server will typically be a dedicated machine, monitoring a large number of Postgres
servers or a smaller number of busy servers.
The PEM server backend database may be an EnterpriseDB distribution of the
PostgreSQL or Advanced Server database server, or an existing Postgres server installed
from another source. The Postgres backing database server must be version 9.2 or later,
and will contain a database named pem, which is used by the PEM server as a repository.
If you would like to use an existing Postgres server to host the PEM server, the
PEM server installer can create the pem database on the Postgres host. You must
manually satisfy the software pre-requisites if you choose to use an existing
server.
For more information about using an existing Postgres server to host the PEM
server backend database, see Section 3.1.3.
If you do not wish to use an existing installation of Postgres as the PEM server
host, the PEM server installer can install PostgreSQL, satisfy the server host's
software pre-requisites, and create an instance (a PostgreSQL database cluster)
that contains the pem database.
This is the simplest PEM server installation option.
ApacheHTTPD is made available for Postgres installations through the PEM server
installer or the StackBuilder utility. If ApacheHTTPD is already installed on the host, the
PEM server installer will review and update the existing installation if required. If the
PEM server host does not contain an existing ApacheHTTPD installation, the PEM
server installer will add it.
Before installing the PEM server, you must decide if you wish to run PostgreSQL and
ApacheHTTPD on the same host or on separate hosts. If you intend to run the
PostgreSQL database server and ApacheHTTPD on different hosts, then you must run the
PEM server installer twice – once on each host, as detailed in Section 3.1.2.

EDB Postgres Enterprise Manager Installation Guide
Copyright © 2013 - 2017 EnterpriseDB Corporation. All rights reserved.
14
The PEM server installer will also install the PEM client web interface (shown in Figure
3.1). You can access the client with a supported version of your browser of choice.
Figure 3.1 - The PEM web interface.
You can use the client to review information about objects that reside on monitored
servers, manage databases and database objects that reside on monitored servers, or
review statistical information gathered by the PEM server.

EDB Postgres Enterprise Manager Installation Guide
Copyright © 2013 - 2017 EnterpriseDB Corporation. All rights reserved.
15
3.1.1 Installing the PEM Server and ApacheHTTPD on the Same Host
The easiest PEM server installation configuration consists of a PEM backend database
server (hosted on a PostgreSQL database installed with the PEM server installer) and an
ApacheHTTPD service that reside on the same host. In this configuration, the PEM
server installer will provide the pre-requisite software for the backend host and create a
service script (on Linux) or register the service (on Windows).
To invoke the PEM server installer on Linux, assume superuser privileges and navigate
into the directory that contains the installer. Then, invoke the installer with the
command:
./pem_server-7.x.x-x-platform.ext
On a Windows system, right click the installer icon and select Run as
Administrator. The installer displays a Welcome dialog (shown in Figure 3.2).
Figure 3.2 - The PEM Server Installer's Welcome dialog.
Click Next to continue to the License Agreement dialog (shown in Figure 3.3).
EDB Postgres Enterprise Manager Installation Guide
Copyright © 2013 - 2017 EnterpriseDB Corporation. All rights reserved.
16
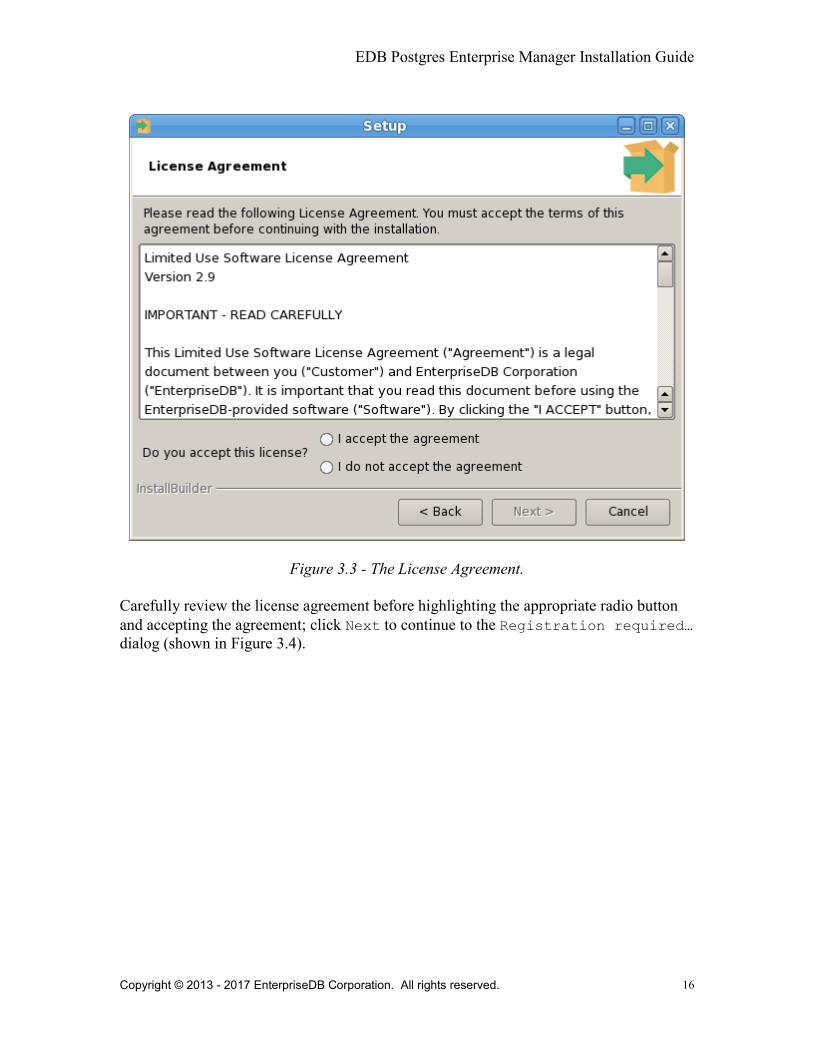
Figure 3.3 - The License Agreement.
Carefully review the license agreement before highlighting the appropriate radio button
and accepting the agreement; click Next to continue to the Registration required…
dialog (shown in Figure 3.4).

EDB Postgres Enterprise Manager Installation Guide
Copyright © 2013 - 2017 EnterpriseDB Corporation. All rights reserved.
17
The Registration required… dialog asks if you have already signed up for an
EnterpriseDB user account; select the appropriate option before clicking Next.
Figure 3.4 - Select a registration option.
If you have not signed up for an EnterpriseDB user account, clicking Next will open a
web browser, displaying the EnterpriseDB User Login/Registration page of the
EnterpriseDB website (shown in Figure 3.5).

EDB Postgres Enterprise Manager Installation Guide
Copyright © 2013 - 2017 EnterpriseDB Corporation. All rights reserved.
18
Figure 3.5 - Register as an EnterpriseDB user.
You can also access the registration page by navigating to:
https://www.enterprisedb.com/user/register
Provide your user information; when you've completed the form, return to the
EnterpriseDB User Account Information dialog (shown in Figure 3.6).

EDB Postgres Enterprise Manager Installation Guide
Copyright © 2013 - 2017 EnterpriseDB Corporation. All rights reserved.
19
Figure 3.6 - Enter your EnterpriseDB user account information.
After providing your registered Email address and Password, click Next to continue
to the Installation Directory dialog (shown in Figure 3.7).

EDB Postgres Enterprise Manager Installation Guide
Copyright © 2013 - 2017 EnterpriseDB Corporation. All rights reserved.
20
Figure 3.7 - Specify an installation directory.
Use the Installation Directory dialog (shown in Figure 3.7) to specify the location
of the PEM server:
By default, the PEM server is installed in the /opt/PEM directory on Linux or in
C:\Program Files\PEM on Windows. Accept the default location, or use the
Installation Directory button to open a browser dialog and select the
directory in which the PEM server will be installed.
Use the Show advanced options check box to instruct the installer to open
the Advanced options dialog.
Use the Advanced options dialog when installing the Postgres database server
and ApacheHTTPD on different hosts, or if you wish the PEM server to reside on
an existing Postgres server installation.
To install the PostgreSQL server packaged with the installer and ApacheHTTPD on the
same host, leave the Show advanced options box unchecked and click Next.

EDB Postgres Enterprise Manager Installation Guide
Copyright © 2013 - 2017 EnterpriseDB Corporation. All rights reserved.
21
The PEM server installer will perform a pre-installation check for the EnterpriseDB
distributions of ApacheHTTPD, LanguagePack, and PostgreSQL 9.6. If the installer
does not locate these packages, it will inform you in the Dependency missing dialog
(shown in Figure 3.8).
Figure 3.8 - The installer checks for pre-requisites.
If the dependencies are missing, the PEM server installer will launch the respective
installation wizards; follow the onscreen directions presented by the installation wizards
for each package.
After installing any missing dependencies, the installation process continues by
displaying the Database Server Installation Details dialog, as shown in Figure
3.9.

EDB Postgres Enterprise Manager Installation Guide
Copyright © 2013 - 2017 EnterpriseDB Corporation. All rights reserved.
22
The information provided on the Database Server Installation Details dialog
enables the installer to connect to the PostgreSQL server.
Figure 3.9 - Enter the name and password of the PostgreSQL superuser.
Provide the User name and Password of a database superuser. After supplying the
requested information, click Next to continue to the Network Details dialog (as
shown in Figure 3.10).
After providing the name and password of the Postgres database superuser, you may be
prompted for the password to the user account under which the PEM agent will run. If
prompted, provide the password, and press Next to continue.

EDB Postgres Enterprise Manager Installation Guide
Copyright © 2013 - 2017 EnterpriseDB Corporation. All rights reserved.
23
Use the Network Details dialog to specify the CIDR-style network address from
which the PEM agents will connect to the server (the client-side address).
Figure 3.10 - Supply the network address from which the agent will connect.
You may specify the address of a network host, or a network address range. For
example, if you wish to monitor database servers with the addresses 192.168.10.23,
192.168.10.76 and 192.168.10.184, enter 192.168.10.0/24 to allow
connections with hosts in that network.
The specified address will be added to the server's pg_hba.conf file. You can specify
additional network addresses by manually adding entries to the pg_hba.conf file on the
PostgreSQL server if required, using the initial entry as a template.
When you've added the Network address, click Next to continue to the Agent
Details dialog (shown in Figure 3.11).

EDB Postgres Enterprise Manager Installation Guide
Copyright © 2013 - 2017 EnterpriseDB Corporation. All rights reserved.
24
The PEM server installer will install a PEM agent on the host on which the server resides,
to monitor the server and provide alert processing and garbage collection services. A
certificate will also be installed in the location specified in the Agent certificate
path field.
Figure 3.11 - Provide a Description for the agent that resides on the server.
Enter an alternate description or select an alternate agent certificate path for the PEM
agent, or accept the defaults. Click Next to continue to the Ready to Install dialog
(shown in Figure 3.12).

EDB Postgres Enterprise Manager Installation Guide
Copyright © 2013 - 2017 EnterpriseDB Corporation. All rights reserved.
25
The wizard is now ready to install the PEM server (see Figure 3.12).
Figure 3.12 - The installation is ready to begin.
Click Back to modify any of the options previously selected, or Next to continue with
the installation.

EDB Postgres Enterprise Manager Installation Guide
Copyright © 2013 - 2017 EnterpriseDB Corporation. All rights reserved.
26
Figure 3.13 - The installation in progress.
During the installation process, the installer will copy files to the system, and set up the
database and web services required to run PEM. A popup dialog opens (shown in Figure
3.14) confirming that the webservice has been configured, and is listening on port 8443,
and that the pem database has been created and configured.
Figure 3.14 - A popup confirms the installation details.

EDB Postgres Enterprise Manager Installation Guide
Copyright © 2013 - 2017 EnterpriseDB Corporation. All rights reserved.
27
Click OK to acknowledge that the webservice has been configured, and that the pem
database has been created, and continue to the Completed… dialog (shown in Figure
3.15).
Figure 3.15 - The PEM server installation is complete.

EDB Postgres Enterprise Manager Installation Guide
Copyright © 2013 - 2017 EnterpriseDB Corporation. All rights reserved.
28
3.1.2 Installing the PEM Server and ApacheHTTPD on Separate Hosts
To use separate hosts for the PEM server backend database and the ApacheHTTPD
server you must:
1. Invoke the PEM server installer on the host of the Postgres server that will contain
the pem database. During the installation, select the Database option on the
Advanced options dialog, and provide connection information for the Postgres
server.
2. Modify the pg_hba.conf file of the Postgres installation on which the PEM
server (and pem database) resides, allowing connections from the host of the
ApacheHTTPD server.
3. Invoke the PEM server installer on the host of the ApacheHTTPD server,
selecting the Web Services option on the Installation Type dialog.
To invoke the PEM server installer on Linux, assume superuser privileges and
navigate into the directory that contains the installer. Then, invoke the installer with
the command:
./pem_server-7.x.x-x-platform.ext
On a Windows system, right click the installer icon and select Run as
Administrator. The installer displays a Welcome dialog (shown in Figure 3.16).

EDB Postgres Enterprise Manager Installation Guide
Copyright © 2013 - 2017 EnterpriseDB Corporation. All rights reserved.
29
Figure 3.16 - The PEM Server Installer's Welcome dialog.
Click Next to continue to the License Agreement dialog (shown in Figure 3.17).

EDB Postgres Enterprise Manager Installation Guide
Copyright © 2013 - 2017 EnterpriseDB Corporation. All rights reserved.
30
Figure 3.17 - The License Agreement.
Carefully review the license agreement before highlighting the appropriate radio button
and accepting the agreement; click Next to continue to the Registration required…
dialog (shown in Figure 3.18).

EDB Postgres Enterprise Manager Installation Guide
Copyright © 2013 - 2017 EnterpriseDB Corporation. All rights reserved.
31
The Registration required… dialog (shown in Figure 3.19) asks if you have already
signed up for an EnterpriseDB user account; select the appropriate option before clicking
Next.
Figure 3.18 - Select a registration option.
If you have not signed up for an EnterpriseDB user account, clicking Next will open a
web browser, displaying the EnterpriseDB User Login/Registration page of the
EnterpriseDB website.
If you have an EnterpriseDB user account, click Next to continue to the EnterpriseDB
User Account Information dialog (shown in Figure 3.19).

EDB Postgres Enterprise Manager Installation Guide
Copyright © 2013 - 2017 EnterpriseDB Corporation. All rights reserved.
32
Figure 3.19 - Enter your EnterpriseDB user account information.
After providing your registered Email address and Password, click Next to continue
to the Installation Directory dialog (shown in Figure 3.20).

EDB Postgres Enterprise Manager Installation Guide
Copyright © 2013 - 2017 EnterpriseDB Corporation. All rights reserved.
33
Figure 3.20 - The Installation Directory dialog.
Use fields on the Installation Directory dialog (shown in Figure 3.20) to specify
the directory in which the PEM server will reside, and to access the Advanced options
dialog:
By default, the PEM server is installed in the /opt/PEM directory on Linux or in
C:\Program Files\PEM on Windows. Accept the default location, or use the
Installation Directory field to open a browser dialog and select the
directory in which the PEM server will be installed.
To install the PEM server and ApacheHTTPD on separate hosts, you must use the
Advanced options dialog to specify the installation type (Web Services or
Database). Select the Show advanced options check box to instruct the
installer to include the Advanced options dialog in the installation process.
Click Next to continue to the Advanced Options dialog (shown in Figure 3.21).

EDB Postgres Enterprise Manager Installation Guide
Copyright © 2013 - 2017 EnterpriseDB Corporation. All rights reserved.
34
Figure 3.21 - The Advanced Options dialog.
Use the radio buttons on the Advanced options dialog to specify the component or
components that you would like to install:
Select Web Services and Database to indicate that the Postgres server and
ApacheHTTPD will both reside on the current host. If you select the Web
Services and Database option, the PEM server installer will allow you to
specify which Postgres server you wish to use for the PEM server before checking
for an ApacheHTTPD installation.
Select Web Services to install ApacheHTTPD on the current host, while using a
Postgres database server that resides on another host to host the PEM server and
pem database.
Please note: you must complete the PEM server installation process on the host of
the PEM server (and pem backend database), selecting Database on the
Advanced options dialog, and modifying the connection properties of the
pg_hba.conf file on the PEM server before using the Web Services option to
install ApacheHTTPD.

EDB Postgres Enterprise Manager Installation Guide
Copyright © 2013 - 2017 EnterpriseDB Corporation. All rights reserved.
35
This option invokes the installation steps documented in Section 3.1.2.2,
Installing Web Services.
Select Database to use an existing Postgres server (version 9.2 or greater), or to
install only the database server that is distributed with the PEM server installer.
This option invokes the installation steps documented in Section 3.1.2.1,
Specifying a Database Host.
After selecting an installation option, click Next to continue.

EDB Postgres Enterprise Manager Installation Guide
Copyright © 2013 - 2017 EnterpriseDB Corporation. All rights reserved.
36
3.1.2.1 Specifying a Database Host
Selecting the Database option on the Advanced options dialog (Figure 3.22) allows
you to specify connection information for the host on which the PEM server backend
database (named pem) will reside.
Figure 3.22 - The Advanced options dialog.
Click Next to continue to the Database Server Selection dialog (shown in Figure
3.23).

EDB Postgres Enterprise Manager Installation Guide
Copyright © 2013 - 2017 EnterpriseDB Corporation. All rights reserved.
37
Figure 3.23 - Selecting a database server.
Use the drop-down listbox on the Database Server Selection dialog to select a host
for the PEM server backend database. You can:
Select a host from existing Postgres installations that reside on the current host.
Please note that you may be required to add the sslutils package to your
installation.
Select the PostgreSQL 9.6 option to install the Postgres server that is
distributed with the PEM server installer. If you decide to use the version of
PostgreSQL that is bundled with the PEM server installer, the EnterpriseDB one-
click PostgreSQL installer will open and walk you through the installation.
Select Other Database Server to specify connection information for a
Postgres server that was not installed using a one-click graphical installer from
EnterpriseDB.
For information about the software pre-requisites for the PEM server database host,
please see Section 3.1.3.1, Preparing the Postgres Server.

EDB Postgres Enterprise Manager Installation Guide
Copyright © 2013 - 2017 EnterpriseDB Corporation. All rights reserved.
38
Click Next to continue.
If the PEM server will reside on an existing Postgres server, the Database Server
Installation Details dialog shown in Figure 3.24 opens.
Figure 3.24 - The Database Server Installation Details dialog.
The information required on the Database Server Installation Details dialog
may vary; the PEM server installer will ask you to provide only the information about the
selected installation that it cannot locate:
Specify the name of a Postgres database superuser in the User field.
Specify the password associated with that user in the Password field.
Click Next to continue.
If prompted, provide the system password for the service account under which the PEM
agent will run, and click Next to continue to the Network Details dialog.

EDB Postgres Enterprise Manager Installation Guide
Copyright © 2013 - 2017 EnterpriseDB Corporation. All rights reserved.
39
Figure 3.25 - Supply the network address from which the agent will connect.
Use the Network Details dialog (see Figure 3.25) to specify the CIDR-style network
address from which PEM agents will connect to the server (the client-side address). The
specified address will be added to the server's pg_hba.conf file.
You can also specify additional network addresses by manually adding entries to the
pg_hba.conf file on the PostgreSQL server; for more information, see Section 8.1.
Accept the default (specifying the localhost), or specify a Network address range, and
click Next to continue to the Agent Details dialog (shown in Figure 3.26).

EDB Postgres Enterprise Manager Installation Guide
Copyright © 2013 - 2017 EnterpriseDB Corporation. All rights reserved.
40
The PEM server installer will install a PEM agent on the host on which the server resides,
to monitor the server and provide alert processing and garbage collection services. A
certificate will also be installed in the location specified in the Agent certificate
path field.
Figure 3.26 - Provide a Description for the agent that resides on the server.
You can enter an alternate description or an alternate agent certificate path for the PEM
agent, or accept the defaults. Click Next to continue to the Ready to Install dialog
(shown in Figure 3.27).

EDB Postgres Enterprise Manager Installation Guide
Copyright © 2013 - 2017 EnterpriseDB Corporation. All rights reserved.
41
The wizard is now ready to install the PEM server.
Figure 3.27 - The installation is ready to begin.
Click Back to modify any of the options previously selected, or Next to proceed with the
installation (see Figure 3.28).

EDB Postgres Enterprise Manager Installation Guide
Copyright © 2013 - 2017 EnterpriseDB Corporation. All rights reserved.
42
Figure 3.28 - The installation in progress.
During the installation process, the installer will copy files to the system, and set up the
PEM server's backend database. A popup dialog opens (shown in Figure 3.29)
confirming that the pem database has been created and configured.
Figure 3.29 - Click OK to confirm that the pem database has been created.
Click OK to acknowledge that the pem database has been created, and continue to the
Completed… dialog (shown in Figure 3.30).

EDB Postgres Enterprise Manager Installation Guide
Copyright © 2013 - 2017 EnterpriseDB Corporation. All rights reserved.
43
Figure 3.30 - The PEM server installation is complete.
When the database portion of the PEM server installation is completed, you can invoke
the PEM server on another host to install (or upgrade) ApacheHTTPD.

EDB Postgres Enterprise Manager Installation Guide
Copyright © 2013 - 2017 EnterpriseDB Corporation. All rights reserved.
44
3.1.2.2 Installing Web Services
Selecting the Web Services radio button on the Advanced options dialog (Figure
3.31) instructs the PEM server installer to either install ApacheHTTPD on the current
host or update an existing ApacheHTTPD installation.
Figure 3.31 - Selecting the Web Services option on the Advanced options dialog.
Please note that the current host may not be the host of the PEM backing database.
Before selecting this option, you must have:
Completed an installation of the PEM server installer on a host system, during
which you specified a backing database for the PEM server.
Modified the pg_hba.conf file on the PEM server database host to allow
connections from the ApacheHTTPD host, and restarted the database server. For
more information about modifying the pg_hba.conf file, see Section 8.1.
When you select the Web Services option and click Next, the PEM server installer will
check the current host for existing ApacheHTTPD and LanguagePack installations. If the
installer does not locate the components, the installer will inform you that one or more
dependencies are missing (see Figure 3.32).

EDB Postgres Enterprise Manager Installation Guide
Copyright © 2013 - 2017 EnterpriseDB Corporation. All rights reserved.
45
Figure 3.32 –The installer has detected missing dependencies.
Click Next to instruct the server to instruct the server to install LanguagePack (see
Figure 3.33).
Figure 3.33 –The installer has detected missing dependencies.
After installing language pack, the installer will invoke the ApacheHTTPD Setup
Wizard (see Figure 3.34).

EDB Postgres Enterprise Manager Installation Guide
Copyright © 2013 - 2017 EnterpriseDB Corporation. All rights reserved.
46
Figure 3.34 - The ApacheHTTPD installation wizard.
Follow the onscreen instructions of the ApacheHTTPD Setup Wizard. When the
wizard completes the installation, click Finish to open the Database Server
Installation Details dialog (shown in Figure 3.35).

EDB Postgres Enterprise Manager Installation Guide
Copyright © 2013 - 2017 EnterpriseDB Corporation. All rights reserved.
47
Figure 3.35 - The Database Server Installation Details dialog.
Use the fields on the Database Server Installation Details dialog to provide
connection information for the Postgres installation that is hosting the PEM server
installation:
Enter the name or IP address of the PEM server host in the Host field.
Enter the port number on which the Postgres server is listening in the Port field.
Enter the name of a Postgres database superuser in the User field.
Enter the password associated with the Postgres superuser in the Password field.
Click Next to continue. Before completing the PEM server installation, the installer will
contact the database host. The pg_hba.conf file on the PEM database host must be
configured to accept connections from the host of the Apache server and the firewall
must allow a connection for the installation to continue. The PEM server installer will
complete the PEM server installation, adding only those items that must reside on the
host of the ApacheHTTPD server.

EDB Postgres Enterprise Manager Installation Guide
Copyright © 2013 - 2017 EnterpriseDB Corporation. All rights reserved.
48
3.1.3 Installing the PEM Server on an Existing Postgres Server
You can use an existing Postgres server (version 9.2 or later) to host the PEM server and
the pem database. Postgres installers and pre-requisite software extensions are freely
available from the EnterpriseDB website at:
http://www.enterprisedb.com/
This section provides information about configuring an existing Postgres server for a
PEM server installation. Please note that the steps that follow should be considered
guidelines only; the actual steps required to configure your Postgres installation will vary
depending on the configuration of your Postgres server.
The following versions of Postgres are pre-configured to contain the sslutils
extension and a service script; no additional preparation is required to use the following
Postgres versions as a PEM backend database server:
PostgreSQL 9.3 or later (as bundled with the PEM Server installer)
Advanced Server 9.2 or later
3.1.3.1 Preparing the Postgres Server
Before installing the PEM server on an existing Postgres server, you must:
Ensure that the Postgres server contains an installation of the sslutils
extension. For more information, see Section 3.1.3.1.1.
Create a service script (on Linux) or register the server with the Windows service
manager. For more information, see Section 3.1.3.1.2.
After preparing the server, you can use the PEM server installer to install PEM on the
existing Postgres server. For details, see Section 3.1.3.2.

EDB Postgres Enterprise Manager Installation Guide
Copyright © 2013 - 2017 EnterpriseDB Corporation. All rights reserved.
49
3.1.3.1.1 Installing the sslutils Extension
The Postgres server on which the PEM server will reside must contain the sslutils
extension. The sslutils package is freely available for download from the
EnterpriseDB website at:
https://www.enterprisedb.com/advanced-downloads
When the web page opens, select the link for the SSL Utils 1.1 package. When the
download completes, extract the file, and copy it into the Postgres installation directory.
On Linux
If the Postgres server resides on a Linux system, use make to build the sslutils
module:
1. Set the value of PATH so it can locate the pg_config program:
export PATH=$PATH:/opt/postgres_inst_dir/9.x/bin/
2. Then, use yum to install the sslutil dependencies:
yum install openssl-devel
3. Move into the sslutils folder, and enter:
make USE_PGXS=1
make USE_PGXS=1 install
On Windows
Remember: You are not required to manually add the sslutils extension when using
the following Postgres installations:
PostgreSQL 9.3 or later (as distributed with the PEM server installer)
Advanced Server 9.2 or later
sslutils must be built with the same compiler that was used to compile the backend
Postgres installation. If you are using a backend Postgres database that was installed on a
Windows platform using a PostgreSQL one-click installer (from EnterpriseDB) or an
Advanced Server installer, you must use Visual Studio to build sslutils. If you are
using:
PostgreSQL 9.2 or 9.3, use Visual Studio 2010

EDB Postgres Enterprise Manager Installation Guide
Copyright © 2013 - 2017 EnterpriseDB Corporation. All rights reserved.
50
While specific details of the installation process will vary by platform and compiler, the
basic steps are the same. You must:
1. Copy the sslutils package to the Postgres installation directory.
2. Open the command line of the appropriate compiler, and navigate into the
sslutils directory.
3. Use the following commands to build sslutils:
SET USE_PGXS=1
SET GETTEXTPATH=path_to_gettext
SET OPENSSLPATH=path_to_openssl
SET PGPATH=path_to_pg_installation_dir
SET ARCH=x86
REM Set ARCH x64 for 64 bit
msbuild sslutils.proj /p:Configuration=Release
Where:
path_to_gettext specifies the location of the GETTEXT library and header
files.
path_to_openssl specifies the location of the openssl library and header
files.
path_to_pg_installation_dir specifies the location of the Postgres
installation.
4. Copy the compiled sslutils files to the appropriate directory for your
installation. The sslutils directory will contain the following files:
sslutils--1.1.sql
sslutils--unpackaged--1.1.sql
sslutils--pemagent.sql.in
sslutils.dll
Copy the .dll libraries and .sql files into place:
COPY sslutils*.sql* "%PGPATH%\share\extension\"
COPY sslutils.dll "%PGPATH%\lib\"

EDB Postgres Enterprise Manager Installation Guide
Copyright © 2013 - 2017 EnterpriseDB Corporation. All rights reserved.
51
3.1.3.1.2 Creating a Service Script or Registering the Service
A service script allows the PEM server to start, stop or restart the server if necessary
when performing configuration management, certificate management, or other
administrative tasks.
When you install a PostgreSQL or an Advanced Server database using an installer from
EnterpriseDB (such as the PostgreSQL one-click installer), the installer will create a
service script, or on Windows, register the service for you. If you have built the Postgres
installation from source, you are required to manually create a service script.
While the PEM server installer checks for the presence of the service script, it does not
check the integrity of the script itself; for PEM to function properly, you must ensure that
the service script works as expected.
Writing a Linux Service Script
On Linux, the service script must reside in the /etc/init.d directory. The service
script must be able to start, stop and restart the database server. Service scripts are
platform-specific; you can find a sample service script in Appendix A, Linux Service
Script (Sample), and information about creating a Postgres service and writing a custom
Postgres service script at:
http://www.postgresql.org/docs/9.6/static/server-start.html
Registering a Service on Windows
If you are using Windows to host the PEM backend database, you must register the name
of the Postgres server with the Windows service manager. If you are using a Postgres
server that was created using an EnterpriseDB installer, the service will be registered
automatically. If you are manually building the installation, you can use the register
clause of the Postgres pg_ctl command to register the service. The syntax of the
command is:
pg_ctl register [-N service_name] [-U user_name]
[-P password] [-D data_directory]
Where:
service_name specifies the name of the Postgres cluster.

EDB Postgres Enterprise Manager Installation Guide
Copyright © 2013 - 2017 EnterpriseDB Corporation. All rights reserved.
52
user_name specifies the name of an operating system user with sufficient
privileges to access the Postgres installation directory and start the Postgres
service.
password specifies the operating system password associated with the user.
data_directory specifies the location of the Postgres data directory.
For more information about using the pg_ctl command and the available command
options, see the Postgres core documentation, available at:
http://www.postgresql.org/docs/9.6/static/app-pg-ctl.html

EDB Postgres Enterprise Manager Installation Guide
Copyright © 2013 - 2017 EnterpriseDB Corporation. All rights reserved.
53
3.1.3.2 Invoking the PEM Server Installer
After preparing the existing Postgres server, invoke the PEM server installer. Assume
superuser (or, on Windows, Administrative) privileges and navigate into the directory
that contains the installer. Then, invoke the installer with the command:
./pem_server-6.x.x-x-platform.ext
The installer displays a Welcome dialog (shown in Figure 3.36).
Figure 3.36 - The PEM Server Installer's Welcome dialog.
Click Next to continue to the License Agreement dialog (shown in Figure 3.37).

EDB Postgres Enterprise Manager Installation Guide
Copyright © 2013 - 2017 EnterpriseDB Corporation. All rights reserved.
54
Figure 3.37 - The License Agreement.
Carefully review the license agreement before highlighting the appropriate radio button
and accepting the agreement; click Next to continue to the Registration required…
dialog (shown in Figure 3.38).

EDB Postgres Enterprise Manager Installation Guide
Copyright © 2013 - 2017 EnterpriseDB Corporation. All rights reserved.
55
The Registration required… dialog asks if you have already signed up for an
EnterpriseDB user account; select the appropriate option before clicking Next.
Figure 3.38 - Select a registration option.
If you have not signed up for an EnterpriseDB user account, click Next to open a web
browser, displaying the EnterpriseDB User Login/Registration page of the
EnterpriseDB website.
If you have an EnterpriseDB user account, click Next to continue to the EnterpriseDB
User Account Information dialog (shown in Figure 3.39).

EDB Postgres Enterprise Manager Installation Guide
Copyright © 2013 - 2017 EnterpriseDB Corporation. All rights reserved.
56
Figure 3.39 - Enter your EnterpriseDB user account information.
After providing your registered Email address and Password, click Next to continue
to the Installation Directory dialog (shown in Figure 3.40).

EDB Postgres Enterprise Manager Installation Guide
Copyright © 2013 - 2017 EnterpriseDB Corporation. All rights reserved.
57
Figure 3.40 - The Installation Directory dialog.
Use the Installation Directory dialog (shown in Figure 3.40) to specify the
location of the PEM server, and access the Advanced options dialog:
Use the Installation Directory field to open a browser dialog and select the
directory in which the PEM server will be installed.
If you are installing the PEM server on an existing server, check the box next to
Show advanced options to instruct the installer to include the Advanced
options dialog in the installation process.
Click Next to continue.

EDB Postgres Enterprise Manager Installation Guide
Copyright © 2013 - 2017 EnterpriseDB Corporation. All rights reserved.
58
Figure 3.41 - The Advanced Options dialog.
Use the radio buttons on the Advanced options dialog (shown in Figure 3.41) to
specify an installation type. Select:
Web Services and Database if both the Postgres server and the
ApacheHTTPD server will reside on the current host. This option is valid if you
are using an existing Postgres server to host the PEM server, or using the PEM
server installer to install the Postgres server on which the PEM server will reside.
If you select Web Services and Database, the PEM server installer will check
the current host for an ApacheHTTPD installation, and upgrade or install
ApacheHTTPD if necessary.
Web Services if only the ApacheHTTPD server will reside on the current host.
See Section 3.1.2.2 for more information about invoking this option.
Database if you are installing only the PEM server (and creating the pem
backend database) on the current host. This option is valid if you are using an
existing Postgres server to host the PEM server, or using the PEM server installer
to install the PostgreSQL server on which PEM will reside.

EDB Postgres Enterprise Manager Installation Guide
Copyright © 2013 - 2017 EnterpriseDB Corporation. All rights reserved.
59
After selecting an installation option, click Next to continue.
Figure 3.42 - The Database Server Selection dialog.
Use the drop-down listbox on the Database Server Selection dialog (Figure 3.42)
to select a Postgres backend database for the PEM server:
Select the name of a Postgres server on the current host that was installed using a
Postgres one-click installer or Advanced Server installer.
Select the PostgreSQL 9.6 (Packaged) option to instruct the installation
wizard to install and use the PostgreSQL server that is packaged with the PEM
server installer.
Select Other Database Server to instruct the PEM server installer to use a
Postgres database (version 9.2 or later) that was installed from a source other than
an EnterpriseDB installer (i.e. from an rpm, or built from source).
Note that the selected database server must include an installation of the
sslutils contrib module, and have a startup script (on Linux) or a registered
service (on Windows). For information about Preparing the Postgres Server,
please see Section 3.1.3.1.

EDB Postgres Enterprise Manager Installation Guide
Copyright © 2013 - 2017 EnterpriseDB Corporation. All rights reserved.
60
If you selected Web Services and Database on the Advanced options dialog, the
installation wizard will check the current host for an existing ApacheHTTPD installation,
and upgrade or install the service as needed.
If you selected Database on the Advanced options dialog, the Database Server
Installation Details dialog (shown in Figure 3.43) opens.
Figure 3.43 - The Database Server Installation Details dialog.
Use the fields on the Database Server Installation Details dialog to describe
the connection to the Postgres server that will host the PEM server:
Enter the port number on which the Postgres server listens in the Port field.
Enter the name of a database superuser in the User field.
Enter the password associated with the superuser in the Password field.
Enter the name of the service script for the Postgres server in the Service Name
field.

EDB Postgres Enterprise Manager Installation Guide
Copyright © 2013 - 2017 EnterpriseDB Corporation. All rights reserved.
61
Please note: For information about preparing a service script, please see Section
3.1.3.1.2.
Click Next to continue.
Figure 3.44 - Supply the network address from which the agent will connect.
Use the Network Details dialog (Figure 3.44) to specify the CIDR-style network
address from which the PEM agents will connect to the server (the client-side address).
The specified address will be added to the server's pg_hba.conf file.
You can specify additional network addresses by manually adding entries to the
pg_hba.conf file on the PostgreSQL server if required, using the initial entry as a
template. For more information about modifying the pg_hba.conf file, see Section 8.1.
When you've added the Network address, click Next to continue to the Agent
Details dialog (shown in Figure 3.45).

EDB Postgres Enterprise Manager Installation Guide
Copyright © 2013 - 2017 EnterpriseDB Corporation. All rights reserved.
62
The PEM server installer will install a PEM agent to the host on which the server resides,
to monitor the server and provide alert processing and garbage collection services. A
certificate will also be installed in the location specified in the Agent certificate
path field.
Figure 3.45 - Provide a Description for the agent that resides on the server.
You can enter an alternate description or an alternate agent certificate path for the PEM
agent, or accept the defaults. Click Next to continue to the Ready to Install dialog
(shown in Figure 3.46).
The wizard is now ready to install the PEM server.

EDB Postgres Enterprise Manager Installation Guide
Copyright © 2013 - 2017 EnterpriseDB Corporation. All rights reserved.
63
Figure 3.46 - The installation is ready to begin.
Click Back to modify any of the options previously selected, or Next to continue with
the installation (see Figure 3.47).

EDB Postgres Enterprise Manager Installation Guide
Copyright © 2013 - 2017 EnterpriseDB Corporation. All rights reserved.
64
Figure 3.47 - The installation in progress.
During the installation process, the installer will copy files to the system, and set up the
PEM server's backend database. A popup dialog opens (shown in Figure 3.48)
confirming that the pem database has been created and configured.
Figure 3.48 - Click OK to confirm that the pem database has been created.
Click OK to acknowledge that the pem database has been created, and continue to the
Completed… dialog (shown in Figure 3.49).

EDB Postgres Enterprise Manager Installation Guide
Copyright © 2013 - 2017 EnterpriseDB Corporation. All rights reserved.
65
Figure 3.49 - The PEM server installation is complete.
If you are using an ApacheHTTPD service that resides on a separate host, you must:
Modify the pg_hba.conf file on the Postgres server host. See Section 8.1 for
more details.
Invoke the PEM server installer on the host of the ApacheHTTPD server. See
Section 3.1.2.2 for more information about installing ApacheHTTPD.

EDB Postgres Enterprise Manager Installation Guide
Copyright © 2013 - 2017 EnterpriseDB Corporation. All rights reserved.
66
3.2 Using the PEM Web Interface
The PEM server installer installs the PEM client web interface. You can use the client to
review information about objects that reside on monitored servers, or to review statistical
information gathered by the PEM server.
You can use the PEM client in your browser of choice to access the PEM server. The
client is distributed with, and installed by the PEM server installer. To open the PEM
web client, open your browser, and navigate to:
https://ip_address_of_PEM_host:8080/pem
Where ip_address_of_PEM_host specifies the IP address of the host of the PEM
server. The Postgres Enterprise Manager Web Login window (shown in Figure
3.2) opens:
Figure 3.2 - The PEM Web Login page.
Use the fields on the Postgres Enterprise Manager Login window to authenticate
yourself with the PEM server:
Provide the name of a pem database user in the Username field. For the first user
connecting, this will be the name provided when installing the PEM server.

EDB Postgres Enterprise Manager Installation Guide
Copyright © 2013 - 2017 EnterpriseDB Corporation. All rights reserved.
67
Provide the password associated with the user in the Password field.
Click the Login button to connect to the PEM server.
If you are using a PEM Trial Licence, the Product Registration dialog (Figure
3.51) will open, and offer you the opportunity to register your copy of PEM.
Figure 3.51 - The Product Registration dialog.
Enter the Product Key and press Register to register your installation, or press Cancel
to connect using available time on the Trial Licence. The PEM client opens as shown
in Figure 3.52.

EDB Postgres Enterprise Manager Installation Guide
Copyright © 2013 - 2017 EnterpriseDB Corporation. All rights reserved.
68
Figure 3.52 - The PEM Client.
To access online help information about the PEM client, by select Help from the PEM
menu bar (see Figure 3.53).
EDB Postgres Enterprise Manager Installation Guide
Copyright © 2013 - 2017 EnterpriseDB Corporation. All rights reserved.
69
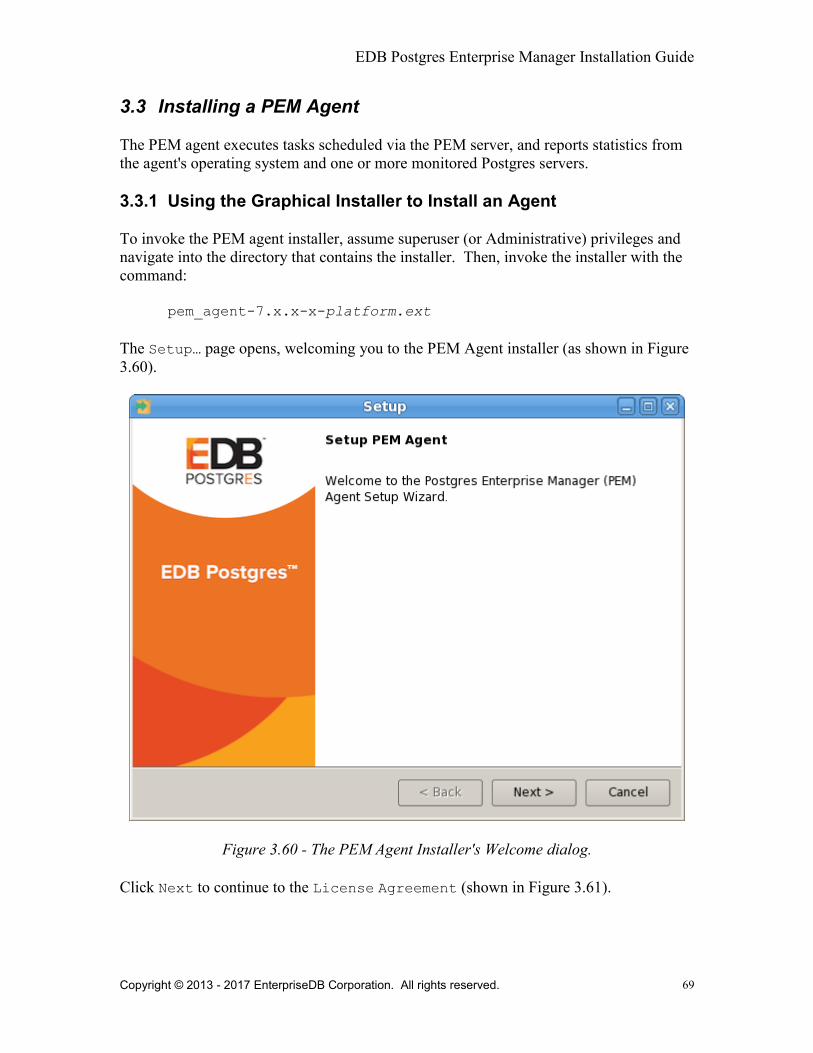
3.3 Installing a PEM Agent
The PEM agent executes tasks scheduled via the PEM server, and reports statistics from
the agent's operating system and one or more monitored Postgres servers.
3.3.1 Using the Graphical Installer to Install an Agent
To invoke the PEM agent installer, assume superuser (or Administrative) privileges and
navigate into the directory that contains the installer. Then, invoke the installer with the
command:
pem_agent-7.x.x-x-platform.ext
The Setup… page opens, welcoming you to the PEM Agent installer (as shown in Figure
3.60).
Figure 3.60 - The PEM Agent Installer's Welcome dialog.
Click Next to continue to the License Agreement (shown in Figure 3.61).

EDB Postgres Enterprise Manager Installation Guide
Copyright © 2013 - 2017 EnterpriseDB Corporation. All rights reserved.
70
Figure 3.61 - The PEM Client License Agreement.
Carefully review the license agreement before highlighting the appropriate radio button
and accepting the agreement; click Next to continue to the Installation Directory
dialog (shown in Figure 3.62).

EDB Postgres Enterprise Manager Installation Guide
Copyright © 2013 - 2017 EnterpriseDB Corporation. All rights reserved.
71
Figure 3.62 - Specify an Installation Directory
By default, the PEM agent is installed in the /home/opt/PEM directory. You can accept
the default installation directory, or modify the contents of the Installation
Directory field, specifying an alternate installation directory for the PEM agent.
By default, the PEM agent installer places a certificate in ~root/.pem (on Linux) or in
the Administrator’s %APPDATA%\pem directory (on Windows). Check the Show
advanced options box to indicate that you would like the PEM agent installer to
include a dialog that allows you to specify an alternate path for the certificate file.
Click Next to continue to the PEM Server Installation Details dialog (shown in
Figure 3.63).
EDB Postgres Enterprise Manager Installation Guide
Copyright © 2013 - 2017 EnterpriseDB Corporation. All rights reserved.
72
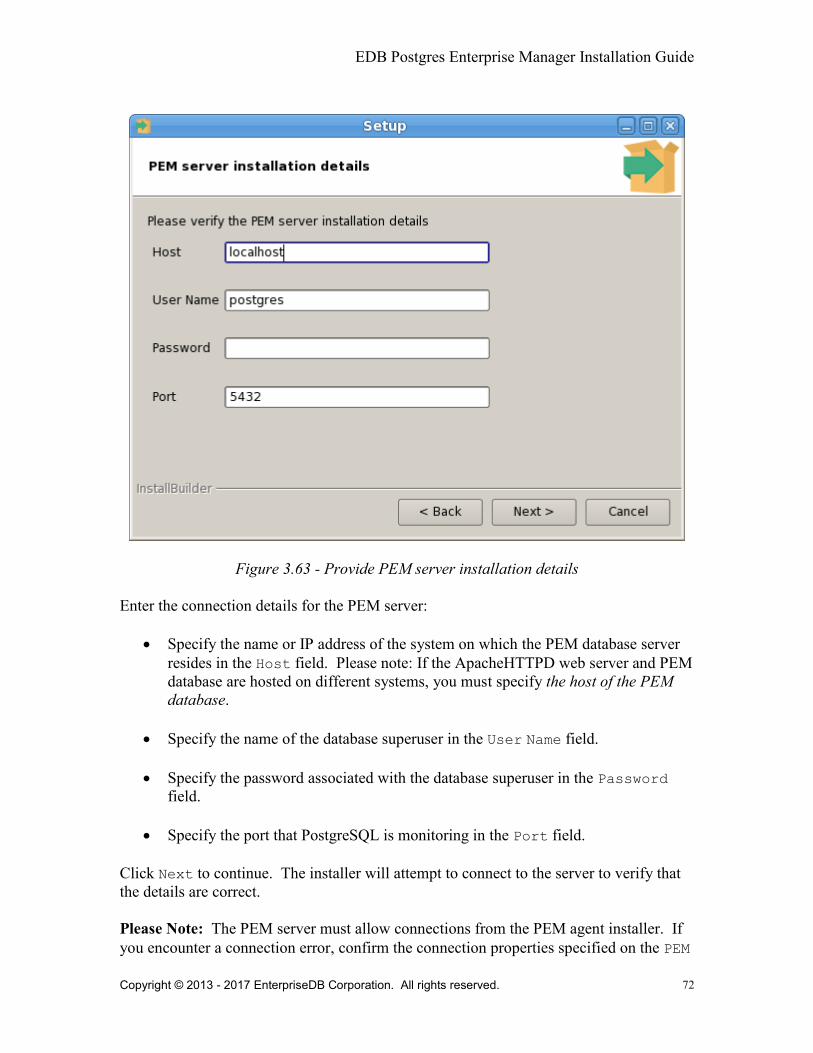
Figure 3.63 - Provide PEM server installation details
Enter the connection details for the PEM server:
Specify the name or IP address of the system on which the PEM database server
resides in the Host field. Please note: If the ApacheHTTPD web server and PEM
database are hosted on different systems, you must specify the host of the PEM
database.
Specify the name of the database superuser in the User Name field.
Specify the password associated with the database superuser in the Password
field.
Specify the port that PostgreSQL is monitoring in the Port field.
Click Next to continue. The installer will attempt to connect to the server to verify that
the details are correct.
Please Note: The PEM server must allow connections from the PEM agent installer. If
you encounter a connection error, confirm the connection properties specified on the PEM

EDB Postgres Enterprise Manager Installation Guide
Copyright © 2013 - 2017 EnterpriseDB Corporation. All rights reserved.
73
Server Installation Details dialog are correct, and confirm that the
pg_hba.conf file (on the PEM server) will allow a connection to the server described in
the error message. For information about modifying the pg_hba.conf file, see Section
8.1.
Figure 3.64 - Specify a descriptive name for the PEM agent
The PEM client tree control displays the value entered in the Description field,
(shown in Figure 3.64) to identify the PEM agent. Specify a descriptive name for the
agent, such as the hostname of the machine the agent is installed on, or a name that
reflects the host's functionality.
Provide a descriptive name, or accept the default provided by the PEM agent host, and
click Next to continue.

EDB Postgres Enterprise Manager Installation Guide
Copyright © 2013 - 2017 EnterpriseDB Corporation. All rights reserved.
74
If you checked the Show advanced options checkbox shown in Figure 3.24, the
Advanced options dialog opens (shown in Figure 3.65).
Figure 3.65 – Provide the certificate path
By default, the PEM agent installer places the certificate in the /root/.pem directory.
Specify an alternate path for the certificate or accept the default and click Next.
The wizard is now ready to install the PEM agent; click Back to amend the installation
directory, or Next to continue.

EDB Postgres Enterprise Manager Installation Guide
Copyright © 2013 - 2017 EnterpriseDB Corporation. All rights reserved.
75
Figure 3.66 - The PEM Agent installation is ready to begin
Click Next on the Ready to Install dialog (shown in Figure 3.66) to instruct the
installer to copy files to the system and register the agent on the PEM server.

EDB Postgres Enterprise Manager Installation Guide
Copyright © 2013 - 2017 EnterpriseDB Corporation. All rights reserved.
76
Figure 3.67 - Progress bars mark the installation's progress
The PEM agent installer displays progress bars (shown in Figure 3.67) to mark the PEM
agent's installation progress.
EDB Postgres Enterprise Manager Installation Guide
Copyright © 2013 - 2017 EnterpriseDB Corporation. All rights reserved.
77
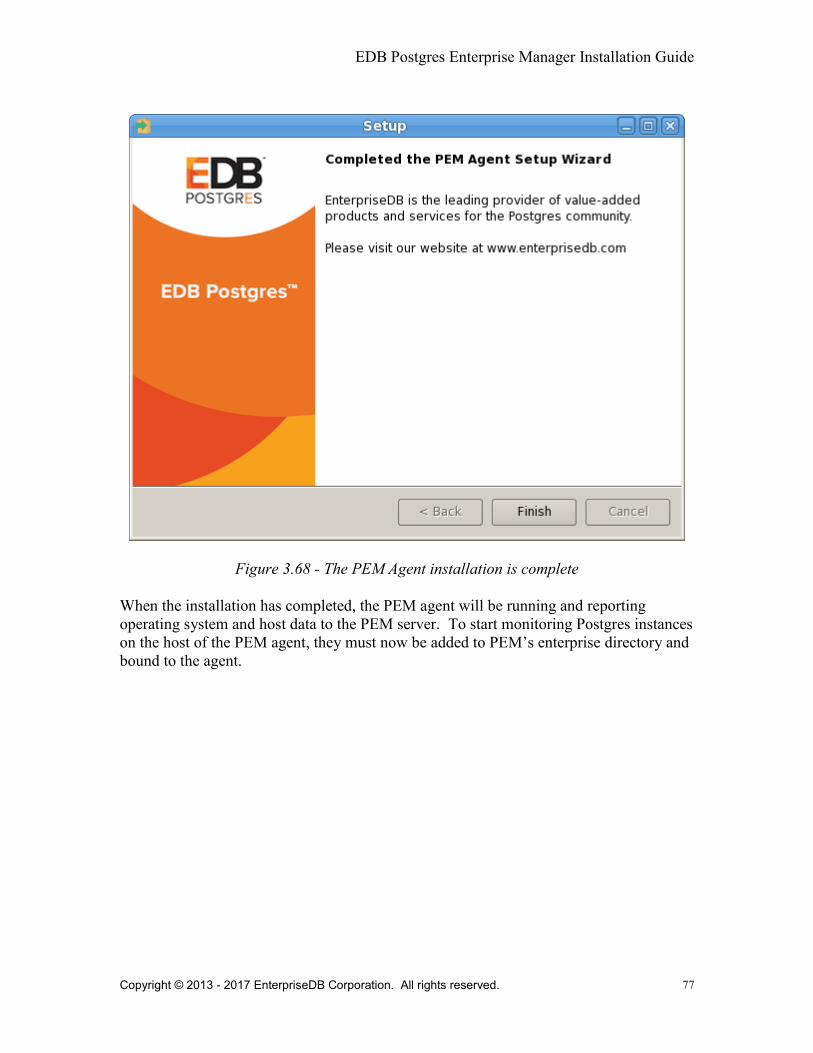
Figure 3.68 - The PEM Agent installation is complete
When the installation has completed, the PEM agent will be running and reporting
operating system and host data to the PEM server. To start monitoring Postgres instances
on the host of the PEM agent, they must now be added to PEM’s enterprise directory and
bound to the agent.

EDB Postgres Enterprise Manager Installation Guide
Copyright © 2013 - 2017 EnterpriseDB Corporation. All rights reserved.
78
3.3.2 Installing an Agent with an RPM Package
On a Linux system, you can use the yum package manager to install a PEM agent. Please
note that before using a package manager to install the PEM agent, the host must contain
the following packages:
epel-release
wxBase
After providing the pre-requisite packages, you can install the PEM agent:
1. Download the edb-repo installation package from:
http://yum.enterprisedb.com/
The edb-repo package creates the repository configuration file (named
edb.repo). The edb.repo file defines multiple repositories hosted at
EnterpriseDB.com.
2. Assume superuser privileges and use the following command to install the edb-
repo package, and create the repository configuration file:
rpm -Uvh edb-repo-9.x-x.noarch.rpm
Where x specifies the version of the file.
Then, use your choice of editor to modify the configuration file, enabling the
enterprisedb-tools and enterprisedb-dependencies repositories. The
configuration file is named edb.repo; it resides in /etc/yum.repos.d.
To enable a repository, change the value of the enabled parameter to 1 and
replace the user_name and password placeholders in the baseurl
specification with your repository credentials. Contact EnterpriseDB for
repository credentials.
For example:
[enterprisedb-tools]
name=EnterpriseDB Tools $releasever - $basearch
baseurl=http://user_name:[email protected]/tool
s/redhat/rhel-$releasever-$basearch
enabled=1
gpgcheck=1
gpgkey=file:///etc/pki/rpm-gpg/ENTERPRISEDB-GPG-KEY
[enterprisedb-dependencies]
name=EnterpriseDB Dependencies $releasever - $basearch

EDB Postgres Enterprise Manager Installation Guide
Copyright © 2013 - 2017 EnterpriseDB Corporation. All rights reserved.
79
baseurl=http://user_name:[email protected]/depe
ndencies/redhat/rhel-$releasever-$basearch
enabled=1
gpgcheck=1
gpgkey=file:///etc/pki/rpm-gpg/ENTERPRISEDB-GPG-KEY
[edbas96]
name=EnterpriseDB Advanced Server 9.6 $releasever -
$basearch
baseurl=http://user_name:[email protected]/9.6/
redhat/rhel-$releasever-$basearch
enabled=1
gpgcheck=1
gpgkey=file:///etc/pki/rpm-gpg/ENTERPRISEDB-GPG-KEY
3. After modifying the content of the repository configuration file, you can use yum
to install the PEM agent:
yum install pem-agent
When the installation is complete, yum will display a list of the installed packages and
dependencies (see Figure 3.69).
Figure 3.69 – Using an RPM package to install the PEM agent.
When you install an RPM package that is signed by a source that is not recognized by
your system, yum may ask for your permission to import the key to your local server. If
prompted, and you are satisfied that the packages come from a trustworthy source, enter a
y, and press Return to continue.

EDB Postgres Enterprise Manager Installation Guide
Copyright © 2013 - 2017 EnterpriseDB Corporation. All rights reserved.
80
During the installation, yum may encounter a dependency that it cannot resolve. If it
does, it will provide a list of the required dependencies that you must manually resolve.
3.3.2.1 Configuring an Agent after an RPM Installation
The RPM installer places the PEM agent in the /usr/pem/agent/bin directory. After
installing the PEM agent, you must use the pemworker.exe binary to register the agent
with the PEM server. To review a list of the registration keywords for the PEM agent,
navigate into the installation directory, assume superuser privileges, and enter:
# ./pemworker --help
Use the keywords displayed by the --help command with the –register-agent
command to specify registration details for the agent. For example:
# PGPASSWORD=password ./pemworker -–register-agent
-–pem-server ip_address -–pem-port port_no
-–pem-user user_name
Where:
password specifies the password associated with the PEM user account.
ip_address specifies the IP address of the PEM server.
port_no specifies the port that PEM monitors for connections.
user_name specifies the name of the PEM user.
You can also include the options shown in the table below in your call to the pemworker
program.
Option Description -c Include –c to specify the name of a configuration file that contains
pemworker options. -o Include –o to specify option=value pairs in the call to pemworker. -f Include –f to instruct pemworker to run in the foreground (without
detaching from the terminal). -t Include –t and the number of seconds between poll times; the default
value is 10. -r Include –r, and the number of seconds that you would like the
pemworker to wait before attempting another connection if a connection aborts.
-s Use –s to specify the location to which logfiles will be written; if not specified, output is directed to STDOUT.
-l Include –l to specify logging verbosity. Specify ERROR, WARNING,

EDB Postgres Enterprise Manager Installation Guide
Copyright © 2013 - 2017 EnterpriseDB Corporation. All rights reserved.
81
DEBUG1, or DEBUG2; the default is ERROR. --register-agent Include --register-agent to register an agent with the PEM server. --register-server Include --register-server to register a database server. --unregister-server Include -- unregister-server to unregister a database server. --pem-server Include --pem-server and the name of the host or IP address of the
PEM server. --pem-port Include --pem-port to specify the port number on which the PEM
server is listening. --pem-user username Include --pem-user to specify the name of the pem user. --cert-path Include --cert-path to specify the complete path to the SSL
certificate file. The default value is /.pem. --config-dir Include --config-dir to specify the path to the configuration file. --display-name Include --display-name to specify the name of a system host. --force-
registration Include --force-registration to force the registration of the PEM agent with the server, using the options provided.
--use-systemd-
service Include --use-systemd-service to specify that the agent resides on a host that is using systemd.
-v/--version Include –v or –-version to display the supported schema version and exit the binary.
The PEM agent RPM installer creates a sample configuration file named
agent.cfg.sample. When you register the PEM agent, the pemworker program
creates the actual agent configuration file (named agent.cfg). Both files reside in
/usr/pem-7.x/etc. You must modify the agent.cfg file, adding the following
configuration parameter:
heartbeat_connection = true
You must also add the location of the ca-bundle.crt file (the certificate authority).
By default, the installer creates a ca-bundle.crt file in the location specified in your
agent.cfg.sample file. You can copy the default parameter value from the sample
file, or, if you use a ca-bundle.crt file that is stored in a different location, specify
that value in the ca_file parameter:
ca_file=/usr/libexec/libcurl-pem7/share/certs/ca-bundle.crt
Then, start the PEM agent service:
# /etc/init.d/pemagent
The service will confirm that it is starting the agent; when the agent is registered and
started, it will be displayed on the Global Overview dashboard and in the Object
browser tree control of the PEM client.

EDB Postgres Enterprise Manager Installation Guide
Copyright © 2013 - 2017 EnterpriseDB Corporation. All rights reserved.
82
3.3.3 PEM Agent Privileges
By default, the PEM agent is installed with root privileges for the operating system host
and superuser privileges for the database server. These privileges allow the PEM agent
to invoke unrestricted probes on the monitored host and database server about system
usage, retrieving and returning the information to the PEM server.
Please note that PEM functionality diminishes as the privileges of the PEM agent
decrease. For complete functionality, the PEM agent should run as root. If the PEM
agent is run under the database server's service account, PEM probes will not have
complete access to the statistical information used to generate reports, and functionality
will be limited to the capabilities of that account. If the PEM agent is run under another
lesser-privileged account, functionality will be limited even further.
Please note that if you limit the operating system privileges of the PEM agent, some of
the PEM probes will not return information, and the following functionality may be
affected:
Probe or Action Operating System PEM Functionality Affected
Data And Logfile Analysis Linux/Windows The Postgres Expert will be unable to
access complete information.
Session Information Linux The per-process statistics will be
incomplete.
PG HBA Linux/Windows The Postgres Expert will be unable to
access complete information.
Service restart functionality Linux/Windows The Audit Log Manager, Server Log
Manager, Log Analysis Expert and PEM
may be unable to apply requested
modifications.
Package Deployment Linux/Windows PEM will be unable to run downloaded
installation modules.
Batch Task Windows PEM will be unable to run scheduled
batch jobs in Windows.
If you restrict the database privileges of the PEM agent, the following PEM functionality
may be affected:
Probe Operating System PEM Functionality Affected
Audit Log Collection Linux/Windows PEM will receive empty data
from the PEM database.
Server Log Collection Linux/Windows PEM will be unable to collect
server log information.
Database Statistics Linux/Windows The Database/Server Analysis
dashboards will contain
incomplete information.
Session Waits/System Waits Linux/Windows The Session/System Waits
dashboards will contain
incomplete information.
Locks Information Linux/Windows The Database/Server Analysis
dashboards will contain

EDB Postgres Enterprise Manager Installation Guide
Copyright © 2013 - 2017 EnterpriseDB Corporation. All rights reserved.
83
incomplete information.
Streaming Replication Linux/Windows The Streaming Replication
dashboard will not display
information.
Slony Replication Linux/Windows Slony-related charts on the
Database Analysis dashboard
will not display information.
Tablespace Size Linux/Windows The Server Analysis dashboard
will not display complete
information.
xDB Replication Linux/Windows PEM will be unable to send xDB
alerts and traps.
If the probe is querying the operating system with insufficient privileges, the probe may
return a permission denied error.
If the probe is querying the database with insufficient privileges, the probe may return a
permission denied error or display the returned data in a PEM chart or graph as an
empty value.
When a probe fails, an entry will be written to the log file that contains the name of the
probe, the reason the probe failed, and a hint that will help you resolve the problem.
You can view probe-related errors that occurred on the server in the Probe Log
Dashboard, or review error messages in the PEM worker log files. On Linux, the default
location of the log file is:
/var/log/pem/worker.log
On Windows, log information is available on the Event Viewer.

EDB Postgres Enterprise Manager Installation Guide
Copyright © 2013 - 2017 EnterpriseDB Corporation. All rights reserved.
84
3.4 Invoking the Server or Agent Installers from the Command Line
The command line options of the PEM server and PEM agent installers offer
functionality in situations where a graphical installation may not work because of limited
resources or system configuration. You can:
Include the --mode unattended option when invoking the installer to perform
an installation without additional user input.
Include the --mode text option when invoking the installer to perform an
installation from the command line with an interactive installer.
Not all command line options are suitable for all platforms. For a complete reference
guide to the command line options, include the --help option when you invoke the
installer.
3.4.1 Invoking the PEM Server Installer in Unattended Mode
You can perform an unattended PEM server installation by providing installation
preferences on the command line when invoking the installer. Please note that the system
on which you are installing the PEM server must have internet access.
On Linux
Before invoking the installer, you must disable SE Linux; for more information, see
Section 2.3. You must be a superuser to install the PEM server.
The PEM server installer has three dependencies:
PostgreSQL
pem-httpd
Language Pack
You can use the PEM server installer to satisfy the dependencies of the PEM server; use
the following command to extract the dependencies:
./pem-server-7.x.x-linux-x64.run --extract-dependents /opt
In our example, the files are extracted to the /opt directory. After extracting the files,
you must install each program. Navigate into the directory that contains the files (in our
example, /opt), and enter:

EDB Postgres Enterprise Manager Installation Guide
Copyright © 2013 - 2017 EnterpriseDB Corporation. All rights reserved.
85
./edb-languagepack-10-1-linux-x64.run --mode unattended
./pem-httpd-2.4.25-1-linux-x64.run --mode unattended
./postgresql-9.6.2-3-linux-x64.run --mode unattended
Then, you can invoke the PEM server installer:
./pem-server-7.x.x-linux-x64.run --mode unattended
--existing-user registered_edb_user --existing-password
edb_user_password --pgport port --pguser postgres
--pgpassword postgres -–cidr-address cidr_address_range
Where:
registered_edb_user specifies the name of a registered EnterpriseDB user.
To register, visit the EDB website at: https://www.enterprisedb.com/user/register
edb_user_password specifies the password associated with the EDB user
account.
port specifies the port used by the backing PostgreSQL database; by default, the
PostgreSQL database uses port 5432.
cidr_address_range specifies the address range that will be added to the
pg_hba.conf file of the PEM server's backing database to allow connections
from the agents that will be monitored by the server. You may wish to specify a
network range (for example, 192.168.2.0/24) to provide server access to agents
that reside on the same network.
Please note: when invoked in unattended mode, the PostgreSQL installer creates a user
named postgres, with a password of postgres.
When the installation completes, the installer will notify you that the webservice is
installed and the port number that it is monitoring:
Configured the webservice for Postgres Enterprise Manager (PEM)
Server on port '8443'
On Windows
You must have Administrative privileges to install the PEM server. Before invoking the
PEM server installer, you must install the following dependencies:
PostgreSQL
pem-httpd
Language Pack

EDB Postgres Enterprise Manager Installation Guide
Copyright © 2013 - 2017 EnterpriseDB Corporation. All rights reserved.
86
You can use the PEM server installer to satisfy the dependencies of the PEM server; use
the following command to extract the dependencies. Navigate to the location of the
installer, and use the following command to extract the dependencies:
pem-server-7.x.x-windows-x64.exe --extract-dependents C:\
In our example, the files are extracted to the C:\ directory. After extracting the files, you
must install each program. Navigate into the directory that contains the files (in our
example, C:\), and enter:
edb-languagepack-10-1-windows-x64.exe --mode unattended
pem-httpd-2.4.25-1-windows-x64.exe --mode unattended
postgresql-9.6.2-3-windows-x64.exe --mode unattended
Then, you can invoke the PEM server installer:
pem-server-7.x.x-windows-x64.exe --mode unattended
--existing-user registered_edb_user --existing-password
edb_user_password --pgport port --pguser postgres
--pgpassword postgres -–cidr-address cidr_address_range --agent_description pem-agent --systempassword windows_password
--agent-crt-path C:\edb
Where:
registered_edb_user specifies the name of a registered EnterpriseDB user.
To register, visit the EDB website at: https://www.enterprisedb.com/user/register
edb_user_password specifies the password associated with the EDB user
account.
port specifies the port used by the backing PostgreSQL database; by default, the
PostgreSQL database uses port 5432.
cidr_address_range specifies the address range that will be added to the
pg_hba.conf file of the PEM server's backing database to allow connections
from the agents that will be monitored by the server. You may wish to specify a
network range (for example, 192.168.2.0/24) to provide server access to agents
that reside on the same network.
windows_password specifies the password associated with the Windows
Administrator's account.
Please note: when invoked in unattended mode, the PostgreSQL installer creates a user
named postgres, with a password of postgres.

EDB Postgres Enterprise Manager Installation Guide
Copyright © 2013 - 2017 EnterpriseDB Corporation. All rights reserved.
87
3.4.2 Invoking the PEM Agent Installer in Unattended Mode
You can perform an unattended PEM server installation by providing installation
preferences on the command line when invoking the installer. Please note that the system
on which you are installing the PEM server must have internet access.
On Linux
Before invoking the PEM agent installer in unattended mode, you must:
install the PEM server; the pg_hba.conf file of the PEM server must allow
connections from the host of the PEM agent.
disable SE Linux on the host of the PEM agent; for more information, see Section
2.3.
ensure that the monitored Postgres database has SSL enabled and is accepting
connections.
You must be a superuser to install the PEM agent. Use the following command to invoke
the PEM agent installer in unattended mode:
./pem-agent-7.x.x-linux-x64.run --mode unattended
--pghost pem_server_host_address --pgport pem_server_port
--pguser postgres --pgpassword pguser_password
--agent_description agent_name
Where:
pem_server_host_address specifies the IP address of the host of the PEM
server.
pem_server_port specifies the port used by the backing PEM database; by
default, the database uses port 5432.
pguser_password specifies the password associated with the PEM database
superuser.
agent_name specifies a descriptive name for the PEM agent.

EDB Postgres Enterprise Manager Installation Guide
Copyright © 2013 - 2017 EnterpriseDB Corporation. All rights reserved.
88
On Windows
Before invoking the PEM agent installer in unattended mode, you must:
install the PEM server; the pg_hba.conf file of the PEM server must allow
connections from the host of the PEM agent.
disable SE Linux on the host of the PEM agent; for more information, see Section
2.3.
ensure that the monitored Postgres database has SSL enabled, and is accepting
connections.
You must have Administrator privileges to install the PEM agent. Use the following
command to invoke the PEM agent installer in unattended mode:
pem-agent-7.x.x-windows-x64.exe --mode unattended
--pghost pem_server_host_address --pgport pem_server_port
--pguser postgres --pgpassword pguser_password
--agent_description agent_name
Where:
pem_server_host_address specifies the IP address of the host of the PEM
server.
pem_server_port specifies the port used by the backing PEM database; by
default, the database uses port 5432.
pguser_password specifies the password associated with the PEM database
superuser.
agent_name specifies a descriptive name for the PEM agent.

EDB Postgres Enterprise Manager Installation Guide
Copyright © 2013 - 2017 EnterpriseDB Corporation. All rights reserved.
89
3.4.3 Invoking the PEM Server Installer in Text Mode
You can invoke the PEM server installer at the command line to perform an interactive
installation if your system does not support a full graphical installation. Please note that
the system on which you are installing PEM must have internet access.
Invoking the Installer on Linux
Before invoking the installer, you must disable SE Linux; for more information, see
Section 2.3. You must be a superuser to install the PEM server.
The PEM server installer has three dependencies:
PostgreSQL
pem-httpd
Language Pack
You can use the PEM server installer to satisfy the dependencies of the PEM server; use
the following command to extract the dependencies:
./pem-server-7.x.x-linux-x64.run --extract-dependents /opt
In our example, the files are extracted to the /opt directory. After extracting the files,
you must install each program; in the example that follows, the dependencies are installed
in unattended mode. Navigate into the directory that contains the files (/opt), and enter:
./edb-languagepack-10-1-linux-x64.run --mode unattended
./pem-httpd-2.4.25-1-linux-x64.run --mode unattended
./postgresql-9.6.2-3-linux-x64.run --mode unattended
Then, invoke the installer with the command:
./pem-server-7.x.x-linux-x64.run --mode text
Invoking the Installer on Windows
You must have Administrative privileges to install the PEM server. Before invoking the
PEM server installer, you must install the following dependencies:
PostgreSQL
pem-httpd
Language Pack

EDB Postgres Enterprise Manager Installation Guide
Copyright © 2013 - 2017 EnterpriseDB Corporation. All rights reserved.
90
You can use the PEM server installer to satisfy the dependencies of the PEM server; use
the following command to extract the dependencies. Navigate to the location of the
installer, and use the following command to extract the dependencies:
pem-server-7.x.x-windows-x64.exe --extract-dependents C:\
In our example, the files are extracted to the C:\ directory. After extracting the files, you
must install each program; the following commands install the dependents in unattended
mode. Navigate into the directory that contains the files (C:\), and enter:
edb-languagepack-10-1-windows-x64.exe --mode unattended
pem-httpd-2.4.25-1-windows-x64.exe --mode unattended
postgresql-9.6.2-3-windows-x64.exe --mode unattended
Then, you can invoke the PEM server installer with the following command:
pem-server-7.x.x-windows-x64.exe --mode text
Example
The example that follows demonstrates performing a text-mode installation on a Linux
system; the installation process on a Windows system is similar.
When you invoke the installer, the installer welcomes you:
----------------------------------------------------------------
Welcome to the Postgres Enterprise Manager (PEM) Server Setup
Wizard.
----------------------------------------------------------------
Before installing the PEM server, you must review and accept the terms of the PEM
license agreement:
Please read the following License Agreement. You must accept the
terms of this agreement before continuing with the installation.
Review the license agreement; when prompted, accept the
agreement, and press Return.
Do you accept this license? [y/n]: y
----------------------------------------------------------------
After accepting the license agreement, you will be prompted for the name and address of
a registered EnterpriseDB user; provide the information when prompted:
EnterpriseDB User Account Information
Please enter the email address and password for your
enterprisedb.com user account.

EDB Postgres Enterprise Manager Installation Guide
Copyright © 2013 - 2017 EnterpriseDB Corporation. All rights reserved.
91
Email address []:
Password :
----------------------------------------------------------------
Next, you will be prompted for an installation directory; you can use the default
installation directory, or specify an alternate location.
Enter a Y after Show advanced options to access menu options that allow you to use
a pre-existing Postgres server installation or Apache installation with the PEM server; for
more information, see Section 3.1.2.
Installation Directory
Please select a directory for the PEM server installation.
Installation Directory [/opt/edb/pem]:
Show advanced options [y/N]:
----------------------------------------------------------------
Use the fields that follow the Database Server Installation Details heading to provide the
name and password of the PostgreSQL database superuser for the PEM backing database:
Database Server Installation Details
Please specify user and password for the local server -
'PostgreSQL 9.6' installation running on port 5432.
User [postgres]:
Password :
----------------------------------------------------------------
When prompted, provide the network address or range that will be added to the
pg_hba.conf file of the PEM server host; this will allow PEM agents on monitored
hosts to contact the server:
Network Details
Please enter the CIDR formatted network address range that agents
will connect to the server from, to be added to the server's
pg_hba.conf file. For example, 192.168.1.0/24.
Network address [127.0.0.1/32]:
----------------------------------------------------------------
Use the Agent Details fields to specify a descriptive name for the agent and the
location of the agent certificate:
Agent Details.
Please specify a description for the agent.
Description. [Postgres Enterprise Manager Host]:
Agent certificate path [/root/.pem]:
----------------------------------------------------------------

EDB Postgres Enterprise Manager Installation Guide
Copyright © 2013 - 2017 EnterpriseDB Corporation. All rights reserved.
92
The installer will prompt you before it proceeds with the installation; press Return to start
the installation:
Setup is now ready to begin installing the PEM server on your
computer.
Do you want to continue? [Y/n]:
Please wait while Setup installs the PEM server on your computer.
Installing
0% ______________ 50% ______________ 100%
###########################
The installer will notify you when the installation is complete:
Info: Configured the webservice for Postgres Enterprise Manager
(PEM) Server on port '8443'.
Created and configured the 'pem' database.
EnterpriseDB is the leading provider of value-added products and
services for the Postgres community.
Please visit our website at www.enterprisedb.com

EDB Postgres Enterprise Manager Installation Guide
Copyright © 2013 - 2017 EnterpriseDB Corporation. All rights reserved.
93
3.4.4 Invoking the PEM Agent Installer in Text Mode
You can invoke the PEM agent installer at the command line to perform an interactive
installation if your system does not support a full graphical installation. Please note that
the system on which you are installing the agent must have access to the PEM server.
Invoking the Installer on Linux
Before invoking the installer, you must disable SE Linux; for more information, see
Section 2.3. You must be a superuser to install the PEM agent.
Invoke the installer with the command:
./pem-agent-7.x.x-linux-x64.run --mode text
Invoking the Installer on Windows
You must have Administrative privileges to install the PEM server. You can invoke the
PEM server installer with the following command:
pem-server-7.x.x-windows-x64.exe --mode text
Example
The example that follows demonstrates performing a text-mode installation on a Linux
system; the installation process on a Windows system is similar.
When you invoke the PEM agent installer, the installer welcomes you:
-----------------------------------------------------------------
Welcome to the Postgres Enterprise Manager (PEM) Agent Setup Wizard. -----------------------------------------------------------------
Before installing the PEM server, you must review and accept the terms of the PEM
license agreement:
Please read the following License Agreement. You must accept the
terms of this agreement before continuing with the installation.

EDB Postgres Enterprise Manager Installation Guide
Copyright © 2013 - 2017 EnterpriseDB Corporation. All rights reserved.
94
Press [Enter] to continue:
Do you accept this license? [y/n]:
-----------------------------------------------------------------
Next, you will be prompted for an installation directory; you can use the default
installation directory, or specify an alternate location.
By default, the PEM agent installer places a certificate in ~root/.pem (on Linux) or in
the Administrator’s %APPDATA%\pem directory (on Windows). Enter a Y after Show
advanced options to access menu options that allow you to specify an alternate path
for the certificate file.
Installation Directory
Please select a directory for PEM agent installation.
Installation Directory [/opt/edb/pem]:
Show advanced options [y/N]:
-----------------------------------------------------------------
When prompted, provide information about the PEM server installation:
PEM server installation details
Please verify the PEM server installation details
Host [localhost]:
User Name [postgres]:
Password :
Port [5432]:
-----------------------------------------------------------------
You can provide a descriptive name for the agent, or press return to accept the default:
Agent Details
Please provide the agent description
Description [localhost]:
-----------------------------------------------------------------
The installer will prompt you before it proceeds with the installation; press Return to start
the installation:
Setup is now ready to begin installing the PEM agent on your
computer.
Do you want to continue? [Y/n]:
-----------------------------------------------------------------
Please wait while Setup installs the PEM agent on your computer.

EDB Postgres Enterprise Manager Installation Guide
Copyright © 2013 - 2017 EnterpriseDB Corporation. All rights reserved.
95
Installing
0% ______________ 50% ______________ 100%
#########################################
The installer will notify you when the installation is complete:
EnterpriseDB is the leading provider of value-added products and
services for the Postgres community.
Please visit our website at www.enterprisedb.com

EDB Postgres Enterprise Manager Installation Guide
Copyright © 2013 - 2017 EnterpriseDB Corporation. All rights reserved.
96
4 Adding Postgres Instances to PEM
After installing a PEM server and agent, you can configure PEM to start monitoring and
managing PostgreSQL or Advanced Server instances.
Note: The server installer will pre-configure an instance of the agent running on the PEM
server to monitor the PEM database server, using the default hostname of the PEM server
in the connection parameters. If the default hostname is not known to machines running
the PEM client, you may need to update the hostname before connecting to the server.
4.1 Logging on to the PEM Server
The PEM web interface (installed by the PEM server installer) provides a convenient
graphical interface that allows you to interact with the PEM server and managed or
unmanaged Postgres instances. The client is distributed with, and installed by the PEM
server installer; to open the PEM client, open your browser, and navigate to:
https://ip_address_of_PEM_host:8080/pem
Where ip_address_of_PEM_host specifies the IP address of the host of the PEM
server. The Postgres Enterprise Manager Web Login window (shown in Figure
4.1) opens:
Figure 4.1 - The PEM Web Login page.

EDB Postgres Enterprise Manager Installation Guide
Copyright © 2013 - 2017 EnterpriseDB Corporation. All rights reserved.
97
Use the fields on the Postgres Enterprise Manager Login window to authenticate
yourself with the PEM server:
Provide the name of a pem database user in the Username field. For the first user
connecting, this will be the name provided when installing the PEM server.
Provide the password associated with the user in the Password field.
Click the Login button to connect to the PEM server, displaying the Global Overview
(as shown in Figure 3.52).
Figure 4.2 – The Global Overview.

EDB Postgres Enterprise Manager Installation Guide
Copyright © 2013 - 2017 EnterpriseDB Corporation. All rights reserved.
98
4.2 Registering a Database Server
Before you can use the PEM web interface to manage or monitor a database server, you
must register the server with the PEM server. When you register a server, you describe
the connection to the server, provide authentication information for the connection, and
specify any management preferences (optionally binding an agent). A server may be
managed or unmanaged:
A managed server is bound to a PEM agent. The PEM agent will monitor the
server to which it is bound, and perform tasks or report statistics for display on the
PEM dashboards. A managed server has access to extended PEM functionality
such as Package Management or Custom Alerting; when registering a server, you
can also allow a managed server to be restarted by PEM as required.
An unmanaged server is not bound to a PEM agent; you can create database
objects on an unmanaged server, but extended PEM functionality (such as
Package Management or Custom Alerting) is not supported on an unmanaged
server.
You must ensure the pg_hba.conf file of the server that you are registering allows
connections from the host of the PEM client. For information about modifying the
pg_hba.conf file, please see Section 8.1.
To register a database server, navigate through the Object menu to the Create menu
and select Server. The Create - Server dialog opens as shown in Figure 4.3.

EDB Postgres Enterprise Manager Installation Guide
Copyright © 2013 - 2017 EnterpriseDB Corporation. All rights reserved.
99
Figure 4.3 – The General tab.
Use the fields on the General tab to describe the general properties of the server:
Use the Name field to specify a user-friendly name for the server. The name
specified will identify the server in the PEM client tree control.
You can use server groups to organize your servers in the PEM client tree control.
Using groups can help you manage large numbers of servers more easily. For
example, you may want to have a production group, a test group, or LAN specific
groups.. Use the Server group drop-down listbox to select the server group in
which the new server will be displayed.
Check the box next to Connect now? to instruct PEM to attempt a connection to
the database server when you click the Save button on the Create - Server

EDB Postgres Enterprise Manager Installation Guide
Copyright © 2013 - 2017 EnterpriseDB Corporation. All rights reserved.
100
dialog. Leave the Connect now? checkbox unchecked if you do not want to
establish a connection to the server immediately. If you do not select the
Connect now? option, the connection parameters are not validated until you
attempt a connection.
Provide notes about the server in the Comments field.
Figure 4.3 – The Connection tab.
Use fields on the Connection tab to specify connection details for the server:
Specify the IP address of the server host, or the fully qualified domain name in the
Host name/address field. On Linux systems, the address field may be left
blank to use the default PostgreSQL Unix Domain Socket on the local machine,

EDB Postgres Enterprise Manager Installation Guide
Copyright © 2013 - 2017 EnterpriseDB Corporation. All rights reserved.
101
or may be set to an alternate path containing a PostgreSQL socket. If you enter a
path, the path must begin with a /.
Specify the port number of the host in the Port field.
Use the Maintenance database field to specify the name of the initial database
that PEM will connect to, and that will be expected to contain the pgAgent
schema and adminpack objects if installed (both are optional). On an Advanced
Server database, the maintenance database is named edb. On PostgreSQL 8.1
and above, the maintenance database for PostgreSQL is named postgres, and
on earlier versions it is named template1.
Specify the name that will be used when authenticating with the server in the
User name field.
Provide the password associated with the specified user in the Password field.
Check the box next to Save password? to instruct the PEM client to store
passwords in the ~/.pgpass file (on Linux) or
%APPDATA%\\postgresql\\pgpass.conf (on Windows) for later reuse.
Stored passwords will be used for all libpq based tools. To remove a password,
disconnect from the server, open the server's Properties dialog and uncheck the
selection.
Use the Team field to specify a PostgreSQL role name. Only PEM users who are
members of this role, who created the server initially, or have superuser privileges
on the PEM server will see this server when they logon to PEM. If this field is
left blank, all PEM users will see the server.
Use the Role field to specify the name of the role that is assigned the privileges
that the client should use after connecting to the server. This allows you to
connect as one role, and then assume the permissions of another role when the
connection is established (the one you specified in this field). The connecting role
must be a member of the role specified.
Use the drop-down listbox in the SSL field to select the type of SSL connection
the server should use.

EDB Postgres Enterprise Manager Installation Guide
Copyright © 2013 - 2017 EnterpriseDB Corporation. All rights reserved.
102
Figure 4.3 – The Advanced tab.
Use fields on the Advanced tab to specify details that are used to manage the server:
Specify the IP address of the server host in the Host address field.
Use the DB restriction field to specify a SQL restriction that will be used
against the pg_database table to limit the databases displayed in the tree
control. For example, you might enter 'live_db', 'test_db' to instruct the
PEM browser to display only the live_db and test_db databases.
For more information about the pg_database table, visit:
http://www.postgresql.org/docs/current/interactive/catalog-pg-database.html

EDB Postgres Enterprise Manager Installation Guide
Copyright © 2013 - 2017 EnterpriseDB Corporation. All rights reserved.
103
Use the Service ID field to specify parameters to control the database service
process. For servers that are stored in the Enterprise Manager directory, enter the
service ID. On Windows machines, this is the identifier for the Windows service.
On Linux machines, this is the name of the service script used to start the server
(provided in /etc/init.d). For example, the Advanced Server 9.6 service
name on Linux is edb-as-9.6.
If the server is a member of a Failover Manager cluster, you can use PEM to
monitor the health of the cluster and to replace the master node if necessary. To
enable PEM to monitor Failover Manager, use the EFM cluster name field to
specify the cluster name. The cluster name is the prefix of the name of the
Failover Manager cluster properties file. For example, if the cluster properties file
is named efm.properties, the cluster name is efm.
If you are using PEM to monitor the status of a Failover Manager cluster, use the
EFM installation path field to specify the location of the Failover Manager
binary file. By default, the Failover Manager binary file is installed in
/usr/efm-2.x/bin, where x specifies the Failover Manager version.

EDB Postgres Enterprise Manager Installation Guide
Copyright © 2013 - 2017 EnterpriseDB Corporation. All rights reserved.
104
Figure 4.3 – The PEM Agent tab.
Use fields on the PEM Agent tab to specify connection details for the PEM agent:
Specify Yes in the Remote monitoring? field to indicate that the PEM agent
does not reside on the same host as the monitored server. When remote
monitoring is enabled, agent level statistics for the monitored server will not be
available for custom charts and dashboards, and the remote server will not be
accessible by some PEM utilities (such as Audit Manager, Capacity Manager,
Log Manager, Postgres Expert and Tuning Wizard).
Select an Enterprise Manager agent using the drop-down listbox to the right of the
Bound agent label. One agent can monitor multiple Postgres servers, either
locally or remotely.

EDB Postgres Enterprise Manager Installation Guide
Copyright © 2013 - 2017 EnterpriseDB Corporation. All rights reserved.
105
Enter the IP address or socket path that the agent should use when connecting to
the database server in the Host field. By default, the agent will use the host
address shown on the General tab. On a Linux server, you may wish to specify
a socket path, e.g. /tmp.
Enter the Port number that the agent will use when connecting to the server. By
default, the agent will use the port defined on the Properties tab.
Use the drop-down listbox in the SSL field to specify an SSL operational mode;
select from require, prefer, allow, disable, verify-ca or verify-full.
SSL Mode Description require To require SSL encryption for transactions between the server the agent. prefer To use SSL encryption between the server and the agent if encryption is available. allow To allow the connection to use SSL if required by the server. disable To disable SSL encryption between the agent and the server. verify-ca To require SSL encryption, and to require the server to authenticate using a
certificate registered by a certificate authority. verify-
full To require SSL encryption, and to require the server to authenticate using a certificate registered by a trusted certificate authority. |
For more information about using SSL, see the PostgreSQL documentation at:
http://enterprisedb.com/docs/en/9.6/pg/libpq-ssl.html
Use the Database field to specify the name of the Postgres Plus database to
which the agent will initially connect.
Specify the name of the role that agent should use when connecting to the server
in the User name field.
Specify the password that the agent should use when connecting to the server in
the Password field, and verify it by typing it again in the Confirm password
field. If you do not specify a password, you must configure the authentication for
the agent manually; you can use a .pgpass file for example.
Specify Yes in the Allow takeover? field to specify that another agent may be
signaled (for example, by a fencing script) to monitor the server. This feature
allows an agent to take responsibility for the monitoring of the database server if,
for example, the server is part of a high availability failover process.
To review the properties of an existing server, right-click on a server name in the PEM
client tree control, and select the Properties... option from the context menu. Before
modifying server properties, you must disconnect from the server before opening the
Properties dialog.

EDB Postgres Enterprise Manager Installation Guide
Copyright © 2013 - 2017 EnterpriseDB Corporation. All rights reserved.
106
4.3 Verifying the Connection and Binding
If you checked the Connect Now option when defining a new server, the PEM client will
initiate a connection to the server when you click Save. The new server will be added to
the PEM client tree control, and be displayed on the Global Overview.
Figure 4.10 - The Global Overview dashboard.
When initially connecting to a newly bound server, the Global Overview dashboard
may display the new server with a status of “unknown” in the server list (as shown in
Figure 4.10) ; before recognizing the server, the bound agent must execute a number of
probes to examine the server, which may take a few minutes to complete depending on
network availability.
Within a few minutes, bar graphs on the Global Overview dashboard should show that
the agent has now connected successfully, and the new server is included in the
Postgres Server Status list.
If after five minutes, the Global Overview dashboard still does not list the new server,
you should review the logfiles for the monitoring agent, checking for errors. Right-click
the agent's name in the tree control, and select the Probe Log Analysis option from the
Dashboards sub-menu of the context menu.

EDB Postgres Enterprise Manager Installation Guide
Copyright © 2013 - 2017 EnterpriseDB Corporation. All rights reserved.
107
5 Installing the SQL Profiler Plugin
The SQL Profiler Plugin allows you to profile a server's workload. You must install the
plugin on each server on which you wish to use SQL Profiler (since it is a plugin to the
database server, you must install a copy of the plugin for each Postgres instance you wish
to profile on each host you wish to profile). For example, if you have a host running
PostgreSQL 9.5 and PostgreSQL 9.6, you must install two versions of the plugin, one for
each server.
SQL Profiler for Postgres Enterprise Manager™ is officially supported only on the
EnterpriseDB distributions of PostgreSQL version 9.2 (and above) and Advanced Server
version 9.2 (and above). The plugin is distributed via StackBuilder, or is available from
the EnterpriseDB website at:
https://www.enterprisedb.com/advanced-downloads
The plugin is also distributed and installed with the server component of the Advanced
Server 9.2 (and above) installer.
The SQL Profiler plugin may be installed on servers with or without a PEM agent,
however traces can only be run in ad-hoc mode on unmanaged servers, and may only be
scheduled on managed servers.
Follow the installation steps listed below to install the plugin for PostgreSQL before
continuing to the Configuration section. If you are using Advanced Server 9.2 or
above, skip ahead to the Configuration section.

EDB Postgres Enterprise Manager Installation Guide
Copyright © 2013 - 2017 EnterpriseDB Corporation. All rights reserved.
108
5.1 Installing SQL Profiler
To invoke the SQL Profiler installer, assume superuser privileges (or Administrator on
Windows), navigate into the directory that contains the installer, and invoke the installer
with the command:
sqlprofiler-pg-x.x-6.0.x-platform.ext
The SQL Profiler installer welcomes you to the Setup Wizard (as shown in Figure 5.1).
Figure 5.1 - The SQL Profiler Installer Welcome dialog.
Click Next to continue to the License Agreement, shown in Figure 5.2.

EDB Postgres Enterprise Manager Installation Guide
Copyright © 2013 - 2017 EnterpriseDB Corporation. All rights reserved.
109
Figure 5.2 - The SQL Profiler License Agreement.
Carefully review the license agreement before highlighting the appropriate radio button
and accepting the agreement; click Next to continue to the Installation Directory
dialog (shown in Figure 5.3).

EDB Postgres Enterprise Manager Installation Guide
Copyright © 2013 - 2017 EnterpriseDB Corporation. All rights reserved.
110
Figure 5.3 - The PostgreSQL Installation Directory
Specify an alternate location for the installation directory, or accept the default location
and click Next to continue.

EDB Postgres Enterprise Manager Installation Guide
Copyright © 2013 - 2017 EnterpriseDB Corporation. All rights reserved.
111
The wizard is now ready to install the SQL Profiler plugin (as shown in Figure 5.4).
Figure 5.4 - Ready to Install
Click Next to continue.

EDB Postgres Enterprise Manager Installation Guide
Copyright © 2013 - 2017 EnterpriseDB Corporation. All rights reserved.
112
Figure 5.5 - Installing the SQL Profiler plugin.
The SQL Profiler plugin installer displays progress bars as it copies files to your system
(see Figure 5.5).

EDB Postgres Enterprise Manager Installation Guide
Copyright © 2013 - 2017 EnterpriseDB Corporation. All rights reserved.
113
Figure 5.6 - The SQL Profiler installation is complete.
When the installation is complete, the SQL Profiler plugin is ready to be configured.

EDB Postgres Enterprise Manager Installation Guide
Copyright © 2013 - 2017 EnterpriseDB Corporation. All rights reserved.
114
5.2 Configuring SQL Profiler
The SQL Profiler plugin is not automatically enabled when the installation process
completes. This allows you to restart the server at a convenient time, and prevents the
plugin from being loaded unnecessarily on systems where it is not required on a continual
basis.
Use the following steps to enable the plugin:
1. Edit the postgresql.conf file on the server you wish to profile, modifying the
shared_preload_libraries parameter as shown below:
shared_preload_libraries = '$libdir/sql-profiler'
2. Restart the Postgres server.
3. Using the Query Tool in the PEM client or the psql command line interface,
run the sql-profiler.sql script in the database specified as the
Maintenance Database on the server you wish to profile. If you are using:
PostgreSQL, the default maintenance database is postgres.
Advanced Server, the default maintenance database is edb.
To use the PEM Query Tool to run the script, highlight the name of the maintenance
database in the PEM Client tree control, and navigate through the Tools menu to select
Query tool. When the Query Tool opens, use the Open option on the Files menu to
open a web browser and navigate to the sql-profiler.sql script. By default, the
sql-profiler.sql script is located in the contrib folder, under your Postgres
installation.
When the script opens in the SQL Editor panel of the Query Tool, highlight the content
of the script in the SQL Editor and select the Execute option from the Query menu (or
click the Execute icon) to invoke the script and configure SQL Profiler.
You can also use the psql command line to invoke the configuration script. The
following command uses psql to invoke the sql-profiler.sql script on an Advanced
Server database on a Linux system:
$ /opt/edb/as9.6/bin/psql -U postgres postgres <
/opt/edb/as9.6/share/contrib/sql-profiler.sql
After configuring SQL Profiler, it is ready to use with all databases that reside on the
server.

EDB Postgres Enterprise Manager Installation Guide
Copyright © 2013 - 2017 EnterpriseDB Corporation. All rights reserved.
115
To access SQL Profiler functionality, highlight the name of the database in the PEM
client tree control; navigate through the Management menu to the SQL Profiler pull-
aside menu. Menu options allow you to manage your SQL traces:
Select Create trace… to define a new trace (see Figure 5.7).
Select Open trace… to open an existing trace.
Select Delete trace(s)… to delete one or more traces.
Select View scheduled trace(s)… to review a list of scheduled traces.
Figure 5.7 – Creating a new trace.
For more information about using SQL Profiler, consult the online help text for SQL
Profiler (accessed through the PEM client Help menu) or the PEM Getting Started
Guide.

EDB Postgres Enterprise Manager Installation Guide
Copyright © 2013 - 2017 EnterpriseDB Corporation. All rights reserved.
116
6 Upgrading and Uninstalling PEM Components
For detailed information about upgrading and moving PEM components, please see the
PEM Upgrade and Migration Guide. PEM documentation and links to PEM and SQL
Profiler installers are available from the EnterpriseDB website at:
https://www.enterprisedb.com/resources/product-documentation
Upgrading Postgres Enterprise Manager™
To upgrade your version of PEM, simply invoke the PEM component installers. Each
installer will notify you if it detects a previous installation, and will upgrade to the more
recent version of PEM.
You should invoke the PEM installers in the following order:
1. Invoke the PEM agent installer on each monitored node except the PEM server
node.
2. Invoke the PEM server installer; this installer will upgrade both the PEM server
and the PEM agent that resides on the PEM server node.
3. Invoke the PEM client installer on any server that is hosting a PEM client.
Upgrading SQL Profiler on a Linux Host
To upgrade a SQL Profiler installation that resides on a Linux host:
1. Delete the existing SQL Profiler query set on each node by invoking the
uninstall-sql-profiler.sql script.
By default, if you are using Advanced Server on a Linux host, the script resides
in:
/opt/PostgresPlus/9.x/share/contrib
If you are using a PostgreSQL installation on a Linux host, the script resides in:
/opt/PostgreSQL/9.x/share/postgresql/contrib
Where x specifies the installed Postgres version.

EDB Postgres Enterprise Manager Installation Guide
Copyright © 2013 - 2017 EnterpriseDB Corporation. All rights reserved.
117
2. Then, invoke the new SQL Profiler installer on each node you wish to profile.
Upgrading SQL Profiler on a Windows Host
If you are using SQL Profiler on a Windows host, Windows will lock any files that have
been executed or loaded into memory. To release any locked files, you must stop the
Postgres server before performing an upgrade.
For information about controlling the server, please see Section 8.3, Controlling a
Service on Windows.
After stopping the Postgres Server:
1. Delete the existing SQL Profiler query set on each node by invoking the
uninstall-sql-profiler.sql script.
If you are using Advanced Server on a Windows host, the script resides in:
C:\Program Files\PostgresPlus\9.x\share\contrib
If you are using a PostgreSQL installation on a Windows host, the script resides
in:
C:\Program Files\PostgreSQL\9.x\share\contrib
Where x specifies the installed Postgres version.
2. Invoke the new SQL Profiler installer on each node you wish to profile.
Then, restart the Postgres Server, to resume profiling the node from a PEM client.
Troubleshooting
If (after upgrading to a newer version of SQL Profiler) you encounter the following error:
An error has occurred:
ERROR: function return row and query-specified return row
do not match
DETAIL: Returned row contains 11 attributes, but query
expects 10.
To correct this error, you must replace the existing query set with a new query set. First,
uninstall SQL Profiler by invoking the uninstall-sql-profiler.sql script, and
then reinstall SQL Profiler by invoking the sql-profiler.sql script.

EDB Postgres Enterprise Manager Installation Guide
Copyright © 2013 - 2017 EnterpriseDB Corporation. All rights reserved.
118
Uninstalling Postgres Enterprise Manager™
Use the uninstallers provided in the PEM installation directory to remove PEM
components from an Advanced Server or PostgreSQL installation on Linux or Solaris.
By default, the PEM uninstallers are located:
Component Uninstaller name Default location PEM server uninstall-pemserver /opt/PEM/server
PEM client uninstall-pemclient /opt/PEM/client
PEM agent uninstall-pemagent /opt/PEM/agent
SQL Profiler uninstall-sqlprofiler /opt/PostgreSQL/9.6
To remove a component, assume superuser privileges, open a terminal window, and
navigate into the directory in which the uninstaller resides; invoke the installer as
follows:
./uninstall-component_name
Where component_name is the name of the component that you wish to remove.
If the PEM installation resides on a Windows host, you can use the Windows
Uninstall a Program applet to remove PEM components. To open the Uninstall
a Program applet, navigate through the Programs submenu on the Windows Control
Panel, selecting Programs and Features. When the Uninstall a Program
window opens, highlight the name of the PEM component that you wish to remove, and
click the Uninstall/Change button. A Windows popup will open, prompting you to
confirm that you wish to remove the component; click Yes to remove the component.

EDB Postgres Enterprise Manager Installation Guide
Copyright © 2013 - 2017 EnterpriseDB Corporation. All rights reserved.
119
7 Server Management
Changes to the pg_hba.conf authentication configuration file require a server reload
before the change will take effect. The sections that follow provide information about
modifying the pg_hba.conf file, restarting the PEM server, and controlling the
ApacheHTTPD service on Linux and Windows.
7.1 Controlling the PEM Server or PEM Agent on Linux
On Linux platforms, the name of the service script that controls:
A PEM server on Advanced Server 9.6 is edb-as-9.6.
A PEM server on Advanced Server 9.5 or prior is ppas-9.x, where x is the
version number.
A PEM server on PostgreSQL is postgresql-9.x.
A PEM agent is pemagent.
You can use the service script to control the service. If you are using RHEL or CentOS
6.x, open a command line, assume superuser privileges, and enter:
/etc/init.d/service_name action
Where:
service_name is the name of the service.
action specifies the action taken by the service. Specify:
start to start the service.
stop to stop the service.
restart to stop and then start the service.
status to check the status of the service.
To control a service on RHEL or CentOS version 7.x, open a command line, assume
superuser privileges, and issue the command:
systemctl service_name action
Where:

EDB Postgres Enterprise Manager Installation Guide
Copyright © 2013 - 2017 EnterpriseDB Corporation. All rights reserved.
120
service_name is the name of the service.
action is the action taken by the service. You can specify:
start to start the service.
stop to stop the service.
restart to stop and then start the service.
status to inquire about the current status of the service.

EDB Postgres Enterprise Manager Installation Guide
Copyright © 2013 - 2017 EnterpriseDB Corporation. All rights reserved.
121
7.2 Controlling the PEM Server or PEM Agent on Windows
The Windows operating system includes a graphical service controller that displays the
server status, and offers point-and-click server control. The registered name of the
service that controls:
a PEM server host on PostgreSQL is postgresql-9.x
a PEM server host on Advanced Server is edb-as-9.6 or ppas-9.x
a PEM agent is Postgres Enterprise Manager - pemAgent
Where x indicates the server version number.
The Services utility can be accessed through the Windows Control Panel. When
the utility opens, use the scroll bar to navigate through the listed services to highlight the
service name (see Figure 8.3).
Figure 8.3 – The Windows Services window.
Use the Stop the service option to stop a service. Any user (or client application)
connected to the server will be abruptly disconnected if you stop the service.
Use the Pause the service option to instruct Postgres to reload a service's
configuration parameters. The Pause the service option is an effective way to reset
parameters without disrupting user sessions for many of the configuration parameters.
Use the Start the service option to start a service.

EDB Postgres Enterprise Manager Installation Guide
Copyright © 2013 - 2017 EnterpriseDB Corporation. All rights reserved.
122
7.3 Controlling the Apache Server
On Linux, you can confirm the status of the Apache service by opening a command line,
and entering the following command:
ps -ef | grep apache
If Linux responds with an answer that is similar to the following example,
ApacheHTTPD is not running:
user 13321 13267 0 07:37 pts/1 00:00:00 grep apache
You can use the following command to start ApacheHTTPD:
/etc/init.d/EnterpriseDBApacheHTTPD start
If ApacheHTTPD starts properly, the ps -ef command will result in output similar to the
following:
$ # ps -ef | grep apache
root 24924 1 0 07:50 ? 00:00:00 /opt/PostgreSQL/EnterpriseDB-
ApacheHTTPD/apache/bin/httpd -k start -f /opt/PostgreSQL/EnterpriseDB-
ApacheHTTPD/apache/conf/httpd.conf
daemon 24925 24924 0 07:50 ? 00:00:00 /opt/PostgreSQL/EnterpriseDB-
ApacheHTTPD/apache/bin/httpd -k start -f /opt/PostgreSQL/EnterpriseDB-
ApacheHTTPD/apache/conf/httpd.conf
daemon 24926 24924 0 07:50 ? 00:00:00 /opt/PostgreSQL/EnterpriseDB-
ApacheHTTPD/apache/bin/httpd -k start -f /opt/PostgreSQL/EnterpriseDB-
ApacheHTTPD/apache/conf/httpd.conf
daemon 24927 24924 0 07:50 ? 00:00:00 /opt/PostgreSQL/EnterpriseDB-
ApacheHTTPD/apache/bin/httpd -k start -f /opt/PostgreSQL/EnterpriseDB-
ApacheHTTPD/apache/conf/httpd.conf
root 25237 22923 0 07:52 pts/0 00:00:00 grep apache

EDB Postgres Enterprise Manager Installation Guide
Copyright © 2013 - 2017 EnterpriseDB Corporation. All rights reserved.
123
On Windows, you can use the Services applet to check the status of the
ApacheHTTPD service.
To confirm the status of the ApacheHTTPD service, navigate through the Control
Panel, to System and Security; select Administrative Tools, and then
Services. The ApacheHTTPD server runs as a service named EnterpriseDB-
ApacheHTTPD (see Figure 8.4).
Figure 8.4 - The EnterpriseDB ApacheHTTPD Windows service.
The Status column displays the current state of the ApacheHTTPD server. Click the
Start link to start ApacheHTTPD if the service is not running.

EDB Postgres Enterprise Manager Installation Guide
Copyright © 2013 - 2017 EnterpriseDB Corporation. All rights reserved.
124
7.4 Modifying the pg_hba.conf File
Entries in the pg_hba.conf file control network authentication and authorization. The
pg_hba.conf file on the PEM server host must allow connections between the PEM
server and ApacheHTTPD, the PEM agent, and the monitored servers.
During the PEM server installation process, you are prompted for the IP address and
connection information for hosts that will be monitored by PEM; this information is
added to the top of the pg_hba.conf file of the PEM backing database (see Figure 8.1).
Figure 8.1 - PEM entries in the pg_hba.conf file.
You may also need to manually modify the pg_hba.conf file to allow connections
between the PEM server and other components. For example, if your ApacheHTTPD
installation does not reside on the same host as the PEM server, you must modify the
pg_hba.conf file on the PEM server host to allowApacheHTTPD to connect to the
server.
By default, the pg_hba.conf file resides in the data directory, under your Postgres
installation; for example, on an Advanced Server 9.6 host, the default location of the
pg_hba.conf is:

EDB Postgres Enterprise Manager Installation Guide
Copyright © 2013 - 2017 EnterpriseDB Corporation. All rights reserved.
125
/opt/edb/as9.6/data/pg_hba.conf
You can modify the pg_hba.conf file with your editor of choice. After modifying the
file, restart the server for changes to take effect. For information about restarting the
server, see Section 8.2 (for Linux) or Section 8.3 (for Windows).
The following example shows a pg_hba.conf entry that allows an md5 password
authenticated connection from a user named postgres, to the postgres database on
the host on which the pg_hba.conf file resides. The connection is coming from an IP
address of 192.168.10.102:
# TYPE DATABASE USER CIDR-ADDRESS METHOD
# IPv4 local connections:
host postgres postgres 192.168.10.102/32 md5
You may specify the address of a network host, or a network address range. For
example, if you wish to allow connections from servers with the addresses
192.168.10.23, 192.168.10.76 and 192.168.10.184, enter a CIDR-ADDRESS
of 192.168.10.0/24 to allow connections from all of the hosts in that network:
# TYPE DATABASE USER CIDR-ADDRESS METHOD
# IPv4 local connections:
host postgres all 192.168.10.0/24 md5
For more information about formatting a pg_hba.conf file entry, please see the
PostgreSQL core documentation at:
http://www.postgresql.org/docs/9.6/static/auth-pg-hba-conf.html

EDB Postgres Enterprise Manager Installation Guide
Copyright © 2013 - 2017 EnterpriseDB Corporation. All rights reserved.
126
7.5 Managing PEM Authentication
Postgres supports a number of authentication methods:
Secure password (md5)
GSSAPI
SSPI
Kerberos
Ident
LDAP
RADIUS
Certificate (SSL)
PAM
Postgres (and PEM) authentication is controlled by the pg_hba.conf configuration file.
Entries within the configuration file specify who may connect to a specific database, and
the type of authentication required before that user is allowed to connect.
A typical entry in the pg_hba.conf file that allows a user named postgres to connect
to all databases from the local host (127.0.0.1/32) using secure password (md5)
authentication connections would take the form:
host all postgres 127.0.0.1/32 md5
Depending on your system's configuration, you may also need to create a password file
for the user account that the PEM agent uses to connect to the server, to allow the agent
to properly respond to the server’s authentication request. An entry in the password file
for a user named postgres, with a password of 1safepwd would take the form:
localhost:5432:*:postgres:1safepwd
The password file is usually named ~root/.pgpass on Linux systems, or
%APPDATA%\postgresql\pgpass.conf (on Windows). For more information about
configuring a password file, visit the EnterpriseDB website at:
http://www.postgresql.org/docs/9.6/static/libpq-pgpass.html
For more information about the authentication methods supported by Postgres, see the
PostgreSQL core documentation at:
http://www.postgresql.org/docs/9.6/static/client-authentication.html

EDB Postgres Enterprise Manager Installation Guide
Copyright © 2013 - 2017 EnterpriseDB Corporation. All rights reserved.
127
7.6 Modifying PEM to Use a Proxy Server
If your network configuration prevents direct communication between PEM and the
EnterpriseDB website, you can configure a proxy server for use by PEM when:
updating the package_catalog table with information about the packages that
are available for installation or update
reading package options
downloading packages with the PEM client
After configuring a proxy server on your network, modify the PEM server configuration,
specifying the connection properties of the proxy, and instructing PEM to use the proxy
server.
Figure 8.2 - The PEM Server Configuration dialog.
To access the Server Configuration dialog and modify the server configuration,
connect to the PEM client, and select Server Configuration… from the Management
menu. The PEM Server Configuration dialog opens as shown in Figure 8.2.

EDB Postgres Enterprise Manager Installation Guide
Copyright © 2013 - 2017 EnterpriseDB Corporation. All rights reserved.
128
To modify a parameter value, locate the parameter, and modify the parameter value in the
Value column. Use the following PEM Server configuration parameters to specify
connection details that allow PEM to connect to the proxy server:
Use the proxy_server parameter to specify the IP address of the proxy server.
Specify a value of t in the proxy_server_authentication parameter to
indicate that the proxy server will require PEM to authenticate when connecting;
specify f if authentication is not required.
Specify a value of t in the proxy_server_enabled parameter if PEM is
required to use a proxy server when retrieving the package list, or f if a proxy
server is not configured.
Use the proxy_server_password parameter to provide the password
associated with the user specified in proxy_server_username.
Specify the port number of the proxy server in the proxy_server_port
parameter.
Specify the user name that should be used when authenticating with the proxy
server in the proxy_server_username parameter.
When you've finished updating the parameters required to configure the proxy server,
click the Save icon in the upper-right corner of the dialog before closing the dialog.

EDB Postgres Enterprise Manager Installation Guide
Copyright © 2013 - 2017 EnterpriseDB Corporation. All rights reserved.
129
8 Agent Configuration
A number of user-configurable parameters and registry entries control the behavior of the
PEM agent. You may be required to modify the PEM agent's parameter settings to
enable some PEM functionality, such as the Streaming Replication wizard. After
modifying values in the PEM agent configuration file, you must restart the PEM agent to
apply any changes.
With the exception of the PEM_MAXCONN parameter, we strongly recommend against
modifying any of the configuration parameters or registry entries listed below without
first consulting EnterpriseDB support experts unless the modifications are required to
enable PEM functionality.
On 64 bit Windows systems, PEM registry entries are located in HKEY_LOCAL_MACHINE\\Software\\Wow6432Node\\EnterpriseDB\\PE
M\\agent
On Linux systems, PEM configuration options are stored in the agent.cfg file,
located in /opt/PEM/agent/etc
Parameter Name Description Value
PEM_HOST (on Windows)
or
pem_host (on Linux)
The IP address or hostname of the PEM server.
By default, set to 127.0.0.1.
PEM_PORT (on Windows)
or
pem_port (on Linux)
The database server port to which the agent connects to communicate with the PEM server.
By default, the PEM server monitors port 5432.
AgentID (on Windows)
or
agent_id (on Linux)
A unique identifier assigned to the PEM agent.
The first agent is assigned an identifier of '1', the second agent's identifier is '2', and so on.
AgentKeyPath (on
Windows)
or
agent_ssl_key (on
Linux)
The complete path to the PEM agent's key file.
By default, on Windows, C:\\Users\\user_name\\AppData\\Roaming\\pem/agent.key By default on Linux, /root/.pem/agent.key
AgentCrtPath (on
Windows)
or
agent_ssl_crt (on
The complete path to the PEM agent's certificate file.
By default, on Windows, C:\\Users\\user_name\\AppData\\Roaming\\pem/agent.crt

EDB Postgres Enterprise Manager Installation Guide
Copyright © 2013 - 2017 EnterpriseDB Corporation. All rights reserved.
130
Linux) By default on Linux, /root/.pem/agent.crt
AgentFlagDir (on
Windows)
or
agent_flag_dir (on
Linux)
Used for HA support. Specifies the directory path checked for requests to take over monitoring another server. Requests are made in the form of a file in the specified flag directory.
Not set by default. This option allows you to override the hard-coded default.
LogLevel (on Windows)
or
log_level (on Linux)
Log level specifies the type of event that will be written to the PEM log files.
Log level may be set to: error, debug1, debug2, or warning. By default, log level is set to warning.
log_location (on
Linux) Specifies the location of the PEM worker log file.
/var/log/pem/worker.log
agent_log_location (on
Linux) Specifies the location of the PEM agent log file.
/var/log/pem/agent.log
LongWait (on Windows)
or
long_wait (on Linux)
The maximum length of time (in seconds) that the PEM agent will wait before attempting to connect to the PEM server if an initial connection attempt fails.
By default, 30 seconds.
ShortWait (on Windows)
or
short_wait (on Linux)
The minimum length of time (in seconds) that the PEM agent will wait before checking which probes are next in the queue (waiting to run).
By default, 10 seconds.
AlertThreads (on
Windows)
or
alert_threads (on
Linux)
The number of alert threads to be spawned by the agent.
Set to 1 for the agent that resides on the host of the PEM server; should be set to 0 for all other agents.
EnableSMTP (on
Windows) When set to true, the SMTP By default, set to true for the agent that
resides on the host of the PEM server;

EDB Postgres Enterprise Manager Installation Guide
Copyright © 2013 - 2017 EnterpriseDB Corporation. All rights reserved.
131
or
enable_smtp(on Linux) email feature is enabled. false for all other agents.
EnableSNMP (on
Windows)
or
enable_snmp (on Linux)
When set to true, the SNMP trap feature is enabled.
By default, set to true for the agent that resides on the host of the PEM server; false for all other agents.
enable_nagios (on
Linux only) When set to true, Nagios alerting is enabled.
By default, set to true for the agent that resides on the host of the PEM server; false for all other agents.
ConnectTimeout (on
Windows)
or
connect_timeout (on
Linux)
The maximum length of time (in seconds, written as a decimal integer string) that the agent will wait for a connection.
Not set by default. If set to 0, the agent will wait indefinitely.
AllowServerRestart (on
Windows)
or
allow_server_restart
(on Linux)
If set to TRUE, the agent can restart the database server that it monitors. Some PEM features may be enabled/disabled, depending on the value of this parameter.
By default, set to TRUE.
AllowPackageManagement
(on Windows)
or
allow_package_manageme
nt (on Linux)
If set to TRUE, the Update Monitor and Package Management features are enabled.
By default, set to FALSE.
MaxConnections (on
Windows)
or
max_connections (on
Linux)
The maximum number of probe connections used by the connection throttler.
By default, set to 0 (an unlimited number of connections).
ConnectionLifetime (on
Windows)
or
connection_lifetime
(on Linux)
Use ConnectionLifetime (or connection_lifetime) to specify the minimum number of seconds an open but idle connection is retained. This parameter is ignored if the value specified in MaxConnections is reached
By default, set to 0 (a connection is dropped when the connection is idle after the agent's processing loop completes a cycle in which the connection has not been used).

EDB Postgres Enterprise Manager Installation Guide
Copyright © 2013 - 2017 EnterpriseDB Corporation. All rights reserved.
132
and a new connection (to a different database) is required to satisfy a waiting request.
AllowBatchProbes (on
Windows)
or
allow_batch_probes (on
Linux)
If set to TRUE, the user will be able to create batch probes using the custom probes feature.
By default, set to FALSE.
HeartbeatConnection
(on Windows)
or
heartbeat_connection
(on Linux)
When set to TRUE, a dedicated connection is used for sending the heartbeats.
By default, set to FALSE.
AllowStreamingReplicat
ion (on Windows)
or
allow_streaming_replic
ation (on Linux)
If set to TRUE, the user will be able to configure and setup streaming replication.
By default, set to FALSE.
BatchScriptDir (on
Windows)
or
batch_script_dir (on
Linux)
Provide the path where script file (for alerting) will be stored.
On Windows, C:\Users\user_name\AppData\Local\Temp
On Linux, set to /tmp.
ConnectionCustomSetup
(on Windows)
or
connection_custom_setu
p (on Linux)
Use this parameter to provide SQL code that will be invoked each time a new connection with the monitored server is established.
By default, no value is provided.
ca_file (Linux only) Provide the path where the CA certificate resides.
By default, /opt/PEM/agent/share/certs/ca-bundle.crt

EDB Postgres Enterprise Manager Installation Guide
Copyright © 2013 - 2017 EnterpriseDB Corporation. All rights reserved.
133
9 Troubleshooting
9.1 Connect to Server Error
Before you can connect to a Postgres server with PEM, you must ensure that the
pg_hba.conf file on both servers allows the connection (see Figure 9.1).
Figure 9.1 – Connect to Server error.
If you receive this error when connecting to the database server, you must modify the
pg_hba.conf file, adding an entry that allows the connection. For more information
about modifying the pg_hba.conf file, see Section 7.4.
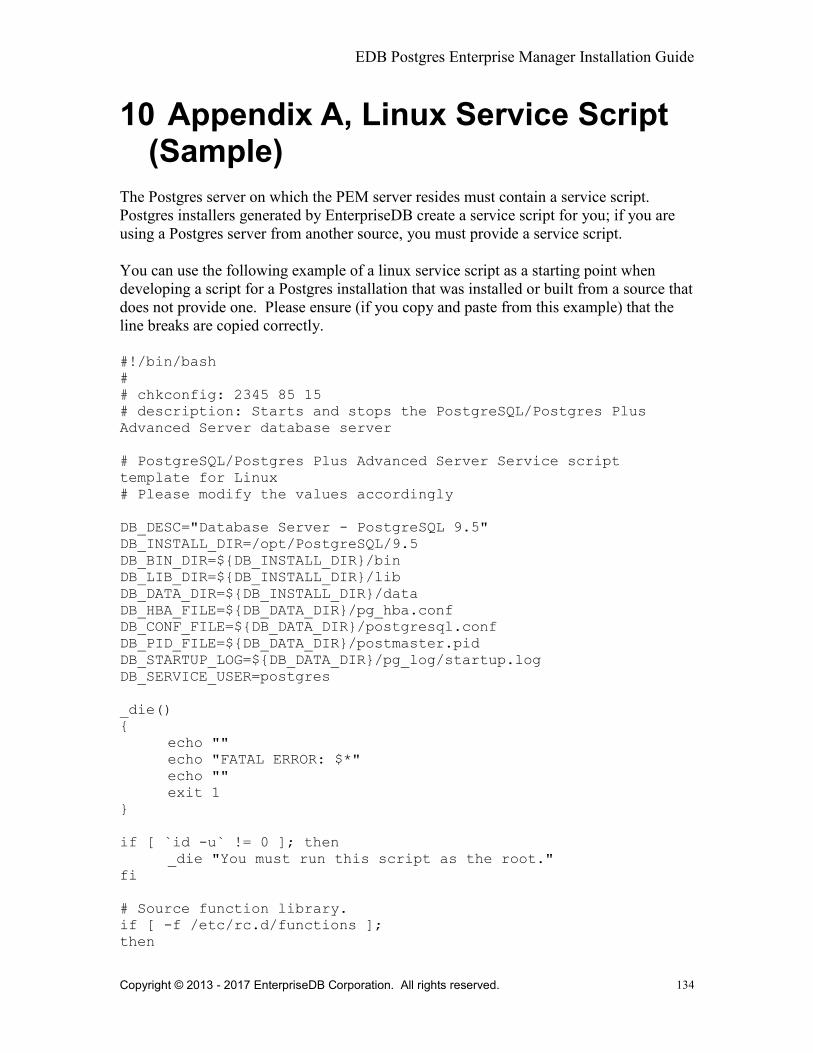
EDB Postgres Enterprise Manager Installation Guide
Copyright © 2013 - 2017 EnterpriseDB Corporation. All rights reserved.
134
10 Appendix A, Linux Service Script (Sample)
The Postgres server on which the PEM server resides must contain a service script.
Postgres installers generated by EnterpriseDB create a service script for you; if you are
using a Postgres server from another source, you must provide a service script.
You can use the following example of a linux service script as a starting point when
developing a script for a Postgres installation that was installed or built from a source that
does not provide one. Please ensure (if you copy and paste from this example) that the
line breaks are copied correctly.
#!/bin/bash
#
# chkconfig: 2345 85 15
# description: Starts and stops the PostgreSQL/Postgres Plus
Advanced Server database server
# PostgreSQL/Postgres Plus Advanced Server Service script
template for Linux
# Please modify the values accordingly
DB_DESC="Database Server - PostgreSQL 9.5"
DB_INSTALL_DIR=/opt/PostgreSQL/9.5
DB_BIN_DIR=${DB_INSTALL_DIR}/bin
DB_LIB_DIR=${DB_INSTALL_DIR}/lib
DB_DATA_DIR=${DB_INSTALL_DIR}/data
DB_HBA_FILE=${DB_DATA_DIR}/pg_hba.conf
DB_CONF_FILE=${DB_DATA_DIR}/postgresql.conf
DB_PID_FILE=${DB_DATA_DIR}/postmaster.pid
DB_STARTUP_LOG=${DB_DATA_DIR}/pg_log/startup.log
DB_SERVICE_USER=postgres
_die()
{
echo ""
echo "FATAL ERROR: $*"
echo ""
exit 1
}
if [ `id -u` != 0 ]; then
_die "You must run this script as the root."
fi
# Source function library.
if [ -f /etc/rc.d/functions ];
then

EDB Postgres Enterprise Manager Installation Guide
Copyright © 2013 - 2017 EnterpriseDB Corporation. All rights reserved.
135
. /etc/init.d/functions
fi
start()
{
STARTDBSERVER=0
if [ -e "${DB_PID_FILE}" ]
then
PIDOFDB=`head -n 1 "${DB_PID_FILE}"`
PIDALIVEDB=""
if [ -n "${DB_PID_FILE}" ]; then
PIDALIVEDB=`ps -p "${PIDOFDB}" | grep
"${PIDOFDB}"`
fi
if [ -n "${PIDALIVEDB}" ]
then
echo "The '${DB_DESC}' is already running.
PID(${PIDALIVEDB})."
exit
else
STARTDBSERVER=1
fi
else
STARTDBSERVER=1
fi
if [ "${STARTDBSERVER}" != 0 ]
then
echo "Starting ${DB_DESC}..."
su - "${DB_SERVICE_USER}" -c
"LD_LIBRARY_PATH=\"${DB_LIB_DIR}:\$LD_LIBRARY_PATH\"
\"${DB_BIN_DIR}/pg_ctl\" -w start -D \"${DB_DATA_DIR}\" -l
\"${DB_STARTUP_LOG}\" -o \"${DB_STARTUP_OPTIONS}\""
if [ $? -eq 0 ];
then
echo "${DB_DESC} started successfully."
exit 0
else
echo "${DB_DESC} did not start in a timely
fashion, please see '${DB_STARTUP_LOG}' for details."
exit 1
fi
fi
}
stop()
{
if [ -e "${DB_PID_FILE}" ]
then
PIDOFDB=`head -n 1 "${DB_PID_FILE}"`

EDB Postgres Enterprise Manager Installation Guide
Copyright © 2013 - 2017 EnterpriseDB Corporation. All rights reserved.
136
PIDALIVEDB=""
if [ -n "${DB_PID_FILE}" ]; then
PIDALIVEDB=`ps -p "${PIDOFDB}" | grep
"${PIDOFDB}"`
fi
if [ -n "${PIDALIVEDB}" ]
then
echo "Stopping ${DB_DESC}..."
su - "${DB_SERVICE_USER}" -c
"LD_LIBRARY_PATH=\"${DB_LIB_DIR}:\$LD_LIBRARY_PATH\"
\"${DB_BIN_DIR}/pg_ctl\" stop -m fast -D \"${DB_DATA_DIR}\" -l
\"${DB_STARTUP_LOG}\" -o \"${DB_STARTUP_OPTIONS}\""
else
echo "The '${DB_DESC}' is not running."
fi
else
echo "The '${DB_DESC}' is not running."
fi
}
reload()
{
echo "Reloading '${DB_DESC}'..."
su - "${DB_SERVICE_USER}" -c
"LD_LIBRARY_PATH=\"${DB_LIB_DIR}:\$LD_LIBRARY_PATH\"
\"${DB_BIN_DIR}/pg_ctl\" reload -D \"${DB_DATA_DIR}\" -l
\"${DB_STARTUP_LOG}\" -o \"${DB_STARTUP_OPTIONS}\""
}
restart()
{
echo "Restarting '${DB_DESC}'..."
su - "${DB_SERVICE_USER}" -c
"LD_LIBRARY_PATH=\"${DB_LIB_DIR}:\$LD_LIBRARY_PATH\"
\"${DB_BIN_DIR}/pg_ctl\" restart -m fast -w -D \"${DB_DATA_DIR}\"
-l \"${DB_STARTUP_LOG}\" -o \"${DB_STARTUP_OPTIONS}\""
if [ $? -eq 0 ];
then
echo "'${DB_DESC}' restarted successfully."
exit 0
else
echo "'${DB_DESC}' did not start in a timely fashion,
please see '${DB_STARTUP_LOG}' for details."
exit 1
fi
}
_die_incomplete_requirement()
{
echo "One or more required configuration variables are not

EDB Postgres Enterprise Manager Installation Guide
Copyright © 2013 - 2017 EnterpriseDB Corporation. All rights reserved.
137
set:"
_die $*
}
_validate_script()
{
if [ -z "${DB_INSTALL_DIR}" ]; then
_die_incomplete_requirement "Missing installation
directory";
fi
if [ ! -d "${DB_INSTALL_DIR}" ]; then
_die_incomplete_requirement "The specified -
'${DB_INSTALL_DIR}' is not a valid installation directory. It is
not present on the system.";
fi
if [ -z "${DB_BIN_DIR}" ]; then
DB_BIN_DIR=${DB_INSTALL_DIR}/bin; fi
if [ ! -d "${DB_BIN_DIR}" ]; then
_die_incomplete_requirement "The specified -
'${DB_BIN_DIR}' is not a valid bin directory. It is not present
on the system.";
fi
if [ ! -f "${DB_BIN_DIR}/pg_config" -o ! -f
"${DB_BIN_DIR}/pg_ctl" ]; then
_die_incomplete_requirement "The specified -
'${DB_BIN_DIR}' does not contain the database server binaries.";
fi
if [ -z "${DB_LIB_DIR}" ]; then
DB_LIB_DIR=${DB_INSTALL_DIR}/lib; fi
if [ -z "${DB_DESC}" ]; then
DB_DESC=`${DB_BIN_DIR}/pg_config --version`; fi
if [ -z "${DB_DATA_DIR}" ]; then
_die_incomplete_requirement "Missing data directory
settings in the script. Please set 'DB_DATA_DIR' variable in the
script.";
fi
if [ ! -d "${DB_DATA_DIR}" ]; then
_die_incomplete_requirement "The specified -
'${DB_DATA_DIR}' is not a valid. It is not present on the
system.";
fi
if [ ! -f "${DB_DATA_DIR}/PG_VERSION" -o ! -d
"${DB_DATA_DIR}/base" -o ! -d "${DB_DATA_DIR}/global" ]; then
_die_incomplete_requirement "The directory -
'${DB_DATA_DIR}' does not look like a valid PostgreSQL/Postgres
Plus Advanced Server data directory."
fi
if [ -z "${DB_SERVICE_USER}" ]; then

EDB Postgres Enterprise Manager Installation Guide
Copyright © 2013 - 2017 EnterpriseDB Corporation. All rights reserved.
138
_die_incomplete_requirement "The service-user is not
specified in the service script. Please set 'DB_SERVICE_USER'
variable in the script."
fi
DB_VALID_SERVICE_USER=`cat /etc/passwd | grep
"^${DB_SERVICE_USER}:"`
if [ -z "${DB_VALID_SERVICE_USER}" ]; then
_die_incomplete_requirement "The service-user
'${DB_SERVICE_USER}' is not present on the system. Please specify
the correct information."
fi
DB_DATA_DIR_OWNER=`ls -l ${DB_DATA_DIR}/PG_VERSION | awk
'{print $3}'`
if [ x"${DB_DATA_DIR_OWNER}" != x"${DB_SERVICE_USER}" ];
then
_die_incomplete_requirement "The specified user -
'${DB_SERVICE_USER}' does not own the data directory -
'${DB_DATA_DIR}'. The data directory is owned by the user -
'${DB_DATA_DIR_OWNER}'."
fi
if [ -z "${DB_HBA_FILE}" ]; then
DB_HBA_FILE=${DB_DATA_DIR}/pg_hba.conf; fi
if [ ! -f "${DB_HBA_FILE}" ]; then
_die_incomplete_requirement "The hba-file -
'${DB_HBA_FILE}' does not exist."
fi
if [ -z "${DB_CONF_FILE}" ]; then
DB_CONF_FILE=${DB_DATA_DIR}/postgresql.conf; fi
if [ ! -f "${DB_CONF_FILE}" ]; then
_die_incomplete_requirement "The config-file -
'${DB_CONF_FILE}' does not exist."
fi
if [ -z "${DB_PID_FILE}" ]; then
DB_PID_FILE=${DB_DATA_DIR}/postmaster.pid; fi
if [ -z "${DB_STARTUP_LOG}" ]; then
DB_STARTUP_LOG=${DB_DATA_DIR}/pg_log/startup.log; fi
DB_STARTUP_OPTIONS=""
if [ x"${DB_CONF_FILE}" !=
x"${DB_DATA_DIR}/postgresql.conf" ]; then
DB_STARTUP_OPTIONS="-c 'config_file=${DB_CONF_FILE}'"
fi
if [ x"${DB_HBA_FILE}" != x"${DB_DATA_DIR}/pg_hba.conf" ];
then
DB_STARTUP_OPTIONS="${DB_STARTUP_OPTIONS} -c
'hba_file=${DB_HBA_FILE}'"
fi
if [ x"${DB_PID_FILE}" != x"${DB_DATA_DIR}/postmaster.pid"
]; then

EDB Postgres Enterprise Manager Installation Guide
Copyright © 2013 - 2017 EnterpriseDB Corporation. All rights reserved.
139
DB_STARTUP_OPTIONS="${DB_STARTUP_OPTIONS} -c
'external_pid_file=${DB_PID_FILE}'"
fi
if [ x"${DEBUG_VALIDATION}" = x"1" ]; then
echo "Using these values in the scripts:"
echo ""
echo "DB_DESC : ${DB_DESC}"
echo ""
echo "DB_INSTALL_DIR : ${DB_INSTALL_DIR}"
echo "DB_BIN_DIR : ${DB_BIN_DIR}"
echo "DB_LIB_DIR : ${DB_LIB_DIR}"
echo ""
echo "DB_DATA_DIR : ${DB_DATA_DIR}"
echo "DB_HBA_FILE : ${DB_HBA_FILE}"
echo "DB_CONF_FILE : ${DB_CONF_FILE}"
echo "DB_PID_FILE : ${DB_PID_FILE}"
echo "DB_STARTUP_LOG : ${DB_STARTUP_LOG}"
echo ""
echo "DB_SERVICE_USER : ${DB_SERVICE_USER}"
echo "DB_STARTUP_OPTIONS : ${DB_STARTUP_OPTIONS}"
echo ""
fi
}
DEBUG_VALIDATION=0
# See how we were called.
case "$1" in
start)
_validate_script
start
;;
stop)
_validate_script
stop
;;
reload)
_validate_script
reload
;;
restart)
_validate_script
restart
;;
condrestart)
_validate_script
if [ -e "${DB_PID_FILE}" ]
then
PIDOFDB=`head -n 1 "${DB_PID_FILE}"`
PIDALIVEDB=""
if [ -n "${DB_PID_FILE}" ]; then
PIDALIVEDB=`ps -p "${PIDOFDB}" | grep

EDB Postgres Enterprise Manager Installation Guide
Copyright © 2013 - 2017 EnterpriseDB Corporation. All rights reserved.
140
"${PIDOFDB}"`
fi
if [ -n "${PIDALIVEDB}" ]
then
restart
else
echo "The '${DB_DESC}' is not running."
fi
else
echo "The '${DB_DESC}' is not running."
fi
;;
status)
_validate_script
su - "${DB_SERVICE_USER}" -c
"LD_LIBRARY_PATH=\"${DB_LIB_DIR}:\$LD_LIBRARY_PATH\"
\"${DB_BIN_DIR}/pg_ctl\" status -D \"${DB_DATA_DIR}\" -l
\"${DB_STARTUP_LOG}\" -o \"${DB_STARTUP_OPTIONS}\""
;;
validate)
DEBUG_VALIDATION=1
_validate_script
exit 0
;;
*)
echo "Usage: $0
{start|stop|restart|condrestart|reload|status|validate}"
exit 1
esac

EDB Postgres Enterprise Manager Installation Guide
Copyright © 2013 - 2017 EnterpriseDB Corporation. All rights reserved.
141
11 Appendix B, Replacing SSL Certificates
The following steps detail replacing the SSL certificates on an existing PEM installation.
If you plan to upgrade your server to a new version at the same time, invoke all of the
PEM installers (first the server installer, then agent installers) before replacing the SSL
certificates. Then:
1. Stop all running PEM agents, first on the server host, and then on any monitored
node.
To stop a PEM agent on a Linux host, open a terminal window, assume superuser
privileges, and enter the command:
/etc/init.d/pemagent stop
On a Windows host, you can use the Services applet to stop the PEM agent.
The PEM agent service is named Postgres Enterprise Manager Agent;
highlight the service name in the Services dialog, and click Stop the
service.
2. Take a backup of the existing SSL keys and certificates. The SSL keys and
certificates are stored in the /data directory under your PEM installation. For
example, the default location on a Linux system is:
/opt/PostgreSQL/9.5/data
Make a copy of the following files, adding an extension to each file to make the
name unique:
ca_certificate.crt
ca_key.key
root.crt
root.crl
server.key
server.crt
For example, the command:
# cp ca_certificate.crt ca_certificate_old.crt
creates a backup of the ca_certificate file with the word old appended to the
entry.

EDB Postgres Enterprise Manager Installation Guide
Copyright © 2013 - 2017 EnterpriseDB Corporation. All rights reserved.
142
3. Use the openssl_rsa_generate_key() function to generate the
ca_key.key file.
/opt/PostgreSQL/9.5/bin/psql -U postgres -d pem --no-psqlrc
-t -A -c "SELECT public.openssl_rsa_generate_key(1024)" >
/opt/PostgreSQL/9.5/data/ca_key.key
After creating the ca_key.key file, cat the contents to the variable CA_KEY for
use when generating the ca_certificate.crt file and modify the privileges
on the ca_key.key file.
CA_KEY=$(cat /opt/PostgreSQL/9.5/data/ca_key.key)
chmod 600 /opt/PostgreSQL/9.5/data/ca_key.key
4. Use the key to generate the ca_certificate.crt file. For simplicity, place
the SQL query into a temporary file with a unique name:
echo "SELECT
openssl_csr_to_crt(openssl_rsa_key_to_csr('${CA_KEY}',
'PEM','US', 'MA', 'Bedford', 'Postgres Enterprise Manager',
'[email protected]'), NULL,
'/opt/PostgreSQL/9.5/data/ca_key.key')" > /tmp/_random.$$
Then use the variable to execute the query, placing the content into the
ca_certificate.crt file.
/opt/PostgreSQL/9.5/bin/psql -U postgres -d pem --no-psqlrc
-t -A -f /tmp/_random.$$ >
/opt/PostgreSQL/9.5/data/ca_certificate.crt
Modify the permissions of the ca_certificate.crt file, and remove the
temporary file that contained the SQL command:
chmod 600 /opt/PostgreSQL/9.5/data/ca_certificate.crt
rm -f /tmp/_random.$$
5. Re-use the ca_certificate.crt file as the root.crt file:
cp /opt/PostgreSQL/9.5/data/ca_certificate.crt
/opt/PostgreSQL/9.5/data/root.crt
Modify the permissions of the root.crt file:
chmod 600 /opt/PostgreSQL/9.5/data/root.crt

EDB Postgres Enterprise Manager Installation Guide
Copyright © 2013 - 2017 EnterpriseDB Corporation. All rights reserved.
143
6. Use the openssl_rsa_generate_crl() function to create the certificate
revocation list (root.crl) .
/opt/PostgreSQL/9.5/bin/psql -U postgres -d pem --no-psqlrc
-t -A -c "SELECT
openssl_rsa_generate_crl('/opt/PostgreSQL/9.5/data/ca_certi
ficate.crt', '/opt/PostgreSQL/9.5/data/ca_key.key')" >
/opt/PostgreSQL/9.5/data/root.crl
Modify the permissions of the root.crl file:
chmod 600 /opt/PostgreSQL/9.5/data/root.crl
7. Use the openssl_rsa_generate_key() function to generate the
server.key file.
/opt/PostgreSQL/9.5/bin/psql -U postgres -d pem --no-psqlrc
-t -A -c "SELECT public.openssl_rsa_generate_key(1024)" >>
/opt/PostgreSQL/9.5/data/server.key
After creating the server.key file, cat the contents to the variable SSL_KEY
for use when generating the server.crt file and modify the privileges on the
server.key file.
SSL_KEY=$(cat /opt/PostgreSQL/9.5/data/server.key)
chmod 600 /opt/PostgreSQL/9.5/data/server.key
8. Use the SSL_KEY to generate the server certificate. Save the certificate in the
server.crt file. For simplicity, place the SQL query into a temporary file with
a unique name:
echo "SELECT
openssl_csr_to_crt(openssl_rsa_key_to_csr('${SSL_KEY}',
'PEM','US', 'MA', 'Bedford', 'Postgres Enterprise Manager',
'/opt/PostgreSQL/9.5/data/ca_certificate.crt',
'/opt/PostgreSQL/9.5/data/ca_key.key')" > /tmp/_random.$$
Then, generate the server.crt file:
/opt/PostgreSQL/9.5/bin/psql -U postgres -d pem --no-psqlrc
-t -A -f /tmp/_random.$$ >>
/opt/PostgreSQL/9.5/data/server.crt
Modify the privileges on the server.crt file, and delete the temporary file:
chmod 600 /opt/PostgreSQL/9.5/data/server.crt

EDB Postgres Enterprise Manager Installation Guide
Copyright © 2013 - 2017 EnterpriseDB Corporation. All rights reserved.
144
rm -f /tmp/_random.$$
9. Restart the Postgres server
/etc/init.d/postgresql-9.5 restart
11.1 Updating Agent SSL Certificates
For each agent that interacts with the PEM server, you must:
generate an rsa key and a certificate.
copy the key and certificate to the agent.
restart the agent.
Each agent has a unique identifier that is stored in the pem.agent table in the pem
database. You must replace the key and certificate files with the key or certificate that
corresponds to the agents identifier. Please note that you must move the agent.key and
agent.crt files (generated in Steps 2 and 3 into place on their respective PEM agent
host before generating the next key file pair; subsequent commands will overwrite the
previously generated file.
To generate a PEM agent key file pair:
1. Use psql to find the number of agents and their corresponding identifiers:
/opt/PostgreSQL/9.5/bin/psql -U postgres -d pem --no-psqlrc
-t -A -c "SELECT ID FROM pem.agent"
On Linux, you can also find the agent identifier and location of the keys and
certificates in the PEM/agent section of the /etc/postgres-reg.ini file.
On Windows, the information is stored in the registry. On a 64-bit Windows
installations, check:
HKEY_LOCAL_MACHINE\SOFTWARE\Wow6432Node\EnterpriseDB\PEM\agent
On a 32-bit Windows installation, check :
HKEY_LOCAL_MACHINE\SOFTWARE\EnterpriseDB\PEM\agent

EDB Postgres Enterprise Manager Installation Guide
Copyright © 2013 - 2017 EnterpriseDB Corporation. All rights reserved.
145
2. After identifying the agents that will need key files, generate an agent.key for
each agent. To generate the key, execute the following command, capturing the
output in a file:
/opt/PostgreSQL/9.5/bin/psql -U postgres -d pem --no-psqlrc
-t -A -c "SELECT openssl_rsa_generate_key(1024)" >
agent.key
Modify the privileges of the agent.key file.
chmod 600 agent.key
3. Generate a certificate for each agent. To generate a certificate, execute the
following command, capturing the output in a certificate file:
/opt/PostgreSQL/9.5/bin/psql -U postgres -d pem --no-psqlrc
-t -A -c "SELECT
openssl_csr_to_crt(openssl_rsa_key_to_csr('$(cat
agent.key)', 'agent$ID', 'US', 'MA', 'Bedford', 'Postgres
Enterprise Manager', '[email protected]'),
'/opt/PostgreSQL/9.5/data/ca_certificate.crt',
'/opt/PostgreSQL/9.5/data/ca_key.key')" > agent.crt
Where $ID is the agent number of the agent (retrieved via the psql command
line).
Modify the privileges of the agent.crt file:
chmod 600 agent.crt
4. Replace each agent's key and certificate file with the newly generated files before
restarting the PEM agent service.
On Linux, restart the service with the command:
/etc/init.d/pemagent start
On a Windows host, you can use the Services applet to start the PEM agent.
The PEM agent service is named Postgres Enterprise Manager Agent;
highlight the service name in the Services dialog, and click Start the
service.