ecoline elt 220 - welcome to spot on marketingspot-on.net/images/eet-eco electronic...
TRANSCRIPT

BEDIENUNGSANLEITUNGUSER MANUALMODE D‘EMPLOI
DE | EN | FR
EXACTLY WHAT YOU NEED.
ECOLINE ELT 220

16 www.geo-fennel-ecoline.com
EN
1 IMPORTANT 17
2 FEATURES 19
Display Indication 20
Operating Panel 20
3 OPERATION 21
Preparation for measurement 21
Power on 21
Alkaline / Rechargeable battery indication 21
Alkaline / Rechargable battery replacement 22
Horizontal angle 0SET (0-SET) 22
Vertical angle 0 error correction 22
Mode conversion of horizontal rightward and leftward (HAR/HAL) 23
Horizontal angle locked - unlocked 23
Measuring a percent of grade (%) 23
Angular repeated measurement 23
Measuring distance 24
Automatic power off 24
Displays Illumination 24
Function setting 25
Function setting method 25
4 TECHNICAL SPECIFICATIONS 26
5 SAFETY INFORMATION 27
Warranty 27
Intended use on instrument 27
Care and cleaning 28
Safety instructions 28
Specific reasons for erroneous measuring results 28
Electromagnetic acceptability (EMC) 28
CE-Conformity 28
Exceptions from responsibility 29
Laser classification 29
CONTENTS

17
EN
IMPORTANT READ THIS BEFORE USING YOUR INSTRUMENT
∙ Make a full check for the instrument before using it. Be sure that the instrument’s func-tions, power, original settings and revised parameters meet your requirements before you operate it.
∙ To avoid direct sunlight to the instrument’s lens, never leave the instrument exposed to extreme heat longer than necessary, or it could affect the instrument’s accuracy.
∙ When mounting or dismounting the instrument to or from the tripod, hold the instru-ment by one hand, turn the central screw on the tripod by the other hand to prevent the instrument from falling. If the instrument must be carried on the tripod, hold the instrument as vertically as possible. Never carry the instrument horizontally over your shoulder. Any long distance transport should be done with the instrument in the carrying case.
∙ Put the instrument in the carrying case to avoid extrusion, crash and shock during the transportation. Shockproof cushion should be necessarily put inside the carrying case during the long distance transportation.
∙ Clean the dirt on the surface of the organic glass and plastic by floss or brush after using the instrument. Dry the instrument in time after use in the rain.
∙ Do not use harsh chemicals to clean the surface of the organic glass and plastic compo-nents. A water dampened rag is all that is necessary.
∙ Use absorbent cotton or lenses tissue to clean the exposed optical parts. Handkerchief, clothes or other things like that are forbidden for cleaning.
∙ The instrument should be stored in an area of low humidity and good ventilation, where the temperature will not exceed 110º F(45ºC). It should be necessary to replace the desiccant regularly in the carrying case.
∙ Always remove the alkaline / rechargeable battery before storing the instrument. ∙ Please contact our company if the instrument’s functions appear abnormal. Non-profes-
sional repairers are forbidden to disassemble the instrument.
1

18 www.geo-fennel-ecoline.com
EN

19
EN
FEATURES 2
1 carrying handle
2 handle screw
3 sighting collimator
4 vertical tangent screw and motion clamp
5 operating key
6 objective lens
7 plate level
8 display
9 eyepiece
10 base plate
11 foot screw
12 focusing knob
13 battery
14 horizontal tangent screw and motion clamp
15 clamp of tribrach

20 www.geo-fennel-ecoline.com
EN
DISPLAY INDICATION
OPERATING PANEL
VA vertical angle
HAR horizontal angle right
HAL horizontal angle left
SFT the second function
REP repeat the horizontal angel
auto power off
HOLD the horizontal angle is holding
% percent grade
m distance unit
gon angle unit
battery level
Button Function 1 Function 2
0SET Set horizontal angle 0 Switch laser plummet on or off
HOLD Hold the horizontal angle Repeat horizontal angle measurement
SFT Select the second function Press it and hold on for 2 seconds to turn on or off illumination
R/L Switch horizontal angle right or left
V/% Switch vertical angle percent grade or DMSPower switch

21
EN
PREPARATION FOR MEASUREMENT
OPERATION
POWER ON
ALKALINE / RECHARGEABLE BATTERY INDICATION
Level and center the instrument precisely to ensure its best performance.
Mount the tripodFirstly place the tripod legs to a suitable position and tighten the locking device.Mount the instrumentAttach the instrument to the tripod carefully, and then move the instrument by loosening center screw. Lock slightly the center screw on the tripod when the plummet is centered above the mark.Roughly level the instrument with the circular vialUse footscrew 1, 2 to move the air bubble in the circular vial so it is centered left to right. Use footscrew 3 to move the air bubble to the center of the vial.
Fine tune level the instrument with the plate levelLoosen horizontal clamp knob. Turn the instrument to place the plate vial parallel with the footscrew 1, 2. Center the bubble using these two footscrews. Attention: Turn the two foot screws reversely when you adjust them.Turn the instrument 90°and center the bubble using level screw 3.Repeat step 1, 2 every time the instrument is turned 90°to center all the bubbles in these positions.
Return to the original position in step A. Rotate the instrument 180°. The plate vial is mounted correctly and the instrument is leveled nicely if the bubble is centered no matter the instrument is rotated in any direction. At the position of step 1, rotate the collimating section 180°. The plate level is mounted correctly and the instru-ment is levelled nicely if the bubble is centered no matter what direction the collimating section is rotated.
Please pay attention to the relations between the turning direction of the level screws and the moving direc-tion of the bubble.
When pressing the power button by 1 sec. audio tone sounds and after a test period of about 2 seconds in which all segments are displayed instrument is ready for usePush „V%“ button to show vertical angle in %.Press the power button and hold on for 2 seconds to turn off the instrument.
Full power
Effective
Effective
Low power but effective, replace the alkaline battery / recharge NiMH battery pack
Instrument will shut off automatically shortly.Replace alkaline battery / recharge NiMH battery pack immediately
3

22 www.geo-fennel-ecoline.com
EN
CHANGE THE BATTERIES
HORIZONTAL ANGLE OSET (0SET)
VERTICAL ANGLE 0 ERROR CORRECTION
Removing tvhe alkaline / rechargeable batteryIn case of use of Alkaline batteries:Push down the press button and remove the battery compartment.Battery replacementPush down the hook to pull cover board away from the battery compartment.Replace the old alkaline battery by new ones / load rechargeable battery - outside of instrument. Take care of correct polarity when replacing the battery.Snap the battery cover back into place.Mounting battery compartmentSlip the projection on the bottom of the battery compartment into the slot. Push the press button on top of the battery compartment until it clicks into place.
∙ Aim at target A using crosshair of the telescope. ∙ Press „0SET“ key once to set reading of horizon-
tal angle 0°00’ 00”. ∙ „0SET“ key is only effective to the horizontal
angle. ∙ Horizontal angle can be set 0 at any time except
the holding state (HOLD key).
∙ Power on while Pressing „R/L“, “SETUP”is shown. ∙ Then the first line will display “SET F1”and glint. ∙ Level the instrument and collimate the reference target in normal telescope setting
(Face 1), press „0SET“ the first line will glint and display “SET F2”. ∙ Turn the telescope in reverse setting (Face 2), collimate the same target ,press „0SET“
the first line will glint and display “SET”. ∙ Press „0SET“ to confirm correction and enter the angle measuring mode. ∙ If you want to exit at any time, you can press „SFT“.

23
EN
MODE CONVERSION OF HORIZONTAL RIGHTWARD AND LEFT-WARD (HAR/HAL)
HORIZONTAL ANGLE LOCKED - UNLOCKED
MEASURING A PERCENT OF GRADE (SLOPE MEASUREMENT %)
ANGULAR REPEATED MEASUREMENT
Aim at target “A” using crosshair of the telescope.Press „R/L“ key, transform horizontal angle mode HAR into the mode HAL. Measuring by mode HAL. „R/L“ key is of no effect to the vertical angle.Press „R/L“ key again, transform mode HAL into mode HAR
Turn the tangent knob and place the required horizontal angle.Press „HOLD“ key once , hold and flicker the value of the horizontal angle.Aim at the target.Press „HOLD“ key, no blink and hold to the value of the horizontal angle.„HOLD“ key is of no effect to the vertical angle.
Press „V%“ the display of vertical angle switches to percent grade. Press „V%“ again.The display turns back to normal angle measurement mode.
1 Press „SFT“ key
2 Press „REP“ key
3 Aim the target A and press „0SET“ key
4 Aim the target B
5 Press „HOLD“ key
6 Aim the target A again and press „0SET“ key
7 Aim the target B again
8 Press „HOLD“ key
9 Repeat 2-8 to measure the desired number of repetitions
10 Press „SFT“ to exit from this mode
24 www.geo-fennel-ecoline.com
EN
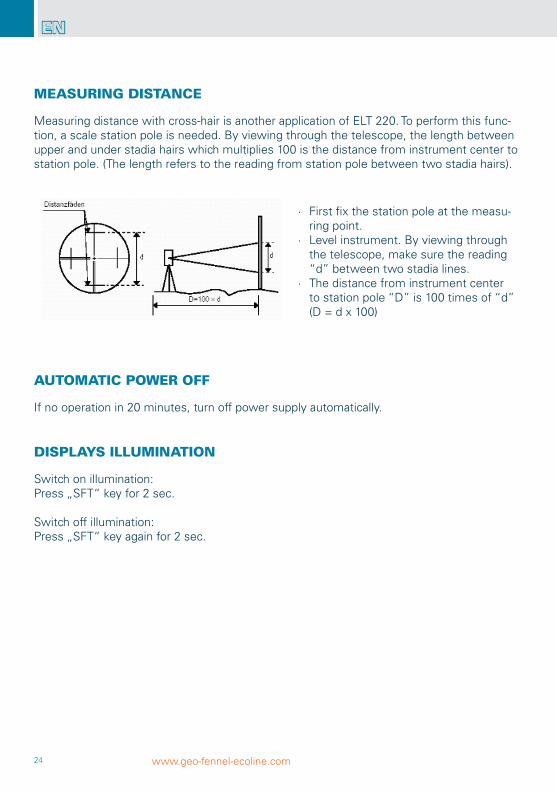
Measuring distance with cross-hair is another application of ELT 220. To perform this func-tion, a scale station pole is needed. By viewing through the telescope, the length between upper and under stadia hairs which multiplies 100 is the distance from instrument center to station pole. (The length refers to the reading from station pole between two stadia hairs).
If no operation in 20 minutes, turn off power supply automatically.
Switch on illumination:Press „SFT“ key for 2 sec.
Switch off illumination:Press „SFT“ key again for 2 sec.
MEASURING DISTANCE
AUTOMATIC POWER OFF
DISPLAYS ILLUMINATION
∙ First fix the station pole at the measu-ring point.
∙ Level instrument. By viewing through the telescope, make sure the reading “d” between two stadia lines.
∙ The distance from instrument center to station pole “D” is 100 times of “d” (D = d x 100)

25
EN
∙ Power on while pressing „0SET“ to enter the function setting mode. ∙ Press „0SET“ or „HOLD“ to select the item (1-4). ∙ Press „R/L“ or „V%“ to change the setting of the selected item. ∙ Setting all the item as you need. ∙ Press „SFT“ to finish setting and enter the normal angle measuring mode.
FUNCTION SETTING
FUNCTION SETTING METHOD
ITEM INSTRUCTION PARAMETER SETTING
1 Vertical angle display Switching between horizon-tal and zenith
Setting ONhorizontal
Setting OFFzenith
2 Automatic power off Auto shut off switch on and off
Setting ONON
Setting OFFOff
3 Minimum angle display Switching between 10“ and 20“
Setting ON10“
Setting OFF20“
4 Angle unit Switching between DEG and GON
Setting ONGON
Setting OFFDMG (Grad)

26 www.geo-fennel-ecoline.com
EN
TECHNICAL SPECIFICATIONS
Telescope:
Magnification 30x
Clear objective aperture 45 mm
Shortest focussing distance 1,5 m
Angle measurement: Incremental
Accuracy 6 mgon (20“)
Shortest focussing distance 3 mgon (10“)
Measuring units 400 gon / 360°
Display / Illumination 1 x LCD / yes
Vials:
Circular level 30“ / 2 mm
Plate level 8“ / 2 mm
Power supply NiMH-Akku
Operating time 18 h
alternatively 4 x 1,5V AA Alkaline-Batterie
Laser plummet:
Wave length 650 nm
Output 1 mw max.
Laser class 2
Spot size 2 mm / 1,5 m
Dimension:
Length / Width / Height 190 / 165 / 345 mm
Weight 4,8 kg
Temperature range -20°C bis +45°C
Tribrach detachable
Dust / water protection IP 54
4

27
EN
SAFETY INFORMATION
ERROR DISPLAY
Display Error Content
E01 Vertical angle 0 position is out of range or set with incorrect procedure.
E04 There’s abnormality in internal memory system.
E05 Reserved for adjustment in factory.
E06 There’s abnormality in angle measuring system.
E07 The level collimation or the telescope revolve too fast(over 4 r/s).
E08 There’s a error detected in angle measuring system. The instrument should be re-powered to eliminate this error.
WARRANTY
This product is warranted by the manufacturer to the original purchaser to be free from de-fects in material and workmanship under normal use for a period of two (2) years from the date of purchase. During the warranty period, and upon proof of purchase, the product will be repaired or replaced (with the same or similar model at manufacturers option), without charge for either parts or labour. In case of a defect please contact the dealer where you originally purchased this product. The warranty will not apply to this product if it has been misused, abused or altered. Without limiting the foregoing, leakage of the battery, bending or dropping the unit are presumed to be defects resulting from misuse or abuse.
5
INTENDED USE OF INSTRUMENT
Triangle, polygon and engineer measurements in the field of civil engineering as well as cadastral survey.
Attention:Fully check every part of the instrument and see whether the operation coincides with the procedures after the error appears. If the error code is still shown after many checks please send the instrument for repair.

28 www.geo-fennel-ecoline.com
EN
CARE AND CLEANING
CE-CONFORMITY
SAFETY INSTRUCTIONS
SPECIFIC REASONS FOR ERRONEOUS MEASURING RESULTS
ELECTROMAGNETIC ACCEPTABILITY (EMC)
Please handle measuring instruments with care.Clean with soft cloth only after any use. If necessary damp cloth with some water: If instru-ment is wet clean and dry it carefully.Pack it up only if it is perfectly dry.Transport in original container / case only.
It cannot be completely excluded that this instrument will disturb other instruments (e.g. navigation systems); will be disturbed by other instruments (e.g. intensive electromagnetic radiation nearby industrial facilities or radio transmitters).
Instrument has CE-mark according to EN 55011:2007, EN 61000-6-1:2007.
∙ Please follow up instructions given in operators’ manual. ∙ Use instrument for measuring jobs only. ∙ Do not open instrument housing. Repairs should be carried out by authorized workshops
only. Please contact your local dealer. ∙ Do not remove warning labels or safety instructions. ∙ Keep instrument away from children. ∙ Do not use instrument in explosive environment.
Measurements through glass or plastic windows.Dirty laser emitting windows.After instrument has been dropped or hit. Please check accuracy.Large fluctuation of temperature: If instrument will be used in cold areas after it has been stored in warm areas (or the other way round) please wait some minutes before carrying out measurements.

29
EN
EXCEPTIONS FROM RESPONSIBILITY
∙ The user of this product is expected to follow the instructions given in operators’ ma-nual. Although all instruments left our warehouse in perfect condition and adjustment the user is expected to carry out periodic checks of the product’s accuracy and general performance.
∙ The manufacturer, or its representatives, assumes no responsibility of results of a faulty or intentional usage or misuse including any direct, indirect, consequential damage, and loss of profits.
∙ The manufacturer, or its representatives, assumes no responsibility for consequential damage, and loss of profits by any disaster (earthquake, storm, flood etc.), fire, accident, or an act of a third party and/or a usage in other than usual conditions.
∙ The manufacturer, or its representatives, assumes no responsibility for any damage, and loss of profits due to a change of data, loss of data and interruption of business etc., caused by using the product or an unusable product.
∙ The manufacturer, or its representatives, assumes no responsibility for any damage, and loss of profits caused by usage other than explained in the users‘ manual.
∙ The manufacturer, or its representatives, assumes no responsibility for damage caused by wrong movement or action due to connecting with other products.
LASER CLASSIFICATION
The instrument is a laser class 2 laser product according to DIN IEC 60825-1:2008-05.It is allowed to use unit without further safety precautions.Eye protection is normally secured by aversion responses and the blink reflex.
The laser instrument is marked with class 2 warning labels.
Please note:If you return instruments for repair / for adjustment to us please disconnect batteries or rechargeable batteries from the instrument - this is for safety reasons! Thank you.

geo-FENNEL GmbHKupferstraße 6D-34225 BaunatalTel. +49 561 / 49 21 45Fax +49 561 / 49 72 [email protected]
Technische Änderungen vorbehalten.All instruments subject to technical changes.
Sous réserve de modifications techniques.
11/2013