eclipse upgrade procedures · as of release 9.0.4, solar eclipse runs on the mac os©, however you...
TRANSCRIPT

i
Eclipse Upgrade Procedures
Release 9.0.5

Table of Contents
ii
Disclaimer This document is for informational purposes only and is subject to change without notice. This document and its contents, including the viewpoints, dates and functional content expressed herein are believed to be accurate as of its date of publication. However, Epicor Software Corporation makes no guarantee, representations or warranties with regard to the enclosed information and specifically disclaims any applicable implied warranties, such as fitness for a particular purpose, merchantability, satisfactory quality or reasonable skill and care. As each user of Epicor software is likely to be unique in their requirements in the use of such software and their business processes, users of this document are always advised to discuss the content of this document with their Epicor account manager. All information contained herein is subject to change without notice and changes to this document since printing and other important information about the software product are made or published in release notes, and you are urged to obtain the current release notes for the software product. We welcome user comments and reserve the right to revise this publication and/or make improvements or changes to the products or programs described in this publication at any time, without notice. The usage of any Epicor software shall be pursuant to an Epicor end user license agreement and the performance of any consulting services by Epicor personnel shall be pursuant to Epicor's standard services terms and conditions. Usage of the solution(s) described in this document with other Epicor software or third party products may require the purchase of licenses for such other products. Where any software is expressed to be compliant with local laws or requirements in this document, such compliance is not a warranty and is based solely on Epicor's current understanding of such laws and requirements. All laws and requirements are subject to varying interpretations as well as to change and accordingly Epicor cannot guarantee that the software will be compliant and up to date with such changes. All statements of platform and product compatibility in this document shall be considered individually in relation to the products referred to in the relevant statement, i.e., where any Epicor software is stated to be compatible with one product and also stated to be compatible with another product, it should not be interpreted that such Epicor software is compatible with both of the products running at the same time on the same platform or environment. Additionally platform or product compatibility may require the application of Epicor or third-party updates, patches and/or service packs and Epicor has no responsibility for compatibility issues which may be caused by updates, patches and/or service packs released by third parties after the date of publication of this document. Epicor® is a registered trademark and/or trademark of Epicor Software Corporation in the United States, certain other countries and/or the EU. All other trademarks mentioned are the property of their respective owners.
Copyright © Epicor Software Corporation. All rights reserved. No part of this publication may be reproduced in any form without the prior written consent of Epicor Software Corporation. Publication Date: October 30, 2018

Eclipse Upgrade Procedures
iii
Table of Contents Eclipse Upgrade Procedures ......................................................................................................................... 1
Chapter 1: Before You Upgrade ................................................................................................................... 2
Hardware and Software Requirements ..................................................................................................... 2
Eclipse Database Server ........................................................................................................................ 2
Client Computers .................................................................................................................................. 2
Software / Server Requirements for Collaborative Order Entry ............................................................... 2
Release Upgrade Authorization Form ........................................................................................................... 3
During Upgrade Weekend ........................................................................................................................ 3
Backup Recommendations ........................................................................................................................ 5
Supported Backup Methods ...................................................................................................................... 5
AIX Frequently Asked Questions: ............................................................................................................ 5
LINUX Frequently Asked Questions: ....................................................................................................... 5
Supported Backup Methods: ..................................................................................................................... 6
Other Backup Methods ............................................................................................................................. 6
Additional Information to Review ............................................................................................................ 6
Check Uptime on Your System ................................................................................................................ 8
Check Companion Product Details ........................................................................................................... 8
Chapter 2: Pre-Installing Solar Java Virtual Machine (JVM) ....................................................................... 9
Pre-Installing Solar Eclipse JVM Manually ............................................................................................. 9
Using the WebStart Page ........................................................................................................................ 11
Install Now .............................................................................................................................................. 11
Advanced Solar Installer ......................................................................................................................... 11
Solar Installer, Offline Mode .................................................................................................................. 11
Companion Product Launches ................................................................................................................ 12
Solar Installer - Offline Mode ................................................................................................................. 13
Engineering Assistance / Support After Your Upgrade .......................................................................... 13
Solar Installer - Advanced ...................................................................................................................... 14
Running the Advanced Installer .............................................................................................................. 14
Additional Parameters ............................................................................................................................. 15
Legacy Solar Installer ............................................................................................................................. 16
Running the Legacy Solar Installer ......................................................................................................... 16
Additional Parameters ............................................................................................................................. 16
Solar Launcher 9.0.0 and Above ............................................................................................................. 17

Table of Contents
iv
Additional Parameters ............................................................................................................................. 17
Chapter 3: Running Your Upgrade ............................................................................................................. 18
On LINUX Servers ................................................................................................................................. 18
Chapter 4: Managing Companion Product Details ..................................................................................... 19
Chip & PIN Requirements for Upgrades ................................................................................................ 20
Functionality Release Requirements ................................................................................................... 20
Job Management Upgrades ..................................................................................................................... 21
Configuring Properties File After Upgrade ............................................................................................ 21
Document Imaging Settings - HTTP/HTTPS ......................................................................................... 21
PDW2 Upgrade Requirements ................................................................................................................ 24
Web Integration API Changes ................................................................................................................ 25
AddressValidation ................................................................................................................................... 25
WOE Settings, EPad Link, and Product Image Viewer .......................................................................... 26
Display Certification Products in WOE CMP .................................................................................... 26
Update Display in WOE Settings for PDW ........................................................................................ 26
EPad Link Device ............................................................................................................................... 26
Solar Product Image Viewer ............................................................................................................... 26
Chapter 5: After Your Upgrade .................................................................................................................. 28
Installing Eclipse After Upgrade............................................................................................................. 28
Solar Installer - Offline Mode ................................................................................................................. 29
Engineering Assistance / Support After Your Upgrade .......................................................................... 29
Authorization Keys ................................................................................................................................. 30
Authorization Keys for 9.0.1............................................................................................................... 30
Authorization Key for 9.0.3 ................................................................................................................ 30
Java JRE Update ..................................................................................................................................... 31
Cut Product Enhancements ..................................................................................................................... 32
Clearing Online Help Cached Files ........................................................................................................ 33
Small Project Jobs Control Settings ............................................................................................................ 34
Release 8.7.9 & Release 9.0.0 ................................................................................................................. 34
Release 9.0.1 ........................................................................................................................................... 34
Release 9.0.2 ........................................................................................................................................... 34
Release 9.0.3 ........................................................................................................................................... 35
Creating New Cases in ServiceNow ........................................................................................................... 36
Chapter 6: Eclipse Files and Attribute Updates for 9.0.4 ........................................................................... 37
1
Eclipse Upgrade Procedures System administrators can use the Eclipse Upgrade Procedures to manage your site through the upgrade process. Most of the steps provided must be performed by a system administrator. If you are unsure, consult Eclipse Support for more information.
Important: The instructions in this procedures manual assume a system administrator level of knowledge for your company.
Regardless of the release you are taking, review the procedures carefully. Some procedures detail which release to which the action pertains. For example, if you are upgrading to Release 8.7.7, you do not need to update your signature capture details.
This document contains the following:
• Release Upgrade Authorization Form - Required information to deliver to Eclipse prior to upgrade.
• Backup Recommendations - Links to assist you with AIX and LINUX backups.
• Pre-Installing and Installing Solar Eclipse - How and why to pre-install the latest release.
• Check Uptime on Your System - Items that must be completed prior to upgrade.
• Companion Products - Details for those companion products which require settings changes prior to upgrade.
• After you Upgrade - Items to address after upgrade has been completed.
• WebStart Information - Details how the Web Start page looks and what to download.
Important: If you have an issue over the weekend during the upgrade that will not allow you to open for business, please page Release Engineering by calling 512-278-5570, leave a message and the call will be returned.
Chapter 1: Before You Upgrade
2
Chapter 1: Before You Upgrade The following topics should be address prior to taking an upgrade:
Hardware and Software Requirements
Release Upgrade Authorization Form
Backup Recommendations
Check Uptime on Your System
Hardware and Software Requirements Ensure you have the following software and hardware requirements to run Solar Eclipse 9.0 and higher.
Eclipse Database Server • Universe 11.2.5
• java-1.8.0-openjdk
Note: If you have a LINUX server, you will need to have RHEL6 or higher. We recommend RHEL7.4 for Release 9.0.4 and above.
• Minimum of 4GB main memory.
• Larger systems will have memory sized accordingly.
• Solar requires a minimum of 2 GB of memory for JBOSS processes.
• Solar and Job Management require a minimum 4GB memory for JBOSS processes.
• For Release 9.0.4, a minimum of Red Hat version 6.7 (RH6.7). We recommend any customers running version 5 to jump to Red Hat Enterprise 7 (RHE7) to eliminate that need during upgrading later.
Client Computers • Window Vista or newer. Windows XP is no longer supported.
• For Release 9.0 and up running from a WebStart page, we recommend having Java 8u66. For Release 8.0, a minimum of Java 7u11 to launch the installer after upgrade. Once you upgrade, we recommend updating to Java 8u66.
• As of Release 9.0.4, Solar Eclipse runs on the Mac OS©, however you must have a windows emulator, such as Boot Camp.
Software / Server Requirements for Collaborative Order Entry Eclipse requires Windows Server 2012 to run Collaborative Order Entry.
For Release 9.0.4, You must be running Red Hat 6.7 or higher for 9.0.4. Red Hat 5 cannot run Java 1.8. Customers must be running version 6 or above. If a site is still on version 5, however, we recommend upgrading to Red Hat 7, to ensure they do not need to upgrade when taking Release 9.0.4.

3
Release Upgrade Authorization Form To ensure a smooth upgrade process to the current version of Eclipse, complete the following information and fax to 512-356-0576 or e-mail to [email protected]. Print clearly and return only this page.
Important: We no longer check backups before the upgrade process begins. You are responsible to make sure you have a successful backup. If you need to change the start time of the planned upgrade, call Eclipse Release Engineering: 512-278-5570.
The MKSYSB (operating system back up) must be no more than two (2) months old for AIX sites.
If you would like Eclipse to start the upgrade as soon as possible you may want to reschedule your backup to run as soon as all users are logged off for the weekend prior to upgrade. If you are unsure how to check information regarding the backup please check the Backup Recommendations page in this document.
During Upgrade Weekend Use the following contacts for issues that arise during the upgrade weekend:
• If you have a general question for Release Engineering, call 512-278-5570. Leave a message and your call will be returned as soon as possible.
• If you have a critical issue that impedes your business, such as a site down, call the Eclipse Emergency Support Number 512-278-5570 immediately and follow the prompts to reach the correct department.
• If you have a non-critical issue, open a Service Request for follow up.
Note: If you contact emergency support number, you may be billed for service for non-critical issues.
• Any necessary reintegration of custom code is billed on a 2 hour minimum (time & materials) basis
• Upgrade requires site to site VPN to Epicor. This must be active at the time of upgrade and a week prior so we can review and prepare your site. In most cases this will be active and you won’t need to do anything. However, the nature of how the upgrades are performed facilitates our need to disclose this requirement.

Release Upgrade Authorization Form
4
Company Name: Upgrade Date: Contacts for Upgrade Weekend:
Name / Phone: Name / Phone: Weekend Hours of Operation: Customer to Run Upgrade Script: Yes or No
Company Authorization: (print name)
Signature:

5
Backup Recommendations Due to the rapidly changing nature of the hardware and software industry, the list provided below is subject to change without notice. We recommend checking this page often for the most up-to-date information.
Eclipse Backups: http://kb.eclipseinc.com/requirements/backups/
Supported Backup Methods • ABS CrashPlan PRO (What is ABS?)
• E-Vault (on- and/or off-site; Linux/Windows/AIX)
• Tape backup (using Eclipse’ standard tape backup scripts, with or without snapshot support)
AIX Frequently Asked Questions: • How do I view my Eclipse tape backup logs on AIX?
http://kb.eclipseinc.com/kb/how-do-i-view-my-eclipse-tape-backup-logs-on-aix/
• How do I run a manual data backup in AIX?
http://kb.eclipseinc.com/kb/how-do-i-run-a-manual-data-backup-in-aix/
• How do I schedule the nightly backup?
http://kb.eclipseinc.com/kb/how-do-i-schedule-the-nightly-backup/
• How do I troubleshoot tape drive errors on my AIX server?
• http://kb.eclipseinc.com/kb/how-do-i-troubleshoot-tape-drive-errors-on-my-aix-server/
• MKSYSB – AIX: http://kb.eclipseinc.com/?s=MKSYSB
LINUX Frequently Asked Questions: • How do I check the status of my ABS backup on my Linux server?
http://kb.eclipseinc.com/kb/how-do-i-check-the-status-of-my-abs-backup-on-my-linux-server/
• How do I view my Eclipse tape backup logs on Linux?
http://kb.eclipseinc.com/kb/how-do-i-view-my-eclipse-tape-backup-logs-on-linux/
• How do I modify my Linux tape backup script to send its logs via email?
http://kb.eclipseinc.com/kb/how-do-i-modify-my-linux-tape-backup-script-to-send-its-logs-via-email/
• How do I check the status of my E-Vault backup?
http://kb.eclipseinc.com/kb/how-do-i-check-the-status-of-my-evault-backup/
• Is there an equivalent the the AIX mksysb system backup tape I need to do in Linux ?
http://kb.eclipseinc.com/kb/can-i-create-a-mksysb-system-backup-on-my-linux-server/

Release Upgrade Authorization Form
6
Supported Backup Methods: Also for backups running the ABS Crash Plan PRO software, it is always running, there is no fixed backup times. f you would like us to start the upgrade as soon as possible, you may want to reschedule your backup to run as soon as all users are logged off for the weekend. If you are unsure how to check information regarding the backup please follow links on below.
Upgrade Start Day/Time after Completed Backup: ____________________________
Note: Save the backup tape and do not attempt to overwrite it. Archive the tape for 3 to 6 months
Use the following links to review:
• http://kb.eclipseinc.com/kb/can-abs-crashplan-be-configured-to-run-at-a-specific-time/
• http://kb.eclipseinc.com/kb/how-do-i-launch-the-crashplan-pro-administration-software-on-my-linux-server/
To suspend/start crash plan PRO:
1. Login as root.
2. Type: service crashplan stop service crashplan start)
Other Backup Methods Many Eclipse customers choose to integrate their servers’ backup routines into pre-existing backup architectures. This usually works well, but we provide the following guidelines:
• The backup will not be “valid” unless the database is suspended and/or there is absolutely no activity taking place (users, phantoms, etc.).
• Storage snapshots can be combined with database suspension to provide a “valid” backup source for active servers.
• The backup job should back up at least the important Eclipse data files.
• Support, monitoring and restores will be the responsibility of the customer.
Important: If you still have questions about backing up your data, open a case in ServiceNow for assistance. Include your backup type, date of your upgrade, and any questions you have. The appropriate team will respond.
Additional Information to Review Review the following regarding support and guidelines for upgrades:
• For 5 days after each upgrade you will go to the TRANS team for support. When you submit an issue via internet the problem type should be TRANS during this period.
• Within Eclipse you have the ability to create user defined screens, user defined views, Eclipse Reports, report writers and mass loads. Periodically, as part of ongoing development efforts, we make changes to code and file structures that may affect your user defined screens, user defined views, Eclipse Reports or report writer/mass load which may require you to make adjustments to them. If assistance is needed from support, please note that these are not considered business critical and will be addressed in the normal flow for support. The Eclipse Feature Summary, starting in Release 9.0.1, will list the affected files and dictionaries for each release.

7
• After the year end and your financials are complete (which includes you completing your audit, publishing the financials, submitting them to everyone required including the IRS), which means you must never change those numbers, we recommend you move your audit date forward to the end of the reported year. Please note that if you need the audit period opened up after it has been closed it requires a written request signed by the CFO of your company. To do this you go to GL Maintenance to Change G/L Closing date and change the audit close date.
Release Upgrade Authorization Form
8
Check Uptime on Your System Complete the following steps prior to taking an upgrade, regardless of the release you are taking.
Have a system administrator run the uptime command on AIX or LINUX command line to see how long the system has been running without a reboot.
If your server has not been rebooted in the past 90 days, reboot your server using the following instructions:
• http://kb.eclipseinc.com/kb/how-do-i-reboot-or-shut-down-my-linux-server/
• http://kb.eclipseinc.com/kb/how-do-i-reboot-my-aix-server/
Check Companion Product Details Use the Managing Companion Product Details in this document to configure certain companion product details prior to taking the upgrade.
9
Chapter 2: Pre-Installing Solar Java Virtual Machine (JVM) If you do not have access to the WebStart page, use the following instructions to install Solar prior to upgrade.
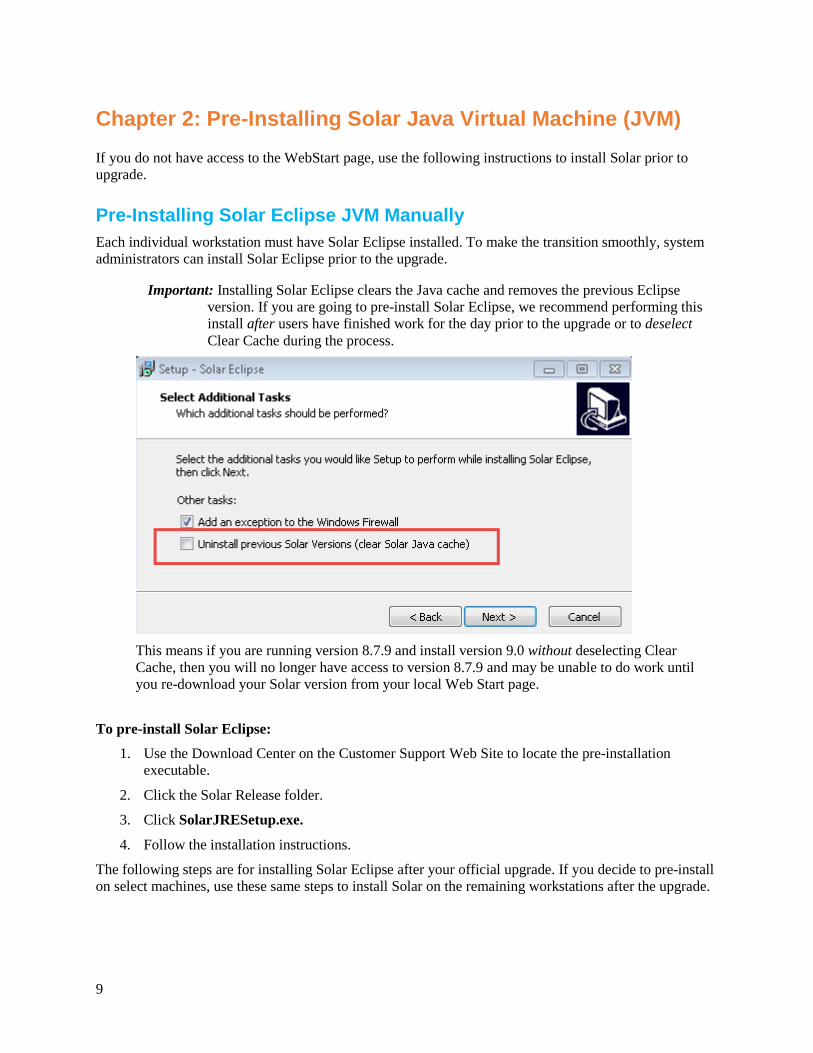
Pre-Installing Solar Eclipse JVM Manually Each individual workstation must have Solar Eclipse installed. To make the transition smoothly, system administrators can install Solar Eclipse prior to the upgrade.
Important: Installing Solar Eclipse clears the Java cache and removes the previous Eclipse version. If you are going to pre-install Solar Eclipse, we recommend performing this install after users have finished work for the day prior to the upgrade or to deselect Clear Cache during the process.
This means if you are running version 8.7.9 and install version 9.0 without deselecting Clear Cache, then you will no longer have access to version 8.7.9 and may be unable to do work until you re-download your Solar version from your local Web Start page.
To pre-install Solar Eclipse:
1. Use the Download Center on the Customer Support Web Site to locate the pre-installation executable.
2. Click the Solar Release folder.
3. Click SolarJRESetup.exe.
4. Follow the installation instructions.
The following steps are for installing Solar Eclipse after your official upgrade. If you decide to pre-install on select machines, use these same steps to install Solar on the remaining workstations after the upgrade.

Chapter 2: Pre-Installing Solar Java Virtual Machine (JVM)
10
To Install Solar Eclipse:
1. Use your Internet browser and navigate to your server ( http://<your.server.name>:2080 ) to display your Web Start page.
2. Click Install Now.
Note: If Solar hangs or "goes nowhere" check to see if your anti-virus software is enabled. If it is, turn off the anti-virus software and try again.
3. If prompted to update Java, click Do Not Show Again and Later.
Note: Once enabled and upgraded, the system checks Java for you each time you launch it.
4. Let the application run and complete the installation.

11
Using the WebStart Page Eclipse provides a web page on your local server to access the installation processes. You can bookmark this page on your browser, as needed.
WebStart Location: //<YourServer>:2080/
The WebStart page on your server houses several installation options and access to web-based applications, such as Job Management.
Install Now Use this for standard Solar Eclipse user installation. This is the most common installation selection which activates the Solar Launcher, downloads, and launches Solar Eclipse. The following window displays as the install completes:
For more information about this option, see Pre-Installing Solar Eclipse in this document or Installing Solar Eclipse in the Feature Summary documentation.
Advanced Solar Installer For system administrators or other advanced users. Provides fields to change the server hostname/IP, server port, or select the Java version to use when installing. This button links to http://serverport/SolarInstallServiceAdv.jnlp. The following options display:
For more information, see Solar Installer - Advanced in this document.
Solar Installer, Offline Mode Allows users to install Solar offline by connecting directly to the server port identified, but does not require Java cache. This button links to http://serverport/installs/SolarJRESetup.exe.

Chapter 2: Pre-Installing Solar Java Virtual Machine (JVM)
12
This installer places a Solar Eclipse icon on your desktop and runs the standard installer program.
For more information, see Solar Installer - Offline Mode in this document.
Companion Product Launches You now have access to several companion products that run in their own applications: Job Management, Eclipse Mobile, and Web Commerce.
For system administrators, use the Eclipse Launch Page Links control maintenance record to manage the URLs that launch these web-based applications.
13
Solar Installer - Offline Mode The Solar Installer setup file allows anyone to install the necessary Java support files used by Solar and automatically configure the firewall rules. The process clears previous cache files and installs the necessary current files.
To use the Solar installer after an upgrade:
1. Display your default browser and navigate to your Eclipse server: (http://<your.server.name>:2080) to display the WebStart page.
2. From the Solar Admin drop down menu, select Solar Installer - Offline Mode.
3. Follow the install wizard instructions.
Engineering Assistance / Support After Your Upgrade Since you will be taking a point upgrade over the weekend you will be supported by the TRANS team for the next 5 days starting Monday. After that time period you will return to regular support. You can reach the TRANS team through the customer website by entering a Service Request or through the auto attendant by calling the support number 512-278-5570.
Important: Do not call the TRANS team over the weekend; you may enter a Service Request that will be reviewed Monday morning.

Chapter 2: Pre-Installing Solar Java Virtual Machine (JVM)
14
Solar Installer - Advanced Use the Advanced Solar Installer for the following:
1. Debug purposes: Will keep the Java Console opened (JNLP and EXE version)
2. Launching solar without using Oracle's webstart: (EXE version only) The EXE version is a 100% standalone launcher that is not restricted by Oracle's rules and it can be run with Java 1.7+ (or even Java 1.6 if you have the Java FX Runtime installed).
Running the Advanced Installer If debugging is needed (Java Console output) use the Solar Admin > Advanced Solar Installer on the Webstart page (URL in MAIN is http://10.161.180.139:2080/SolarInstallServiceAdv.jnlp). After launching the program, leave the Java console open and select Launch Solar:
If you need to launch without the Webstart page, double-click C:\Program Files (x86)\Epicor\SolarEclipse\SolarLauncher.exe or launch the program using C:\Program Files (x86)\Epicor\SolarEclipse\SolarLauncherConsole.exe from the command line.
Command line Usage: SolarLauncherConsole.exe
Valid options are:
• -mode - (admin|download) If -mode is not provided 'admin' mode will be assumed unless -server and -port are provided which will assume user mode and launch Solar automatically.
• -server - (Application Server hostname or IP)
• -port - (Application Server port)
• -cachePath - (Path for the Solar JRE and Solar Cache) Please note that if the user can't write to this path %USER.HOME% will be used instead.
• -javaVersion - (A specific JRE to use) Possible values are [jre1.8.0_45 i586, jre1.8.0_20 i586, jre1.8.0_20 x64, jre1.8.0_45 x64])
Note: If no arguments are provided, the launcher starts in Admin mode and displays an interface to provide a server and port
15
Additional Parameters The Advanced Solar Launcher can receive a hostname/IP and port to connect, which means it can be used as a Release 9.0 dialer if the site's/app server data is known. It can also be used to run Solar with another java version (8u20 and 8u45 at this time.

Chapter 2: Pre-Installing Solar Java Virtual Machine (JVM)
16
Legacy Solar Installer It's the old and untouched SolarInstallService.jnlp, it’s heavily dependant in the Java installed version in the computer. It should only be used in MAC and Linux computers (provided they have Java 8+ installed). It can also be used in Windows if Java 1.8+ is installed (in case someone is having problems with the new launcher).
Important: If you use a Macintosh laptop or desktop machine, you should not user the Legacy Installer. Eclipse has identified issues with the Java8/FX. Instead, use the Install Now option on the main Webstart page.
Running the Legacy Solar Installer Use the Solar Admin > Legacy Installer option from the Webstart page.
URL for MAIN is http://10.161.180.139:2080/SolarInstallServiceLegacy.jnlp
Additional Parameters None

17
Solar Launcher 9.0.0 and Above This is the new launcher, it's the same thing as the "Advanced Solar Installer" running in "user" mode which means it will launch Solar automatically using the server default configurations and hide the Java Console.
To run the Solar launcher, see Installing Solar Eclipse in this document.
Additional Parameters None
Chapter 3: Running Your Upgrade
18
Chapter 3: Running Your Upgrade After consulting with release engineering or your upgrade contact, you can run your own upgrade off-hours using the following procedures.
Important: The installer locks the system, logs off existing users, and displays dots on your screen as it runs the upgrade. After the upgrade completes, the installer unlocks the system and returns you to the LINUX/UNIX command line. You can then type exit to get out of the command shell and test/use your Eclipse System.
On LINUX Servers 1. Login as the ROOT user.
2. Type cd /u2/eclipse/ECL
3. Type ./run_linux_install.sh
4. Press Enter after the Installer Introduction.
5. Press Enter to continue.

19
Chapter 4: Managing Companion Product Details Use the following guides to ensure your companion products run properly after upgrade:
• Web Integration API Changes
• Chip & PIN Requirements for Upgrades
• EDI WIT-NET Upgrade
Important: The following only needs to be done if you are upgrading a version of Eclipse older than 8.7.7 to Eclipse 9.0. If you upgraded to Eclipse 8.7.8 or Eclipse 9.0 already, skip this section and go to Chapter 5.
• PDW WOE Display Settings for Web Commerce
• EPad Link Device
• Solar Product Image Viewer

Chapter 4: Managing Companion Product Details
20
Chip & PIN Requirements for Upgrades Address the following for the triPOS application that is connected to the Vantiv Credit Card Payment Process application (formerly Element):
Functionality Release Requirements The following releases are required for the corresponding functionality:
• Release 9.0.3 - triPOS 5.10 and new installer. We recommend this release as the minimum as it includes the updated triPOS version. If you are running Ingenico Driver 2.20, we recommend uninstalling that version and installing the latest, version 2.6 or higher
• Release 9.0.2.1.3 - Supports secondary non-credit card signature devices. We recommend this release for sites that use Innovo for non-credit card signatures.
• Release 9.0.2.0.6 - Supports non-credit card signatures. We recommend this as a minimum version. This version accepts both CC and non-credit card signatures on the triPOS device.
• Release 9.0.1.1.8 - This release is GA for triPOS, but does not support non-credit card signatures. The installer does not include certain options, and therefore requires some manual configuration of triPOS config file. We no longer recommend this version and encourage an upgrade.
3.
21
Job Management Upgrades In Release 9.0.3, the a new underlying code stream to better your Job Management experience. The web application is quicker and easier to use. In order to make the system more efficient, the user interface has been adjusted so a new look and feel will help you navigate. For the most part, the application has not changed in how it works, however, a few tools had to be modified when the new code was applied.
Important: If you have any Job Management pages bookmarked in your browser, you will need to update them. This means, any bookmarks ending in .seam need to be changed.
Configuring Properties File After Upgrade When upgrading to Release 9.0.4.0.5, we recommend configuring your properties file so that the report files inherit your full report details. If you open your reports and the parameters are blank, then the jm-account-properties file is missing and must be added. You can add this file without restarting JBoss.
Note: This is primarily for users running more than one server. The process is identical.
To enable the reporting property file for cluster JM instances:
1. Install patch for DSN873. This is included in Release 9.0.4.05.
2. Locate the following file on the server where reporting is enabled: <jboss_install>\eclipse\configuration\jm-account.properties.
Note: The JBoss install directory is specific to each site, such as one of the following:/usr/local/jboss or /u2/eclipse/modules/jboss or /opt/apps/jboss. An administrator can use ps -ef | grep jboss command to get the directory.
3. Add true or false at the end of the file, as needed:
• disable.reporting = true
• disable.reporting = false
Important: This is the default even if the line does not exist in the file.
Document Imaging Settings - HTTP/HTTPS In Release 9.0.5, in order to make your Job Management application faster and more reliable in document retrieval, some modifications should be taken to adjust for those running multiple server options with certain IIS tools.
To setup your document imaging:
1. Install IIS on your server. See https://msdn.microsoft.com/en-us/LIBRary/ms181052(v=vs.80).aspx.
2. Install Common HTTP Features, Security and Management Tools.
3. Once installed, in the Roles > Add Roles option, ensure that WebServer IIS is installed.

Chapter 4: Managing Companion Product Details
22
4. In the Add Role Services, ensure that Common HTTP Features, Management Tools IIS, and Management Console are enabled.
5. In the IIS Management Console, select the Content View tab and select Add Virtual Directory.
6. Follow the prompts to add a virtual directory pointing to the shared directory created for
document retrieval created for SMB using pass-through authentication. (https://msdn.microsoft.com/en-us/library/bb763173.aspx):
• Alias - Use any alias, such as http://server/jobmgmtforms/ or http://server/jmforms/
• Path - Enter the path where your Samba directory lives. This will be the same URL as in your Job Management > Admin > Document Imaging settings are set.
7. From the Control Panel, select Turn Window features on or off.
8. Select the Web Management Tools, Common HTTP Features, and World Wide Web Services > Security options.
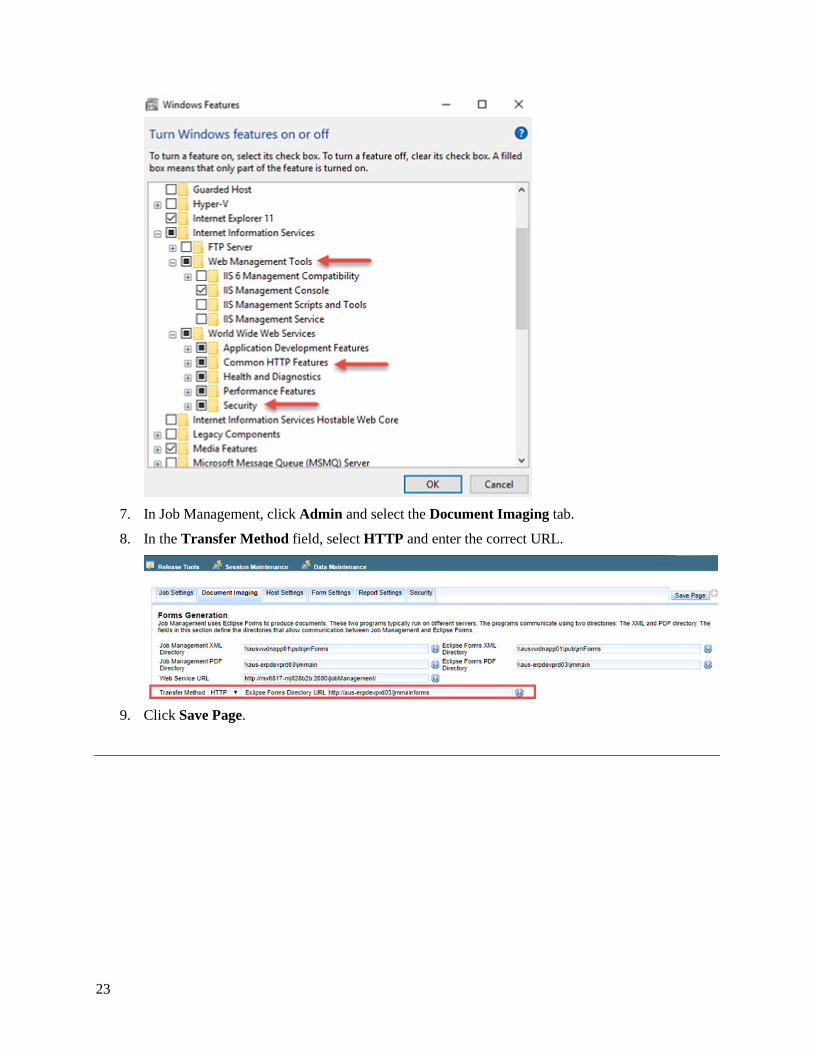
23
7. In Job Management, click Admin and select the Document Imaging tab.
8. In the Transfer Method field, select HTTP and enter the correct URL.
9. Click Save Page.

Chapter 4: Managing Companion Product Details
24
PDW2 Upgrade Requirements The Enhanced Product Data Warehouse (PDW2) requires the following:
• Release 9.0.4.08 or higher.
• PDW WOE Settings for Web Commerce – Page 26 in this documentation

25
Web Integration API Changes With Each upgrade of Eclipse you’ll want to use the most up to date Web Integration Manual. This can be found on our Customer Support Web Site at http://erpcustomer.epicor.com/cws/support/docu/eclipsecompanion.do?folder=%2FWeb+Integration
AddressValidation As of Release 9.0.4 Avalara is no longer required for AddressValidation. This means that action is disconnected from the salesordersubmit transaction, and allows company web developers to verify addresses using the AddressValidation transaction. Previously, you were required to have an address verification service, such as Avalara, enabled to use this transaction and this change allows the validation without the verification service enabled. Their web developer needs to verify addresses submitted by the AddressValidation.

Chapter 4: Managing Companion Product Details
26
WOE Settings, EPad Link, and Product Image Viewer Address the following for these two companion products.
Display Certification Products in WOE CMP For customers who have certified products in their product listings, the a new Display Certification Products in WOE control maintenance record was added in Release 9.0.3. Ensure that this control maintenance record is set to Yes to display these products on your web page.
Important: If set to No, which is the default, Eclipse products that require certification do not display in WOE. This means, even if the customer record has the required certification on file, if this control record is set to No, than no user can add these products to orders.
Update Display in WOE Settings for PDW Customers who use PDW specification sheets and images in Web Commerce must update the WOE display settings through PDW MetaData Maintenance.
To update the display in WOE Settings:
1. From the Tools > Product Data Warehouse (PDW) menu, select PDW Meta Maintenance to display the PDW MetaData Maintenance window.
2. In the Description field, enter the name of your specification sheet.
3. Select the Display in WOE check box. (If in Eterm, enter Yes.)
4. From the File menu, select Save.
5. In the Description field, enter the name of your image file.
6. Select the Display in WOE check box. (If in Eterm, enter Yes.)
7. From the File menu, select Save.
EPad Link Device Perform the following update only if you capture signatures through Close Counter Order in Solar Eclipse or if you use the Signature Capture companion product and you are upgrading to Eclipse Release 9.0.
If you have upgraded to a version higher than Release 8.7.7, skip this step.
If you are on a version older than Release 8.7.7, perform the steps in the following link after the upgrade to Release 9.0.
For the latest instruction, consult the documentation on the Customer Support Website for the signature updates: http://erpcustomer.epicor.com/cws/support/docu/eclipsecompanion/downloadFile.do?folder=/Eclipse Signatures&fileName=Eclipse 9 Close Counter Order and Signature Capture Workstation Setup.pdf
Solar Product Image Viewer If you are upgrading to the current release from a release prior to Release 8.7.9, you must install the Solar Product Image Viewer.
To install the image viewer:
1. Select one of the following:

27
• For locally stored images: Solar Product Image viewer NonPDW Setup.
• For PDW customers: Solar Product Image Viewier PDW Setup.
• For full product maintenance documentation including the image viewer setup: Product Maintenance.
2. Review steps for after your upgrade.

Chapter 5: After Your Upgrade
28
Chapter 5: After Your Upgrade Complete the following tasks after your Release 9.0 Upgrade:
• Material Return Control Enhancements - Review the control maintenance records, authorization keys, and other setup details for material return controls.
• Jave JRE Update
• Install Solar - If you pre-installed Solar Eclipse on workstations, you can skip this step. If you missed any workstations or installed on only some of the workstation install Solar Eclipse on those machines. Steps provided below.
After installation of the new Release 9.0 and above Solar application, users will delete the old Solar icon and use the new Solar Icon to launch Eclipse:
Installing Eclipse After Upgrade Use the following steps to install Solar Eclipse.
To Install Solar Eclipse:
1. Use your Internet browser and navigate to your server ( http://<your.server.name>:2080 ) to display your Web Start page.
2. Click Install Now.
Note: If Solar hangs or "goes nowhere" check to see if your anti-virus software is enabled. If it is, turn off the anti-virus software and try again.
3. If prompted to update Java, click Do Not Show Again and Later.
Note: Once enabled and upgraded, the system checks Java for you each time you launch it.
4. Let the application run and complete the installation.
5. Use Solar Installer - Offline Mode.

29
Solar Installer - Offline Mode The Solar Installer setup file allows anyone to install the necessary Java support files used by Solar and automatically configure the firewall rules. The process clears previous cache files and installs the necessary current files.
To use the Solar installer after an upgrade:
1. Display your default browser and navigate to your Eclipse server: (http://<your.server.name>:2080) to display the WebStart page.
2. From the Solar Admin drop down menu, select Solar Installer - Offline Mode.
3. Follow the install wizard instructions.
Engineering Assistance / Support After Your Upgrade Since you will be taking a point upgrade over the weekend you will be supported by the TRANS team for the next 5 days starting Monday. After that time period you will return to regular support. You can reach the TRANS team through the customer website by entering a Service Request or through the auto attendant by calling the support number 512-278-5570.
Important: Do not call the TRANS team over the weekend; you may enter a Service Request that will be reviewed Monday morning.

Chapter 5: After Your Upgrade
30
Authorization Keys The following authorization keys should be considered after taking your upgrade for the indicated release:
Authorization Keys for 9.0.1 If you require your users to invoice sales orders, review the following information after you take the Release 9.0.1 upgrade:
• SOE.CLOSED.ORDER.EDIT - User are no longer allowed to invoice an order directly from Sales Order Entry if assigned this authorization key. In Release 9.0.1, users must now be assigned SOE.ORDER.TO.INVOICE.
This authorization key only allows editing of a closed order depending on the level assigned.
• SOE.ORDER.TO.INVOICE - Allows users to invoice an order directly from Sales Order Entry. Prior to Release 9.0.1, users could invoice if assigned SOE.CLOSED.ORDER.EDIT. Users must be assigned this new authorization to maintain that level of authority.
Authorization Key for 9.0.3 • SOE.BATCH.REPRINT.ALLOWED - Available in Release 9.0.3.11. Allows users to change the
print flag to B when an invoice has already been printed.
A complete list of new authorization keys and control maintenance records can be found in the corresponding feature summary documents.
31
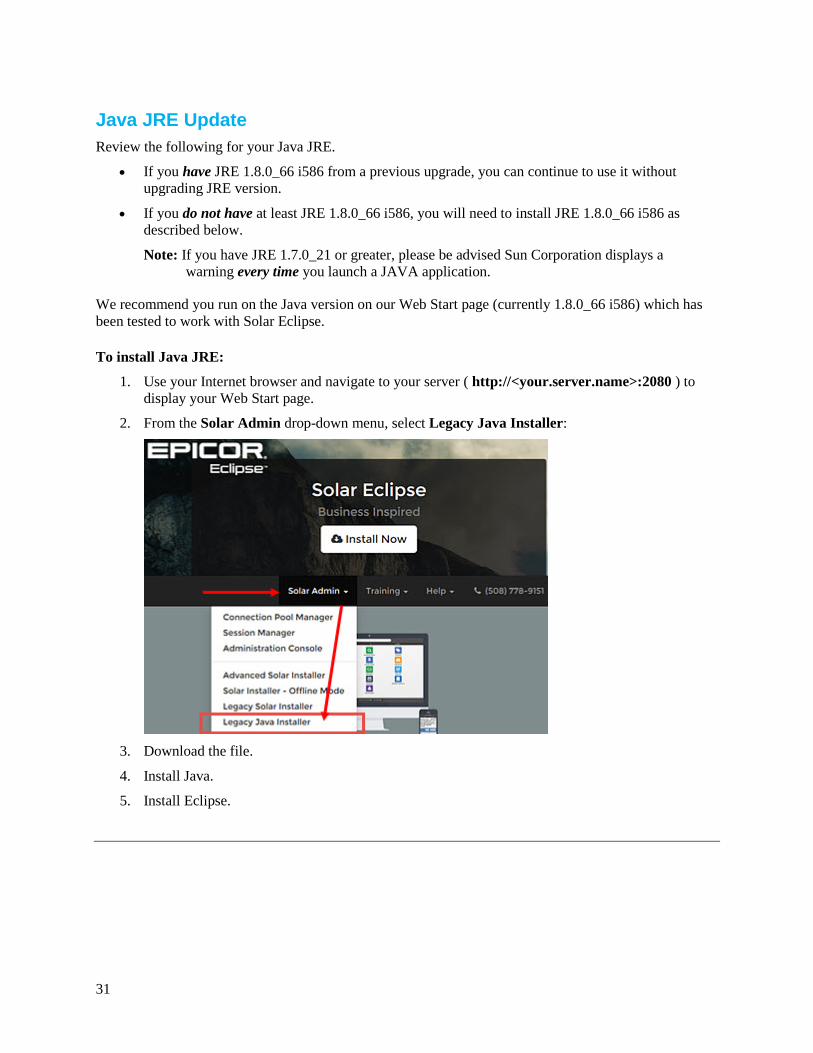
Java JRE Update Review the following for your Java JRE.
• If you have JRE 1.8.0_66 i586 from a previous upgrade, you can continue to use it without upgrading JRE version.
• If you do not have at least JRE 1.8.0_66 i586, you will need to install JRE 1.8.0_66 i586 as described below.
Note: If you have JRE 1.7.0_21 or greater, please be advised Sun Corporation displays a warning every time you launch a JAVA application.
We recommend you run on the Java version on our Web Start page (currently 1.8.0_66 i586) which has been tested to work with Solar Eclipse.
To install Java JRE:
1. Use your Internet browser and navigate to your server ( http://<your.server.name>:2080 ) to display your Web Start page.
2. From the Solar Admin drop-down menu, select Legacy Java Installer:
3. Download the file.
4. Install Java.
5. Install Eclipse.

Chapter 5: After Your Upgrade
32
Cut Product Enhancements During an upgrade to Release 9.0.2, there is a conversion routine that moves the cut products from the MOD.QUEUE program to the new CUT.QUEUE program. It updates the sales orders and transfer orders with the new cut format and then cancels the work orders.
• Cut Groups - Since Cut Groups are no longer branch specific, a lot of your current cut groups can be cleaned up after this upgrade to make it easier for the salespeople.
• Required Groups - With Required Groups, at least one single cut group must be defined for the default. You must defined parallel groups based on the amount of parallel spools you would have on a single order, then remove any group that is labeled with a branch number. Remember to associate any new groups to each branch in the cut group assignment section of Cut Product Maintenance.
33
Clearing Online Help Cached Files Clear your history or cache. Regardless of the release you are taking, make sure each user who regularly uses the online help files (web browser that launches when pressing F11 from Eclipse screens) clears their history or cache files. This ensures that the latest files are being displayed.
Eclipse supports Firefox, Internet Explorer, and Chrome for running the online help if the release is 8.7.8 or higher. Some helpful links:
• Firefox
1. From the History menu, select Clear Recent History.
2. From the Time range to clear drop down menu, select the desired range. To clear your entire cache, select Everything.
3. Next to Details, click the down arrow to choose which elements of the history to clear. To clear your entire cache, select all items.
• Internet Explorer
1. Open Internet Explorer.
2. IE 8: From the Tools menu choose Internet Options.
3. On the General tab, under Browsing history, click Delete.
4. Un-check the Preserve Favorites website data box.
5. Check the Temporary Internet files, Cookies, and History boxes.
• Chrome
Clear your cache:
1. Click on the Chrome menu on the browser toolbar.
2. Select Tools.
3. Select Clear browsing data.
4. A dialogue window will appear, providing you with a list of check boxes for the types of information that you wish to have removed.

Small Project Jobs Control Settings
34
Small Project Jobs Control Settings Small Project Jobs (SPJ) were introduced to Solar Eclipse in Release 8.7.9. Improvements have been made over the subsequent release cycles. Review the following based on which release you are upgrading to. Checking the new settings will ensure that Small Project Jobs will work properly.
Release 8.7.9 & Release 9.0.0 With the new SPJ functionality, the new control maintenance record allows you to update COMM-COST with the SPJ COGS, if needed.
Release 9.0.1 This release introduced two rebate options and G/L options. You must indicate which G/L accounts to use for the respective settings.
Release 9.0.2 This release introduced the ability to select default vendors, cost codes, and rebate products. Prior to this release, the system used the standard default rebate product. This new option lets you define a rebate product specifically for SPJs.
Important: The Default Vendor and Default Cost Code options were added in Release 9.0.2.0. The Default Rebate Product option added in Release 9.0.2.05.

35
Release 9.0.3 This release introduced the option to allow editing when the SPJ purchase order is paid or in a closed period.

Creating New Cases in ServiceNow
36
Creating New Cases in ServiceNow In order to facilitate your upgrade experience, if you require assistance after your upgrade to fix bugs or adjust information, use the ServiceNow portal to create a new service ticket case. Use the following instructions to ensure that your service case is routed through ServiceNow to the correct group.
To create a new case:
1. Login to the ServiceNow Customer Portal at https://epicorcs.service-now.com/epiccare/main.do.
2. Click Create Case on the bottom left of the options.
Note: If this option does not display, click View all services.
3. Verify the Account, Contact, and Epicor Product Line fields are populated correctly.
4. In the Asset / Module area, select the corresponding Asset/Module for the case. This is required.
5. Verify the product version on which you are working. You can change this, if needed.
6. Complete any remaining field information that applies to the case you are opening.
7. In the Case Details area, enter the following:
• Subject - A short description of your issue.
• Category - Select the most appropriate group in which your request falls.
• Urgency - Indicate how critical your issue is.
8. In the Details of your Case area, complete the details of your case.
9. Click the paperclip icon to add any attachments to help illustrate your issue, such as a screen shot.
10. In the Resolution Suggestions area, review the knowledge base articles to check if the issue has suggestions for a fix.
Note: Use the Keywords field to narrow down the resolution suggestions.
11. If a solution is not found using the knowledge base, click Submit.

37
Chapter 6: Eclipse Files and Attribute Updates for 9.0.4 The following new or updated files and attributes have been added since Release 9.0.3 and are included in Release 9.0.4. These files are listed alphabetically.
Eclipse File Dictionaries - Attributes New Changed
ACC.PROD.BR Adding date range to data, now by branch, rank, date X
CONTROL • DISABLE.OLD.ETERM.RULES • SUPER.MATCH.RULES • REMOTE.ORDER.TYPES • EDA.CONFIG • HTTP.TRANSFER.CIPHERSPEC - Adding
AESGCM cipher suite for TLSv1.2 compliance. • SAVELISTS.PURGE - Update to work with
XFER.TH.LIST items for purging. • ECLIPSE.FORMS.VALID.FORMS - Support for
yard tickets. • ECLIPSE.FORMS.DEFAULTS - Support for yard
tickets. • ECLIPSE.FORMS.ARCH.TYPES - Support for
yard tickets.
X
CONTROL.BR OE.PROD.IDX.ADDL.BRS - Replacing commas with virtual machine.
X
DTS.QUEUE Attr 22 - Job name formatting. X
ECLIPSE.FORMS.BRANCHES Yard tickets in Eclipse Forms X
ECLIPSE.FORMS.TYPES X
EDA.ACTIVITY.LOG Activity log for Epicor Data Analytics Eclipse interface. X
JOB_PAYMENTS Attr 18 - Job name formatting. X
LEDGER Attr 83 - Job Management formatting. X
LEDGER.LOG &INDEX&.DATE - Required for Web Integration Sales Order Change Log updates when upgrading.
X
ORDER.PLANS Multiple indexes. Indexes built now during conversion. X
PSUB &INDEX&.DATE Creating a new index X
PVRQUEUE Payable Variance Queue main file. X
PVRQUEUE.NOTES Payable Variance Queue notes. X
PVRQUEUE.NOTES.ARCHIVE Payable Variance Queue archive for notes. X
REPORTS &INDEX& - Create file if not present. X
TRIPOS.VERSION.DATA Creating new file to store TriPOS versioning information. X
ORK.MISC &INDEX& - This has been removed. X

Chapter 6: Eclipse Files and Attribute Updates for 9.0.4
38