ecip management interface training - maryland redesign...7160 columbia gateway drive, suite. 230...
TRANSCRIPT

7160 Columbia Gateway Drive, Suite. 230
Columbia, MD 21046
877.952.7477 | [email protected]
www.crisphealth.org
ECIP Management Interface Training18 February 2020
1

All webinars will be recorded and available for download at
https://hscrc.maryland.gov/Pages/CareRedesign.aspx
Questions can be directed to
Another training webinar will be held Friday, February 21 from 3 – 4p if
you have colleagues unable to attend this session.
2
Training Resources

Detailed documentation for today’s content can be found on the
HSCRC website or on the CRS Portal:
ECIP Data Submission & Management Card > References
All numbers and examples in this presentation are for illustrative
purposes only and do not represent real data for any hospital.
Some examples have been simplified for brevity. See above
specifications for full details of all steps.
3
Reference Documentation

Same Single Access Point - LogOnce
4
The ECIP Management
Interface can be accessed at
https://crp.crisphealth.org
using the same credentials
as all other CRS services.
Alternatively, you can go to
the CRS Landing Page and
navigate from the new card
that can be found there.

New Landing Page Card – ECIP Management
5
Users with access to the ECIP Management Interface will see a new card title ‘ECIP Data Submission &
Management’ on the CRS Landing Page.
If you require access but do not see this card, contact your hospital POC for CRS user provisioning.

Live Demonstration
Available for review in webinar recording on the HSCRC website
6
ECIP Management Dashboard Overview
7
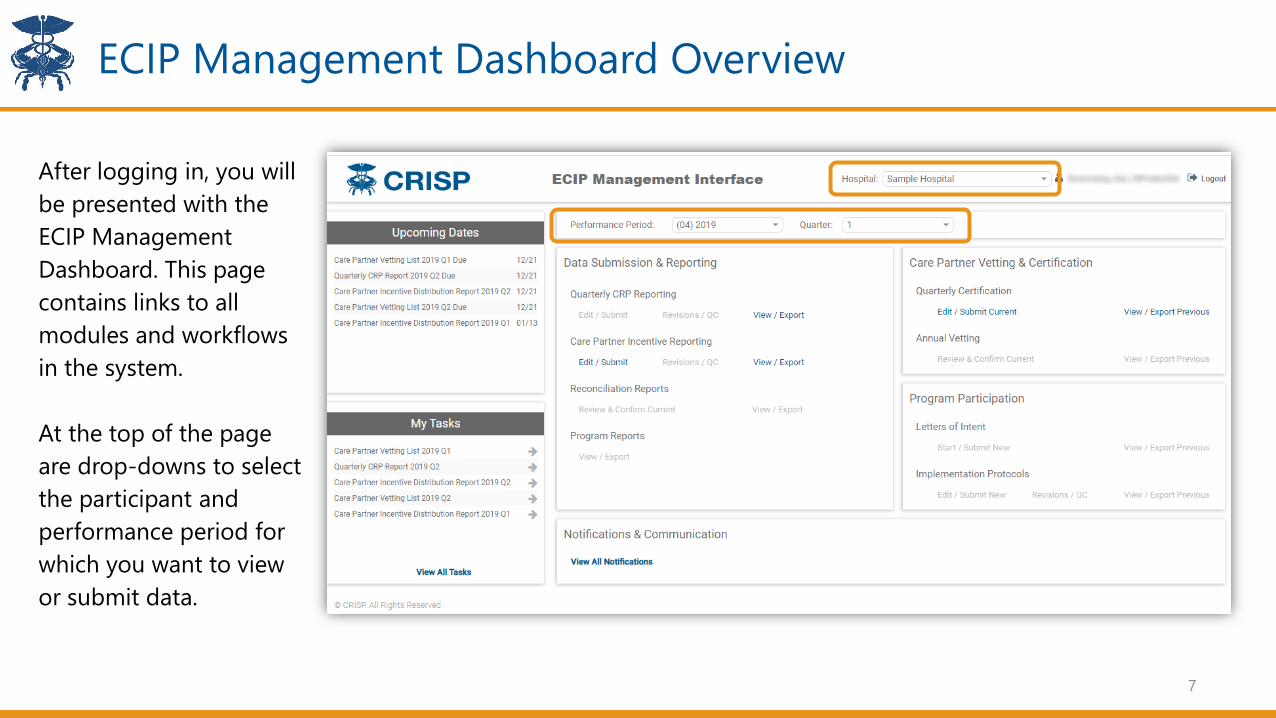
After logging in, you will
be presented with the
ECIP Management
Dashboard. This page
contains links to all
modules and workflows
in the system.
At the top of the page
are drop-downs to select
the participant and
performance period for
which you want to view
or submit data.
ECIP Management Dashboard Overview
8
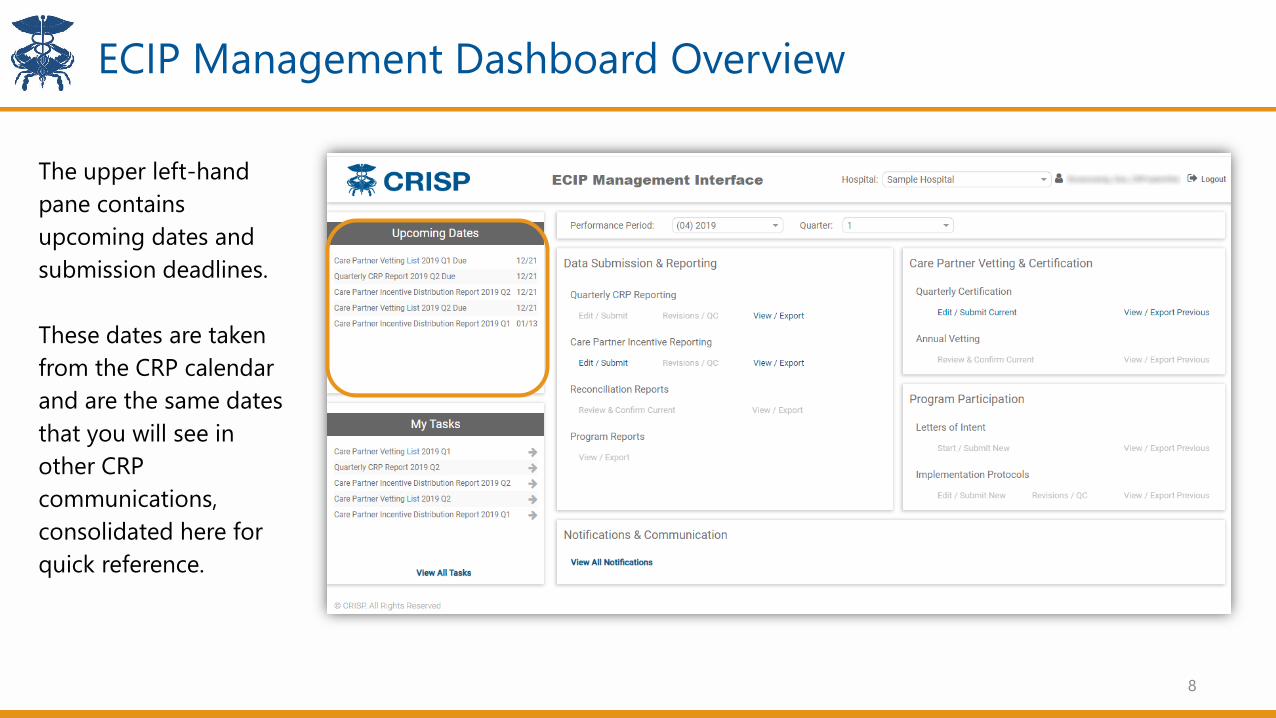
The upper left-hand
pane contains
upcoming dates and
submission deadlines.
These dates are taken
from the CRP calendar
and are the same dates
that you will see in
other CRP
communications,
consolidated here for
quick reference.

ECIP Management Dashboard Overview
9
The bottom left-hand
pane contains a list of
open tasks assigned to
the current user.
Tasks are generated
automatically based on
the CRP calendar, and
email notifications are
sent to users informing
them of new tasks or
upcoming deadlines.
To access the Task
Center, click the ‘View All
Tasks’ link.

ECIP Management Dashboard Overview
10
The three middle panes
contain links to view and
submit data corresponding
to the workflows for ECIP
administration. These are
broken into three areas: Data
Submission & Reporting,
Care Partner Vetting &
Certification, and Program
Participation. Each area
contains modules for all
reporting requirements in
that area.
Each module contains links to begin a submission, revise or correct an existing submission, or view past
submissions. The slides that follow will describe these in detail.
ECIP Management Dashboard Overview
11
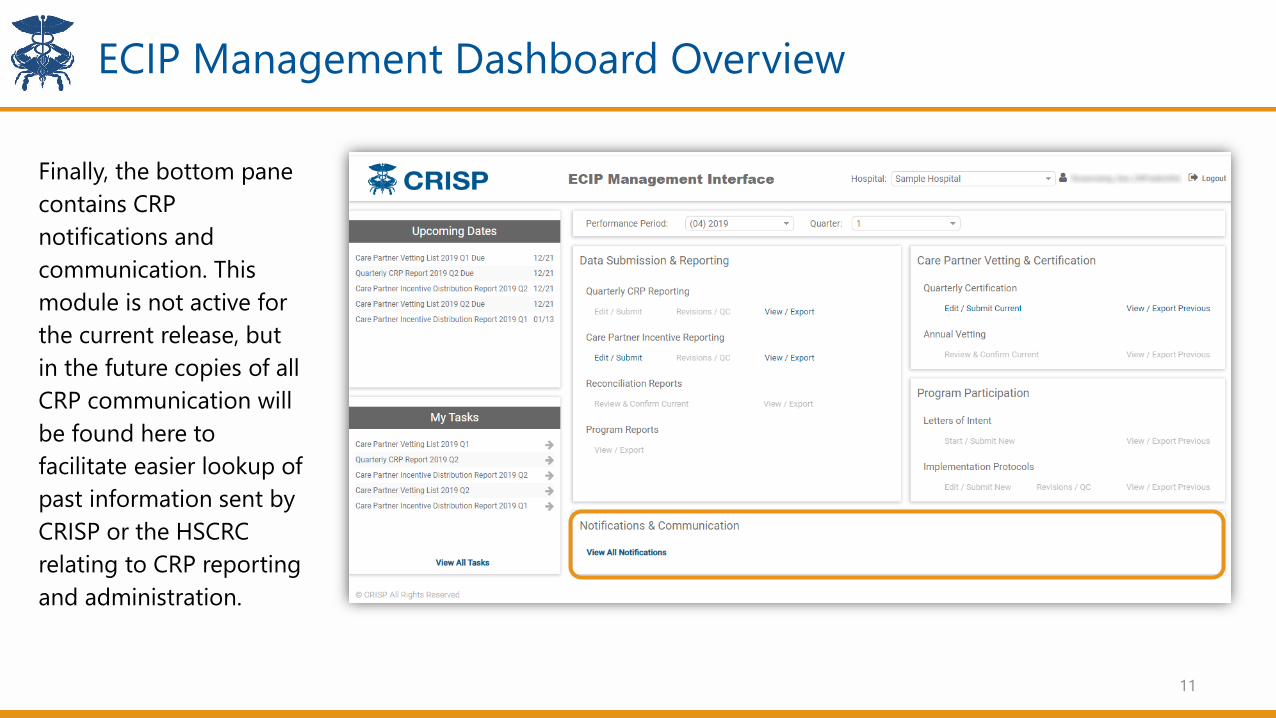
Finally, the bottom pane
contains CRP
notifications and
communication. This
module is not active for
the current release, but
in the future copies of all
CRP communication will
be found here to
facilitate easier lookup of
past information sent by
CRISP or the HSCRC
relating to CRP reporting
and administration.

Task Center
The Task Center contains a
list of all open tasks
currently assigned to you.
Most hospital users will
only see 1-3 tasks at a
time. Clicking on a task
brings up a detailed
description with due date,
link to access the
workflow to start the task,
and point of contact for
any questions. Tasks are
generated automatically
as CRP deadlines
approach, and email
notifications are sent to
users when this occurs.
12

13
Workflow Walkthrough: Quarterly CRP Reporting
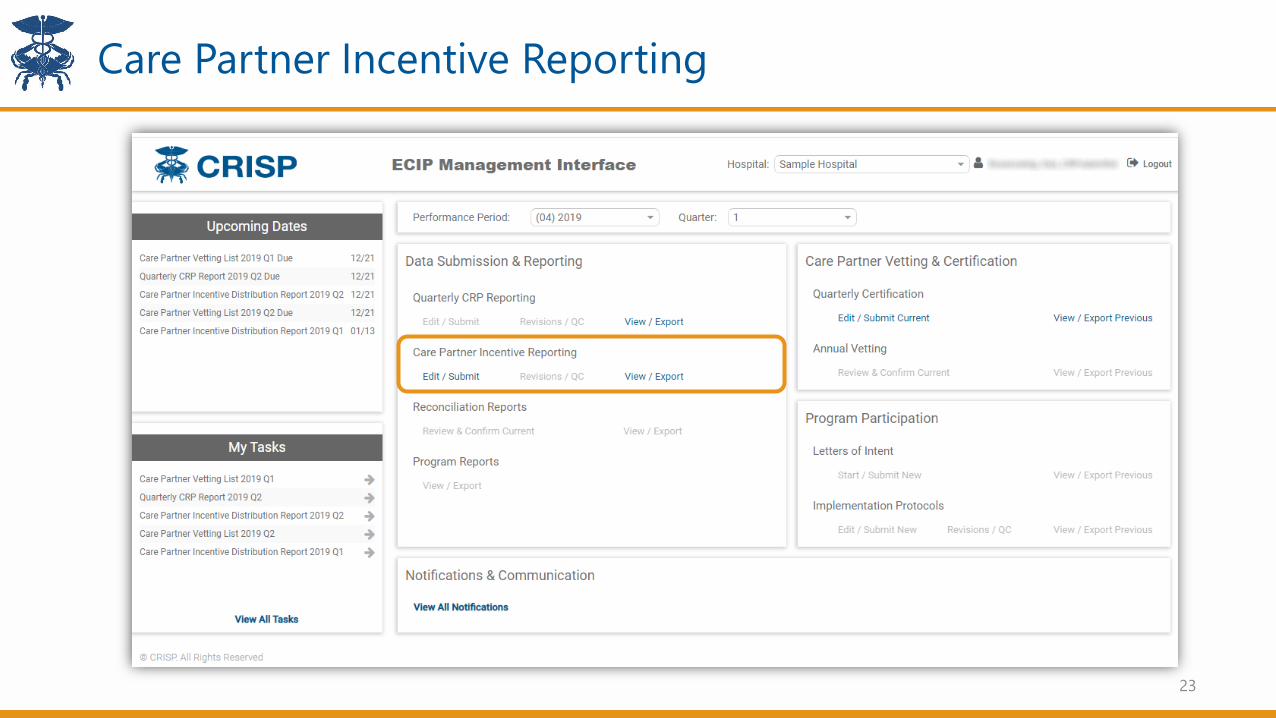
To begin a new
submission, click the
active ‘Edit / Submit’
link in the appropriate
module.
To view or export past
submissions, simply
click the active ‘View /
Export’ link in the
same area.
Data Submission – Quarterly CRP Reporting (1 of 9)
14
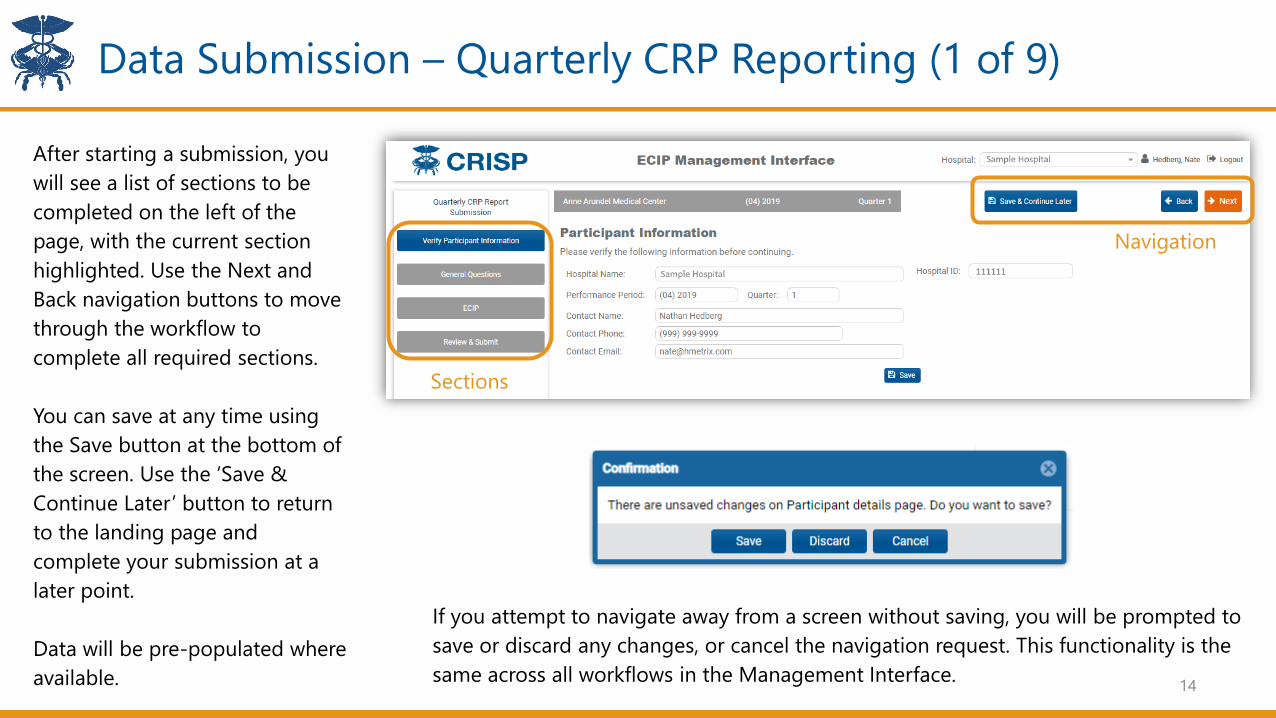
After starting a submission, you
will see a list of sections to be
completed on the left of the
page, with the current section
highlighted. Use the Next and
Back navigation buttons to move
through the workflow to
complete all required sections.
You can save at any time using
the Save button at the bottom of
the screen. Use the ‘Save &
Continue Later’ button to return
to the landing page and
complete your submission at a
later point.
Data will be pre-populated where
available.
If you attempt to navigate away from a screen without saving, you will be prompted to
save or discard any changes, or cancel the navigation request. This functionality is the
same across all workflows in the Management Interface.
Navigation
Sections
Data Submission – Quarterly CRP Reporting (2 of 9)
15
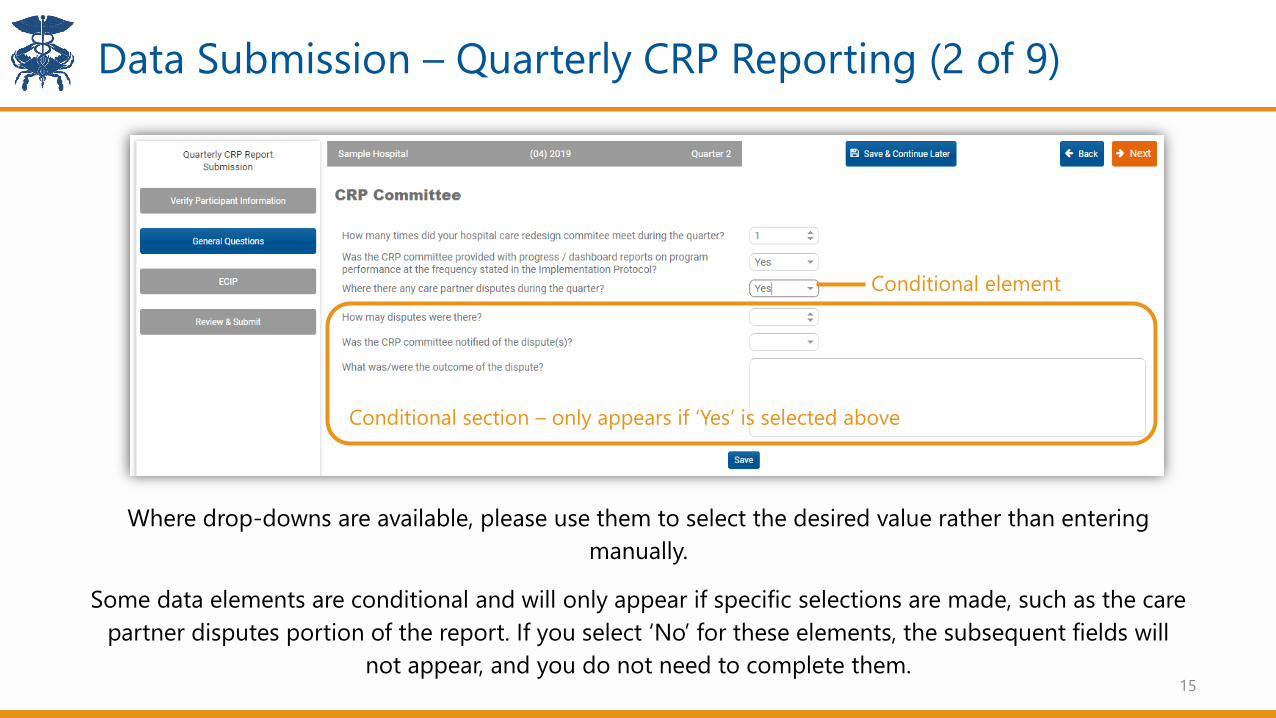
Where drop-downs are available, please use them to select the desired value rather than entering
manually.
Some data elements are conditional and will only appear if specific selections are made, such as the care
partner disputes portion of the report. If you select ‘No’ for these elements, the subsequent fields will
not appear, and you do not need to complete them.
Conditional section – only appears if ‘Yes’ is selected above
Conditional element
16
Data Submission – Quarterly CRP Reporting (3 of 9)
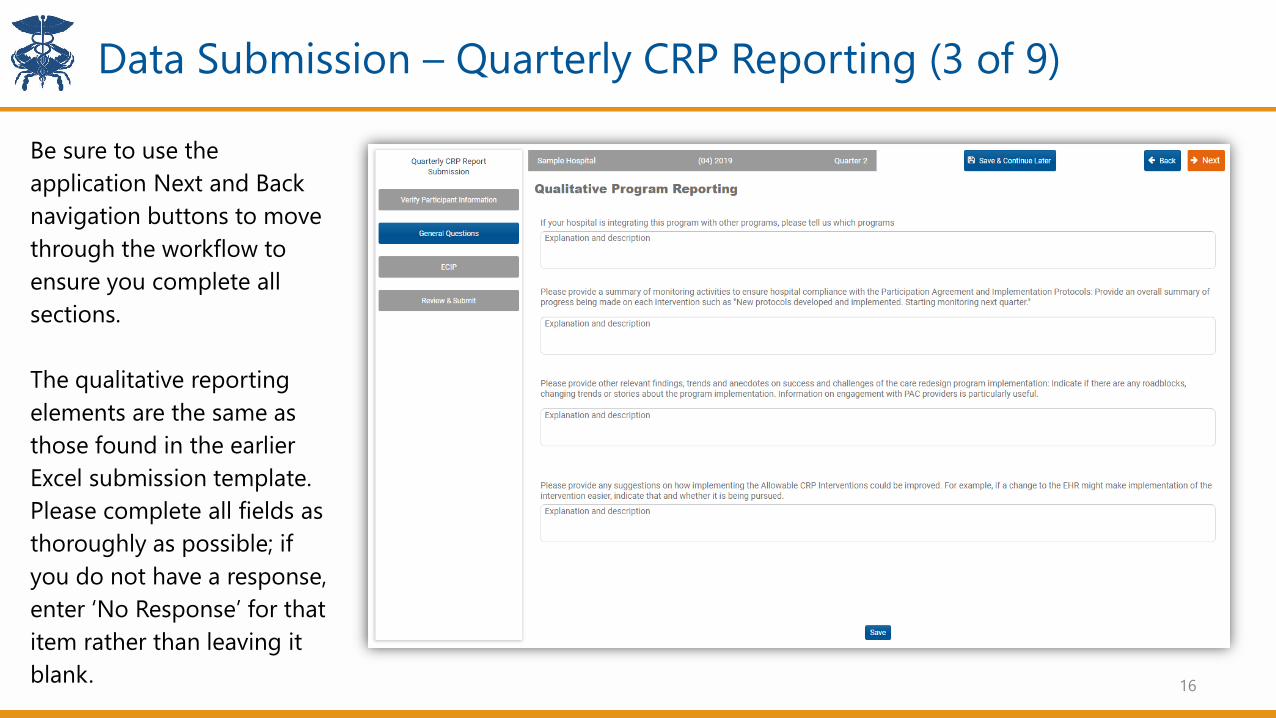
Be sure to use the
application Next and Back
navigation buttons to move
through the workflow to
ensure you complete all
sections.
The qualitative reporting
elements are the same as
those found in the earlier
Excel submission template.
Please complete all fields as
thoroughly as possible; if
you do not have a response,
enter ‘No Response’ for that
item rather than leaving it
blank.
Data Submission – Quarterly CRP Reporting (4 of 9)
17
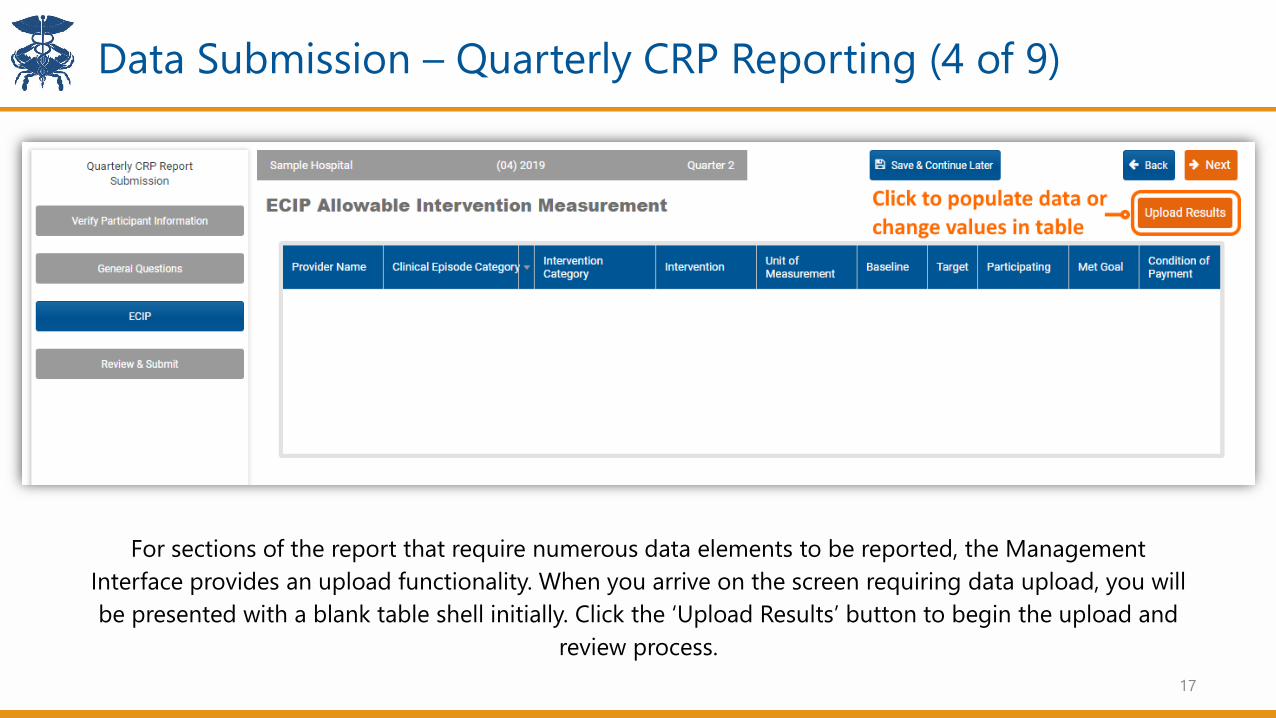
For sections of the report that require numerous data elements to be reported, the Management
Interface provides an upload functionality. When you arrive on the screen requiring data upload, you will
be presented with a blank table shell initially. Click the ‘Upload Results’ button to begin the upload and
review process.
18
Data Submission – Quarterly CRP Reporting (5 of 9)
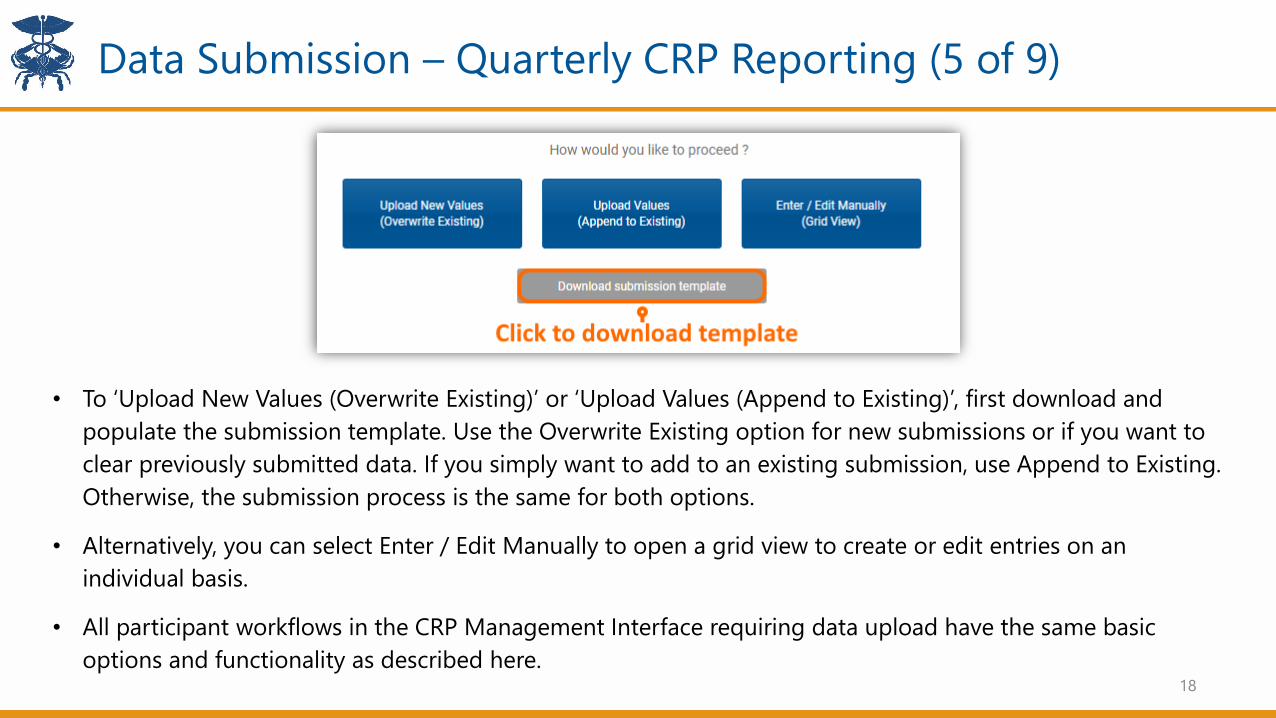
• To ‘Upload New Values (Overwrite Existing)’ or ‘Upload Values (Append to Existing)’, first download and
populate the submission template. Use the Overwrite Existing option for new submissions or if you want to
clear previously submitted data. If you simply want to add to an existing submission, use Append to Existing.
Otherwise, the submission process is the same for both options.
• Alternatively, you can select Enter / Edit Manually to open a grid view to create or edit entries on an
individual basis.
• All participant workflows in the CRP Management Interface requiring data upload have the same basic
options and functionality as described here.

19
Data Submission – Quarterly CRP Reporting (6 of 9)
Upload templates are Excel files that contain tables for all required data elements. For pre-populated
elements, you can select the appropriate choice in-cell from a dropdown menu; if you do not use the
dropdown, please ensure consistent entry for efficient and accurate review. Data elements not matching
the expected format will result in an upload error, and you will be asked to review and correct such cases
before the upload will proceed.
Submission templates are currently available for Care Redesign Intervention Measurement (shown),
Quarterly Care Partner Certification, and Care Partner Incentive Distribution. Each template is different
per the requirements of the given submission, so be sure to download and use the correct template for
each workflow.
Data Submission – Quarterly CRP Reporting (7 of 9)
20
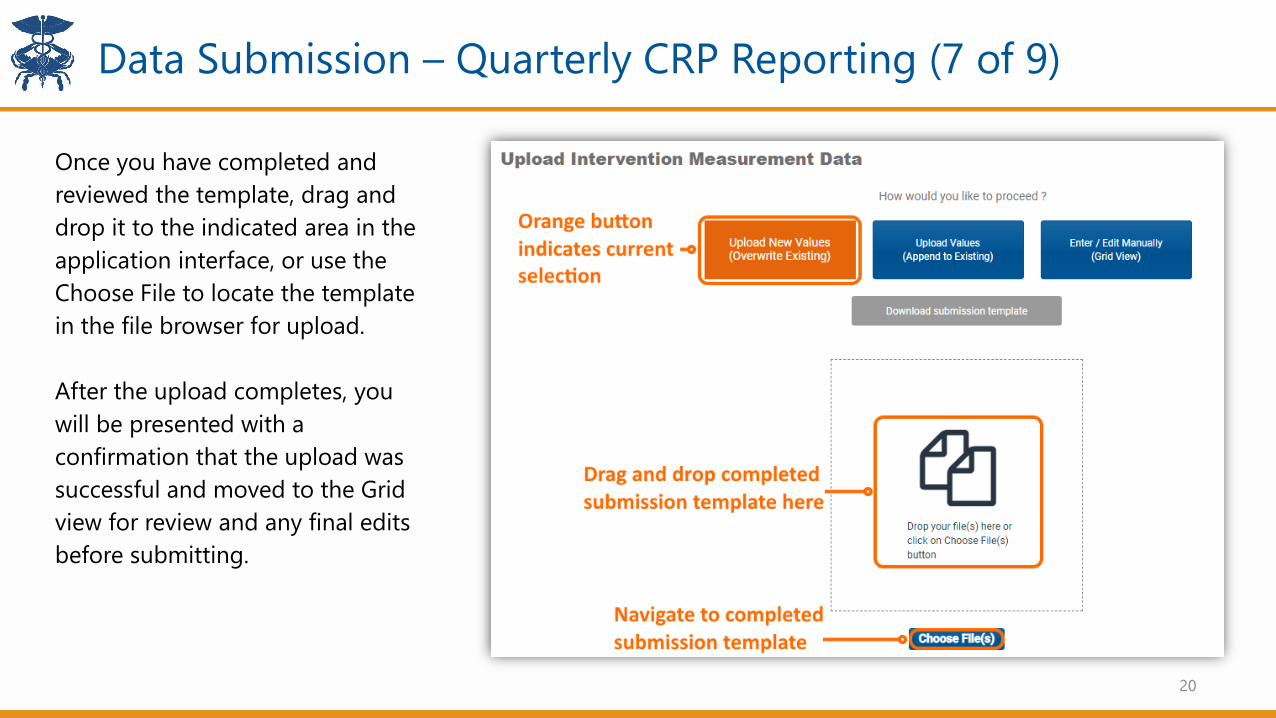
Once you have completed and
reviewed the template, drag and
drop it to the indicated area in the
application interface, or use the
Choose File to locate the template
in the file browser for upload.
After the upload completes, you
will be presented with a
confirmation that the upload was
successful and moved to the Grid
view for review and any final edits
before submitting.

Data Submission – Quarterly CRP Reporting (8 of 9)
21
In the Grid View, you can manually
add, edit, or delete rows.
To add a new row, click the ‘+ Add
New’ button in the upper right
corner of the table. Complete all
elements in the modal window that
appears, then hit Add to confirm,
or Cancel to cancel the entry.
To delete a row, click the trash can
icon at the far-right end of the row.
Double-click a row to edit previously
entered or uploaded values. Be sure that all
new values match the expected data type
for that column.
Add new row
Delete rowNew row
entry pane

Data Submission – Quarterly Reporting (9 of 9)
22
Finally, you will be
asked to attest to the
accuracy of your
submission and
confirm that any
edits or corrections
will promptly be
submitted to CRISP
and the HSCRC.
Type your name to
confirm, noting that
it must match the
username displayed
exactly.
Before submitting, you may also export a PDF and / or Excel copy of your submission
for offline reference. These same PDF and Excel versions can be accessed at any point
by using the ‘View / Export’ links for the corresponding module on the landing page.
23
Care Partner Incentive Reporting

Data Submission – Incentive Payment Distribution
24
Cancel and discard editsConfirm edits and update rowCurrently editing row
Undo last edit
As in the Quarterly CRP
Report, you can double-click
any row to edit it. Where
selectors are available, please
use them to enter the correct
value. After you are done,
you can either Update the
row confirming your changes
or Cancel and discard your
changes.
You can also Undo the last
action take by using the
corresponding button in the
upper right-hand corner of
the table.
Data Submission – Incentive Distributions
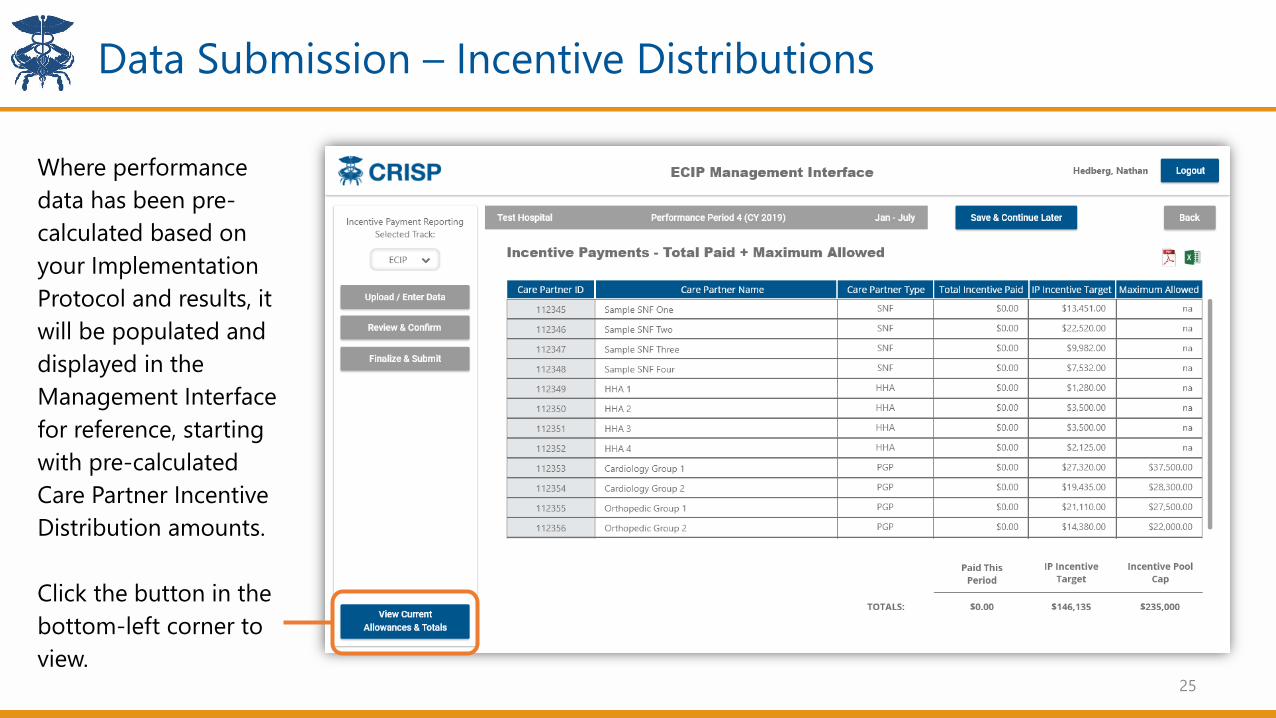
Where performance
data has been pre-
calculated based on
your Implementation
Protocol and results, it
will be populated and
displayed in the
Management Interface
for reference, starting
with pre-calculated
Care Partner Incentive
Distribution amounts.
Click the button in the
bottom-left corner to
view.25
Data Submission – Incentive Distributions
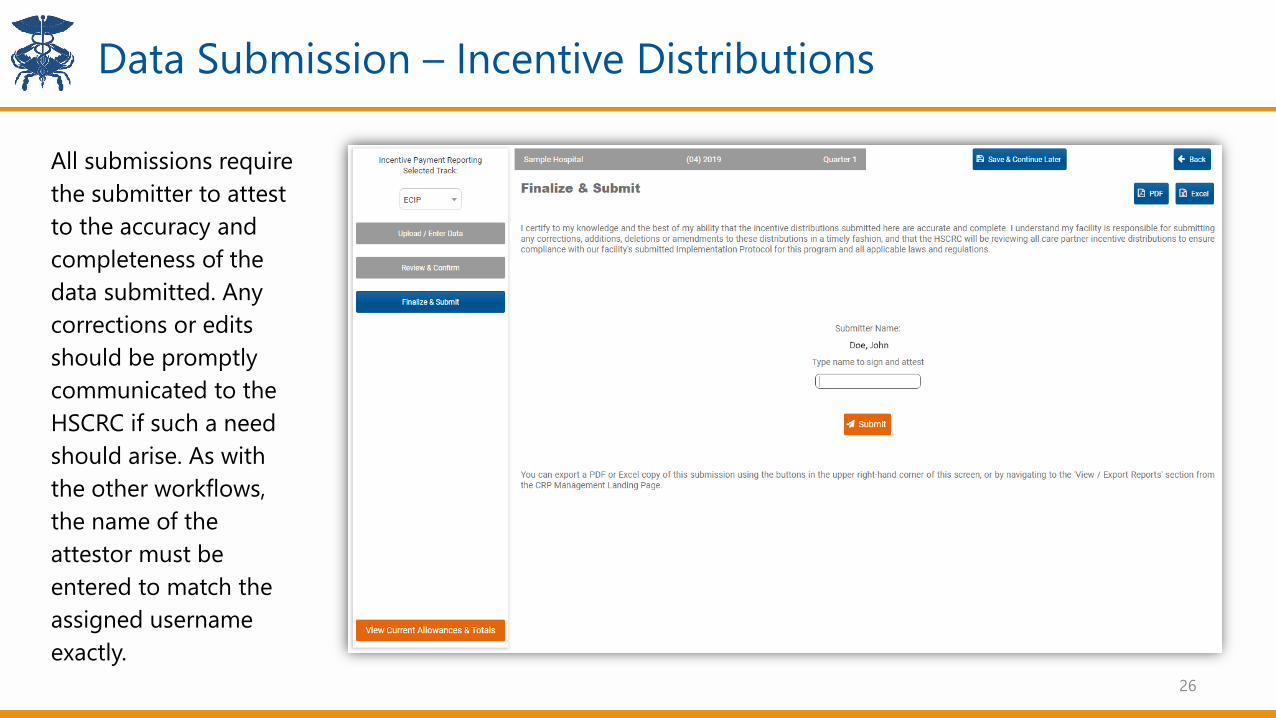
All submissions require
the submitter to attest
to the accuracy and
completeness of the
data submitted. Any
corrections or edits
should be promptly
communicated to the
HSCRC if such a need
should arise. As with
the other workflows,
the name of the
attestor must be
entered to match the
assigned username
exactly.
26

Data Submission – Incentive Distributions
If the HSCRC requires
corrections, edits, or
clarifications to your
submission, you will
receive an email
notification prompting
you to do so. Open edits
can be accessed using the
‘Revisions / QC’ link from
the landing page for the
appropriate workflow, and
any reviewer comments
will be displayed on the
corresponding page.
This is the same for all
workflow modules.27

28
Quarterly Care Partner Certification

Quarterly Care Partner Certification
Care partner certification data is
submitted using the same upload
function as previously described.
Note that in the submission
template, there are two tabs –
one for clinicians and one for
institutional partners. If a type
does not apply, simply leave it
blank.
The ‘Status’ column will
automatically be populated with
the CMS vetting results for the
applicable year. It cannot be
modified in the application; if you
see issues with eligibility here,
reach out to CRISP to discuss.
29

Future Submission Functionality
Additional functionality
will be added to the
Management Interface
over time, including the
Implementation
Protocol submission for
ECIP Year 3 (2021) in
September 2020
30
Q & A
Currently inactive areas of the Management Interface will be covered in future webinars as the corresponding modules go live.
31