ecel 517 digital photo journal
TRANSCRIPT

DIGITAL PHOTO JOURNAL
By Christina Lorance

PROPERTIES OF MATTER

WH
YD
IDI T
AK
ET
HIS
PH
OT
O?
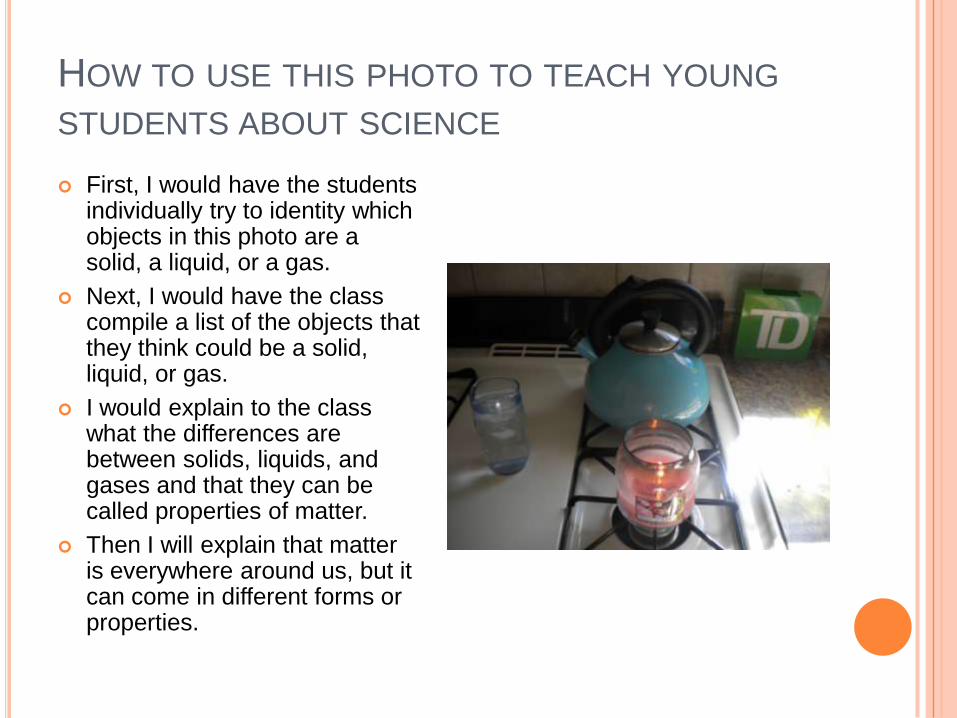
- I took this picture
to show how a
variety of states of
matter can happen
all at once.
- This picture has a
solid (ice) that is
melting into a liquid
form (water).
- The solid wax of
the candle is being
melting into a liquid.
The flame of the
candle is also
showing how
matter can turn into
a gas.
-The liquid water in
the teapot is being
boiled. The liquid is
turning into steam
when it gets very
hot.
- Matter can be
anywhere and in
many different
forms.

NJ CORE CURRICULUM CONTENT
STANDARDS
5.2.2.A.1 Sort and describe objects based on the
materials of which they are made and their
physical properties.
5.2.2.A.2 Identify common objects as
solids, liquids, or gases.
5.2.2.B.1 Generate accurate data and organize
arguments to show that not all substances
respond the same way when heater or
cooled, using common materials, such as
shortening or candle wax.
http://www.njcccs.org/search.aspx
HOW TO USE THIS PHOTO TO TEACH YOUNG
STUDENTS ABOUT SCIENCE
First, I would have the students individually try to identity which objects in this photo are a solid, a liquid, or a gas.
Next, I would have the class compile a list of the objects that they think could be a solid, liquid, or gas.
I would explain to the class what the differences are between solids, liquids, and gases and that they can be called properties of matter.
Then I will explain that matter is everywhere around us, but it can come in different forms or properties.

HOW TO USE THIS PHOTO TO TEACH YOUNG
STUDENTS ABOUT SCIENCE CONTINUED…
I will also explain that not all objects react to being heated or cooled in the same way. I may do a little demonstration by heating up different objects and see if they all react in the same way.
Finally, I will have the students come up with objects that they have at home or in the classroom that have different properties of matter. I want them to be able to determine the difference of objects based on their physical properties.

Explain
what
properties
of matter
are
represented
in the
burning
candle.

HEREDITITY AND REPRODUCTION/
EVOLUTION AND DIVERSITY

WH
YD
IDI T
AK
ET
HIS
PH
OT
O?
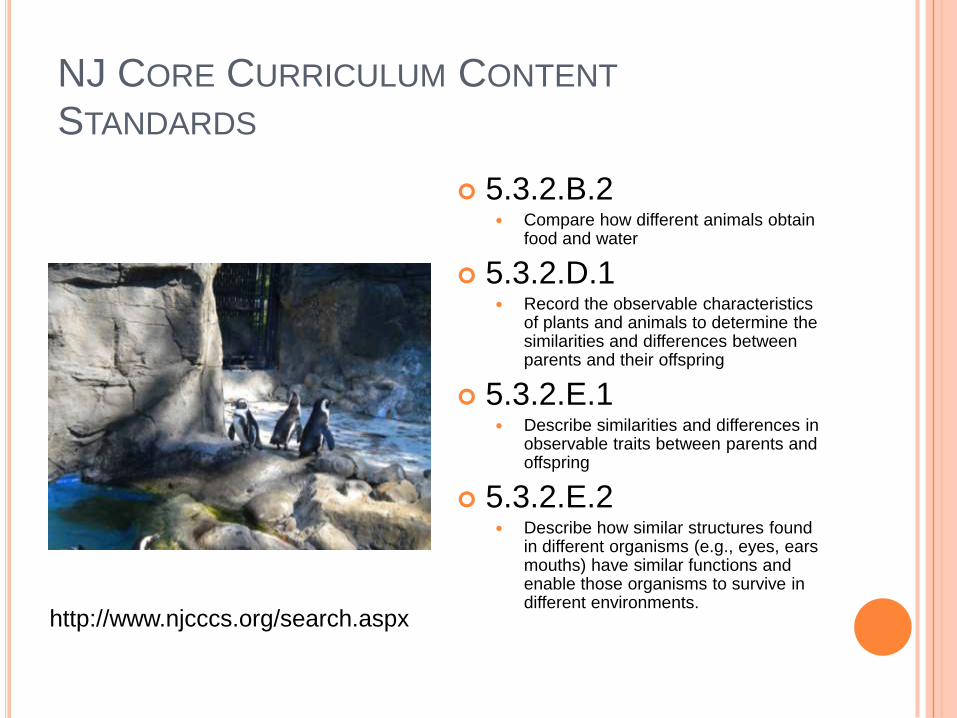
- I took this picture to
show that there are
similarities in
animals. One of the
penguins in the
picture could be a
parent and the rest
could be their
offspring.
-There may be some
minor differences, but
for the most part the
penguins often
resemble their
parents.
-The penguins in this
picture have features
on their body that
enable them to live in
their environment. I
want the students to
see the differences of
the features that the
penguins have in
comparison to the
everyday birds that
we see in our yards.
NJ CORE CURRICULUM CONTENT
STANDARDS
5.3.2.B.2 Compare how different animals obtain
food and water
5.3.2.D.1 Record the observable characteristics
of plants and animals to determine the similarities and differences between parents and their offspring
5.3.2.E.1 Describe similarities and differences in
observable traits between parents and offspring
5.3.2.E.2 Describe how similar structures found
in different organisms (e.g., eyes, ears mouths) have similar functions and enable those organisms to survive in different environments.
http://www.njcccs.org/search.aspx

HOW TO USE THIS PHOTO TO TEACH YOUNG
STUDENTS ABOUT SCIENCE
First, I would have the students compile a list of what they may already know about penguins.
I would ask the students to tell me what features the penguins have that can help them live in their environment. How are they different from the birds that we know?
Then, I would explain to the class about the similarities that animals can have to their parents. Look at the penguins and how similar they are.

HOW TO USE THIS PHOTO TO TEACH YOUNG
STUDENTS ABOUT SCIENCE CONTINUED…
In groups, I would ask the students to draw pictures of other animals that they know of that look similar to their parents. I want them to explain how those features that are similar can help the animal live in the environment that they are in.
I will share with the class a picture that I have of my cat and her mother and show how similar they are to one another.

Could these
penguins live in
your house? Why
or why not.
Explain what
features the
penguins have
that could allow
them to live in
your home or not
to live in your
home.

LIVING AND NONLIVING

WH
YD
IDI T
AK
ET
HIS
PH
OT
O?
-This photo shows how living and nonliving things can be in one environment together.
-The living flowers can be resting on the nonliving fence. The bees on the flowers are also living. There is a boat in the background that is nonliving.
-The flowers in this picture are alive because of the sun that is being absorbed through its leaves and the water from the soil that it is planted in.
-The habit in this pictures can support the growth of the flowers because it is in an area where it can get sun and water. It also has plenty of room to grow.

NJ CORE CURRICULUM CONTENT
STANDARDS
5.3.2.A.1 Group living and nonliving things
according to the characteristics that
they share,
5.3.2.B.1 Describe the requirements for the care
of plants and animals related to
meeting their energy needs.
5.3.2.B.3 Explain that most plants get water
from soil through their roots and
gather light through their leaves.
5.3.2.C.2 Identify the characteristics of a habitat
that enable the habitat to support the
growth of many different plants and
animals.http://www.njcccs.org/search.aspx

HOW TO USE THIS PHOTO TO TEACH YOUNG
STUDENTS ABOUT SCIENCE
First, I would explain to the class the difference between living and nonliving things. I would explain that things are living when they can get nutrients and water from their environment and grow.
Next, I would have the class get into pairs and come up with some examples of living and nonliving things.
I would then explain that the flower in this picture is living because it is getting its food and water from its environment. And because it is getting the food and water it needs, the flowers will grow.

HOW TO USE THIS PHOTO TO TEACH YOUNG
STUDENTS ABOUT SCIENCE
As a whole class experiment, I want each student to plant their own flower seed in a plastic cup.
The students will make sure that their flowers are in the sun and have enough water so that it can grow.
When the flowers have started to bud, I will have the students take their flowers home to plant with their parents.

Explain
how the
flower in
this picture
is living or
nonliving.
Provide
examples.

FORMS OF ENERGY AND THE SUN

WH
YD
IDI T
AK
ET
HIS
PH
OT
O?
-This photo shows
how the sun can
produce shadows
when there is
something solid
blocking its light. In
this case, the trees
are creating the
shadows from the
sun.
- The section of the
street that is in the
full sunlight will be
much hotter than
the parts of the
street that are in
the shadows.
- The light from the
sun allows the
trees, grass, and
flowers in this
picture to grow
because it is
producing energy.

NJ CORE CURRICULUM CONTENT
STANDARDS
5.2.2.C.1 Compare, citing evidence, the heating
of different colored objects placed in
full sunlight.
5.2.2.C.2 Apply a variety of strategies to collect
evidence that validates the principle
that if there is no light, objects cannot
be seen.
5.2.2.C.3 Present evidence that represents the
relationship between a light
source, solid object, and the resulting
shadow.
http://www.njcccs.org/search.aspx

HOW TO USE THIS PHOTO TO TEACH YOUNG
STUDENTS ABOUT SCIENCE
I would first ask the students to tell me what is causing the shadows on the street.
After they have given me their answers, I will explain how the light from the sun can create a shadow if something solid is in the way.
Next, I will have the students explain to me how the sun is good for the trees and the grass in this picture. The goal is to get them to tell me that the sun creates energy and heat for the plants.

HOW TO USE THIS PHOTO TO TEACH YOUNG
STUDENTS ABOUT SCIENCE CONTINUED…
I would demonstrate how shadows work by bringing the class outside along with different shaped objects. Some of the objects will be solid and others will not be. The students will guess which objects will create the shadows before I actually do the demonstration.
My last activity will be to have the students work in pairs and trace their shadows in chalk on the sidewalk outside. This will teach them that their bodies are solid and can block the sunlight.

If you were
walking down the
street without
any shoes or
socks on and it
was a hot day,
where would you
rather walk?
Would you want
to walk on the
shaded part of
the street or in
the full sunlight?
Explain your
reasons.