ebs financial system vendors (pdf format) · step in the workflow. purchasing has the ability to...
TRANSCRIPT

VENDORS

Working with Vendors • Vendors provide goods and services to Michigan State
University and are an integral part of the purchasing process. Disbursement vouchers, purchase orders and payment requests all contain vendor information. Keep in mind the following important notes about vendors in the financial system: – Vendors must exist or be approved in the database prior to
initiating a disbursement voucher. – Vendors do not have to exist or be approved in the database
prior to initiating a requisition. The vendor must be approved in the database prior to the Contract Manager (CM) approving the Purchase Order.
– There are three types of vendors. Each vendor type corresponds to a particular method of purchasing, each with specific functions.

Vendor Types - DV • The first vendor type is a Disbursement Voucher
(DV) vendor. DV vendors are used on the DV document to process direct payments (non-purchase order) or reimbursements. The DV vendor type has the following details: – Must be created and approved prior to submitting a
DV for approval – Requires a Tax ID – Requires a remit address
• Note: MSU employees should not be added to the vendor database.

Vendor Types - SP • The next type of vendor is a Special
Payments (SP) vendor. SP vendors are used on the DV document to process payments to research participants of $150 or less, and also for non-employee reimbursements. The SP vendor type has the following details: – Must be created and approved prior to submitting
a DV for approval – Does not require a Tax ID – Requires a remit address

Vendor Types – Purchase Order • The next vendor type is the Purchase Order vendor. Purchase
Order vendors are used on the requisition, Purchase Order and DV documents. Only Purchasing will create a Purchase Order type vendor. The Purchase Order vendor type has the following details: – Can be created at any time prior to the issuing of the Purchase
Order – Can be used on a DV. When using a Purchase Order vendor on
a DV, the document will be routed to Purchasing as an additional step in the workflow. Purchasing has the ability to disapprove the DV based on the vendor chosen.
– Requires a Tax ID – Requires a purchase order address

Benefits – New Vendor • Uses
– A new vendor could be requested if, for example, it is the first time MSU is purchasing a particular product, and only one vendor sells it.
– Note: When creating a new vendor, the system does not allow entry of duplicate tax IDs.
• Roles – End users and Purchasing populate new vendor
information in the e-doc and submit it for approval. – The vendor reviewers in the central offices verify and
approve the new vendor, and the new vendor is added to the vendor database.

Benefits – Vendor Division • Features
– By being able to create a vendor division, MSU can categorize multiple divisions of the same company and more closely track expenses per vendor.
– Note: A division will have the same tax ID as a parent. • Uses
A vendor division may be requested whenever purchasing from a new division of an existing vendor.
• Roles – End users or Purchasing populate vendor division information in
the e-doc and submit it for approval. – The vendor reviewers in the central offices verify and approve
the vendor division.

Benefits – Vendor Search • Features
– By being able to search for vendors, end users can perform maintenance on the vendor database and easily find information.
– Searches can also be performed by contract. • Uses
There are many instances when the vendor search function is extremely useful, such as creating a vendor division or filling out a requisition.
• Roles Any user of the financial system can search for a vendor or a vendor contract.

Benefits – Vendor Edits • Features
Allows MSU to stay up-to-date with vendor information and clean records.
• Uses – If a vendor moves to a new business address, a new address
record can be added. – If contact information changes, it can now be updated by end
users. • Roles
– When users edit information, yellow stars identify the changes for easy review.
– The changes are then routed to the vendor reviewer for approval.

Creating a New Vendor - Workflow (1) User initiates a new/edit vendor document for disbursement and special payment type vendors only. Purchase order vendors can only be added by the Purchasing department.
(2) Vendor Reviewer processes vendor document. The Vendor Reviewer:1) Verifies vendor information, 2) Applies standards, 3) Verifies tax information, 4) Approves document.
(3) Vendor is now added to vendor database.

Creating a New Vendor • When the need for a new vendor is
identified, a record of the vendor information must be added to the vendor database. This happens in the financial system by creating a new vendor. To begin this process, click on the vendor link on the main menu and then the create new button.
• Note: Be sure to perform a search to see if the vendor exists before creating a new one. See slide 38 on how to perform vendor searches.

Creating a New Vendor - Tabs • The image on the right shows
that each vendor record in the database has 10 document specific tabs of information about the vendor. In addition to these specific tabs, the vendor document also has four tabs which are common to all E-Docs: – Document Overview – Notes and Attachments – Ad-hoc Recipients – Route Log

Creating a New Vendor – Document Overview • The first tab on the vendor document form is Document Overview.
Even though this tab is standard to every e-doc and not just specific to the vendor document, it is worth discussing because it contains the following basic information for the vendor: – Description is a required field and identifies the e-doc that requested the
vendor. – Explanation is an optional field, but should be populated with a brief
description of the types of goods and services a vendor supplies such as:
• Professional services • Mechanical parts • Medical services
– The Org. Doc. # (Original Document) field is a free-form field used to relate the current document to another document within the department.

Creating a New Vendor – Vendor Tab • The first document specific tab (second overall) on the vendor document is
the Vendor tab. This tab contains the identifying information of the vendor and will be discussed here and in the following slides. Vendor Name should be populated if the vendor being added has a
Company Name on their W-9 form. Vendor First Name and Vendor Last Name should be populated if the
vendor being added is under an individual’s name on their tax form. • Note: Either the Vendor Name or Vendor First and Vendor Last Name Fields
are required. • Note: The MSU data standard is to enter the name using all capital letters.

Creating a New Vendor – Vendor Type • Vendor Type is required and identifies the type of payments and contracts to be used with the vendor.
There are three vendor types from which to select: – DV (Disbursement Voucher) – SP (Special Payments) – PO (Purchase Order)
• Note: Only Purchasing will add a Purchase Order type vendor to the database. However, users can add
additional remit addresses to an existing PO vendor by performing a vendor edit. More information on this is contained in the section covering editing vendor information.

Creating a New Vendor – Foreign Vendors
• Foreign vendors are: – Headquartered outside of U.S. – Checked by Purchasing for debarment by U.S
Government when a Purchase Order is issued. – Checked by Accounts Payable for debarment by U.S.
Government when a payment is being made.

Creating a New Vendor – Tax Number Tax Number is the only location in which to place the vendor’s tax number. The tax number is confidential data and will be masked during routing and queries. The Tax Number is:
– Required for DV and Purchase Order vendor types. – Not required for SP vendor types. – Also not required if the vendor is indicated as a foreign vendor regardless of vendor
type. • Information entered in these two fields should be verified against the
vendor’s W-9 form. • If the W-9 contains an FEIN Number, attach a scanned copy of the W-9 in
the notes and attachments tab of the vendor document. W-9’s containing an SSN can also be attached. All attachments become confidential data (available to central offices only) once submitted.

Creating a New Vendor - Ownership • The two fields addressing ownership information of the vendor
are described below. – Ownership Type is a required field. This identifies the business
ownership, such as corporation. – Ownership Type Category is an optional field and further
identifies if the vendor is related to health or legal services for tax reporting purposes.

Creating a New Vendor - Detail • The detail
information under the vendor tab contains standard payment and other order information about the vendor. Populate this portion of the document with the correct information according to the fields. None of this information is required.

Creating a New Vendor - Address • Each vendor must have at
least one default address. DV and SP vendor types must have a minimum of a ‘Remit’ address type while Purchase Order vendor type must have a minimum of a purchase order (PO) address type. The address type identifies how this address is to be used. For example, if this address is where the Purchase Order is sent, select Purchase Order as the address type. Enter in all applicable information for the address.
• Note: Be sure to click the add button after inputting the address information.

Creating a New Vendor – Active Indicator
• An address must be active in order to use it on documents. If the vendor has an address for tax reporting purposes, but does not want it used on documents, it can be added as an inactive address (for example, some vendors prefer to use a PO Box address for orders and business reasons. However, for tax reporting, we must have a physical address. The physical address can be entered as an inactive address.)

Creating a New Vendor - Contact • Each vendor allows for
contact information to be populated. If you choose to enter information about a contact, a contact type is required. This field identifies the type of contact associated with information you are about to enter. Populate the fields in this area with the appropriate and correct information.

Creating a New Vendor – Supplier Diversity
• The Supplier Diversity information is identified by the vendor. The vendor must be CERTIFIED in these diversity fields to qualify. If unsure, please check with Purchasing. – MSU does reporting based on this information to federal and
state governments and also within MSU. – This information is optional. However, if the vendor is certified in
a specific category, users should provide this information.
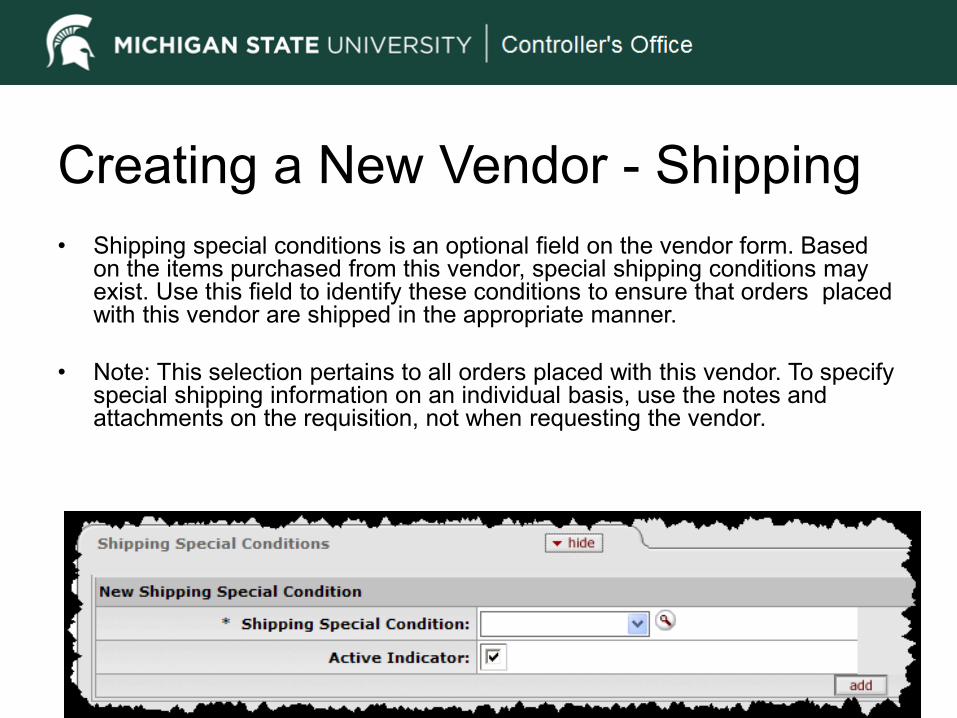
Creating a New Vendor - Shipping • Shipping special conditions is an optional field on the vendor form. Based
on the items purchased from this vendor, special shipping conditions may exist. Use this field to identify these conditions to ensure that orders placed with this vendor are shipped in the appropriate manner.
• Note: This selection pertains to all orders placed with this vendor. To specify special shipping information on an individual basis, use the notes and attachments on the requisition, not when requesting the vendor.

Creating a New Vendor – Commodity Codes
• Only Purchasing has the ability to specify commodity code information. This tab identifies commodity information associated with the vendor.

Creating a New Vendor – New Search Alias
• The New Search Alias tab is optional and provides a place to enter any other names by which a vendor may be known. Any names entered here will be able to be used as criteria when searching for a vendor. Enter this information if the company is know by a different name than is shown on their W-9 or Tax ID information.
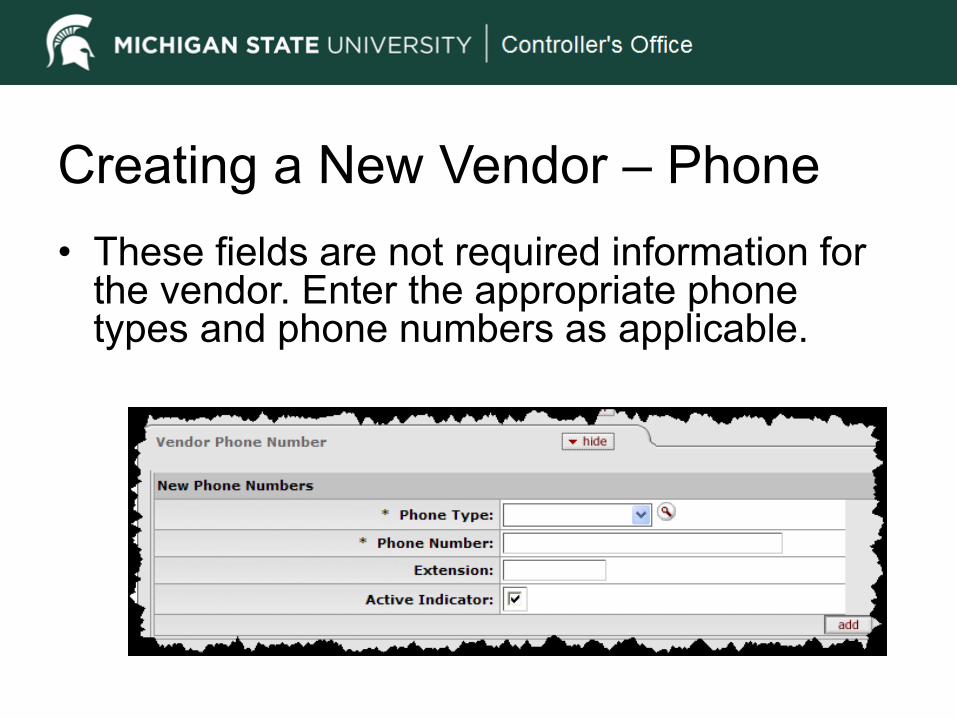
Creating a New Vendor – Phone • These fields are not required information for
the vendor. Enter the appropriate phone types and phone numbers as applicable.

Creating a New Vendor – Customer Number
• The Customer Number tab is not required information, but is used as an MSU account number with a Purchase Order vendor. For example, if MSU has a university contract set up for voicemail systems, then the customer number that the vendor uses to recognize MSU’s account would be entered here.
• Note: MSU will only be using MS as the chart code.

Creating a New Vendor - Contracts • The information on the Contracts tab is optional and can only be completed
by Purchasing. A financial system user without the system privileges of a Purchasing department user will not be able to edit the fields on this tab. The contracts tab identifies contract information associated with the vendor. The image below shows a read-only version of contract information.

Creating a New Vendor – Other Tabs • These tabs are standard to every e-doc and function in the same manner for the vendor
document as on other e-docs. If the W-9 contains an FEIN Number, attach a scanned copy of the W-9 in the notes and attachments tab of the vendor document. W-9’s containing an SSN can also be attached. All attachments become confidential data (available to central offices only) once submitted.

• Depending on the type of vendor being created (DV or SP), there are certain items that need to be attached before submitting the e-doc. Here’s a list of attachments that are needed based on vendor type. – DV Vendors
• Scan and attach the W-9 form. – SP Vendors
• No attachments necessary.
Creating a New Vendor - Attachments

Creating a New Vendor - Routing
• Once the e-doc is populated, it is submitted for approval. Once a vendor is approved, the initiator receives an FYI as a notice that a disbursement voucher or Purchase Order transaction can now be completed.

Vendor Division – A vendor division would be a self-sufficient unit
within a company. A division contains all of the departments necessary to operate independently from the parent company. An example is the Chevrolet Division of the General Motors Corporation.
– When a division is created, attributes such as corporate information are automatically populated for the division since it has to be the same, such as the Tax ID.

Creating a Vendor Division • The process of
creating a vendor division is very similar to creating a new vendor. The process starts at the main menu by clicking the vendor link.

Vendor Search • When creating a vendor division, an existing vendor must
already be present in the database. Therefore, first search for the vendor and then create the division. Enter the criteria and then run a search to find the vendor.

Create Division Link • After performing the search, results like the
ones shown below will appear under the vendor look-up. The link to create a vendor division appears in the action column next to the edit link. Click on the create division link to open and populate the division information.

Division Information • The information for the
vendor division is populated in the same manner as when creating a new vendor. The image at the right shows the information from the Vendor tab within the document. Since some information has to be the same as the parent company, it cannot be edited. As shown, not all fields are editable and those that are not editable are the same as the parent vendor.

Searching Vendor Information • Like any e-doc, vendors can be searched for
in the database. Vendors can be searched for by criteria, contract or document. All users with access to the Financial System can search for vendors for any number of reasons, including: – To see if the needed vendor already exists. – To see if more information is needed about a
vendor. – To locate a vendor document in workflow.

Searching Vendor Information • To begin a vendor search
using criteria, click on the vendor link from the financial system main menu (right) to open the vendor lookup form (below). The following pages will discuss the vendor search form.
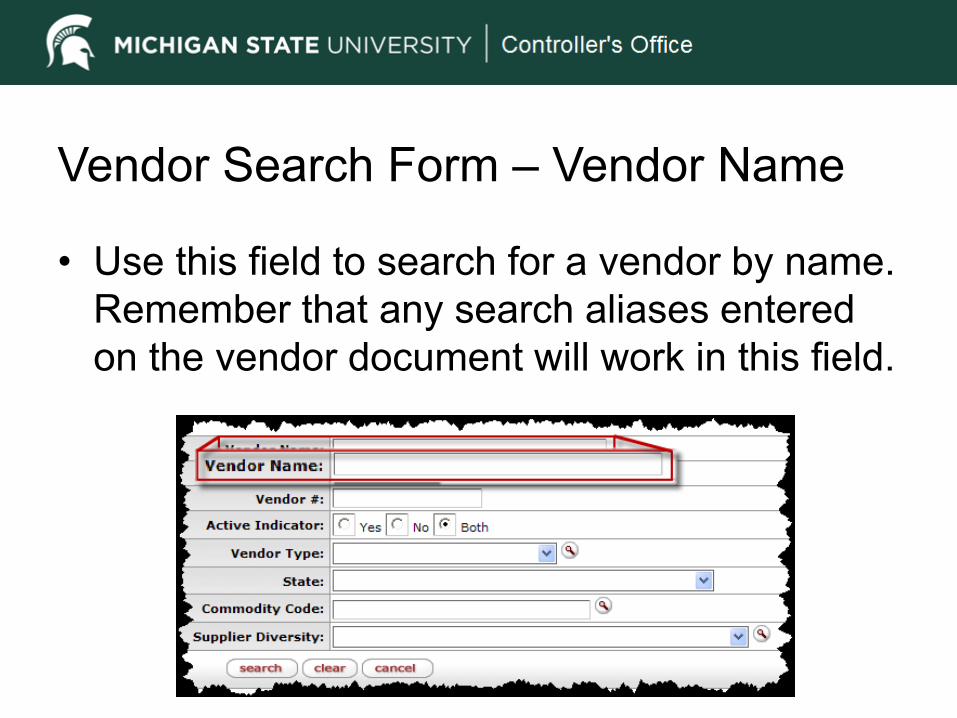
Vendor Search Form – Vendor Name
• Use this field to search for a vendor by name. Remember that any search aliases entered on the vendor document will work in this field.

Vendor Search Form – Tax Number • This field is used to search for a vendor by tax
number. This allows searching by the vendor’s tax number if known, but still provides for confidentiality of the vendor’s Tax Number. When the search results are returned, the tax number will appear masked.

Vendor Search Form – Vendor # • This field will return a specific vendor with
a matching number.
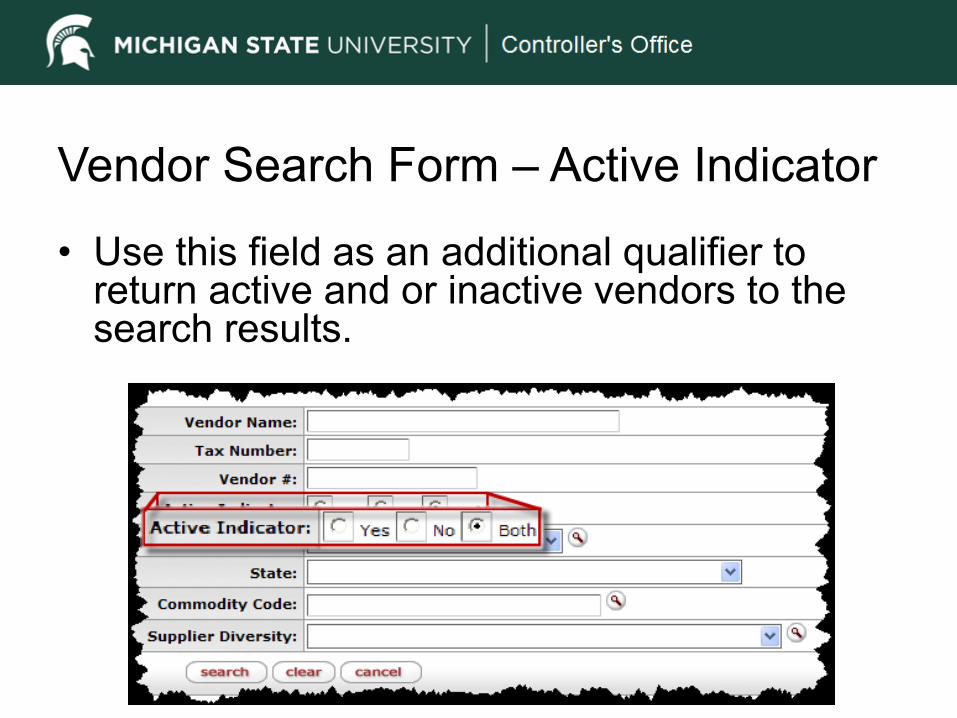
Vendor Search Form – Active Indicator
• Use this field as an additional qualifier to return active and or inactive vendors to the search results.

Vendor Search Form – Vendor Type
• This field will return all vendors of a specific type; purchase order, disbursement voucher, or special payments. (PO, DV or SP)

Vendor Search Results • Once the search is executed, results are returned at
the bottom of the screen.
• Note: Click on the vendor name link for a read-only version of the vendor information.

Vendor Record Edits • Over the course of time, information about a
vendor may change. One of the features of the financial system is being able to perform edits on vendor information. Some examples as to why vendor information may need to be edited include: – Adding an additional address to a vendor – Adding a remit address to a PO vendor – Updating contact information
• Before being able to edit vendor information, first
search for and locate the vendor record.

Vendor Record Edits – Edit Link • The search results are returned at the bottom of
the screen. Clicking edit next to a specific record will take you to the vendor document where you can update information (see image below).

Vendor Record Edits – Old vs. New • When editing, the “old information” is compared against the “new.”
Simply enter the changes in information as you would when creating a new vendor. Any changes are routed for approval in the same manner as when creating a new vendor.
• Note: Users are able to add remit addresses to PO vendors if they need to pay a particular vendor using a Disbursement Voucher. When doing this, the user that is adding the remit address to the PO vendor must attach a document (such as an invoice) that proves the remit address is needed.

Vendor Record Edits – Identifying Changes
• When finished editing, changes are indicated by gold stars on the form tabs, and also at the locations within the form where changes have been made. This shows that the vendor information in that area has been changed.

END