ebay multi-account integration for magento 2 guide
TRANSCRIPT

eBay Multi-Account Integration For Magento 2 Guide
eBay Multi-Account Integration For Magento 2 Guideby CedCommerce Products Documentation
1 / 72

eBay Multi-Account Integration For Magento 2 Guide
1. Overview ........................................................................................................ 32. Installation of the Extension ........................................................................ 33. eBay Multi-Account Configuration .............................................................. 34. Manage Account ......................................................................................... 165. Manage Account Configuration ................................................................ 216. Profile Management .................................................................................... 27
6.1. Adding a New Profile ................................................................................ 276.2. Editing a Profile ........................................................................................ 346.3. Assign Products to Profile ......................................................................... 366.4. Disabling a Profile .................................................................................... 376.5. Enabling a Profile ..................................................................................... 396.6. Deleting a Profile ...................................................................................... 416.7. Manage Categories .................................................................................. 436.8. Manage Attributes .................................................................................... 45
7. Manage Products ........................................................................................ 487.1. Upload Selected Products ......................................................................... 487.2. Inventory and Price Sync .......................................................................... 507.3. Revise Items ............................................................................................ 527.4. End Items on eBay ................................................................................... 547.5. Relist Items on eBay ................................................................................. 56
8. Product Feeds ............................................................................................. 589. Manage Orders ............................................................................................ 6010. Cron Logs .................................................................................................. 6511. Activity Logs ............................................................................................. 6712. Product Change Log ................................................................................ 6813. Help And Support ..................................................................................... 70
2 / 72

eBay Multi-Account Integration For Magento 2 Guide
1. Overview
Keeping in mind the competitive dynamics of the e-commerce world and the increasing demands of themerchants in the cutthroat competition, we at CedCommerce have developed the eBay Multi-Account IntegrationExtension for Magento. This extension is created for Magento 2 users which enables them to list their products byusing multiple accounts on eBay.
The advanced, easy to use eBay Multi-Account Integration for Magento from CedCommerce brings you anexclusive option to list your products using multiple accounts on eBay marketplace and earn globally.
Key features of the extension
Switch between multiple eBay Accounts easily – Start managing your eCommerce business and sellusing multiple eBay accounts, all at a single place.Sending products on eBay gets easy – Create a profile for the similar type of products, add theproducts to it, and send those on eBay every time, easily.Upload products on eBay in one go – With seller friendly interface, it enables you to send the Magentoproducts on eBay in an instant.Enable/Disable products on eBay – Disable your listed products on eBay marketplace and retire them.When needed, enable them once again.Map Magento attributes with eBay – The advanced extension enables you to map the Magento 2store’s product attributes to that of eBay marketplace.
2. Installation of the Extension
To install the extension
Log in the ftp, and then go to Magento 2 root folder (generally present under the public_html folder).Create a new folder named code under the app folder; under code folder, create a folder named Ced.
a. Upload or Drag and Drop app/code/Ced/EbayMultiAccount directory.b. After successfully uploading the directory, the extension is ready to install through CLI commands.c. Now run the following upgrade command in cmd:
php bin/magento setup:upgradephp bin/magento setup:di:compilephp bin/magento setup:static-content:deploy
3. eBay Multi-Account Configuration
To complete the configuration,
1. Go to your Magento 2 admin panel.2. Click on eBay present on the left navigation bar.
3 / 72

eBay Multi-Account Integration For Magento 2 Guide
3. Click on Configuration.You will be navigated to the configuration page as shown below:
eBay Merchant/Developer Settings
4 / 72

eBay Multi-Account Integration For Magento 2 Guide
1. Click on eBay Merchant/Developer Settings and the section will expand as:
2. Under eBay Merchant/Developer Settings do the following steps:In Use Developer Account, if you select No then the cedcommerce internal developer accountwill be used for API calling.Note: The developer account is used for API calling and for every developer account there aresome separate API limits that ebay provides for API calling. The developer account is differentfrom the seller account. If you select Yes, then you must have a developer account but if in case you do not have adeveloper account then click here: https://developer.ebay.com/signin?tab=register(https://developer.ebay.com/signin?tab=register)to register yourself for creating a developer account.After selecting Yes, the sections expand as shown below:
Now for entering the Client ID, Client Secret Key, Developer ID you need to follow the stepsbelow:
Login to the ebay developers Program Page, by clicking here: https://developer.ebay.com/signin?tab=register(https://developer.ebay.com/signin?tab=register)
Enter the login credentials and then click the sign in button. The page appears as shownbelow:
5 / 72

eBay Multi-Account Integration For Magento 2 Guide
Now, click on your profile name on the top of the page, and when the menu appears, click Application access keys, as highlighted in the image below:
On clicking it, a tab will get opened and you may see your App Id, Dev Id, and the Cert Idon the page for Sandbox/Production as highlighted in red boxes in the image below:
Copy the Api Keys from here to enter in ebay Configuration Page in Magento panel.In eBay App ID(Client ID), paste the App ID you had copied from the developer account.
6 / 72
eBay Multi-Account Integration For Magento 2 Guide
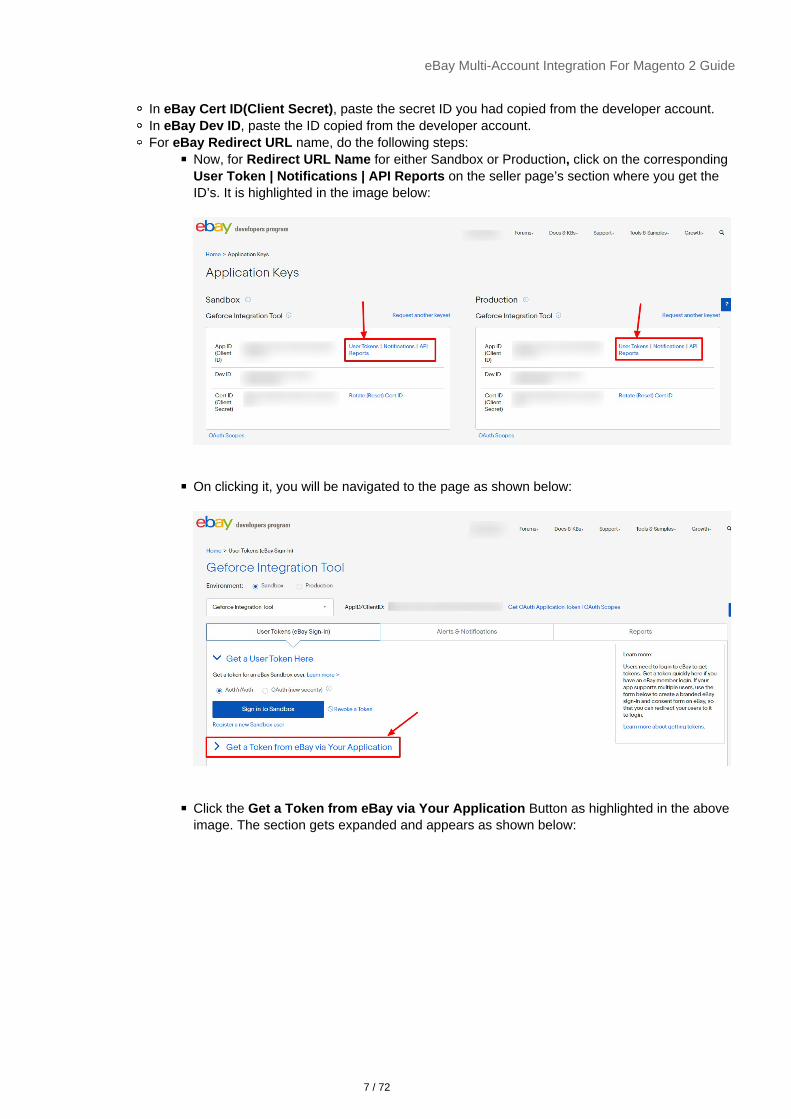
In eBay Cert ID(Client Secret), paste the secret ID you had copied from the developer account.In eBay Dev ID, paste the ID copied from the developer account.For eBay Redirect URL name, do the following steps:
Now, for Redirect URL Name for either Sandbox or Production, click on the correspondingUser Token | Notifications | API Reports on the seller page’s section where you get theID’s. It is highlighted in the image below:
On clicking it, you will be navigated to the page as shown below:
Click the Get a Token from eBay via Your Application Button as highlighted in the aboveimage. The section gets expanded and appears as shown below:
7 / 72

eBay Multi-Account Integration For Magento 2 Guide
Now copy the Redirect URL Name as highlighted inside the red box in the above imageand paste it in the eBay Redirect URL Name field on the eBay Configuration page. (In Your auth accepted URL and Your auth declined URL fields present on the same pageas shown in the above image, you need to enter the URL’s given to you by CedCommerceand save the settings.)
In the Primary Account, select the account you want to set as primary.Note: –If the primary account is selected here then wherever in further process account selection isrequired then it will be skipped and the selected primary account will be chosen by default. -If you do not select any primary account here then you have to select an account at every stepwhere the account selection is required.
eBay Cron Settings
1. Now move to the section eBay Cron Settings, the section is expanded as:
8 / 72

eBay Multi-Account Integration For Magento 2 Guide
2. Under eBay Cron Setting, do the following steps:In the Order Cron, select Enable if you want to fetch the orders. Order Crons are used to fetchwaiting for shipment orders at approx 10 minutes. based on the combination of three ordersettings- Order Status, Fetch Shipped Order, and Fetch Orders No. Of. Days the orders areautomatically fetched if this cron is enabled.In Cancelled Status Order Sync Cron, the orders canceled on ebay whose refund has been sent,those orders can be synced again and the credit memo/refund can be generated if you Enable thiscron.In Order Shipment Cron, the tracking details of orders existing in Magento will be updated as it ison the eBay orders also if you select Enable option.In Inventory Cron, the recent changes in the inventory/price attributes are updated every 10minutes on eBay if you Enable this cron.
9 / 72

eBay Multi-Account Integration For Magento 2 Guide
In Full Inventory Sync Cron, all the products that are live on eBay are scheduled chunk wise andthe inventory and price are synced if this cron is Enabled.In Status Sync Cron, the feed is processed completely on eBay or not,i.e., the status of the feedis synced if this cron is Enabled.In Report File Processing Cron, the feed errors in the bulk scheduler uploaded or its error reportfiles will be synced to Magento if this cron is Enabled.In Job Syncing, the files uploaded on the bulk scheduler will be processed and synced and thedata will be shown that how much feed has been processed if you Enable this cron.In File Upload Cron, the scheduled IDs whose file is created will be uploaded on eBayautomatically if you Enable this cron.In File Creation Cron, for the products that are scheduled in the bulk scheduler a feed is created ifthis cron is Enabled.In Product Sync Cron, if you select Enable then the additional details of the products are updatedif there is any change in it. In Product Upload Cron, the products that are not uploaded on the ebay product manager gridare uploaded automatically if you select Enable in this cron.In Scheduled Price Cron, select Enable if you want to assign products/items based on the criteriaset in ebay pricing rules.In Assign Profile Products Cron, the products are assigned automatically in the profiles whoseebay category ids are the same for the selected category id. This Cron is equivalent to the Massaction Assign Products.In End/Relist Cron, if the ebay status attribute is Yes and the product there is ended on Magentothen this cron will relist it if you Enable it and perform vice versa.
eBay Product Upload Setting
1. Click on eBay Product Upload Setting and the section will expand as:
Note: MSI or Multi-Source Inventory is the feature that manages inventory by the locations. MSI makes iteasier for the merchants to manage and control their multi-channel inventories.
2. Under Inventory Settings, do the following steps:In Use MSI, if you select No then the actual Magento product quantity will be used. But if youselect Yes then it is expanded as:
In MSI Source Code, enter that source code for the particular inventory whose code is required for
10 / 72

eBay Multi-Account Integration For Magento 2 Guide
ebay listings.(Path: Stores -> Inventory -> Sources)In Use Salabe Quantity, if select No then product actual source quantity will go for the ebaylistings, and if you select Yes then under MSI Stock Name, put the stock name that you want touse for the ebay listing.(Path: Stores -> Inventory -> Stocks)
3. Now proceed to the further product upload settings:In Ebay Category Id, enter a single category ID of Magento that will be specific for eBay only. Youcan get this id from catalog ->Categories. The products present in these categories will be used inthe profiles assignment else they will not.In Max Quantity Purchased, enter the maximum quantity the user can purchase at the time ofcheckout of the particular listing.In Upload Bundle Product as Configurable, if the setting is Yes then the product will beuploaded as variation and if you select No then it will be uploaded as Simple.In Upload Bundle Child as Simple, if you select No then Parent Product will be uploaded asSimple and if you select Yes then the child will be also uploaded as simple.In Upload Qty as Maximum Number of Bundles that can be made, if you select Yes thenquantity for your bundle parent product will be calculated based on quantities of each child SKUand divide by the bundle default quantity and use minimum value otherwise if NO is selected thenthe quantity of first child product will be used.In Upload Grouped Product as Configurable, select Yes then the grouped Products will beuploaded as configurable and if you select No then it will be uploaded as simple.In Default Quantity for Non-Managable Stock Product, for some products the manage stock isselected as No, so the quantity you enter here will be used for those products.In Item Location, enter the geographical location of the item listings. This setting can beoverridden under the Account Configuration also.In Postal Code, enter the postal code of the place where the item is located. This setting can beoverridden under the Account Configuration also.In Reason For End Listing, select the reason for the end listing on eBay. This setting is required ifyou want to end any of the listings from the module.In Product Price, you can increase or decrease the price accordingly to display, for this do thefollowing steps:-
Increase by Fixed Price: If selected, then the Modify by Fix Price field appears.Increase by Fixed Percentage: If selected, then the Modify by Percentage Price fieldappears.Enter the numeric value to increase the price of the ebay, product price by the enteredvalue % of Magento 2 price.For Example, Magento 2 price + 5% of Magento 2 price. Magento 2 Price = 100 Select Increase By Fixed Percentage option Modify by Percentage Price = 5 100 + 5% of 100 = 100 + 5 = 105 Thus, eBay Product Price = 105Decrease by Fixed Price: If selected, then the Modify by Fix Price field appears.Decrease by Fixed Percentage: If selected, then the Modify by Percentage Price fieldappears.Enter the numeric value to decrease the price of the eBay product price by the enteredvalue % of Magento 2 price.For Example, Magento 2 price – 5% of Magento 2 price. Magento 2 Price = 100 Select Decrease By Fixed Percentage option Modify by Fix Price = 5 100 – 5% of 100 = 100 – 5 = 95 Thus, eBay Product Price = 95
In Import Field Mapping setting is for Import Item ID Actions. For this, you need to map the ebay
11 / 72

eBay Multi-Account Integration For Magento 2 Guide
and Magento attributes here. Once done the ebay id is imported to Magento.In Convert Currency, if you select No then Magento pricing selected will be chosen as default butif you select No then the currency rate set up in Magento will change the final price according tothe currency of the store location.In Brand Attribute For Pricing Rule, select enter code for making the brand according to thepricing rules you have selected.In Custom Item Specifics, if you have any custom items specifics that are not provided by eBaythen you can add here like Chinese Collar which can be sent with a particular category by addingin this setting.In Show Only Active Ebay Status Product, selected products where ebay attributes are selectedyes will be shown.In Use Watermark, select No if you don’t want the watermark to be shown and the gallery imageswill be selected as the ebay images. If you want to show Watermark on any image then select Yes.Note: Watermark is a faint design made in some paper during manufacture that is visible whenheld against the light and typically identifies the maker.On selecting Yes the menu expands as:
In Image, upload the image you want.In Image Height, enter the height according to you for the image.In image Width, enter the width according to you for the image.In Image Opacity, enter the transparency of the image according to you.In Image Position, select the position where you want to place the image.
In Use MPN as Variation Specifics, select Yes if the brand and MPN are marked then the brandwill go to the parent level and MPN will go to the child with the specifics.
eBay Order Setting:
Click on eBay Order Setting and the section will expand as:
12 / 72

eBay Multi-Account Integration For Magento 2 Guide
Now click on Global Setting and the menu expands:
13 / 72

eBay Multi-Account Integration For Magento 2 Guide
Under Global Settings, do the following steps:In Alternate SKU Attribute, enter a code that will be used to fetch the orders when Magento SKUdoes not match with the eBay/Custom SKUs.In Order Status, the particular state of the order will be fetched. If you select Waiting forShipment Policies then those orders will be fetched whose tracking details have not beenentered. And if you select Waiting for Payment Policies then orders whose payment is pendingwill be fetched.By default, we use the Shipment Policies Option.
14 / 72

eBay Multi-Account Integration For Magento 2 Guide
In Fetch Shipped Order, if you select Yes then the orders which are already shipped on eBay andhave tracking on eBay are fetched. If you select No then it will fetch only the unshipped orderswhich do not have the tracking on eBay.In Fetch Orders No. Of. Days from Today, enter the number of days from the current day forwhich you want the orders to be fetched.In Fetch Order For Out Of Stock Product, select Yes if you want to fetch the orders for theproducts that are out of stock. If No is selected then the orders will move to the failed orders in theeBay order grid.In Allow Order Notification, Select Enable if you want to receive notifications via email about theorder status either fetched or failed. On selecting Enable it is expanded as:
In the Order Notification Email, enter the email to whom you want to send it.In the Order Notification Sender Email, enter the email from which it will be sent.
The Carrier Mapping setting is related to the shipment of orders. The Magento carriers aredifferent from the ebay carriers hence here you map the Magento carriers with the ebay carriers forthe Shipment.In the Shipping Method of eBay Orders, the Magento shipping method is required for Magentoevery order. So here you need to select the Magento shipping method for ebay order which youwill choose from our extension.Note: Mostly ebay Shipping method is preferred in this list because the shipping prices is properlymanaged by us.In Use ebay Order Id as Magento Increment Id, select Yes if you want to override the MagentoIncrement Id with the eBay Order Id/Extended Order Id.In eBay Order Id Prefix, enter the prefix for the Magento orders.In Create New Product (if Not Exist), select Yes if you want to create a new product if it is notexisting in the Magento with the same or any alternate SKU. A product will be created with thename of default_ebay_SKU and this will be used for all other orders which are not existing inMagento with item id as a custom option.In Use Ebay Order Date As Magento Order Date, select Yes you want the Magento order date tobe as same as the eBay order date.In Using Taxjar, select Yes if you are using only Taxjar Module.
Now scroll down to Create Customer Setting, the section is expanded as:
15 / 72
eBay Multi-Account Integration For Magento 2 Guide
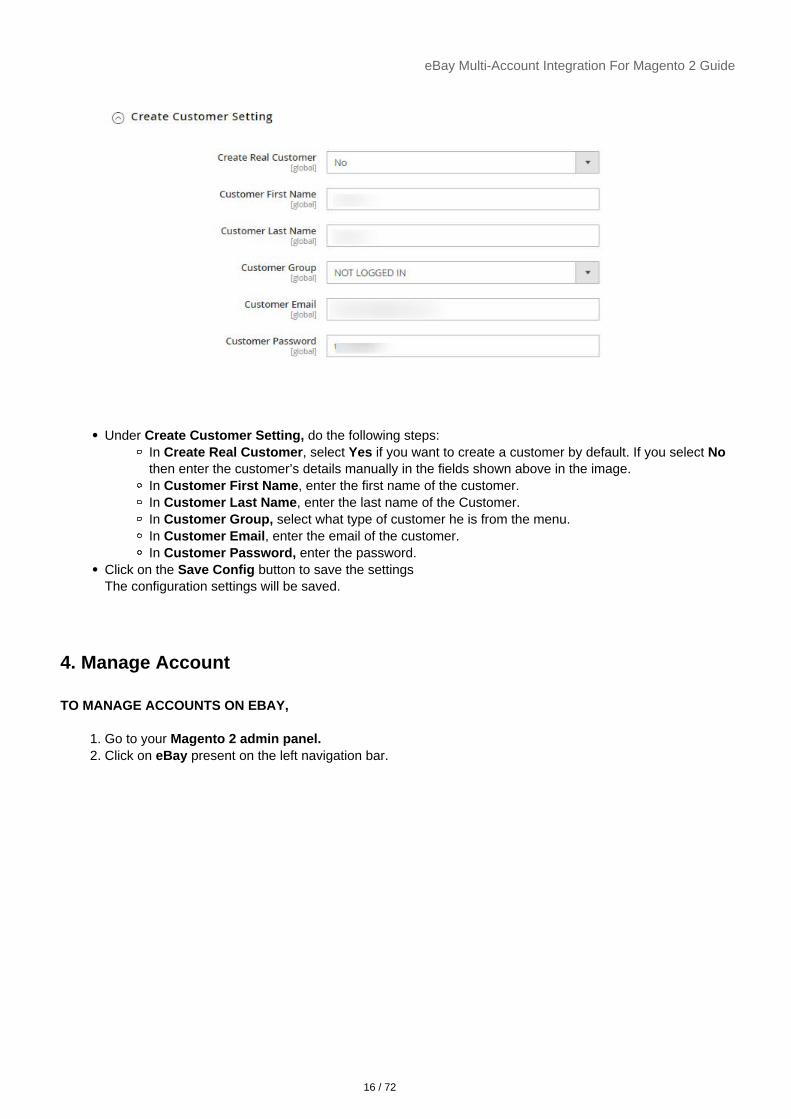
Under Create Customer Setting, do the following steps:In Create Real Customer, select Yes if you want to create a customer by default. If you select Nothen enter the customer’s details manually in the fields shown above in the image.In Customer First Name, enter the first name of the customer.In Customer Last Name, enter the last name of the Customer.In Customer Group, select what type of customer he is from the menu.In Customer Email, enter the email of the customer.In Customer Password, enter the password.
Click on the Save Config button to save the settingsThe configuration settings will be saved.
4. Manage Account
TO MANAGE ACCOUNTS ON EBAY,
1. Go to your Magento 2 admin panel.2. Click on eBay present on the left navigation bar.
16 / 72

eBay Multi-Account Integration For Magento 2 Guide
3. When the menu appears, click on Manage Accounts. On clicking it, you will be navigated to the page as shown below:
4. To add a new account, click on Add Account button on the top right corner.You’ll be redirected to a new page:
17 / 72

eBay Multi-Account Integration For Magento 2 Guide
5. In Account Code, enter the code you wish to remember for your account. This is totally for your ownpurpose so that you might not get confused in different accounts.
6. Select the Account Environment from the drop-down menu i.e, Sandbox for testing purpose or Production for the live website.For Sandbox account, the link is: https://sandbox.ebay.com/(https://sandbox.ebay.com/)
For Production, the link is: https://www.ebay.com/(https://www.ebay.com/)
7. In the Account Location, select the location of the account for which you want to connect your store.8. In the Account Status, if you select Enable the connectivity will be there for product sync, order fetch,
etc. and if you select Disable then the account will be disconnected from Magento.9. In the Account Store section choose the Magento store view you want to use for your ebay store.
10. The Token field is disabled and automatically filled when the fetch token process is done in the next steps.11. Once all the actions have been taken so far, click on the Save button on the top right of the page.
The Account will be created and displayed on the Manage account page.
To Edit an Account-
1. Go to the Manage account Page, click on the Edit button under the Actions column.
18 / 72

eBay Multi-Account Integration For Magento 2 Guide
2. On clicking it you will be navigated to the Edit Account Page as shown below:
3. Do the required changes and click on the Save button.The edits will be saved.
To Fetch Token-
1. Go to the Manage account Page, click on the Fetch Token button under the Actions column.
19 / 72

eBay Multi-Account Integration For Magento 2 Guide
2. The token will be fetched from the ebay store to the Magento Store and will be saved in the Accountdetails.
To Fetch Other Details-
1. Go to the Manage account Page, click on the Fetch Other Details button under the Actions column.
2. The details of the account will be fetched from the ebay store to the Magento store.
To Import Item Ids
1. Go to the Manage account Page, click on the Import Item Ids button under the Actions column.
20 / 72

eBay Multi-Account Integration For Magento 2 Guide
2. The item ids will be imported to that particular account.
To Delete Multiple Accounts-
1. Select the accounts you want to delete.2. Under the Actions list click on the Delete option.
3. The selected accounts will be deleted.
5. Manage Account Configuration
To manage account configuration,
1. Go to your Magento 2 admin panel.2. Click on eBay present on the left navigation bar.
21 / 72

eBay Multi-Account Integration For Magento 2 Guide
Note: In Manage Account Configuration, account-related information like Payment Details, ReturnPolicy, Shipping Policy that needs to go along with the product details are entered. This Accountsection needs to be selected at the time of Profiling.
3. When the menu appears, click on eBay Manage Account Configuration.You will be navigated to the manage account configuration page as shown below:
22 / 72

eBay Multi-Account Integration For Magento 2 Guide
4. To add a new account Click on Add Account Configuration.You will be navigated to the New Account Configuration Page as shown below:
5. In Configuration Code, Enter the code you wish to remember your configuration with. This is totally foryour own purpose so that you might not get confused in different configurations.
6. Now click on Required Configuration, and this page will open up:
7. Under Account Configuration Information, in Select Location choose the location of the account forwhich you want the information to be configured.Note: Details will only be rendered here if the account details have been fetched successfully forthat particular location in the Manage Account section(https://docs.cedcommerce.com/magento-2/
23 / 72

eBay Multi-Account Integration For Magento 2 Guide
ebay-multi-account-integration-magento-2-guide/?section=manage-account).
8. Once the location is selected, the details on the page expand as shown below:
24 / 72

eBay Multi-Account Integration For Magento 2 Guide
25 / 72

eBay Multi-Account Integration For Magento 2 Guide
9. Now under Payment Details, do the following steps:In the Payment Method, select the type of payment method that you want to allow for yourproducts on eBay.In PayPal Email, enter your PayPal email address. It is only if you have selected the PayPalpayment type.
10. Under Return Policy do the following steps:In Return Accepted, select the option of return accepted if you want the products to beapplicable for return after purchase else select Return Not Accepted.In the Return Option, select the option according to you that you wish for the return.In Return Days, select the time duration under which the return can be requested.In Ship Cost Paid By, select the Buyer or Seller who will pay the shipping cost in case of thereturn.
11. Now Under Shipping Policy, do the following steps:In the Service Type, select the option for the type of service for the shipping.
If you select Flat then it means that the shipping amount that we will give from our end willbe applied for the products directly.If you select Calculated then it means that the shipping amount will be directly calculatedon ebay based on the product weight.If you select Calculated Domestic Flat International then it means that for domestic it willbe calculated and for international, the rate will be flat based.If you select Flat Domestic Calculated International then it means that for domestic theshipping amount will be flat type and for international, it will be Calculated.
In Free Shipping, select Yes if want the shipping to be free of cost.In Excluded Areas, select the regions for which you don’t want to allow the shipping of theproducts.In Global Shipping, select Yes if you want the products to be shipped globally.In Ship to location, select the location of the countries for which the products will be shipped.
12. Under Sales Tax Details, enter the tax details for the particular state for which you want. Do the followingsteps:
In Sales Tax %, enter the tax percent applicable for the product for a particular stateIn Sales Tax State, select the state for which you want to apply the sales tax.In Shipping Includes, select Yes if you want the shipping amount or tax to be applicable elseselect No.
13. Under Product Settings(the generic settings for products) do the following steps:In Max Quantity Purchased, enter the maximum quantity the user can purchase at the time ofcheckout of the particular listing. (Can override this setting in Configuration Setting)In Item Location, enter the geographical location of the item listings. (Can override this setting inConfiguration Setting)In Postal Code, enter the postal code of the place where the item is located. (Can override thissetting in Configuration Setting)In Price Setting, select the Price according to you.Note: In the above four mentioned Product settings you will override the main configurationsetting based on the account location.In Set Inventory on the Basis of Threshold, select Yes if want the inventory value by thethreshold.
26 / 72

eBay Multi-Account Integration For Magento 2 Guide
In the Inventory Threshold Value box, enter the required value.In the Send Inventory for Lesser Than Threshold Case box, enter the required value.In the Send Inventory for Greater Than Threshold Case box, enter the required value.In Threshold Buffer, enter the negative or positive values for the products uploading. Thevalue updated will be buffered according to the value entered.In Buffer Percentage, it is applied with Magento Quantity. The quantity entered here willonly be sent on ebay from the Magento store.Note: The priority is given to Buffer Percentage then Threshold Case and thenThreshold Buffer.
14. Click on Save Button.The Account Configuration created will be displayed in the grid.
6. Profile Management
In the Profile Listing section of the eBay Multi Account Integration for Magento, you may take the followingactions:
Adding a new profileEditing the Existing ProfileEnabling a ProfileDisabling a ProfileDeleting a Profile
6.1. Adding a New Profile
TO ADD A NEW PROFILE,
27 / 72

eBay Multi-Account Integration For Magento 2 Guide
1. Go to your Magento 2 admin panel.2. Click on eBay present on the left navigation bar.
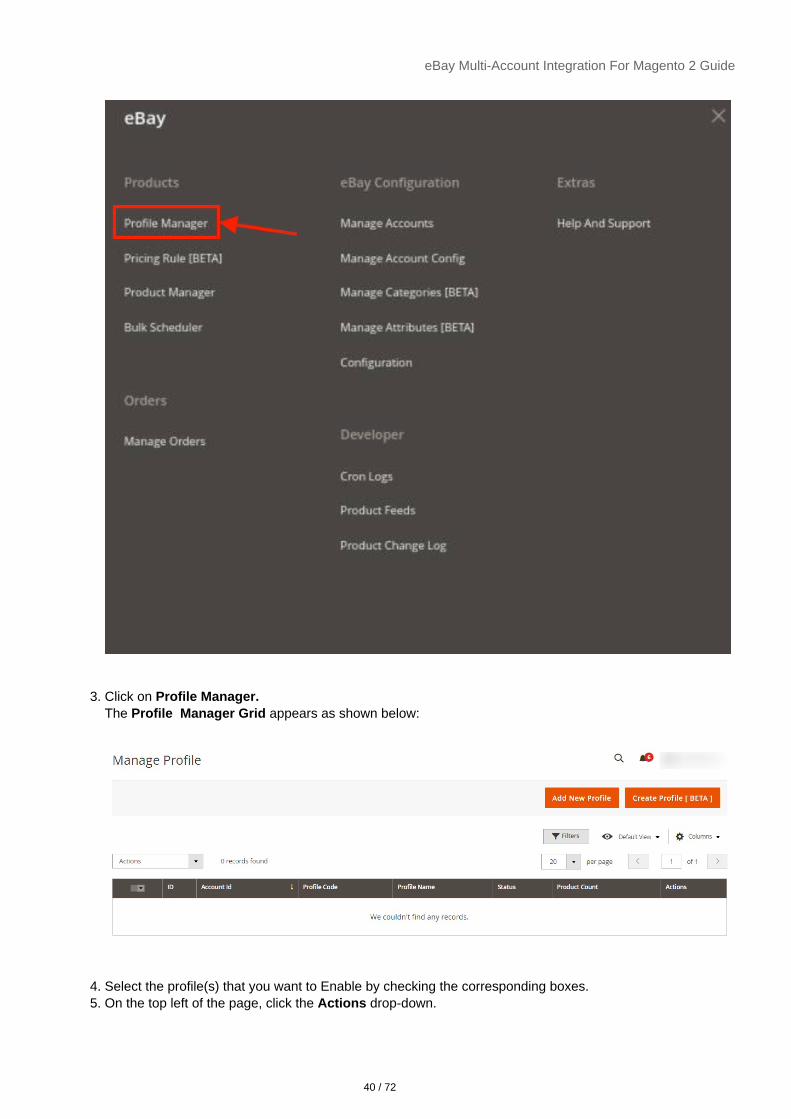
3. Click on Profile Manager.The Profile Manager Grid appears as shown below:
28 / 72

eBay Multi-Account Integration For Magento 2 Guide
Note: In the Profile section for an ebay category we map the Magento required/optional attributes.4. Click on Add New Profile Button.
The New Profile Page appears as shown below:
*Note: If you have selected the Primary Account in Configuration settings then this tab displayedabove won’t be shown and you will be directly redirected to New Profile Page.*
5. Select the account and click on the Edit option under the Actions column.The New Profile page appears as:
6. In the right panel, under Profile Information, do the following stepsIn the Profile Code box, enter a profile code.Note: It is only for internal use. Use the unique profile code with no spaces.In the Profile Name box, enter the name of the profile.Note: Use the unique name to identify the profile.In Account Configuration, select from the dropdown the configuration of the account based onthe location for which you want to create a profile.In PaymentPolicies Profile, select your eBay business policy of payment that will be created onthe eBay seller panel.In ShipmentPolicies Profile, select your eBay business policy of shipment that will be created on
29 / 72

eBay Multi-Account Integration For Magento 2 Guide
the eBay seller panel.In Return Profile, select your eBay business policy of return that will be created on the eBay sellerpanel.Note: If you select business policies here then the once set up during accountconfiguration level will be ignored and the eBay seller policies created will be applied.In the Profile Status list, select Enabled to enable the profile.Note: The Disabled option disables the profile.
7. In the left navigation panel, click on the Category & Attribute In the right panel, the page appears as shown in the following figure:
30 / 72

eBay Multi-Account Integration For Magento 2 Guide
8. In the right panel under Category Mapping, do the following steps:In the Root Level Category list, select the required parent category.If the selected category has the child categories then the relevant sub-category list that appearsbelow to it is activated. Once you select the attributes the item specifics/required item specifics will
31 / 72

eBay Multi-Account Integration For Magento 2 Guide
be listed in this section.In Use Second Category, select Yes if want secondary categories for the profile.In eBay-Magento Category Dependent Attributes Mapping, you need to select the requiredMagento attributes to map the Magento Catalog Attributes with the eBay attributes. Theattributes/item specifics appear depending on the category you have chosen.You can also choose the optional attribute and map it with the Magento Attributes.You may click the Add Attribute button to add attributes if required and repeat the mapping.Category Feature, is for item conditions of the products which you can select from the menu.
In Ebay-Magento Required Attributes Mapping, those generic attributes are mapped which arecategory dependent.
Generic Mapping terms:Max Dispatch Time is the Product handling time in at which the product will bedelivered to the buyer.Listing Type tells the product is of which type, a normal purchase type product oran auction type product. It is of 4 types:
a. AdType– This enumeration value represents a classified ad in a RealEstate category.
b. Chinese- This value indicates an auction listing.c. Custom Code– Reserved for internal or future use.d. FixedPriceItem – A fixed-price listing can offer a single item, or if the seller
has multiple quantities of the same item, multiple quantities of that sameitem can be made available for sale through the same listing.
Listing Duration is For fixed-price listings on the eBay Australia marketplace, onlythe Good ‘Til Cancelled (GTC) listing duration will be supported for all new itemsand relisted items.In the case of Description by choosing the default value.
To add the multiple attributes in your description according to your own choice, clickon Add Multi-Attribute
32 / 72
eBay Multi-Account Integration For Magento 2 Guide
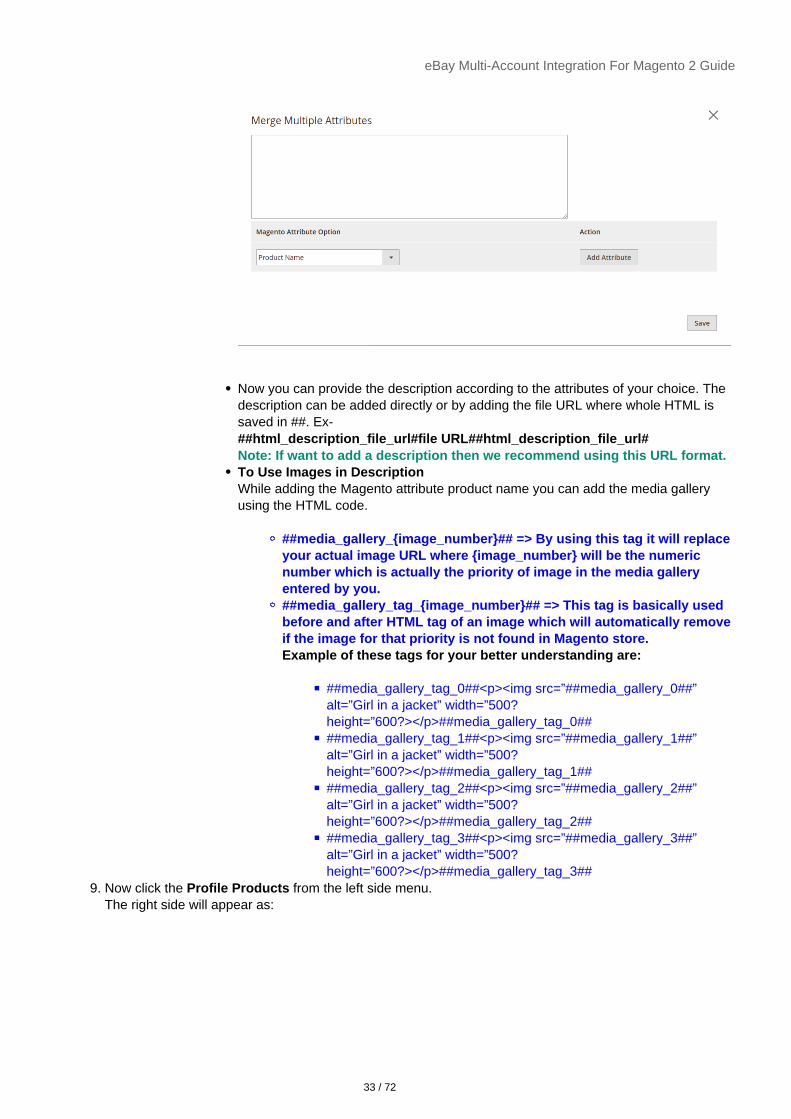
Now you can provide the description according to the attributes of your choice. Thedescription can be added directly or by adding the file URL where whole HTML issaved in ##. Ex-##html_description_file_url#file URL##html_description_file_url#Note: If want to add a description then we recommend using this URL format.To Use Images in DescriptionWhile adding the Magento attribute product name you can add the media galleryusing the HTML code.
##media_gallery_{image_number}## => By using this tag it will replaceyour actual image URL where {image_number} will be the numericnumber which is actually the priority of image in the media galleryentered by you.##media_gallery_tag_{image_number}## => This tag is basically usedbefore and after HTML tag of an image which will automatically removeif the image for that priority is not found in Magento store.Example of these tags for your better understanding are:
##media_gallery_tag_0##<p><img src=”##media_gallery_0##”alt=”Girl in a jacket” width=”500?height=”600?></p>##media_gallery_tag_0####media_gallery_tag_1##<p><img src=”##media_gallery_1##”alt=”Girl in a jacket” width=”500?height=”600?></p>##media_gallery_tag_1####media_gallery_tag_2##<p><img src=”##media_gallery_2##”alt=”Girl in a jacket” width=”500?height=”600?></p>##media_gallery_tag_2####media_gallery_tag_3##<p><img src=”##media_gallery_3##”alt=”Girl in a jacket” width=”500?height=”600?></p>##media_gallery_tag_3##
9. Now click the Profile Products from the left side menu.The right side will appear as:
33 / 72

eBay Multi-Account Integration For Magento 2 Guide
10. If products are not visible, click the Reset Filter button on top of the page. Products will appear.11. Select the products you want to add to this profile.12. Click on the Save button on the top right of the page.13. You will be taken back to the Manage Profile page on which you may see the success message for the
profile creation and you can see the new profile listed on the page.
6.2. Editing a Profile
TO EDIT AN EXISTING PROFILE,
1. Go to your Magento 2 admin panel.2. Click on eBay present on the left navigation bar.
34 / 72

eBay Multi-Account Integration For Magento 2 Guide
3. Click on Profile Manager.The Profile Manager Grid appears as shown below:
4. Scroll down to the required profile row.5. In the Action column of the respective row, click the Edit link.
35 / 72
eBay Multi-Account Integration For Magento 2 Guide
6. Make the changes as per requirement in the respective section.7. Click the Save button.
The edited profile is saved and the success message appears on the Manage Profile page.
6.3. Assign Products to Profile
TO ASSIGN PRODUCTS TO A PROFILE,
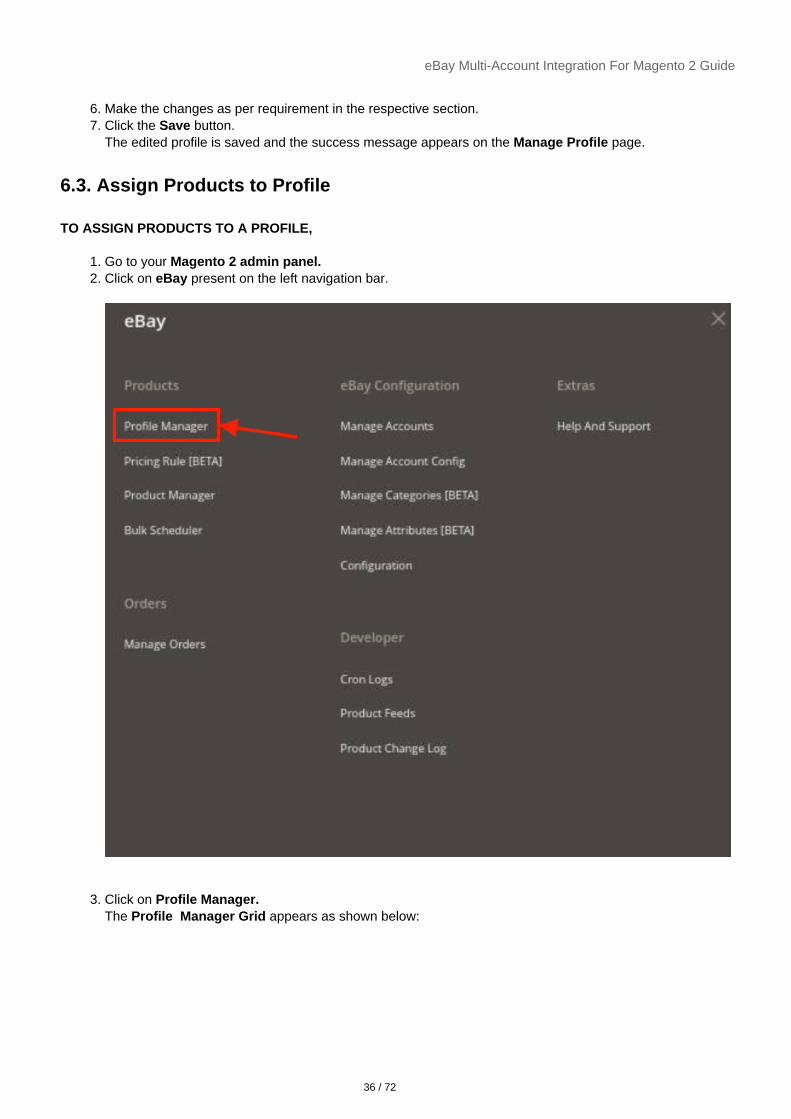
1. Go to your Magento 2 admin panel.2. Click on eBay present on the left navigation bar.
3. Click on Profile Manager.The Profile Manager Grid appears as shown below:
36 / 72

eBay Multi-Account Integration For Magento 2 Guide
4. Select the profile(s) that you want to Assign products by checking the corresponding boxes.5. On the top left of the page, click the Actions drop-down.
6. When the menu appears, select Assign Products.7. The products will be assigned to the selected profiles.
6.4. Disabling a Profile
TO DISABLE A PROFILE,
1. Go to your Magento 2 admin panel.2. Click on eBay present on the left navigation bar.
37 / 72

eBay Multi-Account Integration For Magento 2 Guide
3. Click on Profile Manager.The Profile Manager Grid appears as shown below:
4. Select the profile(s) that you want to disable by checking the corresponding boxes.5. On the top left of the page, click the Actions drop-down.
38 / 72

eBay Multi-Account Integration For Magento 2 Guide
6. When the menu appears, select Disable7. The selected profile(s) will get disabled and a success message appears.
6.5. Enabling a Profile
TO ENABLE A PROFILE,
1. Go to your Magento 2 admin panel.2. Click on eBay present on the left navigation bar.
39 / 72
eBay Multi-Account Integration For Magento 2 Guide
3. Click on Profile Manager.The Profile Manager Grid appears as shown below:
4. Select the profile(s) that you want to Enable by checking the corresponding boxes.5. On the top left of the page, click the Actions drop-down.
40 / 72

eBay Multi-Account Integration For Magento 2 Guide
6. When the menu appears, select Enable.7. The selected profile(s) will get enabled and a success message appears.
6.6. Deleting a Profile
TO DELETE A PROFILE,
1. Go to your Magento 2 admin panel.2. Click on eBay present on the left navigation bar.
41 / 72

eBay Multi-Account Integration For Magento 2 Guide
3. Click on Profile Manager.The Profile Manager Grid appears as shown below:
4. Select the profile(s) that you want to Delete by checking the corresponding boxes.5. On the top left of the page, click the Actions drop-down.
42 / 72

eBay Multi-Account Integration For Magento 2 Guide
6. When the menu appears, select Delete.7. The selected profile(s) will get deleted and a success message appears.
6.7. Manage Categories
Note: This is an alternate way to create profiles.
To manage categories for profiles
1. Go to the Admin panel.2. On the left navigation bar, click the eBay Integration menu.
43 / 72

eBay Multi-Account Integration For Magento 2 Guide
3. Click on Manage Categories.The Manage Categories page appears as shown below:
4. To add a new category, click on Add Category button. First, you need to select the account for which youwant to create a category.
44 / 72

eBay Multi-Account Integration For Magento 2 Guide
5. After clicking on the account the new category page will appear as shown below:
6. In the left navigation panel, click on eBay Category. Under this do the following steps:In Category Code, enter the category code that you have entered in Configuration settings.In Leaf Category, select the Category to be mapped.Then select the Root Level Category to the levels you want.
7. In the left navigation panel, click on Product Query Condition. The section appears as shown below:
8. In Product Query Condition choose the condition from the list to add for mapping the product.9. Click on Save Button, the category will be saved and displayed in the Categories grid.
6.8. Manage Attributes
45 / 72

eBay Multi-Account Integration For Magento 2 Guide
To manage attributes for profiles,
1. Go to the Admin panel.2. On the left navigation bar, click the eBay Integration menu.
3. Click on Manage Attributes.The Manage Attributes page appears as shown below:
46 / 72

eBay Multi-Account Integration For Magento 2 Guide
4. To synchronise or fetch new attributes, click on th Sync/Fetch Attributes button.The attributes will be fetched and displayed on the grid.
5. To map any attribute, click into that row of attributes then map the appropriate Magento attribute from theMagento Attribute Code column & click into Save.
6. If you want to map any default value then have to choose –Set Default Value– in the Magento AttributeCode column & put a default value in the Default Value column.Note: To view applicable values for the List type of attribute you can click on the View Optionbutton of the Action column.
7. To do a Value Mapping of your Magento Attribute options with the eBay attribute option, you can followbelow process:
First, save the Magento Attribute Code for that eBay attribute.Click into Map options button ( edit button ) of the Action column.Then Click into the Add Row, & choose the mapping which is equivalent to each other.
8. To search for any attribute, click on the Filter button.
9. Enter the required option by which you want to filter the attributes for mapping.The applied filter will display the results.
To Edit Attributes in Bulk,
1. Select the attributes that you want to edit.2. In the Actions list, click on Edit.
3. Edit all the required attributes in bulk.
Note:
47 / 72

eBay Multi-Account Integration For Magento 2 Guide
Make sure you mapped all the attributes which are required here in this Manage Attribute gridOnce attribute mapping is done, then you can proceed with profile creation by using Create Profilemass action of Manage Category Section
7. Manage Products
In this section of the integration, the following actions can be performed,
Selected Product UploadSynchronize Inventory and PriceRevise Item(s)End Item(s)Relist Item(s)
In the Manage Product Section, you can see all the products assigned in the accounts where you can check theitem id, price, etc.
Note: Before going any further with Product management ensure to select the account for whichall the mass actions will be performed, from the drop-down menu.
7.1. Upload Selected Products
To upload selected products,
1. Go to your Magento 2 admin panel.2. Click on eBay present on the left navigation bar.
48 / 72

eBay Multi-Account Integration For Magento 2 Guide
3. Click on Product Manager.The eBay Product Listing page appears as shown in the following figure:
4. Select the check boxes associated with the required products that you want to upload.5. Click the Arrow button next to the Actions list, and then click Selected Product Upload(It is for those
49 / 72

eBay Multi-Account Integration For Magento 2 Guide
products which on the grid are shown as Not a Product and do not have the item ids).
Note:-If Item ID is available for listing then you select this Upload product Action and the action won’tbe performed because it already exists on Magento.-If you have an ebay item id and want to upload it again then first edit it on Magento, expand theebay tab, and then for that particular account remove the item id and the product will be replaced.-If you want to remove item id in the bulk of multiple products then gotocatalog–>products–>selcte the products for which you want to remove item id–>then select theupdated mass action–>set the item ids to Null of the same account. Hence the item ids will beremoved.
6. If the products are valid, then only the selected products are uploaded on eBay. Otherwise, an errormessage appears for the specific products that are not valid.
7.2. Inventory and Price Sync
To sync inventory and price
1. Go to your Magento 2 admin panel.2. Click on eBay present on the left navigation bar.
50 / 72

eBay Multi-Account Integration For Magento 2 Guide
3. Click on Product Manager.The eBay Product Listing page appears as shown in the following figure:
4. Select the products for which you want to sync the price and inventory, by checking the correspondingboxes.
51 / 72

eBay Multi-Account Integration For Magento 2 Guide
5. Click the Arrow button next to the Actions list, and then click Sync Inventory-Price.
6. A Confirmation dialog box appears as shown in the following figure. Click OK.
7. The page appears as shown in the following figure with the status:
The inventory and price of selected products get synced between Magento and eBay.
7.3. Revise Items
To revise items,
1. Go to your Magento 2 admin panel.2. Click on eBay present on the left navigation bar.
52 / 72

eBay Multi-Account Integration For Magento 2 Guide
3. Click on Product Manager.The eBay Product Listing page appears as shown in the following figure:
4. Select the products that you want to revise/update by checking the corresponding boxes.5. Click the Arrow button next to the Actions list, and then click Revise Item(s).
53 / 72

eBay Multi-Account Integration For Magento 2 Guide
6. A Confirmation dialog box appears as shown in the following figure. Click OK.
The page appears as shown in the following figure with the status:
The selected products get revised on eBay.
7.4. End Items on eBay
To end items on eBay,
1. Go to your Magento 2 admin panel.2. Click on eBay present on the left navigation bar.
54 / 72

eBay Multi-Account Integration For Magento 2 Guide
3. Click on Product Manager.The eBay Product Listing page appears as shown in the following figure:
4. Select the products that you want to end on eBay by checking the corresponding boxes.5. Click the Arrow button next to the Actions list, and then click End Item(s).
55 / 72

eBay Multi-Account Integration For Magento 2 Guide
6. A Confirmation dialog box appears as shown in the following figure. Click OK.
The page appears as shown in the following figure with the status:
The selected products get ended or retired from eBay.
7.5. Relist Items on eBay
To relist items on eBay,
1. Go to your Magento 2 admin panel.2. Click on eBay present on the left navigation bar.
56 / 72

eBay Multi-Account Integration For Magento 2 Guide
3. Click on Product Manager.The eBay Product Listing page appears as shown in the following figure:
4. Select the products that you want to relist on eBay by checking the corresponding boxes.5. Click the Arrow button next to the Actions list, and then click Relist Item(s).
57 / 72

eBay Multi-Account Integration For Magento 2 Guide
6. A Confirmation dialog box appears as shown in the following figure. Click OK.
The page appears as shown in the following figure with the status:
The selected products will be relisted on eBay.
8. Product Feeds
To View Product Feeds,
1. Go to your Magento 2 admin panel.2. Click on eBay present on the left navigation bar.
58 / 72

eBay Multi-Account Integration For Magento 2 Guide
3. Click on Product Feeds. The Product section contains all the feeds or data that we are sending to eBayand the response which we are getting from the request.The Product Feed Page appears as shown:
59 / 72

eBay Multi-Account Integration For Magento 2 Guide
4. In Account ID, the id will be mentioned for the particular account for which the request has been sent.5. In Feed Type, there are various types of feed types based on the actions like Add Item(whenever a new
feed is added), Revise entry Status(Inventory Price), etc.Feed TypesAddItems => For New Product UploadsReviseItem => When using Revise Items ( basically when updating all product info like name, description,images, etc. )ReviseInventoryStatus => When using Sync Inventory Price mass action ( basically when only inventoryprice sync for the product )RelistItem => When use Relist Items mass actionEndItems => When use Relist Items mass action
6. Feed Status is mainly of 3 types- Warning, Failure, Success that shows the status of your feed.7. Feed Date shows the particular time at which the feed has been generated.8. In Feed File, you can view the data and can also download it.9. In Response, you can view the response from ebay for the particular feed.
10. In Product Ids, the feeds for which products have created will be shown.11. If you want to filter for any product then you can do it by entering the product id.
Note: If any request is failing or you getting any error then you can check in this Product FeedSection.
9. Manage Orders
Manage eBay Multi-Account Orders
In this section, those orders will be shown which have been fetched through our modules. You can fetch neworders and manage the shipment of those orders.
1. Go to your Magento 2 admin panel.2. Click on eBay present on the left navigation bar.
60 / 72

eBay Multi-Account Integration For Magento 2 Guide
3. Click on Manage Orders.The eBay Order List page appears as shown in the following figure:
4. To fetch new orders, click on Fetch eBay Orders. The orders will be fetched based on the followingconfiguration settings: Order Status, Fetch Shipped Order, and Fetch Orders No. Of. Days.The orders will be fetched and displayed on the Order Grid.
61 / 72
eBay Multi-Account Integration For Magento 2 Guide
To View Failed Orders
If not able to find order in sales orders then follow these steps:
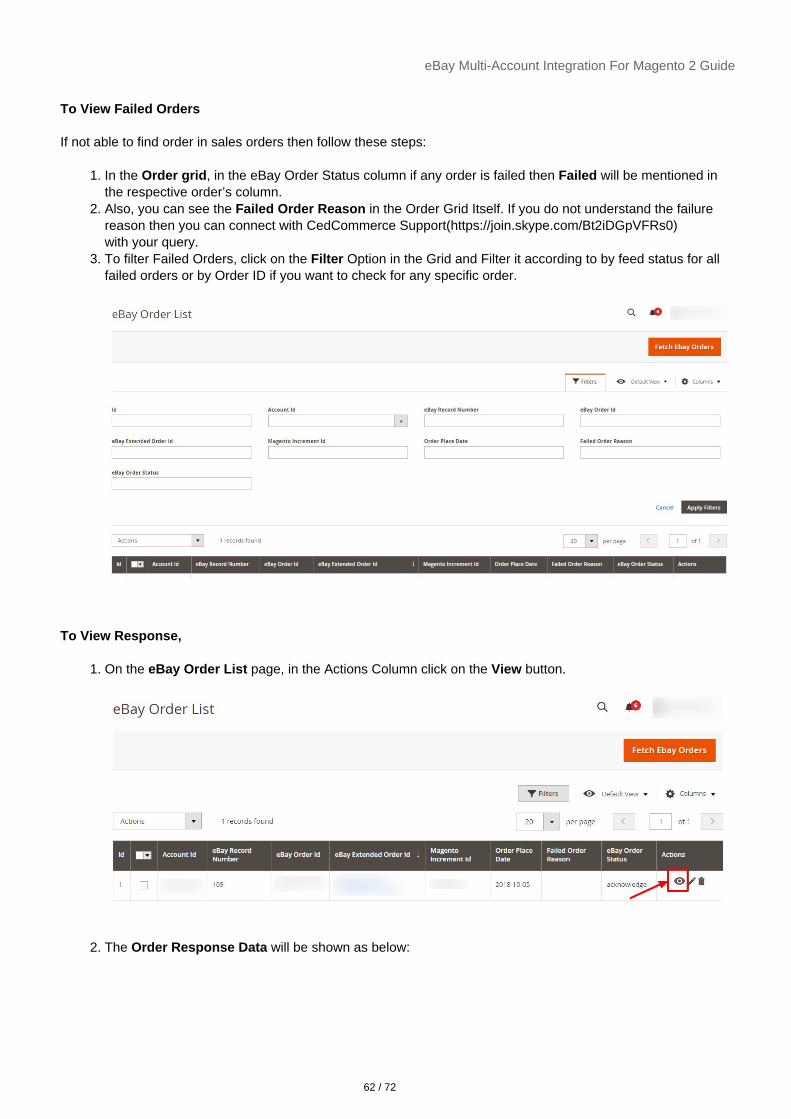
1. In the Order grid, in the eBay Order Status column if any order is failed then Failed will be mentioned inthe respective order’s column.
2. Also, you can see the Failed Order Reason in the Order Grid Itself. If you do not understand the failurereason then you can connect with CedCommerce Support(https://join.skype.com/Bt2iDGpVFRs0)with your query.
3. To filter Failed Orders, click on the Filter Option in the Grid and Filter it according to by feed status for allfailed orders or by Order ID if you want to check for any specific order.
To View Response,
1. On the eBay Order List page, in the Actions Column click on the View button.
2. The Order Response Data will be shown as below:
62 / 72

eBay Multi-Account Integration For Magento 2 Guide
To Ship Orders,
1. On the eBay Order List page, scroll down to the product that you want to ship and click on Edit Button.
2. You will be redirected to Magento Order Panel, Click on Ship.
63 / 72

eBay Multi-Account Integration For Magento 2 Guide
3. The New Shipment Order page will appear. Under Payment and Shipping Method, enter the MagentoCarrier, Title, and Tracking Number of the Order to be Shipped.
4. Then Click on Submit Shipment.
To Delete Orders,
1. Select the orders you want to delete. Then in the Actions menu, click on Delete.
64 / 72

eBay Multi-Account Integration For Magento 2 Guide
2. The selected Orders will be deleted from the eBay Order grid.Note:-This Delete option will only remove orders from our custom eBay Order Grid/Table and not fromSales Order Grid. -After deleting Order if you fetch ebay orders again then it will be fetched again and will beduplicated in the Sales order grid.
10. Cron Logs
To view eBay Cron Grid,
1. Go to your Magento 2 admin panel.2. Click on eBay present on the left navigation bar.
65 / 72

eBay Multi-Account Integration For Magento 2 Guide
3. Click on Cron Logs.The Cron Grid page appears as shown in the following figure:
4. Click on the Truncate button on the top right side of the page.5. All the crons will be cleared.
66 / 72

eBay Multi-Account Integration For Magento 2 Guide
List of Crons and their Use:
ced_ebaymultiaccount_order => to fetch order based on those three configurations ( equivalent to FetchOrders button of manage Orders grid )ced_ebaymultiaccount_sync_cancel_order => this cron will get the Cancelled Order from ebay andcreate credit memo for those orders in Magentoced_ebaymultiaccount_invprice => Sync Inventory/Price for those products whose inventory or priceare recently changed in Magento ( equivalent to Sync Inv Price mass action of manage product grid )ced_ebaymultiaccount_status_sync => Syncs the status from eBay to Magento to set Uploaded/Endedbased on eBayced_ebaymultiaccount_shipment_cron => Sync Shipment/Tracking details to eBay for those orderwhich are completed in Sales Order but exist as Acknowledge status in eBay orderced_ebaymultiaccount_cleanfeeds => Delete the Product Feed that is existing in the Product Feedssection which is created for every product related actionced_ebaymultiaccount_product_update => Sync Product details for those products whose any attributevalues are recently updated in Magento ( equivalent to Revise Items mass action of manage product grid )ced_ebaymultiaccount_product_upload => This will upload all those products which don’t have Item Idin the product and assigned to any profileced_ebaymultiaccount_status_difference_log => this cron will log those products whose ebay_statusattribute value of Magento does not match with the status of the eBay productced_ebaymultiaccount_end_relist_item => this cron will end/relist those product which are logged inproduct change log table /grid as relist/endlist
11. Activity Logs
To view eBay Log Grid,
1. Go to your Magento 2 admin panel.2. Click on eBay present on the left navigation bar.3. Click on Activity Logs.
The eBay Log Grid page appears as shown in the following figure:
To delete the selected logs,
1. Select the logs you want to delete.2. Click Actions on the top left side of the page.
67 / 72

eBay Multi-Account Integration For Magento 2 Guide
3. Click Delete Records.
4. Selected logs will be deleted.
To truncate the logs,
1. Click the Truncate button on the top right side of the page.
2. All the logs will be cleared.
12. Product Change Log
In this section, all the Product changes being done will be displayed in the Product Change Log grid along withthe details.
1. Go to your Magento 2 admin panel.2. Click on eBay present on the left navigation bar.
68 / 72

eBay Multi-Account Integration For Magento 2 Guide
3. Click on Product Change Log. The page appears as shown below:
4. All the Product related details like Account Id, Product Id, Type, Modified At, Updated At, and Number
69 / 72

eBay Multi-Account Integration For Magento 2 Guide
of Times Processed will be displayed.The Product Id shows which Magento product is modified and for which it is logged.In Type, you can see the information type of the product. It is of 4 types based on the MassActions of eBay Product Status: Relist, Endlist, Inventory/Price(Inventory), Revise(Product).In Modified At, the date and time will be mentioned at which the log has been modified inMagento.In Updated At, the date will be mentioned at which the log has been processed from our end.In Number of Time Processed, displays how many times the log has been processed from ourend. The least number will be the priority, i.e. if it is 0 then that will be synced first then number 1will be synced.
13. Help and Support
To view Help & Support section,
1. Go to the Admin panel.2. On the left navigation bar, click the eBay Multi Account Integration menu
70 / 72

eBay Multi-Account Integration For Magento 2 Guide
3. Click Help & Support.The Help & Support page appears as shown in the following figure:
CedCommerce Support
1. Click CedCommerce Support and the section will expand as:
71 / 72

eBay Multi-Account Integration For Magento 2 Guide
2. Click eBay Integration Knowledge Base and you will be navigated to our product page.
Documentation
1. Click Documentation and the section will expand as:
2. On clicking the eBay Integration Extension User Guide By CedCommerce, the users will be navigatedto the guide/document to integrate the Magento store with eBay.
Contact Us via Below Available Mediums
1. Click Contact Us via Below Available Mediums and the section will expand as:
2. Under Contact Us via Below Available Mediums, you may see the different ways to get in touch with us.3. You may call us on Skype by clicking on Contact Us 24*7 vis Skype Call.4. Click Submit issue via Ticket and you will be navigated to our support page on which you may raise a
ticket and get your issue solved by us in no time.5. Click Send us an E-mail and your mailbox will get opened and you may mail us your question or query.6. Click Connect via Skype and you will be able to join us on Skype instantly where we are available 24×7.
Powered by TCPDF (www.tcpdf.org)
72 / 72