easy setup guide - cisco.com€¦ · cisco wap wireless access point easy setup guide 1 connecting...
TRANSCRIPT

Cisco WAP Wireless Access Point
Easy Setup Guide
1 Connecting WAP 2 I ns ta l l i ng F ind IT 3 Configuring WAP
You can easily set up your WAP in this step-by-step guide.

1-1 Before You Begin
Before you begin the installation, make sure that you have the following equipment:● WAP ● Network Switch with PoE● Ethernet Cable ● PC
Connect the PC to the same network as the switch.
1-2 Connecting the WAP to the Network
1 Connect the Ethernet cable to the PoE Ethernet port of the switch.
2 Connect the other end of the Ether-net cable to the Ethernet port of the WAP.
Connecting WAP1
Caution: Cisco 100/300 Series Wireless Access PointsIf PoE is not provided, plug in the supplied power adapter to provide power to the WAP. The
power adapter is supplied with 100 series, sold separately for 300 series. The Gigabit PoE in-
jector is available too, this is useful for extended cable runs, or when using a non-PoE switch..
3 Check the state of the LED.
After the LED on the front panel is changed from blinking to lighting, install the Cisco FindIT Network Discovery Utility to the PC by following steps.
MEMOIt is recommended to install the Cisco FindIT in this guide. By Cisco
FindIT, even if the IP address of the WAP is unknown or changed, you
can easily access to the web-based Configuration Utility of WAP.
In addition, you can:
・Access to the web-based Configuration Utility of other devices, such
as Cisco Small Business Swicthes and Routers.
・Download new firmware updates to the PC with just a few clicks.
・View basic reports, including inventory, maintenance, and end-of-life
reports.
MEMOIf you want to configure the WAP without the Cisco FindIT, you must:
・Locate the IP address of the WAP assigned by your DHCP server, and enter the IP address
in the web browser.
・Locate the SSID (CiscoSB-Setup) of the WAP by using wireless clients, and use the 'cis-
co123' passkey to access the WAP.
After accessing to the web-based Configuration Utility of WAP by any of the methods, proceed
to "3-1 Logging in to Configuration Utility", ❸.
Cisco WAP Wireless Access Point Easy Setup Guide
1 Connecting WAP

To configure the WAP, use the Cisco FindIT Network Discovery Utility to access
to the web-based Configuration Utility. Follow these steps to download the Cisco
FindIT from Cisco.com and install it to the PC.
2
3
1 Enter the URL into a web browser address bar.
http://www.cisco.com/jp/go/findit/download
2 Click the latest version under [Latest] on the left pane.
3 Select the appropriate in-staller for your OS, and click [Download].
Installing FindIT2
MEMOTo find out if your computer is
running a 32-bit or 64-bit ver-
sion of Windows, go to [Control
Panel] - [System and Security]
- [System].
5
6
87
4 Run the installer.
5 Click [Yes].
6 Click [Next].
7 Select [I accept the terms in the license agreement].
8 Click [Next].
Cisco WAP Wireless Access Point Easy Setup Guide
2 Installing FindIT
9
10
11
12
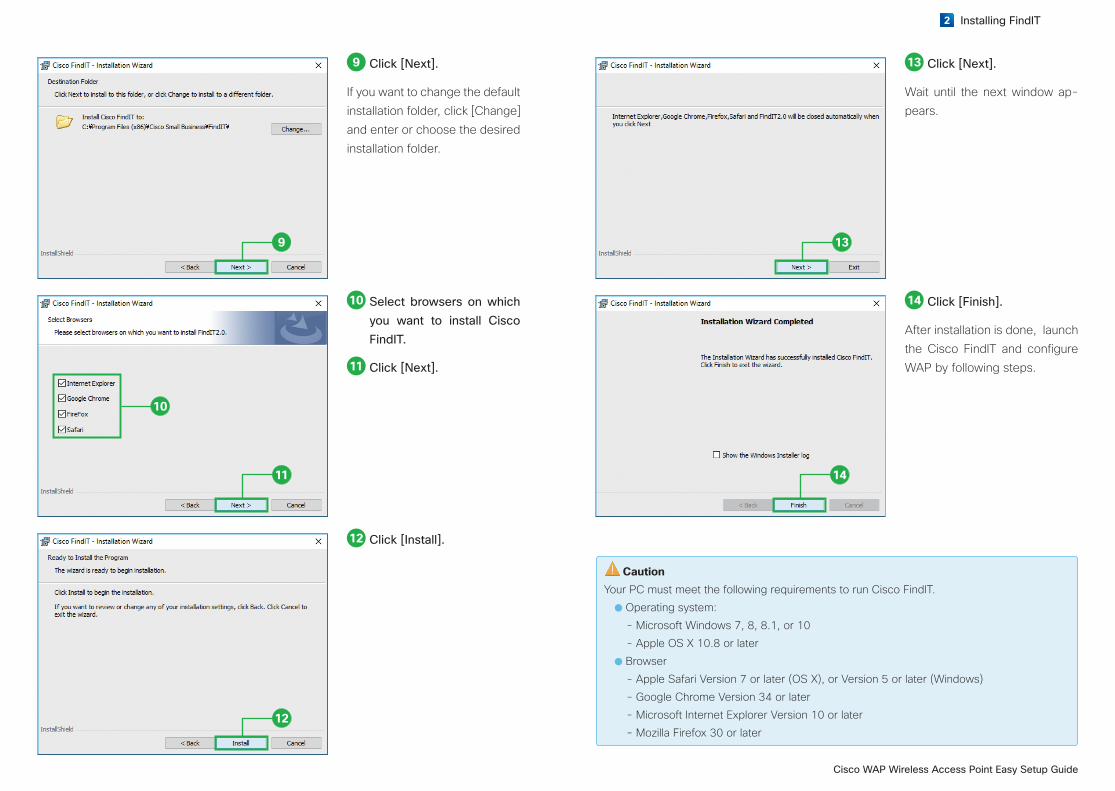
9 Click [Next].
If you want to change the default installation folder, click [Change] and enter or choose the desired installation folder.
10 Select browsers on which you want to install Cisco FindIT.
11 Click [Next].
12 Click [Install].
13
14
13 Click [Next].
Wait until the next window ap-pears.
14 Click [Finish].
After installation is done, launch the Cisco FindIT and configure WAP by following steps.
CautionYour PC must meet the following requirements to run Cisco FindIT.
● Operating system:
- Microsoft Windows 7, 8, 8.1, or 10
- Apple OS X 10.8 or later
● Browser
- Apple Safari Version 7 or later (OS X), or Version 5 or later (Windows)
- Google Chrome Version 34 or later
- Microsoft Internet Explorer Version 10 or later
- Mozilla Firefox 30 or later
Cisco WAP Wireless Access Point Easy Setup Guide
2 Installing FindIT

3-1 Logging in to Configuration Utility
Now you can launch the CiscoFindIT with your web browser or from the list of in-
stalled applications, and you can easily find and log in to the Configuration Utility of
WAP from your web browser
21
3
4
1 Enter your username used for logging in to your OS.
2 Enter your password used for logging in to your OS.
3 Click [Submit].
4 Click [OK] to enable "Life-cycle Reporting" or [Can-cel] to disable.
Configuring WAP3
5
6
7
8
5 Click [Send Now] to help "Product Improvement data" or [Don't send] not to do. You can view data before sending by clicking [View data before send-ing].
6 Right-click the WAP
The WAP is typically shown as [wap...] under [Wireless] in the Device Discovery sidebar.
7 Click [Open].
8 Click [Continue to this website (not recommend-ed)].
Cisco WAP Wireless Access Point Easy Setup Guide
3 Configuring WAP

10
11
9
9 Enter “cisco” in the [User-name].
10 Enter “cisco” in the [Pass-word].
11 Click [Log In].
The Access Point Setup Wizard window appears.
MEMOThe factory default user name
and password are cisco.
MEMOWith Firefox and Internet Explorer, the CiscoFindIT appears in a sidebar adjacent to the content
area of the browser. With Chrome, Safari, and the CiscoFindIT application, the CiscoFindIT
appears in a separate window.
3-2 Configuring Device
After logging in to the Configuration Utility, the Access Point Setup Wizard auto-
matically appears to help you perform initial configuration.
1
2
3
1 Click [Next].
2 Click [Dynamic IP Address (DHCP) (Recommended)].
3 Click [Next].
If you want to configure the IP address manually, click [Static IP Address] and enter the IP infor-mation in each fields.
Cisco WAP Wireless Access Point Easy Setup Guide
3 Configuring WAP

5
4
6
4 Click [Do not Enable Single Point Setup].
5 Click [Next].
6 Select the time zone for your location.
MEMOThe Password Complexity enabled by default requires the password to conform to the follow-
ing complexity settings:
・ Is different from the user name.
・ Is different from the current password.
・ Has a minimum length of eight characters.
・ Contains characters from at least three character classes (uppercase letters, lowercase
letters, numbers, and special characters available on a standard keyboard).
8
7
11
9
10
7 Click [Network Time Pro-tocol (NTP)].
8 Click [Next].
You can also configure the sys-tem clock manually.
9 Enter a password in the [New Password].
10 Enter it again in the [Con-firm Password].
11 Click [Next].
The Configure Radio 1 - Name Your Wireless Network windowappears.
Caution: Cisco WAP131The WAP 131 does not support
the Single Point Setup, skip this
step.
Cisco WAP Wireless Access Point Easy Setup Guide
3 Configuring WAP

3-3 Configuring Radio 1
The WAP contains two radios (2.4 GHz & 5 GHz), each radio functions as an inde-
pendent wireless access point. Configure Radio 1 first, then Radio 2.
2
1
5
4
3
1 Enter a SSID in the [Net-work Name (SSID)].
2 Click [Next].
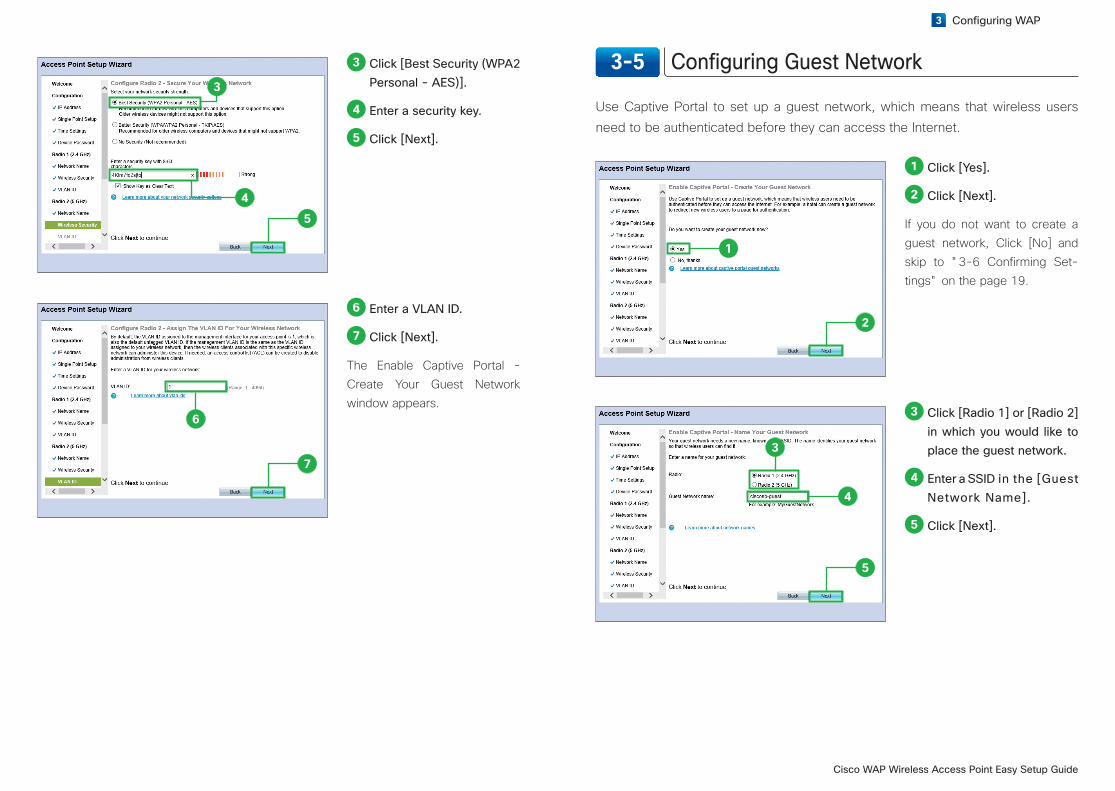
3 Click [Best Security (WPA2 Personal - AES)].
4 Enter a security key.
5 Click [Next].
7
6
3-4 Configuring Radio 2
Configure Radio 2.
2
1
6 Enter a VLAN ID.
By default, the VLAN ID as-signed to the management in-terface for your access point is 1.7 Click [Next].
The Configure Radio 2 - Name Your Wireless Network window appears.
1 Enter a SSID in the [Net-work Name (SSID)].
2 Click [Next].
CautionNot all the WAPs have two radios. If you use the WAP121, WAP321 or WAP551, skip “3-4
Configuring Radio 2”.
Cisco WAP Wireless Access Point Easy Setup Guide
3 Configuring WAP
5
4
3
7
6
3 Click [Best Security (WPA2 Personal - AES)].
4 Enter a security key.
5 Click [Next].
6 Enter a VLAN ID.
7 Click [Next].
The Enable Captive Portal - Create Your Guest Network window appears.
3-5 Configuring Guest Network
Use Captive Portal to set up a guest network, which means that wireless users
need to be authenticated before they can access the Internet.
2
1
5
3
4
1 Click [Yes].
2 Click [Next].
If you do not want to create a guest network, Click [No] and skip to "3-6 Confirming Set-tings" on the page 19.
3 Click [Radio 1] or [Radio 2] in which you would like to place the guest network.
4 Enter a SSID in the [Guest Network Name].
5 Click [Next].
Cisco WAP Wireless Access Point Easy Setup Guide
3 Configuring WAP

8
7
6
10
9
11
6 Click [Best Security (WPA2 Personal - AES)].
7 Enter a security key.
8 Click [Next].
9 Enter a VLAN ID.
10 Click [Next].
11 Click [Next].
If you want to redirect wireless users to a webpage after they log on to the guest network, check [Enable Redirect URL] and enter the URL.
3-6 Confirming Settings
Review the settings that you configured, save and enable them on the WAP.
2
1
3
1 Scroll down to view the settings.
2 Click [Submit].
Wait until Device Setup Com-plete window appears.
3 Click [Finish].
Your WAP has been set up suc-cessfully.
CautionThe guest network VLAN ID
should be different from the
business VLAN ID. If both the
guest SSID and business SSID
are on the same VLAN, then
clients on these networks can
communicate together.
Cisco WAP Wireless Access Point Easy Setup Guide
3 Configuring WAP
Appendix Where to Go From Here Settings
■ Support● Cisco Support Community http://www.cisco.com/go/smallbizsupport● Cisco Support and Resources http://www.cisco.com/go/smallbizhelp● Phone Support Contacts http://www.cisco.com/en/US/support/tsd_cisco_small_business_support_center_contacts.html● Cisco Firmware Downloads http://www.cisco.com/go/smallbizfirmware● Cisco Open Source Requests http://www.cisco.com/go/smallbiz_opensource_request● Cisco Partner Central http://www.cisco.com/web/partners/sell/smb● Cisco Online Device Emulators http://www.cisco.com/go/onlinedevicemanagers
© 2016 Cisco and/or its affiliates. All rights reserved. Cisco and the Cisco logo are trademarks or registered trademarks of Cisco and/or its affiliates in the U.S. and other countries.
To view a list of Cisco trademarks, go to this URL: www.cisco.com/go/trademarks. Third-party trademarks mentioned are the property of their respective owners. The use of the
word partner does not imply a partnership relationship between Cisco and any other company. (1110R)
■ Product Documentation● Cisco 100 Series Wireless Access Points Administration Guide http://www.cisco.com/go/100_wap_resources● Cisco 300 Series Wireless Access Points Administration Guide http://www.cisco.com/go/300_wap_resources● Cisco 500 Series Wireless Access Points Administration Guide http://www.cisco.com/go/500_wap_resources● Cisco Wireless Accessories http://www.cisco.com/go/wap_accessories