easy icam h s i remote wireless n e video surveillance camera · easy icam video surveillance...
TRANSCRIPT
Easy iCAM
Video Surveillance CameraRemote Wireless
User's Manual
Manuel de l'utilisateurManual del Usuario
BedienungsanleitungManuale d'uso
EN
GL
ISH
FR
AN
ÇA
ISE
SP
AÑ
OL
DE
UT
SC
HIT
AL
IAN
O
Please read carefully before using this equipment.
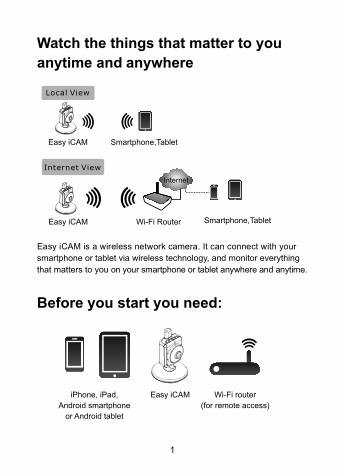
Watch
anytime and anywhere
the things that matter to you
Easy iCAM is a wireless network camera. It can connect with your
smartphone or tablet wireless technology, and monitor everything
on your smartphone or tablet anywhere and anytime.
via
that matters to you
Before you start you need:
iPhone, iPad,
Android smartphone
or Android tablet
Wi-Fi router
(for remote access)
Smartphone,TabletEasy iCAM
1
Easy iCAM
Easy iCAM Smartphone,TabletWi-Fi Router
Internet
2
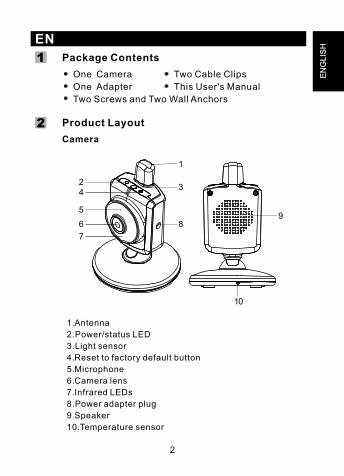
Product Layout
Camera
Package Contents
One Camera
One Adapter
Two Screws and Two Wall Anchors
EN
EN
GL
ISH
This User's Manual
Two Cable Clips
2
11
1.
2.Power/status LED
3.Light sensor
4.Reset to factory default button
5.Microphone
6.Camera lens
7.Infrared LEDs
8.Power adapter plug
9.Speaker
10.Temperature sensor
Antenna
9
10
24
5
6
1
7
3
8
3
First-time Setup
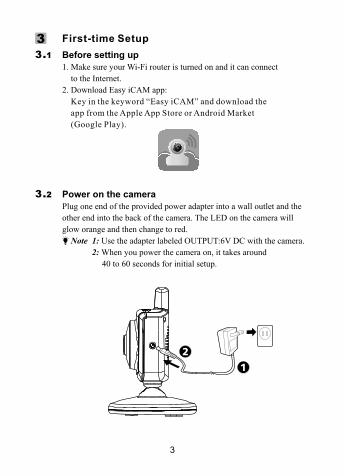
Power on the camera
Before setting up
1. Make sure your Wi-Fi router is turned on and it can connect
to the Internet.
2. Download Easy iCAM app:
Key in the keyword “Easy iCAM” and download the
app from the Apple App Store or Android Market
(Google Play).
3.2
3.1
3
Plug one end of the provided power adapter into a wall outlet and the
other end into the back of the camera. The LED on the camera will
glow orange and then change to red.
Note 1: Use the adapter labeled OUTPUT:6V DC with the camera.
2: When you power the camera on, it takes around
40 to 60 seconds for initial setup.
4
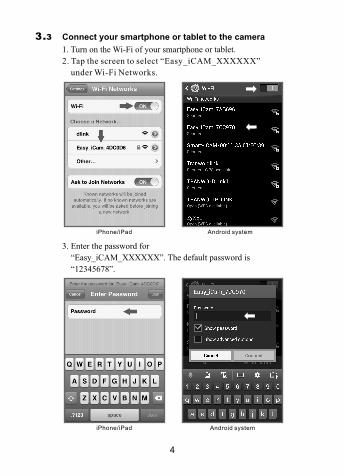
Connect your smartphone or tablet to the camera
1. Turn on the Wi-Fi of your smartphone or tablet.
2. Tap the screen to select “Easy_iCAM_XXXXXX”
under Wi-Fi Networks.
3. Enter the password for
“Easy_iCAM_XXXXXX”. The default password is
“12345678”.
iPhone/iPad Android system
iPhone/iPad Android system
3.3
5
Setting up the camera and Internet connection
1. Launch the Easy iCAM App on your smartphone or tablet.
2. Follow the on-screen app instructions.3. Setting up the camera name (SSID) or password: The screen will show a message that reminds you to
change the Wi-Fi camera name (SSID) or password.a. If you select “Yes”, you can change the Wi-Fi camera
name or password. When you complete the setup of
camera name or password and tap the ok icon, the app
will ask you if you want to set up an Internet connection.
If you select “Yes”, Internet setup will be started.
If you select “No”, the camera will restart to change the
camera name and password automatically.
At this stage please make sure your smartphone or tablet
is connected to the camera because the camera name or
password is changed.
Note: The password must contain at least eight characters.b. If you select “No”, the app will ask you if you want to
set up an Internet connection.4. Setting up an Internet connection: The screen will show a message asking if you want to set up
an Internet connection. a. If you select “Yes”, the camera will scan for available
Wi-Fi networks in range. Tap the name of your Wi-Fi
network, and enter the password of your Wi-Fi router if
necessary. Then the first-time setup is done. Note 1: If the camera cannot find the Wi-Fi network
you want to connect to, please tap the scan icon to
rescan for available Wi-Fi networks.
2: If you complete the Internet setup successfully,
the power/status LED will glow green after
1 to 2 minutes.
b. If you select “No”, the first-time setup is done. Note: If you don’t set up an Internet connection, you can
only get live video feeds by connecting the camera
with your smartphone or tablet directly.
3.4
6
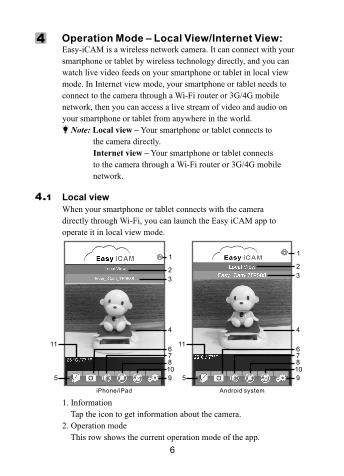
Easy-iCAM is a wireless network camera. It can connect with your
smartphone or tablet by wireless technology directly, and you can
watch live video feeds on your smartphone or tablet in local view
mode. In Internet view mode, your smartphone or tablet needs to
connect to the camera through a Wi-Fi router or 3G/4G mobile
network, then you can access a live stream of video and audio on
your smartphone or tablet from anywhere in the world.
Note: Local view – Your smartphone or tablet connects to
the camera directly.
Internet view – Your smartphone or tablet connects
to the camera through a Wi-Fi router or 3G/4G mobile
network.
Operation Mode – Local View/Internet View:
Local view
When your smartphone or tablet connects with the camera
directly through Wi-Fi, you can launch the Easy iCAM app to
operate it in local view mode.
iPhone/iPad
1. Information
Tap the icon to get information about the camera.
2. Operation mode
This row shows the current operation mode of the app.
4
4.1
Android system
1
2
3
4
6
9
10
7
5
11
8
1
2
3
4
6
9
10
7
5
11
8
7
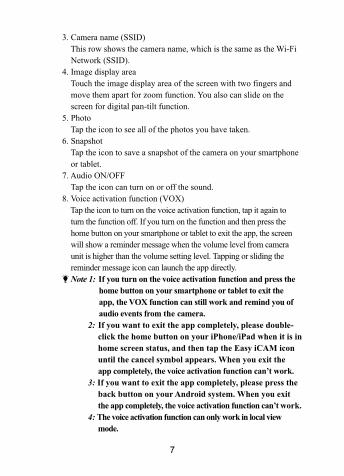
3. Camera name (SSID)
This row shows the camera name, which is the same as the Wi-Fi
Network (SSID).
4. Image display area
Touch the image display area of the screen with two fingers and
move them apart for zoom function. You also can slide on the
screen for digital pan-tilt function.
5. Photo
Tap the icon to see all of the photos you have taken.
6. Snapshot
Tap the icon to save a snapshot of the camera on your smartphone
or tablet.
7. Audio ON/OFF
Tap the icon can turn on or off the sound.
8. Voice activation function (VOX)
Tap the icon to turn on the voice activation function, tap it again to
turn the function off. If you turn on the function and then press the
home button on your smartphone or tablet to exit the app, the screen
will show a reminder message when the volume level from camera
unit is higher than the volume setting level. Tapping or sliding the
reminder message icon can launch the app directly.
Note 1: If you turn on the voice activation function and press the
home button on your smartphone or tablet to exit the
app, the VOX function can still work and remind you of
audio events from the camera.
2: If you want to exit the app completely, please double-
click the home button on your iPhone/iPad when it is in
home screen status, and then tap the Easy iCAM icon
until the cancel symbol appears. When you exit the
app completely, the voice activation function can’t work.
3: If you want to exit the app completely, please press the
back button on your Android system. When you exit
the app completely, the voice activation function can’t work.
4: The voice activation function can only work in local view
mode.
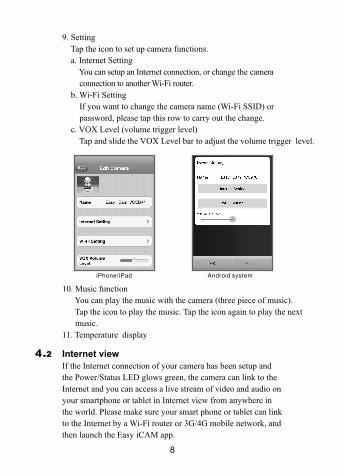
9. Setting
Tap the icon to set up camera functions.
a. Internet Setting
You can setup an Internet connection, or change the camera
connection to another Wi-Fi router.
b. Wi-Fi Setting
If you want to change the camera name (Wi-Fi SSID) or
password, please tap this row to carry out the change.
c. VOX Level (volume trigger level)
Tap and slide the VOX Level bar to adjust the volume trigger level.
iPhone/iPad Android system
8
Internet view
If the Internet connection of your camera has been setup and
the Power/Status LED glows green, the camera can link to the
Internet and you can access a live stream of video and audio on
your smartphone or tablet in Internet view from anywhere in
the world. Please make sure your smart phone or tablet can link
to the Internet by a Wi-Fi router or 3G/4G mobile network, and
then launch the Easy iCAM app.
4.2
10. Music function
You can play the music with the camera (three piece of music).
Tap the icon to play the music. Tap the icon again to play the next
music.
11. Temperature display
Internet view for
iPhone/iPad
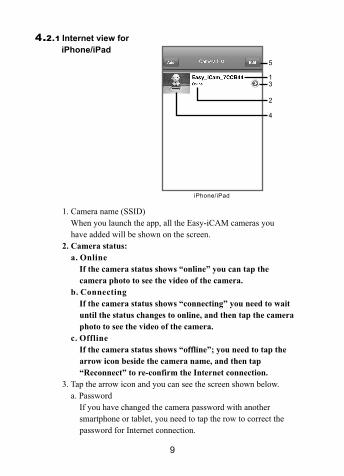
1. Camera name (SSID)
When you launch the app, all the Easy-iCAM cameras you
have added will be shown on the screen.
2. Camera status:
a. Online
If the camera status shows “online” you can tap the
camera photo to see the video of the camera.
b. Connecting
If the camera status shows “connecting” you need to wait
until the status changes to online, and then tap the camera
photo to see the video of the camera.
c. Offline
If the camera status shows “offline”; you need to tap the
arrow icon beside the camera name, and then tap
“Reconnect” to re-confirm the Internet connection.
3. Tap the arrow icon and you can see the screen shown below.
a. Password
If you have changed the camera password with another
smartphone or tablet, you need to tap the row to correct the
password for Internet connection.
iPhone/iPad
5
13
4
2
9
4.2.1
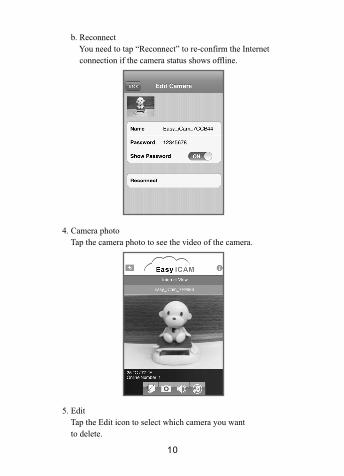
b. Reconnect
You need to tap “Reconnect” to re-confirm the Internet
connection if the camera status shows offline.
4. Camera photo
Tap the camera photo to see the video of the camera.
5. Edit
Tap the Edit icon to select which camera you want
to delete.
10
Internet view for
Android system
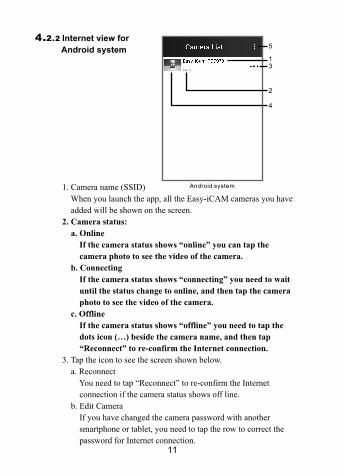
1. Camera name (SSID)
When you launch the app, all the Easy-iCAM cameras you have
added will be shown on the screen.
2. Camera status:
a. Online
If the camera status shows “online” you can tap the
camera photo to see the video of the camera.
b. Connecting
If the camera status shows “connecting” you need to wait
until the status change to online, and then tap the camera
photo to see the video of the camera.
c. Offline
If the camera status shows “offline” you need to tap the
dots icon (…) beside the camera name, and then tap
“Reconnect” to re-confirm the Internet connection.
3. Tap the icon to see the screen shown below.
a. Reconnect
You need to tap “Reconnect” to re-confirm the Internet
connection if the camera status shows off line.
b. Edit Camera
If you have changed the camera password with another
smartphone or tablet, you need to tap the row to correct the
password for Internet connection.11
Android system
13
4
2
54.2.2
12
4. Camera photo
Tap the camera photo and you can see the video of the camera.
5. Tap the icon and select “Exit” if you want to exit the app.
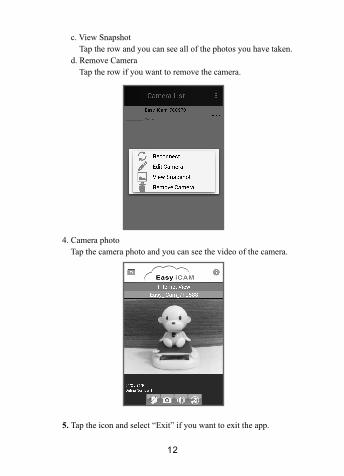
c. View Snapshot
Tap the row and you can see all of the photos you have taken.
d. Remove Camera
Tap the row if you want to remove the camera.
If Internet setup has been carried out for the camera and you
want to add the camera to a second or even more smartphones or
tablets, you just need to follow the step “3.3 Connect your
smartphone or tablet to the camera”, and then the smartphone
or tablet can connect with the camera through a Wi-Fi router or
3G/4G mobile network.
Add camera to second or more other smartphones or tablets
If Internet setup has been carried out for the camera and you
want to add the camera to a second or even more smartphones or
tablets through remote setup, you need to follow the procedure
as below.
Add camera through remote setup
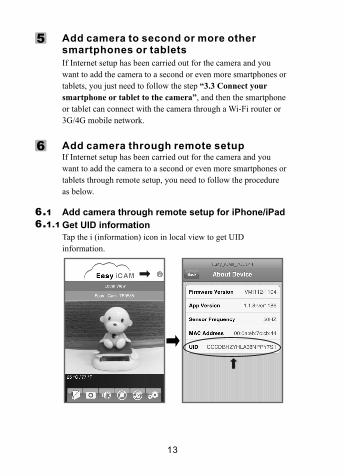
Add camera through remote setup for iPhone/iPad
Get UID information
Tap the i (information) icon in local view to get UID
information.
13
5
6
6.16.1.1
14
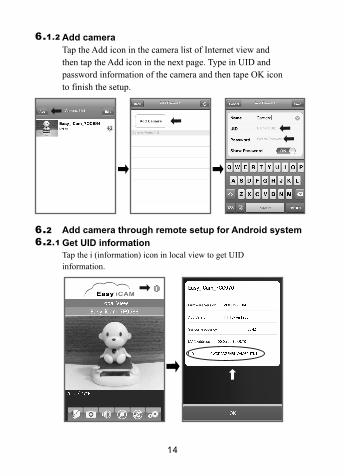
Add camera
Tap the Add icon in the camera list of Internet view and
then tap the Add icon in the next page. Type in UID and
password information of the camera and then tape OK icon
to finish the setup.
Add camera through remote setup for Android system
Get UID information
Tap the i (information) icon in local view to get UID
information.
6.1.2
6.26.2.1
15
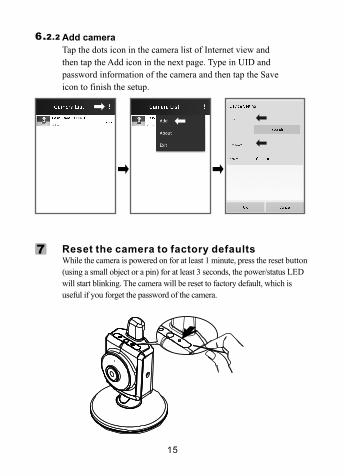
Add camera
Tap the dots icon in the camera list of Internet view and
then tap the Add icon in the next page. Type in UID and
password information of the camera and then tap the Save
icon to finish the setup.
While the camera is powered on for at least 1 minute, press the reset button
(using a small object or a pin) for at least 3 seconds, the power/status LED
will start blinking. The camera will be reset to factory default, which is
useful if you forget the password of the camera.
Reset the camera to factory defaults
6.2.2
7
16
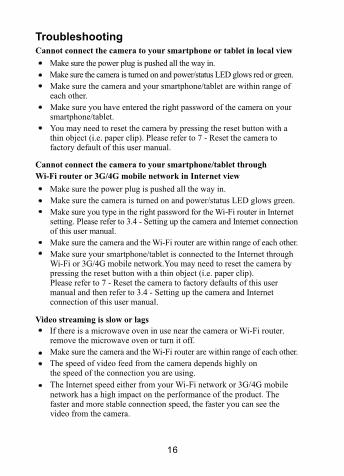
Troubleshooting
Make sure the power plug is pushed all the way in.
Make sure the camera is turned on and power/status LED glows red or green.
Make sure the camera and your smartphone/tablet are within range of each other.
Make sure you have entered the right password of the camera on your smartphone/tablet.
You may need to reset the camera by pressing the reset button with a thin object (i.e. paper clip). Please refer to 7 - Reset the camera to factory default of this user manual.
Make sure the power plug is pushed all the way in.
Make sure the camera is turned on and power/status LED glows green.
Make sure you type in the right password for the Wi-Fi router in Internet setting. Please refer to 3.4 - Setting up the camera and Internet connection of this user manual.
Make sure the camera and the Wi-Fi router are within range of each other.
Make sure your smartphone/tablet is connected to the Internet through Wi-Fi or 3G/4G mobile network.You may need to reset the camera by pressing the reset button with a thin object (i.e. paper clip). Please refer to 7 - Reset the camera to factory defaults of this user manual and then refer to 3.4 - Setting up the camera and Internet connection of this user manual.
Cannot connect the camera to your smartphone/tablet through
Wi-Fi router or 3G/4G mobile network in Internet view
If there is a microwave oven in use near the camera or Wi-Fi router, remove the microwave oven or turn it off.
Make sure the camera and the Wi-Fi router are within range of each other.
The speed of video feed from the camera depends highly on the speed of the connection you are using.
The Internet speed either from your Wi-Fi network or 3G/4G mobile network has a high impact on the performance of the product. The faster and more stable connection speed, the faster you can see the video from the camera.
Video streaming is slow or lags
Cannot connect the camera to your smartphone or tablet in local view

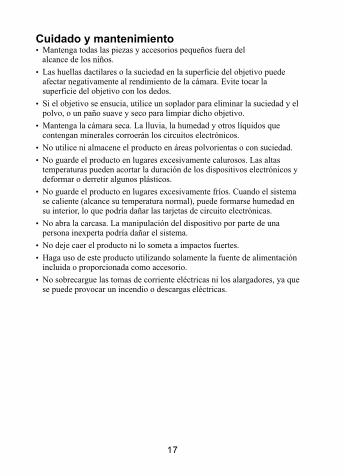
Keep all parts and accessories out of children's reach.
Fingerprints or dirt on the lens surface can adversely affect camera
performance. Avoid touching the lens surface with your fingers.
Should the lens become dirty, use a blower to blow off dirt and dust,
or a soft, dry cloth to wipe off the lens.
Keep the camera dry. Precipitation, humidity, and other liquids
containing minerals will corrode electronic circuits.
Do not use or store in dusty, dirty areas.
Do not store in hot areas. High temperatures can shorten the life of
electronic devices and warp or melt certain plastics.
Do not store in very cold areas. When the system warms up
(to its normal temperature), moisture can form inside the case,
which may damage electronic circuit boards.
Do not attempt to open the case. Non-expert handling of the device
may damage the system.
Avoid dropping or strong shocks.
Operate this product using only the power supply included or
provided as an accessory.
Do not overload electrical outlets or extension cords as this can result in
fire or electric shocks.
Care and Maintenance
17
Caution
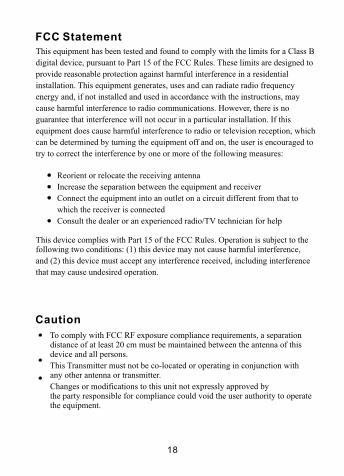
FCC StatementThis equipment has been tested and found to comply with the limits for a Class B
digital device, pursuant to Part 15 of the FCC Rules. These limits are designed to
provide reasonable protection against harmful interference in a residential
installation. This equipment generates, uses and can radiate radio frequency
energy and, if not installed and used in accordance with the instructions, may
cause harmful interference to radio communications. However, there is no
guarantee that interference will not occur in a particular installation. If this
equipment does cause harmful interference to radio or television reception, which
can be determined by turning the equipment off and on, the user is encouraged to
try to correct the interference by one or more of the following measures:
Reorient or relocate the receiving antenna
Increase the separation between the equipment and receiver
Connect the equipment into an outlet on a circuit different from that to
which the receiver is connected
Consult the dealer or an experienced radio/TV technician for help
This device complies with Part 15 of the FCC Rules. Operation is subject to thefollowing two conditions: (1) this device may not cause harmful interference,
and (2) this device must accept any interference received, including interference
that may cause undesired operation.
To comply with FCC RF exposure compliance requirements, a separation distance of at least 20 cm must be maintained between the antenna of this device and all persons.
This Transmitter must not be co-located or operating in conjunction with any other antenna or transmitter.
Changes or modifications to this unit not expressly approved by the party responsible for compliance could void the user authority to operate the equipment.
18
19
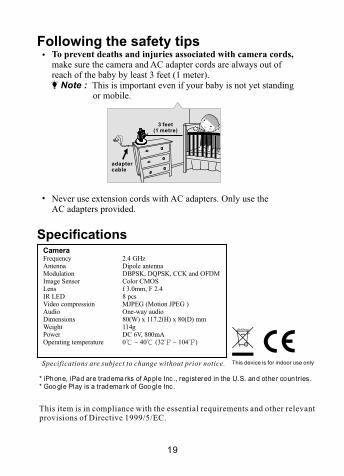
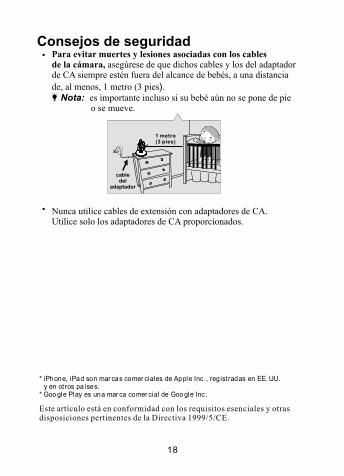
Following the safety tips To prevent deaths and injuries associated with camera cords, make sure the camera and AC adapter cords are always out of reach of the baby by least 3 feet (1 meter). Note : This is important even if your baby is not yet standing or mobile.
Never use extension cords with AC adapters. Only use the AC adapters provided.
Specifications are subject to change without prior notice.
CameraFrequency Antenna Modulation Image Sensor Lens IR LED Video compressionAudioDimensions Weight Power Operating temperature
2.4 GHzDipole antennaDBPSK, DQPSK, CCK and OFDMColor CMOSf 3.0mm, F 2.48 pcsMJPEG (Motion JPEG )One-way audio80(W) x 117.2(H) x 80(D) mm 114gDC 6V, 800mA0℃ ~ 40℃ (32℉ ~ 104℉)
This item is in compliance with the essential requirements and other relevant provisions of Directive 1999/5/EC.
Specifications
* iPhone, iPad are tradema rks of Apple Inc., reg istered in the U.S. and other countries .* Goo gle Play is a tradema rk of Goo gle Inc.

Easy iCAM
1
Easy iCAM
Easy iCAM
Internet
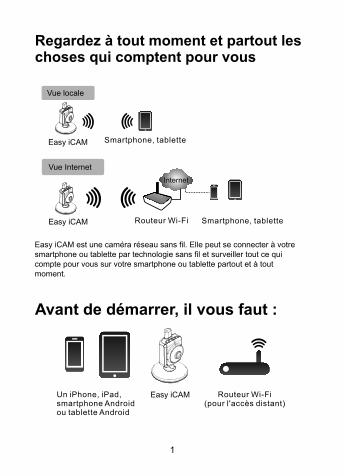
Regardez à tout moment et partout les choses qui comptent pour vous
Avant de démarrer, il vous faut :
Vue locale
Vue Internet
Routeur Wi-Fi
Smartphone, tablette
Un iPhone, iPad, smartphone Android ou tablette Android
Routeur Wi-Fi (pour l'accès distant)
Smartphone, tablette
Easy iCAM est une caméra réseau sans fil. Elle peut se connecter à votre smartphone ou tablette par technologie sans fil et surveiller tout ce qui compte pour vous sur votre smartphone ou tablette partout et à tout moment.
2
FR
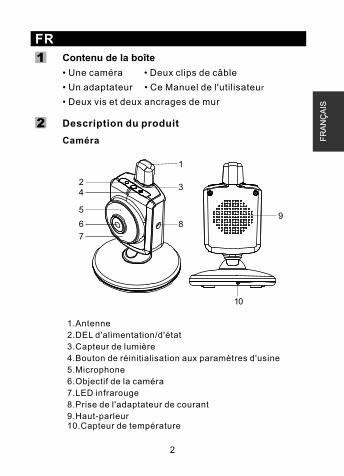
1.Antenne
2.DEL d'alimentation/d'état
3.Capteur de lumière
4.Bouton de réinitialisation aux paramètres d'usine
5.Microphone
6.Objectif de la caméra
7.LED infrarouge
8.Prise de l'adaptateur de courant
9.Haut-parleur10.Capteur de température
FR
AN
ÇA
IS
Contenu de la boîte
• Une caméra • Deux clips de câble
• Un adaptateur • Ce Manuel de l'utilisateur
• Deux vis et deux ancrages de mur
1
Description du produit
Caméra
2
9
10
24
5
6
1
7
3
8
3
Première configuration
Avant la configuration
1. Assurez-vous que votre routeur Wi-Fi est allumé et qu'il peut
se connecter à Internet.
2. Télécharger l'application Easy iCAM :
Saisissez le mot-clé « EASY iCAM » et téléchargez
l'application sur l'App Store d'Apple ou sur Google Play
(Android Market).
3.1
3
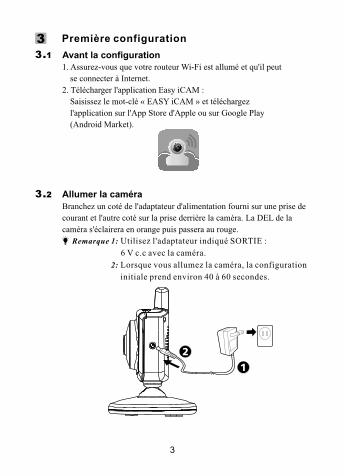
Branchez un coté de l'adaptateur d'alimentation fourni sur une prise de
courant et l'autre coté sur la prise derrière la caméra. La DEL de la
caméra s'éclairera en orange puis passera au rouge.
Remarque 1: Utilisez l'adaptateur indiqué SORTIE :
6 V c.c avec la caméra.
2: Lorsque vous allumez la caméra, la configuration
initiale prend environ 40 à 60 secondes.
Allumer la caméra
3.2
4
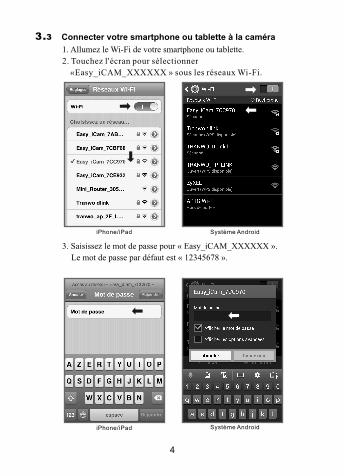
Connecter votre smartphone ou tablette à la caméra
1. Allumez le Wi-Fi de votre smartphone ou tablette.
2. Touchez l'écran pour sélectionner
«Easy_iCAM_XXXXXX » sous les réseaux Wi-Fi.
3. Saisissez le mot de passe pour « Easy_iCAM_XXXXXX ».
Le mot de passe par défaut est « 12345678 ».
iPhone/iPad Système Android
Système Android iPhone/iPad
3.3
5
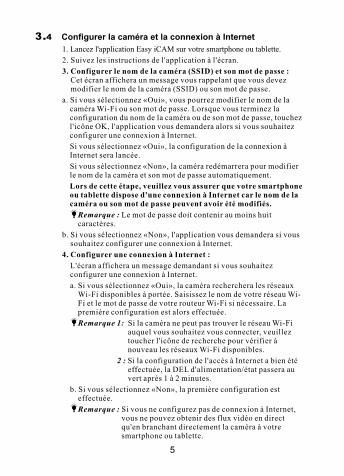
Configurer la caméra et la connexion à Internet
1. Lancez l'application Easy iCAM sur votre smartphone ou tablette.
2. Suivez les instructions de l'application à l'écran.
3. Configurer le nom de la caméra (SSID) et son mot de passe :Cet écran affichera un message vous rappelant que vous devez modifier le nom de la caméra (SSID) ou son mot de passe.
a. Si vous sélectionnez «Oui», vous pourrez modifier le nom de la caméra Wi-Fi ou son mot de passe. Lorsque vous terminez la configuration du nom de la caméra ou de son mot de passe, touchez l'icône OK, l'application vous demandera alors si vous souhaitez configurer une connexion à Internet.
Si vous sélectionnez «Oui», la configuration de la connexion à Internet sera lancée.
Si vous sélectionnez «Non», la caméra redémarrera pour modifier le nom de la caméra et son mot de passe automatiquement.
Lors de cette étape, veuillez vous assurer que votre smartphone ou tablette dispose d'une connexion à Internet car le nom de la caméra ou son mot de passe peuvent avoir été modifiés.
Remarque : Le mot de passe doit contenir au moins huit caractères.
b. Si vous sélectionnez «Non», l'application vous demandera si vous souhaitez configurer une connexion à Internet.
4. Configurer une connexion à Internet :
L'écran affichera un message demandant si vous souhaitez configurer une connexion à Internet.
a. Si vous sélectionnez «Oui», la caméra recherchera les réseaux Wi-Fi disponibles à portée. Saisissez le nom de votre réseau Wi-Fi et le mot de passe de votre routeur Wi-Fi si nécessaire. La première configuration est alors effectuée.
Remarque 1: Si la caméra ne peut pas trouver le réseau Wi-Fi auquel vous souhaitez vous connecter, veuillez toucher l'icône de recherche pour vérifier à nouveau les réseaux Wi-Fi disponibles.
2 : Si la configuration de l'accès à Internet a bien été effectuée, la DEL d'alimentation/état passera au vert après 1 à 2 minutes.
b. Si vous sélectionnez «Non», la première configuration est effectuée.
Remarque : Si vous ne configurez pas de connexion à Internet, vous ne pouvez obtenir des flux vidéo en direct qu'en branchant directement la caméra à votre smartphone ou tablette.
3.4
6
Easy-iCAM est une caméra réseau sans fil. Elle peut se connecter directement à votre smartphone ou tablette sans fil, et vous pouvez voir les flux vidéo sur votre smartphone ou tablette en mode vue locale. En mode vue Internet, votre smartphone ou tablette doit accéder à la caméra via un routeur Wi-Fi ou réseau mobile 3G/4G, puis vous pouvez accéder à un flux en direct de vidéo et d'audio sur votre smartphone ou tablette à tout endroit dans le monde.
Remarque : Vue locale - Votre smartphone ou tablette se connecte directement à la caméra.
Vue Internet - Votre smartphone ou tablette se connecte à la caméra via un routeur Wi-Fi ou un réseau mobile 3G/4G.
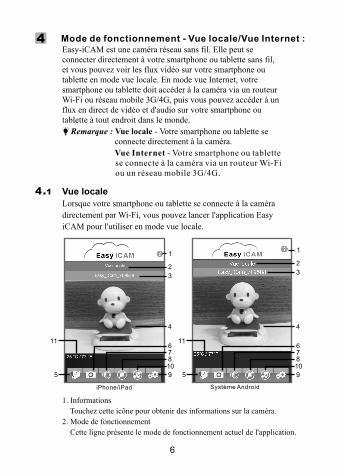
Mode de fonctionnement - Vue locale/Vue Internet :
Vue locale
Lorsque votre smartphone ou tablette se connecte à la caméra
directement par Wi-Fi, vous pouvez lancer l'application Easy
iCAM pour l'utiliser en mode vue locale.
iPhone/iPad
1. Informations
Touchez cette icône pour obtenir des informations sur la caméra.
2. Mode de fonctionnement
Cette ligne présente le mode de fonctionnement actuel de l'application.
Système Android
4
4.1
1
2
3
4
6
9
10
7
5
11
8
1
2
3
4
6
9
10
7
5
11
8
7
3. Nom de la caméra (SSID)
Cette ligne affiche le nom de la caméra, le même que celui du réseau Wi-Fi
(SSID).
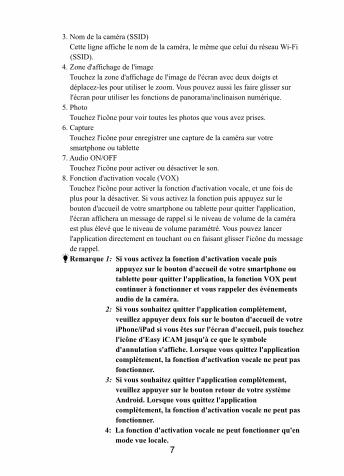
4. Zone d'affichage de l'image
Touchez la zone d'affichage de l'image de l'écran avec deux doigts et
déplacez-les pour utiliser le zoom. Vous pouvez aussi les faire glisser sur
l'écran pour utiliser les fonctions de panorama/inclinaison numérique.
5. Photo
Touchez l'icône pour voir toutes les photos que vous avez prises.
6. Capture
Touchez l'icône pour enregistrer une capture de la caméra sur votre
smartphone ou tablette
7. Audio ON/OFF
Touchez l'icône pour activer ou désactiver le son.
8. Fonction d'activation vocale (VOX)
Touchez l'icône pour activer la fonction d'activation vocale, et une fois de
plus pour la désactiver. Si vous activez la fonction puis appuyez sur le
bouton d'accueil de votre smartphone ou tablette pour quitter l'application,
l'écran affichera un message de rappel si le niveau de volume de la caméra
est plus élevé que le niveau de volume paramétré. Vous pouvez lancer
l'application directement en touchant ou en faisant glisser l'icône du message
de rappel.
Remarque 1: Si vous activez la fonction d'activation vocale puis
appuyez sur le bouton d'accueil de votre smartphone ou
tablette pour quitter l'application, la fonction VOX peut
continuer à fonctionner et vous rappeler des événements
audio de la caméra.
2: Si vous souhaitez quitter l'application complètement,
veuillez appuyer deux fois sur le bouton d'accueil de votre
iPhone/iPad si vous êtes sur l'écran d'accueil, puis touchez
l'icône d'Easy iCAM jusqu'à ce que le symbole
d'annulation s'affiche. Lorsque vous quittez l'application
complètement, la fonction d'activation vocale ne peut pas
fonctionner.
3: Si vous souhaitez quitter l'application complètement,
veuillez appuyer sur le bouton retour de votre système
Android. Lorsque vous quittez l'application
complètement, la fonction d'activation vocale ne peut pas
fonctionner.
4: La fonction d'activation vocale ne peut fonctionner qu'en
mode vue locale.
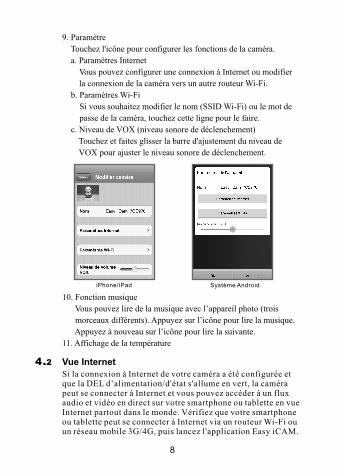
9. Paramètre
Touchez l'icône pour configurer les fonctions de la caméra.
a. Paramètres Internet
Vous pouvez configurer une connexion à Internet ou modifier
la connexion de la caméra vers un autre routeur Wi-Fi.
b. Paramètres Wi-Fi
Si vous souhaitez modifier le nom (SSID Wi-Fi) ou le mot de
passe de la caméra, touchez cette ligne pour le faire.
c. Niveau de VOX (niveau sonore de déclenchement)
Touchez et faites glisser la barre d'ajustement du niveau de
VOX pour ajuster le niveau sonore de déclenchement.
8
iPhone/iPad Système Android
Vue Internet
Si la connexion à Internet de votre caméra a été configurée et que la DEL d’alimentation/d'état s'allume en vert, la caméra peut se connecter à Internet et vous pouvez accéder à un flux audio et vidéo en direct sur votre smartphone ou tablette en vue Internet partout dans le monde. Vérifiez que votre smartphone ou tablette peut se connecter à Internet via un routeur Wi-Fi ou un réseau mobile 3G/4G, puis lancez l'application Easy iCAM.
4.2
10.
11. Affichage de la température
Fonction musique
Vous pouvez lire de la musique avec l’appareil photo (trois
morceaux différents). Appuyez sur l’icône pour lire la musique.
Appuyez à nouveau sur l’icône pour lire la suivante.
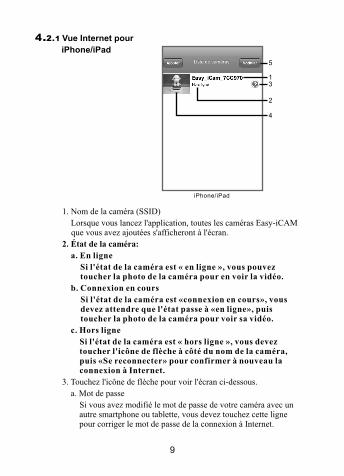
Vue Internet pour
iPhone/iPad
1. Nom de la caméra (SSID)
Lorsque vous lancez l'application, toutes les caméras Easy-iCAM que vous avez ajoutées s'afficheront à l'écran.
2. État de la caméra:
a. En ligne
Si l'état de la caméra est « en ligne », vous pouvez toucher la photo de la caméra pour en voir la vidéo.
b. Connexion en cours
Si l'état de la caméra est «connexion en cours», vous devez attendre que l'état passe à «en ligne», puis toucher la photo de la caméra pour voir sa vidéo.
c. Hors ligne
Si l'état de la caméra est « hors ligne », vous devez toucher l'icône de flèche à côté du nom de la caméra, puis «Se reconnecter» pour confirmer à nouveau la connexion à Internet.
3. Touchez l'icône de flèche pour voir l'écran ci-dessous.
a. Mot de passe
Si vous avez modifié le mot de passe de votre caméra avec un autre smartphone ou tablette, vous devez touchez cette ligne pour corriger le mot de passe de la connexion à Internet.
iPhone/iPad
5
13
4
2
9
4.2.1
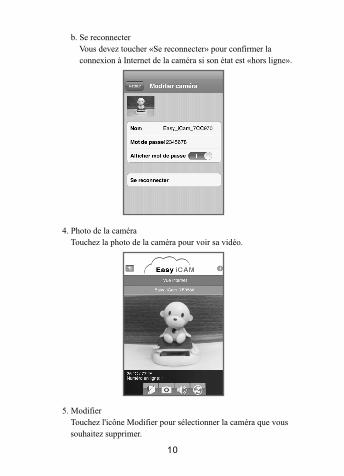
b. Se reconnecter
Vous devez toucher «Se reconnecter» pour confirmer la
connexion à Internet de la caméra si son état est «hors ligne».
4. Photo de la caméra
Touchez la photo de la caméra pour voir sa vidéo.
5. Modifier
Touchez l'icône Modifier pour sélectionner la caméra que vous
souhaitez supprimer.
10

Vue Internet pour
Android system
1. Nom de la caméra (SSID)
Lorsque vous lancez l'application, toutes les caméras Easy-iCAM que vous avez ajoutées s'afficheront à l'écran.
2. État de la caméra:
a. En ligne
Si l'état de la caméra est «en ligne», vous pouvez toucher la photo de la caméra pour en voir la vidéo.
b. Connexion en cours
Si l'état de la caméra est «connexion en cours», vous devez attendre que l'état passe à «en ligne», puis toucher la photo de la caméra pour voir sa vidéo.
c. Hors ligne
Si l'état de la caméra est «hors ligne», vous devez toucher l'icône de points de suspension (...) à côté du nom de la caméra, puis «Se reconnecter» pour confirmer à nouveau la connexion à Internet.
3. Touchez l'icône pour voir l'écran ci-dessous.
a. Se reconnecter
Vous devez toucher «Se reconnecter» pour confirmer la connexion à Internet de la caméra si son état est «hors ligne».
b. Modifier caméra
Si vous avez modifié le mot de passe de votre caméra avec un autre smartphone ou tablette, vous devez touchez cette ligne pour corriger le mot de passe de la connexion à Internet.
11
Système Android
4.2.2
13
4
2
5
12
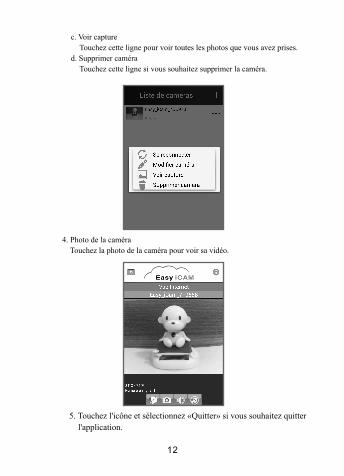
c. Voir capture
Touchez cette ligne pour voir toutes les photos que vous avez prises.
d. Supprimer caméra
Touchez cette ligne si vous souhaitez supprimer la caméra.
4. Photo de la caméra
Touchez la photo de la caméra pour voir sa vidéo.
5. Touchez l'icône et sélectionnez «Quitter» si vous souhaitez quitter
l'application.
Si la configuration Internet a été effectuée pour la caméra et que vous souhaitez l'ajouter à un ou plusieurs smartphones ou tablettes, vous devez simplement suivre l'étape «3.3 Connecter votre smartphone ou tablette à la caméra», le smartphone ou tablette pourra alors se connecter à la caméra via un routeur Wi-Fi ou un réseau mobile 3G/4G.
Ajouter une caméra à un deuxième smartphone ou tablette ou plus
Si la configuration de la connexion à Internet a été effectuée pour la caméra et que vous souhaitez l'ajouter à un ou plusieurs smartphones ou tablettes supplémentaires via la configuration distante, vous devez suivre la procédure ci-dessous.
Ajouter une caméra via la configuration distante
Ajouter une caméra via la configuration distante sur
iPhone/iPad
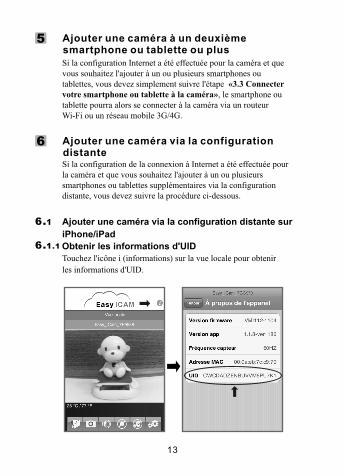
Obtenir les informations d'UID
Touchez l'icône i (informations) sur la vue locale pour obtenir
les informations d'UID.
13
5
6
6.1
6.1.1
14
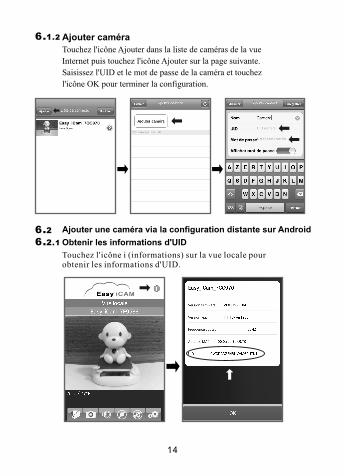
Ajouter caméra
Touchez l'icône Ajouter dans la liste de caméras de la vue
Internet puis touchez l'icône Ajouter sur la page suivante.
Saisissez l'UID et le mot de passe de la caméra et touchez
l'icône OK pour terminer la configuration.
Ajouter une caméra via la configuration distante sur Android
Obtenir les informations d'UID
Touchez l'icône i (informations) sur la vue locale pour obtenir les informations d'UID.
6.1.2
6.26.2.1
15
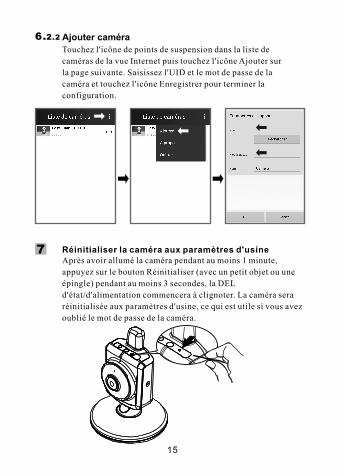
Touchez l'icône de points de suspension dans la liste de
caméras de la vue Internet puis touchez l'icône Ajouter sur
la page suivante. Saisissez l'UID et le mot de passe de la
caméra et touchez l'icône Enregistrer pour terminer la
configuration.
Après avoir allumé la caméra pendant au moins 1 minute,
appuyez sur le bouton Réinitialiser (avec un petit objet ou une
épingle) pendant au moins 3 secondes, la DEL
d'état/d'alimentation commencera à clignoter. La caméra sera
réinitialisée aux paramètres d'usine, ce qui est utile si vous avez
oublié le mot de passe de la caméra.
Réinitialiser la caméra aux paramètres d'usine7
Ajouter caméra
6.2.2
Guide de dépannageImpossible de se connecter à la caméra depuis votre smartphone ou tablette en vue locale
• Assurez-vous que la prise est bien branchée jusqu'au fond.
• Assurez-vous que la caméra est allumée et que la DEL d'alimentation/d'état s'éclaire en rouge ou vert.
• Assurez-vous que la caméra et votre smartphone ou tablette sont à portée l'un de l'autre.
• Assurez-vous d'avoir saisi le bon mot de passe pour la caméra sur votre smartphone ou tablette.
• Vous pourriez avoir à réinitialiser la caméra en appuyant sur le bouton de réinitialisation avec un objet fin (épingle par ex.). Reportez-vous à 7. Réinitialiser la caméra aux paramètres d'usine de ce manuel de l'utilisateur.
Impossible de connecter la caméra à votre smartphone ou tablette via un routeur Wi-Fi ou un réseau mobile 3G/4G sur la vue Internet
• Assurez-vous que la prise est bien branchée jusqu'au fond.
• Assurez-vous que la caméra est allumée et que la DEL d'alimentation/d'état s'éclaire en vert.
• Vérifiez que vous avez saisi le bon mot de passe pour le routeur Wi-Fi dans les paramètres Internet. Reportez-vous à 3.4 Configurer la caméra et la connexion à Internet de ce manuel de l'utilisateur.
• Assurez-vous que la caméra et votre routeur Wi-Fi sont à portée l'un de l'autre.
• Vérifiez que votre smartphone ou tablette est connecté à Internet via un routeur Wi-Fi ou réseau mobile 3G/4G. Vous pourriez avoir à réinitialiser la caméra en appuyant sur le bouton de réinitialisation avec un objet fin (épingle par ex.). Veuillez vous reporter à 7 - Réinitialiser la caméra aux paramètres d'usine puis à 3.4 Configurer la caméra et la connexion à Internet de ce manuel de l'utilisateur.
La diffusion vidéo est lente ou décalée
• Si vous avez un four à micro-ondes près de la caméra ou du routeur Wi-Fi, déplacez le four à micro-ondes ou éteignez-le.
• Assurez-vous que la caméra et votre routeur Wi-Fi sont à portée l'un de l'autre.
• La vitesse du flux vidéo de la caméra dépend fortement de votre vitesse de connexion.
• La vitesse de la connexion à Internet de votre réseau Wi-Fi ou mobile 3G/4G influence grandement les performances du produit. Plus la connexion est rapide et stable, plus vite vous verrez la vidéo de la caméra.
16
Entretien et maintenance• Gardez toutes les pièces et les accessoires hors de portée des enfants.
• Les empreintes de doigt ou de la poussière sur la surface de l'objectif peuvent affecter les performances de la caméra. Évitez donc de toucher la surface de l'objectif avec les doigts.
• Si l'objectif est sale, utilisez un souffleur pour enlever la saleté et la poussière, ou un chiffon doux et sec pour essuyer l'objectif.
• Gardez la caméra au sec. La pluie, l'humidité et les liquides contenant des minéraux peuvent endommager les circuits électroniques.
• Ne pas utiliser ou ranger l'appareil dans des endroits sales ou poussiéreux.
• Ne pas ranger l'appareil dans des endroits chauds. Les températures élevées peuvent réduire la durée de vie des appareils électroniques et déformer ou faire fondre certains plastiques.
• Ne pas ranger l'appareil dans des endroits très froids. Lorsque l'appareil se réchauffe à sa température normale, de la buée peut se former à l'intérieur, ce qui pourrait endommager les circuits électroniques.
• Ne tentez pas d'ouvrir le boîtier. Une utilisation incorrecte de l'appareil peut l'endommager.
• Evitez de le faire tomber ou de le cogner.
• Utilisez cet appareil uniquement avec la source d'alimentation fournie avec celui-ci ou en tant qu'accessoire optionnel.
• Ne pas surcharger les prises murales ou les rallonges électriques, car cela risquerait de causer un incendie ou une électrocution.
17
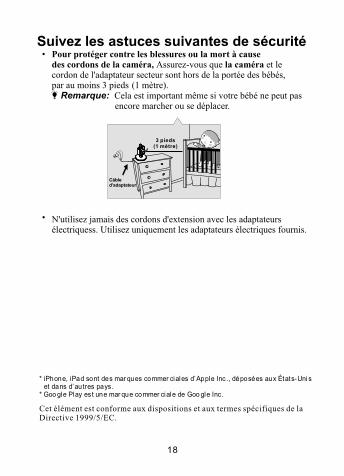
Suivez les astuces suivantes de sécurité Pour protéger contre les blessures ou la mort à cause des cordons de la caméra, Assurez-vous que la caméra et le cordon de l'adaptateur secteur sont hors de la portée des bébés, par au moins 3 pieds (1 mètre). Remarque: Cela est important même si votre bébé ne peut pas encore marcher ou se déplacer.
N'utilisez jamais des cordons d'extension avec les adaptateurs électriquess. Utilisez uniquement les adaptateurs électriques fournis.
3 pieds (1 mètre)
Câble d'adaptateur
Cet élément est conforme aux dispositions et aux termes spécifiques de la Directive 1999/5/EC.
iPhone, iPad sont des mar ques commer ciales d’Apple Inc., déposées aux États-Uni s et dans d’autres pays.* Goo gle Play est une mar que commer ciale de Goo gle Inc.
*
18
Easy iCAM
1
Easy iCAM
Easy iCAM
Internet
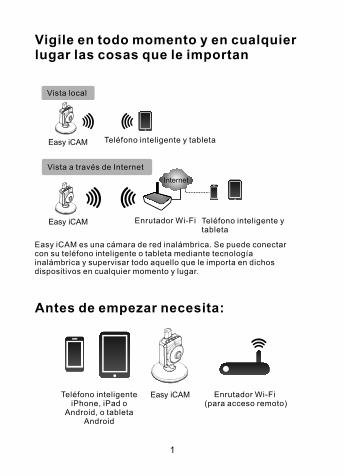
Vigile en todo momento y en cualquier lugar las cosas que le importan
Antes de empezar necesita:
Vista local
Vista a través de Internet
Enrutador Wi-Fi
Teléfono inteligente y tableta
Teléfono inteligente iPhone, iPad o
Android, o tableta Android
Enrutador Wi-Fi (para acceso remoto)
Teléfono inteligente y tableta
Easy iCAM es una cámara de red inalámbrica. Se puede conectar con su teléfono inteligente o tableta mediante tecnología inalámbrica y supervisar todo aquello que le importa en dichos dispositivos en cualquier momento y lugar.

2
ES
1.Antena
2.LED de alimentación y estado
3.Sensor de luz
4.Botón de restablecimiento de valores predeterminados de fábrica
5.Micrófono
6.Objetivo de la cámara
7.LED infrarrojos
8.Enchufe para el adaptador de alimentación
9.Altavoz10.Sensor de temperatura
ES
PA
ÑO
L
Diseño del producto
Cámara
2
1 Contenido del paquete
• Una cámara • Dos abrazaderas de cables
• Un adaptador • Este manual del usuario
• Dos tornillos y dos tacos para pared
9
10
24
5
6
1
7
3
8
3
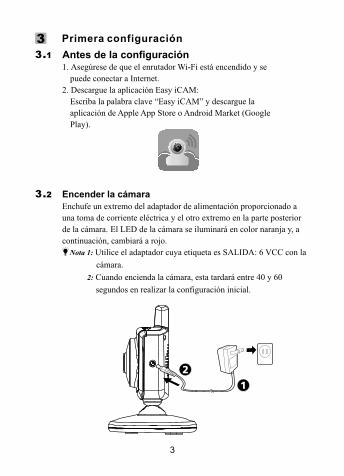
Primera configuración
Antes de la configuración
1. Asegúrese de que el enrutador Wi-Fi está encendido y se
puede conectar a Internet.
2. Descargue la aplicación Easy iCAM:
Escriba la palabra clave “Easy iCAM” y descargue la
aplicación de Apple App Store o Android Market (Google
Play).
3.1
3
Encender la cámara
Enchufe un extremo del adaptador de alimentación proporcionado a
una toma de corriente eléctrica y el otro extremo en la parte posterior
de la cámara. El LED de la cámara se iluminará en color naranja y, a
continuación, cambiará a rojo.
Nota 1: Utilice el adaptador cuya etiqueta es SALIDA: 6 VCC con la
cámara.
2: Cuando encienda la cámara, esta tardará entre 40 y 60
segundos en realizar la configuración inicial.
3.2
4
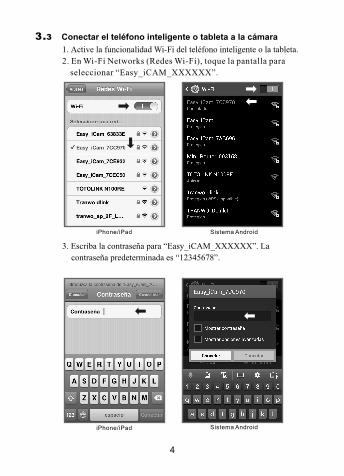
Conectar el teléfono inteligente o tableta a la cámara
1. Active la funcionalidad Wi-Fi del teléfono inteligente o la tableta.
2. En Wi-Fi Networks (Redes Wi-Fi), toque la pantalla para
seleccionar “Easy_iCAM_XXXXXX”.
3. Escriba la contraseña para “Easy_iCAM_XXXXXX”. La
contraseña predeterminada es “12345678”.
iPhone/iPad Sistema Android
Sistema Android iPhone/iPad
3.3
5
Configurar la cámara y la conexión a Internet
1. Inicie la aplicación Easy iCAM en el teléfono inteligente o tableta.
2. Siga las instrucciones de la aplicación que aparezcan en la pantalla.
3. Configurar el nombre (SSID) o la contraseña de la cámara:La pantalla mostrará un mensaje que le recordará que cambie el nombre Wi-Fi (SSID) o la contraseña de la cámara.
a. Si selecciona “Sí”, podrá cambiar el nombre Wi-Fi o la contraseña de la cámara. Cuando complete la configuración del nombre o contraseña de la cámara y toque el icono Aceptar, la aplicación le preguntará si desea configurar una conexión a Internet.
Si selecciona “Sí”, se iniciará la configuración de Internet.
Si selecciona “No”, la cámara se reiniciará para cambiar su nombre y contraseña automáticamente.
Llegados a este punto y debido al cambio de nombre de contraseña de la cámara, asegúrese de que el teléfono inteligente o la tableta está conectada a la cámara.
Nota: La contraseña debe tener al menos ocho caracteres.
b. Si selecciona “No”, la aplicación le preguntará si desea configurar una conexión a Internet.
4. Configurar una conexión a Internet:
La pantalla le mostrará un mensaje preguntándole si desea configurar una conexión a Internet.
a. Si selecciona “Sí”, la cámara buscará las redes Wi-Fi dentro del alcance. Toque el nombre de su red Wi-Fi y, si es necesario, escriba la contraseña del enrutador Wi-Fi. A continuación, se realizará la configuración de primer uso.
Nota 1: Si la cámara no puede encontrar la red Wi-Fi a la que quiere conectarse, toque el icono de búsqueda para volver a buscar redes Wi-Fi disponibles.
2: Si la configuración de Internet se completa correctamente, el LED de alimentación y estado se iluminará en color verde después de 1 o 2 minutos.
b. Si selecciona “No”, la configuración de primer uso habrá terminado.
Nota: Si no configura una conexión a Internet, solamente podrá obtener imágenes de vídeo en directo conectando la cámara con su teléfono inteligente o tableta directamente.
3.4
6
Easy-iCAM es una cámara de red inalámbrica. Puede conectar la cámara con su teléfono inteligente o tableta mediante tecnología inalámbrica directamente y ver imágenes de vídeo en directo en dichos dispositivos en el modo de vista local. En el modo de vista a través de Internet, deberá conectar su smartphone o tablet a la cámara a través del enrutador Wi-Fi o una red móvil 3G/4G, lo que le permite acceder a una secuencia de vídeo y audio en directo en su teléfono inteligente o tableta desde cualquier lugar del mundo.
Nota: Vista local - Su teléfono inteligente o tableta se conecta a la cámara directamente.
Vista a través de Internet - Su teléfono inteligente o tableta se conecta a la cámara a través de un enrutador Wi-Fi o de una red móvil 3G/4G.
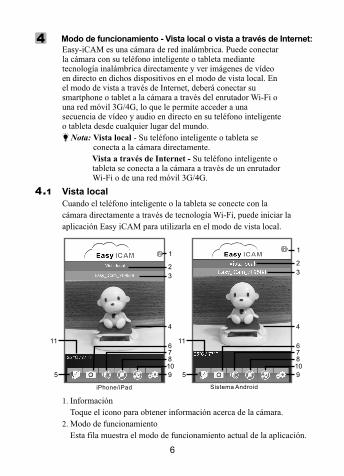
Modo de funcionamiento - Vista local o vista a través de Internet:
Vista local
Cuando el teléfono inteligente o la tableta se conecte con la
cámara directamente a través de tecnología Wi-Fi, puede iniciar la
aplicación Easy iCAM para utilizarla en el modo de vista local.
iPhone/iPad
1. Información
Toque el icono para obtener información acerca de la cámara.
2. Modo de funcionamiento
Esta fila muestra el modo de funcionamiento actual de la aplicación.
Sistema Android
4
4.1
1
2
3
4
6
9
10
7
5
11
8
1
2
3
4
6
9
10
7
5
11
8
7
3. Nombre de la cámara (SSID)
Esta fila muestra el nombre de la cámara, que es el mismo que el de la red
Wi-Fi (SSID).
4. Área de visualización de la imagen
Toque el área de visualización de la imagen de la pantalla con dos dedos y
sepárelos para llevar a cabo la función de zoom. También puede desplazarse
por la pantalla para disponer de la función de panorámica e inclinación
digital.
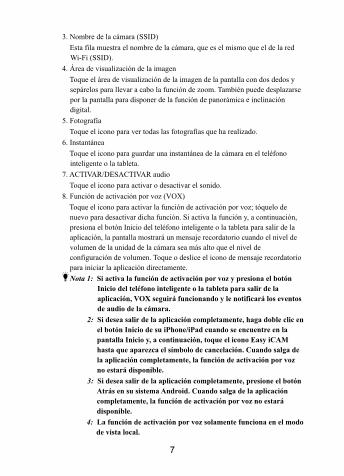
5. Fotografía
Toque el icono para ver todas las fotografías que ha realizado.
6. Instantánea
Toque el icono para guardar una instantánea de la cámara en el teléfono
inteligente o la tableta.
7. ACTIVAR/DESACTIVAR audio
Toque el icono para activar o desactivar el sonido.
8. Función de activación por voz (VOX)
Toque el icono para activar la función de activación por voz; tóquelo de
nuevo para desactivar dicha función. Si activa la función y, a continuación,
presiona el botón Inicio del teléfono inteligente o la tableta para salir de la
aplicación, la pantalla mostrará un mensaje recordatorio cuando el nivel de
volumen de la unidad de la cámara sea más alto que el nivel de
configuración de volumen. Toque o deslice el icono de mensaje recordatorio
para iniciar la aplicación directamente.
Nota 1: Si activa la función de activación por voz y presiona el botón
Inicio del teléfono inteligente o la tableta para salir de la
aplicación, VOX seguirá funcionando y le notificará los eventos
de audio de la cámara.
2: Si desea salir de la aplicación completamente, haga doble clic en
el botón Inicio de su iPhone/iPad cuando se encuentre en la
pantalla Inicio y, a continuación, toque el icono Easy iCAM
hasta que aparezca el símbolo de cancelación. Cuando salga de
la aplicación completamente, la función de activación por voz
no estará disponible.
3: Si desea salir de la aplicación completamente, presione el botón
Atrás en su sistema Android. Cuando salga de la aplicación
completamente, la función de activación por voz no estará
disponible.
4: La función de activación por voz solamente funciona en el modo
de vista local.
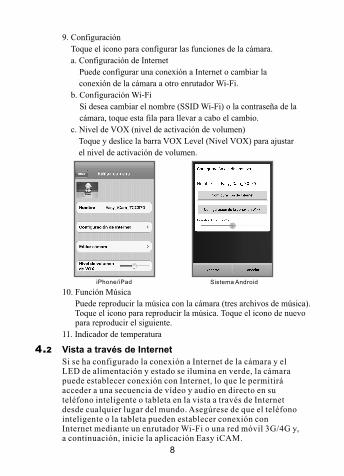
9. Configuración
Toque el icono para configurar las funciones de la cámara.
a. Configuración de Internet
Puede configurar una conexión a Internet o cambiar la
conexión de la cámara a otro enrutador Wi-Fi.
b. Configuración Wi-Fi
Si desea cambiar el nombre (SSID Wi-Fi) o la contraseña de la
cámara, toque esta fila para llevar a cabo el cambio.
c. Nivel de VOX (nivel de activación de volumen)
Toque y deslice la barra VOX Level (Nivel VOX) para ajustar
el nivel de activación de volumen.
Vista a través de Internet
Si se ha configurado la conexión a Internet de la cámara y el LED de alimentación y estado se ilumina en verde, la cámara puede establecer conexión con Internet, lo que le permitirá acceder a una secuencia de vídeo y audio en directo en su teléfono inteligente o tableta en la vista a través de Internet desde cualquier lugar del mundo. Asegúrese de que el teléfono inteligente o la tableta pueden establecer conexión con Internet mediante un enrutador Wi-Fi o una red móvil 3G/4G y, a continuación, inicie la aplicación Easy iCAM.
8
4.2
iPhone/iPad Sistema Android
10.
11. Indicador de temperatura
Función Música
Puede reproducir la música con la cámara (tres archivos de música).Toque el icono para reproducir la música. Toque el icono de nuevo para reproducir el siguiente.
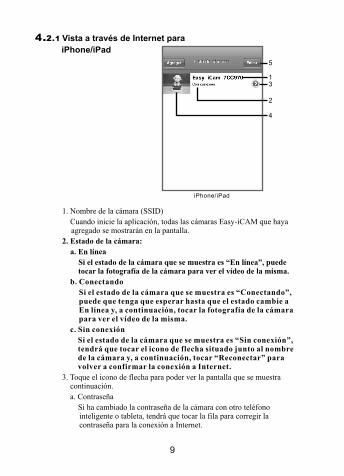
Vista a través de Internet para
iPhone/iPad
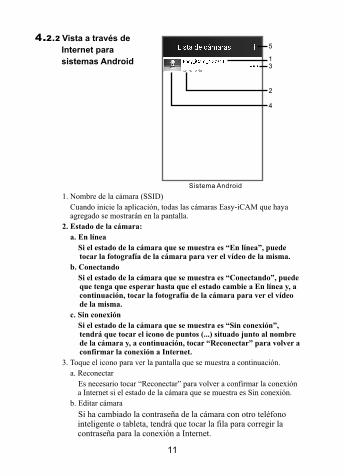
1. Nombre de la cámara (SSID)
Cuando inicie la aplicación, todas las cámaras Easy-iCAM que haya agregado se mostrarán en la pantalla.
2. Estado de la cámara:
a. En línea
Si el estado de la cámara que se muestra es “En línea”, puede tocar la fotografía de la cámara para ver el vídeo de la misma.
b. Conectando
Si el estado de la cámara que se muestra es “Conectando”, puede que tenga que esperar hasta que el estado cambie a En línea y, a continuación, tocar la fotografía de la cámara para ver el vídeo de la misma.
c. Sin conexión
Si el estado de la cámara que se muestra es “Sin conexión”, tendrá que tocar el icono de flecha situado junto al nombre de la cámara y, a continuación, tocar “Reconectar” para volver a confirmar la conexión a Internet.
3. Toque el icono de flecha para poder ver la pantalla que se muestra continuación.
a. Contraseña
Si ha cambiado la contraseña de la cámara con otro teléfono inteligente o tableta, tendrá que tocar la fila para corregir la contraseña para la conexión a Internet.
iPhone/iPad
5
13
4
2
9
4.2.1

b. Reconectar
Es necesario tocar “Reconectar” para volver a confirmar la
conexión a Internet si el estado de la cámara que se muestra es
Sin conexión.
4. Fotografía de la cámara
Toque la fotografía de la cámara para ver el vídeo de esta.
5. Editar
Toque el icono Editar para seleccionar la cámara que desea
eliminar.
10
Vista a través de
Internet para
sistemas Android
1. Nombre de la cámara (SSID)
Cuando inicie la aplicación, todas las cámaras Easy-iCAM que haya agregado se mostrarán en la pantalla.
2. Estado de la cámara:
a. En línea
Si el estado de la cámara que se muestra es “En línea”, puede tocar la fotografía de la cámara para ver el vídeo de la misma.
b. Conectando
Si el estado de la cámara que se muestra es “Conectando”, puede que tenga que esperar hasta que el estado cambie a En línea y, a continuación, tocar la fotografía de la cámara para ver el vídeo de la misma.
c. Sin conexión
Si el estado de la cámara que se muestra es “Sin conexión”, tendrá que tocar el icono de puntos (...) situado junto al nombre de la cámara y, a continuación, tocar “Reconectar” para volver a confirmar la conexión a Internet.
3. Toque el icono para ver la pantalla que se muestra a continuación.
a. Reconectar
Es necesario tocar “Reconectar” para volver a confirmar la conexión a Internet si el estado de la cámara que se muestra es Sin conexión.
b. Editar cámara
Si ha cambiado la contraseña de la cámara con otro teléfono inteligente o tableta, tendrá que tocar la fila para corregir la contraseña para la conexión a Internet.
11
Sistema Android
4.2.2
13
4
2
5
12
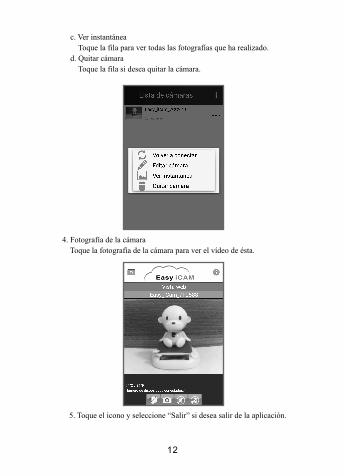
c. Ver instantánea
Toque la fila para ver todas las fotografías que ha realizado.
d. Quitar cámara
Toque la fila si desea quitar la cámara.
4. Fotografía de la cámara
Toque la fotografía de la cámara para ver el vídeo de ésta.
5. Toque el icono y seleccione “Salir” si desea salir de la aplicación.
Si se ha llevado a cabo la configuración de Internet para la cámara y desea agregar ésta a un segundo (o más) teléfono inteligente o tableta, simplemente tiene que seguir los pasos de la sección “3.3 Conectar el teléfono inteligente o la tableta a la cámara”. Una vez realizados dichos pasos, el teléfono inteligente o la tableta se podrá conectar con la cámara a través de un enrutador Wi-FI o de una red móvil 3G/4G.
Agregar una cámara a un segundo (o más) teléfono inteligente o tableta
Si se ha llevado a cabo la configuración de Internet para la cámara y desea agregar ésta a un segundo (o más) teléfono inteligente o tableta a través de configuración remota, debe seguir el procedimiento que se indica a continuación.
Agregar una cámara a través de configuración remota
Agregar una cámara a través de configuración remota para
iPhone/iPad
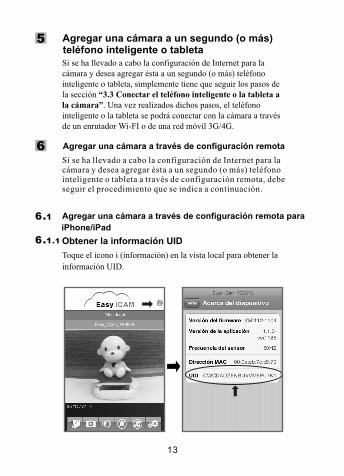
Obtener la información UID
Toque el icono i (información) en la vista local para obtener la
información UID.
13
5
6
6.1
6.1.1

14
Agregar cámara
Toque el icono Agregar de la lista de cámaras de la vista a través de
Internet y, a continuación, toque el icono Agregar en la siguiente
página. Escriba la información de UID y contraseña de la cámara y, a
continuación, toque el icono Aceptar para terminar la configuración.
Agregar una cámara a través de configuración remota
para sistemas Android
Obtener la información UID
Toque el icono i (información) en la vista local para obtener la información UID.
6.1.2
6.2
6.2.1
15
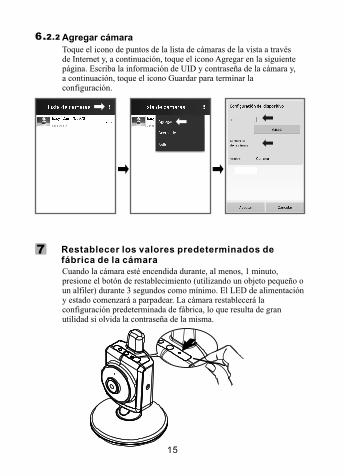
Agregar cámara
Toque el icono de puntos de la lista de cámaras de la vista a través de Internet y, a continuación, toque el icono Agregar en la siguiente página. Escriba la información de UID y contraseña de la cámara y, a continuación, toque el icono Guardar para terminar la configuración.
Cuando la cámara esté encendida durante, al menos, 1 minuto, presione el botón de restablecimiento (utilizando un objeto pequeño o un alfiler) durante 3 segundos como mínimo. El LED de alimentación y estado comenzará a parpadear. La cámara restablecerá la configuración predeterminada de fábrica, lo que resulta de gran utilidad si olvida la contraseña de la misma.
Restablecer los valores predeterminados de fábrica de la cámara
6.2.2
7

Solucionar problemasNo puede conectar la cámara al teléfono inteligente o tableta en la vista local
• Asegúrese de que el enchufe de alimentación está totalmente insertado.
• Asegúrese de que la cámara está encendida y de que el LED de alimentación y estado está iluminado en color rojo o verde.
• Asegúrese de que la cámara y el teléfono inteligente o tableta se encuentran dentro del alcance uno del otro.
• Asegúrese de que ha introducido la contraseña correcta de la cámara en el teléfono inteligente o tableta.
• Puede que tenga que restablecer la cámara presionando el botón de restablecimiento con un objeto fino (como por ejemplo un clip de papel). Consulte la sección 7 - Restablecer los valores predeterminados de fábrica de la cámara de este manual.
La cámara no se puede conectar al teléfono inteligente o tableta a través de un enrutador Wi-Fi o red móvil 3G/4G en la vista a través de Internet
• Asegúrese de que el enchufe de alimentación está totalmente insertado.
• Asegúrese de que la cámara está encendida y de que el LED de alimentación y estado está iluminado en color verde.
• Asegúrese de que ha escrito la contraseña correcta para el enrutador Wi-Fi en la configuración a Internet. Consulte la sección 3.4 - Configurar la cámara y la conexión a Internet de este manual.
• Asegúrese de que la cámara y el enrutador Wi-Fi se encuentran dentro del alcance uno del otro.
• Asegúrese de que el teléfono inteligente o la tableta está conectada a Internet a través de tecnología Wi-Fi o de una red móvil 3G/4G. Puede que tenga que restablecer la cámara presionando el botón de restablecimiento con un objeto fino (como por ejemplo un clip de papel). Consulte la sección 7 - Restablecer los valores predeterminados de fábrica de la cámara y, a continuación, la sección 3.4 - Configurar la cámara y la conexión a Internet, ambas en este manual.
La transmisión por secuencias de vídeo es lenta o sufre retrasos
• Si hay un horno de microondas en uso cerca de la cámara o del enrutador Wi-Fi, quítelo o apáguelo.
• Asegúrese de que la cámara y el enrutador Wi-Fi se encuentran dentro del alcance uno del otro.
• La velocidad de las secuencias de vídeo desde la cámara dependen en gran medida de la velocidad de la conexión que esté utilizando.
• La velocidad de Internet desde la red Wi-Fi o la red móvil 3G/4G tiene un gran impacto en el rendimiento del producto. Cuanto más rápida y estable sea la velocidad de conexión, más rápido podrá ver el video desde la cámara.
16
Cuidado y mantenimiento • Mantenga todas las piezas y accesorios pequeños fuera del alcance de los niños.
• Las huellas dactilares o la suciedad en la superficie del objetivo puede afectar negativamente al rendimiento de la cámara. Evite tocar la superficie del objetivo con los dedos.
• Si el objetivo se ensucia, utilice un soplador para eliminar la suciedad y el polvo, o un paño suave y seco para limpiar dicho objetivo.
• Mantenga la cámara seca. La lluvia, la humedad y otros líquidos que contengan minerales corroerán los circuitos electrónicos.
• No utilice ni almacene el producto en áreas polvorientas o con suciedad.
• No guarde el producto en lugares excesivamente calurosos. Las altas temperaturas pueden acortar la duración de los dispositivos electrónicos y deformar o derretir algunos plásticos.
• No guarde el producto en lugares excesivamente fríos. Cuando el sistema se caliente (alcance su temperatura normal), puede formarse humedad en su interior, lo que podría dañar las tarjetas de circuito electrónicas.
• No abra la carcasa. La manipulación del dispositivo por parte de una persona inexperta podría dañar el sistema.
• No deje caer el producto ni lo someta a impactos fuertes.
• Haga uso de este producto utilizando solamente la fuente de alimentación incluida o proporcionada como accesorio.
• No sobrecargue las tomas de corriente eléctricas ni los alargadores, ya que se puede provocar un incendio o descargas eléctricas.
17
18
Consejos de seguridad Para evitar muertes y lesiones asociadas con los cables de la cámara, asegúrese de que dichos cables y los del adaptador de CA siempre estén fuera del alcance de bebés, a una distancia
de, al menos, 1 metro (3 pies). Nota: es importante incluso si su bebé aún no se pone de pie o se mueve.
Nunca utilice cables de extensión con adaptadores de CA. Utilice solo los adaptadores de CA proporcionados.
1 metro (3 pies)
cable del
adaptador
Este artículo está en conformidad con los requisitos esenciales y otras disposiciones pertinentes de la Directiva 1999/5/CE.
* y en ot ros países.* Goo gle Play es una mar ca comer cial de Goo gle Inc.
iPhone, iPad son mar cas comer ciales de Apple Inc., reg ist radas en EE. UU.

Easy iCAM
1
Easy iCAM
Easy iCAM
Internet
Betrachten Sie jederzeit und überall das, was Ihnen wichtig ist
Bevor Sie loslegen benötigen Sie:
Lokale Ansicht
Internetansicht
WLAN-Router
Smartphone, Tablet
iPhone, iPad, Android-Smartphone oder
Android-Tablet
WLAN-Router (für externen Zugriff)
Smartphone, Tablet
Easy iCAM ist eine drahtlose Netzwerkkamera. Über Drahtlostechnologie kann sie eine Verbindung zu Ihrem Smartphone oder Tablet herstellen und per Smartphone oder Tablet jederzeit und überall alles überwachen, was Ihnen wichtig ist.
2
DE
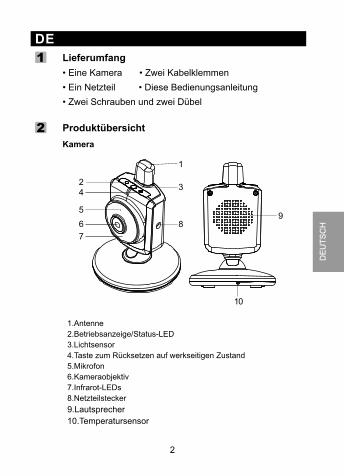
1.Antenne
2.Betriebsanzeige/Status-LED
3.Lichtsensor
4.Taste zum Rücksetzen auf werkseitigen Zustand
5.Mikrofon
6.Kameraobjektiv
7.Infrarot-LEDs
8.Netzteilstecker
9.Lautsprecher
10.Temperatursensor
DE
UT
SC
H
Lieferumfang
• Eine Kamera • Zwei Kabelklemmen
• Ein Netzteil • Diese Bedienungsanleitung
• Zwei Schrauben und zwei Dübel
Produktübersicht
Kamera
2
1
9
10
24
5
6
1
7
3
8
3
Erstmalige Einrichtung
Vor der Einrichtung
1. Stellen Sie sicher, dass Ihr WLAN-Router eingeschaltet ist
und eine Verbindung zum Internet herstellen kann.
2. Easy iCAM-App herunterladen:
Geben Sie den Suchbegriff „Easy iCAM“ ein, laden Sie die
App aus dem Apple App Store bzw. dem Android Market
(Google Play) herunter.
3.1
3
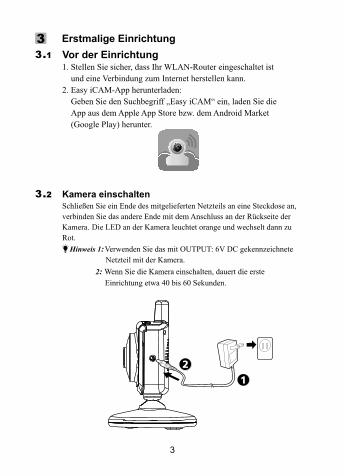
Kamera einschalten
Schließen Sie ein Ende des mitgelieferten Netzteils an eine Steckdose an,
verbinden Sie das andere Ende mit dem Anschluss an der Rückseite der
Kamera. Die LED an der Kamera leuchtet orange und wechselt dann zu
Rot.
Hinweis 1: Verwenden Sie das mit OUTPUT: 6V DC gekennzeichnete
Netzteil mit der Kamera.
2: Wenn Sie die Kamera einschalten, dauert die erste
Einrichtung etwa 40 bis 60 Sekunden.
3.2

4
Ihr Smartphone oder Tablet mit der Kamera verbinden
1. Schalten Sie WLAN an Ihrem Smartphone oder Tablet ein.
2.Tippen Sie zur Auswahl von „Easy_iCAM_XXXXXX“ unter
WLAN-Netzwerke auf den Bildschirm.
3. Geben Sie das Kennwort für „Easy_iCAM_XXXXXX“ ein. Das
Standardkennwort lautet „12345678“.
iPhone/iPad Android-System
Android-System iPhone/iPad
3.3
5
Kamera- und Internetverbindung einrichten
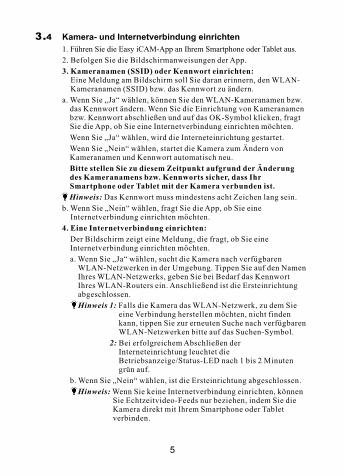
1. Führen Sie die Easy iCAM-App an Ihrem Smartphone oder Tablet aus.
2. Befolgen Sie die Bildschirmanweisungen der App.
3. Kameranamen (SSID) oder Kennwort einrichten:Eine Meldung am Bildschirm soll Sie daran erinnern, den WLAN-Kameranamen (SSID) bzw. das Kennwort zu ändern.
a. Wenn Sie „Ja“ wählen, können Sie den WLAN-Kameranamen bzw. das Kennwort ändern. Wenn Sie die Einrichtung von Kameranamen bzw. Kennwort abschließen und auf das OK-Symbol klicken, fragt Sie die App, ob Sie eine Internetverbindung einrichten möchten.
Wenn Sie „Ja“ wählen, wird die Interneteinrichtung gestartet.
Wenn Sie „Nein“ wählen, startet die Kamera zum Ändern von Kameranamen und Kennwort automatisch neu.
Bitte stellen Sie zu diesem Zeitpunkt aufgrund der Änderung des Kameranamens bzw. Kennworts sicher, dass Ihr Smartphone oder Tablet mit der Kamera verbunden ist.
Hinweis: Das Kennwort muss mindestens acht Zeichen lang sein.
b. Wenn Sie „Nein“ wählen, fragt Sie die App, ob Sie eine Internetverbindung einrichten möchten.
4. Eine Internetverbindung einrichten:
Der Bildschirm zeigt eine Meldung, die fragt, ob Sie eine Internetverbindung einrichten möchten.
a. Wenn Sie „Ja“ wählen, sucht die Kamera nach verfügbaren WLAN-Netzwerken in der Umgebung. Tippen Sie auf den Namen Ihres WLAN-Netzwerks, geben Sie bei Bedarf das Kennwort Ihres WLAN-Routers ein. Anschließend ist die Ersteinrichtung abgeschlossen.
Hinweis 1: Falls die Kamera das WLAN-Netzwerk, zu dem Sie eine Verbindung herstellen möchten, nicht finden kann, tippen Sie zur erneuten Suche nach verfügbaren WLAN-Netzwerken bitte auf das Suchen-Symbol.
2: Bei erfolgreichem Abschließen der Interneteinrichtung leuchtet die Betriebsanzeige/Status-LED nach 1 bis 2 Minuten grün auf.
b. Wenn Sie „Nein“ wählen, ist die Ersteinrichtung abgeschlossen.
Hinweis: Wenn Sie keine Internetverbindung einrichten, können Sie Echtzeitvideo-Feeds nur beziehen, indem Sie die Kamera direkt mit Ihrem Smartphone oder Tablet verbinden.
3.4
6
Easy-iCAM ist eine drahtlose Netzwerkkamera. Sie kann per Drahtlostechnologie direkt eine Verbindung mit Ihrem Smartphone oder Tablet herstellen und Sie können Echtzeitvideo-Feeds an Ihrem Smartphone oder Tablet im lokalen Ansichtsmodus betrachten. Im Internetansichtsmodus muss Ihr Smartphone oder Tablet über einen WLAN-Router oder ein mobiles 3G/4G-Netzwerk eine Verbindung zur Kamera herstellen; anschließend können Sie an Ihrem Smartphone oder Tablet überall auf der Welt auf den Echtzeitstream mit Bild und Ton zugreifen.
Hinweis: Lokale Ansicht – Ihr Smartphone oder Tablet stellt direkt eine Verbindung zur Kamera her.
Internetansicht – Ihr Smartphone oder Tablet stellt über einen WLAN-Router oder ein mobiles 3G/4G-Netzwerk eine Verbindung zur Kamera her.
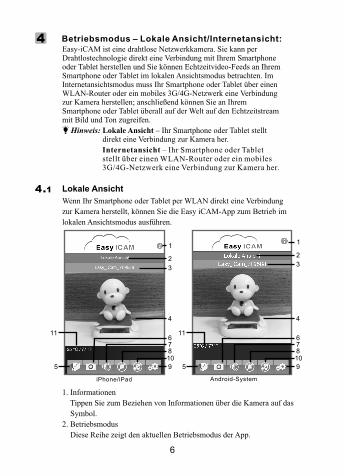
Betriebsmodus – Lokale Ansicht/Internetansicht:
Lokale Ansicht
Wenn Ihr Smartphone oder Tablet per WLAN direkt eine Verbindung
zur Kamera herstellt, können Sie die Easy iCAM-App zum Betrieb im
lokalen Ansichtsmodus ausführen.
iPhone/iPad
1. Informationen
Tippen Sie zum Beziehen von Informationen über die Kamera auf das
Symbol.
2. Betriebsmodus
Diese Reihe zeigt den aktuellen Betriebsmodus der App.
Android-System
4
4.1
1
2
3
4
6
9
10
7
5
11
8
1
2
3
4
6
9
10
7
5
11
8
7
3. Kameraname (SSID)
Diese Reihe zeigt den Kameranamen, der mit dem WLAN-Netzwerk
identisch ist (SSID).
4. Bildanzeigebereich
Berühren Sie den Bildanzeigebereich des Bildschirms mit zwei Finger,
schieben Sie diese zum Zoomen auseinander. Zur Nutzung der digitalen
Schwenk-/Neigungsfunktion können Sie auch über den Bildschirm wischen.
5. Foto
Tippen Sie zur Anzeige aller Fotos, die Sie aufgenommen haben, auf das
Symbol.
6. Schnappschuss
Tippen Sie zum Speichern eines Schnappschusses der Kamera auf Ihrem
Smartphone oder Tablet auf das Symbol.
7. Audio ein/aus
Durch Antippen des Symbols können Sie den Ton ein- und ausschalten.
8. Sprachaktivierungsfunktion (VOX)
Tippen Sie zum Einschalten der Sprachaktivierungsfunktion auf das Symbol,
durch erneutes Antippen schalten Sie die Funktion ab. Wenn Sie die
Funktion einschalten und dann zum Verlassen der App die Startseite-Taste an
Ihrem Smartphone oder Tablet drücken, werden Sie durch eine
Bildschirmmeldung informiert, falls der Lautstärkepegel von der Kamera
höher ist als die Lautstärkeeinstellung. Durch Antippen oder Wischen über
das Erinnerungssymbol lässt sich die App direkt starten.
Hinweis 1: Wenn Sie die Sprachaktivierungsfunktion einschalten und
zum Verlassen der App die Startseite-Taste an Ihrem
Smartphone oder Tablet drücken, bleibt die VOX-Funktion
aktiv und informiert Sie über Audioereignisse von der
Kamera.
2: Falls Sie die App vollständig verlassen möchten, drücken Sie
die Startseite-Taste an Ihrem iPhone/iPad bei Anzeige des
Startbildschirms bitte zweimal, tippen Sie dann auf das Easy
iCAM-Symbol, bis das Abbrechen-Symbol erscheint. Wenn
Sie die App komplett verlassen, ist die
Sprachaktivierungsfunktion inaktiv.
3: Falls Sie die App vollständig verlassen möchten, drücken Sie
bitte die Zurück-Taste an Ihrem Android-System. Wenn Sie
die App komplett verlassen, ist die
Sprachaktivierungsfunktion inaktiv.
4: Die Sprachaktivierungsfunktion kann nur im lokalen
Ansichtsmodus arbeiten.
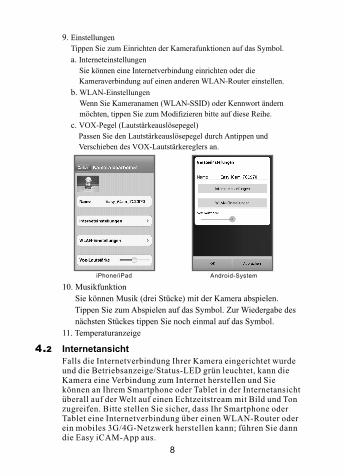
9. Einstellungen
Tippen Sie zum Einrichten der Kamerafunktionen auf das Symbol.
a. Interneteinstellungen
Sie können eine Internetverbindung einrichten oder die
Kameraverbindung auf einen anderen WLAN-Router einstellen.
b. WLAN-Einstellungen
Wenn Sie Kameranamen (WLAN-SSID) oder Kennwort ändern
möchten, tippen Sie zum Modifizieren bitte auf diese Reihe.
c. VOX-Pegel (Lautstärkeauslösepegel)
Passen Sie den Lautstärkeauslösepegel durch Antippen und
Verschieben des VOX-Lautstärkereglers an.
Internetansicht
Falls die Internetverbindung Ihrer Kamera eingerichtet wurde und die Betriebsanzeige/Status-LED grün leuchtet, kann die Kamera eine Verbindung zum Internet herstellen und Sie können an Ihrem Smartphone oder Tablet in der Internetansicht überall auf der Welt auf einen Echtzeitstream mit Bild und Ton zugreifen. Bitte stellen Sie sicher, dass Ihr Smartphone oder Tablet eine Internetverbindung über einen WLAN-Router oder ein mobiles 3G/4G-Netzwerk herstellen kann; führen Sie dann die Easy iCAM-App aus.
8
4.2
iPhone/iPad Android-System
10.
Sie können Musik (drei Stücke) mit der Kamera abspielen.
Tippen Sie zum Abspielen auf das Symbol. Zur Wiedergabe des
nächsten Stückes tippen Sie noch einmal auf das Symbol.
11. Temperaturanzeige
Musikfunktion
Internetansicht für
iPhone/iPad
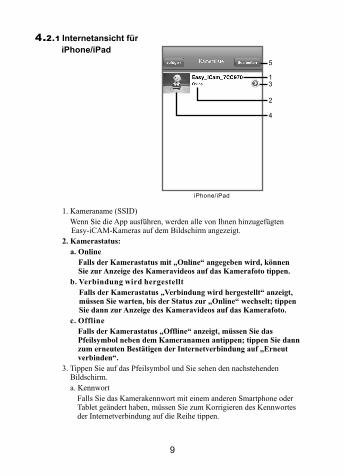
1. Kameraname (SSID)
Wenn Sie die App ausführen, werden alle von Ihnen hinzugefügten Easy-iCAM-Kameras auf dem Bildschirm angezeigt.
2. Kamerastatus:
a. Online
Falls der Kamerastatus mit „Online“ angegeben wird, können Sie zur Anzeige des Kameravideos auf das Kamerafoto tippen.
b. Verbindung wird hergestellt
Falls der Kamerastatus „Verbindung wird hergestellt“ anzeigt, müssen Sie warten, bis der Status zur „Online“ wechselt; tippen Sie dann zur Anzeige des Kameravideos auf das Kamerafoto.
c. Offline
Falls der Kamerastatus „Offline“ anzeigt, müssen Sie das Pfeilsymbol neben dem Kameranamen antippen; tippen Sie dann zum erneuten Bestätigen der Internetverbindung auf „Erneut verbinden“.
3. Tippen Sie auf das Pfeilsymbol und Sie sehen den nachstehenden Bildschirm.
a. Kennwort
Falls Sie das Kamerakennwort mit einem anderen Smartphone oder Tablet geändert haben, müssen Sie zum Korrigieren des Kennwortes der Internetverbindung auf die Reihe tippen.
iPhone/iPad
5
13
4
2
9
4.2.1
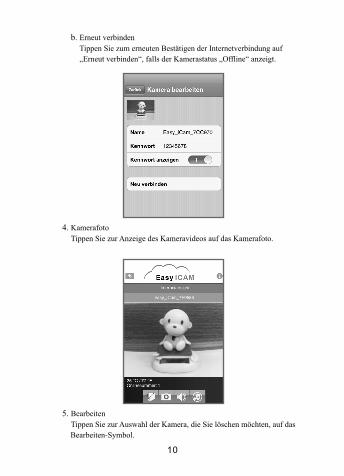
b. Erneut verbinden
Tippen Sie zum erneuten Bestätigen der Internetverbindung auf
„Erneut verbinden“, falls der Kamerastatus „Offline“ anzeigt.
4. Kamerafoto
Tippen Sie zur Anzeige des Kameravideos auf das Kamerafoto.
5. Bearbeiten
Tippen Sie zur Auswahl der Kamera, die Sie löschen möchten, auf das
Bearbeiten-Symbol.
10
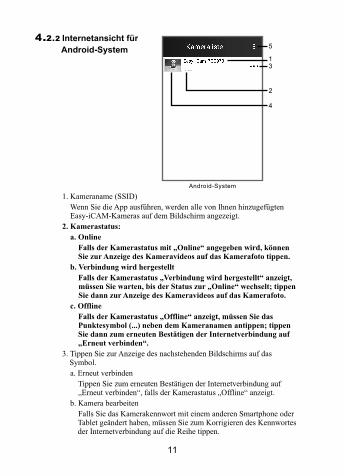
Internetansicht für
Android-System
1. Kameraname (SSID)
Wenn Sie die App ausführen, werden alle von Ihnen hinzugefügten Easy-iCAM-Kameras auf dem Bildschirm angezeigt.
2. Kamerastatus:
a. Online
Falls der Kamerastatus mit „Online“ angegeben wird, können Sie zur Anzeige des Kameravideos auf das Kamerafoto tippen.
b. Verbindung wird hergestellt
Falls der Kamerastatus „Verbindung wird hergestellt“ anzeigt, müssen Sie warten, bis der Status zur „Online“ wechselt; tippen Sie dann zur Anzeige des Kameravideos auf das Kamerafoto.
c. Offline
Falls der Kamerastatus „Offline“ anzeigt, müssen Sie das Punktesymbol (...) neben dem Kameranamen antippen; tippen Sie dann zum erneuten Bestätigen der Internetverbindung auf „Erneut verbinden“.
3. Tippen Sie zur Anzeige des nachstehenden Bildschirms auf das Symbol.
a. Erneut verbinden
Tippen Sie zum erneuten Bestätigen der Internetverbindung auf „Erneut verbinden“, falls der Kamerastatus „Offline“ anzeigt.
b. Kamera bearbeiten
Falls Sie das Kamerakennwort mit einem anderen Smartphone oder Tablet geändert haben, müssen Sie zum Korrigieren des Kennwortes der Internetverbindung auf die Reihe tippen.
11
Android-System
4.2.2
13
4
2
5
12
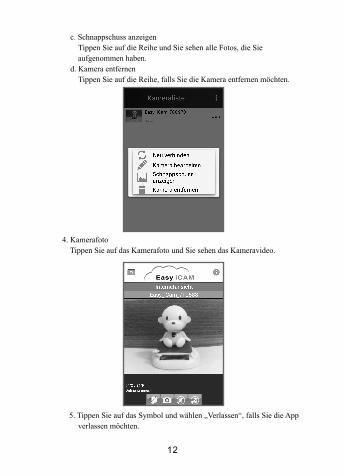
c. Schnappschuss anzeigen
Tippen Sie auf die Reihe und Sie sehen alle Fotos, die Sie
aufgenommen haben.
d. Kamera entfernen
Tippen Sie auf die Reihe, falls Sie die Kamera entfernen möchten.
4. Kamerafoto
Tippen Sie auf das Kamerafoto und Sie sehen das Kameravideo.
5. Tippen Sie auf das Symbol und wählen „Verlassen“, falls Sie die App
verlassen möchten.
Falls die Interneteinrichtung für die Kamera ausgeführt wurde und Sie die Kamera einem zweiten oder weiteren Smartphones bzw. Tablets hinzufügen möchten, müssen Sie einfach den Schritt „3.3 Ihr Smartphone oder Tablet mit der Kamera verbinden“ befolgen; anschließend kann das Smartphone oder Tablet über einen WLAN-Router oder ein mobiles 3G/4G-Netzwerk eine Verbindung zur Kamera herstellen.
Fügen Sie die Kamera zu einem zweiten oder weiteren Smartphones oder Tablets hinzu.
Falls die Interneteinrichtung für die Kamera durchgeführt wurde und Sie die Kamera mittels externer Einrichtung einer zweiten oder weiteren Smartphones bzw. Tablets hinzufügen möchten, müssen Sie das nachstehende Verfahren befolgen.
Kamera über externe Einrichtung hinzufügen
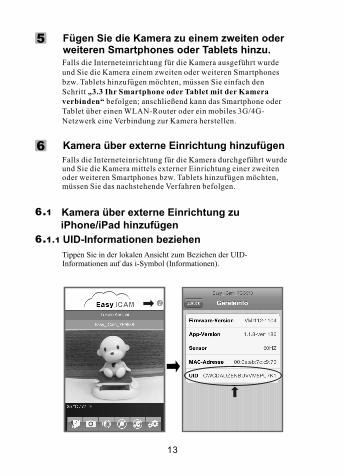
UID-Informationen beziehen
Kamera über externe Einrichtung zu iPhone/iPad hinzufügen
Tippen Sie in der lokalen Ansicht zum Beziehen der UID-Informationen auf das i-Symbol (Informationen).
13
5
6
6.1
6.1.1
14
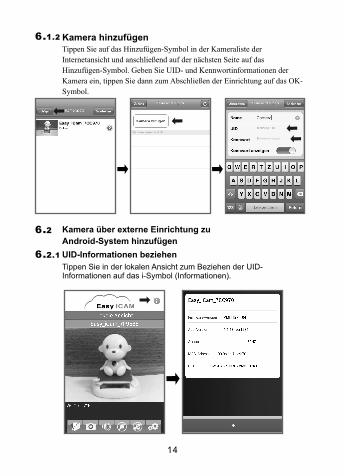
Kamera hinzufügen
Tippen Sie auf das Hinzufügen-Symbol in der Kameraliste der
Internetansicht und anschließend auf der nächsten Seite auf das
Hinzufügen-Symbol. Geben Sie UID- und Kennwortinformationen der
Kamera ein, tippen Sie dann zum Abschließen der Einrichtung auf das OK-
Symbol.
Kamera über externe Einrichtung zu
Android-System hinzufügen
UID-Informationen beziehen
Tippen Sie in der lokalen Ansicht zum Beziehen der UID-Informationen auf das i-Symbol (Informationen).
6.1.2
6.2
6.2.1
15
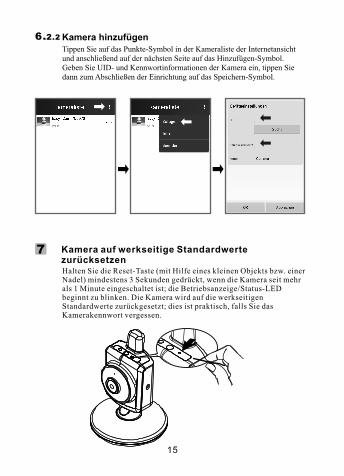
Kamera hinzufügen
Tippen Sie auf das Punkte-Symbol in der Kameraliste der Internetansicht und anschließend auf der nächsten Seite auf das Hinzufügen-Symbol. Geben Sie UID- und Kennwortinformationen der Kamera ein, tippen Sie dann zum Abschließen der Einrichtung auf das Speichern-Symbol.
Halten Sie die Reset-Taste (mit Hilfe eines kleinen Objekts bzw. einer Nadel) mindestens 3 Sekunden gedrückt, wenn die Kamera seit mehr als 1 Minute eingeschaltet ist; die Betriebsanzeige/Status-LED beginnt zu blinken. Die Kamera wird auf die werkseitigen Standardwerte zurückgesetzt; dies ist praktisch, falls Sie das Kamerakennwort vergessen.
Kamera auf werkseitige Standardwerte zurücksetzen
6.2.2
7
ProblemlösungDie Kamera lässt sich in der lokalen Ansicht nicht mit dem Smartphone oder Tablet verbinden
• Prüfen Sie, ob der Netzstecker vollständig eingesteckt ist.
• Stellen Sie sicher, dass die Kamera eingeschaltet ist und die Betriebsanzeige/Status-LED rot oder grün leuchtet.
• Vergewissern Sie sich, dass sich Kamera und Smartphone/Tablet innerhalb der Reichweite befinden.
• Prüfen Sie, ob Sie das Kamerakennwort richtig an Ihrem Smartphone/Tablet eingegeben haben.
• Möglicherweise müssen Sie die Kamera rücksetzen, indem Sie die Reset-Taste mit einem schmalen Gegenstand (z. B. einer gerade gebogenen Büroklammer) drücken. Bitte beachten Sie „7. Kamera auf werkseitige Standardwerte zurücksetzen“ in dieser Bedienungsanleitung.
Die Kamera lässt sich in der Internetansicht nicht per WLAN-Router oder mobilem 3G/4G-Netzwerk mit dem Smartphone/Tablet verbinden
• Prüfen Sie, ob der Netzstecker vollständig eingesteckt ist.
• Stellen Sie sicher, dass die Kamera eingeschaltet ist und die Betriebsanzeige/Status-LED grün leuchtet.
• Prüfen Sie, ob Sie das Kennwort des WLAN-Routers richtig in den Interneteinstellungen eingegeben haben. Bitte beachten Sie „3.4 Kamera- und Internetverbindung einrichten“ in dieser Bedienungsanleitung.
• Vergewissern Sie sich, dass sich Kamera und WLAN-Router innerhalb der Reichweite befinden.
• Vergewissern Sie sich, dass Ihr Smartphone/Tablet per WLAN- oder mobilem 3G/4G-Netzwerk mit dem Internet verbunden ist. Möglicherweise müssen Sie die Kamera rücksetzen, indem Sie die Reset-Taste mit einem schmalen Gegenstand (z. B. einer gerade gebogenen Büroklammer) drücken. Bitte beachten Sie „7. Kamera auf werkseitige Standardwerte zurücksetzen“ und anschließend „3.4 Kamera- und Internetverbindung einrichten“ in dieser Bedienungsanleitung.
Videostreaming ist langsam oder zeitverzögert
• Falls sich eine Mikrowelle in der Nähe von Kamera oder WLAN-Router befindet, stellen Sie die Mikrowelle an einen anderen Ort bzw. schalten Sie sie aus.
• Vergewissern Sie sich, dass sich Kamera und WLAN-Router innerhalb der Reichweite befinden.
• Die Geschwindigkeit des Video-Feed von der Kamera ist stark von der Geschwindigkeit der verwendeten Verbindung abhängig.
• Die Internetgeschwindigkeit Ihres WLAN- oder mobilen 3G/4G-Netzwerks hat erhebliche Auswirkungen auf die Produktleistung. Je schneller und stabiler die Verbindung, desto besser die Videoübertragung von der Kamera.
16

Pflege und Wartung • Bewahren Sie alle Teile und sämtliches Zubehör außerhalb der Reichweite von Kindern auf.
• Fingerabdrücke und Schmutz an der Linsenoberfläche können sich erheblich auf die Kameraleistung auswirken. Achten Sie darauf, die Linsenoberfläche nicht mit Ihren Fingern zu berühren.
• Sollte die Linse schmutzig werden, beseitigen Sie Schmutz und Staub mit einem Druckluftreiniger oder einem weichen, trockenen Tuch.
• Halten Sie die Kamera trocken. Niederschlag, Feuchtigkeit und andere Flüssigkeiten mit Mineralien lassen elektronische Schaltkreise korrodieren.
• Verwenden oder lagern Sie das Produkt nicht an staubigen, schmutzigen Orten.
• Bewahren Sie das Produkt nicht an heißen Orten auf. Hohe Temperaturen können die Lebenszeit elektronischer Geräte verkürzen und bestimmte Kunststoffteile verformen oder schmelzen lassen.
• Bewahren Sie das Produkt nicht an sehr kalten Orten auf. Wenn sich das System erwärmt (auf normale Betriebstemperatur) kann sich Feuchtigkeit im Inneren des Gehäuses bilden und die elektronische Schaltkreise beschädigen.
• Versuchen Sie nicht, das Gehäuse zu öffnen. Unsachgemäße Handhabung des Gerätes kann das System beschädigen.
• Lassen Sie das Gerät nicht fallen, setzen Sie es keinen starken Erschütterungen aus.
• Betreiben Sie das Produkt nur mit dem mitgelieferten oder als Zubehör bereitgestellten Netzteil.
• Überlasten Sie Steckdosen oder Verlängerungskabel nicht, da dies Brand- und Stromschlaggefahr bergen kann.
17

18
Sicherheitstipps befolgen So vermeiden Sie (lebensgefährliche) Verletzungen in Verbindung mit den Kabeln der Kamera, Achten Sie darauf, dass sich die Kabel von Kamera und Netzteil immer außerhalb der Reichweite des Babys befinden (mindestens 1 Meter entfernt). Hinweis: Dies ist auch dann zu beachten, wenn Ihr Baby noch nicht stehen oder sich bewegen kann.
Verwenden Sie niemals Verlängerungskabel in Verbindung mit Netzteilen. Verwenden Sie nur die mitgelieferten Netzteile.
Netzteilkabel
1 Meter
Dieses Gerät stimmt mit den grundlegenden Anforderungen und anderen relevanten Bestimmungen der Richtlinie 1999/5/EG überein.
*
einget ragen sind.
* Goo gle Play ist eine Mar ke der Goo gle Inc.
iPhone und iPad sind Mar ken der Apple Inc., die in den USA und anderen Ländern
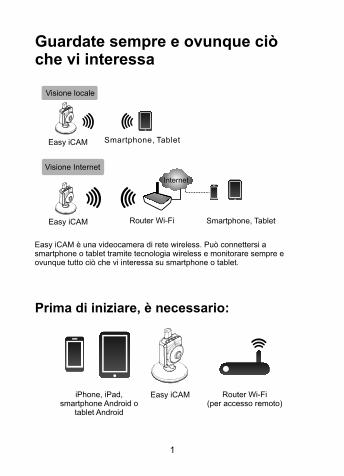
Easy iCAM
1
Easy iCAM
Easy iCAM
Internet
Guardate sempre e ovunque ciò che vi interessa
Prima di iniziare, è necessario:
Visione locale
Visione Internet
Router Wi-Fi
Smartphone, Tablet
iPhone, iPad, smartphone Android o
tablet Android
Router Wi-Fi(per accesso remoto)
Smartphone, Tablet
Easy iCAM è una videocamera di rete wireless. Può connettersi a smartphone o tablet tramite tecnologia wireless e monitorare sempre e ovunque tutto ciò che vi interessa su smartphone o tablet.
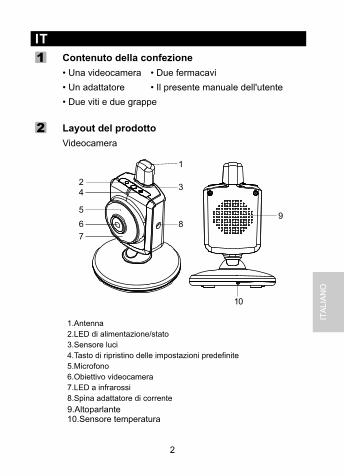
2
IT
1.Antenna
2.LED di alimentazione/stato
3.Sensore luci
4.Tasto di ripristino delle impostazioni predefinite
5.Microfono
6.Obiettivo videocamera
7.LED a infrarossi
8.Spina adattatore di corrente
9.Altoparlante10.Sensore temperatura
ITA
LIA
NO
Contenuto della confezione
• Una videocamera • Due fermacavi
• Un adattatore • Il presente manuale dell'utente
• Due viti e due grappe
Layout del prodotto
Videocamera
2
1
9
10
24
5
6
1
7
3
8
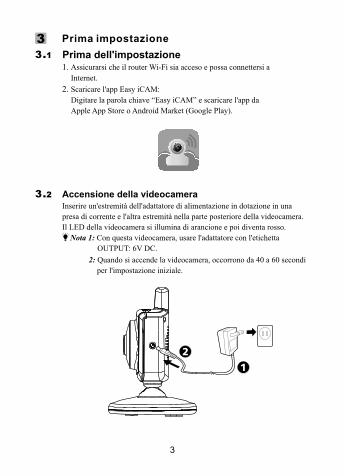
3
Prima impostazione
Prima dell'impostazione
1. Assicurarsi che il router Wi-Fi sia acceso e possa connettersi a
Internet.
2. Scaricare l'app Easy iCAM:
Digitare la parola chiave “Easy iCAM” e scaricare l'app da
Apple App Store o Android Market (Google Play).
3.1
3
Accensione della videocamera
Inserire un'estremità dell'adattatore di alimentazione in dotazione in una
presa di corrente e l'altra estremità nella parte posteriore della videocamera.
Il LED della videocamera si illumina di arancione e poi diventa rosso.
Nota 1: Con questa videocamera, usare l'adattatore con l'etichetta
OUTPUT: 6V DC.
2: Quando si accende la videocamera, occorrono da 40 a 60 secondi
per l'impostazione iniziale.
3.2
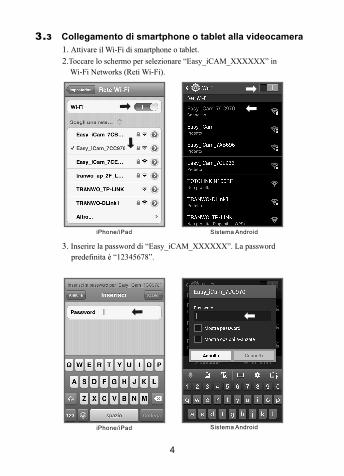
4
Collegamento di smartphone o tablet alla videocamera
1. Attivare il Wi-Fi di smartphone o tablet.
2.Toccare lo schermo per selezionare “Easy_iCAM_XXXXXX” in
Wi-Fi Networks (Reti Wi-Fi).
3. Inserire la password di “Easy_iCAM_XXXXXX”. La password
predefinita è “12345678”.
iPhone/iPad Sistema Android
Sistema Android iPhone/iPad
3.3
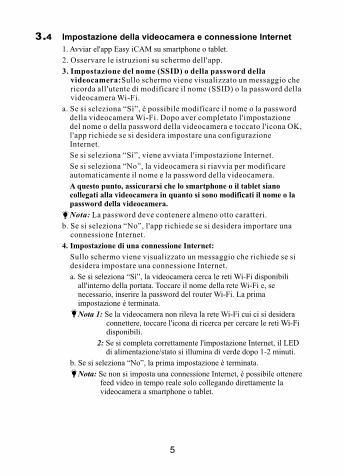
5
Impostazione della videocamera e connessione Internet
1. Avviar el'app Easy iCAM su smartphone o tablet.
2. Osservare le istruzioni su schermo dell'app.
3. Impostazione del nome (SSID) o della password della videocamera:Sullo schermo viene visualizzato un messaggio che ricorda all'utente di modificare il nome (SSID) o la password della videocamera Wi-Fi.
a. Se si seleziona “Sì”, è possibile modificare il nome o la password della videocamera Wi-Fi. Dopo aver completato l'impostazione del nome o della password della videocamera e toccato l'icona OK, l'app richiede se si desidera impostare una configurazione Internet.
Se si seleziona “Sì”, viene avviata l'impostazione Internet.
Se si seleziona “No”, la videocamera si riavvia per modificare automaticamente il nome e la password della videocamera.
A questo punto, assicurarsi che lo smartphone o il tablet siano collegati alla videocamera in quanto si sono modificati il nome o la password della videocamera.
Nota: La password deve contenere almeno otto caratteri.
b. Se si seleziona “No”, l'app richiede se si desidera importare una connessione Internet.
4. Impostazione di una connessione Internet:
Sullo schermo viene visualizzato un messaggio che richiede se si desidera impostare una connessione Internet.
a. Se si seleziona “Sì”, la videocamera cerca le reti Wi-Fi disponibili all'interno della portata. Toccare il nome della rete Wi-Fi e, se necessario, inserire la password del router Wi-Fi. La prima impostazione è terminata.
Nota 1: Se la videocamera non rileva la rete Wi-Fi cui ci si desidera connettere, toccare l'icona di ricerca per cercare le reti Wi-Fi disponibili.
2: Se si completa correttamente l'impostazione Internet, il LED di alimentazione/stato si illumina di verde dopo 1-2 minuti.
b. Se si seleziona “No”, la prima impostazione è terminata.
Nota: Se non si imposta una connessione Internet, è possibile ottenere feed video in tempo reale solo collegando direttamente la videocamera a smartphone o tablet.
3.4

6
Easy-iCAM è una videocamera di rete wireless. Può connettersi
direttamente a smartphone o tablet tramite tecnologia wireless e
consente di guardare feed video in tempo reale su smartphone o
tablet in modalità di visione locale. In modalità di visione Internet,
lo smartphone o il tablet deve connettersi alla videocamera tramite
router Wi-Fi o rete mobile 3G/4G, quindi è possibile accedere ad
uno stream live di video e audio su smartphone o tablet da qualsiasi
parte del mondo.
Nota: Visione locale – Lo smartphone o il tablet si collega
direttamente alla videocamera.
Visione Internet – Lo smartphone o il tablet si collega alla
videocamera tramite router Wi-Fi o rete mobile 3G/4G.
Modalità operativa – Visione locale/Visione Internet:
Visione locale
Quando lo smartphone o il tablet si connette direttamente alla
videocamera tramite Wi-Fi, è possibile avviare l'app Easy iCAM per
azionarla in modalità di visione locale.
iPhone/iPad
1. Informazioni
Toccare l'icona per ottenere informazioni sulla videocamera.
2. Modalità operativa
Questa riga mostra la modalità operativa attuale dell'app.
Sistema Android
4
4.1
1
2
3
4
6
9
10
7
5
11
8
1
2
3
4
6
9
10
7
5
11
8
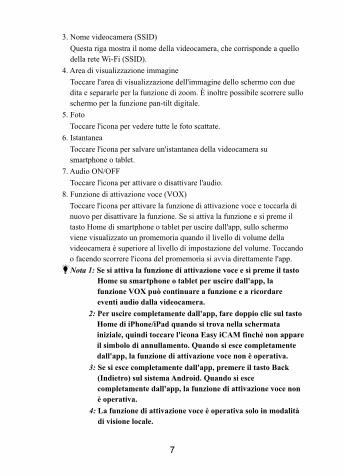
7
3. Nome videocamera (SSID)
Questa riga mostra il nome della videocamera, che corrisponde a quello
della rete Wi-Fi (SSID).
4. Area di visualizzazione immagine
Toccare l'area di visualizzazione dell'immagine dello schermo con due
dita e separarle per la funzione di zoom. È inoltre possibile scorrere sullo
schermo per la funzione pan-tilt digitale.
5. Foto
Toccare l'icona per vedere tutte le foto scattate.
6. Istantanea
Toccare l'icona per salvare un'istantanea della videocamera su
smartphone o tablet.
7. Audio ON/OFF
Toccare l'icona per attivare o disattivare l'audio.
8. Funzione di attivazione voce (VOX)
Toccare l'icona per attivare la funzione di attivazione voce e toccarla di
nuovo per disattivare la funzione. Se si attiva la funzione e si preme il
tasto Home di smartphone o tablet per uscire dall'app, sullo schermo
viene visualizzato un promemoria quando il livello di volume della
videocamera è superiore al livello di impostazione del volume. Toccando
o facendo scorrere l'icona del promemoria si avvia direttamente l'app.
Nota 1: Se si attiva la funzione di attivazione voce e si preme il tasto
Home su smartphone o tablet per uscire dall'app, la
funzione VOX può continuare a funzione e a ricordare
eventi audio dalla videocamera.
2: Per uscire completamente dall'app, fare doppio clic sul tasto
Home di iPhone/iPad quando si trova nella schermata
iniziale, quindi toccare l'icona Easy iCAM finché non appare
il simbolo di annullamento. Quando si esce completamente
dall'app, la funzione di attivazione voce non è operativa.
3: Se si esce completamente dall'app, premere il tasto Back
(Indietro) sul sistema Android. Quando si esce
completamente dall'app, la funzione di attivazione voce non
è operativa.
4: La funzione di attivazione voce è operativa solo in modalità
di visione locale.

9. Impostazione
Toccare l'icona per impostare le funzioni della videocamera.
a. Impostazione Internet
È possibile impostare una connessione Internet o modificare la
connessione della videocamera su un altro router Wi-Fi.
b. Impostazione Wi-Fi
Per modificare il nome (SSID Wi-Fi) o la password della
videocamera, toccare questa riga per effettuare la modifica.
c. Livello VOX (livello di attivazione volume)
Toccare e far scorrere la barra di VOX Level (Livello VOX) per
regolare il livello di attivazione volume.
Visione Internet
Se si è impostata la connessione Internet della videocamera e il LED di alimentazione/stato si illumina di verde, la videocamera può connettersi ad Internet ed è possibile accedere ad uno stream live di video e audio su smartphone o tablet da qualsiasi parte del mondo. Assicurarsi che lo smartphone o il tablet possano connettersi a Internet con un router Wi-Fi o una rete mobile 3G/4G, quindi avviare l'app Easy iCAM.
8
4.2
iPhone/iPad Sistema Android
10.
È possibile riprodurre musica (tre brani musicali) con la fotocamera.
Toccare l’icona per riprodurre musica. Toccare di nuovo l’icona per
riprodurre il brano successivo.
11. Display temperatura
Funzione Musica
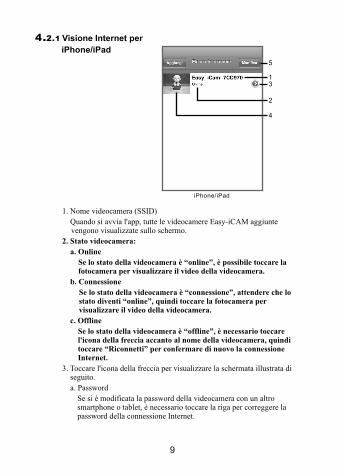
Visione Internet per
iPhone/iPad
1. Nome videocamera (SSID)
Quando si avvia l'app, tutte le videocamere Easy-iCAM aggiunte vengono visualizzate sullo schermo.
2. Stato videocamera:
a. Online
Se lo stato della videocamera è “online”, è possibile toccare la fotocamera per visualizzare il video della videocamera.
b. Connessione
Se lo stato della videocamera è “connessione”, attendere che lo stato diventi “online”, quindi toccare la fotocamera per visualizzare il video della videocamera.
c. Offline
Se lo stato della videocamera è “offline”, è necessario toccare l'icona della freccia accanto al nome della videocamera, quindi toccare “Riconnetti” per confermare di nuovo la connessione Internet.
3. Toccare l'icona della freccia per visualizzare la schermata illustrata di seguito.
a. Password
Se si è modificata la password della videocamera con un altro smartphone o tablet, è necessario toccare la riga per correggere la password della connessione Internet.
iPhone/iPad
5
13
4
2
9
4.2.1
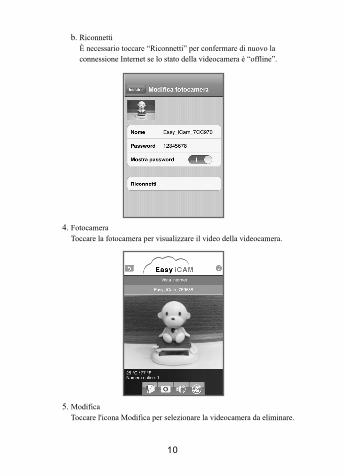
b. Riconnetti
È necessario toccare “Riconnetti” per confermare di nuovo la
connessione Internet se lo stato della videocamera è “offline”.
4. Fotocamera
Toccare la fotocamera per visualizzare il video della videocamera.
5. Modifica
Toccare l'icona Modifica per selezionare la videocamera da eliminare.
10
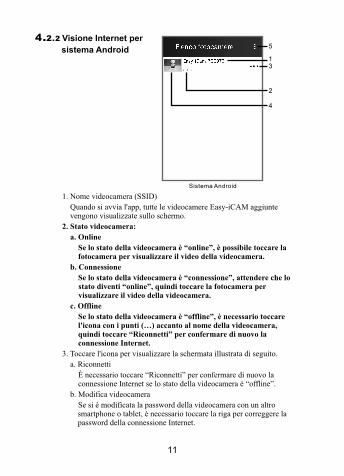
Visione Internet per
sistema Android
1. Nome videocamera (SSID)
Quando si avvia l'app, tutte le videocamere Easy-iCAM aggiunte vengono visualizzate sullo schermo.
2. Stato videocamera:
a. Online
Se lo stato della videocamera è “online”, è possibile toccare la fotocamera per visualizzare il video della videocamera.
b. Connessione
Se lo stato della videocamera è “connessione”, attendere che lo stato diventi “online”, quindi toccare la fotocamera per visualizzare il video della videocamera.
c. Offline
Se lo stato della videocamera è “offline”, è necessario toccare l'icona con i punti (…) accanto al nome della videocamera, quindi toccare “Riconnetti” per confermare di nuovo la connessione Internet.
3. Toccare l'icona per visualizzare la schermata illustrata di seguito.
a. Riconnetti
È necessario toccare “Riconnetti” per confermare di nuovo la connessione Internet se lo stato della videocamera è “offline”.
b. Modifica videocamera
Se si è modificata la password della videocamera con un altro smartphone o tablet, è necessario toccare la riga per correggere la password della connessione Internet.
11
Sistema Android
4.2.2
13
4
2
5
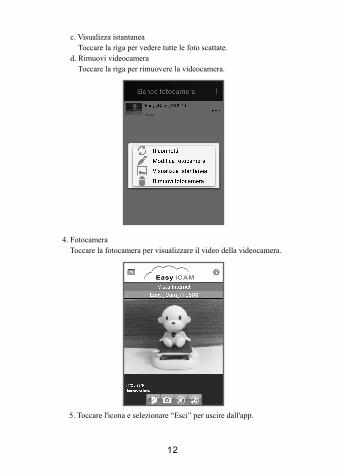
12
c. Visualizza istantanea
Toccare la riga per vedere tutte le foto scattate.
d. Rimuovi videocamera
Toccare la riga per rimuovere la videocamera.
4. Fotocamera
Toccare la fotocamera per visualizzare il video della videocamera.
5. Toccare l'icona e selezionare “Esci” per uscire dall'app.
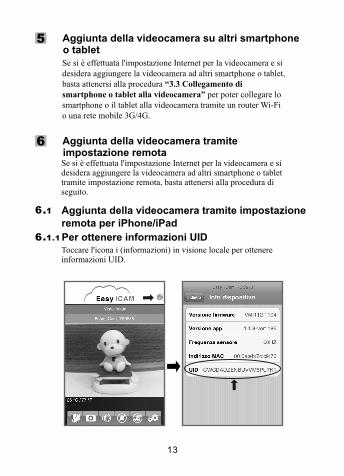
Se si è effettuata l'impostazione Internet per la videocamera e si desidera aggiungere la videocamera ad altri smartphone o tablet, basta attenersi alla procedura “3.3 Collegamento di smartphone o tablet alla videocamera” per poter collegare lo smartphone o il tablet alla videocamera tramite un router Wi-Fi o una rete mobile 3G/4G.
Aggiunta della videocamera su altri smartphone o tablet
Se si è effettuata l'impostazione Internet per la videocamera e si desidera aggiungere la videocamera ad altri smartphone o tablet tramite impostazione remota, basta attenersi alla procedura di seguito.
Aggiunta della videocamera tramite impostazione remota
Per ottenere informazioni UID
Aggiunta della videocamera tramite impostazione remota per iPhone/iPad
Toccare l'icona i (informazioni) in visione locale per ottenere informazioni UID.
5
6
6.1
6.1.1
13
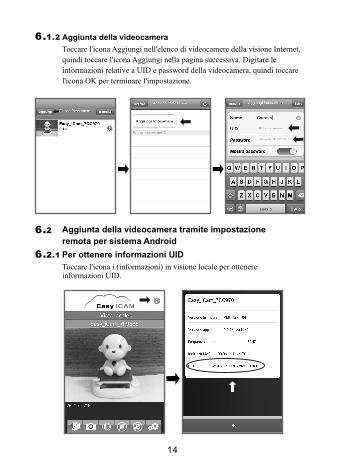
14
Aggiunta della videocamera
Toccare l'icona Aggiungi nell'elenco di videocamere della visione Internet,
quindi toccare l'icona Aggiungi nella pagina successiva. Digitare le
informazioni relative a UID e password della videocamera, quindi toccare
l'icona OK per terminare l'impostazione.
Aggiunta della videocamera tramite impostazione
remota per sistema Android
Per ottenere informazioni UID
Toccare l'icona i (informazioni) in visione locale per ottenere informazioni UID.
6.1.2
6.2
6.2.1
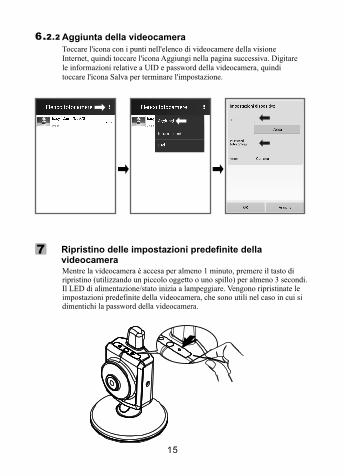
15
Aggiunta della videocamera
Toccare l'icona con i punti nell'elenco di videocamere della visione Internet, quindi toccare l'icona Aggiungi nella pagina successiva. Digitare le informazioni relative a UID e password della videocamera, quindi toccare l'icona Salva per terminare l'impostazione.
Mentre la videocamera è accesa per almeno 1 minuto, premere il tasto di ripristino (utilizzando un piccolo oggetto o uno spillo) per almeno 3 secondi. Il LED di alimentazione/stato inizia a lampeggiare. Vengono ripristinate le impostazioni predefinite della videocamera, che sono utili nel caso in cui si dimentichi la password della videocamera.
Ripristino delle impostazioni predefinite della videocamera
6.2.2
7
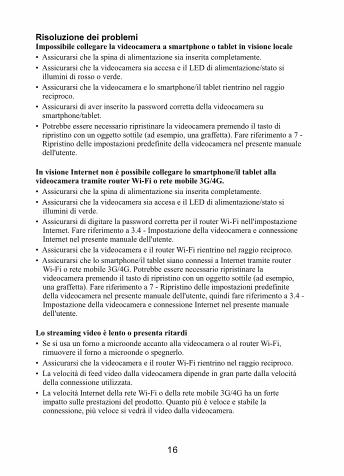
Risoluzione dei problemiImpossibile collegare la videocamera a smartphone o tablet in visione locale
• Assicurarsi che la spina di alimentazione sia inserita completamente.
• Assicurarsi che la videocamera sia accesa e il LED di alimentazione/stato si illumini di rosso o verde.
• Assicurarsi che la videocamera e lo smartphone/il tablet rientrino nel raggio reciproco.
• Assicurarsi di aver inserito la password corretta della videocamera su smartphone/tablet.
• Potrebbe essere necessario ripristinare la videocamera premendo il tasto di ripristino con un oggetto sottile (ad esempio, una graffetta). Fare riferimento a 7 - Ripristino delle impostazioni predefinite della videocamera nel presente manuale dell'utente.
In visione Internet non è possibile collegare lo smartphone/il tablet alla videocamera tramite router Wi-Fi o rete mobile 3G/4G.
• Assicurarsi che la spina di alimentazione sia inserita completamente.
• Assicurarsi che la videocamera sia accesa e il LED di alimentazione/stato si illumini di verde.
• Assicurarsi di digitare la password corretta per il router Wi-Fi nell'impostazione Internet. Fare riferimento a 3.4 - Impostazione della videocamera e connessione Internet nel presente manuale dell'utente.
• Assicurarsi che la videocamera e il router Wi-Fi rientrino nel raggio reciproco.
• Assicurarsi che lo smartphone/il tablet siano connessi a Internet tramite router Wi-Fi o rete mobile 3G/4G. Potrebbe essere necessario ripristinare la videocamera premendo il tasto di ripristino con un oggetto sottile (ad esempio, una graffetta). Fare riferimento a 7 - Ripristino delle impostazioni predefinite della videocamera nel presente manuale dell'utente, quindi fare riferimento a 3.4 - Impostazione della videocamera e connessione Internet nel presente manuale dell'utente.
Lo streaming video è lento o presenta ritardi
• Se si usa un forno a microonde accanto alla videocamera o al router Wi-Fi, rimuovere il forno a microonde o spegnerlo.
• Assicurarsi che la videocamera e il router Wi-Fi rientrino nel raggio reciproco.
• La velocità di feed video dalla videocamera dipende in gran parte dalla velocità della connessione utilizzata.
• La velocità Internet della rete Wi-Fi o della rete mobile 3G/4G ha un forte impatto sulle prestazioni del prodotto. Quanto più è veloce e stabile la connessione, più veloce si vedrà il video dalla videocamera.
16
Cura e manutenzione • Tenere tutte le parti e gli accessori lontano dalla portata dei bambini.
• La presenza di impronte digitali o sporcizia sulla superficie dell'obiettivo possono influire negativamente sulle prestazioni della videocamera. Evitare di toccare la superficie dell'obiettivo con le dita.
• Se l'obiettivo si sporca, utilizzare un vaporizzatore per eliminare polvere e sporco o un panno asciutto e morbido per pulire l'obiettivo.
• Tenere asciutta la videocamera. La pioggia, l'umidità e altri liquidi che contengono minerali corrodono i circuiti elettronici.
• Non utilizzare e non riporre in ambienti polverosi e sporchi.
• Non conservare in ambienti soggetti a temperature elevate. Le temperature elevate possono ridurre la vita utile dei dispositivi elettronici e deformare o fondere alcuni componenti in plastica.
• Non conservare in ambienti soggetti a temperature estremamente rigide. Quando il sistema si riscalda (con il ritorno alla normale temperatura) all'interno dell'apparecchio può formarsi dell'umidità che potrebbe danneggiare i circuiti elettronici.
• Non tentare di aprire l'apparecchio. Se il dispositivo viene maneggiato da persone non esperte, il sistema potrebbe danneggiarsi.
• Evitare che cada o venga sottoposto a forti urti.
• Azionare questo prodotto utilizzando solo l'alimentatore in dotazione o fornito come accessorio.
• Non sovraccaricare le prese di corrente e i cavi di prolunga per evitare incendi o scosse elettriche.
17

18
Osservare le istruzioni sulla sicurezza Per prevenire la morte e lesioni in associazione ai cavi della videocamera, assicurarsi che i cavi della videocamera e dell'adattatore CA siano sempre fuori della portata del bambino, ad una distanza di almeno 3 piedi (1 metro). Nota: È importante, anche se il vostro bambino non è ancora in grado di stare in piedi o di muoversi autonomamente.
Non usare mai prolunghe con gli adattatori AC. Usare solo gli adattatori AC forniti in dotazione.
3 piedi (1 metro)
Cavo adattatore
Questa attrezzatura è conforme ai requisiti essenziali e ad altri requisiti relativi della Direttiva 1999/5/CE.
* al tri Paes i.* Goo gle Play è un mar ch io di Goo gle Inc.
iPhone, iPad sono mar ch i di Apple Inc., reg ist rat i negl i Stat i Uni ti e in

TTD-VMi111B408-000740-00