easy hd expressway! hv-320 dvb-t fpv tv … · hv-320 dvb-t fpv tv transmitter box quick...
TRANSCRIPT

Easy HD Expressway!
WWW.HIDES.COM.TW 1
HV-320 DVB-T FPV TV Transmitter Box
Quick Installation Guide
PACKAGE CONTENTS 2
FRONT PANEL VIEW 2
BACK PANEL VIEW 2
BOARD VIEW 3
POWER ON 4
CONFIGURE THE TRANSMISSION PARAMETERS 5
BACKUP AND RESTORE DC CALIBRATION TABLE 10
FIRMWARE UPDATE 11
UART-1 TX DEBUG MESSAGES 13
UART-1 RX DATA MUX INPUT 13
TRICKS FOR LATENCY SHORTENING 17
SHORTEN RECEIVER LATENCY WITH HV-110 HD BOX 19
ENCRYPT THE RF SIGNAL 19
ENCRYPT THE STREAM DATA 20
TRICKS FOR SMOOTHING THE VIDEO MOTION 20
CUSTOMIZE THE ENCODED FRAME RATE 22

Easy HD Expressway!
WWW.HIDES.COM.TW 2
Package Contents
HV-320 Transmitter Box
5V or 12V DC adaptor
USB UART dongle
Firmware version: V0.0.5.4.70
Front Panel View
Back Panel View
Easy HD Expressway!
WWW.HIDES.COM.TW 3
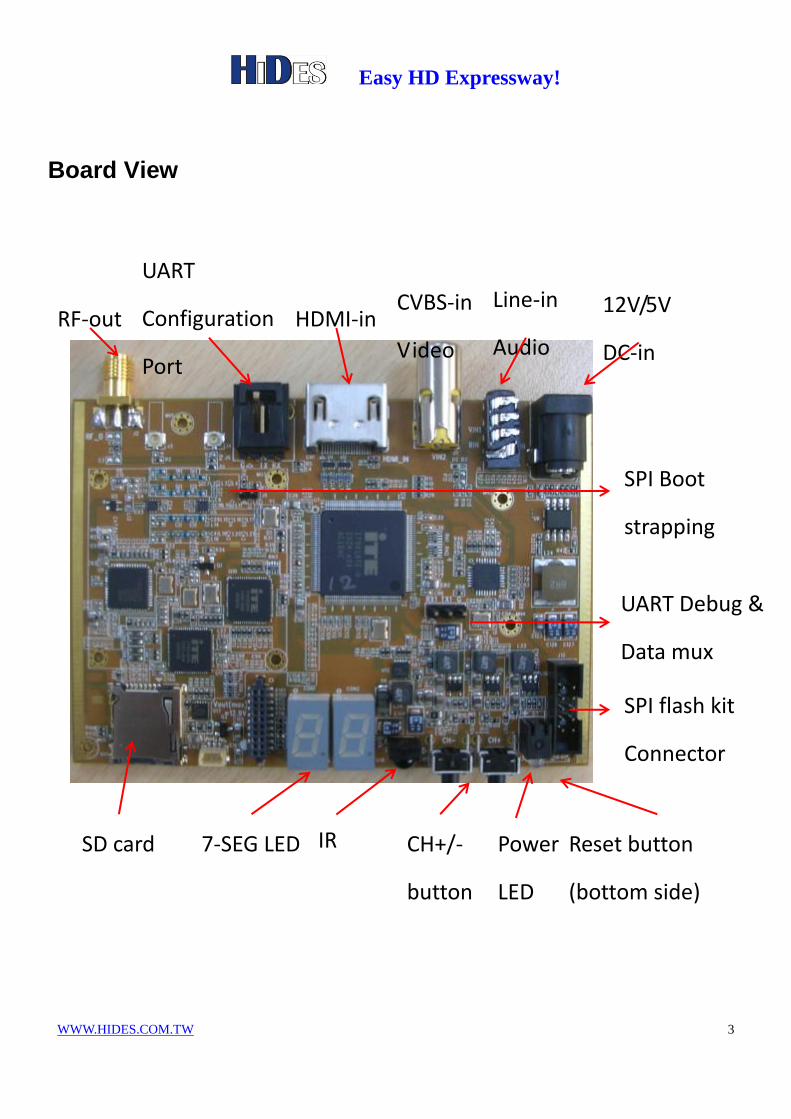
Board View
RF-out
UART
Configuration
Port
HDMI-in CVBS-in
Video
Line-in
Audio
12V/5V
DC-in
SD card 7-SEG LED CH+/-
button
Reset button
(bottom side)
Power
LED
IR
UART Debug &
Data mux
SPI flash kit
Connector
SPI Boot
strapping

Easy HD Expressway!
WWW.HIDES.COM.TW 4
Connect RF-output and the video input source
Feed the RF-out to the SMA connector.
Either HDMI or CVBS video input is supported, but only one source can be connected.
Power on
Note: It’s very important, in high gain mode, please attached an antenna before power on the box in
high gain mode. The power amplifier may burn out without any antenna attached.
Apply DC 5V or 12V to the power jack. One and only one DC power source is enough.
1. HV-320E/EH can support either 5VDC or 6~16 DC input.
2. For HV-320 with PA900/PA1200/ PA2400, it’s recommended to use 12V DC only.
(DC-in higher than 12.5V will damage the PA!!!)
+
After power on, the default transmission channel is CH 21, 474 MHz / 8MHz BW.
Easy HD Expressway!
WWW.HIDES.COM.TW 5
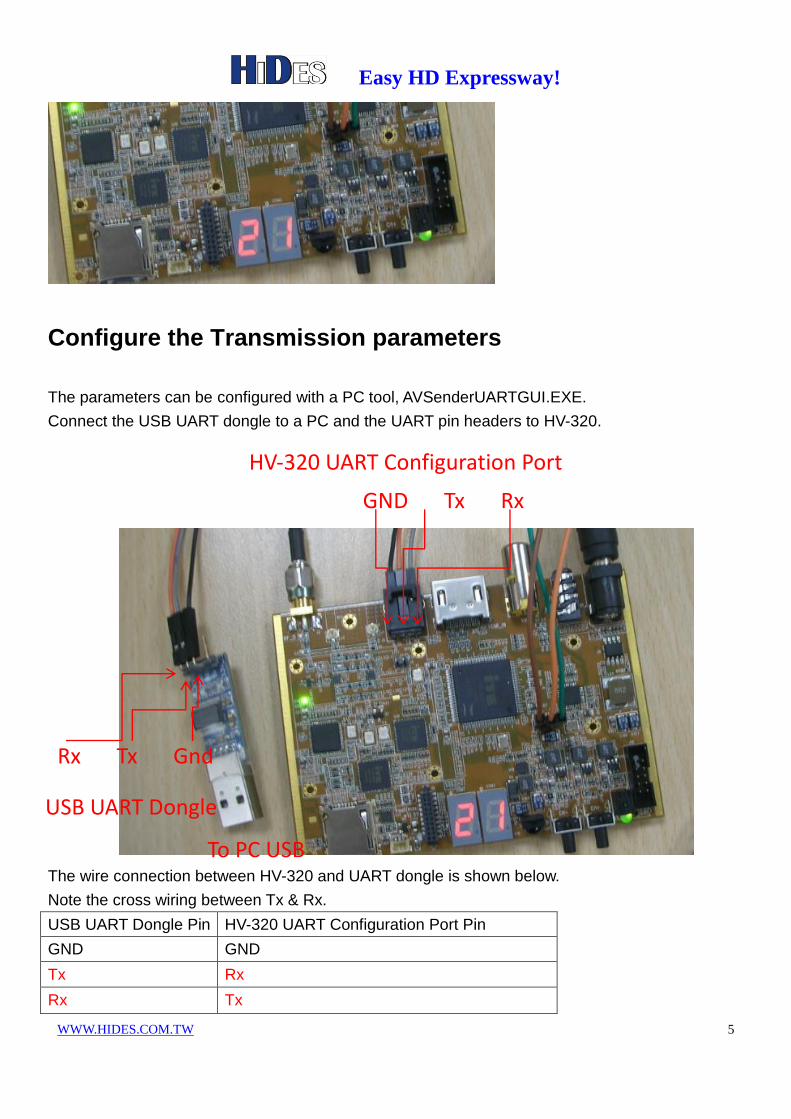
Configure the Transmission parameters
The parameters can be configured with a PC tool, AVSenderUARTGUI.EXE.
Connect the USB UART dongle to a PC and the UART pin headers to HV-320.
The wire connection between HV-320 and UART dongle is shown below.
Note the cross wiring between Tx & Rx.
USB UART Dongle Pin HV-320 UART Configuration Port Pin
GND GND
Tx Rx
Rx Tx
To PC USB
HV-320 UART Configuration Port
GND Tx Rx
Rx Tx Gnd
USB UART Dongle
Easy HD Expressway!
WWW.HIDES.COM.TW 6
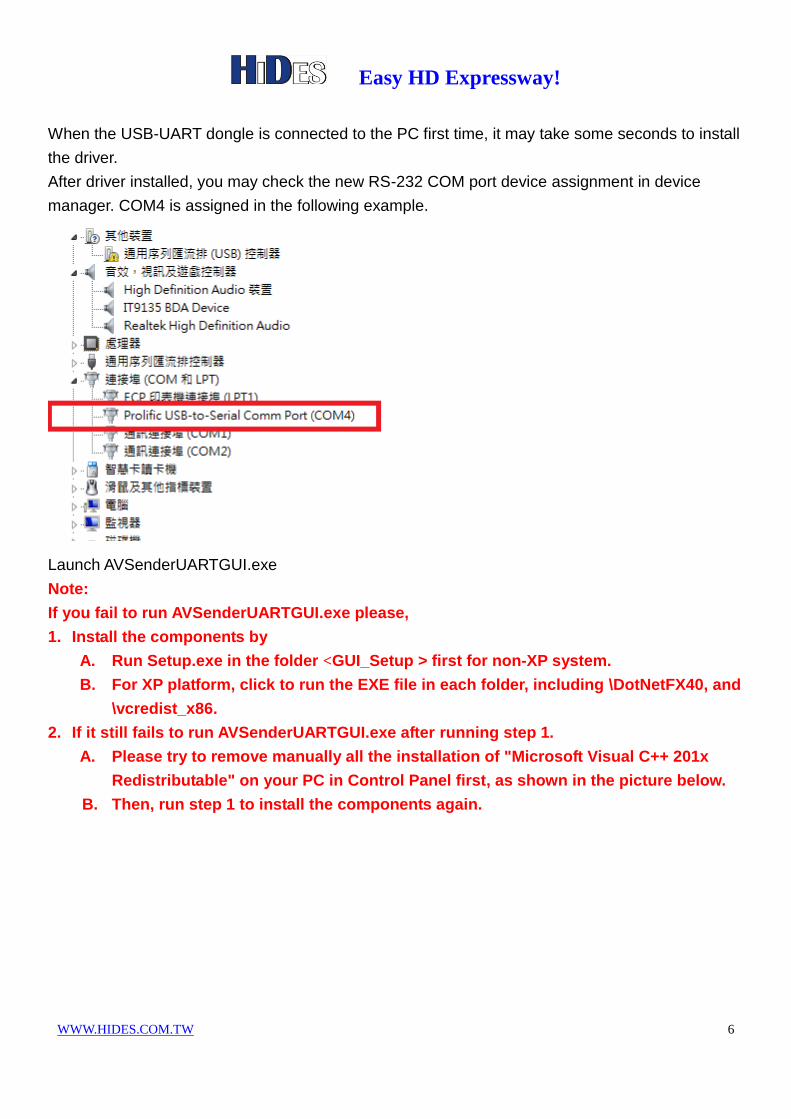
When the USB-UART dongle is connected to the PC first time, it may take some seconds to install
the driver.
After driver installed, you may check the new RS-232 COM port device assignment in device
manager. COM4 is assigned in the following example.
Launch AVSenderUARTGUI.exe
Note:
If you fail to run AVSenderUARTGUI.exe please,
1. Install the components by
A. Run Setup.exe in the folder <GUI_Setup > first for non-XP system.
B. For XP platform, click to run the EXE file in each folder, including \DotNetFX40, and
\vcredist_x86.
2. If it still fails to run AVSenderUARTGUI.exe after running step 1.
A. Please try to remove manually all the installation of "Microsoft Visual C++ 201x
Redistributable" on your PC in Control Panel first, as shown in the picture below.
B. Then, run step 1 to install the components again.

Easy HD Expressway!
WWW.HIDES.COM.TW 7
Select the correct com port for the USB UART cable.
Click on “Open/Close” button to connect HV-320.
In the “MediaConfig” page, please click on “GetMediaConfig” button first.
You can configure the “Max Bit Rate” for video compression.
When configuration is done, click on “SetMediaConfig” button to set HV-320.

Easy HD Expressway!
WWW.HIDES.COM.TW 8
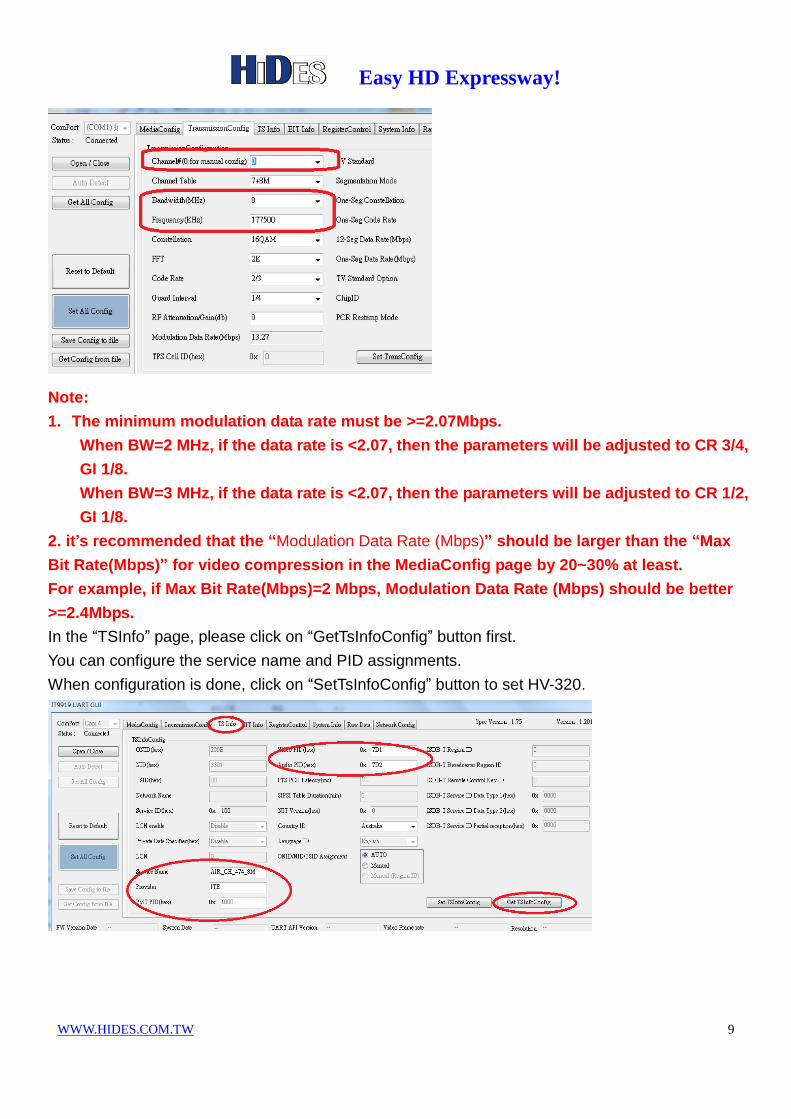
In the “TransmissionConfig” page, please click on “GetTransConfig” button first.
You can configure the Channel number or the transmission parameters.
When configuration is done, click on “SetTransConfig” button to set HV-320.
If you want to input frequency and bandwidth manually, please select Channel#
0. The bandwidth and frequency fields will be un-grayed then.
Easy HD Expressway!
WWW.HIDES.COM.TW 9
Note:
1. The minimum modulation data rate must be >=2.07Mbps.
When BW=2 MHz, if the data rate is <2.07, then the parameters will be adjusted to CR 3/4,
GI 1/8.
When BW=3 MHz, if the data rate is <2.07, then the parameters will be adjusted to CR 1/2,
GI 1/8.
2. it’s recommended that the “Modulation Data Rate (Mbps)” should be larger than the “Max
Bit Rate(Mbps)” for video compression in the MediaConfig page by 20~30% at least.
For example, if Max Bit Rate(Mbps)=2 Mbps, Modulation Data Rate (Mbps) should be better
>=2.4Mbps.
In the “TSInfo” page, please click on “GetTsInfoConfig” button first.
You can configure the service name and PID assignments.
When configuration is done, click on “SetTsInfoConfig” button to set HV-320.
Easy HD Expressway!
WWW.HIDES.COM.TW 1 0
Backup and Restore DC Calibration Table
For each HV-320, a specific DC calibration table is kept in the NOR flash to optimize the DC LO
leakage.
This paragraph describes how to back up and restore the DC calibration table.
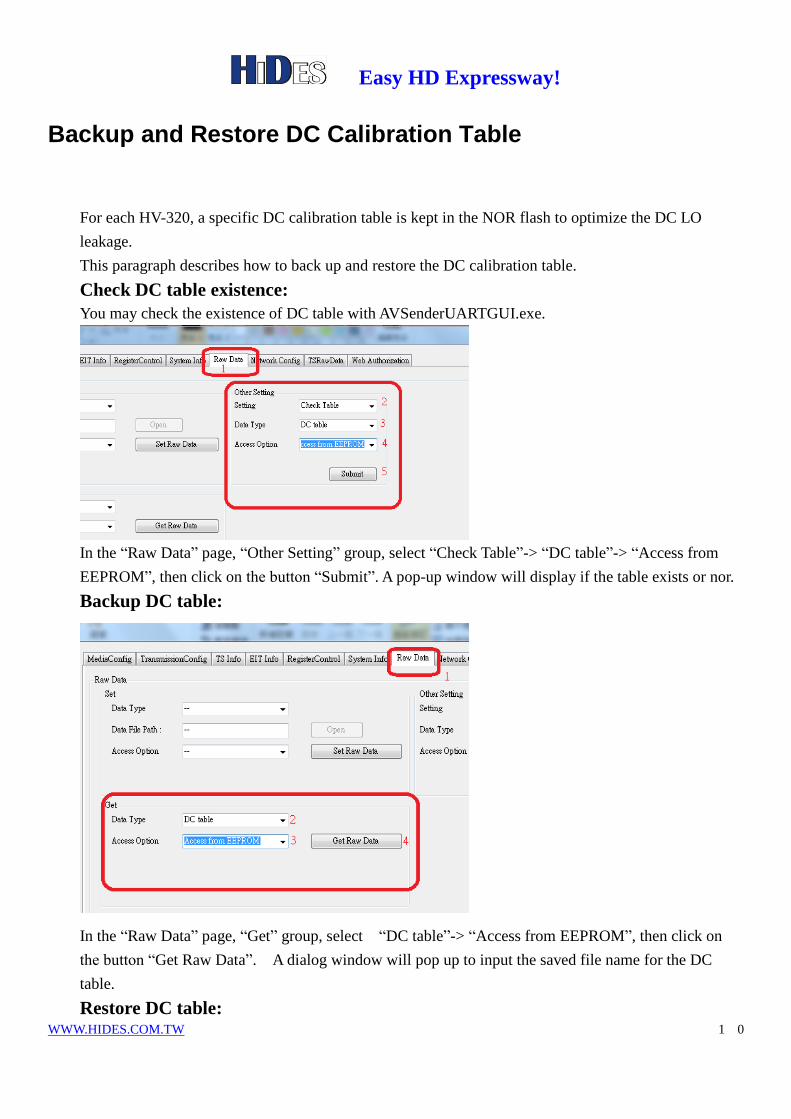
Check DC table existence:
You may check the existence of DC table with AVSenderUARTGUI.exe.
In the “Raw Data” page, “Other Setting” group, select “Check Table”-> “DC table”-> “Access from
EEPROM”, then click on the button “Submit”. A pop-up window will display if the table exists or nor.
Backup DC table:
In the “Raw Data” page, “Get” group, select “DC table”-> “Access from EEPROM”, then click on
the button “Get Raw Data”. A dialog window will pop up to input the saved file name for the DC
table.
Restore DC table:

Easy HD Expressway!
WWW.HIDES.COM.TW 1 1
In the “Raw Data” page, “Set” group, select “DC table”-> “Open” a DC table file->“Access from
EEPROM”, then click on the button “Set Raw Data”.
Firmware Update
Before firmware update, it’s recommend to backup a copy of the DC calibration table in the NOR flash.
The firmware update process may corrupt the DC calibration table in the NOR flash.
1. Copy the firmware image file “jedi.img” to the root directory of a micro SD card.
2. Power the HV-320 box down.
3. Plug in the micro SD card
Easy HD Expressway!
WWW.HIDES.COM.TW 1 2
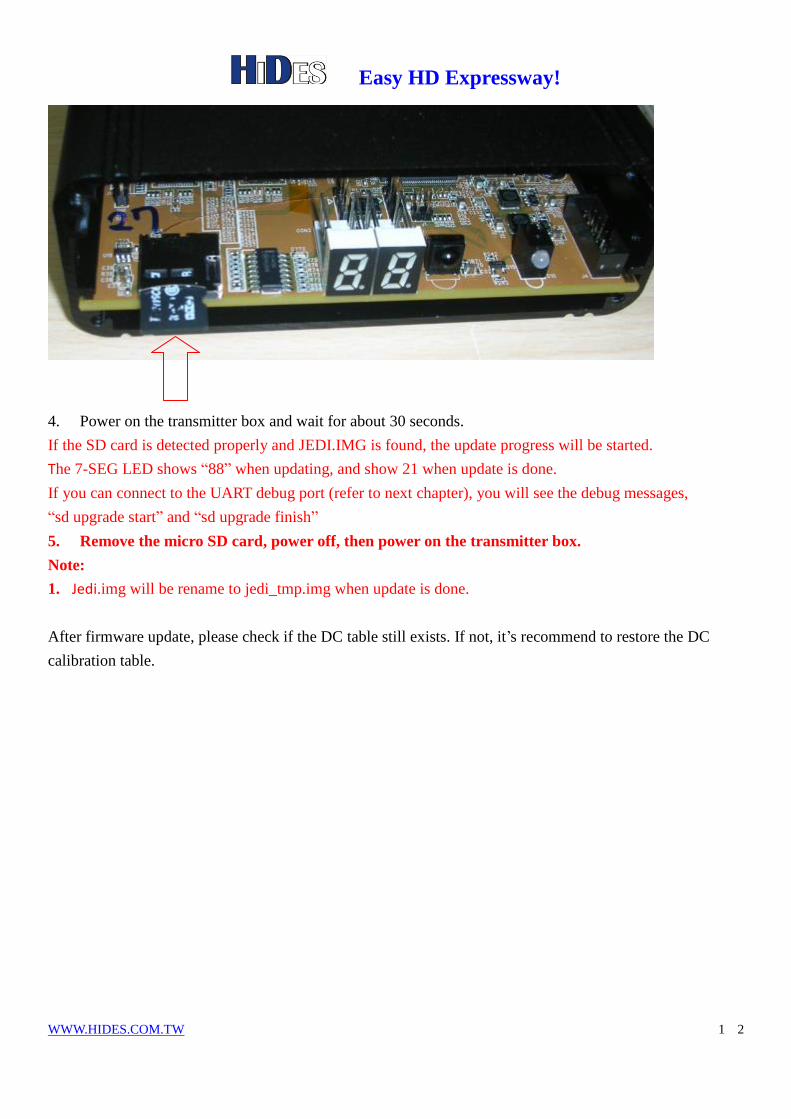
4. Power on the transmitter box and wait for about 30 seconds.
If the SD card is detected properly and JEDI.IMG is found, the update progress will be started.
The 7-SEG LED shows “88” when updating, and show 21 when update is done.
If you can connect to the UART debug port (refer to next chapter), you will see the debug messages,
“sd upgrade start” and “sd upgrade finish”
5. Remove the micro SD card, power off, then power on the transmitter box.
Note:
1. Jedi.img will be rename to jedi_tmp.img when update is done.
After firmware update, please check if the DC table still exists. If not, it’s recommend to restore the DC
calibration table.
Easy HD Expressway!
WWW.HIDES.COM.TW 1 3
UART-1 Tx Debug Messages
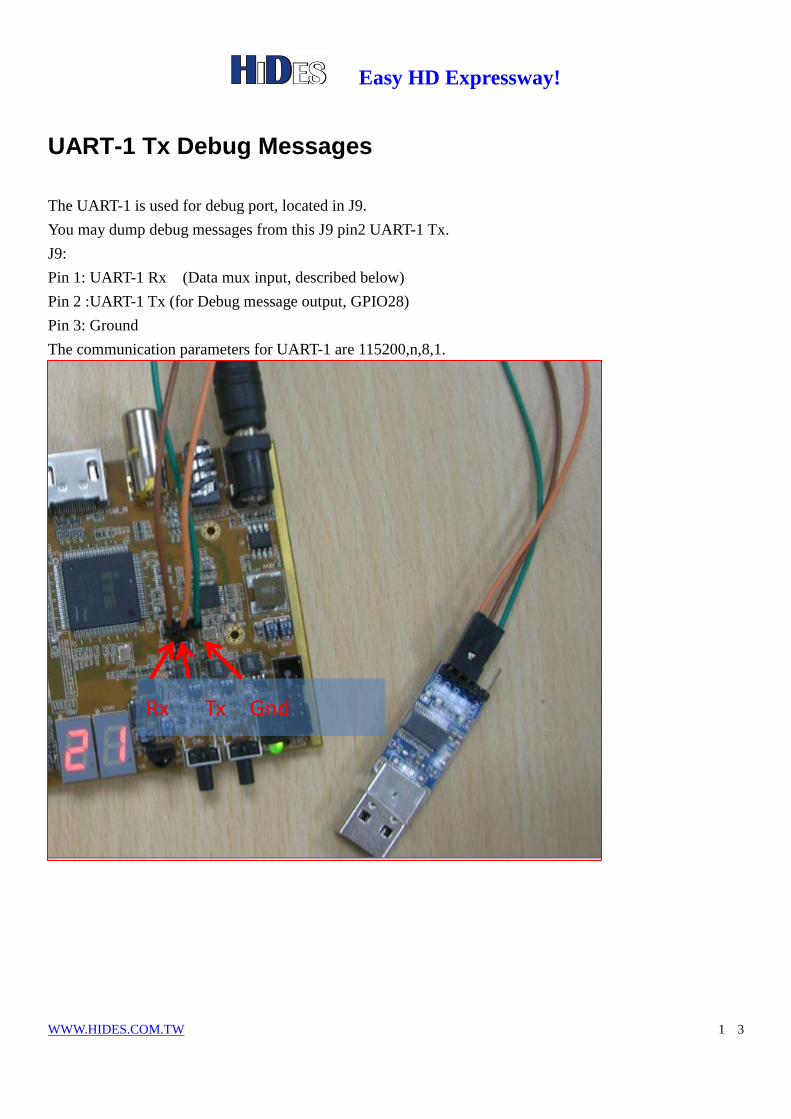
The UART-1 is used for debug port, located in J9.
You may dump debug messages from this J9 pin2 UART-1 Tx.
J9:
Pin 1: UART-1 Rx (Data mux input, described below)
Pin 2 :UART-1 Tx (for Debug message output, GPIO28)
Pin 3: Ground
The communication parameters for UART-1 are 115200,n,8,1.
Rx Tx Gnd
Easy HD Expressway!
WWW.HIDES.COM.TW 1 4
UART-1 Rx Data mux input
the UART-1 Rx (IT9919 pin 66, GPIO27) is also used for data (GPS aviation or any digital information)
mux input, while UART-1 Tx for debug message output.
The communication parameters for UART-1 are 115200,n,8,1.
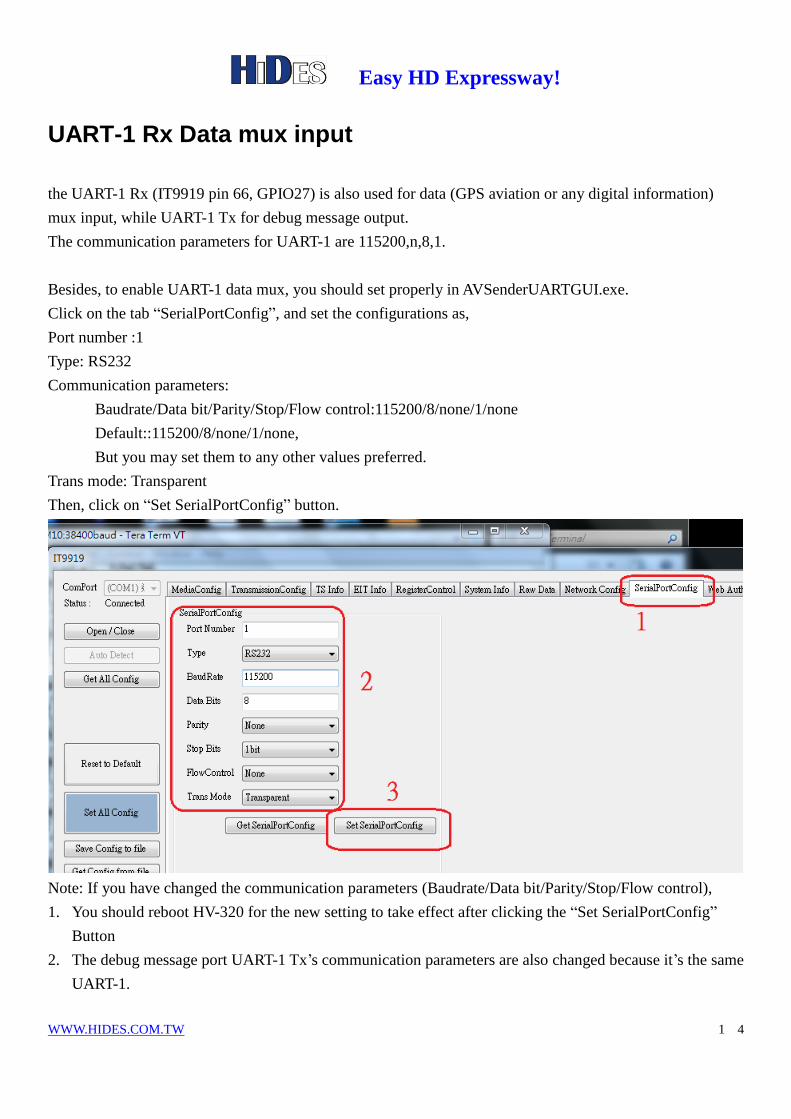
Besides, to enable UART-1 data mux, you should set properly in AVSenderUARTGUI.exe.
Click on the tab “SerialPortConfig”, and set the configurations as,
Port number :1
Type: RS232
Communication parameters:
Baudrate/Data bit/Parity/Stop/Flow control:115200/8/none/1/none
Default::115200/8/none/1/none,
But you may set them to any other values preferred.
Trans mode: Transparent
Then, click on “Set SerialPortConfig” button.
Note: If you have changed the communication parameters (Baudrate/Data bit/Parity/Stop/Flow control),
1. You should reboot HV-320 for the new setting to take effect after clicking the “Set SerialPortConfig”
Button
2. The debug message port UART-1 Tx’s communication parameters are also changed because it’s the same
UART-1.

Easy HD Expressway!
WWW.HIDES.COM.TW 1 5
Configure with Android Tablet or Smartphone An Android App (AVSender Tool Kit.APK) is provided for users to configure HV-320 parameters with an
Android Table PC or smart phone.
Note:
1. The android platform and USB cable should support USB-OTG feature.
(Hint: If the Android platform supports USB-OTG, you should be able to access USB disk via the USB
port)
2. For Nexus 7 or Nexus 10 tablets. Please install OTG Disk Explorer on http://goo.gl/7zBgYx
Please click AVSender Tool Kit.APK on your Android platform to install it.
The APK can also be found on,
https://drive.google.com/folderview?id=0B8b3vTd96xbsNlJWOVROSXZxSGc&usp=sharing
After installation, the tool will pop up when HV-320 is connected to your Android platform.
Or, you may click on the icon to launch the tool.
On the system page, the “Reset” icon can be used to reset HV-320 to system default
Easy HD Expressway!
WWW.HIDES.COM.TW 1 6
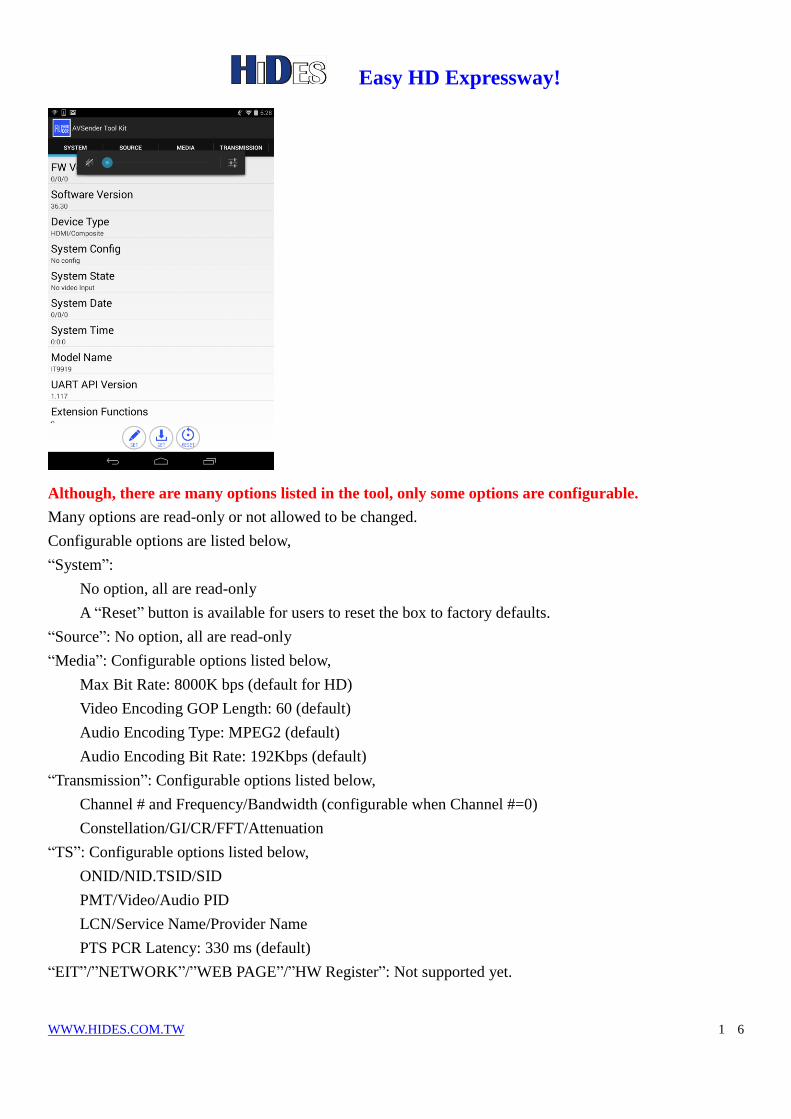
Although, there are many options listed in the tool, only some options are configurable.
Many options are read-only or not allowed to be changed.
Configurable options are listed below,
“System”:
No option, all are read-only
A “Reset” button is available for users to reset the box to factory defaults.
“Source”: No option, all are read-only
“Media”: Configurable options listed below,
Max Bit Rate: 8000K bps (default for HD)
Video Encoding GOP Length: 60 (default)
Audio Encoding Type: MPEG2 (default)
Audio Encoding Bit Rate: 192Kbps (default)
“Transmission”: Configurable options listed below,
Channel # and Frequency/Bandwidth (configurable when Channel #=0)
Constellation/GI/CR/FFT/Attenuation
“TS”: Configurable options listed below,
ONID/NID.TSID/SID
PMT/Video/Audio PID
LCN/Service Name/Provider Name
PTS PCR Latency: 330 ms (default)
“EIT”/”NETWORK”/”WEB PAGE”/”HW Register”: Not supported yet.
Easy HD Expressway!
WWW.HIDES.COM.TW 1 7
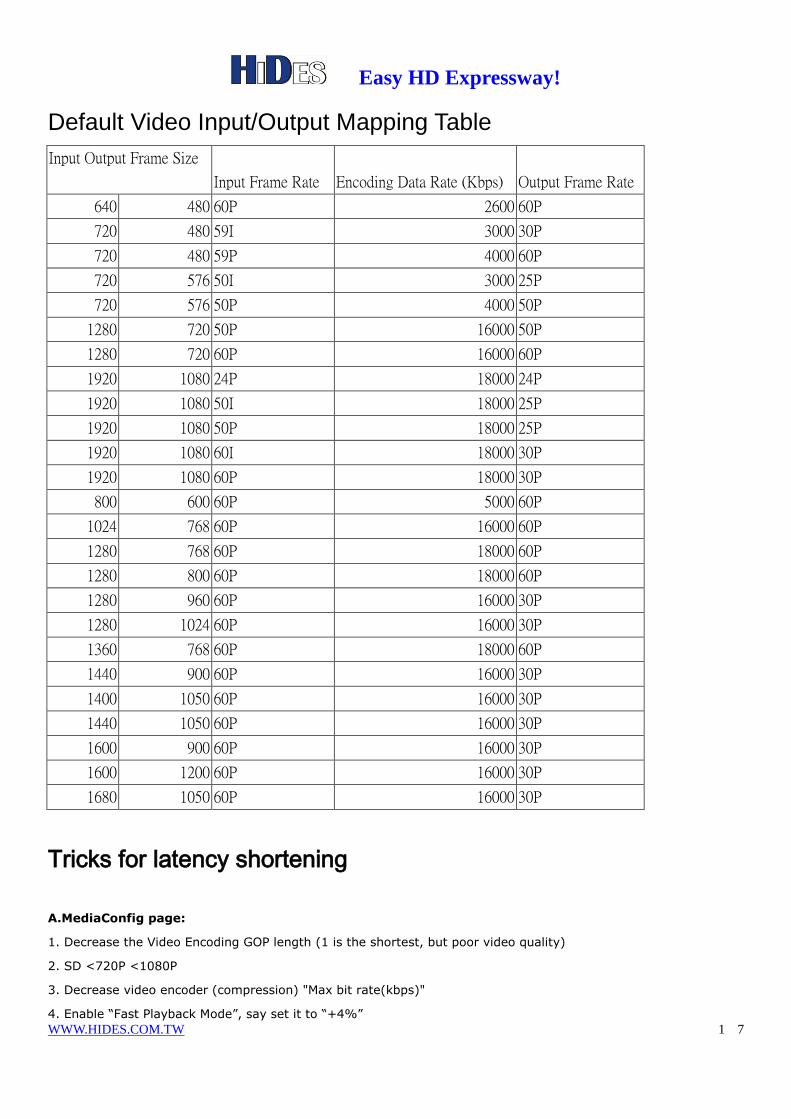
Default Video Input/Output Mapping Table
Input Output Frame Size
Input Frame Rate Encoding Data Rate (Kbps) Output Frame Rate
640 480 60P 2600 60P
720 480 59I 3000 30P
720 480 59P 4000 60P
720 576 50I 3000 25P
720 576 50P 4000 50P
1280 720 50P 16000 50P
1280 720 60P 16000 60P
1920 1080 24P 18000 24P
1920 1080 50I 18000 25P
1920 1080 50P 18000 25P
1920 1080 60I 18000 30P
1920 1080 60P 18000 30P
800 600 60P 5000 60P
1024 768 60P 16000 60P
1280 768 60P 18000 60P
1280 800 60P 18000 60P
1280 960 60P 16000 30P
1280 1024 60P 16000 30P
1360 768 60P 18000 60P
1440 900 60P 16000 30P
1400 1050 60P 16000 30P
1440 1050 60P 16000 30P
1600 900 60P 16000 30P
1600 1200 60P 16000 30P
1680 1050 60P 16000 30P
Tricks for latency shortening
A.MediaConfig page:
1. Decrease the Video Encoding GOP length (1 is the shortest, but poor video quality)
2. SD <720P <1080P
3. Decrease video encoder (compression) "Max bit rate(kbps)"
4. Enable “Fast Playback Mode”, say set it to “+4%”
Easy HD Expressway!
WWW.HIDES.COM.TW 1 8
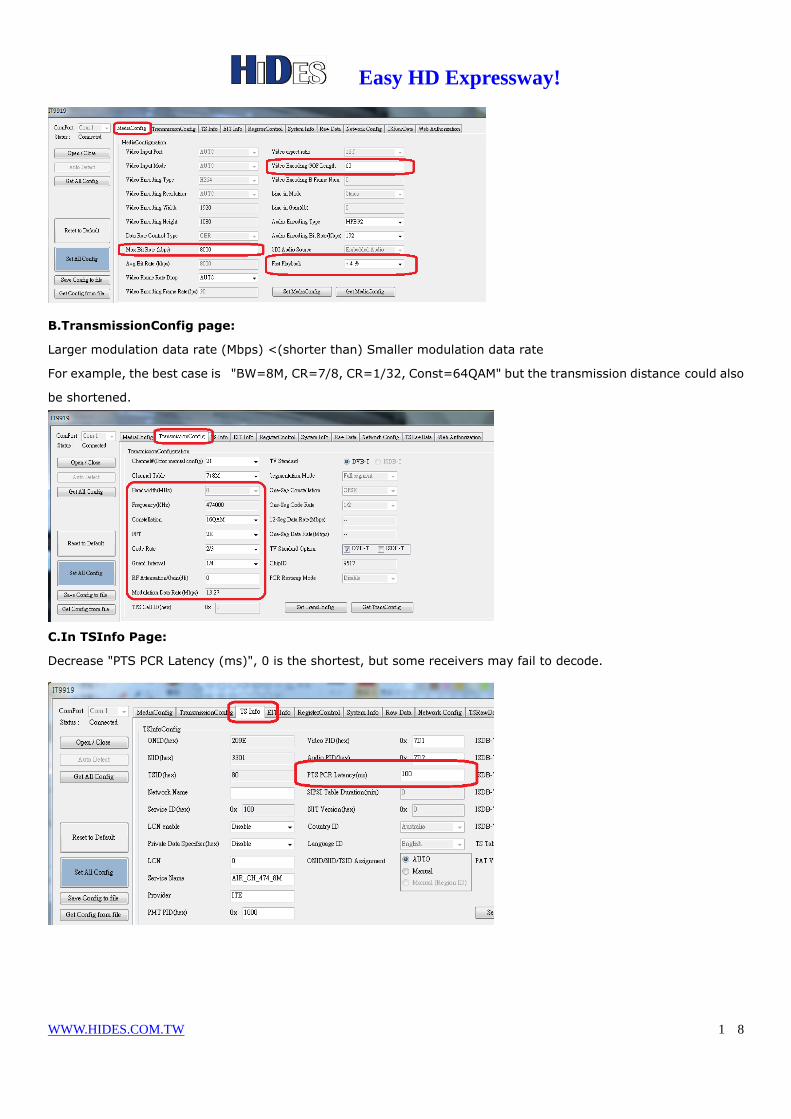
B.TransmissionConfig page:
Larger modulation data rate (Mbps) <(shorter than) Smaller modulation data rate
For example, the best case is "BW=8M, CR=7/8, CR=1/32, Const=64QAM" but the transmission distance could also
be shortened.
C.In TSInfo Page:
Decrease "PTS PCR Latency (ms)", 0 is the shortest, but some receivers may fail to decode.
Easy HD Expressway!
WWW.HIDES.COM.TW 1 9
Shorten receiver latency with HV-110 HD box
If you are testing HV-320 Tx latency with HV-110 Rx, you may get a special firmware from Hides for
HV-110 Rx.
The special firmware for HV-110 Rx can decrease the receiver latency very much.
However, with the new firmware, HV-110 can only decode HD video from HV-320, and cannot decode
video from other Tx sources, like HV-100/HV-102 or live TV stations.
Please consult Hides ([email protected]) for the special low-latency firmware for HV-110.
In the soon future, we will provide a single low-latency HV-110 firmware which supports HD video from
any Tx source.
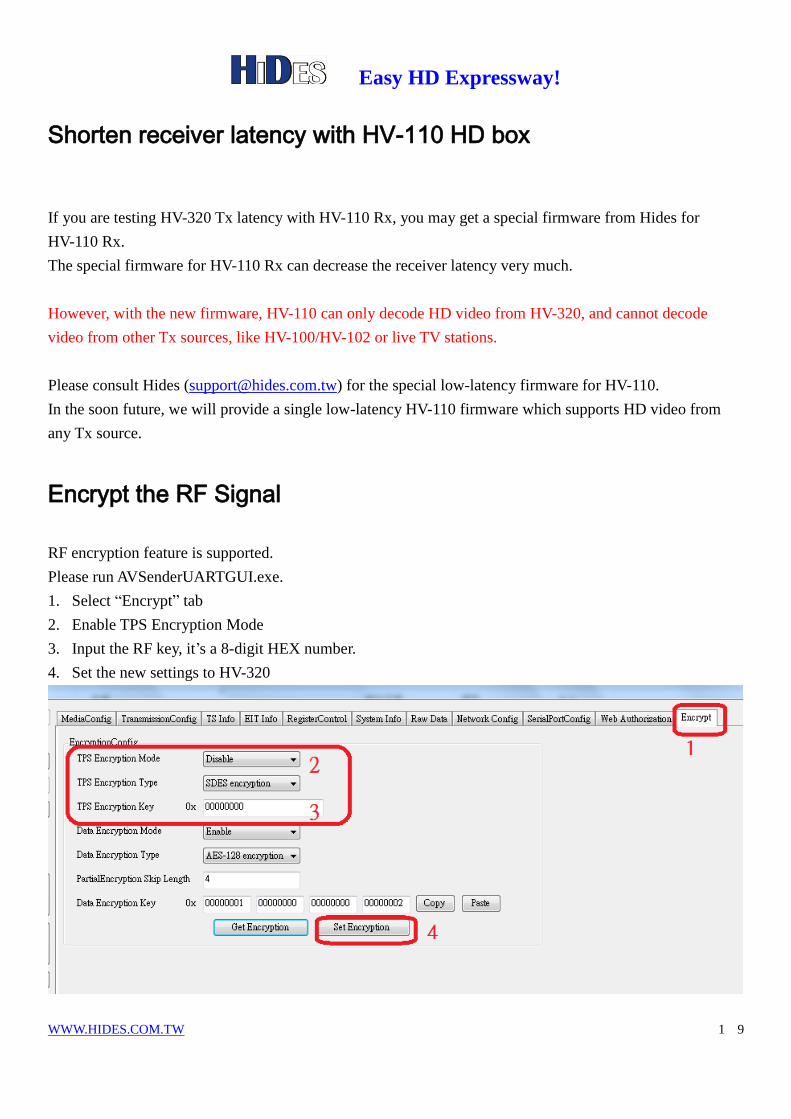
Encrypt the RF Signal
RF encryption feature is supported.
Please run AVSenderUARTGUI.exe.
1. Select “Encrypt” tab
2. Enable TPS Encryption Mode
3. Input the RF key, it’s a 8-digit HEX number.
4. Set the new settings to HV-320

Easy HD Expressway!
WWW.HIDES.COM.TW 2 0
Encrypt the Stream Data
TS data encryption feature is supported.
Please run AVSenderUARTGUI.exe.
1. Select “Encrypt” tab
2. Enable Data Encryption Mode
3. Input the key, it’s a 32-digit HEX number.
4. Set the new settings to HV-320
Tricks for smoothing the video motion
If there are large motions in the video input, the encoded stream may have glitches and stutter on the TV.
You may change the configuration to get the optimized video smoothness.
A.MediaConfig page:
Check video encoder (compression) "Max bit rate(kbps)" which is better to be less than modulation data rate by 50%.
For example, if it’s 8000Kbps, modulation data rate is recommended to be 12000Kbps.

Easy HD Expressway!
WWW.HIDES.COM.TW 2 1
B.TransmissionConfig page:
Modulation data rate should be larger than video encoder (compression) "Max bit rate(kbps)" by 50%. For example,
if video encoder (compression) "Max bit rate(kbps)" is 8000Kbps, modulation data rate is recommended to be
12000Kbps. Change the transmission parameters properly to fit this requirement.
C.In TSInfo Page:
Increase "PTS PCR Latency (ms)" to a larger value, say 1000ms or larger.
Easy HD Expressway!
WWW.HIDES.COM.TW 2 2
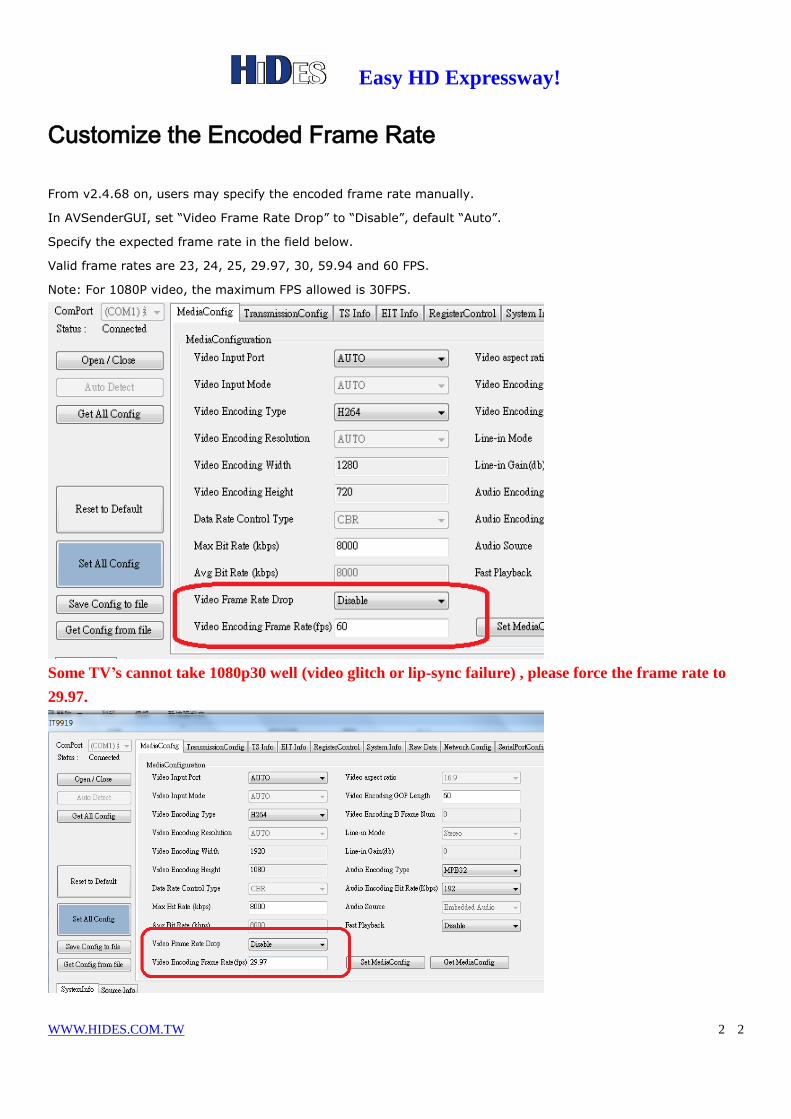
Customize the Encoded Frame Rate
From v2.4.68 on, users may specify the encoded frame rate manually.
In AVSenderGUI, set “Video Frame Rate Drop” to “Disable”, default “Auto”.
Specify the expected frame rate in the field below.
Valid frame rates are 23, 24, 25, 29.97, 30, 59.94 and 60 FPS.
Note: For 1080P video, the maximum FPS allowed is 30FPS.
Some TV’s cannot take 1080p30 well (video glitch or lip-sync failure) , please force the frame rate to
29.97.