e-procurement - poncvo.puducherry.gov.in/e-procurement/powerpoint/entire processs... · 6 allow...
TRANSCRIPT

1
E-PROCUREMENT
2
TABLE OF CONTENTS
1. INTRODUCTION
2. TENDER CREATION AND PUBLISHING
2.1 LOGGING INTO THE SYSTEM.
2.2 CREATING THE TENDER
2.2.1. Creation of Basic Details
2.2.2. Cover Details
2.2.3. NIT Documents
2.2.4. Creation of Tender Work/Item Details
2.2.5. Fee details
2.2.6. Critical Dates
2.2.7. Bid Opener Selection
2.2.8. Work Item Documents
2.2.9. Other Important Documents
2.3 PUBLISHING THE TENDER

3
3. BID SUBMISSION
3.1 Logging into the System.
3.2 Seek Clarification
3.3 Bid Submission
4. BID OPENING
4.1 Logging into the System.
4.2 Opening and Evaluation
4.2.1 Technical Bid Opening
4.2.2 Technical Evaluation
4.2.3 Financial Bid Opening
4.2.4 Financial Bid Evaluation
4.3 A ward of Contract
5. CORRIGENDUM
5.1 Creating the Corrigendum
5.2 Publishing the Corrigendum.

4
1. INTRODUCTION E –Procurement : E –Procurement is a process of buying or selling products online. It is a Mission Mode Project which clearly defines the measurable output by making the process simple and transparent. E–Procurement System is developed by GepNIC. Advantages of eprocurement: There is non discrimination among the bidders. Secured online bid submission .No Per Bid Bidding Charges . The data is encrypted at the Client end using DSC and secured encrypted data is transferred to the server. Tender: An open invitation to offer a work or service. Roles and functions of department users ROLES FUNCTIONS Procurement Officer Admin Creates a New Call for Tender Procurement Officer Publisher Publishes a Tender Procurement Officer Opener Participates in Bid Opening Procurement Officer Evaluator Participates in Bid Evaluation Auditor Auditing of Tenders

5
2. TENDER CREATION AND PUBLISHING 2.1 Logging into the System.
1. Access the E-Procurement system by typing the following address, or Universal Resource Locator (URL), in your Web Browser.
http://demoeproc.nic.in/
2. Logging on to the system using the DSC Card
a. Insert your DSC Card into the USB Port.
b. Enter the Login and Password and click ‘Submit’.

6
When the authentication process is successful, you are logged on to the
E-Procurement system and below page gets displayed.
Once the password is given, below page gets displayed.
2.2 Creating the Tender
Select the ‘Tender List’ option from the menu.
7
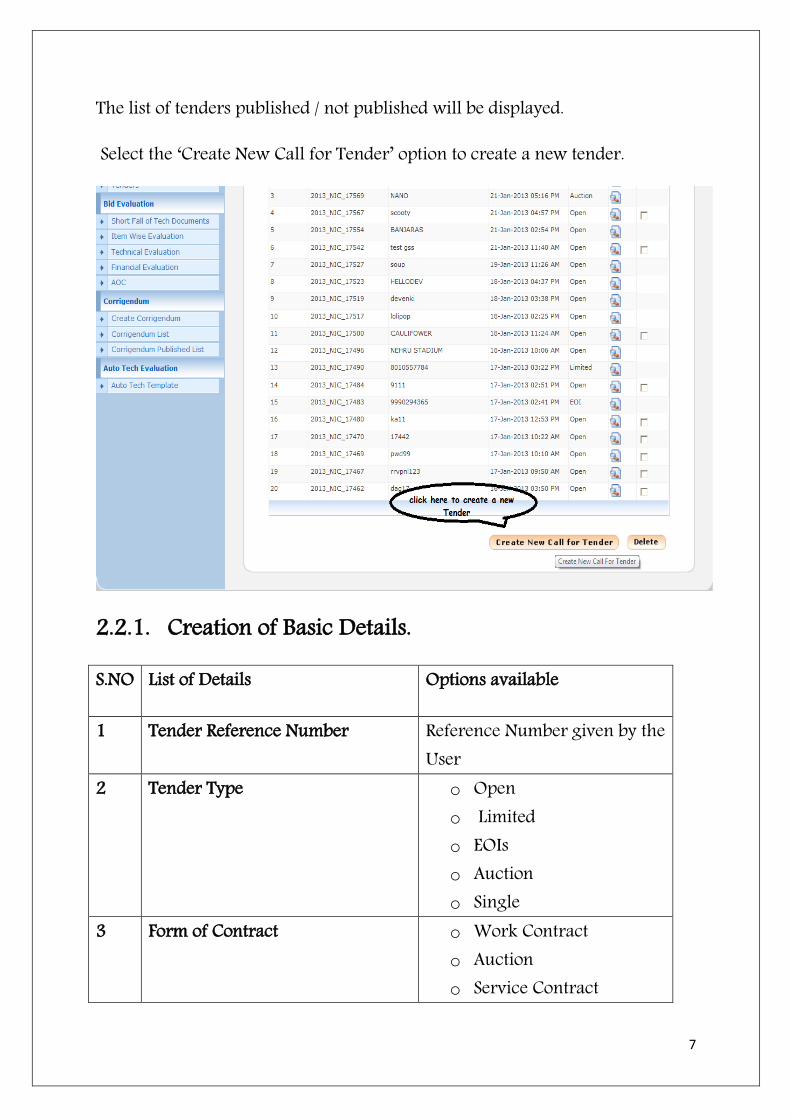
The list of tenders published / not published will be displayed.
Select the ‘Create New Call for Tender’ option to create a new tender.
2.2.1. Creation of Basic Details.
S.NO List of Details Options available
1 Tender Reference Number Reference Number given by the User
2 Tender Type o Open o Limited o EOIs o Auction o Single
3 Form of Contract o Work Contract o Auction o Service Contract

8
o Buy o Empanelment o Sell o Buy & Service
4 No. of Covers o 1 o 2 o 3 o 4
5 Tender Category o Goods o Works o services
6 Allow Resubmission o YES o NO
7 Allow Withdrawal o YES o NO
8 Allow Offline Submission o YES o NO
9 Payment Mode o Offline o Online
9(a) If Offline : Instruments : o SS-Small Savings
Instrument o BG-Bank Guarantee o BC-Bankers Cheque o DD-Demand Draft
9(b) If Online : Banks : o ICICI o UTI o SBI o PNB

9
Enter the Tender Basic Details.

10
2.2.2 Cover Details
On Clicking “Next” below page gets displayed.
Based on the No of Covers given in the “Basic Details of Tender”, cover details needs to be entered.
No. of Covers Cover type 1 Fee/Prequalification/Technical/Financial
2 i. Fee/Prequalification/Technical ii. Financial
3 i. Fee ii. Prequalification/Technical iii. Financial
4 i. Fee ii. Prequalification iii. Technical iv. Financial

11
Since the “No of Covers” given in Basic Details is 2, First cover will have “Fee / Prequalification / Technical” details and second cover will have “Finance “ details. Enter the Document Type and Document Description and click ‘Save’ for each content. Cover 1
Repeat the same for other two documents of First cover

12
Once all the details of the First cover are given, click “submit”.

13
Repeat the same process for the second cover
Cover 2
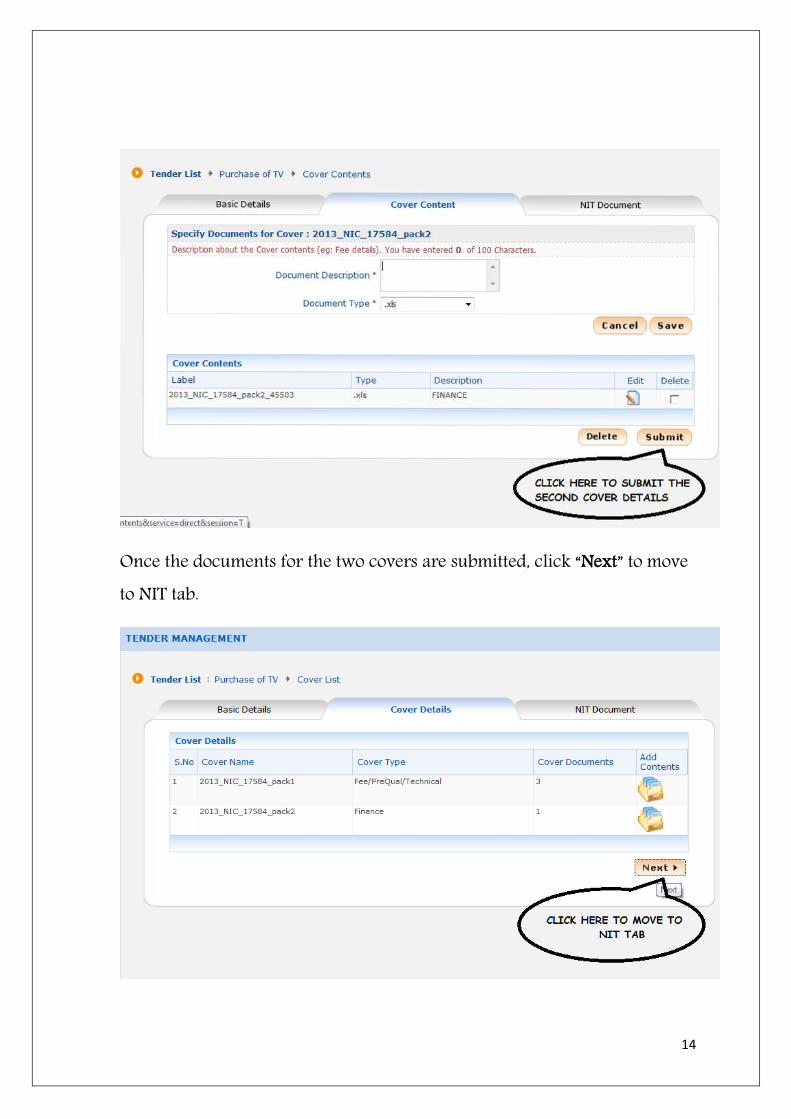
14
Once the documents for the two covers are submitted, click “Next” to move to NIT tab.

15
2.2.3 NIT DOCUMENT
On clicking “Next”, below page gets displayed. Click ‘Upload’ option to upload the Notice Inviting Tender (NIT) Document. Only .jpeg and .pdf files can be uploaded here.
Click “Browse” to upload the NIT Document.
16
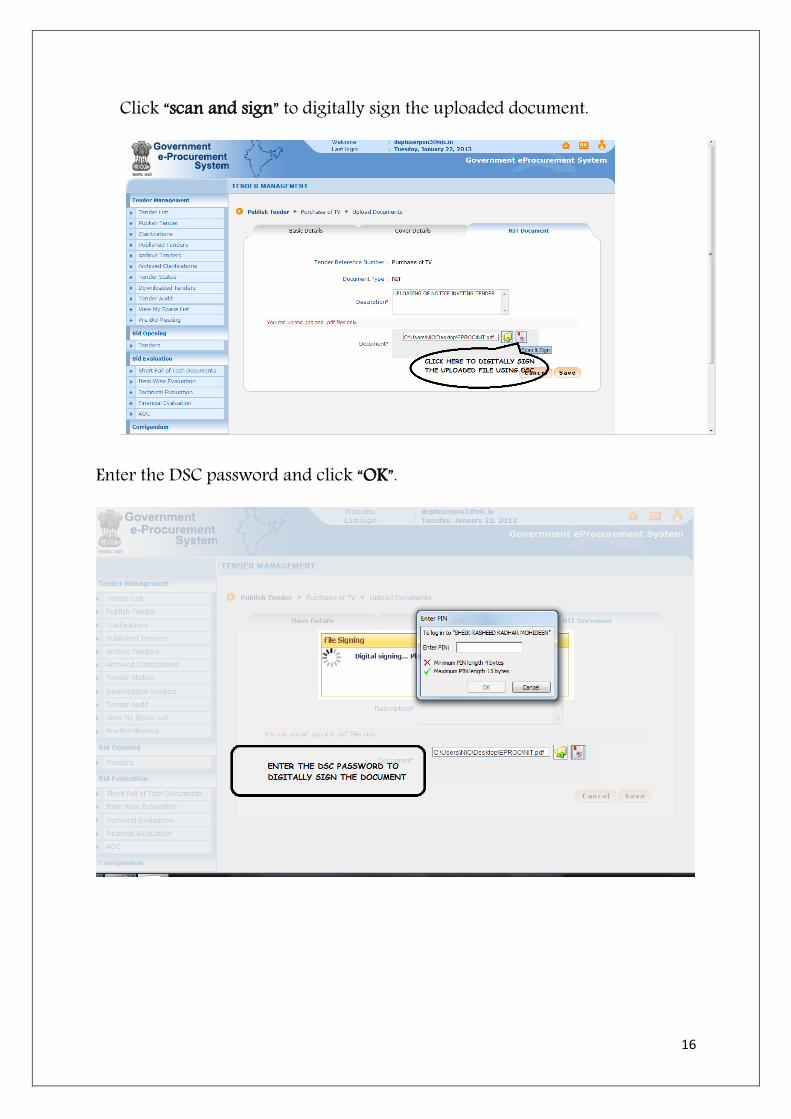
Click “scan and sign” to digitally sign the uploaded document.
Enter the DSC password and click “OK”.
17
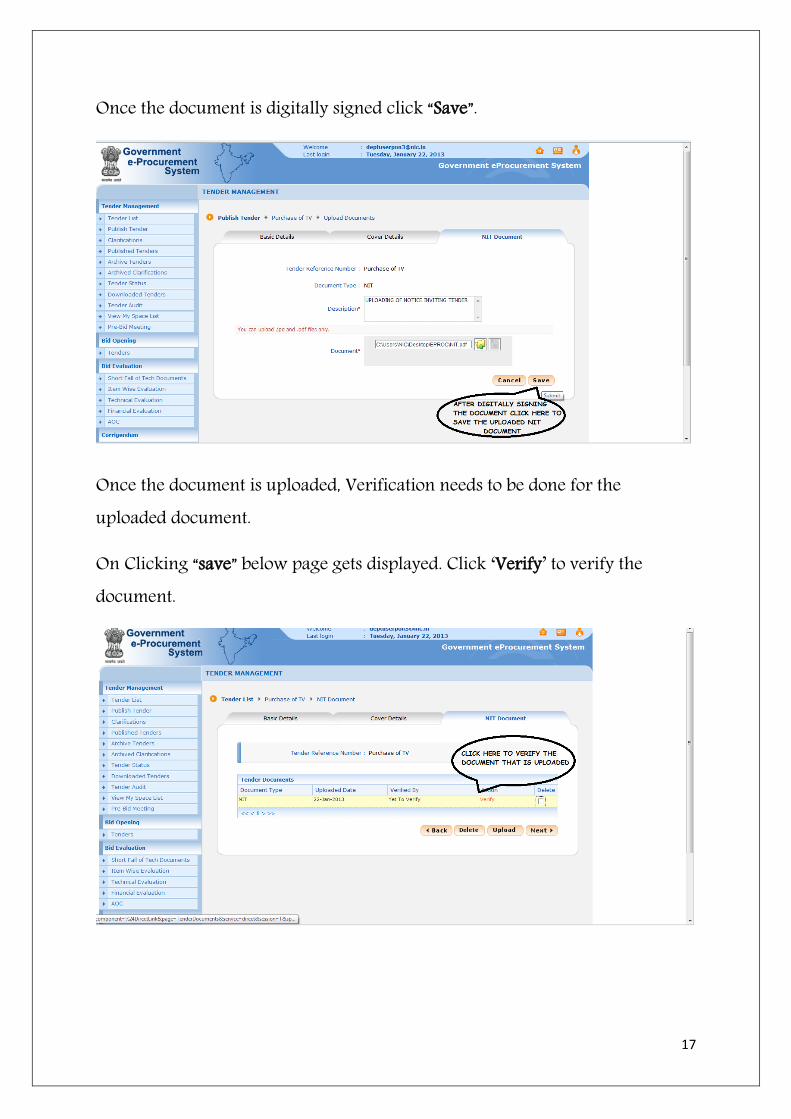
Once the document is digitally signed click “Save”.
Once the document is uploaded, Verification needs to be done for the uploaded document.
On Clicking “save” below page gets displayed. Click ‘Verify’ to verify the document.

18
On clicking “verify” below page gets displayed.
Open the document and check if it is correct and tick the check box by clicking it. Click the ‘Signed Property’ to view the person who has signed the document and the date & time at which the document was signed. When the document is open, check if the document is correct and click ‘Save’ . The following page appears. Action gets changed from “Verify” to “Verified”.
Click “Next“ to proceed.

19
The following page with the basic details, cover details and NIT document gets displayed. Click “Add New” to add the Work/Item details of the Tender.
2.2.4 Creation of Tender Work/Item Details
Title Description
Work Item Title * Title of the Work Item
Work Description * Brief description of the tender.
Pre Qual Details Pre Qualification
Product Category * The category of the Tender.
Product Sub Category Sub Category of the product.
Contract Type * The specific type of contract(Tender/Empanelment) to be selected.
Tender Value * Estimated Cost of the tender
Validity Days * The specific validity days to be selected or specified

20
Completion Period in days
The completion period in days to be specified
Location * The location of the work to be entered
Pincode The Pincode of the location to be entered
PreBid Meeting * If PreBid Meeting is required, PreBid Meeting Place and Address needs to be entered.
Bid Opening Place * The place where the bid will be opened needs be Specified
Tender Class * The Class of the Tender.
Inviting Officer * Name of the Officer who is floating the tender
Inviting Officer Address *
Address of the Officer who is floating the tender
Enter the “Work Item Details” and click “Next” to move to the “Fee details” tab.
21
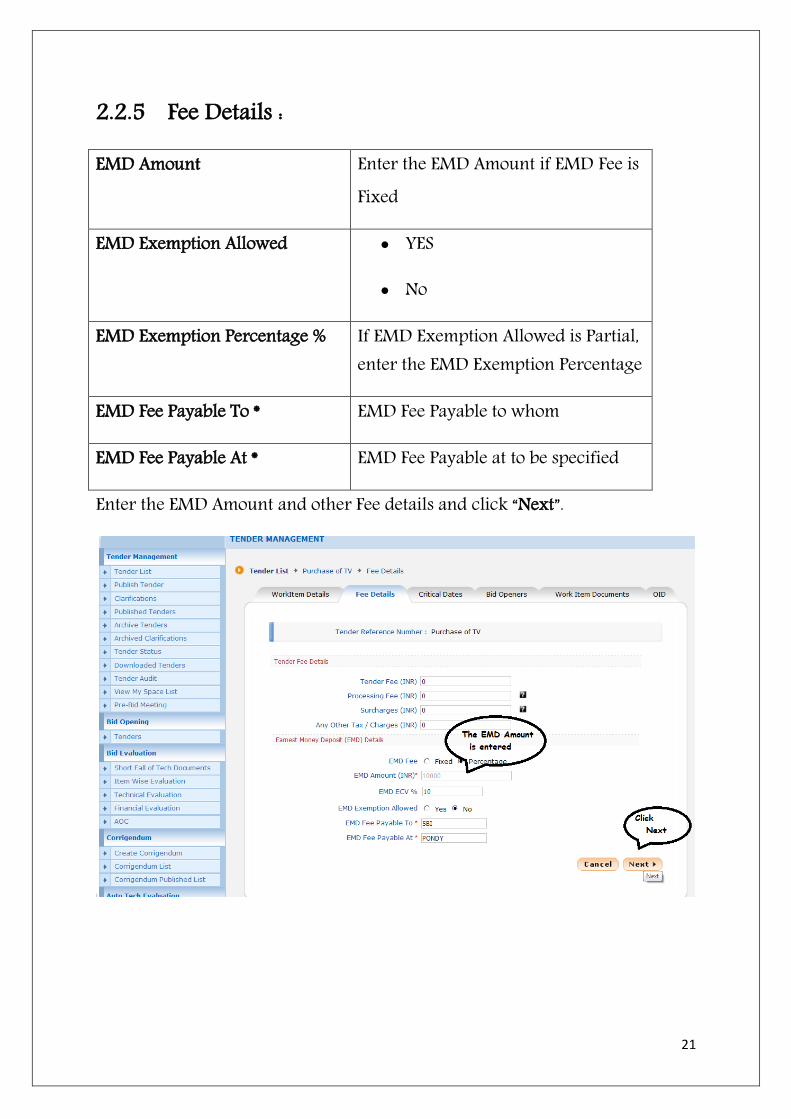
2.2.5 Fee Details :
EMD Amount Enter the EMD Amount if EMD Fee is Fixed
EMD Exemption Allowed YES
No
EMD Exemption Percentage % If EMD Exemption Allowed is Partial, enter the EMD Exemption Percentage
EMD Fee Payable To * EMD Fee Payable to whom
EMD Fee Payable At * EMD Fee Payable at to be specified
Enter the EMD Amount and other Fee details and click “Next”.

22
2.2.6 Critical Dates
Publishing Date Date of publishing of tender
Document Sale Start Date The date from which the document can be downloaded
This date should be greater than Publishing date.
Document Sale End Date The date till which the document can be downloaded
This date should be greater than Document Sale Start Date
Seek Clarification Start Date The date from which the bidders can seek Clarification
This date should be greater than

23
Document Sale End Date
Seek Clarification End Date The date by which the bidders can seek Clarification This date should be greater than Seek Clarification Start Date
Bid Submission Start Date The date from which bid can be submitted
This date should be greater than Seek Clarification End Date
Bid Submission End Date The date by which bid can be submitted
This date should be greater than Bid Submission Start Date
Bid Opening Date Date on which the tender / bids shall be opened
This date should be greater than Bid Submission End Date

24
On clicking “Next”, below page gets displayed.
Enter the dates and click “Next”.
2.2.7 Bid Opener Selection
Click “Next” to move to “Bid Openers” tab.
Available options are,
“Bid Openers in your department”

25
“Show all Bid openers in your Organization”
“Bid Openers in same level in Organization”

26
“Bid openers in Vertical level(up and down by one level)”
Click “Bid Openers in Quick selection”
27
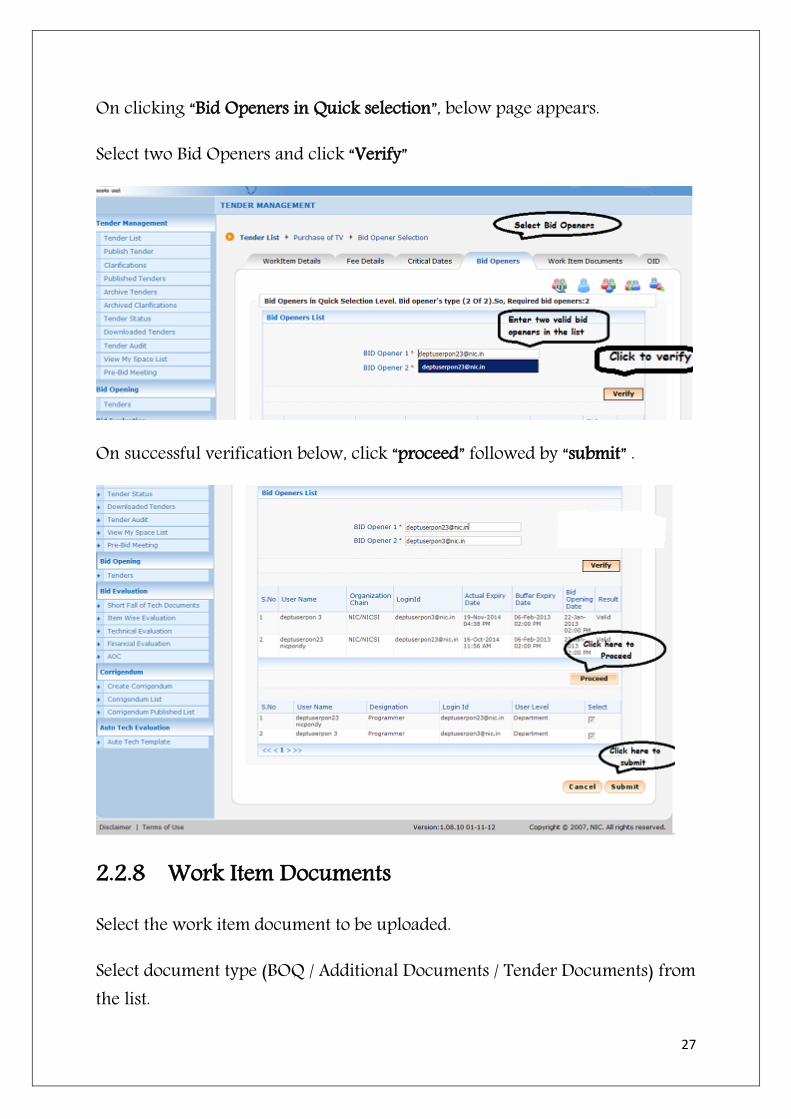
On clicking “Bid Openers in Quick selection”, below page appears.
Select two Bid Openers and click “Verify”
On successful verification below, click “proceed” followed by “submit” .
2.2.8 Work Item Documents
Select the work item document to be uploaded.
Select document type (BOQ / Additional Documents / Tender Documents) from the list.

28
Click Browse to select the tender document to be uploaded.
Click here to know more about BOQ.
BOQ.docx
Once the document is uploaded click “scan and sign” to digitally sign the document.

29
Enter your DSC password and click “OK”
Once the documents is signed below message gets displayed.

30
Once the document is uploaded click “verify” to verify the uploaded document.
On clicking “verify”. Below page gets displayed
Open the document and check if it is correct and tick the check box by clicking it. Click the ‘Signed Property’ to view the person who has signed the document and the date & time at which the document was signed. When the document is open, check if the document is correct and click ‘check BOQ’ .

31
Click “Save” once the document is verified.
2.2.9 OID[Other Important Documents]
On clicking “save”, below page gets displayed.
There are two type of documents ,
Sensitive – Documents which include financial details of tender.Ex.Fee
Non Sensitive - Documents other than financial details. Ex. License.
32
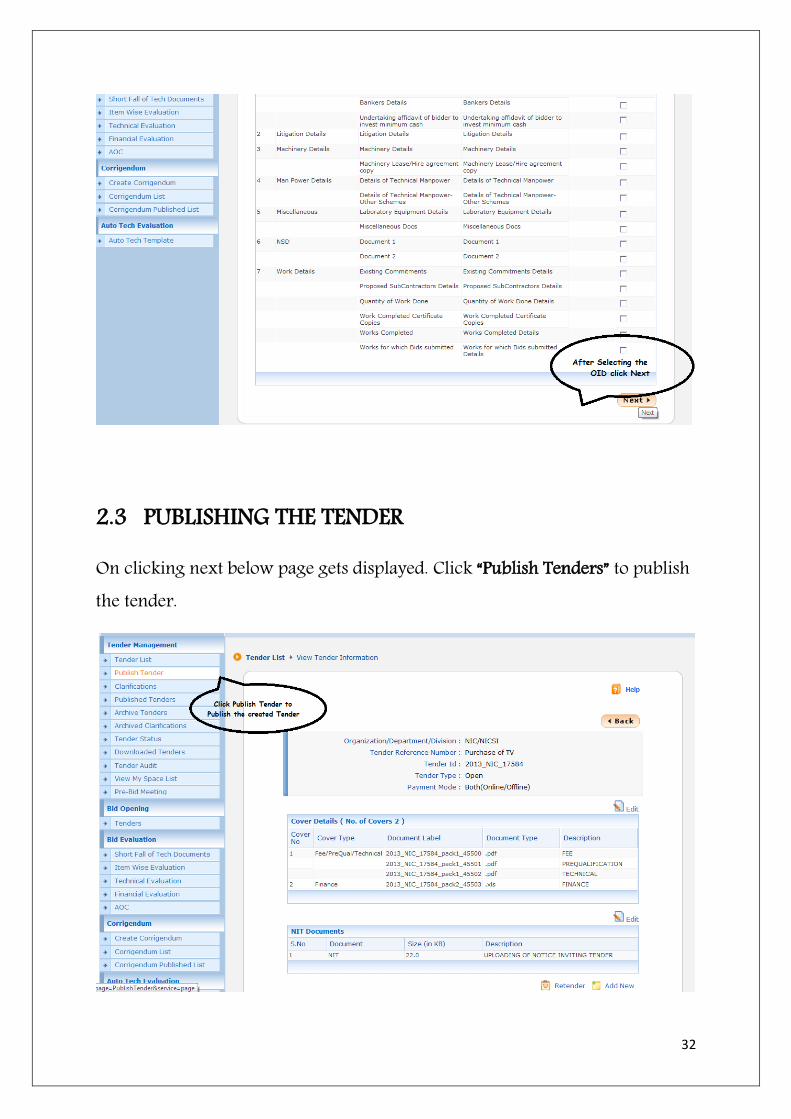
2.3 PUBLISHING THE TENDER
On clicking next below page gets displayed. Click “Publish Tenders” to publish the tender.

33
List of tenders gets displayed. Select your tender and click “view”
Created tender gets displayed
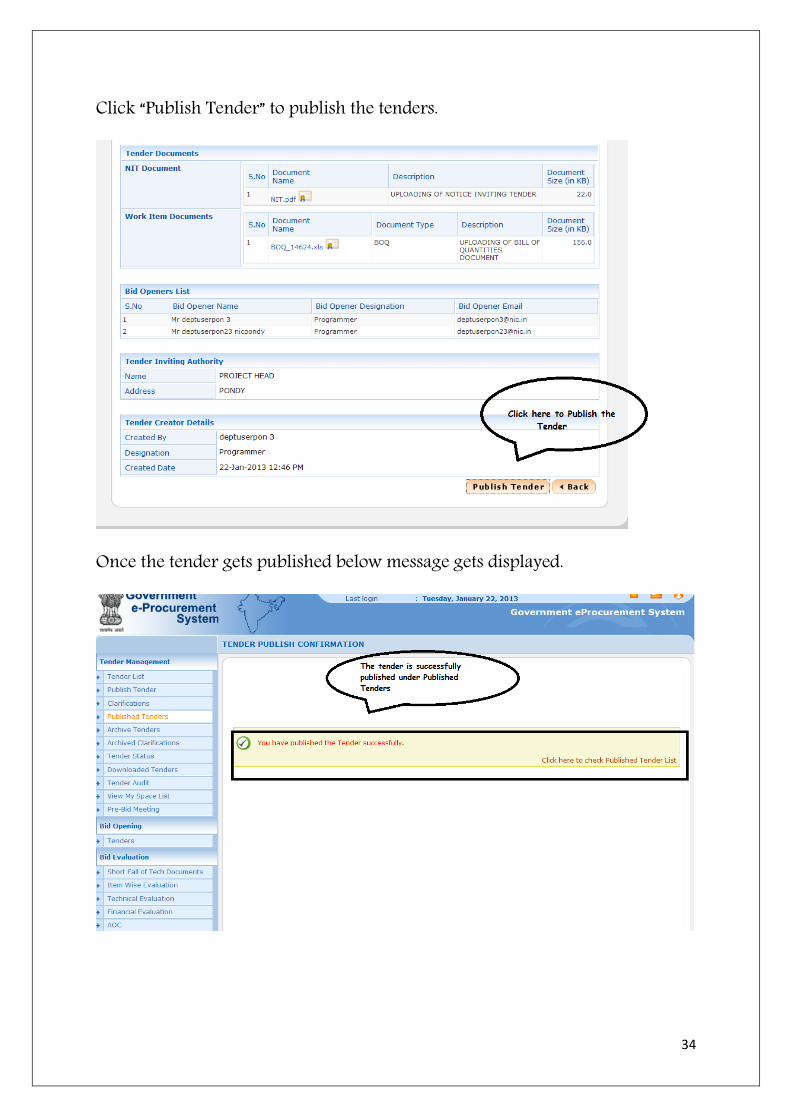
34
Click “Publish Tender” to publish the tenders.
Once the tender gets published below message gets displayed.

35
Click published tenders to check the published tenders

36
BID SUBMISSION

37
3. BID SUBMISSION
3.1 Logging into the system
Instructions to be followed before entering the website:
1.Insert Bidder’s DSC(Digital signature certificate) 2. Go to token administartion and check whether the inserted
DSC is in operational mode or not. 3. If it is in operational mode then proceed with the login
otherwise check the status of your DSC
To perform the clarification process, enter the login and password in user login

38
Select the DSC login
Authentication of the DSC user login takes place here and Authentication of the DSC password takes place by entering the password in the pop up appearing
39
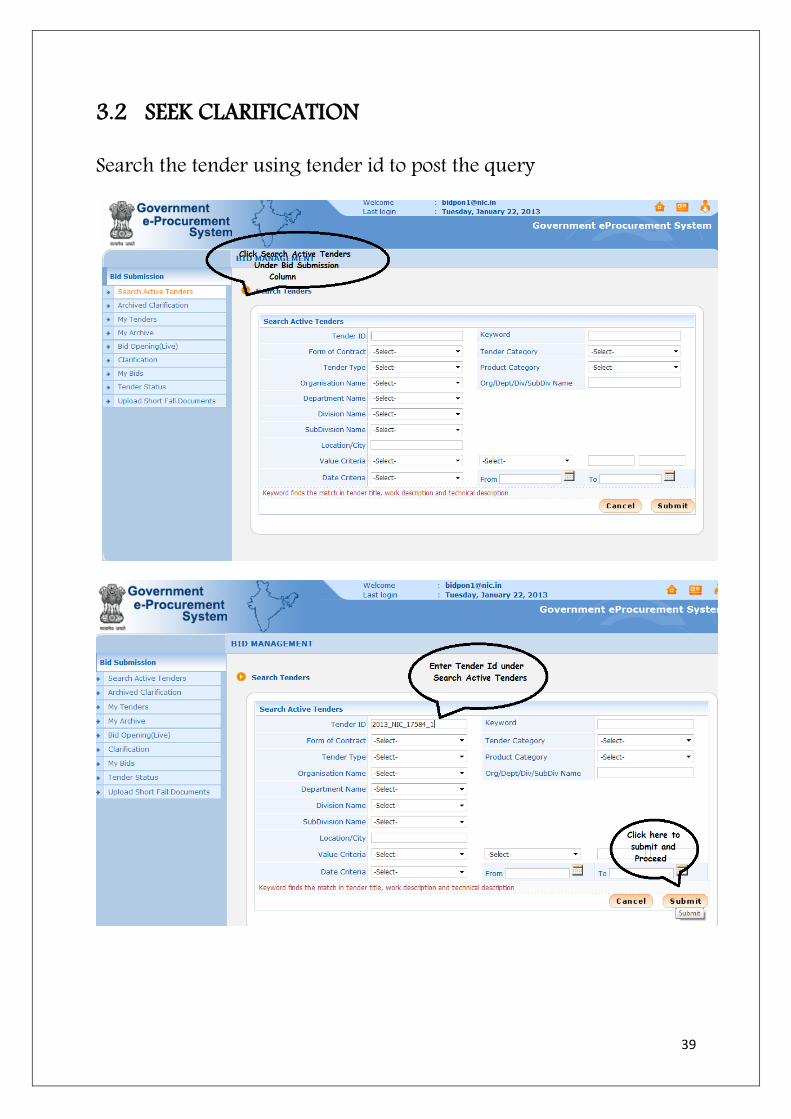
3.2 SEEK CLARIFICATION
Search the tender using tender id to post the query

40
Add the tender to ‘my tenders’ tab for which you want to perform clarification.
To perform clarification process select clarification tab under bid submission column.

41
Select view to view the tender details.
The following page displays how to post clarifications about the tender.

42
Mention the clarification title and the clarification that is required , in the clarification tab and then upload the clarification document and digitally sign the uploaded document

43
After digitally signing the document select proceed to post your clarification to the department.
The following page displays that the clarification is successfully posted.

44
3.3 Bid Submission
Instructions to be followed before entering the website:
1.Insert Bidder’s DSC(Digital signature certificate) 2. Go to token administartion and check whether the inserted DSC is in
operational mode or not. 3. If it is in operational mode then proceed with the login otherwise
check the status of your DSC
To submit the bid, enter the login and password in user login

45
Select the Login icon
Authentication of the DSC user login takes place here and Authentication of the DSC password takes place by entering the password in the pop up appearing
46
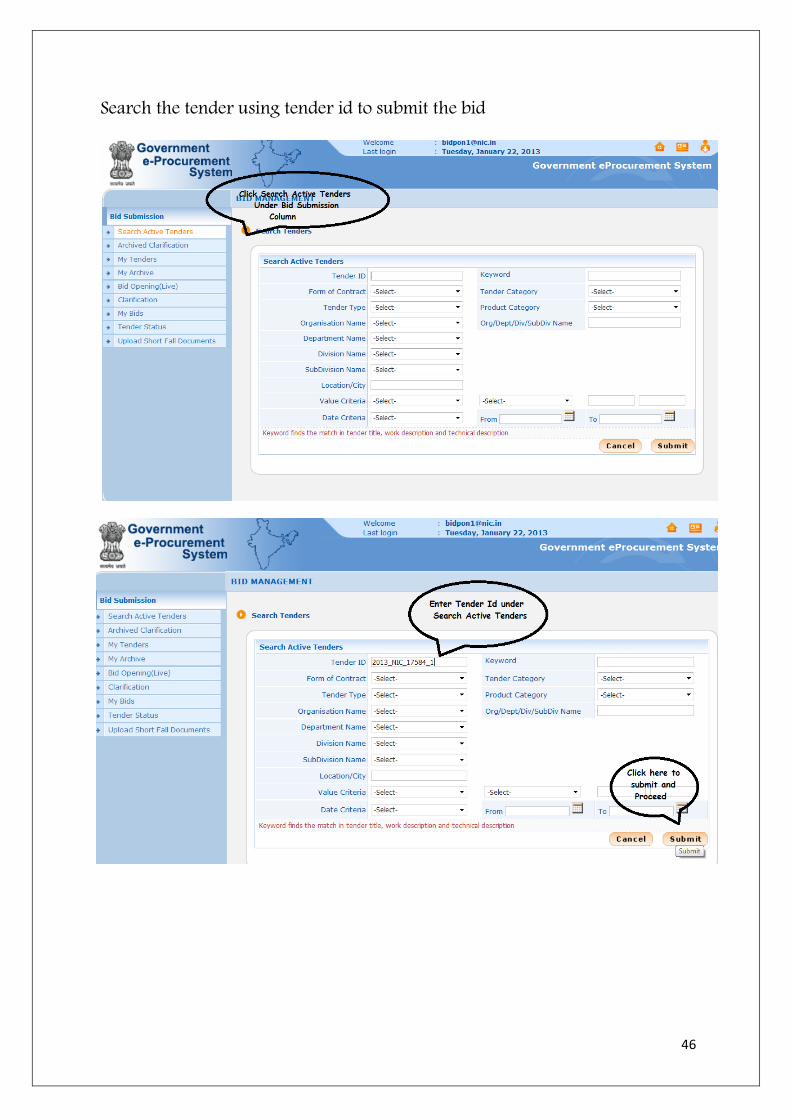
Search the tender using tender id to submit the bid

47
Add the tender to ‘my tenders’ tab for which you want to perform the bid submission.
Select My Tenders under Bid Submission column.

48
The Already created tender details can be viewed here

49
To submit the tender related fees the payment mode is selected according to the bidder’s choice.

50
The Portal user Agreement is agreed by the bidder to proceed his Bid submission process by clicking submit
The Offline Payment details are entered and click “save”
51
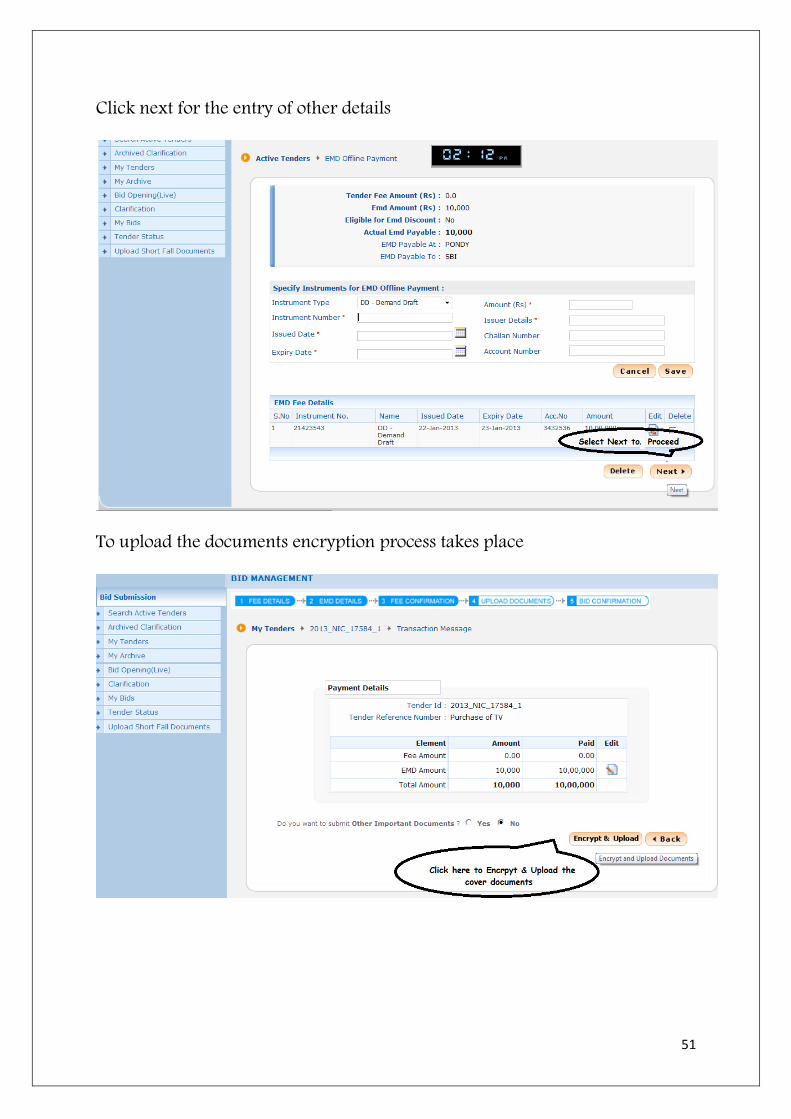
Click next for the entry of other details
To upload the documents encryption process takes place

52
Uploading of the first cover details takes place
Browsing for the fee detail document and selection of the file takes place

53
After uploading each cover details the verification of the uploaded documents takes place
Select the check box and click confirm to encrypt the documents

54
Click encrypt and upload the first cover details
While encrypting the documents the DSC authentication takes places to check whether the user is same or not
55
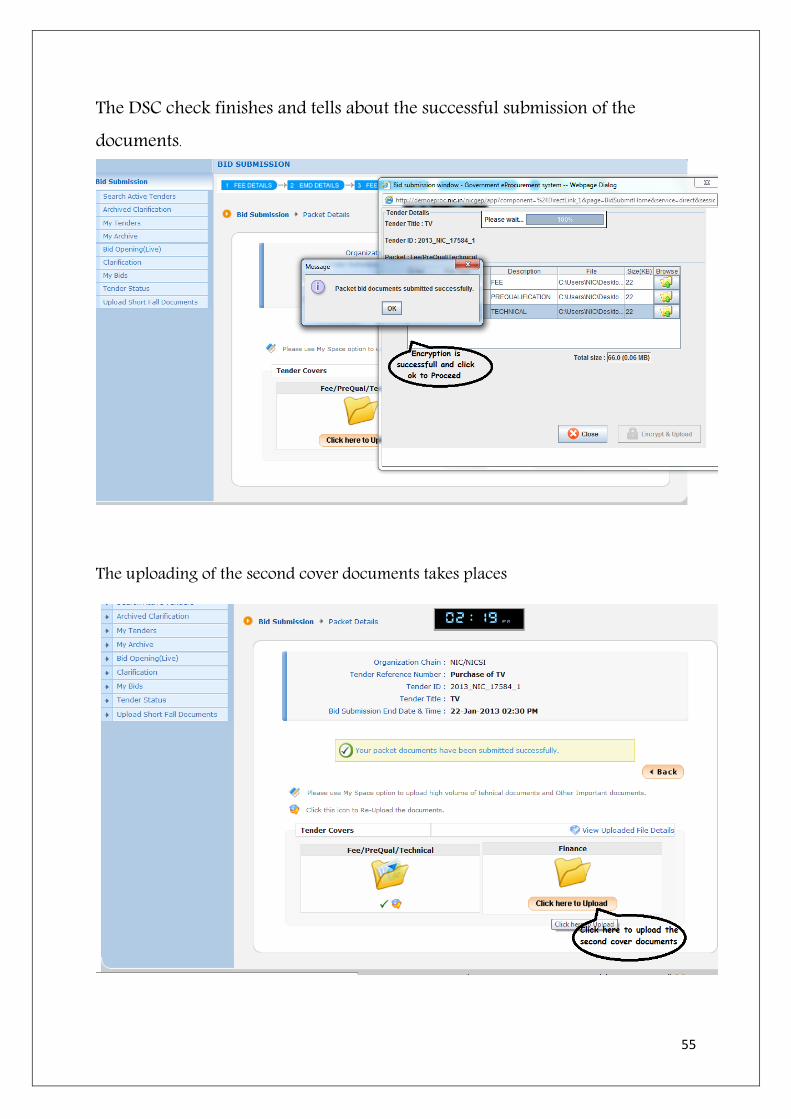
The DSC check finishes and tells about the successful submission of the documents.
The uploading of the second cover documents takes places

56
The second cover document is browsed and uploaded
The selection of second cover details takes place by clicking the open icon
57
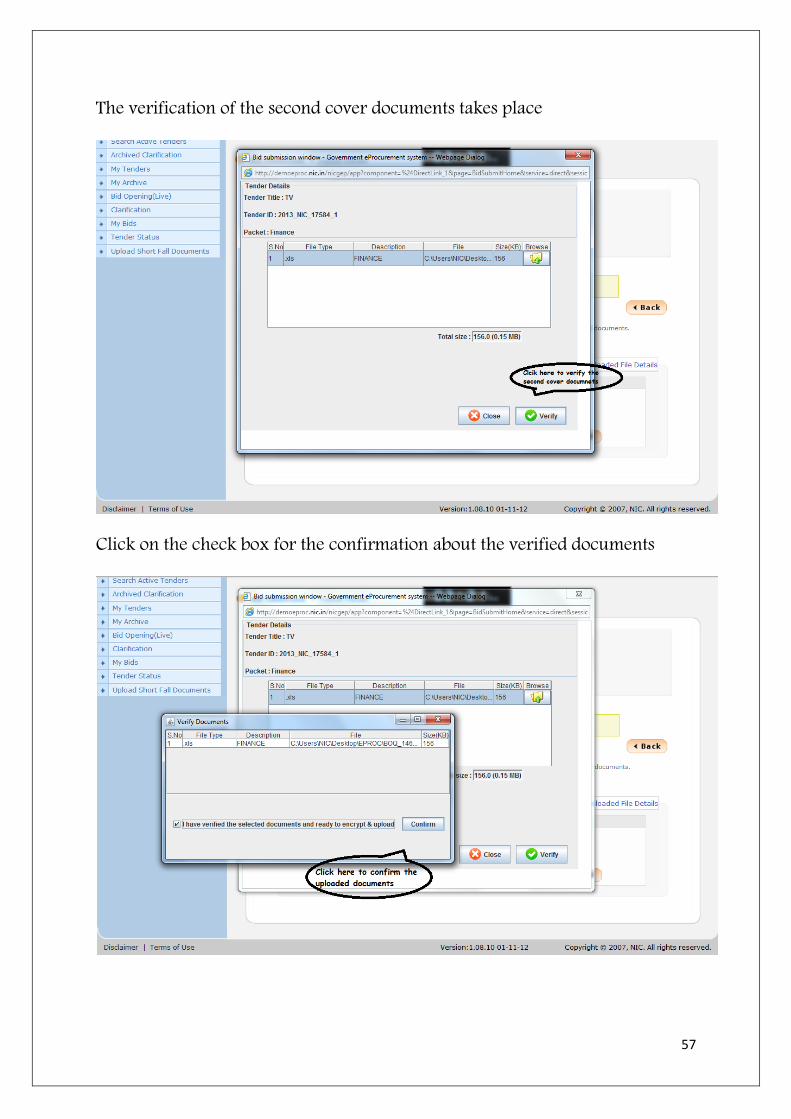
The verification of the second cover documents takes place
Click on the check box for the confirmation about the verified documents
58
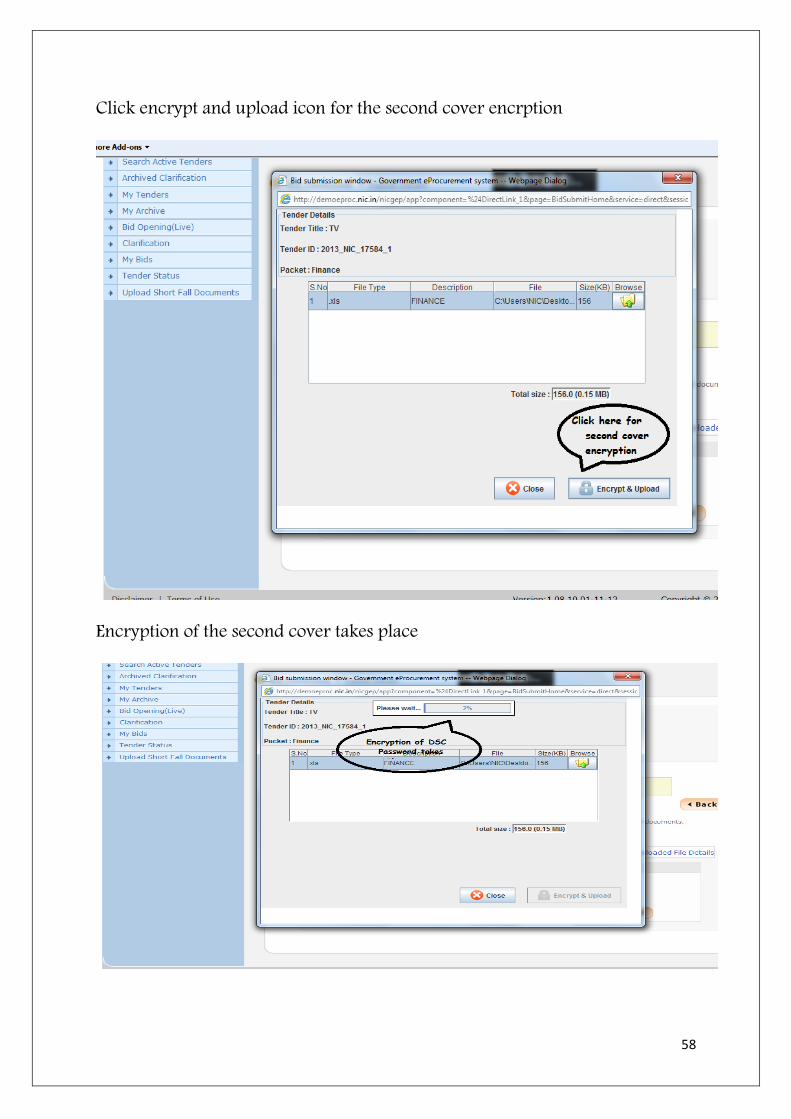
Click encrypt and upload icon for the second cover encrption
Encryption of the second cover takes place

59
The successful encryption message is displayed and click okay for next screen to appear
Finally select the freeze bid submission icon to end the bid submission process.

60
The successful placing of bid is informed to the bidder.
The uploaded documents of the bid submission process can be viewed here

61
By clicking view icon the submitted bid for the tender can be viewed in My Bids column present under bid submission

62
BID OPENING

63
4. BID OPENING:
Bid opening is the process of opening the bid that has been submitted by the bidder for that particular tender. This is usually done by the departmental user of that department using their respective DSC. Here in bid opening two processes takes place.
Process1- Technical bid opening, Technical evaluation Process 2- Financial bid opening, Financial evaluation, Award of
Contract 4.1 Logging into the System.
Goto the same Universal Resource Locator (URL), in your Web Browser.
http://demoeproc.nic.in/
Logging on to the system using the DSC Card
a. Insert your DSC Card into the USB Port.
b. Enter the Login and Password and click ‘Submit’.

64
When the authentication process is successful, you are logged on to the
E-Procurement system and below page gets displayed.

65
Once the password is given, below page gets displayed.
4.2 Opening and Evaluation
4.2.1 Technical Bid Opening ( Process I )
The First Bid Opener logs on to the eprocurement System using the User Login option on the right side with the Login Id and Password with which he is registered. After successful logon, a welcome message and the menu options are displayed.

66
Click Tenders in the Bid Opening Menu. The Tenders to be opened on that day
will be displayed. Select the tender by clicking ‘View’.
The following page is displayed. When the Bid Opener’s keys are not
decrypted, it is indicated by a red signal. The Bid opener for whom the Decrypt
button is enabled should decrypt his key. He should put his DSC card in the
card reader and click on ‘Decrypt’.

67
Then the Bid Opener will be prompted to enter the password.
Click ‘OK’. If it is successful, a message ‘Key Decrypted Successfully’ will be displayed.

68
When the decryption is successful the red button turns green. The same procedure has to be repeated for the Second Bid Opener. The Second Bid Opener has to login using his login and password and the following page will be displayed.

69
Then the Bid Opener will be prompted to enter the password.
When the keys of both of the bid openers are decrypted, both the buttons
appear green and the ‘Open Bid’ option is displayed as shown below.

70
The following page is displayed with one active bids.
The documents submitted by the first bidder are displayed. Verify each document by clicking on Verify.

71
After each document is verified the Status changes from ‘Yet to verify’ to
‘Accepted’ / ‘Rejected’ as updated. The following page is displayed. Similarly all
the documents are viewed and verified.

72
The bid has been opened and the status changes to unlock. Click on next to to update any other information

73
Click on next to upload the bid opening summary document.
The Technical Bid Opening summary is uploaded and signed using the ‘Sign Document’ option as shown below.

74
Click on next so that this process will be followed by Technical Evaluation.
4.2.2 TECHNICAL EVALUATION
The department users who have been assigned the role of Bid Evaluation should login with their DSCs. After logging in, select the option ‘Technical Evaluation’ in the Bid Evaluation menu.
75
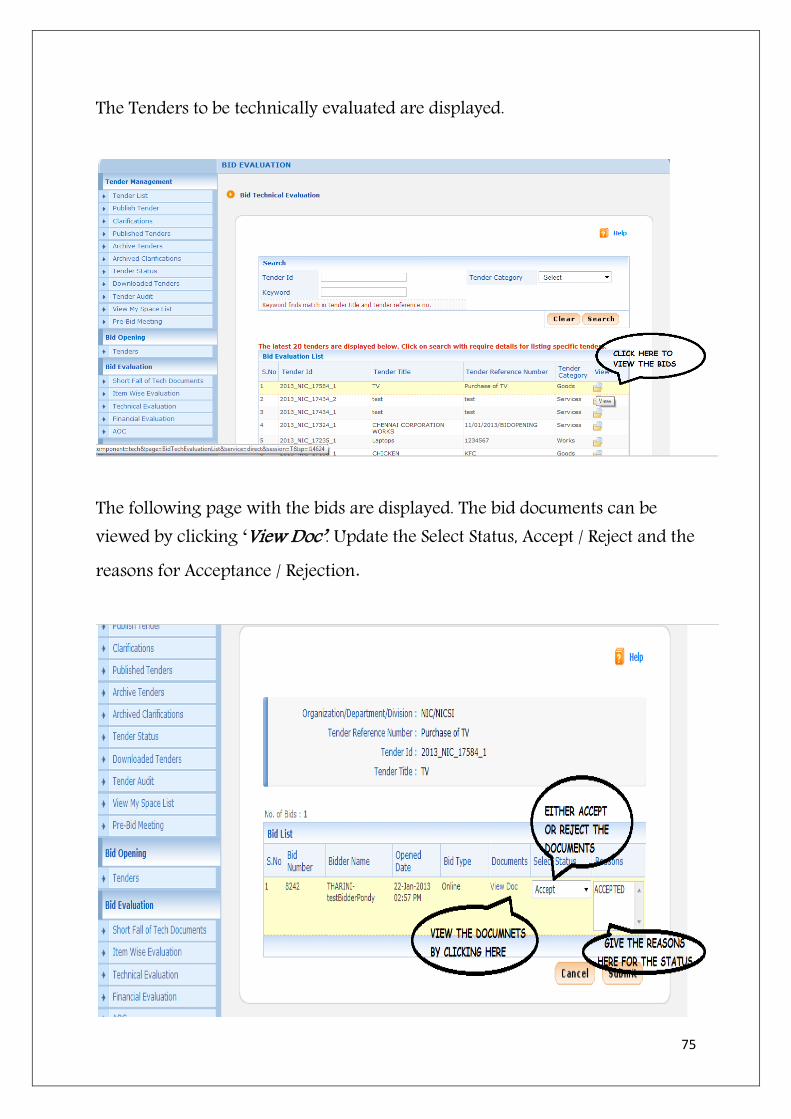
The Tenders to be technically evaluated are displayed.
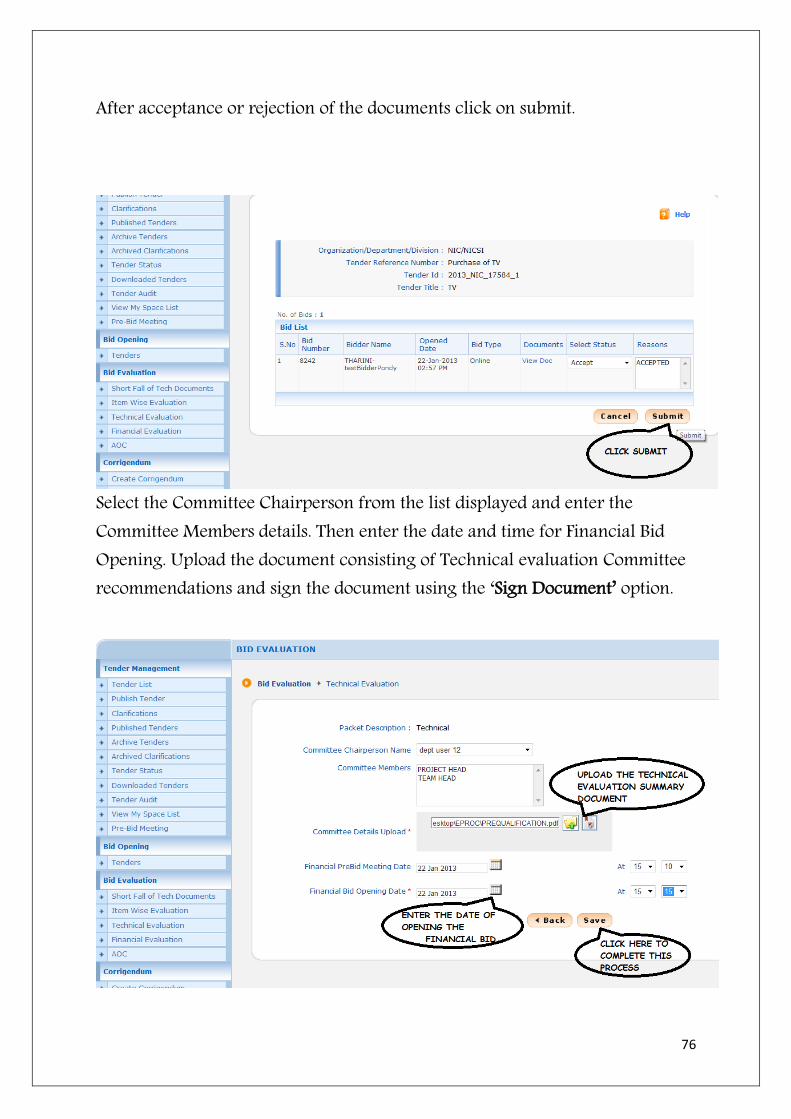
The following page with the bids are displayed. The bid documents can be viewed by clicking ‘View Doc’. Update the Select Status, Accept / Reject and the reasons for Acceptance / Rejection.
76
After acceptance or rejection of the documents click on submit.
Select the Committee Chairperson from the list displayed and enter the Committee Members details. Then enter the date and time for Financial Bid Opening. Upload the document consisting of Technical evaluation Committee recommendations and sign the document using the ‘Sign Document’ option.

77
The Technical Evaluation Summary can be printed by clicking the icon present at the bottom of the page which could be kept for reference later.
4.2.3 Financial Bid Opening ( Process II )
The First Bid Opener logs on to the eprocurement System using the User Login option on the right side with the Login Id and Password with which he has registered. After successful logon, a welcome message and the menu options are displayed.

78
Click Tenders in the Bid Opening Menu. The Tenders to be opened on that day
will be displayed. Select the tender by clicking ‘View’.
The following page is displayed. When the Bid Opener’s keys are not
decrypted, it is indicated by a red signal. The Bid opener for whom the Decrypt
button is enabled should decrypt his key. He should put his DSC card in the
card reader and click on ‘Decrypt’.

79
Click ‘OK’. If it is successful, a message ‘Key Decrypted Successfully’ will be displayed.
When the decryption is successful the red button turns green. The same
procedure has to be repeated for the Second Bid Opener. The Second Bid
Opener has to login using his login and password and the following page will
be displayed.

80
When the keys of both of the bid openers are decrypted, both the buttons
appear green and the ‘Open Bid’ option is displayed as shown below.

81
The bids will be displayed.
The financial bid documents are displayed and verify the documents.

82
The Status changes from ‘Yet to verify’ to ‘Accepted’ / ‘Rejected’ as updated. Similarly all financial documents are viewed and verified and click on next after verification of all documents.

83
The lock is released and click next to move to the next process.

84
The BOQ chart is generated successfully as shown below.
Click ‘View BOQ Chart’ to view the BOQ Chart.
85
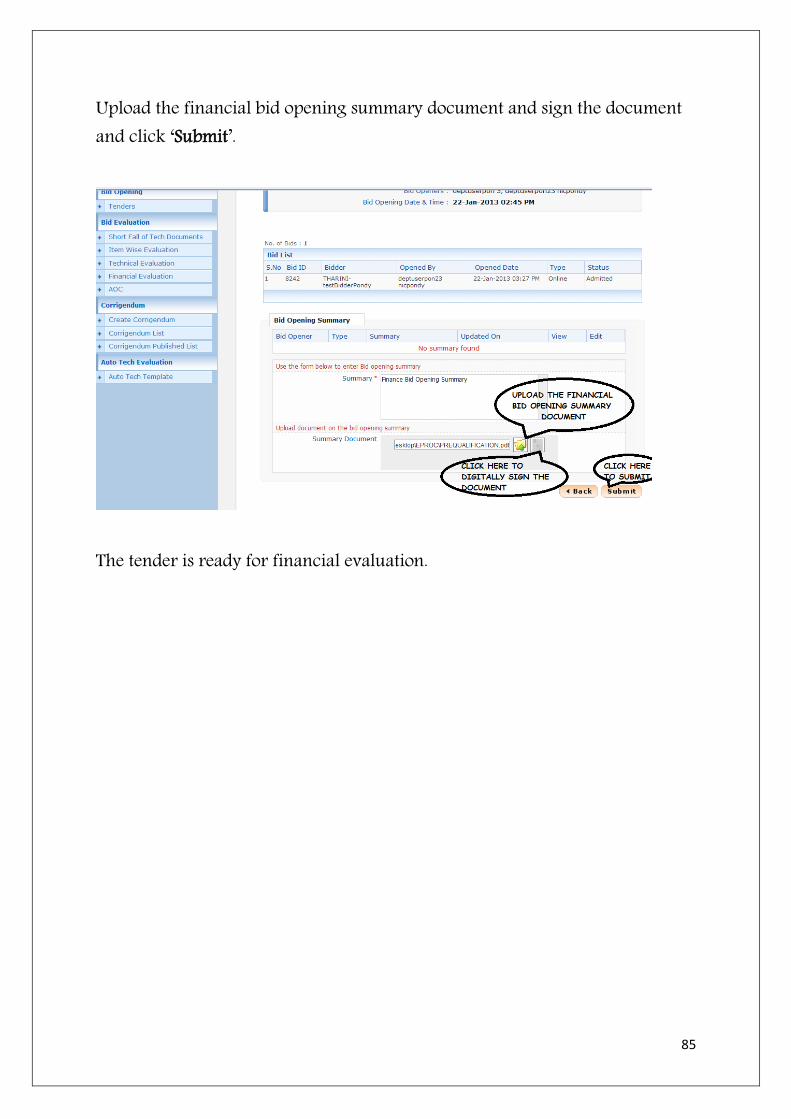
Upload the financial bid opening summary document and sign the document and click ‘Submit’.
The tender is ready for financial evaluation.

86
4.2.4 FINANCIAL EVALUATION: Select the ‘Financial Evaluation’ option in the Bid Evaluation menu. The
tenders to be financially evaluated are displayed. The following page is
displayed.
The corresponding amount, bid rank , status and the reason for that status will
be displayed .

87
Inorder to view the BOQ chart click on View BOQ chart. So the following page
will be displayed.
Digitally sign the financial evaluation summary document and upload that
document. Click save to save the document that is uploaded.

88
Financial Evaluation Information will be displayed as follows.

89
4.3 A ward of Contract
AOC is Award of Contract. It’s a type of agreement between the shortlisted bidder and the department with all the criteria that has to be followed, along with quotations they agreed to finish the job. Select the ‘AOC’ option in the Bid Evaluation menu. The tenders for which AOC to be performed will be displayed. The following page is displayed.

90
The tender for which AOC needs to be performed will be displayed. Select the
tender by clicking ‘View’.
After selecting the tender, the quotation that the bidder has agreed to work
with, the contract date and the completion period needs to be given. Along
with that AOC summary document needs to be uploaded. The uploaded
document must be digitally signed using DSC and then click save.

91
To view the AOC document click the print option that is present at the bottom
of the page.
With this the AOC gets created.
92
CORRIGENDUM

93
5. CORRIGENDUM
5.1. CREATING THE CORRINGENDUM
To create the corrigendum enter the valid tender Id in search published tenders and then click submit to proceed with the further steps

94
Select create corrigendum under corrigendum column in the left hand side of your screen

95
The valid tender is listed under Active Tenders to add corrigendum click Add Corrigendum or view
Click on of to proceed adding the details for corrigendum creation

96
Select the corrigendum type and title then click Next to proceed
The uploading of the document for the corrigendum type takes place after the successful digital signing click save to proceed
97
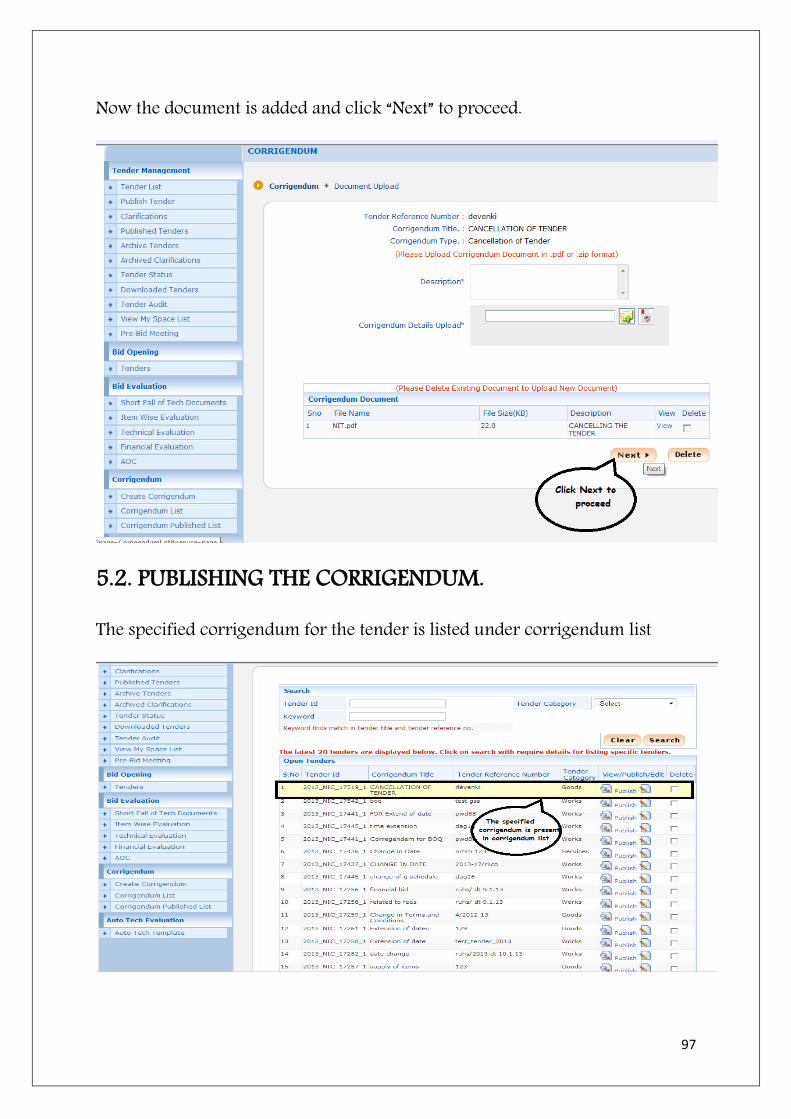
Now the document is added and click “Next” to proceed.
5.2. PUBLISHING THE CORRIGENDUM.
The specified corrigendum for the tender is listed under corrigendum list

98
The details of the corrigendum is ready to get published
The publishing of the corrigendum is completed after clicking Publish Tender icon

99
The corrigendum is published successfully