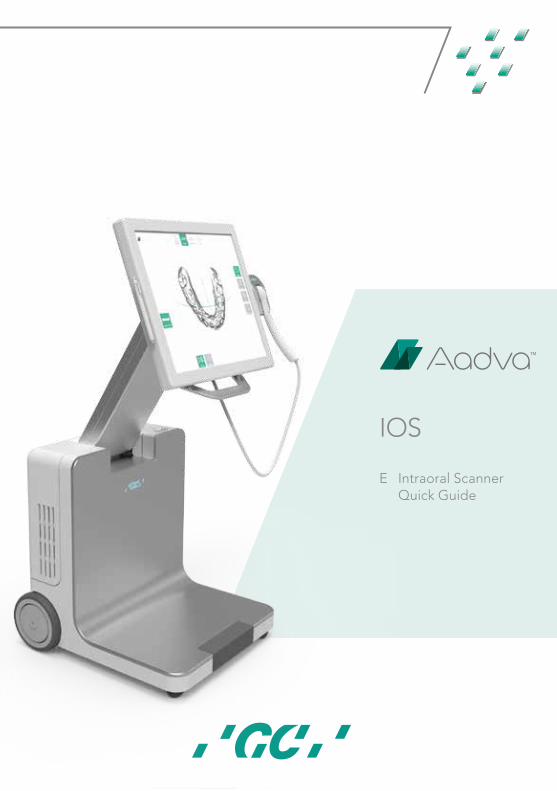
e intraoral scanner quick guide - cdn.gceurope.com · 7 a gc aadva™ ios 5 b c 1. unpack and...
TRANSCRIPT
IOS E Intraoral Scanner Quick Guide
3
GC Aadva™ IOS
E - Contents
Preface ................................................... 3
Components ......................................... 4
Unpacking ............................................. 5
Starting/Booting the system ............... 5
Log-in .................................................... 5
Scanning ................................................ 6
Inspecting ............................................. 9
Additional scans ................................. 10
Bite scan .............................................. 11
Margin line definition ......................... 12
Bite registration .................................. 13
Restoration section ............................ 14
Delivery ............................................... 15
Attachments ....................................... 18
Summary ............................................. 18
Data transfer ....................................... 19
Terminating and disconnecting the
device .................................................. 19
Additional features ............................ 20
GC Digital Services Team .................. 22

Dear IOS Customer,
We would like to thank you for purchasing our GC Aadva Intraoral Scanner.
Our GC Aadva IOS allows you to capture 3D dental impressions.
Please carefully read and follow the instructions for use described in this manual in
order to safely operate the GC Aadva IOS. Improper use of the device will result
in personal injury and hazardous situations.
WheWhen multiple users are operating the device, make sure that all users read these
instructions and are trained prior to operating the GC Aadva IOS. We advise you,
prior to scanning a patient, to scan gypsum models without sectioned dies to fully
master our GC Aadva IOS.
Store this manual where you can easily access it when you would need help and/or
information.
The begin date of the warranty is the day of activation of your IOS device.
GC Europe N.V.GC Europe N.V.

6
A
GC Aadva™ IOS
5
CB
1. Unpack and remove foil.
2. Unlock brakes.
3. Unlock screen. (A)
4. Adjust screen to required position using the handles
Unpacking
1. Plug in the main power cable.
2. Flip the main power switch to the ‘I’ position, located at the back of the cart. (B)
3. Push the power button, located at the back of the screen. (C) (The system will also start automatically, when the monitor is unlocked and pushed entirely forwards)
Starting/Booting the system
The start screen will ask you to enter your user name and a 6-digit pin, which will be provided at the installation of your GC AADVA IOS. If you forgot your pin code, please call our GC Digital Support Team
Log-in
207959-GC-AADVA-IOS-GEBRUIKSAANWIJZINGEN-E-NL-FR-IT-DE-TR.indd 5 17/05/16 09:47
4
Touch-screen monitor
Light-weight hand piece and cradle inlay
Handle to position monitor
Cart
Ventilation
Rubber footrest to fine tune position and break mechanism
Power on/off button
USB 3.0 slot (2x)
Lock/unlock mechanism for monitor
Flash card slot
Pen for touch-screen (optional)
Components
207959-GC-AADVA-IOS-GEBRUIKSAANWIJZINGEN-E-NL-FR-IT-DE-TR.indd 4 17/05/16 09:47

7
A
GC Aadva™ IOS
5
CB
1. Unpack and remove foil.
2. Unlock brakes.
3. Unlock screen. (A)
4. Adjust screen to required position using the handles
Unpacking
1. Plug in the main power cable.
2. Flip the main power switch to the ‘I’ position, located at the back of the cart. (B)
3. Push the power button, located at the back of the screen. (C) (The system will also start automatically, when the monitor is unlocked and pushed entirely forwards)
Starting/Booting the system
The start screen will ask you to enter your user name and a 6-digit pin, which will be provided at the installation of your GC AADVA IOS. If you forgot your pin code, please call our GC Digital Support Team
Log-in
207959-GC-AADVA-IOS-GEBRUIKSAANWIJZINGEN-E-NL-FR-IT-DE-TR.indd 5 17/05/16 09:47

8 7
GC Aadva™ IOS
2. Press ‘Start Scan’
You will get a 6-step procedure:
2.1 Use the cradle inlay (please sterilize the cradle first, using the prescribed guidelines) and change the inlay for each new patient.
2.2 Disinfect and wipe the hand piece dry
2.3 The scanner will heat up to prevent fogging. Please wait until the bar turns green.
2.4 Place the retractor (e.g.: Kerr OptiView)
2.5 Remove all blood and saliva.
2.6 Take the hand piece before pressing ‘OK’ or make an up-and-down movement while holding the hand piece (if activated in the settings menu)
2.7 A timer will count down from 5 to 0 seconds, indicating when the scanner will start scanning.
3. Start scanning
• Choose an easily accessible starting point, parallel to the occlusal plane and start moving the hand piece. (A)
207959-GC-AADVA-IOS-GEBRUIKSAANWIJZINGEN-E-NL-FR-IT-DE-TR.indd 7 17/05/16 09:47
6
(Digital Services Platform)
Quick Guide
1. Press ‘Create new patient’
Insert patient data by using the touch screen, or skip this, and insert data at the end of the scanning session. The system will save all the data from previously entered patients, so you will be able to browse through patients by pressing the ‘search patient’ button.
Scanning
207959-GC-AADVA-IOS-GEBRUIKSAANWIJZINGEN-E-NL-FR-IT-DE-TR.indd 6 17/05/16 09:47

97
GC Aadva™ IOS
2. Press ‘Start Scan’
You will get a 6-step procedure:
2.1 Use the cradle inlay (please sterilize the cradle first, using the prescribed guidelines) and change the inlay for each new patient.
2.2 Disinfect and wipe the hand piece dry
2.3 The scanner will heat up to prevent fogging. Please wait until the bar turns green.
2.4 Place the retractor (e.g.: Kerr OptiView)
2.5 Remove all blood and saliva.
2.6 Take the hand piece before pressing ‘OK’ or make an up-and-down movement while holding the hand piece (if activated in the settings menu)
2.7 A timer will count down from 5 to 0 seconds, indicating when the scanner will start scanning.
3. Start scanning
• Choose an easily accessible starting point, parallel to the occlusal plane and start moving the hand piece. (A)
207959-GC-AADVA-IOS-GEBRUIKSAANWIJZINGEN-E-NL-FR-IT-DE-TR.indd 7 17/05/16 09:47

10 9
GC Aadva™ IOS
1. When finished scanning press the ‘Model’ button. You will have again the opportunity to inspect the model by using the interface at the right side of the screen
Inspecting
2. Automatic filling of holes
• Parts which were not scanned will be automatically filled by the software and will be indicated in red. (To change this colour, go to the settings menu)
• If you wish to re-scan in this phase, press the ‘Re-scan’ button.
• If you are satisfied with the scan, press the ‘Save’ button.
Switch view: Add contrast to the mesh.
Reset view: The model will be placed back into the starting position and size.
Zoom: Pressing this button will allow you to zoom in-and out.
Move: Swipe your finger from the model to the desired position.
Rotate: Rotates the model by moving your finger over the model.
207959-GC-AADVA-IOS-GEBRUIKSAANWIJZINGEN-E-NL-FR-IT-DE-TR.indd 9 17/05/16 09:47
8
• The ideal distance between the scan head and a tooth is between 0 and 15 mm. A sound will be heard indicating the range of focus. (If activated in the settings menu)
Waypoint: A ‘waypoint’ is a reference point to which you can return if you lose scan focus. You can make a waypoint simply by letting the scan head touch the occlusal plane. Recommended waypoints : At the beginning, at premolars and at the end.
• On the screen, you will see a real-time image of the scan. The blue colour in the left frame indicates which parts are being viewed by the scanner
• You can hide the real-time image by pressing the ‘Hide’ button.
• On the right hand side, you will get a 3D image of what the scanner already captured.
• Grey/white colour: Captured
• Red/Orange colour: Not captured/re-scan if needed
4. Pause at any time by pressing the ‘Control’ button and review the scan.
5. Continue scanning by pressing the ‘Control’ button again.
6. Press ‘Reset Scan’ to start over.
207959-GC-AADVA-IOS-GEBRUIKSAANWIJZINGEN-E-NL-FR-IT-DE-TR.indd 8 17/05/16 09:47

119
GC Aadva™ IOS
1. When finished scanning press the ‘Model’ button. You will have again the opportunity to inspect the model by using the interface at the right side of the screen
Inspecting
2. Automatic filling of holes
• Parts which were not scanned will be automatically filled by the software and will be indicated in red. (To change this colour, go to the settings menu)
• If you wish to re-scan in this phase, press the ‘Re-scan’ button.
• If you are satisfied with the scan, press the ‘Save’ button.
Switch view: Add contrast to the mesh.
Reset view: The model will be placed back into the starting position and size.
Zoom: Pressing this button will allow you to zoom in-and out.
Move: Swipe your finger from the model to the desired position.
Rotate: Rotates the model by moving your finger over the model.
207959-GC-AADVA-IOS-GEBRUIKSAANWIJZINGEN-E-NL-FR-IT-DE-TR.indd 9 17/05/16 09:47

12 11
GC Aadva™ IOS
When both the upper –and lower jaw are scanned, a new window will open. This will allow you to record the bite scan.
1. Press ‘Ok’ to continue or press ‘Skip’
• To record the bite scan, make sure the buccal surface of the upper and lower teeth are scanned while the patient keeps maximum intercuspation.
• Once the upper, lower –and bite scan are saved, you will be redirected to the Model section. Even without these scan, you can always enter the model section by pressing the ’model’ icon.
• The ‘Fast Export’ button is visible and allows you to export the existing scan quickly to an external memory stick.
Bite scan
207959-GC-AADVA-IOS-GEBRUIKSAANWIJZINGEN-E-NL-FR-IT-DE-TR.indd 11 17/05/16 09:47
10
1. After having clicked the ‘Save’ button, four new buttons will be shown. Define which type of scan you just made.
Additional scans
• You will be redirected back to the start screen. On the left side, you can see which scans you already made.
2. Follow these 6 steps again and press ‘OK’ to start a new scan or overwrite the previous.
3. Press the ‘Skip’ button if you have all your required scans.
207959-GC-AADVA-IOS-GEBRUIKSAANWIJZINGEN-E-NL-FR-IT-DE-TR.indd 10 17/05/16 09:47

1311
GC Aadva™ IOS
When both the upper –and lower jaw are scanned, a new window will open. This will allow you to record the bite scan.
1. Press ‘Ok’ to continue or press ‘Skip’
• To record the bite scan, make sure the buccal surface of the upper and lower teeth are scanned while the patient keeps maximum intercuspation.
• Once the upper, lower –and bite scan are saved, you will be redirected to the Model section. Even without these scan, you can always enter the model section by pressing the ’model’ icon.
• The ‘Fast Export’ button is visible and allows you to export the existing scan quickly to an external memory stick.
Bite scan
207959-GC-AADVA-IOS-GEBRUIKSAANWIJZINGEN-E-NL-FR-IT-DE-TR.indd 11 17/05/16 09:47

14 13
GC Aadva™ IOS
The bite registration sets and checks the occlusion between the upper, lower –and bite scan. When checking the occlusion, you will initially see the upper model and the bite registration scan.
Bite registration
1. Press ‘Add points’ and choose at least 3 points on the upper model and on the bite registration scan. (The location and set order must be the same on both scans)
2. After setting all points, press ‘Match models’ to match the models. • Add points: by clicking this icon, points can be added by clicking the respective model area
• Delete points: after clicking the delete point icon, points can be removed by clicking them on the model
• Undo: by clicking undo, with each click the last action selected point is removed.
• Hide: hide position for the support window
• Match models: merge models
• Add note: by clicking this icon, notes can be added
3. After merging the models, press ‘Add points’ and choose again at least 3 points in both models.
207959-GC-AADVA-IOS-GEBRUIKSAANWIJZINGEN-E-NL-FR-IT-DE-TR.indd 13 17/05/16 09:47
12
This function allows you to draw the margin line of the prepared tooth/teeth. The main central area shows the 3D model with the preparation on your chosen scan type. If you select a specific spot, it will show the point in the miniature support view. By making subtle movements, the point can be moved. When releasing the touch-screen, the point is added.
Press ‘Save’ when you are satisfied with your preparation. A new window will pop-up, asking to proceed to the next screen or, to add a margin line to an additional preparation.
• Add points: by touching this icon, points can be added around at the margins of the preparation.
• Undo: by clicking undo, with each click the last action selected point is removed. A history of 40 points shall be stored
• Delete points: after clicking the delete point icon, points can be removed by clicking them in the model view window
• Hide: hide position for the support window
• Save: save function to finish the margin line definition
Margin line definition
207959-GC-AADVA-IOS-GEBRUIKSAANWIJZINGEN-E-NL-FR-IT-DE-TR.indd 12 17/05/16 09:47

1513
GC Aadva™ IOS
The bite registration sets and checks the occlusion between the upper, lower –and bite scan. When checking the occlusion, you will initially see the upper model and the bite registration scan.
Bite registration
1. Press ‘Add points’ and choose at least 3 points on the upper model and on the bite registration scan. (The location and set order must be the same on both scans)
2. After setting all points, press ‘Match models’ to match the models. • Add points: by clicking this icon, points can be added by clicking the respective model area
• Delete points: after clicking the delete point icon, points can be removed by clicking them on the model
• Undo: by clicking undo, with each click the last action selected point is removed.
• Hide: hide position for the support window
• Match models: merge models
• Add note: by clicking this icon, notes can be added
3. After merging the models, press ‘Add points’ and choose again at least 3 points in both models.
207959-GC-AADVA-IOS-GEBRUIKSAANWIJZINGEN-E-NL-FR-IT-DE-TR.indd 13 17/05/16 09:47

16 15
GC Aadva™ IOS
1. Fill in all missing patient data.
2. Select the tooth/teeth you wish to have restored. With each tooth you will get the following options to define:
• Restoration type
• Material
• Shade
4. Click ‘Save’ to proceed
5. Click the ‘Clone restoration’ button, to copy the same specifications for an additional restoration.
Restoration section
207959-GC-AADVA-IOS-GEBRUIKSAANWIJZINGEN-E-NL-FR-IT-DE-TR.indd 15 17/05/16 09:47
14
4. Press ‘Match models’ again. • You will now see the models, colorized with colours which show the contact
points and the distance between teeth (in mm). 5. Click on a model to rotate, move or zoom. Click ’Add note’ to add a remark. 7. When satisfied, press ‘Save’ to proceed to the Export tab.
207959-GC-AADVA-IOS-GEBRUIKSAANWIJZINGEN-E-NL-FR-IT-DE-TR.indd 14 17/05/16 09:47

1715
GC Aadva™ IOS
1. Fill in all missing patient data.
2. Select the tooth/teeth you wish to have restored. With each tooth you will get the following options to define:
• Restoration type
• Material
• Shade
4. Click ‘Save’ to proceed
5. Click the ‘Clone restoration’ button, to copy the same specifications for an additional restoration.
Restoration section
207959-GC-AADVA-IOS-GEBRUIKSAANWIJZINGEN-E-NL-FR-IT-DE-TR.indd 15 17/05/16 09:47

18 17
GC Aadva™ IOS
1. Add attachments to your order by clicking ‘Add’.
These can be derived from your memory stick or flash card by using the ports located next to the power button.
How to add an attachment from memory stick or flash card:
• Insert your memory stick or flash card into the appropriate port
• Click ‘Add’ and select your media device
• Choose your file and click ‘Open’
2. Add notes if required
3. Click ‘Save’ to proceed
Attachments
207959-GC-AADVA-IOS-GEBRUIKSAANWIJZINGEN-E-NL-FR-IT-DE-TR.indd 17 17/05/16 09:47
16
1. Insert your desired delivery address and ‘add to favourites’ to save this address.
2. Select the check box in case of a different billing address and you will have the option of entering the alternative billing address.
Delivery
207959-GC-AADVA-IOS-GEBRUIKSAANWIJZINGEN-E-NL-FR-IT-DE-TR.indd 16 17/05/16 09:47

1917
GC Aadva™ IOS
1. Add attachments to your order by clicking ‘Add’.
These can be derived from your memory stick or flash card by using the ports located next to the power button.
How to add an attachment from memory stick or flash card:
• Insert your memory stick or flash card into the appropriate port
• Click ‘Add’ and select your media device
• Choose your file and click ‘Open’
2. Add notes if required
3. Click ‘Save’ to proceed
Attachments
207959-GC-AADVA-IOS-GEBRUIKSAANWIJZINGEN-E-NL-FR-IT-DE-TR.indd 17 17/05/16 09:47

2018
1. After clicking ‘Save’ you will see a summary of your entered data.
2. Confirm the accuracy and completeness of the information by clicking the check box and pressing the ‘Confirm’ button.
3. You can also view the PDF order sheet by pressing ‘View PDF’.
Summary
207959-GC-AADVA-IOS-GEBRUIKSAANWIJZINGEN-E-NL-FR-IT-DE-TR.indd 18 17/05/16 09:47
19
GC Aadva™ IOS
Choose your method of transferring your data by selecting one of the four options on the screen.
• USB: To save your PDF file to your USB stick
• Aadva DSP only: To export and manage your file(s) in your Aadva DSP (Digital Services Platform)
• USB and Aadva DSP: to save your file on your USB stick and to manage your file in the Aadva DSP.
• Network: to export your file to your local network
Please read the GC Aadva DSP Quick Guide for more information about the GC Digital Services Platform (DSP).
Data transfer
1. Push the power button, located at the side of the flexible arm (C)
2. Flip the main power switch, located on the back of the device to the ‘O’ position (B)
3. When all the above steps are performed, the power cable can be safely disconnected from the device and wall socket.
Terminating and disconnecting the device
207959-GC-AADVA-IOS-GEBRUIKSAANWIJZINGEN-E-NL-FR-IT-DE-TR.indd 19 17/05/16 09:47

2119
GC Aadva™ IOS
Choose your method of transferring your data by selecting one of the four options on the screen.
• USB: To save your PDF file to your USB stick
• Aadva DSP only: To export and manage your file(s) in your Aadva DSP (Digital Services Platform)
• USB and Aadva DSP: to save your file on your USB stick and to manage your file in the Aadva DSP.
• Network: to export your file to your local network
Please read the GC Aadva DSP Quick Guide for more information about the GC Digital Services Platform (DSP).
Data transfer
1. Push the power button, located at the side of the flexible arm (C)
2. Flip the main power switch, located on the back of the device to the ‘O’ position (B)
3. When all the above steps are performed, the power cable can be safely disconnected from the device and wall socket.
Terminating and disconnecting the device
207959-GC-AADVA-IOS-GEBRUIKSAANWIJZINGEN-E-NL-FR-IT-DE-TR.indd 19 17/05/16 09:47

2220
General
Gesture control Enable or disable the gesture control for initiating scanning
Dentist address – Title Displays title
Dentist Address – First Name Displays first name
Dentist Address – Last Name Displays last name
Dentist Address – Street Displays street
Dentist Address – Zip Code Displays zip code
Dentist address – Country Displays country
Cart ID
Hand piece ID Displays the unique ID of the hand piece
Dental Notation System Choose the dental notation type
Keyboard Layout/Language Choose the keyboard layout
Language Choose the language
User Management Displays the active or inactive status of the user management
Wi-Fi Connection
Status Displays online or offline status of the Wi-Fi connection
Hidden Network Name Displays the active or inactive status
Network Name Displays the network name
Wi-Fi Password Displays the Wi-Fi password
Scan
Acoustic Scan Feedback Activate or inactivate the sound during scanning
Scan Countdown Activate or inactivate the scan
Miniature Support View Activate or inactivate the miniature support view
Model
Bite Reg. Max Dist. (mm) ‘Bite registration maximum distance’. With this setting, it is possible to change the visualized distance range between the upper and lower jaw after the bite registration.
Default Mesh Colour Change the colour of the generated mesh
Default Zoom (Model section) Adjust the default zoom setting in the model section
Maximum Zoom Value Adjust the maximum zoom value in the model section
Margin Line
Point Size in % (?) Adjust the size of the added points in the margin line section
Line Thickness in % Adjust the line thickness in the margin line section
Export
Mesh Export Format Choose between STL or PLY file type to export
Aadva DSP – Username Displays the username of the Aadva DSP
Aadva DSP – Password Displays the password of the Aadva DSP
Export ATF Files Activate/deactivate the export of ATF files
Export Log Files Activate/deactivate the export of log files
Network Export Path Choose the network path to which you want to export
Terminating and disconnecting the device
207959-GC-AADVA-IOS-GEBRUIKSAANWIJZINGEN-E-NL-FR-IT-DE-TR.indd 20 17/05/16 09:47
21
GC Aadva™ IOS
The user management section is accessed by clicking on the ‘Admin’ button in the upper left corner. This button is located on the left of the ‘Log-out’ button.The user administration window will allow the user to change their PIN, remove users and add new dentists.
Downloads This section will allow the user to download documents such as, the ‘Instructions For Use’ as well as software updates.
FAQThis area is dedicated to frequently asked questions. You can find the most frequently asked questions and their answers.
207959-GC-AADVA-IOS-GEBRUIKSAANWIJZINGEN-E-NL-FR-IT-DE-TR.indd 21 17/05/16 09:47

2321
GC Aadva™ IOS
The user management section is accessed by clicking on the ‘Admin’ button in the upper left corner. This button is located on the left of the ‘Log-out’ button.The user administration window will allow the user to change their PIN, remove users and add new dentists.
Downloads This section will allow the user to download documents such as, the ‘Instructions For Use’ as well as software updates.
FAQThis area is dedicated to frequently asked questions. You can find the most frequently asked questions and their answers.
207959-GC-AADVA-IOS-GEBRUIKSAANWIJZINGEN-E-NL-FR-IT-DE-TR.indd 21 17/05/16 09:47

2422
Where to find help/support?
First line of support
Using your DSP (Digital Services Platform).
1.) Contact your local GC Digital Services Team. The contact details can be found on the bottom of the home page of your DSP.
2.) Create a support ticket (also found on the bottom of the DSP homepage)
Second line of support
• GC Digital Services Europe (Only English, Dutch and French)
Tel : +32 16 74 26 00
E-mail : [email protected]
GC Digital Services Team
207959-GC-AADVA-IOS-GEBRUIKSAANWIJZINGEN-E-NL-FR-IT-DE-TR.indd 22 17/05/16 09:47
3
GC Aadva™ IOS
Cher client,
Merci d’avoir acheté l’AADVA IOS de GC, ainsi que le logiciel qui lui est associé.
Cet appareil et son logiciel vous permettent de réaliser facilement un scan intra-
oral, vous évitant ainsi les empreintes selon les méthodes traditionnelles.
Une utilisation et une manipulation inappropriées peuvent s’avérer dangereuses et
provoquer des dommages. Veillez donc à lire attentivement et à respecter ce
guide rapide ainsi que les instructions de fonctionnement applicables. Veuillez par
ailleurs lire le mode d’emploi dans son intégralité pour en savoir davantage et
assurer une bonne utilisation. Gardez-le toujours à portée de main.
Pour éviter le risque de blessures corporelles ou de dommages matériels, il est
important de respecter et de lire toutes les consignes de sécurité du mode
d’emploi fourni avec votre appareil IOS.
Si vous constatez des erreurs ou un manque d’informations, n’hésitez pas à nous
en faire part.
Équipe GC AADVA IOS
Préface
207959-GC-AADVA-IOS-GEBRUIKSAANWIJZINGEN-E-NL-FR-IT-DE-TR.indd 3 17/05/16 09:46