dvd video player model dv-s1u - sharp...
TRANSCRIPT
POWERPOWER PLAY STOPSTOP
STILL/STILL/PAUSEPAUSE
OPEN /OPEN /CLOSECLOSE
SKIPSKIP
Please read this Operation Manual carefully before using your Unit.
DVD Video PlayerMODEL
DV-S1UOPERATION MANUAL
– 2 – EN9F21
WARNING: TO REDUCE THE RISK OF FIRE OR ELECTRIC SHOCK, DO NOTEXPOSE THIS APPLIANCE TO RAIN OR MOISTURE.
This device complies with Part 15 of the FCC Rules. Operation is subject to the following two conditions:(1) This device may not cause harmful interference, and (2) this device must accept any interference received, including interference that may cause undesired operation.
INFORMATIONThis equipment has been tested and found to comply with the limits for a Class B digital device, pursuant to Part 15 ofthe FCC Rules. These limits are designed to provide reasonable protection against harmful interference in a residentialinstallation. This equipment generates, uses and can radiate radio frequency energy and, if not installed and used inaccordance with the instructions, may cause harmful interference to radio communications. However, there is no guar-antee that interference will not occur in a particular installation. If this equipment does cause harmful interference toradio or television reception, which can be determined by turning the equipment off and on, the user is encouraged totry to correct the interference by one or more of the following measures:—Reorient or relocate the receiving antenna.—Increase the separation between the equipment and receiver.—Connect the equipment into an outlet on a circuit different from that to which the receiver is connected.—Consult the dealer or an experienced radio/TV technician for help.
CAUTION:THIS UNIT IS A CLASS 1 LASER PRODUCT.USE OF CONTROLS OR ADJUSTMENTS OR PERFORMANCE OF PROCEDURES OTHER THANTHOSE SPECIFIED HEREIN MAY RESULT IN HAZARDOUS RADIATION EXPOSURE.AS THE LASER BEAM USED IN THIS UNIT IS HARMFUL TO THE EYES, DO NOT ATTEMPT TO DISAS-SEMBLE THE CABINET.REFER SERVICING TO QUALIFIED PERSONNEL ONLY.
“WARNING—FCC Regulations state that any unauthorized changes or modificationsto this equipment not expressly approved by the manufacturer could void the user’sauthority to operate this equipment.”
This symbol warns the user of uninsulatedvoltage within the unit that can cause danger-ous electric shocks.
This symbol alerts the user that there areimportant operating and maintenance instruc-tions in the literature accompanying this unit.
CAUTION:TO REDUCE THE RISK OF ELECTRIC SHOCK, DONOT REMOVE COVER (OR BACK). NO USER SER-VICEABLE PARTS INSIDE. REFER SERVICING TOQUALIFIED SERVICE PERSONNEL.
CAUTIONRISK OF ELECTRIC SHOCK
DO NOT OPEN
For future reference, record the model and serial number (located on therear of the Unit) in the space provided.
As an Energy Star® Partner, SHARP has determined that this product meets the Energy Star® guidelines for energy effi-ciency. Energy Star is a U.S. registered mark.
Model No.:
Serial No.:
– 3 – EN9F21
IMPORTANT SAFEGUARDS1) Read Instructions - All the safety and operating instruc-
tions should be read before the product is operated.2) Retain Instructions - The safety and operating instructions
should be retained for future reference.3) Heed Warnings - All warnings on the product and in the
operating instructions should be adhered to.4) Follow Instructions - All operating and use instructions
should be followed.5) Cleaning - Unplug this product from the wall outlet before
cleaning. Do not use liquid cleaners or aerosol cleaners.Use a damp cloth for cleaning.
6) Attachments - Do not use attachments not recommendedby the product manufacturer as they may cause hazards.
7) Water and Moisture - Do not use this product near water -for example, near a bath tub, wash bowl, kitchen sink, orlaundry tub; in a wet basement; or near a swimming pool;and the like.
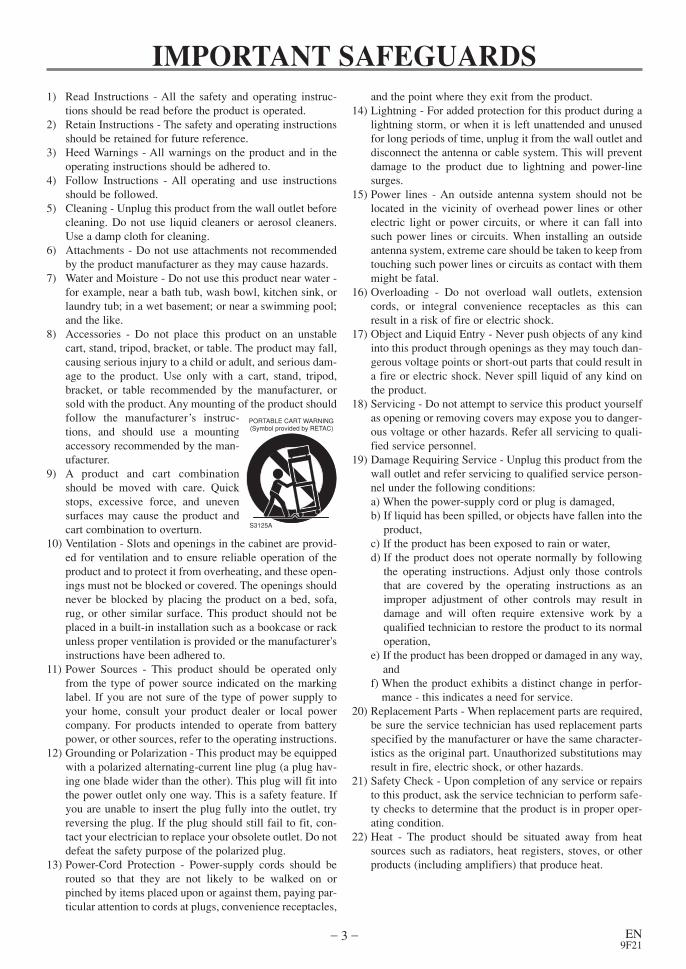
8) Accessories - Do not place this product on an unstablecart, stand, tripod, bracket, or table. The product may fall,causing serious injury to a child or adult, and serious dam-age to the product. Use only with a cart, stand, tripod,bracket, or table recommended by the manufacturer, orsold with the product. Any mounting of the product shouldfollow the manufacturer’s instruc-tions, and should use a mountingaccessory recommended by the man-ufacturer.
9) A product and cart combinationshould be moved with care. Quickstops, excessive force, and unevensurfaces may cause the product andcart combination to overturn.
10) Ventilation - Slots and openings in the cabinet are provid-ed for ventilation and to ensure reliable operation of theproduct and to protect it from overheating, and these open-ings must not be blocked or covered. The openings shouldnever be blocked by placing the product on a bed, sofa,rug, or other similar surface. This product should not beplaced in a built-in installation such as a bookcase or rackunless proper ventilation is provided or the manufacturer'sinstructions have been adhered to.
11) Power Sources - This product should be operated onlyfrom the type of power source indicated on the markinglabel. If you are not sure of the type of power supply toyour home, consult your product dealer or local powercompany. For products intended to operate from batterypower, or other sources, refer to the operating instructions.
12) Grounding or Polarization - This product may be equippedwith a polarized alternating-current line plug (a plug hav-ing one blade wider than the other). This plug will fit intothe power outlet only one way. This is a safety feature. Ifyou are unable to insert the plug fully into the outlet, tryreversing the plug. If the plug should still fail to fit, con-tact your electrician to replace your obsolete outlet. Do notdefeat the safety purpose of the polarized plug.
13) Power-Cord Protection - Power-supply cords should berouted so that they are not likely to be walked on orpinched by items placed upon or against them, paying par-ticular attention to cords at plugs, convenience receptacles,
and the point where they exit from the product.14) Lightning - For added protection for this product during a
lightning storm, or when it is left unattended and unusedfor long periods of time, unplug it from the wall outlet anddisconnect the antenna or cable system. This will preventdamage to the product due to lightning and power-linesurges.
15) Power lines - An outside antenna system should not belocated in the vicinity of overhead power lines or otherelectric light or power circuits, or where it can fall intosuch power lines or circuits. When installing an outsideantenna system, extreme care should be taken to keep fromtouching such power lines or circuits as contact with themmight be fatal.
16) Overloading - Do not overload wall outlets, extensioncords, or integral convenience receptacles as this canresult in a risk of fire or electric shock.
17) Object and Liquid Entry - Never push objects of any kindinto this product through openings as they may touch dan-gerous voltage points or short-out parts that could result ina fire or electric shock. Never spill liquid of any kind onthe product.
18) Servicing - Do not attempt to service this product yourselfas opening or removing covers may expose you to danger-ous voltage or other hazards. Refer all servicing to quali-fied service personnel.
19) Damage Requiring Service - Unplug this product from thewall outlet and refer servicing to qualified service person-nel under the following conditions:a) When the power-supply cord or plug is damaged,b) If liquid has been spilled, or objects have fallen into the
product, c) If the product has been exposed to rain or water, d) If the product does not operate normally by following
the operating instructions. Adjust only those controlsthat are covered by the operating instructions as animproper adjustment of other controls may result indamage and will often require extensive work by aqualified technician to restore the product to its normaloperation,
e) If the product has been dropped or damaged in any way,and
f) When the product exhibits a distinct change in perfor-mance - this indicates a need for service.
20) Replacement Parts - When replacement parts are required,be sure the service technician has used replacement partsspecified by the manufacturer or have the same character-istics as the original part. Unauthorized substitutions mayresult in fire, electric shock, or other hazards.
21) Safety Check - Upon completion of any service or repairsto this product, ask the service technician to perform safe-ty checks to determine that the product is in proper oper-ating condition.
22) Heat - The product should be situated away from heatsources such as radiators, heat registers, stoves, or otherproducts (including amplifiers) that produce heat.
PORTABLE CART WARNING(Symbol provided by RETAC)
S3125A

– 4 – EN9F21
SYMBOLS USED IN THIS MANUALThe following symbols appear below in some headings and notes in this manual, with the following meanings!
: Description refers to playback of DVD video discs.
: Description refers to playback of audio CDs.
CD
DVD
SUPPLIED ACCESSORIES
Copy ProtectionThis Unit supports Macrovision copy protection.On DVD discs that include a copy protection code, if the contents of theDVD disc are copied using a VCR, the copy protection code prevents thevideotape copy from playing normally.
Recommended Measures for Optimum Picture ExcellenceThis Unit is a precision device constructed using extremely accurate technology.• The disc cannot be played if the disc drive component is worn out or if the internal pick up lens is dirty.To obtain optimum picture quality, the Unit should be checked (cleaning and replacement of some parts) every 1,000 hours.Note that this period varies depending on the environment (temperature, humidity, dust, etc.) in which the Unit is used.Contact your authorized Sharp supplier for details.
Warning of Dew FormationDew may form on the pickup lens in the following conditions.• Immediately after a heater has been turned on.• In a steamy or very humid room.• When the unit is suddenly moved from a cold environment to a warm one.If dew forms inside this unit, it may not operate properly.In this case, turn on the power and wait about one hour for the dew to evaporate.
OthersIt is the intent of Sharp that this product be used in full compliance with the copyright laws of the United States and that priorpermission be obtained from copyright owners whenever necessary.
Apparatus Claims of U.S. Patent Nos. 4,631,603,4,577,216, 4,819,098 and 4,907,093 licensed forlimited viewing uses only.
This product incorporates copyright protection technology that is protected by method claims of certain U.S. patents andother intellectual property rights owned by Macrovision Corporation and other rights owners. Use of this copyright protec-tion technology must be authorized by Macrovision Corporation, and is intended for home and other limited viewing usesonly unless otherwise authorized by Macrovision Corporation. Reverse engineering or disassembly is prohibited.
Remote control
(RRMCGA030WJSA)
Two “AA” size batteries (R-06) A/V cables
(approx. 3 feet (100 cm) long)
Service1. Do not attempt to service this Unit yourself. Instead, unplug it and contact a qualified service technician. (See CONSUMER
LIMITED WARRANTY at the end of this manual.)2. Be sure the service technician uses authorized replacement parts or their equivalents. Unauthorized parts may cause fire,
electrical shock, or other hazards.3. Following any service or repair, be sure the service technician performs safety checks to certify that this Unit is in safe oper-
ating order.

– 5 – EN9F21
TABLE OF CONTENTS■ IMPORTANT SAFEGUARDS . . . . . . . . . . . . . . . . . . . . . . . . . . . . . . . . . . . . . . . . . . . . . . . . . . . . . . . . . . . . . . . . . . . . . . . . 3
SUPPLIED ACCESSORIES. . . . . . . . . . . . . . . . . . . . . . . . . . . . . . . . . . . . . . . . . . . . . . . . . . . . . . . . . . . . . . . . . . . . . . . . . . . 4SYMBOLS USED IN THIS MANUAL . . . . . . . . . . . . . . . . . . . . . . . . . . . . . . . . . . . . . . . . . . . . . . . . . . . . . . . . . . . . . . . . . . 4
■ FEATURES. . . . . . . . . . . . . . . . . . . . . . . . . . . . . . . . . . . . . . . . . . . . . . . . . . . . . . . . . . . . . . . . . . . . . . . . . . . . . . . . . . . . . . . 6■ ABOUT THE DISCS. . . . . . . . . . . . . . . . . . . . . . . . . . . . . . . . . . . . . . . . . . . . . . . . . . . . . . . . . . . . . . . . . . . . . . . . . . . . . . . . 7
PLAYABLE DISCS . . . . . . . . . . . . . . . . . . . . . . . . . . . . . . . . . . . . . . . . . . . . . . . . . . . . . . . . . . . . . . . . . . . . . . . . . . . . . . . . . 7DISC TYPES . . . . . . . . . . . . . . . . . . . . . . . . . . . . . . . . . . . . . . . . . . . . . . . . . . . . . . . . . . . . . . . . . . . . . . . . . . . . . . . . . . . . . . 7
■ OPERATING CONTROLS AND FUNCTIONS . . . . . . . . . . . . . . . . . . . . . . . . . . . . . . . . . . . . . . . . . . . . . . . . . . . . . . . . . . . 8DISPLAY . . . . . . . . . . . . . . . . . . . . . . . . . . . . . . . . . . . . . . . . . . . . . . . . . . . . . . . . . . . . . . . . . . . . . . . . . . . . . . . . . . . . . . . . . 9DISPLAYS DURING OPERATION. . . . . . . . . . . . . . . . . . . . . . . . . . . . . . . . . . . . . . . . . . . . . . . . . . . . . . . . . . . . . . . . . . . . . 9LOADING THE BATTERIES . . . . . . . . . . . . . . . . . . . . . . . . . . . . . . . . . . . . . . . . . . . . . . . . . . . . . . . . . . . . . . . . . . . . . . . . . 9
■ HOOKUPS. . . . . . . . . . . . . . . . . . . . . . . . . . . . . . . . . . . . . . . . . . . . . . . . . . . . . . . . . . . . . . . . . . . . . . . . . . . . . . . . . . . . . . . 10CONNECTING TO A TV. . . . . . . . . . . . . . . . . . . . . . . . . . . . . . . . . . . . . . . . . . . . . . . . . . . . . . . . . . . . . . . . . . . . . . . . . . . . 10CONNECTING TO A STEREO SYSTEM . . . . . . . . . . . . . . . . . . . . . . . . . . . . . . . . . . . . . . . . . . . . . . . . . . . . . . . . . . . . . . . 10CONNECTING TO AN AMPLIFIER EQUIPPED WITH DIGITAL INPUT JACKS, MD DECK OR DAT DECK . . . . . . . . 11CONNECTING TO A TV OR A STEREO TV THAT HAS COMPONENT VIDEO IN JACKS . . . . . . . . . . . . . . . . . . . . . . . 11CONNECTING TO A DOLBY DIGITAL DECODER OR DTS DECODER . . . . . . . . . . . . . . . . . . . . . . . . . . . . . . . . . . . . . 12
■ PLAYING A DISC . . . . . . . . . . . . . . . . . . . . . . . . . . . . . . . . . . . . . . . . . . . . . . . . . . . . . . . . . . . . . . . . . . . . . . . . . . . . . . . . . 13PLAYING A DVD VIDEO OR AN AUDIO CD. . . . . . . . . . . . . . . . . . . . . . . . . . . . . . . . . . . . . . . . . . . . . . . . . . . . . . . . . . . 13USING THE DISC MENUS. . . . . . . . . . . . . . . . . . . . . . . . . . . . . . . . . . . . . . . . . . . . . . . . . . . . . . . . . . . . . . . . . . . . . . . . . . 13USING THE TITLE MENU . . . . . . . . . . . . . . . . . . . . . . . . . . . . . . . . . . . . . . . . . . . . . . . . . . . . . . . . . . . . . . . . . . . . . . . . . . 14PAUSING PLAYBACK OR DISPLAYING A STILL PICTURE . . . . . . . . . . . . . . . . . . . . . . . . . . . . . . . . . . . . . . . . . . . . . . 14RESUMING PLAYBACK FROM THE POINT WHERE PLAYBACK STOPPED . . . . . . . . . . . . . . . . . . . . . . . . . . . . . . . . 14STEPPING THROUGH FRAMES . . . . . . . . . . . . . . . . . . . . . . . . . . . . . . . . . . . . . . . . . . . . . . . . . . . . . . . . . . . . . . . . . . . . . 14FAST FORWARD/REVERSE. . . . . . . . . . . . . . . . . . . . . . . . . . . . . . . . . . . . . . . . . . . . . . . . . . . . . . . . . . . . . . . . . . . . . . . . . 15SLOW MOTION . . . . . . . . . . . . . . . . . . . . . . . . . . . . . . . . . . . . . . . . . . . . . . . . . . . . . . . . . . . . . . . . . . . . . . . . . . . . . . . . . . 15STARTING FROM A DESIRED TRACK . . . . . . . . . . . . . . . . . . . . . . . . . . . . . . . . . . . . . . . . . . . . . . . . . . . . . . . . . . . . . . . 15PLAYING FROM A DESIRED TITLE OR CHAPTER . . . . . . . . . . . . . . . . . . . . . . . . . . . . . . . . . . . . . . . . . . . . . . . . . . . . . 15STARTING FROM A DESIRED TIME COUNT . . . . . . . . . . . . . . . . . . . . . . . . . . . . . . . . . . . . . . . . . . . . . . . . . . . . . . . . . . 15MARKER. . . . . . . . . . . . . . . . . . . . . . . . . . . . . . . . . . . . . . . . . . . . . . . . . . . . . . . . . . . . . . . . . . . . . . . . . . . . . . . . . . . . . . . . 16RANDOM (Audio CD). . . . . . . . . . . . . . . . . . . . . . . . . . . . . . . . . . . . . . . . . . . . . . . . . . . . . . . . . . . . . . . . . . . . . . . . . . . . . . 16REPEAT . . . . . . . . . . . . . . . . . . . . . . . . . . . . . . . . . . . . . . . . . . . . . . . . . . . . . . . . . . . . . . . . . . . . . . . . . . . . . . . . . . . . . . . . . 16A-B REPEAT . . . . . . . . . . . . . . . . . . . . . . . . . . . . . . . . . . . . . . . . . . . . . . . . . . . . . . . . . . . . . . . . . . . . . . . . . . . . . . . . . . . . . 17PROGRAM (Audio CD). . . . . . . . . . . . . . . . . . . . . . . . . . . . . . . . . . . . . . . . . . . . . . . . . . . . . . . . . . . . . . . . . . . . . . . . . . . . . 17ZOOM PLAYBACK. . . . . . . . . . . . . . . . . . . . . . . . . . . . . . . . . . . . . . . . . . . . . . . . . . . . . . . . . . . . . . . . . . . . . . . . . . . . . . . . 18PLAYING AN MP3 DISC . . . . . . . . . . . . . . . . . . . . . . . . . . . . . . . . . . . . . . . . . . . . . . . . . . . . . . . . . . . . . . . . . . . . . . . . . . . 18CHANGING THE ONSCREEN DISPLAY DURING MP3 DISC PLAY . . . . . . . . . . . . . . . . . . . . . . . . . . . . . . . . . . . . . . . . 18PLAYING AN MP3 DISC FROM A DESIRED TRACK . . . . . . . . . . . . . . . . . . . . . . . . . . . . . . . . . . . . . . . . . . . . . . . . . . . . 19PLAYING AN MP3 DISC IN A PROGRAMMED WAY . . . . . . . . . . . . . . . . . . . . . . . . . . . . . . . . . . . . . . . . . . . . . . . . . . . . 19PLAYING AN MP3 DISC AT RANDOM. . . . . . . . . . . . . . . . . . . . . . . . . . . . . . . . . . . . . . . . . . . . . . . . . . . . . . . . . . . . . . . . 19
■ SETTINGS . . . . . . . . . . . . . . . . . . . . . . . . . . . . . . . . . . . . . . . . . . . . . . . . . . . . . . . . . . . . . . . . . . . . . . . . . . . . . . . . . . . . . . 20CHANGING THE AUDIO LANGUAGE OR SOUND MODE . . . . . . . . . . . . . . . . . . . . . . . . . . . . . . . . . . . . . . . . . . . . . . . 20CHANGING THE SUBTITLE LANGUAGE . . . . . . . . . . . . . . . . . . . . . . . . . . . . . . . . . . . . . . . . . . . . . . . . . . . . . . . . . . . . . 21CHANGING THE CAMERA ANGLE (Multi-Angle Pictures) . . . . . . . . . . . . . . . . . . . . . . . . . . . . . . . . . . . . . . . . . . . . . . . . 21CHANGING THE ON-SCREEN DISPLAY . . . . . . . . . . . . . . . . . . . . . . . . . . . . . . . . . . . . . . . . . . . . . . . . . . . . . . . . . . . . . . 22BLACK LEVEL SETTING . . . . . . . . . . . . . . . . . . . . . . . . . . . . . . . . . . . . . . . . . . . . . . . . . . . . . . . . . . . . . . . . . . . . . . . . . . 22SETTING LIST . . . . . . . . . . . . . . . . . . . . . . . . . . . . . . . . . . . . . . . . . . . . . . . . . . . . . . . . . . . . . . . . . . . . . . . . . . . . . . . . . . . 23
■ CHANGING THE SETUP ITEMS . . . . . . . . . . . . . . . . . . . . . . . . . . . . . . . . . . . . . . . . . . . . . . . . . . . . . . . . . . . . . . . . . . . . 24LANGUAGE SETTINGS. . . . . . . . . . . . . . . . . . . . . . . . . . . . . . . . . . . . . . . . . . . . . . . . . . . . . . . . . . . . . . . . . . . . . . . . . . . . 24DISPLAY SETTINGS . . . . . . . . . . . . . . . . . . . . . . . . . . . . . . . . . . . . . . . . . . . . . . . . . . . . . . . . . . . . . . . . . . . . . . . . . . . . . . 25AUDIO SETTINGS . . . . . . . . . . . . . . . . . . . . . . . . . . . . . . . . . . . . . . . . . . . . . . . . . . . . . . . . . . . . . . . . . . . . . . . . . . . . . . . . 26PARENTAL LOCK . . . . . . . . . . . . . . . . . . . . . . . . . . . . . . . . . . . . . . . . . . . . . . . . . . . . . . . . . . . . . . . . . . . . . . . . . . . . . . . . 27
■ LANGUAGE CODE LIST. . . . . . . . . . . . . . . . . . . . . . . . . . . . . . . . . . . . . . . . . . . . . . . . . . . . . . . . . . . . . . . . . . . . . . . . . . . 28■ TROUBLESHOOTING GUIDE . . . . . . . . . . . . . . . . . . . . . . . . . . . . . . . . . . . . . . . . . . . . . . . . . . . . . . . . . . . . . . . . . . . . . . 29■ SERVICE INFORMATION(For the U.S.) . . . . . . . . . . . . . . . . . . . . . . . . . . . . . . . . . . . . . . . . . . . . . . . . . . . . . . . . . . . . . . 30■ HANDLING PRECAUTIONS. . . . . . . . . . . . . . . . . . . . . . . . . . . . . . . . . . . . . . . . . . . . . . . . . . . . . . . . . . . . . . . . . . . . . . . . 30
DISC HANDLING . . . . . . . . . . . . . . . . . . . . . . . . . . . . . . . . . . . . . . . . . . . . . . . . . . . . . . . . . . . . . . . . . . . . . . . . . . . . . . . . . 30■ SPECIFICATIONS . . . . . . . . . . . . . . . . . . . . . . . . . . . . . . . . . . . . . . . . . . . . . . . . . . . . . . . . . . . . . . . . . . . . . . . . . . . . . . . . 31■ WARRANTY . . . . . . . . . . . . . . . . . . . . . . . . . . . . . . . . . . . . . . . . . . . . . . . . . . . . . . . . . . . . . . . . . . . . . . . . . . . BACK COVER
ESPAÑOL (Guía rápida de operación)INDICE
■ IMPORTANTES MEDIDAS DE SEGURIDAD Y PRECAUCIONES . . . . . . . . . . . . . . . . . . . . . . . . . . . . . . . . . . . . . . . . . 34■ CONTROLES DE OPERACIÓN Y FUNCIONES . . . . . . . . . . . . . . . . . . . . . . . . . . . . . . . . . . . . . . . . . . . . . . . . . . . . . . . . 36■ CONEXIONES . . . . . . . . . . . . . . . . . . . . . . . . . . . . . . . . . . . . . . . . . . . . . . . . . . . . . . . . . . . . . . . . . . . . . . . . . . . . . . . . . . . 38■ REPRODUCCIÓN DE UN DISCO. . . . . . . . . . . . . . . . . . . . . . . . . . . . . . . . . . . . . . . . . . . . . . . . . . . . . . . . . . . . . . . . . . . . 38

– 6 – EN9F21
FEATURES
¡Dolby Digital sound This player can handle Dolby Digital surround soundhaving 5.1 channels when connected to a Dolby Digitaldecoder.
¡Still/fast/slow/step playback Various playback modes are available including still pic-tures, fast forward/reverse, slow motion and step frames.
¡Random playback for audio CD and MP3This player can shuffle the order of tracks to play them inrandom order.
¡Program playback for audio CD and MP3You can program the order of tracks to play them in anydesired order.
¡DVD menus in a desired language You can display DVD menus in a desired language, ifavailable on a DVD.
¡Screen saver/Auto power-off functionsThe screen saver program starts when there is no inputfrom the player for five minutes in the stop mode. Whenthe screen saver program is activated for 30 minutes, thepower is automatically turned off.
¡Subtitles in a desired language You can select a desired language for the display subtitles,if that language is available on a disc.
¡Selecting a camera angle You can select the desired camera angle, if a disc containssequences recorded from different angles.
¡Choices for audio language and sound mode You can select the desired audio language and soundmode, if different languages and modes are available on adisc.
¡Parental lock You can set the control level to limit playback of discswhich may not be suitable for children.
¡Automatic detection of discs This player automatically detects if a loaded disc is DVD,audio CD or MP3 on disc.
¡Playing an MP3 discYou can enjoy MP3 files which is recorded on CD-R/RW.
¡Direct SearchYou can search the desired title, chapter, and track withnumeric button during playback or in stop mode.
¡On-screen display Information about the current operation can be displayedon a TV screen, allowing you to confirm the currentlyactive functions (such as program playback), on the TVscreen using the remote control.
¡DTS (Digital Theater System)Sound system different from Dolby Digital sound system
¡SearchChapter search: Search for the chapter designated by user
is possible.Title search: Search for the title designated by user is
possible.Track search: Search for the track designated by user is
possible.Time search: Search for the time designated by user is
possible.
¡RepeatChapter: Repeated playback of the chapter of the
disc being played is possible.Title: Repeated playback of the title of the disc
being played is possible.Track: Repeated playback of the track of the disc
being played is possible.Disc (audio CD): Repeated playback of the entire disc being
(MP3) played is possible.A-B: The part between A and B designated by
user is possible.Album: Repeated playback of the album of the
MP3 disc being played is possible.
¡Zoom2-time and 4-time magnified screen can be displayed.
¡MarkerThe part designated by user can be called back.
¡Resume PlayUser can resume to playback from the part at which theplay was stopped even if the power turn off.
¡Component Video Out JacksJacks located on the back of the DVD Player which areused to send high-quality video to a TV switch ComponentVideo In Jacks.
¡DimmerBrightness of the display can be varied.
¡Bit rate indication
¡DRC (Dynamic range control)You can control the range of sound volume.
– 7 – EN9F21
ABOUT THE DISCS
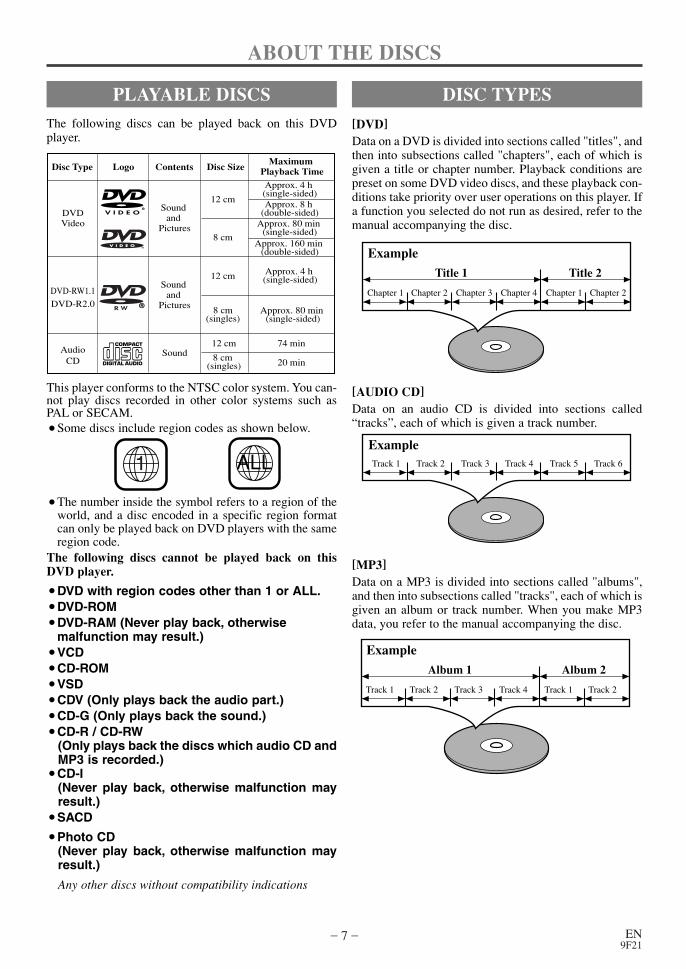
The following discs can be played back on this DVDplayer.
This player conforms to the NTSC color system. You can-not play discs recorded in other color systems such asPAL or SECAM.¡Some discs include region codes as shown below.
¡The number inside the symbol refers to a region of theworld, and a disc encoded in a specific region formatcan only be played back on DVD players with the sameregion code.
The following discs cannot be played back on thisDVD player.
¡DVD with region codes other than 1 or ALL.¡DVD-ROM¡DVD-RAM (Never play back, otherwise
malfunction may result.)¡VCD¡CD-ROM¡VSD¡CDV (Only plays back the audio part.)¡CD-G (Only plays back the sound.)¡CD-R / CD-RW
(Only plays back the discs which audio CD andMP3 is recorded.)
¡CD-I(Never play back, otherwise malfunction mayresult.)
¡SACD
¡Photo CD(Never play back, otherwise malfunction mayresult.)
Any other discs without compatibility indications
PLAYABLE DISCS
DVDVideo
DVD-RW1.1
DVD-R2.0
12 cm
Approx. 4 h (single-sided)
Approx. 80 min (single-sided)
8 cm
LogoMaximum
Playback TimeContentsDisc Type
Sound and
Pictures
Disc Size
74 min
Approx. 8 h (double-sided)
Approx. 160 min (double-sided)
12 cm Approx. 4 h (single-sided)
Approx. 80 min (single-sided)
8 cm(singles)
Sound and
Pictures
12 cm
20 min8 cm (singles)
AudioCD
Sound
[DVD]Data on a DVD is divided into sections called "titles", andthen into subsections called "chapters", each of which isgiven a title or chapter number. Playback conditions arepreset on some DVD video discs, and these playback con-ditions take priority over user operations on this player. Ifa function you selected do not run as desired, refer to themanual accompanying the disc.
DISC TYPES
Example
Title 1 Title 2
Chapter 1 Chapter 2 Chapter 1 Chapter 2Chapter 3 Chapter 4
[AUDIO CD]Data on an audio CD is divided into sections called“tracks”, each of which is given a track number.
ExampleTrack 1 Track 2 Track 3 Track 4 Track 5 Track 6
[MP3]Data on a MP3 is divided into sections called "albums",and then into subsections called "tracks", each of which isgiven an album or track number. When you make MP3data, you refer to the manual accompanying the disc.
Example
Album 1 Album 2
Track 1 Track 2 Track 1 Track 2Track 3 Track 4
– 8 – EN9F21
OPERATING CONTROLS AND FUNCTIONS
STOPPOWER PLAY
SKIPSTILL/PAUSE
OPEN /CLOSE
RREV FWDQ
2 43 51
9 8 7 6
N O P
Tde
FRONT PANEL
REMOTE CONTROL
STILL/PAUSEDIRECT SKIP
RETURN
ZOOM
MODE
SUBTITLE
MARKER
MENU
SKIP
REPEAT
A-B REPEAT
ANGLE AUDIO
CLEAR
TITLE
STOP
PLAY
FWDREV
SETUP
DIMMER
ENTER
OPEN/CLOSE
BLACKLEVEL
ONSCREEN
POWER
1 2 3
654
7
C 0 +10
8 9
11011
13
15
17
18
194
20
16
12
14
58
21
6
7
2223242526
28
30313
29
27
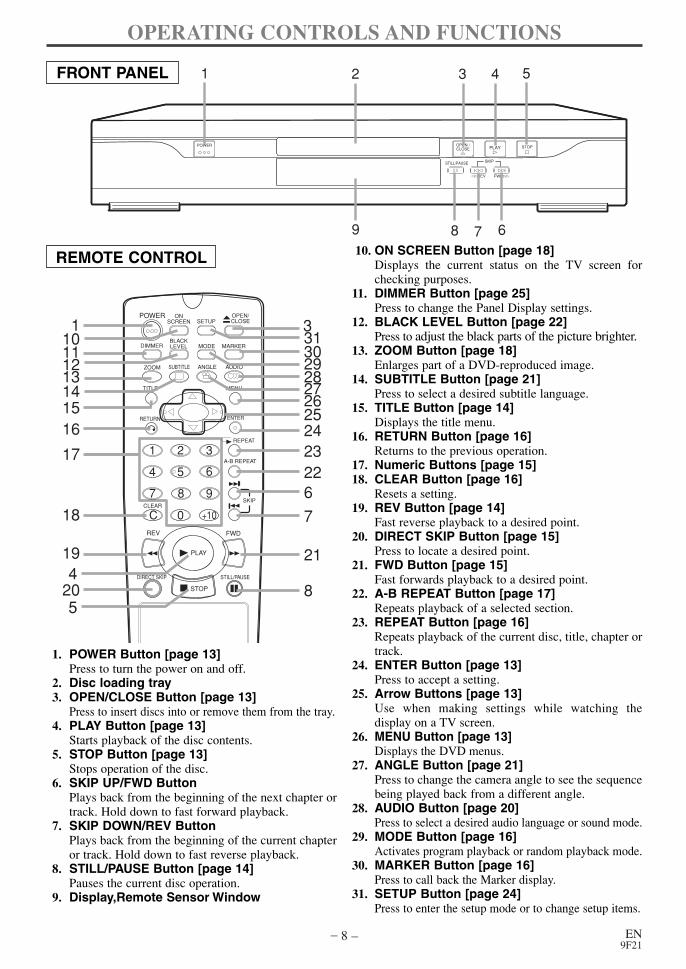
1. POWER Button [page 13]Press to turn the power on and off.
2. Disc loading tray3. OPEN/CLOSE Button [page 13]
Press to insert discs into or remove them from the tray.4. PLAY Button [page 13]
Starts playback of the disc contents.5. STOP Button [page 13]
Stops operation of the disc.6. SKIP UP/FWD Button
Plays back from the beginning of the next chapter ortrack. Hold down to fast forward playback.
7. SKIP DOWN/REV ButtonPlays back from the beginning of the current chapteror track. Hold down to fast reverse playback.
8. STILL/PAUSE Button [page 14]Pauses the current disc operation.
9. Display,Remote Sensor Window
10. ON SCREEN Button [page 18]Displays the current status on the TV screen forchecking purposes.
11. DIMMER Button [page 25]Press to change the Panel Display settings.
12. BLACK LEVEL Button [page 22]Press to adjust the black parts of the picture brighter.
13. ZOOM Button [page 18]Enlarges part of a DVD-reproduced image.
14. SUBTITLE Button [page 21]Press to select a desired subtitle language.
15. TITLE Button [page 14]Displays the title menu.
16. RETURN Button [page 16]Returns to the previous operation.
17. Numeric Buttons [page 15]18. CLEAR Button [page 16]
Resets a setting.19. REV Button [page 14]
Fast reverse playback to a desired point.20. DIRECT SKIP Button [page 15]
Press to locate a desired point.21. FWD Button [page 15]
Fast forwards playback to a desired point.22. A-B REPEAT Button [page 17]
Repeats playback of a selected section.23. REPEAT Button [page 16]
Repeats playback of the current disc, title, chapter ortrack.
24. ENTER Button [page 13]Press to accept a setting.
25. Arrow Buttons [page 13]Use when making settings while watching thedisplay on a TV screen.
26. MENU Button [page 13]Displays the DVD menus.
27. ANGLE Button [page 21]Press to change the camera angle to see the sequencebeing played back from a different angle.
28. AUDIO Button [page 20]Press to select a desired audio language or sound mode.
29. MODE Button [page 16]Activates program playback or random playback mode.
30. MARKER Button [page 16]Press to call back the Marker display.
31. SETUP Button [page 24]Press to enter the setup mode or to change setup items.

– 9 – EN9F21
R L
AUDIO OUT VIDEO OUT
VIDEO S-VIDEODIGITAL
Y
PB
PR
3635343332 3738
REAR VIEW
32. Power Cord33. COAXIAL DIGITAL AUDIO OUT Jack34. Right AUDIO OUT Jack35. Left AUDIO OUT Jack
36. VIDEO OUT Jack37. Component Video Out Jacks (Y/PB/PR)38. S-VIDEO OUT Jack
DISPLAY DISPLAYS DURINGOPERATION
LOADING THE BATTERIES
Stays on when the inserteddisc is being played back.
CD:Lights up when a CD is inserted on the tray.
Lights up when a DVDis inserted on the tray.
Lights up when the inserted disc comes to a pause.
Stays on when the A-B repeat function is on.
Stays on when the repeat function is on.
Displays how long a current title or track has been played back. When a chapter or track has switched, the number of a new title, chapter or track is displayed.
Power on
No disc inserted
Tray open
Tray closed
Loading the Disc
Power off
1. Open the battery compartmentcover.
2. Insert two “AA” size batteries (R-06), with each one oriented cor-rectly.
3. Close the cover.
Notes¡Do not mix alkaline and manganese batteries.¡Do not mix old and new batteries.

– 10 – EN9F21
HOOKUPS
FOR TVs WITH S-VIDEO INPUT JACK
Use an S-Video cable (commercially available) in place of the yellow video cable to enjoy pictures at higherquality.
CONNECTING TO A TV
R L
AUDIO OUT VIDEO OUT
VIDEO S-VIDEODIGITAL
Y
PB
PR
A/V-compatible or
wide screen TV
To VIDEO OUT jack
To VIDEO INPUT jack
To AUDIO OUT jacks
To Right (red) and Left (white)AUDIO INPUT jacks
Notes¡Connect the DVD player directly to a TV. If the A/V cables are connected to a VCR, pictures may be
distorted due to the copy protection system.
¡Be sure to turn off the power to all components in the system before connecting another component.
¡Refer to the Operation Manuals for your TV, stereo system and any other components to be connected to theDVD player.
R L
AUDIO OUT VIDEO OUT
VIDEO S-VIDEODIGITAL
Y
PB
PR
To Right (red) and Left (white) AUDIO OUT jacks
A/V-compatible or
wide screen TV
Stereo system
To S-VIDEO INPUT jack
To VIDEO INPUT jackor
To ANALOG AUDIO INPUT jacks
R L
AUDIO OUT VIDEO OUT
VIDEO S-VIDEODIGITAL
Y
PB
PR
To S-VIDEO OUT jack
To S-VIDEO INPUT jack
To Right (red) and Left (white)
To AUDIO OUT jacks
AUDIO INPUT jacks
A/V-compatible or
wide screen TV
[Fig. 1]
[Fig. 2]
[Fig. 3]
– 11 – EN9F21
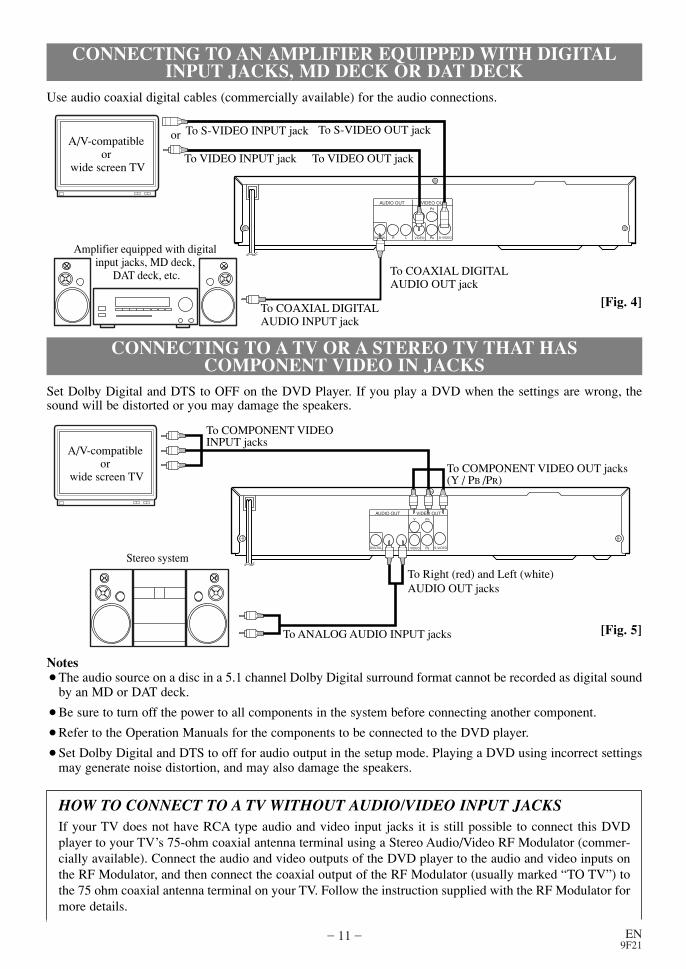
CONNECTING TO AN AMPLIFIER EQUIPPED WITH DIGITALINPUT JACKS, MD DECK OR DAT DECK
Use audio coaxial digital cables (commercially available) for the audio connections.
R L
AUDIO OUT VIDEO OUT
VIDEO S-VIDEODIGITAL
Y
PB
PR
To COAXIAL DIGITAL AUDIO INPUT jack
A/V-compatible or
wide screen TV
Amplifier equipped with digital input jacks, MD deck,
DAT deck, etc.
To VIDEO INPUT jack To VIDEO OUT jack
or To S-VIDEO INPUT jack To S-VIDEO OUT jack
To COAXIAL DIGITAL AUDIO OUT jack
[Fig. 4]
CONNECTING TO A TV OR A STEREO TV THAT HAS COMPONENT VIDEO IN JACKS
Set Dolby Digital and DTS to OFF on the DVD Player. If you play a DVD when the settings are wrong, thesound will be distorted or you may damage the speakers.
A/V-compatible or
wide screen TV
Stereo system
To COMPONENT VIDEOINPUT jacks
To COMPONENT VIDEO OUT jacks(Y / PB /PR)
To Right (red) and Left (white) AUDIO OUT jacks
To ANALOG AUDIO INPUT jacks
R L
AUDIO OUT VIDEO OUT
VIDEO S-VIDEODIGITAL
Y
PB
PR
[Fig. 5]
Notes¡The audio source on a disc in a 5.1 channel Dolby Digital surround format cannot be recorded as digital sound
by an MD or DAT deck.
¡Be sure to turn off the power to all components in the system before connecting another component.
¡Refer to the Operation Manuals for the components to be connected to the DVD player.
¡Set Dolby Digital and DTS to off for audio output in the setup mode. Playing a DVD using incorrect settingsmay generate noise distortion, and may also damage the speakers.
HOW TO CONNECT TO A TV WITHOUT AUDIO/VIDEO INPUT JACKSIf your TV does not have RCA type audio and video input jacks it is still possible to connect this DVD player to your TV’s 75-ohm coaxial antenna terminal using a Stereo Audio/Video RF Modulator (commer-cially available). Connect the audio and video outputs of the DVD player to the audio and video inputs onthe RF Modulator, and then connect the coaxial output of the RF Modulator (usually marked “TO TV”) tothe 75 ohm coaxial antenna terminal on your TV. Follow the instruction supplied with the RF Modulator formore details.

– 12 – EN9F21
CONNECTING TO A DOLBY DIGITAL DECODEROR DTS DECODER
If using this DVD player to play back a DVD in a 5.1 channel Dolby Digital surround or DTS surround format,the DVD player outputs a Dolby Digital or DTS data stream from its COAXIAL DIGITAL AUDIO OUT jack.By hooking the player up to a Dolby Digital or DTS decoder, you can enjoy a more convincing, realisticambience with powerful and high-quality surround sound of a professional standard such as can be heard inmovie theaters.
Use audio coaxial digital cables (commercially available) for the audio connections.
A/V-compatible or
wide screen TV
Front speaker (left)
Center speaker
Front speaker (right)
Surround speaker
(left)
Surround speaker (right)
Subwoofer
or
To S-VIDEO INPUT jack
To S-VIDEO OUT jackTo VIDEO INPUT jack
To VIDEO OUT jack
To COAXIAL DIGITAL AUDIO OUT jack
To COAXIAL DIGITAL AUDIO INPUT jack
Dolby Digital, DTS or MPEG
decoder
R L
AUDIO OUT VIDEO OUT
VIDEO S-VIDEODIGITAL
Y
PB
PR
Notes¡Be sure to turn off the power to all components in
the system before connecting another component.
¡Refer to the Operation Manuals for the componentsto be connected to the DVD player.
¡If connected to a Dolby Digital decoder, set DolbyDigital to on for audio output in the setup mode.
¡If connected to a DTS decoder, set DTS to ON foraudio output in the setup mode.
¡Unless connected to a Dolby Digital decoder or aDTS decoder, set Dolby Digital and DTS to off foraudio output in the setup mode. Playing a DVDusing incorrect settings may generate noise distor-tion, and may also damage the speakers.
[Fig. 6]
Manufactured under license from DolbyLaboratories.“Dolby” and the double-D sym-bol are trademarks of Dolby Laboratories.
“DTS” and “DTS Digital Out” are trademarksof Digital Theater Systems, Inc.
If your TV’s 75 ohm coaxial antenna terminal is already occupied by an antenna or cable box connection,remove that cable from your TV’s antenna terminal and reconnect it to the coaxial antenna input terminal ofthe RF Modulator (usually marked “ANT IN”), then connect the RF modulator to your TV’s antenna terminal as described above.
Note¡The picture quality from DVD discs will not be as good if the DVD player is connected to the TV’s
antenna terminal through an RF Modulator.
– 13 – EN9F21
PLAYING A DISC
PLAYING A DVD VIDEOOR AN AUDIO CD
Getting startedTurn on the power of the TV, amplifier and any othercomponents which are connected to the DVD player.(Change the input system to suit the DVD player, andcheck that the sound volume is correct.)
1 Press the POWER button.¡The power will turn on.
2 Press the OPEN/CLOSE button.
¡The disc loading tray will open.
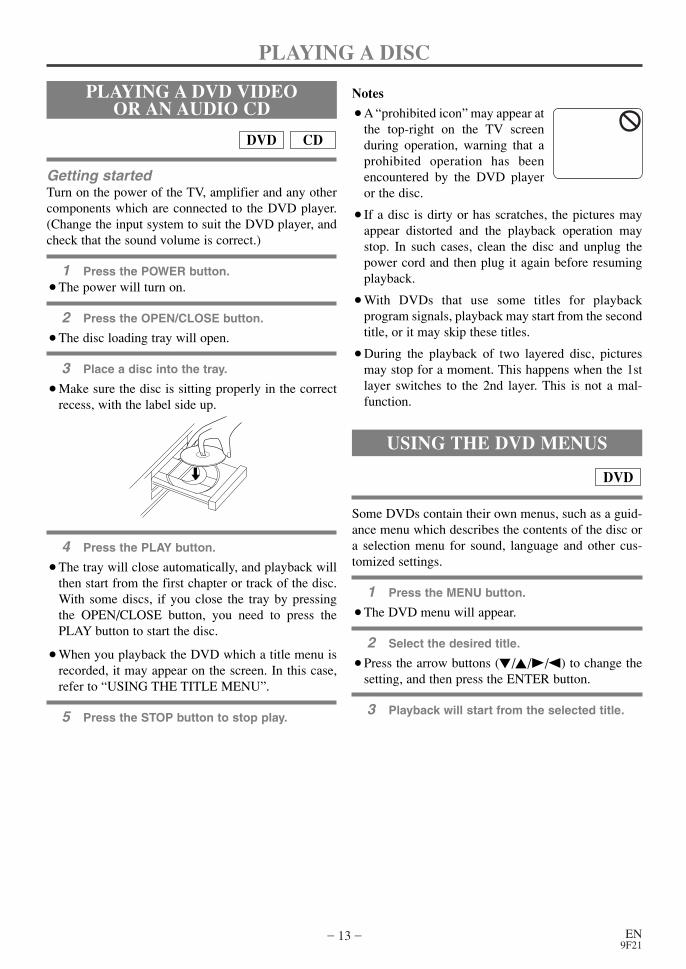
3 Place a disc into the tray.
¡Make sure the disc is sitting properly in the correctrecess, with the label side up.
4 Press the PLAY button.
¡The tray will close automatically, and playback willthen start from the first chapter or track of the disc.With some discs, if you close the tray by pressingthe OPEN/CLOSE button, you need to press thePLAY button to start the disc.
¡When you playback the DVD which a title menu isrecorded, it may appear on the screen. In this case,refer to “USING THE TITLE MENU”.
5 Press the STOP button to stop play.
CDDVD
Notes
¡A “prohibited icon” may appear atthe top-right on the TV screenduring operation, warning that aprohibited operation has beenencountered by the DVD playeror the disc.
¡If a disc is dirty or has scratches, the pictures mayappear distorted and the playback operation maystop. In such cases, clean the disc and unplug thepower cord and then plug it again before resumingplayback.
¡With DVDs that use some titles for playback program signals, playback may start from the secondtitle, or it may skip these titles.
¡During the playback of two layered disc, picturesmay stop for a moment. This happens when the 1stlayer switches to the 2nd layer. This is not a mal-function.
USING THE DVD MENUS
Some DVDs contain their own menus, such as a guid-ance menu which describes the contents of the disc ora selection menu for sound, language and other cus-tomized settings.
1 Press the MENU button.
¡The DVD menu will appear.
2 Select the desired title.
¡Press the arrow buttons (L/K/B/s) to change thesetting, and then press the ENTER button.
3 Playback will start from the selected title.
DVD

– 14 – EN9F21
USING THE TITLE MENU
With a DVD containing a title menu, you can selectdesired titles from the menu.
1 Press the TITLE button.
¡The title menu will appear.
2 Select the desired title.
¡Press the arrow buttons (L/K/B/s) to change thesetting, and then press the ENTER button.
CALLING UP A MENU SCREENDURING PLAYBACK
For DVDs¡Press the MENU button to call up the DVD menu.
¡Press the TITLE button to call up the title menu.
Note
¡Contents of menus and corresponding menu operations may vary between discs. Refer to themanual accompanying the disc for details.
DVD
PAUSING PLAYBACK OR DISPLAYING A STILL PICTURE
1 Press the STILL/PAUSE button during play-back.
¡Playback will pause, with soundmuted.
2 Press the PLAY button to resume playback.
CDDVD
F
B
STEPPING THROUGH FRAMES
1 Press the STILL/PAUSE button while play-back is paused.
¡The next picture frame is dis-played with sound muted eachtime the button is pressed.
2 Press the PLAY button to resume playback.
DVD
F
B
RESUMING PLAYBACK FROMTHE POINT WHERE
PLAYBACK STOPPED
1 Press the STOP button during playback.
¡Playback will stop, and thenappear the resuming message atthe center.
2 Press the PLAY button. Playback will startfrom the point where the previous playbacksession was stopped.
Note
¡The resume function can be reset by pressing theSTOP button twice or by opening the disc loadingtray.
CDDVD
Press 'PLAY' to play from here.To play the beginning, press 'STOP' first and then 'PLAY'.
B

– 15 – EN9F21
1 DIRECT SKIP button and then press thenumeric buttons to select a title or a chapter.
¡Perform the title search and thechapter search after setting them onthe same screen at the same time.Changeover by K/ L buttons.
¡During playback, press the numericbuttons to select a Chapter. TheChapter will be located and play-back will start.
¡When playback is stopped, pressthe numeric buttons to select aTitle. The Title will be located andplayback will start.
Note¡Playback from a desired title or chapter is not avail-
able with some DVDs.¡Some discs which the chapter number isn’t dis-
played cannot playback from a desired chapter.
DVD
FAST FORWARD/REVERSE
1 Press the FWD g or REV h button dur-ing playback.
¡For DVDs, pressing the FWD g or REV h but-ton cycles the playback speed in four steps.In case ofDVDs, the sound will mute.
¡For audio CDs, the playback speed is ×16 fixed.
2 Press the PLAY button to return to normalplayback speed.
Note¡FAST FORWARD or REVERSE from a TITLE to
other TITLEs is not possible.
CDDVD
You can also press the DIRECTSKIP button, use the numeric but-tons to enter the track number,when the track number is enteredin the entry box, playback of thedesired track will start automatically.
Ex2
Ex8
Ex30
Ex60
Dx30
Dx60
Dx8
Dx2
E DREV Button ButtonFWD
SLOW MOTION
1 Press the FWD g button while playback ispaused. (Sound remains muted.)
¡Slow motion mode will be activated.¡Pressing the FWD g button cycles the playback
speed in three steps. Select an appropriate speedwhile referring to the speed indication on the screen.
2 Press the PLAY button to return to normalplayback speed.
Notes¡Slow playback is not available with audio CDs ¡The reverse of slow playback is not available.¡Slow playback from a TITLE to other TITLEs is not
possible.
DVD
×1/16
×1/8
×1/2
D ButtonFWD
STARTING FROM A DESIREDTRACK
1 Press the numeric buttons to enter thedesired track number.
¡The selected track will be located, and playback will start.
CD
TRICKS WITH THE SKIP BUTTONS (H, G)
If the SKIP button G is pressed during playback orwhile playback is paused, the current track/chapter isskipped and the next track/chapter is played. When theSKIP button H is pressed once, the top of the currenttrack/chapter is located for replaying. When the SKIPbutton H is pressed again within 2seconds after play-back begin, the previous track/chapter is located.
Note
SKIP from a TITLE to other TITLEs is not possible.
T __/ 15
PLAYING FROM A DESIREDTITLE OR CHAPTER
STARTING FROM A DESIREDTIME COUNT
You can use this function during playback.
1 Press the DIRECT SKIP button twice.
2 Press the numeric buttons to set the desiredtime count.
¡Example: 1 hour, 23 minutes and30 seconds
1 → 2 → 3 → 3 → 0
CDDVD
T 1 / 12 C __ / 3
1:23:30TOTAL 1:29:00
T __ / 12 C 0 / 3

– 16 – EN9F21
RANDOM (Audio CD)
1 Press the MODE button in stop mode.
¡The program setting menu screen will appear.
2 Press the MODE button again.
CD
RANDOM
EXIT : MODESTART : PLAY
REPEAT
You can use this function during playback.
1 Press the REPEAT button.
For DVDs¡A single title or chapter is played back repeatedly.
¡Pressing the REPEAT button cycles the display onthe screen as follows.
For audio CDs¡The whole disc or a single track is played back
repeatedly.
¡Pressing the REPEAT button cycles the display onthe screen through Off, TRACK and All.
CDDVD
The current Title is played back repeatedly.
The current Chapter is played back repeatedly.
No repeat playback.[OFF]
[CHAPTER]
[TITLE]
The whole Disc is played back repeatedly.
The current Track is played back repeatedly.
No repeat playback.[OFF]
[TRACK]
[ALL]
If the REPEAT button is pressed once dur-ing program/random playback, the currenttrack is played back repeatedly.If the REPEAT button is pressed again, theprogram/random playback is performedrepeatedly.
Notes¡Repeat playback is not available with some discs.¡The REPEAT setting will be cleared when moving
to other title, chapter or track.¡Repeat playback is not function during A-B repeat
playback.
Notes¡In the case of DVD, Time Search in Title is effec-
tive. (But Time Search in Chapter is ineffective.)¡In the case of CD, Time Search in Track is effective.
(But Time Search in the entire disc is ineffective.)¡Playback from a desired time count is not available
with some discs or if the unit is in stop mode.
MARKER
You can define the part to be called back.
1 Press the MARKER button during playback.
Set the marker¡Using the cursor (s / B) button, position the cursor
on to the marker number shown as “NOT SET”.Press the ENTER button when the screen to bereviewed appears. The marked time will be dis-played. Up to 5 points can bemarked.
Call back the marker¡Using the cursor (s / B) button, position the cursor
on to the marker number to be called back and pressthe ENTER button.
Clear the marker¡Using the cursor (s / B) button, position the cursor
on to the marker number to be cleared and press theCLEAR button.To clear all markers, place the cursor on “AC” (Allclear markers) and press the ENTER button.
2 Press the MARKER button or the RETURNbutton to exit the display.
CDDVD
1 2 3 4 5 ACNOT SET
3 Press the PLAY button. Random playbackwill then start.
Note
¡Program playback is not available during randomplayback.
– 17 – EN9F21
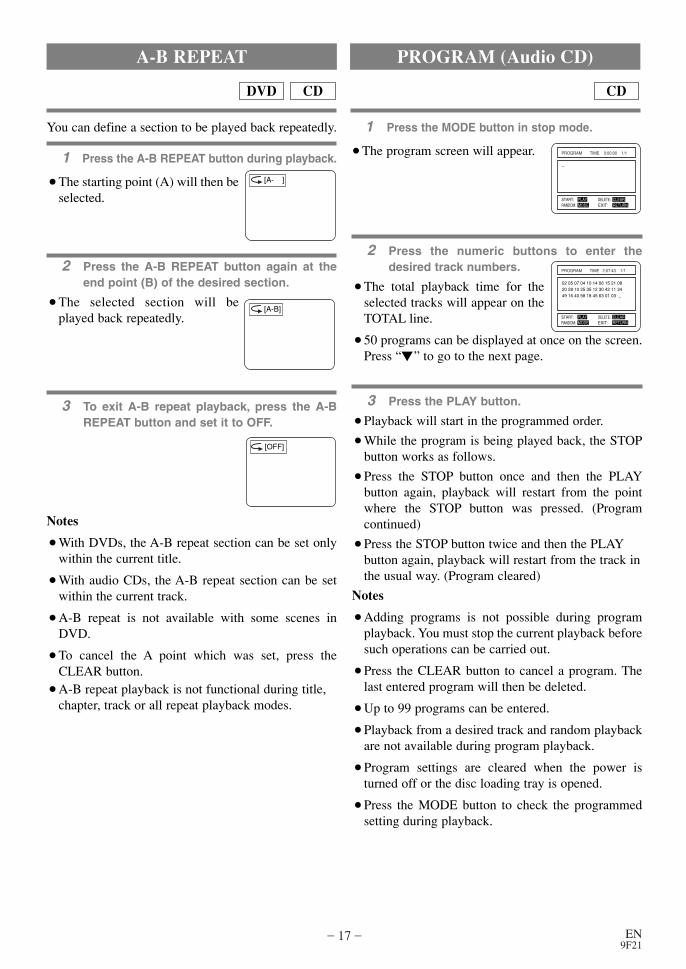
You can define a section to be played back repeatedly.
1 Press the A-B REPEAT button during playback.
¡The starting point (A) will then beselected.
2 Press the A-B REPEAT button again at theend point (B) of the desired section.
¡The selected section will beplayed back repeatedly.
3 To exit A-B repeat playback, press the A-BREPEAT button and set it to OFF.
Notes
¡With DVDs, the A-B repeat section can be set onlywithin the current title.
¡With audio CDs, the A-B repeat section can be setwithin the current track.
¡A-B repeat is not available with some scenes inDVD.
¡To cancel the A point which was set, press theCLEAR button.
¡A-B repeat playback is not functional during title,chapter, track or all repeat playback modes.
CDDVD
A-B REPEAT PROGRAM (Audio CD)
1 Press the MODE button in stop mode.
¡The program screen will appear.
CD
PROGRAM TIME 0:00:00 1/1
RANDOM: MODE EXIT: RETURNSTART: PLAY DELETE: CLEAR
--
2 Press the numeric buttons to enter thedesired track numbers.
¡The total playback time for theselected tracks will appear on theTOTAL line.
¡50 programs can be displayed at once on the screen.Press “L” to go to the next page.
3 Press the PLAY button.
¡Playback will start in the programmed order.
¡While the program is being played back, the STOPbutton works as follows.
¡Press the STOP button once and then the PLAYbutton again, playback will restart from the pointwhere the STOP button was pressed. (Program continued)
¡Press the STOP button twice and then the PLAYbutton again, playback will restart from the track inthe usual way. (Program cleared)
Notes
¡Adding programs is not possible during programplayback. You must stop the current playback beforesuch operations can be carried out.
¡Press the CLEAR button to cancel a program. Thelast entered program will then be deleted.
¡Up to 99 programs can be entered.
¡Playback from a desired track and random playbackare not available during program playback.
¡Program settings are cleared when the power isturned off or the disc loading tray is opened.
¡Press the MODE button to check the programmedsetting during playback.
02 05 07 04 10 14 06 15 21 0820 28 10 25 35 12 30 42 11 3449 16 40 58 18 45 63 01 03 _
PROGRAM TIME 2:07:43 1/1
RANDOM: MODE EXIT: RETURNSTART: PLAY DELETE: CLEAR
[A- ]
[A-B]
[OFF]
– 18 – EN9F21
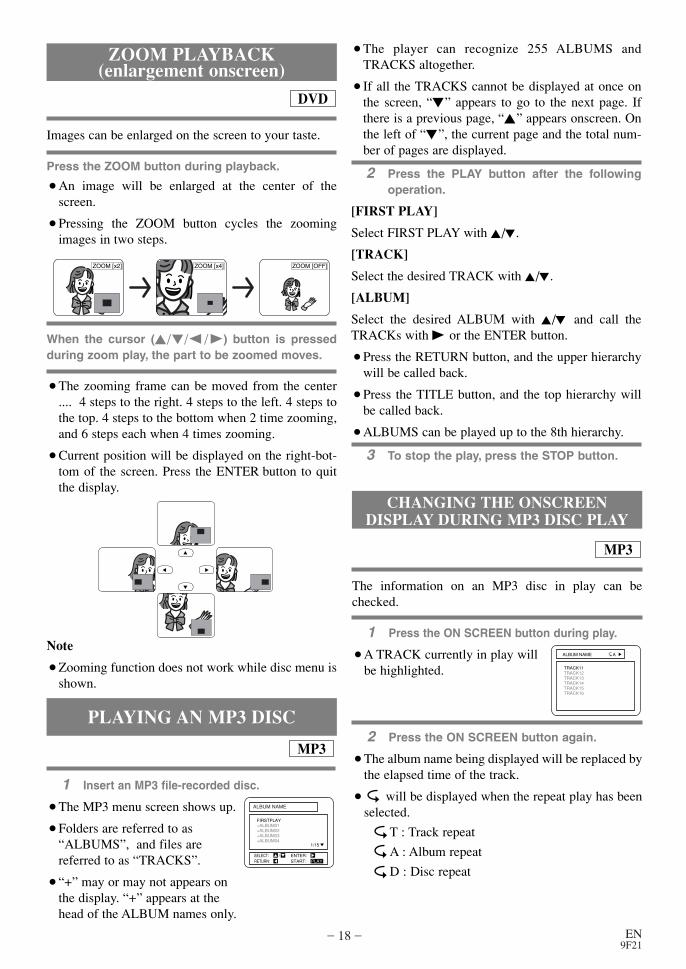
ZOOM PLAYBACK(enlargement onscreen)
Images can be enlarged on the screen to your taste.
Press the ZOOM button during playback.
¡An image will be enlarged at the center of thescreen.
¡Pressing the ZOOM button cycles the zoomingimages in two steps.
DVD
ZOOM [x4]ZOOM [x2] ZOOM [OFF]
When the cursor (K/ L/ s / B) button is pressedduring zoom play, the part to be zoomed moves.
¡The zooming frame can be moved from the center.... 4 steps to the right. 4 steps to the left. 4 steps tothe top. 4 steps to the bottom when 2 time zooming,and 6 steps each when 4 times zooming.
¡Current position will be displayed on the right-bot-tom of the screen. Press the ENTER button to quitthe display.
Note
¡Zooming function does not work while disc menu isshown.
PLAYING AN MP3 DISC
¡The player can recognize 255 ALBUMS andTRACKS altogether.
¡If all the TRACKS cannot be displayed at once onthe screen, “L” appears to go to the next page. Ifthere is a previous page, “K” appears onscreen. Onthe left of “L”, the current page and the total num-ber of pages are displayed.
2 Press the PLAY button after the followingoperation.
[FIRST PLAY]
Select FIRST PLAY with K/L.
[TRACK]
Select the desired TRACK with K/L.
[ALBUM]
Select the desired ALBUM with K/L and call theTRACKs with B or the ENTER button.
¡Press the RETURN button, and the upper hierarchywill be called back.
¡Press the TITLE button, and the top hierarchy willbe called back.
¡ALBUMS can be played up to the 8th hierarchy.
3 To stop the play, press the STOP button.
CHANGING THE ONSCREEN DISPLAY DURING MP3 DISC PLAY
The information on an MP3 disc in play can bechecked.
1 Press the ON SCREEN button during play.
¡A TRACK currently in play willbe highlighted.
2 Press the ON SCREEN button again.
¡The album name being displayed will be replaced bythe elapsed time of the track.
¡ will be displayed when the repeat play has beenselected.
T : Track repeat
A : Album repeat
D : Disc repeat
MP3
TRACK11TRACK12TRACK13TRACK14TRACK15TRACK16
ALBUM NAME A
1 Insert an MP3 file-recorded disc.
¡The MP3 menu screen shows up.
¡Folders are referred to as“ALBUMS”, and files arereferred to as “TRACKS”.
¡“+” may or may not appears onthe display. “+” appears at thehead of the ALBUM names only.
MP3
FIRSTPLAY+ALBUM01+ALBUM02+ALBUM03+ALBUM04
1/15
START: PLAYSELECT: /RETURN:
ENTER:
ALBUM NAME

– 19 – EN9F21
PLAYING AN MP3 DISC ATRANDOM
1 Press the MODE button twice in STOP mode.
2 Press the PLAY button.
¡Random play starts.
MP3
RANDOM
EXIT: MODESTART: PLAY
1 Press the DIRECT SKIP button.
¡The SEARCH menu shows up.¡A track currently in play or under
RESUME ON will be highlight-ed. In the case of RESUME OFF,the first track of the disc will behighlighted.
2 Using the K/L buttons, select a track to beplayed. Then press the PLAY button to startplaying.
¡Press the RETURN button, and the SEARCH menudisappears.
Notes
¡During play, a desired track can be directly searched.Just type in the TRACK number with the numericalbuttons.
¡If the typed TRACK number is not available, the“disable” symbol appears and the direct search modeis cancelled.
¡Playback cannot be started from a desired timecount.
MP3
PLAYING AN MP3 DISC FROM ADESIRED TRACK
PLAYING AN MP3 DISC IN APROGRAMMED WAY
2 Using the K/L buttons, select a track. Thenpress the ENTER button to save it in a pro-gram.
Notes
¡When an album name is high-lighted, press the B button, andthe next hierarchy shows up.
¡Press the { button to go back to the previous hier-archy.
¡If the entire program cannot be displayed at once onthe screen, “L” appears to go to the next page.
3 When the disc has been programmed, pressthe PLAY button.
¡Programmed play starts.
Notes
¡The right-hand window is for display only. If youwant to see other pages, press the SKIP UP/DOWNbutton.
¡Press the CLEAR button, and the last-programmedentry will be deleted.
¡Press the RETURN button, and the STOP screenwill show up with the program contents in memory.
¡To stop the program, press the STOP button twice.
¡Do not turn off the power or open the disc trayhalfway. The program setting will be cancelled.
RAMDOM: MODE EXIT: RETURNSTART: PLAY DELETE: CLEAR
+ALBUM10+ALBUM11+ALBUM12TRACK11TRACK12
TRACK11
PROGRAM - ALBUM01 1/1
1/5 1/1
+ALBUM01TRACK11TRACK12TRACK13TRACK14
ALBUM NAME
1/15
START: PLAYSELECT: /RETURN:
ENTER:
RAMDOM: MODE EXIT: RETURNSTART: PLAY DELETE: CLEAR
+ALBUM51+ALBUM52TRACK51TRACK52TRACK53
TRACK11TRACK52TRACK31TRACK22TRACK03
PROGRAM - ALBUM05 2/3
1/5 2/3
3 Press the ON SCREEN button again, and theDISPLAY screen disappears.
1 Press the MODE button in STOP mode.
¡The program screen shows up.
MP3
RAMDOM: MODE EXIT: RETURNSTART: PLAY DELETE: CLEAR
+ALBUM01+ALBUM02+ALBUM03TRACK01TRACK02
PROGRAM-ALBUM NAME 1/1
1/5 1/1

– 20 – EN9F21
SETTINGS
CHANGING THE AUDIOLANGUAGE OR SOUND MODE
The DVD player has a function which allows you toselect the desired audio language and sound mode.
For DVDsPress the AUDIO button during playback, and thenpress the AUDIO button to select the desired audiolanguage.
¡The audio language can be changed if multiple languages are recorded on the DVD being played.
CDDVD
Notes¡Pressing the Audio button may not work on some
DVDs with multiple audio languages (e.g. DVDswhich allow audio language setting on the discmenu). Operation varies between discs, so refer tothe manual accompanying the disc.
¡Current audio language and sound mode will be dis-played when you press the AUDIO button at first .
¡If a desired language is not shown after pressing theAudio button several times, the disc does not havean audio source in that language.
¡The audio language resets to the one which has beenselected in the setup mode, every time the power isturned on or discs are replaced. If that language isnot available on a disc, a language defined by thedisc is selected.
¡The screen display will disappear after about 5 seconds.
¡If you use DIGITAL AUDIO OUT jack, the soundmode of audio CDs can not be changed.
1.ENG 5.1CH 48k/3D
2.FRE 5.1CH 48k/3D
3.JPN 5.1CH 48k/3D
HELLO Bon jour
For audio CDsPress the AUDIO button during playback.
¡Pressing the AUDIO button cycles the sound modethrough STEREO, L-CH and R-CH.
Both right and left channelsare active (stereo).
Only the left channel is active.
Only the right channel is active.
L-CH
R-CH
STEREO

– 21 – EN9F21
CHANGING THE SUBTITLELANGUAGE
The DVD player has a function which allows you toselect the desired language for subtitles.
Press the SUBTITLE button during playback, andthen press the SUBTITLE button to select thedesired subtitle language.
¡The subtitle language can be changed if the subtitlesare recorded in multiple languages on the DVDbeing played.
¡The subtitle language cannot be changed if the subtitles are recorded in a single language on theDVD being played.
¡Pressing the SUBTITLE button cycles the subtitlelanguage from SUBTITLE 1, SUBTITLE 2 and allthe languages recorded.
¡Current subtitle mode will be displayed when youpress the SUBTITLE button at first.
¡Press the SUBTITLE button, and then press the cur-sor (s / B) button to set it to on or off.
Notes¡Some discs allow subtitle language setting on the
disc menu. (Operation varies between discs, so referto the manual accompanying the disc.)
¡If the desired language is not shown after pressingthe SUBTITLE button several times, the disc doesnot have subtitles in that language.
¡The subtitle language resets to the one which hasbeen selected in the setup mode, every time thepower is turned on or discs are replaced. If that language is not available on a disc, a languagedefined by the disc is selected.
¡It may take time to display the subtitles in the selected language.
¡The screen display will disappear after about 5 seconds.
¡When “NOT AVAILABLE” appears onscreen, itmeans no subtitle is recorded on the scene.
DVD
CHANGING THE CAMERAANGLE (Multi-Angle Pictures)
The DVD player has a function which allows you toselect the desired camera angle.
1 Press the ANGLE button during playback.
¡If the disc contains sequences recorded from differ-ent camera angles, the angle icon ( ) will appearat the top-right of the screen. You can change thecamera angle when the icon appears on the screen.
¡The camera angle cannot be changed if the disc doesnot contain sequences recorded from different camera angles.
2 Press the ANGLE button while the angle number is shown on the screen.
Note
¡The screen display will disappear after about 5 seconds.
¡Current angle information will be displayed whenyou press the ANGLE button at first.
DVD
Subtitle 1
Subtitle 2
OFF
1.ENG/3
2.FRE/6
OFF
Angle 1
Angle 2
Angle 8
1 / 8
2 / 8
8 / 8
HELLO Bon jour

– 22 – EN9F21
CHANGING THE ON-SCREENDISPLAY
C 1/2 0:00:00 -1:23:45
TIME:Elapsed time of the current title on remainintime of the current title.
C(Chapter):Current chapter number / the number of total chapter.
You can check the information about the disc by pressing the ON SCREEN button on the remote con-trol.
For DVDs1 Press the ON SCREEN button during playback.
CDDVD
2 Press the ON SCREEN button again.
¡Use the number button to start from a desired chap-ter.
3 Press the ON SCREEN button again.
4 Press the ON SCREEN button or the CLEARbutton to exit the display.
T 7/49 0:01:46 -0:03:27
TIME:Elapsed time of the current chapter andremaining time of the current chapter.
T(Title):Current title number / the number of total titles.
BIT RATE C L0
BIT RATE indicator will appear.BIT RATE shows the quantity of information which is recorded in DVD.
Layer number(*1) L0: Layer 0 is playing back L1: Layer 1 is playing back Current Repeat setting C: Chapter repeat T: Title repeat A B: A-B repeat
(*2)
*1) It appears when the layered disc is playing back.*2) It appears when Repeat play back is set.
For audio CDs1 Press the ON SCREEN button during playback.
T 4/12 0:03:21 -0:02:15
T(Track):Current track number / the number of total tracks.
TIME:Elapsed time of the current track and remaining time of the current track.Current Repeat setting T: Track repeat A: Album repeat D: Disc repeat
T
2 Press the ON SCREEN button again.
ALL 4/12 0:13:45 -0:45:40
ALL:Current track number / the number of total tracks.
TIME:Elapsed time of the current disk and remaining time of the current disc.
T
Current Repeat setting T: Track repeat A: Album repeat D: Disc repeat
3 Press the ON SCREEN button or the CLEARbutton to exit the display.
You can adjust the black parts of the picture brighter.
1 Press the BLACK LEVEL button during play-back.
¡The setup screen will appear.
2 Press the BLACK LEVEL button repeatedly toset it on or off.
¡ON : It makes the dark parts brighter.(Default : ON)OFF : Original picture which is recorded on the discwill be shown.
BLACK LEVEL SETTINGS
BLACK LEVEL ON
¡Use the number button to start from a desired track.

– 23 – EN9F21
SETTING LIST
1. LANGUAGE AUDIO To set the audio from the speaker.
To set the subtitle on the TV screen.
To set the disc menu on the TVscreen.
To set the language munu or on-screen display.
To set the audio signal from the DIGITAL OUT.
To set the control of the volume range.
To set the conversion of audio signalrecorded in PCM from 96kHz to 48kHz.
To set the parental level of DVD soft.
To set or change the password.
To set it to your TV type.
To set angle icon( )on or off.
To shut off DVD player automaticallywhen it is left inactivate for 35 minutes.
To set the illumination of this main unit display.
SUBTITLE
DISC MENU
PLAYER MENU
3. AUDIO (DIGITAL OUT)
DOLBY DIGITAL
DTS
4. PARENTAL PARENTAL LEVEL
CHANGE Please enter 4-digit password.
2. DISPLAY TV ASPECT
MENU SETTING( is default.) Setting Explanation
page 24
page 25
page 26
page 27
ORIGINALENGLISHFRENCH
ENGLISHFRANÇAISESPAÑOL
4:3 LETTER BOX4:3 PAN&SCAN16:9 WIDE
PANEL DISPLAY BRIGHTDIMMERAUTO
ANGLE ICON OFFON
AUTO POWER OFF OFFON
BITSTREAMDPCM
OFFON
DRC OFFON
DOWNSAMPLING AUTO48kHz96kHz
All8 - 1
ORIGINALENGLISHFRENCH
OFFENGLISHFRENCH
This is a list of the settings to use conveniently and the default. You need to change the setting, for example,when you hook up with the wide TV or amplifier. Please see each page for the details.
Note
¡Changing the settings, it will keep on after switching off.
¡Setup function is available in STOP mode only.
¡When you play a DVD with menu, sometimes the disc menu takes priority.
– 24 – EN9F21
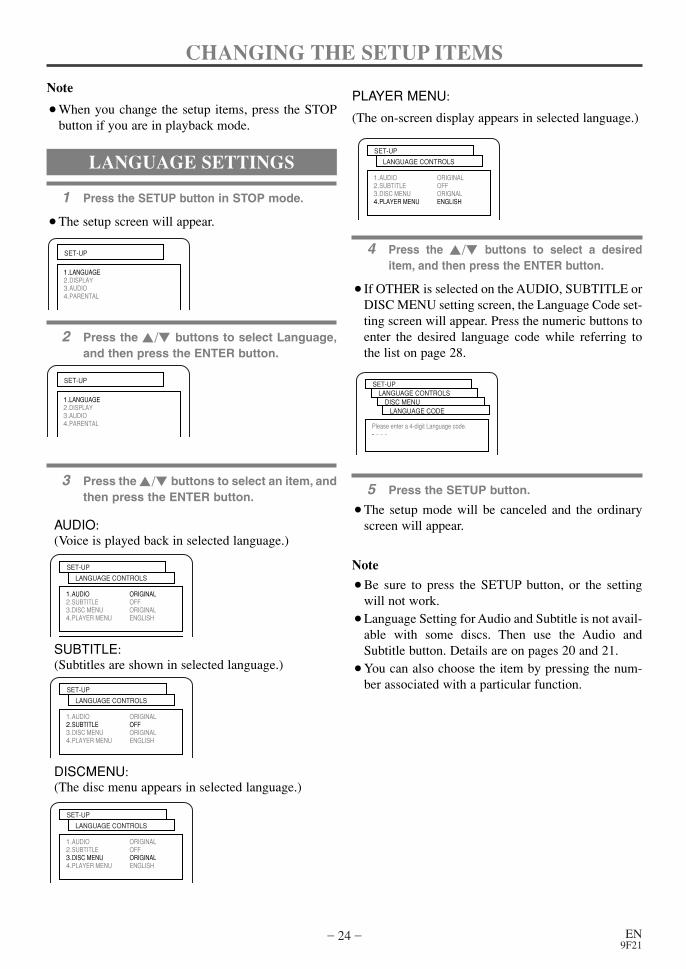
1 Press the SETUP button in STOP mode.
¡The setup screen will appear.
2 Press the K/L buttons to select Language,and then press the ENTER button.
3 Press the K/L buttons to select an item, andthen press the ENTER button.
PLAYER MENU:
(The on-screen display appears in selected language.)
4 Press the K/L buttons to select a desireditem, and then press the ENTER button.
¡If OTHER is selected on the AUDIO, SUBTITLE orDISC MENU setting screen, the Language Code set-ting screen will appear. Press the numeric buttons toenter the desired language code while referring tothe list on page 28.
5 Press the SETUP button.
¡The setup mode will be canceled and the ordinaryscreen will appear.
Note
¡Be sure to press the SETUP button, or the settingwill not work.
¡Language Setting for Audio and Subtitle is not avail-able with some discs. Then use the Audio andSubtitle button. Details are on pages 20 and 21.
¡You can also choose the item by pressing the num-ber associated with a particular function.
Note
¡When you change the setup items, press the STOPbutton if you are in playback mode.
CHANGING THE SETUP ITEMS
LANGUAGE SETTINGS
1.LANGUAGE2.DISPLAY3.AUDIO4.PARENTAL
SET-UP
Please enter a 4-digit Language code.- - - -
SET-UPLANGUAGE CONTROLS
DISC MENULANGUAGE CODE
1.LANGUAGE2.DISPLAY3.AUDIO4.PARENTAL
SET-UP
AUDIO:(Voice is played back in selected language.)
SUBTITLE:(Subtitles are shown in selected language.)
DISCMENU:(The disc menu appears in selected language.)
SET-UP
1.AUDIO ORIGINAL2.SUBTITLE OFF3.DISC MENU ORIGINAL4.PLAYER MENU ENGLISH
LANGUAGE CONTROLS
1.AUDIO ORIGINAL2.SUBTITLE OFF3.DISC MENU ORIGINAL4.PLAYER MENU ENGLISH
SET-UP
LANGUAGE CONTROLS
1.AUDIO ORIGINAL2.SUBTITLE OFF3.DISC MENU ORIGINAL4.PLAYER MENU ENGLISH
SET-UP
LANGUAGE CONTROLS
1.AUDIO ORIGINAL2.SUBTITLE OFF3.DISC MENU ORIGNAL4.PLAYER MENU ENGLISH
SET-UP
LANGUAGE CONTROLS

– 25 – EN9F21
4 Press the K/L buttons to select a desireditem, and then press the ENTER button.
5 Press the SETUP button.
¡The setup mode will be canceled and the ordinaryscreen will appear.
Note
¡Be sure to press the SETUP button, or the settingwill not work.
¡You can also choose the item by pressing the num-bers.
¡You can change the PANEL DISPLAY setting(BRIGHT or DIMMER) by pressing the DIMMERbutton on the remote control.
1 Press the SETUP button in STOP mode.
¡The setup screen will appear.
2 Press the K/L buttons to select DISPLAYand then press the ENTER button.
3 Press the K/L buttons to select an item, andthen press the ENTER button.
DISPLAY SETTINGS
1.LANGUAGE2.DISPLAY3.AUDIO4.PARENTAL
SET-UP
1.LANGUAGE2.DISPLAY3.AUDIO4.PARENTAL
SET-UP
ANGLE ICON (Default: On)
Display or not display the Angle icon on the screen.
AUTO POWER OFF (Default: On)
Set or not set to turn off after the screen saver is started andno keys are pressed for 35 minutes.
TV ASPECT(Default : 4:3 LETTER BOX)4:3 LETTER BOX : Wide screen with black bars on topand bottom4:3 PAN & SCAN : Full height picture, trimmed bothsides16:9 WIDE : If wide screen TV is connected
PANEL DISPLAY (Default : BRIGHT)Adjust the brightness of the display of the unit.* Auto: Stays dim only during playback.
1.TV ASPECT 4:3 LETTER BOX2.PANEL DISPLAY BRIGHT3.ANGLE ICON ON4.AUTO POWER OFF ON
SET-UP
DISPLAY CONTROLS
1.TV ASPECT 4:3 LETTER BOX2.PANEL DISPLAY BRIGHT3.ANGLE ICON ON4.AUTO POWER OFF ON
SET-UP
DISPLAY CONTROLS
1.BRIGHT2.DIMMER3.AUTO
SET-UPDISPLAY CONTROLS
PANEL DISPLAY
SET-UP
DISPLAY CONTROLS
1.TV ASPECT 4:3 LETTER BOX2.PANEL DISPLAY BRIGHT3.ANGLE ICON ON4.AUTO POWER OFF ON
SET-UP
DISPLAY CONTROLS
1.TV ASPECT 4:3 LETTER BOX2.PANEL DISPLAY BRIGHT3.ANGLE ICON ON4.AUTO POWER OFF ON

– 26 – EN9F21
1 Press the SETUP button in STOP mode.
¡The setup screen will appear.
2 Press the K/L buttons to select Audio andthen press the ENTER button.
3 Press the K/L buttons to select an item, andthen press the ENTER button.
4 Press the SETUP button.
¡The setup mode will be canceled and the ordinaryscreen will appear.
AUDIO SETTINGS
1.LANGUAGE2.DISPLAY3.AUDIO4.PARENTAL
SET-UP
1.LANGUAGE2.DISPLAY3.AUDIO4.PARENTAL
SET-UP
DRC (Default : OFF)
On : DRC (Dynamic Range Control)
¡This function is for controlling the range of soundvolume. By compressing the range of sound vol-ume, it is possible not only to suppress the outputof loud sound at night and but also to raise the vol-ume of low sound.
¡However, this function is effective only for thesound recorded by Dolby Digital recording. Whenthe sound recorded by Dolby Digital 5.1ch is out-putted, the sound is compressed automaticallyeven with this function being set at “Off”.
DOLBY DIGITAL (default : BITSTREAM)BITSTREAM : Output by Dolby Digital
Set to BITSTREAM when the unit is connected toDolby Digital Decoder.
1.DRC OFF2.DOLBY DIGITAL BITSTREAM3.DTS OFF4.DOWNSAMPLING AUTO
SET-UP
AUDIO CONTROLS
1.DRC OFF2.DOLBY DIGITAL BITSTREAM3.DTS OFF4.DOWNSAMPLING AUTO
SET-UP
AUDIO CONTROLS
DTS (Default : OFF)On: Output by DTSSet to On when the unit is connected to DTS
Decoder
DOWNSAMPLING (Default : AUTO)Set the output for the DVD recorded in PCM 96kHz
(96kHz or 48 khz)¡Press the o/p buttons to select an item, and then
press the ENTER button.
1.DRC OFF2.DOLBY DIGITAL BITSTREAM3.DTS OFF4.DOWNSAMPLING AUTO
SET-UP
AUDIO CONTROLS
SET-UP
AUDIO CONTROLS
DOWNSAMPLING
1.AUTO2.48kHz3.96kHz
1.DRC OFF2.DOLBY DIGITAL BITSTREAM3.DTS OFF4.DOWNSAMPLING AUTO
SET-UP
AUDIO CONTROLS
– 27 – EN9F21
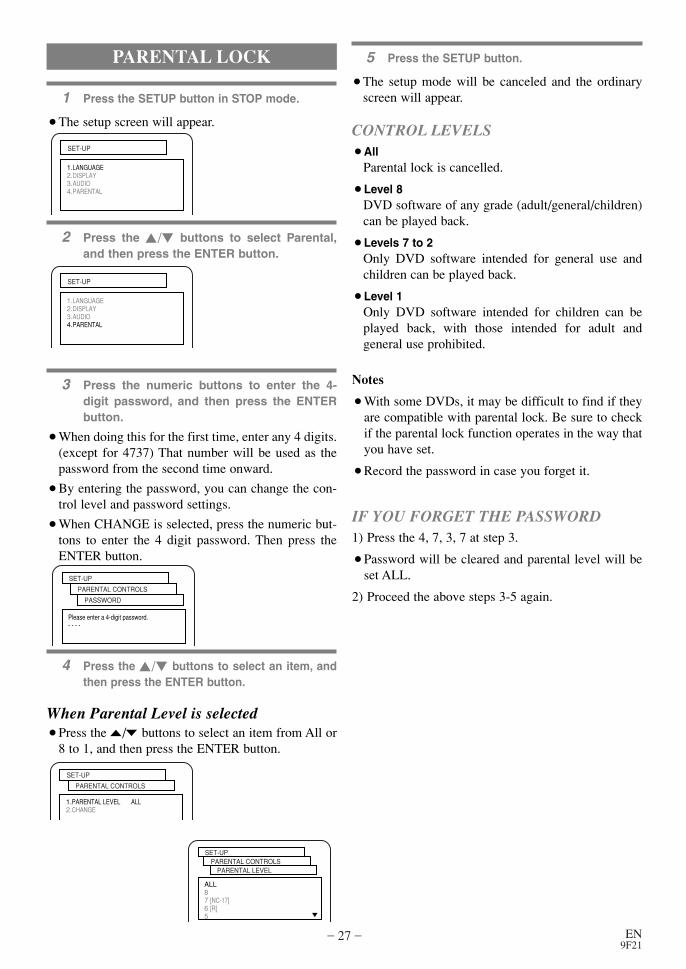
CONTROL LEVELS¡All
Parental lock is cancelled.
¡Level 8DVD software of any grade (adult/general/children)can be played back.
¡Levels 7 to 2Only DVD software intended for general use andchildren can be played back.
¡Level 1Only DVD software intended for children can beplayed back, with those intended for adult and general use prohibited.
Notes
¡With some DVDs, it may be difficult to find if theyare compatible with parental lock. Be sure to checkif the parental lock function operates in the way thatyou have set.
¡Record the password in case you forget it.
IF YOU FORGET THE PASSWORD1) Press the 4, 7, 3, 7 at step 3.
¡Password will be cleared and parental level will beset ALL.
2) Proceed the above steps 3-5 again.
1 Press the SETUP button in STOP mode.
¡The setup screen will appear.
2 Press the K/L buttons to select Parental,and then press the ENTER button.
3 Press the numeric buttons to enter the 4-digit password, and then press the ENTERbutton.
¡When doing this for the first time, enter any 4 digits.(except for 4737) That number will be used as thepassword from the second time onward.
¡By entering the password, you can change the con-trol level and password settings.
¡When CHANGE is selected, press the numeric but-tons to enter the 4 digit password. Then press theENTER button.
4 Press the K/L buttons to select an item, andthen press the ENTER button.
When Parental Level is selected¡Press the o/p buttons to select an item from All or
8 to 1, and then press the ENTER button.
PARENTAL LOCK
1.LANGUAGE2.DISPLAY3.AUDIO4.PARENTAL
SET-UP
1.LANGUAGE2.DISPLAY3.AUDIO4.PARENTAL
SET-UP
Please enter a 4-digit password.- - - -
SET-UP
PARENTAL CONTROLS
PASSWORD
1.PARENTAL LEVEL ALL2.CHANGE
SET-UP
PARENTAL CONTROLS
ALL87 [NC-17]6 [R]5
SET-UPPARENTAL CONTROLS
PARENTAL LEVEL
5 Press the SETUP button.
¡The setup mode will be canceled and the ordinaryscreen will appear.

– 28 – EN9F21
LANGUAGE CODE LIST
123456789
1011121314151617181920212223242526272829303132333435363738394041424344454647484950515253545556575859606162636465666768
No. Language Country code
AfarAbkhazianAfrikaansAmharicArabicAssameseAymaraAzerbaijaniBashkirByelorussianBulgarianBihariBislamaBengali;BanglaTibetanBretonCatalanCorsicanCzechWelshDanish [DAN]German [GER]BhutaniGreek [GRE]English [ENG]EsperantoSpanish [SPA]EstonianBasquePersianFinnish [FIN]FijiFaroeseFrench [FRE]FrisianIrish [IRI]Scots GaelicGalicianGuaraniGujaratiHausaHindiCroatianHungarian [HUN]ArmenianInterlinguaInterlingueInupiakIndonesianIcelandic [ICE]Italian [ITA]HebrewJapaneseYiddishJapanese [JPN]GeorgianKazakhGreenlandicCambodianKannadaKorean [KOR]KashmiriKurdishKirghizLatinLingalaLaothianLithuanian
4 7 4 74 7 4 84 7 5 24 7 5 94 7 6 44 7 6 54 7 7 14 7 7 24 8 4 74 8 5 14 8 5 34 8 5 44 8 5 54 8 6 04 8 6 14 8 6 44 9 4 74 9 6 14 9 6 54 9 7 15 0 4 75 0 5 15 0 7 25 1 5 85 1 6 05 1 6 15 1 6 55 1 6 65 1 6 75 2 4 75 2 5 55 2 5 65 2 6 15 2 6 45 2 7 15 3 4 75 3 5 05 3 5 85 3 6 05 3 6 75 4 4 75 4 5 55 4 6 45 4 6 75 4 7 15 5 4 75 5 5 15 5 5 75 5 6 05 5 6 55 5 6 65 5 6 95 6 4 75 6 5 55 6 6 95 7 4 75 7 5 75 7 5 85 7 5 95 7 6 05 7 6 15 7 6 55 7 6 75 7 7 15 8 4 75 8 6 05 8 6 15 8 6 6
69707172737475767778798081828384858687888990919293949596979899
100101102103104105106107108109110111112113114115116117118119120121122123124125126127128129130131132133134135136
No. Language Country code
Latvian;LettishMalagasyMaoriMacedonianMalayalamMongolianMoldavianMarathiMalayMalteseBurmeseNauruNepaliDutch [DUT]Norwegian [NOR]Occitan(Afan)OromoOriyaPanjabiPolishPashto;PushtoPortuguese [POR]QuechuaRhaeto-RomanceKirundiRomanian [RUM]Russian [RUS]KinyarwandaSanskritSindhiSanghoSerbo-CroatianSinghaleseSlovakSlovenianSamoanShonaSomaliAlbanianSerbianSiswatSesothoSundaneseSwedish [SWE]SwahiliTamilTeluguTajikThaiTigrinyaTurkmenTagalogSetswanaTongaTurkish [TUR]TsongaTatarTwiUkrainianUrduUzbekVietnameseVolapukWolofXhosaYorubaChinese [CHI]Zulu
5 8 6 85 9 5 35 9 5 55 9 5 75 9 5 85 9 6 05 9 6 15 9 6 45 9 6 55 9 6 65 9 7 16 0 4 76 0 5 16 0 5 86 0 6 16 1 4 96 1 5 96 1 6 46 2 4 76 2 5 86 2 6 56 2 6 66 3 6 76 4 5 96 4 6 06 4 6 16 4 6 76 4 6 96 5 4 76 5 5 06 5 5 36 5 5 46 5 5 56 5 5 76 5 5 86 5 5 96 5 6 06 5 6 16 5 6 36 5 6 46 5 6 56 5 6 66 5 6 76 5 6 86 5 6 96 6 4 76 6 5 16 6 5 36 6 5 46 6 5 56 6 5 76 6 5 86 6 6 06 6 6 16 6 6 46 6 6 56 6 6 66 6 6 96 7 5 76 7 6 46 7 7 26 8 5 56 8 6 16 9 6 17 0 5 47 1 6 17 2 5 47 2 6 7
If you choose a Language that has a 3 letter language code, the code will be displayed everytime you change theAudio or Subtitle language setting on pages 20 and 21. If you choose any other languages, ‘---’ will be displayedinstead. (3 letter language code is written in bracket.)

– 29 – EN9F21
¡No malfunction.
TROUBLESHOOTING GUIDEIf the DVD player does not perform properly when operated as instructed in this Operation Manual, check theplayer, consulting the following checklist.
Symptom Cause RemedyNo power ¡Loose power plug. ¡Insert the power plug firmly into the wall outlet.
The player does notrespond to theremote control.
¡The remote control is not aimedat the sensor on the player.
¡Obstacles present between theremote control and the sensor.
¡The remote control is too faraway from the player.
¡Dead batteries.
¡Aim the remote control directly at the sensor onthe player.
¡Remove the obstacles from the signal path.
¡Use the remote control within 23’ (7m) of theplayer.
¡Replace the batteries.
No picture¡Loose video connection.¡Wrong disc.
¡Connect the video cables firmly.¡Insert a correct video disc that plays on this
player.
Disc cannot beplayed
¡No disc.¡Dirty disc.¡Disc is placed upside down.¡Parental lock is active.
¡Insert a disc.¡Clean the disc.¡Place the disc correctly, with the label side up.¡Cancel the parental lock or change the control
level.
No sound
¡Loose audio connection.¡The power of the connected
audio component is off.¡Wrong audio output settings.¡Wrong input settings on the
connected audio component.
¡Copy protection is active.¡Unit accidentally set into fast
forward or reverse mode.¡The 1st layer is switching to the
2nd layer, when playing a twolayered disc.
¡Connect the audio cables firmly.¡Turn the power of the audio component on.
¡Correct the audio output settings.¡Correct the input settings on the audio
component.
Distorted picture
¡Connect the player directly to the TV.¡There are some cases where pictures may be
slightly distorted, which are not a sign of amalfunction.
¡Although Pictures may stop for a moment, thisis not a malfunction.
Audio or subtitlelanguage does notmatch the setup.
¡The selected language is notavailable for audio or subtitleson the DVD.
¡No malfunction.
The camera anglecannot be changed.
¡The DVD does not containsequences recorded from different camera angles.
¡No malfunction.
Audio or subtitlelanguage cannot bechanged.
¡The DVD does not containaudio source or subtitles in theselected language.
¡No malfunction.
“Prohibited icon”appears on thescreen, prohibitingan operation.
¡That operation is prohibited bythe player or disc.
Notes
Some functions are not available in specific modes, but this is not a malfunction. Read the description in thisOperation Manual for details on correct operations.¡Playback from a desired track and random playback are not available during program playback.

– 30 – EN9F21
SERVICE INFORMATION (For the U.S.)
HANDLING PRECAUTIONCABINET CLEANING
¡Wipe the front panel and other exterior surfaces of the DVD player with a soft cloth immersed in lukewarmwater and wrung dry.
¡Never use a solvent or alcohol.Do not spray insecticide liquid near the DVD player.Such chemicals may cause damage and discoloration to the exposed surfaces.
For the location of the nearest Sharp Authorized Service Center, or to obtain product literature, accessories, sup-plies or customer assistance, please call 1-800-BE-SHARP (1-800-237-4277) or visit SHARP’s website(http://www.sharp-usa.com).
¡Use discs which have the following logos on them.(Optical audio digital discs.)
¡Handle the discs so that fingerprints and dust do notadhere to the surfaces of the discs.
¡Always store the disc in its protective case when it isnot used.
¡To clean-off, use a soft cloth.
¡Do not use a hard cloth since this will mar the disc.
¡Wipe the disc in a straight line from center to edge.
¡Never wipe with a circular motion.
¡Do not use detergent or abrasive cleaning agents.
DISC HANDLING

– 31 – EN9F21
SPECIFICATIONSProduct type : DVD Video Player
Discs : DVD videoAudio CD
Output signal format : NTSC color
Frequency responseDVD (linear sound) : 20 Hz to 22 kHz (sample rate: 48 kHz)
20 Hz to 44 kHz (sample rate: 96 kHz)CD : 20 Hz to 20 kHz
Signal-to-noise ratio (S/N ratio)CD : 110 dB (EIAJ)
Dynamic rangeDVD (linear sound) : 95 dBCD : 94 dB (EIAJ)
Total distortion factorCD : 0.007% (EIAJ)
Wow and flutter : Below the measurement limitation (+/-0.001% W PEAK) (EIAJ)
ConnectionsS-Video output : Mini DIN 4-pin jack (75 ohm)Video output : One RCA connector, 1 Vpp (75 ohm)Coaxial digital audio output : One pin jack, 500mVpp (75 ohm)Analog audio output : Two RCA connectors (one left channel, one right channel) 2 Vrms (47 kilo-ohm)Component video output : One pin jack (Y), 1 Vpp (75 ohm) Two pin jacks (PB)/(PR), 700mVpp (75 ohm)
Power source : 120 V AC +/- 10%, 60 Hz +/- 0.5%
Power consumption : 14 W (standby: 2 W)
Operating temperature : 5°C to 40°C
Dimensions : W 17-1/8” (435mm)
H 2-17/32” (75mm)
D 8-5/16” (211mm)
Weight : 4.62 lbs (2.1kg)
¡Designs and specifications are subject to change without notice.
¡If there is a discrepancy between languages, the default language will be English.

– 32 – EN9F21
ESPAÑOL (Guía rápida de operación)
■ IMPORTANTES MEDIDAS DE SEGURIDAD Y PRECAUCIONES.................................................................... 31
■ CONTROLES DE OPERACIÓN Y FUNCIONES ........................ 33VISUALIZACIÓN .................................................................. 34VVISUALIZACIONES DURANTE LA OPERACIÓN ........................................................................ 34INSTALACIÓN DE LAS PILAS.............................................. 34
■ CONEXIONES ........................................................................ 35CONEXIÓN A UN TELEVISOR ............................................ 35CONEXIÓN A UN AMPLIFICADOR EQUIPADO CON TOMAS DE ENTRADA DIGITAL, PLATINA MD O PLATINA DAT.............................................................. 35CONEXIÓN A UN DESCODIFICADOR DOLBY DIGITAL O A UN DESCODIFICADOR DTS ........................ 35CONEXIÓN A UN TELEVISOR O A UN TELEVISOR ESTÉREO QUE TENGA TOMAS COMPONENT VIDEO IN ...................................................... 35
■ REPRODUCCIÓN DE UN DISCO ............................................ 35REPRODUCCIÓN DE UN DVD DE VÍDEO O UN CD DEAUDIO .................................................................................. 35

– 33 – EN9F21
AVISO: PARA REDUCIR EL RIESGO DE INCENDIO O ELECTROCHOQUE NOEXPONGA ESTE APARATO A LA HUMEDAD.
Este dispositivo cumple con la Parte 15 de las reglas de la FCC (Comisión Federal de Comunicaciones). La operaciónse encuentra sujeta a las dos condiciones siguientes: (1) Este dispositivo no debería producir interferencias perjudiciales, y (2) este dispositivo debe aceptar cualquier interferencia recibida, incluyendo las que puedan producir una operación
indeseable.
INFORMACIONEste equipo se ha sometido a todo tipo de pruebas y cumple con las normas establecidas para dispositivo digital deClase B, de conformidad con la Parte 15 de las reglas de la FCC (Comisión Federal de Comunicaciones). Estas reglasestán diseñadas para asegurar una protección razonable contra interferencias perjudiciales en las instalaciones residen-ciales. Este equipo genera, utiliza y puede emitir energía de radiofrecuencia y, si no se instala y utiliza debidamente, esdecir, conforme a las instrucciones, podrían producirse interferencias perjudiciales en las radiocomunicaciones. Sinembargo, no se garantiza que estas interferencias no se produzcan en una instalación determinada. Si este equipo oca-siona interferencias en la recepción de radio o televisión, lo cual puede comprobarse con sólo apagar y encender elequipo, intente corregir el problema mediante una o una combinación de las siguientes medidas:—Reoriente la antena receptora o cámbiela de lugar.—Aumente la separación entre el equipo y el receptor.—Enchufe el equipo a una toma de corriente situada en un circuito distinto del receptor.—Consulte a su distribuidor o a un técnico experto en radio/televisión.
PRECAUCION:ESTA UNIDAD HA SIDO CLASIFICADA COMO PRODUCTO CLASS 1 LASER.EL USO DE MANDOS O AJUSTES O LA REALIZACION DE PROCEDIMIENTOS DISTINTOS DE LOSINDICADOS EN LA PRESENTE IMPLICA EL RIESGO DE EXPOSICION A UNA RADIACION PELI-GROSA.COMO LOS RAYOS LASER UTILIZADOS EN ESTA UNIDAD PUEDEN RESULTAR PERJUDICIALESPARA SUS OJOS, NO INTENTE DESARMAR EL GABINETE. SOLICITE EL SERVICIO UNICAMENTE APERSONAL CUALIFICADO.
“ADVERTENCIA—Las reglas de la FCC (Comisión Federal de Comunicaciones)estipulan que cualquier modificación o cambio a este equipo no aprobado expresa-mente por el fabricante podrá anular la autorización del usuario para operar esteequipo”.
Este símbolo previene al usuario del voltajeaislado dentro de la unidad que puede provocardescargas eléctricas peligrosas.
Este símbolo advierte al usuario que existeninstrucciones de operación y de mantenimien-to en la literatura incluida en esta unidad.
PRECAUCION:TPARA REDUCIR EL RIESGO DE DESCARGA ELEC-TRICA, NO QUITE LA CUBIERTA. EL USUARIO NODEBERA DAR NINGUN TIPO DE SERVICIO A NINGU-NA PARTE INTERNA. DEBERA SER REALIZADO SOLOPOR PERSONAL DE SERVICIO CALIFICADO.
PRECAUCIONPELIGRO DE DESCARGA ELECTRICA NOABRIR DECLARACIÓN DE CONFORMIDAD
Para futura referencia, anote los números de modelo y de serie (indica-dos en la parte posterior esta unidad) en el espacio provisto.
Como socio de Energy Star®, SHARP ha determinado que este producto cumple con las pautas de Energy Star® para usoeficiente de energía. Energy Star es una marca registrada estadounidense.
No. de modelo:
No. de serie:

– 34 – EN9F21
IMPORTANTES MEDIDAS DE SEGURIDAD Y PRECAUCIONES1) Lea las instrucciones - Lea detenidamente todas las
instrucciones de seguridad y operación antes de usar elproducto.
2) Conserve las instrucciones - Conserve las instrucciones deseguridad y operación para consultas futuras.
3) Respete las advertencias - Observe estrictamente todas lasadvertencias impresas en el producto y las incluidas en elmanual de instrucciones.
4) Siga las instrucciones - Siga todas las instrucciones deoperación.
5) Limpieza - Desconecte el producto del tomacorrientemural antes de limpiarlo. No use limpiadores líquidos niaerosol. Use un paño húmedo para la limpieza del produc-to.
6) Enchufes - No use enchfes no recomendados por el fabri-cante del producto, ya que podría ser peligroso.
7) Agua y humedad - No use este producto cerca del agua,por ejemplo, cerca de una bañera o lavamanos, cerca delfregadero de la cocina o lavandería, en un piso mojado,cerca de una piscina, etc.
8) Accesorios - No instale este producto en un carro, soporte,trípode o mesa inestables. El grabador de videocassettespodría caerse, causando serias lesiones a un niño o adulto,resultando también severamente dañado. Uselo sólo el uncarro, soporte, trípode o mesa recomendados por el fabri-cante, o vendidos con el producto. Toda instalación delproducto deberán hacerse de acuerdo a las instruccionesdel fabricante, empleando los accesorios de instalaciónrecomendados por el mismo.
9) La combinación de producto ycarro debe ser movida con cuida-do. Las detenciones bruscas, lafuerza excesiva y las superficiesdisparejas podrán hacer que elproducto y el carro se vuelquen.
10) Ventilación - El gabinete del producto tiene renuras y aber-turas de ventilación que garantizan el funcionamiento con-fiable del producto, evitando que se recaliente. Estas aber-turas no deberán ser bloquear las aberturas, nunca setúe elgrabador de videocassettes encima de una cama, sofá,alfombra u otra superficie similar. El grabador de video-cassettes no debe ser instalado en un mueble emportado,como una repisa para libros o bastidor, a menos que sepueda garantizar una ventilación adecuada, o cuando lasinstrucciones del fabricante así lo especifiquen.
11) Alimentación - Este grabador de videocassettes sólo debeser operado mediante el tipo de fuente de alimentaciónespecificado en la etiqueta indicadora. Si no seta seturo deltipo de fuente de alimentación que tiene en su casa, con-sulte a su distribuidor o a la compañía de electricidad localEn el caso de grabador de doseñados para funcionar a pilaso con otras fuentes de alimentación, consulte el manuel deinstrucciones respectivo.
12) Conexión a tierra o polarización - Este producto estáequipado con una clavija polarizada de corriente alterna(una clavija que tiene una espiga más ancha que la otra).Esta clavija solamente pordá ser insertada en el tomacorri-ente en una sola dirección. Esta es una medida de seguri-dad. Si no puediera insertar completamente la clavija en eltomacorriente, vuelva a intentarlo invirtiendo la clavija. Si
aún no fuera posible insertar la clavija, tome contacto conun electricista para que repare su tomacorriente obsoleto .No modifique las características de seguridad de la clavijapolarizada.
13) Protección del cable de alimentación - Los cables de ali-mentación deberán ser tendidos de manera tal que la prob-abilidad de que sean pisados o aplastados por otros obje-tos sea mínima. Preste especial atención a las clavijas delos cables, a los receptáculos, y al punto por donde salendel producto.
14) Tormentas eléctricas - Como medida adicional de protec-ción durante tormentas eléctricas, o cuando el productopermanezca sin uso durante períodos prolongados de tiem-po, desconéctelo del tomoacorriente mural y desconecte laantena o sistema de cable. Esto evitará que el grabador devideocassettes resulte dañado por tormentas eléctricas osobretensiones en la línea de alimentación.
15) Líneas de alimentación - Un antena exterior no debe serinstalada en la cercanía de líneas de alimentación aéreas nide otros circuitos de potencial para iluminación eléctrica,o donde pueda caerse y hacer contacto con tales líneas ocircuitos. Al instalar un sistema de antena exterior, entamucho cuidado de no tocar tales líneas o circuitos de ali-mentación, ya que el contacto con ellos podría será fatal.
16) Sobrecarga - No sobrecargue los tomacorrientes muralesni los cables de extensión, ya que esto podría causar incen-dios o descargas eléctricas.
17) Entrada de objetos y líquidos - Nunca introduzca objetosde ningún tipo por las aberturas de sete producto, ya quepordría tocar peligrosos puntos de alta tensión o cortocir-cuitar partes, provocando incendios o descargas elécticas.Nunca derrame ningún tipo de líquido sobre el producto.
18) Servicio - No intente reparar el producto usted mismo; alabrir o desmontar las cobiertas usted se expondrá a altatensión y a otros peligros. Solicite todo servicio a person-al calificado.
19) Daños que requieran reparación - En los siguientes casos,desconecte el producto del tomacorriente mural y llame aun técnico de servicio calificado:a) Cuando el cable de alimentación o la clavija estén daña-
dos,b) Si se ha derramado líquido sobre la unidad, o si algún
objeto ha caído dentro del producto, c) Si el producto ha sido expuesto a la lluvia o al agua, d) Cuando a pesar de haber sebuido las instrucciones de
operación, el producto no funcione normalmente.Ajuste solamente los controles mencionados en el man-ual de instrucciones; el ajuste incorrecto de otros con-troles podrá causar daños a la unidad, la que por lo gen-eral requerirá de un prolongado trabajo de reparación(por un técnico calificado) para que sus condicionesnormales de operación puedan ser restablecidas,
e) Si el producto se ha caído o si el gabinete se ha dañado.f) Cuando el producto muestre un cambio notorio en su
rendimiento.20) Piezas de requesto - Cuando sea necesario reemplazar
piezas, asegúrese de que el técnico de servicio emplee laspiezas de requesto especificadas por el fabricante, o piezasque tengan las mismas características que las piezas origi-nales. Las sustituciones no autorizadas podrán causar
– 35 – EN9F21
Servicio1. No intente dar servicio Ud. mismo a esta unidad. Desconéctela y póngase en contacto con un técnico especializado. (Véase
Consumer Limited Warranty al final de este manual)
2. Asegúrese de que el técnico de servicio utilice las partes autorizadas de reemplazo o sus equivalentes. Las partes no autor-izadas podrían ocasionar electrochoque, incendio u otros peligros.
3. Después de cualquier servicio o reparación, asegúrese de que el técnico de servicio lleve a cabo las verificaciones de seguri-dad para certificar que esta unidad esté en buen estado de operación.
Protección contra copiasEsta unidad soporta la protección contra copias Macrovision.En los discos DVD con código de protección contra copias, si intentacopiar los contenidos del disco DVD utilizando una videograbadora(VCR), el código de protección contra copias evitará la reproducción nor-mal de la videocinta copiada.
Métodos recomendados para la alta calidad de imagenEsta unidad es un instrumento de precisión construído utilizando tecnología altamente avanzada.• El disco no podrá ser reproducido si el componente de la unidad del disco está gastado o si el lente interno esta sucio.Para obtener una alta calidad de imagen, esta unidad debe ser chequeada (limpieza y reemplazo de algunas partes) cada 1,000horas. Este período varia de acuerdo con el ambiente en el cual la unidad esta usada. Refierase a su distribuidor Sharp autor-izado para detalles.
Precaución sobre la formación de humedadHay casos en los cuales se puede formar humedad dentro de la unidad.Operando una unidad en la cual se formado humedad, puede dañar or enrollar la cinta o señales del disco no podrán ser leídas.Remueva el cassette o disco y deje la unidad encedida (power ON) por 2 horas para que se caliente y quite la humedad. Launidad operará de nuevo normalmente.Se puede formar humedad en el tambor, las cabezas, el lente, la cinta, o el disco bajo las siguientes condiciones:• Inmediatamente después de que se ha encedido un calefactor.• En un cuarto muy húmedo y caluroso.• Cuando la unidad se ha movido repentinamente de un ambiente frio a un ambiente calido.
Opere esta unidad en un lugar donde la temperatura es entre 5°C a 35°C (41°F a 95°F). Humedad se puede formar dentro dela unidad en lugares fríos.
OtrosEs intención de Sharp que este producto sea utilizado de total conformidad con las leyes de copyright de los Estados Unidos yque se obtenga el consentimiento previo de los titulares del copyright siempre que sea necesario.
“Apparatus Claims of U.S. Patents” Nos.4.631.603, 4.577.216, 4.819.098 y 4.907.093licenciadas para utilizaciones de visualización lim-itada solamente.
Este producto incorpora tecnología de protección de copyright que está protegida por reclamaciones de ciertas patentes delos EE.UU. y otros derechos de propiedad intelectual de propiedad de Macrovision Corporation y otros propietarios. El usode esta tecnología de protección de copyright debe ser autorizado por Macrovision Corporation, y es solamente para usodoméstico u otros usos limitados a menos que se autorice lo contrarío por Macrovision Corporation. Se prohíbe la inge-niería inversa y el desmontaje.
incendios, descargas eléctricas y otoros problemas.21) Revisión de seguridad - Al finalizar cualquier servicio de
mantenimiento o reparación de este producto, solicítele altécnico que efectúe comprobaciones de seguridad paradeterminar si el producto se encuentra o no en condicionesóptimas de operación.
22) Calor - Este producto debe colocarse fuera del alcance defuentes de calor tales como radiadores, rejillas de calefac-ción, estufas o cualquier otro producto destinado a pro-ducir calor, incluyendo los amplificadores.

– 36 – EN9F21
CONTROLES DE OPERACIÓN Y FUNCIONES
STOPPOWER PLAY
SKIPSTILL/PAUSE
OPEN /CLOSE
RREV FWDQ
2 43 51
9 8 7 6
N O P
Tde
PANEL DELANTERO
MANDO A DISTANCIA
STILL/PAUSEDIRECT SKIP
RETURN
ZOOM
MODE
SUBTITLE
MARKER
MENU
SKIP
REPEAT
A-B REPEAT
ANGLE AUDIO
CLEAR
TITLE
STOP
PLAY
FWDREV
SETUP
DIMMER
ENTER
OPEN/CLOSE
BLACKLEVEL
ONSCREEN
POWER
1 2 3
654
7
C 0 +10
8 9
11011
13
15
17
18
194
20
16
12
14
58
21
6
7
2223242526
28
30313
29
27
1. Botón de la alimentaciónPúlselo para conectar y desconectar la alimentación.
2. Bandeja de disco3. Botón de abertura/cierre (OPEN/CLOSE)
Púlselo para introducir discos en la bandeja o sacar-los de ella.
4. Botón de reproducción (PLAY)Inicie la reproducción del contenido del disco.
5. Botón de parada (STOP) Detiene la operación del disco.
6. Botón de salto ascendente/avance rápido(SKIP UP/FWD) (Unidad principal)Inicia la reproducción desde el principio del capítuloo pista siguiente. Manténgalo pulsado para que lareproducción avance rápidamente.
7. Botón de salto ascendente/avance rápido(SKIP UP/FWD) (Unidad principal)Inicia la reproducción desde el principio del capítuloo pista siguiente. Manténgalo pulsado para que lareproducción avance rápidamente.
8. Botón del modo de búsqueda (DIRECT SKIP) Púlselo para localizar un punto deseado.
9. Visualizador, ventana del sensor del mandoa distancia
10. Botón de visualización (ON SCREEN)Muestra el estado actual en la pantalla del televisorcon fines de comprobación.
11. Botón de palidez (DIMMER)Púlselo para cambiar el ajuste de visualización en lapantalla.
12. Botón del niver del negro (BLACK LEVEL) Púlselo para cambiar el ajuste de niveles de control.
13. Botón del ZOOMAmplia parte de una imagen de DVD reproducida.
14. Botón de subtítulos (SUBTITLE) Púlselo para seleccionar el idioma de subtítulosdeseado.
15. Botón de titulación (TITLE)Visualiza el menú de títulos.
16. Botón de retorno (RETURN)Púlselo para volver a la operación anterior.
17. Botones numéricos18. Botón de cancelación (CLEAR)
Repone un ajuste.19. Botón de salto descendente/retroceso rápi-
do (SKIP DOWN/REV)Inicia la reproducción desde el principio del capítuloo pista actual. Manténgalo pulsado para que la repro-ducción retroceda rápidamente.
20. Botón del modo de búsqueda (DIRECT SKIPMODE) Púlselo para localizar un punto deseado.
21. Botón de salto ascendente/avance rápido(SKIP UP/FWD)Inicia la reproducción desde el principio del capítuloo pista siguiente. Manténgalo pulsado para que lareproducción avance rápidamente.
22. Botón de repetición A-B (A-B REPEAT)Repite la reproducción de una sección seleccionada.
23. Botón de repetición (REPEAT)Repite la reproducción del disco, título, capítulo opista actual.
24. Botón de introducción (ENTER)Púlselo para aceptar un ajuste.
25. Botones numéricos26. Botón de MENU Visualiza los menús DVD.27. Botón de ángulos (ANGLE)
Púlselo para cambiar el ángulo de la cámara y verdesde un ángulo diferente la secuencia que está sien-do reproducida.
28. Botón de AUDIOPúlselo para seleccionar el modo de sonido o elidioma de audio deseado.
29. Botón de modo (MODE)Activa el modo de reproducción programada o elmodo de reproducción aleatoria.
30. Botón del marcador (MARKER)Púlselo para volver a llamar la visualización de mar-cador.
31. Botón de preparación (SETUP) Púlselo para entrar en el modo de preparación o paracambiar elementos de preparación.

– 37 – EN9F21
R L
AUDIO OUT VIDEO OUT
VIDEO S-VIDEODIGITAL
Y
PB
PR
3635343332 3738
VISTA TRASERA
32. Cable de alimentación33. Toma de salida de audio digital coaxial
(COAXIAL DIGITAL AUDIO OUT)34. Toma de salida de audio derecha (AUDIO OUT)
35. Toma de salida de audio izquierda (AUDIO OUT)36. Toma de salida de vídeo (VIDEO OUT)37. Tomas de salida de vídeo componentes38. Toma de salida de vídeo (VIDEO OUT)
VISUALIZACIONES DURANTELA OPERACIÓN
INSTALACIÓN DE LAS PILAS
Conexión de alimentación
No hay disco insertado
Bandeja abierta
Bandeja cerrada
Carga del disco
Desconexión de alimentación
1. Abra la tapa del compartimientode las pilas.
2. Introduzca dos pilas del tamaño“AA” (R-06) con las polaridadescolocadas correctamente.
3. Cierre la tapa.
Notas¡No mezcle pilas alcalinas y de manganeso.¡No mezcle pilas viejas y nuevas.
VISUALIZACIÓN
Permanece encendido cuandoel disco insertado está siendoreproducido.
CD:Se enciende cuandose inserta un CD enla bandeja.
Se enciende cuando se inserta un DVD en la bandeja.
Se enciende cuando eldisco insertado haceuna pausa.
Permanece encendidocuando está activada lafunción de repetición A-B.
Permanece encendido cuando está activada la función de repetición.
Visualiza el tiempo de reproducción del título o de la pista actual.Cuando se cambia un capítulo o una pista, se visualiza el número del nuevo título, capítulo o pista.

– 38 – EN9F21
CONEXIONES
REPRODUCCIÓN DE UN DVDDE VÍDEO O UN CD DE AUDIO
Para empezarConecte la alimentación del televisor, amplificador ycualquier otro componente que esté conectado alreproductor DVD. (Cambie el sistema de entrada paraadaptarlo al reproductor DVD, y compruebe que elvolumen del sonido sea correcto.)
1 Pulse el botón POWER.¡La alimentación se conectará.
2 Pulse el botón OPEN/CLOSE.
¡La bandeja de carga del disco se abrirá.
CDDVD
3 Ponga un disco en la bandeja.
¡Asegúrese de que el disco esté correctamente asen-tado en el hueco correcto, con el lado de la etiquetahacia arriba.
4 Pulse el botón PLAY.
¡La bandeja se cerrará automáticamente y la repro-ducción empezará desde el primer capítulo o pistadel disco. Necesitará pulsar el botón PLAY sólocuando la bandeja haya sido cerrada pulsando elbotón OPEN/CLOSE.
¡Cuando reproduzca un DVD que tenga grabado unmenú de títulos, el menú tal vez aparezca en la pan-talla. En este caso, consulte "UTILIZACIÓN DELMENÚ DE TÍTULOS".
5 Pulse el botón STOP para detener la reproducción.
REPRODUCCIÓN DE UN DISCO
PARA TELEVISORES CON TOMA DEENTRADA DE VÍDEO S
Utilice un cable de vídeo S (de venta en el comercio)en lugar del cable de vídeo amarillo para disfrutar deimágenes de más alta calidad.
CONEXIÓN A UN TELEVISOR
Consulte la figura 1 de la página 10
Para hacer las conexiones de audio utilice cables digitales coaxiales de audio (de venta en el comercio).
CONEXIÓN A UN AMPLIFI-CADOR EQUIPADO CON
TOMAS DE ENTRADA DIGITAL,PLATINA MD O PLATINA DAT
Consulte la figura 4 de la página 11
Ponga Dolby Digital y DTS en OFF en el reproductorDVD. Si reproduce un DVD cuando los ajustes estánmal hechos, el sonido se distorsionará o usted tal vezestropee los altavoces.
CONEXIÓN A UN TELEVISOR OA UN TELEVISOR ESTÉREO
QUE TENGA TOMAS COMPO-NENT VIDEO IN
Consulte la figura 5 de la página 11
Si utiliza este reproductor DVD para reproducir unDVD en un formato de sonido ambiental DTS o sonidoambiental Dolby Digital de 5,1 canales, el reproductorDVD dará salida a un flujo de datos Dolby Digital oDTS desde su toma COAXIAL DIGITAL AUDIOOUT. Conectando el reproductor a un descodificadorDolby Digital o DTS, usted podrá disfrutar de unambiente más convincente y real, con un sonido ambi-ental potente y de alta calidad de estándar profesionalcomo el que puede oírse en los cines.
Para hacer las conexiones de audio utilice cables digi-tales coaxiales de audio (de venta en el comercio).
CONEXIÓN A UN DESCODIFI-CADOR DOLBY DIGITAL O AUN DESCODIFICADOR DTS
Consulte la figura 6 de la página 12
Consulte la figura 3 de la página 10
Consulte la figura 2 de la página 10

– 39 – EN9F21
MEMO
CONSUMER LIMITED WARRANTYSHARP ELECTRONICS CORPORATION warrants to the first consumer purchaser that this Sharp brand product (the“Product”), when shipped in its original container, will be free from defective workmanship and materials, and agreesthat it will, at its option, either repair the defect or replace the defective Product or part thereof with a new orremanufactured equivalent at no charge to the purchaser for parts or labor for the period(s) set forth below.
This warranty does not apply to any appearance items of the Product nor to the additional excluded item(s) set forthbelow nor to any Product the exterior of which has been damaged or defaced, which has been subjected to impropervoltage or other misuse, abnormal service or handling, or which has been altered or modified in design orconstruction.
In order to enforce the rights under this limited warranty, the purchaser should follow the steps set forth below andprovide proof of purchase to the servicer.
The limited warranty described herein is in addition to whatever implied warranties may be granted to purchasers bylaw. ALL IMPLIED WARRANTIES INCLUDING THE WARRANTIES OF MERCHANTABILITY AND FITNESS FOR USEARE LIMITED TO THE PERIOD(S) FROM THE DATE OF PURCHASE SET FORTH BELOW. Some states do not allowlimitations on how long an implied warranty lasts, so the above limitation may not apply to you.
Neither the sales personnel of the seller nor any other person is authorized to make any warranties other than thosedescribed herein, or to extend the duration of any warranties beyond the time period described herein on behalf ofSharp.
The warranties described herein shall be the sole and exclusive warranties granted by Sharp and shall be the soleand exclusive remedy available to the purchaser. Correction of defects, in the manner and for the period of timedescribed herein, shall constitute complete fulfillment of all liabilities and responsibilities of Sharp to the purchaserwith respect to the Product, and shall constitute full satisfaction of all claims, whether based on contract, negligence,strict liability or otherwise. In no event shall Sharp be liable, or in any way responsible, for any damages or defects inthe Product which were caused by repairs or attempted repairs performed by anyone other than an authorizedservicer. Nor shall Sharp be liable or in any way responsible for any incidental or consequential economic or propertydamage. Some states do not allow the exclusion of incidental or consequential damages, so the above exclusion maynot apply to you.
THIS WARRANTY GIVES YOU SPECIFIC LEGAL RIGHTS. YOU MAY ALSO HAVE OTHER RIGHTS WHICH VARYFROM STATE TO STATE.
CONSUMER LIMITED WARRANTY(Valid for warranty service in the U.S. only)
TO OBTAIN SUPPLY, ACCESSORY OR PRODUCT INFORMATION, GO TO OUR WEBSITE AT www.sharp-usa.comOR CALL 1-800-BE-SHARP.
Model Specific Section
Your Product Model Number & Description:
Warranty Period for this Product:
Additional Item(s) Excluded fromWarranty Coverage (if any):
Where to Obtain Service:
DV-S1U DVD Video Player
(Be sure to have this information available when you need servicefor your Product.)
One (1) year parts and ninety (90) days labor from date of purchase.
Non-rechargeable batteries.
SHARP ELECTRONICS CORPORATIONSharp Plaza, Mahwah, New Jersey 07430-2135
SHARP CORPORATIONOsaka, Japan
SHARP ELECTRONICS CORPORATIONSharp Plaza, Mahwah, New Jersey 07430-2135
SHARP CORPORATIONOsaka, Japan
Printed in ChinaImpreso en China
Call Sharp Electronics corporation toll free at 1-800-BE-SHARP forinstructions on how to obtain service on your DVD player.
:What to do to Obtain Service Ship your product, prepaid, as per the instruction given by the Sharprepresentative at the toll free number (1-800-BE-SHARP). BE sure tohave your proof of purchace available. Be sure to ship the product securely packaged and insured against shipping damage.
0VMN02953E56A0UD ★★★★