dv-c600(e)-1b toc€¦ · 4.do not touch this unit with wet hands do not handle this unit or power...
TRANSCRIPT

DVD Changer
DV-C600Instruction Manual
Thank you for purchasing the ONKYO DVD Changer.Please read this manual thoroughly before makingconnections and turning on the power.Following the instructions in this manual will enableyou to obtain optimum performance and listeningenjoyment from your new DVD Changer.Please retain this manual for future reference.
Contents
6
10
14
32
Getting Started
Connections
Function Setup
Before Using Your DVD Changer 2
THIS DVD CHANGER IS MANUFACTURED FORPLAYBACK OF REGION 1 (USA, CANADA) ENCODEDDVD SOFTWARE. USE OF SOFTWARE NOT INTENDEDFOR REGION 1 PLAYBACK MAY RESULT INUNDESIRABLE PLAYER PERFORMANCE.
OPEN/CLOSE PLAY
POWER
OFF
STOPPAUSE
DISC 1 DISC 2 DISC 3 DISC 4 DISC 5 DISC 6
NEXT SELECTION
REPEAT
DVD / VIDEO CD / CD CD CHANGER DV-C600
ON
DIMMER DISPLAY DISC SKIP
DISC1 2 3 4 5 6
STANDBY/ON
DIRECT DIGIT AL ATHP
20Advanced Playback
40Others
Basic Playback

2
1. Read Instructions - All the safety and operating instructions shouldbe read before the appliance is operated.
2. Retain Instructions - The safety and operating instructions shouldbe retained for future reference.
3. Heed Warnings - All warnings on the appliance and in the operatinginstructions should be adhered to.
4. Follow Instructions - All operating and use instructions should befollowed.
5. Water and Moisture - The appliance should not be used near water- for example, near a bathtub, washbowl, kitchen sink, laundry tub,in a wet basement, or near a swimming pool, and the like.
6. Carts and Stands - The appliance shouldbe used only with a cart or stand that isrecommended by the manufacturer.
6A. An appliance and cart combination shouldbe moved with care. Quick stops,excessive force, and uneven surfaces maycause the appliance and cart combinationto overturn.
7. Wall or Ceiling Mounting - The appliance should be mounted to awall or ceiling only as recommended by the manufacturer.
8. Ventilation - The appliance should be situated so that its locationor position does not interfere with its proper ventilation. For example,the appliance should not be situated on a bed, sofa, rug, or similarsurface that may block the ventilation openings; or if placed in abuilt-in installation, such as a bookcase or cabinet that may impedethe flow of air through the ventilation openings, there should be freespace of at least 5 cm (2 in.) and an opening behind the appliance.
9. Heat - The appliance should be situated away from heat sourcessuch as radiators, heat registers, stoves, or other appliances(including amplifiers) that produce heat.
10. Power Sources - The appliance should be connected to a powersupply only of the type described in the operating instructions or asmarked on the appliance.
11. Polarization - If the appliance is provided with a polarized plughaving one blade wider than the other, please read the followinginformation:
The polarization of the plug is a safety feature. The polarized plugwill only fit the outlet one way. If the plug does not fit fully into theoutlet, try reversing it. If there is still trouble, the user should seekthe services of a qualified electrician. Under no circumstances shouldthe user attempt to defeat the polarization of the plug.
12. Power-Cord Protection - Power-supply cords should be routed sothat they are not likely to be walked on or pinched by items placedupon or against them, especially near plugs, conveniencereceptacles, and the point where they exit from the appliance.
13. Cleaning - The appliance should be cleaned only as recommendedby the manufacturer.
14. Nonuse Periods - The power cord of the appliance should beunplugged from the outlet when left unused for a long period oftime.
15. Object and Liquid Entry - Care should be taken so that objects donot fall and liquids are not spilled into the enclosure through openings.
16. Damage Requiring Service - The appliance should be servicedby qualified service personnel when:
A. The power-supply cord or the plug has been damaged; or
B. Objects have fallen, or liquid has been spilled into theappliance; or
C. The appliance has been exposed to rain; or
D. The appliance does not appear to operate normally orexhibits a marked change in performance; or
E. The appliance has been dropped, or the enclosure damaged.
17. Servicing - The user should not attempt to service the appliancebeyond that described in the operating instructions. All other servicingshould be referred to qualified service personnel.
Important Safeguards
WARNING:TO REDUCE THE RISK OF FIRE OR ELECTRIC SHOCK, DO NOT EXPOSE THIS APPLIANCE TO RAIN OR MOISTURE.
CAUTION:TO REDUCE THE RISK OF ELECTRIC SHOCK, DO NOT REMOVE COVER (OR BACK). NO USER-SERVICEABLE PARTS INSIDE. REFER SERVICING TO QUALIFIED SERVICE PERSONNEL.
The lightning flash with arrowhead symbol, within an equilateral triangle, is intended to alert the user to the presence of uninsulated “dangerous voltage” within the product’s enclosure that may be of sufficient magnitude to constitute a risk of electric shock to persons.
The exclamation point within an equilateral triangle is intended to alert the user to the presence of important operating and maintenance (servicing) instructions in the literature accompanying the appliance.
WARNINGRISK OF ELECTRIC SHOCK
DO NOT OPENRISQUE DE CHOC ELECTRIQUE
NE PAS OUVRIR
AVIS
PORTABLE CART WARNING
S3125A
3
DANGER:INVISIBLE LASER RADIATION WHEN OPEN AND INTER-LOCK FAILED OR DEFEATED. AVOID DIRECT EXPOSURETO BEAM.
CAUTION:THIS PRODUCT UTILIZES A LASER. USE OF CONTROLSOR ADJUSTMENTS OR PERFORMANCE OF PROCEDURESOTHER THAN THOSE SPECIFIED HEREIN MAY RESULT INHAZARDOUS RADIATION EXPOSURE.
For European modelThis unit contains a semiconductor laser system and is classified as a“CLASS 1 LASER PRODUCT.” So, to use this model properly, readthis Instruction Manual carefully. In case of any trouble, please contactthe store where you purchased the unit. To prevent being exposed tothe laser beam, do not try to open the enclosure.
“CLASS 1 LASER
PRODUCT”
This label on the rear panel states that:
1. This unit is a CLASS 1 LASER PRODUCT and employs a laserinside the cabinet.
2. To prevent the laser from being exposed, do not remove the cover.Refer servicing to qualified personnel.
For U.S. modelThe laser is covered by a housing which prevents exposure duringoperation or maintenance. However, this product is classified as a LaserProduct by CDRH (Center for Devices and Radiological Health) whichis a department of the Food and Drug Administration.According to their regulations 21 CFR section 1002.30, all manufactureswho sell Laser Products must maintain records of writtencommunications between the manufacturer, dealers and customersconcerning radiation safety. If you have any complaints aboutinstructions or explanations affecting the use of this product, pleasefeel free to write to the address on the back page of this manual. Whenyou write us, please include the model number and serial number ofyour unit.
In compliance with Federal Regulations, the certification, identificationand the period of manufacture are indicated on the rear panel.
FCC INFORMATION FOR USER
CAUTION:The user changes or modifications not expressly approved by the partyresponsible for compliance could void the user’s authority to operatethe equipment.
NOTE:This equipment has been tested and found to comply with the limits fora Class B digital device, pursuant to Part 15 of the FCC Rules. Theselimits are designed to provide reasonable protection against harmfulinterference in a residential installation. This equipment generates, usesand can radiate radio frequency energy and, if not installed and used inaccordance with the instructions, may cause harmful interference toradio communications. However, there is no guarantee that interferencewill not occur in a particular installation. If this equipment does causeharmful interference to radio or television reception, which can bedetermined by turning the equipment off and on, the user is encouragedto try to correct the interference by one or more of the followingmeasures:
Precautions• Reorient or relocate the receiving antenna.• Increase the separation between the equipment and receiver.• Connect the equipment into an outlet on a circuit different from that
to which the receiver is connected.• Consult the dealer or an experienced radio/TV technician for help.
For Canadian modelCAUTION: THIS DIGITAL APPARATUS DOES NOT EXCEED THECLASS B LIMITS FOR RADIO NOISE EMISSION FROM DIGITALAPPARATUS SET OUT IN THE RADIO INTERFERENCE REGULA-TIONS OF THE CANADIAN DEPARTMENT OF COMMUNICATIONS.
For models having a power cord with a polarized plug:CAUTION: TO PREVENT ELECTRIC SHOCK, MATCH WIDE BLADEOF PLUG TO WIDE SLOT, FULLY INSERT.
Modele pour les CanadienATTENTION: L’INTERFERENCE RADIO ELECTRIQUE GENEREEPAR CET APPAREIL NUMERIQUE DE TYPE B NE DEPASSE PASLES LIMITES ENONCEES DANS LE REGLEMENT SUR LES PER-TURBATIONS RADIO ELECTRIQUES, SECTION APPAREILNUMERIQUE, DU MINISTERE DES COMMUNICATIONS.
Sur les modeles dont la fiche est polarisee:ATTENTION: POUR EVITER LES CHOCS ELECTRIQUES,INTRODUIRE LA LAME LA PLUS LARGE DE LA FICHE DANS LABORNE CORRESPONDANTE DE LA PRISE ET POUSSERJUSQU’AU FOND.

4
1.Warranty ClaimYou can find the serial number on the rear panel of this unit. In caseof warranty claim, please report this number.
2.Recording CopyrightRecording of copyrighted material for other than personal use isillegal without permission of the copyright holder.
3.PowerWARNING
BEFORE PLUGGING IN THE UNIT FOR THE FIRST TIME, READTHE FOLLOWING SECTION CAREFULLY.
The voltage of the available power supply differs according to countryor region. Be sure that the power supply voltage of the area wherethis unit will be used meets the required voltage (e.g., AC 230 V, 50Hz or AC 120 V, 60 Hz) written on the rear panel.
Worldwide models are equipped with a voltage selector to conformto local power supplies. Be sure to set this switch to match thevoltage of the power supply in your area before plugging in the unit.
4.Do not touch this unit with wet handsDo not handle this unit or power cord when your hands are wet ordamp. If water or any other liquid enters the case, take this unit toan authorized service center for inspection.
5. Location of this unit• Place this unit in a well-ventilated location.
Take special care to provide plenty of ventilation on all sides of thisunit especially when it is placed in an audio rack. If ventilation isblocked, this unit may overheat and malfunction.
• Do not expose this unit to direct sunlight or heating units as thisunit's internal temperature may rise and shorten the life of the pickup.
• Avoid damp and dusty places and places directly affected byvibrations from the speakers. In particular, avoid placing the unit onor above one of the speakers.
• Be sure this unit is placed in a horizontal position. Never place it onits side or on a slanted surface as it may malfunction.
• When you place this DVD Changer near a TV, radio, or VCR, theplayback picture may become poor and the sound may be distorted.In this case, place the DVD Changer away from the TV, radio, orVCR.
6.CareFrom time to time you should wipe the front and rear panels andthe cabinet with a soft cloth. For heavier dirt, dampen a soft cloth ina weak solution of mild detergent and water, wring it out dry, andwipe off the dirt. Following this, dry immediately with a clean cloth.Do not use rough material, thinners, alcohol or other chemicalsolvents or cloths since these could damage the finish or removethe panel lettering.
7.Notes on Handling• When shipping the DVD Changer, use the original shipping carton
and packing materials. For maximum protection, repack the unit asit was originally packed at the factory.
• Do not use volatile liquids, such as insect spray, near the DVDChanger. Do not leave rubber or plastic products in contact with theDVD Changer for a long time. They will leave marks on the finish.
• The top and rear panels of the DVD Changer may become warmafter a long period of use. This is not a malfunction .
• When the DVD Changer is not in use, be sure to remove the discand turn off the power.
• If you do not use the DVD Changer for a long period, the unit maynot function properly in the future. Turn on and use the DVD Changeroccasionally.
Precautions8.To Obtain a Clear Picture
The DVD Changer is a high technology, precision device. If theoptical pick-up lens and disc drive parts are dirty or worn down, thepicture quality becomes poor. To obtain a clear picture, werecommend regular inspection and maintenance (cleaning or partsreplacement) every 1,000 hours of use depending on the operatingenvironment. For details, contact your nearest dealer.
9.Notes on Moisture CondensationMoisture condensation damages the DVD Changer.Please read the following carefully.
Moisture condensation occurs, for example, when you pour a colddrink into a glass on a warm day. Drops of water form on the outsideof the glass. In the same way, moisture may condense on the opticalpick-up lens inside this unit, one of the most crucial internal parts ofthe DVD Changer.
Examples of moisturecondensation
• Moisture condensation occurs in the following cases.
- When you bring the DVD Changer directly from a cold place to awarm place.
- When you use the DVD Changer in a room where you just turnedon the heater, or a place where the cold wind from the air conditionerdirectly hits the unit.
- In summer, when you use the DVD Changer in a hot and humidplace just after you move the unit from an air conditioned room.
- When you use the DVD Changer in a humid place.
• Do not use the DVD Changer when moisture condensation mayoccur.If you use the DVD Changer in such a situation, it may damagediscs and internal parts. Remove the disc, connect the power cordof the DVD Changer to the wall outlet, turn on the DVD Changer,and leave it for two or three hours. After a few hours, the DVDChanger will have warmed up and evaporated any moisture. Keepthe DVD Changer connected to the wall outlet and moisturecondensation will seldom occur.

5
Table of Contents
Important Safeguards/Precautions/Table of Contents .................................................................................................... 2–5
Handling Discs .......................................................... 9Cleaning Discs .......................................................... 9Storing Discs ............................................................. 9About Region Numbers ............................................. 9About VIDEO CDs ..................................................... 9Notes on Copyright .................................................... 9
Connecting to an Amplifier Equippedwith Dolby Pro Logic Surround ................................ 12Connecting to an Amplifier Equippedwith a DTS Decoder ................................................ 13Connecting to an Amplifier Equippedwith a Digital Audio Input ......................................... 13
Playing back Discs ....................................................... 14Basic Playback ........................................................ 14Direct Playback, Stop and Pause ............................ 16Fast Reverse and Fast Forward Playback .............. 16Slow-Motion Playback ............................................. 17Resuming Playback From the Desired Location ..... 17
Locating Titles, Chapters, or Tracks ............................. 18Locating a Title Using the Title Menu ...................... 18Title Selection with the Numeric Buttons ................. 18Selecting Chapters or Tracks .................................. 19
Selecting a Precise Scene or Audio Passage .............. 20Entering the Time Location ...................................... 20
Repeat Functions ......................................................... 21Repeating a Title or Chapter/Track .......................... 21Repeating a Given Scene or Passage .................... 21
Setting the Desired Playback Order ............................. 22Programming Memory Sequences .......................... 22
Additional Playback Functions ..................................... 24Next Selection: Preparing the next Audio Track ...... 24Using the DVD Changer as CD player .................... 25Random Playback ................................................... 26
DVD Video Disc Functions ........................................... 27
Zooming in ............................................................... 27Changing the Camera Angle ................................... 27Audio Playback Settings .......................................... 28Using the Subtitle Feature ....................................... 30
Using The On-Screen Display Functions ..................... 31Requesting Basic Information ................................. 31More Specific Information: Remaining Timeand Setting Status ................................................... 31
Advanced Settings ........................................................ 32Setting Procedure .................................................... 32LANGUAGE Functions ............................................ 34PICTURE Settings ................................................... 35AUDIO Settings ....................................................... 36
Troubleshooting ............................................................ 40Symptoms and Corrections ..................................... 40
Identification of Controls ............................................... 41Front Panel .............................................................. 41Rear Panel .............................................................. 41
DISPLAY Settings .................................................... 37OPERATION Settings.............................................. 37
Table of Languages ...................................................... 39Table of Languages and Their Abbreviations .......... 39
DVD Display ............................................................ 42Remote Controller ................................................... 43
Specifications ................................................................ 44DVD Changer/Outputs ............................................ 44
Features .......................................................................... 6Supplied Accessories ..................................................... 7Preparing the Remote Controller ................................... 8
Installing the remote controller batteries ................... 8Using the remote controller ....................................... 8
Notes on the Discs You Can Use with this Unit ............. 9Discs You can Use .................................................... 9
Connecting the DV-C600 to a TV ................................. 10Connecting the DV-C600 to a TV ............................ 10
Connecting to an Audio System and TV withCOMPONENT VIDEO Inputs ....................................... 11Other Audio Playback Options ..................................... 12
Connecting to an Amplifier Equippedwith a Dolby Digital Decoder ................................... 12
Getting Started
Connections
Basic Playback
Advanced Playback
Function Setup
Others

6
Getting Started
Features Highlights that Set the DV-C600• Dolby®* Digital Audio Output
• 6-Disc playback (instead of the usual five)
• DTS®** Compatibility
• Video CD playback
• Gold-plated component-video output (usually found onlyon high-end players, and not always gold-plated)
• Full 96-kHz/24-bit resolution with 96-kHz/24-bit discs(some players don’t play these discs, and some play themby downsampling the signal to a lower 48-kHz samplingrate, or reducing the resolution to 20 bits or less, or both)
• Direct digital path for signal purity
• Enhanced black-level setting (another uncommon feature)
• Next Selection (an Onkyo exclusive feature)
• Aluminum front panel (distinguishes the DV-C600 frommass-market models)
Video Features• DTS® Compatibility means the DV-C600 can pass a DTS-
encoded digital signal from discs with DTS soundtracks toan external processor or receiver with a DTS decoder
• Advanced 10-Bit 27 MHz Video D/A Conversion for fourtimes the accuracy of conventional 8-bit, 13.5 MHzsystems
• Gold-Plated Component-Video Output to realize the fullpotential of DVDs
• 3-Mode Picture Magnification enables you to “zoom”in andenlarge in three steps 25 selected areas of the picture
• Enhanced Black-Level Control lets you set the referenceblack threshold cutoff-especially useful for picture calibra-tion on TVs
• Passes PLUGE Signals to make it easier for you to set thebrightness of your monitor when using DVD test discs
• Video CD Playback for enjoying the wide selection ofinexpensive Video-CD software, which has the same highaudio quality as MiniDiscs, and picture quality comparableto VHS video cassettes
• High Resolution Onscreen Display
• S-Video Output
• Full-Time Active Video Outputs to make using the DVDchanger with both the main home-theater television andthe display in the bedroom much easier
• 4-Mode Search (title, DVD chapter, CD track, and time)
• Still Frame to view single frames
• Frame Advance
• Slow Motion for DVD playback without sound at 1/2, 1/4,or 1/8th the normal speed
• Fast Forward/Reverse (x2, x8, x30)
• Last Memory Play function for both DVDs and CDs-resumes play from where last stopped, even if the powerwas turned off
• 6-Mode Repeat allows you to repeat titles, chapters,tracks, all tracks, memory, and a user-selected A-Bsection on DVDs and CDs
• Programmed Memory Playback
• Random Playback
• Multi-Aspect Ratio
• 8-Language Soundtrack Capability
• 32 Subtitle Languages
• Multi-Camera Angle
• Parental Viewing Control
• Screen Saver
Audio Features• Audiophile-Class Audio Performance
• Direct Digital Path
• Full 96-kHz/24-Bit Audio Resolution
• Digital Audio Output (coaxial)
• Optical Digital Audio Output
• 1 Pair of Analog Outputs (RCA)
Other Features You’ll Enjoy• 5-Disc Exchange
• CD Mode (DVD Skip) Control
• Next Selection
• Direct Disc Access
• Separate LEDs for Each Disc (1 to 6)
• Dual-Focus Optical Pickup
• Dynamic Range Control
• Large, Bright, 14-Segment Fluorescent Display
• 2-Mode Display Dimmer (normal, dim)
• Anti-Resonant, Heavy-Gauge, Reinforced-Steel Chassis
• Large Anti-Resonant Feet
• Heavy-Duty Power Cord
• Brushed Aluminum Front Panel
• 54-Key Full-Function Remote Control
* Manufactured under license from Dolby Laboratories. “Dolby” andthe double-D symbol are trademarks of Dolby Laboratories.Confidential Unpublished Works.©1992-1997 Dolby Laboratories, Inc. All rights reserved.
** “DTS” and “DTS Digital Surround” are trademarks of DigitalTheater Systems, Inc.
About This ManualThis manual explains the basic procedures for operatingyour DVD Changer. Some DVD video discs do notsupport the full potential of the DVD technology. Your DVDChanger may therefore not respond to all operatingcommands. Refer to instruction notes on discs.A “ ” mark may appear on the TV screen duringoperation. It means that the operation is not permitted bythe DVD Changer or the disc.

7
Getting S
tartedC
onnectionsF
unction Setup
Advanced P
laybackO
thersB
asic Playback
Supplied AccessoriesAfter unpacking, check whether the boxcontains all items listed below.If anything is missing, contact the ONKYOdealer where you bought the DVD Changer.The number of accessories is indicated inbrackets.
Remote controller (RC-406DV) [1] Batteries for the remote controller (size AA/UB-3) [2]
Audio/video connection cable [1] S video cable [1]
cable [1]

8
Installing the remote controller batteries
1 Remove the battery compartment cover by pressingand sliding it away from the remote controller unit.
2 Insert two AA (R6- or UM-3)-size batteries into thebattery compartment. Carefully follow the polaritydiagram (positive (+) and negative (–) symbols) insidethe battery compartment.
3 After batteries are installed and seated correctly,replace the compartment cover.
Notes:• Do not mix new batteries with old batteries or different
kinds of batteries.• To avoid corrosion, remove the batteries if the remote
controller is not to be used for a long time.• Remove dead batteries immediately to avoid damage
from corrosion. If the remote controller doesn’t operatesmoothly, replace both the batteries at the same time.
• The life of the batteries supplied is about six months butthis will vary depending on usage.
Using the remote controller
Point the remote controller toward the remote controlsensor.
Notes:• Place the unit away from strong light such as direct
sunlight or inverted fluorescent light which can preventproper operation of the remote controller.
• Using another remote controller of the same type in thesame room or using the unit near equipment which usesinfrared rays may cause operational interference.
• Do not put any object such as a book on the remotecontroller. The buttons of the remote controller may bepressed by mistake and drain the batteries.
• Make sure the audio rack doors do not have coloredglass. Placing the unit behind such doors may preventproper remote controller operation.
• If there is any obstacle between the remote controller andthe remote control sensor, the remote controller will notoperate.
Preparing the Remote Controller
DV-C600
STANDBY indicator
Remote control sensor
30˚30˚
approx. 5 m(16 feet)
3
2
1

9
Getting S
tartedC
onnectionsF
unction Setup
Advanced P
laybackO
thersB
asic Playback
Notes on the Discs You Can Use with this Unit
Discs You can Use
Your DVD Changer can play back the following discs:
• You cannot play back discs other than those listed above.• You cannot play back discs such as CD-R, CD-RW, CD-
ROM, DVD-RAM, DVD-RW, etc., even though they maybe labelled with one of the above logos.
• This DVD Changer uses the NTSC color system, andcannot play back DVD videos recorded in any other colorsystem (PAL, SECAM, etc.).
• Avoid using heart-shaped or octagonal discs. Playingirregularly shaped discs may damage the DVD Changer’sinternal mechanism.
• Do not use discs that contain adhesive tape or a disc label(on rental discs). Otherwise, you may not be able to ejectthe discs, or the DVD Changer may become inoperative.
Handling Discs
• Never touch the playback side (the “blank” side) of thedisc.
• Never attach paper or tape to discs.
Cleaning Discs
• Fingerprints and dust on the disc cause a deterioration ofthe picture and sound quality. Wipe the disc from the centeroutwards with a soft cloth. Always keep the discs clean.
• Stubborn dust or dirt can be removed by wiping the disclightly with a slightly moistened soft cloth and finishingwith a dry cloth.
• Never use solvents such as thinner, benzine, commer-cially available cleaners, or antistatic spray for vinyl LPs.They may damage the disc.
Storing Discs• Do not store discs in places subject to direct sunlight or
near heat sources.• Do not store discs in places subject to moisture and dust,
such as in a bathroom or near a humidifier.• Store discs vertically in their case. Stacking or placing objects
on unprotected discs may cause warping and scratches.
About Region NumbersThe region number of this DVD Changer is “1”. This numberrefers to the coding format of the discs that can be playedback and is only important for DVD video discs. If the regionnumber of the DVD video disc you are trying to play back isdifferent from “1”, that is, if the disc neither contains the 1
nor the symbol, the DV-C600 cannot play it back. (In thiscase, your DVD Changer displays a warning message.)
About VIDEO CDsYour DVD Changer can play back version 1.1 and 2.0 VideoCDs. Version 2.0 discs support PBC functionality. (PBC isthe abbreviation of Playback Control.)• VIDEO CDs not equipped with PBC functionality (Version 1.1)
Sound and pictures are played back in the same way asan audio CD.
• VIDEO CDs equipped with PBC functionality (Version 2.0)In addition to the functions available for version 1.1 VideoCDs, you can use interactive software and search functions.These are accessible via a menu displayed on the TV screen(Menu Playback). However, not all functions described in thisInstruction Manual are supported by all Video CDs.
Notes on Copyright
It is forbidden by law to copy, broadcast, show, broadcast on cable,play in public, and rent copyrighted material without permission.DVD video discs are copy protected, and any copy madefrom these discs will be distorted.This product incorporates copyright protection technology that isprotected by method claims of certain U.S. patents and otherintellectual property rights owned by Macrovision Corporationand other rights owners. Use of this copyright protectiontechnology must be authorized by Macrovision Corporation, andis intended for home and other limited viewing uses, unlessotherwise authorized by Macrovision Corporation. Reverseengineering or disassembly is prohibited.
In this section, you will learn which discs can be used with your DV-C600, and how to handle, clean, and store them.
Disc mark Contents
Audio +
Video(movingpictures)
Audio +Video
(movingpictures)
Audio
Discsize
12 cm
8 cm
12 cm
8 cm
12 cm
8 cm (CDsingle)
Maximumplayback time
Approx. 4 hours(single sided disc)Approx. 8 hours(double-sided disc)Approx. 80 minutes(single-sided disc)Approx. 160 minutes(double-sided disc)
Approx. 74 minutes
Approx. 20 minutes
Approx. 74 minutes
Approx. 20 minutes
DVDvideos
VIDEOCDs
AudioCDs
Playback side

10
Connecting the DV-C600 to a TV
Here is how to connect your DVD Changer to your TV set. In this case, both the video and audio signals will be played back byyour TV set.
Connecting the DV-C600 to a TV
1. Switch off the DVD Changer and the TV set.
2. Connect the DV-C600 to your TV set as shown in the illustration.
Selecting the audio outputsYour DV-C600 provides several options for audio playback: you can use the analog or one of the digital audio outputs. If theaudio is to be played back by your TV set, connect the ANALOG OUTPUTs to the audio inputs of your TV set and activate them(“Analog 2ch”). See “Audio Settings” on page 36 for details.
Notes:
• See also the instruction manual of the connected TV on how to select the signals transmitted by the DVD Changer.• Before connecting the DVD Changer to your TV, be sure to turn off the power to and unplug both units from the wall outlet.• If your TV set has one audio input (monaural), connect a Y cable adapter to the DV-C600’s ANALOG OUTPUTs, and the other end of the
adapter to the TV’s audio input.• Be sure to establish a direct video connection between the DV-C600 and your TV set. Do not route the video signal through your VCR or other
video component. Otherwise the picture may be distorted due to the DVD disc’s copy protection.
L
R
COMPONENTY C B C R
VIDEO OUTPUT
VIDEOS VIDEO
ANALOGOUTPUT
OPTICALCOAXIAL
REMOTECONTROL
D I G I TALOUTPUT
REGIONAL CODE 1
(white)
Signal flow
To ANALOGAUDIO OUT
To audio inputs(white)
(red)
Audio·video cable (supplied)
To wall outlet
ToVIDEO
OUT
To S VIDEO OUT
S video cable (supplied)
If the TV has an S video input, connect theDVD changer with the supplied S video cable.
To S video input
TV or monitor withaudio and video inputs
(red)
(yellow)
To video input
(yellow)
Power plug

11
Getting S
tartedC
onnectionsF
unction Setup
Advanced P
laybackO
thersB
asic Playback
Connecting to an Audio System and TV withCOMPONENT VIDEO Inputs It is also possible to “split” the audio and video signals by sending the video signal to your TV set and
the audio signal to an amplifier. Doing so has the advantage that you can:• Listen to the sound of audio CDs and DVD video discs in stereo (via the amplifier) or in Dolby Digital, Dolby Pro Logic
Surround or DTS (see pages 12, 13);
• Enjoy a better picture quality of DVD video discs on a TV equipped with Component Video inputs than would be possible viaan S-video connection.
Notes
• See also the manuals of your audio amplifier and TV set for establishing the correct connections and making the required settings.• Before connecting the DVD Changer to other equipment, be sure to turn off the power and unplug all components from the wall outlet.• This DVD Changer outputs a very dynamic audio signal. Be sure to set the amplifier’s volume to a moderate listening level to avoid damaging
your speakers due to sudden volume surges.• Switch off the amplifier or select another input source before connecting or disconnecting the DVD Changer’s power cord. If you leave the
amplifier power on, the speakers may be damaged.
Your DV-C600 provides several options for audio playback: you can use the analog or one of the digital audio outputs. If youramplifier only provides analog inputs, use the DV-C600’s ANALOG OUTPUTs and select them via the on-screen menu (“Analog2ch”). See “Audio Settings” on page 36 for details.
COMPONENT VIDEO OUT (COLOR DIFFERENCE):Some TVs or monitors are equipped with Color Difference inputs. Connecting the DV-C600 to these inputs allows you to enjoy abetter picture quality. Be sure to match the DV-C600’s VIDEO OUTPUTs with the Component Video inputs of your TV or monitor(see the illustration).Actual labels for the Color Difference inputs may vary depending on the TV manufacturer (e.g. Y, B-Y, R-Y, etc.).On some TVs or monitors, the color levels of the picture may be reduced slightly, or the tint may change. In such cases, adjustthe TV or monitor for optimum performance.
Note:
• If you place the DVD Changer near a tuner or radio, the radio reception might be distorted due to interference. In this case, locate the DV-C600 away from the tuner or radio.
To audio inputsof the amplifier
Audio system
Power plug
To YVIDEOOUT
To CBVIDEOOUT
To CRVIDEOOUT
(red)(white)
To wall outlet
To ANALOGAUDIO OUT
(white)
(red)
TV or monitor withcomponent signal inputs
To Y video input
To CR video input
To CB video input
Signal flow
L
R
COMPONENTY C B C R
VIDEO OUTPUT
VIDEOS VIDEO
ANALOGOUTPUT
OPTICALCOAXIAL
REMOTECONTROL
D I G I TALOUTPUT
REGIONAL CODE 1
12
L
R
COMPONENTY C B C R
VIDEO OUTPUT
VIDEOS VIDEO
ANALOGOUTPUT
OPTICALCOAXIAL
REMOTECONTROL
D I G I TALOUTPUT
REGIONAL CODE 1
TV
Signal flow
Connectionexample
To audio input
Frontspeaker(right)
Frontspeaker(left)
Audio cable
Amplifier equipped withDolby Pro Logic surround
Rear speaker
Center speaker
TV
Signal flow
Connectionexample
To COAXIAL typedigital audio input
Frontspeaker(right)
Frontspeaker(left)
75 Ω coaxial cable
Optical digital cable
Amplifier equipped witha Dolby Digital decoder
Rear speaker(left surround)
Rear speaker(right surround)
Sub-woofer
To OPTICAL type digital audioinput
Center speaker
L
R
COMPONENTY C B C R
VIDEO OUTPUT
VIDEOS VIDEO
ANALOGOUTPUT
OPTICALCOAXIAL
REMOTECONTROL
D I G I TALOUTPUT
REGIONAL CODE 1
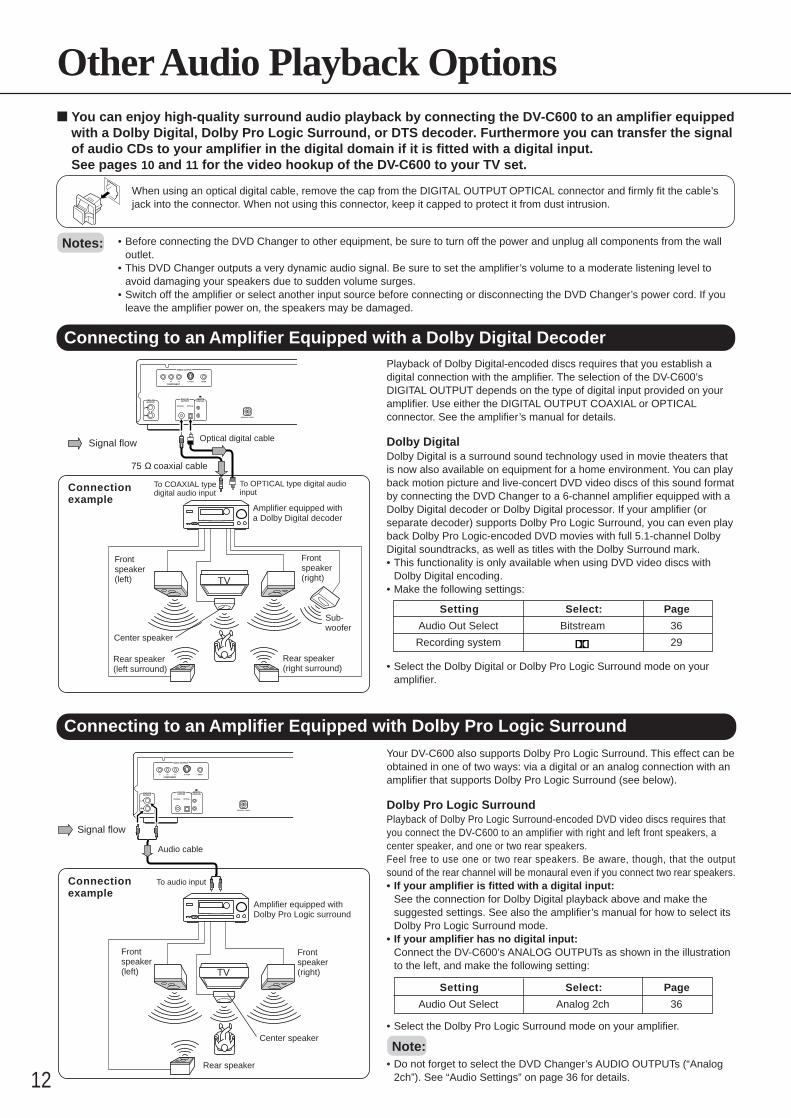
Other Audio Playback Options You can enjoy high-quality surround audio playback by connecting the DV-C600 to an amplifier equipped
with a Dolby Digital, Dolby Pro Logic Surround, or DTS decoder. Furthermore you can transfer the signalof audio CDs to your amplifier in the digital domain if it is fitted with a digital input.See pages 10 and 11 for the video hookup of the DV-C600 to your TV set.
When using an optical digital cable, remove the cap from the DIGITAL OUTPUT OPTICAL connector and firmly fit the cable’sjack into the connector. When not using this connector, keep it capped to protect it from dust intrusion.
Notes:
Connecting to an Amplifier Equipped with Dolby Pro Logic SurroundYour DV-C600 also supports Dolby Pro Logic Surround. This effect can beobtained in one of two ways: via a digital or an analog connection with anamplifier that supports Dolby Pro Logic Surround (see below).
Dolby Pro Logic SurroundPlayback of Dolby Pro Logic Surround-encoded DVD video discs requires thatyou connect the DV-C600 to an amplifier with right and left front speakers, acenter speaker, and one or two rear speakers.Feel free to use one or two rear speakers. Be aware, though, that the outputsound of the rear channel will be monaural even if you connect two rear speakers.• If your amplifier is fitted with a digital input:
See the connection for Dolby Digital playback above and make thesuggested settings. See also the amplifier’s manual for how to select itsDolby Pro Logic Surround mode.
• If your amplifier has no digital input:Connect the DV-C600’s ANALOG OUTPUTs as shown in the illustrationto the left, and make the following setting:
Setting Select: Page
Audio Out Select Analog 2ch 36
• Select the Dolby Pro Logic Surround mode on your amplifier.
Note:• Do not forget to select the DVD Changer’s AUDIO OUTPUTs (“Analog
2ch”). See “Audio Settings” on page 36 for details.
Connecting to an Amplifier Equipped with a Dolby Digital DecoderPlayback of Dolby Digital-encoded discs requires that you establish adigital connection with the amplifier. The selection of the DV-C600’sDIGITAL OUTPUT depends on the type of digital input provided on youramplifier. Use either the DIGITAL OUTPUT COAXIAL or OPTICALconnector. See the amplifier’s manual for details.
Dolby DigitalDolby Digital is a surround sound technology used in movie theaters thatis now also available on equipment for a home environment. You can playback motion picture and live-concert DVD video discs of this sound formatby connecting the DVD Changer to a 6-channel amplifier equipped with aDolby Digital decoder or Dolby Digital processor. If your amplifier (orseparate decoder) supports Dolby Pro Logic Surround, you can even playback Dolby Pro Logic-encoded DVD movies with full 5.1-channel DolbyDigital soundtracks, as well as titles with the Dolby Surround mark.• This functionality is only available when using DVD video discs with
Dolby Digital encoding.• Make the following settings:
Setting Select: Page
Audio Out Select Bitstream 36
Recording system 29
• Select the Dolby Digital or Dolby Pro Logic Surround mode on youramplifier.
• Before connecting the DVD Changer to other equipment, be sure to turn off the power and unplug all components from the walloutlet.
• This DVD Changer outputs a very dynamic audio signal. Be sure to set the amplifier’s volume to a moderate listening level toavoid damaging your speakers due to sudden volume surges.
• Switch off the amplifier or select another input source before connecting or disconnecting the DVD Changer’s power cord. If youleave the amplifier power on, the speakers may be damaged.

13
Getting S
tartedC
onnectionsF
unction Setup
Advanced P
laybackO
thersB
asic Playback
L
R
COMPONENTY C B C R
VIDEO OUTPUT
VIDEOS VIDEO
ANALOGOUTPUT
OPTICALCOAXIAL
REMOTECONTROL
D I G I TALOUTPUT
REGIONAL CODE 1
TV
Signal flow
Connectionexample
To COAXIAL typedigital audio input
Frontspeaker(right)
Frontspeaker(left)
Optical digital cable
Amplifier equipped with aDTS decoder
Rear speaker(left surround)
Rear speaker(right surround)
Sub-woofer
To OPTICAL type digital audioinput
75 Ω coaxial cable
Center speaker
Warnings• If you connect to the digital input of an amplifier that does not have a Dolby Digital decoder or DTS decoder, set the DV-C600’s “Audio
Out Select” function to “PCM.” Any other setting may damage your ears or speakers when using high volume levels.
• During playback of DTS-encoded audio CDs, excessive noise may be output from the ANALOG OUTPUTs. To avoid possible damage toyour audio system, we recommend you either break the connection between the DVD Changer’s ANALOG OUTPUTs and the amplifier,or to only start playback of your DV-C600 after selecting the appropriate digital input source on your amplifier.
• DTS Digital Surround™ playback is only available if you connect an external 5.1-channel DTS Digital Surround™ decoder to a DIGITALOUTPUT jack of the DVD Changer.
Connecting to an Amplifier Equipped with a DTS DecoderPlayback of DTS-encoded discs requires that you establish a digital connection with the amplifier. The selection of the DV-C600’s DIGITALOUTPUT depends on the type of digital input provided on your amplifier. Use either the DIGITAL OUTPUT COAXIAL or OPTICAL connector.See the amplifier’s manual for details.
Digital Theater System (DTS)DTS is a high-quality surround technology used in movie theaters that is alsoavailable for home use on DVD video discs or audio CDs. If you have a DTSdecoder or processor, you can obtain the full benefit or 5.1-channel DTSencoded sound tracks.• DTS functionality is only available when using DVD video discs or audio
CDs with DTS encoding.• Make the following settings:
Setting Select: Page
Audio Out Select Bitstream 36
Recording system DTS 29
• Select the DTS mode on your amplifier.
Digital Stereo Audio PlaybackThe DV-C600 also allows you to output a stereo audio signal in the digitaldomain. The selection of the DV-C600’s DIGITAL OUTPUT depends on thetype of digital input provided on your amplifier. Use either the DIGITALOUTPUT COAXIAL or OPTICAL connector. See the amplifier’s manual fordetails.
L
R
COMPONENTY C B C R
VIDEO OUTPUT
VIDEOS VIDEO
ANALOGOUTPUT
OPTICALCOAXIAL
REMOTECONTROL
D I G I TALOUTPUT
REGIONAL CODE 1
TV
Signal flow
Connectionexample
To COAXIAL typedigital audio input
Frontspeaker(right)
Frontspeaker(left)
Optical digital cable
Amplifier equipped with aDigital Audio Input
To OPTICAL type digital audioinput
75 Ω coaxial cable
PCMIf your amplifier provides a digital audio input, you can establish a digitalconnection between the DV-C600 and the amplifier. Choose this type ofconnection if your amplifier is equipped with a better D/A converter than yourDV-C600, or if you also own a dedicated D/A converter.
• Make the following setting:
Setting Select: Page
Audio Out Select PCM 36
Notes:
• NEVER connect a DIGITAL OUTPUT jack of the DVD Changer to the AC-3RF input of a Dolby Digital Receiver. AC-3 RF inputs use a differentencoding format that is not supported by the DV-C600’s DIGITAL OUTPUTs.
• The amplifier’s coaxial digital input may be labelled “DIGITAL” rather than“COAXIAL”. See its manual for details.
Connecting to an Amplifier Equipped with a Digital Audio Input

14
1
2
3
OPEN/ CLOSE
POWER
POWER
STANDBY/ON
or
OPEN/CLOSE
or
CAUTIONKeep your fingers clear of the disc drawer as it is closing toavoid personal injury.
OPEN/CLOSE PLAY
POWER
OFF
STOPPAUSE
DISC 1 DISC 2 DISC 3 DISC 4 DISC 5 DISC 6
NEXT SELECTION
REPEAT
DVD / VIDEO CD / CD CD CHANGER DV-C600
ON
DIMMER DISPLAY DISC SKIP
DISC1 2 3 4 5 6
STANDBY/ON
DIRECT DIGIT AL ATHP
POWER 2
3
DISC 1–6STANDBY/ON
DISC SKIP
Playing back Discs
This section shows you the basics on how to playback a disc.Most steps in this manual need to be performed using thesupplied remote controller. The relative buttons are usuallyindicated at the beginning of a section.
Basic Playback
Preparations• To view a video disc, switch on your TV set and select the video input the DV-C600 is connected to. See also pages 10, 11
for how to connect the DVD Changer to your TV set.
• If you are also using an amplifier for separate audio playback (see pages 11, 12, 13), switch on the amplifier and select theinput the DV-C600 is connected to.
Connecting to a Wall Outlet and Powering On.1 Plug the power cord into a suitable wall outlet.
2 Press the POWER button on the main unit to switch it toStandby mode.
The STANDBY/ON indicator on the main unit lights.
3 Press the STANDBY/ON button on the main unit, or thePOWER button on the supplied remote controller toswitch on the DVD Changer.
The display lights up, and the STANDBY indicator goesdark.
Press the OPEN/CLOSE button.The disc drawer opens.
Place a disc in the front disc tray (DISC 1).
DVD / VIDEO CD / CD CD CHANGER DV-C600
DIRECT DIGIT AL ATHP
DISC 2 DISC 1 DISC 6
Be sure to insert the disc with the playback side down.
Placing discs in the remaining disc trays.Repeatedly press the DISC SKIP buttonon the main unit to rotate the disc drawercounter-clockwise, and place a disc ineach desired tray (1 – 6).
Press the OPEN/CLOSE button again.The disc drawer closes.Press one of the DISC 1–6 buttons to select the desireddisc on the tray for playback.
Notes:• The DV-C600 supports two disc sizes.
To avoid damaging your discs or causingmalfunction, be sure to insert the discsin the correct guide.
• Only use DVD video discs or audio CDs.Other data carriers may damage yourDVD Changer and/or amplifier/TV set.
Tips:The corresponding disc tray indicatorlights up when the unit detects the disc.
Note:The disc drawer can also be opened whenthe DVD Changer is switched off.
Note:Alternatively, press one of the DISC 1–6buttons to close the disc drawer and playthe selected disc automatically.
4 OPEN/ CLOSE

15
Getting S
tartedC
onnectionsF
unction Setup
Advanced P
laybackO
thersB
asic Playback
DVD VCD CD
REMOTE CONTROLLER RC-406DV
1 2 3
5 6
7 8 9
+10 0
4
POWER
RANDOM MEMORY
REPEATA-B
SLOW
CLEAR
ENTER
DISPLAY
DISC 1 DISC 2 DISC 3
DISC 4 DISC 5 DISC 6
OPEN/ CLOSE
UP
FFPLAYFR
DOWN STOP
PAUSE/STEP
DIMMER
SUBTITLEON/OFF
RETURN
SETUPMENU
TITLE
AUDIO ANGLE SUBTITLE
ZOOM
CD MODE
DISC
NEXT SELECTION
SEARCH
MENUENTER
TITLE
PAUSESTOP
52, 41
/ / /
FIRST SETUP
TV Shape 4:3LB
Thank you for your purchase ofour DVD-Video Player.Please make a selection forOn-Screen Language and your TV shapeand press ENTER button on your remote control.
On-Screen Language ENG
PLAY Press the PLAY button.The DVD Changer starts playback.If you have inserted a DVD video disc with a title menu ora Video CD with PBC (Playback Control) functionality, amenu screen may appear. See “Direct Playback via theOn-Screen Menu” on page 16.To start playback of a PBC-equipped VIDEO CD from themenu screen, set “PBC” to “ON” via the on-screen menufunction. See page 38.
To obtain a higher picture qualityOccasionally, some picture distortion not usually visible during anormal telecast may appear on the TV screen during playback of aDVD video disc. This is due to the fact that DVD videos provide ahigher resolution and therefore also more data to process. While theamount of noise depends on the TV you connect the DVD Changer to,reducing the sharpness setting on your TV when viewing DVD videodiscs may alleviate the problem.
About the DVD VCD CD symbolsThe DVD VCD CD icons on the heading bars below show the discsthat support the function described in the section in question.
DVD : This function is available for playback of DVD video discs.VCD : This function is available for playback of VIDEO CDs.CD : This function is available for playback of audio CDs.
Notes:• For PBC (Playback Control) of VIDEO CDs,
see “About VIDEO CDs” on page 9.• Depending on the DVD video disc you are
using, you may need to press the TITLE orMENU button to display the menu screen.
Inserting other discs
1. Stop playback of the DVD Changer.2. Press the OPEN/CLOSE button to open the disc drawer.3. Press the DISC SKIP button on the main unit repeatedly
until the disc you wish to replace can be accessed.
Note:
You need to stop playback before being able to insert one or severalnew discs.
4. Remove the disc you wish to replace, and insert another disc.5. Press the OPEN/CLOSE button again to close the disc drawer.
Note:
You can also press the PLAY button to automatically close thedrawer and start playback of the disc that is currently up front. To startplayback of another disc than the one in the front tray, you first needto close the disc drawer.
Selecting the desired disc for playback
Press one of the DISC1–6 buttons on the main unit or on theremote controller. The DV-C600 starts playing the first title of theselected disc. There is no need to press the PLAY button.
Notes:
• If you select the desired disc using one of the DISC1–6buttons while the DVD Changer is playing back a title ofanother disc, playback starts with the first title of the newly selecteddisc.
• You can also press the DISC SKIP button to jump to the disc in thenext tray (or from tray #6 to tray #1 if the disc in tray #6 is currentlybeing played back). In that case playback will start with the first titleof the disc in the newly selected tray.
• If you select the desired disc by pressing the DISC SKIP buttonwhile the DVD Changer is stopped, press the PLAY button tostart playback of the first title of the selected disc.
The FIRST SETUP screenThe FIRST SETUP screen is only displayed the very first timeyou switch on your DV-C600. This page allows you to set thetwo single most important parameters. Note that you canchange these settings any time by selecting the appropriateon-screen menu function. See also page 34, 35.
1. Check the video connection of the DVD Changer toyour TV set (see page 10 and following) and switch onyour TV.
2. Switch on the DVD Changer.The following menu screenpage is displayed:
3. Press the remote controller’s or button to select “On-
Screen Language” andpress the ENTER button.
You can select one of thefollowing languages: ENG(English), FRE (French), orSPA (Spanish). That languagewill be used on all on-screen menupages and for subtitling. See page 35.
4. Select the desired language using the or buttonand confirm by pressing ENTER.
Note:
If you agree with the currently selected language, just press ENTERwithout changing the setting.
5. Press the button to select the “TV Shape” function.This function allows you to specify the picture size of yourTV. See 35 for details.
6. Use the and buttons to specify the screen size andconfirm by pressing ENTER.
7. Press the SETUP button to store your settings.
The settings are stored and you are returned to the FIRSTSETUP screen page. As stated above, you can alsochange these settings at a later stage. See page 32.
DISC 1 DISC 2 DISC 3 DISC 4 DISC 5 DISC 6 DISC 1 DISC 2 DISC 3
DISC 4 DISC 5 DISC 6
<main unit> <remote controller>
ENTER
To select the items on the screen.
<remote controller>
After selecting an item, confirm your choice by pressing ENTER.
5
or
PLAY

16
DVD VCD CD
2 8
PlayLast
Fast forwardFast reverse
MotionSlow-
30
REMOTE CONTROLLER RC-406DV
1 2 3
5 6
7 8 9
+10 0
4
POWER
RANDOM MEMORY
REPEATA-B
SLOW
CLEAR
ENTER
DISPLAY
DISC 1 DISC 2 DISC 3
DISC 4 DISC 5 DISC 6
OPEN/ CLOSE
UP
FFPLAYFR
DOWN STOP
PAUSE/STEP
DIMMER
SUBTITLEON/OFF
RETURN
SETUPMENU
TITLE
AUDIO ANGLE SUBTITLE
ZOOM
CD MODE
DISC
NEXT SELECTION
SEARCH
PAUSE/STEP
FRPLAYFFOPEN/CLOSE
STOP / / / ,ENTER
FR
FF
PLAY
DVD VCD CD
FR
FF
Playing back Discs (continued)
Direct Playback, Stop and Pause
Direct Playback via the On-Screen Menu
1. Switch on your TV set.
2. Select the desired title using the / / / or the number buttons.
3. Press the ENTER button.
The DVD Changer starts playing back the selected title.
• If you do not need the menu functionality of PBC-encoded VideoCDs, set the “PBC” function to “Off”. See page 38.
Pausing Playback: Still mode
1. To pause playback, press the PAUSE/STEP button.
• The sound is muted during still mode.
2. Press the PLAY button to resume playback.
Note:
The DV-C600 also provides a function for optimum display of still pictures(only available for DVD video discs). See "Pause/Still" on page 37.
Stopping Playback
Press the STOP button.If you do not wish to resume playback from this position,see “Resuming Playback from the Beginning of the CurrentTitle” on page 17.
Removing a Disc
1. Stop playback.
2. Press the OPEN/CLOSE button.
3. Wait until the disc drawer has opened completely, thenremove the disc.
Notes:
• Do not move the DV-C600 during playback or subject it to strongvibrations to avoid damaging the discs.
• Use the OPEN/CLOSE button on the remote controller or DVDplayer to open and close the disc drawer. Do not obstruct the discdrawer while it is moving. Doing so may cause the DVD Changer tomalfunction.
• Do not push up the disc drawer or put objects other than discs on it.Doing so may cause the DVD Changer to malfunction.
• In many instances, a menu screen will appear after playback of amovie is completed. Prolonged display of such a menu may damageyour television set, permanently etching that image onto the screen.To avoid this, press the STOP button on your remote controller onceplayback of the movie is finished.
• If you pause a picture and leave it still for a long time, the screensaver of the DV-C600 is automatically activated (provided the"Screen Saver" function is set to "On", see page 37). To deactivatethe screen saver and resume playback, press the PLAY button.
You can play back discs at various speeds, and resume playback in various ways.Use the remote controller for the following functions.
Fast Reverse and Fast Forward Playback
Press the FR (fast reverse) or FF (fastforward) button during playback.
• DVD video discs
The playback speed changes to twice thenormal speed in the selected direction.
Press the button again to further increasethe fast forward or reverse speed.
FR: press this button to quickly return toan earlier position.
FF: press this button to advance to aposition behind the current position.
2 8 30
TV screen
X2 the normal speed
X8 the normal speed
X30 the normal speed
• VIDEO CDs/Audio CDs
For Video and Audio CDs, there are twofast forward and reverse speeds.
FR1 FR2
FF1 FF2
TV screen
Fast reverse playback
Fast forward playback
Resuming Normal Playback after Fast Forward-ing/Reversing
After locating the desired position,press the PLAY button to resumenormal playback.
• The DVD Changer does not play back sound or subtitlesduring fast reverse or forward scans of DVD video discs.The sound of audio CDs, however, is played back at theselected scrolling speed.
• The x2, x8 and x30 speeds are only approximate values.They may vary slightly from disc to disc.
ENTER

17
Getting S
tartedC
onnectionsF
unction Setup
Advanced P
laybackO
thersB
asic Playback
DVD VCD DVD VCD CD
2
1
SLOW
SLOW
PLAY
STOP
PLAY
PLAY
STOP
REMOTE CONTROLLER RC-406DV
1 2 3
5 6
7 8 9
+10 0
4
POWER
RANDOM MEMORY
REPEATA-B
SLOW
CLEAR
ENTER
DISPLAY
DISC 1 DISC 2 DISC 3
DISC 4 DISC 5 DISC 6
OPEN/ CLOSE
UP
FFPLAYFR
DOWN STOP
PAUSE/STEP
DIMMER
SUBTITLEON/OFF
RETURN
SETUPMENU
TITLE
AUDIO ANGLE SUBTITLE
ZOOM
CD MODE
DISC
NEXT SELECTION
SEARCH
SLOW
PLAY
REMOTE CONTROLLER RC-406DV
1 2 3
5 6
7 8 9
+10 0
4
POWER
RANDOM MEMORY
REPEATA-B
SLOW
CLEAR
ENTER
DISPLAY
DISC 1 DISC 2 DISC 3
DISC 4 DISC 5 DISC 6
OPEN/ CLOSE
UP
FFPLAYFR
DOWN STOP
PAUSE/STEP
DIMMER
SUBTITLEON/OFF
RETURN
SETUPMENU
TITLE
AUDIO ANGLE SUBTITLE
ZOOM
CD MODE
DISC
NEXT SELECTION
SEARCH
12
Slow-Motion PlaybackDVD video discs can be played back in slow motion. This isdone by reducing the playback speed.
Press the or SLOW button duringplayback.
By pressing either button repeatedly, youcan cycle through the three availableplayback speeds.
1/8 the 1/4 the 1/2 thenormal speed normal speed normal speed
TV screen
1/8 1/4 1/2
1/2 the 1/4 the 1/8 thenormal speed normal speed normal speed
TV screen
1/2 1/4 1/8
Resuming Normal Playback
Press the PLAY button to resumenormal playback.
Using Frame Step DVD VCD
While playback is paused, you can stepforward one frame at a time by pressingthe PAUSE/STEP button.
Resuming Playback From the Desired LocationAfter stopping playback, you can either resume from thelocation where it was stopped, or from the beginning of thecurrent title.
Press the STOP button at the locationwhere you want to halt playback.
The DVD Changer memorizes thislocation.
Press the PLAY button.
The DVD Changer resumes playbackfrom the location where playback wasstopped.
Resuming Playback from the Beginning of theCurrent Title
If you do not wish to resume playback from the position whereit was stopped, proceed as follows. In this case, playback willbe started from the beginning of the last title you played back,or from the beginning of the disc.
1. Stop playback by pressing the STOP button twice.
The second press of the STOP buttonwill clear the DVD Changer’s locationmemory.
2. Press the PLAY button.
The location where playback is starteddepends on the type of disc you are using:
DVD video disc: Playback starts from thebeginning of the current title.
Video CDs/audio CDs: Playback startsfrom the beginning of the disc.
• To quickly resume playback from the beginning of a DVDvideo disc, open and close the disc drawer by pressing the
OPEN/CLOSE button, then press the PLAY button.
Notes:
• The DVD Changer’s location memory is also cleared when you:–unplug the DVD Changer from the wall outlet after stopping
playback.–open the disc drawer.–adjust/change the Parental Lock function (see page 37) or select
another disc menu language (see page 34).• Depending on the disc, playback may not be resumed at the exact
location where it was stopped.• Other settings you change via the on-screen menu while a location
is memorized may be available only after the memory is cleared.
Only for the DVDvideo disc
PAUSE/STEP

18
Normally, DVD video discs are divided into “titles”, while the titles are themselves sub-divided into “chapters”.VIDEO CDs and audio CDs are divided into “tracks”. You can quickly locate any specific title, chapter, or track.
DVD DVD
3
2
11
2
3
ENTER
ENTER
SEARCH
PLAY
1 2 3
5 6
7 8 9
+10 0
4
TITLE
Locating a Title Using the Title MenuIf the DVD video disc you are playing back contains a titlemenu, you can locate any specific title you wish to play back.
Press the TITLE button.
A Title menu like the following appears:
TITLE 4TITLE 3
2TITLE1TITLE
Use the / / / buttons to selectthe title you want to watch.
If the titles in the Title menu are assigneda number, you can directly select thedesired title using the numeric buttons onthe remote controller.
Press the ENTER button.
The DVD Changer starts playback fromChapter 1 of the selected title.
Notes:
• The above instructions correspond to the basic procedure. Pleasenote that the exact steps may depend on the contents of theselected DVD video disc. If different instructions appear on the TVscreen, follow those instructions.
• If you display the Title menu during playback and press the TITLEbutton again without selecting a title, the DVD Changer resumesplayback from the point where you first pressed the TITLE button.
Title Selection with the Numeric ButtonsIf the selected DVD video disc contains Title numbers, youcan select the desired title by entering its number.
Press the SEARCH button.
Check whether the Title number ishighlighted. If it is not, press to select it.
Example:
T i t l e:Chapter :
11
Press the numeric button of the Titleyou wish to select.
To select two-digit Titles, press the +10button followed by a numeric button. Hereare two examples:
To select Title 2, press [2].
T i t l e :Chapter :
21
2
To select Title 12, press [+10] once (for “10”),then [2].
T i t l e:Chapter :
21
11 2
Press the PLAY button.
The DVD Changer starts playback fromChapter 1 of the selected title. You canalso select another Chapter beforestarting playback. See page 17.
Notes:
• Press the CLEAR button if you do not wish to start playback fromthe Title number you have just entered (before pressing the PLAY button). Pressing CLEAR several times will reset both the Titleand Chapter numbers. (SEARCH also allows you to directly selectthe desired Chapter, see next page.)
• See pages 32, 34 for how to select the languages for the on-screenmenu displays.
Locating Titles, Chapters, or Tracks
DVD video disc
Title 1 Title 2
Chapter 1 Chapter 2 Chapter 1 Chapter 2 Chapter 3Track 2 Track 3 Track 4 Track 5Track 1
VIDEO CD/ Audio CD

19
Getting S
tartedC
onnectionsF
unction Setup
Advanced P
laybackO
thersB
asic Playback
Selecting Chapters or Tracks
Direct Selection using the Numeric ButtonsThe DV-C600 also allows you to directly select a Chapter of aTitle (DVD video discs) or a Track (Video or audio CD).
Note:
Steps 1 and 2 are only necessary for DVD video discs. Start with step3 if you want to select a Track of a Video or audio CD.
Press the SEARCH button.
In the case of a DVD video disc, thefollowing is displayed:
T i t l e:Chapter :
11
Press the button to select the nu-meric field next to the Chapter entry:
T i t l e:Chapter :
11
Press the numeric button of theChapter (or Track) you want to playback.
To select two-digit numbers, press the+10 button followed by a numeric button.
To select Title 25, press [+10] twice (for“20”) then [5].
T i t l e :Chapter :
152
2 5
5+10 +10
Track : 52
(DVD video disc)(Video/Audio CD)
Selecting Titles and Chapters Simultaneously
As stated above, it is also possible to specify the desiredChapter number after selecting a Title (see the previous page)before starting playback. To select Chapter 25 of Title 2, forexample, here is what you need to do.
PLAY
22 5
SEARCH
Chapter numberTitle number
T i t l e:Chapter :
252
DVD VCD CD
1
2
3
SEARCH
1 2 3
5 6
7 8 9
+10 0
4
PLAY
REMOTE CONTROLLER RC-406DV
1 2 3
5 6
7 8 9
+10 0
4
POWER
RANDOM MEMORY
REPEATA-B
SLOW
CLEAR
ENTER
DISPLAY
DISC 1 DISC 2 DISC 3
DISC 4 DISC 5 DISC 6
OPEN/ CLOSE
UP
FFPLAYFR
DOWN STOP
PAUSE/STEP
DIMMER
SUBTITLEON/OFF
RETURN
SETUPMENU
TITLE
AUDIO ANGLE SUBTITLE
ZOOM
CD MODE
DISC
NEXT SELECTION
SEARCH
ENTER
DOWN
PLAYUP
Numeric buttons
SEARCH
TITLE
CLEAR
/ / /
DOWN
UP
Note:
• Press the CLEAR button if you do not wish to start playback fromthe Chapter number you have just entered (before pressing the PLAY button). Pressing CLEAR several times will reset both the Titleand Chapter numbers.
Selecting the Next/Previous Chapter or TrackAnother way to select Chapters (DVD video discs) or Tracks(Video/audio CDs) is by using the UP and DOWN buttons:
Use the DOWN or UP button toselect the desired Chapter or Track.
Playback starts automatically, so you donot need to press the PLAY button.
: The DOWN button has twofunctions. If you press it once, theDVD Changer returns to thebeginning of the currently selectedChapter or Track. Press it twice toreturn to the beginning of thepreceding Chapter or Track.
: Press UP to jump to thebeginning of the next Chapter orTrack.
Notes:
• Some Titles don’t contain Chapter numbers. In that case, the DOWN and UP buttons do not work.
• If “Title Stop” is set to “Off” (see page 38), the DOWN and UP buttons also allow you to jump from the last (or first) Chapter of
a given Title to the first Chapter of the next (or previous) Title. Thatis, if you press DOWN after returning to Chapter 1 of thecurrent Title, the DVD Changer jumps to the first Chapter of theprevious Title. Pressing UP after selecting the last Chapter ofthe current Title takes you to Chapter 1 of the following Title. If “TitleStop” is set to “On”, the DOWN and UP buttons only allowyou to cycle through the Chapters of the currently selected Title.

20
1
2
DVD VCD CD
3
SEARCH
1 2 3
5 6
7 8 9
+10 0
4
PLAY
REMOTE CONTROLLER RC-406DV
1 2 3
5 6
7 8 9
+10 0
4
POWER
RANDOM MEMORY
REPEATA-B
SLOW
CLEAR
ENTER
DISPLAY
DISC 1 DISC 2 DISC 3
DISC 4 DISC 5 DISC 6
OPEN/ CLOSE
UP
FFPLAYFR
DOWN STOP
PAUSE/STEP
DIMMER
SUBTITLEON/OFF
RETURN
SETUPMENU
TITLE
AUDIO ANGLE SUBTITLE
ZOOM
CD MODE
DISC
NEXT SELECTION
SEARCH
PLAY
Numeric buttons
SEARCH
Selecting a Precise Scene orAudio Passage
It is also possible to directly select a given location and to start playbackfrom there. This may come in handy when you want to view a given scene(DVD video discs/Video CDs) or listen to a specific passage (audio CD)within the currently selected Title or Track.
Entering the Time LocationHere is how to enter the time location of the scene or passageyou wish to play back:
Press the SEARCH button several timesuntil the following message is dis-played:
T i m e – – : – – : – –
Enter the desired time value with thenumeric buttons.
Here is an example:
32 51 0
T i m e 1 : 2 5 : 3 0
Press the PLAY button.
The DVD Changer starts playback fromthat location.
Notes:
• Some discs may not respond to this procedure.• In some cases, there may be a slight shift between the time value
you enter and the location where playback starts.• This method of selecting the desired location is only available within
the current Title (DVD video discs) or track (Video/audio CDs).

21
Getting S
tartedC
onnectionsF
unction Setup
Advanced P
laybackO
thersB
asic Playback
1
DVD VCD CD
CLEAR
REMOTE CONTROLLER RC-406DV
1 2 3
5 6
7 8 9
+10 0
4
POWER
RANDOM MEMORY
REPEATA-B
SLOW
CLEAR
ENTER
DISPLAY
DISC 1 DISC 2 DISC 3
DISC 4 DISC 5 DISC 6
OPEN/ CLOSE
UP
FFPLAYFR
DOWN STOP
PAUSE/STEP
DIMMER
SUBTITLEON/OFF
RETURN
SETUPMENU
TITLE
AUDIO ANGLE SUBTITLE
ZOOM
CD MODE
DISC
NEXT SELECTION
SEARCH
PLAY
A-B
CLEAR
REPEAT
REPEAT
Repeat Functions
Your DVD Changer allows you to repeat a given Title, Chapter/track ordisc indefinitely. It is also possible to repeat a given scene or audiopassage (A–B Repeat).
Repeating a Title or Chapter/TrackHere is what you need to do in order to program a playbackloop of the selected Title, Chapter/track, or disc:
Select the disc that contains thematerial to be repeated (or that youwant to playback repeatedly in itsentirety).See “Selecting the desired disc forplayback” on page 15.
Select the Title or Chapter/track youwant to repeat.See “Locating Titles, Chapters, or Tracks”on page 18 and following.
Press the REPEAT button to select thedesired Repeat function.Pressing this button repeatedly cycles youthrough the available options. These optionsdepend on the currently selected disc:
DVD video discs:
Chapter Repeat
Title Repeat
Disc Repeat
All Repeat
Repeat Off
Video CDs/audio CDs
Repeat
Repeat
Repeat Off
Track
All
RepeatDisc
To cancel the Repeat function at anytime, press the CLEAR button.
Note:
Some discs do not support these Repeat functions.
2
3
4
Repeating a Given Scene or Passage
Start playback of the desired Chapter orTrack (see page 19 and following forhow to select it).
Press the A–B button at the beginningof the scene or passage you wish torepeat (this position is called “A”).
A –
Press A–B again at the end of theexcerpt to be repeated (to store point“B”).
A – B
The DVD Changer automatically returnsto point “A” and starts repeating theselected excerpt.
To cancel the Repeat function at anytime, press the CLEAR button.
Notes:
• Some discs do not support the A–B Repeat function.• The “A” and “B” points must be located within the currently selected
Title or Track.• For DVD video discs: The A–B Repeat function is not available for
scenes that provide several camera angles.• In some cases, the “A” and “B” points may be shifted slightly with
respect to the positions you selected.
Repeats the samechapter.
Repeats the sametitle.
Repeats the samedisc.
Repeats all discs.
Resumes normalplayback.
Repeats the sametrack.
Repeats the samedisc.
Repeats all discs.
Resumes normalplayback.
1
3
DVD VCD CD
A-B
A-B
CLEAR
2
4
22
2
1
MEMORY
DVD VCD CD
Title : 2Chapter : 25Title : 2Chapter : 25
Title : 2Chapter : 12Title : 2Chapter : 12
Title : 1Chapter : 1Title : 1Chapter : 1
REMOTE CONTROLLER RC-406DV
1 2 3
5 6
7 8 9
+10 0
4
POWER
RANDOM MEMORY
REPEATA-B
SLOW
CLEAR
ENTER
DISPLAY
DISC 1 DISC 2 DISC 3
DISC 4 DISC 5 DISC 6
OPEN/ CLOSE
UP
FFPLAYFR
DOWN STOP
PAUSE/STEP
DIMMER
SUBTITLEON/OFF
RETURN
SETUPMENU
TITLE
AUDIO ANGLE SUBTITLE
ZOOM
CD MODE
DISC
NEXT SELECTION
SEARCH
5
7
3
/ / /
CLEAR
RETURN
DISPLAY4
Setting the Desired PlaybackOrder
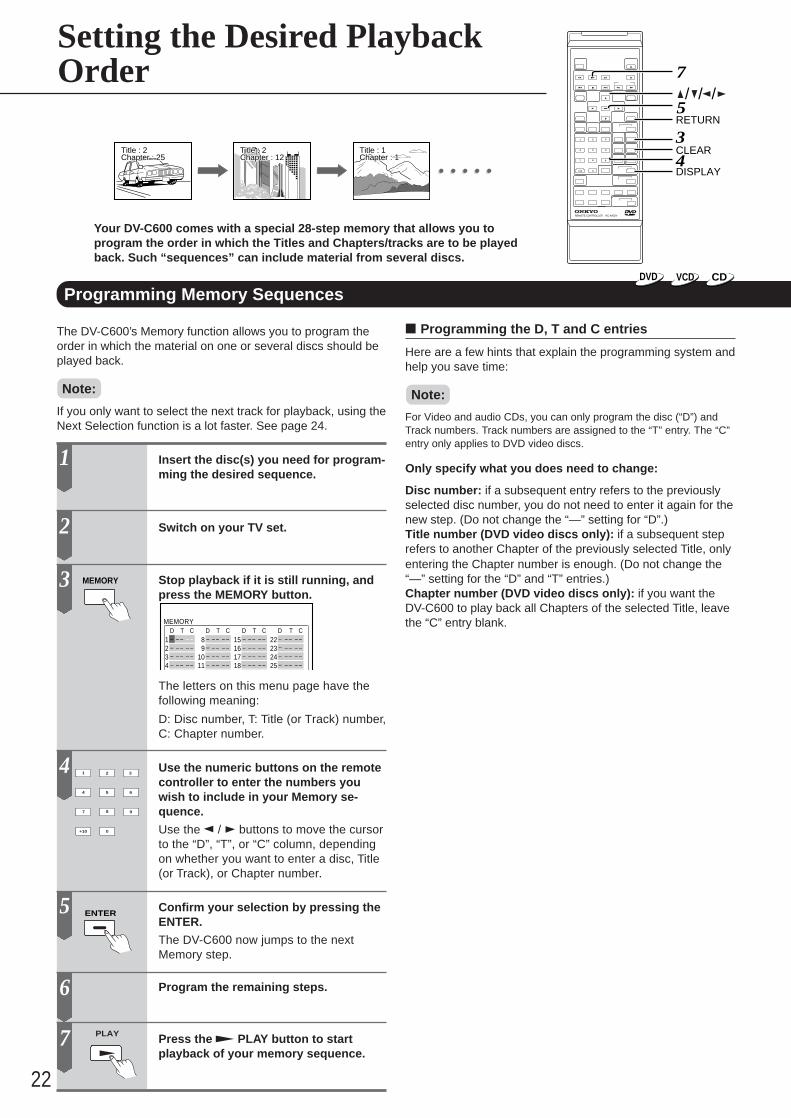
Your DV-C600 comes with a special 28-step memory that allows you toprogram the order in which the Titles and Chapters/tracks are to be playedback. Such “sequences” can include material from several discs.
Programming Memory Sequences
The DV-C600’s Memory function allows you to program theorder in which the material on one or several discs should beplayed back.
Note:
If you only want to select the next track for playback, using theNext Selection function is a lot faster. See page 24.
Insert the disc(s) you need for program-ming the desired sequence.
Switch on your TV set.
Stop playback if it is still running, andpress the MEMORY button.
1TD D D DC
234
MEMORY
– – – –– – – –– – – –– – – –
8T C
91011
– – – –– – – –– – – –– – – –
15T C
161718
– – – –– – – –– – – –– – – –
22T C
232425
– – – –– – – –– – – –– – – –
––––
––––
––––
––––
The letters on this menu page have thefollowing meaning:
D: Disc number, T: Title (or Track) number,C: Chapter number.
Use the numeric buttons on the remotecontroller to enter the numbers youwish to include in your Memory se-quence.
Use the / buttons to move the cursorto the “D”, “T”, or “C” column, dependingon whether you want to enter a disc, Title(or Track), or Chapter number.
Confirm your selection by pressing theENTER.
The DV-C600 now jumps to the nextMemory step.
Program the remaining steps.
Press the PLAY button to startplayback of your memory sequence.
Programming the D, T and C entries
Here are a few hints that explain the programming system andhelp you save time:
Note:
For Video and audio CDs, you can only program the disc (“D”) andTrack numbers. Track numbers are assigned to the “T” entry. The “C”entry only applies to DVD video discs.
Only specify what you does need to change:
Disc number: if a subsequent entry refers to the previouslyselected disc number, you do not need to enter it again for thenew step. (Do not change the “—” setting for “D”.)Title number (DVD video discs only): if a subsequent steprefers to another Chapter of the previously selected Title, onlyentering the Chapter number is enough. (Do not change the“—” setting for the “D” and “T” entries.)Chapter number (DVD video discs only): if you want theDV-C600 to play back all Chapters of the selected Title, leavethe “C” entry blank.
PLAY
3
4
5
6
7
ENTER
1 2 3
5 6
7 8 9
+10 0
4

23
Getting S
tartedC
onnectionsF
unction Setup
Advanced P
laybackO
thersB
asic Playback
DVD VCD CD
Here are a few programming examples:
Chapters 25 and 12 of Title # 2 on disc #3 (two steps):
2 23ENTER
5Memory 1
Memory 2
Disc number Title number Chapter number
1 2ENTER
All chapters of Title #1 on disc #1:
1 1ENTER
Memory 3
Disc number Title number
Chapter 2 of Title #4 on disc #1:
24ENTER
Memory 4
1TD D D DC
234567
MEMORY
02 2502 1201 – –04 02– –– – – –– – – –
8T C
91011121314
– – – –– – – –– – – –– – – –– – – –– – – –– – – –
15T C
161718192021
– – – –– – – –– – – –– – – –– – – –– – – –– – – –
22T C
232425262728
– – – –– – – –– – – –– – – –– – – –– – – –– – – –
3311–––
–––––––
–––––––
–––––––
– –
“Copy” the settings of the previous memory:Doing so allows you to use the settings of the previousmemory as a starting point and only change one entry.Example: if memory 1 refers to disc 3/Title 2/Chapter 25, whilememory 2 needs to refer to disc 1/Title 2/Chapter 12, you can“copy” memory 1 to memory 2 and modify the “C” (chapter)entry:
• Program the memory to be copied (example: memory 1),and press the ENTER button. The DVD Changer advancesto memory 2.
• Use the numeric buttons to enter the chapter number 12on the black cursor on the “C” entry, then press theENTER button, “D” and “T” on the memory 1 are copied tomemory 2.
Other Memory Functions
Leaving the MEMORY display pageTo leave the MEMORY display page, press the RETURN orMEMORY button.
Correcting an entry of a previously programmed step:
a) Use the / buttons to move the cursor to the corre-sponding memory number.
b) Select the entry (D, T or C) you wish to change with the / buttons.
c) Enter the correct value using the numeric buttons.
Erasing a step
a) Stop playback.
b) If the Memory sequence is not currently displayed, pressthe MEMORY button to select it.
c) Select the step you wish to erase with the / buttons.
d) Press the CLEAR button to erase the selected step.
Erasing the entire Memory sequenceTo erase all steps, either switch the DVD Changer off andback on again, or open and close the disc tray.
Programming the next step during playbackIf you press the MEMORY button during playback, a menupage is displayed where you can program a new step.
Programming several new steps during playback
a) Press the MEMORY button followed by the DISPLAYbutton.The Memory menu appears on the TV screen.
b) Continue with step 3 on page 22.
Notes:
• Some discs do not allow Memory playback.• The Repeat function (see page 21) is also available during playback
of your Memory sequence. Press the REPEAT button to activate itfor the current step of your Memory sequence.
• You can only program Title (or Track) and Chapter numbers thatexist on the selected disc.
• For Video and audio CDs, the “T” entry allows you to select thetrack, while the “C” entry is not used.
• The Memory function is also available during playback.

24
2
1
3
NEXT SELECTION
DISC 1 DISC 2 DISC 3
DISC 4 DISC 5 DISC 6
Additional Playback FunctionsNext Selection: Preparing the next Audio Track
During playback of an audio CD, you can already prepare the next track that will be played as soon as the current one isfinished. The difference with direct selection of a track or disc is that playback of the prepared track starts only after the currenttrack is finished (i.e. not right away).
During playback of an audio CD, press the NEXTSELECTION button on the DV-C600 or the remotecontroller to activate this function.
NEXT indicator flashes
Current disc number
The NEXT indicator flashes and the disc number disap-pears on the display.
Use the DISC1 – 6 buttons (or DISC + and DISC –) toselect the disc that contains the next track you wantto listen to.The number of the selected disc flashes on the display.
If you want to play back all tracks of the selected disc,skip to step 4 without selecting a track.AL: means that all tracks will be played back.
Tip:You can also use the DISC SKIP button on the DV-C600to select the next disc.
Select the track using the numeric buttons.The number of the selected track flashes on the display.In that case, the display looks as follows:
Press the NEXT SELECTION button to confirm your selection.The disc number and track number light up continuously.After a few moments, the disc and track numbers of thecurrently playing track reappear.
You can check the next selection by pressing the NEXTSELECTION button.As soon as the current track is finished, the DVDChanger will play back the prepared track (or disc if youselected “AL”).
Tip:NEXT SELECTION is also available during Memoryplayback (see page 22) and Random playback (see page25). Using Next Selection, will cancel the Memory orRandom playback function, however.
Cancelling the Next Selection function
If you decide not to take advantage of the Next Selection function after all, proceed as follows:
1. Press the NEXT SELECTION button.The disc and song numbers flash on the display.
2. Press the CLEAR button.
3. Press the NEXT SELECTION button again.The NEXT indicator goes dark and the function is cancelled.
NEXT SELECTION
4
Note:
This function is only available for audio CDs(when the CD indicator lights).
Note:
You need to press one of these buttonswithin 8 seconds after pressing NEXTSELECTION. Otherwise, the Next Selectionfunction will be cancelled. In that case, startagain with step 1.
Notes:
• Directly selecting another disc or track withthe DISC SKIP button, DISC +/–, DOWN
/UP or the numeric buttons afterpreparing a track with NEXT SELECTIONcancels the Next Selection function.
• You can only prepare one track with NextSelection. See “Programming MemorySequences” on page 22 for how toprepare a series of tracks. Preparing yetanother track before the previouslyentered Next Selection command hasbeen executed overrides your first setting,so that only the second Next Selection iscarried out.
• If you stop playback by pressing the STOP button, the Next Selection function is
cancelled.
CD
1 2 3
5 6
7 8 9
+10 0
4

25
Getting S
tartedC
onnectionsF
unction Setup
Advanced P
laybackO
thersB
asic Playback
1CD MODE
Using the DVD Changer as CD playerSince your DV-C600 allows you to insert up to six discs in any combination (DVD video discs, Video CDs, audio CDs), theremay be times when you only want to listen to music and avoid having to press the DISC SKIP or DISC+ and DISC– buttonsseveral times to skip to the next audio CD. In that case, proceed as follows:
Press the CD MODE button while the DV-C600 isstopped or playing back a CD.The RPT message appears on the display and theREPEAT indicator lights to signal that all audio CDs willbe repeated in sequence.
Disc number REPEAT lights up.Track number
Press the CD MODE button again to cancel CD Mode.The RPT message disappears and the REPEAT indicatorgoes dark again to signal that the DVD Changer hasreturned to normal playback mode.
CD
Note:
The CD MODE button does not work while theDV-C600 is playing back a disc other than anaudio CD. You first need to press the STOPbutton. Next, press the CD MODE button toenter CD Mode. The DVD Changer startsplaying back the audio CD in the holder with thelowest number.
Note:
Another way of selecting only audio tracks is to take advantage of the DV-C600’s Memory function. See “Programming Memory Sequences” onpage 22 for details.
CD MODE

26
2
1
PLAY
1
PLAY
RANDOM
Additional Playback Functions (continued)
Random Playback
Title : 2Chapter : 2Title : 2Chapter : 2
Title : 3Chapter : 1
Title : 2Chapter : 2
TITLE : 1CHAPTER : 3Title : 1Chapter : 3
Title : 3Chapter : 1
1 2 3
5 6
7 8 9
+10 0
4
POWER
RANDOM MEMORY
REPEATA-B
SLOW
CLEAR
ENTER
DISPLAY
DISC 1 DISC 2 DISC 3
OPEN/ CLOSE
UP
FFPLAYFR
DOWN STOP
PAUSE/STEP
DIMMER
SUBTITLEON/OFF
RETURN
SETUPMENU
TITLE
AUDIO ANGLE SUBTITLE
ZOOM
CD MODE
DISC
SEARCH
PLAYUP
RANDOMCLEARNumber buttonsSEARCH
The DV-C600’s Random playback functions allow you to select a mode wherethe DV-C600 decides which Title or Chapter/track to play next. A similarfunction is available on most CD players. There are two Random functions:one for DVDs only, and another that is available for both DVDs and Video/audio CDs:
Title Random DVD
For DVD video discs, you can decide to have the DV-C600select the Titles in a random (unpredictable) order:
Stop playback and select the DVD videodisc whose titles you wish to watch inrandom order.
See “Selecting the desired disc forplayback” on page 15 for details.
Press the RAN-DOM button toselect “TitleRandom”.
Pressing this buttonrepeatedly will cyclethrough the follow-ing options:
Note:
If you press theRANDOM button during playback, the DV-C600 automatically starts randomplayback after finishing the current title.
Press the PLAY button within 5seconds after pressing the RANDOMbutton.
The DVD Changer starts random play-back.
Press CLEAR to resume normalplayback.
Notes:
• Some discs may not permit random playback.• You cannot use this Random function in conjunction with Memory
playback (see page 22).• Select “Random Off” if you do not need the Random function after
all.
Playing Chapters or Tracks in Random Order DVD VCD CD
This Random function allows you to activate random playbackof the Chapters within the currently selected title (DVD videodiscs) or of the tracks on a Video or audio CD.
Stop playback and select the discwhose titles you wish to watch/listen toin random order.
See “Selecting the desired disc forplayback” on page 15 for details.
Press the SEARCH button and use thenumeric buttons on the remote control-ler to select the Title.
Note:
This is only possible for DVD video discs.Skip to step 2 for Video/audio CDs.
Press the RANDOM button to select“Chapter Random” (DVD) or “TrackRandom” (Video/audio CD).
If you press theRANDOM buttonduring playback, theDV-C600 automati-cally starts randomplayback after finishing the currentChapter or track.
Press the PLAY button within 5seconds after pressing the RANDOMbutton.
The DVD Changer starts random playback.
Press CLEAR to resume normalplayback.
Notes:• Some discs may not permit random playback.• You cannot use this Random function in conjunction with Memory play-
back (see page 22).• You can press the UP button during Random playback to jump to
the next Chapter or track and continue Random playback from there.• Select “Random Off” if you do not need the Random function after all.
Random Off
Title Random
DVD
Chapter Random
2
4
3
RANDOM
SEARCH
(DVD video disc)
RandomChap t e r
T i t l e :Chap t e r :
21
3
4
5
CLEAR
CLEAR
(DVD video disc)
T i t l e :Chap t e r :
212
SEARCH

27
Getting S
tartedC
onnectionsF
unction Setup
Advanced P
laybackO
thersB
asic Playback
1 ANGLE
ANGLE
RETURN
CLEAR
ZOOM
DVD Video Disc Functions
REMOTE CONTROLLER RC-406DV
1 2 3
5 6
7 8 9
+10 0
4
POWER
RANDOM MEMORY
REPEATA-B
SLOW
CLEAR
ENTER
DISPLAY
DISC 1 DISC 2 DISC 3
DISC 4 DISC 5 DISC 6
OPEN/ CLOSE
UP
FFPLAYFR
DOWN STOP
PAUSE/STEP
DIMMER
SUBTITLEON/OFF
RETURN
SETUPMENU
TITLE
AUDIO ANGLE SUBTITLE
ZOOM
CD MODE
DISC
NEXT SELECTION
SEARCH
CLEARZOOM
RETURN / / /
Zooming in
The Zoom function allows you tomagnify a portion of a picture.Feel free to select the area to bemagnified.
Changing the Camera Angle
Angle : 2 Angle : 3Angle : 1
One of the new features of the DVD carrieris that some discs contain scenes shot fromdifferent angles. The following functionallows you to select the desired angle.
Press the ZOOM button during normalor slow (see page 17) playback or whileplayback is paused (“still”, see page16).
There are three Zoom levels. Press thisbutton repeatedly to select the desiredlevel.
Zoom 1
Zoom 2
Zoom 3
Press the RETURN button to progres-sively zoom out again (return to thepreceding Zoom level).
Use the / / / buttons to shift thezoom point.
When the zoom point reaches an edge ofthe picture, the color of the “Zoom”message changes.
Pressing the CLEAR button restores thezoom point to the center of the picture.
To defeat the Zoom function, press theZOOM button repeatedly until the“Zoom” message disappears.
Notes:
• Some DVD Video discs do not support the Zoom function.• For certain scenes, the Zoom function is not available.• The Zoom function does not apply to subtitles or menu screens
included on DVD video discs.• During zoom playback, the / / / buttons are not available
for selecting option of a DVD’s menu function (they are used to shiftthe zoom point). If you want to use the menu screens, cancel zoomplayback (see above).
• The magnification level varies depending on the picture size youselect (see page 32, 35).
REMOTE CONTROLLER RC-406DV
1 2 3
5 6
7 8 9
+10 0
4
POWER
RANDOM MEMORY
REPEATA-B
SLOW
CLEAR
ENTER
DISPLAY
DISC 1 DISC 2 DISC 3
DISC 4 DISC 5 DISC 6
OPEN/ CLOSE
UP
FFPLAYFR
DOWN STOP
PAUSE/STEP
DIMMER
SUBTITLEON/OFF
RETURN
SETUPMENU
TITLE
AUDIO ANGLE SUBTITLE
ZOOM
CD MODE
DISC
NEXT SELECTION
SEARCH
CLEAR
41, 4
Set the “On-Screen Displays” functionto “On” if you want the angle icon ( )as well as series of other icons to bedisplayed on screen. See pages 32, 37for details.
If you do not need these on-screenmessages, set the above function to “Off”.
Start playback and look out for themultiangle icon ( ).
If this icon appears on the display (and onscreen)…
…press the ANGLE button.
Angle: 1Angle icon
Current angle number
Select the desired Angle by repeatedlypressing ANGLE.
You can also use the and buttons toadvance to the next or return to theprevious angle. ANGLE only allows you tocycle in one direction.
Angle: 1
Angle: 2
Angle: 3
Use the numeric buttons to directly selectthe desired angle.
Press the CLEAR button to switch offthe angle number.
Notes:
• You can also change the camera angle in pause (“still”) mode (seepage 16). In that case, the camera angle changes to the new settingwhen you resume playback.
• If you pause a picture immediately after changing the camera angle, theresumed playback picture may no longer use the new camera angle.
ZOOM
ENTER
2
3
4
5
2
1
3
4
DVD DVD
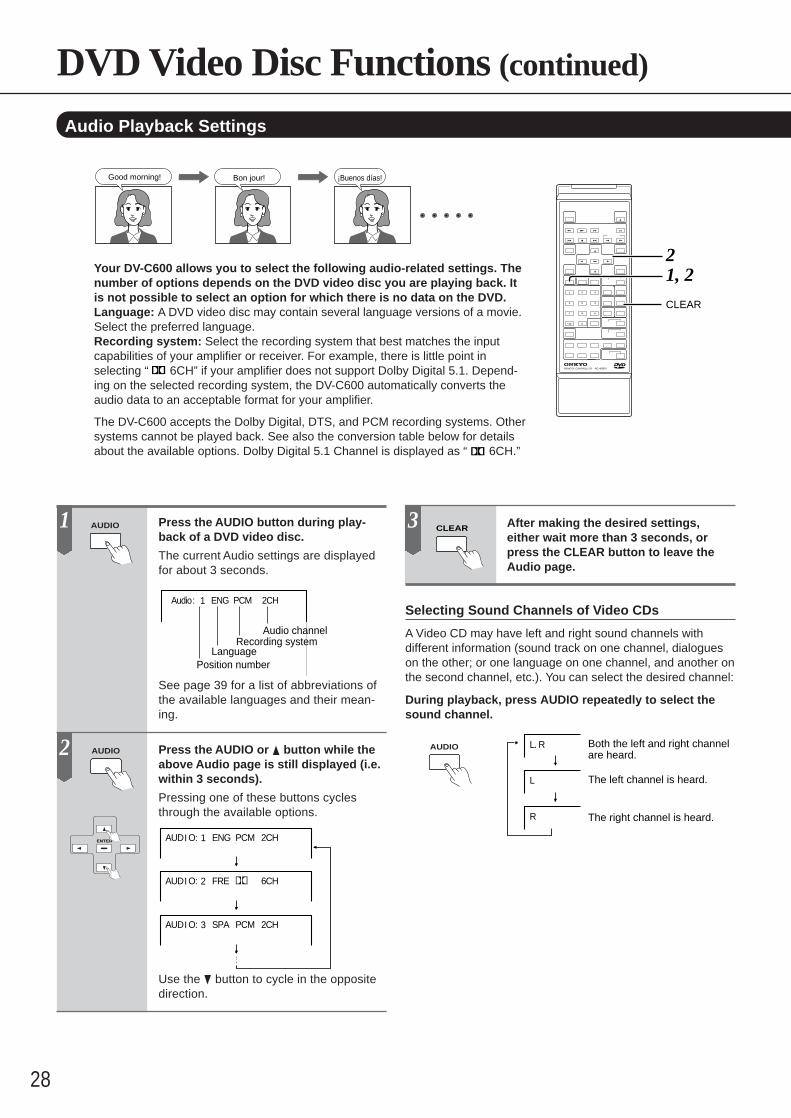
28
Press the AUDIO button during play-back of a DVD video disc.
The current Audio settings are displayedfor about 3 seconds.
Audio: ENG PCM 2CH1
Audio channelRecording system
LanguagePosition number
See page 39 for a list of abbreviations ofthe available languages and their mean-ing.
Press the AUDIO or button while theabove Audio page is still displayed (i.e.within 3 seconds).
Pressing one of these buttons cyclesthrough the available options.
AUDI O: ENG PCM 2CH
AUDI O: FRE 6CH
AUDI O: SPA PCM 2CH
1
2
3
Use the button to cycle in the oppositedirection.
DVD Video Disc Functions (continued)
REMOTE CONTROLLER RC-406DV
1 2 3
5 6
7 8 9
+10 0
4
POWER
RANDOM MEMORY
REPEATA-B
SLOW
CLEAR
ENTER
DISPLAY
DISC 1 DISC 2 DISC 3
DISC 4 DISC 5 DISC 6
OPEN/ CLOSE
UP
FFPLAYFR
DOWN STOP
PAUSE/STEP
DIMMER
SUBTITLEON/OFF
RETURN
SETUPMENU
TITLE
AUDIO ANGLE SUBTITLE
ZOOM
CD MODE
DISC
NEXT SELECTION
SEARCH
CLEAR
21, 2
Audio Playback Settings
Good morning! ¡Buenos días!Bon jour!
After making the desired settings,either wait more than 3 seconds, orpress the CLEAR button to leave theAudio page.
Selecting Sound Channels of Video CDs
A Video CD may have left and right sound channels withdifferent information (sound track on one channel, dialogueson the other; or one language on one channel, and another onthe second channel, etc.). You can select the desired channel:
During playback, press AUDIO repeatedly to select thesound channel.
L. R
L
R
Both the left and right channel are heard.
The left channel is heard.
The right channel is heard.
1
2
AUDIO
AUDIO
ENTER
Your DV-C600 allows you to select the following audio-related settings. Thenumber of options depends on the DVD video disc you are playing back. Itis not possible to select an option for which there is no data on the DVD.Language: A DVD video disc may contain several language versions of a movie.Select the preferred language.Recording system: Select the recording system that best matches the inputcapabilities of your amplifier or receiver. For example, there is little point inselecting “ 6CH” if your amplifier does not support Dolby Digital 5.1. Depend-ing on the selected recording system, the DV-C600 automatically converts theaudio data to an acceptable format for your amplifier.
The DV-C600 accepts the Dolby Digital, DTS, and PCM recording systems. Othersystems cannot be played back. See also the conversion table below for detailsabout the available options. Dolby Digital 5.1 Channel is displayed as “ 6CH.”
CLEAR3
AUDIO

29
Getting S
tartedC
onnectionsF
unction Setup
Advanced P
laybackO
thersB
asic Playback
Notes:
• Some discs allow you to change Audio settings only via the discmenu. In that case, press the MENU button and choose the desiredlanguage.
• The Audio settings are not saved internally. When you switch off theDVD Changer or open the disc tray, the DV-C600 returns to thedefault setting. See page 34.
• When you select an option that is not available on the selected DVDvideo disc, the DV-C600 ignores your setting and goes on using thepreviously selected language, etc.
Recording Systems and Automatic Conversions
Here are all the Recording systems formats the DV-C600supports as well as the conversions that will be carriedaccording to the Recording system you select (see page 28).
Output sound conversion table (sampling frequency/quantization bit)
Linear PCM
Discs Sound recording system
Audio settings on the setting screen (page 32, 36)
Bitstream Analog 2ch Stereo Output PCM
DIGITAL ANALOG DIGITAL ANALOG DIGITAL ANALOGOUTPUT jack OUTPUT jacks OUTPUT jack OUTPUT jacks OUTPUT jack OUTPUT jacks
Dolby Digital Bitstream 48 kHz/16 bit Bitstream 48 kHz/16 bit 48 kHz/16 bit 48 kHz/16 bit
48 kHz/16 bit 48 kHz/16 bit 48 kHz/16 bit 48 kHz/16 bit 48 kHz/16 bit 48 kHz/16 bit 48 kHz/16 bit
48 kHz/20 bit 48 kHz/16 bit 48 kHz/16 bit 48 kHz/16 bit 48 kHz/20 bit 48 kHz/16 bit 48 kHz/16 bit
48 kHz/24 bit 48 kHz/16 bit 48 kHz/16 bit – 48 kHz/24 bit 48 kHz/16 bit 48 kHz/16 bit
96 kHz/16 bit 48 kHz/16 bit 48 kHz/16 bit – 96 kHz/16 bit 48 kHz/16 bit 48 kHz/16 bit
96 kHz/20bit 48 kHz/16 bit 48 kHz/16 bit – 96 kHz/20 bit 48 kHz/16 bit 48 kHz/16 bit
96 kHz/24 bit 48 kHz/16 bit 48 kHz/16 bit – 96 kHz/24 bit 48 kHz/16 bit 48 kHz/16 bit
DTS Bitstream – Bitstream – – –
MPEG 2 Bitstream(7.1ch) – Bitstream(2ch) 48kHz/16bit 48kHz/16bit 48kHz/16bit
VIDEO CDs MPEG1 44.1 kHz/16 bit 44.1 kHz/16 bit 44.1 kHz/16 bit 44.1 kHz/16 bit 44.1 kHz/16 bit 44.1 kHz/16 bit
Audio CDsLinear PCM 44.1 kHz/16 bit 44.1 kHz/16 bit 44.1 kHz/16 bit 44.1 kHz/16 bit 44.1 kHz/16 bit 44.1 kHz/16 bit 44.1 kHz/16 bit
DTS Bitstream (Noise) Bitstream (Noise) Bitstream (Noise)
DVDvideo discs
DVD

30
DVD Video Disc Functions (continued)
Using the Subtitle Feature
Good evening! Bon soir! ¡Buenas tardes!
Some DVD video discs also contain subtitles – sometimes even inseveral languages. Here is how to display them and select thelanguage (if several languages are available).
REMOTE CONTROLLER RC-406DV
1 2 3
5 6
7 8 9
+10 0
4
POWER
RANDOM MEMORY
REPEATA-B
SLOW
CLEAR
ENTER
DISPLAY
DISC 1 DISC 2 DISC 3
DISC 4 DISC 5 DISC 6
OPEN/ CLOSE
UP
FFPLAYFR
DOWN STOP
PAUSE/STEP
DIMMER
SUBTITLEON/OFF
RETURN
SETUPMENU
TITLE
AUDIO ANGLE SUBTITLE
ZOOM
CD MODE
DISC
NEXT SELECTION
SEARCH
CLEAR
SUBTITLESUBTITLE ON/OFF
/ / /
Selecting the Subtitle Language
Press the SUBTITLE button duringplayback.
The current subtitle setting is displayedfor about three seconds.
Subtitle: ENG On1
LanguagePosition number
Refer to the list of languages and theirabbreviations. See page 39.
Press the SUBTITLE or button duringthe above page is displayed.
Repeatedly press the SUBTITLE or button to cycle through the options. Youcan only select a subtitle language forwhich there are data on the selected DVDvideo disc.
Subtitle 1 ENG :
Subtitle 2 FRE :
Subtitle 3 SPA :
On
On
On
You can also use button to cyclethrough the options in the oppositedirection.
Press the CLEAR button to hide theabove indication.
Turning Subtitles On or Off
Press the SUBTITLE ON/OFF buttonduring playback.
The current subtitle setting is displayedfor about three seconds.
Subtitle ENG: On1
Good morning!
Appears for about 3 seconds
Subtitles
The subtitles are displayed at the bottomof the screen.
Press the SUBTITLE ON/OFF buttonagain to turn the subtitles off.
Subtitle ENG: Off1 Appears for about 3 seconds
The subtitles disappear.
Notes:
• Some DVD video discs are set to display subtitles automatically. Inthat case, you cannot switch off the subtitle function.
• For certain scenes, the subtitle function takes a little longer tobecome effective (due to heavy data processing). Switching onsubtitles may thus not always have an immediate effect.
• Some DVD video discs also allow you to select the language andstatus of the subtitles via the disc menu.
• See page 39 for a list of abbreviations of the available languagesand their meaning.
• The Subtitle settings are not saved internally. When you switch offthe DVD Changer or open the disc tray, the DV-C600 returns to thedefault settings. See page 34.
• When you select an option that is not available on the selected DVDvideo disc, the DV-C600 ignores your setting and goes on using thepreviously selected language, etc.
SUBTITLE
1
2
1SUBTITLEON/OFF
ENTER
DVD
CLEAR3
2SUBTITLEON/OFF
SUBTITLE

31
Getting S
tartedC
onnectionsF
unction Setup
Advanced P
laybackO
thersB
asic Playback
REMOTE CONTROLLER RC-406DV
1 2 3
5 6
7 8 9
+10 0
4
POWER
RANDOM MEMORY
REPEATA-B
SLOW
CLEAR
ENTER
DISPLAY
DISC 1 DISC 2 DISC 3
DISC 4 DISC 5 DISC 6
OPEN/ CLOSE
UP
FFPLAYFR
DOWN STOP
PAUSE/STEP
DIMMER
SUBTITLEON/OFF
RETURN
SETUPMENU
TITLE
AUDIO ANGLE SUBTITLE
ZOOM
CD MODE
DISC
NEXT SELECTION
SEARCH
DISPLAY
Using The On-Screen Display Functions
Information about a disc and its operational status can be monitored onyour TV screen. If you want to take advantage of this feature for audioCDs, please remember to connect the DV-C600 to your TV set (seepages 10 and 11) and to switch it on.Please note that the information provided on screen is only for refer-ence purposes and cannot be changed.
More Specific Information: Remaining Time and Setting StatusYou can also view the elapsed time, remaining time, andsetting status of the disc on the TV screen. Though theoperation is almost exactly the same as for requesting generalinformation, please note that you need to start playbackbefore being able to access this information.
Press the DISPLAY button duringplayback.
Each time you press the DISPLAY button,the on-screen display changes as follows.
Title : 3Elapsed Remain
Chapter : 2Chapter Repeat
0:03:08
Play
0:10:150:10:240:50:45
Subtitle : 12 ENG OffAngle : 1
Audio : 1 ENG 2CH
Bit Rate: 6.0 Mbps0 10
DVD video disc Current title numberPlayback mode
e.g.
Current chapter numberOperational status
Elapsed time and remaining time of the current titleElapsed time and remaining time of the current chapter
Current sound channel settingCurrent subtitle setting
Current angle setting
See page 39 for a list of abbreviations of the languages.
Bit Rate (Mbit/sec): Amount of picture, sound and subtitle data on the DVD video disc transferred per second. The larger the value, the more data need to be processed. Please note that the amount of data provides no information about the picture quality.
Press DISPLAY again to leave this page.
VIDEO CD/Audio CD
Track : 3Elapsed Remain
DiscTrack Repeat
0:05:12
Play
0:01:200:43:000:02:00
Playback mode
e.g.
Current track number
Operational statusElapsed time and remaining time of the current track
Elapsed time and remaining time of the disc
Press DISPLAY again to leave this page.
DISPLAY
DISPLAY
DVD VCD CD DVD VCD CD
Requesting Basic InformationThis operation allows you to view the current title number,track number, and total playing time of the disc on the TVscreen.
Stop playback and press the DISPLAYbutton.
Each time you press the DISPLAY button,the on-screen display changes as follows:
DVD video disc
Title :Chapter:
21
Stop
e.g.
Current title number
Current chapter number
Operational status
Press DISPLAY again to leave this page.
VIDEO CD/Audio CD
:Track 1 Total 0:46:30Stop
Current track numbere.g.
Operational status
Total playing time of the discPress DISPLAY again to
leave this page.

32
3
ENTER
ENTER
4
5
6 SETUP
1
SETUP
ENTER
2
REMOTE CONTROLLER RC-406DV
1 2 3
5 6
7 8 9
+10 0
4
POWER
RANDOM MEMORY
REPEATA-B
SLOW
CLEAR
ENTER
DISPLAY
DISC 1 DISC 2 DISC 3
DISC 4 DISC 5 DISC 6
OPEN/ CLOSE
UP
FFPLAYFR
DOWN STOP
PAUSE/STEP
DIMMER
SUBTITLEON/OFF
RETURN
SETUPMENU
TITLE
AUDIO ANGLE SUBTITLE
ZOOM
CD MODE
DISC
NEXT SELECTION
SEARCH
221
DVD VCD CD
Advanced Settings
The DV-C600 contains a lot more functions than have been covered sofar. Most of these functions can only be accessed via the on-screenmenu. Please note that not all available functions apply to all disc typessupported by the DV-C600. Setting the language, for instance, has noeffect for audio CDs.
Setting Procedure
Switch on your TV set.
Stop playback and press the SETUPbutton.
The following on-screen menu appears:
LANGUAGE
Disc Menu Language ENGAudio Language ENGSubtitle Language ---
On-Screen Language ENG
Use the / buttons to select themenu heading (icon) that providesaccess to the desired function.
See the next page for an overview of theavailable functions. Here is what the iconsstand for:
Language-related settings.
Picture-related settings.
Audio output settings.
Settings related to the on-screen menufunction.
General utility settings.
Use the / buttons to choose afunction below the selected icon, andconfirm by pressing the ENTER button.
Enter the desired value with the / buttons and confirm by pressing theENTER button.
For the OPERATION function, you willalso need the / buttons. The exactprocedure will be explained in thatsection.
Repeat steps 4 and 5 to change othersettings.
Press the SETUP button to switch offthe on-screen menu.
Press the RETURN button to return to theprevious display.
Notes:
• Though the SETUP button may also work during normal playback,certain functions may not be accessible. In that case, a warningmessage is displayed. Stop playback and press SETUP again to beable to select the desired function.
3
RETURN
ENTER
ENTER

33
Getting S
tartedC
onnectionsF
unction Setup
Advanced P
laybackO
thersB
asic Playback
DVD VCD CD
DVD
DVD
DVD
DVD
DVD VCD
DVD VCD CD
DVD
DVD
DVD
DVD VCD CD
DVD VCD CD
DVD
DVD VCD
DVD
DVD
DVD
Setting Details Page
On-Screen Language Allows you to select the language of the on-screendisplays.
Disc Menu Language Allows you to select the language to be used by the discmenus (menus included on the discs you are playing back).
Audio Language Allows you to select the sound track language.
Subtitle Language Allows you to select the subtitle language.
TV Shape Allows you to adapt the picture size to the aspect ratio ofyour TV.
Black Level Allows you to set the “blackness” of the screen.
Audio Out Select Allows you to select the audio outputs (digital or analog)and/or the output format of the digital audio data.
Dynamic Range Control Allows you to reduce the dynamic range of the audio data(i.e. to reduce the difference between loud and softsounds).
Karaoke Vocal Allows you to switch on or mute the vocal track of a DVDKaraoke disc.
Extended Audio Features Allows you to activate or mute the Extended Audio track forvisually impaired persons.
On-Screen Displays Allows you to decide against having the operation statusicons displayed on the TV screen.
OSD Background Color Allows you to select the background color for on-screendisplays.
Extended Subtitle Features Allows you to activate or switch off special subtitles forhearing-impaired persons.
Screen Saver Allows you to switch on or off the screen saver function.
Pause/Still Allows you to select the resolution of still pictures. (Field/Frame)
Parental Lock Allows you to set on or switch off the Parental Lockfunction.
Title Stop Allows you to switch on or off a feature that automaticallystops playback after a Title is finished.
PBC To select to playback a PBC- controllable video CD.
34
34
34
34
35
35
36
36
36
36
37
37
37
37
37
37
38
38VCD
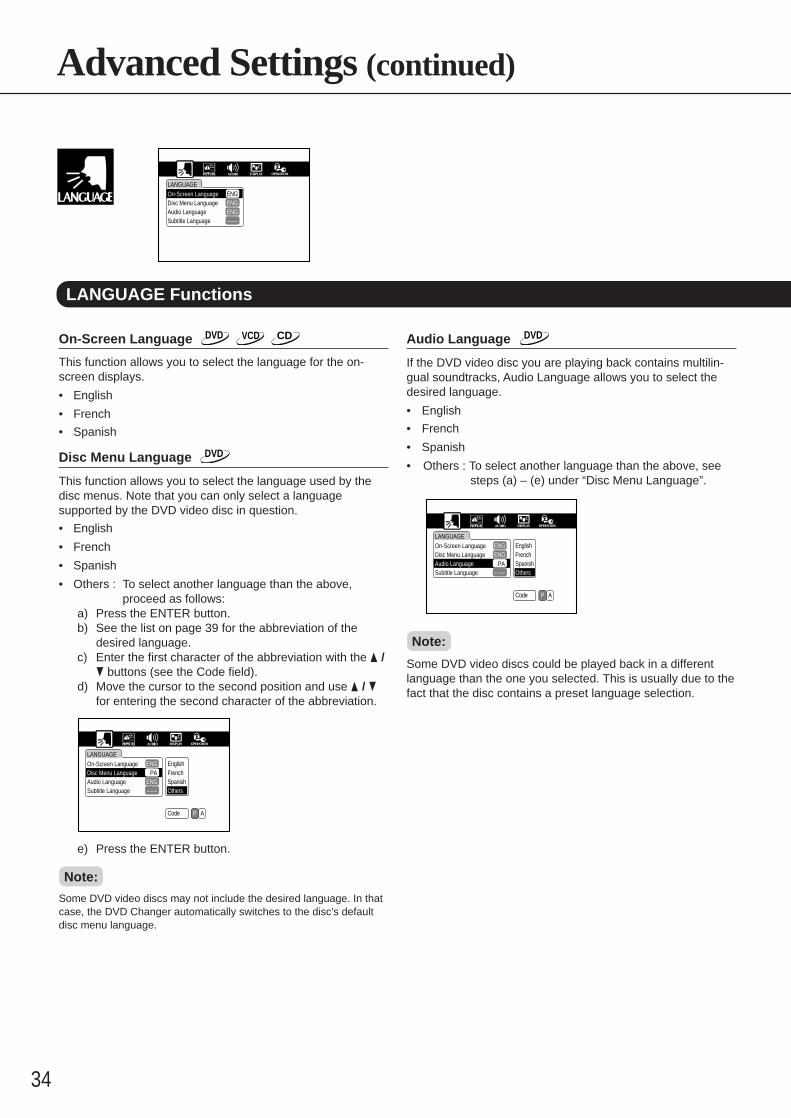
34
Advanced Settings (continued)
LANGUAGE Functions
On-Screen Language DVD VCD CD
This function allows you to select the language for the on-screen displays.
• English
• French
• Spanish
Disc Menu Language DVD
This function allows you to select the language used by thedisc menus. Note that you can only select a languagesupported by the DVD video disc in question.
• English
• French
• Spanish
• Others : To select another language than the above,proceed as follows:
a) Press the ENTER button.b) See the list on page 39 for the abbreviation of the
desired language.c) Enter the first character of the abbreviation with the /
buttons (see the Code field).d) Move the cursor to the second position and use /
for entering the second character of the abbreviation.
LANGUAGE
Disc Menu Language PAAudio Language ENG
FrenchSpanishOthersSubtitle Language ---
On-Screen Language ENG English
Code P A
e) Press the ENTER button.
Note:
Some DVD video discs may not include the desired language. In thatcase, the DVD Changer automatically switches to the disc’s defaultdisc menu language.
LANGUAGE
Disc Menu Language ENGAudio Language ENGSubtitle Language ---
On-Screen Language ENG
Audio Language DVD
If the DVD video disc you are playing back contains multilin-gual soundtracks, Audio Language allows you to select thedesired language.
• English
• French
• Spanish
• Others : To select another language than the above, seesteps (a) – (e) under “Disc Menu Language”.
LANGUAGE
Disc Menu LanguageAudio Language
ENG FrenchSpanishOthersSubtitle Language ---
On-Screen Language ENG English
Code P A
PA
Note:
Some DVD video discs could be played back in a differentlanguage than the one you selected. This is usually due to thefact that the disc contains a preset language selection.

35
Getting S
tartedC
onnectionsF
unction Setup
Advanced P
laybackO
thersB
asic Playback
PICTURE
Black Level NrmlTV Shape 4:3LB
PICTURE Settings
TV Shape DVD
This is where you can specify the shape of your TV screen.This is important for determining whether you would like tosee the whole picture, or a slightly bigger version.
4:3 Letterbox:
Select this setting if you own a standard4:3 TV set and want to see the wholepicture. In that case, maskingbars are inserted above and below thepicture.
4:3 Normal:
Select this setting for a standard 4:3 TVset if you want the picture to fill theentire screen. In that case, the left andright borders may fall outside thescreen’s scope.
16:9 Widescreen:
Select this setting for a 16:9 wide-screen TV.
Notes:
• The picture size is preset on the DVD video disc. Therefore, theplayback picture may not conform to the picture size you select.
• When you play DVD video discs that only contain 4:3 picture sizeinformation, any other TV Shape setting you may select is ignored.
• If you select “16:9 Widescreen” while your TV set is equipped with a4:3 screen, the picture will be horizontally distorted (compressed)during playback. Always set the TV Shape function according to theTV set your are using.
Black Level DVD VCD
This function allows you to optimize the black picture content(true black instead of dark gray), and hence the video quality.
Enhanced: Enhanced black level. (0 IRE)
Normal: Standard black level. (7.5 IRE)
Subtitle Language DVD
Use this function to select the subtitle language, or to switchthe subtitles off altogether.
• English
• French
• Spanish
• No Subtitle (subtitles are switched off)
• Others: To select another language than the above, seesteps (a) – (e) under “Disc Menu Language”.
LANGUAGE
Disc Menu LanguageAudio Language
ENGENG
Subtitle Language
On-Screen Language ENG
Code P A
PA
FrenchSpanishNo SubtitlesOthers
English
Notes:
• If DVD video disc contains a preset subtitle language setting, yourselection is ignored.
• Some DVD video discs allow you to change the subtitle languageonly via the disc menu. If so, press the MENU button and choosethe desired subtitle language from the disc menu.

36
Advanced Settings (continued)
AUDIO
Dynamic Range Control OnKaraoke Vocal OffExtended Audio Feature Off
Audio Out Select Bitstream
AUDIO Settings
Audio Out Select DVD VCD CD
This function allows you to select the outputs and format foraudio playback. Always select the setting that best matchesyour amplifier’s capabilities and input connectors. The“Bitstream” and “PCM” options refer to the DV-C600’s digitaloutputs. See also “Other Audio Playback Options” on page12.
Bitstream: Select this option if your amplifier is equippedwith a digital input (optical or coaxial) and aDolby Digital, DTS, MPEG1, or MPEG2decoder. The DV-C600 outputs digital audioinformation in the Bitstream format when youplay back a DVD video disc with Dolby Digital,DTS, MPEG1, or MPEG2 encoding.
Analog2Ch: Select this option if the DV-C600 is connectedto the audio inputs of your TV set, or an analoginput pair of your external amplifier. Note thateven this analog connection may allow you totake advantage of the amplifier’s Dolby ProLogic processor.
PCM: Select this option if the DV-C600 is connectedto a digital input of your amplifier and if youwould like the sound to be played back instereo (e.g. for audio CDs). If you select “PCM”,the audio data of DVD video discs with DolbyDigital, MPEG1, or MPEG2 encoding isautomatically converted to 2-channel PCM, sothat you lose the surround information. See alsothe table on page 29.
Dynamic Range Control DVD
Dynamic Range Control allows you to “compress” thedynamic range of a DVD’s sound track, so that you can lowerthe volume without losing extremely soft signals. This isespecially useful when you are watching a movie late at night.
Off: The full dynamic range is maintained.
On: Low-level signals are slightly boosted so as to remainaudible at a low volume setting.
Notes:
• This function is only available during playback of Dolby Digital-encoded DVD video discs.
• The degree of dynamic range reduction may differ depending on theDVD video disc.
Karaoke Vocal DVD
DVD Karaoke discs sometimes also contain a vocal track youprobably don’t need for Karaoke applications. That is why theDV-C600 allows you to switch the lead vocal off.
Off: The lead vocal track is muted.
On: If available on the selected DVD Karaoke disc, the leadvocal track is output.
Notes:
• The Karaoke Vocal feature is only available during playback ofDolby Digital-encoded (multi-channel) DVD Karaoke discs.
• For optimum Karaoke enjoyment, be sure to use appropriate audioequipment, such as an external amplifier.
Extended Audio Feature DVD
Some DVD video discs contain a special track that describesthe on-screen actions for visually impaired persons. Your DV-C600 is set to automatically output this track if available. If thisis not necessary, switch this function off.
Off: The Extended Audio Feature track is muted.
On: The Extended Audio Feature is active.

37
Getting S
tartedC
onnectionsF
unction Setup
Advanced P
laybackO
thersB
asic Playback
DISPLAY
OSD Background Color GrayExtended Subtitle Features OffScreen Saver On
On-Screen Displays On
OPERATION
Parental Lock Off
OnTitle StopPBC
Off
Pause/Still Auto
DISPLAY Settings
On-Screen Displays DVD VCD CD
This function allows you to activate or suppress the display ofon-screen icons that inform you about the operational status.
Off: Operational icons or messages (e.g. “Play”, “ ”) arenot displayed.
On: Operational icons or messages (e.g. “Play”, “ ”) aredisplayed on-screen.
OSD Background Color DVD VCD CD
This function allows you to select the background color for theon-screen menu.
Blue: Blue background.
Gray: Gray background.
Extended Subtitle Features DVD
Some DVD video discs contain special subtitles, an enhance-ment of closed captioning for hearing-impaired persons. TheDVD Changer automatically displays these special subtitles.
Off: The special subtitles are not displayed.
On: The special subtitles are displayed.
Screen Saver DVD
The screen saver function protects your TV screen from burn-in of images that are displayed for too long. If you also workwith a computer, you probably know how it works. The screensaver is especially useful if you often use the Pause (“still”)function and tend to forget to switch it off. See page 16.
Off: The screen saver will not blank out the screen after thedelay time has elapsed.
On: The screen saver will come on whenever necessary.
OPERATION Settings
Pause/Still DVD
This function allows you to obtain an even better quality forstill pictures. Such pictures are displayed when you pauseplayback of a DVD video disc. See also page 16.
Auto: For normal use. The image quality should besufficient for most applications.
Frame: Still pictures are clearer thanks to a higherresolution.
Parental Lock DVD
DVD video discs equipped with the Parental Lock functionallow you to decide what exactly can be viewed on your DV-C600, which is especially useful if you have children. Forexample: you could select a level where violent scenesunsuitable for children are skipped and replaced with moresuitable scenes, or prevent playback of a disc altogether.Whether the Parental Lock function actually works dependson the DVD video disc in question, because it needs tocontain the software capable of responding to this function.Parental Lock is secured by means of a 4-digit code to avoidthat your children bypass this function.Ask your dealer or rental service for details about the ParentalLock support of a given DVD video disc. Also note that themeaning of the Parental Lock levels depends on the countrywhose rating standards are used by the DVD video disc.
Off: The Parental Lock feature is not active. To select the“Off” setting, perform steps 1 and 2 below.
On: Switching on Parental Lock involves specifying thehighest level that can be viewed. You cannot justswitch this function on without selecting a level.Careful: if you only carry out steps 1 and 2, ParentalLock will be switched off. Be sure to perform steps 1 –4 below.
OPERATION
Parental Lock Off
OnTitle StopPBC
Off
Pause/Still AutoOnOff
Security Code
1. Press the ENTER button.
2. Enter the 4-digit code via the numeric buttons on theremote controller, and press the ENTER button.If you entered the wrong code, press the CLEAR buttonbefore pressing ENTER, and enter your 4-digit code again.

38
Advanced Settings (continued)
OPERATION Settings (continued)
Changing the Parental Lock level
Perform steps 2 – 4 above.
Changing the 4-digit Code
a) After selecting a level or “Off,” press the STOP button fourtimes, followed by the ENTER button.STOP STOP STOP STOP ENTER
The current 4-digit code is cleared.
b) Press the numeric buttons to enter a new 4-digit securitycode.
c) Press the ENTER button.Be sure to either memorize this code or to write down andstore it in a safe place.
Title Stop DVD
This function allows you to specify what happens when theDV-C600 reaches the end of a DVD Title.
Off: The DV-C600 continues after playback of a Title iscompleted. Selecting this option also changes thebehavior of the DOWN and UP buttons. See“Selecting the Next/Previous Chapter or Track” onpage 19.
On: The DV-C600 stops after playback of a title is com-pleted.
PBC (Playback Control) VCD
Off: The menu screen of the selected Video CD (if avail-able) is not displayed.
On: The menu screen of a Video CD with PBC functionalityis displayed on screen.
3. Press the / buttons to select the country whosestandards were used to rate the DVD video disc.
See the information supplied with the DVD for details.
Level6Level5
Level3Level4
Level2Level1
Level7Level8Viewable
4. Press the / buttons to select the Parental Locklevel, then press the ENTER button.
Level6Level5
Level3Level4
Level2Level1
Level7Level8Locked
Viewable
It is now impossible to play back DVD video discs rated higherthan the selected level. For example, when you select level 7(“Viewable”), discs rated higher than level 7 are locked out(“Locked”) and cannot be played back.
The Parental Lock level is equivalent to the following USAmovie ratings:
Level 7: NC-17
Level 6: R
Level 4: PG 13
Level 3: PG
Level 1: G
The parental lock levels for “Canada” are included for futureuse. Since they are different from the US ratings, carefullycheck what they correspond to before buying new DVD videodiscs with the Canadian Parental Lock system as theybecome available.

39
Getting S
tartedC
onnectionsF
unction Setup
Advanced P
laybackO
thersB
asic Playback
Abbreviationof the Language
Language
––– No alternatelanguage
CHI (ZH) ChineseDUT (NL) DutchENG (EN) EnglishFRE (FR) FrenchGER (DE) German
ITA (IT) ItalianJPN (JA) JapaneseKOR (KO) KoreanMAY (MS) MalaySPA (ES) Spanish
AA AfarAB AbkhazianAF AfrikaansAM AmharicAR ArabicAS AssameseAY AymaraAZ AzerbaijaniBA BashkirBE BelorussianBG BulgarianBH BihariBI BislamaBN Bengali,BanglaBO TibetanBR BretonCA CatalanCO CorsicanCS CzechCY WelshDA DanishDZ BhutaniEL Greek
Abbreviationof the Language
Language
EO EsperantoET EstonianEU BasqueFA PersianFI FinnishFJ FijiFO FaroeseFY FrisianGA IrishGD Scottish GaelicGL GalicianGN GuaraniGU GujaratiHA HausaHI HindiHR CroatianHU HungarianHY ArmenianIA InterlinguaIE InterlingueIK InupiakIN IndonesianIS IcelandicIW HebrewJI Yiddish
JW JavaneseKA GeorgianKK KazakhKL GreenlandicKM CambodianKN KannadaKS KashmiriKU KurdishKY KirghizLA Latin
Abbreviationof the Language
Language
LN LingalaLO LaotianLT LithuanianLV Latvian,LettishMG MalagasyMI MaoriMK MacedonianML MalayalamMN MongolianMO MoldavianMR MarathiMT MalteseMY BurmeseNA NauruNE NepaliNO NorwegianOC OccitanOM (Afan) OromoOR OriyaPA PanjabiPL PolishPS Pashto,PushtoPT PortugueseQU QuechuaRM Rhaeto-RomanceRN KirundiRO RomanianRU RussianRW KinyarwandaSA SanskritSD SindhiSG SangoSH Serbo-CroatianSI SinghaleseSK Slovak
Abbreviationof the Language
Language
SL SlovenianSM SamoanSN ShonaSO SomaliSQ AlbanianSR SerbianSS SiswatiST SesothoSU SudaneseSV SwedishSW SwahiliTA TamilTE TeluguTG TajikTH ThaiTI TigrinyaTK TurkmenTL TagalogTN SetswanaTO TonganTR TurkishTS TsongaTT TatarTW TwiUK UkrainianUR UrduUZ UzbekVI VietnameseVO VolapükWO WolofXH XhosaYO YorubaZU Zulu
Table of Languages
Table of Languages and Their Abbreviations
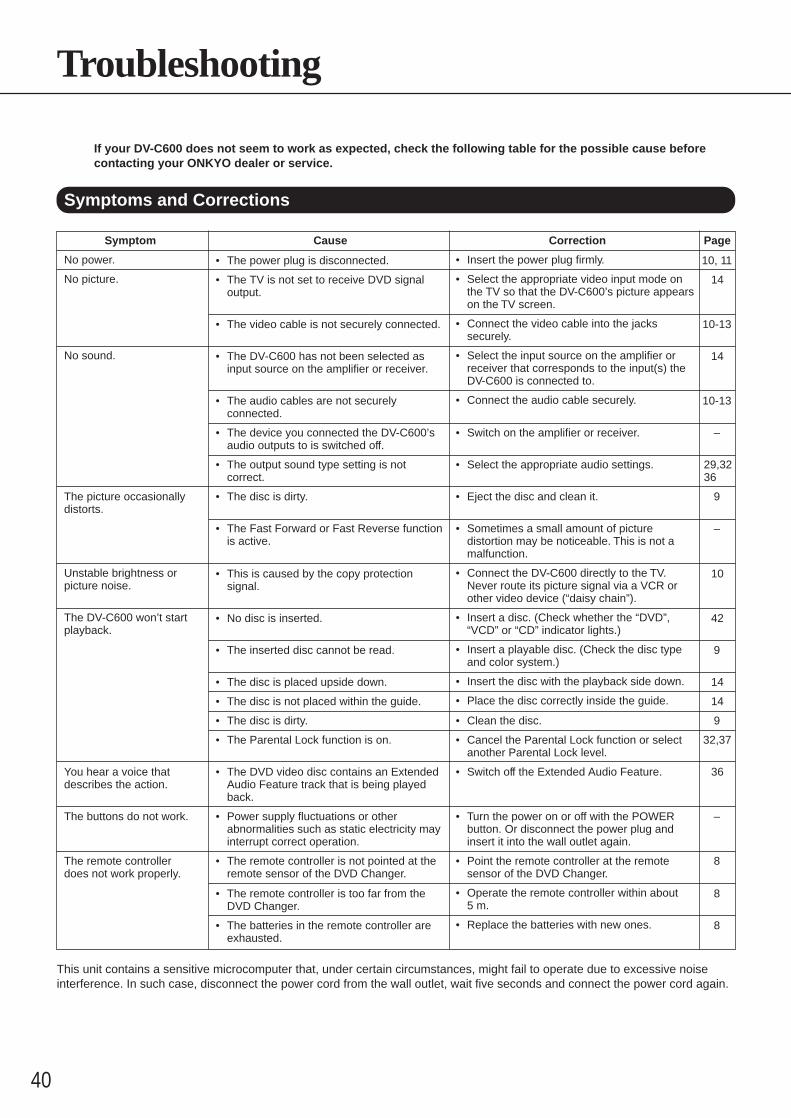
40
Symptom
No power.
No picture.
No sound.
The picture occasionallydistorts.
Unstable brightness orpicture noise.
The DV-C600 won’t startplayback.
You hear a voice thatdescribes the action.
The buttons do not work.
The remote controllerdoes not work properly.
Troubleshooting
If your DV-C600 does not seem to work as expected, check the following table for the possible cause beforecontacting your ONKYO dealer or service.
Symptoms and Corrections
This unit contains a sensitive microcomputer that, under certain circumstances, might fail to operate due to excessive noiseinterference. In such case, disconnect the power cord from the wall outlet, wait five seconds and connect the power cord again.
Cause
• The power plug is disconnected.
• The TV is not set to receive DVD signaloutput.
• The video cable is not securely connected.
• The DV-C600 has not been selected asinput source on the amplifier or receiver.
• The audio cables are not securelyconnected.
• The device you connected the DV-C600’saudio outputs to is switched off.
• The output sound type setting is notcorrect.
• The disc is dirty.
• The Fast Forward or Fast Reverse functionis active.
• This is caused by the copy protectionsignal.
• No disc is inserted.
• The inserted disc cannot be read.
• The disc is placed upside down.
• The disc is not placed within the guide.
• The disc is dirty.
• The Parental Lock function is on.
• The DVD video disc contains an ExtendedAudio Feature track that is being playedback.
• Power supply fluctuations or otherabnormalities such as static electricity mayinterrupt correct operation.
• The remote controller is not pointed at theremote sensor of the DVD Changer.
• The remote controller is too far from theDVD Changer.
• The batteries in the remote controller areexhausted.
Correction
• Insert the power plug firmly.
• Select the appropriate video input mode onthe TV so that the DV-C600’s picture appearson the TV screen.
• Connect the video cable into the jackssecurely.
• Select the input source on the amplifier orreceiver that corresponds to the input(s) theDV-C600 is connected to.
• Connect the audio cable securely.
• Switch on the amplifier or receiver.
• Select the appropriate audio settings.
• Eject the disc and clean it.
• Sometimes a small amount of picturedistortion may be noticeable. This is not amalfunction.
• Connect the DV-C600 directly to the TV.Never route its picture signal via a VCR orother video device (“daisy chain”).
• Insert a disc. (Check whether the “DVD”,“VCD” or “CD” indicator lights.)
• Insert a playable disc. (Check the disc typeand color system.)
• Insert the disc with the playback side down.
• Place the disc correctly inside the guide.
• Clean the disc.
• Cancel the Parental Lock function or selectanother Parental Lock level.
• Switch off the Extended Audio Feature.
• Turn the power on or off with the POWERbutton. Or disconnect the power plug andinsert it into the wall outlet again.
• Point the remote controller at the remotesensor of the DVD Changer.
• Operate the remote controller within about5 m.
• Replace the batteries with new ones.
Page
10, 11
14
10-13
14
10-13
–
29,3236
9
–
10
42
9
14
14
9
32,37
36
–
8
8
8

41
Getting S
tartedC
onnectionsF
unction Setup
Advanced P
laybackO
thersB
asic Playback
Identification of Controls
See the pages in [ ] for details.
Front Panel
OPEN/CLOSE PLAY
POWER
OFF
STOPPAUSE
DISC 1 DISC 2 DISC 3 DISC 4 DISC 5 DISC 6
NEXT SELECTION
REPEAT
DVD / VIDEO CD / CD CD CHANGER DV-C600
ON
DIMMER DISPLAY DISC SKIP
DISC1 2 3 4 5 6
STANDBY/ON
DIRECT DIGIT AL ATHP
PAUSE button[16]
NEXT SELECTION button [24]
FR/FF buttons [16]
Up/Down buttons [19]
DVD display [42]
Disc tray [14]
POWER button [14]
STANDBY/ONbutton
[14]
STANDBY/ONindicator
[14]
DISC1-6 buttons [14, 15]
STOP button[16]
PLAY button[15-20, 22, 26]
OPEN/CLOSE button [14]
DISC SKIP button [14, 24]
REPEAT button [21]
DIMMER button [42]
DISPLAY button [31]
Disc tray indicators [14]
Rear Panel
L
R
COMPONENTY C B C R
VIDEO OUTPUT
VIDEOS VIDEO
ANALOGOUTPUT
OPTICALCOAXIAL
REMOTECONTROL
D I G I TALOUTPUT
REGIONAL CODE 1
REMOTE CONTROL jacks[41]
S VIDEO OUT jack [10]COMPONENTVIDEO OUT jacks
Y•CB•CR [11]
ANALOG OUTPUT (L/R) jacks
[10, 11, 12]
VIDEO OUT jack [10]
DIGITAL OPTICAL AUDIO OUT terminal [12, 13]
DIGITAL COAXIAL AUDIO OUT jack [12, 13]
Power plug
Power cord
Connections for System Remote Controller ( )If you own several -compatible ONKYO devices, be sure to connect their jacks to one another. This will allow you to usethe remote controller of the main component (e.g. the amplifier) to control the entire system.
1. To use this DVD Changer with an amplifier (or receiver), cassette tape deck, and tuner with the symbol, insert the remotecontroller cable plugs into the REMOTE CONTROLLER jacks.
2. As the connection order of the bus is unimportant, you could also connect one of the DV-C600’s REMOTE CONTROL-LER jacks to the tuner, the cassette tape deck, amplifier/receiver, or the compact disc player.
3. When using the remote controller of an -equipped ONKYO amplifier (or receiver) to operate the entire bus, the remotecontroller must be pointed at the sensor of the amplifier (or receiver).
Notes:
• The upper and lower REMOTE CONTROLLER jacks have the same function.• Remote controller operation is not possible when only the remote controller cable is connected — the audio jacks must also be connected.• One remote controller cable equipped with a 1/8" (3.5mm) diameter miniature two-conductor phone plug is included with the DV-C600 and
with every ONKYO tuner, compact disc player or cassette tape deck with the symbol.

42
Operating status indicator
Chapter number indicator
NEXT indicator
CD/VCD indicator
DVD indicator
Total playing time/remaining time/Memory indictors
Angle icon indicator
DISC number indicatorTITLE, TR number indicator
REPEAT indicator
• Pressing of the DIMMER buttonchanges the brightness of the Display.
Normal Dimmed
The indicators vary depending on the kinds of discs you play.
DVD Video disc
• When closing the disc tray:Example
Total number of titles
• During playback:Example
Playing chapter 3 in title 2
Elapsed time of the current title
Some DVD video discs may not display thechapter numbers or elapsed time.
DVD Display
VIDEO CD
• When closing the disc tray:Example
Total number of tracks
Total playing time of the disc
• During playback:Example
Playing track 6 Elapsed time of the current title
Some VIDEO CDs may not display the tracknumbers or elapsed time.
Audio CD
• When closing the disc tray:Example
Total number of tracks
Total playing time of the disc
• During playback:Example
Playing track 6 Elapsed time of the current title
Identification of Controls (continued)

43
Getting S
tartedC
onnectionsF
unction Setup
Advanced P
laybackO
thersB
asic Playback
Most steps in this manual need to be performed using the supplied remote controller. That is why the functionsof the remote controller’s buttons are explained in the relative chapters and sections. See the pages in [ ] fordetails.
Remote Controller
POWER
RANDOM MEMORY
REPEATA-B
SLOW
CLEAR
ENTER
DISPLAY
DISC 1 DISC 2 DISC 3
DISC 4 DISC 5 DISC 6
REMOTE CONTROLLER RC-406DV
OPEN/ CLOSE
UP
FFPLAYFR
DOWN STOP
PAUSE/STEP
DIMMER
SUBTITLEON/OFF
RETURN
SETUPMENU
TITLE
AUDIO ANGLE SUBTITLE
ZOOM
CD MODE
DISC
NEXT SELECTION
1 2 3
5 6
7 8 9
+10 0
4
SEARCH
OPEN/CLOSE button [14]
PAUSE/STEP button [16]
SLOW button [17]
SETUP button [32]
POWER button [14]
FR button [16]
FF button [16]PLAY button [15-20,22,26]
DOWN button [19]
STOP button [16, 17, 38] UP button [19]
MENU button* [15]
ENTER button [18, 22, 32, 38]TITLE button [18] RETURN button [27, 32]
AUDIO button [28]
ANGLE button [27]
SUBTITLE button [30]
Numeric buttons [18, 22, 24]
SUBTITLE ON/OFF button [30]
RANDOM button [26]MEMORY button [22]
ZOOM button [27]CLEAR button [21, 26-28, 30]
A-B button [21]REPEAT button [21]
SEARCH button [18-20, 26]
DISPLAY button [31]
CD MODE button [25] DIMMER button [42]
DISC number buttons [14-15, 24]
NEXT SELECTION button [24]
/ / / buttons [15-16,18,22-23, 27-28, 30, 32, 34-38
* MENU buttonUse the MENU button to displaythe menu screen of the currentlyselected DVD video disc. See“Locating a Title Using the TitleMenu” on page 18 for details.

Sales & Product Planning Div. : 2-1, Nisshin-cho, Neyagawa-shi, OSAKA 572-8540, JAPANTel: 072-831-8111 Fax: 072-833-5222 http://www.onkyo-intl.com
ONKYO U.S.A. CORPORATION18 Park Way, Upper Saddle River, N.J. 07458, U.S.A.Tel: 201-785-2600 Fax: 201-785-2650 http://www.onkyousa.com
ONKYO EUROPE ELECTRONICS GmbHLiegnitzerstrasse 6, 82194 Groebenzell, GERMANYTel: +49-8142-4401-0 Fax: +49-8142-4401-555 http://www.onkyo.net
ONKYO CHINA LIMITEDUnits 2102-2107, Metroplaza Tower I, 223 Hing Fong Road, Kwai Chung,N.T., HONG KONG Tel: 852-2429-3118 Fax: 852-2428-9039 http://www.onkyochina.com
E
http://www.onkyo.co.jp/HOMEPAGE
SN 29342782 I9907-1
Specifications
DVD Changer/Outputs
DVD Changer
Power supply AC 120 V, 60 Hz
Power consumption 19 W
Weight 7.0 kg
External dimensions 435 X 121 X 433 mm (W/H/D)
Signal system Standard NTSC
Laser Semiconductor laser, wavelength 650 nm
Frequency range (digital audio) DVD linear sound : 48 kHz sampling 4 Hz to 22 kHz96 kHz sampling 4 Hz to 44 kHz
Audio CD : 4 Hz to 20 kHz
Signal-to-noise ratio (digital audio) More than 96 dB (EIAJ)
Audio dynamic range (digital audio) More than 90 dB (EIAJ)
Harmonic distortion (digital audio) Less than 0.01 %
Wow and flutter Below measurable level (less than ±0.001 % (W.PEAK)) (EIAJ)
Operating conditions Temperature: 5˚C to 35˚C (41 to 95 degrees), Operation status: Horizontal
Outputs
Video output 1.0 V (p-p), 75 Ω, negative sync., pin jack X 1
S video output (Y) 1.0 V (p-p), 75 Ω, negative sync., Mini DIN 4-pin X 1(C) 0.286 V (p-p), 75 Ω
Component Video output (Y) 1.0 V (p-p), 75 Ω, negative sync., pin jack X 1(Cb)/(Cr) 0.7 V (p-p), 75 Ω
Digital Audio output (optical) Optical connector X 1
Digital Audio output (coaxial) 0.5 V (p-p), 75 Ω, pin jack X 1
Audio output (analog audio) 2.0 V (rms), 470 Ω, pin jack (L, R) X 1
• Design and specifications are subject to change without notice.