duraflo® section 077200 roof vents · weather protection while improving ventilation in high wind...
TRANSCRIPT

DU
RAFL
O®
SEC
TIO
N 0
7720
0 R
OO
F VE
NTS
W E K N O W V E N T I L A T I O N
Effective Date: Jan. 1, 2016

- 2 -
Extreme weather conditions across the country has increased the demand for a weather resistant vent. Duraflo® has developed the WeatherPRO® Series line of roof vents, which are available now through your local distributor or retail store.
With the WeatherPRO® Series, you no longer need to worry about extreme weather. Designed to allow for high volumes of airflow, while providing excellent defence against weather infiltration, the patented WeatherPRO® internal baffles deflect water and snow allowing for harmless draining out the drainage openings. The WeatherPRO® series also incorporates a patent pending moisture control system which directs precipitation away from the vent openings.
Combining manufacturing quality, with Duraflo® WeatherPRO® technology, and a patent pending moisture control system, will ensure the WeatherPRO® Series is the first choice when weather infiltration is an issue.

- 3 -
Injection molded from pure, high grade polypropylene with premium UV inhibitor additives that blocks harmful UV Rays.
• Over 15 years of accelerated weathering testing• Customized UV inhibitor package in all molded products• All colours contain UV inhibitors• CSA evaluated
Evaluated and passed based on the following criteria:• ASTM G 155 Accelerated Weathering• ASTM D 638 Tensile Strength Difference • ASTM D 2843 Smoke Density Rating • ASTM D 635 Rate of Burning
Material & UV Protection
Material - Cold Impact Tested
WeatherPRO® Upward Venting
The solid sidewalls and upward venting design behind the WeatherPRO® vents have been engineered to increase weather protection while improving ventilation in high wind areas. The solid sidewalls work in part with the interior baffles, providing the first line of defense against driving rain and snow. The solid sidewalls also act to push wind up and over the cap of the vent, as opposed to under, like a traditional roof vent. This airflow over the cap of the vent creates negative pressure to draw air from the attic.
The WeatherPRO® line of vents are manufactured from all virgin polypropylene allowing them to withstand the most extreme climates. The material used in manufacturing the WeatherPRO® Series is cold impact tested at -40 degrees. The material remains functional, flexible and resilient to damage even when installed with a nail gun.
UV Protected Polypropylene
0.06” (1.52 mm)
0.009” (0.229 mm)
UV Rays are blocked
after only .009”
(0.229 mm)
Interior baffle shield
Interior baffle shield Interior baffle shield Interior baffle shields

- 4 -
DESCRIPTION PART # SIZE - IMPERIAL
SIZE - METRIC
Black 60PRO150BL 21-1/8”
x 21-1/8” x 22”
536 mm x 536 mm x 559 mm
Brown 60PRO150BR
Grey 60PRO150G
Weatherwood 60PRO150WW
DESCRIPTION PART # SIZE - IMPERIAL
SIZE - METRIC
Black 60PRO140BL 21-1/8”
x 21-1/8” x 19-1/2”
536 mm x 536 mm x 495 mm
Brown 60PRO140BR
Grey 60PRO140G
Weatherwood 60PRO140WW
DESCRIPTION PART # SIZE - IMPERIAL
SIZE - METRIC
Black 60PRO130BL 21-1/8”
x 21-1/8” x 17”
536 mm x 536 mm x 432 mm
Brown 60PRO130BR
Grey 60PRO130G
Weatherwood 60PRO130WW
STATIC VENTS - PROVentilator, 1, 2 & 3 Tier Models
3 Tier 60PRO150 Model: 130 sq-in / 839 sq-cm2 Tier 60PRO140 Model: 95 sq-in / 613 sq-cm1 Tier 60PRO130 Model: 48 sq-in / 310 sq-cm
• Engineered to resist denting, peeling, extreme heat and cold impact to -40
Black, Brown, Weatherwood, Grey
WeatherPRO’s patented internal baffles deflect water and snow, allowing for harmless draining out the drainage openings. Designed to allow high airflow while providing excellent defense against weather infiltration.
Description:
Net Free Venting Area
Approved Certifications
Durability
Colors Available
Weather Protection
Models: WeatherPRO® PROVentilators: 3 Tier #60PRO150 2 Tier #60PRO140 1 Tier #60PRO130
Multiple pivot stop points for quick
leveling
Molded in screw guides
External Drip tray allows moisture to
drain harmlessly away from vent openings
Easily adjust to roof pitch with front
and back locking tabs
Large top cap improves
appearance of the roof line
Unique baffle system wards off
wind driven snow and rain
• CSA certified - Plastic Type B roof vents, for installation on sloping surfaces• Miami Dade High Velocity Hurricane Zone certified
Model Heights: 21-1/8”
20”
19-7/8”
21-1/8”
22”19-1/2” 17”
3 Tier 2 Tier 1 Tier
3 Tier, 2 Tier & 1 Tier3, 2 or 1 Tier models
• One 3 Tier Model will ventilate 1000 - 1200 sq. ft. of attic space (approx) • One 2 Tier Model will ventilate 400 - 500 sq. ft. of attic space (approx)• One 1 Tier Model will ventilate 200 - 300 sq. ft. of attic space (approx)• Patented internal weather baffles• The chimney style design allows the PRO Ventilator to harness wind energy and create pressure variances that powerfully draw air out from within the attic space.• Roof pitch range 3/12 – 12/12• Injection molded from pure, high grade polypropylene with premium UV inhibitors• Lightweight , no-assembly design makes for easy handling. Setting the pitch is quick and simple with centralized pivot points, built-in adjustment tabs and pitch stops.
CommonDimensions:

- 5 -
Net Free Venting Area
TURBINE VENTS - PROTURBO
DESCRIPTION PART # SIZE IMPERIAL METRIC
Black 60PRO117BL 17-1/2” x 20” x 16-1/4” 445mm x 508mm x 413mm
Brown 60PRO117BR 17-1/2” x 20” x 16-1/4” 445mm x 508mm x 413mm
Weatherwood 60PRO117WW 17-1/2” x 20” x 16-1/4” 445mm x 508mm x 413mm
Grey 60PRO117G 17-1/2” x 20” x 16-1/4” 445mm x 508mm x 413mm
• No internal or external moving parts – requires no maintenance• One Turbo will ventilate 1000 sq ft (93 sq. meters) of attic space (approx) – regardless of wind speed• Roof pitch range from 3/12 to 12/12• Large flashing allows for easy installation• Injection molded from pure, high grade polypropylene with premium UV inhibitors• Available as a full unit (including base) or as replacement top only• Lightweight , no-assembly design makes for easy handling. Setting the pitch is quick and simple with centralized pivot points, built-in adjustment tabs and pitch stops.
117 sq-in / 755 sq-cm
• CSA certified - Plastic Type B roof vents, for installation on sloping surfaces• Miami Dade High Velocity Hurricane Zone certified
• Engineered to resist denting, peeling, extreme heat and cold impact to -40
Black, Brown, Weatherwood, Grey
WeatherPRO’s patented internal baffles deflect water and snow, allowing for harmless draining out the drainage openings. Designed to allow high airflow while providing excellent defense against weather infiltration.
Net Free Venting Area
Approved Certifications
Durability
Colors Available
Weather Protection
Model: WeatherPRO® PROTurbo # 60PRO117
Pivoting top with locking pitch guide tabs – 3/12 to 12/12
Unique baffle system wards
off wind driven snow and rain
Cold impact resistant to -40
Crush, Dent & UV resistant
polypropylene
117 Sq. In. Net Free
Venting Area
17-1/2” 17-1/2”
16-1/4”
3-3/4”
20”21”
21”
A
CD
A
B
3/12 - 12/12
3/12 - 12/12
(580mm)
(95mm)
(445mm)(445mm)
(413mm)
(533mm)
Description:
Dimensions:

- 6 -
24” (610 mm)
19” (483 mm)
18” (457 mm)
12” (309 mm)
3-1/2” (89 mm)
DESCRIPTION PART # SIZE IMPERIAL METRIC
Black 60PRO50SLBL 18” x 24” x 3-1/2” 457 mm x 610 mm x 89 mm
Brown 60PRO50SLBR 18” x 24” x 3-1/2” 457 mm x 610 mm x 89 mm
Grey 60PRO50SLG 18” x 24” x 3-1/2” 457 mm x 610 mm x 89 mm
Weatherwood 60PRO50SLWW 18” x 24” x 3-1/2” 457 mm x 610 mm x 89 mm
2.Drainage openings
4.Outer vertical
walls5.
Protected vent opening
Moisture drip channels
1.Air exits over the
vent not under
3.Diverts run-off
around cap
STATIC VENTS - PROSlantBack
• Patented internal weather baffles• Five PRO SlantBack’s will ventilate 1000 sq. ft. (93 sq. meters) of attic space (approx)• Roof pitch range 3/12 – 14/12• Injection molded from pure, high grade polypropylene with premium UV inhibitors• Top venting design uses chimney effect to channel moist air away from roof eliminating shingle staining• Vent cap design with built in weeping holes eliminates bird nesting and water pooling• Unique design allows it to be used as an intake where soffit ventilation is limited or not available
50 sq-in / 322 sq-cm
• CSA certified – Plastic Type B roof vents, for installation on sloping surfaces• Miami Dade High Velocity Hurricane Zone certified NOA# 11-0930.08
• Engineered to resist denting, peeling, extreme heat and cold impact to -40
Black, Brown, Weatherwood, Grey
WeatherPRO’s patented internal baffles deflect water and snow, allowing for harmless draining out the drainage openings. Designed to allow high airflow while providing excellent defense against weather infiltration.
Description:
Net Free Venting Area
Approved Certifications
Durability
Colors Available
Weather Protection
Dimensions:
Model: WeatherPRO® SlantBack, # 60PRO50SL

- 7 -
Net Free Venting Area 2.Drainage openings
1.Air exits over the vent not under
18-1/2”(470 mm)
18-1/2”(470 mm)
4-1/2”(114 mm)
DESCRIPTION PART # SIZE IMPERIAL METRIC
Black 60PRO50BL 18-1/2” x 18-1/2” x 4-1/2” 470 mm x 470 mm x 114 mm
Brown 60PRO50BR 18-1/2” x 18-1/2” x 4-1/2” 470 mm x 470 mm x 114 mm
Grey 60PRO50G 18-1/2” x 18-1/2” x 4-1/2” 470 mm x 470 mm x 114 mm
White 60PRO50W 18-1/2” x 18-1/2” x 4-1/2” 470 mm x 470 mm x 114 mm
Weatherwood 60PRO50WW 18-1/2” x 18-1/2” x 4-1/2” 470 mm x 470 mm x 114 mm
STATIC VENTS - PRO50
• Patented internal weather baffles• Five WeatherPRO PRO50’s will ventilate 1000 sq. ft. (93 sq. meters) of attic space (approx)• Roof pitch range 3/12 – 14/12• Injection molded from pure, high grade polypropylene with premium UV inhibitors• Top venting design uses chimney effect to channel moist air away from roof eliminating shingle staining• Vent cap design with built in weeping holes eliminates bird nesting and water pooling
50 sq-in / 322 sq-cm
• CSA certified – Plastic Type B roof vents, for installation on sloping surfaces• Miami Dade High Velocity Hurricane Zone certified: NOA 04.0401.01
• Engineered to resist denting, peeling, extreme heat and cold impact to -40
Black, Brown, Weatherwood, Gray, White
WeatherPRO’s patented internal baffles deflect water and snow, allowing for harmless draining out the drainage openings. Designed to allow high airflow while providing excellent defense against weather infiltration.
Description:
Net Free Venting Area
Approved Certifications
Durability
Colors Available
Weather Protection
Dimensions:
Model: WeatherPRO® PRO50, model # 60PRO50
3.Diverts run-off
around cap

- 8 -
STATIC VENTS - PRO75
5-1/2”(140mm)
217/8”(555.63mm)
15.-7/8”(403.23mm)
21-7/8”(556mm)
21-7/8”(555.63mm)
21-7/8”(556mm)
15-7/8”(403mm)
15-7/8”(403.23mm)
15-7/8”(403mm)
DESCRIPTION PART # SIZE IMPERIAL METRIC
Black 60PRO75BL 21-7/8” x 21-7/8” x 5-1/2” 556 mm x 556 mm x 140 mmBrown 60PRO75BR 21-7/8” x 21-7/8” x 5-1/2” 556 mm x 556 mm x 140 mmGrey 60PRO75G 21-7/8” x 21-7/8” x 5-1/2” 556 mm x 556 mm x 140 mm
White 60PRO75W 21-7/8” x 21-7/8” x 5-1/2” 556 mm x 556 mm x 140 mmWeatherwood 60PRO75WW 21-7/8” x 21-7/8” x 5-1/2” 556 mm x 556 mm x 140 mm
• Patented internal weather baffles• Four PRO75’s will ventilate 1000 sq ft (93 sq. meters) of attic space (approx)• Roof pitch range 3/12 – 12/12• Injection molded from pure, high grade polypropylene with premium UV inhibitors• Top venting design uses chimney effect to channel moist air away from roof eliminating shingle staining• Vent cap design with built in weeping holes eliminates bird nesting and water pooling
75 sq-in / 483 sq-cm
• CSA certified - Plastic Type B roof vents, for installation on sloping surfaces
• Engineered to resist denting, peeling, extreme heat and cold impact to -40
Black, Brown, Weatherwood, Grey, White
WeatherPRO’s patented internal baffles deflect water and snow, allowing for harmless draining out the drainage openings. Designed to allow high airflow while providing excellent defense against weather infiltration.
Description:
Net Free Venting Area
Approved Certifications
Durability
Colors Available
Weather Protection
Dimensions:
2.Drainage openings
5.Protected vent
opening
Moisture drip channels
1.Air exits over the
vent not under
3.Diverts run-off
around cap4.
Outer vertical walls
Model: WeatherPRO® PRO75, model # 60PRO75

- 9 -
AirFoilDesigned Edge
(1219mm)4 Ft.
4 Ft.
DESCRIPTION PART # AIMPERIAL METRIC
Metric - Black 6072METBL 12-7/8” 327mm
Metric - Brown 6072METBR 12-7/8” 327mm
Metric - Weatherwood 6072METWW 12-7/8” 327mm
Imperial - Black 6073BL 11-5/8” 295mm
Imperial - Brown 6073BR 11-5/8” 295mm
Imperial - Weatherwood 6073WW 11-5/8” 295mm
CONTINUOUS RIDGE VENTS - WeatherPRO® Ridge
• Engineered with AirFoil Technology – based on the Bernoulli principle to maximize air lift• Four pieces of WeatherPRO® PRORidge vent will ventilate 1000 sq. ft. (93 sq. meters) of attic space (approx)• Patented internal weather baffle system• Roof pitch range 3/12 – 12/12• 4 foot sections, 12 pieces per carton• Latch connectors on each end, built-in end caps every 3 in/7.6 cm• Injection molded from pure, high grade polypropylene with premium UV inhibitors• Available for use with either Metric or Imperial size shingles
18.3 sq-in per linear foot (387 sq-cm per linear meter)
• CSA certified - Plastic Type C ridge vent, for installation on roof ridge
• Engineered to resist denting, peeling, extreme heat and cold impact to -40
Black, Brown, Weatherwood
WeatherPRO’s patented internal baffles deflect water and snow, allowing for harmless draining out the drainage openings. Designed to allow high airflow while providing excellent defense against weather infiltration.
Description:
Approved Certifications
Durability
Colors Available
Weather Protection
Dimensions:
Models: WeatherPRO PRORidge, • Metric - 6072MET • Imperial - 6073
Net Free Venting Area
Net Free Venting Area
- 10 -
Ventilation Calculator
Ventilation requirements for your home
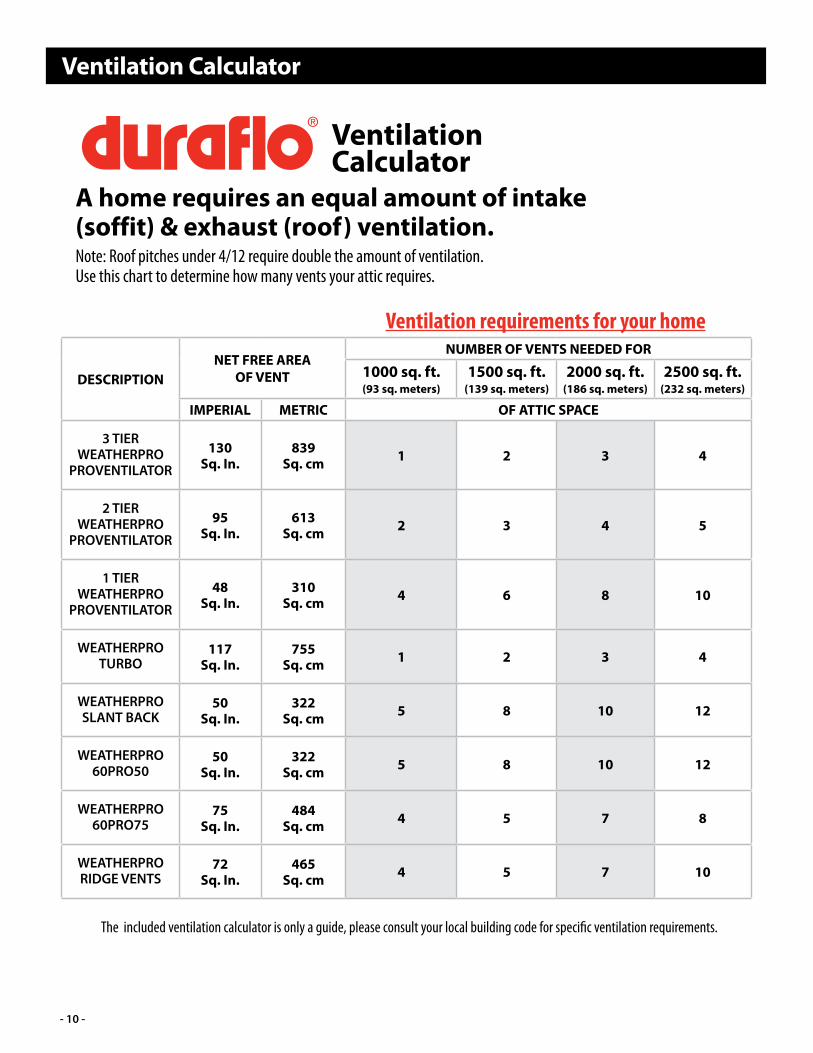
The included ventilation calculator is only a guide, please consult your local building code for specific ventilation requirements.
A home requires an equal amount of intake (soffit) & exhaust (roof) ventilation.Note: Roof pitches under 4/12 require double the amount of ventilation. Use this chart to determine how many vents your attic requires.
Ventilation Calculator
DESCRIPTIONNET FREE AREA
OF VENT
NUMBER OF VENTS NEEDED FOR
1000 sq. ft. (93 sq. meters)
1500 sq. ft. (139 sq. meters)
2000 sq. ft. (186 sq. meters)
2500 sq. ft. (232 sq. meters)
IMPERIAL METRIC OF ATTIC SPACE
3 TIERWEATHERPRO
PROVENTILATOR
130 Sq. In.
839 Sq. cm 1 2 3 4
2 TIERWEATHERPRO
PROVENTILATOR
95 Sq. In.
613Sq. cm 2 3 4 5
1 TIERWEATHERPRO
PROVENTILATOR
48 Sq. In.
310 Sq. cm 4 6 8 10
WEATHERPRO TURBO
117 Sq. In.
755 Sq. cm 1 2 3 4
WEATHERPRO SLANT BACK
50 Sq. In.
322 Sq. cm 5 8 10 12
WEATHERPRO 60PRO50
50 Sq. In.
322 Sq. cm 5 8 10 12
WEATHERPRO 60PRO75
75 Sq. In.
484 Sq. cm 4 5 7 8
WEATHERPRO RIDGE VENTS
72 Sq. In.
465 Sq. cm 4 5 7 10

- 11 -
The included ventilation calculator is only a guide, please consult your local building code for specific ventilation requirements.
DESCRIPTIONNET FREE AREA
OF VENT
NUMBER OF VENTS NEEDED FOR
1000 sq. ft. (93 sq. meters)
1500 sq. ft. (139 sq. meters)
2000 sq. ft. (186 sq. meters)
2500 sq. ft. (232 sq. meters)
IMPERIAL METRIC OF ATTIC SPACE
3 TIERWEATHERPRO
PROVENTILATOR
130 Sq. In.
839 Sq. cm 1 2 3 4
2 TIERWEATHERPRO
PROVENTILATOR
95 Sq. In.
613Sq. cm 2 3 4 5
1 TIERWEATHERPRO
PROVENTILATOR
48 Sq. In.
310 Sq. cm 4 6 8 10
WEATHERPRO TURBO
117 Sq. In.
755 Sq. cm 1 2 3 4
WEATHERPRO SLANT BACK
50 Sq. In.
322 Sq. cm 5 8 10 12
WEATHERPRO 60PRO50
50 Sq. In.
322 Sq. cm 5 8 10 12
WEATHERPRO 60PRO75
75 Sq. In.
484 Sq. cm 4 5 7 8
WEATHERPRO RIDGE VENTS
72 Sq. In.
465 Sq. cm 4 5 7 10
INSTALLATION - PROVentilator, 1, 2 & 3 Tier Models
4. Using a 1/2“ (1.3 cm) bead, apply a generous amount of construction sealant to the base of the vent.
4.
Note: Use non-petroleum based sealants only. The use of petroleum based sealants may void any manufactures product warranty.
5.
5. Position the roof vent over the cut opening in the roof. Center the vent by aligning edges of the vent throat with the chalk lines previously marked. Using the molded nail indicators, nail the top half of the vent securely into place.
8.
8. Using the 4 screws supplied, secure vent into position as shown.
7.
7. Using the pitch tabs lower the top of the unit back to desired pitch. Ensure the top of the unit is level.
Level Top
Pitch Tabs
24”(61 cm)
12” x 12”(30.5 cm x 30.5 cm)
1. Apply underlayment on the sheathing and in the center of the rafters cut a 12” (30.5 cm) square hole. The edge of the hole should be at least 12” (30.5 cm)and no more than 24” (61 cm) from the roof peak.
2. Using a 1/2” (1.3 cm) bead, apply a generous amount of construction sealant to the underlayment infront of hole before applying next shingle course.
2.
Underlayment
Shingles
3. Install next shingle course over sealant bead and mark extended chaulk lines to help position vent over opening in next step.
3.
6. 6. Gently lift the pitch calculating tabs (Fig A.), rotating the top of the unit up to make room for nailing the bottom half of the �ange (Note: Ensure the vent throat overlaps (Fig B.). Using the molded nail indicators, nail the remainder of the vent securely into place.
Fig. B.Fig. A.
Note: For added protection against weather in�ltration seal any exposed nail heads.
For New Construction Note: PROVentilator placement and the balancing of intake and exhaust venting are extremely important in achieving ideal ventilator performance.

- 12 -
4.
4. Using a 1/2 inch bead, apply a generous amount of construction sealant to the base of the vent.Note: Use non-petroleum based sealants only. The use of petroleum based sealants may void any manufactures product warranty.
5.
5. Position the roof vent over the cut opening in the roof. Center the vent by aligning edges of the vent throat with the chalk lines previously marked. Using the molded nail indicators, nail the top half of the vent securely into place.
8.
8. Using the molded in screw guide in front of vent, secure vent into position as shown with 1 screw supplied.
7.
7. Using the pitch tabs pivot the top of the unit to desired pitch. Ensure the top of the unit is level.
Level Top
24”
12” x 12”
1. Apply underlayment on the sheathing and In the center of the rafters cut a 12” round hole. The edge of the hole should be at least 12” and no more than 24” from the roof peak.
2.
Underlayment
Shingles
3. Install next shingle course over sealant bead and mark extended chaulk lines to help position vent over opening in next step.
3.
6. 6. Gently lift the pitch calculating tabs (Fig A.), pivoting the top of the unit up to and nail the bottom half of the �ange.
Note: For added protection against weather in�ltration seal any exposed nail heads.
Fig. A.
Pitch Tabs
Pitch Tabs
2. Using a 1/2 inch bead, apply a generous amount of construction sealant to the underlayment infront of hole before applying next shingle course.
INSTALLATION - PROTurbo For New Construction Installation of Duraflo® WeatherPRO® PROTurbo should comply with all local standards and regulations. Before beginning a job, determine how much ventilation is required in both soffit and roof vents and what sizes of vent would best suit the job. If required, refer to Duraflo® Ventilation Calculator for guidance.

- 13 -
INSTALLATION - PRO SlantBack
For New Construction or Re-Roofing
1. Determine the location of vents: Evenly space the roof vents along the width of the roof, marking the location of all roof vents before cutting holes. Centre the holes between the rafters within two feet (24”) (61 cm) from the peak of the roof. Cut and prepare the opening: Cut the holes in the sheathing before applying shingles, cut a 6-1/2” x 8-1/2” (16.5 cm x 21.6 cm) opening. Shingle up until the first full course of shingles covers the bottom of the hole. Cut the excess shingles away from the hole.2. Position the vent and nail the vent in place: Duraflo® Roof Vents have a top arrow indicator. Make sure the throat of the vent is in the proper position centered over the opening. Using the pre-marked nail holes, nail the vent securely into place. 3. Complete the shingle installation: Continue installing shingles, overlapping the flange of the vent. Cut the shingles around the top of the vent to match its shape.
Installation of Duraflo® WeatherPRO® SlantBack Vent should comply with all local standards and regulations. Before beginning a job, determine how much ventilation is required in both soffit and roof vents and what sizes of vent would best suit the job. If required, refer to Duraflo® Ventilation Calculator for guidance.
Caution: DO NOT USE roofing cement /roofing tar to seal the vent to the roof. The wide flange and molded-in water guards will force the water down the roof over the shingles. The polypropylene flange is large enough and flexible enough to effectively self seal against the roof without the aid of roofing tars. Roofing tars are potentially damaging to the roof vent and the asphalt shingles. Use of roofing tar will void any warranty on the Duraflo® Roof Vents. Optional: Seal all nail heads with an approved sealant, such as silicone. Make sure the sealant is a non-petroleum product (usually available in a plastic tube).
6-1/2”(16.5 cm)
8-1/2”(21.6 cm)
24”(61 cm)
Rough Cut Opening

- 14 -
INSTALLATION - PRO50 & PRO75
For New Construction or Re-Roofing
1. Determine the location of vents: Evenly space the roof vents along the width of the roof, marking the location of all roof vents before cutting holes. Centre the holes between the rafters within two feet (24”) (61 cm) from the peak of the roof. Cut and prepare the opening: Cut the holes in the sheathing before applying shingles, for PRO50 cut a 7-1/4” x 7-1/4” (18.4 cm x 18.4 cm) opening, for the PRO75 cut a 9-1/2” x 9-1/2” (24 cm x 24 cm) opening. Shingle up until the first full course of shingles covers the bottom of the hole. Cut the excess shingles away from the hole.2. Position the vent and nail the vent in place: Duraflo® Roof Vents have a top arrow indicator. Make sure the throat of the vent is in the proper position centered over the opening. Using the pre-marked nail holes, nail the vent securely into place. 3. Complete the shingle installation: Continue installing shingles, overlapping the flange of the vent. Cut the shingles around the top of the vent to match its shape.
Installation of Duraflo® WeatherPRO® PRO50 or PRO75 Roof Vent should comply with all local standards and regulations. Before beginning a job, determine how much ventilation is required in both soffit and roof vents and what sizes of vent would best suit the job. If required, refer to Duraflo® Ventilation Calculator for guidance.
Caution: DO NOT USE roofing cement /roofing tar to seal the vent to the roof. The wide flange and molded-in water guards will force the water down the roof over the shingles. The polypropylene flange is large enough and flexible enough to effectively self seal against the roof without the aid of roofing tars. Roofing tars are potentially damaging to the roof vent and the asphalt shingles. Use of roofing tar will void any warranty on the Duraflo® Roof Vents. Optional: Seal all nail heads with an approved sealant, such as silicone. Make sure the sealant is a non-petroleum product (usually available in a plastic tube).
PRO75Rough Cut Opening
7-1/4” (18.4 cm)
7-1/4” (18.4 cm)
9-1/2” (24 cm)
9-1/2” (24 cm)
24”(61 cm)
PRO50Rough Cut Opening

- 15 -
INSTALLATION GUIDE
Step 1. Cut a slot in sheathing along the ridge 2” (5 cm) wide 1” (2.5 cm) on each side of peak). If ridge beam is present, cut a slot 1” (2.5 cm) wide on each side of the beam. A closed area of sheathing 12” (30.5 cm) in length should be at both ends of ridge. The 12” (30.5cm) area should be coverd to preventin�ltration.
Step 2.For step 2 it is recommended a chalk line be used to ensure the ridge vent is installed straight along the roof peak. Place the �rst piece of vent with female end 1/2” (1.3 cm) from the gable end. On one side of the peak fasten the �rst piece using nails at each end and in middle sections. Fold the vent over the peak and fasten the second side using the same nail pattern. (2” (5 cm) nails are minimum length). Continue installing additional pieces along ridge connecting the female end over the male end.
Step 3. When reaching the ridge end, the last vent section may need to be cut to length. There are molded-in end caps every 3” (7.6 cm) on the underside of the ridge vent. Measure and cut amount needed to install to within 1/2” (1.3 cm) of ridge end. After fastening the ridge vent to the roof peak install ridge caps using a min 2” (5 cm) nail. The ridge caps should be centered on the vent and sit between the outer raised ba�e walls.
Canplas Industries Ltd.P.O Box 1800, 500 Veterans DriveBarrie, Ontario, Canada L4M 4V3Tel. (705) 726-3361Toll Free 1-800-461-5300Fax: (705) 726-2186
Canplas LLC11402 East 53rd Ave.Suite 200, Denver, CO, U.S.A. 80239Tel: (303) 373-1923Toll Free: 1-800-461-5307Fax: (303) 373-1928
1
2B
2C
3
2A
Caution: seal the vent to the roof.
with a non-petroleum based sealant product.
12” (30.5 cm)
INSTALLATION - WeatherPRO® RIDGE VENT
Installation of Duraflo® WeatherPRO® PRORidge Vent should comply with all local standards and regulations. Before beginning a job, determine how much ventilation is required in both soffit and roof vents and what sizes of vent would best suit the job. If required, refer to Duraflo Ventilation Calculator for guidance.

- 16 -
Specifications
Duraflo® brand products are manufactured by Canplas Industries Ltd.
Section 07 72 00Roof Vents
PART 1 GENERAL
1.1 SECTION INCLUDES
A. Roof vents of the following types: 1. Continuous ridge vents. (Duraflo® PRORidge Vent) 2. Turbine vents. (Duraflo® PROTurbo Vent). 3. Static vents. (Duraflo® PRO75 Roof Vent)(Duraflo® PRO50 Roof Vent)(Duraflo® PROSlantBack Roof Vent) (Duraflo® PROVentilator Roof Vent)
1.2 RELATED SECTIONS
A. Section 07 72 00 – Roof Accessories.
1.3 SUBMITTALS
A. Submit under provisions of Section 01 30 00 - Administrative Requirements. B. Product Data: Manufacturer’s data sheets on each product to be used, including: 1. Preparation instructions and recommendations. 2. Storage and handling requirements and recommendations. 3. Installation methods.
1.4 QUALITY ASSURANCE
A. Manufacturer Qualifications: Minimum five (5) years of experience manufacturing similar products. B. Installer Qualifications: Minimum two (2) years of experience installing similar products.
1.5 PRE-INSTALLATION MEETINGS
A. Convene minimum two weeks prior to starting Work of this section.
1.6 DELIVERY, STORAGE, AND HANDLING
A. Deliver and store products in manufacturer’s unopened packaging bearing the brand name and manufacturer’s identification until ready for installation.
B. Handling: Handle materials to avoid damage.
1.7 PROJECT CONDITIONS
A. Maintain environmental conditions (temperature, humidity, and ventilation) within limits
recommended by manufacturer for optimum results. Do not install products under environmental conditions outside manufacturer’s recommended limits.
1.8 SEQUENCING
A. Ensure that products of this section are supplied to affected trades in time to prevent interruption of construction progress.
1.9 WARRANTY
A. Warranty: Provide manufacturer’s standard limited warranty, and as follows: 1. Duraflo® PRORidge: 35 year limited warranty. 2. Duraflo® PROTurbo Vent: 35 year limited warranty. 3. Duraflo® PRO75 Roof Vent: 35 year limited warranty. 4. Duraflo® PRO50 Roof Vent: 35 year limited warranty. 5. Duraflo® PROSlantBack Roof Vent: 35 year limited warranty. 6. Duraflo® PROVentilator Roof Vent: 35 year limited warranty.
PART 2 PRODUCTS
2.1 MANUFACTURERS
A. Acceptable Manufacturer: Canplas Industries Ltd., which is located at: ; Canada; 500 Veterans Dr. P.O. Box1800; Barrie, ON, Canada L4M 4V3; Toll Free Tel: 800-461-1771; Tel: 705-726-3361; Fax: 705-726-2186; Email:request info ([email protected]); Web: www.duraflo.com
B. Substitutions: Not permitted.
C. Requests for substitutions will be considered in accordance with provisions of Section 01 60 00 - Product Requirements.
2.2 ROOF VENTS
A. Roof ventilation shall be from a single source of Duraflo® Roofing Ventilation products manufactured by Canplas Industries Ltd.
B. The vents shall be manufactured from all virgin polypropylene using injection molding technology.
C. The material shall be cold impact tested to -40 degrees F (-38 degrees C) and shall remain functional, flexible and resilient to damage even when installed with a nail gun.
D. The material shall contain UV inhibitors and pass

- 17 -
Specifications UV accelerated testing per ASTM G-155 for 15 year accelerated testing.
2.3 CONTINUOUS RIDGE VENTS
A. Product: Duraflo® PRORidge Vent as manufactured by Canplas Industries Ltd.
1. Design: Internal baffles and drainage openings easily deflect and direct away extreme weather. Airfoil designed edge allows smooth airflow over the ridge line maximizing effective ventilation from the attic space. TriFold flexibility for use on full range of pitches. Code regulated insect grill. Net Free Area: 18.3 sq.in./lin.ft.(387 sq.cm/lin. m). 2. Miami Dade High Velocity Hurricane Zone certified: NOA 05-0516.06. 3. CSA certified - Plastic Type C ridge vent, for installation on roof ridge. 4. Construction: Injection molded from pure, high grade polypropylene with premium UV inhibitoradditives. Engineered to resist denting, peeling, extreme heat and cold impact to - 40 degree F (-38 degree C). 5. Model: Metric - Black (6072METBL). 6. Model: Metric - Brown (6072METBR). 7. Model: Metric - Weatherwood (6072METWW). 8. Model: Imperial - Black (6073BL). 9. Model: Imperial - Brown (6073BR). 10. Model: Imperial - Weatherwood (6073WW).
2.4 TURBINE VENTS
A. Product: Duraflo® PROTurbo Vent as manufactured by Canplas Industries Ltd. 1. Design: No internal or external moving parts - requires no maintenance. Internal baffles deflect water and snow, allowing it to drain out the drainage openings. Allows high airflow while providing excellent defense against weather infiltration. Two- piece base fits roof pitches from 3/12 to 12/12. 117sq. in. (755 sq. cm) net free area. 2. Construction: Injection molded from pure, high grade polypropylene with premium UV inhibitor additives. Engineered to resist denting, peeling, extreme heat and cold impact to -40 degree F (-38 degree C). 3. CSA certified - Plastic Type B roof vents, for installation on sloping surfaces. 4. Miami Dade High Velocity Hurricane Zone certified: NOA 07.1023.01 5. Construction: Injection molded from pure, high grade polypropylene with premium UV inhibitor additives. 6. Model: Black (60PRO117BL) 17-1/2 inches x 20 inches x 16-1/4 inches (445 mm x 508 mm x 413 mm). 7. Model: Brown (60PRO117BR) 17-1/2 inches x 20 inches x 16-1/4 inches
(445 mm x 508 mm x 413 mm). 8. Model: Weatherwood (60PRO117WW) 17-1/2 inches x 20 inches x 16-1/4 inches (445 mm x 508 mm x 413 mm). 9. Model: Grey (60PRO117G) 17-1/2 inches x 20 inches x 16-1/4 inches (445 mm x 508 mm x 413 mm).
2.5 STATIC VENTS
A. Product: Duraflo® PRO75 Roof Vent as manufactured by Canplas Industries Ltd. 1. Design: Top venting design uses chimney effect to channel moist air away from roof eliminating shingle staining. Vent cap design with built in weeping holes eliminates bird nesting and water pooling. Roof pitch range 3/12 to 12/12. Net free venting area of 75 sq. inches (483 sq. cm). 2. Construction: Injection molded from pure, high grade polypropylene with premium UV inhibitor additives. Engineered to resist denting, peeling, extreme heat and cold impact to -40 degree F (-38 degree C). 3. CSA certified - Plastic Type B roof vents, for installation on sloping surfaces. 4. Model: Black (60PRO75BL) 21.875 inches x 21.875 inches x 5.5 inches (556 mm x 556 mm x 140 mm). 5. Model: Brown (60PRO75BR) 21.875 inches x 21.875 inches x 5.5 inches (556 mm x 556 mm x 140 mm). 6. Model: White (60PRO75W) 21.875 inches x 21.875 inches x 5.5 inches (556 mm x 556 mm x 140 mm). 7. Model: Gray (60PRO75G) 21.875 inches x 21.875 inches x 5.5 inches (556 mm x 556 mm x 140 mm). 8. Model: Weatherwood (60PRO75WW) 21.875 inches x 21.875 inches x 5.5 inches (556 mm x 556 mm x 140 mm).
B. Product: Duraflo® PRO50 Roof Vent as manufactured by Canplas Industries Ltd. 1. Design: Top venting design uses chimney effect to channel moist air away from roof eliminating shingle staining. Vent cap design with built in weeping holes eliminates bird nesting and water pooling. Roof pitch range 3/12 to 14/12. Net free venting area of 50 sq. inches (322 sq. cm). 2. Construction: Injection molded from pure, high grade polypropylene with premium UV inhibitor additives. Engineered to resist denting, peeling, extreme heat and cold impact to -40 degree F (-38 degree C). 3. CSA certified - Plastic Type B roof vents, for installation on sloping surfaces. 4. Miami Dade High Velocity Hurricane Zone certified: NOA 04.0401.01. 5. Model: Black (60PRO50BL) 18-1/2 inches x 18-1/2 inches x 4-1/2 inches (470 mm x 470 mm x 114 mm).
- 18 -
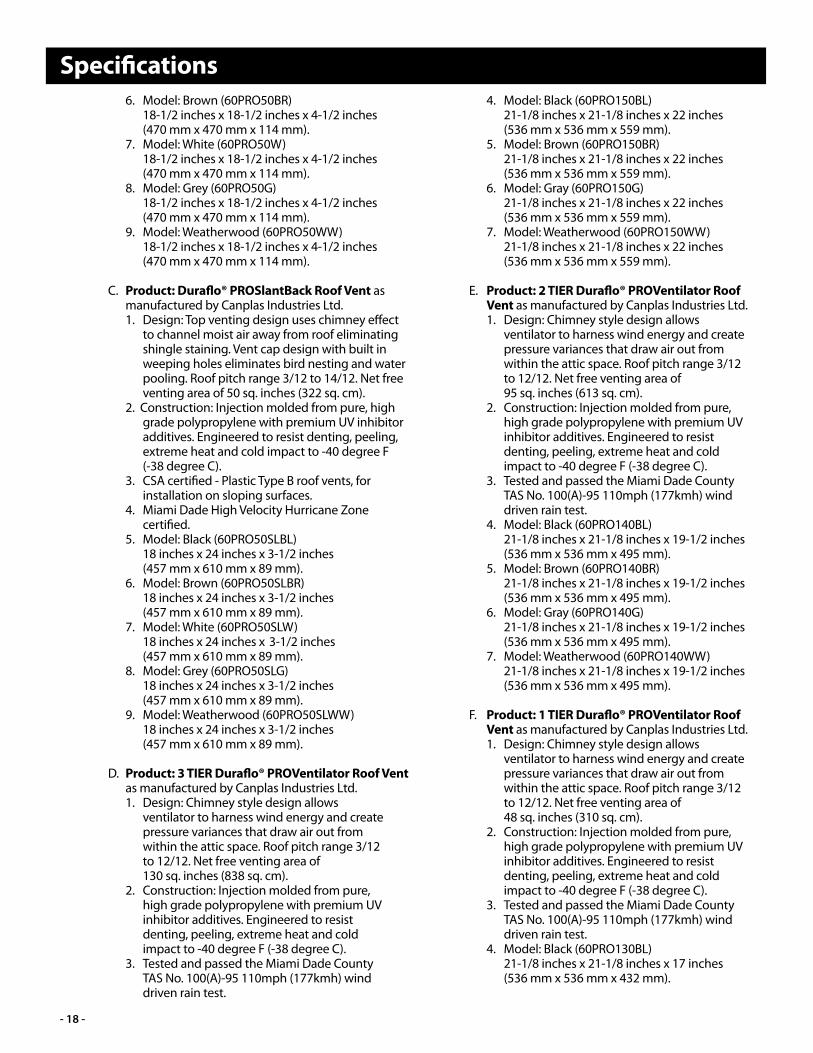
6. Model: Brown (60PRO50BR) 18-1/2 inches x 18-1/2 inches x 4-1/2 inches (470 mm x 470 mm x 114 mm). 7. Model: White (60PRO50W) 18-1/2 inches x 18-1/2 inches x 4-1/2 inches (470 mm x 470 mm x 114 mm). 8. Model: Grey (60PRO50G) 18-1/2 inches x 18-1/2 inches x 4-1/2 inches (470 mm x 470 mm x 114 mm). 9. Model: Weatherwood (60PRO50WW) 18-1/2 inches x 18-1/2 inches x 4-1/2 inches (470 mm x 470 mm x 114 mm).
C. Product: Duraflo® PROSlantBack Roof Vent as manufactured by Canplas Industries Ltd. 1. Design: Top venting design uses chimney effect to channel moist air away from roof eliminating shingle staining. Vent cap design with built in weeping holes eliminates bird nesting and water pooling. Roof pitch range 3/12 to 14/12. Net free venting area of 50 sq. inches (322 sq. cm). 2. Construction: Injection molded from pure, high grade polypropylene with premium UV inhibitor additives. Engineered to resist denting, peeling, extreme heat and cold impact to -40 degree F (-38 degree C). 3. CSA certified - Plastic Type B roof vents, for installation on sloping surfaces. 4. Miami Dade High Velocity Hurricane Zone certified. 5. Model: Black (60PRO50SLBL) 18 inches x 24 inches x 3-1/2 inches (457 mm x 610 mm x 89 mm). 6. Model: Brown (60PRO50SLBR) 18 inches x 24 inches x 3-1/2 inches (457 mm x 610 mm x 89 mm). 7. Model: White (60PRO50SLW) 18 inches x 24 inches x 3-1/2 inches (457 mm x 610 mm x 89 mm). 8. Model: Grey (60PRO50SLG) 18 inches x 24 inches x 3-1/2 inches (457 mm x 610 mm x 89 mm). 9. Model: Weatherwood (60PRO50SLWW) 18 inches x 24 inches x 3-1/2 inches (457 mm x 610 mm x 89 mm). D. Product: 3 TIER Duraflo® PROVentilator Roof Vent as manufactured by Canplas Industries Ltd. 1. Design: Chimney style design allows ventilator to harness wind energy and create pressure variances that draw air out from within the attic space. Roof pitch range 3/12 to 12/12. Net free venting area of 130 sq. inches (838 sq. cm). 2. Construction: Injection molded from pure, high grade polypropylene with premium UV inhibitor additives. Engineered to resist denting, peeling, extreme heat and cold impact to -40 degree F (-38 degree C). 3. Tested and passed the Miami Dade County TAS No. 100(A)-95 110mph (177kmh) wind driven rain test.
4. Model: Black (60PRO150BL) 21-1/8 inches x 21-1/8 inches x 22 inches (536 mm x 536 mm x 559 mm). 5. Model: Brown (60PRO150BR) 21-1/8 inches x 21-1/8 inches x 22 inches (536 mm x 536 mm x 559 mm). 6. Model: Gray (60PRO150G) 21-1/8 inches x 21-1/8 inches x 22 inches (536 mm x 536 mm x 559 mm). 7. Model: Weatherwood (60PRO150WW) 21-1/8 inches x 21-1/8 inches x 22 inches (536 mm x 536 mm x 559 mm).
E. Product: 2 TIER Duraflo® PROVentilator Roof Vent as manufactured by Canplas Industries Ltd. 1. Design: Chimney style design allows ventilator to harness wind energy and create pressure variances that draw air out from within the attic space. Roof pitch range 3/12 to 12/12. Net free venting area of 95 sq. inches (613 sq. cm). 2. Construction: Injection molded from pure, high grade polypropylene with premium UV inhibitor additives. Engineered to resist denting, peeling, extreme heat and cold impact to -40 degree F (-38 degree C). 3. Tested and passed the Miami Dade County TAS No. 100(A)-95 110mph (177kmh) wind driven rain test. 4. Model: Black (60PRO140BL) 21-1/8 inches x 21-1/8 inches x 19-1/2 inches (536 mm x 536 mm x 495 mm). 5. Model: Brown (60PRO140BR) 21-1/8 inches x 21-1/8 inches x 19-1/2 inches (536 mm x 536 mm x 495 mm). 6. Model: Gray (60PRO140G) 21-1/8 inches x 21-1/8 inches x 19-1/2 inches (536 mm x 536 mm x 495 mm). 7. Model: Weatherwood (60PRO140WW) 21-1/8 inches x 21-1/8 inches x 19-1/2 inches (536 mm x 536 mm x 495 mm).
F. Product: 1 TIER Duraflo® PROVentilator Roof Vent as manufactured by Canplas Industries Ltd. 1. Design: Chimney style design allows ventilator to harness wind energy and create pressure variances that draw air out from within the attic space. Roof pitch range 3/12 to 12/12. Net free venting area of 48 sq. inches (310 sq. cm). 2. Construction: Injection molded from pure, high grade polypropylene with premium UV inhibitor additives. Engineered to resist denting, peeling, extreme heat and cold impact to -40 degree F (-38 degree C). 3. Tested and passed the Miami Dade County TAS No. 100(A)-95 110mph (177kmh) wind driven rain test. 4. Model: Black (60PRO130BL) 21-1/8 inches x 21-1/8 inches x 17 inches (536 mm x 536 mm x 432 mm).
Specifications

- 19 -
5. Model: Brown (60PRO130BR) 21-1/8 inches x 21-1/8 inches x 17 inches (536 mm x 536 mm x 432 mm). 6. Model: Gray (60PRO130G) 21-1/8 inches x 21-1/8 inches x 17 inches (536 mm x 536 mm x 432 mm). 7. Model: Weatherwood (60PRO130WW) 21-1/8 inches x 21-1/8 inches x 17 inches (536 mm x 536 mm x 432 mm).
PART 3 EXECUTION
3.1 EXAMINATION A. Do not begin installation until substrates have been properly prepared. B. If substrate preparation is the responsibility of another installer, notify Architect of unsatisfactory preparation before proceeding.
3.2 PREPARATION
A. Clean surfaces thoroughly prior to installation.
B. Prepare surfaces using the methods recommended by the manufacturer for achieving the best result for the substrate under the project conditions.
3.3 INSTALLATION
A. Install in accordance with manufacturer’s instructions and in proper relationship with adjacent construction.
3.4 FIELD QUALITY CONTROL
A. Provide inspection certificates of Authority Having Jurisdiction (AHJ).
3.5 PROTECTION
A. Protect installed products until completion of project. B. Touch-up, repair or replace damaged products before Substantial Completion.
END OF SECTION
Specifications

Duraflo® Roofs Vents are manufactured in a ISO 9001 and 14001 registered facility. Our quality management system has been registered for the design, manufacture and distribution of high quality injection molded products used in plumbing, industrial, ventilation and central vacuum applications.
GD-05057-08-16 Printed in Canada Duraflo® brand products manufactured by Canplas Industries.
®
www.arcat.com www.csc-dcc.ca www.csinet.org
Eastern U.S. CustomersTel: (289) 881-0120Toll Free: 1-800-463-9572Fax: (905) 844-0826
Western U.S. CustomersTel: (303) 373-1918 Toll Free: 1-888-461-5307Fax: (303) 373-1923
www.ipexna.com | [email protected]