dupont air barrier installation guidelines · dupont™ tyvek® air barrier installation guidelines...
TRANSCRIPT

DuPont™ Tyvek® Air Barrier Installation Guidelines HelPInG you GeT THe joB Done rIGHT
Canadian Version
Version 2

2Copyright ©2008 E. I. du Pont de Nemours and Company. All Rights Reserved. v.2
Table of ContentsApplicable Products ..................................................................................................................................................................2
Required Materials ...................................................................................................................................................................2
Code Requirements ..................................................................................................................................................................3
General Instructions .................................................................................................................................................................3
Special Considerations .............................................................................................................................................................3
Installation Instructions .............................................................................................................................................................4
Foundation/floor connection .....................................................................................................................................................4
Continuity
Top of wall connection .........................................................................................................................................................7
Knee-wall .............................................................................................................................................................................7
Cantilever Floor ....................................................................................................................................................................7
Roof-wall interface ...............................................................................................................................................................8
Penetrations .........................................................................................................................................................................8
Handling Tears and Holes ....................................................................................................................................................9
DuPont™ Flashing Systems Integration ..................................................................................................................................10
Applicable ProductsAir Barrier
Product dimensions AreA
DuPont™ Tyvek® HomeWrap® 3 ft x 100 ft (0.91 m x 30.48 m) 300 sq ft (91.44 m2) 5 ft x 200 ft (1.52 m x 60.96 m) 1,000 sq ft (304.80 m2) 9 ft x 100 ft (2.74 m x 30.48 m) 900 sq ft (274.32 m2) 9 ft x 150 ft (2.74 m x 45.72 m) 1,350 sq ft (411.48 m2) 10 ft x 100 ft (3.05 m x 30.48 m) 1,000 sq ft (304.80 m2) 10 ft x 150 ft (3.05 m x 45.72 m) 1,500 sq ft (457.20 m2)
DuPont™ Tyvek® CommercialWrap® 5 ft x 200 ft (1.52 m x 60.96 m) 1,000 sq ft (304.80 m2) 10 ft x 125 ft (3.05 m x 38.10 m) 1250 sq ft (381 m2)
DuPont™ Tyvek® HeaderWrap®
CCMC Approved Sheathing Tapes
Product
CCMC 13123-R: Intertape Polymer’s Sheathing Tape CCMC 11955-R: Tuck 20502 Contractor’s Sheathing Tape
required Materials• DuPont™ Tyvek® Air Barrier
• CCMCapprovedsheathingtape
• DuPont™ Tyvek® Wrap Caps or or other 1” (25 mm) cap fastener (see step 3)
• CompatibleCaulksandSealants–SeetheDuPontBuildingScienceBulletin“CompatibilityGuidelinesforBuilding
Sealants” for additional guidance.
• Verticalfurringstripsonstudlines(i.e.strapping)whererainscreenisdesiredorrequiredbycode.

3Copyright ©2008 E. I. du Pont de Nemours and Company. All Rights Reserved. v.2
Air Barrier Code requirementsThe 2005 National Building Code (NBC) of Canada (Sections 5.4 and 9.25.3) requires air barrier systems to be included in
thermally insulated wall assemblies. The materials “intended to provide the principal resistance to air leakage shall have air
leakage characteristics not greater than .02 L(s•m2) measured at an air pressure difference of 75 Pa”. DuPont™ Tyvek® air
barriers perform as air barrier materials as recognized in the following CCMC evaluation reports:
• CCMC12857-RDuPont™ Tyvek® HomeWrap®–AirBarrierMaterial™
• CCMC13253-RDuPont™ Tyvek® CommercialWrap®–AirBarrierMaterial™
Air barrier systems shall be continuous across junctions between different building assemblies and around penetrations in
the building assembly. This guide provides information on installing DuPont™ Tyvek® air barriers to achieve this continuity.
General Instructions The most effective time to install DuPont™ Tyvek® air barriers is when:
• wallsareconstructed
• stepflashingsandkickoutflashingsareinstalled
• BeFore the windows and doors are set
If you want to install windows and doors prior to the air barrier, please refer to the DuPont™ Flashing Systems Installation
Guidelines, Flashing BeFore air barrier section which will direct you back to this guide at the appropriate step.
If the house has windows and doors already installed and they are flashed be sure to integrate the air barrier by following the duPont™ Flashing systems integration section in this guide.
Note: If DuPont™ FlexWrap™ and apron are used, install the air barrier under the apron with DuPont™ Tyvek® and ensure
proper shingling. If a non-self adhering sill flashing product is used, please maintain proper shingling.
Special Considerations 1. DuPont requires that DuPont™ Tyvek® HomeWrap® and DuPont™ Tyvek® HeaderWrap® be covered within 4 months (120
days) of its installation.
2. DuPont requires that DuPont™ Tyvek® CommercialWrap® be covered within 9 months (270 days) of its installation.

4
Thru-wallFlashing
Copyright ©2008 E. I. du Pont de Nemours and Company. All Rights Reserved. v.2
DuPont™ Tyvek® Air Barrier Installation Guidelines
Installation InstructionsStart at the bottom of the structure to ensure proper shingling occurs throughout the installation.
Proper shingling is required to provide for water shedding and to prevent water entering the
wall system.
STep 1
Foundation / Floor ConnectionThe foundation wall is part of the air barrier system. Install DuPont™ Tyvek® HeaderWrap® (or
appropriately cut width of DuPont™ Tyvek®) on sill gasket and foundation wall. Seal DuPont™ Tyvek®
onto the inside wall to hold in place. Build floor structure and wrap DuPont™ Tyvek® up and around
floor joist as shown below. DuPont™ Tyvek® must be shingled over flashing and taped to properly drain
any rain that penetrates the cladding.
STep 2
Start wrapping at the bottom of the structure to ensure proper shingling with the wrapped
foundation. Proper shingling is required to provide for water shedding and to help prevent water
entering the wall system.

5Copyright ©2008 E. I. du Pont de Nemours and Company. All Rights Reserved. v.2
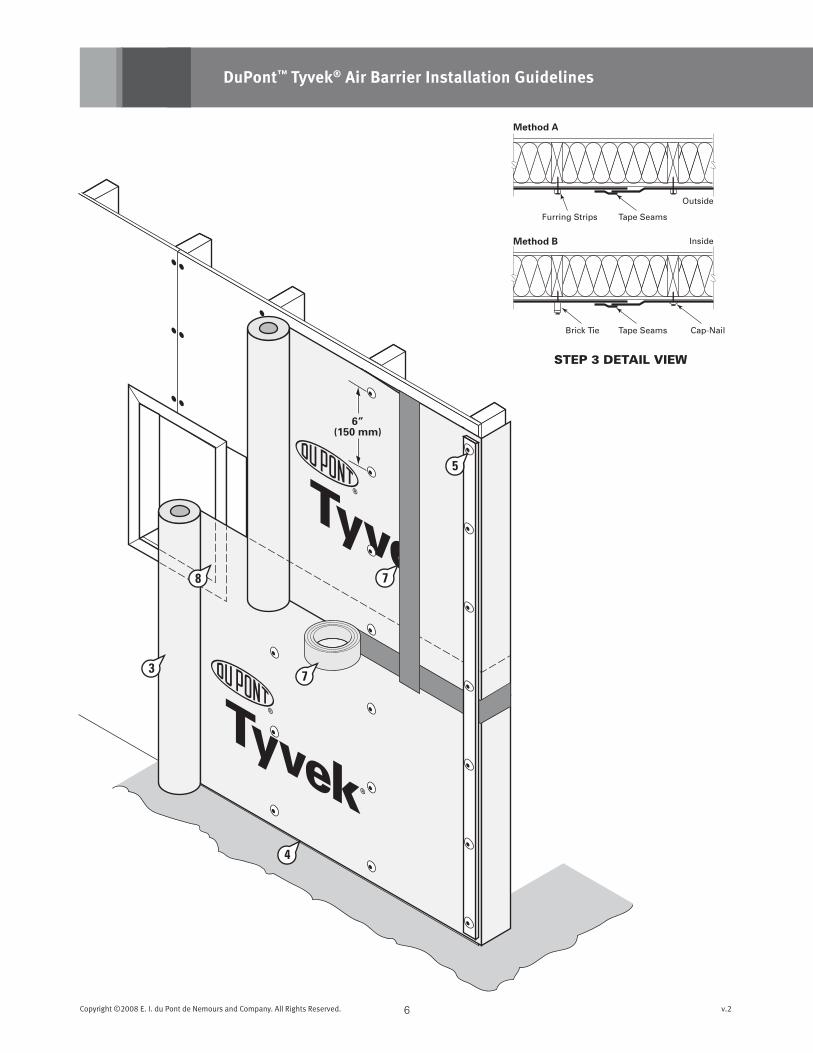
STep 3
UNWRAP roll at corner, leaving 6” to 12” (150 to 300 mm) vertical overlap.
Printed stud marks are available on some DuPont™ Tyvek® products to aid in aligning with the studs.
(e.g. studmarks are 8” (200 mm) apart for DuPont™ Tyvek® HomeWrap®)
STep 4
Roll should be plumb. Bottom edge of roll should extend over sill plate interface at least 2” (150 mm).
Extend to bottom of sill plate for slab on grade foundations. For stucco exteriors integrate with
weep screed.
STep 5
As with all air barriers, DuPont™ Tyvek® can be secured to the exterior sheathing by either of the
following methods.
method A: Continuous furring strips shall be installed vertically along stud lines.
method B: Cap-nails shall be installed along stud lines at 6” (150mm) O.C. Additional cap-nails should
be installed to support DuPont™ Tyvek® bridging across any opening in the sheathing board.
Brick ties can be substituted for cap-nails in masonry veneer construction.
note: Do not fasten within 9” (225 mm) of rough opening head.
STep 6
Unroll directly over windows and doors. Upper layer of air barrier should overlap bottom layer of air
barrier by a minimum of 6” (150 mm).
Refer to the DuPont™ Flashing Systems Installation Guidelines to prepare and flash window and door opening.
note: If windows are already installed, the DuPont™ Tyvek® air barrier shall be integrated with proper shingling with window flashings. If DuPont™ FlexWrap™ and apron are used, install the air barrier under the apron to ensure proper shingling. If non-self adhering sill flashing is used, install the air barrier under the bottom of the sill flashing to maintain proper shingling.
STep 7
All vertical and horizontal seams shall be taped with approved tape.
Taping all vertical and horizontal seams is part of the requirement to obtain the DuPont™ Tyvek®
Products Material and Labor Residential 10-year Limited Warranty.
STep 8
After the air barrier is installed, refer to the DuPont™ Flashing Systems Installation Guidelines to
prepare and flash windows and doors.
6
3
4
5
8
7
7
6”(150 mm)
Outside
Inside
Tape Seams
Tape Seams Cap-NailBrick Tie
Furring Strips
Method A
Method B
STep 3 DeTAil View
Copyright ©2008 E. I. du Pont de Nemours and Company. All Rights Reserved. v.2
DuPont™ Tyvek® Air Barrier Installation Guidelines

7
DuPont™ Tyvek®
DuPont™ Tyvek®
Secure and SealDuPont™ Tyvek®
Connection
Secure and SealDuPont™ Tyvek®
Connection
Support DuPont™ Tyvek®
Along Rafters andSecure to Undersideof Ceiling Barrier
Support and SealAir Barrier Materialas Required
Copyright ©2008 E. I. du Pont de Nemours and Company. All Rights Reserved. v.2
Cantilever FloorWrap the DuPont™ Tyvek® under and up the Cantilever floor
and fold the DuPont™ Tyvek® up the sides of the Cantilever
wall a minimum of 6” (150 mm). Tape all corners. Top layer
of air barrier should go over bottom layer a minimum of 6”
(150 mm).
note: Get the inside corner as tight as possible using a 1x4
(25 x 100 mm) or similar.
Continuity
Top of wall ConnectionTo ensure continuity of the air barrier membrane, DuPont™
Tyvek® shall be installed as shown in the drawing.
The ceiling and wall air barrier membranes shall be
overlapped and sealed with a continuous strip of tape.
Knee-wallCoordination of roof and knee-wall construction is
important to ensure continuity of the air barrier.
Support and fasten DuPont™ Tyvek® over lower floor
ceiling area.
Tape all seams that may arise due to construction.

8
1 2
3
6“ (150mm)Minimum
DuPont™ Tyvek®
Overlap
1 2
3
Copyright ©2008 E. I. du Pont de Nemours and Company. All Rights Reserved. v.2
DuPont™ Tyvek® Air Barrier Installation Guidelines
penetrationsThere are many types of penetrations including dryer vents,
bathroom exhaust fans, exterior electrical outlets, exterior
lights, gas lines, etc.
Seal the DuPont™ Tyvek®aroundallelectrical,HVACand
plumbing penetrations with sealant or approved sheathing
tape, or DuPont™ Flashing Systems products.
Start taping or flashing at bottom of penetrations, shingling
upper tape over bottom tape.
Lap duPont™ tyvek® over all flashing (e.g. wall to roof intersections and thru-wall flashings).
Products that have flanges should be integrated into the air
barrier using approved sheathing tape, or DuPont™ Flashing
Systems products.
Roof-wall interfaceLap DuPont™ Tyvek® over all flashing at roof-wall interfaces
and tape DuPont™ Tyvek® to the flashing.

9
Tears Holes
1
2 3
2“ (50mm)Minimum
Copyright ©2008 E. I. du Pont de Nemours and Company. All Rights Reserved. v.2
Handling Tears and HolesDuring the course of installing the air barrier, minor tears
may occur. Be sure to tape all tears. Tears can easily be
covered with approved sheathing tape or DuPont™ Flashing
Systems products.
Larger holes (greater than 1” (25 mm) ) may require you to
cut a piece of DuPont™ Tyvek® air barrier to cover the hole.
Keep in mind shingling.
Make a cut 2” (50 mm) above the hole and extending a
minimum of 2” (50 mm) on each side of the hole. Measure
and cut a piece of DuPont™ Tyvek®. Tuck the cut piece of
DuPont™ Tyvek® underneath the tear. Tape along the
perimeter by starting at bottom of tear, shingling upper tape
over bottom tape.

10
DO NOT CUT!through
DuPont™ FlexWrap™
or apron.
A
B
A
B
Copyright ©2008 E. I. du Pont de Nemours and Company. All Rights Reserved. v.2
DuPont™ Tyvek® Air Barrier Installation Guidelines
DuPont™ Flashing Systems Integration If windows and doors have not been installed reference the
DuPont™ Flashing Systems Installation Guidelines to
prepare the rough opening.
If windows and doors are already flashed, then follow
these last 2 integration steps to tie the air barrier into the
flashing.
STep 1A.Verifythattheairbarrierisproperlyshingledwiththe
bottom of the apron.
B. Cut as shown to expose window and apron. do not cut through duPont™ FLexWrAP™ or APron.
STep 2A. Tape all seams as shown. do not tAPe at bottom of
window.

11Copyright ©2008 E. I. du Pont de Nemours and Company. All Rights Reserved. v.2
Technical SpecificationsDuPont™ Tyvek® air barriers used in construction products is made from 100% flash spunbonded high density polyethylene fibers which have been bonded together by heat and pressure, without binders or fillers, into a tough, durable sheet structure. Additives have been incorporated into the polyethylene to provide ultraviolet light resistance. DuPont requires that DuPont™ Tyvek® air barriers be covered within four months (120 days) of installation.
DuPont™ Flashing Systems products are made from a synthetic rubber adhesive and a laminate of polyethylene film, elastic fiber, synthetic rubber adhesive, polyurethane adhesive, and a top sheet of flash spunbonded high density polyethylene fibers. Additives have been incorporated into these materials to provide ultraviolet light resistance. DuPont requires that DuPont™ Tyvek® HomeWrap®, DuPont™ Tyvek® and DuPont™ Tyvek® HeaderWrap®
be covered within 4 months (120 days) of its installation. DuPont™ Tyvek® CommercialWrap® must be covered within 9 months (270 days) of its installation.
warningDuPont™ Tyvek® air barriers are slippery and should not be used in any application where it will be walked on. In addition, because it is slippery, DuPont recommends using kickjacks or scaffolding for exterior work above the first floor. If ladders must be used, extra caution must be taken to use them safely by following the requirements set forth in CAN3-Z11-M81 (R2005) for portable ladders. DuPont™ Tyvek® is combustible and should be protected from a flame and other high heat sources. DuPont™ Tyvek® will melt at 275°F (135°C) and if the temperature of DuPont™ Tyvek® reaches 750°F (400°C), it will burn and the fire may spread and fall away from the point of ignition. For more information, call 1-800-44-Tyvek.
DuPont™ Flashing Systems products and their release paper are slippery and should not be walked on. Remove release paper from work area immediately. DuPont™ Flashing Systems products will melt at temperatures greater than 250°F (121°C). DuPont™ Flashing Systems products are combustible and should be protected from flame and other high heat sources. DuPont™ Flashing Systems products will not support combustion if the heat source is removed. However, if burning occurs, ignited droplets may fall away from the point of ignition. For more information, call 1-800-44-Tyvek.
NoteWhen installed in conjunction with other building materials, DuPont™ Flashing Systems must be properly shingled with these materials, such that water is diverted to the exterior of the wall system. DuPont™ Tyvek® products are secondary weather barriers, not the primary water barrier. The outer façade is the primary barrier. You must follow façade manufacturer’s installation and maintenance requirements for all façade systems in order to maintain water holdout properties and ensure performance of DuPont™ Tyvek®. Use of additives, coatings or cleansers on or in the façade system may impact the performance of DuPont™ Tyvek® water-resistive barriers. DuPont™ Tyvek® Weather Barrier Systems products are to be used as outlined in this installation guideline. DuPont™ Flashing Systems products are not suggested for use on roof windows. For superior protection against bulk water penetration, DuPont suggests a system combining a quality exterior façade, a good secondary weather barrier and an exterior sheathing, appropriate flashing materials and details; and high quality windows and doors with particular attention to proper installation of each component. In a system where no exterior sheathing is used and DuPont™ Tyvek® is installed directly over the wall studs, exterior façade materials should be selected to ensure maximum protection against water intrusion. Careful workmanship and proper installation of each component is very important.
DuPont believes this information to be reliable and accurate. The information may be subject to revision as additional experience and knowledge is gained. It is the user’s responsibility to determine the proper construction materials needed.
For complete warranty information please see the full Warranty at www.construction.tyvek.com. To submit a warranty claim, please contact DuPont at www.construction.tyvek.com or call 1-800-44-Tyvek. Warranty coverage requires submission of proof of purchase of the DuPont™ Tyvek® at issue.
This information is not intended to be used by others for advertising, promotion or other publication for commercial purposes.

For more information about DuPont™ Tyvek® Weatherization Systems, please call 1-800-44-Tyvek or visit us at www.Construction.Tyvek.com
Copyright © 2008 E. I. du Pont de Nemours and Company. All rights reserved. The DuPont Oval Logo, DuPont™, The miracles of science™ , Tyvek®, Tyvek® HomeWrap®, Tyvek® StuccoWrap™, Tyvek® DrainWrap™, DuPont™ FlexWrap™, DuPont™ StraightFlash™ and DuPont™ StraightFlash™ VF are registered trademarks or trademarks of E. I. du Pont de Nemours and Company. DuPont Canada is a licencee. K-17941CE 03/08