ducati 748/916/996 installation · pdf fileducati 748/916/996 installation instructions...

1
DUCATI 748/916/996 Installation Instructions PKT-007 Introduction: Made in USA This easy to install, high quality, Powerlet™ kit provides a convenient way to access the battery on Ducati 916, 748, & 996 motorcycles. The operator can supply power to the battery (i.e. battery charger), draw power from the battery (i.e. heated vest), or monitor the state of charge on the battery using the Powerlet socket. Parts List: 1 - Wiring harness w/ 15A fuse 1 - Mounting bracket w/ socket 2 - Allen screw, 8x35mm 2 - Flat washer, 8mm Ty-wrap(s) Please read all of the instructions carefully before attempting the installation of this product. Please have a trained professional install this kit if you are not familiar with these procedures. Quick Start Instruction: STEP #1 Remove necessary fairings. STEP #2 Route wires starting at the battery and finishing at the bracket. STEP #3 Attach the wires to the socket and test. STEP #4 Mount the bracket. STEP #5 Look over your work. STEP #6 Put everything you took off back on. Detailed Instruction: STEP #1 – Remove the right side fairing, & seat. See the Ducati service manual. STEP #2 – Stretch out the wiring harness. Locate a large wiring harness behind the frame rail [B]. Grab the socket end of the harness and start routing the harness by looping the wires up through the gap between the frame members just behind the battery [B]. You should be following the large wiring harness behind the frame rail. The wires will exit in the underside of the seat area, just like the large harness [D]. Attach the ground (black) wire under the hinge-mounting bolt[C]. Tie wrap the harness under the cross member [E]. Go back to the battery area and using a ty-wrap, attach the fuse holder to the wiring just above the plus terminal of the battery [F]. The fuse holder can be slid to create or eliminate slack in the harness at the socket. Connect the red wire to the battery posts as follows: RED WIRE = BATTERY POSITIVE STEP #3 – Install the fuse in the fuse-holder. Next attach the wires to the socket. The center terminal is plus and the outer ring is negative (see dwg below). Apply either dielectric grease or Vaseline to the terminals. Use a voltmeter to check if the polarity is correct. STEP #4 - Attach the bracket behind the left side tail section mounting lug[A]. The stock bolt needs to be replaced with the supplied (longer) 8mm bolt. This bolt is under a load so it may be tight to remove. Have someone support the tail section when replacing this bolt. The second bolt can be used on the other side. STEP #5 - Apply the remaining ty-wraps in useful locations. Do NOT allow the harness to directly contact the motor or exhaust. STEP #6 –Replace fairings & seat. Enjoy! Copyright 2006-2009 Coliant Corporation PATENTS PENDING August 28, 2009 PHONE: 877-752-7835 FAX: 586-276-0907 WEB SITE: www.powerlet.net POSITIVE NEGATIVE POWERLET CONNECTOR NEGATIVE FRONT REAR POSITIVE A B C D E F

Upload: lamdan

Post on 26-Mar-2018

248 views

Category:

Documents


6 download

TRANSCRIPT

DUCATI 748/916/996 Installation InstructionsPKT-007

Introduction: Made in USAThis easy to install, high quality, Powerlet™ kit provides a convenient way toaccess the battery on Ducati 916, 748, & 996 motorcycles. The operator cansupply power to the battery (i.e. battery charger), draw power from thebattery (i.e. heated vest), or monitor the state of charge on the battery usingthe Powerlet socket.

Parts List:• 1 - Wiring harness w/ 15A fuse• 1 - Mounting bracket w/ socket• 2 - Allen screw, 8x35mm• 2 - Flat washer, 8mm• Ty-wrap(s)

Please read all of the instructions carefully before attempting theinstallation of this product. Please have a trained professional install

this kit if you are not familiar with these procedures.

Quick Start Instruction:STEP #1 Remove necessary fairings. STEP #2 Route wires starting at the battery and finishing at the bracket.STEP #3 Attach the wires to the socket and test.STEP #4 Mount the bracket.STEP #5 Look over your work. STEP #6 Put everything you took off back on.

Detailed Instruction:STEP #1 – Remove the right side fairing, & seat. See the Ducati servicemanual.

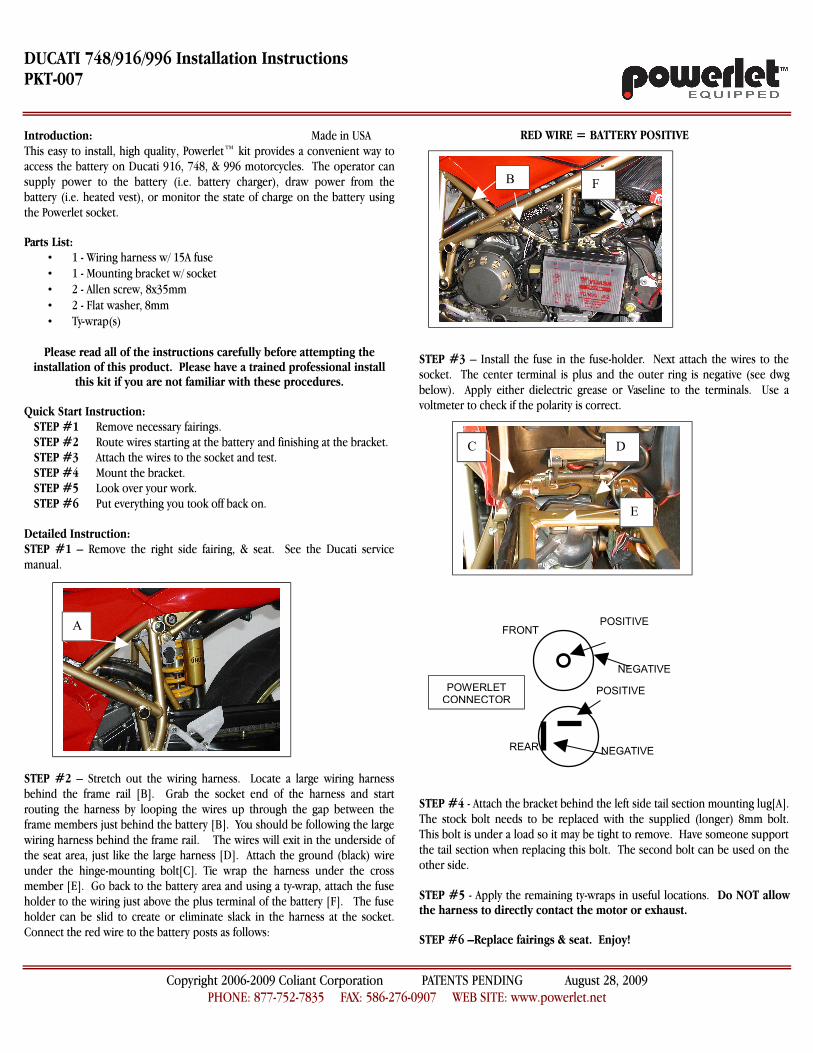
STEP #2 – Stretch out the wiring harness. Locate a large wiring harnessbehind the frame rail [B]. Grab the socket end of the harness and startrouting the harness by looping the wires up through the gap between theframe members just behind the battery [B]. You should be following the largewiring harness behind the frame rail. The wires will exit in the underside ofthe seat area, just like the large harness [D]. Attach the ground (black) wireunder the hinge-mounting bolt[C]. Tie wrap the harness under the crossmember [E]. Go back to the battery area and using a ty-wrap, attach the fuseholder to the wiring just above the plus terminal of the battery [F]. The fuseholder can be slid to create or eliminate slack in the harness at the socket.Connect the red wire to the battery posts as follows:

RED WIRE = BATTERY POSITIVE

STEP #3 – Install the fuse in the fuse-holder. Next attach the wires to thesocket. The center terminal is plus and the outer ring is negative (see dwgbelow). Apply either dielectric grease or Vaseline to the terminals. Use avoltmeter to check if the polarity is correct.

STEP #4 - Attach the bracket behind the left side tail section mounting lug[A].The stock bolt needs to be replaced with the supplied (longer) 8mm bolt.This bolt is under a load so it may be tight to remove. Have someone supportthe tail section when replacing this bolt. The second bolt can be used on theother side.

STEP #5 - Apply the remaining ty-wraps in useful locations. Do NOT allowthe harness to directly contact the motor or exhaust.

STEP #6 –Replace fairings & seat. Enjoy!

Copyright 2006-2009 Coliant Corporation PATENTS PENDING August 28, 2009PHONE: 877-752-7835 FAX: 586-276-0907 WEB SITE: www.powerlet.net

POSITIVE

NEGATIVE

POWERLETCONNECTOR

NEGATIVE

FRONT

REAR

POSITIVE

A

B

C D

E

F