ds-40 user's guide - epson · see these sections to learn about the power management options...
TRANSCRIPT

DS-40 User's Guide


3
ContentsDS-40 User's Guide ..................................................................................................................................... 7Scanner Basics............................................................................................................................................ 8
Scanner Parts Locations ...................................................................................................................... 8Scanner Parts.................................................................................................................................. 8Scanner Buttons and Lights........................................................................................................... 11Optional and User Replaceable Epson Scanner Parts .................................................................. 13
Powering Your Scanner ..................................................................................................................... 13Installing Batteries ......................................................................................................................... 13Using the Optional AC Adapter...................................................................................................... 15
Changing the Power Off Setting ......................................................................................................... 16Loading Originals...................................................................................................................................... 18
Loading Originals in the Input Slot...................................................................................................... 18Original Document Loading Capacity ................................................................................................. 20Plastic Card Loading Capacity ........................................................................................................... 21
Wi-Fi Networking ....................................................................................................................................... 23Network Security Recommendations ................................................................................................. 23Connection Mode Switch.................................................................................................................... 23Connecting to an Existing Wi-Fi Network .......................................................................................... 25
Manually Connecting to a Wi-Fi Network....................................................................................... 26Wi-Fi Protected Setup (WPS) ........................................................................................................ 28
Using WPS to Connect to a Network......................................................................................... 28Using WPS PIN Mode to Connect to a Network........................................................................ 29
Setting Up Network Scanning........................................................................................................ 31Determining the Scanner's IP Address ..................................................................................... 34
Direct Wi-Fi Mode Setup .................................................................................................................... 34Enabling a Direct Wi-Fi Connection............................................................................................... 35Using WPS to Set Up a Direct Wi-Fi Connection ........................................................................... 36
Epson DocumentScan App for iOS/Android....................................................................................... 37Scanning .................................................................................................................................................... 38
Starting a Scan from a Scanner Button .............................................................................................. 38

4
Assigning Start Button Settings or Scan Jobs................................................................................ 39Scanning with Document Capture Pro or Document Capture ............................................................ 39Scanning with Epson Scan................................................................................................................. 42
Available Image Adjustments ........................................................................................................ 44Starting a Scan from a Scanning Program ......................................................................................... 45Scanning Special Projects.................................................................................................................. 47
Convert Scanned Documents to Editable Text (OCR)................................................................... 47Scanning Using OCR - Windows .............................................................................................. 47Scanning Using OCR - Mac ...................................................................................................... 49
Scanning to a SharePoint Server or Cloud Service ....................................................................... 51Cleaning and Transporting Your Scanner............................................................................................... 54
Cleaning Your Scanner ...................................................................................................................... 54Cleaning Inside Your Scanner............................................................................................................ 54Replacing Batteries ............................................................................................................................ 56Calibrating Your Scanner ................................................................................................................... 58Transporting Your Scanner ................................................................................................................ 59
Solving Problems ...................................................................................................................................... 61Scanner Light Status .......................................................................................................................... 61Solving Scanning Problems ............................................................................................................... 63
Scanner Does Not Turn On or Turns Off Unexpectedly................................................................. 63Scanner Button Does Not Work as Expected ................................................................................ 64Scanning Software Does Not Operate Correctly ........................................................................... 65Cannot Start Epson Scan .............................................................................................................. 65Original Feeds Incorrectly in Scanner............................................................................................ 66Original Jams in Scanner............................................................................................................... 67Scanning is Slow ........................................................................................................................... 68
Solving Network Scanning Problems ................................................................................................. 68Cannot Scan Over a Network ........................................................................................................ 68Scanner Cannot Connect to a Wireless Router ............................................................................. 70
Solving Scanned Image Quality Problems ......................................................................................... 71Back of Original Image Appears in Scanned Image ...................................................................... 71Scanned Characters are Blurry ..................................................................................................... 72Characters are not Recognized During Conversion to Editable Text (OCR) ................................. 72

5
Ripple Patterns Appear in an Image .............................................................................................. 73Spots or Lines Appear in All Scanned Images............................................................................... 73Scanned Image Edges are Cropped ............................................................................................. 73
Uninstall Your Scanner Software........................................................................................................ 74Uninstalling Scanner Software - Windows..................................................................................... 74Uninstalling Scanner Software - Mac............................................................................................. 75
Where to Get Help.............................................................................................................................. 75Technical Specifications .......................................................................................................................... 77
Windows System Requirements ........................................................................................................ 77Mac System Requirements ................................................................................................................ 78General Specifications ....................................................................................................................... 78Dimension Specifications ................................................................................................................... 79Electrical Specifications ..................................................................................................................... 79Environmental Specifications ............................................................................................................. 80USB Interface Specifications.............................................................................................................. 80Network Interface Specifications ........................................................................................................ 81Safety and Approvals Specifications .................................................................................................. 81
Notices ....................................................................................................................................................... 83Important Safety Instructions.............................................................................................................. 83Battery Safety Instructions ................................................................................................................. 84Restrictions on Copying ..................................................................................................................... 85Default Delay Times for Power Management for Epson Products...................................................... 86Trademarks........................................................................................................................................ 86Copyright Notice................................................................................................................................. 86
Open Source Software License..................................................................................................... 87Info-ZIP Copyright and License ..................................................................................................... 90A Note Concerning Responsible Use of Copyrighted Materials..................................................... 92Copyright Attribution...................................................................................................................... 92

7
DS-40 User's GuideWelcome to the DS-40 User's Guide.For a printable PDF copy of this guide, click here.
8
Scanner BasicsSee these sections to learn about the basic features of your scanner.Scanner Parts LocationsPowering Your ScannerChanging the Power Off Setting
Scanner Parts LocationsSee these sections to identify the parts on your scanner.Scanner PartsScanner Buttons and LightsOptional and User Replaceable Epson Scanner PartsParent topic: Scanner Basics
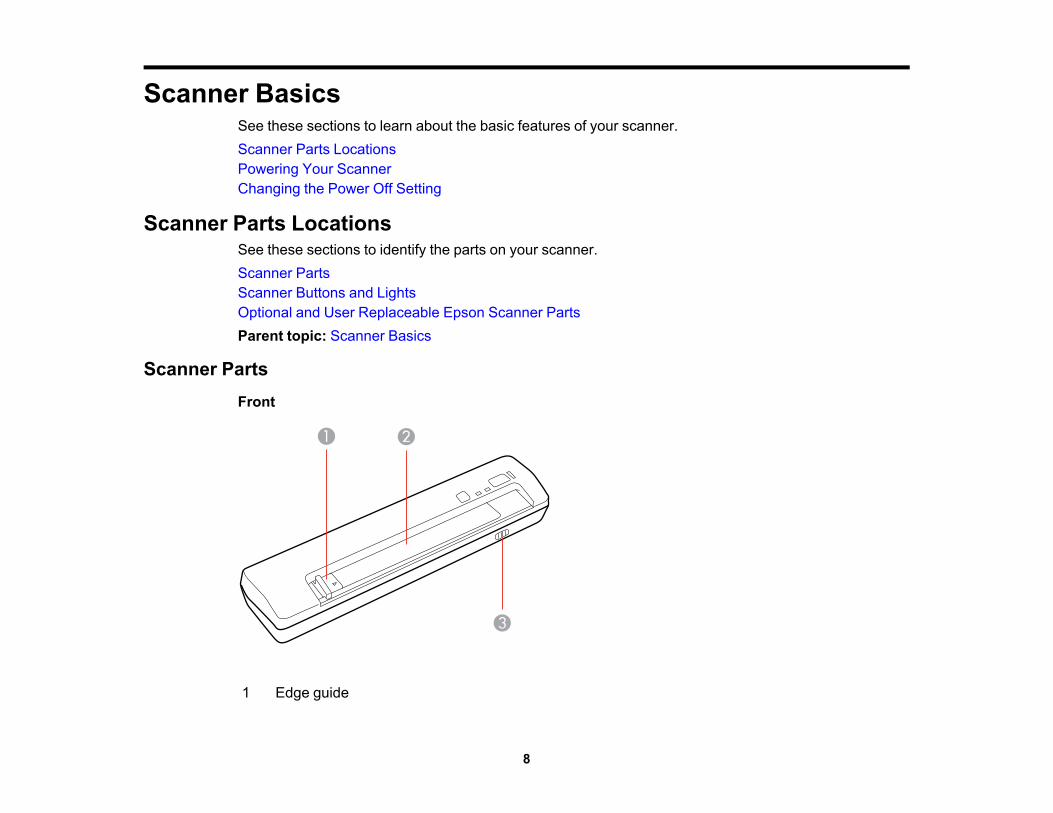
Scanner PartsFront
1 Edge guide
9
2 Input slot3 Connection mode switch
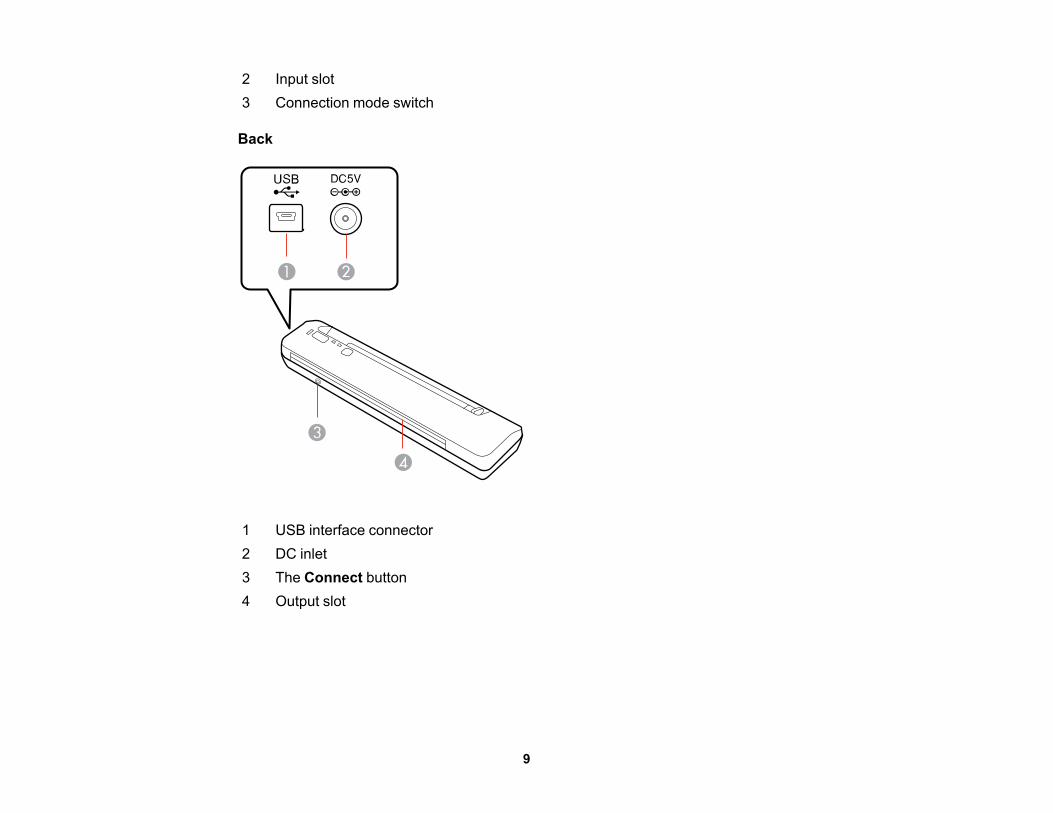
Back
1 USB interface connector2 DC inlet3 The Connect button4 Output slot

10
Accessories
1 USB cable2 Accessory kit3 Carrying bag4 4 AA batteries
Parent topic: Scanner Parts Locations

11
Scanner Buttons and LightsButtons
1 The power button2 The start button
12
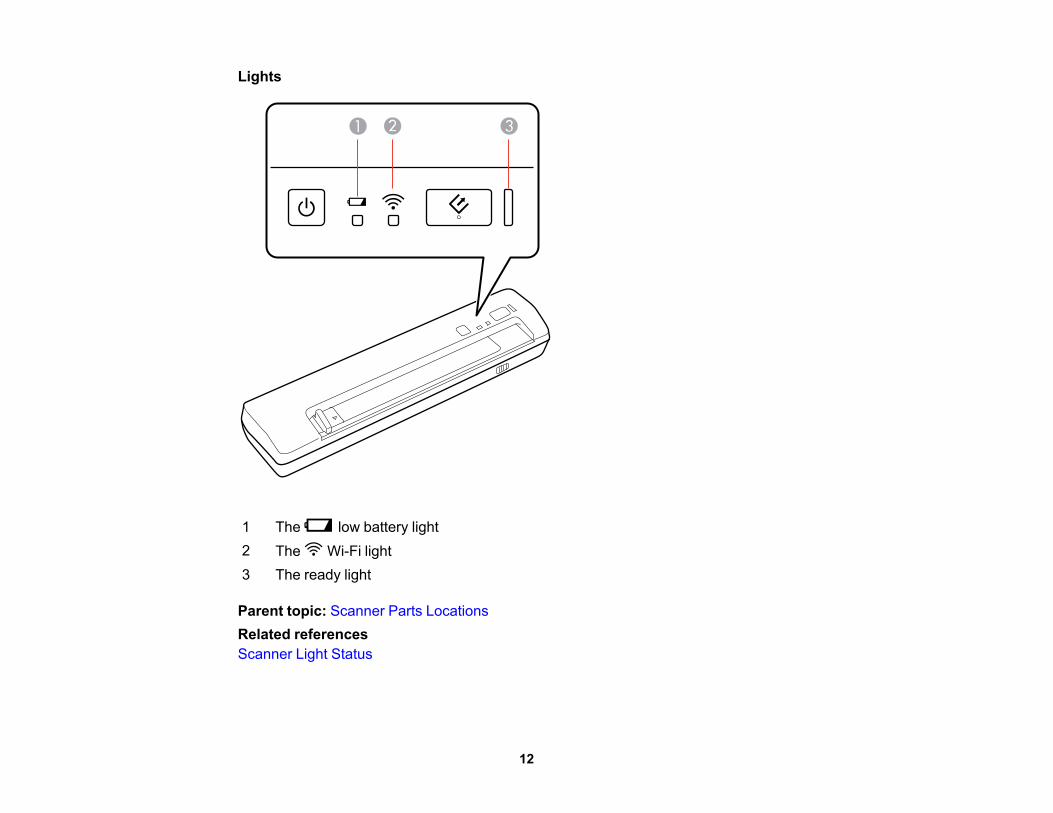
Lights
1 The low battery light2 The Wi-Fi light3 The ready light
Parent topic: Scanner Parts LocationsRelated referencesScanner Light Status
13
Optional and User Replaceable Epson Scanner PartsYou can purchase genuine Epson accessories at epson.com (U.S. sales), epson.ca (Canadian sales), orepson.com.jm (Caribbean sales). You can also purchase accessories from an Epson authorized reseller.To find the nearest one, call 800-GO-EPSON (800-463-7766) in the U.S. or 800-807-7766 in Canada.
Part Part numberAC adapter B12B867201Maintenance sheet kit B12B818291
Parent topic: Scanner Parts Locations
Powering Your ScannerSee these sections to learn about the power management options for your scanner.If you connect your scanner using a USB connection, you can power the scanner through the USB port.If you connect your scanner using a Wi-Fi connection, you must install the batteries or connect theoptional AC adapter.Installing BatteriesUsing the Optional AC AdapterParent topic: Scanner Basics
Installing BatteriesYou can use 4 AA batteries (Ni-MH, alkaline, or lithium) to power your scanner.
Caution: Use only the type of batteries specified in this manual. Do not install batteries of different types,or mix new and old batteries.
14
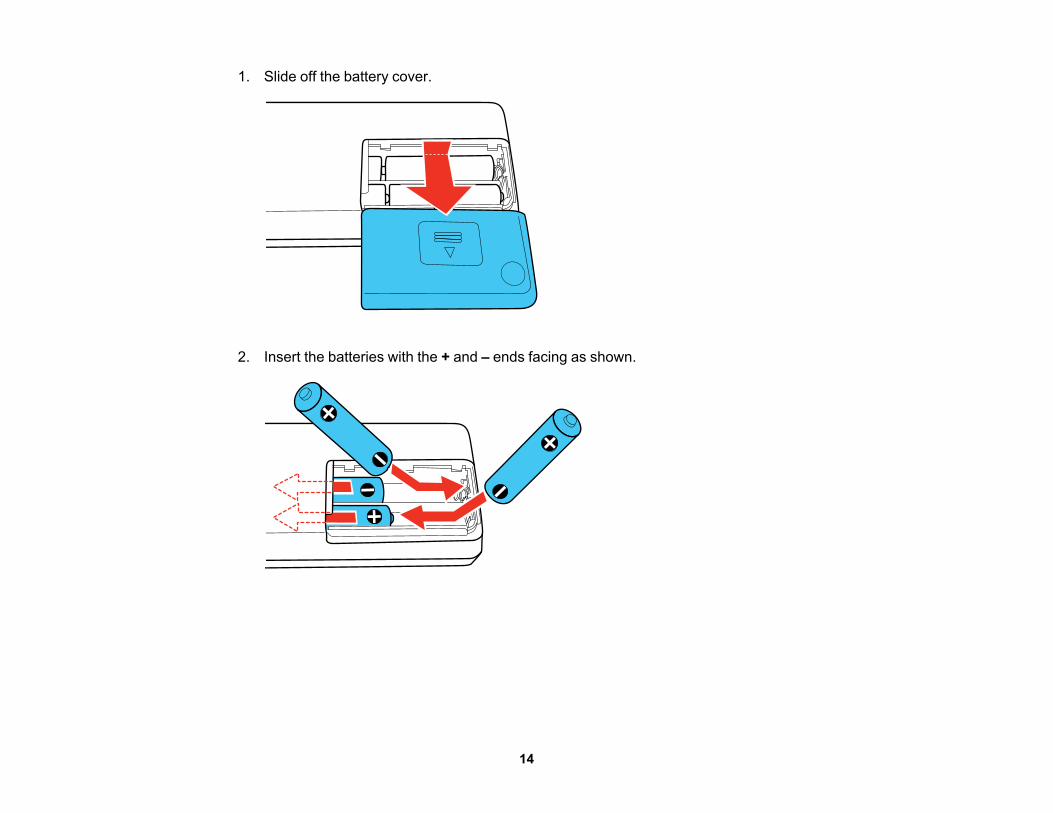
1. Slide off the battery cover.
2. Insert the batteries with the + and – ends facing as shown.

15
3. Slide the battery cover back on.
Parent topic: Powering Your ScannerRelated referencesBattery Safety Instructions
Using the Optional AC AdapterWhen scanning a large number of documents over a wireless connection, use the optional AC adapter(part number B12B867201) to avoid draining the batteries.
Note: The AC adapter does not recharge the batteries installed in the scanner.
16
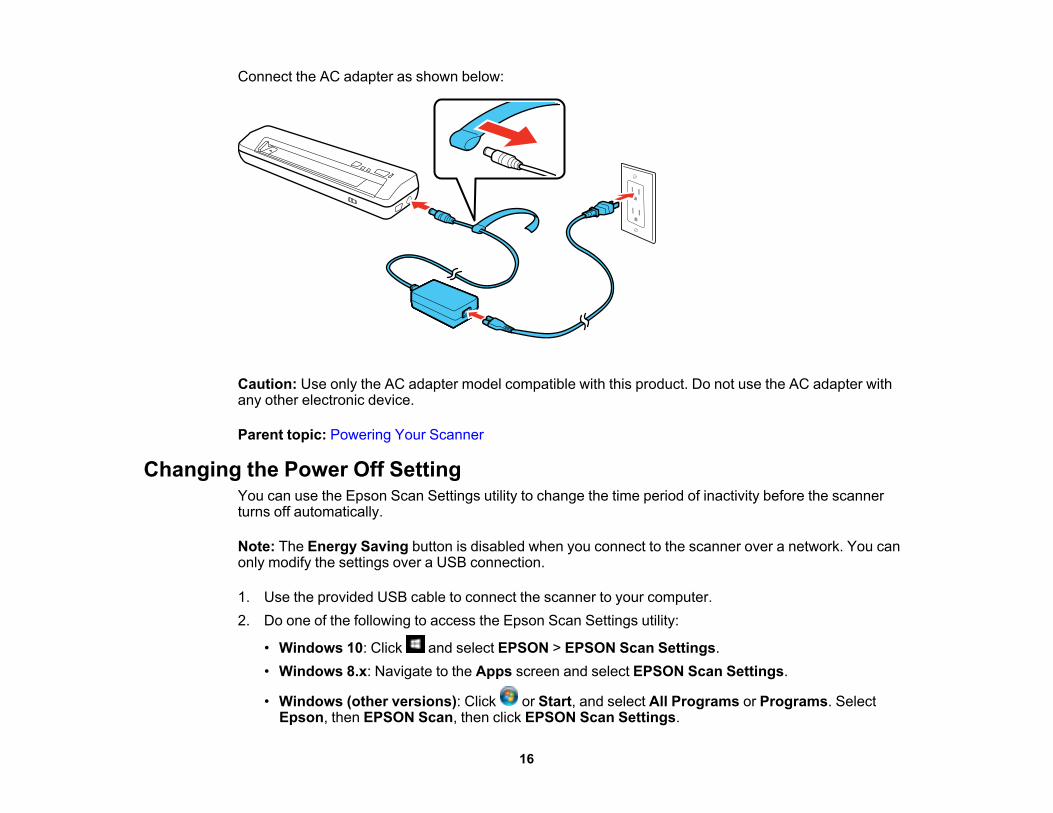
Connect the AC adapter as shown below:
Caution: Use only the AC adapter model compatible with this product. Do not use the AC adapter withany other electronic device.
Parent topic: Powering Your Scanner
Changing the Power Off SettingYou can use the Epson Scan Settings utility to change the time period of inactivity before the scannerturns off automatically.
Note: The Energy Saving button is disabled when you connect to the scanner over a network. You canonly modify the settings over a USB connection.
1. Use the provided USB cable to connect the scanner to your computer.2. Do one of the following to access the Epson Scan Settings utility:
• Windows 10: Click and select EPSON > EPSON Scan Settings.• Windows 8.x: Navigate to the Apps screen and select EPSON Scan Settings.
• Windows (other versions): Click or Start, and select All Programs or Programs. SelectEpson, then EPSON Scan, then click EPSON Scan Settings.

17
• Mac: Open the Applications folder, then open the Epson Software folder and double-click theEPSON Scan Settings icon.
3. Click Energy Saving.
4. Enter the time period of inactivity before the scanner turns off automatically as the Power Off Timersetting. If you enter a value of 0, the scanner will not turn off automatically.
5. Click OK.Parent topic: Scanner Basics

18
Loading OriginalsFollow the instructions here to load your originals into the scanner.Loading Originals in the Input SlotOriginal Document Loading CapacityPlastic Card Loading Capacity
Loading Originals in the Input SlotYou can load an original that meets the document specifications in the input slot.1. Slide the edge guide all the way out.
Caution: Do not load photos, or valuable original documents or artwork, directly into the scanner.This may wrinkle or damage the original.
19
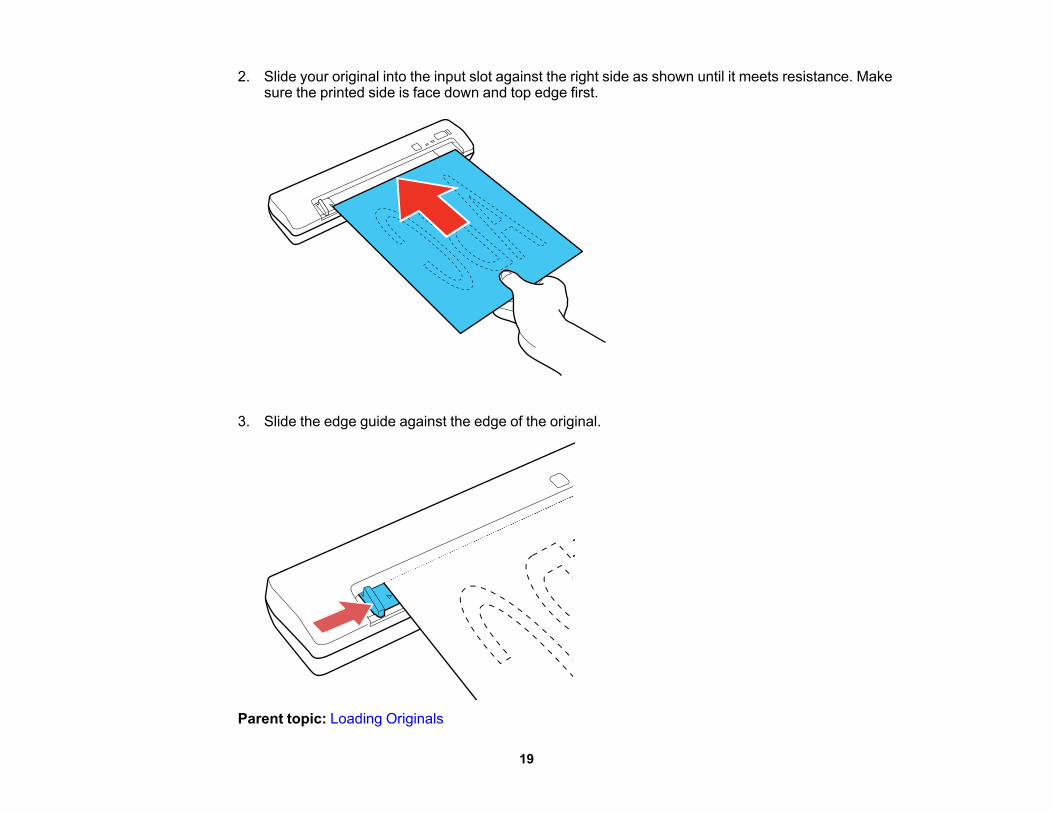
2. Slide your original into the input slot against the right side as shown until it meets resistance. Makesure the printed side is face down and top edge first.
3. Slide the edge guide against the edge of the original.
Parent topic: Loading Originals

20
Related referencesOriginal Document Loading CapacityPlastic Card Loading Capacity
Original Document Loading CapacityYou can load an original document that meets the specifications in your scanner.
Paper type Paper size Paper weight orthickness
Loading capacity
Plain paper, fine paper,recycled paper
Letter (8.5 × 11 inches[216 × 279 mm])
9 to 72 lb(35 to 270 g/m2)
1 sheet
A4 (8.3 × 11.7 inches[210 × 297 mm])Legal (8.5 × 14 inches[216 × 356 mm])A5 (5.8 × 8.2 inches[148 × 210 mm])A6 (4.1 × 5.8 inches[105 × 148 mm])B5 (7.2 × 10.1 inches[182 × 257 mm])
Paper envelopes Envelopes (from 3.5 ×3.5 inches [90 × 90 mm] to8.0 × 10.9 inches [205 ×277 mm])
Less than0.014 inch(0.38 mm)
1 envelope
Note: The length of paper that can be scanned on Windows is 2.9 to 36.0 inches (73.7 to 914.4 mm). Ona Mac, the maximum length is 16.5 inches (419 mm).
Caution: Do not load the following types of originals in the scanner, or they may be damaged or maydamage the scanner:• Folded paper• Thermal paper• Coated paper
21
• Originals with uneven surfaces, such as embossed documents• Photos• Originals with wet ink• Ripped, curled, or wrinkled originals• Originals containing stapes or paper clips• Originals with holes, other than standard hole-punched originals• Originals that are bound• Originals with carbon paper backing• Transparencies• Glossy originals• Carbon-less paper• Perforated originals• Originals with labels or stickers• Envelopes that are torn• Envelopes with open flaps• Envelopes with exposed sticky glue• Envelopes sealed with sealing wax• Envelopes with windows
Parent topic: Loading Originals
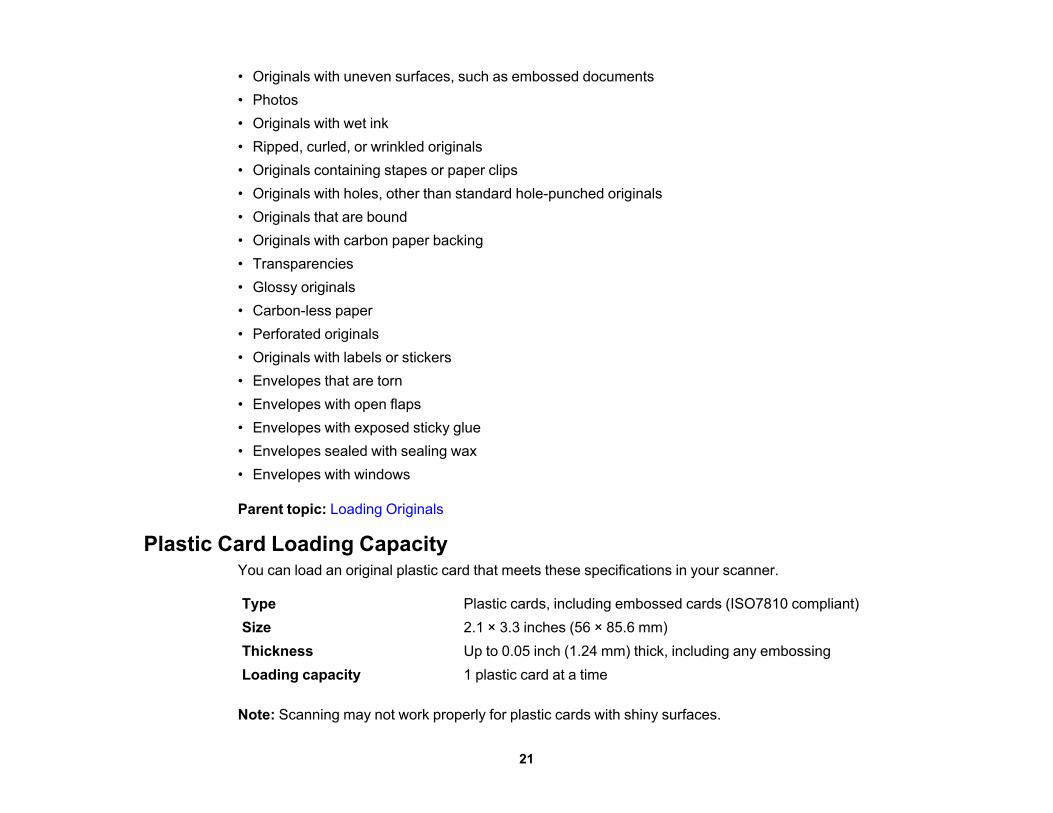
Plastic Card Loading CapacityYou can load an original plastic card that meets these specifications in your scanner.
Type Plastic cards, including embossed cards (ISO7810 compliant)Size 2.1 × 3.3 inches (56 × 85.6 mm)Thickness Up to 0.05 inch (1.24 mm) thick, including any embossingLoading capacity 1 plastic card at a time
Note: Scanning may not work properly for plastic cards with shiny surfaces.

22
Parent topic: Loading Originals

23
Wi-Fi NetworkingSee these sections to use your scanner over a Wi-Fi network.Network Security RecommendationsConnection Mode SwitchConnecting to an Existing Wi-Fi NetworkDirect Wi-Fi Mode SetupEpson DocumentScan App for iOS/Android
Network Security RecommendationsTo help deter unauthorized access to your product over a network, you should protect your networkenvironment using appropriate security measures.Security measures such as these can help deter threats such as loss of user data, use of telephone andfax lines, and other intrusions:• Connect your product only to a network protected by a firewall
Connecting your product directly to the Internet may leave it vulnerable to security threats. Instead,connect it to a router or other network connection protected by a firewall. Your router may alreadyhave a firewall set up by your Internet service provider; check with your ISP for confirmation. For bestresults, set up and use a private IP address for your network connection.
• Change the default administrator password on your productIf your product has an option to set an administrator password, change the default administratorpassword to deter access by unauthorized users to personal data stored on your product, such as IDs,passwords, and contact lists.
Parent topic: Wi-Fi Networking
Connection Mode SwitchThe position of the connection mode switch determines which method you can use to connect thescanner to a wireless network or device, or to a computer.

24
Connection mode DescriptionWi-Fi Connects to a Wi-Fi router (requires additional network setup steps, see
link at end of topic)AP mode Creates a local Wi-Fi network that allows other devices to connect directly
to the scannerUSB Connects to a computer via a mini-USB cable
Parent topic: Wi-Fi NetworkingRelated conceptsConnecting to an Existing Wi-Fi NetworkDirect Wi-Fi Mode Setup

25
Connecting to an Existing Wi-Fi NetworkYou can set up your scanner to communicate with your computer using a wireless router. The wirelessrouter can be connected to your computer over a wireless or wired network.
1 Epson scanner2 Wireless router3 Computer with a wireless interface4 Computer5 Internet6 Ethernet cable (used only for wired connection to the wireless router)
Manually Connecting to a Wi-Fi NetworkWi-Fi Protected Setup (WPS)
26
Setting Up Network ScanningParent topic: Wi-Fi Networking
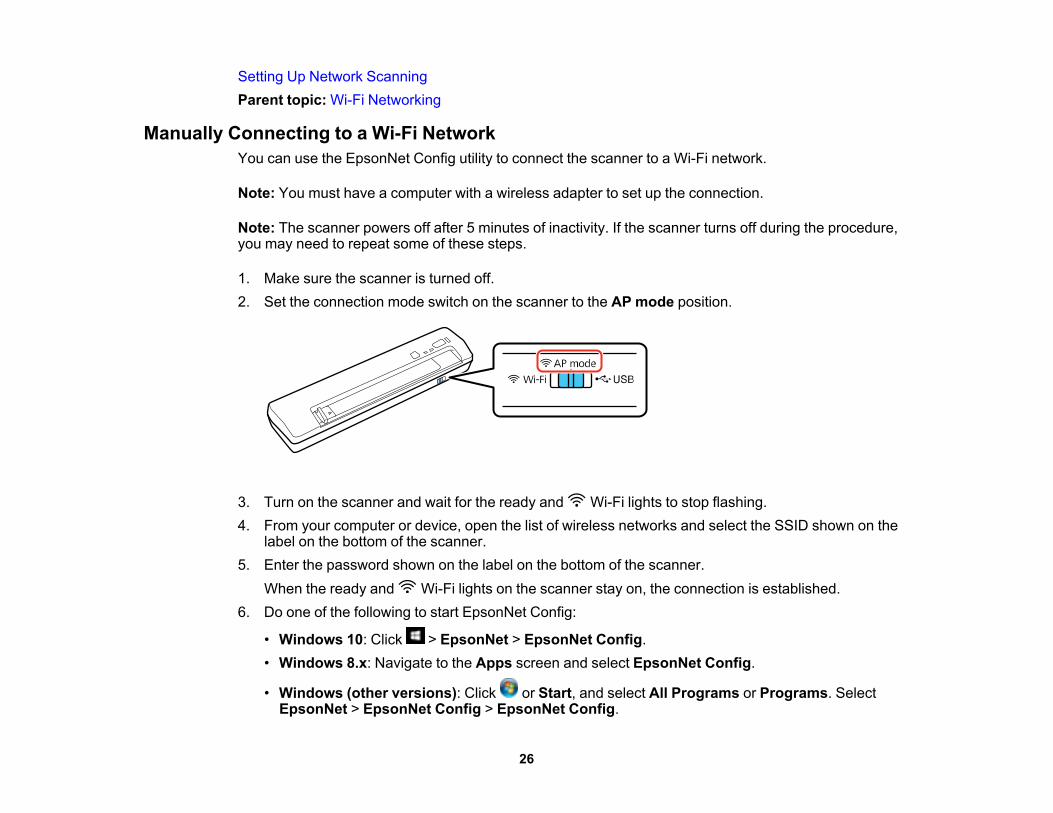
Manually Connecting to a Wi-Fi NetworkYou can use the EpsonNet Config utility to connect the scanner to a Wi-Fi network.
Note: You must have a computer with a wireless adapter to set up the connection.
Note: The scanner powers off after 5 minutes of inactivity. If the scanner turns off during the procedure,you may need to repeat some of these steps.
1. Make sure the scanner is turned off.2. Set the connection mode switch on the scanner to the AP mode position.
3. Turn on the scanner and wait for the ready and Wi-Fi lights to stop flashing.4. From your computer or device, open the list of wireless networks and select the SSID shown on the
label on the bottom of the scanner.5. Enter the password shown on the label on the bottom of the scanner.
When the ready and Wi-Fi lights on the scanner stay on, the connection is established.6. Do one of the following to start EpsonNet Config:
• Windows 10: Click > EpsonNet > EpsonNet Config.• Windows 8.x: Navigate to the Apps screen and select EpsonNet Config.
• Windows (other versions): Click or Start, and select All Programs or Programs. SelectEpsonNet > EpsonNet Config > EpsonNet Config.
27
• Mac: Open the Applications folder, select Epson Software > EpsonNet > EpsonNet Config >EpsonNet Config.
7. Select your scanner from the list and click Configuration.8. Select Network > Wi-Fi.9. Select the following settings for your infrastructure connection:
• Communication mode: Select Infrastructure.• SSID: Enter the SSID of the wireless router.• Security level: Select the wireless connection's security protocol.• WEP Settings or WPA Settings: Enter the wireless connection's security key.
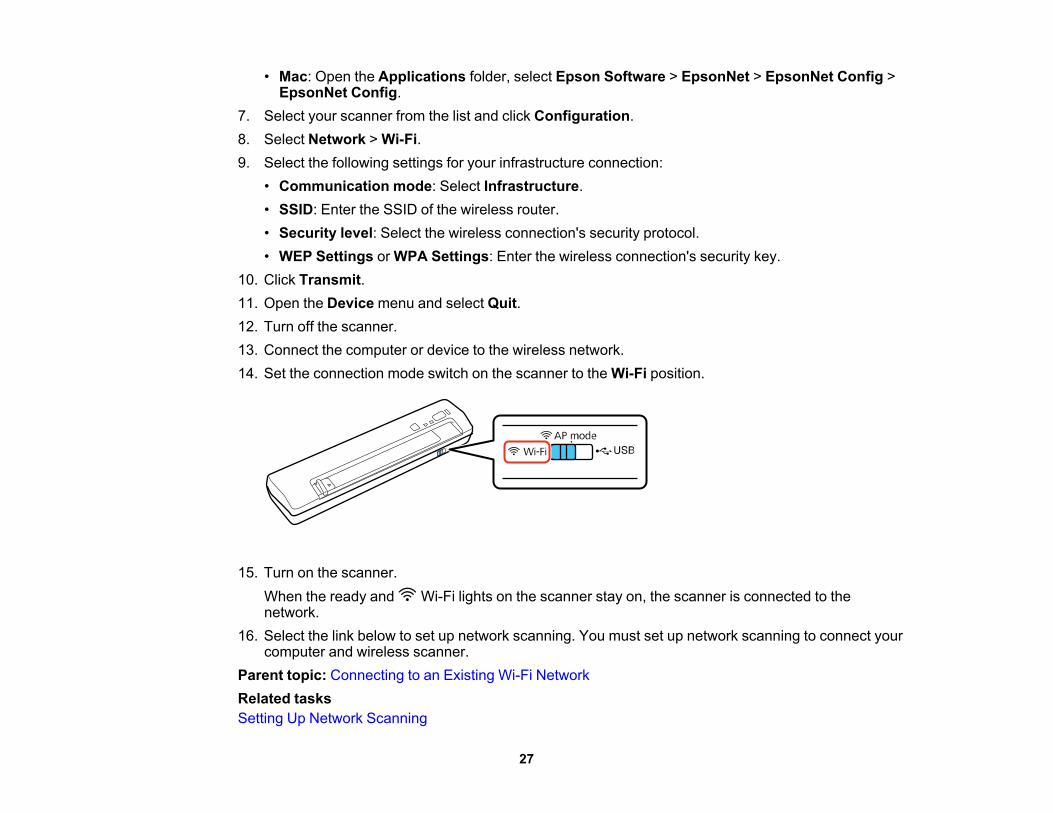
10. Click Transmit.11. Open the Device menu and select Quit.12. Turn off the scanner.13. Connect the computer or device to the wireless network.14. Set the connection mode switch on the scanner to the Wi-Fi position.
15. Turn on the scanner.When the ready and Wi-Fi lights on the scanner stay on, the scanner is connected to thenetwork.
16. Select the link below to set up network scanning. You must set up network scanning to connect yourcomputer and wireless scanner.
Parent topic: Connecting to an Existing Wi-Fi NetworkRelated tasksSetting Up Network Scanning

28
Wi-Fi Protected Setup (WPS)If your network uses a WPS-enabled wireless router, you can quickly connect your scanner to thenetwork using Wi-Fi Protected Setup (WPS).
Note: To check if your router is WPS-enabled, look for a button labeled WPS on your router. If there isno hardware button, there may be a WPS setting in the software for the device. Check your networkproduct documentation for details.
Using WPS to Connect to a NetworkUsing WPS PIN Mode to Connect to a NetworkParent topic: Connecting to an Existing Wi-Fi Network
Using WPS to Connect to a NetworkIf you have a WPS-enabled wireless router, you can use Wi-Fi Protected Setup (WPS) to connect yourscanner to the network.1. Make sure the scanner is turned off.2. Set the connection mode switch on the scanner to the Wi-Fi position.
3. Enable WPS on your router by pressing the WPS button or enabling the WPS setting in your routerfirmware.The router enters WPS discovery mode for 2 minutes.
4. Turn on the scanner.

29
5. Press and hold the Connect button on the scanner for at least 3 seconds, then release it when theready and Wi-Fi lights flash alternately.
Note: If you do not complete this step within 2 minutes, repeat steps 1 to 5.
When the ready and Wi-Fi lights on the scanner stay on, the scanner is connected to thenetwork.
6. Select the link below to set up network scanning. You must set up network scanning to connect yourcomputer and wireless scanner.
Parent topic: Wi-Fi Protected Setup (WPS)Related tasksSetting Up Network Scanning
Using WPS PIN Mode to Connect to a NetworkIf you have a WPS-enabled wireless router that supports PIN mode, you can use Wi-Fi Protected Setup(WPS) PIN mode to connect your scanner to the network.1. Find the WPS PIN number setting in your router's firmware.
30
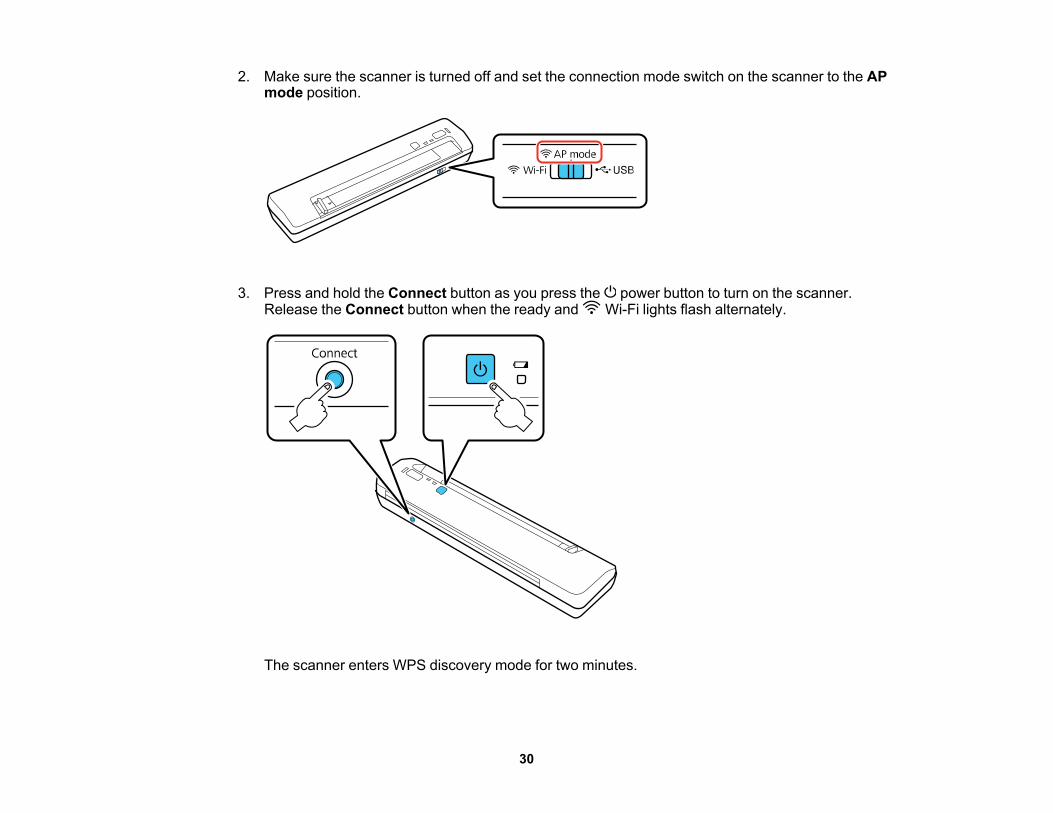
2. Make sure the scanner is turned off and set the connection mode switch on the scanner to the APmode position.
3. Press and hold the Connect button as you press the power button to turn on the scanner.Release the Connect button when the ready and Wi-Fi lights flash alternately.
The scanner enters WPS discovery mode for two minutes.

31
4. Enter the PIN code 01234565 into the WPS PIN number setting in the router firmware within twominutes.
Note: If you do not enter the code within 2 minutes, repeat steps 1 to 4.
The ready and Wi-Fi lights on the scanner stay on, indicating that the scanner is connected to thenetwork.
5. Turn off the scanner.6. Set the connection mode switch on the scanner to the Wi-Fi position.
7. Press the power button to turn on the scanner.When the ready and Wi-Fi lights on the scanner stay on, the scanner is connected to thenetwork.
8. Select the link below to set up network scanning. You must set up network scanning to connect yourcomputer and wireless scanner.
Parent topic: Wi-Fi Protected Setup (WPS)Related tasksSetting Up Network Scanning
Setting Up Network ScanningAfter manually configuring your scanner to connect to your network, you must set up the computer toconnect to the scanner using the Epson Scan Settings utility. Your scanner must be turned on andconnected to the network before you begin.
Note: The scanner powers off after 5 minutes of inactivity. If the scanner turns off during the procedure,you may need to repeat some of these steps.

32
Note: Make a note of the IP address or host name of the scanner so you can enter it in these steps.
1. Do one of the following to start Epson Scan Settings:
• Windows 10: Click > EPSON > EPSON Scan Settings.• Windows 8.x: Navigate to the Apps screen and select EPSON Scan Settings.
• Windows (other versions): Click or Start > All Programs or Programs > EPSON > EPSONScan > EPSON Scan Settings.
• Mac: Open the Applications folder, click Epson Software, and click EPSON Scan Settings.2. Select your scanner from the Select Scanner list.3. Select the Network setting and click Add.

33
You see a screen like this:
4. Do one of the following:• Under Search for addresses, select the IP address of your scanner, and click OK.• Select the Enter address setting, type in the IP address or host name of your scanner, and click
OK.5. Click the Test button to check the connection.
You see a confirmation message.
34
6. Click OK to save your settings and close Epson Scan Settings.Determining the Scanner's IP AddressParent topic: Connecting to an Existing Wi-Fi Network
Determining the Scanner's IP AddressIf you have multiple scanners on your network, you need to know the IP address of the scanner whensetting up network scanning.1. Do one of the following to start EpsonNet Config:
• Windows 10: Click > EpsonNet > EpsonNet Config.• Windows 8.x: Navigate to the Apps screen and select EpsonNet Config.
• Windows (other versions): Click or Start, and select All Programs or Programs. SelectEpsonNet > EpsonNet Config > EpsonNet Config.
• Mac: Open the Applications folder and select Epson Software > EpsonNet > EpsonNet Config> EpsonNet Config.
2. Locate your scanner in the list and write down the IP address.Parent topic: Setting Up Network Scanning
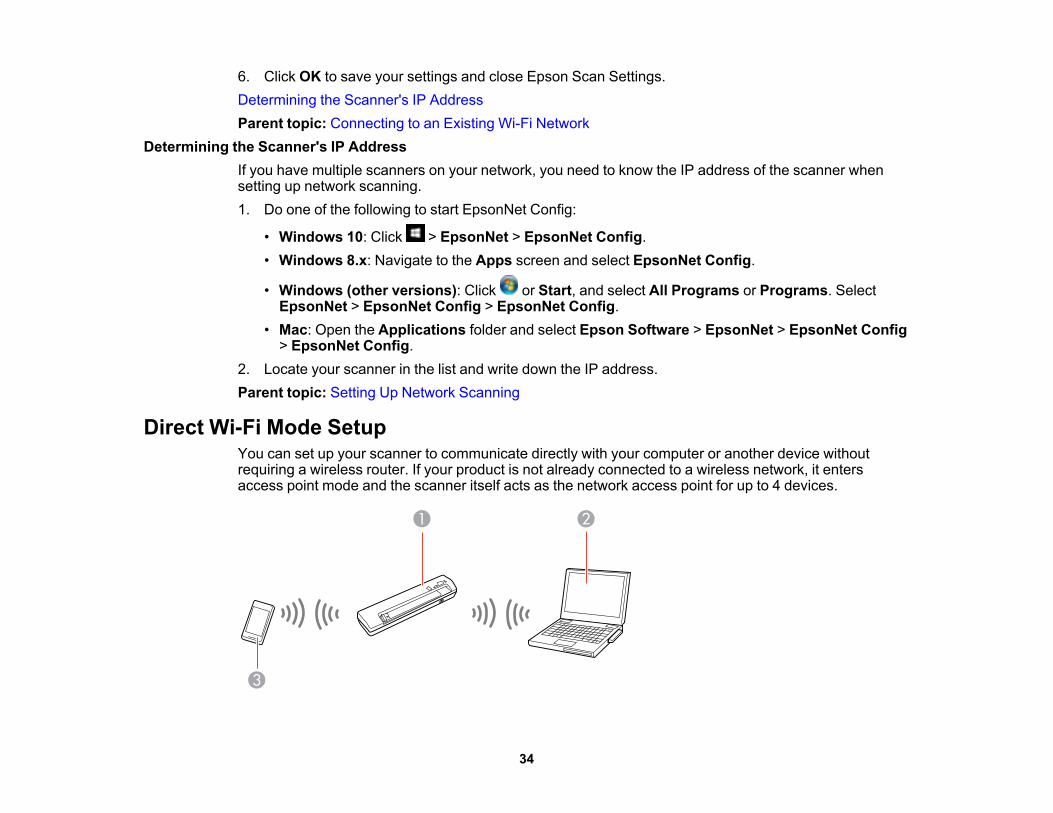
Direct Wi-Fi Mode SetupYou can set up your scanner to communicate directly with your computer or another device withoutrequiring a wireless router. If your product is not already connected to a wireless network, it entersaccess point mode and the scanner itself acts as the network access point for up to 4 devices.

35
1 Epson scanner2 Computer with a wireless interface3 Other wireless device
Enabling a Direct Wi-Fi ConnectionUsing WPS to Set Up a Direct Wi-Fi ConnectionParent topic: Wi-Fi Networking
Enabling a Direct Wi-Fi ConnectionYou can enable a direct Wi-Fi connection to allow direct communication between your scanner andcomputer or other devices without a wireless router.
Note: While you are connected to the scanner, your computer cannot access the internet.
1. Make sure the scanner is turned off.2. Set the connection mode switch on the scanner to the AP mode position.
3. Turn on the scanner.4. Wait for the ready and Wi-Fi lights to stop flashing.5. From your computer or device, search for and select the SSID shown on the label on the bottom of
the scanner.6. Enter the password shown on the label on the bottom of the scanner.
The computer connects to the scanner's wireless network. If the connection is unsuccessful, makesure you entered the password correctly.

36
Parent topic: Direct Wi-Fi Mode Setup
Using WPS to Set Up a Direct Wi-Fi ConnectionYou can use Wi-Fi Protected Setup (WPS) to create a direct Wi-Fi connection to a WPS-enabledcomputer or device.
Note: While you are connected to the scanner, your computer cannot access the internet.
1. Make sure the scanner is turned off.2. Set the connection mode switch on the scanner to the AP mode position.
3. Enable WPS on your router by pressing the WPS button or enabling the WPS setting in your routerfirmware.The router enters WPS discovery mode for 2 minutes.
4. Turn on the scanner.5. Press and hold the Connect button for at least 3 seconds until the ready and Wi-Fi lights flash
alternately.

37
When the ready and Wi-Fi lights on the scanner stay on, the connection is established.
Note: If you do not complete this step within 2 minutes, start the procedure again.
Parent topic: Direct Wi-Fi Mode Setup
Epson DocumentScan App for iOS/AndroidYou can use the Epson DocumentScan app to scan from a network scanner to an iOS or Android deviceover a direct Wi-Fi connection.For more information about Epson DocumentScan, search for the app on the App Store (iOS) or GooglePlay (Android).Parent topic: Wi-Fi Networking

38
ScanningYou can scan your originals and save them as digital files.Starting a Scan from a Scanner ButtonScanning with Document Capture Pro or Document CaptureScanning with Epson ScanStarting a Scan from a Scanning ProgramScanning Special Projects
Starting a Scan from a Scanner ButtonYou can scan using a button on your scanner. This automatically starts the scanning program you haveassigned to the button.Your product automatically selects suitable default scan settings, but you can view or change them asnecessary.
Note: Document Capture Pro (Windows) and Document Capture (Mac) do not support scanning fromthe scanner button over a wireless network. Launch Epson Scan before scanning from the scannerbutton.
1. Make sure you installed the scanner software and connected the scanner to your computer ornetwork.
2. Load an original in your scanner.3. Press the start button.
The image is scanned and saved to the folder you have specified.
Note: If your product is connected via USB, you can use Document Capture Pro (Windows) orDocument Capture (Mac) to change the default scan settings when you scan using the startbutton.
Assigning Start Button Settings or Scan JobsParent topic: Scanning

39
Assigning Start Button Settings or Scan JobsYou can view or change the default scan settings when you scan using the start button. You do thisusing the Document Capture Pro (Windows) or Document Capture (Mac) program.1. Start Document Capture Pro or Document Capture on a computer connected to the scanner.
2. Click the Manage Job icon from the toolbar at the top of the window.3. On the Job Management window, click Add or the + icon.4. Enter a name for the new job, then select the settings you want to view or change and change the
settings as necessary, and click OK.
Note: See the Help information in Document Capture Pro or Document Capture for details.
5. Do one of the following:• Windows: On the Job Management window, click Event Settings.
• Mac: Click the icon at the bottom of the window, then click Event Settings.6. Select the job that you want to assign to the start button from the pull-down menu.7. Click OK.Parent topic: Starting a Scan from a Scanner Button
Scanning with Document Capture Pro or Document CaptureWhen you scan with Document Capture Pro (Windows) or Document Capture (Mac), the programautomatically saves your scanned file on your computer in the folder you specify. You can selectsettings, preview, and change the scanned file settings as necessary.
Note: The settings may vary, depending on the software version you are using. See the Help informationin Document Capture or Document Capture Pro for details.
1. Do one of the following to start Document Capture Pro (Windows) or Document Capture (Mac):
• Windows 10: Click and select Epson Software > Document Capture Pro.• Windows 8.x: Navigate to the Apps screen and select Document Capture Pro.
• Windows (other versions): Click or Start, and select All Programs or Programs. SelectEpson Software > Document Capture Pro.

40
• Mac: Open the Applications folder, open the Epson Software folder, and select DocumentCapture.
2. Select Switch to Standard View, if necessary.You see a window like this:
3. Click the Scan icon.
41
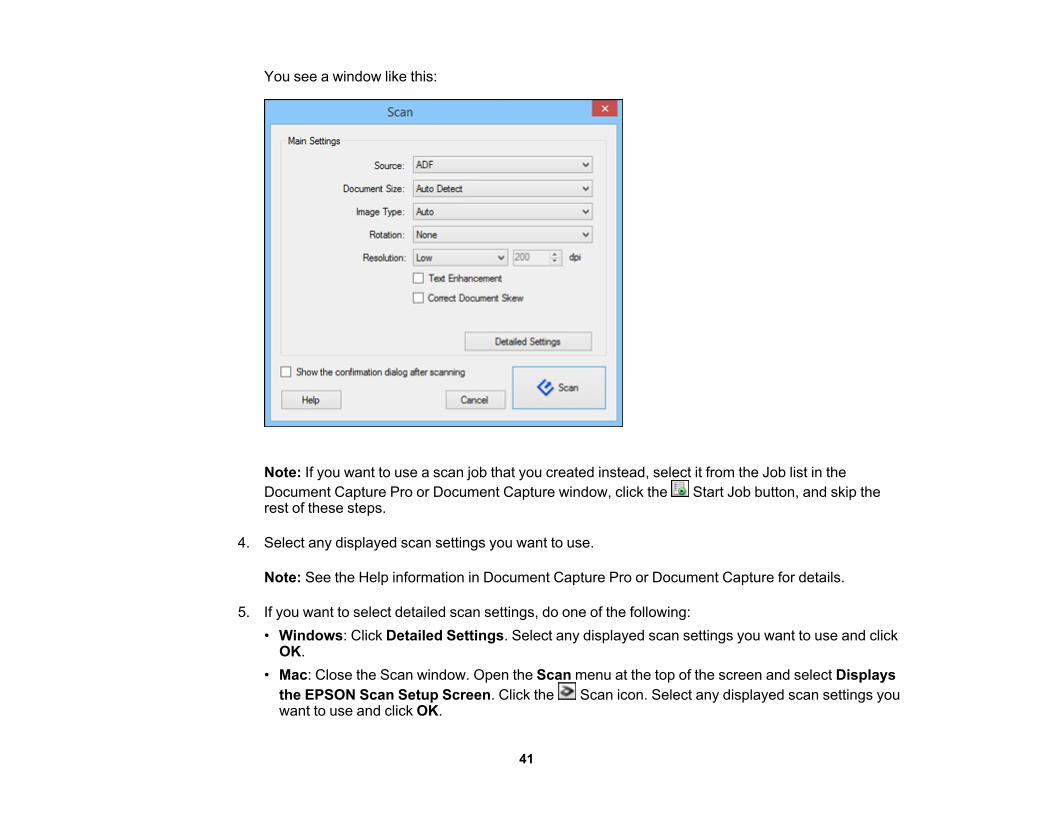
You see a window like this:
Note: If you want to use a scan job that you created instead, select it from the Job list in theDocument Capture Pro or Document Capture window, click the Start Job button, and skip therest of these steps.
4. Select any displayed scan settings you want to use.
Note: See the Help information in Document Capture Pro or Document Capture for details.
5. If you want to select detailed scan settings, do one of the following:• Windows: Click Detailed Settings. Select any displayed scan settings you want to use and click
OK.• Mac: Close the Scan window. Open the Scan menu at the top of the screen and select Displays
the EPSON Scan Setup Screen. Click the Scan icon. Select any displayed scan settings youwant to use and click OK.
42
6. Click Scan.You see a preview of your scan in the Document Capture Pro (Windows) or Document Capture(Mac) window.
7. If you would like to scan additional originals and add them to the current captured images, click theAdd Page button and repeat steps 2 through 5.
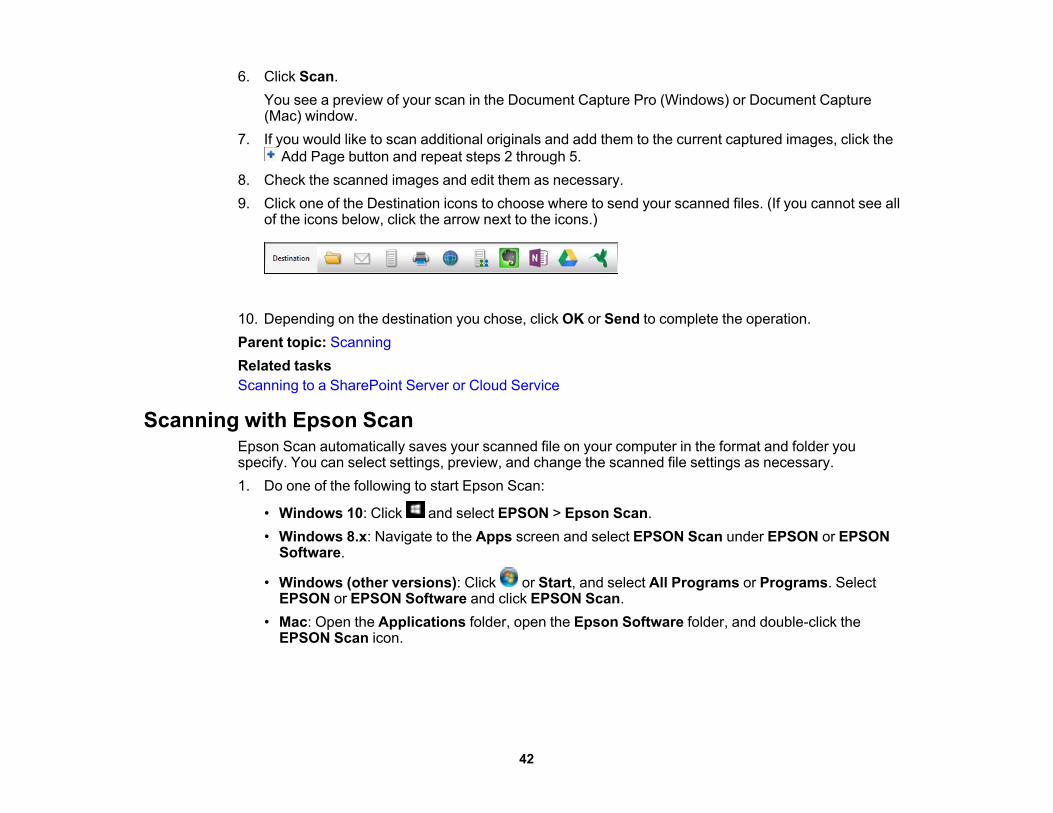
8. Check the scanned images and edit them as necessary.9. Click one of the Destination icons to choose where to send your scanned files. (If you cannot see all
of the icons below, click the arrow next to the icons.)
10. Depending on the destination you chose, click OK or Send to complete the operation.Parent topic: ScanningRelated tasksScanning to a SharePoint Server or Cloud Service
Scanning with Epson ScanEpson Scan automatically saves your scanned file on your computer in the format and folder youspecify. You can select settings, preview, and change the scanned file settings as necessary.1. Do one of the following to start Epson Scan:
• Windows 10: Click and select EPSON > Epson Scan.• Windows 8.x: Navigate to the Apps screen and select EPSON Scan under EPSON or EPSON
Software.
• Windows (other versions): Click or Start, and select All Programs or Programs. SelectEPSON or EPSON Software and click EPSON Scan.
• Mac: Open the Applications folder, open the Epson Software folder, and double-click theEPSON Scan icon.

43
You see a window like this:
2. Select options for each of the scan settings on the screen.3. If necessary, click the Preview button.
Epson Scan previews your original and displays the result in a separate Preview window. Thescanner also ejects the page.
4. Reload the page in the scanner.
44
5. Click the Image Adjustment tab and select any of the image adjustment settings you want to use.Before making adjustments, click the image or scan area in the Preview window.
6. Click Scan.You see the File Save Settings window.
7. Change any of the necessary file save settings and click OK.Epson Scan scans your original, and saves the file in the selected folder or opens it in your scanningprogram. If the file was saved directly to your computer, you see the file in the Windows Explorer or MacFinder, where you can view and print the image, if desired.Available Image AdjustmentsParent topic: Scanning
Available Image AdjustmentsYou can select these options from the Image Adjustments tab in Epson Scan.
Note: Not all adjustment settings may be available, depending on the Image Type setting.
Select the Image Option checkbox to access additional settings.Unsharp Mask
Makes the edges of certain image areas clearer. Turn off this option to leave softer edges.Descreening
Removes the ripple pattern that might appear in subtly shaded image areas, such as skin tones. Thisoption improves results when scanning magazines or newspapers. (The results of descreening do notappear in the preview image, only in your scanned image.)
Text EnhancementSharpens the appearance of letters in text documents.
Auto Area SegmentationMakes grayscale images clearer and text recognition more accurate by separating the text from thegraphics.
DropoutThe scan will not pick up the color you select. This setting is only available if you select an ImageType of Grayscale or Black & White.
Color EnhanceEnhances the red, green, or blue shades in the scanned image.

45
Edge FillCorrects shadowing around the edges of the image by filling the shadows with the color you select.
BrightnessAdjusts the overall lightness and darkness of the scanned image.
ContrastAdjusts the difference between the light and dark areas of the overall scanned image.
ThresholdAdjusts the level at which black areas in text and line art are delineated, improving text recognition inOCR (Optical Character Recognition) programs.
Parent topic: Scanning with Epson Scan
Starting a Scan from a Scanning ProgramYou can start Epson Scan from a TWAIN-compliant scanning program to select scan settings, scan, andopen the scanned image in the program.1. Open your scanning program and select its scanning option. (See your scanning program help for
instructions.)2. Select your product.
Note: In certain programs, you may need to select your product as the "source" first. If you see aSelect Source option, choose it and select your product. With Windows, do not select a WIA optionfor your product; it will not work correctly.

46
You see an Epson Scan window like this:
Note: In certain programs, you may see the program's scan window instead of the Epson Scanwindow. Select scanning options as necessary.
Parent topic: Scanning

47
Scanning Special ProjectsYour product's scanning software offers various options to help you quickly complete special scanprojects.Convert Scanned Documents to Editable Text (OCR)Scanning to a SharePoint Server or Cloud ServiceParent topic: Scanning
Convert Scanned Documents to Editable Text (OCR)You can scan a document and convert the text into data that you can edit with a word processing,spreadsheet, or HTML-editing program. This process is called OCR (Optical Character Recognition).To scan and use OCR, you need to install an OCR program, such as ABBYY FineReader.Scanning Using OCR - WindowsScanning Using OCR - MacParent topic: Scanning Special Projects
Scanning Using OCR - WindowsYou can use the ABBYY FineReader OCR program to convert scanned documents to editable text.1. Load your original in the scanner.2. Do one of the following to open ABBYY FineReader:
• Windows 8.x: Navigate to the Apps screen and select ABBYY FineReader 9.0 Sprint.
• Windows (other versions): Click or Start, and select All Programs or Programs. SelectABBYY FineReader 9.0 Sprint > ABBYY FineReader 9.0 Sprint.
48
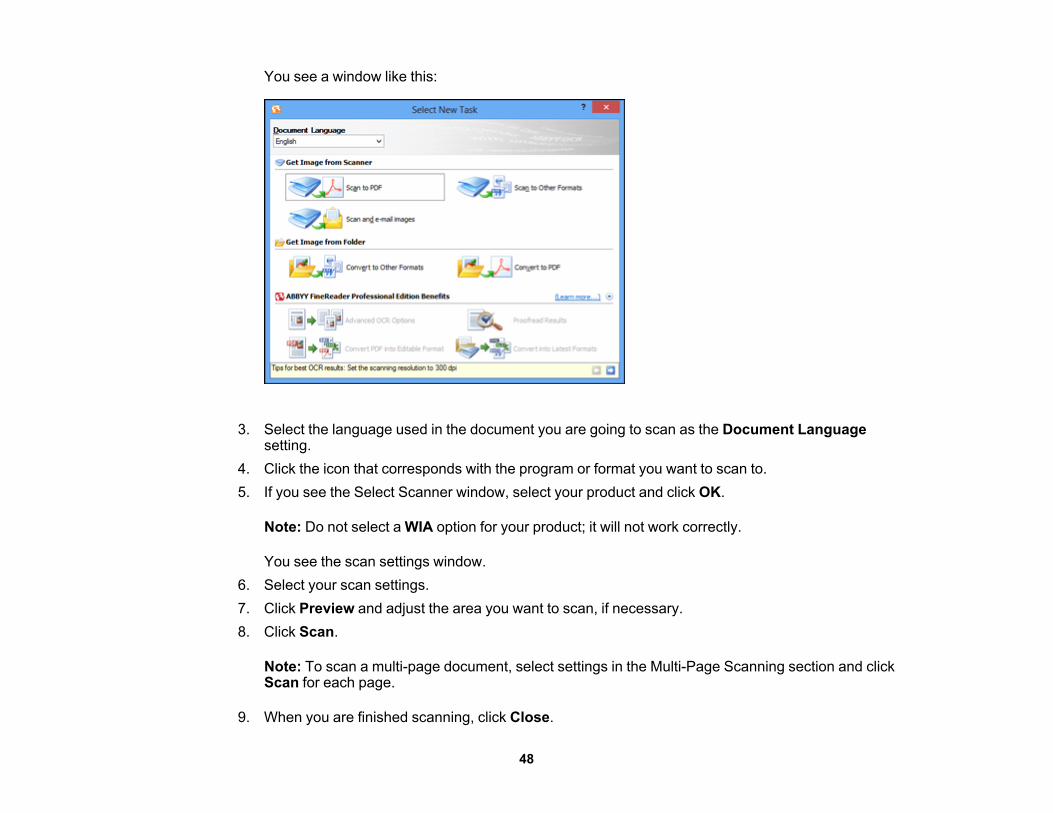
You see a window like this:
3. Select the language used in the document you are going to scan as the Document Languagesetting.
4. Click the icon that corresponds with the program or format you want to scan to.5. If you see the Select Scanner window, select your product and click OK.
Note: Do not select a WIA option for your product; it will not work correctly.
You see the scan settings window.6. Select your scan settings.7. Click Preview and adjust the area you want to scan, if necessary.8. Click Scan.
Note: To scan a multi-page document, select settings in the Multi-Page Scanning section and clickScan for each page.
9. When you are finished scanning, click Close.

49
Your document is scanned and processed into editable text, then you see the Save As window.10. Select a name and a file format for your document and click Save.
The file is saved and then opened in an application associated with the file type you selected, ifavailable on your system.
Parent topic: Convert Scanned Documents to Editable Text (OCR)Related tasksScanning with Epson Scan
Scanning Using OCR - MacYou can use the ABBYY FineReader OCR program to convert scanned documents to editable text.1. Load your original in the scanner.2. Open the Applications folder and click the ABBYY FineReader Sprint icon.
50
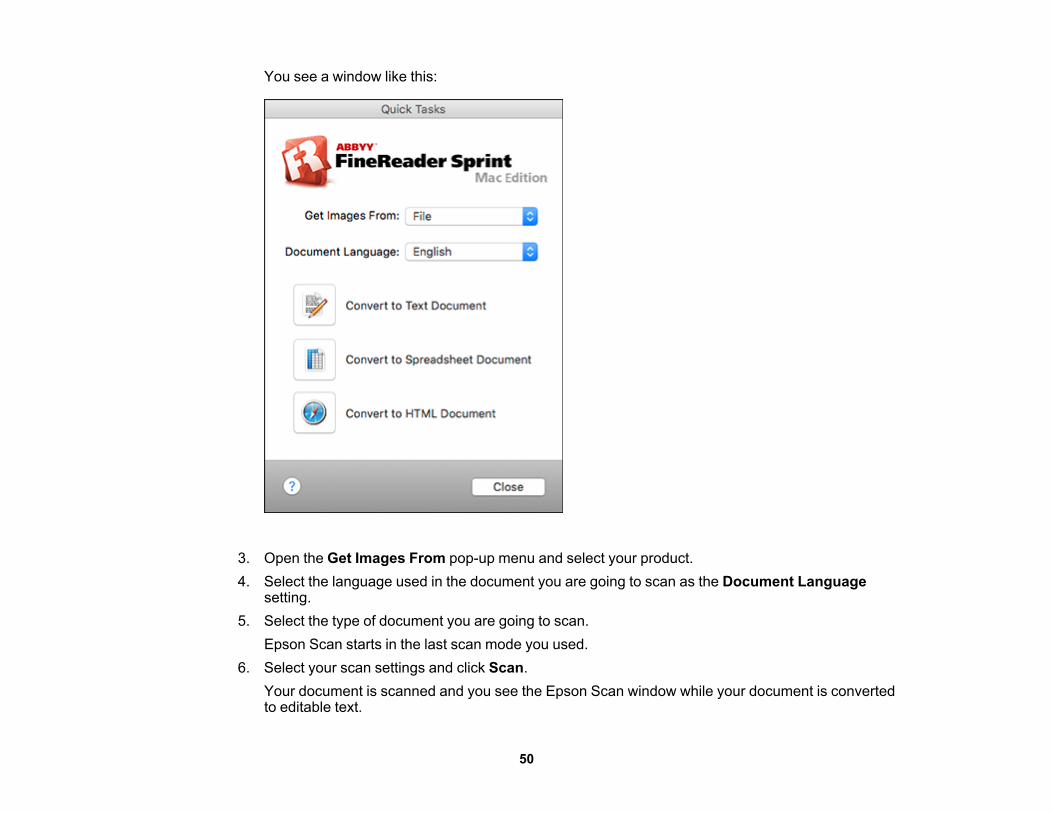
You see a window like this:
3. Open the Get Images From pop-up menu and select your product.4. Select the language used in the document you are going to scan as the Document Language
setting.5. Select the type of document you are going to scan.
Epson Scan starts in the last scan mode you used.6. Select your scan settings and click Scan.
Your document is scanned and you see the Epson Scan window while your document is convertedto editable text.

51
7. Click Close to close the Epson Scan window and Preview window, if necessary.You see the Save Converted File As window:
8. Click the Save button.The file is saved and then opened in an application associated with the file type you selected, ifavailable on your system.
Parent topic: Convert Scanned Documents to Editable Text (OCR)Related tasksScanning with Epson Scan
Scanning to a SharePoint Server or Cloud ServiceYou can use Document Capture Pro (Windows) or Document Capture (Mac) to upload scanned imagesto a SharePoint server or a cloud service.1. Do one of the following to start Document Capture Pro (Windows) or Document Capture (Mac):
• Windows 10: Click and select Epson Software > Document Capture Pro.• Windows 8.x: Navigate to the Apps screen and select Document Capture Pro.
• Windows (other versions): Click or Start, and select All Programs or Programs. SelectEpson Software > Document Capture Pro.
• Mac: Open the Applications folder, open the Epson Software folder, and select DocumentCapture.

52
You see a window like this:
2. Click the Scan icon.3. Select any displayed scan settings you want to use.
Note: See the Help information in Document Capture Pro or Document Capture for details.
4. Click Scan.You see a preview of your scan in the Document Capture Pro or Document Capture window.
5. Click one of the cloud service Destination icons to choose where to save your scanned file. (If youcannot see all of the icons below, the service software may not be installed, the service may not beavailable on your platform, or you need to click the arrow next to the icons.)
• Web Folder (WebDAV)
• Microsoft SharePoint server (Windows only)
• Evernote (Windows only)

53
• Microsoft OneNote (Windows only)
• Google Drive
• SugarSyncYou see the Transfer Settings window.
6. Enter any required information to set up the destination. If you have previously created a savedsetting for the destination, select it from the drop-down list.
7. Adjust any save settings, then click OK or Send, depending on the destination.Your originals are scanned and uploaded to the indicated server.
Parent topic: Scanning Special ProjectsRelated tasksScanning with Document Capture Pro or Document Capture

54
Cleaning and Transporting Your ScannerSee these sections if you need to clean or transport your scanner.Cleaning Your ScannerCleaning Inside Your ScannerReplacing BatteriesCalibrating Your ScannerTransporting Your Scanner
Cleaning Your ScannerTo keep your product working at its best, you should clean it several times a year.
Caution: Do not use a hard brush, alcohol, or paint thinner to clean the product or you may damage it.Do not use oil or other lubricants inside the product or let water get inside it. Do not open the product'souter case.
1. Turn off the scanner and unplug the optional AC adapter.2. Disconnect any connected cables.3. Clean the outer case with a soft, dry cloth. Do not use liquid or chemical cleansers.
Note: If the outer case still requires additional cleaning, use a slightly damp cloth to wipe the outercase. Then wipe the case with a soft, dry cloth.
Parent topic: Cleaning and Transporting Your Scanner
Cleaning Inside Your ScannerClean your scanner regularly using the wet and dry cleaning sheets that came with your scanner. Duston the scanning surface can cause spots or lines in your scanned images.
Caution: Use the wet and dry cleaning sheets to clean your scanner. Do not use a hard brush, alcohol,or paint thinner to clean the product or you may damage it. Do not use oil or other lubricants inside theproduct or let water get inside it.

55
You can purchase genuine Epson accessories at epson.com (U.S. sales), epson.ca (Canadian sales), orepson.com.jm (Caribbean sales). You can also purchase accessories from an Epson authorized reseller.To find the nearest one, call 800-GO-EPSON (800-463-7766) in the U.S. or 800-807-7766 in Canada.1. Turn on the scanner and make sure it is connected to the computer.2. Load the dry cleaning sheet into the scanner.
3. Do one of the following to start Epson Scan Settings:• Windows 8.x: Navigate to the Apps screen and select EPSON Scan Settings.
• Windows (other versions): Click or Start > All Programs or Programs > EPSON > EPSONScan > EPSON Scan Settings.
• Mac: Open the Applications folder, click Epson Software, and click EPSON Scan Settings.4. Click Maintenance.5. Click Cleaning. Cleaning takes about 30 seconds.
The scanner feeds and ejects the cleaning sheet.6. If the scanner is not clean, repeat these steps to clean it again.
Note: You can use the same dry cleaning sheet multiple times.
7. If the scanner is not clean after multiple cleanings with the dry cleaning sheet, repeat these stepsusing the wet cleaning sheet.
Note: You can use the wet cleaning sheet only once.

56
Parent topic: Cleaning and Transporting Your ScannerRelated referencesOptional and User Replaceable Epson Scanner Parts
Replacing BatteriesWhen the low battery light is on, you need to replace the batteries. You can use 4 AA batteries (Ni-MH, alkaline, or lithium) to power your scanner.
Caution: Use only the type of batteries specified in this manual. Do not install batteries of different types,or mix new and old batteries.
1. Slide off the battery cover.
57
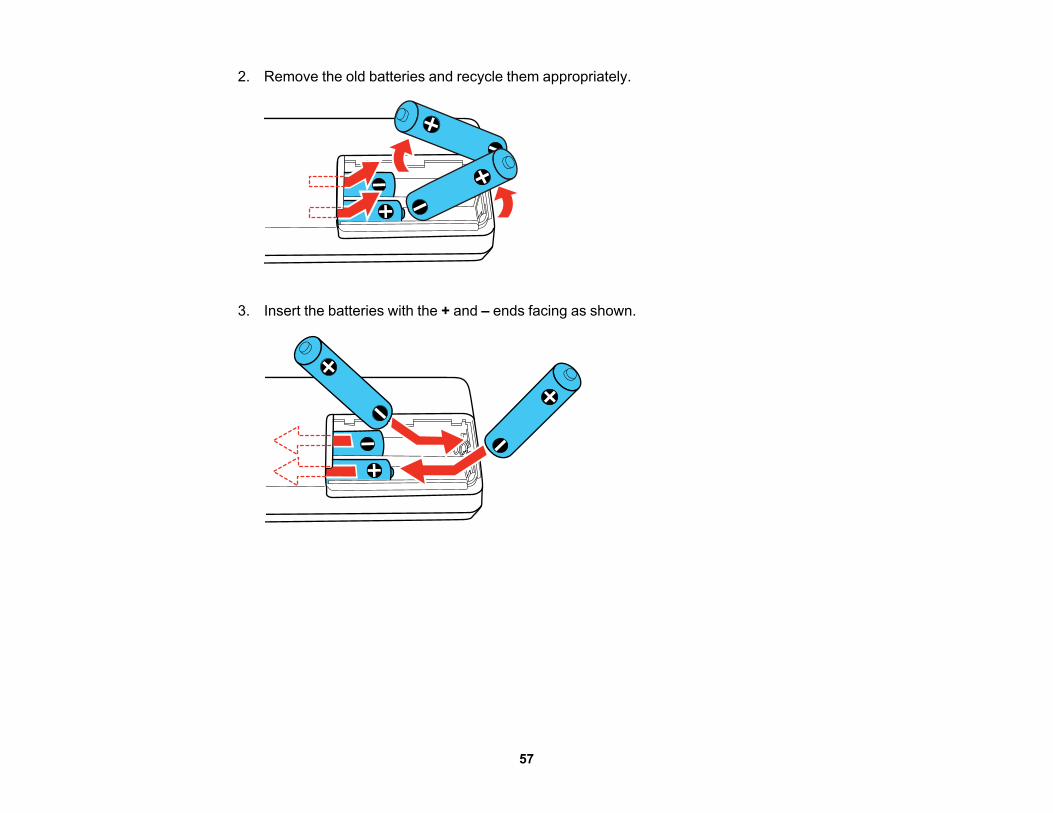
2. Remove the old batteries and recycle them appropriately.
3. Insert the batteries with the + and – ends facing as shown.

58
4. Slide the battery cover back on.
Parent topic: Cleaning and Transporting Your ScannerRelated referencesBattery Safety Instructions
Calibrating Your ScannerIf you notice any of the following image quality problems, you can calibrate the scanner using thecalibration sheet that came with it.• Scanned images are blurry• Scanned colors differ from the colors in the original.• Scanned image are darker or lighter than the original.• Scanned images contain vertical lines.
Note: You can use the calibration sheet multiple times. If calibrating the scanner does not improve theimage quality, contact Epson for support. Make sure the scanner batteries are not low or calibration willnot start.
1. Turn on the scanner and make sure it is connected to the computer.
59
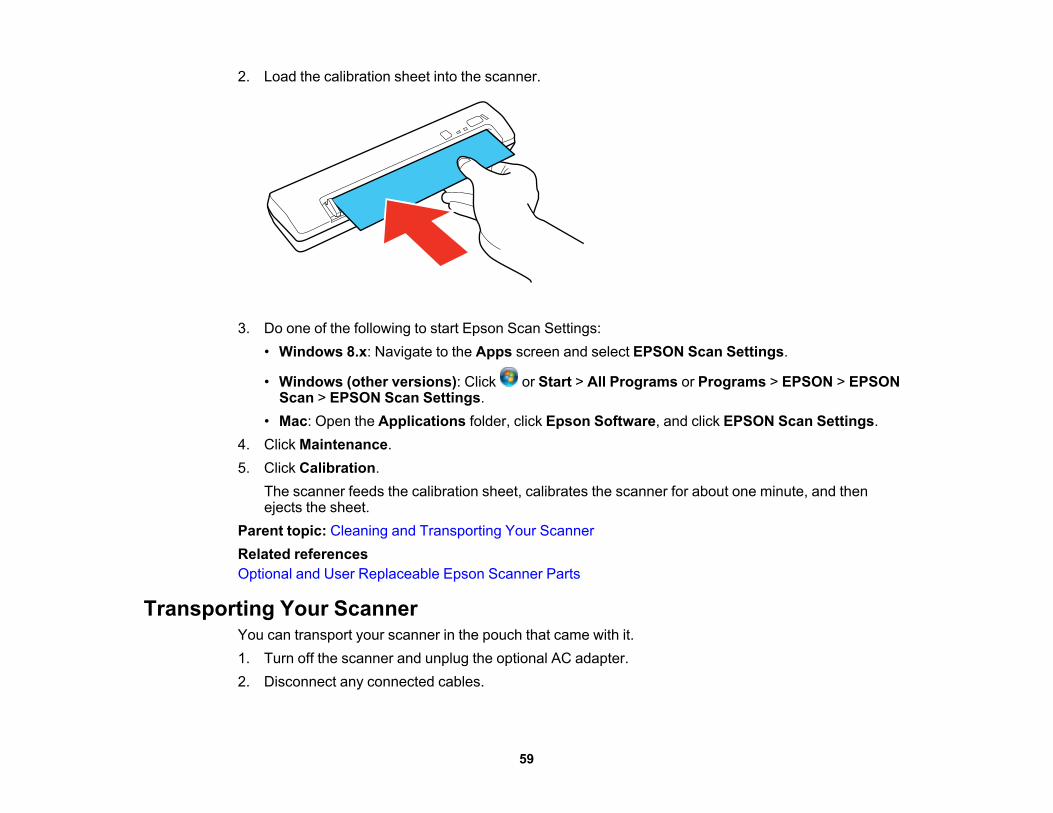
2. Load the calibration sheet into the scanner.
3. Do one of the following to start Epson Scan Settings:• Windows 8.x: Navigate to the Apps screen and select EPSON Scan Settings.
• Windows (other versions): Click or Start > All Programs or Programs > EPSON > EPSONScan > EPSON Scan Settings.
• Mac: Open the Applications folder, click Epson Software, and click EPSON Scan Settings.4. Click Maintenance.5. Click Calibration.
The scanner feeds the calibration sheet, calibrates the scanner for about one minute, and thenejects the sheet.
Parent topic: Cleaning and Transporting Your ScannerRelated referencesOptional and User Replaceable Epson Scanner Parts
Transporting Your ScannerYou can transport your scanner in the pouch that came with it.1. Turn off the scanner and unplug the optional AC adapter.2. Disconnect any connected cables.

60
3. Place the scanner and USB cable in the provided pouch.
Parent topic: Cleaning and Transporting Your Scanner
61
Solving ProblemsCheck these sections for solutions to problems you may have using your product.Scanner Light StatusSolving Scanning ProblemsSolving Network Scanning ProblemsSolving Scanned Image Quality ProblemsUninstall Your Scanner SoftwareWhere to Get Help
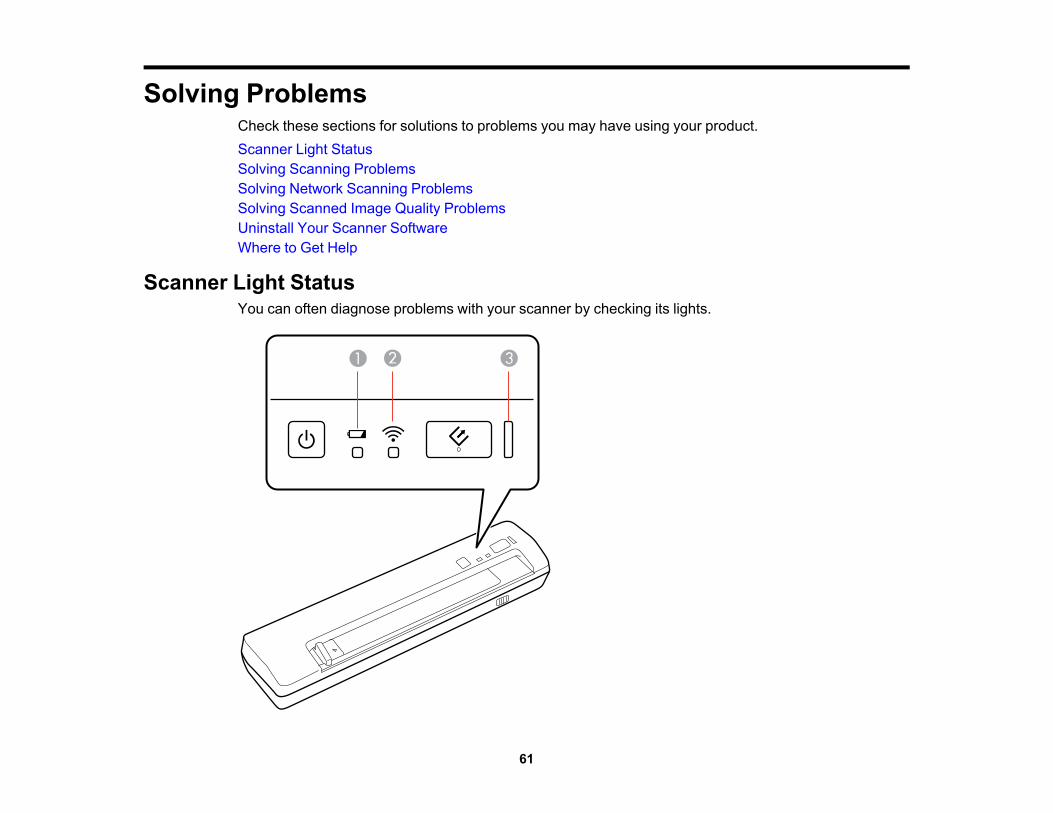
Scanner Light StatusYou can often diagnose problems with your scanner by checking its lights.

62
1 The low battery light2 The Wi-Fi light3 The ready light
USB connection
Light status Condition/solutionThe ready light is on The scanner is turned on and ready to scan.The ready light is flashing The scanner is scanning or initializing. Wait for the ready light to stop
flashing before turning off the scanner.The scanner is calibrating or feeding a cleaning sheet.
The ready light and theWi-Fi light are flashing
alternately
The scanner firmware is updating. Do not turn off the scanner ordisconnect any cables until the status lights have stopped flashing.
The ready light and theWi-Fi light are flashing at
the same time
A paper is jammed. Reload the original. If the lights continue to flash, ascanner error may have occurred. Turn the scanner off and then backon again. If the error continues, contact Epson for support.
Wireless connection
Light status Condition/solutionThe ready light is on The scanner is turned on and ready to scan.The ready light is flashing The scanner is scanning or initializing. Wait for the ready light to stop
flashing before turning off the scanner.The scanner is calibrating or feeding a cleaning sheet.
The ready light is on and theWi-Fi light is flashing
A WPS or AirStation One-Touch Secure System (AOSS) error hasoccurred. Retry the connection.
The ready light is flashing andthe Wi-Fi light is on
The product is scanning or connecting to a wireless network.

63
Light status Condition/solutionThe ready light and the
Wi-Fi light are flashingalternately
The scanner firmware is updating. Do not turn off the scanner ordisconnect any cables until the status lights have stopped flashing.The product is in a standby state for a Wi-Fi Protected Setup (WPS)connection.
The ready light and theWi-Fi light are flashing at
the same time
A paper is jammed. Reload the original. If the lights continue to flash, ascanner error may have occurred. Turn the scanner off and then backon again. If the error continues, contact Epson for support.
The Wi-Fi light is flashing An AOSS error has occurred. Retry the connection.
The low battery light ison
The batteries are running low. Make sure you have replacementbatteries available.
Parent topic: Solving Problems
Solving Scanning ProblemsCheck these solutions if you have problems scanning with your product.Scanner Does Not Turn On or Turns Off UnexpectedlyScanner Button Does Not Work as ExpectedScanning Software Does Not Operate CorrectlyCannot Start Epson ScanOriginal Feeds Incorrectly in ScannerOriginal Jams in ScannerScanning is SlowParent topic: Solving Problems
Scanner Does Not Turn On or Turns Off UnexpectedlyIf the scanner does not turn on or if it turns off unexpectedly, try these solutions:• Make sure the optional AC adapter is securely connected to the scanner and to a working electrical
outlet.• If the scanner turns off unexpectedly, you may need to adjust the Energy Saving > Power Off Timer
setting in Epson Scan Settings. The scanner must be connected via USB to change this setting.• Try pressing the power button for approximately one second.
64
• If you are using a USB connection, make sure the connection mode switch is set to USB.• If you are using a wireless connection, make sure that charged batteries are installed or the optional
AC adapter is connected.Parent topic: Solving Scanning ProblemsRelated referencesScanner Buttons and LightsRelated tasksInstalling BatteriesUsing the Optional AC AdapterChanging the Power Off SettingReplacing Batteries
Scanner Button Does Not Work as ExpectedIf the scanner button does not start the correct program or perform the correct action, try these solutions:• Document Capture Pro (Windows) and Document Capture (Mac) do not support using the button to
scan over a wireless connection. Connect the scanner using a USB cable.• On Windows, be sure that the scanner is listed under Imaging Devices in the Device Manager.• Make sure Document Capture Pro (Windows) or Document Capture (Mac) is installed correctly. If
necessary, uninstall and reinstall it.• Make sure you have assigned the correct job to the scanner button and change it, if necessary.• If you selected Keep Blocking in a Windows Security Alert window during or after installation of
Document Capture Pro, unblock the EEventManager Application program in the Windows securitysettings; see Windows help for details.
• Check the status of the lights and make sure the scanner is ready to scan.• Make sure the connection mode switch is set correctly (ES-300W).• When using a wireless connection, start Epson Scan on your computer before scanning from the
product.• On a Mac, make sure you are logged in as the user who installed the scanner software. Other users
must run Epson Scanner Monitor in the Applications folder before using the button to scan.Parent topic: Solving Scanning ProblemsRelated conceptsUninstall Your Scanner Software
65
Related referencesScanner Light Status
Scanning Software Does Not Operate CorrectlyIf your scanning software does not operate correctly, try these solutions:• Make sure your computer has adequate memory and meets the system requirements for your
operating system.• Make sure your computer is not running in a power-saving mode, such as sleep or standby. If so,
wake your system and restart your scanning software.• Make sure the scanner is turned on.• Make sure the connection between the scanner and your computer is secure.• If you upgraded your operating system but did not reinstall your scanning software, try reinstalling it.• On Windows, be sure that the scanner is listed under Imaging Devices in the Device Manager.• Connect the scanner directly to the computer. The scanner may not work properly when connected
through a USB hub.• If you are scanning on a Mac, make sure no other Epson scanner drivers are installed. If other drivers
are installed, uninstall them, then reinstall this scanner's software.• If you are using a TWAIN-compliant program, make sure that the correct product is selected as the
Scanner or Source setting.Parent topic: Solving Scanning ProblemsRelated conceptsUninstall Your Scanner SoftwareRelated tasksStarting a Scan from a Scanning Program
Cannot Start Epson ScanIf you cannot start Epson Scan, try these solutions:• Make sure your scanner is turned on and any interface cables are securely connected at both ends.• Make sure Epson Scan is selected in your scanning program.• Make sure your computer is not running in a power-saving mode, such as sleep or standby. If so,
wake your system and restart Epson Scan.

66
• If you connected the scanner using a USB cable, make sure it is connected directly to your computeror through only one USB hub.
• Check the connection setting and test the connection using Epson Scan Settings:
• Windows 10: Click and select EPSON > EPSON Scan Settings. Make sure the correctConnection setting is selected, then click the Test button.
• Windows 8.x: Navigate to the Apps screen and select EPSON Scan Settings. Make sure thecorrect Connection setting is selected, then click the Test button.
• Windows (other versions): Click or Start > All Programs or Programs > EPSON > EPSONScan > EPSON Scan Settings. Make sure the correct Connection setting is selected, then clickthe Test button.
• Mac: Open the Applications folder, click Epson Software, and click EPSON Scan Settings. Makesure the correct Connection setting is selected, then click the Test button.
• Make sure you do not have multiple versions of Epson Scan installed. If you do, uninstall both versionsand install one version.
• If you upgraded your operating system but did not reinstall Epson Scan, try reinstalling it.• If you are using a TWAIN-compliant program, make sure that the correct product is selected as the
Scanner or Source setting.Parent topic: Solving Scanning ProblemsRelated conceptsUninstall Your Scanner SoftwareRelated tasksScanning with Epson Scan
Original Feeds Incorrectly in ScannerIf you have problems feeding originals in your scanner, try these solutions:• Load only an original that meets the specifications for your scanner.• Clean inside the scanner using a cleaning sheet.Parent topic: Solving Scanning ProblemsRelated referencesOriginal Document Loading CapacityPlastic Card Loading Capacity
67
Related tasksCleaning Inside Your ScannerLoading Originals in the Input Slot
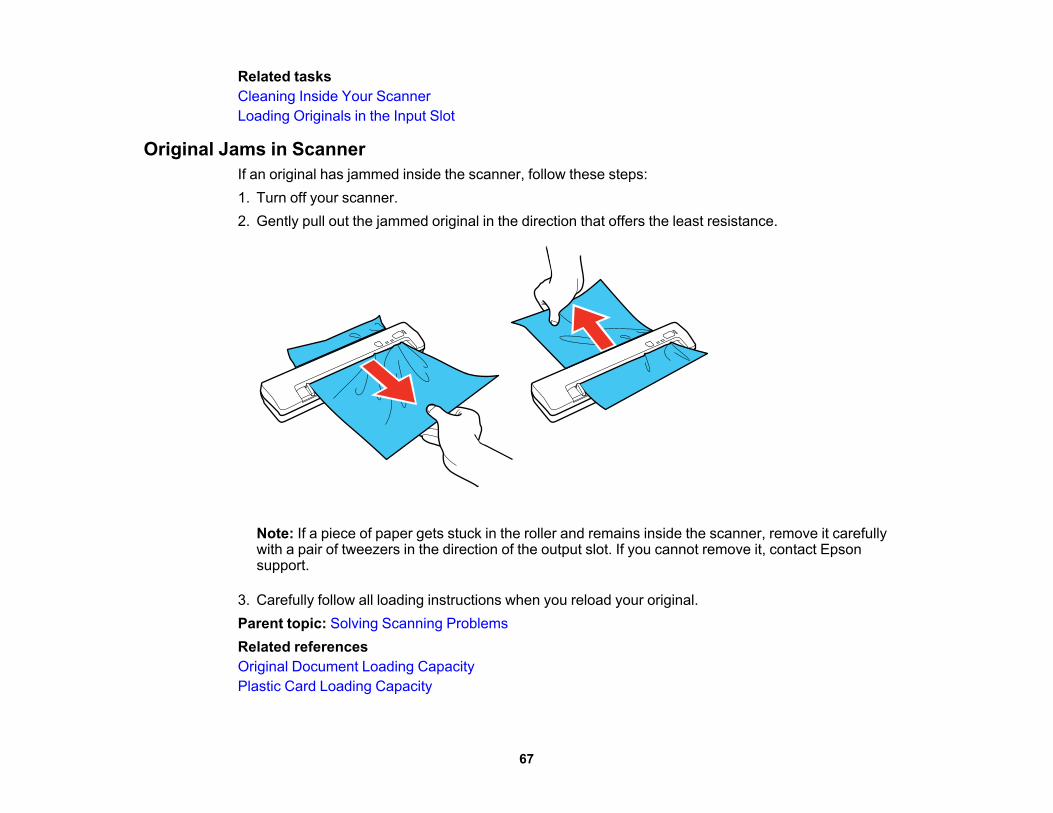
Original Jams in ScannerIf an original has jammed inside the scanner, follow these steps:1. Turn off your scanner.2. Gently pull out the jammed original in the direction that offers the least resistance.
Note: If a piece of paper gets stuck in the roller and remains inside the scanner, remove it carefullywith a pair of tweezers in the direction of the output slot. If you cannot remove it, contact Epsonsupport.
3. Carefully follow all loading instructions when you reload your original.Parent topic: Solving Scanning ProblemsRelated referencesOriginal Document Loading CapacityPlastic Card Loading Capacity

68
Related tasksLoading Originals in the Input Slot
Scanning is SlowIf scanning becomes slow, try these solutions:• Scan your original at a lower resolution, if possible.• Make sure your system meets the requirements for your operating system. If you are scanning a high-
resolution image, you may need more than the minimum requirements. If necessary, increase yoursystem's memory or reduce the resolution.
Parent topic: Solving Scanning ProblemsRelated referencesWindows System RequirementsMac System RequirementsRelated tasksScanning with Document Capture Pro or Document CaptureScanning with Epson Scan
Solving Network Scanning ProblemsCheck these solutions if you have problems scanning over a network.Cannot Scan Over a NetworkScanner Cannot Connect to a Wireless RouterParent topic: Solving Problems
Cannot Scan Over a NetworkIf you cannot start Epson Scan for scanning over a network, try these solutions:
Note: Document Capture Pro (Windows) and Document Capture (Mac) do not support starting a scanfrom the scanner button over a wireless network. Launch Epson Scan before scanning from the scannerbutton.
• If you did not successfully connect to a network while installing your product software, select the link atthe end of this topic and follow the steps in "Manually Connecting to a Wi-Fi Network". If you are stillunable to connect to a network, try the other solutions in this topic.

69
• If you are scanning a large original at a high resolution, a network communication error may occur. Tryscanning again at a lower resolution.
• If network communication was interrupted while starting Epson Scan, exit Epson Scan, wait a fewseconds, and restart it. If Epson Scan cannot restart, turn off your scanner, turn it back on, and tryrestarting Epson Scan again.
• Check the connection setting and test the connection using Epson Scan Settings:
Windows 10: Click > EPSON > EPSON Scan Settings. Make sure the Connection setting is setto Network, then select your scanner and click the Test button.Windows 8.x: Navigate to the Apps screen and select EPSON Scan Settings. Make sure theConnection setting is set to Network, then click the Test button.
Windows (other versions): Click or Start > All Programs or Programs > EPSON > EPSONScan > EPSON Scan Settings. Make sure the Connection setting is set to Network, then click theTest button.Mac: Open the Applications folder, click Epson Software, and click EPSON Scan Settings. Makesure the Connection setting is set to Network, then click the Test button.
• You may need to disable the firewall and any anti-virus software on your wireless router.• If you see the message "Network product is not available: currently being used by user", there may be
a communication error between the scanner and computer. Restart the scanner.• Epson Scan does not support networks that use only IPv6. Use Epson Scan on a network that
supports IPv4.• If the Firewall function is active on Windows XP or later, the scanner may not be discovered by Epson
Scan Settings. Open Epson Scan Settings, click Add, and enter the IP address for your scanner.• On a Mac, if you have previously used the scanner with Image Capture, you may need to release the
scanner in Image Capture before you can scan with Epson Scan.Parent topic: Solving Network Scanning ProblemsRelated tasksManually Connecting to a Wi-Fi NetworkSetting Up Network ScanningStarting a Scan from a Scanner Button
70
Scanner Cannot Connect to a Wireless RouterIf your scanner has trouble finding or connecting to a wireless router, try these solutions:• If you did not successfully connect to a network while installing your product software, select the link at
the end of this topic and follow the steps in "Manually Connecting to a Wi-Fi Network". If you are stillunable to connect to a network, try the other solutions in this topic.
• If you are connecting the scanner via Wi-Fi Protected Setup (WPS), make sure you activate WPS onyour scanner within 2 minutes of activating WPS discovery mode on the router by pressing the WPSbutton or enabling the WPS setting in your router firmware.
• Make sure to place your scanner within contact range of your router. Avoid placing your scanner neara microwave oven, 2.4 GHz cordless phone, or large metal object, such as a filing cabinet.
Note: If you are using a 5 GHz wireless router, set the router to operate in dual band (2.4 GHz and5 GHz) mode. If your router uses a single network name (SSID) for both the 2.4 GHz and 5 GHz band,give each band its own network name (SSID) instead, such as Home Network 2.4 GHz and HomeNetwork 5 GHz. See your router documentation or contact your internet service provider forinstructions.
• Verify that your router is operating correctly by connecting to it from your computer or another device.• You may need to disable the firewall and any anti-virus software on your wireless router.• Check to see if access restrictions, such as MAC address filtering, are set on the router. If access
restrictions are set, add your scanner's MAC address to your router's address list. To obtain yourscanner's MAC address, check the label on the back or bottom of your scanner. Then follow theinstructions in your router documentation to add the address to the list.
• If your router does not broadcast its network name (SSID), follow the instructions that came with yourscanner to enter your wireless network name manually.
• If your router has security enabled, determine the kind of security it is using and any requiredpassword or passphrase for connection. Then make sure to enter the exact WEP key or WPApassphrase correctly.
• Check if your computer is restricting the available wireless channels. If so, verify that your wirelessaccess point is using one of the usable channels and change to a usable channel, if necessary.
• The scanner may not be able to communicate with a computer with multiple network interfaces.Disable all network interfaces except for the interface connected to the scanner.
• Enable the DHCP function on the access point or router.• Check that the scanner's IP address is set correctly.
71
Parent topic: Solving Network Scanning ProblemsRelated conceptsWi-Fi Protected Setup (WPS)Direct Wi-Fi Mode SetupRelated tasksManually Connecting to a Wi-Fi NetworkDetermining the Scanner's IP Address
Solving Scanned Image Quality ProblemsCheck these sections if a scanned image on your computer screen has a quality problem.Back of Original Image Appears in Scanned ImageScanned Characters are BlurryCharacters are not Recognized During Conversion to Editable Text (OCR)Ripple Patterns Appear in an ImageSpots or Lines Appear in All Scanned ImagesScanned Image Edges are CroppedParent topic: Solving ProblemsRelated tasksScanning with Epson Scan
Back of Original Image Appears in Scanned ImageIf an image from the back of a thin original appears in your scanned image, make sure you selected thecorrect Image Type setting for your original and select the Text Enhancement setting in Epson Scan.You can also select the Remove Background setting in Epson Scan.
Note: If you select Color as the Image Type setting, you can change the level from Standard to High toremove more of the background.
Parent topic: Solving Scanned Image Quality ProblemsRelated tasksScanning with Epson Scan
72
Scanned Characters are BlurryIf characters in your scanned images are blurry, try these solutions:• Make sure you do not move the scanner or original while scanning.• Operate the scanner on a flat, stable surface.• Adjust these Epson Scan settings (if available) and try scanning again:
• Select the Text Enhancement setting.• Adjust the Threshold setting.• Increase the Resolution setting.
Parent topic: Solving Scanned Image Quality ProblemsRelated tasksScanning with Epson Scan
Characters are not Recognized During Conversion to Editable Text (OCR)If characters in your scanned images are not recognized during OCR conversion, try these solutions:• Make sure your original is straight.• Adjust these Epson Scan settings (if available) and try scanning again:
• Select Text Enhancement• Select the correct Image Type setting• Adjust the Threshold setting
• Set the scanning resolution between 200 and 600 dpi.• If you are using OCR software, check the manual for any additional adjustments.Parent topic: Solving Scanned Image Quality ProblemsRelated tasksScanning Using OCR - WindowsScanning Using OCR - Mac
73
Ripple Patterns Appear in an ImageYou may see a ripple pattern (called a moiré) in scanned images of printed documents. This is causedby interference from differing pitches in the scanner's screen and your original's halftone screen. Toreduce this effect, adjust these Epson Scan settings (if available) and try scanning again:• Select the Descreening setting.• Select a lower Resolution setting.Parent topic: Solving Scanned Image Quality ProblemsRelated tasksScanning with Epson Scan
Spots or Lines Appear in All Scanned ImagesIf spots or lines appear in all your scanned images, try these solutions:• Clean the scanner glass.• Calibrate the scanner.
Note: If you are scanning a plastic card with a shiny surface, it can create a line in the scan.
Parent topic: Solving Scanned Image Quality ProblemsRelated tasksCleaning Inside Your ScannerCalibrating Your Scanner
Scanned Image Edges are CroppedIf the edges of a scanned image are cropped, try the following solutions:• Select Auto Detect as the Size setting (Epson Scan) or the Document Size setting (Document
Capture Pro or Document Capture).• Adjust the cropping area shown in the Crop Margins for Size "Auto" setting in Epson Scan.
• Document Capture Pro (Windows): Select Detailed Settings from the Scan window. ClickConfiguration and select the Document tab. Adjust the cropping area shown in the Crop Marginsfor Size "Auto" setting.
• Document Capture (Mac): Open the Scan menu and select Display the EPSON Scan SetupScreen. Click the Scan button. Select Main Settings from the Scan window. Click
74
Configuration and select the Document tab. Adjust the cropping area shown in the Crop Marginsfor Size "Auto" setting.
Parent topic: Solving Scanned Image Quality ProblemsRelated tasksScanning with Epson Scan
Uninstall Your Scanner SoftwareIf you have a problem that requires you to uninstall and re-install your software, follow the instructions foryour operating system.Uninstalling Scanner Software - WindowsUninstalling Scanner Software - MacParent topic: Solving Problems
Uninstalling Scanner Software - WindowsYou can uninstall and then re-install your scanner software to solve certain problems.1. Turn off the scanner.2. Disconnect any interface cables.3. Do the following to uninstall each of your scanning software programs, then follow any on-screen
instructions:
• Windows 10: Click and select (Settings) > Apps > Apps & features. Select the scannersoftware program and click Uninstall.
• Windows 8.x: Navigate to the Apps screen and select Control Panel > Programs > Programsand Features. Select the scanner software program and click Uninstall/Change.
• Windows 7 or Windows Vista: Open the Windows Control Panel utility. Select Programs andFeatures. (In Classic view, select Programs and click Uninstall a program.) Select the scannersoftware program and click Uninstall/Change.
• Windows XP: Open the Windows Control Panel utility. Double-click Add or Remove Programs.Select the scanner software program and click Change/Remove.
4. Restart your computer, then see the Start Here sheet to re-install your software.
Note: If you find that re-installing your scanner software does not solve a problem, contact Epson.
Parent topic: Uninstall Your Scanner Software

75
Uninstalling Scanner Software - MacIn most cases, you do not need to uninstall your scanner software before re-installing it. However, youcan download the Uninstaller utility from the Epson support website to uninstall your scanner software asdescribed here.1. To download the Uninstaller utility, visit epson.com/support (U.S.), epson.ca/support (Canada), or
epson.com.jm/support (Caribbean) and select your product.2. Follow the instructions on the screen to install the Uninstaller utility.3. Quit all applications currently running on your Mac.4. Double-click the Uninstaller icon.5. In the Epson Uninstaller screen, select the checkbox for each software program you want to
uninstall.6. Click Uninstall.7. Follow the on-screen instructions to uninstall the software.8. To reinstall your scanner software, see the Start Here sheet for instructions.
Note: If you find that re-installing your scanner software does not solve a problem, contact Epson.
Parent topic: Uninstall Your Scanner Software
Where to Get HelpIf you need to contact Epson for technical support services, use the following support options.
Internet SupportVisit Epson's support website at epson.com/support (U.S.), epson.ca/support (Canada), orepson.com.jm/support (Caribbean) and select your product for solutions to common problems with yourproduct. You can download utilities and documentation, get FAQs and troubleshooting advice, or e-mailEpson with your questions.
Speak to a Support RepresentativeBefore you call Epson for support, please have the following information ready:• Product name• Product serial number (located on a label on the product)• Proof of purchase (such as a store receipt) and date of purchase

76
• Computer configuration• Description of the problemThen call:• U.S.: (562) 276-4382, 6 AM to 8 PM, Pacific Time, Monday through Friday, and 7 AM to 4 PM, Pacific
Time, Saturday• Canada: (905) 709-3839, 6 AM to 8 PM, Pacific Time, Monday through Friday, and 7 AM to 4 PM,
Pacific Time, SaturdayDays and hours of support are subject to change without notice. Toll or long distance charges mayapply.
Note: For help using any other software on your system, see the documentation for that software fortechnical support.
Purchase Supplies and AccessoriesYou can purchase genuine Epson accessories at epson.com (U.S. sales), epson.ca (Canadian sales), orepson.com.jm (Caribbean sales). You can also purchase accessories from an Epson authorized reseller.To find the nearest one, call 800-GO-EPSON (800-463-7766) in the U.S. or 800-807-7766 in Canada.Parent topic: Solving Problems
77
Technical SpecificationsThese sections list the technical specifications for your scanner.
Note: Epson offers a recycling program for end of life Epson products. Please go to this site (U.S) or thissite (Canada) for information on how to return your Epson products for proper disposal.
Windows System RequirementsMac System RequirementsGeneral SpecificationsDimension SpecificationsElectrical SpecificationsEnvironmental SpecificationsUSB Interface SpecificationsNetwork Interface SpecificationsSafety and Approvals Specifications
Windows System RequirementsMake sure your system meets these requirements before using it with your scanner.
System Microsoft Windows 10, Windows 8.x, Windows 7, Windows Vista,Windows XP Home Edition, Windows XP Professional Edition,Windows XP Professional x64 Edition
Interface External USB port (Type A)Display Color monitor with 800 × 600 resolution or higher and 24-bit color
(Full Color)
Note: For the latest product software available for your operating system, visit the Epson support site atepson.com/support (U.S.), epson.ca/support (Canada), or epson.com.jm/support (Caribbean), selectyour product, and select Downloads.
Parent topic: Technical Specifications
78
Mac System RequirementsMake sure your system meets these requirements before using it with your scanner.
System macOS 10.13.x, macOS 10.12.x, OS X 10.11.x, OS X 10.10.x,10.9.x, 10.8.x, 10.7.x, 10.6.x, 10.5.8(Fast user switching on Mac OS X is not supported.)
Interface Macintosh USBDisplay Color monitor with 800 × 600 resolution or higher and millions of
colors
Note: Epson Scan does not support the UNIX File System (UFS) for OS X. Install Epson Scan on a diskor in a partition that does not use UFS.
Note: For the latest product software available for your operating system, visit the Epson support site atepson.com/support (U.S.), epson.ca/support (Canada), or epson.com.jm/support (Caribbean), selectyour product, and select Downloads.
Parent topic: Technical Specifications
General SpecificationsScanner type Sheet feed, simplex color A4 scannerPhotoelectric device CISEffective pixels 5154 × 8400 pixels at 600 dpiDocument size Maximum:
Up to 8.5 × 14 inches (215.9 × 355.6 mm) at 600 dpiWindows maximum: 8.5 × 36 inches (215.9 × 914.4 mm) at 300 dpior lowerMac maximum: 8.5 × 16.5 inches (215.9 × 420.1 mm) at 300 dpi orlowerMinimum:2 × 2.9 inches (52 × 73.7 mm); portrait orientation3.4 × 2.1 inches (85.6 × 54 mm); landscape orientation

79
Paper input Facedown loadingPaper output Facedown ejectionPaper capacity 1 sheet of paper at 9 to 72 lb (35 to 270 g/m2) weightScanning resolution 600 dpi (main scan)
600 dpi with Micro Step (sub scan)(up to 300 dpi or lower for paper longer than 14 inches (355.6 mm)
Output resolution 50 to 1200 dpi in 1 dpi incrementsImage data 16 bits per pixel per color internal
1 to 8 bits per pixel per color externalInterface One Hi-Speed USB portLight source RGB LED
Parent topic: Technical Specifications
Dimension SpecificationsHeight 1.7 inches (43 mm)Width 11.7 inches (296 mm)Depth 2.7 inches (69 mm)Weight(without batteries)
1.14 lb (515 g)
Note: Dimensions do not include projecting parts.
Parent topic: Technical Specifications
Electrical SpecificationsNote: Power consumption varies depending on operating conditions or whether an option is installed.
Power supply Four AA-size alkaline, Ni-MH, or lithium batteries

80
External power supply USB bus power: DC5V, 0.5 AOptional AC adapter model: SYS1319-1005
Power consumption USB connection:Operating: 2.5 WReady mode: 1.3 WSleep mode: 1.3 WPower off mode: 0.0125 WWireless network connection:Operating: 5.5 WReady mode: 3.5 WSleep mode: 3.0 WPower off mode: 0.4 W
Parent topic: Technical Specifications
Environmental SpecificationsTemperature Operating: 50 to 95 °F (10 to 35 °C)
Storage: –13 to 140 °F (–25 to 60 °C)Humidity(non-condensing)
Operating: 10 to 80% RHStorage: 10 to 90% RH
Operating conditions Ordinary office or home conditions
Note: Avoid operating the scanner in direct sunlight, near a strong light source, or in extremely dustyconditions.
Parent topic: Technical Specifications
USB Interface SpecificationsInterface type Universal Serial Bus Specifications Revision 2.0

81
Electrical standard Hi-Speed mode (480 Mbits per second)Connector type One Type B port
Note: The product may not operate if connected to a computer USB port on a keyboard or monitor, or ifconnected using a long USB cable.
Parent topic: Technical Specifications
Network Interface SpecificationsWireless LAN standard IEEE 802.11 b/g/nWireless security WEP (64/128 bit)
WPA-PSK (TKIP/AES); WPA2 compliant with support forWPA/WPA2 personal
Frequency band 2.4 GHzCommunication mode Infrastructure mode
Direct Wi-Fi connection (access point mode)
Note: Wireless LAN standard complies with either IEEE 802.11 b/g or IEEE 802.11 b/g/n, depending onpurchase location.
Parent topic: Technical Specifications
Safety and Approvals SpecificationsUnited States EMC: FCC part 15 Subpart B class BCanada EMC: CAN/CSA-CEI/IEC CISPR 22 Class B
This equipment contains the following wireless module:• Manufacturer: Askey Computer Corporation.• Type: WLU6117-D69 (RoHS)This product conforms to Part 15 of FCC Rules and RSS-210 of the IC Rules. Epson cannot acceptresponsibility for any failure to satisfy the protection requirements resulting from a non-recommended

82
modification of the product. Operation is subject to the following two conditions: (1) this device may notcause harmful interference, and (2) this device must accept any interference received, includinginterference that may cause undesired operation of the device.To prevent radio interference to the licensed service, this device is intended to be operated indoors andaway from windows to provide maximum shielding. Equipment (or its transmit antenna) that is installedoutdoors is subject to licensing.Parent topic: Technical Specifications
83
NoticesCheck these sections for important notices about your scanner.
Note: Epson offers a recycling program for end of life Epson products. Please go to this site (U.S) or thissite (Canada) for information on how to return your Epson products for proper disposal.
Important Safety InstructionsBattery Safety InstructionsRestrictions on CopyingDefault Delay Times for Power Management for Epson ProductsTrademarksCopyright Notice
Important Safety InstructionsFollow these safety instructions when setting up and using the scanner:• Read all these instructions, and follow all warnings and instructions marked on the scanner.• Place the scanner close enough to the computer for the interface cable to reach it easily.• Do not use with wet hands.• When connecting this product to a computer or other device with a cable, ensure the correct
orientation of the connectors. Each connector has only one correct orientation. Inserting a connectorin the wrong orientation may damage both devices connected by the cable.
• Do not insert objects into any opening as they may touch dangerous voltage points or short out parts.Beware of electrical shock hazards.
• Place the product on a flat, stable surface that extends beyond the base of the product in all directions.If you place the product by the wall, leave enough room between the back of the product and the wallso that the scanned document can be ejected. The product will not operate properly if it is tilted at anangle.
• After replacing consumable parts, dispose of them correctly following the rules of your local authority.Do not disassemble them.
• If you notice any unusual effects such as noise, overheating, smoke, odor, discoloration, ordeformation, immediately turn off the scanner, unplug the cables (if any), and stop using the scanner.
• Do not subject the scanner to physical impacts or drop the scanner.

84
• Do not place or store the scanner outdoors, in a car, near excessive dirt or dust, water, heat sources,or in locations subject to shocks, vibrations, condensation, high temperature or humidity, directsunlight, strong light sources, or rapid changes in temperature or humidity.
• Never disassemble, modify, or attempt to repair the scanner or a scanner option by yourself except asspecifically explained in this guide.
Caution: Radio waves from this product may adversely affect the operation of medical equipment,airplanes, or automatically controlled devices, such as pacemakers, automatic doors, or fire alarms.When using this product near such devices or inside a medical facility, follow the directions fromauthorized staff members at the facility, and follow all posted warnings and directions on the device toavoid causing an accident.
Warning: The cords included with this product contain chemicals, including lead, known to the State ofCalifornia to cause birth defects or other reproductive harm. Wash hands after handling. (This notice isprovided in accordance with Proposition 65 in Cal. Health & Safety Code § 25249.5 and following.)
USB• The USB cable should be placed to avoid abrasions, cuts, fraying, crimping, and kinking.• Do not place objects on top of the USB cable and do not allow the cable to be stepped on or run over.
Be particularly careful to keep the USB cable straight at the end.• Unplug the scanner and the USB cable, and refer servicing to qualified service personnel under the
following conditions: Liquid has entered the scanner; the scanner has been dropped or the case hasbeen damaged; the scanner does not operate normally or exhibits a distinct change in performance.(Do not adjust controls that are not covered by the operating instructions.)
Parent topic: Notices
Battery Safety Instructions• Use batteries properly to avoid injury or fire caused by leaking, overheating, explosion, erosion, or any
other damage to the product.• If you are not going to use the scanner for a long period, be sure to remove the batteries.• Keep batteries out of reach of children. If battery acid gets into your eyes or on your skin, immediately
rinse the affected area thoroughly with water and seek medical treatment. If a battery is swallowed,seek medical treatment immediately.
• If battery acid leaks from a battery, wipe it off with a cloth and replace the battery with a new one.• Use AA Ni-MH, alkaline, or lithium batteries.
85
• Do not use new and old batteries together or mix different types of batteries.• Insert batteries so that the polarities (+ and –) are correct.• Remove dead batteries promptly.• Do not heat batteries or throw them in fire or water.• Do not remove batteries with metal objects such as tweezers or the tip of a pen.• Cover the ends of the batteries with tape to prevent combustion or explosion when disposing of them.• Make sure to follow local battery disposal regulations.Parent topic: Notices
Restrictions on CopyingObserve the following restrictions to ensure responsible and legal use of your scanner.Copying of the following items is prohibited by law:• Bank bills, coins, government-issued marketable securities, government bond securities, and
municipal securities• Unused postage stamps, pre-stamped postcards, and other official postal items bearing valid postage• Government-issued revenue stamps, and securities issued according to legal procedureExercise caution when copying the following items:• Private marketable securities (stock certificates, negotiable notes, checks, etc.), monthly passes,
concession tickets, etc.• Passports, driver's licenses, warrants of fitness, road passes, food stamps, tickets, etc.
Note: Copying these items may also be prohibited by law.
Restriction on disassembling and decompilingYou may not disassemble, decompile or otherwise attempt to derive the source code of any softwareincluded with this product.Parent topic: Notices
86
Default Delay Times for Power Management for Epson ProductsThis product will enter sleep mode after a period of nonuse. The time interval has been set at the factoryto ensure that the product meets Energy Star standards of energy efficiency, and cannot be modified bythe consumer.Parent topic: Notices
TrademarksEPSON® is a registered trademark and EPSON Exceed Your Vision is a registered logomark of SeikoEpson Corporation.Mac and OS X are trademarks of Apple Inc., registered in the U.S. and other countries.App Store is a service mark of Apple Inc.Android, Google Play, and Google Drive are trademarks of Google, Inc.General Notice: Other product names used herein are for identification purposes only and may betrademarks of their respective owners. Epson disclaims any and all rights in those marks.
Parent topic: Notices
Copyright NoticeAll rights reserved. No part of this publication may be reproduced, stored in a retrieval system, ortransmitted in any form or by any means, electronic, mechanical, photocopying, recording, or otherwise,without the prior written permission of Seiko Epson Corporation. The information contained herein isdesigned only for use with this Epson product. Epson is not responsible for any use of this information asapplied to other products.Neither Seiko Epson Corporation nor its affiliates shall be liable to the purchaser of this product or thirdparties for damages, losses, costs, or expenses incurred by purchaser or third parties as a result of:accident, misuse, or abuse of this product or unauthorized modifications, repairs, or alterations to thisproduct, or (excluding the U.S.) failure to strictly comply with Seiko Epson Corporation's operating andmaintenance instructions.

87
Seiko Epson Corporation shall not be liable for any damages or problems arising from the use of anyoptions or any consumable products other than those designated as Original Epson Products or EpsonApproved Products by Seiko Epson Corporation.Seiko Epson Corporation shall not be held liable for any damage resulting from electromagneticinterference that occurs from the use of any interface cables other than those designated as Epsonapproved Products by Seiko Epson Corporation.This information is subject to change without notice.Open Source Software LicenseInfo-ZIP Copyright and LicenseA Note Concerning Responsible Use of Copyrighted MaterialsCopyright AttributionParent topic: Notices
Open Source Software License1) This product includes open source software programs listed in Section 6) according to the licenseterms of each open source software program.2) We provide the source code of the GPL Programs, LGPL Programs and Apache License Program(each is defined in Section 6) until five (5) years after the discontinuation of same model of this product.If you desire to receive the source code above, contact Epson as described in the User's Guide. Youshall comply with the license terms of each open source software program.3) The open source software programs are WITHOUT ANY WARRANTY; without even the impliedwarranty of MERCHANTABILITY AND FITNESS FOR A PARTICULAR PURPOSE. See the licenseagreements of each open source software program for more details, which are described in OSS.pdf onyour scanner software CD.4) OpenSSL toolkitThis product includes software developed by the OpenSSL project for use in the OpenSSL Toolkit(http://www.openssl.org/).This product includes cryptographic software written by Eric Young ([email protected]).5) The license terms of each open source software program are described in OSS.pdf on your scannersoftware CD.6) The list of open source software programs which this product includes are as follows.GNU GPL
88
This product includes the open source software programs which apply the GNU General Public LicenseVersion 2 or later version ("GPL Programs").The list of GPL Programs:base-passwd-3.5.7busybox-1.2.2.1ifupdown-0.6.8kernel-2.6.18lsp-arm-versatile926ejs-2.6.18_pro500module-init-tools-3.2pre1mount-2.12net-tools-1.60netbase-4.29psmisc-21.5readline-libs-5.0sysvinit-2.86udev-0.093udhcp 0.9.8cvs20050124-5util-linux-2.12usb8786GNU LGPLThis product includes the open source software programs which apply the GNU Lesser General PublicLicense Version 2 or later version ("LGPL Programs").The list of LGPL Programs:uclibc-0.9.29libusb-libs-0.1.12zeroconf 0.6.1-1iksemel 1.4Apache License

89
This product includes the open source software program "Bonjour" which apply the Apache LicenseVersion2.0 ("Apache License Program").Bonjour LicenseThis product includes the open source software program "Bonjour" which applies the terms andconditions provided by owner of the copyright to the "Bonjour".Net-SNMP licenseThis product includes the open source software program "Net-SNMP" which applies the terms andconditions provided by owner of the copyright to the "Net-SNMP".OpenSSL License/Original SSLeay LicenseThis product includes the open source software program "OpenSSL toolkit" which applies the licenseterms of OpenSSL License and Original SSLeay License.BSD License (Berkeley Software Distribution License)This product includes the open source software programs which apply the Berkeley SoftwareDistribution License ("BSD Programs").The list of BSD Programs:busybox-1.2.2.1util-linux-2.12mount-2.12mvlutils-2.8.4netkit-ftp-0.17netkit-base-0.17portmap-5betaSun RPC LicenseThis product includes the open source software programs which apply the Sun RPC License ("Sun RPCPrograms").The list of Sun RPC Programs:busybox- 1 .2.2.1netkit-inetd-0.17portmap-5betaTCP Wrappers license
90
This product includes the open source software program "libwrap-libs-7.6" which applies the terms andconditions provided by owner of the copyright to the "TCP Wrappers".libncurses licenseThis product includes the open source software program "libncurses-5.4" which applies the terms andconditions provided by owner of the copyright to the "libncurses".busybox licenseThis product includes the open source software program "busybox- 1.2.2.1" which applies the terms andconditions provided by owner of the copyright to the "busybox".linux-ftpd licenseThis product includes the open source software program "linux-ftpd-0.17" which applies the terms andconditions provided by owner of the copyright to the "linux-ftpd".SHA1licenseThis product includes the open source software program "SHA1" which applies the terms and conditionsprovided by owner of the copyright to the "SHA1".ARC4 licenseThis product includes the open source software program "ARC4" which applies the terms and conditionsprovided by owner of the copyright to the "ARC4".json_parserlicenseThis product includes the open source software program "json_parser" which applies the terms andconditions provided by owner of the copyright to the "json_parser".MD5licenseThis product includes the open source software program "MD5" which applies the terms and conditionsprovided by owner of the copyright to the "MD5".AESlicenseThis product includes the open source software program "AES" which applies the terms and conditionsprovided by owner of the copyright to the "AES".Parent topic: Copyright Notice
Info-ZIP Copyright and LicenseThis is version 2007-Mar-4 of the Info-ZIP license. The definitive version of this document should beavailable at ftp://ftp.info-zip.org/pub/infozip/license.html indefinitely and a copy at http://www.info-zip.org/pub/infozip/license.html.
91
Copyright (c) 1990-2007 Info-ZIP. All rights reserved.For the purposes of this copyright and license, "Info-ZIP" is defined as the following set of individuals:Mark Adler, John Bush, Karl Davis, Harald Denker, Jean-Michel Dubois, Jean-loup Gailly, HunterGoatley, Ed Gordon, Ian Gorman, Chris Herborth, Dirk Haase, Greg Hartwig, Robert Heath, JonathanHudson, Paul Kienitz, David Kirschbaum, Johnny Lee, Onno van der Linden, Igor Mandrichenko, SteveP. Miller, Sergio Monesi, Keith Owens, George Petrov, Greg Roelofs, Kai Uwe Rommel, SteveSalisbury, Dave Smith, Steven M. Schweda, Christian Spieler, Cosmin Truta, Antoine Verheijen, Paulvon Behren, Rich Wales, Mike White.This software is provided "as is," without warranty of any kind, express or implied. In no event shall Info-ZIP or its contributors be held liable for any direct, indirect, incidental, special or consequential damagesarising out of the use of or inability to use this software.Permission is granted to anyone to use this software for any purpose, including commercial applications,and to alter it and redistribute it freely, subject to the above disclaimer and the following restrictions:1. Redistributions of source code (in whole or in part) must retain the above copyright notice, definition,disclaimer, and this list of conditions.2. Redistributions in binary form (compiled executables and libraries) must reproduce the abovecopyright notice, definition, disclaimer, and this list of conditions in documentation and/or other materialsprovided with the distribution. The sole exception to this condition is redistribution of a standardUnZipSFX binary (including SFXWiz) as part of a self-extracting archive; that is permitted withoutinclusion of this license, as long as the normal SFX banner has not been removed from the binary ordisabled.3. Altered versions--including, but not limited to, ports to new operating systems, existing ports with newgraphical interfaces, versions with modified or added functionality, and dynamic, shared, or static libraryversions not from Info-ZIP--must be plainly marked as such and must not be misrepresented as beingthe original source or, if binaries, compiled from the original source. Such altered versions also must notbe misrepresented as being Info-ZIP releases--including, but not limited to, labeling of the alteredversions with the names "Info-ZIP" (or any variation thereof, including, but not limited to, differentcapitalizations), "Pocket UnZip," "WiZ" or "MacZip" without the explicit permission of Info-ZIP. Suchaltered versions are further prohibited from misrepresentative use of the Zip-Bugs or Info-ZIP e-mailaddresses or the Info-ZIP URL(s), such as to imply Info-ZIP will provide support for the altered versions.4. Info-ZIP retains the right to use the names "Info-ZIP," "Zip," "UnZip," "UnZipSFX," "WiZ," "PocketUnZip," "Pocket Zip," and "MacZip" for its own source and binary releases.Parent topic: Copyright Notice

92
A Note Concerning Responsible Use of Copyrighted MaterialsEpson encourages each user to be responsible and respectful of the copyright laws when using anyEpson product. While some countries' laws permit limited copying or reuse of copyrighted material incertain circumstances, those circumstances may not be as broad as some people assume. Contact yourlegal advisor for any questions regarding copyright law.Parent topic: Copyright Notice
Copyright Attribution© 2018 Epson America, Inc.2/18CPD-40796R3Parent topic: Copyright Notice