drying fruits and vegetables - university of idaho - offering top
TRANSCRIPT

In this edition Answers to the most commonly asked questions about food drying Blanching and drying time guidelines
How to dry canned fruits and frozen vegetables
Pretreatment guidelines
Fruits & VegetablesDRYING
A Pacifi c Northwest Extension PublicationIdaho • Oregon • Washington
PNW 397
3rd
Edition
Pacifi c Northwest Extension publications are jointly produced by the three Pacifi c Northwest states—Idaho, Oregon, and Washington. Similar crops, climate, and topography create a natural geographic unit that crosses state lines. Since 1949, the PNW program has published more than 400 titles. Joint writing, editing, and production have prevented duplication of effort, broadened the availability of faculty specialists, and substantially reduced costs for the participating states.
Published and distributed in furtherance of the Acts of Congress of May 8 and June 30, 1914, by University of Idaho Extension, the Oregon State University Extension Service, Washington State University Extension, and the U.S. Department of Agriculture cooperating.
The three participating extension services offer educational programs, activities, and materials without regard to race, color, national origin, religion, sex, sexual orientation, age, disability, or status as a disabled veteran or Vietnam-era veteran, as required by state and federal laws. University of Idaho Extension, Oregon State University Extension Service, and Washington State University Extension are Equal Opportunity Employers.
Published June 1995. Revised April 2000. Reprinted August 2003. Revised August 2009. $2.50
© 2009 by University of Idaho. All rights reserved.
Contents Introduction 1
Drying Methods 2
Selecting Foods for Drying 4
Preparing Foods for Drying 5
Pretreating Fruits and Vegetables 6
Drying in a Dehydrator 11
Packaging 13
Storage 14
Making Fruit Leathers 15
Drying Guidelines for Fruits 18
Drying Guidelines for Vegetables 20
Enjoying Dried Foods 23
Recipes 24
Questions and Answers 28
The authors—Marilyn A. Swanson, former Extension Food Safety Specialist, School of Family and Consumer Sciences, University of Idaho. Revised by Sandra M. McCurdy, Extension Food Safety Specialist, School of Family and Consumer Sciences, University of Idaho, in collaboration with extension specialists at Oregon State University and Washington State University.
Cover photo—Dishes prepared from dried fruits and vegetables (top to bottom) are Tangy Golden Fruit Snacks, Dried Vegetable Quick Bread, and Tangy Stewed Fruit.
Tips for Drying for Best Quality
• Don’t overblanch. • Dry foods as quickly as possible without raising
the temperature above 150°F initially or above 140°F for the remaining drying time. Dry herbs, coconut, and mushrooms at lower temperatures.
• Do not overload the dryer. • Keep the food on the drying trays well spaced with
no overlapping. • Keep good air circulation to quickly move moisture
away from the drying food. • If possible, dry when the relative humidity is low. • Check to be sure foods are suffi ciently dry. • Condition dried fruits. • Store dried foods in packages that do not admit
moisture or oxygen. • Store dried foods in a cool, dark, dry place. • Store in amounts that can be used easily at one time.

1
Drying foods yourself allows you to choose the best, tastiest variet-ies you can buy or pick fresh from the garden. Home drying also lets you enjoy dried fruits and vegetables the grocery stores don’t carry. Dried berries make wonderful additions to winter muffi ns. Dried tomatoes perk up a pot of baked beans. Backpackers let lightweight dried vegetable mixes simmer into tempting soups. And the foods you dry yourself cost a lot less than the ones you buy.
Microorganisms and enzymes that spoil food and make it unsafe to eat need water to be active. Drying works as a preservation method simply by depriving them of water.
Recent research, however, has revealed that if harmful bacteria are present on fruits and vegetables before drying, these pathogens can survive the drying process. Even so, there are no documented cases of people becoming ill due to eating home-dried fruits and vegetables.
For those who would like an extra measure of safety, instructions are included in this bulletin for optional pretreatment methods that improve destruction of harmful bacteria during drying. Pretreatment is especially important if uncooked dried foods will be eaten by indi-viduals who are at greater risk for foodborne illness (children, pregnant women, immune-compromised, and elderly individuals).
Introduction

2
Unlike canning, in which you follow precise instructions for pack-aging and processing times to keep the food safe to eat, food drying is fl exible. Decisions about food-piece sizes, food mixtures, pretreat-ments, and packaging are yours. Drying time is determined less by the clock than by simple tests you perform.
Almost any food-safe packaging will do for dried foods. And, un-like canned foods, packages can be opened and closed again and again.
High-quality, moderately priced electric dehydrators are widely available. Easy to use and needing little care, they produce a consis-tently top-quality product. For these reasons, most people buy or bor-row electric dehydrators rather than use their oven or the sun. What-ever drying method you choose, the principles in this guide will apply.
Drying MethodsFoods can be dried in an electric dehydrator, in a solar dryer, or in
a regular oven.
Dehydrator DryingDehydrator drying produces the best quality dried products, so it’s
not surprising that it’s also the most popular drying method. Dehydra-tor drying also gives you greater fl exibility than other methods be-cause it does not depend on dry, sunny days or take over your oven. A variety of electric dehydrators are available for purchase. A dehydrator should have a heat source, a thermostat, and some method of air circu-lation. If you buy a dehydrator, follow the directions that come with it.

3
Buying a Dehydrator Before you buy a new or used food dehydrator, check to see that
it has all these features: • Instruction manual. • Thermostatically controlled temperature dial with settings be-
tween 130° and 150°F. (If you plan to dry meat jerky in your dehydrator, the dehydrator must be capable of maintaining a temperature of 145°F. Contact the extension educator in your county for instructions on how to safely prepare meat jerky.)
• Fan or blower to distribute warm air evenly. • Shelves made of stainless steel or food-grade plastic. (Galvanized
screening is not food-safe.) • Easy loading and unloading features. • Outside cabinets made of hard plastic, aluminum, or steel. The
highest quality dehydrator has double-wall construction with insulating material sandwiched between the walls to reduce the amount of heat lost during use.
• Enclosed heating element. • Appropriate number of trays for your use. Most food dryers come
with 4 to 10 food trays. • Source of replacement parts.
Solar DryingSolar drying is like sun drying, only better. The sun’s rays collect in
a solar box so that, compared with sun drying, drying temperature is higher and drying time is shorter. The shorter drying time gives micro-organisms less chance to cause spoilage.
If you do not want to buy or build a solar box, you can use the back window ledge of an automobile where the sun shines through. Crack the windows slightly to allow air fl ow so temperatures do not get too hot. Cover the trays with netting to keep bugs out.
Oven DryingYou can use your oven to dry small amounts of food at one time.
You’ll have little or no investment in equipment and you won’t have to depend on the weather.

4
Although oven drying produces a safe, generally tasty product, don’t expect top quality. Oven-dried food is more brittle and usually darker and less fl avorful than food dried in a dehydrator. Another disadvantage of oven drying is its energy cost. Oven drying takes two or three times longer than drying in a dehydrator.
Before drying in an oven, test the oven temperature with an oven thermometer for about 1 hour. Prop open the oven door as you would when actually drying fruit. The oven should maintain a temperature of 130° to 150°F.
If the oven cannot maintain a temperature in this range, you will not have high-quality dried food. If the oven is too hot, your food will begin to cook instead of dry. If it is too cool, your food may not dry fast enough and spoil instead.
Selecting Foods for Drying
FruitsIf you’re new to drying, start
with the fruits you like best. Think also about how you will use your dried fruits. Peaches or pears in a tangy stewed fruit? Apples or apri-cots for lunch box snacks? Berries to toss into muffi n or cake batters? Most fruits are easy to dry.
High-quality fruits make the best dried products. Choose fi rm, fully ripe fruit that is heavy for its size. Handle fruits gently and process them immediately because fruit ready for drying is very frag-ile. Use overripe or bruised fruits in other ways (for example, as fruit leathers).
VegetablesVegetables for drying should be fresh, tender, and just mature.
Avoid immature vegetables because their color and fl avor tend to be weak or poor. Also avoid excessively mature vegetables, which are inclined to be tough, woody, or fi brous. For the best quality and nutri-tion, dry vegetables as soon as possible after harvest.

5
Preparing Foods for DryingFor suggestions for specifi c fruits and vegetables, see the drying
guidelines beginning on page 18.
FruitsGently wash all fruits in cold water just before drying to remove
dirt, bacteria, and insects. Thoroughly wash fruits that have skins you will not peel off, such as cherries and prunes. Do not soak fruit be-cause extended soaking can cause nutrient loss and waterlog the fruit, which increases drying times.
Remove fruit stems and peels. Peels may be left on some fruits, such as apples and peaches, but they may become bitter or discolor during drying. Core or pit the fruit and cut it into uniform halves, quarters, or slices. Trim away diseased or soft spots.
VegetablesWash vegetables in cold water just before drying. If vegetables are
covered with soil, wash them under clean running water to prevent the dirt from resettling on the food. Do not allow vegetables to soak in water.
Most vegetables should be peeled and trimmed then cut, sliced, or shredded into uniform pieces. Although peeling some vegetables such as young zucchini and well-washed carrots is optional, unpeeled vegetables tend to be tougher when dried. Remove fi brous or woody portions and damaged areas. You can prepare pieces with a food slicer or food processor.

6
Pretreating Fruits and Vegetables for Quality and Safety
See the drying guidelines on pages 18 through 22 for specifi c details.
Although you can dry and store many foods without pretreat-ment, pretreatment generally improves quality and can make the food safer to eat. Research shows that treating fruits and vegetables with an acidic solution (citric or ascorbic acid) or with a sodium metabisulfi te solution helps destroy any harmful bacteria that may be present on produce during the dehydration process, including E. coli O157:H7, Salmonella, and Listeria monocytogenes.
Six reasons for treating food before drying are to
1. Preserve color and fl avor 2. Minimize nutrient loss 3. Stop decomposition (enzyme action) 4. Ensure more even drying 5. Extend storage life 6. Enhance destruction of
harmful bacteria during drying
Pretreating FruitsDecomposition from enzyme action during storage is less a prob-
lem with fruits than it is with vegetables. Fruits have higher levels of sugar and acid, which counteract enzyme action. Although pretreating fruit is not necessary, you can use an ascorbic acid/citric acid dip, a salt solution dip, syrup blanching, a honey dip, or a sulfi ting procedure. Certain fruits, such as apricots, pears, peaches, and some varieties of apples, tend to discolor with drying. Pretreating those fruits can decrease browning during processing and storage and lower losses of fl avor and of vitamins A and C. The ascorbic acid, citric acid, and me-tabisulfi te dips can also enhance the destruction of potentially hazard-ous bacteria during drying.
If you use a pretreatment method that requires soaking fruits in a water solution, you will need to increase drying time because the fruit will absorb some water. Do not allow foods to soak more than 1 hour.
7
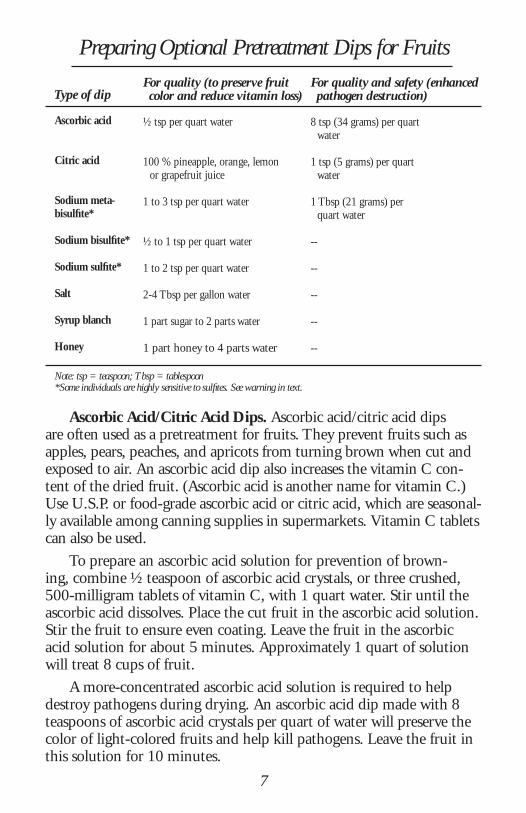
Ascorbic Acid/Citric Acid Dips. Ascorbic acid/citric acid dips are often used as a pretreatment for fruits. They prevent fruits such as apples, pears, peaches, and apricots from turning brown when cut and exposed to air. An ascorbic acid dip also increases the vitamin C con-tent of the dried fruit. (Ascorbic acid is another name for vitamin C.) Use U.S.P. or food-grade ascorbic acid or citric acid, which are seasonal-ly available among canning supplies in supermarkets. Vitamin C tablets can also be used.
To prepare an ascorbic acid solution for prevention of brown-ing, combine ½ teaspoon of ascorbic acid crystals, or three crushed, 500-milligram tablets of vitamin C, with 1 quart water. Stir until the ascorbic acid dissolves. Place the cut fruit in the ascorbic acid solution. Stir the fruit to ensure even coating. Leave the fruit in the ascorbic acid solution for about 5 minutes. Approximately 1 quart of solution will treat 8 cups of fruit.
A more-concentrated ascorbic acid solution is required to help destroy pathogens during drying. An ascorbic acid dip made with 8 teaspoons of ascorbic acid crystals per quart of water will preserve the color of light-colored fruits and help kill pathogens. Leave the fruit in this solution for 10 minutes.
½ tsp per quart water
100 % pineapple, orange, lemon or grapefruit juice
1 to 3 tsp per quart water
½ to 1 tsp per quart water
1 to 2 tsp per quart water
2-4 Tbsp per gallon water
1 part sugar to 2 parts water
1 part honey to 4 parts water
Ascorbic acid
Citric acid
Sodium meta-bisulfi te*
Sodium bisulfi te*
Sodium sulfi te*
Salt
Syrup blanch
Honey
8 tsp (34 grams) per quart water
1 tsp (5 grams) per quart water
1 Tbsp (21 grams) per quart water
--
--
--
--
--
Note: tsp = teaspoon; Tbsp = tablespoon*Some individuals are highly sensitive to sulfi tes. See warning in text.
For quality (to preserve fruit color and reduce vitamin loss)
For quality and safety (enhanced pathogen destruction)Type of dip
Preparing Optional Pretreatment Dips for Fruits

8
Pineapple juice or juice from citrus fruits such as oranges, lemons, or grapefruit can also be used as a pretreatment. These juices contain a mixture of citric and ascorbic acids. Citric acid does not prevent browning as well as ascorbic acid, but it’s more effective at destroying harmful bacteria. For enhanced pathogen destruction, prepare a citric acid solution by stirring 1 teaspoon of citric acid crystals into 1 quart of cold water. For a lemon juice solution, mix equal parts of lemon juice and cold water. Place fruit in either solution and soak for 10 minutes.
You can also use a commercial pretreatment such as the anti-dark-ening powders often sold with food preservation supplies. Follow the label directions.
Salt Solution Dip. Prepare a solution of 2 to 4 tablespoons of salt per gallon of water. Soak fruit for 2 to 5 minutes, and then drain it well.
Syrup Blanching. Prepare fruit for drying. Prepare a sugar syrup made with 1 part sugar and 2 parts water. If desired, use less sugar. Bring the syrup solution to a boil. Add the fruit, simmer for 5 min-utes, then drain the fruit. Place the fruit on drying trays and dry. This fruit product is like a candied fruit.
Honey Dip. A honey treatment for fruit can effectively minimize browning and softening in light-colored fruit. Prepare a honey-water dip using 1 part honey to 4 parts water. Dip the fruit in the honey solution immediately after slicing, let it soak for about 5 minutes, and drain well. The dried fruit will have a slight honey taste.
Sulfi ting. Sulfur dioxide treatments, either sulfi ting or sulfuring, are very effective for retarding oxidation and browning in fruit. Fruit fl avor and storage life may also improve. Almost all commercially pro-duced light-colored fruits, such as dried apples, pears, and apricots, are treated with sulfur compounds.
Some individuals, particularly those with asthmatic conditions, are highly sensitive to sulfi tes. During the drying process, most of the sulfi tes enter the air, leaving only a trace on the fruit. Nevertheless, this trace may cause severe allergic reactions in sensitive individuals. Sensi-tive individuals should not eat food treated with sulfi tes or prepare soaking solutions with sulfi tes. If you use a sulfi ting pretreatment when drying foods, be sure to say so on the label.
Sulfi ting involves preparing a solution of water and a sulfi ting agent and then soaking the cut fruit in the solution. In the United States six sulfur compounds (sulfur dioxide, sodium sulfi te, sodium

9
bisulfi te, potassium bisulfi te, sodium metabisulfi te, and potassium metabisulfi te) have been listed by the U.S. Food and Drug Adminis-tration (FDA) as “Generally Recognized as Safe” (GRAS). Th e most popular sulfi ting agents for home drying are sodium bisulfi te, sodium sulfi te, and sodium metabisulfi te. Th ey should be either U.S.P. (food grade) or reagent grade (pure). Th ey are available at most wine-making supply centers and some larger supermarkets.
In addition to slowing the browning in fruit, sodium metabisulfi te destroys harmful bacteria during drying. When using sodium meta-bisulfi te to destroy bacteria, use 1 tablespoon of sodium metabisulfi te in 1 quart of water and a soak time of 10 minutes.Th e sulfi ting process has two steps: 1. Prepare the sulfi ting solution in a large glass container just before
use. Place the cut fruit in the solution. Do not leave the fruit in the sulfi ting solution too long or the fruit will be mushy. Use about 10 minutes for sliced fruit and 30 minutes for halved fruit. Do not exceed the recommended quantities of sulfi tes or soak times.
2. After sulfi ting, remove the fruit and drain it well. Some people recommend a quick rinse in cold water before drying. Place sulfi ted fruit on drying trays and dry. Drying times for sulfi ted fruits are longer because the fruit absorbs some water during soaking.
Pretreating VegetablesBlanching (heating in boiling water or steam) is the pretreat-
ment method of choice for vegetables. Almost all vegetables should be blanched before drying to destroy the enzymes that make vegetables deterio-rate. Blanching keeps vegetables from browning, becoming bitter, or develop-ing off fl avors. Blanching also cleans and softens vegetables and makes them easier to rehydrate later.
You can either immerse vegetables in boiling water or blanch them in steam. Vegetables lose more nutrients during boiling, but they heat more evenly. In addition, water blanch-ing (boiling) enhances destruction of harmful bacteria compared with steam blanching.

10
Steam Blanching. Use a steamer or make a steamer out of a kettle with a tight-fi tting lid. Place a colander, wire basket, or sieve inside the kettle. Make sure the food will be above the water level. Add 2 inches of water to the kettle and heat it to boiling. Place the container with the loosely packed food in the steamer, cover the kettle tightly, and continue boiling.
Water Blanching. Fill a kettle with enough water to cover the food. Bring the water to a rolling boil and gradually stir in the food. Cover the kettle tightly and boil. You can reuse the water when blanching more of the same food, adding more water as necessary. If the water appears dirty, replace it with clean water.
Citric acid added to the blanching water (¼ teaspoon per quart of water) will help destroy harmful bacteria but will result in a somewhat olive-green color in dried green vegetables. A citric acid blanch used with potato slices produces a superior product compared with a plain water blanch. If you plan to cook your dried vegetables before eating them, for example by adding them to soups or stews, then a citric acid treatment is not necessary.
Determining Blanching Times. Blanching times vary with alti-tude (higher altitudes require longer blanching times), the type and texture of the vegetable, the amount of vegetable, and the thickness of the pieces. Generally, vegetables should feel and taste fi rm yet tender. They should not be fully cooked, but they should be heated all the way through. Test the food by cutting through a piece. If suffi ciently blanched, it will appear cooked (translucent) nearly to the center.
The drying guidelines on pages 18-22 suggest blanching times, but you should test the food frequently to avoid over- or underblanching. Underblanching may cause deterioration in storage, poor rehydration, or bad color. Overblanching makes vegetables lose color, fl avor, and nutrients and gives them poor texture after rehydration.
After Blanching. Drain vegetables by pouring them directly on the drying trays. If you plan to reuse the water, place a large pan under the trays. Wipe the bottom of the drying tray with a clean towel to remove excess water. Draining the vegetables on one tray and then transferring them to the drying tray results in unnecessary handling. Immediately transfer the blanched vegetables into the dehydrator so drying can begin while the vegetables are still warm.

11
Drying in a DehydratorDistribute the food on trays in a single layer. Different foods can
be dried at the same time, but try to choose foods that will dry in about the same amount of time. (Dry similarly sized pieces together.) Onions, peppers, and other strong foods tend to fl avor other foods, so dry them separately.
Moisture must be removed from the food as quickly as possible at a temperature that does not seriously impair the fl avor, texture, or color of the food. If the temperature is too low at the beginning, the food may spoil before it dries. If the temperature is too high, the sur-face may harden so that the interior dries much more slowly. Start the dryer at 140° to 150°F, with the exceptions noted in the drying guide-lines (page 18). After 2 to 3 three hours, lower the dryer temperature to 130°F to 140°F. Adequate air fl ow can reduce drying times.
Monitor the drying process. If necessary, rotate the trays to ensure even drying. You may need to stir grated, shredded, or fi nely cut foods.
Drying Canned Fruits and Frozen VegetablesUsing canned fruits is a quick way to prepare fruit for drying.
Drain the syrup, rinse the fruit, and cut it into ½-inch slices, if desired, then dry as usual. Drying times will be longer than for fresh fruit because the canned fruit will contain absorbed syrup. Dried canned fruit resembles candied fruit and can be used in similar ways.
Likewise, frozen vegetables can be thawed, drained, and dried. Blanching was taken care of before freezing.
12
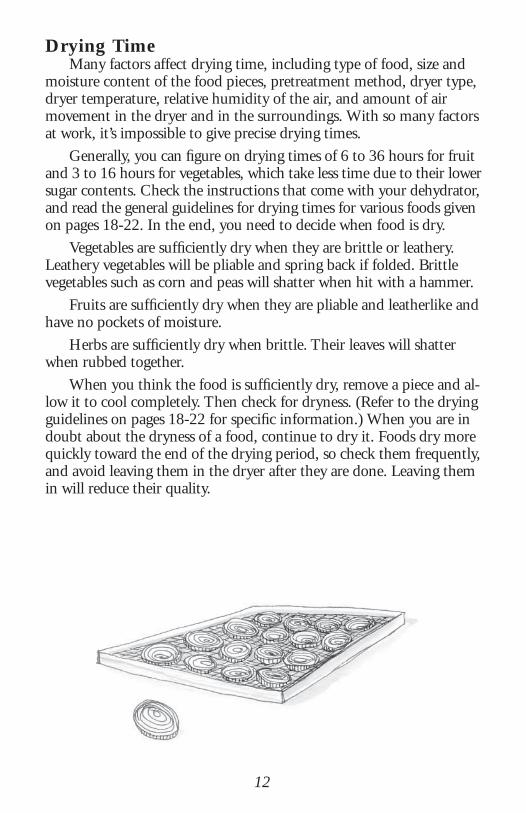
Drying TimeMany factors affect drying time, including type of food, size and
moisture content of the food pieces, pretreatment method, dryer type, dryer temperature, relative humidity of the air, and amount of air movement in the dryer and in the surroundings. With so many factors at work, it’s impossible to give precise drying times.
Generally, you can fi gure on drying times of 6 to 36 hours for fruit and 3 to 16 hours for vegetables, which take less time due to their lower sugar contents. Check the instructions that come with your dehydrator, and read the general guidelines for drying times for various foods given on pages 18-22. In the end, you need to decide when food is dry.
Vegetables are suffi ciently dry when they are brittle or leathery. Leathery vegetables will be pliable and spring back if folded. Brittle vegetables such as corn and peas will shatter when hit with a hammer.
Fruits are suffi ciently dry when they are pliable and leatherlike and have no pockets of moisture.
Herbs are suffi ciently dry when brittle. Their leaves will shatter when rubbed together.
When you think the food is suffi ciently dry, remove a piece and al-low it to cool completely. Then check for dryness. (Refer to the drying guidelines on pages 18-22 for specifi c information.) When you are in doubt about the dryness of a food, continue to dry it. Foods dry more quickly toward the end of the drying period, so check them frequently, and avoid leaving them in the dryer after they are done. Leaving them in will reduce their quality.

13
PackagingGood packaging and storage techniques are crucial. Packaging
protects your dried food from oxygen, moisture (gain or loss), light, microorganisms, and pests. After you have checked foods and found them to be thoroughly dry and cool, pack them immediately for storage.
Conditioning FruitsSome pieces of fruit will be more moist than others after drying so
it is a good idea to condition fruits before long-term storage. Condi-tioning distributes moisture evenly in the fruit. It reduces the chance of spoilage, particularly from mold.
To condition, loosely pack cooled, dried fruit in plastic or glass containers to about two-thirds full. Cover the containers tightly. Shake them daily for about 2 to 4 days. The excess moisture in some pieces will be absorbed by the drier pieces. If you notice water forming on the container lid, place the fruit back in the dehydrator. Because vegetables dry to a nearly waterless state, conditioning vegetables is not necessary.
Choosing ContainersThe ideal container for a dried food is: • Clean and sanitary • Nontoxic • Lightweight • Easily disposable or recyclable • Moisture resistant • Airtight • Protective against light • Easily opened and closed • Impermeable to gases and odors • Durable • Low-cost
Unfortunately no single food container has all these characteris-tics. Make your choice based on the type of dried food, your intended storage conditions, and storage time. Three materials—glass, plastics,

14
and metal (never galvanized steel)—are used for packaging most dried foods. Even open-and-close plastic bags are suitable.
One good method of storing dried food is to place sealed plastic bags inside a larger glass or metal container with a tight-fi tting lid. This two-step packaging has the advantages of being relatively easy, allowing more food to be stored in one container, and protecting against insects and other pests. Although you could store more than one type of dried food inside the larger glass or metal container, do not combine foods with strong odors such as onions, cabbage, or broccoli because other dried foods may absorb their odors.
LabelingLabel each package with the type of food, pretreatment step, and
date. Labels may be taped on the outside of a package, tied on with string, or inserted into a clear glass or plastic package. With proper la-bels you will not have to open individual packages each time you want to use a dried food.
StorageThe length of time you can store dried food depends on • The type of food • Factors related to the drying process (pretreatment
and fi nal level of moisture in the dried food) • Packaging of the dried food • The storage area
An ideal storage area for dried food is cool, dark, and dry. The cooler the storage area, the longer the shelf life. Dark areas are ideal because light fades fruit and veg-etables and decreases their vitamin A and C contents.
The storage area need not be fancy; a dark, unheated closet or drawer works fi ne. Metal containers have the advantage of keeping their contents in darkness. Glass or plastic containers can be covered

15
with a cardboard box, a barrel, or black plastic to keep light out. Many people store dried foods in the refrigerator or freezer, which keeps quality high.
During storage at room temperature, the most common type of spoilage is mold growth. Molds can grow in foods that are not com-pletely dry and in foods that absorb water when they are packaged or stored in moist conditions. (Remember: don’t consume moldy foods. Some toxic molds can grow at room temperature.) Dried food will probably not absorb enough water to allow bacterial or yeast spoilage.
One typical change that occurs during storage is “Maillard brown-ing,” which involves complex chemical reactions between the food’s sugars and proteins. Other chemical changes that may take place during storage include loss of vitamin C or other nutrients, general discoloration, changes in food structure leading to an inability of the dried food to fully rehydrate, and toughness in the rehydrated cooked product.
Making Fruit LeathersFruit leathers are a wonderful way to use small quantities of fruit
or extra-ripe fruit. Fruit leathers, also known as fruit paper and fruit taffi es, are chewy fruit roll-ups made from either cooked or uncooked fruit purée.
Fruit leathers allow for individual creativity through combinations of different fruits. Generally you can use any kind of fruit, including apples, bananas, berries, grapes, mangos, papayas, peaches, pears, pine-apple, plums, and even tomatoes. Citrus fruits alone are generally not recommended. Fruit leathers are an excellent use for slightly overripe or bruised fruit that would otherwise be discarded.
Uncooked Fruit Leathers 1. Select ripe or overripe fruit or fruit combinations. 2. Wash fruit and cut away blemishes. Remove stones or pits. Re-
move larger seeds from berries, grapes, and tomatoes if you wish. Peel all tough-skinned fruits; peel others if you wish.
3. Cut fruit into chunks and place them in a food chopper, blender, or food processor.
4. Add 1 tablespoon lemon or other citrus juice per quart of yellow or light-colored fruit, if desired, for keeping fruit color.

16
5. Chop, grind, or blend the fruit into a thick purée. If the fruit has little juice, add several spoonfuls of water or fruit juice to obtain a uniform purée. (If uncooked fruit purée is too juicy, it can be cooked to remove excess liquid.)
6. (Optional) Add sugar, honey, or corn syrup to taste. (Generally no additional sweetener is needed, particularly with ripe fruit, because fruit tastes sweeter after being dried.)
7. (Optional) Add spices (for example, cinnamon, nutmeg, cloves, allspice) to taste. Start with ½ teaspoon dried spice per quart of puréed fruit; spice fl avors intensify during drying.
8. Use a drying tray designed for fruit leather or line a portion of a drying tray with lightly oiled heavy plastic wrap. Do not com-pletely cover the tray with plastic wrap or the air will be unable to circulate to other trays. Pour a small amount of purée onto the lining wrap. Make sure the tray has an edge to prevent spillage. Tilt the tray until the purée spreads no more than ¼ inch thick almost to the edge of the plastic wrap. (Two cups of purée will cover a 12- by 17-inch drying tray.)
9. (Optional) Sprinkle the purée with chopped nuts, seeds, or grated coconut.
Cooked Fruit Leathers (Double-Boiler Method) 1. Select, wash, and prepare fruit as described for uncooked fruit
leather. 2. Cut the fruit into slices or chunks and place them in the top of a
double boiler. 3. Add water to the bottom of the double boiler. Cover the double
boiler and steam the fruit for 15 minutes or until fruit is soft. (If a double boiler is not available, you can place a small pan con-taining the fruit in a larger pan that is partially fi lled with boiling water.)
4. Follow steps 4-9 for uncooked fruit leather.

17
Cooked Fruit Leathers (Microwave Method) 1. Select, wash, and prepare fruit as described for uncooked fruit
leather. 2. Cut the fruit into slices or chunks and place them in a micro-
wave-safe bowl. 3. Cover the bowl with plastic wrap or a microwave lid. 4. Microwave on high for 4 minutes, stir, and rotate the bowl. Con-
tinue stirring and rotating the bowl every 4 minutes until fruit is soft.
5. Follow steps 4-9 for uncooked fruit leather.
Fruit Leather from Canned Fruit 1. Thoroughly drain home-canned or commercially canned fruit or
use baby food fruit without tapioca. 2. Follow steps 3 and 5-9 for uncooked fruit leather. Since canned
fruits have been heat processed to stop enzymatic action, you don’t need to add ascorbic acid.
Drying and Storing Fruit LeathersPlace prepared trays in the dehydrator. Dry until the leather is
sticky, generally 6 to 8 hours at 140°F. Properly dried fruit leather will be translucent and slightly tacky to the touch but will still peel away from the plastic wrap.
Lift an edge of the leather, which should stick tightly to the surface, and peel it back slightly. If the leather peels away readily, it is dry. If the leather has cooled, it may need to be warmed slightly for a few minutes to help it peel away. If the fruit leather cracks or chips, it has dried too long, but it is still edible. Remove the remainder of the plastic wrap. If part of the leather is still sticky, you can dry it more without the plastic wrap.
After drying the fruit leather, leave it whole or cut it into pieces. The fruit leather can be rolled and wrapped in plastic wrap or stored fl at in sheets with plastic wrap separating each sheet. Place the wrapped pieces in an air-tight container in a cool, dark, dry place. You can also store fruit leather in the refrigerator or freezer.

18
Peel (optional) and core. Cut into slices or rings about ¼-inch thick.
Cut in half and pit. Fruits dry more rapidly if quar-tered or sliced.
Peel and slice ¼ to ½-inch
thick, crosswise or length-wise.
Remove stems.
Remove stems. Slice in half and remove pit, or pit and dry whole.
Drain milk. Steam fruit 1 minute to loosen meat or pry meat out with a knife. Trim dark outer skin, and grate meat or slice in chunks.
Remove stems.
If fi gs are small or have partly dried on the tree, they may be dried whole. Otherwise, cut in half. Dry with skin-side down.
Select seedless varieties.
None, ascorbic acid/citric acid dip, syrup blanch, honey dip, salt solution dip, or sulfi ting
Ascorbic acid/citric acid dip, syrup blanch, honey dip, or sulfi ting
None or ascorbic acid/citric acid dip
None or dip larger berries in boiling water to crack the skins
None or sulfi ting
None
Dip in boiling water to crack skins or syrup blanch
None, or syrup blanch
Dip in boiling water 30 seconds to crack skins. Plunge in ice water to stop cooking. Drain on paper towels.
Leathery to crisp; no moist area in center
6-12 hours
Springy; no moist area in center
24-36 hours for halves
Pliable to crisp8-10 hours
Shriveled; leathery24-36 hours
Pliable; leathery24-36 hours
Leathery to crispDry at 110˚
Shriveled24-36 hours
Pliable; leathery; slightly sticky; no moist area in center
6-12 hours
Pliable; leathery12-20 hours
Apples
Apricots
Bananas
Blueberries/Huckleberries
Cherries
Coconuts
Cranberries
Figs
Grapes
Drying Guidelines for Fruits
*Drying times are guidelines only. Test food frequently for dryness according to the criteria described in the chart. Cool food before testing.
Fruit
Selection and prepara-tion (thoroughly wash all fruits) Pretreatment
Tests for dryness and drying time guidelines*

19
Kiwi fruit
Papayas
Peaches
Pears
Pineapples
Plums
Prunes
Rhubarb
Strawberries
None
None, or syrup blanch
None, ascorbic acid/citric acid dip, syrup blanch, honey dip, salt solution dip, or sulfi ting
None, ascorbic acid/citric acid dip, syrup blanch, honey dip, salt solution dip, or sulfi ting
None, or syrup blanch
None, or sulfi ting for light-colored fruit
None
None, or blanch for 1-2 minutes
None
Pliable; leathery
Pliable; leathery
Pliable; leathery24-36 hours for halves
Pliable; leathery 24-36 hours for halves
Leathery but not sticky
24-36 hours
Pliable; leathery24-36 hours for halves
Pliable; leathery; a handful of properly dried prunes will fall apart after squeezing
24-36 hours for halves
Very brittle; tough
Pliable; leathery
Remove outer skin. Slice ¼-inch thick
Cut in half and remove seeds. Peel and slice.
Peel and slice peaches. Fruits dry more rapidly if quar-tered or sliced.
Peel, cut in half lengthwise, and core. Section or slice about ¼-inch thick.
Peel and remove thorny eyes; cut into ¼-inch-thick slices.
Cut in half and pit. Fruits dry more rapidly if quar-tered or sliced.
Cut in half and pit. Fruits dry more rapidly if quar-tered or sliced.
Cut in 1-inch lengths.
Remove stems. Cut strawber-ries in half. Dry skin-side down.
Selection and prepara-tion (thoroughly wash all fruits) Pretreatment
Tests for dryness and drying time guidelines*Fruit
Drying Guidelines for Fruits (cont.)
*Drying times are guidelines only. Test food frequently for dryness according to the criteria described in the chart. Cool food before testing.

20
Select small, tender beets of good color and fl avor, free from woodiness. Steam or boil until cooked through. Cool, trim off roots and crowns, and peel. Cut into shoestring strips or into slices about ¼-inch thick.
Trim and cut as for serving. Quarter stalks lengthwise.
Remove outer leaves, quarter, and core. Cut into shreds about 1/8-inch thick.
Select crisp, tender carrots, free from woodiness. Wash; trim off the roots and tops. Cut into slices or strips about ¼-inch thick.
Separate into fl owerets; cut large ones in half.
Strip off leaves; cut stalks into ¼-inch pieces. Stir occasion-ally during drying.
Select tender, sweet corn. Husk. Steam on the cob for 5 to 10 minutes, or until milk is set. Cut from cob.
Remove defective pods. Remove strings if necessary. Split pods lengthwise to hasten drying.
Steam or boil until tender 25-30 minutes for small
beets
Water or steam blanch2-3 minutes in water 3-5 minutes in steam
Steam blanch 2-3 minutes
Steam blanch3-4 minutes
Water blanch (add 1 table-spoon vinegar per 1 gallon water)
3-4 minutes
Water blanch 30 seconds to 2 minutes
Steam blanch
Water or steam blanch2-3 minutes in water3-4 minutes in steam
Tough; brittle10-12 hours
Crisp12-15 hours
Crisp10-12 hours
Tough; brittle10-12 hours
Tough; brittle12-15 hours
Crisp10-16 hours
Crisp; brittle6-10 hours
Brittle8-14 hours
Beets
Broccoli
Cabbage
Carrots
Caulifl ower
Celery
Corn (cut)
Green beans
Drying Guidelines for Vegetables
*Blanching and drying times are guidelines only. Test food frequently for dryness according to the criteria described in the chart. Cool food before testing.
Selection and prepara-tion (thoroughly wash all vegetables)
Pretreatment and blanching time guidelines*
Tests for dryness and drying time guidelines*Vegetable

21
Slice off woody stems. Slice, or dry whole if small. Spread not more than ½-inch deep on trays.
Use young, tender pods only. Cut ½-inch crosswise, slice, or split lengthwise. Spread not more than ½-inch deep on trays.
Remove outer, discolored layers. Slice ¼-inch thick or chop.
No precooking necessary. Hang bunches or whole plants in a dry, warm place to dry. When dry, crush leaves and remove stems. When drying in dehydrator or oven, keep temperatures below 120°F.
Select crisp, tender parsnips, free from woodiness. Wash; trim off the roots and tops. Cut into slices or strips about ½-inch thick.
Select young, tender peas of a sweet variety. Shell. Stir frequently while drying.
Cut in ½-inch strips or rings. Remove seeds and “parti-tions.” Spread rings two layers deep; spread strips not more than ½-inch deep.
Mushrooms
Okra
Onions
Parsley and other herbs
Parsnips
Peas
Peppers (green, red, or
yellow)
Warning: Use only commercially grown mushrooms. Only an expert can differentiate between poisonous and edible varieties.
None
Water blanch2-3 minutes
None
None
Water or steam blanch2-3 minutes in water 3-5 minutes in steam
Steam blanch quickly after shelling
2-3 minutes
None, or water or steam blanch
2-3 minutes in water3-5 minutes in steam
Crisp; brittleDry at 120˚F
Tough; brittle8-10 hours
Brittle; light colored; feels like paper
3-9 hours
BrittleDry at 100˚F
1-2 hours in a dehydrator
Tough; brittle
Hard; wrinkled; shatter when hit with a hammer
8-10 hours
Tough; brittle8-12 hours
Drying Guidelines for Vegetables (cont.)
*Blanching and drying times are guidelines only. Test food frequently for dryness according to the criteria described in the chart. Cool food before testing.
Selection and prepara-tion (thoroughly wash all vegetables)
Pretreatment and blanching time guidelines*
Tests for dryness and drying time guidelines*Vegetable

22
Potatoes
Pumpkin, yellow
Soybeans
Spinach and other greens
Squash (Hubbard or
winter types)
Squash (summer, crookneck,
scallop, zucchini, etc.)
Tomatoes (meaty varieties)
Peel; cut into shoestring strips 3/16-inch in cross section or slice about ¼-inch thick.
Chop into strips about 1-inch wide. Peel off rind; scrape off fi ber and seeds. Cut peeled strips into pieces about 1/8-inch thick.
Blanch pods until beans are tender but fi rm. Shell.
Select young, tender leaves. Wash. See that leaves do not form wads when placed on trays. Cut large leaves cross-wise into several pieces.
Chop into strips about 1-inch wide. Peel off rind; scrape off fi ber and seeds. Cut peeled strips into pieces about 1/8-inch thick.
Wash, trim, and cut into ¼-inch-thick slices.
Select tomatoes of good color. Steam or dip in boiling water to loosen skins. Chill in cold water; peel. Cut into sections not more than ¾-inch wide. Cut small pear or plum tomatoes in half.
Rinse in cold water. Water or steam blanch, and rinse well.
5-6 minutes in water 6-8 minutes in steam
Water or steam blanch until tender
1 minute in water2-3 minutes in steam
Water or steam blanch
Water or steam blanch until wilted
Water or steam blanch until tender
1 minute in water2-3 minutes in steam
None, or water or steam blanch
None
Crisp8-12 hours
Tough to brittle10-16 hours
Shatter when hit with a hammer
Brittle
Tough to brittle10-16 hours
Leathery to brittle10-12 hours
Leathery to crisp10-18 hours
Drying Guidelines for Vegetables (cont.)
Selection and prepara-tion (thoroughly wash all vegetables)
Pretreatment and blanching time guidelines*
Tests for dryness and drying time guidelines*
*Blanching and drying times are guidelines only. Test food frequently for dryness according to the criteria described in the chart. Cool food before testing.
Vegetable

23
Enjoying Dried FoodsYou can eat dried fruits plain or mix them with nuts and seeds for
a healthy mixed snack. Use chopped dried fruit or whole dried ber-ries or cranberries instead of raisins or nuts in cakes, quick breads, and cookies.
Dried vegetables make excellent additions to homemade soups and stews. Generally you should soak root crops such as beets, carrots, and potatoes before adding them to a soup, stew, or casserole. Most other dried vegetables can be added directly. (You may need to increase cooking time and add extra liquid to be sure the vegetables are tender.) Dried leafy vegetables can be powdered in a blender or food processor then stirred into soups or purées.
To prepare a dried soup mixture, cut fresh vegetables into small pieces then dry them according to the directions for each vegetable. After drying, combine and store them. Cabbage, carrots, celery, corn, onions, and peas make tasty combinations. Rice, dry beans, split peas, and meat stock are usually added at the time of cooking
Plumping and Rehydrating Fruits and Vegetables
Fruits. To plump or soften dried fruit to make it more chewable, cover it with boiling water, let it stand for 5 minutes, and drain.
Vegetables. When you soak or rehydrate dried vegetables, they should plump to nearly the same size they were when fresh. Start with 1 ½ to 2 cups cold water for each cup of dried vegetable. Keep the vegetables covered with water during soaking by adding more water, if necessary. Rehydrating root vegetables takes about ½ to 2 hours, depending on the size of the pieces.
If you are adding dried vegetables to a soup or stew, don’t worry about rehydrating them; just toss them in.

24
RecipesVegetable Soup Serves 6 4 cups water ¾ to 1 cup dried vegetables
(green beans, corn, peas, tomatoes, onions, etc.) 2 packages bouillon granules or cubes Seasonings to taste (herbs, soy sauce, or curry) Variation: Add ½ cup rice, noodles, lentils,
or barley with the other ingredients.
1. Bring water to a boil. Add dried vegetables, bouillon, and seasonings.
2. Simmer about 20 minutes or until vegetables are tender, though chewy. (Freshly dried vegetables will not take as long to reconsti-tute as those that have been stored for a long time.)
3. Remember to refrigerate leftovers.
Dried Vegetable Quick Bread Makes 2 loaves 3 cups fl our 1 teaspoon ground cinnamon 2 teaspoons baking soda ½ teaspoon baking powder ¾ cup honey 3 beaten eggs 1 cup oil 2 teaspoons vanilla or other fl avor extract 2 cups fi nely chopped, rehydrated vegetables
(about 1 ½ cups dried) (optional) ½ cup raisins or other chopped dried fruit
1. Using equal amounts of dried vegetables and water, cover the vegetables with cool water. Soak for 15 to 60 minutes, until soft. Drain and set aside.
2. Combine fl our, cinnamon, baking soda, and baking powder in a large bowl. Set aside.

25
3. In another bowl, mix the honey, eggs, oil, vanilla fl avoring, and 2 cups of the rehydrated vegetables.
4. Pour the honey mixture into the fl our mixture. Mix well until the fl our is completely moistened.
5. Add raisins or dried fruit, if desired. 6. Pour into two greased and fl oured 7- by 3-inch loaf pans. 7. Bake at 350°F for about 50 minutes. Test for doneness by insert-
ing a toothpick into the center. If it comes out clean, the loaves are done.
Tangy Golden Fruit Snack Makes about 36 balls ½ cup dried apricots ½ cup dried apples ½ cup dried peaches ½
cup fi nely grated dried coconut
¼ cup fi nely chopped nuts 1 teaspoon fi nely grated citrus fruit peel (orange, lemon, lime) ½ teaspoon cinnamon ¼ cup honey (you may want to add 1 more tablespoon of honey if you are using a tart juice such as lemon juice) ¼ cup citrus juice Powdered sugar, if desired
1. With a food processor or grinder, grind apricots, apples, and peaches into bits about half the size of a raisin or about 1/8
inch in diameter. Place in a medium bowl.
2. Stir in coconut, nuts, citrus peel, and cinnamon. 3. Slightly warm honey and citrus juices. Stir to mix well. 4. Slowly pour the honey mixture over the fruit mixture, stirring
until the mixture sticks together evenly. 5. Form into balls ¾ to 1 inch in diameter (about 1 rounded tea-
spoon) and place on drying racks. 6. Dry in food dryer until no longer sticky to the touch (2-3 hours). 7. If desired, roll balls in powdered sugar.

26
Dried Berry Cobbler Filling 2 cups dried blueberries, cranberries, gooseberries, or other berry 2 cups boiling water 2 tablespoons tapioca 1 to 1 ½ cups sugar, depending on tartness of berries
1. Pour boiling water over the berries and let them soak for 3 to 4 hours.
2. Place soaked berries and liquid in a shallow baking dish. 3. Combine sugar and tapioca; sprinkle over the berries. 4. Cover the berries with batter (see below), and bake
30 minutes at 400°F.
Batter ¼ cup butter or margarine ½ cup sugar 1 egg, well beaten 1 ½ cups fl our 2 teaspoons baking powder ½ teaspoon salt ½ cup milk
1. Cream together butter and sugar. Add beaten egg. 2. Thoroughly mix fl our, baking powder, and salt. 3. Add the fl our mixture to the butter mixture one-half cup at a
time, alternately with the milk.

27
Dried Fruit Rice Pudding ¼ cup uncooked rice ½ cup sugar 4 cups milk ¼ teaspoon ground ginger ¼ teaspoon salt ¾ cup dried fruit, cut into small pieces (not dried bananas)
1. Combine all ingredients in a large casserole. 2. Bake, uncovered, in a 300°F oven for 2 ½ hours, or until rice
is tender, stirring occasionally. Occasional stirring is especially important during the fi rst hour of baking.
3. Cool. Serve cold.
Tangy Stewed Fruit
2 to 3 cups dried fruit such as apples, apricots, cherries, fi gs, nectarines, peaches, pears, pineapple, cranberries, or prunes
2 ½ cups boiling water 1 tablespoon lemon juice ½ cup orange juice 2 tablespoons sugar ½ teaspoon cinnamon ¼ cup honey
1. Pour boiling water over dried fruit in a medium saucepan. Let stand to soften 5 to 15 minutes.
2. Add orange and lemon juices. Bring to a boil. 3. Simmer 20 minutes. 4. Stir in sugar, cinnamon, and honey. Mix well. 5. Serve hot or cold.

28
Questions & Answers
I did not pretreat my pears before drying them. Now they are quite dark in color. Are they safe to eat?
Yes, the pears are still good to eat. Pretreating helps to stop the enzyme action that darkens light-colored fruit. Also, storing your dried fruit at cool temperatures helps to prevent the browning reaction that occurs during prolonged storage.
My dried apples molded. Can they be rescued?No. Throw them out. The next time you dry fruit, either remove
more of the moisture so mold cannot grow or store the dried fruit in the freezer.
My banana chips don’t taste like the ones in the store. What can I do?
There are several varieties of banana chips available. Read the in-gredients on their labels. Some banana chips are dipped in honey, and some are dipped in granulated sugar, brown sugar, or fl avored gelatin. Be sure the bananas you dry are ripe. Some commercial banana chips have been treated to make them crisp, but this isn’t possible to do at home.
What can I do about insects that may have contaminated my sun-dried vegetables?
To kill any insects or insect eggs that may have contaminated foods left to dry in the sun, place the packaged dried foods into your home freezer at 0°F for 48 hours. Or, pasteurize them for 30 minutes with-out packaging in a 150°F oven.
Store-bought dried fruits are softer and moister than mine. How can I achieve this at home?
Commercially prepared fruits do have a higher moisture content, but they also contain preservatives to prevent mold growth at room temperature. If you want to slightly underdry your fruits to keep them soft, plan to store them in the freezer.

Contents Introduction 1
Drying Methods 2
Selecting Foods for Drying 4
Preparing Foods for Drying 5
Pretreating Fruits and Vegetables 6
Drying in a Dehydrator 11
Packaging 13
Storage 14
Making Fruit Leathers 15
Drying Guidelines for Fruits 18
Drying Guidelines for Vegetables 20
Enjoying Dried Foods 23
Recipes 24
Questions and Answers 28
The authors—Marilyn A. Swanson, former Extension Food Safety Specialist, School of Family and Consumer Sciences, University of Idaho. Revised by Sandra M. McCurdy, Extension Food Safety Specialist, School of Family and Consumer Sciences, University of Idaho, in collaboration with extension specialists at Oregon State University and Washington State University.
Cover photo—Dishes prepared from dried fruits and vegetables (top to bottom) are Tangy Golden Fruit Snacks, Dried Vegetable Quick Bread, and Tangy Stewed Fruit.
Tips for Drying for Best Quality
• Don’t overblanch. • Dry foods as quickly as possible without raising
the temperature above 150°F initially or above 140°F for the remaining drying time. Dry herbs, coconut, and mushrooms at lower temperatures.
• Do not overload the dryer. • Keep the food on the drying trays well spaced with
no overlapping. • Keep good air circulation to quickly move moisture
away from the drying food. • If possible, dry when the relative humidity is low. • Check to be sure foods are suffi ciently dry. • Condition dried fruits. • Store dried foods in packages that do not admit
moisture or oxygen. • Store dried foods in a cool, dark, dry place. • Store in amounts that can be used easily at one time.

In this edition Answers to the most commonly asked questions about food drying Blanching and drying time guidelines
How to dry canned fruits and frozen vegetables
Pretreatment guidelines
Fruits & VegetablesDRYING
A Pacifi c Northwest Extension PublicationIdaho • Oregon • Washington
PNW 397
3rd
Edition
Pacifi c Northwest Extension publications are jointly produced by the three Pacifi c Northwest states—Idaho, Oregon, and Washington. Similar crops, climate, and topography create a natural geographic unit that crosses state lines. Since 1949, the PNW program has published more than 400 titles. Joint writing, editing, and production have prevented duplication of effort, broadened the availability of faculty specialists, and substantially reduced costs for the participating states.
Published and distributed in furtherance of the Acts of Congress of May 8 and June 30, 1914, by University of Idaho Extension, the Oregon State University Extension Service, Washington State University Extension, and the U.S. Department of Agriculture cooperating.
The three participating extension services offer educational programs, activities, and materials without regard to race, color, national origin, religion, sex, sexual orientation, age, disability, or status as a disabled veteran or Vietnam-era veteran, as required by state and federal laws. University of Idaho Extension, Oregon State University Extension Service, and Washington State University Extension are Equal Opportunity Employers.
Published June 1995. Revised April 2000. Reprinted August 2003. Revised August 2009. $2.50
© 2009 by University of Idaho. All rights reserved.