drone building 101
TRANSCRIPT

RC Multirotors 101:Building and Setup with
APM Mission Planner
Speaker: Aaron Buma
www.AaronBuma.com
www.BellinghamAerialMedia.com

Aaron BumaPersonal: AaronBuma.com
Business: BellinghamAerialMedia.com
Contact: [email protected]: @AaronDBuma
LinkedIn: LinkedIn.com/pub/AaronBuma

Agenda
• A little history
• Overview of parts
• How to put together
• Resources – Parts and Community
• Questions
• APM Mission Planner Walkthrough

Multirotors – Quick History
• First one 1923 …. A little better in 1956 ….
• Development on multirotors started early late 90’s and early 2000’s?
• Increasing Market growth – DJI (about a billion dollar value), 3D Robotics

Multirotors - Parts
• Frames
• Power Distribution Board or Harness
• Electronic Speed Controllers
• Motors
• Propellers
• Batteries
• BEC and Voltage Regulators
• Flight Controller
• Transmitter and Receive

Multirotors – Frame Configurations
• X or H format
• Has 4 or 8 motors
• Redundancy on with 8, but at a loss of efficiency
• Simplest to build and manage
• Front cameras can have propellers or propeller shadows in-view (DJI Phantom)

Multirotors – Frame Configurations
• Y - format
• Has 3 or 6 motors
• Redundancy on with 6, but at a loss of efficiency
• More complex than X setup, due to rear rotor(s) requirement to rotate to turn
• Clearer front-facing view for cameras
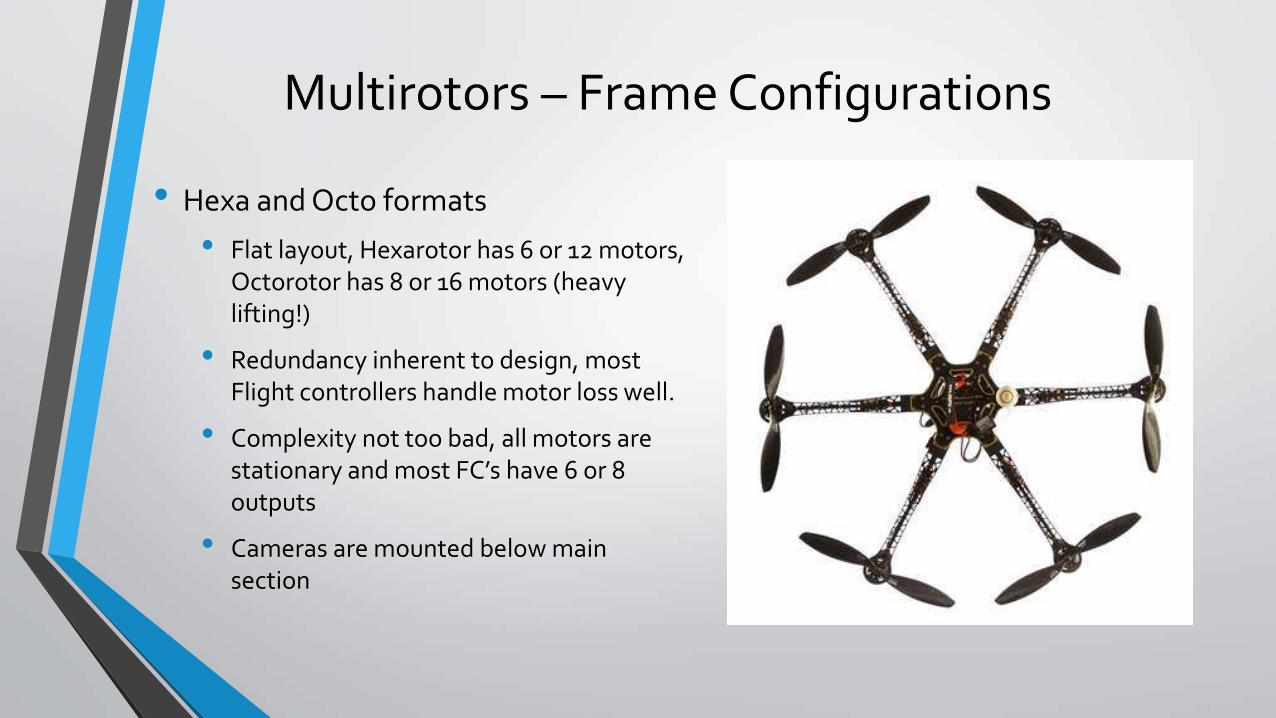
Multirotors – Frame Configurations
• Hexa and Octo formats
• Flat layout, Hexarotor has 6 or 12 motors, Octorotor has 8 or 16 motors (heavy lifting!)
• Redundancy inherent to design, most Flight controllers handle motor loss well.
• Complexity not too bad, all motors are stationary and most FC’s have 6 or 8 outputs
• Cameras are mounted below main section

Frames – Planning the build
• Purpose of multirotor: Aerial Photography? Park fun? Endurance record flight times?
• How redundant should it be?
• Size: micro or full-size?
• Folding frame or not?
• Case available?

Power Distribution Board or Harness
• Transfers power from the battery to the motors, flight controller, camera etc
• Basic PDBs – solder wires, or bullet connectors, to them, the have not voltage regulators or Battery Elimination Circuits (BEC)
• Fancy PDBs – starting to see them online, they have 12v output and built in BECs
• Integrated PDB – Some frames (ex: TBS Discovery) have PDB’s built in

Electronic Speed Controllers (ESC)
• Required for brushless motors
• Has 3 wires, two for power (connected to PDB) and a servo wire (3 smaller wires) that connect to flight controller
• ESCs control the RPMs for which the motor spins
• Amperage ratings - Check propeller and motor setup Amp requirements

Electronic Speed Controllers (ESC) - Continued
• Firmwares – Allow for various tweaks and settings
• SimonK – most performant, ESC’s with this pre-flashed on them are available
• Mostly flash-able
• DJI’s are locked (E300, E600, E800 tuned ESC/Motor sets)
• Tuning/Setup –
• Programming Cards - ~$20-30
• With Tx/Rx – Tone and beep based menu
• Individually vs All-At-Once
• Throttle Range setup required

Motors
• Kv rating
• Higher Kv - meant for and most efficient with: smaller and higher speed propellers
• 2600kv with 5” props
• Lower Kv – meant for and most efficient with: larger and slower speed propellers
• 300 Kv with 20” props
• Propeller diameter, pitch and design play a factor in picking the motor
• “Pancake” – Larger diameter, most efficient at a slower more powerful spin
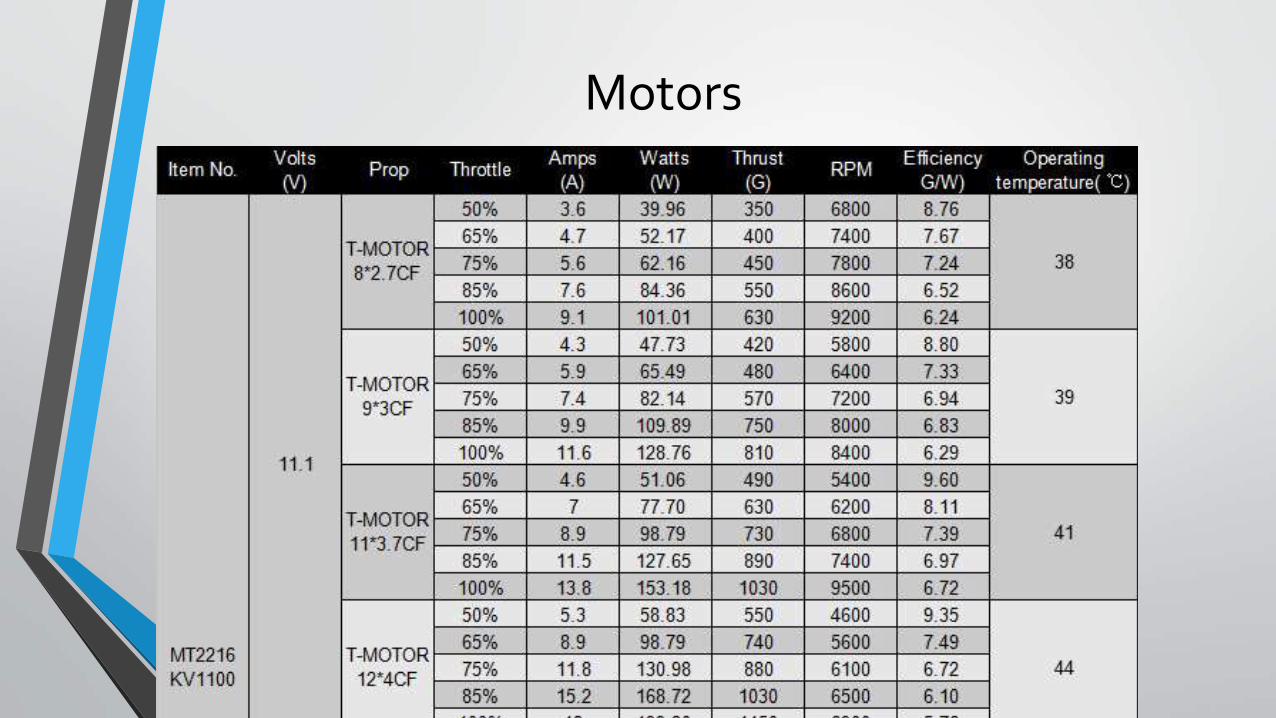
Motors

Propellers
• ABS
• Pros: Inexpensive ($2/$3 each), durable, easy to balance
• Cons: Flexible, twice the weight as carbon fiber (in my personal experience)
• Carbon Composite
• Pros: Cheaper than straight Carbon Fiber (CF), lighter than ABS
• Cons: A middle-ground between ABS and CF with middle-ground on cost, performance and durability
• Carbon Fiber
• Pros: Stiff and light – most efficient
• Cons: EXPENSIVE – A set (1 CC and 1 CW) Tmotor ~$40-$$$

Propellers - Continued
• Balancing
• Wear and tear, ‘jello’ in pictures/video, efficiency cost
• Cheaper Props usually means more balancing required
• Balance blades AND shaft hub
• My balancer: Du-Bro

Batteries – Lipo’s
DO-NOT’s
• Don’t charge over 4.2 (extreme danger)
• Don’t discharge (fly) or charge until battery is at room temp after either
• Don’t discharge lower than ~3.3v (this damages the battery)
• Don’t keep a ‘puffy’ lipo around (extreme danger)
DO’s
• DO USE A FIREPROOF LIPO BAG, or metal ammo can, fire proof safe etc.
• DO charge with a lipo charger, USB ones overcharge and puff your lipos
• DO Follow the instructions on how to charge a lipo with said charger
• DO Keep sand on hand, water will not put it out.

Batteries - Continued
• “S” rating – Number of cells in the battery
• 3.7v per cell (4.2 fully charged): 4s battery outputs 16.8v fully charged
• Micro quads (ex. Hubsan X4, Cheerson CX10) have 1s, or 1 cell Lipos
• Larger Multirotors have multiple 6s, 8s or even 10s batteries
• Mah rating – Milliamp Hours
• Ex. 4200 Mah – capacity of battery
• “C” rating
• Until Lipo technology improves, it is generally unsafe to charge faster than 1C (or at the capacity-per-hour of the battery)

BEC and Voltage Regulators
• BEC – Battery Elimination Circuit aka Power Filter
• ESC’s and Motors create electronic ‘noise’ that anything in the power circuit feels
• Can cause First Person View (FPV) feeds to be fuzzy when you start your motors
• BEC’s create ‘clean’ power
• Basic Setup: Battery->PDB->BEC->Components

BEC and Voltage Regulators
• Voltage Regulator / Stepper – Outputs a set steady voltage
• Components usually don’t have internal voltage limiters
• Check the voltage requirements
• Avoid releasing the magic blue smoke that makes electronics work
• Voltage examples:
• Gimbal Controller board: 12v
• FPV Cameras: 5v to 12v (camera specific)
• Video Transmitter: 12v

Flight Controller aka “The Brains”
• Combines inputs from pitch, roll, yaw, horizontal and vertical accelerometers, GPS receivers, controller receivers to keep control of the aircraft.
• Is connected to the receiver either a per-channel cables or via SBUS (all the channels on one cable)
• Is powered by BEC/PF component or powered via one of the power connections from a ESC (if that ESC has a BEC built in)
• It’s really FC dependent: DJI has a DJI-specific component (powered off of the PDB), 3DRobotics has one you plug in-line with the battery and PDB

Flight Controllers Simple Comparison
• Locked/Expensive: DJI Naza M Lite, Naza V2, Wookong?
• Plug and play, but no tuning, “DJI dance required”
• Reliability Question: Flyaway, Grounded until locked firmware updates
• Eagle Tree Systems – has plug and play customizable OSD
• ArduoPilot (APM Pilot)
• Open-Source
• Fully Featured
• Fully Configurable
• Full Code Accessibility
• Many Hardware Vendors

Transmitter and Receiver
• Starting out, it’s best to buy a Transmitter/Receiver combo (Tx/Rx). There are a few Tx and Rx types and they only will work with one of similar type.
• Follow the binding instructions included with the set, they are really simple to set up.
• Frequency
• Most common is 2.4GHz and further range and obstacle penetration is required, UHF is used.
• Channels – Use at least a 6 channel Tx/Rx set
• Each of the pitch, roll, yaw, throttle require a channel (that’s 4 so far)
• All flight controllers have multiple flight modes (another channel, now up to 5)

Other Components
• On-Screen-Display (OSD) – used to display telemetry (altitude, gps, voltage, heading ETC).
• Gimbals and Gimbal Controllers
• FPV Systems (Camera, VTX), Goggles and Monitors
• Groundstations (VRx, TV’s)
• Dipole, Cloverleaf, Yagi other antenna types

Basic Tools Needed to Build
• Small set of Phillips and Flathead screw drivers
• Metric and Standard Allen
• Soldering Iron with solder
• “Helping Hands” (Harbor Freight)
• Wire cutters/strippers
• Heat-shrink Tubing (Harbor Freight)
• A lighter or heat gun for the tubing

So how do all these parts go together?
?

Step 1: Frame Assembly

Step 2: Mount Motors

Step 2: ESC’s to Motors• Don’t worry about direction of rotation
• If wrong, swap any two ESC wires to reverse motor direction.

Step 3: Power Harness ( without a PDB)

Step 3: Power Harness (with a PDB)

Step 3: Power Harness ( with frame-based PDB’s)

Step 4: Connect ESCs to Flight Controller

Step 5: Controller RX to FC
Step 6: Connect to FC Software and Calibrate
• Visit manufacturer site to get correct drivers
• Verify controller connectivity
• Update firmware
• Calibrate compass (process varies per FC)
• Calibrate Accelerometers
• Calibrate controller modes/sticks/switches
• Set up initial flight modes

Step 7: Verify Motor Rotation
• Take/keep propellers off!
• Most Flight Controller software will have ability to test rotation of motors to verify that the ESC’s are wired correctly.
• If you can’t verify it via software, you’ll just have to test via throttling up.

Step 8: Test flight/Tune
• In a SAFE area!!!
• Let FC set its GPS location, this can take a while if it hasn’t done it recently
• Verify that it is ready via LED output or tones based on FC
• Do not learn to fly with it in GPS mode! Use it as an aid later, not a crutch from the start!
• Or use a test rig:


Parts and Community Resources
Parts – Online Stores• ReadyMadeRC.com
• GetFPV.com
• GotHeliRC.com
• Amazon.com
• HobbyKing and Banggood
• Non-US based = higher shipping
• YMMV – I hear constant complaints about product and service
Community
• Facebook Group – Quadcopters
• RCGroups.com
• Reddit Subs: Quadcopters, Multirotors, FPV, Multicopter, RadioControl, DIYDrones, MultiCopterBuildsx

WATCH OUT It’s addicting ;)

Any Questions so far?
• Next up: APM Mission Softare walkthrough (sorry, no flying)