driveit low voltage ac drives - s3.amazonaws.com drive manuals general manuals ... relay output...
TRANSCRIPT

DriveIT Low Voltage AC Drives
User’s Manual
Input Disconnect and Bypass Configurations for ACH550 Drives (1…550 Hp)

ACH550 Drive Manuals GENERAL MANUALS
ACH550-UH HVAC User's Manual (1…150 HP)• Safety • Installation• Start-Up• Diagnostics• Maintenance• Technical DataACH550-U2 Installation Supplement (200...550 HP) • Safety• Installation• Maintenance• Technical DataACH550 Input Disconnect and Bypass Supplement (1...550 HP) • Safety• Installation• Start-Up• Maintenance• Technical Data
OPTION MANUALS (Fieldbus Adapters, I/O Extension Modules etc., manuals delivered with optional equipment)
Relay Output Extension Module (typical title)• Installation• Programming• Fault tracing• Technical data
© 2004 ABB Oy. All Rights Reserved.
ii Input Disconnect and Bypass Configurations for ACH550

Safety
Warning! The ACH550 adjustable speed AC drive with bypass should ONLY be installed by a qualified electrician.Warning! Even when the motor is stopped, dangerous voltage is present at the Power Circuit terminals U1, V1, W1 and U2, V2, W2 and, depending on the frame size, UDC+ and UDC-, or BRK+ and BRK-.Warning! Dangerous voltage is present when input power is connected. After disconnecting the supply, wait at least 5 minutes (to let the intermediate circuit capacitors discharge) before removing the cover. Warning! Even when power is removed from the input terminals of the ACH550, there may be dangerous voltage (from external sources) on the terminals of the relay outputs R01…R03.Warning! When the control terminals of two or more drive units are connected in parallel, the auxiliary voltage for these control connections must be taken from a single source which can either be one of the units or an external supply.Warning! The ACH550 is not a field repairable unit. Never attempt to repair a malfunctioning unit; contact the factory or your local Authorized Service Center for replacement.Warning! The ACH550 will start up automatically after an input voltage interruption if the external run command is on.
Note! For more technical information, contact the factory or your local ABB sales representative.
Use of Warnings and NotesThere are two types of safety instructions throughout this manual:• Notes draw attention to a particular condition or fact, or give information on a
subject.
• Warnings caution you about conditions which can result in serious injury or death and/or damage to the equipment. They also tell you how to avoid the danger. The warning symbols are used as follows:
Dangerous voltage warning warns of high voltage which can cause physical injury and/or damage to the equipment. General warning warns about conditions, other than those caused by electricity, which can result in physical injury and/or damage to the equipment
Input Disconnect and Bypass Configurations for ACH550 iii

Safety
iv Input Disconnect and Bypass Configurations for ACH550
Table of Contents
SafetyUse of Warnings and Notes . . . . . . . . . . . . . . . . . . . . . . . . . . . . . . . . . . . . . . . . iii
Table of Contents
Chapter 1 – IntroductionHow To Use This Manual . . . . . . . . . . . . . . . . . . . . . . . . . . . . . . . . . . . . . . . . . . 1Intended Audience . . . . . . . . . . . . . . . . . . . . . . . . . . . . . . . . . . . . . . . . . . . . . . . 1Terminal Block Nomenclature . . . . . . . . . . . . . . . . . . . . . . . . . . . . . . . . . . . . . . 1Warranty and Liability Information . . . . . . . . . . . . . . . . . . . . . . . . . . . . . . . . . . . 2
Chapter 2 – Overview of ACH550 with E-BypassGeneral Information About the ACH550 . . . . . . . . . . . . . . . . . . . . . . . . . . . . . . . 1Detailed Description of Operation . . . . . . . . . . . . . . . . . . . . . . . . . . . . . . . . . . . 5Typical Applications and Configurations . . . . . . . . . . . . . . . . . . . . . . . . . . . . . 12
Chapter 3 – Installation InstructionsPre-Installation Planning . . . . . . . . . . . . . . . . . . . . . . . . . . . . . . . . . . . . . . . . . . 1Mechanical Installation . . . . . . . . . . . . . . . . . . . . . . . . . . . . . . . . . . . . . . . . . . . . 5Electrical Installation . . . . . . . . . . . . . . . . . . . . . . . . . . . . . . . . . . . . . . . . . . . . . 11Bypass Control Board Relay Contact Inputs . . . . . . . . . . . . . . . . . . . . . . . . . . 24Bypass Control Board Relay Contact Outputs . . . . . . . . . . . . . . . . . . . . . . . . . 25
Chapter 4 – Start-up ProcedureSafety Precautions . . . . . . . . . . . . . . . . . . . . . . . . . . . . . . . . . . . . . . . . . . . . . . . 1Installation Inspection . . . . . . . . . . . . . . . . . . . . . . . . . . . . . . . . . . . . . . . . . . . . . 1E-Bypass Jumper, Switch and Pot Settings . . . . . . . . . . . . . . . . . . . . . . . . . . . . 2Macros and Parameter Settings . . . . . . . . . . . . . . . . . . . . . . . . . . . . . . . . . . . . . 6Keypad Control Tests . . . . . . . . . . . . . . . . . . . . . . . . . . . . . . . . . . . . . . . . . . . . . 6
Index
Input Disconnect and Bypass Configurations for ACH550 v

Table of Contents
vi Input Disconnect and Bypass Configurations for ACH550

Chapter 1 – Introduction
This chapter explains the purpose and contents of this manual, intended audience, and conventions used in this manual.
How To Use This Manual
The purpose of this manual is to provide you with the information necessary to install and start-up your ACH550 with E-Bypass. This manual also explains features and functions of the E-Bypass and requirements such as external drive control connections, wiring, cable sizes, and cable routing.
The ACH550 with E-Bypass user documentation also includes the ACH550-UH User's Manual. Both the ACH550-UH User's Manual and this E-Bypass manual are required to properly install and operate the ACH550 with E-Bypass.
"Chapter 1 – Introduction", the chapter you are reading now, introduces you to this User’s Manual for the ACH550 with E-Bypass.
"Chapter 2 – Overview of ACH550 with E-Bypass" explains drive identification and the available features and functions, and provides a detailed description of operation.
"Chapter 3 – Installation Instructions" covers E-Bypass pre-installation planning, initial inspection, mounting and electrical wiring.
"Chapter 4 – Start-up Procedure" includes safety precautions, configuration settings, installation inspection and initial start-up tests.
Intended Audience The audience for this manual has:
• Minimal knowledge of ABB product names and terminology.
• No experience or training in installing, operating, or servicing the ACH550 with E-Bypass.
• Basic knowledge of standard electrical wiring practices, electronic components, and electrical schematic symbols.
The audience for this manual will install and start-up the ACH550 with E-Bypass. If you do not possess the skills listed above, please refer the installation to a qualified installer.
Terminal Block Nomenclature
This manual expresses specific terminal blocks and connections as a letter, a number, a colon (:), and another number. The letter and number to the left of the colon identify the terminal block, for example X1. The number to the right of the colon identifies the terminal number, for example 9. In this manual, a terminal connection numbered 9, located on a terminal block named X1, is identified as X1:9.
Input Disconnect and Bypass Configurations for ACH550 1-1

Chapter 1 – Introduction
Warranty and Liability Information
The warranty for your ABB E-Bypass covers manufacturing defects. The manufacturer carries no responsibility for damage due to transport or unpacking.
In no event and under no circumstances shall the manufacturer be liable for damages and failures due to misuse, abuse, improper installation, or abnormal conditions of temperature, dust, or corrosives, or failures due to operation above rated capacities. Nor shall the manufacturer ever be liable for consequential and incidental damages.
The period of manufacturer's warranty is 12 months after installation, and not more than 18 months from the date of delivery.
Extended warranty may be available with certified start-up. Contact your local distributor for details.
Your local ABB Drives company or distributor may have a different warranty period, which is specified in their sales terms, conditions, and warranty terms.
If you have any questions concerning your ACH550 with E-Bypass, contact your local distributor or ABB Drives office.
The technical data and specifications are valid at the time of printing. ABB reserves the right to subsequent alterations without notice.
1-2 Input Disconnect and Bypass Configurations for ACH550
Chapter 2 – Overview of ACH550 with E-Bypass
This chapter explains the numbers and letters on the control nameplate, describes the E-Bypass features and provides a detailed description of operation. It also describes the E-Bypass hardware components and input/output connections.
General Information About the ACH550
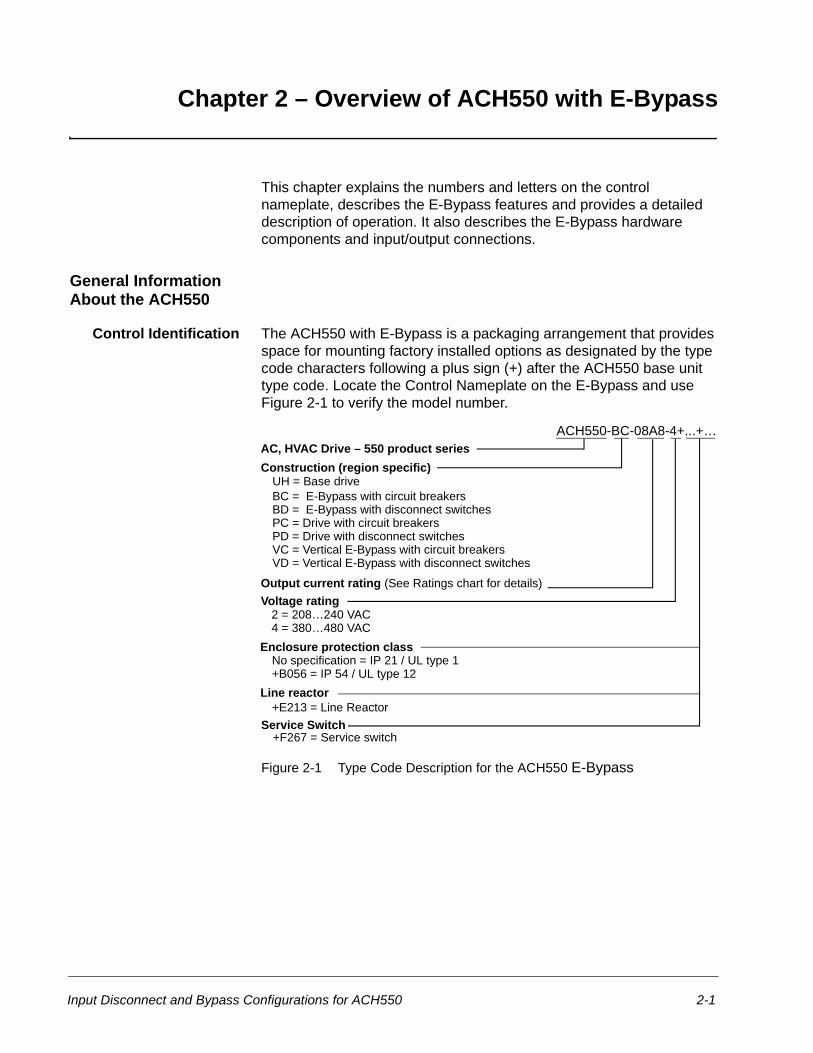
Control Identification The ACH550 with E-Bypass is a packaging arrangement that provides space for mounting factory installed options as designated by the type code characters following a plus sign (+) after the ACH550 base unit type code. Locate the Control Nameplate on the E-Bypass and use Figure 2-1 to verify the model number.
Figure 2-1 Type Code Description for the ACH550 E-Bypass
ACH550-BC-08A8-4+...+… AC, HVAC Drive – 550 product series
4 = 380…480 VAC
BC = E-Bypass with circuit breakers
2 = 208…240 VAC
Construction (region specific)
Output current rating (See Ratings chart for details)Voltage rating
UH = Base drive
Enclosure protection classNo specification = IP 21 / UL type 1 +B056 = IP 54 / UL type 12
BD = E-Bypass with disconnect switches PC = Drive with circuit breakers PD = Drive with disconnect switches VC = Vertical E-Bypass with circuit breakers VD = Vertical E-Bypass with disconnect switches
Line reactor+E213 = Line Reactor
Service Switch+F267 = Service switch
Input Disconnect and Bypass Configurations for ACH550 2-1

Chapter 2 – Overview of ACH550 with E-Bypass
E-Bypass Features and Functions
The ACH550 with E-Bypass is an ACH550 AC adjustable frequency drive in an integrated UL type 1 or UL type 12 package with a bypass motor starter. The ACH550 with E-Bypass provides a disconnect switch or circuit breaker with door mounted operator (padlockable in the OFF position), a bypass starter, motor overload protection, a local operator keypad with indicating lights, and provisions for external control connections. An optional drive service switch (drive input disconnect) may also be provided.
Figure 2-2 shows the front view of the ACH550 E-Bypass configurations, and identifies the major components.
Figure 2-2 E-Bypass Configurations, Exterior View
The following is a typical power diagram.
Figure 2-3 Typical Power Diagram for E-Bypass
BP0090
ACH-CP-B
Bypass Keypad
Operating Handle
E-Bypass
ACH550 Drive
Control Panel
for Disconnect Switch or Circuit Breaker
Bypass Keypad
Operating Handle for Disconnect Switch
or Circuit Breaker
ACH-CP-B Control Panel
ACH550 Drive
E-Bypass
E-Bypass
ACH550
Drive with E-Bypass
Motor3 PhaseDrive 33
Disconnect Switchor Circuit Breaker
Service Switch(Optional)
Input Power
BypassContacts
BypassControl
2-2 Input Disconnect and Bypass Configurations for ACH550

Chapter 2 – Overview of ACH550 with E-Bypass
Input Power Input power is connected to the ACH550 with E-Bypass through a door interlocked disconnect switch or circuit breaker.
Door InterlockedDisconnect Switch
The door interlocked disconnect switch is not fused. The branch circuit that provides power to the ACH550 with E-Bypass must include appropriate motor branch circuit protective devices to provide short circuit and ground fault protection for the motor in the bypass mode.
Door Interlocked Circuit Breaker
The door interlocked circuit breaker is an optional alternative to the door interlocked disconnect switch. The circuit breaker provides short circuit and ground fault protection for the motor in the bypass mode.
Drive Input Fuses Drive input fuses are provided to disconnect the drive from power in the event that a component fails in the drive’s power circuitry. Since fast-acting fuses are provided, the branch circuit protection will not clear when the drive input fuses blow. If the drive input fuses blow, the motor can be switched to Bypass without replacing fuses or resetting a circuit breaker. The drive’s electronic protection circuitry is designed to clear drive output short circuits and ground faults without blowing the drive input fuses. Drive input fuse specifications are listed in Table 2-1 and Table 2-2.
Table 2-1 208 - 240 Volt, Drive Input Fuse Rating
208 - 240 VoltFrame Size
Drive Input Fuse Ratings
HP Identification Amps(600V)
BussmannType
1 ACH550-xx-04A6-2 R1 15 KTK-R-15
1.5 ACH550-xx-06A6-2 R1 15 KTK-R-15
2 ACH550-xx-07A5-2 R1 15 KTK-R-15
3 ACH550-xx-012A-2 R1 15 KTK-R-15
5 ACH550-xx-017A-2 R1 30 KTK-R-30
7.5 ACH550-xx-024A-2 R2 30 KTK-R-30
10 ACH550-xx-031A-2 R3 40 JJS-40
15 ACH550-xx-046A-2 R3 80 JJS-80
20 ACH550-xx-059A-2 R3 80 JJS-80
25 ACH550-xx-075A-2 R4 100 JJS-100
30 ACH550-xx-088A-2 R4 125 JJS-125
40 ACH550-xx-114A-2 R4 150 JJS-150
50 ACH550-xx-143A-2 R6 200 JJS-200
60 ACH550-xx-178A-2 R6 225 JJS-225
75 ACH550-xx-221A-2 R6 350 JJS-350
100 ACH550-xx-248A-2 R6 350 JJS-350
Input Disconnect and Bypass Configurations for ACH550 2-3

Chapter 2 – Overview of ACH550 with E-Bypass
Table 2-2 380 - 480 Volt, Drive Input Fuse Rating
Note: Fuses listed are similar in function to fuses listed in the ACH550-UH User’s Manual, physical characteristics may differ. Fuses from other manufacturers can be used if they meet the ratings given in the table. The fuses recommended in the table are UL recognized.
Line Reactor The ACH550 E-Bypass may contain optional input line reactors to provide an additional input impedance to limit the harmonics back to the power line. This impedance is in addition to the approximately 5% input impedance provided by internal reactors that are standard in the drive.
380 - 480 VoltFrameSize
Drive Input Fuse Ratings
HP Identification Amps(600V)
BussmannType
1/1.5 ACH550-xx-03A3-4 R1 15 KTK-R-15
2 ACH550-xx-04A1-4 R1 15 KTK-R-15
3 ACH550-xx-06A9-4 R1 15 KTK-R-15
5 ACH550-xx-08A8-4 R1 15 KTK-R-15
7.5 ACH550-xx-012A-4 R1 15 KTK-R-15
10 ACH550-xx-015A-4 R2 30 KTK-R-30
15 ACH550-xx-023A-4 R2 30 KTK-R-30
20 ACH550-xx-031A-4 R3 40 JJS-40
25 ACH550-xx-038A-4 R3 40 JJS-40
30 ACH550-xx-044A-4 R4 100 JJS-100
40 ACH550-xx-059A-4 R4 100 JJS-100
50 ACH550-xx-072A-4 R4 100 JJS-100
60 ACH550-xx-077A-4 R6 125 JJS-125
75 ACH550-xx-096A-4 R6 125 JJS-125
100 ACH550-xx-124A-4 R6 150 JJS-150
125 ACH550-xx-157A-4 R6 200 JJS-200
150 ACH550-xx-180A-4 R6 225 JJS-225
200 ACH550-xx-245A-4 R7 400 JJS-400
250 ACH550-xx-316A-4 R8 400 JJS-400
300 ACH550-xx-368A-4 R8 400 JJS-400
350 ACH550-xx-414A-4 R8 600 JJS-600
400 ACH550-xx-486A-4 R8 600 JJS-600
2-4 Input Disconnect and Bypass Configurations for ACH550

Chapter 2 – Overview of ACH550 with E-Bypass
Bypass Contactors The bypass circuit available with the ACH550 E-Bypass includes two contactors. One contactor is the bypass contactor (2M) that can be used to manually connect the motor directly to the incoming power line in the event that the ACH550 is out of service. The other contactor is the ACH550 output contactor (1M for R1 through R4 and 3M for R5 through R8) that disconnects the ACH550 from the motor when the motor is operating in the Bypass mode. The drive output contactor and the bypass contactor are interlocked to prevent “back feeding,” applying line voltage to the ACH550 output terminals.
Motor Overload Protection
In the Drive mode, motor overload protection is provided by the ACH550.
In the Bypass mode, motor overload protection is provided by the bypass control board.
WARNING: If power is applied and the switches and contacts in the control circuit are commanding the motor to run, the motor will start as soon as the overload protection is reset.
Use caution when resetting the overload protection to make sure it is safe to start the motor.
Operator Control The ACH-CP-B Control Panel is a keypad with an LCD unit that provides status indication and operator control for the ACH550 drive. In normal operation with the E-Bypass, the ACH550 should be placed in the Auto mode by pressing the Auto key on the ACH-CP-B Control Panel. Refer to the ACH550-UH User’s Manual for additional information on the ACH-CP-B Control Panel and other aspects of ACH550 operation.
The E-Bypass has a separate keypad that is used for selecting the Drive or Bypass mode and for manually starting and stopping the motor in the Bypass mode. The bypass keypad has LEDs that indicate the status of both the bypass and the drive. The bypass keypad is described in detail in the Detailed Description of Operation.
E-Bypass Options In addition to the line reactor and circuit breaker options described above, the E-Bypass has space for factory installation of a drive service switch (drive input disconnect). The drive service switch provides a superior implementation and functional equivalent of a three-contactor bypass arrangement.
Detailed Description of Operation
The following paragraphs provide a detailed description of the various features and functions of the E-Bypass. Circuit diagrams for this product are shipped with the unit.
Input Disconnect and Bypass Configurations for ACH550 2-5

Chapter 2 – Overview of ACH550 with E-Bypass
Bypass Control Keypad Figure 2-4 shows the bypass control keypad and identifies the keys and LED indicating lights. The functions of the various keys and LEDs are described in the following paragraphs.
Figure 2-4 Bypass Control Keypad
Ready LED The Ready LED is illuminated when the disconnect switch or circuit breaker is closed and power is applied to the ACH550 and bypass.
Enable LED The Enable LED is illuminated under the following conditions:
1) Both the Safety Interlock and Run Enable contacts are closed.
2) The Safety Interlock contact is closed with no Start command present.
The Enable LED flashes, if the Run Enable contact is open and when the Safety Interlock contact is closed and a Start command is present.
The Enable LED is not illuminated when the Safety Interlock contact is open.
Drive Run LED The Drive Run LED is illuminated green when the ACH550 drive is running.
Bypass Fault LED The Bypass Fault LED indicates the status of the bypass overload/underload protection. The LED is red when the bypass has tripped on an overload/underload or the bypass control board has faulted.
Drive Selected LED The Drive Selected LED is illuminated green when the ACH550 drive has been selected as the power source for the motor.
Bypass Selected LED The Bypass Selected LED is illuminated green when the E-Bypass has been selected as the power source for the motor.
Ready LED
Enable LED
Hand LED
Auto LED
Drive and Bypass
Auto Key
Reset Key
Drive/BypassSelect Keys
Bypass Run
Drive/Bypass
ON/Hand Key
OFF Key
LED
Running/Stopped/Faulted LEDs
Selected LEDs
Automatic LED
BypassFault LED
2-6 Input Disconnect and Bypass Configurations for ACH550

Chapter 2 – Overview of ACH550 with E-Bypass
Drive Fault LED The Drive Fault LED is illuminated red when the motor or drive protection functions have shut down the ACH550.
Bypass Run LED The Bypass Run LED is illuminated green when the motor is running in bypass.
Automatic Transfer LED The Automatic Transfer LED is illuminated green to indicate the system has automatically transferred to Bypass after a Drive fault. The Automatic Transfer LED flashes green to indicate the system has been placed in an Override condition.
Auto LED The Auto LED is illuminated green when the Auto Start contact has been selected as the means for starting and stopping the motor in the bypass mode.
Hand LED The Hand LED is illuminated green when the motor has been started manually in the bypass mode.
Drive Select Key The Drive Select key selects the ACH550 drive as the power source for the motor.
Bypass Select Key The Bypass Select key selects the bypass as the power source for the motor.
Reset Key The Reset key resets the bypass fault. It may take several minutes before the bypass can be reset after an overload trip.
Auto Key The Auto key selects the Auto Start contact as the means for starting and stopping the motor in the bypass mode.
Hand Key The Hand key can be used to manually start the motor when the bypass has been selected as the power source for the motor.
OFF Key The OFF key can be used to manually stop the motor if the motor has been running on bypass power.
Operating Modes
Drive Mode Under normal conditions the system is in the Drive mode. The ACH550 drive provides power to the motor and controls its speed. The source of the drive’s start/stop and speed commands is determined by the Auto or Hand mode selection of the drive’s keypad. Commands come from the control terminals when the Auto mode has been selected or from the drive keypad when the Hand mode has been selected. The user can normally switch to the Drive mode by pressing the Drive key on the bypass keypad.
Bypass Mode In the Bypass mode, the motor is powered by AC line power through the bypass contactor. The source of the bypass start/stop commands is determined by the Auto or Hand mode selection of the bypass’ keypad. Commands come from the control terminals when the Auto mode has been selected or from the bypass keypad when the Hand mode has been selected. The user can normally switch to the Bypass mode by
Input Disconnect and Bypass Configurations for ACH550 2-7

Chapter 2 – Overview of ACH550 with E-Bypass
pressing the Bypass key on the bypass keypad. Alternative methods of bypass control called Overrides are also available. Refer to the following descriptions of the Override modes.
Fireman’s Override Mode In the Fireman’s Override (Override 1) mode, the motor is powered by AC line power through the bypass contactor. The source of the start command is internal and unaffected by external stop commands.The user can switch to the Fireman’s Override mode by closing the Fireman’s Override input contact. When the Fireman’s Override input contact is closed, the system is forced to bypass and runs the motor. The Automatic Transfer LED flashes green when the system is in override. While in Fireman’s Override the system does not respond to any other inputs including overloads, faults, safeties and enables. Fireman’s Override is designed for “Run to Destruction” operation. Normally when the Fireman’s Override input contact is switched from closed to open, the system returns to the operating mode that existed prior to entering Override and can be controlled using the Drive and Bypass keys. The exception to this is when the Bypass Override (Override 2) input contact is closed, in which case the system switches to Bypass Override mode.
Bypass Override Mode In the Bypass Override (Override 2) mode, the motor is powered by AC line power through the bypass contactor. The source of the start command is internal and unaffected by external stop commands.The user can switch to the Bypass Override mode by closing the Bypass Override input contact. When the Bypass Override input contact is closed, the system is forced to bypass and does not respond to the Drive and Bypass keys. The Automatic Transfer LED flashes green when the system is in override. While in Bypass Override the system responds to bypass overloads, faults, safeties and enables. Normally when the Bypass Override input contact is switched from closed to open, the system switches to the Drive mode and can be controlled using the Drive and Bypass keys.The exception to this is when the Fireman’s Override (Override 1) input contact is closed, in which case the system remains in Fireman’s Override mode.
Hand Mode When the system is in the Bypass mode, the operator can manually start the motor by pressing the Hand key. The motor will run and the Hand LED will be illuminated green. In order to run the motor, the Safety Interlock and Run Enable contacts must be closed (green Enable LED) and any bypass fault must be reset.
Auto Mode In the Auto mode the bypass start/stop command comes from the Start/Stop input terminal on the bypass control board. The Auto mode is selected by pressing the Auto key on the bypass keypad. The Auto LED is illuminated green when the bypass is in the Auto mode. If the system is in the Bypass mode, the motor will run across the line if the Auto mode is selected, the Start/Stop, Safety Interlock and Run Enable contacts are closed and any bypass fault is reset.
2-8 Input Disconnect and Bypass Configurations for ACH550

Chapter 2 – Overview of ACH550 with E-Bypass
Off Mode If the motor is running in the Bypass mode, the operator can manually stop the motor by pressing the OFF key. The Hand or Auto LED will go out. The motor can be restarted by pressing the Hand key or the bypass can be returned to the Auto mode by pressing the Auto key. If the system is in the Drive mode, pressing the OFF key will take the bypass out of the Auto mode, but will not affect motor operation from the drive. If the system is switched to the Bypass mode, a motor that is running will stop.
Bypass/Drive Mode Transfers
If the ACH550 is in the Auto mode and the motor is running in the Drive mode, the motor will transfer to bypass operation and continue running if the system is switched to the Bypass mode and the bypass is in the Auto mode with the Start/Stop Input contact closed.
If the motor is running in the Bypass mode, the motor will transfer to drive operation and continue running if the system is switched to the Drive mode and the drive is in the Auto mode with the Start/Stop Input contact closed.
Starting the Motor on Application of Power
If the Safety Interlock and Run Enable Input contacts are closed and the system is in the Bypass mode and in either the Hand or Auto mode, the motor will start across the line as soon as power is applied. If the system is in the Drive mode with the drive in the Auto mode, the motor will start on the drive as soon as power is applied.
Automatic Transfer Option When the Automatic Transfer option is selected, the motor is automatically transferred to line power if the drive trips out on a protective trip. If automatic restart has been enabled in the drive, the drive will attempt to automatically restart before the motor is transferred to line power. The Automatic Transfer option is selected by setting a configuration switch on the bypass control board. See "E-Bypass Jumper, Switch and Pot Settings" on page 4-2. The Automatic Transfer LED is illuminated green once the system has automatically transferred to bypass operation.
Output Contactor Control In the unlikely event of failure in the bypass control electronics, the user can engage the drive output contactor without the control electronics by using a configuration jumper on the bypass control board. See "Output Contactor Control" on page 4-5.
Bypass Control Board Inputs and Outputs
The E-Bypass control board has five relay contact (digital) inputs, six relay outputs and one digital output that are available for connection to external control circuits. The internal 24VDC supply is normally used in conjunction with the relay contact inputs. Use of an external 110 VAC power supply requires re-configuring Jumper J3. Care should be taken when using external supply voltages so as not to damage the drive and bypass electronics. The input and output functions are described below. Refer to "Chapter 3 – Installation Instructions" for additional information and connection instructions.
Input Disconnect and Bypass Configurations for ACH550 2-9

Chapter 2 – Overview of ACH550 with E-Bypass
Relay Contact Inputs
Start/Stop The Start/Stop input is connected to a normally open contact that starts and stops the system. When the E-Bypass is in the Drive mode and the ACH550 is in the Auto mode, the Start/Stop input contact controls the motor by starting and stopping the ACH550 drive. When the E-Bypass is in the Bypass mode and the Auto LED is illuminated green, the Start/Stop input contact controls the motor by controlling the bypass contactor.
Run Enable The Run Enable input is connected to the series combination of any external normally closed permissive contacts, such as damper end switches, that must be closed to allow the motor to run. If any of these external contacts are open while a Start command is present, the Enable LED will flash and the motor is prevented from running.
Safety Interlock The Safety Interlock input is connected to the series combination of any external normally closed interlock contacts, such as Firestat, Freezestat, and high static pressure switches – switches that must be closed to allow the motor to run. If any of these external contacts are open, the Enable LED is not illuminated, the drive output contactor, bypass contactor, and System Started relay are de-energized preventing the motor from running.
Fireman’s Override (Override 1)
The Fireman’s Override (Override 1) input can be connected to an external contact that is closed to select the Fireman’s Override mode. See "Fireman’s Override Mode" on page 2-8 for a description of this mode.
Bypass Override (Override 2)
The Bypass Override (Override 2) input can be connected to an external contact that is closed to select the Bypass Override mode. See "Bypass Override Mode" on page 2-8 for a description of this mode.
Relay Contact Outputs
Drive Fault The Drive Fault relay is energized during normal operation. The Drive Fault relay is de-energized when an ACH550 drive fault has occurred.
System Run The System Run relay is energized when the E-Bypass System is running. The System Run relay provides an output when the motor is running whether powered by the ACH550 drive or the bypass. Separate Drive Run and Bypass Run contacts can be created by using the common (C) contact of the System Run relay and connecting the the normally open (NO) contact of the System Run relay to the common (C) contact of the Mode / Override relay. To do this the Mode / Override relay must be configured for Mode relay operation. See "E-Bypass Jumper, Switch and Pot Settings" on page 4-2. The normally closed (NC) contact of the Mode relay becomes the Drive Run contact and the normally open (NO) contact of the Mode relay becomes the Bypass Run contact This configuration provides outputs that are closed when the motor is running. See "Typical Applications and Configurations" at the end of this Chapter.
2-10 Input Disconnect and Bypass Configurations for ACH550

Chapter 2 – Overview of ACH550 with E-Bypass
System Started The System Started relay is energized when the E-Bypass system is started. Three conditions must be met in order for the relay to energize. 1) a Start command must be present, 2) the Safety Interlock input contact must be closed and 3) there can be no fault present in the system.
The Start command can come from the bypass control board terminal block, the ACH550 keypad, the bypass keypad, or serial communications depending on the operational mode selected. The System Started relay is ideal for use in damper actuator circuits, opening the dampers only under those conditions where the system is preparing to run the motor. Closing the dampers if the safeties open, the system faults, or when a Stop command is issued.
Mode/Override The Mode / Override relay is a configurable relay. The function of the relay is selectable between Mode and Override operation. If the Mode / Override relay is configured for Mode operation (Default), the relay is energized when the Bypass mode is selected and de-energized when the Drive mode is selected. If the Mode / Override relay is configured for Override operation, the relay is energized when the Override mode is selected and de-energized in all other modes. See "E-Bypass Jumper, Switch and Pot Settings" on page 4-2.
Bypass Fault The Bypass Fault relay is energized during normal operation. The Bypass Fault relay is de-energized when a bypass fault has occurred or when the bypass motor overload/underload protection has tripped.
Hand/Off/Auto The Hand/Off/Auto relay is energized when the bypass is in the Auto mode and de-energized in the Hand mode and when the bypass is Off. In the Auto mode the bypass start/stop command comes from the Start/Stop input terminal on the bypass control board.
Digital Output
Safety Interlock The Safety Interlock output is active when the Safety Interlock Input contact is closed. The Safety Interlock output is available for customer connection and routing through the ACH550 drive. User’s can select from a variety of optional communication protocols to monitor the Safety Interlock status through the ACH550 digital inputs. Refer to the ACH550-UH User’s Manual and the appropriate communications manual for additional information about monitoring ACH550 digital inputs.
ACH550 Drive Inputs and Outputs
Some of the ACH550 inputs and outputs are pre-wired to the bypass control board and not available for external use. The inputs and outputs that are not pre-wired are available for external use by connecting directly to the terminals in the ACH550. The pre-wired and available inputs and outputs are described below. Refer to the ACH550-UH User’s Manual for additional information about the inputs and outputs. See also "Chapter 3 – Installation Instructions" for additional information and connection instructions.
Input Disconnect and Bypass Configurations for ACH550 2-11

Chapter 2 – Overview of ACH550 with E-Bypass
The ACH550 has two relay outputs that are pre-wired to the bypass control board. These two relay outputs are used to provide the System (Drive) Started and Drive Fault outputs that are described above.
Two of the ACH550’s digital inputs, the Auto Mode Start/Stop input and the Run Enable input are also pre-wired to the bypass control board. These two digital inputs are coordinated with the Start/Stop and Run Enable inputs that control the motor in both the Drive and Bypass modes of operation.
Caution: The E-Bypass will not work properly if the Drive relay outputs RO1 and RO3 or the Drive digital inputs DI1 and DI2 are reassigned by changing ACH550 configuration settings. The only macro that, by default, provides the proper configuration settings is the E-Bypass macro. If any other macro will be used, see "Macros and Parameter Settings" on page 4-6.
Four of the digital inputs of the ACH550 are available for routing E-Bypass outputs (digital and relay) through the ACH550 drive. Users can select from a variety of communication protocols to monitor the E-Bypass status through the ACH550 digital inputs. The digital inputs of the ACH550 are also available for selecting constant speeds or providing Speed Increase and Speed Decrease inputs. The functions of these inputs is determined by the ACH550 macro selection. Refer to the ACH550-UH User’s Manual for additional information.
The ACH550 Auto Mode External Reference input is an analog input that sets the operating speed when the ACH550 HVAC macro is selected and the drive is in the Auto mode. When the HVAC PID Control macro is selected, analog inputs are used for setting the PID reference and receiving the transducer feedback “actual” signal. Refer to the ACH550-UH User’s Manual for additional information.
The Output Frequency analog output of the ACH550 provides a 4 to 20 mA signal proportional to the drive output frequency or motor speed.
Typical Applications and Configurations
The following figures show the connections for several typical applications.
2-12 Input Disconnect and Bypass Configurations for ACH550

Chapter 2 – Overview of ACH550 with E-Bypass
Figure 2-5 Basic Control Connections for Separate Drive Run & Bypass Run Commands
Parameter Number Description Setting
1001 EXTERNAL 1 COMMANDS 1 (DI1)
1002 EXTERNAL 2 COMMANDS 1 (DI1)
1601 RUN ENABLE 2 (DI2)
1401 RELAY OUTPUT 1 7 (STARTED)
1403 RELAY OUTPUT 3 3 (FAULT (-1))
BP0076
Input Disconnect and Bypass Configurations for ACH550 2-13

Chapter 2 – Overview of ACH550 with E-Bypass
Figure 2-6 Basic Control Connections for Externally Supplied 115 VAC Power
Parameter Number Description Setting
1001 EXTERNAL 1 COMMANDS 1 (DI1)
1002 EXTERNAL 2 COMMANDS 1 (DI1)
1601 RUN ENABLE 2 (DI2)
1401 RELAY OUTPUT 1 7 (STARTED)
1403 RELAY OUTPUT 3 3 (FAULT (-1))
BP0075
2-14 Input Disconnect and Bypass Configurations for ACH550

Chapter 2 – Overview of ACH550 with E-Bypass
Figure 2-7 Basic Control Connections for Damper Actuator Control
Parameter Number Description Setting
1001 EXTERNAL 1 COMMANDS 1 (DI1)
1002 EXTERNAL 2 COMMANDS 1 (DI1)
1601 RUN ENABLE 2 (DI2)
1401 RELAY OUTPUT 1 7 (STARTED)
1403 RELAY OUTPUT 3 3 (FAULT (-1))
BP0074
Input Disconnect and Bypass Configurations for ACH550 2-15

Chapter 2 – Overview of ACH550 with E-Bypass
Figure 2-8 Basic Control Connections for Routing Outputs Through the ACH550
Parameter Number Description Setting
1001 EXTERNAL 1 COMMANDS 1 (DI1)
1002 EXTERNAL 2 COMMANDS 1 (DI1)
1201 CONST SPEED SEL 0 (NOT SEL)
1601 RUN ENABLE 2 (DI2)
1401 RELAY OUTPUT 1 7 (STARTED)
1403 RELAY OUTPUT 3 3 (FAULT (-1))
BP0073
2-16 Input Disconnect and Bypass Configurations for ACH550

Chapter 2 – Overview of ACH550 with E-Bypass
Figure 2-9 Customer Control Connection Worksheet
Parameter Number Description Setting
1001 EXTERNAL 1 COMMANDS 1 (DI1)
1002 EXTERNAL 2 COMMANDS 1 (DI1)
1601 RUN ENABLE 2 (DI2)
1401 RELAY OUTPUT 1 7 (STARTED)
1403 RELAY OUTPUT 3 3 (FAULT (-1))
BP0072
Input Disconnect and Bypass Configurations for ACH550 2-17

Chapter 2 – Overview of ACH550 with E-Bypass
2-18 Input Disconnect and Bypass Configurations for ACH550

Chapter 3 – Installation Instructions
This chapter explains how to install the ACH550 with E-Bypass and connect all power, motor, and control wiring. It also explains the initial inspection procedures.
Pre-Installation Planning
Before beginning installation, review the installation instructions in this chapter and make sure that the installation requirements can be met. The following topics should be considered in pre-installation planning:
• Environment
• Heat Dissipation Requirements
• Mounting Area
• Wiring Requirements
Environment The ACH550 with E-Bypass must be installed in a heated, indoor controlled environment that is relatively free of moisture and conductive contaminants such as condensation, carbon dust, and the like.
The maximum ambient temperature allowed is 104°F (40°C) for an ACH550 in the E-Bypass enclosure. The rating is based on a variable torque load with the load current lower than or equal to the continuous maximum load current.
Input Disconnect and Bypass Configurations for ACH550 3-1

Chapter 3 – Installation Instructions
Heat Dissipation Requirements
ACH550 drives are self-cooled. The cooling air entering the drive must be clean and free from corrosive materials. The tables below give the heat dissipated into the hot air exhausted from the drives. If the drives are installed in a confined space, the heat must be removed from the area by ventilation or air conditioning equipment.
Table 3-1 208 - 240 Volt, Heat Dissipation for ACH550 E-Bypass Units
208 - 240 Volt Heat Dissipation and Airflow Requirements
HP Identification Watts BTU/Hr CFM
1 ACH550ACH550-xx-04A6-2 55 189 26
1.5 ACH550ACH550-xx-06A6-2 73 249 26
2 ACH550ACH550-xx-07A5-2 81 176 26
3 ACH550ACH550-xx-012A-2 116 404 26
5 ACH550ACH550-xx-017A-2 161 551 26
7.5 ACH550ACH550-xx-024A-2 227 776 52
10 ACH550ACH550-xx-031A-2 285 373 52
15 ACH550ACH550-xx-046A-2 420 1434 79
20 ACH550ACH550-xx-059A-2 536 1829 79
25 ACH550ACH550-xx-075A-2 671 2290 165
30 ACH550ACH550-xx-088A-2 786 2685 165
40 ACH550ACH550-xx-114A-2 1014 3463 165
50 ACH550ACH550-xx-143A-2 1268 4431 238
60 ACH550ACH550-xx-178A-2 1575 5379 238
75 ACH550ACH550-xx-221A-2 1952 6666 238
100 ACH550ACH550-xx-248A-2 2189 7474 238
3-2 Input Disconnect and Bypass Configurations for ACH550

Chapter 3 – Installation Instructions
Table 3-2 380 - 480 Volt, Heat Dissipation for ACH550 E-Bypass Units
If the cooling air contains dust, clean the cooling surfaces of the unit regularly using compressed air and a brush. If the ACH550 is in a UL type 1 enclosure, cover the vents during cleaning to prevent the dust from entering the unit.
If the heatsink is not cleaned and is not able to dissipate the expended heat, the ACH550’s thermal protection will activate, causing a fault indication which stops the drive. The ACH550 can be started again when the temperature of the heatsink has fallen below the trip level.
380 - 480 Volt Heat Dissipation and Airflow Requirements
HP Identification Watts BTU/Hr CFM
1/1.5 ACH550ACH550-xx-03A3-4 40 137 26
2 ACH550ACH550-xx-04A1-4 52 177 26
3 ACH550ACH550-xx-06A9-4 97 331 26
5 ACH550ACH550-xx-08A8-4 127 433 26
7.5 ACH550ACH550-xx-012A-4 172 587 26
10 ACH550ACH550-xx-015A-4 232 792 52
15 ACH550ACH550-xx-023A-4 337 1150 52
20 ACH550ACH550-xx-031A-4 457 1560 79
25 ACH550ACH550-xx-038A-4 562 1918 79
30 ACH550ACH550-xx-044A-4 667 2276 165
40 ACH550ACH550-xx-059A-4 907 3096 165
50 ACH550ACH550-xx-072A-4 1120 3820 165
60 ACH550ACH550-xx-077A-4 1295 4420 99
75 ACH550ACH550-xx-096A-4 1440 4915 99
100 ACH550ACH550-xx-124A-4 1940 6621 238
125 ACH550ACH550-xx-157A-4 2310 7884 238
150 ACH550ACH550-xx-180A-4 2810 9590 238
200 ACH550ACH550-xx-245A-4 3850 13000 300
250 ACH550ACH550-xx-316A-4 5300 18000 700
300 ACH550ACH550-xx-368A-4 6850 23000 700
350 ACH550ACH550-xx-414A-4 7000 24000 700
400 ACH550ACH550-xx-486A-4 7600 26000 700
Input Disconnect and Bypass Configurations for ACH550 3-3

Chapter 3 – Installation Instructions
Mounting Location When mounting the unit take the following precautions:
• DO NOT mount in direct sunlight.
• DO NOT mount on surfaces with temperatures above 104°F (40°C).
• DO NOT allow the ambient temperature around the ACH550 to exceed the ambient temperature as stated in Environment above.
• Mount the E-Bypass enclosure vertically with the ACH550 control panel and Bypass control panel visible and the disconnect accessible.
• Enclosure dimension drawings are presented in this chapter.
• For proper cooling, each unit must have two inches (50 mm) of clear space on each side. If units are to be mounted next to each other, there must be a total of four inches (100 mm) from unit to unit.
• The units cannot be mounted one above the other.
Wiring Requirements The ACH550 with E-Bypass is designed for use on a three-phase system. Four wires (three phase wires plus a ground wire) are required for the input wiring. Input and output conductors, and branch circuit protection must be sized to local codes. All field power wiring shall be copper, rated for 60°C if rated for less than 100 amps or 75°C if rated 100 amps or more. At least three separate metallic conduits are required, one for input power, one for output power to the motor and one for control signals. The External Speed Reference signal must be wired using a shielded twisted pair cable. Refer to "Electrical Installation" on page 3-11 for detailed wiring information.
Initial Inspection Procedure
As you unpack the ACH550 with E-Bypass, check for any signs of damage and verify that the delivery is complete by examining the contents for items such as the user’s manual, keypad, etc. In the event of damage, please contact the shipping company or the supplier. Locate the drive nameplate and confirm that the E-Bypass is configured to the order specifications. Refer to "Chapter 2 – Overview of ACH550 with E-Bypass" in this manual.
If the E-Bypass is stored before start-up, verify that the environmental conditions in the storage room meet the following conditions:
• Temperature between -40°F and +158°F (-40°C and +70°C).
• Relative humidity less than 95 percent.
• No condensation.
The warranty covers defects in manufacturing. The manufacturer carries no responsibility for damage incurred during transport or unpacking.
If any questions arise concerning the ACH550 with E-Bypass, please contact your Distributor or local ABB Drives Office.
3-4 Input Disconnect and Bypass Configurations for ACH550

Chapter 3 – Installation Instructions
Mechanical Installation Securely mount the ACH550 with E-Bypass on a wall in a vertical position. Use the four mounting notches at the top and bottom of the unit. Before mounting the unit, verify that the environmental conditions conform to the specifications listed in "Pre-Installation Planning" in this chapter.
To ensure safe installation, check that the surface of the mounting location is flat.
Attach the E-Bypass enclosure at the mounting notches and tighten the bolts.
Dimensions and Weights
The dimensions and weights of the ACH550 E-Bypass units are given in the following illustrations.
Input Disconnect and Bypass Configurations for ACH550 3-5

Chapter 3 – Installation Instructions
Vertical E-Bypass UL type 1, R1…R4
Vertical E-Bypass, UL type 1
Dimensions Ref.
R1 R2 R3 R4
mm in. mm in. mm in. mm in.
W 136 5.4 136 5.4 220 8.7 220 8.7
W1 98 3.9 98 3.9 160 6.3 160 6.3
H 1095 43.1 1195 47 1361 53.6 1466 57.7
H1 1078 42.4 1178 46.4 1332 52.4 1437 56.6
D 219 8.6 230 9 269 10.6 269 10.6
kg lb. kg lb. kg lb. kg lb.
Mass 18 40 23 50 50.8 112 59.4 131
W1
W
H1
H
D
BP0064
3-6 Input Disconnect and Bypass Configurations for ACH550

Chapter 3 – Installation Instructions
Standard E-Bypass UL type 1, R1…R6
Standard E-Bypass, UL type 1, R1…R6
Dimensions Ref.
R1 R2 R3 R4 R5 R6
mm in. mm in. mm in. mm in. mm in. mm in.
W 443 17.4 443 17.4 521 20.5 521 20.5 713 28.1 713 28.1
W1 320 12.6 320 12.6 400 15.7 400 15.7 713 28.1 713 28.1
H 849 33.4 849 33.4 957 37.7 957 37.7 1212 47.7 1212 47.7
H1 810 31.9 810 31.9 920 36.2 920 36.2 1175 46.3 1175 46.3
D 319 12.6 319 12.6 365 14.4 365 14.4 485 19.1 485 19.1
kg lb. kg lb. kg lb. kg lb. kg lb. kg lb.
Mass 35.4 78 38.1 84 54.4 120 62.6 138 120.6 266 163.3 360
W1
W
D
BP0063
H1 H
Input Disconnect and Bypass Configurations for ACH550 3-7

Chapter 3 – Installation Instructions
Standard E-Bypass UL type 12, R1…R6
Standard E-Bypass, UL type 12, R1…R6
Dimensions Ref.
R1 R2 R3 R4 R5 R6
mm in. mm in. mm in. mm in. mm in. mm in.
W 443 17.4 443 17.4 521 20.5 521 20.5 713 28.1 713 28.1
W1 320 12.6 320 12.6 400 15.7 400 15.7 713 28.1 713 28.1
H 862 33.9 862 33.9 995 39.2 995 39.2 1282 50.5 1282 50.5
H1 810 31.9 810 31.9 920 36.2 920 36.2 1175 46.3 1175 46.3
D 319 12.6 319 12.6 365 14.4 365 14.4 485 19.1 485 19.1
kg lb. kg lb. kg lb. kg lb. kg lb. kg lb.
Mass 35.4 78 38.1 84 55.8 123 63.9 141 122.9 271 165.6 365
W1
W
H1 H
D
BP0062
3-8 Input Disconnect and Bypass Configurations for ACH550

Chapter 3 – Installation Instructions
Standard E-Bypass UL type 1, R7…R8
Standard E-Bypass, UL type 1, R7…R8
Dimensions Ref.R7 R8
mm in. mm in.
W 806 31.7 806 31.7
H 2065 81.3 2065 81.3
D 659 25.9 659 25.9
kg lb. kg lb.
Mass 303 668 454 1000
BP0017
W
H
D
Input Disconnect and Bypass Configurations for ACH550 3-9

Chapter 3 – Installation Instructions
Standard E-Bypass UL type 12, R7…R8
Standard E-Bypass, UL type 12, R7…R8
Dimensions Ref.R7 R8
mm in. mm in.
W 806 31.7 806 31.7
H 2318 91.3 2318 91.3
D 659 25.9 659 25.9
kg lb. kg lb.
Mass 324 713 474 1045
BP0018
W
H
D
3-10 Input Disconnect and Bypass Configurations for ACH550

Chapter 3 – Installation Instructions
Electrical Installation
Cable Entries ACH550 Vertical E-Bypass units are configured for wiring access from the bottom only. ACH550 Standard Mount E-Bypass units are configured for wiring access from the top. At least three separate metallic conduits are required, one for input power, one for output power to the motor and one for control signals.
Terminal Sizes Power and motor cable terminal sizes are shown in the Table 3-3 to Table 3-6 for connections to an input circuit breaker or disconnect switch, a motor terminal block and ground lugs. The table also lists torque that should be applied when tightening the terminals.
Table 3-3 208 - 240 Volt, Vertical E-Bypass Power Terminal Data
208 - 240 VoltFrameSize
Maximum Wire Size Capacities of Power Terminals
HP Identification Circuit Breaker
Disconnect Switch
Motor Terminal Block
Overload Relay
Ground Lugs
1 ACH550-Vx-04A6-2 R1 #3 44 in/lbs
#8 7 in/lbs
#6 13 in/lbs
N/A #4 35 in/lbs
1.5 ACH550-Vx-06A6-2 R1 #3 44 in/lbs
#8 7 in/lbs
#6 13 in/lbs
N/A #4 35 in/lbs
2 ACH550-Vx-07A5-2 R1 #3 44 in/lbs
#8 7 in/lbs
#6 13 in/lbs
N/A #4 35 in/lbs
3 ACH550-Vx-012A-2 R1 #3 44 in/lbs
#8 7 in/lbs
#6 13 in/lbs
N/A #4 35 in/lbs
5 ACH550-Vx-017A-2 R1 #3 44 in/lbs
#8 7 in/lbs
#6 13 in/lbs
N/A #4 35 in/lbs
7.5 ACH550-Vx-024A-2 R2 #3 44 in/lbs
#8 7 in/lbs
#6 13 in/lbs
N/A #4 35 in/lbs
10 ACH550-Vx-031A-2 R3 #3 44 in/lbs
#4 18 in/lbs
#2/0 120 in/lbs
N/A #2 50 in/lbs
15 ACH550-Vx-046A-2 R3 #3 44 in/lbs
#4 18 in/lbs
#2/0 120 in/lbs
N/A #2 50 in/lbs
20 ACH550-Vx-059A-2 R3 #3 44 in/lbs
#4 18 in/lbs
#2/0 120 in/lbs
N/A #2 50 in/lbs
25 ACH550-Vx-075A-2 R4 #3 44 in/lbs
#1/0 55 in/lbs
#2/0 120 in/lbs
N/A #2 50 in/lbs
Input Disconnect and Bypass Configurations for ACH550 3-11

Chapter 3 – Installation Instructions
Table 3-4 380 - 480 Volt, Vertical E-Bypass Power Terminal Data
380 - 480 VoltFrameSize
Maximum Wire Size Capacities of Power Terminals
HP Identification Circuit Breaker
Disconnect Switch
Motor Terminal Block
Overload Relay
Ground Lugs
1/1.5 ACH550-Vx-03A3-4 R1 #3 44 in/lbs
#8 7 in/lbs
#6 13 in/lbs
N/A #4 35 in/lbs
2 ACH550-Vx-04A1-4 R1 #3 44 in/lbs
#8 7 in/lbs
#6 13 in/lbs
N/A #4 35 in/lbs
3 ACH550-Vx-06A9-4 R1 #3 44 in/lbs
#8 7 in/lbs
#6 13 in/lbs
N/A #4 35 in/lbs
5 ACH550-Vx-08A8-4 R1 #3 44 in/lbs
#8 7 in/lbs
#6 13 in/lbs
N/A #4 35 in/lbs
7.5 ACH550-Vx-012A-4 R1 #3 44 in/lbs
#8 7 in/lbs
#6 13 in/lbs
N/A #4 35 in/lbs
10 ACH550-Vx-015A-4 R2 #3 44 in/lbs
#8 7 in/lbs
#6 13 in/lbs
N/A #4 35 in/lbs
15 ACH550-Vx-023A-4 R2 #3 44 in/lbs
#8 7 in/lbs
#6 13 in/lbs
N/A #4 35 in/lbs
20 ACH550-Vx-031A-4 R3 #3 44 in/lbs
#4 18 in/lbs
#2/0 120 in/lbs
N/A #2 50 in/lbs
25 ACH550-Vx-038A-4 R3 #3 44 in/lbs
#4 18 in/lbs
#2/0 120 in/lbs
N/A #2 50 in/lbs
30 ACH550-Vx-044A-4 R4 #3 44 in/lbs
#4 18 in/lbs
#2/0 120 in/lbs
N/A #2 50 in/lbs
40 ACH550-Vx-059A-4 R4 #3 44 in/lbs
#4 18 in/lbs
#2/0 120 in/lbs
N/A #2 50 in/lbs
50 ACH550-Vx-072A-4 R4 #3 44 in/lbs
#1/0 55 in/lbs
#2/0 120 in/lbs
N/A #2 50 in/lbs
3-12 Input Disconnect and Bypass Configurations for ACH550

Chapter 3 – Installation Instructions
Table 3-5 208 - 240 Volt, Standard E-Bypass Power Terminal Data
208 - 240 VoltFrameSize
Maximum Wire Size Capacities of Power Terminals
HP Identification Circuit Breaker
Disconnect Switch
Motor Terminal Block
Overload Relay
Ground Lugs
1 ACH550-Bx-04A6-2 R1 #613 in/lbs
#613 in/lbs
#613 in/lbs
N/A #435 in/lbs
1.5 ACH550-Bx-06A6-2 R1 #613 in/lbs
#613 in/lbs
#613 in/lbs
N/A #435 in/lbs
2 ACH550-Bx-07A5-2 R1 #613 in/lbs
#613 in/lbs
#613 in/lbs
N/A #435 in/lbs
3 ACH550-Bx-012A-2 R1 #613 in/lbs
#613 in/lbs
#613 in/lbs
N/A #435 in/lbs
5 ACH550-Bx-017A-2 R1 #613 in/lbs
#613 in/lbs
#613 in/lbs
N/A #435 in/lbs
7.5 ACH550-Bx-024A-2 R2 #613 in/lbs
#613 in/lbs
#613 in/lbs
N/A #435 in/lbs
10 ACH550-Bx-031A-2 R3 #2/0120 in/lbs
#2/0120 in/lbs
#2/0120 in/lbs
N/A #250 in/lbs
15 ACH550-Bx-046A-2 R3 #2/0120 in/lbs
#2/0120 in/lbs
#2/0120 in/lbs
N/A #250 in/lbs
20 ACH550-Bx-059A-2 R3 #2/0120 in/lbs
#2/0120 in/lbs
#2/0120 in/lbs
N/A #250 in/lbs
25 ACH550-Bx-075A-2 R4 #2/0120 in/lbs
#2/0120 in/lbs
#2/0120 in/lbs
N/A #250 in/lbs
30 ACH550-Bx-088A-2 R4 300MCM275 in/lbs
#1/070 in/lbs
250MCM275 in/lbs
N/A 3 x #3/0250 in/lbs
40 ACH550-Bx-114A-2 R4 300MCM275 in/lbs
#1/070 in/lbs
250MCM275 in/lbs
N/A 3 x #3/0250 in/lbs
50 ACH550-Bx-143A-2 R6 300MCM275 in/lbs
350MCM200 in/lbs
250MCM275 in/lbs
N/A 3 x #3/0250 in/lbs
60 ACH550-Bx-178A-2 R6 300MCM275 in/lbs
350MCM200 in/lbs
400MCM375 in/lbs
N/A 3 x #3/0250 in/lbs
75 ACH550-Bx-221A-2 R6 350MCM275 in/lbs
350MCM200 in/lbs
400MCM375 in/lbs
N/A 3 x #3/0250 in/lbs
100 ACH550-Bx-248A-2 R6 350MCM275 in/lbs
350MCM200 in/lbs
400MCM375 in/lbs
N/A 3 x #3/0250 in/lbs
Input Disconnect and Bypass Configurations for ACH550 3-13

Chapter 3 – Installation Instructions
Table 3-6 380 - 480 Volt, Standard E-Bypass Power Terminal Data
380 - 480 VoltFrameSize
Maximum Wire Size Capacities of Power Terminals
HP Identification Circuit Breaker
Disconnect Switch
Motor Terminal Block
Overload Relay Ground Lugs
1/1.5 ACH550-Bx-03A3-4 R1 #613 in/lbs
#613 in/lbs
#613 in/lbs
N/A #435 in/lbs
2 ACH550-Bx-04A1-4 R1 #613 in/lbs
#613 in/lbs
#613 in/lbs
N/A #435 in/lbs
3 ACH550-Bx-06A9-4 R1 #613 in/lbs
#613 in/lbs
#613 in/lbs
N/A #435 in/lbs
5 ACH550-Bx-08A8-4 R1 #613 in/lbs
#613 in/lbs
#613 in/lbs
N/A #435 in/lbs
7.5 ACH550-Bx-012A-4 R1 #613 in/lbs
#613 in/lbs
#613 in/lbs
N/A #435 in/lbs
10 ACH550-Bx-015A-4 R2 #613 in/lbs
#613 in/lbs
#613 in/lbs
N/A #435 in/lbs
15 ACH550-Bx-023A-4 R2 #613 in/lbs
#613 in/lbs
#613 in/lbs
N/A #435 in/lbs
20 ACH550-Bx-031A-4 R3 #2/0120 in/lbs
#2/0120 in/lbs
#2/0120 in/lbs
N/A #250 in/lbs
25 ACH550-Bx-038A-4 R3 #2/0120 in/lbs
#2/0120 in/lbs
#2/0120 in/lbs
N/A #250 in/lbs
30 ACH550-Bx-044A-4 R4 #2/0120 in/lbs
#2/0120 in/lbs
#2/0120 in/lbs
N/A #250 in/lbs
40 ACH550-Bx-059A-4 R4 #2/0120 in/lbs
#2/0120 in/lbs
#2/0120 in/lbs
N/A #250 in/lbs
50 ACH550-Bx-072A-4 R4 #2/0120 in/lbs
#2/0120 in/lbs
#2/0120 in/lbs
N/A #250 in/lbs
60 ACH550-Bx-077A-4 R5 300MCM275 in/lbs
#1/070 in/lbs
#2/053 in/lbs
N/A 3 x #3/0250 in/lbs
75 ACH550-Bx-096A-4 R5 300MCM275 in/lbs
#1/070 in/lbs
#2/053 in/lbs
N/A 3 x #3/0250 in/lbs
100 ACH550-Bx-124A-4 R6 300MCM275 in/lbs
350MCM200 in/lbs
250MCM275 in/lbs
N/A 3 x #3/0250 in/lbs
125 ACH550-Bx-157A-4 R6 300MCM275 in/lbs
350MCM200 in/lbs
250MCM275 in/lbs
N/A 3 x #3/0250 in/lbs
150 ACH550-Bx-180A-4 R6 300MCM275 in/lbs
350MCM200 in/lbs
250MCM275 in/lbs
N/A 3 x #3/0250 in/lbs
200 ACH550-Bx-245A-4 R7 2 x 250MCM275 in/lbs
2 x 250MCM275 in/lbs
350MCM350 in/lbs
N/A 5 Bus Bar holes (13/32” bolts)
250 ACH550-Bx-316A-4 R8 2 x 250MCM275 in/lbs
2 x 250MCM275 in/lbs
2 x 600MCM500 in/lbs
N/A 5 Bus Bar holes (13/32” bolts)
300 ACH550-Bx-368A-4 R8 2 x 500MCM275 in/lbs
2 x 500MCM275 in/lbs
2 x 600MCM500 in/lbs
N/A 5 Bus Bar holes (13/32” bolts)
350 ACH550-Bx-414A-4 R8 2 x 500MCM275 in/lbs
2 x 500MCM275 in/lbs
2 x 600MCM 500 in/lbs
N/A 5 Bus Bar holes (13/32” bolts)
400 ACH550-Bx-486A-4 R8 2 x 500MCM275 in/lbs
2 x 500MCM275 in/lbs
2 x 600MCM 500 in/lbs
N/A 5 Bus Bar holes (13/32” bolts)
3-14 Input Disconnect and Bypass Configurations for ACH550

Chapter 3 – Installation Instructions
Connection PointsVertical E-Bypass Figure 3-1 shows the Vertical E-Bypass wiring connection points. Refer
to the ACH550-UH User's Manual for control connections to the drive.
Figure 3-1 Wiring Connection Points – Vertical E-Bypass
BP0054
ACH550
E-BypassControl BoardTerminals (X2)
Disconnect Switchor Circuit Breaker
Output
Input Power Cable
Ground Lug(s)
Terminals
Service Switch(Optional)
Terminals
Input Ground
Output GroundOutput
Terminals
Service Switch(Optional)
R2 R4
Input Disconnect and Bypass Configurations for ACH550 3-15

Chapter 3 – Installation Instructions
Standard E-Bypass – Wall Mount
Figure 3-2 shows the Standard E-Bypass (wall mounted) wiring connection points. Refer to the ACH550-UH User's Manual for control connections to the drive.
Figure 3-2 Wiring Connection Points – Standard E-Bypass (Wall Mount)
BP0051
ACH550
Output
Input Power
Ground Lug(s)
Terminals
E-BypassControl BoardTerminals (X2)
Terminals
Output Terminals
Ground Lug(s)
Disconnect Switchor Circuit Breaker
Disconnect Switchor Circuit Breaker
R1…R4
R5/R6
3-16 Input Disconnect and Bypass Configurations for ACH550
Chapter 3 – Installation Instructions
Standard E-Bypass – Floor Mount
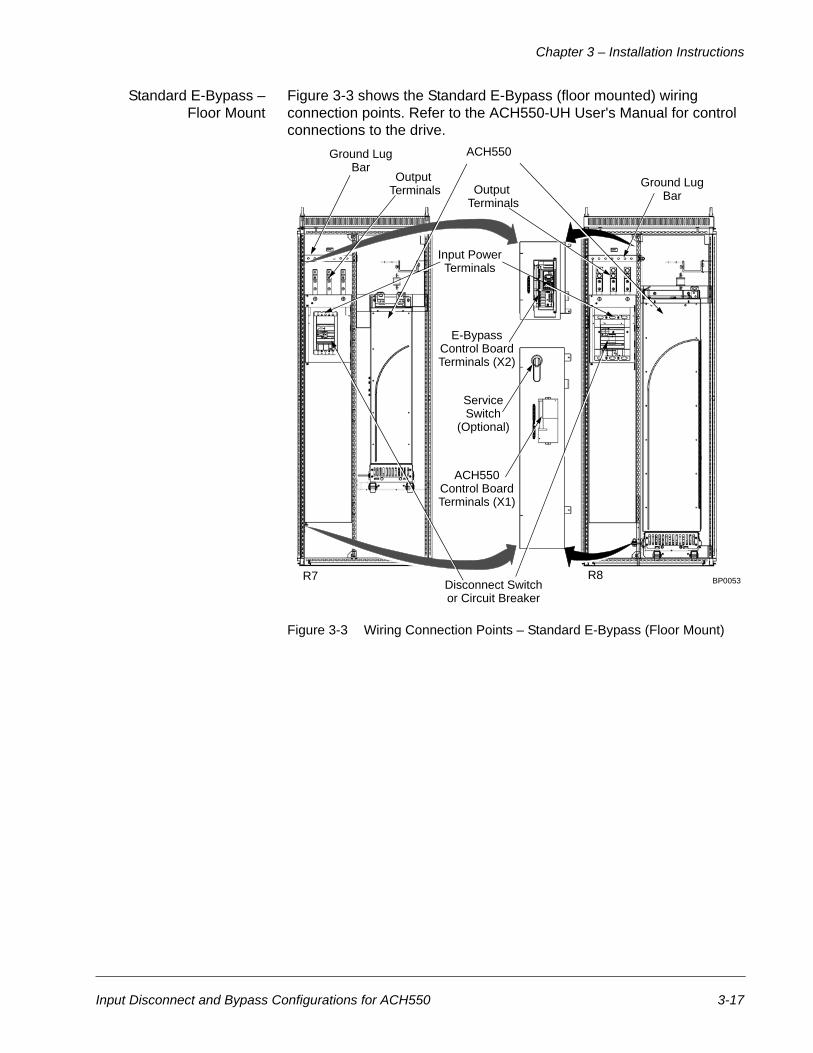
Figure 3-3 shows the Standard E-Bypass (floor mounted) wiring connection points. Refer to the ACH550-UH User's Manual for control connections to the drive.
Figure 3-3 Wiring Connection Points – Standard E-Bypass (Floor Mount)
ACH550
Input Power
Ground LugBar
Terminals
E-BypassControl BoardTerminals (X2)
BP0053Disconnect Switchor Circuit Breaker
Output Terminals Output
Terminals
Ground LugBar
ServiceSwitch
(Optional)
ACH550Control BoardTerminals (X1)
R7 R8
Input Disconnect and Bypass Configurations for ACH550 3-17

Chapter 3 – Installation Instructions
Input Wiring Power wiring must conform to the requirements defined in "Wiring Requirements" on page 3-4.
When connected to a 480 VAC power source, the ACH550 with E-Bypass with the circuit breaker option is suitable for use on a circuit capable of delivering not more than 20,000 RMS symmetrical amperes (14,000 RMS symmetrical amperes for the 3 and 5 Hp models). When connected to a 240 VAC power source, the ACH550 with E-Bypass with the circuit breaker option is suitable for use on a circuit capable of delivering not more than 50,000 RMS symmetrical amperes.
WARNING!
• Do not connect or disconnect input or output power wiring, or control wires, when power is applied.
• Never connect line voltage to drive output Terminals T1, T2, and T3.
• Do not make any voltage tolerance tests (Hi Pot or Megger) on any part of the unit. Disconnect motor wires before taking any measurements in the motor or motor wires.
• Make sure that power factor correction capacitors are not connected between the drive and the motor.
Input Connections – Vertical E-Bypass
Configurations
Connect the input power to the terminals at the bottom of the disconnect switch or circuit breaker as shown in Figure 3-4. Also see Figure 3-1. Connect the equipment grounding conductor to the ground lug near the input power connection point.
Figure 3-4 Input Power Wiring – Vertical E-Bypass
BP0044
Input Power Cables
Ground
3-18 Input Disconnect and Bypass Configurations for ACH550

Chapter 3 – Installation Instructions
Input Connections – Standard E-Bypass
Configurations
Connect input power to the terminals of the disconnect switch or circuit breaker. Connect the equipment grounding conductor to the ground lug at the top of the enclosure. Figure 3-5 shows the connection points for Standard E-Bypass configurations. Also see Figure 3-3 for R7 or R8.
Figure 3-5 Input Power Wiring – Standard E-Bypass (Wall Mounted)
Output Wiring Install the motor wiring away from other wire routes. Avoid long parallel runs with other wires. A dedicated metallic conduit should be provided from the drive to the motor for the output wiring.
WARNING! Check the motor and motor wiring insulation before connecting the ACH550 to line power. Follow the procedure provided below. Before proceeding with the insulation resistance measurements, check that the ACH550 is disconnected from incoming line power. Failure to disconnect line power could result in death or serious injury.
BP0041
BP0043
Standard Configuration (R1…R4)
Input Power Cable
Gnd
Standard Configuration (R5, R6)
Input Disconnect and Bypass Configurations for ACH550 3-19

Chapter 3 – Installation Instructions
Checking Motor Wiring and Motor Insulation
1. Check that the motor wires are disconnected from the E-Bypass output on Terminals T1, T2, and T3.
2. Check that the motor wires are disconnected from the motor and remove bridging connections at the motor.
3. Measure the insulation resistances of the motor. The voltage range of the insulation resistance meter must be at least equal to the line voltage, but not exceeding 1000 V. The insulation resistance must be greater than 1 MΩ.
4. Measure the insulation resistance of the motor wiring between the phases and between each phase and ground. The insulation resistance must be greater than 1 MΩ.
5. Perform the Keypad Control Test before connecting the motor. Refer to "Keypad Control Tests" on page 4-6.
Motor Cable Length The rapid rate of voltage changes causes capacitive coupling between motor wiring and the grounded metallic conduit. This phenomenon can cause substantially higher measured current than actual motor current, which may result in nuisance overcurrent trips or ground faults. Table 3-7 lists the maximum motor cable length based on capacitive coupling. It may also be necessary to consider motor insulation requirements related to drive output dv/dt.
Table 3-7 Maximum Recommended Motor Wire Lengths
Output Connections – Vertical E-Bypass
Configurations
Connect the motor cables to the terminals at the bottom of the bypass section as shown in Figure 3-6. Also see Figure 3-1. Connect the motor grounding conductor to the ground lug near the motor cable terminal block connection point.
Figure 3-6 Output Power Wiring – Vertical E-Bypass
Frame SizeMaximum Cable Length
Feet Meters
R1 330 100
R2, R3, R4 660 200
R5, R6, R7, R8 990 300
BP0044
Output Power CablesGnd
3-20 Input Disconnect and Bypass Configurations for ACH550

Chapter 3 – Installation Instructions
Output Connections – Standard E-Bypass
Configurations
Connect the motor cables to the output terminal block as shown in Figure 3-7. Also see Figure 3-3 for R7 or R8. The motor grounding conductor can be connected to the ground lug near the terminal block.
Figure 3-7 Output Power Wiring – Standard E-Bypass (Wall Mounted)
Control Wiring The control wiring includes connections to an analog speed command signal and a start/stop relay contact for controlling the motor in the AUTO mode. There may also be connections to external run enable interlock contacts and a connection from the Motor Run contact to an external status indicating circuit. For a detailed description of the control circuit functions, refer to the section entitled "Detailed Description of Operation" on page 2-5.
BP0041BP0043
Standard Configuration (R1…R4)
Output Power Cable
Gnd
Standard Configuration (R5, R6)
Gnd
Input Disconnect and Bypass Configurations for ACH550 3-21

Chapter 3 – Installation Instructions
Connect Control Wires Connect control wiring to terminal block X1 on the ACH550 control board and to terminal block X2 on the E-Bypass control board. Figure 3-1, Figure 3-2 and Figure 3-3 show the location of X2 for various configurations. Refer to the ACH550-UH User’s Manual for the location of X1. X1 accepts one wire per terminal in wire sizes ranging from 22 AWG to 16 AWG and X2 accepts one wire per terminal in wire sizes ranging from 26 AWG to 14 AWG. Up to three wires per terminal can be connected with a proportional reduction in maximum wire size. The control terminals should be tightened to 4 inch-pounds of torque.
Basic Connections Figure 3-8 shows the basic control connections for use with the E-Bypass macro. These connections are described in the following paragraphs.
Additional Connections Analog inputs and outputs and additional digital input and relay output connections are available on Terminal Block X1 inside the ACH550. Note that the E-Bypass control circuitry uses inputs and outputs DI1, DI2, RO1 and RO3. These inputs and outputs are not available for any other purpose and must not be reconfigured. AI1, AI2, AO1, AO2, DI3, DI4, DI5, DI6 and RO2 are available for use. Refer to the ACH550-UH User’s Manual for information about control connections on Terminal Block X1.
When making connections to Terminal Block X1, be careful not to disturb the factory installed wiring between ACH550 terminal block X1 and E-Bypass control board terminal X2.
3-22 Input Disconnect and Bypass Configurations for ACH550

Chapter 3 – Installation Instructions
Figure 3-8 Basic Control Connections for E-Bypass Macro
Parameter Number Description Setting
1001 EXTERNAL 1 COMMANDS 1 (DI1)
1002 EXTERNAL 2 COMMANDS 1 (DI1)
1601 RUN ENABLE 2 (DI2)
1401 RELAY OUTPUT 1 7 (STARTED)
1403 RELAY OUTPUT 3 3 (FAULT (-1))
BP0071
Input Disconnect and Bypass Configurations for ACH550 3-23

Chapter 3 – Installation Instructions
Analog Input One of the available analog inputs is usually used with the E-Bypass macro. The customer’s external Auto Speed Reference is connected to ACH550 terminals X1:2(+) and X1:3(-).
The analog inputs can accept a voltage signal (0 – 10 VDC) or a current signal (0 – 20 mA). Switch J1, located on the ACH550 control board (J1 is used for both AI1 and AI2), determines the signal type. Set J1 to either the voltage or current position according to the type of external signal that will be connected. Figure 3-9 shows switch positions. To locate J1, refer to the ACH550-UH User’s Manual, or, for R7 and R8, refer to Figure 3-3.
Figure 3-9 ACH550 J1 Position Examples
Caution: There are pre-wired connections on bypass terminals X2:7 through X2:9 and X2:11 through X2:14. Do not disturb these connections when adding external wiring connections.
Bypass Control Board Relay Contact Inputs
Start/Stop Input Contact To start the ACH550 by dry contact (maintained), connect the contact between bypass terminals X2:1 and X2:15. Closing this contact will start the system when the drive or bypass is in the Auto mode provided the Safety Interlock input is closed.
Run Enable Input Contacts
Run Enable permissives, such as damper end switches are normally closed dry contacts connected in series between bypass terminals X2:2 and X2:15. When any of these contacts opens, the motor will stop and the System Run relay will de-energize, whether in DRIVE or BYPASS.
Safety Interlock Input Contacts
Safety Interlocks, such as Freeze, Fire, and Smoke protection are normally closed dry contacts connected in series between bypass terminals X2:3 and X2:15. When any of these contacts opens, the motor will stop and the System Started & System Run relays will de-energize, whether in DRIVE or BYPASS.
J1AI1: (in Voltage Position)AI2: (in Current Position)
ON
ON
J1
AI1 & AI2: (in Voltage Position)
ON
ON
J1
ON
ON
AI1 & AI2: (in Current Position)
3-24 Input Disconnect and Bypass Configurations for ACH550

Chapter 3 – Installation Instructions
Fireman’s Override (Override 1) Contact
Fireman’s Override is designed for “Run to Destruction” operation. See "Fireman’s Override Mode" on page 2-8 for a description of this mode.
Connect the Fireman’s Override contact between bypass terminals X2:4 and X2:15.
Bypass Override (Override 2) Contact
If the Bypass Override (Override 2) input contact is closed, the system is forced to the Bypass Override mode. See "Bypass Override Mode" on page 2-8 for a description of this mode.
Connect the Bypass Override contact between bypass terminals X2:5 and X2:15.
Caution: There are pre-wired connections on bypass terminals X2:7 through X2:9 and X2:11 through X2:14. Do not disturb these connections when adding external wiring connections.
Bypass Control Board Relay Contact Outputs
Drive Fault Form C contacts of a Drive Fault relay are provided at bypass terminals X2:28(NC), X2:29(NO) and X2:30(COM). The drive fault relay is energized when the drive is energized and not faulted.
System Run Form C contacts of a System Run relay are provided at bypass terminals X2:19(NC), X2:20(NO) and X2:21(COM). The System Run relay is energized when the E-Bypass System is running. The System Run relay provides an output when the motor is running whether powered by the ACH550 drive or the bypass.
Separate normally open Drive Run and Bypass Run contacts can be created by using the System Run relay with the Mode / Override relay. This is done by using X2:21(COM) and connecting X2:20(NO) to X2:27(COM). X2:25(NC) becomes the Drive Run contact and X2:26(NO) becomes the Bypass Run contact. This configuration provides outputs that are closed when the motor is running. To do this the Mode / Override relay must be configured for Mode relay operation. See "E-Bypass Jumper, Switch and Pot Settings" on page 4-2.
System Started Form C contacts of a System Started relay are provided at bypass terminals X2:22(NC), X2:23(NO) and X2:24(COM). Three conditions must be met in order for the relay to energize. 1) a Start command must be present. 2) the Safety Interlock input contact must be closed and 3) there can be no fault present in the system.
The System Started relay is ideal for use in damper actuator circuits.
Input Disconnect and Bypass Configurations for ACH550 3-25

Chapter 3 – Installation Instructions
Mode/Override Form C contacts of a Mode / Override relay are provided at bypass terminals X2:25(NC), X2:26(NO) and X2:27(COM). The Mode / Override relay is a configurable relay. The function of the relay is selectable between Mode and Override operation. If the Mode / Override relay is configured for Mode operation (Default), the relay is energized when the Bypass mode is selected and de-energized when the Drive mode is selected. If the Mode / Override relay is configured for Override operation, the relay is energized when the Override mode is selected and de-energized in all other modes. See "E-Bypass Jumper, Switch and Pot Settings" on page 4-2.
Bypass Fault Form C contacts of a Bypass Fault relay are provided at bypass terminals X2:16(NC), X2:17(NO) and X2:18(COM). The Bypass Fault relay is energized when the bypass is energized and not faulted and the underload/overload protection is reset.
Hand/Off/Auto Form C contacts of a Hand/Off/Auto relay are provided at bypass terminals X2:31(NC), X2:32(NO) and X2:33(COM). The Hand/Off/Auto relay is energized when the bypass is in the Auto mode and de-energized in the Hand mode and when the bypass is Off.
Relay Contact Ratings The relay contact ratings are:
Maximum Voltage: 30 VDC / 125 VAC
Maximum Switching Current: 8 A at 24 VDC, 0.4 A at 125 VAC
Maximum Continuous Current: 2 A rms
If the relay contacts are used to control inductive loads, such as the coils of relays or contactors, some form of noise suppression must be provided at the load. This is to reduce the electrical noise that could interfere with the electronics in the drive, as well as increase the life of the contacts in the relay.
DC coils should be suppressed with a diode, although this is not required because of the small amount of noise generated by these type of circuits. If a diode is used, it should have a voltage rating greater than or equal to the supply voltage rating.
Wiring Practices The external control wiring to X1 and X2 must not be run in the same metallic conduit or raceway with any high power wiring. The external speed reference signal must be wired using a twisted pair shielded cable. The shield connection must be terminated at the ground terminal provided (X1:1). The other end of the shield should be cut and taped back at the signal source.
3-26 Input Disconnect and Bypass Configurations for ACH550

Chapter 4 – Start-up Procedure
This chapter explains how to inspect the installation and how to start up the ACH550 with E-Bypass.
Safety Precautions Before start-up, read and follow the precautions listed below.
• After the supply voltage is disconnected from the input, the DC Bus capacitors should discharge to a safe voltage in about five minutes.
• To ensure that the voltage level is safe, measure the voltage between the DC Bus terminals, UC+ and UC- inside the ACH550 drive unit. The testing meter must be rated for 1000 VDC.
WARNING! When the ACH550 with E-Bypass is connected to the line power, the Motor Terminals T1, T2, and T3 are live even if the motor is not running. Do not make any connections when the ACH550 with E-Bypass is connected to the line. Disconnect and lock out power to the drive before servicing the drive. Failure to disconnect power may cause death or serious injury.
Installation Inspection Inspect the mechanical and electrical installation of the ACH550 with E-Bypass for compliance with your local electrical installation regulations and codes.
Note: Do not connect the motor wires before proceeding with the Keypad Control Test with Motor Disconnected. Refer to Keypad Control Tests in this chapter.
After installation, inspect the following:
• ACH550 with E-Bypass and motor grounding.
• Supply and motor wire size and connections.
• Control cable connections, wire shield grounding, and control cable location away from the power wires.
• Quantity and quality of cooling air for the ACH550 with E-Bypass.
Connect the ACH550 with E-Bypass to supply voltage. Check that the voltage between L1 – L2, L1 – L3, and L2 – L3 is VN + 10%.
Refer to "Chapter 3 – Installation Instructions" in this manual for detailed installation instructions and requirements.
Input Disconnect and Bypass Configurations for ACH550 4-1

Chapter 4 – Start-up Procedure
E-Bypass Jumper, Switch and Pot Settings
Figure 4-1 shows the locations of the jumpers, DIP switch and potentiometers on the E-Bypass control board. The functions and settings of these items are explained in the following paragraphs.
Figure 4-1 E-Bypass Control Board
DIP Switch Settings The DIP switch is used to configure the bypass overload protection, select the Mode / Override relay’s function and enable the automatic bypass feature. Match the DIP Switch Codes to your drive model using Table 4-1 or Table 4-2 and Table 4-3.
BP0091
4-2 Input Disconnect and Bypass Configurations for ACH550

Chapter 4 – Start-up Procedure
Table 4-1 208 - 240 Volt, Codes for Overload Trip Current DIP Switch
208 - 240 Volt
HP Identification Frame Size
Switch Code
1 ACH550-xx-04A6-2 R1 A
1.5 ACH550-xx-06A6-2 R1 A
2 ACH550-xx-07A5-2 R1 A
3 ACH550-xx-012A-2 R1 A
5 ACH550-xx-017A-2 R1 B
7.5 ACH550-xx-024A-2 R2 B
10 ACH550-xx-031A-2 R3 C
15 ACH550-xx-046A-2 R3 D
20 ACH550-xx-059A-2 R3 D
25 ACH550-xx-075A-2 R4 D
30 ACH550-xx-088A-2 R4 F
40 ACH550-xx-114A-2 R4 F
50 ACH550-xx-143A-2 R6 G
60 ACH550-xx-178A-2 R6 G
75 ACH550-xx-221A-2 R6 G
100 ACH550-xx-248A-2 R6 G
Input Disconnect and Bypass Configurations for ACH550 4-3

Chapter 4 – Start-up Procedure
Table 4-2 208 - 240 Volt, Codes for Overload Trip Current DIP Switch
Table 4-3 DIP Switch Settings
Default settings in (parentheses).
208 - 240 Volt
HP Identification Frame Size
Switch Code
1 ACH550-xx-04A6-2 R1 A
1.5 ACH550-xx-06A6-2 R1 A
2 ACH550-xx-07A5-2 R1 A
3 ACH550-xx-012A-2 R1 A
5 ACH550-xx-017A-2 R1 B
7.5 ACH550-xx-024A-2 R2 B
10 ACH550-xx-031A-2 R3 C
15 ACH550-xx-046A-2 R3 D
20 ACH550-xx-059A-2 R3 D
25 ACH550-xx-075A-2 R4 D
30 ACH550-xx-088A-2 R4 F
40 ACH550-xx-114A-2 R4 F
50 ACH550-xx-143A-2 R6 G
60 ACH550-xx-178A-2 R6 G
75 ACH550-xx-221A-2 R6 G
100 ACH550-xx-248A-2 R6 G
Switch Position
Switch Setting Configurations
Switch Code
A B C D E F G H
1 (OFF) / ON = Automatic Transfer Bypass Feature (OFF) / ON
2 (OFF) / ON = Mode / Override Relay RO4 (Mode) / Override
3 RESERVED (OFF)
4 OFF / (ON) = NEMA Class 30 / (NEMA Class 20) overload trip curve
5 RESERVED (OFF)
6 OFF OFF OFF OFF ON ON ON ON
7 OFF OFF ON ON OFF OFF ON ON
8 OFF ON OFF ON OFF ON OFF ON
4-4 Input Disconnect and Bypass Configurations for ACH550

Chapter 4 – Start-up Procedure
Output Contactor Control
In the unlikely event of failure in the bypass control electronics, the user can engage the drive output contactor without the control electronics by moving jumper J2 to the position as shown in Figure 4-1. When the jumper is in the Output Contactor position, the Drive contactor is energized and the Bypass contactor is de-energized. The contactors, and therefore the system, are not controlled by the bypass electronics when jumper J2 is in the Output Contactor position. The system is incapable of Bypass or Override operation in this configuration.
Overload Trip Current Adjustment
Potentiometer
The overload protection trip current must be adjusted to the motor nameplate current using the P1 adjustment potentiometer located in the lower right hand area of the bypass control board as shown in Figure 4-1. Table 4-4 shows the trip currents for the various frame sizes for potentiometer settings of 10 to 100.
Table 4-4 Overload Trip Current Potentiometer Settings
Underload Trip Current Adjustment
Potentiometer
The underload protection trip current must be adjusted to a percentage of the motor nameplate current using the P2 adjustment potentiometer located in the lower right hand area of the bypass control board as shown in Figure 4-1. Potentiometer settings are adjustable from 0 to 100% of the P1 (overload trip) setting. The default setting is 0% which effectively removes the underload protection trip feature from the system.
Circuit Breaker Settings The circuit breakers on ACH550 E-Bypasses with output ratings above 120 amps have adjustable switch settings for instantaneous and overload current protection. The factory default settings are practical for most applications. Refer to the ABB SACE Instruction Sheet supplied with your equipment for additional information on the adjustment of these settings.
PotentiometerSetting
Overload Trip Current (Values in Amps)
Switch Code
A B C D E F G H
10 1.2 2.5 3.8 7.5 10.4 15.5 30.0 48.8
20 2.4 5.0 7.6 15.0 20.8 31.0 60.0 97.6
30 3.6 7.5 11.4 22.5 31.2 46.5 90.0 146.4
40 4.8 10.0 15.2 30.0 41.6 62.0 120.0 195.2
50 6.0 12.5 19.0 37.5 52.0 77.5 150.0 244.0
60 7.2 15.0 22.8 45.0 62.4 93.0 180.0 292.8
70 8.4 17.5 26.6 52.5 72.8 108.5 210.0 341.6
80 9.6 20.0 30.4 60.0 83.2 124.0 240.0 390.4
90 10.8 22.5 34.2 67.5 93.6 139.5 270.0 439.2
100 12.0 25.0 38.0 75.0 104.0 155.0 300.0 488.0
Input Disconnect and Bypass Configurations for ACH550 4-5

Chapter 4 – Start-up Procedure
Macros and Parameter Settings
Apply power to the E-Bypass unit. The display should show the operating status of the drive. If the motor is a standard 208 V, 60 Hz motor connected to a 208 V drive or a 480 V, 60 Hz motor connected to a 480 V drive, the default parameter settings should be suitable for the initial tests described below. If the motor’s rating is not 208 V or 480 V, 60 Hz, the MOTOR NOM VOLT and MOTOR NOM FREQ parameters will need to be properly set before proceeding. Refer to the ACH550-UH User’s Manual and set the parameters as required.
The only macro that provides the proper configuration settings by default is the E-Bypass macro. If any other macro will be used, the selected macro can be set after completing the initial tests. When using any other macro the following parameter values must be set or portions of the E-Bypass will not function properly:
• Parameter 1001 must be set to “DI1”
• Parameter 1002 must be set to “DI1”
• Parameter 1601 must be set to “DI2”
• Parameter 1401 (RO1) must be set to “Started”
• Parameter 1403 (RO3) must be set to “Fault (-1)”
Refer to the ACH550-UH User’s Manual for additional information.
Keypad Control Tests
Motor Disconnected from the ACH550
with E-Bypass
After setting the Start-up Data parameters, test and become familiar with the operation of the ACH550 Drive with E-Bypass without the motor connected as follows:
1. Disconnect and lock out power to the E-Bypass unit, wait at least five minutes after disconnecting power.
2. Disconnect the motor from the E-Bypass unit.
3. Apply power to the E-Bypass unit by turning on the branch circuit disconnect device and the bypass disconnect switch or circuit breaker.
4. The ACH550 Control Panel display should be illuminated. On the bypass keypad, the Ready LED and Enable LED should be illuminated. If the Enable LED is not illuminated, check to see that closed contacts or jumpers connect terminal X2:2 and X2:3, on the bypass control board, to terminal X2:15.
5. Either the Drive Selected or Bypass Selected LED should be illuminated. Pressing the Drive Select or Bypass Select key should switch the bypass back and forth between the Drive mode and the Bypass mode as indicated by the LEDs above each button. Check that the bypass keypad switches the system between modes. Leave the system in the Bypass mode when proceeding to the next step.
4-6 Input Disconnect and Bypass Configurations for ACH550

Chapter 4 – Start-up Procedure
6. Check to see that pressing the Auto key on the bypass keypad causes the Auto LED to be illuminated, pressing the Hand key causes the Hand LED to be illuminated and pressing the OFF key causes either the Hand or Auto LED to go off. Leave the Hand and Auto LEDs off when proceeding to the next step.
7. For Steps 8 through 13 Parameter 9904 must be set to “Scalar:Freq”. After successful completion of Step 12, Parameter 9904 may be set to “Vector:Speed” if very specific application requirements make it necessary to use this type of motor control. Operation using the “Vector:Speed” setting is unnecessary for control of almost all fan and pump applications. Refer to the ACH550-UH User's Manual for details on setting parameters.
8. Press the Drive Select key on the bypass keypad. The Drive Select LED should be illuminated.
9. Press the HAND key on the ACH550 keypad. Note that the bottom line of the display indicates “HAND” and “RUN” and a Right Arrow. The Drive Run LED on the Bypass keypad should be illuminated.
10. Press the UP arrow. Note that the reference frequency indication in the top line of the display increases from “0.0 Hz.” The large actual output frequency indication in the center line of the display should also increase from “0.0 Hz.”
11. In the top line of the display, the output current indication should indicate “0.0 A” and the torque indication should indicate “0%.”
12. Press the DOWN arrow until the frequency indications return to “0.0 Hz”
13. Press the OFF key. Note that the bottom line of the display indicates “Off.”
If the ACH550 Drive and E-Bypass operate according to these steps, disconnect and lock out power to prepare for the next test.
WARNING! Wait at least five minutes after disconnecting power from the drive before you attempt to service the drive. Bus capacitors in the intermediate DC circuit must discharge before servicing the drive. Check for zero volts at Terminals UC+ and UC-. Meter must be rated for 1000 VDC.
If the drive does not operate according to these steps, refer to the ACH550-UH User’s Manual.
Motor Connected to the E-Bypass
After successfully testing the drive with the motor disconnected, continue testing the drive as follows:
1. Disconnect and lock out power to the E-Bypass unit.
2. Connect the motor to the output terminals.
Input Disconnect and Bypass Configurations for ACH550 4-7

Chapter 4 – Start-up Procedure
CAUTION: If the Fireman’s Override (Override 1) input contact is closed the motor will start across the line as soon as power is applied. If the Safety Interlock and Run Enable input contacts are closed and the Bypass Override (Override 2) input contact is closed the motor will start across the line as soon as power is applied.
If the Start/Stop, Safety Interlock and Run Enable input contacts are closed and the system is in the Bypass mode and in either Hand or Auto, the motor will start across the line as soon as power is applied.
If the Start/Stop, Safety Interlock and Run Enable input contacts are closed and the system is in the Drive mode with the drive in either Hand or Auto mode, the motor will start on the drive as soon as power is applied. In order to prevent the motor from starting, the system should be in the Drive mode and the drive should be OFF when the power is disconnected at the end of the previous series of tests with the motor disconnected.In order to prevent the motor from running without disconnecting the motor, open the Run Enable and Safety Interlock contacts on bypass control board terminals X2:2, X2:3 and X2:4 before applying power. Set the bypass to Drive mode and the drive to OFF.
3. Apply power to the E-Bypass unit.
4. Press the Hand key on the ACH550 control panel.
CAUTION: Check motor rotation direction as soon as the motor begins to move. If motor does not rotate in the correct direction, shut down the drive, disconnect and lock out power to the drive and wait five minutes. Swap any two motor output wires (T1, T2, and T3). Incorrect motor rotation direction may cause equipment damage.
5. Slowly increase the output frequency by pressing the UP ARROW key. Verify that motor speed varies as frequency varies.
6. Increase the speed to 60 Hz or the highest safe operating speed.
7. Measure the output current in all three phases. The current should be balanced, and should not exceed the motor or drive rating.
8. Press the OFF key on the ACH550 control panel. The motor should stop.
4-8 Input Disconnect and Bypass Configurations for ACH550

Chapter 4 – Start-up Procedure
CAUTION: Check the motor rotation direction in bypass.
Press the OFF key and then the Bypass Select key on the bypass keypad. Press the Hand key and then quickly press the OFF key to “bump” the motor. If the motor turns in the wrong direction, swap any two input power leads at the disconnect switch. Do not swap the motor leads.
If the drive does not operate according to these steps, refer to the ACH550-UH User’s Manual.
If the drive operates according to these steps, your ACH550 with E-Bypass is ready to use with preset or modified macro settings. Refer to the ACH550-UH User’s Manual for programming instructions.
Input Disconnect and Bypass Configurations for ACH550 4-9

Chapter 4 – Start-up Procedure
4-10 Input Disconnect and Bypass Configurations for ACH550

Index
Aair flow . . . . . . . . . . . . . . . . . . . . . . . . . . . . . . . . . 3-2analog inputs, J1 setting . . . . . . . . . . . . . . . . . . 3-24applications
blank form . . . . . . . . . . . . . . . . . . . . . . . . . . 2-17damper actuator control . . . . . . . . . . . . . . . 2-15external 115 VAC . . . . . . . . . . . . . . . . . . . . 2-14HVAC hand-auto. . . . . . . . . . . . . . . . . . . . . 3-23outputs routed through drive. . . . . . . . . . . . 2-16separate drive & bypass run commands. . . 2-13typical, diagrams. . . . . . . . . . . . . . . . . . . . . 2-12
audience, intended . . . . . . . . . . . . . . . . . . . . . . . 1-1auto key. . . . . . . . . . . . . . . . . . . . . . . . . . . . . . . . 2-7auto LED . . . . . . . . . . . . . . . . . . . . . . . . . . . . . . . 2-7auto mode . . . . . . . . . . . . . . . . . . . . . . . . . . . . . . 2-8automatic bypass . . . . . . . . . . . . . . . . . . . . . . . . 2-9automatic transfer LED . . . . . . . . . . . . . . . . . . . . 2-7
Bbypass
automatic bypass . . . . . . . . . . . . . . . . . . . . . 2-9contactors, description . . . . . . . . . . . . . . . . . 2-5control board, description . . . . . . . . . . . . . . . 2-9drive/bypass mode transfers. . . . . . . . . . . . . 2-9fault contact, wiring . . . . . . . . . . . . . . . . . . . 3-26fault LED . . . . . . . . . . . . . . . . . . . . . . . . . . . . 2-6jumpering over e-bypass, description . . . . . . 2-9mode. . . . . . . . . . . . . . . . . . . . . . . . . . . . . . . 2-7run LED. . . . . . . . . . . . . . . . . . . . . . . . . . . . . 2-7select key . . . . . . . . . . . . . . . . . . . . . . . . . . . 2-7selected LED . . . . . . . . . . . . . . . . . . . . . . . . 2-6
Ccircuit breaker
door interlocked . . . . . . . . . . . . . . . . . . . . . . 2-3settings . . . . . . . . . . . . . . . . . . . . . . . . . . . . . 4-5
configurationstypical, diagrams. . . . . . . . . . . . . . . . . . . . . 2-12
contactorbypass, description . . . . . . . . . . . . . . . . . . . . 2-5jumper, description . . . . . . . . . . . . . . . . . . . . 2-9
contactor jumper, setting . . . . . . . . . . . . . . . . . . . 4-5control identification. . . . . . . . . . . . . . . . . . . . . . . 2-1control panel, ACH550 . . . . . . . . . . . . . . . . . . . . 2-5control wiring . . . . . . . . . . . . . . . . . . . . . . . . . . . 3-21cooling requirements . . . . . . . . . . . . . . . . . . . . . . 3-2
Ddescription of operation . . . . . . . . . . . . . . . . . . . . 2-5digital output
safety interlock, description. . . . . . . . . . . . . 2-11dimensions . . . . . . . . . . . . . . . . . . . . . . . . . . . . . 3-5
DIP switchlocation. . . . . . . . . . . . . . . . . . . . . . . . . . . . . 4-2settings. . . . . . . . . . . . . . . . . . . . . . . . . . . . . 4-2
disconnect switch . . . . . . . . . . . . . . . . . . . . . . . . 2-3drive
fault contact, wiring . . . . . . . . . . . . . . . . . . 3-25fault LED . . . . . . . . . . . . . . . . . . . . . . . . . . . 2-7fault relay, description . . . . . . . . . . . . . . . . 2-10LED . . . . . . . . . . . . . . . . . . . . . . . . . . . . . . . 2-6mode . . . . . . . . . . . . . . . . . . . . . . . . . . . . . . 2-7select key . . . . . . . . . . . . . . . . . . . . . . . . . . . 2-7selected LED . . . . . . . . . . . . . . . . . . . . . . . . 2-6
Eenable LED. . . . . . . . . . . . . . . . . . . . . . . . . . . . . 2-6environment . . . . . . . . . . . . . . . . . . . . . . . . . . . . 3-1
Ffireman’s override
contact, wiring . . . . . . . . . . . . . . . . . . . . . . 3-25mode operation . . . . . . . . . . . . . . . . . . . . . . 2-8relay, description . . . . . . . . . . . . . . . . . . . . 2-10
fusesdrive (240 v), input fuse rating table. . . . . . . 2-3drive (480 v), input fuse, rating table . . . . . . 2-4drive input fuses . . . . . . . . . . . . . . . . . . . . . . 2-3
Hhand key . . . . . . . . . . . . . . . . . . . . . . . . . . . . . . . 2-7hand LED . . . . . . . . . . . . . . . . . . . . . . . . . . . . . . 2-7hand mode . . . . . . . . . . . . . . . . . . . . . . . . . . . . . 2-8hand/off/auto contact, wiring. . . . . . . . . . . . . . . 3-26heat dissipation. . . . . . . . . . . . . . . . . . . . . . . . . . 3-2heat sink, cleaning . . . . . . . . . . . . . . . . . . . . . . . 3-3
Iidentification, control type code . . . . . . . . . . . . . 2-1input power
circuit breaker. . . . . . . . . . . . . . . . . . . . . . . . 2-3description . . . . . . . . . . . . . . . . . . . . . . . . . . 2-3disconnect switch . . . . . . . . . . . . . . . . . . . . . 2-3drive input fuses . . . . . . . . . . . . . . . . . . . . . . 2-3
inputsACH550 drive. . . . . . . . . . . . . . . . . . . . . . . 2-11relay contacts . . . . . . . . . . . . . . . . . . . . . . . 2-10
inspectionof installation . . . . . . . . . . . . . . . . . . . . . . . . 4-1unpacking. . . . . . . . . . . . . . . . . . . . . . . . . . . 3-4
I-1 Input Disconnect and Bypass Configurations for ACH550

Index
installationclearance space requirements . . . . . . . . . . . 3-4electrical . . . . . . . . . . . . . . . . . . . . . . . . . . . 3-11environment . . . . . . . . . . . . . . . . . . . . . . . . . 3-1inspection of . . . . . . . . . . . . . . . . . . . . . . . . . 4-1location . . . . . . . . . . . . . . . . . . . . . . . . . . . . . 3-4mounting unit . . . . . . . . . . . . . . . . . . . . . . . . 3-5planning . . . . . . . . . . . . . . . . . . . . . . . . . . . . 3-1
installation planningcooling . . . . . . . . . . . . . . . . . . . . . . . . . . . . . 3-1environment . . . . . . . . . . . . . . . . . . . . . . . . . 3-1
insulation checkmotor cable . . . . . . . . . . . . . . . . . . . . . . . . . 3-20
Jjumper
analog input type . . . . . . . . . . . . . . . . . . . . 3-24contactor control, description . . . . . . . . . . . . 2-9e-bypass J2, J3 location . . . . . . . . . . . . . . . . 4-2output contactor, setting . . . . . . . . . . . . . . . . 4-5
Kkey
auto. . . . . . . . . . . . . . . . . . . . . . . . . . . . . . . . 2-7bypass select . . . . . . . . . . . . . . . . . . . . . . . . 2-7drive select . . . . . . . . . . . . . . . . . . . . . . . . . . 2-7hand . . . . . . . . . . . . . . . . . . . . . . . . . . . . . . . 2-7off . . . . . . . . . . . . . . . . . . . . . . . . . . . . . . . . . 2-7reset . . . . . . . . . . . . . . . . . . . . . . . . . . . . . . . 2-7
keypadbypass control. . . . . . . . . . . . . . . . . . . . . . . . 2-6description of operation . . . . . . . . . . . . . . . . 2-6keypad control tests . . . . . . . . . . . . . . . . . . . 4-6operator control overview . . . . . . . . . . . . . . . 2-5
LLED
auto. . . . . . . . . . . . . . . . . . . . . . . . . . . . . . . . 2-7automatic transfer . . . . . . . . . . . . . . . . . . . . . 2-7bypass fault. . . . . . . . . . . . . . . . . . . . . . . . . . 2-6bypass run . . . . . . . . . . . . . . . . . . . . . . . . . . 2-7bypass selected . . . . . . . . . . . . . . . . . . . . . . 2-6drive fault . . . . . . . . . . . . . . . . . . . . . . . . . . . 2-7drive running . . . . . . . . . . . . . . . . . . . . . . . . . 2-6drive selected . . . . . . . . . . . . . . . . . . . . . . . . 2-6enable . . . . . . . . . . . . . . . . . . . . . . . . . . . . . . 2-6hand . . . . . . . . . . . . . . . . . . . . . . . . . . . . . . . 2-7ready. . . . . . . . . . . . . . . . . . . . . . . . . . . . . . . 2-6
liability, information . . . . . . . . . . . . . . . . . . . . . . . 1-2line reactor. . . . . . . . . . . . . . . . . . . . . . . . . . . . . . 2-4location
connectors, diagrams . . . . . . . . . . . . . . . . . 3-15e-bypass dip sw . . . . . . . . . . . . . . . . . . . . . . 4-2e-bypass jumpers . . . . . . . . . . . . . . . . . . . . . 4-2e-bypass pots . . . . . . . . . . . . . . . . . . . . . . . . 4-2mounting . . . . . . . . . . . . . . . . . . . . . . . . . . . . 3-4
Mmacro
parameter settings for non-e-bypass . . . . . . 4-6manual, how to use . . . . . . . . . . . . . . . . . . . . . . . 1-1manuals. . . . . . . . . . . . . . . . . . . . . . . . . . . . . . . . 0-ii
mechanical installation . . . . . . . . . . . . . . . . . . . . 3-5mode
auto . . . . . . . . . . . . . . . . . . . . . . . . . . . . . . . 2-8bypass mode . . . . . . . . . . . . . . . . . . . . . . . . 2-7drive . . . . . . . . . . . . . . . . . . . . . . . . . . . . . . . 2-7drive/bypass mode transfers . . . . . . . . . . . . 2-9fireman’s override, operation . . . . . . . . . . . . 2-8hand . . . . . . . . . . . . . . . . . . . . . . . . . . . . . . . 2-8off . . . . . . . . . . . . . . . . . . . . . . . . . . . . . . . . . 2-9operating mode descriptions . . . . . . . . . . . . 2-7override 1, description . . . . . . . . . . . . . . . . . 2-8override 2, description . . . . . . . . . . . . . . . . . 2-8override 2, operation . . . . . . . . . . . . . . . . . . 2-8
mode overridecontact, wiring . . . . . . . . . . . . . . . . . . . . . . 3-26
motorrotation direction. . . . . . . . . . . . . . . . . . . . . . 4-8
motor cableinsulation check . . . . . . . . . . . . . . . . . . . . . 3-20maximum length. . . . . . . . . . . . . . . . . . . . . 3-20
motor parametersettings. . . . . . . . . . . . . . . . . . . . . . . . . . . . . 4-6
motor protectionoverload relay. . . . . . . . . . . . . . . . . . . . . . . . 2-5reset key. . . . . . . . . . . . . . . . . . . . . . . . . . . . 2-7short circuit and ground fault . . . . . . . . . . . . 2-3
mounting location . . . . . . . . . . . . . . . . . . . . . . . . 3-4
Nnomenclature, terminal block . . . . . . . . . . . . . . . 1-1
Ooff key . . . . . . . . . . . . . . . . . . . . . . . . . . . . . . . . . 2-7off mode . . . . . . . . . . . . . . . . . . . . . . . . . . . . . . . 2-9operator control
detailed description of operation . . . . . . . . . 2-5overview . . . . . . . . . . . . . . . . . . . . . . . . . . . . 2-5
optioncircuit breaker. . . . . . . . . . . . . . . . . . . . . . . . 2-3fieldbus adapter module. . . . . . . . . . . . . . . . 2-5
outputsACH550 drive. . . . . . . . . . . . . . . . . . . . . . . 2-11relay contacts . . . . . . . . . . . . . . . . . . . . . . . 2-10
overloadpot location. . . . . . . . . . . . . . . . . . . . . . . . . . 4-2relay reset key . . . . . . . . . . . . . . . . . . . . . . . 2-7relay, motor protection . . . . . . . . . . . . . . . . . 2-5trip current pot, adjustment . . . . . . . . . . . . . 4-5
override 1contact wiring . . . . . . . . . . . . . . . . . . . . . . . 3-25description . . . . . . . . . . . . . . . . . . . . . . . . . . 2-8relay, description . . . . . . . . . . . . . . . . . . . . 2-10
override 2contact, wiring . . . . . . . . . . . . . . . . . . . . . . 3-25mode operation . . . . . . . . . . . . . . . . . . . . . . 2-8relay, description . . . . . . . . . . . . . . . . . . . . 2-10
Pparameter
config for non-e-bypass macro. . . . . . . . . . . 4-6
I-2 Input Disconnect and Bypass Configurations for ACH550

Index
parametersmatching drive to motor. . . . . . . . . . . . . . . . . 4-6
planning . . . . . . . . . . . . . . . . . . . . . . . . . . . . . . . . 3-1
Rratings
relay contacts . . . . . . . . . . . . . . . . . . . . . . . 3-26ready LED . . . . . . . . . . . . . . . . . . . . . . . . . . . . . . 2-6relay contact
drive fault, description . . . . . . . . . . . . . . . . . 2-10fireman’s override, description . . . . . . . . . . 2-10input descriptions . . . . . . . . . . . . . . . . . . . . 2-10output descriptions . . . . . . . . . . . . . . . . . . . 2-10override 2, description. . . . . . . . . . . . . . . . . 2-10ratings . . . . . . . . . . . . . . . . . . . . . . . . . . . . . 3-26run enable, description . . . . . . . . . . . . . . . . 2-10safety interlock, description. . . . . . . . . . . . . 2-10start/stop, description . . . . . . . . . . . . . . . . . 2-10
relay contactswiring. . . . . . . . . . . . . . . . . . . . . . . . . . . . . . 3-24
reset key . . . . . . . . . . . . . . . . . . . . . . . . . . . . . . . 2-7rotation, check direction. . . . . . . . . . . . . . . . . . . . 4-8run enable contact, wiring . . . . . . . . . . . . . . . . . 3-24run enable relay, description . . . . . . . . . . . . . . . 2-10
Ssafety . . . . . . . . . . . . . . . . . . . . . . . . . . . . . . . . . . 0-iii
start up instructions . . . . . . . . . . . . . . . . . . . . 4-1safety interlock
contact, wiring . . . . . . . . . . . . . . . . . . . . . . . 3-24output, description. . . . . . . . . . . . . . . . . . . . 2-11
safety interlock relaydescription. . . . . . . . . . . . . . . . . . . . . . . . . . 2-10
startstart-up safety . . . . . . . . . . . . . . . . . . . . . . . . 4-1
start/stop contact, wiring . . . . . . . . . . . . . . . . . . 3-24start/stop relay, description . . . . . . . . . . . . . . . . 2-10starting
on application of power . . . . . . . . . . . . . . . . . 2-9switch
see DIP switchsystem run contact, wiring . . . . . . . . . . . . . . . . . 3-25system started contact, wiring . . . . . . . . . . . . . . 3-25
Tterminal block nomenclature . . . . . . . . . . . . . . . . 1-1terminals
max. wire size . . . . . . . . . . . . . . . . . . . . . . . 3-11torque . . . . . . . . . . . . . . . . . . . . . . . . . . . . . 3-11
testskeypad control. . . . . . . . . . . . . . . . . . . . . . . . 4-6motor disconnected. . . . . . . . . . . . . . . . . . . . 4-6
transfer LED . . . . . . . . . . . . . . . . . . . . . . . . . . . . 2-7type code . . . . . . . . . . . . . . . . . . . . . . . . . . . . . . . 2-1
Uunderload
trip current pot, adjustment . . . . . . . . . . . . . . 4-5underload pot
location . . . . . . . . . . . . . . . . . . . . . . . . . . . . . 4-2
Wwarning
automatic start up. . . . . . . . . . . . . . . . . . . . . 0-iiidangerous voltages . . . . . . . . . . . . . . . . . . . 0-iiilisting . . . . . . . . . . . . . . . . . . . . . . . . . . . . . . 0-iiinot field repairable . . . . . . . . . . . . . . . . . . . . 0-iiiparallel control connections . . . . . . . . . . . . . 0-iiiqualified installer. . . . . . . . . . . . . . . . . . . . . . 0-iii
warranty, information . . . . . . . . . . . . . . . . . . . . . 1-2weight . . . . . . . . . . . . . . . . . . . . . . . . . . . . . . . . . 3-5wiring
bypass fault contact . . . . . . . . . . . . . . . . . . 3-26cable entries . . . . . . . . . . . . . . . . . . . . . . . . 3-11connector locations diagrams. . . . . . . . . . . 3-15control. . . . . . . . . . . . . . . . . . . . . . . . . . . . . 3-21drive fault contact . . . . . . . . . . . . . . . . . . . . 3-25fireman’s override contact . . . . . . . . . . . . . 3-25hand/off/auto contact . . . . . . . . . . . . . . . . . 3-26input power. . . . . . . . . . . . . . . . . . . . . . . . . 3-18mode override contact . . . . . . . . . . . . . . . . 3-26motor . . . . . . . . . . . . . . . . . . . . . . . . . . . . . 3-19output . . . . . . . . . . . . . . . . . . . . . . . . . . . . . 3-19override 2 contact. . . . . . . . . . . . . . . . . . . . 3-25practices . . . . . . . . . . . . . . . . . . . . . . . . . . . 3-26relay contacts . . . . . . . . . . . . . . . . . . . . . . . 3-24requirements, power cable . . . . . . . . . . . . . . 3-4run enable contact . . . . . . . . . . . . . . . . . . . 3-24safety interlock contact. . . . . . . . . . . . . . . . 3-24start/stop contact . . . . . . . . . . . . . . . . . . . . 3-24system run contact . . . . . . . . . . . . . . . . . . . 3-25system started contact . . . . . . . . . . . . . . . . 3-25terminal sizes . . . . . . . . . . . . . . . . . . . . . . . 3-11
Input Disconnect and Bypass Configurations for ACH550 I-3

ABB OyAC DrivesP.O. Box 184FIN-00381 HELSINKIFINLANDTelephone +358 10 22 11Telefax +358 10 22 22681Internet http://www.abb.com
ABB Inc. Automation TechnologiesDrives & Machines16250 West Glendale DriveNew Berlin, WI 53151USATelephone 262 785-3200
800 HELP-365Telefax 262 780-5135
3AU
A00
0000
6289
RE
V A
/ E
NE
FFE
CTI
VE
: AP
R 2
, 200
4S
UP
ER
SE
DE
S: N
ON
E