drive safely and enjoy your kia! ki, bl-eng (can) · pdf file · 2009-01-15kia,the...
TRANSCRIPT

KIA, THE COMPANY
Congratulations! Your selection of a Kia was a wise investment. It will give you years of driv-ing pleasure. Now that you are the owner of a Kia vehicle, you’ll probably be asked a lot ofquestions about your vehicle and the company like “What is a Kia?”, “Who is Kia?”, “Whatdoes ‘Kia’ mean?”.Here are some answers. First, Kia is the oldest car company in Korea. It is a company thathas thousands of employees focused on building high-quality vehicles at affordable prices.The first syllable, Ki, in the word “Kia” means “to arise from to the world” or “to come up outof to the world.” The second syllable, a, means “Asia.” So, the word Kia, means “to arisefrom” or “to come up out of Asia to the world.”
Drive safely and enjoy your Kia!
BL-ENG (CAN)-foreword.qxd 8/8/2005 10:40 AM Page 1

Thank you for choosing a Kia vehicle.When you require service, remember that your dealerknows your vehicle best. Your dealer has factory-trainedtechnicians, recommended special tools, genuine Kiareplacement parts and is dedicated to your completesatisfaction.Because subsequent owners require this importantinformation as well, this publication should remain withthe vehicle if it is sold.This manual will familiarize you with operational, main-tenance and safety information about your new vehicle.It is supplemented by a Warranty & ConsumerInformation Manual that provides important informationon all warranties regarding your vehicle. If your vehicle isequipped with an audio system, you will also receive aKia Integrated Audio System Manual. We urge you toread these manuals carefully.Kia offers a great variety of options, components andfeatures for its various models.
Therefore, the equipment described in this manual,along with the various illustrations, may not all be appli-cable to your particular vehicle. The information andspecifications provided in this manual were accurate atthe time of printing. Kia reserves the right to discontinueor change specifications or design at any time withoutnotice and without incurring any obligation. If you havequestions, always check with your Kia Dealer.We assure you of our continuing interest in your motor-ing pleasure and satisfaction in your Kia vehicle.
© 2005 Kia Motors Corp.All rights reserved. Reproduction by any means, elec-tronic or mechanical, including photocopying, recording,or by any information storage and retrieval system ortranslation in whole or part is not permitted without writ-ten authorization from Kia Motors Corporation.Printed in Korea
FOREWORD
i
BL-ENG (CAN)-foreword.qxd 8/8/2005 10:40 AM Page 2

ii
TABLE OF CONTENTS
INTRODUCTION 1
YOUR VEHICLE AT A GLANCE 2
KNOWING YOUR VEHICLE 3
DRIVING YOUR VEHICLE 4
DRIVING TIPS 5
IN CASE OF AN EMERGENCY 6
MAINTENANCE 7
SPECIFICATIONS 8
INDEX 9
BL-ENG (CAN)-foreword.qxd 8/8/2005 10:40 AM Page 3

1-1
INTRODUCTION
How to Use This Manual . . . . . . . . . . . . . . . . . . . . . . . . . . . . . 1-2
Vehicle Handling Instruction . . . . . . . . . . . . . . . . . . . . . . . . . 1-3
Vehicle Break-In Process . . . . . . . . . . . . . . . . . . . . . . . . . . . . 1-3
1
BL-ENG (CAN)-1.qxd 8/8/2005 10:42 AM Page 1

HOW TO USE THIS MANUALWe want to help you get the greatestpossible driving pleasure from yourvehicle. Your Owner’s Manual canassist you in many ways. For yoursafety and the safety of your pas-sengers, we strongly urge that youread the entire manual. In order toavoid death or injury, pleasereview the WARNING and CAU-TION sections contained through-out the manual. The WARNING andCAUTION sections are easily rec-ognized by their special markingslisted on this page.Illustrations complement the words inthis manual to best explain how toenjoy your vehicle. By reading yourmanual, you will learn about features,important safety information, anddriving under various road conditions.
The general layout of the manual isprovided in the Table of Contents. Inaddition, an alphabetical index locat-ed at the back of the manual hasbeen provided for you reference.Sections: This manual has eight sec-tions plus an index. Each sectionbegins with a brief list of contents toprovide you with an overview of whatis contained in that section.
You will find various WARNING’s,CAUTION’s, and NOTICE’s in thismanual. These WARNING’s,CAUTION’s and NOTICE’s are pro-vided to enhance your safety andcontinued satisfaction with your Kiavehicle.You should carefully read andfollow all procedures and recommen-dations provided in theseWARNING’s, CAUTION’s andNOTICE’s.
INTRODUCTION
1-2
WARNINGA WARNING indicates a situa-tion in which serious bodilyinjury or death could result ifthe warning is ignored.
CAUTIONA CAUTION indicates a situa-tion in which personal injury,perhaps severe, could result ifthe caution is ignored.
✽✽ NOTICEA NOTICE indicates a situation inwhich damage to your vehicle couldresult if the notice is ignored.
BL-ENG (CAN)-1.qxd 8/8/2005 10:42 AM Page 2

VEHICLE HANDLINGINSTRUCTIONSAs with other vehicles of this type,failure to operate this vehicle correct-ly may result in loss of control, anaccident or vehicle rollover. Specificdesign characteristics (higher groundclearance, track, etc.) give this vehi-cle a higher center of gravity thanordinary cars. They are not designedfor cornering at the same speeds asconventional 2-wheel drive vehicles.Avoid sharp turns or abrupt maneu-vers. Again, failure to operate thisvehicle correctly may result in loss ofcontrol, an accident or vehiclerollover. Be sure to read the “on-pavement’’ and “off-road’’ drivingguidelines, Section 5 in this manual.
VEHICLE BREAK-INPROCESSNo special break-in period is needed.By following a few simple precautionsfor the first 600 miles (1 000 km) youmay add to the performance, econo-my and life of your vehicle.• Do not race the engine.• Do not maintain a single speed for
long periods of time, either fast orslow. Varying engine speed isneeded to properly break in theengine.
• Avoid hard stops, except in emer-gencies, to allow the brakes to seatproperly.
• Avoid full-throttle starts.
INTRODUCTION
1-3
BL-ENG (CAN)-1.qxd 8/8/2005 10:42 AM Page 3
2-1
YOUR VEHICLE AT A GLANCE
Interior and Exterior Overview . . . . . . . . . . . . . . . . . . . . . . . . 2-2Instrument Panel Overview. . . . . . . . . . . . . . . . . . . . . . . . . . . 2-3
2
BL-ENG (CAN)-2.qxd 7/28/05 6:14 PM Page 2-1

INTERIOR AND EXTERIOR OVERVIEW
YOUR VEHICLE AT A GLANCE
2-2
S2BLA201A
1. Outside rearview mirror
2. Instrument cluster
3. Steering wheel
4. Seat
5. Rear hatch window
6. Rear hatch
7. Door
8. Power window switches
9. Rear door child safety lock
10. Shift lever
11. Parking brake lever
12. Lights
13. Spare tire
1 2 3 4 5 6
7 8 9 10 11 12 13
BL-ENG (CAN)-2.qxd 7/28/05 6:14 PM Page 2-2
INSTRUMENT PANEL OVERVIEW
YOUR VEHICLE AT A GLANCE
2-3
SRSAIR BAG
PRND2L
HM PASSENGER AIRBAG OFF
5BLA003
1. Light control / Turn signals
2. 4 wheel drive control knob (if equipped)
3. Instrument cluster
4. Wiper/Washer
5. Climate control system (if equipped)
6. Radio (if equipped)
7. Passenger’s Air Bag (if equipped)
8. Air vent
9. Hood release lever
10. Driver’s Air Bag (if equipped)
11. Steering wheel
12. Ignition switch
13. Parking brake lever
14. Shift lever (if equipped)
15. Power outlet
16. Glove box
1 2 3 4 5 6 7 8
9 10 11 12 13 14 15 16
BL-ENG (CAN)-2.qxd 7/28/05 6:14 PM Page 2-3
3-1
KNOWING YOUR VEHICLE
Keys. . . . . . . . . . . . . . . . . . . . . . . . . . . . . . . . . . . . . . . . . . . . . 3-2Immobilizer System . . . . . . . . . . . . . . . . . . . . . . . . . . . . . . . . 3-3Door Locks . . . . . . . . . . . . . . . . . . . . . . . . . . . . . . . . . . . . . . . 3-5Windows . . . . . . . . . . . . . . . . . . . . . . . . . . . . . . . . . . . . . . . . 3-10Front Seat . . . . . . . . . . . . . . . . . . . . . . . . . . . . . . . . . . . . . . . 3-13Rear Seat. . . . . . . . . . . . . . . . . . . . . . . . . . . . . . . . . . . . . . . . 3-21Safety Belts . . . . . . . . . . . . . . . . . . . . . . . . . . . . . . . . . . . . . . 3-25Air Bag - Supplemental Restraint System . . . . . . . . . . . . . . 3-44Rear Hatch. . . . . . . . . . . . . . . . . . . . . . . . . . . . . . . . . . . . . . . 3-67Hood . . . . . . . . . . . . . . . . . . . . . . . . . . . . . . . . . . . . . . . . . . . 3-69Fuel Filler Lid . . . . . . . . . . . . . . . . . . . . . . . . . . . . . . . . . . . . 3-70Auto Fuel Cutoff Switch . . . . . . . . . . . . . . . . . . . . . . . . . . . . 3-72Steering Wheel . . . . . . . . . . . . . . . . . . . . . . . . . . . . . . . . . . . 3-73Mirrors . . . . . . . . . . . . . . . . . . . . . . . . . . . . . . . . . . . . . . . . . . 3-74Interior Lights . . . . . . . . . . . . . . . . . . . . . . . . . . . . . . . . . . . . 3-76Cup Holder . . . . . . . . . . . . . . . . . . . . . . . . . . . . . . . . . . . . . . 3-78Sunglass Holder . . . . . . . . . . . . . . . . . . . . . . . . . . . . . . . . . . 3-79Storage Compartment. . . . . . . . . . . . . . . . . . . . . . . . . . . . . . 3-80Electrical Power Outlet . . . . . . . . . . . . . . . . . . . . . . . . . . . . . 3-82Sunroof . . . . . . . . . . . . . . . . . . . . . . . . . . . . . . . . . . . . . . . . . 3-83Antenna . . . . . . . . . . . . . . . . . . . . . . . . . . . . . . . . . . . . . . . . . 3-86Luggage Net . . . . . . . . . . . . . . . . . . . . . . . . . . . . . . . . . . . . . 3-86Tonneau cover . . . . . . . . . . . . . . . . . . . . . . . . . . . . . . . . . . . 3-87Luggage center box . . . . . . . . . . . . . . . . . . . . . . . . . . . . . . . 3-88Roof Rack . . . . . . . . . . . . . . . . . . . . . . . . . . . . . . . . . . . . . . . 3-89
3
BL-ENG (CAN)-3.qxd 7/28/05 5:52 PM Page 1

KEYS
The key code number is stamped onthe plate attached to your key set.Should you lose your keys, this num-ber will enable an authorized Kiadealer to duplicate your keys easily.Remove this plate from the key ringand store it in a safe place. Also,record the code number and keep itin a safe and handy place, but not inthe vehicle.
KNOWING YOUR VEHICLE
3-2
30284
S2BLA301
WARNING - Ignition KeyLeaving children unattended ina vehicle with the ignition key isdangerous even if the key is notin the ignition. Children couldplace the key in the ignition andoperate the power windows orother controls, leading to a seri-ous accident. Never leave achild alone in the vehicle, withor without keys.
CAUTIONUse only Kia original parts forthe ignition key in your vehicle.If an aftermarket key is used,the ignition switch may notreturn to ON after START. If thishappens, the starter will contin-ue to operate causing damageto the starter motor and possi-ble fire due to excessive currentin the wiring.
BL-ENG (CAN)-3.qxd 7/28/05 5:52 PM Page 2

IMMOBILIZER SYSTEM -FOR GASOLINE ENGINE (IF EQUIPPED)
The immobilizer system is an anti-theft device, designed to deter auto-mobile theft.
1) ID keyThis key must be used first to reg-ister a unique ID code in the ICM.
2) Master keyThis key is for general use. It willopen all locks on your vehicle. Oneside of the key has the Kia logoand the other side has the “M”symbol.
If you need additional keys or loseyour keys, your Authorized KiaDealer can make new keys if you cansupply the key number and ID key.
KNOWING YOUR VEHICLE
3-3
M M
CAUTIONDon’t lose your ID key or forgetthe password.Always keep your ID key in aplace where you remember andrecord your password. If youdon’t have both the passwordand ID key, consult yourAuthorized Kia Dealer.
CAUTIONA transponder equipped in yourignition key is very importantpart to deactivate the immobiliz-er system. So you must not giveany shock on it. It could causethe failure of your immobilizersystem and your vehicle’s start-ing.
S2BLD3027
✽✽ NOTICEIf you make your own duplicatekey, you will not be able to cancelthe system or start the engine.
✽✽ NOTICEWhen starting the engine, do notuse the key with other immobilizerkeys around. Otherwise the enginemay not start or may stop soonafter it starts. Keep each key sepa-rately not to have any malfunctionafter you receive your new vehicle.
ID Key Master Key
BL-ENG (CAN)-3.qxd 7/28/05 5:52 PM Page 3

Limp home (override) procedure
When you turn the ignition key to theON position, if the IMMO indicatorremains on continuously after blink-ing 6 times, the transponder installedin the ignition key is out of order. Youcannot start the engine without usingthe limp home procedure. To start theengine, you have to input your pass-word using the ignition switch.
The following procedure shows howto input a sample password of “2345.”1. Turn the ignition key to the ON
position. The IMMO indicator willblink 6 times and remain on indi-cating the beginning of the limphome procedure.
2. Turn the ignition key to the ACCposition.
3. To enter the first digit (in this exam-ple “2”), turn the ignition key to theON and ACC position twice. Wait 3seconds but not more than 10 sec-onds, and perform the same pro-cedure for the next digits (forexample, for “3”, turn the ignition toON and ACC 3 times).
4. If all of the digits have been inputsuccessfully, you have to start theengine within 10 seconds. If youattempt to start the engine after 10seconds, the engine will not startand you will have to input yourpassword again.
After performing the limp home pro-cedure, you have to see an author-ized Kia dealer immediately toinspect and repair your ignition key orimmobilizer system.
KNOWING YOUR VEHICLE
3-4
CAUTIONIf you cannot start your enginein spite of the limp home proce-dure, have your vehicle towedby an authorized Kia dealer forinspection and necessaryrepairs.
CAUTIONDo not change, alter or adjustthe immobilizer system at yourdiscretion. It could cause themalfunction of your immobilizersystem. A malfunction resultingfrom the changing, alteringand/or adjusting by personsother than an authorized Kiadealer will not be covered bythe Kia Warranty.
BL-ENG (CAN)-3.qxd 7/28/05 5:52 PM Page 4

DOOR LOCKS
Automatic Door Locks
Operating Door Locks - With theKey• Turn the key toward rear of vehicle
to unlock.Turn the key toward front of vehicleto lock.
• All four doors and rear hatch can belocked and unlocked from the driv-er or passenger door with the key.
• Once the doors are unlocked, theymay be opened by pulling the doorhandle.
Two turn unlock systemTo unlock the other doors and rearhatch, turn the key to the rear of thevehicle twice within three seconds. Tolock all doors and rear hatch, turn thekey toward the front of the vehicleonce.
Operating Door Locks - Withoutthe Key
Pushing the door lock knob and thenclosing the door enables the door tolock without a key.
KNOWING YOUR VEHICLE
3-5
S2BLA302
LOCK
UNLOCK
S2BLA304
✽✽ NOTICEAlways remove the ignition key,engage the parking brake, close allwindows and lock all doors whenleaving your vehicle unattended.
BL-ENG (CAN)-3.qxd 7/28/05 5:52 PM Page 5

Operating Door Locks - WithRemote Keyless Entry (If equipped)
If your vehicle has this feature, youcan lock and unlock your doors andrear hatch from up to 5 m (15 feet)away using the key chain transmittersupplied with your vehicle.
• Lock ( ):If you depress the correspondingbutton on the transmitter, all fourdoors and rear hatch will lock andthe hazard lamp will flash once.
• Unlock ( ):If you depress the correspondingbutton on the transmitter, all the dri-ver’s door will unlock, the hazardlamp will flash twice and the domelight and/or rear cargo area light willcome on for 30 seconds if theirswitches are placed in the centerposition.To unlock the other doors and rearhatch, depress the correspondingbutton twice within three seconds.After depressing this button, unlessyou open the doors within 30 sec-onds, all four doors will lock auto-matically.
• Rear hatch window unlock ( ):If you depress the correspondingbutton on the transmitter, the rearhatch window will unlock.
• Panic ( ):If you depress the correspondingbutton on the transmitter for morethan 2 seconds, the horn will soundand hazard lamp will flash for about27 seconds.
This device complies with IndustryCanada Standard RSS-210.Operation is subject to the followingtwo conditions:1. This device may not cause interfer-
ence, and 2. This device must accept any inter-
ference, including interference thatmay cause undesired operation ofthe device.
KNOWING YOUR VEHICLE
3-6
WARNINGLeaving your vehicle unlockedcan invite theft or possible harmto you or others from someonehiding in your vehicle while youare gone. Always remove theignition key, engage the parkingbrake, close all windows andlock all doors when leavingyour vehicle unattended.S4BLA303
WARNINGChanges or modifications notexpressly approved by the partyresponsible for compliancecould void the user's authorityto operate the equipment.
BL-ENG (CAN)-3.qxd 7/28/05 5:52 PM Page 6
Battery Replacement
1. Insert a slim tool into the slot andgently pry open the transmitter.
2. Remove and replace the 3-volt bat-tery with the (+) facing up.
3. Reassemble the transmitter.4. Check the transmitter operation.
KNOWING YOUR VEHICLE
3-7
S2BLA3068
✽✽ NOTICE• The keyless entry system may not
operate when;- the ignition key is in the ignition
switch.- you exceed the operating dis-
tance limit (5m).- the battery in the transmitter is
weak.- other vehicles or objects may be
blocking the signal. Check thelocation.
- the weather is very cold.- the transmitter is close to a
radio transmitter such as aradio station or an airportwhich can interfere with normaloperation of the transmitter.
• If you have a problem with thekeyless entry system, contact anauthorized Kia dealer as soon aspossible.
CAUTION• Using the wrong battery can
cause the transmitter to mal-function. Be sure to use thecorrect battery.
• To avoid damaging the trans-mitter, don’t drop it, get it wet,or expose it to heat or sun-light.
BL-ENG (CAN)-3.qxd 7/28/05 5:52 PM Page 7
Operating Door Locks From
Inside the vehicle• To lock a door, push the door lock
button to the “LOCK” position.• To unlock a door, pull the door lock
button to the “UNLOCK” position.• To open a door, pull the door han-
dle outward.• If you pull the driver’s door handle,
the driver’s door is automaticallyunlocked and opened.
Central Door Locks (If equipped)
• Pressing the front portion of thedoor lock switch will automaticallylock all the doors and rear hatch.
• Pressing the rear portion of thedoor lock switch will automaticallyunlock all the doors and rear hatch.
• If you lock/unlock the driver door orthe passenger door with a key, allthe doors and rear hatch will auto-matically lock/unlock. (Whenunlocking the driver door with a key,refer to “Two turn unlock system” onpage 3-5.)
• If you lock/unlock the passengerdoor with the manual door lock, allthe doors and rear hatch will auto-matically lock/unlock.
• If you lock/unlock the driver doorwith the manual door lock, only thedriver door will lock/unlock.
The door ajar warning light will illumi-nate when a door is not fully closed.Close the door completely and thelight will go out.
KNOWING YOUR VEHICLE
3-8
S2BLA305
LOCKUNLOCK
S2BLC305B S2BLC307
LOCKUNLOCK
✽✽ NOTICEIf the airbag deploys, all doors willunlock automatically.
LOCK UNLOCK
BL-ENG (CAN)-3.qxd 7/28/05 5:52 PM Page 8
Rear Door Child Safety Lock
The child safety lock prevents chil-dren from opening the rear doorsfrom the inside. It should be usedwhenever children are in the vehicle.To lock, push the child safety lock tothe “LOCKED” position.
• To lock a rear door so that it cannotbe opened from the inside, pushthe child safety lock located on therear edge of the door to the“LOCKED” position before closingthe door.
• To open a rear door while the childsafety lock is engaged, push thedoor lock button to the “UNLOCK”position (red mark is visible) thenpull the outside door handle.
KNOWING YOUR VEHICLE
3-9
LOCKED FREE
S2BLA306
WARNING - UnattendedChildren
An enclosed vehicle canbecome extremely hot, causingdeath or severe injury to unat-tended children or animals whocannot escape the vehicle.Furthermore, children mightoperate features of the vehiclethat could injure them, or theycould encounter other harm,possibly from someone gainingentry to the vehicle. Never leavechildren or animals unattendedin your vehicle.
CAUTIONThe doors should always befully closed and locked whilethe vehicle is in motion to pre-vent accidental opening of thedoor.Locked doors will also discour-age potential intruders whenthe vehicle stops or slows.
WARNING - Rear Door Locks
If children accidentally open therear doors while the vehicle isin motion, the child could fallout and be seriously injured. Toprevent a child from openingthe rear doors from the inside,the rear door safety locksshould be used whenever chil-dren are in the vehicle.
BL-ENG (CAN)-3.qxd 7/28/05 5:52 PM Page 9

WINDOWSPower Windows
The ignition switch must be in the ONposition for power windows to operate.Each door has a power window switchthat controls that door’s window.However, the driver has a power win-dow switch which can block the opera-tion of the passenger windows.
Driver’s Door Power WindowControls
The driver’s door has a master powerwindow switch that controls all thewindows in the vehicle. The ignitionswitch must be in the ON position forpower windows to operate. To open awindow, press down on the front por-tion of the corresponding switch. Toclose a window, pull up on the frontportion of the corresponding powerwindow switch.
Driver’s Window Automatic-downWindow Switch
The driver’s window has an“Automatic-Down” feature. To activatethe express-down feature, momen-tarily depress the front of the switchto the second detent position. To can-cel this feature, pull up on the front ofthe switch and then release it ormomentarily depress the front of theswitch to the first detent position.
Power Window Timer (If equipped)
The power windows can be operatedfor approximately 30 seconds afterthe ignition key is removed or turnedto the ACC or LOCK position.However, if the front doors areopened, the power windows cannotbe operated even within 30 secondsafter the ignition key removal.
KNOWING YOUR VEHICLE
3-10
S2BLA305C✽✽ NOTICETo prevent the possibility of damageto the power window system, do notopen or close more than two win-dows at the same time. This will alsoensure the longevity of the fuse.
WARNING - Windows• Do not allow children to play
with the power windows. Theymay seriously injure them-selves or others.
• Always double check to makesure all arms, hands, and otherobstructions are safely out ofthe way before closing a win-dow.
BL-ENG (CAN)-3.qxd 7/28/05 5:52 PM Page 10
Driver’s Power Window Switch
The driver’s power window switchprovides two (2) separate window-down functions.• Depressing the driver’s power win-
dow switch completely lowers thedriver’s window automatically(Automatic-Down). To cancel thisfunction, pull up on the front of theswitch and release it or momentari-ly depress the front of the switch tothe first detent position.
• Depressing the driver’s power win-dow switch partially (to the firstdetent) provides precise control ofthe window-down position. Toraise/close the driver’s window, pullup on the power window switch.
Power Window Lock SwitchFeature
The driver can disable the power win-dow switches on a passenger door bydepressing the power window lockswitch located on the driver’s door toON. When the power window lockswitch is ON, the driver’s mastercontrol can not operate the passen-ger door power windows either.
KNOWING YOUR VEHICLE
3-11
S2BLA305DPower window lock switch
WARNING- Power Windows
• Keep the driver’s door powerwindow lock switch in the ON(depressed) position, exceptwhen someone is operating apassenger door window.Serious injury can result(especially to children) fromunintentional window opera-tion.
• Always double check to makesure all arms, hands, andother obstructions are safelyout of the way before closinga window.
✽✽ NOTICEIf you notice buffeting and pulsa-tion (wind shock) with either sidewindow open, you should open theopposite window slightly to reducethe condition.
BL-ENG (CAN)-3.qxd 7/28/05 5:52 PM Page 11
Passenger Doors Power WindowControls
To open a window, press down on thefront portion of the power windowswitch. To close a window, pull up onthe front portion of the power windowswitch.
KNOWING YOUR VEHICLE
3-12
S2BLA307
✽✽ NOTICEThe driver’s door power window“LOCK” switch must be in theOFF position (not depressed) tooperate the passenger door win-dows.
BL-ENG (CAN)-3.qxd 7/28/05 5:52 PM Page 12
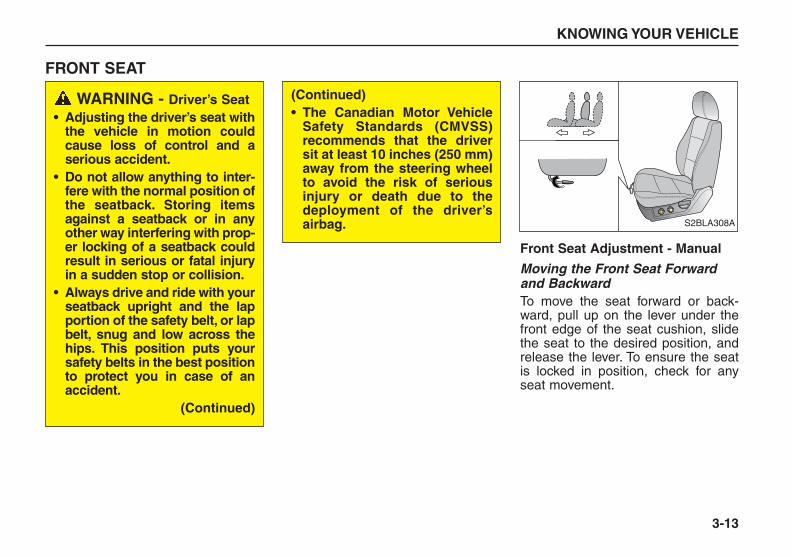
FRONT SEAT
Front Seat Adjustment - Manual
Moving the Front Seat Forwardand BackwardTo move the seat forward or back-ward, pull up on the lever under thefront edge of the seat cushion, slidethe seat to the desired position, andrelease the lever. To ensure the seatis locked in position, check for anyseat movement.
KNOWING YOUR VEHICLE
3-13
S2BLA308A
WARNING - Driver’s Seat• Adjusting the driver’s seat with
the vehicle in motion couldcause loss of control and aserious accident.
• Do not allow anything to inter-fere with the normal position ofthe seatback. Storing itemsagainst a seatback or in anyother way interfering with prop-er locking of a seatback couldresult in serious or fatal injuryin a sudden stop or collision.
• Always drive and ride with yourseatback upright and the lapportion of the safety belt, or lapbelt, snug and low across thehips. This position puts yoursafety belts in the best positionto protect you in case of anaccident.
(Continued)
(Continued)• The Canadian Motor Vehicle
Safety Standards (CMVSS)recommends that the driversit at least 10 inches (250 mm)away from the steering wheelto avoid the risk of seriousinjury or death due to thedeployment of the driver’sairbag.
BL-ENG (CAN)-3.qxd 7/28/05 5:52 PM Page 13

Adjusting the Front SeatbackReclinerTo change the seatback angle, leanforward slightly and raise the leverlocated on the outer portion of theseat. Slowly and carefully lean backto the desired angle and release thelever. After adjustment, make surethat the lever has returned to its orig-inal locked position.
KNOWING YOUR VEHICLE
3-14
S2BLA308B
CAUTIONLoose objects in the driver’sfoot area could interfere withthe operation of the foot pedals,possibly causing an accident.Loose objects might interferewith the seat slide mechanism.Do not place anything under thefront seats.
WARNING - Front SeatRiding in a vehicle with a frontseatback reclined could lead toserious or fatal injury in an acci-dent. If a front seat is reclined,the occupant’s hips may slideunder the lap portion of thesafety belt applying great forceto the unprotected abdomen.Internal injuries could result.Keep the seatbacks in a com-fortably upright position when-ever the vehicle is in motion.
BL-ENG (CAN)-3.qxd 7/28/05 5:52 PM Page 14

Adjusting the Height of DriverSeat CushionTo change the height (front portion)of the seat cushion, rotate the knoblocated on the outside of the seatcushion.• To lower the seat cushion, rotate
the knob toward the front of thevehicle.
• To raise the seat cushion, rotate theknob toward the rear of the vehicle.
To change the height (rear portion) ofthe seat cushion, rotate the knoblocated on the outside of the seatcushion.• To lower the seat cushion, rotate
the knob toward the front of thevehicle.
• To raise the seat cushion, rotate theknob toward the rear of the vehicle.
Lumbar Support (Driver’s Seat Only)You can adjust the lumbar support bymoving the lever on the right side ofthe driver’s seatback. Pivoting thelever increases or decreases the lum-bar support.
KNOWING YOUR VEHICLE
3-15
S2BLA308C S1BLA256
BL-ENG (CAN)-3.qxd 7/28/05 5:52 PM Page 15
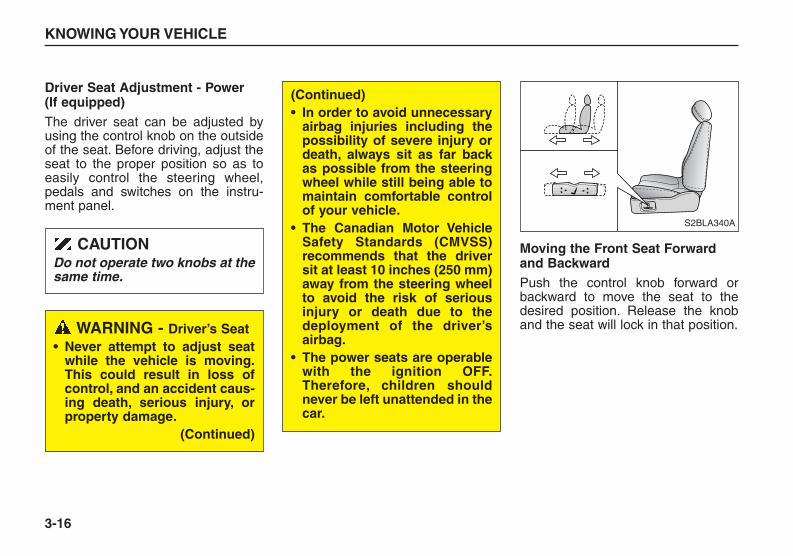
Driver Seat Adjustment - Power (If equipped)The driver seat can be adjusted byusing the control knob on the outsideof the seat. Before driving, adjust theseat to the proper position so as toeasily control the steering wheel,pedals and switches on the instru-ment panel.
Moving the Front Seat Forwardand BackwardPush the control knob forward orbackward to move the seat to thedesired position. Release the knoband the seat will lock in that position.
KNOWING YOUR VEHICLE
3-16
S2BLA340A
CAUTIONDo not operate two knobs at thesame time.
WARNING - Driver’s Seat• Never attempt to adjust seat
while the vehicle is moving.This could result in loss ofcontrol, and an accident caus-ing death, serious injury, orproperty damage.
(Continued)
(Continued)• In order to avoid unnecessary
airbag injuries including thepossibility of severe injury ordeath, always sit as far backas possible from the steeringwheel while still being able tomaintain comfortable controlof your vehicle.
• The Canadian Motor VehicleSafety Standards (CMVSS)recommends that the driversit at least 10 inches (250 mm)away from the steering wheelto avoid the risk of seriousinjury or death due to thedeployment of the driver’sairbag.
• The power seats are operablewith the ignition OFF.Therefore, children shouldnever be left unattended in thecar.
BL-ENG (CAN)-3.qxd 7/28/05 5:52 PM Page 16

Adjusting the Front SeatbackReclinerRotate the upper portion of the con-trol knob forward or backward torecline the seatback to the desiredposition. Release the control knoband the seatback will lock in position.
Adjusting the Height of Front SeatCushion
Front height of front seat cushionMove the front portion of the controlknob up to raise or down to lower thefront part of the seat cushion.
KNOWING YOUR VEHICLE
3-17
S2BLA340CS2BLA340B
✽✽ NOTICEPrior to operating the vehicle,ensure the seat is locked securely bytrying to move the seat forward orbackward without using the controlknob. If the seat moves, it is notlocked properly.
BL-ENG (CAN)-3.qxd 7/28/05 5:52 PM Page 17

Rear height of front seat cushionMove the rear portion of the controlknob up to raise or down to lower therear part of the seat cushion.
Height of front seat cushionTo raise or lower the seat cushiontotally, pull up and push down on thecenter of the corresponding switch.
KNOWING YOUR VEHICLE
3-18
S2BLA340ES2BLA340D
WARNINGTo minimize the risk of possiblesevere personal injury in theevent of a collision, both the dri-ver's and passenger's seat-backs should be in a normalseating position while the car isin motion. The protection pro-vided by the vehicle’s restraintsystem may be reduced signifi-cantly when the seatbacks arereclined. All parts of therestraint system are designedto absorb energy in an accidentand this can best be accom-plished if the seatback is in anormal seating position and theseatbelt is in close proximity tothe occupant.
BL-ENG (CAN)-3.qxd 7/28/05 5:52 PM Page 18

Heating the Front Seats (If equipped)
The front seats can be electricallyheated individually when the ignitionswitch is ON. To heat one of the frontseats, depress the correspondingswitch on the center panel. To deac-tivate the seat heater, press theswitch again.
Headrest
All the seat headrests provide com-fort and also help protect your headand neck in the event of certain kindsof collisions.Hold the headrest and pull up to raiseit. It will lock into position. To lower theheadrest, push the lock lever on theleft side and push down on the head-rest.
KNOWING YOUR VEHICLE
3-19
AUTO AUTO AMB
OFF
TEMP
MODE
AMB
A/C
A/C
L R
HM PASSENGER AIRBAG OFF
5BLC451 S1BLA257
Releaselever
✽✽ NOTICEThe seat warmer will not operate ifambient temperature is above37±3°C (98.5±5.5°F).
BL-ENG (CAN)-3.qxd 7/28/05 5:52 PM Page 19

If your vehicle is equipped with theheadrest swing feature, the frontheadrests may be adjusted forwardto four positions by pulling it forward.To adjust the headrest backwards,pull it forward and release it.
KNOWING YOUR VEHICLE
3-20
WARNING - Headrests• To reduce the risk of head and
neck injuries, don’t operatethe vehicle with the headrestremoved or improperly posi-tioned.
• For best protection, adjust theheadrest so its center is ashigh as your ears.
• Do not adjust the driver’sheadrest while driving.
BL-ENG (CAN)-3.qxd 7/28/05 5:52 PM Page 20

REAR SEAT
Split Folding Rear Seat
The rear seatbacks fold forward toprovide additional cargo space and toprovide access to the cargo area.• To fold the rear seatback(s) down,
press the lock release button locat-ed on top of the seatbacks, then foldthe seatback forward and down.
• To raise the seatback, lift and push itfirmly until it clicks into place.
• When you return the seatback to itsupright position, reposition the rearsafety belts so that they can be usedby rear seat passengers.
KNOWING YOUR VEHICLE
3-21
S2BLB301A
WARNING- Rear Seatback
• The rear seatback must besecurely latched. If not, pas-sengers and objects could bethrown forward resulting inserious injury or death in theevent of a sudden stop or col-lision.
• Luggage and other cargoshould be laid flat in the cargoarea. If objects are large,heavy, or must be piled, theymust be secured. Under nocircumstances should cargobe piled higher than the seat-backs. Failure to follow thesewarnings could result in seri-ous injury or death in theevent of a sudden stop, colli-sion or rollover.
(Continued)
(Continued)• No passenger should ride in
the cargo area or sit or lie onfolded seatbacks while thevehicle is moving. All passen-gers must be in seats andrestrained properly while rid-ing.
• When resetting the seatbackto the upright position, makesure it is securely latched bypushing it forward and back-wards.
• To avoid the possibility ofburns, do not remove the car-pet in the cargo area.Emission controls beneaththis floor generate highexhaust temperatures.
BL-ENG (CAN)-3.qxd 7/28/05 5:52 PM Page 21

To fold the rear seat:
1. Pull up the strap to lift the rear por-tion of the seat cushion.
2. Remove the headrest and put theheadrest poles into the holes onthe rear of the seat cushion.
3. Press the lock release button onthe seatbacks, then fold the seat-back forward and down firmly.
KNOWING YOUR VEHICLE
3-22
S2BLB301C S2BLB301D S2BLB301E
BL-ENG (CAN)-3.qxd 7/28/05 5:52 PM Page 22
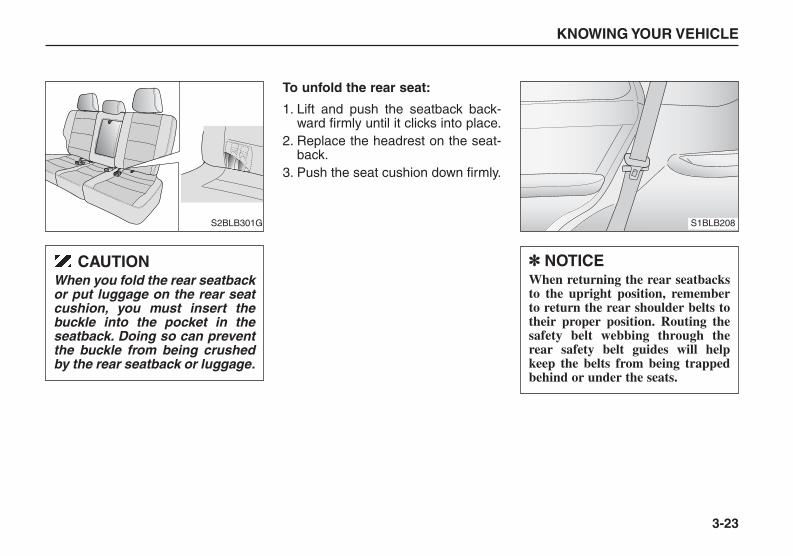
To unfold the rear seat:
1. Lift and push the seatback back-ward firmly until it clicks into place.
2. Replace the headrest on the seat-back.
3. Push the seat cushion down firmly.
KNOWING YOUR VEHICLE
3-23
S2BLB301G S1BLB208
CAUTIONWhen you fold the rear seatbackor put luggage on the rear seatcushion, you must insert thebuckle into the pocket in theseatback. Doing so can preventthe buckle from being crushedby the rear seatback or luggage.
✽✽ NOTICEWhen returning the rear seatbacksto the upright position, rememberto return the rear shoulder belts totheir proper position. Routing thesafety belt webbing through therear safety belt guides will helpkeep the belts from being trappedbehind or under the seats.
BL-ENG (CAN)-3.qxd 7/28/05 5:52 PM Page 23

Center Armrest
This armrest is located in the centerof the rear seatback. Pull the armrestdown using the strap provided on thearmrest.
KNOWING YOUR VEHICLE
3-24
S2BLB301F
CAUTIONDo not remove the floor carpetin your vehicle. Emission con-trol system components causehigh exhaust temperaturesunder the floor.
WARNING - CargoCargo should always besecured to prevent it from shift-ing and causing injury to thevehicle occupants.
BL-ENG (CAN)-3.qxd 7/28/05 5:52 PM Page 24

SAFETY BELTS
Pre-tensioner Seat Belt
Your vehicle is equipped with driver’sand front passenger’s pre-tensionersafety belts. The purpose of the pre-tensioner is to pull the safety beltsnugly against the occupant’s body incertain frontal collisions.The pre-tensioner safety belts willactivate, along with the airbags, whena frontal collision is severe enough.
When the vehicle stops suddenly, orif the occupant tries to lean forwardtoo quickly, the seat belt retractor willlock into position. However, in certainfrontal collisions, the pre-tensionerwill also activate and pull the seat beltinto tighter contact against the occu-pant’s body.
The safety belt pre-tensioner systemconsists mainly of the following com-ponents.Their locations are shown in the illus-tration.1. SRS airbag warning light.2. Seat belt pre-tensioner assembly.3. SRS control module.
KNOWING YOUR VEHICLE
3-25
SBS403100 S2BLD3122 3
1 Passenger’sside airbag
Driver’s side airbag
WARNINGTo obtain maximum benefitfrom a pre-tensioner, safety beltmust be worn correctly.
BL-ENG (CAN)-3.qxd 7/28/05 5:52 PM Page 25
Safety Belt Restraint System
KNOWING YOUR VEHICLE
3-26
CAUTION• When the pre-tensioner safety
belts are activated, a loudnoise may be heard and finepowder, which may appear tobe smoke, may be visible in thepassenger compartment. Thepowder is not toxic.
• The powder may cause skinirritation and should not bebreathed for prolonged peri-ods.Wash your hands and facethoroughly after an accident inwhich such powder has beenreleased.
• If the pre-tensioner seat belt isnot working properly, the airbagwarning light will illuminate,since both devices are on thesame electrical circuit. If theSRS airbag warning light doesnot blink when the ignition keyis turned to “ON” or “ACC”, or ifit remains illuminated for morethan 6 seconds, or if it illumi-nates while the vehicle is beingdriven, please have an author-ized Kia dealer inspect the sys-tem as soon as possible.
WARNING- Pretentioner Repair or
Replacement• Pre-tensioners are designed
to operate once. After activa-tion, pre-tensioner safetybelts must be replaced.
• Do not attempt to inspect,repair or replace the pre-ten-sioner safety belts yourself.You can permanently damagethe system.
WARNING - Safety BeltsTo minimize the risk of seriousor fatal injury in an accident, thedriver and all passengersshould use the appropriatesafety restraints for their ageand size. The presence ofairbags does not change theneed to be properly restrainedby a safety belt or size-appro-priate child restraint. In fact,airbags can work properly whenpassengers are correctlyrestrained in the vehicle. Besure you are familiar with theinformation in this section,including the information oninfant and child restraints.Read the safety warnings on thesun visors.
BL-ENG (CAN)-3.qxd 7/28/05 5:52 PM Page 26

We strongly recommend that thedriver and all passengers be properlyrestrained at all times by using thesafety belts provided with the vehicle.Proper use of the safety beltsdecreases the risk of severe injury ordeath in accidents or sudden stops.In most states, and in Canada, thelaw requires their use.Inertial locks in the safety belt retrac-tors allow all of the lap/shoulder safe-ty belts to remain unlocked duringnormal vehicle operation.This allows the occupants some free-dom of movement and increasedcomfort while using the safety belts. Ifa force is applied to the vehicle, suchas a strong stop, a sharp turn, or acollision, the safety belt retractors willautomatically lock the safety belts.
Since the inertial locks do not requirea collision to lock up, you maybecome aware of the safety beltslocking while braking or going aroundsharp corners.Whenever possible, use the centerrear seat position to install your childrestraint. The center rear seat is thesafest position for a child to sit in. Ifthe center seat is unavailable, a childrestraint system may be installed inan outboard rear seat position. Neverinstall a rear-facing infant seat in thefront passenger position, as an inflat-ing airbag could cause serious orfatal injury to a child in that position.
The rear safety belts use a specialauto-lock feature designed to allow achild restraint to be used in thesepositions without an added lockingclip. They normally lock only underextreme or emergency conditions(emergency lock mode). Howeverthey can be adjusted so that theyremain in fixed and locked when achild restraint system is placed inthese positions. (Use this auto-lockmode only to secure a child restraint,never for passengers restrained bythe safety belts.) Page 3-38 givesinstructions on placing the safety beltin the auto lock mode.The drivers safety belt can only oper-ate in the emergency lock mode.
KNOWING YOUR VEHICLE
3-27
BL-ENG (CAN)-3.qxd 7/28/05 5:52 PM Page 27
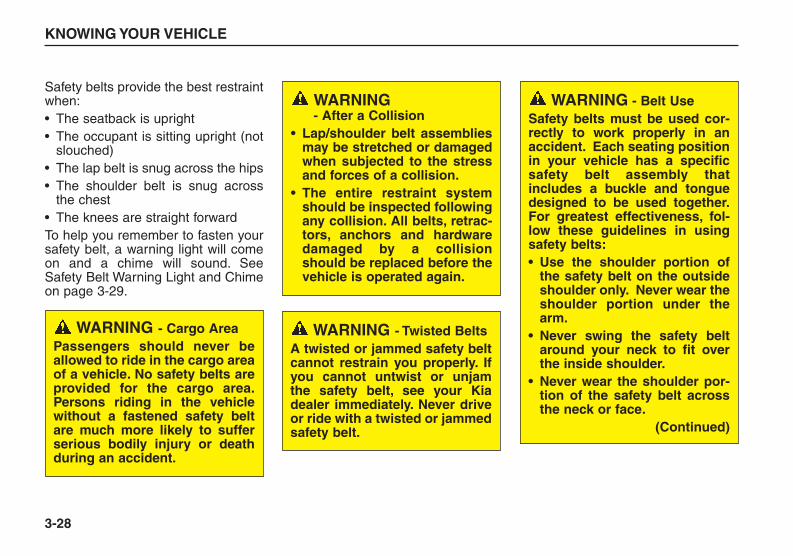
Safety belts provide the best restraintwhen:• The seatback is upright• The occupant is sitting upright (not
slouched)• The lap belt is snug across the hips• The shoulder belt is snug across
the chest• The knees are straight forwardTo help you remember to fasten yoursafety belt, a warning light will comeon and a chime will sound. SeeSafety Belt Warning Light and Chimeon page 3-29.
KNOWING YOUR VEHICLE
3-28
WARNING - After a Collision
• Lap/shoulder belt assembliesmay be stretched or damagedwhen subjected to the stressand forces of a collision.
• The entire restraint systemshould be inspected followingany collision. All belts, retrac-tors, anchors and hardwaredamaged by a collisionshould be replaced before thevehicle is operated again.
WARNING - Cargo AreaPassengers should never beallowed to ride in the cargo areaof a vehicle. No safety belts areprovided for the cargo area.Persons riding in the vehiclewithout a fastened safety beltare much more likely to sufferserious bodily injury or deathduring an accident.
WARNING - Twisted BeltsA twisted or jammed safety beltcannot restrain you properly. Ifyou cannot untwist or unjamthe safety belt, see your Kiadealer immediately. Never driveor ride with a twisted or jammedsafety belt.
WARNING - Belt UseSafety belts must be used cor-rectly to work properly in anaccident. Each seating positionin your vehicle has a specificsafety belt assembly thatincludes a buckle and tonguedesigned to be used together.For greatest effectiveness, fol-low these guidelines in usingsafety belts:• Use the shoulder portion of
the safety belt on the outsideshoulder only. Never wear theshoulder portion under thearm.
• Never swing the safety beltaround your neck to fit overthe inside shoulder.
• Never wear the shoulder por-tion of the safety belt acrossthe neck or face.
(Continued)
BL-ENG (CAN)-3.qxd 7/28/05 5:52 PM Page 28

Safety Belt Warning Light andChime
Type AAs a reminder to the driver and pas-senger, safety belt warning light willilluminate for approximately 6 sec-onds each time you turn the ignitionswitch ON regardless of belt fasten-ing.If the driver's safety belt is not fas-tened when the ignition key is turnedON, the safety belt warning chime willsound for approximately 6 seconds.
KNOWING YOUR VEHICLE
3-29
(Continued)• Wear the lap portion as low as
possible. Be sure that the lapbelt fits snugly around thehips. never wear a lap belt orlap portion of a lap/shoulderbelt over your waist; it shouldalways go over the strongerarea of your hips.
• Never use a single safety beltfor more than one person.
• The seatbacks should alwaysremain in a comfortable,upright position when thevehicle is moving.
(Continued)• Inspect the safety belts peri-
odically for excessive wear ordamage. Pull out each beltfully and look for fraying, cuts,burns or other damage. Pullthe safety belt out and let itretract a number of times.Make sure that the lap/shoul-der belts return smoothly andeasily into the retractor.
• Check the latches to makesure they latch and releasewithout interference or delay.
• Never close the doors on anypart of the lap or shoulderbelt.
• Any belt not in good conditionor in good working ordershould be promptly replaced.
CAUTIONNever close the doors on any partof the lap or shoulder belt. It candamage the safety belt or bucklewhich could increase the risk ofinjury in case of an accident.
WARNING- Safety Belt Care
• A damaged belt may not giveyou the protection you need inan accident.
(Continued)
W-29
BL-ENG (CAN)-3.qxd 7/28/05 5:52 PM Page 29
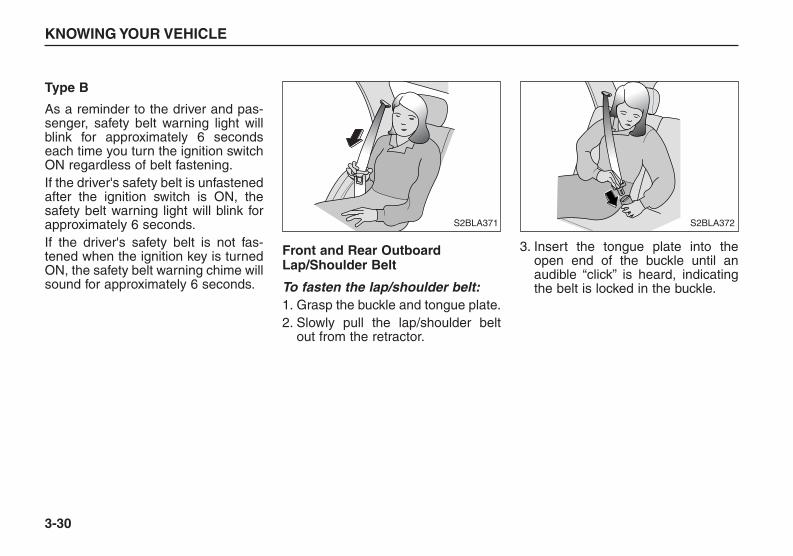
Type B
As a reminder to the driver and pas-senger, safety belt warning light willblink for approximately 6 secondseach time you turn the ignition switchON regardless of belt fastening.If the driver's safety belt is unfastenedafter the ignition switch is ON, thesafety belt warning light will blink forapproximately 6 seconds.If the driver's safety belt is not fas-tened when the ignition key is turnedON, the safety belt warning chime willsound for approximately 6 seconds.
Front and Rear OutboardLap/Shoulder Belt
To fasten the lap/shoulder belt:1. Grasp the buckle and tongue plate.2. Slowly pull the lap/shoulder belt
out from the retractor.
3. Insert the tongue plate into theopen end of the buckle until anaudible “click” is heard, indicatingthe belt is locked in the buckle.
KNOWING YOUR VEHICLE
3-30
S2BLA371 S2BLA372
BL-ENG (CAN)-3.qxd 7/28/05 5:52 PM Page 30
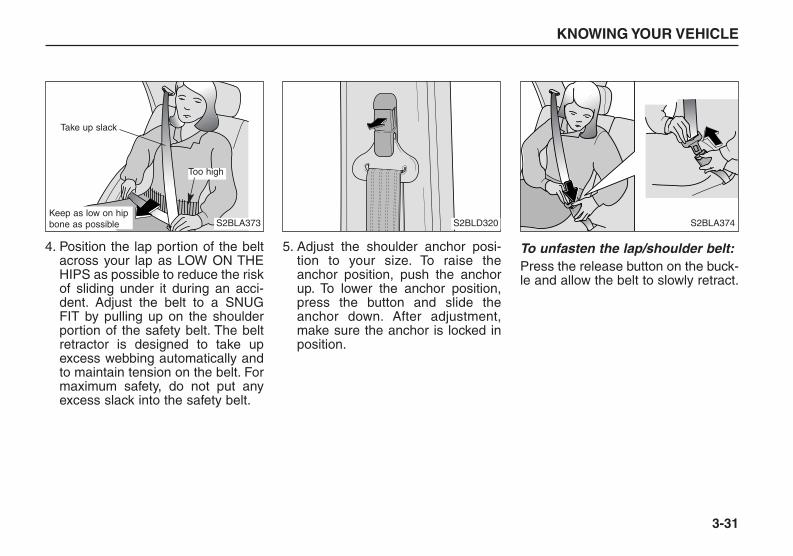
4. Position the lap portion of the beltacross your lap as LOW ON THEHIPS as possible to reduce the riskof sliding under it during an acci-dent. Adjust the belt to a SNUGFIT by pulling up on the shoulderportion of the safety belt. The beltretractor is designed to take upexcess webbing automatically andto maintain tension on the belt. Formaximum safety, do not put anyexcess slack into the safety belt.
5. Adjust the shoulder anchor posi-tion to your size. To raise theanchor position, push the anchorup. To lower the anchor position,press the button and slide theanchor down. After adjustment,make sure the anchor is locked inposition.
To unfasten the lap/shoulder belt:Press the release button on the buck-le and allow the belt to slowly retract.
KNOWING YOUR VEHICLE
3-31
S2BLA373 S2BLD320
Take up slack
Keep as low on hipbone as possible
Too high
S2BLA374
BL-ENG (CAN)-3.qxd 7/28/05 5:52 PM Page 31

3 Point Rear Center Belt (If equipped)
To fasten the rear center belt1. Slowly pull the tongue plates out
from the retractor.
KNOWING YOUR VEHICLE
3-32
S2BLB302Z
WARNING - Safety Belts• The seatbacks should always
remain in a comfortable,upright position while thevehicle is in motion. The safe-ty belt system will provide themost protection with the seat-backs in an upright position.
• Never wear the shoulder por-tion of the safety belt underthe outside arm or behind theback.
• Never wear the shoulder por-tion of the safety belt acrossthe neck or face.
• Wear the lap portion of thesafety belt as low as possible.Be sure the lap belt fits snug-ly around the hips. Never wearthe lap belt over your waist.
• Make sure the safety belts arenot twisted while in use.
(Continued)
(Continued)• Never use a single belt to
restrain more than one personat a time.
Failure to follow these warningswill increase the chance andseverity of injury in an accident.
BL-ENG (CAN)-3.qxd 7/28/05 5:52 PM Page 32

2. Insert the tongue plate (A) into theopen end of the buckle (C) until anaudible “click" is heard, indicatingthe latch is locked. Make sure thebelt is not twisted.
3. Pull the tongue plate (B) and insertthe tongue plate into the open endof the buckle (D) until an audible“click” is heard, indicating the latchis locked. Make sure the belt is nottwisted.
There will be an audible “click” whenthe tab locks in the buckle. The seatbelt automatically adjusts to the prop-er length only after the lap belt isadjusted manually so that it fits snug-ly around your hips, if you lean for-ward in a slow, easy motion, the beltwill extend and let you move around.If there is a sudden stop or impact,the belt will lock into position. It willalso lock if you try to lean forward tooquickly.
KNOWING YOUR VEHICLE
3-33
(D)
(A)
(C)
(B)
S2BLB303A (D)
(B)
PRES
S
S2BLC304
WARNINGWhen using the rear seat centerbelt, you must lock all tongueplates and buckles. If anytongue plate or buckle is notlocked, it will increase thechance of injury in the event ofcollision.
BL-ENG (CAN)-3.qxd 7/28/05 5:52 PM Page 33

To unfasten the rear center belt 1. Press the release button on the
buckle (D) and remove the tongueplate (B) from the buckle (D).
2. Type APress the release button on thebuckle (C) and remove the tongueplate (A) from the buckle (C).The belt webbing will retract auto-matically.Type BTo retract the rear center seatbelt,insert the key or similar small rigiddevice into the web release button(E) on the anchor connector. Pull upon the seat belt web (A) and allowthe webbing to retract automatically.
Proper Use and Care of the SafetyBelt System
To ensure that the safety belts providethe maximum protection, please followthese instructions:• Use the belts at all times - even on
short trips.• If the safety belt is twisted, straighten it
prior to use.• Keep sharp edges and damaging
objects away from the belt.• Periodically inspect belt webbing,
anchors, buckles, and all other partsfor signs of wear, and damage.Replace damaged, excessively wornor questionable parts immediately.
• To clean the belt webbing, use a mildsoap solution recommended for clean-ing upholstery or carpets. Follow theinstructions provided with the soap.Donot bleach or dye the webbingbecause this may weaken the webbingfibers and allow them to fail whenloaded in a collision.
• Do not make modifications or addi-tions to the safety belt.
• After wearing a safety belt, makesure it fully retracts to the stowedposition. Do not allow the belt to getcaught in the door when you close it.
KNOWING YOUR VEHICLE
3-34
(D)
(B)
PRES
S
S2BLC303A
(A)
(A)(C)
(B)
(D) (C)
(A)
(C)(E)
E6BLA390
E6BLA391
Type A
Type B
BL-ENG (CAN)-3.qxd 7/28/05 5:52 PM Page 34

Restraint of Pregnant Women
Pregnant women should wearlap/shoulder belt assemblies when-ever possible according to specificrecommendations by their doctors.The lap portion of the belt should beworn AS SNUGLY AND AS LOW ASPOSSIBLE.
Restraint of Infants and SmallChildren
To increase their safety, infants andyoung children should always berestrained by a restraint systemapproved for their age and size.
Many companies manufacture child-restraint systems (often called childseats) for infants and small children.An acceptable child-restraint systemmust always satisfy Motor VehicleSafety Standards of your country.Make sure that any child-restraintsystem you use in your vehicle islabeled as complying with those safe-ty standards.The child restraint system should bechosen to fit both the size of the childand the size of the vehicle seat. Besure to follow any instructions provid-ed by the child restraint system man-ufacturer when installing the child-restraint system.
KNOWING YOUR VEHICLE
3-35
WARNING- Pregnant Women
Pregnant women must neverplace the lap portion of thesafety belt over the area of theabdomen where the fetus islocated or above the abdomen.
WARNING- Children on Lap
Never hold a child on your lapor in your arms in a movingvehicle. Even a very strong per-son cannot hold onto a child inthe event of even a minor colli-sion.
BL-ENG (CAN)-3.qxd 7/28/05 5:52 PM Page 35
KNOWING YOUR VEHICLE
3-36
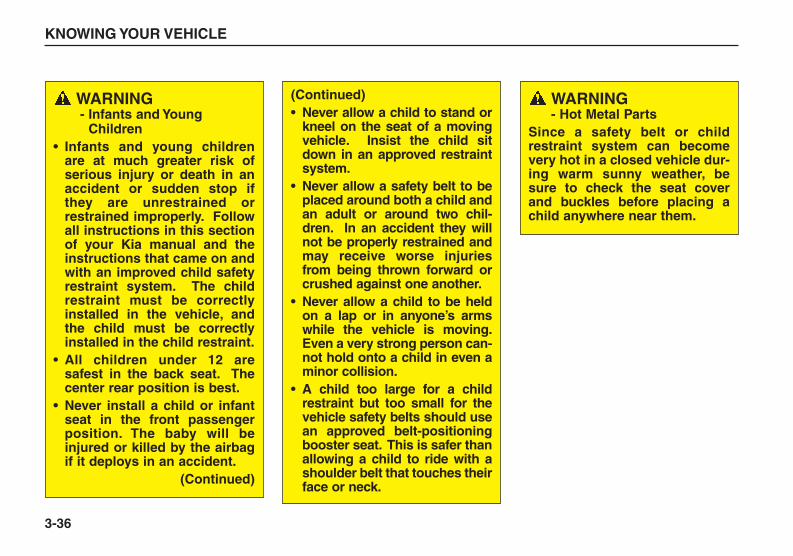
WARNING- Infants and Young
Children• Infants and young children
are at much greater risk ofserious injury or death in anaccident or sudden stop ifthey are unrestrained orrestrained improperly. Followall instructions in this sectionof your Kia manual and theinstructions that came on andwith an improved child safetyrestraint system. The childrestraint must be correctlyinstalled in the vehicle, andthe child must be correctlyinstalled in the child restraint.
• All children under 12 aresafest in the back seat. Thecenter rear position is best.
• Never install a child or infantseat in the front passengerposition. The baby will beinjured or killed by the airbagif it deploys in an accident.
(Continued)
(Continued)• Never allow a child to stand or
kneel on the seat of a movingvehicle. Insist the child sitdown in an approved restraintsystem.
• Never allow a safety belt to beplaced around both a child andan adult or around two chil-dren. In an accident they willnot be properly restrained andmay receive worse injuriesfrom being thrown forward orcrushed against one another.
• Never allow a child to be heldon a lap or in anyone’s armswhile the vehicle is moving.Even a very strong person can-not hold onto a child in even aminor collision.
• A child too large for a childrestraint but too small for thevehicle safety belts should usean approved belt-positioningbooster seat. This is safer thanallowing a child to ride with ashoulder belt that touches theirface or neck.
WARNING- Hot Metal Parts
Since a safety belt or childrestraint system can becomevery hot in a closed vehicle dur-ing warm sunny weather, besure to check the seat coverand buckles before placing achild anywhere near them.
BL-ENG (CAN)-3.qxd 7/28/05 5:52 PM Page 36

Restraint of Large Children
As children grow, they may need touse new child restraints, includinglarger child seats or booster seats,which are appropriate for theirincreased size.A child who has outgrown availablechild restraint systems should usethe belts provided in the vehicle.When seated, the child should berestrained by the lap/shoulder belt.If the shoulder belt slightly touchesthe child’s neck or face, try placingthe child closer to the center of thevehicle. If the shoulder belt stilltouches their face or neck, they mayneed to be returned to a childrestraint system. In addition, after-market devices are available fromindependent manufacturers whichhelp pull the shoulder belt lower andaway from the child’s face or neck.
Placement of a Child RestraintSystem
We recommend that, whenever pos-sible, you put the child restraint in thecenter position of the rear seat.If the center rear seat is not available,or you are using more than one childrestraint system in the vehicle at thesame time, the rear safety belts havebeen designed to allow a childrestraint to be used in these posi-tions. Since those safety belts nor-mally lock only under extreme oremergency conditions (emergencylock mode) you must manually adjustthose belts to the auto lock mode.
KNOWING YOUR VEHICLE
3-37
WARNINGWhen a child restraint is not inuse, make sure that it issecured by a safety belt. In asudden stop or accident, aloose child restraint could bethrown forward and injuresomeone.
✽✽ NOTICEThe driver’s safety belt incorpo-rates the emergency lock modeonly.
WARNING- Restraint Instructions
Failure to observe this manualsinstructions regarding childrestraint systems and theinstructions provided with thechild restraint system couldincrease the chance and/orseverity of injury in an accident.
BL-ENG (CAN)-3.qxd 7/28/05 5:52 PM Page 37
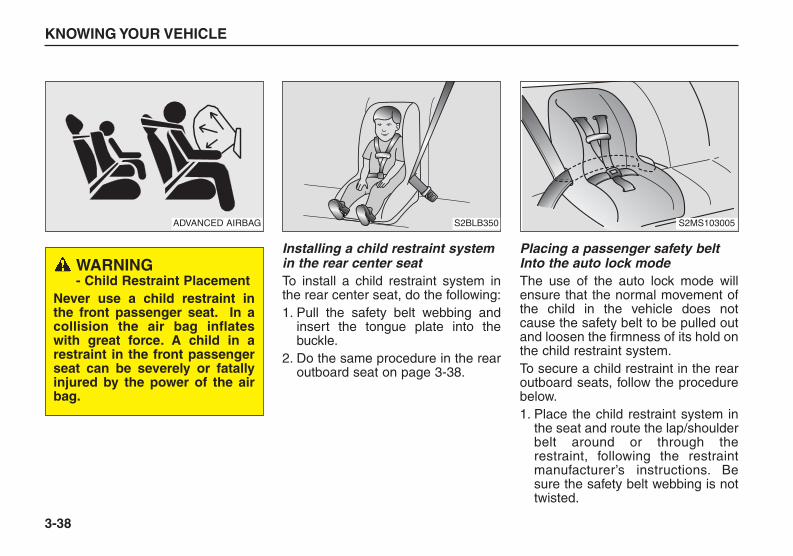
Installing a child restraint systemin the rear center seatTo install a child restraint system inthe rear center seat, do the following:1. Pull the safety belt webbing and
insert the tongue plate into thebuckle.
2. Do the same procedure in the rearoutboard seat on page 3-38.
Placing a passenger safety beltInto the auto lock modeThe use of the auto lock mode willensure that the normal movement ofthe child in the vehicle does notcause the safety belt to be pulled outand loosen the firmness of its hold onthe child restraint system.To secure a child restraint in the rearoutboard seats, follow the procedurebelow.1. Place the child restraint system in
the seat and route the lap/shoulderbelt around or through therestraint, following the restraintmanufacturer’s instructions. Besure the safety belt webbing is nottwisted.
KNOWING YOUR VEHICLE
3-38
ADVANCED AIRBAG
WARNING- Child Restraint Placement
Never use a child restraint inthe front passenger seat. In acollision the air bag inflateswith great force. A child in arestraint in the front passengerseat can be severely or fatallyinjured by the power of the airbag.
S2BLB350 S2MS103005
BL-ENG (CAN)-3.qxd 7/28/05 5:52 PM Page 38

2. Fasten the lap/shoulder belt latchinto the buckle. Listen for the dis-tinct “click” sound.
Position the release button so that itis easy to access in case of an emer-gency.
3. Pull the shoulder portion of thesafety belt all the way out. Whenthe shoulder portion of the safetybelt is fully extended, it will shift theretractor to the “Auto Lock” (childrestraint) mode.
4. Slowly allow the belt to retract. Pullup on the shoulder webbing. A“clicking” or “ratcheting” sound willbe heard as the belt retracts. Thisindicates the retractor is now in theautomatic locking mode. Pushdown on the child restraint whileyou pull up on the belt in order toremove any slack in the belt.
KNOWING YOUR VEHICLE
3-39
S2BLD301S2BLD310
"Click"
S2BLD302
BL-ENG (CAN)-3.qxd 7/28/05 5:52 PM Page 39

5. Before placing the child in the childrestraint, forcibly try to push theseat from side to side and forwardto make sure that the seat issecurely held in place.
6. Double check that the retractor isin the automatic locking mode bytrying to pull the shoulder portionof the safety belt out of the retrac-tor. If you cannot pull the belt out ofthe retractor, it is in the automaticlocking mode. If you can, repeatstep 4.
To remove the child restraint, pressthe release button on the buckle andthen pull the lap/shoulder belt out ofthe restraint and allow the safety beltto retract fully.
Child restraint anchor position For small children and babies, theuse of a child seat or infant seat isstrongly recommended. This childseat or infant seat should be ofappropriate size for the child andshould be installed in accordancewith the manufacturer’s instructions.It is further recommended that theseat be placed in the vehicle’s rearseat since this can make an impor-tant contribution to safety. Your vehi-cle is provided with three childrestraint hook holders on the floorbehind the rear seat for installing thechild seat or infant seat.
KNOWING YOUR VEHICLE
3-40
WARNING- Auto Lock Mode
The lap/shoulder belt automati-cally returns to the “emergencylock mode” whenever the belt isallowed to retract fully.Therefore,the preceding seven steps mustbe followed each time a childrestraint is installed.If the safety belt is not placed inthe “auto lock” mode, severeinjury or death could occur to thechild and/or other occupants inthe vehicle in a collision, sincethe child restraint will not beeffectively held in place.
✽✽ NOTICEWhen the safety belt is allowed toretract to its fully stowed position,the retractor will automaticallyswitch from the “Auto Lock” modeto the emergency lock mode fornormal adult usage.
WARNING- Child Restraint Placement
Never use a child restraint inthe front passenger seat. Achild in a child restraintinstalled in the front passengerseat can be severely or fatallyinjured by an air bag whichcould impact the child restraintwith great force when the airbag inflates.
S2BLD303
BL-ENG (CAN)-3.qxd 7/28/05 5:52 PM Page 40
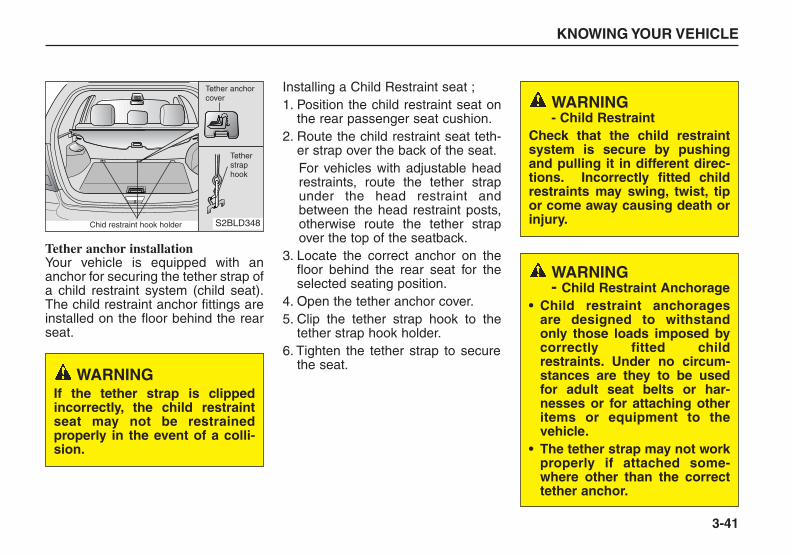
Tether anchor installation Your vehicle is equipped with ananchor for securing the tether strap ofa child restraint system (child seat).The child restraint anchor fittings areinstalled on the floor behind the rearseat.
Installing a Child Restraint seat ;1. Position the child restraint seat on
the rear passenger seat cushion.2. Route the child restraint seat teth-
er strap over the back of the seat.For vehicles with adjustable headrestraints, route the tether strapunder the head restraint andbetween the head restraint posts,otherwise route the tether strapover the top of the seatback.
3. Locate the correct anchor on thefloor behind the rear seat for theselected seating position.
4. Open the tether anchor cover.5. Clip the tether strap hook to the
tether strap hook holder.6. Tighten the tether strap to secure
the seat.
KNOWING YOUR VEHICLE
3-41
S2BLD348
WARNING - Child Restraint
Check that the child restraintsystem is secure by pushingand pulling it in different direc-tions. Incorrectly fitted childrestraints may swing, twist, tipor come away causing death orinjury.
WARNING If the tether strap is clippedincorrectly, the child restraintseat may not be restrainedproperly in the event of a colli-sion.
WARNING - Child Restraint Anchorage
• Child restraint anchoragesare designed to withstandonly those loads imposed bycorrectly fitted childrestraints. Under no circum-stances are they to be usedfor adult seat belts or har-nesses or for attaching otheritems or equipment to thevehicle.
• The tether strap may not workproperly if attached some-where other than the correcttether anchor.
Tether anchorcover
Tetherstraphook
Chid restraint hook holder
BL-ENG (CAN)-3.qxd 7/28/05 5:52 PM Page 41
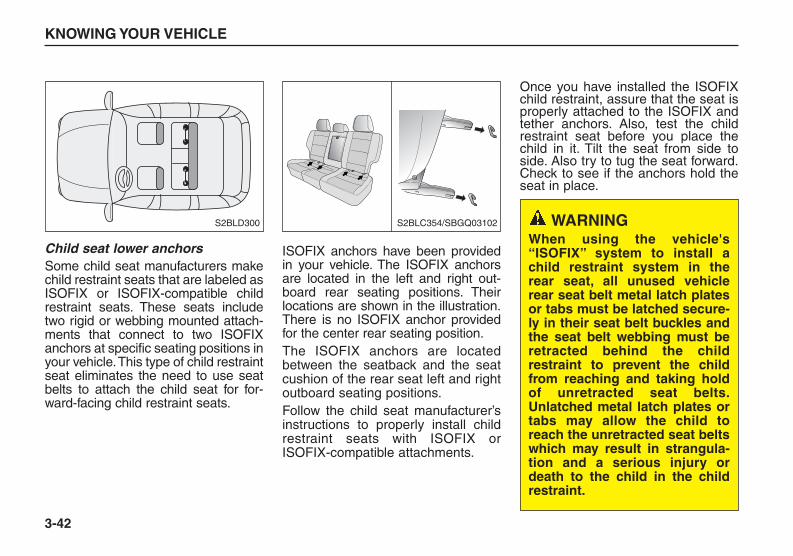
Child seat lower anchorsSome child seat manufacturers makechild restraint seats that are labeled asISOFIX or ISOFIX-compatible childrestraint seats. These seats includetwo rigid or webbing mounted attach-ments that connect to two ISOFIXanchors at specific seating positions inyour vehicle.This type of child restraintseat eliminates the need to use seatbelts to attach the child seat for for-ward-facing child restraint seats.
ISOFIX anchors have been providedin your vehicle. The ISOFIX anchorsare located in the left and right out-board rear seating positions. Theirlocations are shown in the illustration.There is no ISOFIX anchor providedfor the center rear seating position.The ISOFIX anchors are locatedbetween the seatback and the seatcushion of the rear seat left and rightoutboard seating positions.Follow the child seat manufacturer’sinstructions to properly install childrestraint seats with ISOFIX orISOFIX-compatible attachments.
Once you have installed the ISOFIXchild restraint, assure that the seat isproperly attached to the ISOFIX andtether anchors. Also, test the childrestraint seat before you place thechild in it. Tilt the seat from side toside. Also try to tug the seat forward.Check to see if the anchors hold theseat in place.
KNOWING YOUR VEHICLE
3-42
S2BLC354/SBGQ03102S2BLD300 WARNING When using the vehicle's“ISOFIX” system to install achild restraint system in therear seat, all unused vehiclerear seat belt metal latch platesor tabs must be latched secure-ly in their seat belt buckles andthe seat belt webbing must beretracted behind the childrestraint to prevent the childfrom reaching and taking holdof unretracted seat belts.Unlatched metal latch plates ortabs may allow the child toreach the unretracted seat beltswhich may result in strangula-tion and a serious injury ordeath to the child in the childrestraint.
BL-ENG (CAN)-3.qxd 7/28/05 5:52 PM Page 42

KNOWING YOUR VEHICLE
3-43
WARNING If the child restraint is notanchored properly, the risk of achild being seriously injured orkilled in a collision greatlyincreases.
(Continued)• Do not install a child restraint
seat at the rear center seatingposition using the vehicle’sISOFIX anchors. The ISOFIXanchors are only provided forthe left and right outboard rearseating positions. Do not mis-use the ISOFIX anchors byattempting to attach a childrestraint seat in the middlerear seating position positionto the ISOFIX anchors. In acrash, the child restraint seatISOFIX attachments may notbe strong enough to securethe child restraint seat proper-ly in the rear center seatingposition and may break, caus-ing serious injury or death.
(Continued)
(Continued)• Attach the ISOFIX or ISOFIX-
compatible child restraint seatonly to the appropriate loca-tions shown in the illustration.
• Always follow the installationand use instructions providedby the manufacturer of thechild restraint.
WARNING • Do not mount more than one
child restraint to a single teth-er or to a child restraint loweranchorage point. The improp-er increased load may causethe anchorage points or tetheranchor to break, causing seri-ous injury or death.
(Continued)
BL-ENG (CAN)-3.qxd 7/28/05 5:52 PM Page 43

KNOWING YOUR VEHICLE
3-44
AIRBAG - ADVANCED SUPPLEMENTAL RESTRAINT SYSTEM
SRSAIRBAG
RESACCEL
COASTSET
PWR
SEEK
CANCEL
SRSAIRBAG
➀ Driver’s airbag ➁ Front passenger’sairbag
➃ Front impact sensor
➅ SRS control module
S2BLA201A/5BLA422/5BLA002/5BLD320/5BLA371/5BLA619/5BLD502/5BLC326G/5BLA370
SRSAIRBAG
➄ Side impact sensor
➆ Occupant classifi-cation system
SRSAIRBAG
➂ Curtain Airbag
➀
➁
➂
➃
➄➅
➆
BL-ENG (CAN)-3.qxd 7/28/05 5:52 PM Page 44

➀ Driver’s airbag(see page 3- 48)
➁ Front passenger’s airbag(see page 3- 49)
➂ Curtain Airbag(see page 3- 55)
➃ Front impact sensor(see page 3- 57)
➄ Side impact sensor(see page 3- 57)
➅ SRS Control Module(see page 3- 57)
➆ Occupant classification system(see page 3- 49)
Airbag inflation condition(see page 3- 58)
Airbag non-inflation condition(see page 3- 59)
Airbag warning light(see page 3- 64)
Airbag service(see page 3- 64)
Airbag warning label(see page 3- 66)
What your airbag system does
Driver’s airbag and front passenger’sairbag are designed to supplementthe protection offered by the safetybelt in certain frontal collisions.Likewise, curtain airbags aredesigned to supplement the protec-tion offered by the safety belt in sidecollisions. Safety belts are designedto reduce the injury of the driver orpassengers in case of light impact orcollision. However, to help reduceimpact on driver or passengers in aserious collision, seat belts must alsobe correctly worn.
What your airbag system does notdo
The air bag system is designed tosupplement the protection offered bythe safety belt system. IT IS NOT ASUBSTITUTE FOR THE SAFETYBELT.
KNOWING YOUR VEHICLE
3-45
BL-ENG (CAN)-3.qxd 7/28/05 5:52 PM Page 45

The importance of using safety belts
There are four very important rea-sons to use safety belts even with anairbag supplemental restraint sys-tem. They:• help keep you in the proper position
(away from the airbag) when itinflates.
• reduce the risk of harm in rollover,side impact or rear impact colli-sions, because an airbag is notdesigned to inflate in such situa-tions and even a side curtain airbagis designed to inflate only in certainside impact collisions.
• reduce the risk of harm in frontal orside collisions which are not severeenough to actuate the airbag sup-plemental restraint system.
• reduce the risk of being thrownfrom your vehicle.
KNOWING YOUR VEHICLE
3-46
WARNING - Airbags &Safety Belts
• Even in vehicles with air bags,you and your passengersmust always wear the safetybelts provided in order to min-imize the risk and severity ofinjury in the event of a colli-sion or rollover.
• Always wear your safety belt.It can help keep you awayfrom the air bags duringheavy braking just before acollision.
• If occupants are not fastenedor correctly seated, they can-not be protected, and thusface serious injury or death.
(Continued)
(Continued)• Driver’s and front passenger’s
airbag are designed to inflateonly in certain frontal colli-sions, and curtain airbags aredesigned to inflate in certainside impacts. They will gener-ally not provide protection inside impacts (except curtainairbags) or rear impacts,rollovers, less severe frontalcollisions. They will not pro-vide protection from laterimpacts in a multi-impact col-lision.
(Continued)
BL-ENG (CAN)-3.qxd 7/28/05 5:52 PM Page 46

Airbag system components
The main components of your SRSare:• To indicate that your vehicle is
equipped with airbags, the corre-sponding airbag covers are markedwith “SRS AIRBAG”.- Driver’s airbag (see page 3- 48)- Passenger’s airbag (see page 3- 49)- Curtain airbag (see page 3- 55)
• A diagnostic system that continual-ly monitors the system operation.
• An indicator light to warn you of apossible problem with the system.
• Emergency power backup in caseyour car’s electrical system is dis-connected in a crash.
The SRS uses a collection of sensorsto gather information about the dri-ver’s and front passenger’s safetybelt usage and impact severity.The safety belt usage sensors deter-mine if the driver and front passen-ger’s safety belts are fastened. Thesesensors provide the ability to controlthe SRS deployment based onwhether or not the safety belts arefastened, and how severe is theimpact.
KNOWING YOUR VEHICLE
3-47
(Continued)• If your vehicle has been sub-
jected to flood conditions(e.g. soaked carpeting/stand-ing water on the floor of thevehicle, etc.) or if your vehiclehas become flood damaged inany way, do not attempt tostart the vehicle or put the keyin the ignition before discon-necting the battery. This maycause airbag deployment,which could result in seriouspersonal injury or death. Ifflooded conditions are sub-jected to your vehicle, beforestarting the vehicle, have thevehicle towed to an author-ized Kia dealer for inspectionand necessary repairs.
BL-ENG (CAN)-3.qxd 7/28/05 5:52 PM Page 47

The advanced SRS offers the abilityto control the airbag inflation with twolevels. A first stage level is providedfor moderate-severity impacts. A sec-ond stage level is provided for moresevere impacts.According to the impact severity andsafety belt usage, the SRSCM (SRSControl Module) controls the airbaginflation. Failure to properly wearsafety belts can increase the risk orseverity of injury in an accident.Additionally, your SRS is equippedwith an occupant classification sys-tem in the front passenger’s seat.Theoccupant classification systemdetects the presence of a passengerin the front passenger’s seat and willturn off the front passenger’s airbagunder certain conditions. For moredetail, see “Occupant ClassificationSystem” later in this section. Driver’s airbag
The driver’s airbag is stored in thecenter of the steering wheel.
KNOWING YOUR VEHICLE
3-48
WARNING • Ignoring the SRS indictor light
(airbag indicator and passen-ger airbag off indicator) canresult in serious or fatal injuryif the airbags occupant classi-fication system or pretension-ers do not work properly. Haveyour car checked by a dealeras soon as possible if the SRSwarning light alerts you to apotential problem.
• Sitting improperly or out ofposition can result in seriousor fatal injury in a crash. Alloccupants should sit uprightin their seats with their feet onthe floor until the vehicle isparked and the ignition key isremoved.
SRSAIRBAG
RESACCEL
COASTSET
PWR
SEEK
CANCEL
5BLA422
HLZ206
BL-ENG (CAN)-3.qxd 7/28/05 5:52 PM Page 48

Front passenger’s airbag
Front passenger’s airbag is stored inthe instrument panel on the glovebox.Since you cannot anticipate whichairbags will deploy or from whatdirection, never put any objects orornaments on the instrument panel.
Occupant classification systemThe occupant classification systemdetects the presence of a passengerin the front passenger's seat and willturn off the front passenger's airbagunder certain conditions.The occupant classification system isdesigned to detect the presence of aproperly-seated occupant and deter-mine if the front passenger's airbagshould be enabled (may inflate) ornot.Only the front passenger front airbagis controlled by the OccupantClassification System.
KNOWING YOUR VEHICLE
3-49
WARNING• You must always sit as far
back from the steering wheelairbag as possible (chest atleast 10 inches (250 mm) awayfrom the steering wheel),while still maintaining a com-fortable seating position forgood vehicle control, in orderto reduce the risk of injury ordeath in a collision.
• Never place objects over theairbag storage compartmentsor between the airbags andyourself. Due to the speed andforce of the airbag inflation,such objects could hit yourbody at high speed and causesevere bodily injury and evendeath.
• Do not put stickers or orna-ments on the steering wheelcover. These may interferewith the deployment of theairbag.
SRSAIRBAG
5BLA002
HLZ208
5BLA370
BL-ENG (CAN)-3.qxd 7/28/05 5:52 PM Page 49
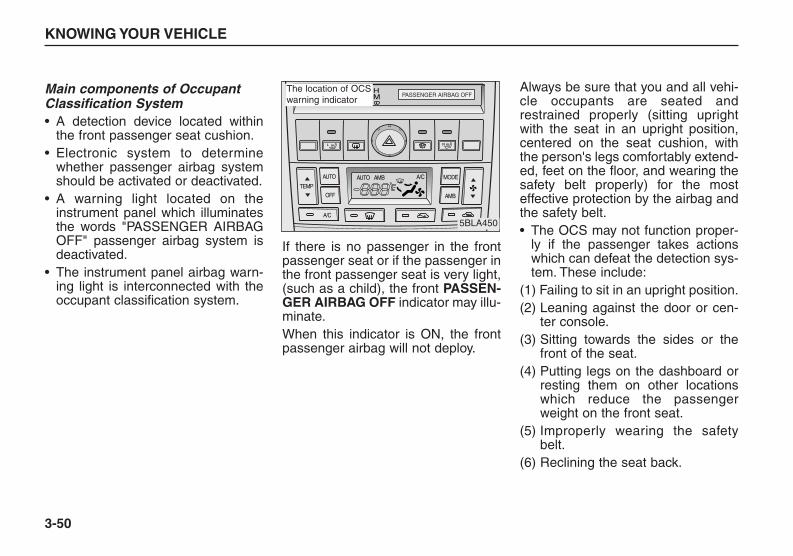
Main components of OccupantClassification System• A detection device located within
the front passenger seat cushion.• Electronic system to determine
whether passenger airbag systemshould be activated or deactivated.
• A warning light located on theinstrument panel which illuminatesthe words "PASSENGER AIRBAGOFF" passenger airbag system isdeactivated.
• The instrument panel airbag warn-ing light is interconnected with theoccupant classification system.
If there is no passenger in the frontpassenger seat or if the passenger inthe front passenger seat is very light,(such as a child), the front PASSEN-GER AIRBAG OFF indicator may illu-minate.When this indicator is ON, the frontpassenger airbag will not deploy.
Always be sure that you and all vehi-cle occupants are seated andrestrained properly (sitting uprightwith the seat in an upright position,centered on the seat cushion, withthe person's legs comfortably extend-ed, feet on the floor, and wearing thesafety belt properly) for the mosteffective protection by the airbag andthe safety belt.• The OCS may not function proper-
ly if the passenger takes actionswhich can defeat the detection sys-tem. These include:
(1) Failing to sit in an upright position.(2) Leaning against the door or cen-
ter console.(3) Sitting towards the sides or the
front of the seat.(4) Putting legs on the dashboard or
resting them on other locationswhich reduce the passengerweight on the front seat.
(5) Improperly wearing the safetybelt.
(6) Reclining the seat back.
KNOWING YOUR VEHICLE
3-50
AUTO AUTO AMB
OFF
TEMP
MODE
AMB
A/C
A/C
HM
L R
PASSENGER AIRBAG OFF
5BLA450
The location of OCSwarning indicator
BL-ENG (CAN)-3.qxd 7/28/05 5:52 PM Page 50
• The "PASSENGER AIRBAG OFF"indicator illuminates after the igni-tion key is turned to the "ON" posi-tion or after the engine is started. Ifthe front passenger seat is unoccu-pied or is occupied by very smallperson, or is occupied by someonewho is improperly seated, the"PASSENGER AIRBAG OFF" indi-cator will remain illuminated. If thefront passenger seat is occupied bysomeone of adult size and bodyshape, the "PASSENGER AIRBAGOFF" indicator will turn off after 6seconds.
• If the "PASSENGER AIRBAG OFF"indicator illuminates, the front pas-senger airbag will not deploy ineither a side or frontal collision.
• If the "PASSENGER AIRBAG OFF"indicator is not illuminated, the frontpassenger airbag may deploy infrontal collision.
KNOWING YOUR VEHICLE
3-51
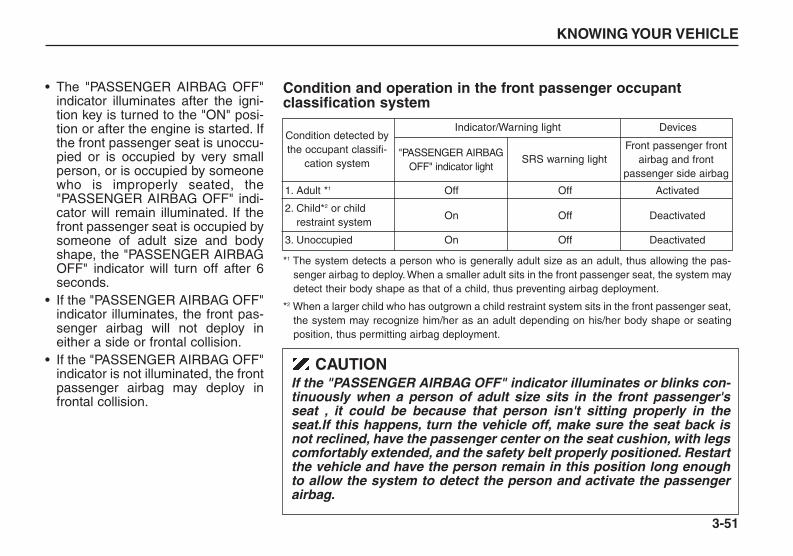
CAUTIONIf the "PASSENGER AIRBAG OFF" indicator illuminates or blinks con-tinuously when a person of adult size sits in the front passenger'sseat , it could be because that person isn't sitting properly in theseat.If this happens, turn the vehicle off, make sure the seat back isnot reclined, have the passenger center on the seat cushion, with legscomfortably extended, and the safety belt properly positioned. Restartthe vehicle and have the person remain in this position long enoughto allow the system to detect the person and activate the passengerairbag.
Condition and operation in the front passenger occupant classification system
Condition detected bythe occupant classifi-
cation system
1. Adult *1
2. Child*2 or childrestraint system
3. Unoccupied
Off
On
On
Off
Off
Off
Activated
Deactivated
Deactivated
"PASSENGER AIRBAGOFF" indicator light
SRS warning lightFront passenger front
airbag and front passenger side airbag
Indicator/Warning light Devices
*1 The system detects a person who is generally adult size as an adult, thus allowing the pas-senger airbag to deploy. When a smaller adult sits in the front passenger seat, the system maydetect their body shape as that of a child, thus preventing airbag deployment.
*2 When a larger child who has outgrown a child restraint system sits in the front passenger seat,the system may recognize him/her as an adult depending on his/her body shape or seatingposition, thus permitting airbag deployment.
BL-ENG (CAN)-3.qxd 7/28/05 5:52 PM Page 51

KNOWING YOUR VEHICLE
3-52
WARNINGIf the front passenger seatshould be modified for personswith disabilities that may affectthe operation of the occupantclassification system, contactan authorized Kia dealer.
WARNING• Even though your vehicle is
equipped with the occupantclassification system, do notinstall a child restraint systemin the front passenger seat.The child could be severelyinjured or killed if the airbagdeploys. Children are afford-ed the most protection in theevent of an accident whenthey are restrained by theproper restraint system in therear seat.
(Continued)
(Continued)• If the "PASSENGER AIRBAG
OFF" indicator is illuminatedwhen the front passenger'sseat is occupied by a person ofadult size who is seated prop-erly, or if the "PASSENGERAIRBAG OFF" indicator is notilluminated when the front pas-senger's seat is unoccupied oroccupied by a very small per-son, the occupant classifica-tion system is not workingproperly. Have your vehicleimmediately inspected by yourKia dealer if the occupant clas-sification system is not work-ing properly.
(Continued)
CAUTIONIf the occupant classificationsystem is not working properly,the airbag warning light ( ) onthe instrument panel will illumi-nate. If there is a malfunction ofthe occupant classification sys-tem, the "PASSENGER AIRBAGOFF" indicator will illuminateand the front passenger'sairbag will not deploy in frontalcrashes even if there is an adultsized occupant in the front pas-senger seat. If the SRS airbagwarning light does not illumi-nate when the ignition key isturned to "ON" position, if itremains illuminated after blink-ing for approximately six sec-onds, or if it illuminates whilethe vehicle is being driven, havean authorized Kia dealerinspect the occupant classifica-tion system with the SRS airbagsystem as soon as possible.
BL-ENG (CAN)-3.qxd 7/28/05 5:52 PM Page 52
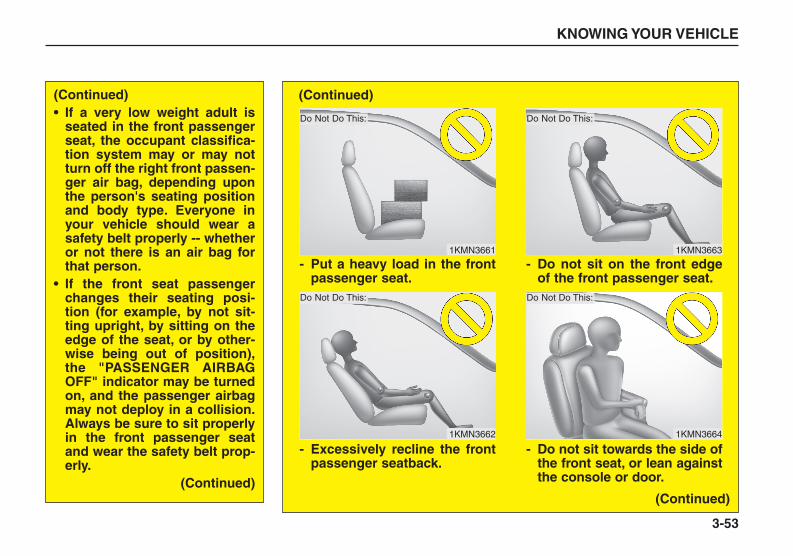
KNOWING YOUR VEHICLE
3-53
(Continued)• If a very low weight adult is
seated in the front passengerseat, the occupant classifica-tion system may or may notturn off the right front passen-ger air bag, depending uponthe person's seating positionand body type. Everyone inyour vehicle should wear asafety belt properly -- whetheror not there is an air bag forthat person.
• If the front seat passengerchanges their seating posi-tion (for example, by not sit-ting upright, by sitting on theedge of the seat, or by other-wise being out of position),the "PASSENGER AIRBAGOFF" indicator may be turnedon, and the passenger airbagmay not deploy in a collision.Always be sure to sit properlyin the front passenger seatand wear the safety belt prop-erly.
(Continued)
1KMN3661
Do Not Do This:
Do Not Do This:
1KMN3662
1KMN3663
1KMN3664
- Put a heavy load in the frontpassenger seat.
- Excessively recline the frontpassenger seatback.
- Do not sit on the front edgeof the front passenger seat.
- Do not sit towards the side ofthe front seat, or lean againstthe console or door.
Do Not Do This:
Do Not Do This:
(Continued)
(Continued)
BL-ENG (CAN)-3.qxd 7/28/05 5:52 PM Page 53

KNOWING YOUR VEHICLE
3-54
(Continued)• Do not modify or replace the
front passenger seat. This willdisable the OCS unless aproper Kia replacement seat isused.
• Do not place sharp objects onthe front passenger seat.These can damage the occu-pant classification system, ifthey puncture the seat cush-ion.
• Do not install accessory seatcovers on the front seats,since these will interfere withproper sensor operation.
✽✽ NOTICE• If luggage or other objects are
placed on the front passenger'sseat or if the temperature of theseat changes while the seat isunoccupied, the "PASSENGERAIRBAG OFF" indicator mayblink. These conditions do notindicate a problem.
• Do not put heavy objects on thefront passenger's seat. This maycause front passenger airbagdeployment in the event of anaccident, thus increasing yourrepair costs.
1KMN3665
1KMN3666
- Proper seating position
- Do not put feet on dash-board.
(Continued)
(Continued)Do Not Do This:
Do This:
BL-ENG (CAN)-3.qxd 7/28/05 5:52 PM Page 54
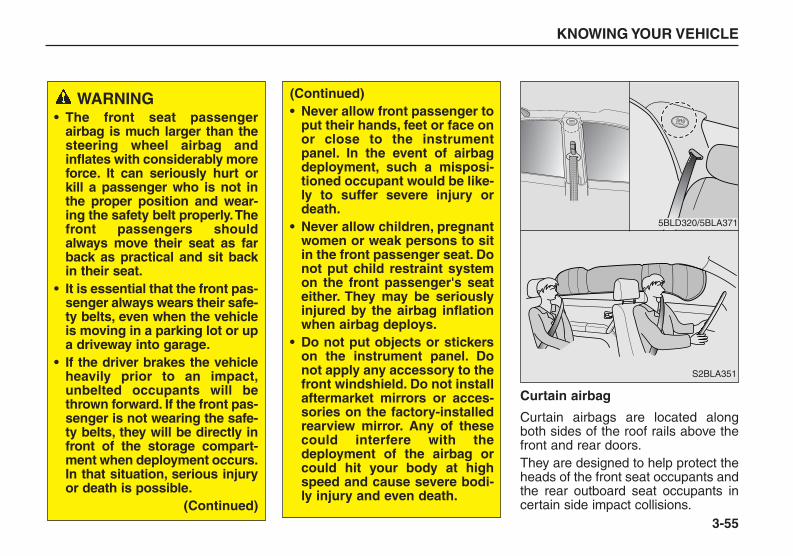
Curtain airbag
Curtain airbags are located alongboth sides of the roof rails above thefront and rear doors.They are designed to help protect theheads of the front seat occupants andthe rear outboard seat occupants incertain side impact collisions.
KNOWING YOUR VEHICLE
3-55
SRSAIRBAG
5BLD320/5BLA371
S2BLA351
SRSAIRBAG
(Continued)• Never allow front passenger to
put their hands, feet or face onor close to the instrumentpanel. In the event of airbagdeployment, such a misposi-tioned occupant would be like-ly to suffer severe injury ordeath.
• Never allow children, pregnantwomen or weak persons to sitin the front passenger seat. Donot put child restraint systemon the front passenger's seateither. They may be seriouslyinjured by the airbag inflationwhen airbag deploys.
• Do not put objects or stickerson the instrument panel. Donot apply any accessory to thefront windshield. Do not installaftermarket mirrors or acces-sories on the factory-installedrearview mirror. Any of thesecould interfere with thedeployment of the airbag orcould hit your body at highspeed and cause severe bodi-ly injury and even death.
WARNING• The front seat passenger
airbag is much larger than thesteering wheel airbag andinflates with considerably moreforce. It can seriously hurt orkill a passenger who is not inthe proper position and wear-ing the safety belt properly.Thefront passengers shouldalways move their seat as farback as practical and sit backin their seat.
• It is essential that the front pas-senger always wears their safe-ty belts, even when the vehicleis moving in a parking lot or upa driveway into garage.
• If the driver brakes the vehicleheavily prior to an impact,unbelted occupants will bethrown forward. If the front pas-senger is not wearing the safe-ty belts, they will be directly infront of the storage compart-ment when deployment occurs.In that situation, serious injuryor death is possible.
(Continued)
BL-ENG (CAN)-3.qxd 7/28/05 5:52 PM Page 55

• If the curtain airbag deploys, itremains inflated for approximately3 seconds. The curtain airbagdeployment occurs only on the sideof the vehicle affected by theimpact.
• The curtain airbags are notdesigned to deploy during colli-sions from the front or rear of thevehicle or in most rollover situa-tions.
• The curtain airbags are designed todeploy only during certain side-impact collisions, depending on thecrash severity, angle, speed andimpact. The curtain airbags are notdesigned to deploy in all sideimpact situations.
KNOWING YOUR VEHICLE
3-56
WARNING• In order for the curtain airbags
to provide its best protection,both front seat occupants andboth outboard rear occupantsshould sit in an upright posi-tion with the safety belts prop-erly fastened. Especially, chil-dren should sit in a properchild restraint system.
• When children are seated inthe rear outboard seats, theymust be seated in the properchild restraint system. Makesure to put the child restraintsystem as far away from thedoor side as possible, andsecure the child restraint sys-tem to be locked in position.
(Continued)
(Continued)• Do not allow the passengers
to lean their heads or bodiesonto doors, put their arms onthe doors, stretch their armsout of the window, or placeobjects between the doors andpassengers when they areseated on the seats where cur-tain airbags are equipped.
• Never try to open or repair anycomponents of the curtainairbag system. This should bedone only by an authorizedKia dealer.
Failure to follow the above men-tioned instructions can result ininjury or death to the vehicleoccupants in an accident.
BL-ENG (CAN)-3.qxd 7/28/05 5:52 PM Page 56

Why didn’t my airbag go off in acollision?
(Inflation and non-inflation condi-tions of the airbag)There are many types of accidents inwhich the airbag would not beexpected to provide additional pro-tection.These include rear impacts, secondor third collisions in multiple impactaccidents, as well as low speedimpacts. In other words, just becauseyour vehicle is damaged and even if itis totally unusable, don’t be surprisedthat the airbags did not inflate.
KNOWING YOUR VEHICLE
3-57
Airbag collision sensors➀ SRS control module➁ Front impact sensor
➂ Side impact sensor
S2BLA201A/5BLC326G/5BLA619/5BLD502
➀ ➁ ➂
➀
➁
➂
BL-ENG (CAN)-3.qxd 7/28/05 5:52 PM Page 57
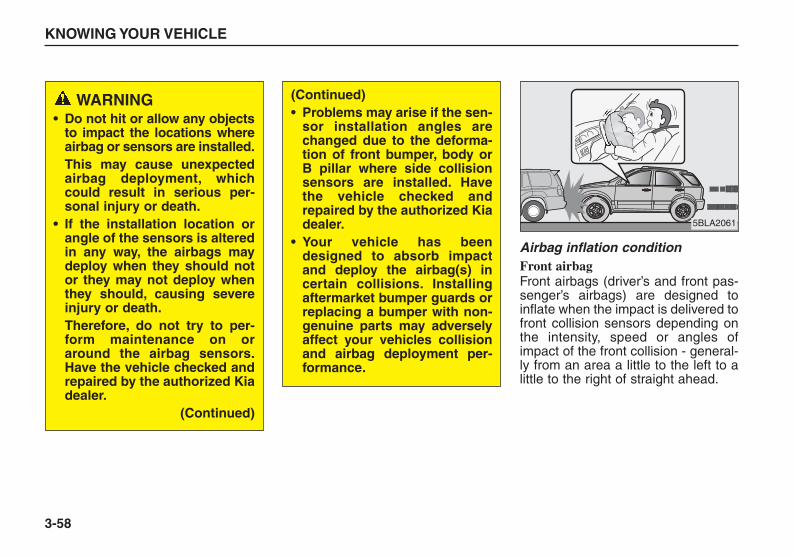
Airbag inflation conditionFront airbag Front airbags (driver’s and front pas-senger’s airbags) are designed toinflate when the impact is delivered tofront collision sensors depending onthe intensity, speed or angles ofimpact of the front collision - general-ly from an area a little to the left to alittle to the right of straight ahead.
KNOWING YOUR VEHICLE
3-58
WARNING• Do not hit or allow any objects
to impact the locations whereairbag or sensors are installed.This may cause unexpectedairbag deployment, whichcould result in serious per-sonal injury or death.
• If the installation location orangle of the sensors is alteredin any way, the airbags maydeploy when they should notor they may not deploy whenthey should, causing severeinjury or death.Therefore, do not try to per-form maintenance on oraround the airbag sensors.Have the vehicle checked andrepaired by the authorized Kiadealer.
(Continued)
(Continued)• Problems may arise if the sen-
sor installation angles arechanged due to the deforma-tion of front bumper, body orB pillar where side collisionsensors are installed. Havethe vehicle checked andrepaired by the authorized Kiadealer.
• Your vehicle has beendesigned to absorb impactand deploy the airbag(s) incertain collisions. Installingaftermarket bumper guards orreplacing a bumper with non-genuine parts may adverselyaffect your vehicles collisionand airbag deployment per-formance.
5BLA2061
BL-ENG (CAN)-3.qxd 7/28/05 5:52 PM Page 58

Curtain airbagCurtain airbags are designed toinflate when the impact is delivered toside collision sensors depending onthe strength, speed or angles ofimpact of side impact collision orrollover by the side impact.
Although the front airbags (driver’sand front passenger’s airbags) aredesigned to inflate only in frontal col-lision, it may inflate in any collision iffront impact sensors are deliveredwith certain impact.Curtain airbags are designed toinflate only in side impact collision, itmay inflate in any collision if sideimpact sensors are delivered withcertain impact.In other words, they may inflate inaccidents such as slant collision orimpact, collision or impact where thefront portion of the vehicle goesunder a vehicle with a higher groundclearance (bus or truck), collision witha utility pole or rollover. Therefore,drive safely at all times.If the vehicle chassis is impacted bybumps or objects on unimprovedroads or sidewalks, airbags maydeploy. Drive carefully on unimprovedroads or on surfaces not designed forvehicle traffic.To protect occupants, front airbags orpre-tensioner safety belts may deployin certain side impact collisions.
Airbag non-inflation conditions• In collisions, the vehicle safety belts
are sufficient to protect the vehicleoccupants and the airbags may notdeploy. In some cases, deployingairbags in low-speed collisions cancause a secondary impact to theoccupants (light abrasions, cuts,burns, etc.), or loss of vehicle con-trol.
KNOWING YOUR VEHICLE
3-59
5BLA2325BLA302
S2BLA351
BL-ENG (CAN)-3.qxd 7/28/05 5:52 PM Page 59

• Airbags may not inflate in rear colli-sions, because occupants aremoved backward by the force of theimpact. In this case, the airbags donot provide proper protection.
• Front airbags may not inflate in sideimpact collision, because occu-pants move to the direction of thecollision, and thus front airbagdeployment does not provide prop-er protection.However, curtain airbags mayinflate depending on the intensity,vehicle speed and angles ofimpact.
• In a slant impact or collision, Theforce delivered will be relativelyweaker than that of frontal or sidecollision. So, the airbags may notinflate.
KNOWING YOUR VEHICLE
3-60
1BLA2331BLA231 1BLA234
BL-ENG (CAN)-3.qxd 7/28/05 5:52 PM Page 60

• At the moment of an accident, driv-ers brake heavily with reflex. Insuch heavy braking, the front por-tion of the vehicle is lowered by theforce of the braking and the vehiclecan go under a vehicle with a high-er ground clearance. Airbags maynot inflate in this situation becauseimpacts may not be delivered ormay be delivered with less intensi-ty.
• Airbags may not inflate in rolloveraccidents because airbag deploy-ment would not provide proper pro-tection to the occupants.However, curtain airbags mayinflate when the vehicle is rolledover by a side impact collision.
• Airbags may not inflate if the vehi-cle collides with objects such asutility poles or trees, where thepoint of impact is concentrated toone area and the full force of theimpact is not delivered to the sen-sors.
KNOWING YOUR VEHICLE
3-61
5BLA20665BLA230 5BLA612
BL-ENG (CAN)-3.qxd 7/28/05 5:52 PM Page 61
How does the airbag system operate
• Airbag only operates when the igni-tion switch is turned to ON orSTART position.
• Airbags inflate instantly in the eventof serious frontal or side collision inorder to help protect the occupantsfrom serious physical injury.
• There is no single speed at whichthe airbags will inflate.Generally, airbags are designed toinflate by the severity of a collisionand its direction. These two factorsdetermine whether the sensorssend out an electronic deploy-ment/inflation signal.
• Airbag deployment depends on anumber of factors including vehiclespeed, angles of impact and thedensity and stiffness of the vehiclesor objects which your vehicle hits inthe collision. Though, factors arenot limited to those mentionedabove.
• The front airbags will completelyinflate and deflate in an instant.It is virtually impossible for you tosee the airbags inflate during anaccident. It is much more likely thatyou will simply see the deflatedairbags hanging out of their storagecompartments after the collision.
• In order to help provide protection ina severe collision, the airbags mustinflate rapidly. The speed of airbaginflation has been determined by theCanadian Motor Vehicle SafetyStandards (CMVSS) to reduce thelikelihood of serious or life-threaten-ing injuries and is thus a mandatorypart of the airbag design.However, airbag inflation can alsocause injuries which normally caninclude facial abrasions, bruisesand broken bones, because thatspeed also causes the airbags toexpand with a great deal force.
• There are even circumstancesunder which contact with thesteering wheel airbag can causefatal injuries, especially if theoccupant is positioned exces-sively close to the steeringwheel.
KNOWING YOUR VEHICLE
3-62
WARNING• Driver should sit as far back
(at least 10 inches (250 mm)away) from the steering wheelairbag as possible to reducethe risk of injury or death in acollision. The front passengershould always move their seatas far back as possible and sitback in their seat.
• Airbag inflates instantly in anevent of collision, passengersmay be injured by the airbagexpansion force if they are notin proper position.
• Airbag inflation may causeinjuries which normallyinclude facial or bodily abra-sions, injuries by the brokenglasses or burns by the explo-sives.
BL-ENG (CAN)-3.qxd 7/28/05 5:52 PM Page 62

Noise and smoke
When the airbags inflate, they makea loud noise and they leave smokeand powder in the air inside of thevehicle. This is normal and is a resultof the ignition of the airbag inflator.After the airbag inflates, you may feelsubstantial discomfort in breathingdue to the contact of your chest toboth the safety belt and the airbag, aswell as from breathing the smoke andpowder. We strongly urge you toopen your doors and/or windowsas soon as possible after impact inorder to reduce discomfort andprevent prolonged exposure to thesmoke and powder.Though smoke and powder are non-toxic, it may cause irritation to theskin (eyes, nose and throat etc). Ifthis is the case, wash and rinse withthe cold water immediately and con-sult the doctor if the symptom per-sists.
Installing a child restraint on afront passenger seat is forbidden.
Never place a rear-facing childrestraint in the front passenger seat.If the airbag deploys, it would impactthe rear-facing child restraint, caus-ing serious or fatal injury.In addition, do not place front-facingchild restraint in the front passengerseat either. If the front passengerairbag inflates, it would cause seriousor fatal injuries to the improperly posi-tioned or improperly restrained child.
KNOWING YOUR VEHICLE
3-63
WARNINGWhen the airbags deploy, theairbag related parts in steeringwheel and/or instrument paneland/or in both sides of the roofrails above the front and reardoors are very hot. To preventinjury, do not touch the airbagstorage areas internal compo-nents immediately after anairbag has inflated.
ADAIRBAG
BL-ENG (CAN)-3.qxd 7/28/05 5:52 PM Page 63
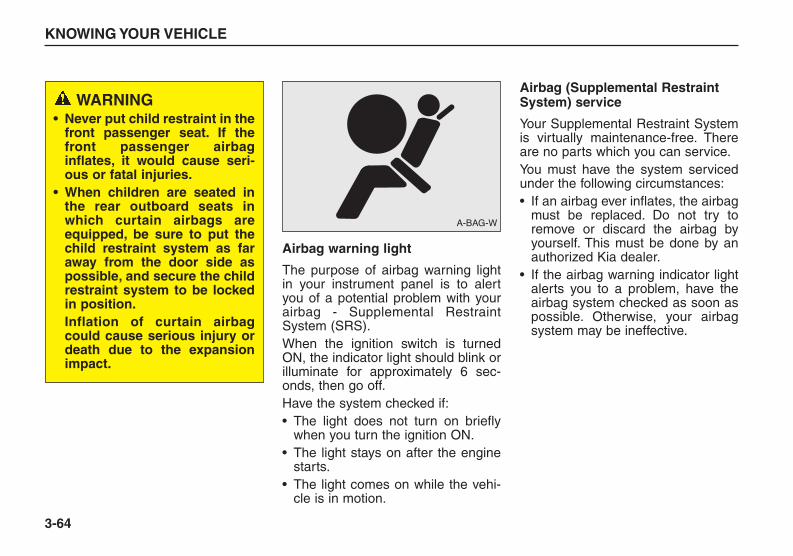
Airbag warning light
The purpose of airbag warning lightin your instrument panel is to alertyou of a potential problem with yourairbag - Supplemental RestraintSystem (SRS).When the ignition switch is turnedON, the indicator light should blink orilluminate for approximately 6 sec-onds, then go off.Have the system checked if:• The light does not turn on briefly
when you turn the ignition ON.• The light stays on after the engine
starts.• The light comes on while the vehi-
cle is in motion.
Airbag (Supplemental RestraintSystem) service
Your Supplemental Restraint Systemis virtually maintenance-free. Thereare no parts which you can service.You must have the system servicedunder the following circumstances:• If an airbag ever inflates, the airbag
must be replaced. Do not try toremove or discard the airbag byyourself. This must be done by anauthorized Kia dealer.
• If the airbag warning indicator lightalerts you to a problem, have theairbag system checked as soon aspossible. Otherwise, your airbagsystem may be ineffective.
KNOWING YOUR VEHICLE
3-64
A-BAG-W
WARNING• Never put child restraint in the
front passenger seat. If thefront passenger airbaginflates, it would cause seri-ous or fatal injuries.
• When children are seated inthe rear outboard seats inwhich curtain airbags areequipped, be sure to put thechild restraint system as faraway from the door side aspossible, and secure the childrestraint system to be lockedin position.Inflation of curtain airbagcould cause serious injury ordeath due to the expansionimpact.
BL-ENG (CAN)-3.qxd 7/28/05 5:52 PM Page 64

When repairing or scrapping thevehicles • Repairing steering wheel, instru-
ment panel, center console orroofs, or installing car audio aroundcenter console or painting frontmetal sheet could disable theairbag system. Have them checkedby an authorized Kia dealer.
• When leaving the vehicle at anauthorized Kia dealer, inform thatthe vehicle is equipped with airbagsystem, and leave the owner’smanual in the vehicle.
• Since airbag system containsexplosive chemical substances,contact an authorized Kia dealerwhen scrapping the vehicle.
KNOWING YOUR VEHICLE
3-65
CAUTION Do not modify any part of theSupplemental Restraint System.Excessive modification couldmake the airbag system ineffec-tive.
WARNING• Do not modify your steering
wheel, seat or any other partof the Supplemental RestraintSystem. Modification couldmake the system inoperable.
• Do not work on the system’scomponents or wiring. Thiscould cause the airbags toinflate inadvertently, possiblyseriously injuring someone.Working on the system couldalso disable the system sothat the airbags would notdeploy in a collision.
• Any work on the SRS system,such as removing, installing,repairing, or any work on thesteering wheel must be per-formed by a qualified Kiatechnician. Improper handlingof the airbag system mayresult in serious personalinjury.
BL-ENG (CAN)-3.qxd 7/28/05 5:52 PM Page 65

KNOWING YOUR VEHICLE
3-66
Airbag warning label
Airbag warning labels which are now required by the Canadian Motor Vehicle Safety Standards (CMVSS) are attachedto alert driver and passengers of potential risk of airbag system.Note that these government warnings focus on the risk to children, Kia also wants you to be aware of the risks whichadults are exposed to. Those have been described in previous pages.
➀
➁ PUSH
XXXXXXXXXXXXXXXXXXXXXXXX
XXXXXXXXXXXXXXXXXXXXXXXX
XXXXXXXXXXXXXXXXXXXXXXXX
XXXXXXXXXXXXXXXXXXXXXXXX
XXXXXXXXXXXXXXXXXXXXXXXXXXXXXXXXXXXXXXXXXXXXXXXXXXXXXXXXXXXXXXXXXXXXXXXXXXXXXXXXXXXXXXXXXXXXXXXX
You could cause the air bag to inflate or the system
may fail to operate which may result in severe personal injury.
Refer to Service Manual for further information.
Cela pourrait
gonfler le coussin de sécurité ou le mettre hors service et
entraîner des blessures. Voir le manuel de réparation.
WARNING
AVERTISSEMENT
➀
➁
5BLN0300/5BLA430H/5BLN0302
BL-ENG (CAN)-3.qxd 7/28/05 5:52 PM Page 66

REAR HATCH
Opening the Rear Hatch
To open the rear hatch from the out-side:1. Insert the door key into the lock
and turn it counterclockwise. Youcan also unlock the latch (but notrelease it) with the power door locksystem.
2. Reach under the license plate lightshield and pull the rear hatch han-dle to release the latch.
3. Pull the rear hatch back and up toopen.
Make certain that you close the rearhatch door before driving your vehi-cle. Possible damage may occur tothe rear hatch lift cylinders andattaching hardware if the rear hatchdoor is not closed prior to driving.
KNOWING YOUR VEHICLE
3-67
S2BLA612A S2BLA330B
LOCKUNLOCK
WARNINGThe rear hatch swings upward.Make sure no objects or peopleare near the rear of the vehiclewhen opening the hatch.
WARNING - Rear Hatch• Check to be sure the rear
hatch is completely closedbefore driving. If the rearhatch is open, exhaust gasescan enter the vehicle.
• Occupants should never ridein the rear cargo area whereno restraints are available. Toavoid injury in the event of anaccident or sudden stops,occupants should always beproperly restrained.
BL-ENG (CAN)-3.qxd 7/28/05 5:52 PM Page 67

Opening the Rear Hatch Window
To open the rear hatch window, pressthe rear hatch window release buttonand raise the rear hatch window atthe rear of the vehicle.
The window will raise completely byitself after it has been raised halfway.To close the rear hatch window, lowerand push down the rear hatch win-dow firmly. Make sure that the rearhatch window is securely fastened.You can also open the rear hatch win-dow by inserting the key into the rearhatch key cylinder and turning thekey to the right twice within 3 sec-onds and raising it.
KNOWING YOUR VEHICLE
3-68
S2BLC305E S2BLB351
✽✽ NOTICEIf the rear hatch window is leftopen or ajar, poisonous exhaustgases may enter the vehicle result-ing in serious illness or damage tothe occupants.
BL-ENG (CAN)-3.qxd 7/28/05 5:52 PM Page 68

HOOD
Opening the Hood:
1. Pull the release lever on the lowerleft side of the instrument panel tounlatch the hood.
2. Go to the front of the vehicle,slightly raise the hood, push thesecondary latch to the right and liftthe hood.
3. Raise the hood. It will raise com-pletely by itself after it has beenraised halfway.
KNOWING YOUR VEHICLE
3-69
S2BLA317AS2BLA419C S2BLA316
BL-ENG (CAN)-3.qxd 7/28/05 5:52 PM Page 69

Closing the Hood:
• Check the area under the hood tomake certain all filler caps are inplace and that all loose items havebeen removed.
• Lower the hood then push down toproperly lock in place.
• Check to make sure the hood isclosed.
FUEL FILLER LID
1. Pull the fuel filler lid out to open.2. To remove the cap, turn it counter-
clockwise.3. Hold the cap on the hook to avoid
damage on the surface of the vehi-cle.
4. Refuel the fuel tank.5. To install the cap, place it on the
fuel filler neck and turn it clockwiseuntil it “CLICKS”. This indicatesthat the cap is securely tightened.
KNOWING YOUR VEHICLE
3-70
WARNING - Refueling• If pressurized fuel sprays out,
it can cause serious injuries.Always remove the fuel capcarefully and slowly. If the capis venting fuel or if you hear ahissing sound, wait until thecondition stops before com-pletely removing the cap.
• Because your vehicle uses anORVR (On-board RefuellingVapor Recovery) system, “TopOFF” the vehicle very careful-ly to prevent fuel splash-back.
S2BLC318A
OPEN
CLOSE
WARNING• Before closing the hood,
make sure that all engineparts and tools have beenremoved from the engine areaand that no one’s hands arenear the hood opening.
• Do not leave gloves, rags orany other combustible materi-al in the engine compartment.Doing so may cause a heat-induced fire.
BL-ENG (CAN)-3.qxd 7/28/05 5:52 PM Page 70

KNOWING YOUR VEHICLE
3-71
WARNING Automotive fuels are flamma-ble/explosive materials. Whenrefueling, please note the fol-lowing guidelines carefully.Failure to follow these guide-lines may result in severe per-sonal injury, severe burns ordeath by fire or explosion.• Before refueling always note
the location of the EmergencyGasoline Shut-Off, if available,at the gas station facility.
• Before touching the fuel noz-zle or fuel filler cap, youshould eliminate potentiallydangerous static electricitydischarge by touching anoth-er metal part of the front of thevehicle, a safe distance awayfrom the fuel filler neck, noz-zle, or other gas source.
(Continued)
(Continued)• Do not get back into a vehicle
once you have begun refuel-ing. Do not touch, rub or slideagainst any item or fabric(polyester, satin, nylon, etc.)capable of producing staticelectricity. Static electricitydischarge can ignite fuelvapors resulting in explosion.If you must re-enter the vehi-cle, you should once againeliminate potentially danger-ous static electricity dis-charge by touching a metalpart of the vehicle, away fromthe fuel filler neck, nozzle orother gasoline source.
• When using a portable fuelcontainer be sure to place thecontainer on the ground priorto refueling. Static electricitydischarge from the containercan ignite fuel vapors causing afire. Once refueling has begun,contact with the vehicle shouldbe maintained until the filling iscomplete. Use only portablefuel containers designed tocarry and store gasoline.
(Continued)
(Continued)• Do not use cellular phones
around a gas station or whilerefueling any vehicle. Electriccurrent and/or electronicinterference from cellularphones can potentially ignitefuel vapors causing a fire. Ifyou must use your cellularphone use it in a place awayfrom the gas station.
• When refueling always shutthe engine off. Sparks pro-duced by electrical compo-nents related to the enginecan ignite fuel vapors causinga fire. Always insure that theengine is OFF before and dur-ing refueling. Once refuelingis complete, check to makesure the fuel filler cap anddoor are securely closed,before starting the engine.
(Continued)
BL-ENG (CAN)-3.qxd 7/28/05 5:52 PM Page 71

AUTO FUEL CUTOFF SWITCH
The auto fuel cutoff switch is locatedon the passenger’s side of the enginecompartment. In the event of a colli-sion or sudden impact, the auto fuelcutoff device cuts off the fuel supply.If this device is activated, it must bereset by pressing in on the top of theswitch before the engine can berestarted.
KNOWING YOUR VEHICLE
3-72
S2BLA392
WARNING Before resetting the auto fuelcutoff switch, the fuel lineshould be checked for fuelleaks.
✽✽ NOTICE• If the fuel filler cap requires
replacement, use only a genuineKia cap or the equivalent speci-fied for your vehicle. An incorrectfuel filler cap can result in a seri-ous malfunction of the fuel sys-tem or emission control system.Correct replacement caps areavailable at authorized Kia deal-ers.
• Do not spill fuel on the exteriorsurfaces of the vehicle. Any typeof fuel spilled on painted surfacesmay damage the paint.
• A loose fuel filler cap may causethe “Check Engine” light in theinstrument panel to illuminateunnecessarily.
• If the fuel filler lid will not openin cold weather because the areaaround it is frozen, push or light-ly tap the lid.
(Continued)• Do not light any fire around a
gas station. DO NOT usematches or a lighter and DONOT SMOKE or leave a lit cig-arette in your vehicle while ata gas station especially dur-ing refueling. Automotive fuelis highly flammable and can,when ignited, result in explo-sion by flames.
• If a fire breaks out duringrefueling, leave the vicinity ofthe vehicle, and immediatelycontact the manager of thegas station or contact thepolice and local fire depart-ment. Follow any safetyinstructions they provide.
BL-ENG (CAN)-3.qxd 7/28/05 5:52 PM Page 72
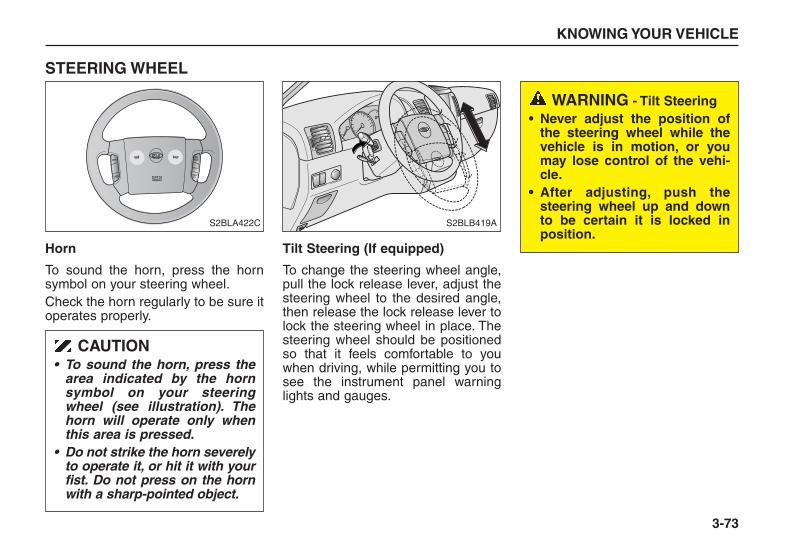
STEERING WHEEL
Horn
To sound the horn, press the hornsymbol on your steering wheel.Check the horn regularly to be sure itoperates properly.
Tilt Steering (If equipped)
To change the steering wheel angle,pull the lock release lever, adjust thesteering wheel to the desired angle,then release the lock release lever tolock the steering wheel in place. Thesteering wheel should be positionedso that it feels comfortable to youwhen driving, while permitting you tosee the instrument panel warninglights and gauges.
KNOWING YOUR VEHICLE
3-73
WARNING - Tilt Steering• Never adjust the position of
the steering wheel while thevehicle is in motion, or youmay lose control of the vehi-cle.
• After adjusting, push thesteering wheel up and downto be certain it is locked inposition.
SRSAIRBAG
RESACCEL
COASTSET
PWR
SEEK
CANCEL
S2BLA422C S2BLB419A
CAUTION• To sound the horn, press the
area indicated by the hornsymbol on your steeringwheel (see illustration). Thehorn will operate only whenthis area is pressed.
• Do not strike the horn severelyto operate it, or hit it with yourfist. Do not press on the hornwith a sharp-pointed object.
BL-ENG (CAN)-3.qxd 7/28/05 5:52 PM Page 73
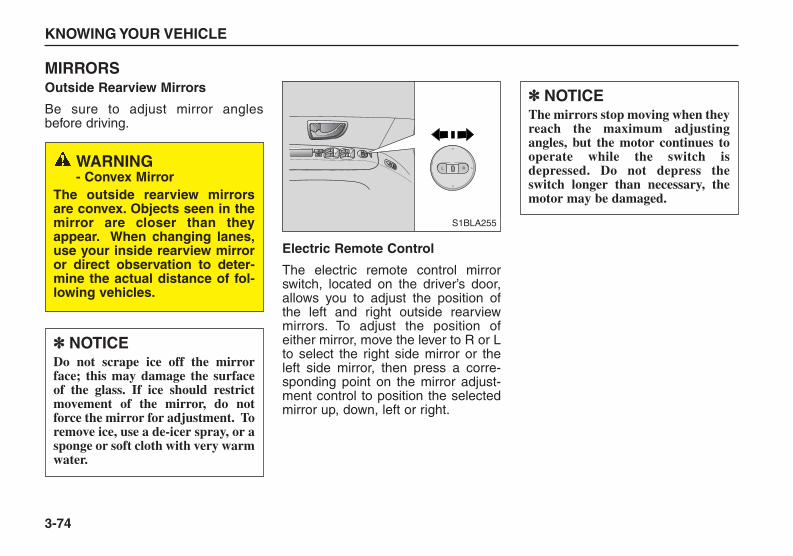
MIRRORSOutside Rearview Mirrors
Be sure to adjust mirror anglesbefore driving.
Electric Remote Control
The electric remote control mirrorswitch, located on the driver’s door,allows you to adjust the position ofthe left and right outside rearviewmirrors. To adjust the position ofeither mirror, move the lever to R or Lto select the right side mirror or theleft side mirror, then press a corre-sponding point on the mirror adjust-ment control to position the selectedmirror up, down, left or right.
KNOWING YOUR VEHICLE
3-74
L R
S1BLA255
WARNING- Convex Mirror
The outside rearview mirrorsare convex. Objects seen in themirror are closer than theyappear. When changing lanes,use your inside rearview mirroror direct observation to deter-mine the actual distance of fol-lowing vehicles.
✽✽ NOTICEDo not scrape ice off the mirrorface; this may damage the surfaceof the glass. If ice should restrictmovement of the mirror, do notforce the mirror for adjustment. Toremove ice, use a de-icer spray, or asponge or soft cloth with very warmwater.
✽✽ NOTICEThe mirrors stop moving when theyreach the maximum adjustingangles, but the motor continues tooperate while the switch isdepressed. Do not depress theswitch longer than necessary, themotor may be damaged.
BL-ENG (CAN)-3.qxd 7/28/05 5:52 PM Page 74
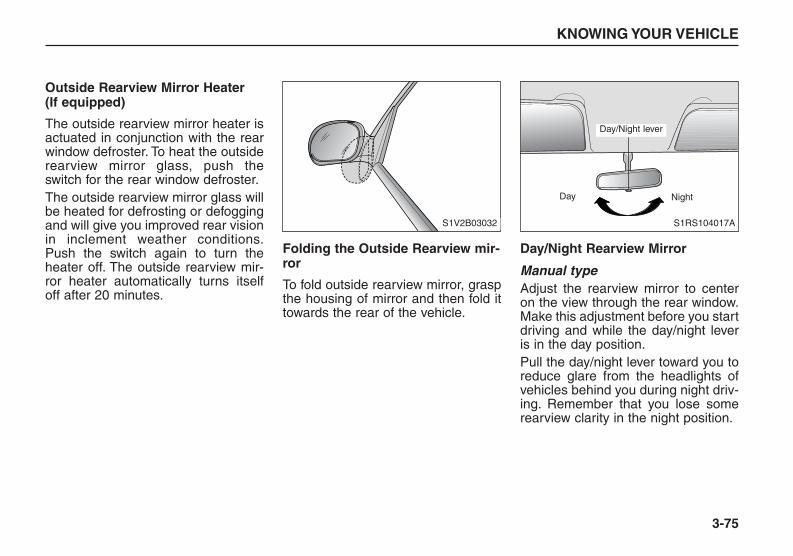
Outside Rearview Mirror Heater (If equipped)
The outside rearview mirror heater isactuated in conjunction with the rearwindow defroster. To heat the outsiderearview mirror glass, push theswitch for the rear window defroster.The outside rearview mirror glass willbe heated for defrosting or defoggingand will give you improved rear visionin inclement weather conditions.Push the switch again to turn theheater off. The outside rearview mir-ror heater automatically turns itselfoff after 20 minutes.
Folding the Outside Rearview mir-ror
To fold outside rearview mirror, graspthe housing of mirror and then fold ittowards the rear of the vehicle.
Day/Night Rearview Mirror
Manual typeAdjust the rearview mirror to centeron the view through the rear window.Make this adjustment before you startdriving and while the day/night leveris in the day position.Pull the day/night lever toward you toreduce glare from the headlights ofvehicles behind you during night driv-ing. Remember that you lose somerearview clarity in the night position.
KNOWING YOUR VEHICLE
3-75
S1V2B03032 S1RS104017A
Day Night
Day/Night lever
BL-ENG (CAN)-3.qxd 7/28/05 5:52 PM Page 75

Electric type (if equipped)The electric day/night rearview mirrorautomatically controls the glare fromthe headlights of the car behind you.Adjust the rearview mirror to thedesired position.Press the “O” button to turn the auto-matic- dimming function off. The mir-ror indicator light will turn off.Press the “I” button to turn the auto-matic- dimming function on. The mir-ror indicator light will illuminate.
INTERIOR LIGHTS
Map Light
The lights are switched ON or OFF bypressing the corresponding switches.
KNOWING YOUR VEHICLE
3-76
PUSH
TILT SLIDE
S2BLA430J
S2BLA430E
Type A
Type B
S2BLC301
CAUTIONDo not place objects in the rearseat or cargo area which wouldinterfere with your vision outthe rear window.
BL-ENG (CAN)-3.qxd 7/28/05 5:52 PM Page 76

Dome Light
The dome light has three buttons:OFF - The light stays OFF even
when a door is open.DOOR - The light turns ON or OFF
when a door is opened orclosed.The light goes out graduallyduring 5~6 seconds afterthe door is closed.
ON - The light turns ON and stays oneven when the doors are allclosed.
Rear Cargo Area Light
The switch has three positions:OFF - The light stays off even when a
door is open.
• - The light turns ON or OFF whena door is opened or closed.The light goes out gradually dur-ing 5~6 seconds after the door isclosed.
ON - The light turns ON and stays oneven when the doors are allclosed.
Door Courtesy Lamp
The door courtesy lamp comes ONwhen the door is opened to assistwhen you get in or out and also towarn passing vehicles.
KNOWING YOUR VEHICLE
3-77
OFF DOOR ON
S2BLA324
OFF ON
ONOFF
S2BLA325 S2BLA750A
BL-ENG (CAN)-3.qxd 7/28/05 5:52 PM Page 77
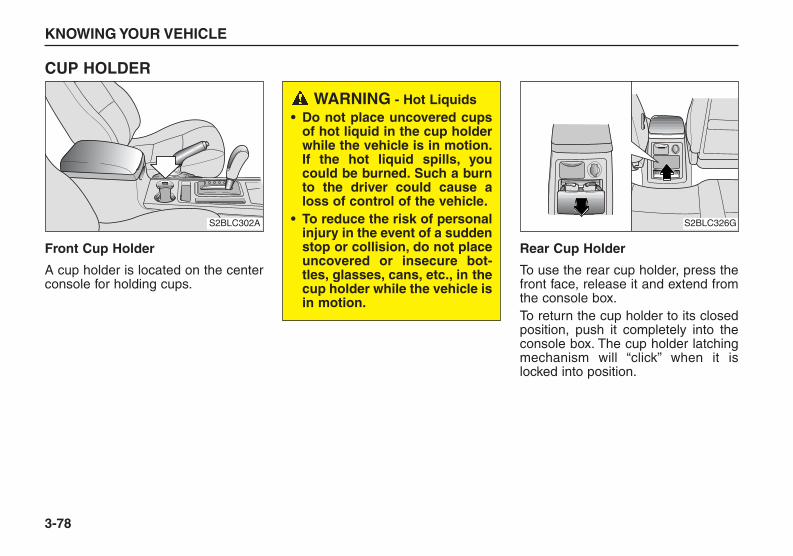
CUP HOLDER
Front Cup Holder
A cup holder is located on the centerconsole for holding cups.
Rear Cup Holder
To use the rear cup holder, press thefront face, release it and extend fromthe console box.To return the cup holder to its closedposition, push it completely into theconsole box. The cup holder latchingmechanism will “click” when it islocked into position.
KNOWING YOUR VEHICLE
3-78
S2BLC302A S2BLC326G
WARNING - Hot Liquids• Do not place uncovered cups
of hot liquid in the cup holderwhile the vehicle is in motion.If the hot liquid spills, youcould be burned. Such a burnto the driver could cause aloss of control of the vehicle.
• To reduce the risk of personalinjury in the event of a suddenstop or collision, do not placeuncovered or insecure bot-tles, glasses, cans, etc., in thecup holder while the vehicle isin motion.
BL-ENG (CAN)-3.qxd 7/28/05 5:52 PM Page 78
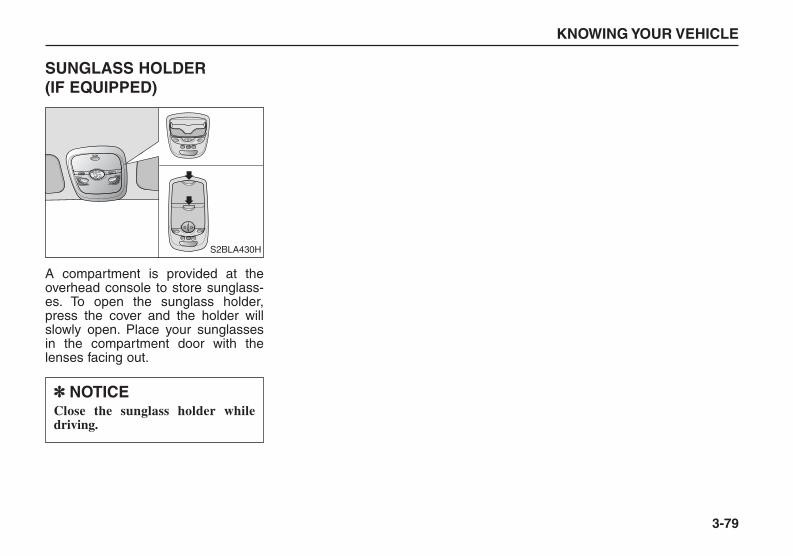
SUNGLASS HOLDER (IF EQUIPPED)
A compartment is provided at theoverhead console to store sunglass-es. To open the sunglass holder,press the cover and the holder willslowly open. Place your sunglassesin the compartment door with thelenses facing out.
KNOWING YOUR VEHICLE
3-79
PUSH
S2BLA430H
✽✽ NOTICEClose the sunglass holder whiledriving.
BL-ENG (CAN)-3.qxd 7/28/05 5:52 PM Page 79

STORAGE COMPARTMENT
Center Tray
To use the storage compartment,press the front face, and then releaseit to allow the storage compartment toslowly extend from the instrumentpanel.
Multi Box
The multi box may be opened bypulling it out by its handle grip. It canbe used for storing small items.
Center Console Storage
To use the console storage compart-ment, pull the cover up.
KNOWING YOUR VEHICLE
3-80
S2BLA339A
HM PASSENGER AIRBAG OFF
5BLA335A
LOW
AUTO
S2BLA411A
WARNINGDo not put gas lighters andother explosive materials in thevehicle.These may cause explo-sion if the vehicle is exposed forextended periods outside in hotweather.
BL-ENG (CAN)-3.qxd 7/28/05 5:52 PM Page 80
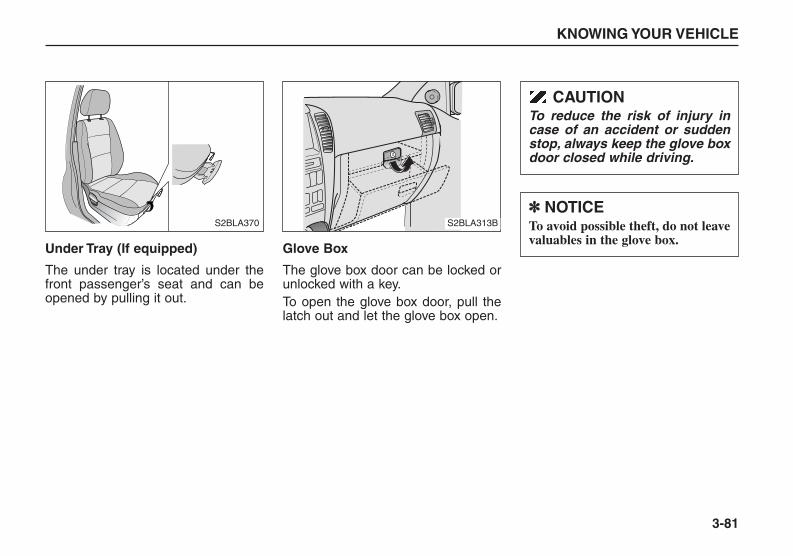
Under Tray (If equipped)
The under tray is located under thefront passenger’s seat and can beopened by pulling it out.
Glove Box
The glove box door can be locked orunlocked with a key.To open the glove box door, pull thelatch out and let the glove box open.
KNOWING YOUR VEHICLE
3-81
S2BLA370 S2BLA313B
CAUTIONTo reduce the risk of injury incase of an accident or suddenstop, always keep the glove boxdoor closed while driving.
✽✽ NOTICETo avoid possible theft, do not leavevaluables in the glove box.
BL-ENG (CAN)-3.qxd 7/28/05 5:52 PM Page 81
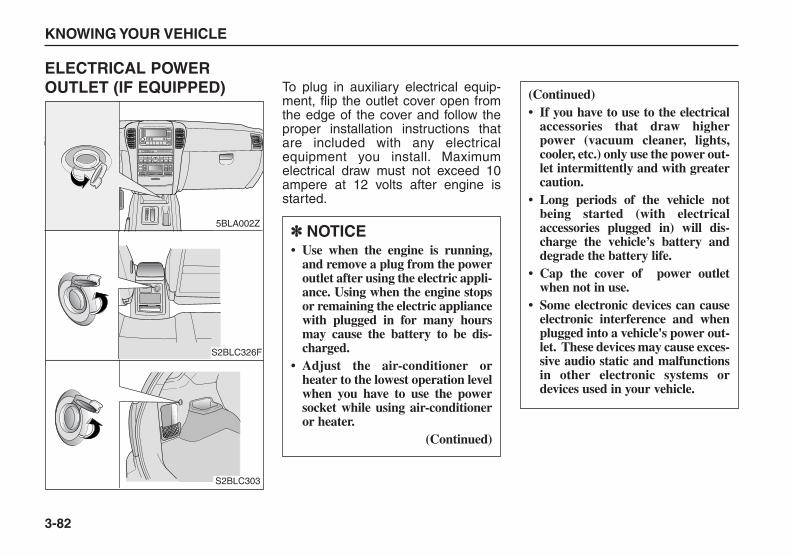
ELECTRICAL POWEROUTLET (IF EQUIPPED) To plug in auxiliary electrical equip-
ment, flip the outlet cover open fromthe edge of the cover and follow theproper installation instructions thatare included with any electricalequipment you install. Maximumelectrical draw must not exceed 10ampere at 12 volts after engine isstarted.
KNOWING YOUR VEHICLE
3-82
PRND2L
HM
5BLA002Z
S2BLC326F
S2BLC303
(Continued)• If you have to use to the electrical
accessories that draw higherpower (vacuum cleaner, lights,cooler, etc.) only use the power out-let intermittently and with greatercaution.
• Long periods of the vehicle notbeing started (with electricalaccessories plugged in) will dis-charge the vehicle’s battery anddegrade the battery life.
• Cap the cover of power outletwhen not in use.
• Some electronic devices can causeelectronic interference and whenplugged into a vehicle's power out-let. These devices may cause exces-sive audio static and malfunctionsin other electronic systems ordevices used in your vehicle.
✽✽ NOTICE• Use when the engine is running,
and remove a plug from the poweroutlet after using the electric appli-ance. Using when the engine stopsor remaining the electric appliancewith plugged in for many hoursmay cause the battery to be dis-charged.
• Adjust the air-conditioner orheater to the lowest operation levelwhen you have to use the powersocket while using air-conditioneror heater.
(Continued)
BL-ENG (CAN)-3.qxd 7/28/05 5:52 PM Page 82

SUNROOF (IF EQUIPPED)If your vehicle is equipped with thisfeature, you can slide or tilt your sun-roof with the sunroof switches locatedon the overhead console.
Sliding the Sunroof
The sunroof can be opened or closedwhen the ignition switch is in the “ON”position. To slide the sunroof,momentarily press “OPEN” ( ) onthe SLIDE switch. The sunroof willslide all the way open. To stop thesunroof sliding at any point, pressany sunroof switch. To close the sun-roof, press “CLOSE” ( ) on theSLIDE switch and hold it until it isclosed completely.
Tilting the Sunroof
To tilt the sunroof, momentarily press“UP” ( ) on the TILT switch. Thesunroof will tilt all the way up. To stopthe sunroof tilting at any point, pressany sunroof switches.To close it, press “DOWN” ( ) onthe TILT switch and hold it until it isclosed completely.
KNOWING YOUR VEHICLE
3-83
PUSH
TILT SLIDE
S2BLA430C
PUSH
TILT SLIDE
S2BLA430G
✽✽ NOTICEThe sunroof cannot slide when it isin the tilt position nor can it be tilt-ed while in an open or slide posi-tion.
BL-ENG (CAN)-3.qxd 7/28/05 5:52 PM Page 83

Sunshade
The sunshade will be opened withthe glass panel automatically whenthe glass panel is slid.You will have toclose it manually if you want it closed.
In case of an Emergency
If the sunroof does not open electri-cally:1. Remove the overhead console.2. Insert the emergency handle (pro-
vided with the vehicle) and turn thehandle clockwise to open or coun-terclockwise to close.
KNOWING YOUR VEHICLE
3-84
S2BLA361
✽✽ NOTICE• Do not depress the sunroof switch
longer than necessary. It couldcause the failure of the sunroofmotor.
• Periodically remove any dirt thatmay accumulate on the guide rail.
• If you try to open the sunroofwhen the temperature is belowfreezing or when the sunroof iscovered with snow or ice, theglass or the motor could be dam-aged.
BL-ENG (CAN)-3.qxd 7/28/05 5:52 PM Page 84

Resetting the Sunroof
When your battery happens to be dis-connected or discharged, or you usethe emergency handle to operate thesunroof, you have to reset your sun-roof system as follows:
1. Turn the ignition key to the ONposition
2. Tilt the sunroof up fully as follows:Case A : When the sunroof has
closed completely orbeen tilted:Press the TILT UP but-ton for 1 second thenrelease it.
Case B : When the sunroof hasslid open:Press and hold theclose button for morethan 5 seconds until thesunroof has closed com-pletely, then press theTILT UP button for 1second and release it.
3. Press and hold the TILT UP buttononce again until the sunroofmoves slightly and returns to theoriginal TILT UP position.
4. Release the TILT Up button whenthe procedure is finished. Thesunroof system is reset.
KNOWING YOUR VEHICLE
3-85
PUSH
TILT SLIDE
S2BLA738B
S2BLA329
BL-ENG (CAN)-3.qxd 7/28/05 5:52 PM Page 85

ANTENNA
Fixed Rod Antenna
Your car uses a fixed rod antenna toreceive both AM and FM broadcastsignals.This antenna is removable. Toremove the antenna, turn it counter-clockwise. To install the antenna, turnit clockwise.
LUGGAGE NET (IF EQUIPPED)
To keep items from shifting in thetrunk, you can use the four ringslocated in the trunk to attach thecargo net.
KNOWING YOUR VEHICLE
3-86
S2MS103019
S2BLB312C
CAUTION• Be sure to remove the anten-
na before washing the car inan automatic car wash or itmay be damaged.
• When reinstalling your anten-na, it is important that it isfully tightened to ensure prop-er reception.
BL-ENG (CAN)-3.qxd 7/28/05 5:52 PM Page 86

TONNEAU COVER (IF EQUIPPED)
Use the tonneau cover to hide itemsstored in the cargo area.
To use the tonneau cover, pull thehandle backward and insert theedges into the slots of the slide rails.
KNOWING YOUR VEHICLE
3-87
S2BLB312A
CAUTIONDo not put fragile, bulky orexcessive quantity of items intoluggage net. They could bedamaged.
S2BLB313WARNING
Avoid eye injury. DO NOT over-stretch. ALWAYS keep face andbody out of recoll path.DO NOT use when strap hasvisible signs of wear or dam-age.
BL-ENG (CAN)-3.qxd 7/28/05 5:52 PM Page 87

LUGGAGE CENTER BOX (IF EQUIPPED)
The luggage center box is locatedunder the floor in cargo area.You canplace a first aid kit, a reflector trian-gle, tools, etc. in the box for easyaccess.
1. Grasp the handle on the top of thecover and lift it.
2. Detach the hook from the coverand hang it on the top edge of theroof.
To close the cover, hang the hook onthe bottom of the cover.
KNOWING YOUR VEHICLE
3-88
S2BLB312B
S2BLB314
CAUTION• Do not place objects on the
tonneau cover. Such objectsmay be thrown about insidethe vehicle and possiblyinjure vehicle occupants dur-ing an accident or when brak-ing.
• Never allow anyone to ride inthe luggage compartment. Itis designed for luggage only.
• Maintain the balance of thevehicle and locate the weightas far forward as possible.
✽✽ NOTICESince the tonneau cover may bedamaged or malformed, do not putthe luggage on it when it is used.
BL-ENG (CAN)-3.qxd 7/28/05 5:52 PM Page 88

ROOF RACK (IF EQUIPPED)
If the vehicle has a roof rack, you canload things on top of your vehicle.Thetwo cross bars on the roof rack canbe repositioned forward or rearwardfor conveniently loading cargo or lug-gage. With an assistant on the oppo-site side of the vehicle, press andhold the slider lock buttons on eachside, then move the cross bar to thedesired position. Release the buttonsand lock the cross bar by moving thecrossbar slightly forward or rearward.
• Loading cargo or luggage above 45 kg (100 lbs) on the roof rackmay damage your vehicle.When you carry large objects,never let them hang over the rear orthe sides of your vehicle.
• To prevent damage or loss of cargoas you are driving, check frequent-ly to make sure the luggage carrierand cargo are still securely fas-tened.
• Always drive your vehicle at a mod-erate speed.
• Loading cargo or luggage overspecification on the roof rack maydamage stability of your vehicle.
KNOWING YOUR VEHICLE
3-89
S2BLA618B
ROOF RACK45 kg (100 lbs.)
EVENLY DISTRIBUTED
✽✽ NOTICE• The cross bars should be posi-
tioned before carrying a load onthe roof rack.
• In case the sunroof is equipped,do not position roof rack loadsthat could interfere with openingof the sunroof.
• The following specification ismaximum weight when loadingcargo or luggage.
BL-ENG (CAN)-3.qxd 7/28/05 5:52 PM Page 89
4-1
DRIVING YOUR VEHICLE
Ignition Switch . . . . . . . . . . . . . . . . . . . . . . . . . . . . . . . . . . . . 4-2Starting the Gasoline Engine . . . . . . . . . . . . . . . . . . . . . . . . 4-4Manual Transmission . . . . . . . . . . . . . . . . . . . . . . . . . . . . . . . 4-7Automatic Transmission . . . . . . . . . . . . . . . . . . . . . . . . . . . . 4-9Four Wheel Drive(4WD) . . . . . . . . . . . . . . . . . . . . . . . . . . . . 4-20Limited Slip Differential . . . . . . . . . . . . . . . . . . . . . . . . . . . . 4-30Brake System . . . . . . . . . . . . . . . . . . . . . . . . . . . . . . . . . . . . 4-30Power Steering . . . . . . . . . . . . . . . . . . . . . . . . . . . . . . . . . . . 4-37Cruise Control . . . . . . . . . . . . . . . . . . . . . . . . . . . . . . . . . . . 4-38Instrument Cluster . . . . . . . . . . . . . . . . . . . . . . . . . . . . . . . 4-41Gauges . . . . . . . . . . . . . . . . . . . . . . . . . . . . . . . . . . . . . . . . . 4-43Warnings and Indicators . . . . . . . . . . . . . . . . . . . . . . . . . . . 4-45Multi-Meter . . . . . . . . . . . . . . . . . . . . . . . . . . . . . . . . . . . . . . 4-52Lighting . . . . . . . . . . . . . . . . . . . . . . . . . . . . . . . . . . . . . . . . 4-58Wipers and Washers . . . . . . . . . . . . . . . . . . . . . . . . . . . . . . 4-62Defroster . . . . . . . . . . . . . . . . . . . . . . . . . . . . . . . . . . . . . . . . 4-65Hazard Warning Flasher . . . . . . . . . . . . . . . . . . . . . . . . . . . . 4-66Interior Features . . . . . . . . . . . . . . . . . . . . . . . . . . . . . . . . . . 4-67Manual Climate Control System . . . . . . . . . . . . . . . . . . . . . 4-71Automatic Climate Control System . . . . . . . . . . . . . . . . . . . 4-79Windshield Defrosting and Defogging (Manual type) . . . . . 4-86Windshield Defrosting and Defogging (Automatic type) . . 4-88
4
BL-ENG (CAN)-4.qxd 7/28/05 5:55 PM Page 1

IGNITION SWITCH
Illuminated Ignition Switch
Whenever a door is opened, the igni-tion switch will be illuminated for yourconvenience, provided the ignitionswitch is not in the ON position. Thelight will go off approximately 10 sec-onds after closing the door or whenthe ignition switch is turned on.
Ignition Switch and Anti-TheftSteering Column Lock
Ignition switch positionLOCKThe steering wheel locks to protectagainst theft. The ignition key can beremoved only in the LOCK position.When turning the ignition switch tothe LOCK position, push the keyinward at the ACC position and turnthe key toward the LOCK position.
ACC (Accessory)The steering wheel is unlocked andelectrical accessories are operative.
ONThe warning lights can be checkedbefore the engine is started. This isthe normal running position after theengine is started.Do not leave the ignition switch ON ifthe engine is not running. The batterywill discharge.
STARTTurn the ignition key to the STARTposition to start the engine. Theengine will crank until you release thekey; then it returns to the ON position.The brake warning lamp can bechecked in this position.If difficulty is experienced in turningthe ignition key to the START posi-tion, turn the steering wheel right andleft to release the tension and thenturn the key.
DRIVING YOUR VEHICLE
4-2
PUSH
LOC
K
ACC ON
STAR
T
S2BLA401A
✽✽ NOTICE - ManualTransmission
For your safety, the engine will notstart if the clutch pedal is not fullydepressed.
BL-ENG (CAN)-4.qxd 7/28/05 5:55 PM Page 2
DRIVING YOUR VEHICLE
4-3
Automatic TransaxleWhen turning the ignition switch tothe LOCK position, the shift levermust be in the P (Park) position.
Manual TransaxleWhen turning the ignition switch tothe LOCK position, push the keyinward at the ACC position and turnthe key toward the LOCK position.
WARNING - Ignition Key• It is dangerous to turn the
ignition switch to LOCK orACC while the vehicle is mov-ing. You could lose control ofsteering and braking.
• The anti-theft steering columnlock (if equipped) is not a sub-stitute for the parking brake.Before leaving the driver’sseat, always make sure theshift lever is engaged in 1stgear for manual transmission,or P (Park) for automatictransmission. Set the parkingbrake fully AND shut theengine off. If you do not takethese precautions, the vehiclemay move suddenly andunexpectedly. Take the igni-tion key with you.
(Continued)
(Continued)• Never reach through the
steering wheel for the ignitionswitch or any other controlswhile the vehicle is moving.The presence of your hand orarm in this area could cause aloss of vehicle control, anaccident and serious bodilyinjury or fatal injury.
BL-ENG (CAN)-4.qxd 7/28/05 5:55 PM Page 3
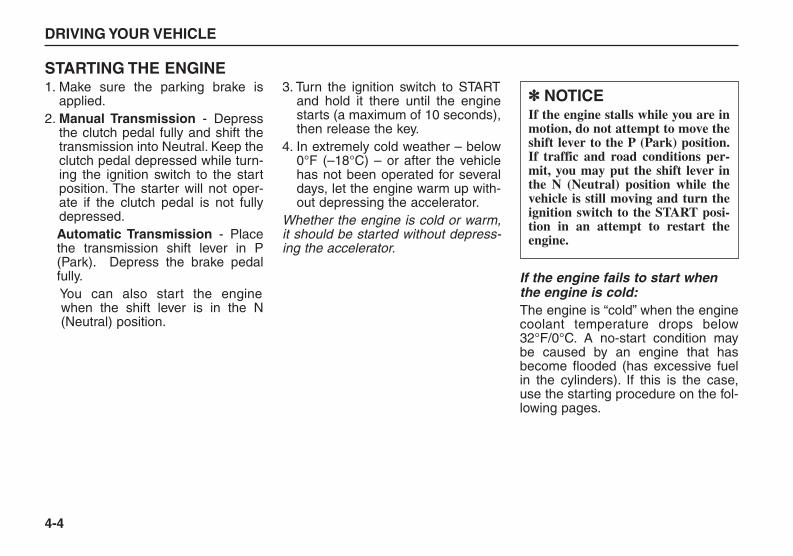
STARTING THE ENGINE1. Make sure the parking brake is
applied.2. Manual Transmission - Depress
the clutch pedal fully and shift thetransmission into Neutral. Keep theclutch pedal depressed while turn-ing the ignition switch to the startposition. The starter will not oper-ate if the clutch pedal is not fullydepressed.Automatic Transmission - Placethe transmission shift lever in P(Park). Depress the brake pedalfully.You can also start the enginewhen the shift lever is in the N(Neutral) position.
3. Turn the ignition switch to STARTand hold it there until the enginestarts (a maximum of 10 seconds),then release the key.
4. In extremely cold weather – below0°F (–18°C) – or after the vehiclehas not been operated for severaldays, let the engine warm up with-out depressing the accelerator.
Whether the engine is cold or warm,it should be started without depress-ing the accelerator.
If the engine fails to start whenthe engine is cold:The engine is “cold” when the enginecoolant temperature drops below32°F/0°C. A no-start condition maybe caused by an engine that hasbecome flooded (has excessive fuelin the cylinders). If this is the case,use the starting procedure on the fol-lowing pages.
DRIVING YOUR VEHICLE
4-4
✽✽ NOTICEIf the engine stalls while you are inmotion, do not attempt to move theshift lever to the P (Park) position.If traffic and road conditions per-mit, you may put the shift lever inthe N (Neutral) position while thevehicle is still moving and turn theignition switch to the START posi-tion in an attempt to restart theengine.
BL-ENG (CAN)-4.qxd 7/28/05 5:55 PM Page 4
1. Make sure the parking brake isapplied.
2. Manual Transmission - Depressthe clutch pedal fully and shift thetransmission into Neutral. Keep theclutch pedal depressed while turn-ing the ignition switch to the startposition. The starter will not oper-ate if the clutch pedal is not fullydepressed.Automatic Transmission - Placethe transmission shift lever in P(Park) or N (Neutral). Depress thebrake pedal fully.
3. While fully depressing the acceler-ator, turn the ignition switch to theSTART position and hold it (a max-imum of 10 seconds) to dischargethe excess fuel.If the engine starts, the enginespeed will increase suddenly;release the key and the accelera-tor immediately.
4. If the engine has not yet started,release the accelerator after crank-ing the engine. Without depressingthe accelerator, crank the engineuntil it starts (a maximum of 10seconds).
If the engine fails to start whenthe engine is warm:A no-start condition, characterized byfailure to restart a warmed enginedespite repeated attempts may beeliminated by using the following pro-cedure.1. Make sure the parking brake is
applied.2. Manual Transmission - Depress
the clutch pedal fully and shift thetransmission into Neutral. Keep theclutch pedal depressed while turn-ing the ignition switch to the startposition. The starter will not oper-ate if the clutch pedal is not fullydepressed.Automatic Transmission - Placethe transmission shift lever in P(Park) or N (Neutral). Depress thebrake pedal fully.
DRIVING YOUR VEHICLE
4-5
BL-ENG (CAN)-4.qxd 7/28/05 5:55 PM Page 5

3. While depressing the acceleratorabout halfway, turn the ignitionswitch to the START position andhold it (a maximum of 10 seconds).
4. Let the engine idle for about 10seconds before driving.
The starter will not operate if:• Manual transmission - the clutch
pedal is not fully depressed.• Automatic transmission - the shift
lever is NOT in the P (Park) or N(Neutral) position.
Excessive engine noise may occur ifthe engine has not been operated foran extended period.The noise shouldstop after the engine has reachednormal operating temperature. If thenoise does not stop, have the vehicleinspected by an authorized Kia deal-er.
DRIVING YOUR VEHICLE
4-6
✽✽ NOTICEDo not engage the starter for morethan 10 seconds. If the engine stallsor fails to start, wait 5 to 10 secondsbefore re-engaging the starter.Improper use of the starter maydamage it.
BL-ENG (CAN)-4.qxd 7/28/05 5:55 PM Page 6
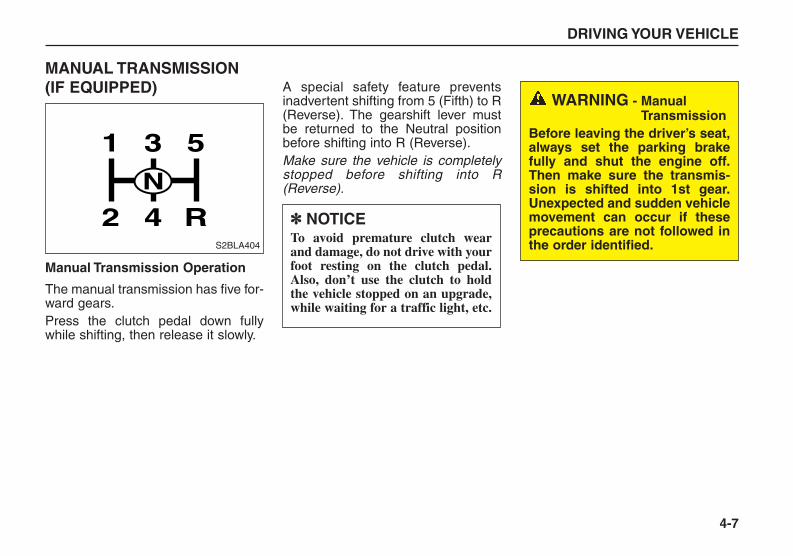
MANUAL TRANSMISSION (IF EQUIPPED)
Manual Transmission Operation
The manual transmission has five for-ward gears.Press the clutch pedal down fullywhile shifting, then release it slowly.
A special safety feature preventsinadvertent shifting from 5 (Fifth) to R(Reverse). The gearshift lever mustbe returned to the Neutral positionbefore shifting into R (Reverse).Make sure the vehicle is completelystopped before shifting into R(Reverse).
DRIVING YOUR VEHICLE
4-7
✽✽ NOTICETo avoid premature clutch wearand damage, do not drive with yourfoot resting on the clutch pedal.Also, don’t use the clutch to holdthe vehicle stopped on an upgrade,while waiting for a traffic light, etc.
N
1 3 5
2 4 RS2BLA404
WARNING - ManualTransmission
Before leaving the driver’s seat,always set the parking brakefully and shut the engine off.Then make sure the transmis-sion is shifted into 1st gear.Unexpected and sudden vehiclemovement can occur if theseprecautions are not followed inthe order identified.
BL-ENG (CAN)-4.qxd 7/28/05 5:55 PM Page 7

Recommended Shift Speeds
The chart shows when to shift forsmooth driving and best fuel econo-my.This data has been obtained throughtests. You are encouraged to followthis shift schedule.
You may have to upshift at higherspeeds than those above if you needmore power while you are driving ona hill or passing another vehicle.However, never operate the enginewith the tachometer (RPM) in the redarea.
Downshifting
When you must slow down in heavytraffic or while driving up steep hills,downshift before the engine starts to“labor’’. Downshifting reduces thechance of stalling and gives betteracceleration when you again need toincrease your speed. When the vehi-cle is traveling down steep hills,downshifting helps maintain safespeed and prolongs brake life.
DRIVING YOUR VEHICLE
4-8
Gear Position Speeds - km/h (Mph)
1 0 – 21 (0 – 13)
2 21 – 40 (13 – 25)
3 40 – 60 (25 – 37)
4 40 – 60 (25 – 37)
5 over 72 (over 45)
BL-ENG (CAN)-4.qxd 7/28/05 5:55 PM Page 8
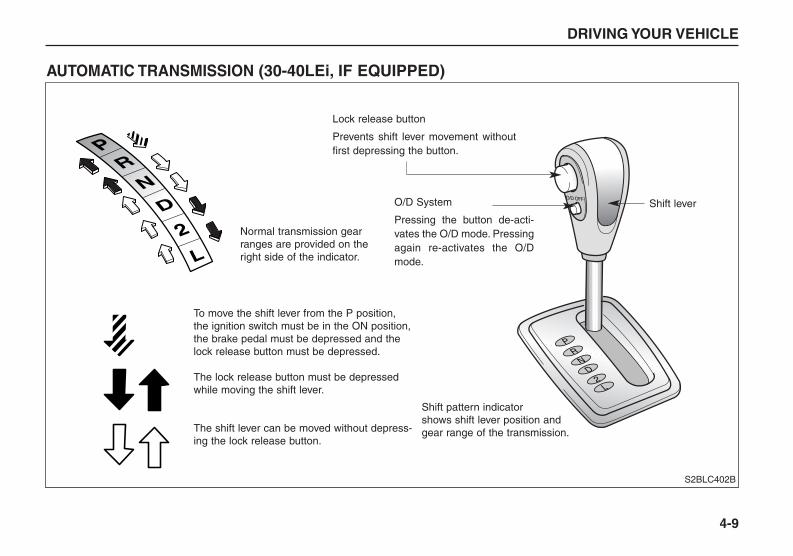
DRIVING YOUR VEHICLE
4-9
PR
ND
2L
O/D OFF
PR
ND
2L
S2BLC402B
AUTOMATIC TRANSMISSION (30-40LEi, IF EQUIPPED)
Normal transmission gearranges are provided on theright side of the indicator.
Lock release button
Prevents shift lever movement withoutfirst depressing the button.
Shift pattern indicatorshows shift lever position andgear range of the transmission.
To move the shift lever from the P position,the ignition switch must be in the ON position,the brake pedal must be depressed and thelock release button must be depressed.
The lock release button must be depressedwhile moving the shift lever.
The shift lever can be moved without depress-ing the lock release button.
O/D System
Pressing the button de-acti-vates the O/D mode. Pressingagain re-activates the O/Dmode.
Shift lever
BL-ENG (CAN)-4.qxd 7/28/05 5:55 PM Page 9

Automatic TransmissionOperation
The automatic transmission is elec-tronically controlled.All normal forward driving is donewith the shift lever in the D (Drive)position.
To move the shift lever from the P(Park) position, the ignition switchmust be in the ON position, the brakepedal must be depressed and thelock release button must bedepressed.For smooth operation, depress thebrake pedal when shifting from N(Neutral) to a forward or reverse gear.
DRIVING YOUR VEHICLE
4-10
PR
ND
2L
O/D OFF
PR
ND
2L
S2BLA402C
WARNING- Automatic Transaxle
Before leaving the driver’s seat,always make sure the shift leveris in the P (PARK) position; thenset the parking brake fully andshut the engine off. Unexpectedand sudden vehicle movementcan occur if these precautionsare not followed in the orderidentified.
✽✽ NOTICE• To avoid damage to your trans-
mission, do not accelerate theengine in R (Reverse) or any for-ward gear position with thebrakes on.
• When stopped on an upgrade, donot hold the vehicle stationarywith engine power. Use the serv-ice brake or the parking brake.
• Do not shift from N (Neutral) orP (Park) into L (Low), 2 (SecondGear), D (Drive), or R (Reverse)when the engine is above idlespeed.
✽✽ NOTICEIf the Emission Control SystemMalfunction Indicator Light ( )flashes, it indicates an electricalproblem with the transmission.Should this occur, have the vehiclechecked by an Authorized KiaDealer as soon as possible.
CHECK
BL-ENG (CAN)-4.qxd 7/28/05 5:55 PM Page 10

Shift Lock System
For your safety, the AutomaticTransmission has a shift lock systemwhich prevents shifting the transmis-sion out of P (Park) unless the brakepedal is depressed.To shift the transmission out of P(Park):1. Depress and hold the brake pedal.2. Start the engine or turn the ignition
to the ON position.3. Depress the lock release button
and move the shift lever.When the ignition switch is in theACC or LOCK position, the transmis-sion cannot be shifted from P (Park).
If the brake pedal is repeatedlydepressed and released with the shiftlever in the P (Park) position, a chat-tering noise near the shift lever maybe heard. This is a normal condition.Also, the ignition key cannot beremoved unless the shift lever is inthe P (Park) position. If the ignitionswitch is in any other position, the keycannot be removed.
Transmission Ranges
O/D (OverDrive) SystemPressing the O/D system button can-cels and engages the overdrive sys-tem. When the O/D system is can-celled (button is pressed), the O/DOFF indicator illuminates and thetransmission gear range is limited to1st through 3rd. The transmission willnot shift to 4th gear until the O/D sys-tem button is pressed again torelease the switch.
DRIVING YOUR VEHICLE
4-11
PR
ND
2L
O/D OFF
S2BLA407
BL-ENG (CAN)-4.qxd 7/28/05 5:55 PM Page 11

When driving down a sloping roadwith the transaxle in O/D (5th), youcan decrease the vehicle speed with-out using the brakes by pressing theO/D OFF button.When the ignition is switched OFF,O/D OFF mode is automatically can-celled.
O/D OFF indicatorThis indicator light illuminates in theinstrument panel when the O/D modeis cancelled.
P (Park)This position locks the transmissionand prevents the front wheels fromrotating. Always come to a completestop before shifting into this position.
DRIVING YOUR VEHICLE
4-12
✽✽ NOTICEIf the O/D OFF indicator flashes, itindicates an electrical problem withthe transaxle. Should this occur,have the vehicle checked by anAuthorized Kia Dealer as soon aspossible.
WARNING• Shifting into P (Park) while the
vehicle is in motion will causethe drive wheels to lock whichwill cause you to lose controlof the vehicle.
• Do not use the P (Park) posi-tion in place of the parkingbrake. Always make sure theshift lever is latched in the P(Park) position so that it can-not be moved unless the lockrelease button is pushed in,AND set the parking brakefully.
(Continued)
(Continued)• Before leaving the driver’s
seat, always make sure theshift lever is in the P (PARK)position. Set the parkingbrake fully, shut the engine offand take the key with you.Unexpected and sudden vehi-cle movement can occur ifyou do not follow these pre-cautions in the order speci-fied.
• Never leave a child unattend-ed in a vehicle.
CAUTIONThe transmission may be dam-aged if you shift into P (Park)while the vehicle is in motion.
BL-ENG (CAN)-4.qxd 7/28/05 5:55 PM Page 12
R (Reverse)Use this position to drive the vehiclebackward.
N (Neutral)With the gearshift in the N position,the wheels and transmission are notlocked. The vehicle will roll freelyeven if the transfer case is in gear,unless the parking brake or servicebrakes are applied.
D (Drive)This is the normal forward drivingposition. The transmission will auto-matically shift through a four-gearsequence, providing the best econo-my and power.
For extra power when passing anoth-er vehicle or climbing grades,depress the accelerator fully, at whichtime the transmission will automati-cally downshift to the next lower gear.
2 (Second Gear)Use 2 (Second Gear) for more powerwhen climbing hills and for increasedbraking when going down hills. Thisposition also helps reduce wheel spinon slippery surfaces. When the shiftlever is placed in 2 (Second Gear),the transmission will automaticallyshift from first to second gear.Downshifting from second to firstgear is possible below speeds of 26miles per hour (43 km/h). Do notexceed 36 miles per hour (60 km/h)while in second gear.
L (Low)Move the shift lever to this position inhard pulling situations and for climb-ing steep grades. Do not exceed 22miles per hour (35 km/h) while inLow.
DRIVING YOUR VEHICLE
4-13
✽✽ NOTICEAlways come to a complete stopbefore shifting into or out of R(Reverse); you may damage thetransmission if you shift into Rwhile the vehicle is in motion,except as explained in “Rocking theVehicle”, in this manual.
BL-ENG (CAN)-4.qxd 7/28/05 5:55 PM Page 13
Moving Up a Steep Grade From aStanding Start
To move up a steep grade from astanding start, depress the brakepedal, shift the shift lever to D (Drive),2 (Second) or L (Low) depending onload weight and steepness of thegrade, and release the parking brake.Depress the accelerator graduallywhile releasing the service brakes.
DRIVING YOUR VEHICLE
4-14
✽✽ NOTICEDo not exceed the recommendedmaximum speeds in 2 (SecondGear) or L (Low). Operating thevehicle at speeds above the maxi-mum recommended, for these gearsmay cause excessive heat to developwhich could result in damage to orfailure of the automatic transmis-sion.
BL-ENG (CAN)-4.qxd 7/28/05 5:55 PM Page 14

DRIVING YOUR VEHICLE
4-15
AUTOMATIC TRANSMISSION (A5SR1, IF EQUIPPED)
5BLA402
The lock release button must be depressed while moving the shift lever.
The lock release button must be depressed while moving the shift lever.
To move the shift lever from the P position, the ignition switch must be in the ON position,the brake pedal must be depressed and the lock release button must be depressed.
+ (UP)
- (DOWN)
Sports modeAutomatic mode
Lock release button prevents shift levermovement without first depressing thebutton.
BL-ENG (CAN)-4.qxd 7/28/05 5:55 PM Page 15
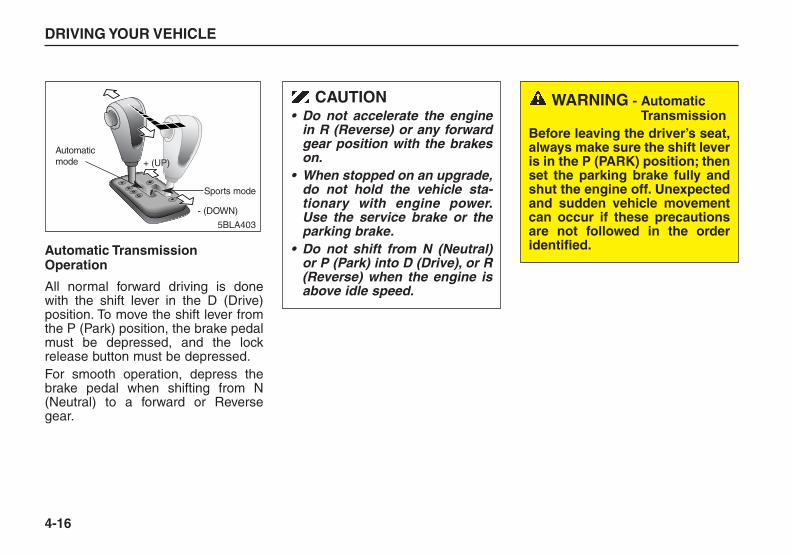
Automatic TransmissionOperation
All normal forward driving is donewith the shift lever in the D (Drive)position. To move the shift lever fromthe P (Park) position, the brake pedalmust be depressed, and the lockrelease button must be depressed.For smooth operation, depress thebrake pedal when shifting from N(Neutral) to a forward or Reversegear.
DRIVING YOUR VEHICLE
4-16
CAUTION• Do not accelerate the engine
in R (Reverse) or any forwardgear position with the brakeson.
• When stopped on an upgrade,do not hold the vehicle sta-tionary with engine power.Use the service brake or theparking brake.
• Do not shift from N (Neutral)or P (Park) into D (Drive), or R(Reverse) when the engine isabove idle speed.
WARNING - AutomaticTransmission
Before leaving the driver’s seat,always make sure the shift leveris in the P (PARK) position; thenset the parking brake fully andshut the engine off. Unexpectedand sudden vehicle movementcan occur if these precautionsare not followed in the orderidentified.
5BLA403
+ (UP)
- (DOWN)
Automaticmode
Sports mode
BL-ENG (CAN)-4.qxd 7/28/05 5:55 PM Page 16
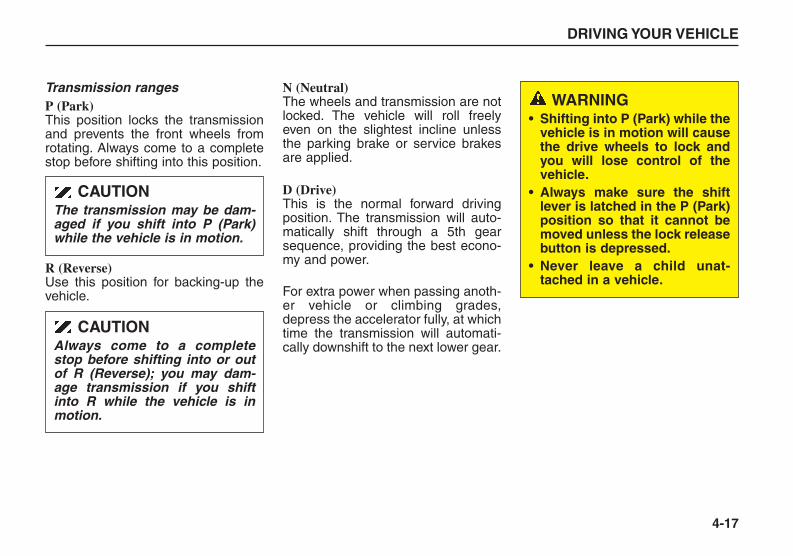
Transmission ranges P (Park)This position locks the transmissionand prevents the front wheels fromrotating. Always come to a completestop before shifting into this position.
R (Reverse)Use this position for backing-up thevehicle.
N (Neutral)The wheels and transmission are notlocked. The vehicle will roll freelyeven on the slightest incline unlessthe parking brake or service brakesare applied.
D (Drive)This is the normal forward drivingposition. The transmission will auto-matically shift through a 5th gearsequence, providing the best econo-my and power.
For extra power when passing anoth-er vehicle or climbing grades,depress the accelerator fully, at whichtime the transmission will automati-cally downshift to the next lower gear.
DRIVING YOUR VEHICLE
4-17
CAUTIONThe transmission may be dam-aged if you shift into P (Park)while the vehicle is in motion.
CAUTIONAlways come to a completestop before shifting into or outof R (Reverse); you may dam-age transmission if you shiftinto R while the vehicle is inmotion.
WARNING• Shifting into P (Park) while the
vehicle is in motion will causethe drive wheels to lock andyou will lose control of thevehicle.
• Always make sure the shiftlever is latched in the P (Park)position so that it cannot bemoved unless the lock releasebutton is depressed.
• Never leave a child unat-tached in a vehicle.
BL-ENG (CAN)-4.qxd 7/28/05 5:55 PM Page 17

Sports Mode
Whether the vehicle is stationary or inmotion, sports mode is selected bypushing the shift lever from the “D”position into the manual gate. Toreturn to “D” range operation, pushthe shift lever back into the maingate.
In sports mode, moving the shift leverbackwards and forwards will allowyou to make gearshifts rapidly. In con-trast to a manual transmission, thesports mode allows gearshifts withthe accelerator pedal depressed.
Up (+) : Push the lever forwardonce to shift up one gear.
Down (-) : Pull the lever backwardsonce to shift down onegear.
DRIVING YOUR VEHICLE
4-18
✽✽ NOTICE• Upshifts do not take place auto-
matically in sports mode. Thedriver must execute upshifts inaccordance with road conditions,taking care to keep the enginespeed below the red zone.
• In sports mode, only the five for-ward gears can be selected. Toreverse or park the vehicle, movethe shift lever to the “R” or “P”position as required.
• In sports mode, downshifts aremade automatically when thevehicle slows down. When thevehicle stops, 1st gear is automat-ically selected.
(Continued)
E4BLA402C
+ (UP)
- (DOWN)
Automaticmode
Sports mode
BL-ENG (CAN)-4.qxd 7/28/05 5:55 PM Page 18

Moving up a Steep grade from aStanding Start
To move up a steep grade from astanding start, depress the brakepedal, shift the shift lever to D (Drive).Select the appropriate gear depend-ing on load weight and steepness ofthe grade, and release the parkingbrake. Depress the accelerator grad-ually while releasing the servicebrakes.When accelerating from a stop ona steep hill, the vehicle may have atendency to roll backwards.Shifting the shift lever into 2(Second Gear) while in Sport modewill help prevent the vehicle fromrolling backwards.
Shift Lock System
For your safety, the AutomaticTransmission has a shift lock systemwhich prevents shifting the transmis-sion out of P (Park) unless the brakepedal is depressed.To shift the transmission out of P(Park):1. Depress and hold the brake pedal.2. Start the engine or turn the ignition
to the ON position.3. Depress the lock release button
and move the shift lever.When the ignition switch is in theACC or LOCK position, the transmis-sion cannot be shifted from P (Park).If the brake pedal is repeatedlydepressed and released with the shiftlever in the P (Park) position, a chat-tering noise near the shift lever maybe heard. This is a normal condition.Also, the ignition key cannot beremoved unless the shift lever is inthe P (Park) position. If the ignitionswitch is in any other position, the keycannot be removed.
DRIVING YOUR VEHICLE
4-19
(Continued)• In sports mode, when the engine
rpm approaches the red zoneshift points are varied to upshiftautomatically.
• To maintain the required levels ofvehicle performance and safety,the system may not execute cer-tain gearshifts when the shiftlever is operated.
• When driving on a slippery road,push the shift lever forward intothe +(up) position. This causesthe transmission to shift into the2nd gear which is better forsmooth driving on a slipperyroad. Push the shift lever to the -(down) side to shift back to the1st gear.
• While the vehicle is driving in 5thgear with the shift lever in the"D" position, selecting the shiftlever to sports mode positioncauses the transmission to down-shift to 4th gear automatically tosecure driving performance. Atthe time of shifting you can have ashift feeling.
BL-ENG (CAN)-4.qxd 7/28/05 5:55 PM Page 19

FOUR WHEEL DRIVE (4WD)For Safe Four-Wheel Drive Operation • Your vehicle allows you to drive in
on-road and off-road conditions.• However, do not try to drive in deep
standing water, mud, or over steephills.
• When you are driving up or downhills drive as close to straight upand down the hill as possible. Useextreme caution in going up ordown steep hills, since you may flipyour vehicle over depending on thegrade, terrain and water/mud con-ditions.
• You must learn how to corner in a4WD vehicle as soon as possible.Do not rely on your experience inconventional 2WD vehicles inchoosing safe cornering speed.Youmust drive more slowly.
• Drive off-road carefully becauseyour vehicle may be damaged byrocks or roots of trees. Becomefamiliar with the off-road conditionsyou are going to drive before youstart.
DRIVING YOUR VEHICLE
4-20
WARNING- Four Wheel Drive
Driving across the contour ofsteep hills can be extremelydangerous. This danger cancome from slight changes in thewheel angle which can destabi-lize the vehicle or, even if thevehicle is maintaining stabilityunder power, it can lose thatstability if the vehicle stops itsforward motion. Your vehiclemay roll over without warningand without time for you to cor-rect a mistake that could causeserious injury or death.
CAUTIONDo not grab inside of the steer-ing wheel when you are drivingoff-road. Your arm may be hurtby a sudden steering maneuveror from steering wheel rebounddue to impact with objects onthe ground. This may cause youto lose steering wheel control.
BL-ENG (CAN)-4.qxd 7/28/05 5:55 PM Page 20

• Always hold the steering wheelfirmly when you are driving off-road.
• Make sure all passengers arewearing seat belts.
• Do not drive in water if the level ishigher than the bottom of the vehi-cle.
• Check your brake condition onceyou are out of mud or water. Pressthe brake pedal several times asyou move slowly until you feel nor-mal braking forces return.
• Shorten your scheduled mainte-nance interval if you drive in off-roadconditions such as sand, mud orwater (see “Scheduled Maintenance”in the Index). Always wash you carthoroughly.
DRIVING YOUR VEHICLE
4-21
WARNINGReduce speed when you turncorners. The center of gravity of4WD vehicles is higher thanthat of conventional 2WD vehi-cles, making them more likely toroll over when you turn cornerstoo fast.
CAUTIONIf you are driving in heavy wind,the vehicle's higher center ofgravity decreases your steeringcontrol capacity and requiresyou to drive more slowly.
WARNINGIf you are driving too fast inwater, the water spray can getinto the engine compartmentand wet the ignition system,causing your vehicle a suddenstop. If this happens and yourvehicle is in a tilted position,your vehicle may roll over.
BL-ENG (CAN)-4.qxd 7/28/05 5:55 PM Page 21

Full-Time 4WD Operation (If equipped)
When 4WD is selected with the trans-fer shift knob, the vehicle will switchto 4WD operation after a few sec-onds.
To avoid shift shock, when the vehicleis stopped and you make a transfercase shift using the transfer shiftknob, wait until the correspondingindicator light in the instrument clus-ter illuminates before driving.
Knob positionThis is used to set different positions.
AUTOFull power delivered to front and rearaxle for increased traction. Use thismode for normal on-road driving.The 4WD LOW indicator light ( )will be turned off after blinking for afew seconds to remind you that youare in the AUTO mode.
LOW Full power to both axles, including alower gear ratio for low speed appli-cations that require extra power suchas wet pavement, snow-coveredroads and/or off-road.LOW Mode is not recommended ondry pavement.The 4WD LOW indicator light ( )will be turned on after blinking for afew seconds to remind you that youare in the LOW mode.
4WDLOW
4WDLOW
DRIVING YOUR VEHICLE
4-22
LOW
AUTO
S2BLA411B
✽✽ NOTICEWhen the vehicle shifts into 4WDmode, a slight mechanical soundand vibration may be felt and doesnot indicate a problem with the sys-tem.
BL-ENG (CAN)-4.qxd 7/28/05 5:55 PM Page 22

Transfer shift knob operationAUTO ↔↔ LOW1. Stop the vehicle.2. Depress the clutch pedal (Manual
transmission) or put the shift leverinto N (Neutral) position (Automatictransmission).
3. AUTO ➝➝ LOW: Turn the transfer shift knob toLOW mode.
LOW ➝➝ AUTO: Turn the transfer shift knob toAUTO mode.
4. Before releasing the clutch pedal(Manual Transmission) or shiftingto other ranges from N (AutomaticTransmission), wait for the corre-sponding indicator light in theinstrument cluster to go ON orOFF.
Part-Time 4WD Operation (If equipped)
You can send your engine's drivingpower to all front and rear wheels formaximum power.Four-wheel drive is useful when youdrive in snow, mud, ice or sand wheregood traction is required, or whenyour wheels lose traction using two-wheel drive.
DRIVING YOUR VEHICLE
4-23
LOW
AUTO
S2BLA412
CAUTIONIf the vehicle moves while thetransfer shift is in process, thegearbox may be damaged.
BL-ENG (CAN)-4.qxd 7/28/05 5:55 PM Page 23
When 4WD is selected with the trans-fer shift knob, the vehicle will switchto 4WD operation after a few sec-onds.
To avoid shift shock, when the vehicleis stopped and you make a transfercase shift using the transfer shiftknow, wait until the correspondingindicator light in the instrument clus-ter illuminates before driving.
Knob position
This is used to set different positions.
2HI (Rear-wheel drive)This mode is used, when driving onnormal roads and highway.
4HI (High-range 4-wheel drive)This mode is used, when driving off-roads, wet or snow covered roadswith normal speed.The 4WD indicator light ( ) will beturned on to remind you that you arein the 4HI mode.
DRIVING YOUR VEHICLE
4-24
✽✽ NOTICE• Do not select four wheel drive on
flat and normal roads.• Four-wheel driving on flat roads
for a long period causes poor fueleconomy and noise and it alsocauses tires to wear faster.
• Four-wheel driving on flat andnormal roads can result in asevere binding and chatteringcondition when turning the steer-ing wheel.
• Four-wheel driving on flat roadsfor a long period can also causethe differential oil temperature toincrease, resulting in damage toparts in the power train.
✽✽ NOTICEWhen the vehicle shifts into 4WDmode, a slight mechanical soundand vibration may be felt and doesnot indicate a problem with the sys-tem.
BL-ENG (CAN)-4.qxd 7/28/05 5:55 PM Page 24

4LO (Low-range 4-wheel drive)Use 4LO for climbing or descendinghills, off-roads driving and towing thevehicle, especially when increasedpower is required.The 4WD LOW indicator light ( )will be turned on to remind you thatyou are in the 4LO mode.
Transfer shift knob operationBy turning the transfer knob (4HI,4LO), both front and rear axles areengaged.This improves the traction character-istic.
2HI ➝➝ 4HITurn the transfer knob from the 2HImode to 4HI mode at speed below80km/h.It is not necessary to depress theclutch pedal or put the shift lever intoN (Neutral) position (ManualTransmission) or put the shift leverinto N (Neutral) position (AutomaticTransmission).Perform this operation when drivingstraight. There will be a few secondsof time delay before come into 4HImode when you shift the knob to 4 HIfrom 2HI.
4HI ➝➝ 2HITurn the transfer knob from the 4HImode to the 2HI mode at speedbelow 80km/h. It is not necessary todepress the clutch pedal (manualtransmission) or put the shift leverinto N (Neutral) (automatic transmis-sion). Perform this operation whendriving straight. Perform this opera-tion when driving straight.If the transfer mode does not shiftinto 2HI mode when you turn thetransfer knob to 2HI, drive straightahead with accelerating or decelerat-ing, or drive in reverse.
4HI ↔↔ 4LO1. Stop the vehicle.2. Depress the clutch pedal for the
manual transmission or put theshift lever into N (Neutral) for theautomatic transmission.
3. 4HI ➝➝ 4LO: Select the 4LO mode.4LO➝➝ 4HI: Select the 4HI mode.
4. Before releasing the clutch pedal(Manual transmission) or shiftingto other ranges from N range(Automatic transmission) ,wait forcorresponding indicator light turnson or off in the cluster.
4WDLOW
DRIVING YOUR VEHICLE
4-25
CAUTIONIf the vehicle moves while thetransfer shift is in process, thegearbox may be damaged.
BL-ENG (CAN)-4.qxd 7/28/05 5:55 PM Page 25

For Safe Four-Wheel DriveOperation
• Your vehicle allows you to drive inon-road and off-road conditions.
• However, do not try to drive in deepstanding water, mud, or over steephills.
• When you are driving up or downhills, drive as close to straight upand down the hills as possible. Useextreme caution in going up ordown steep hills, since you can flipyour vehicle over depending on thegrade, terrain and water/mud con-ditions.
DRIVING YOUR VEHICLE
4-26
WARNING - Four-WheelDriving
The conditions on-road or off-road that demand four-wheeldrive mean all functions of yourvehicle are exposed to moreextreme stress than under high-way conditions. Slow down,look ahead, and be ready forsudden changes in the compo-sition and traction of the sur-face under your tires. If youhave any doubt about the safetyof the conditions you are fac-ing, stop and consider the bestway to proceed. Do not exceedthe ability of yourself or yourvehicle to operate safely.
WARNING - Steep HillsDriving across the contour ofsteep hills can be extremelydangerous. This danger cancome from slight changes in thehill angle which can destabilizethe vehicle. Even if the vehicleis maintaining stability underpower, it can lose that stability ifthe vehicle stops its forwardmotion. Your vehicle may rollover without warning and with-out time for you to correct amistake that could cause seri-ous injury or death.
HILL1/HILL2
Approach Hill StraightUp/Down
Do not Approach atAngle
BL-ENG (CAN)-4.qxd 7/28/05 5:55 PM Page 26
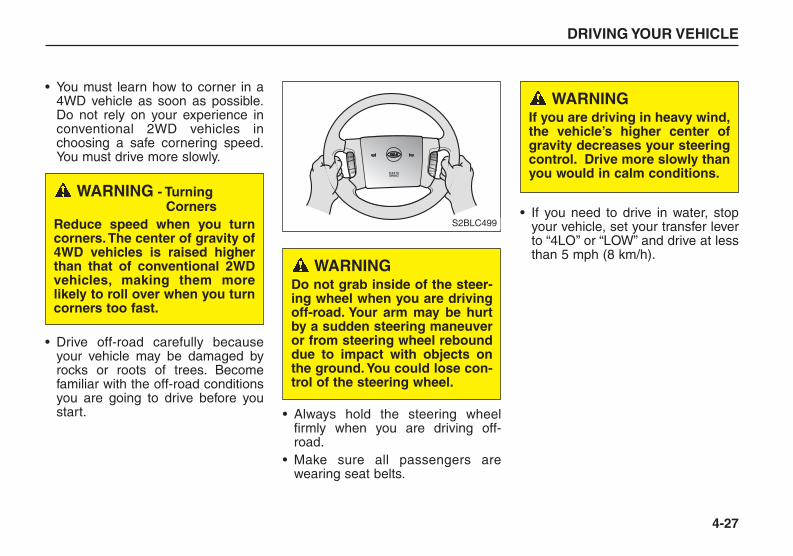
• You must learn how to corner in a4WD vehicle as soon as possible.Do not rely on your experience inconventional 2WD vehicles inchoosing a safe cornering speed.You must drive more slowly.
• Drive off-road carefully becauseyour vehicle may be damaged byrocks or roots of trees. Becomefamiliar with the off-road conditionsyou are going to drive before youstart. • Always hold the steering wheel
firmly when you are driving off-road.
• Make sure all passengers arewearing seat belts.
• If you need to drive in water, stopyour vehicle, set your transfer leverto “4LO’’ or “LOW” and drive at lessthan 5 mph (8 km/h).
DRIVING YOUR VEHICLE
4-27
WARNING - TurningCorners
Reduce speed when you turncorners. The center of gravity of4WD vehicles is raised higherthan that of conventional 2WDvehicles, making them morelikely to roll over when you turncorners too fast.
WARNINGDo not grab inside of the steer-ing wheel when you are drivingoff-road. Your arm may be hurtby a sudden steering maneuveror from steering wheel rebounddue to impact with objects onthe ground. You could lose con-trol of the steering wheel.
WARNINGIf you are driving in heavy wind,the vehicle’s higher center ofgravity decreases your steeringcontrol. Drive more slowly thanyou would in calm conditions.SRS
AIRBAG
RESACCEL
COASTSET
PWR
SEEK
CANCEL
S2BLC499
BL-ENG (CAN)-4.qxd 7/28/05 5:55 PM Page 27

• Do not drive in water if the level ishigher than the bottom of the wheelhubs.
• Check your brake condition onceyou are out of mud or water. Pressthe brake pedal several times asyou move slowly until you feel nor-mal braking forces return.
• Shorten your scheduled mainte-nance interval if you drive off-road inconditions such as sand, mud orwater (see “Scheduled Maintenance’’in the Index). Always wash your carthoroughly.
• The full time four wheel drive vehi-cle cannot be towed by an ordinari-ly tow truck. Make sure that thevehicle is towed with its four wheelsraised off the ground.
• Since the driving torque is alwaysapplied to the 4 wheels the perform-ance of the 4WD vehicle is greatlyaffected by the condition of the tires.Be sure to equip them with all fourtires with same size and type.
DRIVING YOUR VEHICLE
4-28
CAUTIONWhile the full-time 4WD vehicleis being raised on a jack, neverstart the engine or cause thetires to rotate.There is the danger that rotatingtires touching the ground couldcause the vehicle to go off thejack and to jump forward.If one of the front or rear wheelsbegins to spin in mud, snow,etc. the vehicle can sometimesbe driven out by depressing theaccelerator pedal further; how-ever avoid running the enginecontinuously at high rpmbecause doing so could dam-age the 4WD system.
WARNING - Driving Through Water
If you are driving too fast inwater, the water spray can getinto the engine compartmentand wet the ignition system,causing your vehicle to sudden-ly stop. If this happens and yourvehicle is in a tilted position,your vehicle may roll over.
WARNING Your vehicle is equipped withtires designed to provide for saferide and handling capability. Donot use a size and type of tireand wheel that is different fromthe one that is originallyinstalled on your vehicle. It canaffect the safety and perform-ance of your vehicle, whichcould lead to handling failure orrollover and serious injury.When replacing the tires, besure to equip all four tires withthe tire and wheel of the samesize, type, tread, brand andload-carrying capacity. If younevertheless decide to equipyour vehicle with any tire/wheelcombination not recommendedby Kia for off road driving, youshould not use these tires forhighway driving.
BL-ENG (CAN)-4.qxd 7/28/05 5:55 PM Page 28
DRIVING YOUR VEHICLE
4-29
WARNING• Avoid high cornering speed.• Do not make quick steering
wheel movements, such assharp lane changes or fast,sharp turns.
• The risk of rollover is greatlyincreased if you lose controlof your vehicle at highspeeds.
• In a collision crash, an unbelt-ed person is significantlymore likely to die compared toa person wearing a seat belt.
• Loss of control often occurs iftwo or more wheels drop offthe roadway and the driverover steers to re-enter theroadway.
• In the event your vehicleleaves the roadway, do notsteer sharply.Instead, slow down beforepulling back into the travellanes.
BL-ENG (CAN)-4.qxd 7/28/05 5:55 PM Page 29

LIMITED SLIP DIFFERENTIAL(IF EQUIPPED) A limited slip differential if equipped,is for the rear wheel differential only.The features of this limited slip differ-ential are described below;Just as with conventional differential,the wheel on one side is allowed toturn at a different speed from thewheel on the other side when thevehicle is cornering.The difference between the limitedslip differential and a conventionaldifferential is that if the wheel on oneside of the vehicle loses traction, agreater amount of torque is applied tothe rear wheel on the other side toimprove traction.
BRAKE SYSTEMPower Brakes
Your vehicle has power-assistedbrakes that adjust automaticallythrough normal usage.In the event that the power-assistedbrakes lose power because of astalled engine or some other reason,you can still stop your vehicle byapplying greater force to the brakepedal than you normally would. Thestopping distance, however, will belonger. Refer to the scheduled main-tenance guide for scheduled mainte-nance intervals.When the engine is not running, thereserve brake power is partiallydepleted each time the brake pedal isapplied. Do not pump the brake pedalwhen the power assist has beeninterrupted. Pump the brake pedalonly when necessary to maintainsteering control on slippery surfaces.
DRIVING YOUR VEHICLE
4-30
WARNINGTo avoid injury, never run theengine with one wheel off theground, such as when changinga tire.
BL-ENG (CAN)-4.qxd 7/28/05 5:55 PM Page 30

In the Event of Brake Failure
If the service brakes should fail tooperate while the vehicle is in motion,you can make an emergency stopwith the parking brake. The stoppingdistance, however, will be muchgreater than normal.
DRIVING YOUR VEHICLE
4-31
WARNING- Parking Brake
Pulling on the parking brakewhile the vehicle is moving atnormal speeds can cause asudden loss of control of thevehicle. If you must use theparking brake to stop the vehi-cle, use great caution in apply-ing the brake.
WARNING - Brakes• Do not drive with your foot
resting on the brake pedal.This will create abnormallyhigh brake temperatures,excessive brake lining andpad wear, and increased stop-ping distances.
• When descending a long orsteep hill, shift to a lower gearand avoid continuous applica-tion of the brakes. Continuousbrake application will causethe brakes to overheat andcould result in a temporaryloss of braking performance.
(Continued)
(Continued)• Wet brakes may result in the
vehicle not slowing down atthe usual rate and pulling toone side when the brakes areapplied. Applying the brakeslightly will indicate whetherthey have been affected inthis way. Always test yourbrakes in this fashion afterdriving through deep water.Todry the brakes, apply themlightly while maintaining asafe forward speed until brakeperformance returns to nor-mal.
BL-ENG (CAN)-4.qxd 7/28/05 5:55 PM Page 31

Disc Brake Wear Indicators
Your vehicle has disc brakes.When your brake pads are worn andit’s time for new pads, you will hear ahigh-pitched warning sound fromyour front brakes. You may hear thissound come and go or it may occurwhenever you depress the brakepedal. Please remember that some driving
conditions or climates may cause abrake squeal when you first apply (orlightly apply) the brakes. This is nor-mal and does not indicate a problemwith your brakes.
Parking Brake
To set the parking brake, pull theparking brake handle fully and firmlyupward while applying the servicebrake.
DRIVING YOUR VEHICLE
4-32
S2BLC302B
WARNING - Brake WearThis brake wear warning soundmeans your vehicle needs serv-ice. If you ignore this audiblewarning, you will eventuallylose braking performance,which could lead to a seriousaccident.
✽✽ NOTICETo avoid costly brake repairs, donot continue to drive with wornbrake pads. Always replace brakepads or linings as a complete frontor rear axle sets.
CAUTIONAlways replace brake pads ascomplete front or rear axle sets.
BL-ENG (CAN)-4.qxd 7/28/05 5:55 PM Page 32

To release the parking brake, pull thehandle up slightly and push therelease button.Then lower the handleto the released position while holdingthe button in.
Check the brake warning light eachtime you start the engine. This warn-ing will be illuminated when theengine is running and the parkingbrake is set.Before driving, be sure the parkingbrake is fully released and the brakewarning light is off.
DRIVING YOUR VEHICLE
4-33
S2BLC302C
WARNINGTo prevent unintentional move-ment when stopped and leavingthe vehicle, do not use thegearshift lever in place of theparking brake. Set the parkingbrake AND make sure thegearshift lever is securely posi-tioned in 1st (First) gear or R(Reverse) for manual transmis-sion equipped vehicles and in P(Park) for automatic transmis-sion equipped vehicles.
BL-ENG (CAN)-4.qxd 7/28/05 5:55 PM Page 33
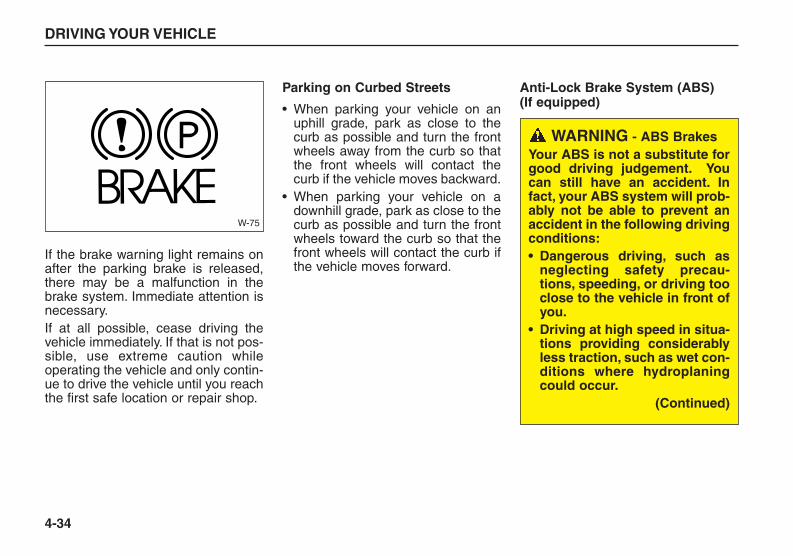
If the brake warning light remains onafter the parking brake is released,there may be a malfunction in thebrake system. Immediate attention isnecessary.If at all possible, cease driving thevehicle immediately. If that is not pos-sible, use extreme caution whileoperating the vehicle and only contin-ue to drive the vehicle until you reachthe first safe location or repair shop.
Parking on Curbed Streets
• When parking your vehicle on anuphill grade, park as close to thecurb as possible and turn the frontwheels away from the curb so thatthe front wheels will contact thecurb if the vehicle moves backward.
• When parking your vehicle on adownhill grade, park as close to thecurb as possible and turn the frontwheels toward the curb so that thefront wheels will contact the curb ifthe vehicle moves forward.
Anti-Lock Brake System (ABS) (If equipped)
DRIVING YOUR VEHICLE
4-34
WARNING - ABS BrakesYour ABS is not a substitute forgood driving judgement. Youcan still have an accident. Infact, your ABS system will prob-ably not be able to prevent anaccident in the following drivingconditions:• Dangerous driving, such as
neglecting safety precau-tions, speeding, or driving tooclose to the vehicle in front ofyou.
• Driving at high speed in situa-tions providing considerablyless traction, such as wet con-ditions where hydroplaningcould occur.
(Continued)
W-75
BL-ENG (CAN)-4.qxd 7/28/05 5:55 PM Page 34

The ABS system continuously sens-es the speed of the wheels. If thewheels are going to lock, the ABSsystem repeatedly modulates thehydraulic brake pressure to thewheels.When you apply your brakes underconditions which may lock thewheels, you may hear a “tik-tik’’sound from the brakes, or feel a cor-responding sensation in the brakepedal. This is normal and it meansyour ABS system is active.In order to obtain the maximum ben-efit from your ABS system in anemergency situation, do not attemptto modulate your brake pressure anddo not try to pump your brakes. Pressyour brake pedal as hard as possibleor as hard as the situation warrantsand allow the ABS system to controlthe force being delivered to the rearbrakes.
• Even with the anti-lock brake sys-tem, your vehicle still requires suffi-cient stopping distance. Alwaysmaintain a safe distance from thevehicle in front of you.
• Always slow down when cornering.The anti-lock brake system cannotprevent accidents resulting fromexcessive speeds.
• On loose or uneven road surfaces,operation of the anti-lock brake sys-tem may result in a longer stoppingdistance than for vehicles equippedwith a conventional brake system.
DRIVING YOUR VEHICLE
4-35
ABSW-78
(Continued)• Driving too fast on poor road
surfaces. The ABS isdesigned to improve maxi-mum braking effectiveness ontypical highways and roads ingood condition. On poor roadsurfaces in poor condition,the ABS may actually reducebraking effectiveness.
BL-ENG (CAN)-4.qxd 7/28/05 5:55 PM Page 35
DRIVING YOUR VEHICLE
4-36
✽✽ NOTICEWhen you jump start your vehiclebecause of a discharged battery, theengine may not run as smoothlyand the ABS warning light mayblink at the same time. This hap-pens because of the low batteryvoltage. It does not mean your ABSis malfunctioning.• Do not pump your brakes!• Have the battery recharged
before driving the vehicle.
✽✽ NOTICE• If the ABS warning light is on and
stays on, you may have a problemwith the ABS system. In this case,however, your regular brakes willwork normally.
• The ABS warning light will stayon for 2-3 seconds after theengine starts. During that time,the ABS will go through self-diag-nosis and the light will go off ifeverything is normal. If the lightstays on, you may have a problemwith your ABS system. Contactan authorized Kia dealer as soonas possible.
✽✽ NOTICE• When you drive on a road having
poor traction, such as an icy road,and operate your brakes continu-ously, the ABS will be active con-tinuously and the ABS warninglight may illuminate. Pull yourcar over to a safe place and stopthe engine.
• Restart the engine. If the ABSwarning light is off, then yourABS system is normal.Otherwise, you may have a prob-lem with the ABS. Contact anauthorized Kia dealer as soon aspossible.
BL-ENG (CAN)-4.qxd 7/28/05 5:55 PM Page 36
POWER STEERINGPower steering uses energy from theengine to assist you in steering thevehicle. If the engine is off or if thepower steering system becomesinoperative, the vehicle may still besteered, but it will require increasedsteering effort.Should you notice any change in theeffort required to steer during normalvehicle operation, have the powersteering system checked by anauthorized Kia dealer.
DRIVING YOUR VEHICLE
4-37
✽✽ NOTICEIf the vehicle is parked for extendedperiods outside in cold weather(below-10°C (14°F)), the powersteering may require increasedeffort when the engine is first start-ed. This is caused by increased fluidviscosity due to the cold weatherand does not indicate a malfunc-tion.When this happens, increase theengine RPM to 1500rpm thenrelease or let the engine idle for twoor three minutes to warm up thefluid.
✽✽ NOTICE• Never hold the steering wheel
against a stop (extreme right orleft turn) for more than five sec-onds with the engine running.Holding the steering wheel formore than five seconds in eitherposition may cause damage to thepower steering pump.
• If the power steering drive beltbreaks or if the power steeringpump malfunctions, the steeringeffort will greatly increase.
BL-ENG (CAN)-4.qxd 7/28/05 5:55 PM Page 37

CRUISE CONTROLThe cruise control system allows youto program the vehicle to maintain aconstant speed without resting yourfoot on the accelerator pedal.With cruise control, you can set andautomatically maintain any speed ofmore than about 24 mph (40km/h).
To Set Cruise Control Speed:
1. Push the CRUISE switch, locatedon the left side of the steering col-umn, to the ON position.
2. Accelerate to the desired speed,which must be more than 24 mph(40 km/h).
3. Depress the COAST/SET switch,located on the steering wheel, andrelease it at the speed you want.Release the accelerator at thesame time. The desired speed willautomatically be maintained andthe CRUISE light on your instru-ment cluster will illuminate.
The SET function cannot be activateduntil approximately 2 seconds afterthe CRUISE MAIN switch has beenengaged.On a steep grade, the vehicle maymomentarily slow down while goingdownhill.
DRIVING YOUR VEHICLE
4-38
SRSAIRBAG
RESACCEL
COASTSET
PWR
SEEK
CANCEL
S2BLA421
LOW
AUTOCRUiSE
S2BLA420WARNING- Cruise Control
Do not use the cruise controlfeature under the following con-ditions:• Heavy or unsteady traffic• Slippery or winding roads• Situations that involve vary-
ing speeds
WARNINGIf the CRUISE MAIN switch isleft on, the cruise control can beswitched on accidentally. Keepthe CRUISE MAIN switch offwhen cruise control is not inuse.
BL-ENG (CAN)-4.qxd 7/28/05 5:55 PM Page 38
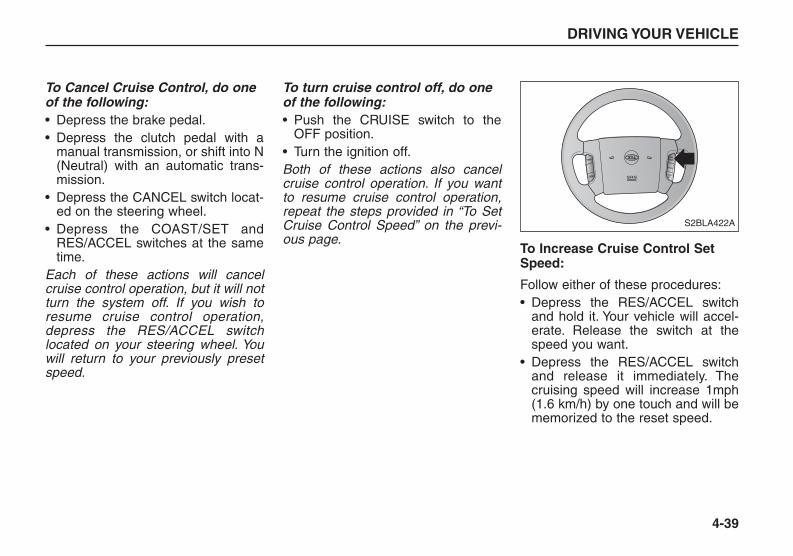
To Cancel Cruise Control, do oneof the following:• Depress the brake pedal.• Depress the clutch pedal with a
manual transmission, or shift into N(Neutral) with an automatic trans-mission.
• Depress the CANCEL switch locat-ed on the steering wheel.
• Depress the COAST/SET andRES/ACCEL switches at the sametime.
Each of these actions will cancelcruise control operation, but it will notturn the system off. If you wish toresume cruise control operation,depress the RES/ACCEL switchlocated on your steering wheel. Youwill return to your previously presetspeed.
To turn cruise control off, do oneof the following:• Push the CRUISE switch to the
OFF position.• Turn the ignition off.Both of these actions also cancelcruise control operation. If you wantto resume cruise control operation,repeat the steps provided in “To SetCruise Control Speed” on the previ-ous page.
To Increase Cruise Control SetSpeed:
Follow either of these procedures:• Depress the RES/ACCEL switch
and hold it. Your vehicle will accel-erate. Release the switch at thespeed you want.
• Depress the RES/ACCEL switchand release it immediately. Thecruising speed will increase 1mph(1.6 km/h) by one touch and will bememorized to the reset speed.
DRIVING YOUR VEHICLE
4-39
SRSAIRBAG
RESACCEL
COASTSET
PWR
SEEK
CANCEL
S2BLA422A
BL-ENG (CAN)-4.qxd 7/28/05 5:55 PM Page 39
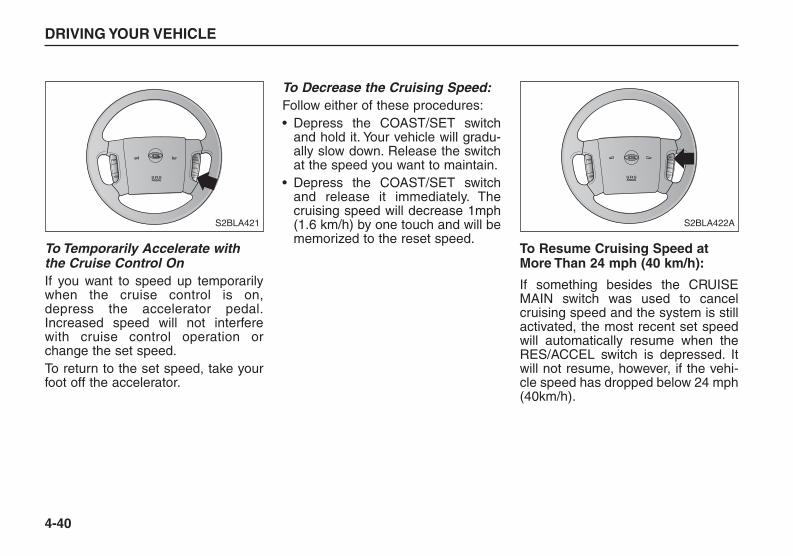
To Temporarily Accelerate withthe Cruise Control OnIf you want to speed up temporarilywhen the cruise control is on,depress the accelerator pedal.Increased speed will not interferewith cruise control operation orchange the set speed.To return to the set speed, take yourfoot off the accelerator.
To Decrease the Cruising Speed:Follow either of these procedures:• Depress the COAST/SET switch
and hold it. Your vehicle will gradu-ally slow down. Release the switchat the speed you want to maintain.
• Depress the COAST/SET switchand release it immediately. Thecruising speed will decrease 1mph(1.6 km/h) by one touch and will bememorized to the reset speed.
To Resume Cruising Speed atMore Than 24 mph (40 km/h):
If something besides the CRUISEMAIN switch was used to cancelcruising speed and the system is stillactivated, the most recent set speedwill automatically resume when theRES/ACCEL switch is depressed. Itwill not resume, however, if the vehi-cle speed has dropped below 24 mph(40km/h).
DRIVING YOUR VEHICLE
4-40
SRSAIRBAG
RESACCEL
COASTSET
PWR
SEEK
CANCEL
S2BLA422A
SRSAIRBAG
RESACCEL
COASTSET
PWR
SEEK
CANCEL
S2BLA421
BL-ENG (CAN)-4.qxd 7/28/05 5:55 PM Page 40

DRIVING YOUR VEHICLE
4-41
ABS
CHECK
4WDLOW
H
C
F
EBRAKE
0
1
2
34
56 7 8
00
10
20
3040
5060 70 80
90100
110
120
13020
40
60
80100 120
140160
180
200
2201000rpm
CRUISE
km/hMPH
IMMO
1. Tachometer
2. Turn signal indicators
3. Speedometer
4. Engine temperature gauge
5. Warning and indicator lights
6. Tripmeter / Odometer
7. Trip meter reset button
8. Fuel gauge
1 2 3 2 4
5 6 7 8 5
5BLD401
INSTRUMENT CLUSTER (MANUAL TRANSMISSION)
BL-ENG (CAN)-4.qxd 7/28/05 5:55 PM Page 41
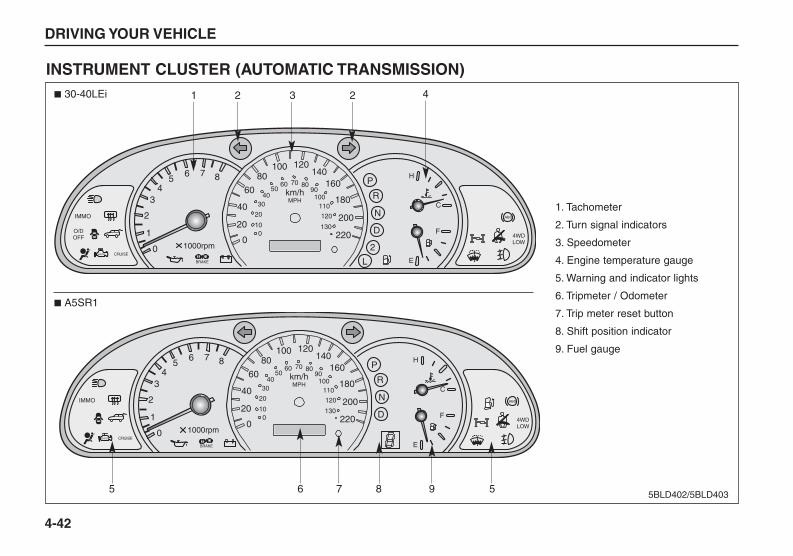
DRIVING YOUR VEHICLE
4-42
ABS
CHECK
O/DOFF 4WD
LOW
P
N
R
D
2
L
H
C
F
EBRAKE
0
1
2
34
56 7 8
00
10
20
3040
5060 70 80
90100
110
120
13020
40
60
80100 120
140160
180
200
2201000rpm
CRUISE
km/hMPH
IMMO1. Tachometer
2. Turn signal indicators
3. Speedometer
4. Engine temperature gauge
5. Warning and indicator lights
6. Tripmeter / Odometer
7. Trip meter reset button
8. Shift position indicator
9. Fuel gauge
1 2 3 2 4
5BLD402/5BLD403
INSTRUMENT CLUSTER (AUTOMATIC TRANSMISSION)
5 6 7 98 5
� 30-40LEi
� A5SR1
BL-ENG (CAN)-4.qxd 7/28/05 5:55 PM Page 42
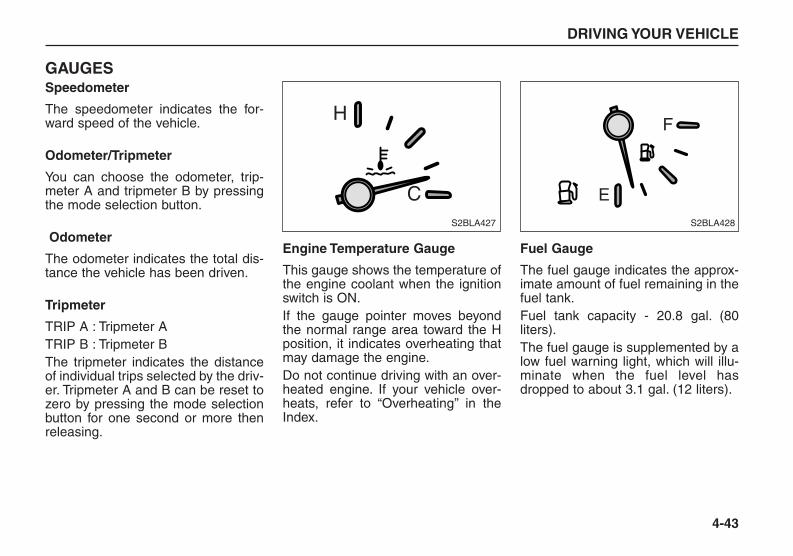
GAUGESSpeedometer
The speedometer indicates the for-ward speed of the vehicle.
Odometer/Tripmeter
You can choose the odometer, trip-meter A and tripmeter B by pressingthe mode selection button.
Odometer
The odometer indicates the total dis-tance the vehicle has been driven.
Tripmeter
TRIP A : Tripmeter ATRIP B : Tripmeter BThe tripmeter indicates the distanceof individual trips selected by the driv-er. Tripmeter A and B can be reset tozero by pressing the mode selectionbutton for one second or more thenreleasing.
Engine Temperature Gauge
This gauge shows the temperature ofthe engine coolant when the ignitionswitch is ON.If the gauge pointer moves beyondthe normal range area toward the Hposition, it indicates overheating thatmay damage the engine.Do not continue driving with an over-heated engine. If your vehicle over-heats, refer to “Overheating’’ in theIndex.
Fuel Gauge
The fuel gauge indicates the approx-imate amount of fuel remaining in thefuel tank.Fuel tank capacity - 20.8 gal. (80liters).The fuel gauge is supplemented by alow fuel warning light, which will illu-minate when the fuel level hasdropped to about 3.1 gal. (12 liters).
DRIVING YOUR VEHICLE
4-43
F
E
S2BLA428
H
CS2BLA427
BL-ENG (CAN)-4.qxd 7/28/05 5:55 PM Page 43
Tachometer
The tachometer indicates the approx-imate number of engine revolutionsper minute (rpm).Use the tachometer to select the cor-rect shift points and to prevent lug-ging the engine and/or over-revvingthe engine.
The tachometer pointer may moveslightly when the ignition switch is inACC or ON position with the engineOFF. This movement is normal andwill not affect the accuracy of thetachometer once the engine is run-ning.
Instrument Panel Illumination (If equipped)
When the vehicle’s parking lights orheadlights are on, the instrumentpanel lights activate. This makes theinstruments and controls visible indarkness. To adjust the instrumentpanel illumination intensity, rotate theillumination control knob.You can turn ON or OFF the interiorlights (map light, dome light) by rotat-ing the control knob to the maximumposition when the interior lights areturned OFF.
DRIVING YOUR VEHICLE
4-44
0
1
2
34
56 7 8
1000rpm
Red Zone
S2BLA426A
LOW
AUTO
S2BLA429✽✽ NOTICEDo not operate the engine withinthe tachometer’s RED ZONE.This may cause severe engine dam-age.
BL-ENG (CAN)-4.qxd 7/28/05 5:55 PM Page 44
WARNINGS AND INDICA-TORSWarning Lights / Audible Indicators
Checking operation All warning lights are checked byturning the ignition switch ON (do notstart the engine). Any light that doesnot illuminate should be checked byan Authorized Kia Dealer.After starting the engine, check tomake sure that all warning lights areoff. If any are still on, this indicates asituation that needs attention. Whenreleasing the parking brake, thebrake system warning light should gooff. The fuel warning light will stay onif the fuel level is low.
Anti-Lock Brake System(ABS) Warning Light
This light illuminates when you startthe engine. The light will go off if theABS system is operating normally.Also, this light illuminates if the key isturned to ON and goes off in 2-3 sec-onds if the system is operating nor-mally.
O/D OFF Indicator (A/T:30-40LEi)
This indicator comes on when theO/D system is deactivated.
Engine Oil PressureWarning
This warning light indicates theengine oil pressure is low.If the warning light illuminates whiledriving:1. Drive safely to the side of the road
and stop.2. With the engine off, check the
engine oil level. If the level is low,add oil as required.
If the warning light remains on afteradding oil or if oil is not available, callan Authorized Kia Dealer.
DRIVING YOUR VEHICLE
4-45
ABS
O/DOFF
✽✽ NOTICEIf the engine is not stopped immedi-ately, severe damage could result.
BL-ENG (CAN)-4.qxd 7/28/05 5:55 PM Page 45

Charging System Warning
This warning light indicates a mal-function of either the generator orelectrical charging system.If the warning light comes on whilethe vehicle is in motion:1. Drive to the nearest safe location.2. With the engine off, check the gen-
erator drive belt for looseness orbreakage.
3. If the belt is adjusted properly, aproblem exists somewhere in theelectrical charging system. Havean Authorized Kia Dealer correctthe problem as soon as possible.
Safety Belt Warning
Type AAs a reminder to the driver and pas-senger, safety belt warning light willilluminate for approximately 6 sec-onds each time you turn the ignitionswitch ON regardless of belt fasten-ing.
Type BAs a reminder to the driver and pas-senger, safety belt warning light willblink for approximately 6 secondseach time you turn the ignition switchON regardless of belt fastening.If the driver's safety belt is unfastenedafter the ignition switch is ON, thesafety belt warning light will blink forapproximately 6 seconds.
Shift PatternIndicators (A/T: 30-40LEi)
The individual indicators illuminate toshow the shift lever selection.
Shift PatternIndicators (A/T: A5SR1)
The individual indicators illuminate toshow the shift lever selection.
DRIVING YOUR VEHICLE
4-46
P R N D 2 L
P R N D
BL-ENG (CAN)-4.qxd 7/28/05 5:55 PM Page 46

Parking Brake & BrakeFluid Warning
Parking brake warning This light is illuminated when theparking brake is applied with the igni-tion switch in the START or ON posi-tion. The warning light should go offwhen the parking brake is released.
Low brake fluid level warningIf the warning light remains on, it mayindicate that the brake fluid level inthe reservoir is low.If the warning light remains on:1. Drive carefully to the nearest safe
location and stop your vehicle.2. With the engine stopped, check
the brake fluid level immediatelyand add fluid as required. Thencheck all brake components forfluid leaks.
3. Do not drive the vehicle if leaks arefound, the warning light remains onor the brakes do not operate prop-erly. Have it towed to anyAuthorized Kia Dealer for a brakesystem inspection and necessaryrepairs.
To check bulb operation, checkwhether the parking brake and brakefluid warning light illuminates whenthe ignition switch is in the ON posi-tion
DRIVING YOUR VEHICLE
4-47
WARNINGDriving the vehicle with a warn-ing light on is dangerous. If thebrake warning light remains on,have the brakes checked andrepaired immediately by anAuthorized Kia Dealer.
BL-ENG (CAN)-4.qxd 7/28/05 5:55 PM Page 47
Rear Hatch Ajar Warning
This warning light activates when therear hatch or rear hatch window arenot closed securely.
Low Fuel Level Warning
This warning light indicates the fueltank is nearly empty. The warninglight will come on when the fuel levelhas dropped to about 3.1 us gal. (12liters). Refuel as soon as possible.
Rear Hatch WindowDefroster Indicator
This light comes on when the rearhatch defroster switch is depressedto remove the frost on the rear hatchglass.Press the switch again to shut off thedefroster when the frost is removed.The rear hatch window defroster willautomatically turn off after 20 min-utes.It will also turn off whenever youremove the ignition key.
Door Ajar Warning
This warning light comes on when adoor is not closed securely with theignition in any position.
Headlight High BeamIndicator
This indicator activates when theheadlights are on and in the highbeam position or when the turn signallever is pulled into the Flash-to-Passposition.
DRIVING YOUR VEHICLE
4-48
BL-ENG (CAN)-4.qxd 7/28/05 5:55 PM Page 48

Immobilizer Indicator
When you turn the ignition key to theON position, if the IMMO indicatorgoes off after blinking 6 times, thisindicates that the immobilizer systemis normal. However, if the IMMO indi-cator remains on continuously afterblinking 6 times, this indicates thatthe immobilizer system is out of orderand you cannot start the engine with-out the limp home procedure. Referto the “Limp home procedure” onpage 3-4.
Malfunction Indicator
The CHECK ENGINE or malfunctionindicator light is installed in your vehi-cle’s instrument panel and respondsto signals from the vehicle’s OnBoard Diagnostic (OBD -II) System.The OBD-II System monitors the per-formance of the vehicle’s EmissionControl System (ECS), which isdesigned to reduce the amount of airpollutants in engine exhaust to thelevels required by government regu-lations.When you first start the engine, thecheck engine light will illuminatebriefly as a system check to confirmthat the OBD-II System is operatingproperly. As the engine starts, thislight turns off. However, if at any timethe OBD-II system detects a faultysignal or determines that the ECS isnot performing to specification, theCHECK ENGINE light will illuminatecontinuously or flash.
Continuously ON :If the CHECK ENGINE light comesON while driving and illuminates con-tinuously, a potential problem hasbeen discovered in the ECS or one ofthe exhaust system components.Generally, the vehicle will continue tobe driveable but it should be checkedby an authorized Kia dealer as soonas possible. This condition is unlikelyto lead to engine damage unless adecrease in vehicle power or poorrunning conditions is immediatelyapparent.Note that the CHECK ENGINE lightwill illuminate for a problem like aloose or missing gas cap, but will notilluminate as a result of low engine oilor coolant, low automatic transaxlefluid or engine overheating. The driv-er will be alerted to these conditionsby other indicators on the instrumentpanel
DRIVING YOUR VEHICLE
4-49
CHECKIMMO
BL-ENG (CAN)-4.qxd 7/28/05 5:55 PM Page 49

Air Bag Warning
This warning light will blink forapproximately 6 seconds each timeyou turn the ignition switch to the ONposition.If this indicator does not do this or if itilluminates while the vehicle is beingdriven, see an Authorized Kia Dealerfor immediate service.
Auto Cruise Indicator
The indicator light illuminates whenthe cruise control system is activated.
Front fog light indicator (if equipped)
This light comes on when the frontfog lights are ON.
4WD Indicator Light (If equipped) (Part Time 4WD Only)
When the key is turned to the “ON”position, the 4WD indicator light willcome on and then go off in a few sec-onds.The 4WD indicator light will illuminatewhen the transfer shift knob is set to4HI position (Part time 4WD only).
4WD LOW Indicator Light (If equipped)
When the key is turned to the “ON”position, the 4WD Low indicator willcome on and then go off in a few sec-onds. The 4WD Low indicator lightcomes on when the transfer shiftknob is set to 4WD low position.Part-time 4WD : 4LO positionFull-time 4WD : Low position
DRIVING YOUR VEHICLE
4-50
CRUISE
4WDLOW
CAUTION• Prolonged driving with the On
Board Diagnostic SystemMalfunction Indicator Light( ) illuminated may causedamage to the emission con-trol systems which couldeffect driveability and/or fueleconomy.
• If the On Board DiagnosticSystem Malfunction IndicatorLight ( ) illuninates, poten-tial catalytic converter dam-age is possible which couldresult in loss of engine power.Have the On Board DiagnosticSystem inspected as soon aspossible by an authorized Kiadealer.
CHECK
CHECK
✽✽ NOTICEA loose fuel filler cap may cause theOn Board Diagnostic SystemMalfunction Indicator Light ( )in the instrument panel to illumi-nate unnecessarily. Always makesure that the fuel filler cap is tight.
CHECK
BL-ENG (CAN)-4.qxd 7/28/05 5:55 PM Page 50
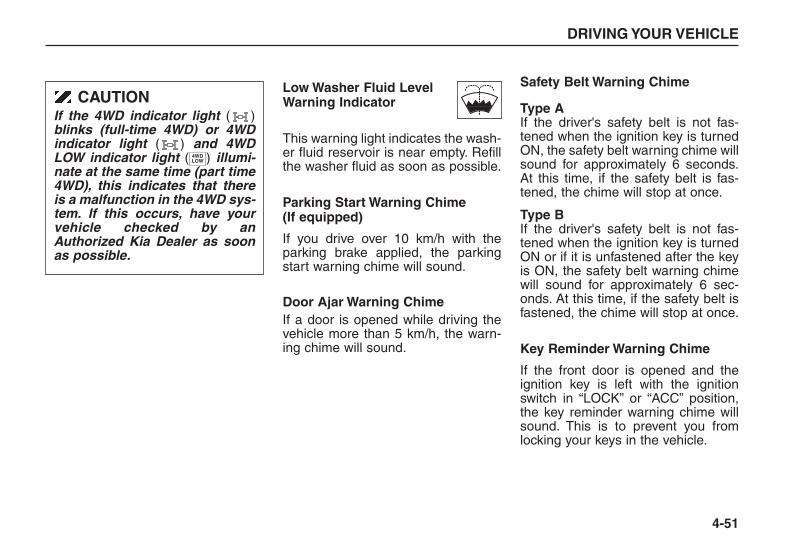
Low Washer Fluid LevelWarning Indicator
This warning light indicates the wash-er fluid reservoir is near empty. Refillthe washer fluid as soon as possible.
Parking Start Warning Chime(If equipped)
If you drive over 10 km/h with theparking brake applied, the parkingstart warning chime will sound.
Door Ajar Warning Chime If a door is opened while driving thevehicle more than 5 km/h, the warn-ing chime will sound.
Safety Belt Warning Chime
Type AIf the driver's safety belt is not fas-tened when the ignition key is turnedON, the safety belt warning chime willsound for approximately 6 seconds.At this time, if the safety belt is fas-tened, the chime will stop at once.
Type BIf the driver's safety belt is not fas-tened when the ignition key is turnedON or if it is unfastened after the keyis ON, the safety belt warning chimewill sound for approximately 6 sec-onds. At this time, if the safety belt isfastened, the chime will stop at once.
Key Reminder Warning Chime
If the front door is opened and theignition key is left with the ignitionswitch in “LOCK” or “ACC” position,the key reminder warning chime willsound. This is to prevent you fromlocking your keys in the vehicle.
DRIVING YOUR VEHICLE
4-51
CAUTIONIf the 4WD indicator light ( )blinks (full-time 4WD) or 4WDindicator light ( ) and 4WDLOW indicator light ( ) illumi-nate at the same time (part time4WD), this indicates that thereis a malfunction in the 4WD sys-tem. If this occurs, have yourvehicle checked by anAuthorized Kia Dealer as soonas possible.
4WDLOW
BL-ENG (CAN)-4.qxd 7/28/05 5:55 PM Page 51

MULTI-METER (IF EQUIPPED)
The Functions Of Multi-Meter
1. Azimuth Compass2. Relative Altimeter3. Barometer4. Tempmeter (if equipped)
How to Adjust the Multi-Meter
Switch functionMode/Set Switch Function1. Selection of modes : If you push
the MODE/SET switch for lessthan 1 second, the mode will beselected as follows.
2. Correction of Relative AzimuthCompass Indicator.
3. Correction of Terrestrial deviationof the Azimuth Compass.
4. Clear the altitude to “0” (zero).
Up/Down Switch1. Correction of the terrestrial devia-
tion angle of the AzimuthCompass.
2. Conversion of the RelativeAltimeter. units (m ⇔ ft).
3. Conversion of the Tempmeter units(°C ⇔ °F).
DRIVING YOUR VEHICLE
4-52
DRT ALTI BARO Ehpamft
PUSH
MODE/SET UP DOWN
S2BLA430A
Azimuth Compass ↓
Relative Altimeter ↓
Barometer ↓
Tempmeter (if equipped)
BL-ENG (CAN)-4.qxd 7/28/05 5:55 PM Page 52
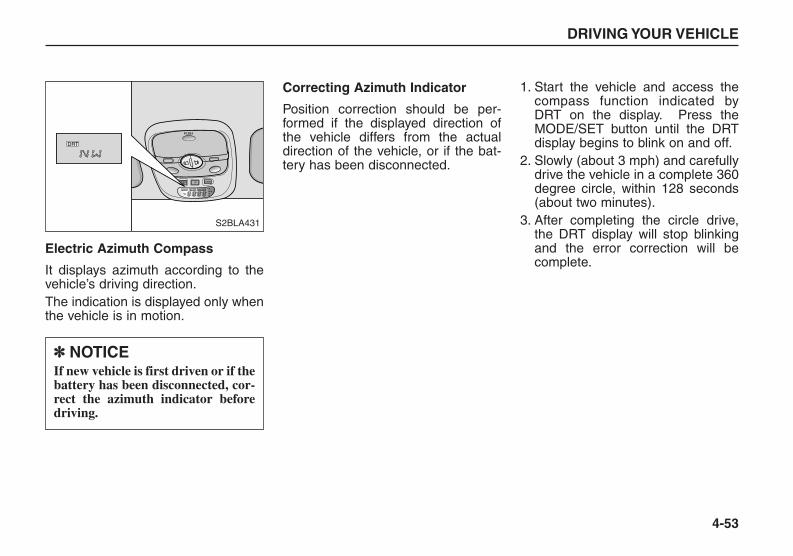
Electric Azimuth Compass
It displays azimuth according to thevehicle’s driving direction.The indication is displayed only whenthe vehicle is in motion.
Correcting Azimuth Indicator
Position correction should be per-formed if the displayed direction ofthe vehicle differs from the actualdirection of the vehicle, or if the bat-tery has been disconnected.
1. Start the vehicle and access thecompass function indicated byDRT on the display. Press theMODE/SET button until the DRTdisplay begins to blink on and off.
2. Slowly (about 3 mph) and carefullydrive the vehicle in a complete 360degree circle, within 128 seconds(about two minutes).
3. After completing the circle drive,the DRT display will stop blinkingand the error correction will becomplete.
DRIVING YOUR VEHICLE
4-53
DRT ALTI BARO Ehpamft
PUSH
MODE/SET UP DOWN
DRT
S2BLA431
✽✽ NOTICEIf new vehicle is first driven or if thebattery has been disconnected, cor-rect the azimuth indicator beforedriving.
BL-ENG (CAN)-4.qxd 7/28/05 5:55 PM Page 53
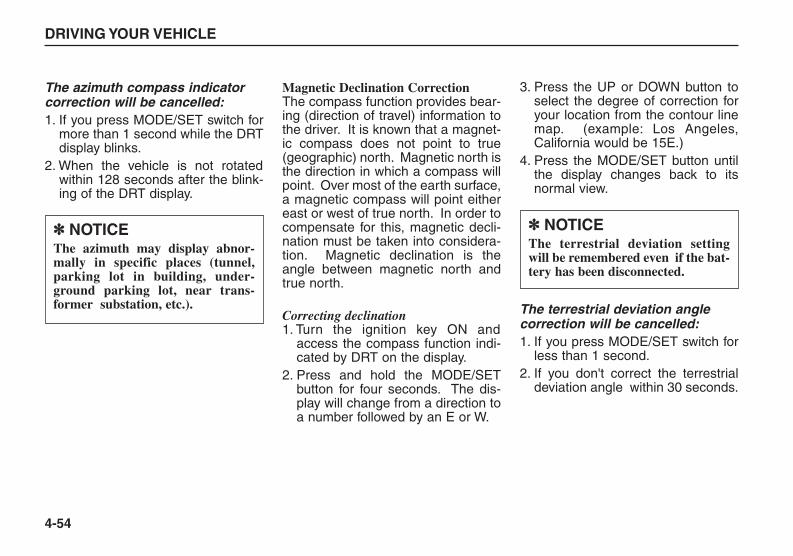
The azimuth compass indicatorcorrection will be cancelled:1. If you press MODE/SET switch for
more than 1 second while the DRTdisplay blinks.
2. When the vehicle is not rotatedwithin 128 seconds after the blink-ing of the DRT display.
Magnetic Declination CorrectionThe compass function provides bear-ing (direction of travel) information tothe driver. It is known that a magnet-ic compass does not point to true(geographic) north. Magnetic north isthe direction in which a compass willpoint. Over most of the earth surface,a magnetic compass will point eithereast or west of true north. In order tocompensate for this, magnetic decli-nation must be taken into considera-tion. Magnetic declination is theangle between magnetic north andtrue north.
Correcting declination1. Turn the ignition key ON and
access the compass function indi-cated by DRT on the display.
2. Press and hold the MODE/SETbutton for four seconds. The dis-play will change from a direction toa number followed by an E or W.
3. Press the UP or DOWN button toselect the degree of correction foryour location from the contour linemap. (example: Los Angeles,California would be 15E.)
4. Press the MODE/SET button untilthe display changes back to itsnormal view.
The terrestrial deviation anglecorrection will be cancelled:1. If you press MODE/SET switch for
less than 1 second.2. If you don't correct the terrestrial
deviation angle within 30 seconds.
DRIVING YOUR VEHICLE
4-54
✽✽ NOTICEThe azimuth may display abnor-mally in specific places (tunnel,parking lot in building, under-ground parking lot, near trans-former substation, etc.).
✽✽ NOTICEThe terrestrial deviation settingwill be remembered even if the bat-tery has been disconnected.
BL-ENG (CAN)-4.qxd 7/28/05 5:55 PM Page 54
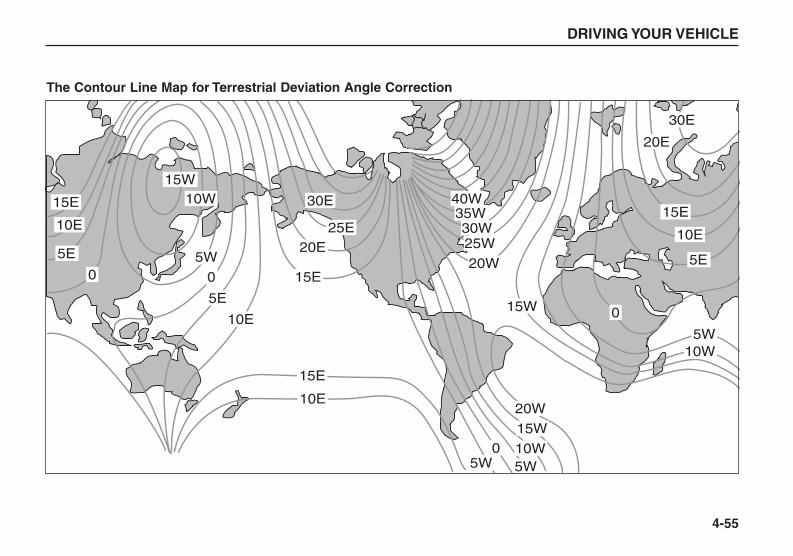
DRIVING YOUR VEHICLE
4-55
The Contour Line Map for Terrestrial Deviation Angle Correction
BL-ENG (CAN)-4.qxd 7/28/05 5:55 PM Page 55
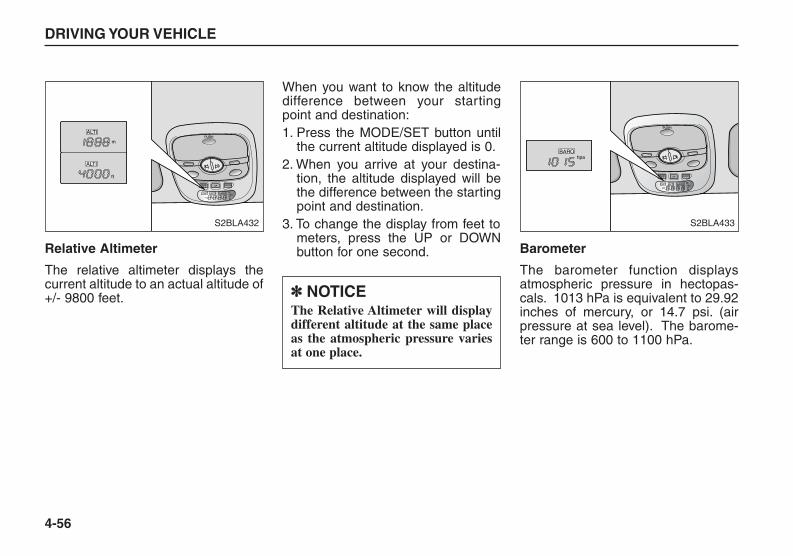
Relative Altimeter
The relative altimeter displays thecurrent altitude to an actual altitude of+/- 9800 feet.
When you want to know the altitudedifference between your startingpoint and destination:1. Press the MODE/SET button until
the current altitude displayed is 0.2. When you arrive at your destina-
tion, the altitude displayed will bethe difference between the startingpoint and destination.
3. To change the display from feet tometers, press the UP or DOWNbutton for one second. Barometer
The barometer function displaysatmospheric pressure in hectopas-cals. 1013 hPa is equivalent to 29.92inches of mercury, or 14.7 psi. (airpressure at sea level). The barome-ter range is 600 to 1100 hPa.
DRIVING YOUR VEHICLE
4-56
DRT ALTI BARO Ehpamft
PUSH
MODE/SET UP DOWN
m
ft
ALTI
ALTI
S2BLA432
DRT ALTI BARO Ehpamft
PUSH
MODE/SET UP DOWN
hpaBARO
S2BLA433
✽✽ NOTICEThe Relative Altimeter will displaydifferent altitude at the same placeas the atmospheric pressure variesat one place.
BL-ENG (CAN)-4.qxd 7/28/05 5:55 PM Page 56
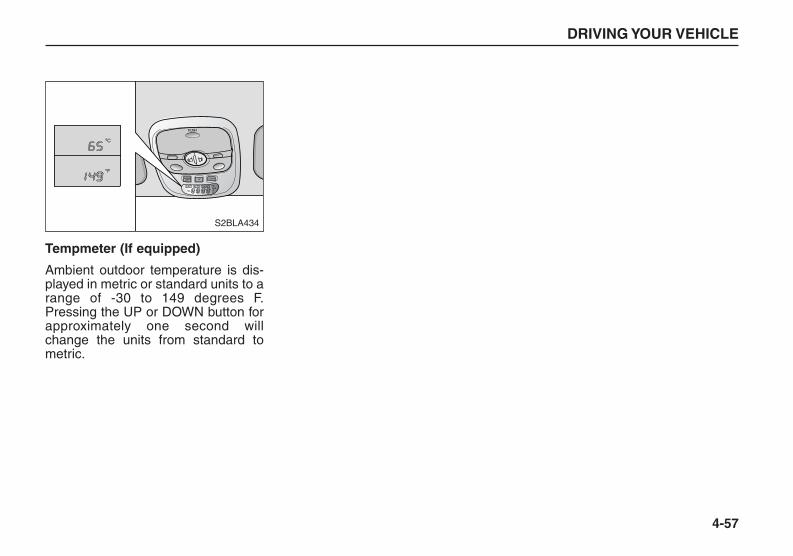
Tempmeter (If equipped)
Ambient outdoor temperature is dis-played in metric or standard units to arange of -30 to 149 degrees F.Pressing the UP or DOWN button forapproximately one second willchange the units from standard tometric.
DRIVING YOUR VEHICLE
4-57
DRT ALTI BARO Ehpamft
PUSH
MODE/SET UP DOWN
C
F
S2BLA434
BL-ENG (CAN)-4.qxd 7/28/05 5:55 PM Page 57
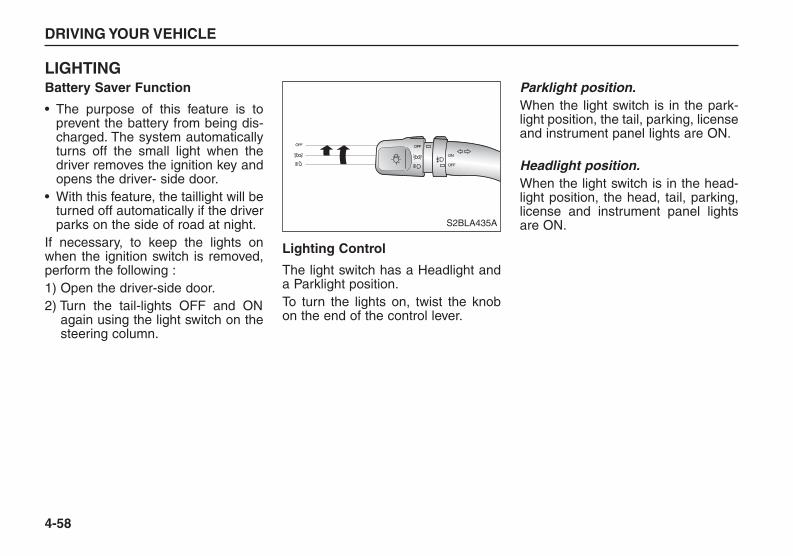
LIGHTINGBattery Saver Function
• The purpose of this feature is toprevent the battery from being dis-charged. The system automaticallyturns off the small light when thedriver removes the ignition key andopens the driver- side door.
• With this feature, the taillight will beturned off automatically if the driverparks on the side of road at night.
If necessary, to keep the lights onwhen the ignition switch is removed,perform the following :1) Open the driver-side door.2) Turn the tail-lights OFF and ON
again using the light switch on thesteering column.
Lighting Control
The light switch has a Headlight anda Parklight position.To turn the lights on, twist the knobon the end of the control lever.
Parklight position.When the light switch is in the park-light position, the tail, parking, licenseand instrument panel lights are ON.
Headlight position.When the light switch is in the head-light position, the head, tail, parking,license and instrument panel lightsare ON.
DRIVING YOUR VEHICLE
4-58
OFF
OFF
ON
OFF
S2BLA435A
BL-ENG (CAN)-4.qxd 7/28/05 5:55 PM Page 58

Auto light position (If equipped)When the light switch is in the autolight position (third position), the tail-lights and headlights will be turnedautomatically ON or OFF accordingto external illumination.
High-Beam operationTo turn on the high-beam headlights,push the lever away from you. Pull itback for low beams.The high-beam indicator will lightwhen the headlight high beams areswitched on.To prevent the battery from being dis-charged, do not leave the lights on fora prolonged time while the engine isnot running.
DRIVING YOUR VEHICLE
4-59
AUTO
OFF
OFF
ON
AUTO
OFF
S2BLA436B S2BLC201A
AUTO
OFF
OFF
ON
S2BLA436A
✽✽ NOTICETo ensure better control of the autolight system, never place items onthe sensor located on the dash.Don’t clean the sensor with a win-dow cleaner, only use a towel damp-ened with water. If your front wind-shield has a coating or tint the autolight system may not work proper-ly.
BL-ENG (CAN)-4.qxd 7/28/05 5:55 PM Page 59

Flashing Headlights
To flash the headlights, pull the levertoward you. It will return to the normalposition when released. The head-light switch does not need to be on touse this flashing feature.
Turn Signals
The ignition switch must be on for theturn signals to function. To turn on theturn signals, move the lever up ordown. Green arrow indicators on theinstrument panel indicate which turnsignal is operating. They will self-can-cel after a turn is completed. If theindicator continues to flash after aturn, manually return the lever to theOFF (middle) position.
Lane change signalsTo signal a lane change, move theturn signal lever slightly and hold it inposition. The lever will return to theOFF (center) position when released.If an indicator stays on and does notflash or if it flashes abnormally, one ofthe turn signal bulbs may be burnedout and will require replacement.
DRIVING YOUR VEHICLE
4-60
AUTO
OFF
OFF
ON
S2BLA438
AUTO
OFF
OFF
ON
S2BLA439
BL-ENG (CAN)-4.qxd 7/28/05 5:55 PM Page 60

Front Fog Light (If equipped)
To turn the front fog lights ON, turnthe headlights ON after starting theengine and then turn the front foglight switch to ON position. To turn itOFF, turn it to OFF position or turnthe headlights OFF.
Daytime Running Light
Daytime Running Lights (DRL) canmake it easier for others to see thefront of your vehicle during the day.DRL can be helpful in many differentdriving conditions, and it is especiallyhelpful after dawn and before sunset.The DRL system will make your high-beam headlights turn OFF when:• The headlight switch is ON.• The parking brake is engaged.• The engine stops.
DRIVING YOUR VEHICLE
4-61
AUTO
OFF
OFF
ON
S2BLA440
BL-ENG (CAN)-4.qxd 7/28/05 5:55 PM Page 61
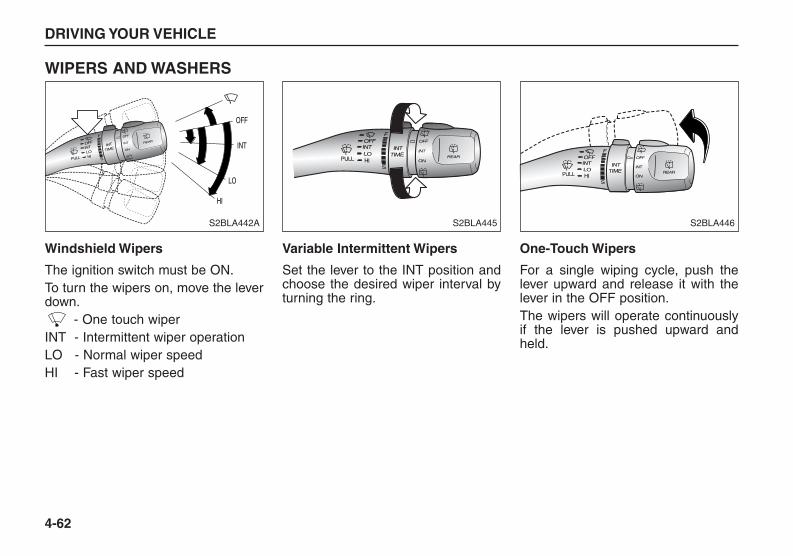
WIPERS AND WASHERS
Windshield Wipers
The ignition switch must be ON.To turn the wipers on, move the leverdown.
- One touch wiperINT - Intermittent wiper operationLO - Normal wiper speedHI - Fast wiper speed
Variable Intermittent Wipers
Set the lever to the INT position andchoose the desired wiper interval byturning the ring.
One-Touch Wipers
For a single wiping cycle, push thelever upward and release it with thelever in the OFF position.The wipers will operate continuouslyif the lever is pushed upward andheld.
DRIVING YOUR VEHICLE
4-62
HILO
ON
INTINT
OFF OFF
F
S
REAR
INTTIME
PULL
S2BLA445
OFF
INT
LO
HI
HILO
ON
REAR
INTINTOFF
OFFF
S
INT
TIME
PULL
S2BLA442A
HILO
ON
INTINT
OFF OFF
F
S
REAR
INTTIME
PULL
S2BLA446
BL-ENG (CAN)-4.qxd 7/28/05 5:55 PM Page 62
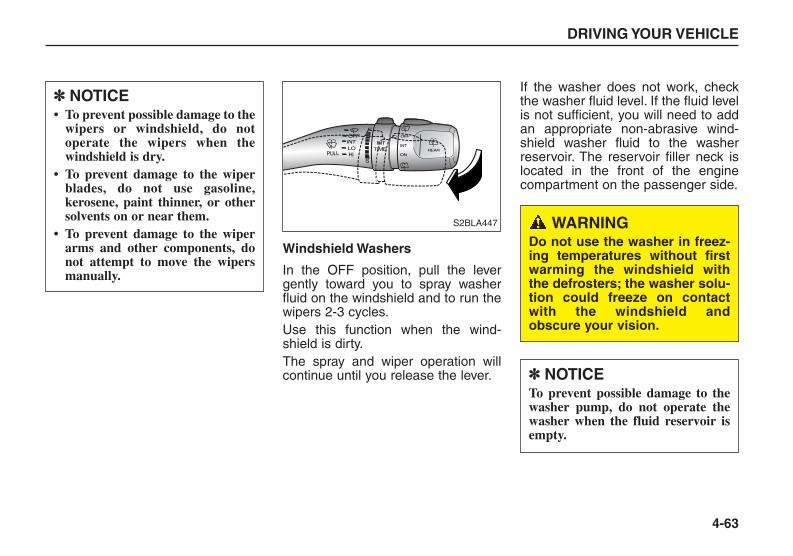
Windshield Washers
In the OFF position, pull the levergently toward you to spray washerfluid on the windshield and to run thewipers 2-3 cycles.Use this function when the wind-shield is dirty.The spray and wiper operation willcontinue until you release the lever.
If the washer does not work, checkthe washer fluid level. If the fluid levelis not sufficient, you will need to addan appropriate non-abrasive wind-shield washer fluid to the washerreservoir. The reservoir filler neck islocated in the front of the enginecompartment on the passenger side.
DRIVING YOUR VEHICLE
4-63
HILO
ON
INTINT
OFF OFF
F
S
REAR
INTTIME
PULL
S2BLA447
✽✽ NOTICE• To prevent possible damage to the
wipers or windshield, do notoperate the wipers when thewindshield is dry.
• To prevent damage to the wiperblades, do not use gasoline,kerosene, paint thinner, or othersolvents on or near them.
• To prevent damage to the wiperarms and other components, donot attempt to move the wipersmanually.
WARNINGDo not use the washer in freez-ing temperatures without firstwarming the windshield withthe defrosters; the washer solu-tion could freeze on contactwith the windshield andobscure your vision.
✽✽ NOTICETo prevent possible damage to thewasher pump, do not operate thewasher when the fluid reservoir isempty.
BL-ENG (CAN)-4.qxd 7/28/05 5:55 PM Page 63

Rear Window Wiper and WasherSwitch
The rear window wiper and washerswitch is located at the end of thewiper and washer switch lever. Turnthe switch to desired position tooperate the rear wiper and washer.When the rear hatch window isopened the rear window wiper andwasher does not work.
- Spraying washer fluid and wip-ing
INT - Intermittent wiper operation ON - Normal wiper opertion
- Spraying washer fluid and wip-ing
DRIVING YOUR VEHICLE
4-64
HIPULLLO
ON
INT INTTIME
INT
OFF OFF
F
S
REAR
S2BLA448
✽✽ NOTICETo prevent possible damage to therear window wiper, do not open therear hatch window while the rearwindow wiper and washer is oper-ating.
BL-ENG (CAN)-4.qxd 7/28/05 5:55 PM Page 64
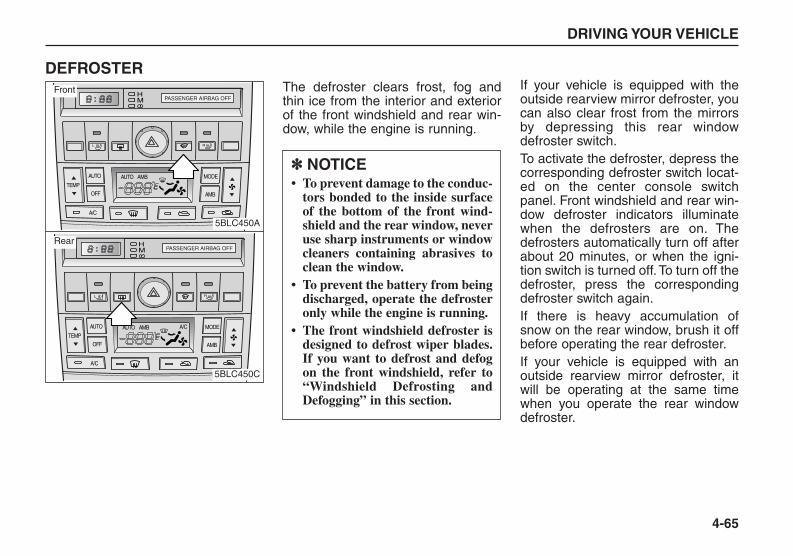
DEFROSTER The defroster clears frost, fog andthin ice from the interior and exteriorof the front windshield and rear win-dow, while the engine is running.
If your vehicle is equipped with theoutside rearview mirror defroster, youcan also clear frost from the mirrorsby depressing this rear windowdefroster switch.To activate the defroster, depress thecorresponding defroster switch locat-ed on the center console switchpanel. Front windshield and rear win-dow defroster indicators illuminatewhen the defrosters are on. Thedefrosters automatically turn off afterabout 20 minutes, or when the igni-tion switch is turned off.To turn off thedefroster, press the correspondingdefroster switch again.If there is heavy accumulation ofsnow on the rear window, brush it offbefore operating the rear defroster.If your vehicle is equipped with anoutside rearview mirror defroster, itwill be operating at the same timewhen you operate the rear windowdefroster.
DRIVING YOUR VEHICLE
4-65
AUTO AUTO AMB
OFF
TEMP
MODE
AMB
A/C
A/C
L R
HM PASSENGER AIRBAG OFF
5BLC450A
AUTO AUTO AMB
OFF
TEMP
MODE
AMB
A/C
A/C
L R
HM PASSENGER AIRBAG OFF
5BLC450C
Front
Rear
✽✽ NOTICE• To prevent damage to the conduc-
tors bonded to the inside surfaceof the bottom of the front wind-shield and the rear window, neveruse sharp instruments or windowcleaners containing abrasives toclean the window.
• To prevent the battery from beingdischarged, operate the defrosteronly while the engine is running.
• The front windshield defroster isdesigned to defrost wiper blades.If you want to defrost and defogon the front windshield, refer to“Windshield Defrosting andDefogging” in this section.
BL-ENG (CAN)-4.qxd 7/28/05 5:55 PM Page 65
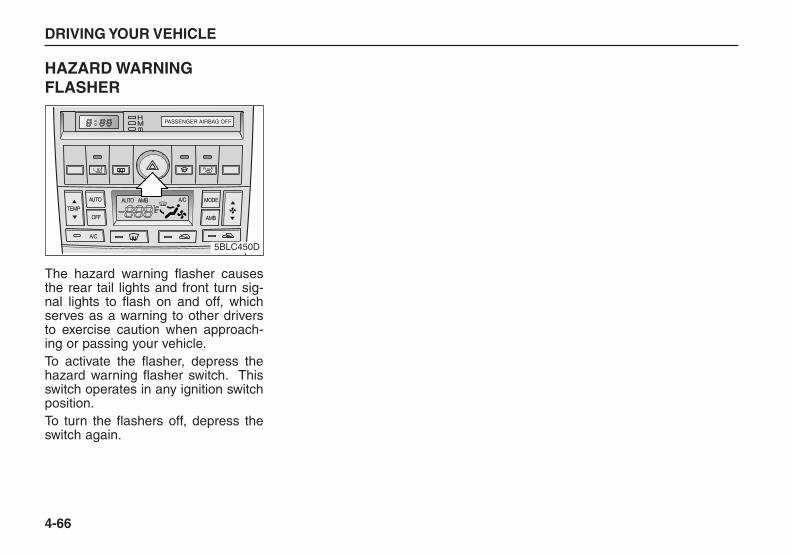
HAZARD WARNINGFLASHER
The hazard warning flasher causesthe rear tail lights and front turn sig-nal lights to flash on and off, whichserves as a warning to other driversto exercise caution when approach-ing or passing your vehicle.To activate the flasher, depress thehazard warning flasher switch. Thisswitch operates in any ignition switchposition.To turn the flashers off, depress theswitch again.
DRIVING YOUR VEHICLE
4-66
AUTO AUTO AMB
OFF
TEMP
MODE
AMB
A/C
A/C
L R
HM PASSENGER AIRBAG OFF
5BLC450D
BL-ENG (CAN)-4.qxd 7/28/05 5:55 PM Page 66

INTERIOR FEATURES
Digital Clock
When the ignition switch is in theACC or ON position, the clock but-tons operate as follows:
HOUR “H’’:Pressing the “H’’ button with your fin-ger, a pencil or similar object willadvance the time displayed by onehour.
MINUTE “M’’:Pressing the “M’’ button with your fin-ger, a pencil or similar object willadvance the time displayed by oneminute.
RESET “:00’’:To clear away minutes, press the“:00’’ button with your finger, a pencilor similar object. Then the clock willbe set precisely on the hour.For example, if the “:00’’ button ispressed while the time is between9:01 and 9:29, the display will bereset to 9:00. If pressed while it isbetween 9:30 and 9:59, the displaywill be reset to 10:00.
Cigarette Lighter
To use the cigarette lighter, press thefront face then release it to allow thecigarette lighter and ashtray to slowlyextend from center panel.To operate the cigarette lighter, pressit in and release it. When it is heated,it automatically pops out ready foruse.If the engine is not running, the igni-tion switch must be in the ACC posi-tion for the lighter to operate.
DRIVING YOUR VEHICLE
4-67
AUTO AUTO AMB
OFF
TEMP
MODE
AMB
A/C
A/C
HM
L R
PASSENGER AIRBAG OFF
5BLA450
HM
5BLA335E
BL-ENG (CAN)-4.qxd 7/28/05 5:55 PM Page 67
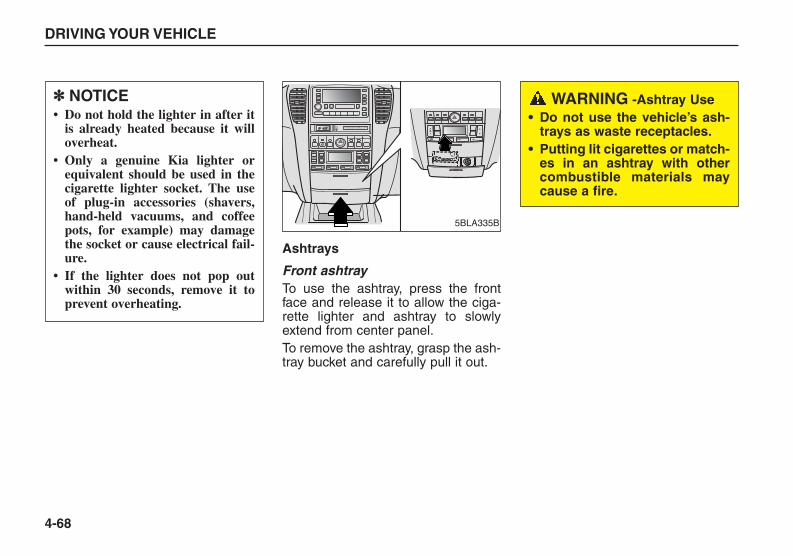
Ashtrays
Front ashtrayTo use the ashtray, press the frontface and release it to allow the ciga-rette lighter and ashtray to slowlyextend from center panel.To remove the ashtray, grasp the ash-tray bucket and carefully pull it out.
DRIVING YOUR VEHICLE
4-68
HM
5BLA335B
✽✽ NOTICE• Do not hold the lighter in after it
is already heated because it willoverheat.
• Only a genuine Kia lighter orequivalent should be used in thecigarette lighter socket. The useof plug-in accessories (shavers,hand-held vacuums, and coffeepots, for example) may damagethe socket or cause electrical fail-ure.
• If the lighter does not pop outwithin 30 seconds, remove it toprevent overheating.
WARNING -Ashtray Use• Do not use the vehicle’s ash-
trays as waste receptacles.• Putting lit cigarettes or match-
es in an ashtray with othercombustible materials maycause a fire.
BL-ENG (CAN)-4.qxd 7/28/05 5:55 PM Page 68
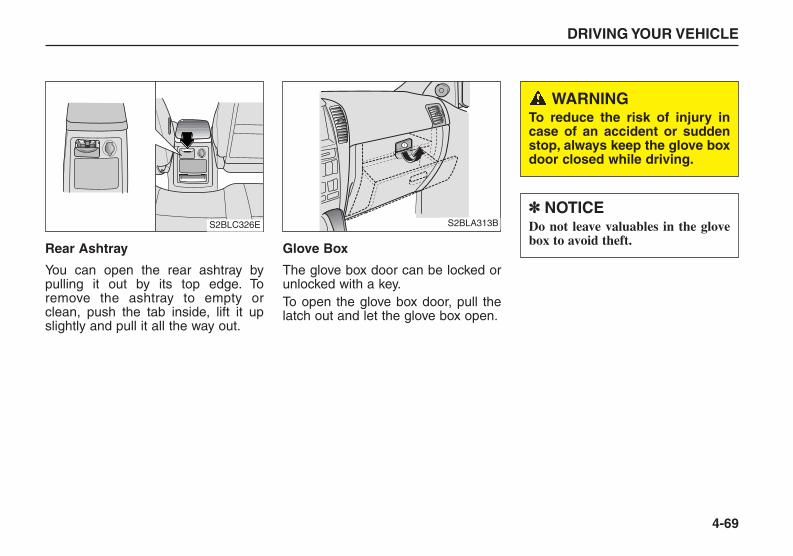
Rear Ashtray
You can open the rear ashtray bypulling it out by its top edge. Toremove the ashtray to empty orclean, push the tab inside, lift it upslightly and pull it all the way out.
Glove Box
The glove box door can be locked orunlocked with a key.To open the glove box door, pull thelatch out and let the glove box open.
DRIVING YOUR VEHICLE
4-69
S2BLC326E S2BLA313B
WARNINGTo reduce the risk of injury incase of an accident or suddenstop, always keep the glove boxdoor closed while driving.
✽✽ NOTICEDo not leave valuables in the glovebox to avoid theft.
BL-ENG (CAN)-4.qxd 7/28/05 5:55 PM Page 69
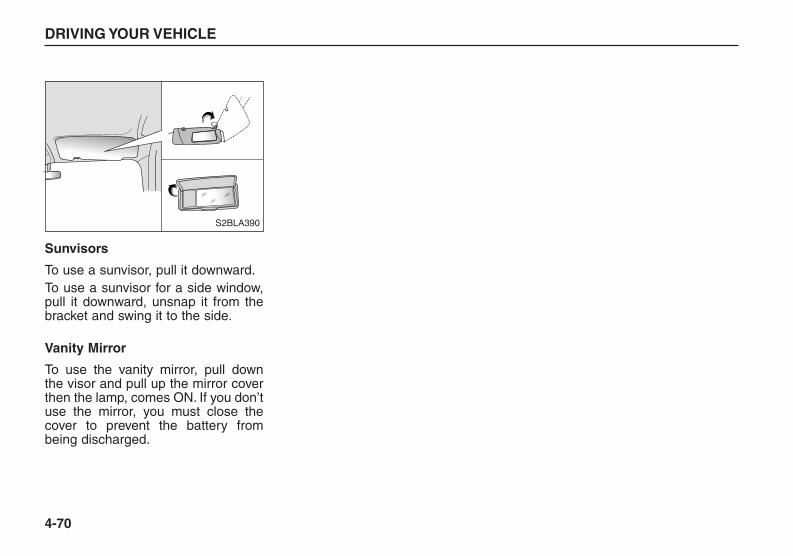
Sunvisors
To use a sunvisor, pull it downward.To use a sunvisor for a side window,pull it downward, unsnap it from thebracket and swing it to the side.
Vanity Mirror
To use the vanity mirror, pull downthe visor and pull up the mirror coverthen the lamp, comes ON. If you don’tuse the mirror, you must close thecover to prevent the battery frombeing discharged.
DRIVING YOUR VEHICLE
4-70
S2BLA390
BL-ENG (CAN)-4.qxd 7/28/05 5:55 PM Page 70
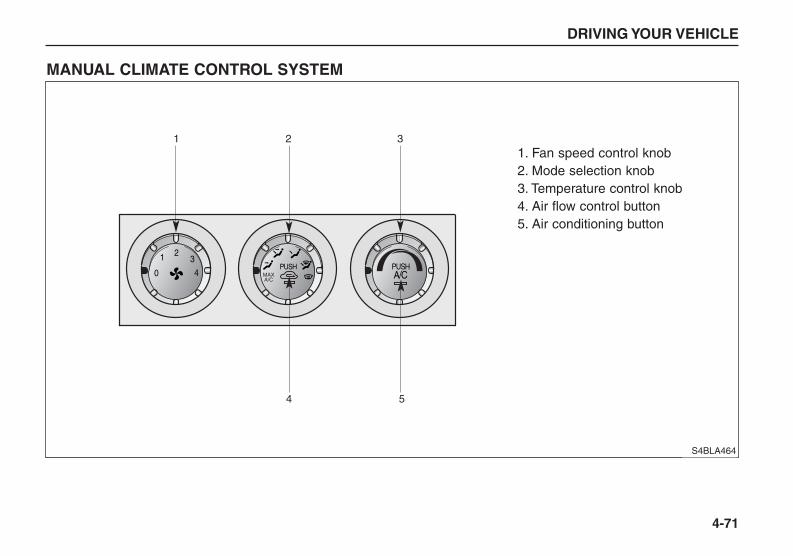
DRIVING YOUR VEHICLE
4-71
0
1 23
4PUSHA/C
PUSHMAXA/C
S4BLA464
1. Fan speed control knob2. Mode selection knob3. Temperature control knob4. Air flow control button5. Air conditioning button
1 2 3
54
MANUAL CLIMATE CONTROL SYSTEM
BL-ENG (CAN)-4.qxd 7/28/05 5:55 PM Page 71
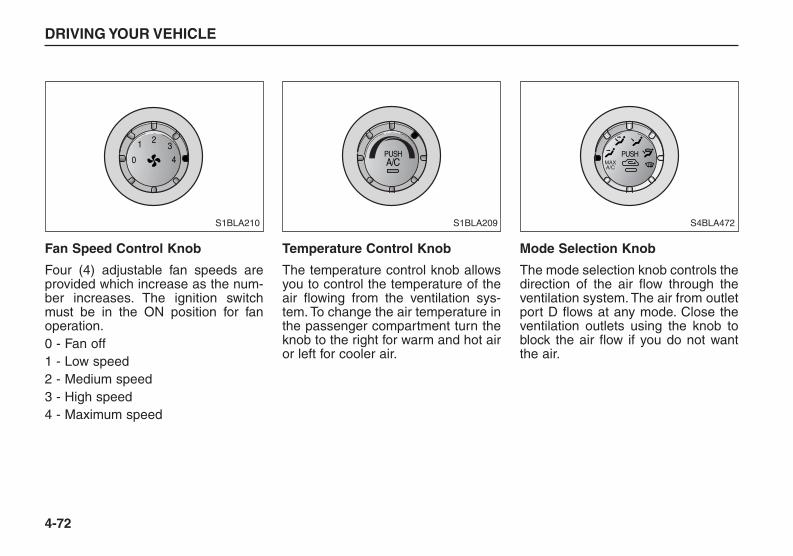
Fan Speed Control Knob
Four (4) adjustable fan speeds areprovided which increase as the num-ber increases. The ignition switchmust be in the ON position for fanoperation.0 - Fan off1 - Low speed2 - Medium speed3 - High speed4 - Maximum speed
Temperature Control Knob
The temperature control knob allowsyou to control the temperature of theair flowing from the ventilation sys-tem. To change the air temperature inthe passenger compartment turn theknob to the right for warm and hot airor left for cooler air.
Mode Selection Knob
The mode selection knob controls thedirection of the air flow through theventilation system. The air from outletport D flows at any mode. Close theventilation outlets using the knob toblock the air flow if you do not wantthe air.
DRIVING YOUR VEHICLE
4-72
0
1 23
4
S1BLA210
PUSHA/C
S1BLA209
PUSHMAXA/C
S4BLA472
BL-ENG (CAN)-4.qxd 7/28/05 5:55 PM Page 72
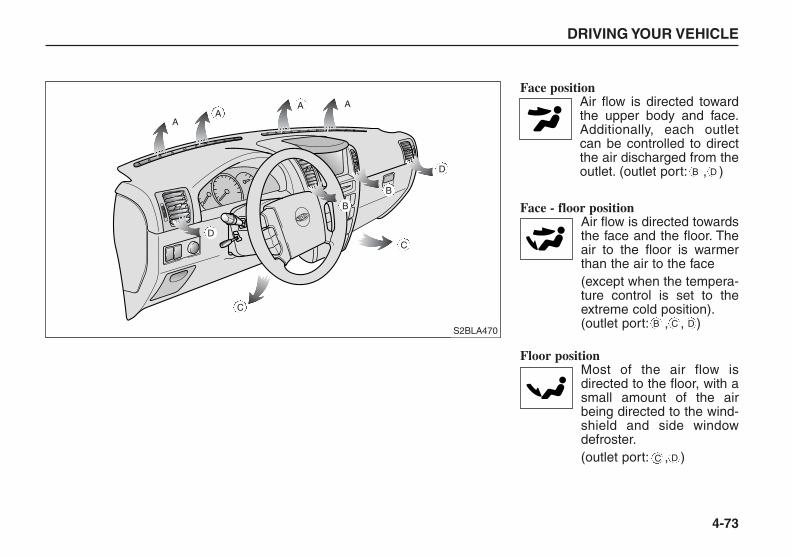
Face position Air flow is directed towardthe upper body and face.Additionally, each outletcan be controlled to directthe air discharged from theoutlet. (outlet port: , )
Face - floor position Air flow is directed towardsthe face and the floor. Theair to the floor is warmerthan the air to the face(except when the tempera-ture control is set to theextreme cold position).(outlet port: , , )
Floor position Most of the air flow isdirected to the floor, with asmall amount of the airbeing directed to the wind-shield and side windowdefroster.(outlet port: , )
DRIVING YOUR VEHICLE
4-73
S2BLA470
AA
A A
D
D
C
C
B
B
B D
B
C
C D
D
BL-ENG (CAN)-4.qxd 7/28/05 5:55 PM Page 73

Floor - defrost position Most of the air flow isdirected to the floor andthe windshield with a smallamount directed to theside window defrosters.(outlet port: , , )
Defrost position Most of the air flow isdirected to the windshieldwith a small amount of airdirected to the side win-dow defrosters.(outlet port: , )
MAX/ A/C position When you select the MAXA/C mode while the fanspeed is on, it will be setthe system automaticallyas follows;• the air conditioning sys-
tem will be turned on.• the recirculated air posi-
tion will be selected.• the face mode will be
selected.If you select the MAX A/Cmode, you could not can-cel the A/C system and therecirculated air position.Set the fan speed controlknob to desired speed androtate the temperaturecontrol knob to theextreme left position.
Air Flow Control Button
It is recommended that under normalconditions the outside (fresh) airposition be selected.
DRIVING YOUR VEHICLE
4-74
A
A C D
D
PUSHMAXA/C
S4BLA472A
MAXA/C
BL-ENG (CAN)-4.qxd 7/28/05 5:55 PM Page 74

Recirculated air position If you press the air intakecontrol button once (recir-culate), almost all outsideair flow into the vehicle isshut off, and air within thevehicle will be recirculated.This position can be usedtemporarily for maximumheating or cooling (ifequipped with an air condi-tioning) and to help pre-vent undesirable outsideair flow into the vehicle.
Outside (fresh) air position If you press the air intakecontrol button again, theair position will be changedto outside (fresh) air andair will enter the ventilationsystem from outside thevehicle. Use this positionfor normal ventilation andheating.
To reduce the probability of foggingup the inside of the windshield, the airintake control is set to the outside(fresh) air position automatically ifany of following occur.• The mode is selected to the ,
or while the system is activated.• The ignition switch is turned off.• The fan is off.Press the air intake control button toselect the recirculated air positionwhile the ignition switch is on.
DRIVING YOUR VEHICLE
4-75
CAUTIONContinued climate control sys-tem operation in the recirculat-ed air position may allowhumidity to increase inside thevehicle which may fog the glassand obscure visibility.
WARNINGDon’t sleep in a vehicle with airconditioning system or heatingsystem on. It may cause seriousharm or death to passengersdue to a drop in the oxygenlevel and/or body temperature.
BL-ENG (CAN)-4.qxd 7/28/05 5:55 PM Page 75

Air Conditioning Button (If equipped)
Push the A/C button to turn the airconditioning system on. The indicatorlight in the button will illuminate whenthe fan speed control knob is on.Push the button again to turn the airconditioning system off.
System Operation
Ventilation1. Set the mode selection knob to the
position.2. Set the air intake control button to
the outside (fresh) air position.3. Set the temperature control knob
to the desired position.4. Set the fan speed control knob to
the desired speed.
Heating1. Set the mode selection knob to the
position.2. Set the air intake control button to
the outside (fresh) air position.3. Set the temperature control knob
to the desired position.4. Set the fan speed control knob to
the desired speed.5. If dehumidified heating is desired,
turn the air conditioning system on.• If cool air is desired at face level for
bi-level operation, set the modeselection knob to the position.
• If the windshield fogs up, set themode selection knob to the position.
DRIVING YOUR VEHICLE
4-76
PUSHA/C
S1BLA211
BL-ENG (CAN)-4.qxd 7/28/05 5:55 PM Page 76

Air conditioning All Kia Air Conditioning Systems arefilled with environmentally friendlyR134a refrigerant which is not dam-aging to the ozone layer.1. Start the engine. Push the air con-
ditioning button.2. Set the mode selection knob to the
face position.3. Set the air intake control button to
the outside air or recirculated airposition.
4. Set the temperature control knobto the desired position.
5. Set the fan speed control knob tothe desired speed.
6. Adjust the fan speed control knoband temperature control knob tomaintain maximum comfort.
• If warmer air is desired at floor levelfor bi-level operation, set the modeselection knob to the positionand adjust the temperature controlknob to maintain maximum com-fort.
• When maximum cooling is desired,rotate the temperature control knobto the extreme left position and setthe air intake control button to therecirculated air position, then setthe fan speed control knob to thehighest speed.
DRIVING YOUR VEHICLE
4-77
✽✽ NOTICEWhen using the air conditioningsystem, monitor the temperaturegauge closely while driving up hillsor in heavy traffic when outsidetemperatures are high. Air condi-tioning system operation maycause engine overheating. Continueto use the blower fan but turn theair conditioning system off if thetemperature gauge indicates engineoverheating.
BL-ENG (CAN)-4.qxd 7/28/05 5:55 PM Page 77

Air Conditioning SystemOperation Tips
• If the vehicle has been parked indirect sunlight during hot weather,open the windows for a short timeto let the hot air inside the vehicleescape.
• To help reduce moisture inside ofwindows on rainy humid days,decrease the humidity inside thevehicle by operating the air condi-tioning system.
• During air conditioning systemoperation, you may occasionallynotice a slight change in enginespeed at idle as the air conditioningcompressor cycles on. This is anormal system operation charac-teristics.
• Use the air conditioning systemevery month if only for a few min-utes.
• After the use of the air conditioningsystem, you may notice clear waterdripping (or even pudding) on theground under the passenger sideof the vehicle. This is a normal sys-tem operation characteristics.
• The air conditioning systemincludes a function that will auto-matically turns the air conditioningcompressor off if engine coolanttemperature approaches an overheating level. The air conditioningcompressor operation will resumeonce engine coolant temperaturereturns to the normal range. Also,the air conditioning compressor isautomatically turned off for a fewseconds when the accelerator isfully depressed.
• When operating the air conditioningsystem use the outside (fresh) airposition.
• Operating the air conditioning sys-tem in the recirculated air positiondoes provide maximum cooling,however, continual operation in thismode may cause the air inside thevehicle to become stale.
DRIVING YOUR VEHICLE
4-78
BL-ENG (CAN)-4.qxd 7/28/05 5:55 PM Page 78

AUTOMATIC CLIMATE CON-TROL SYSTEM (IF EQUIPPED)The automatic climate control systemis controlled by simply setting thedesired temperature.
DRIVING YOUR VEHICLE
4-79
AUTO AUTO AMB
OFF
TEMP
MODE
AMB
A/C
A/C
L R
S2BLC465A
1. Temperature Control Button 2. AUTO (Automatic Control) Button3. Indicator Light4. Mode Selection Button5. Fan Speed Control Button6. Air Conditioning Button
7. OFF Button8. Defrost Button9. Outside (fresh) Air Position Button10. AMB (ambient) Button 11. Recirculated Air Position Button
1
6 7 8 9 10 11
2 3 4 5
BL-ENG (CAN)-4.qxd 7/28/05 5:55 PM Page 79
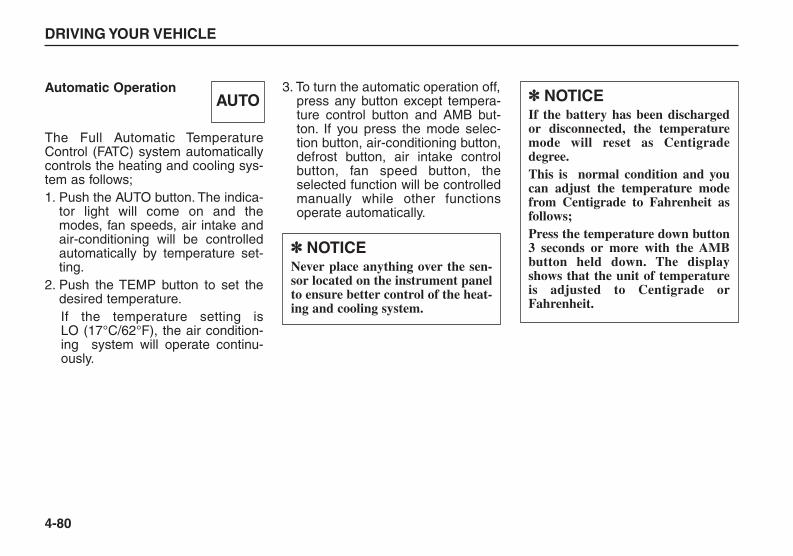
Automatic Operation
The Full Automatic TemperatureControl (FATC) system automaticallycontrols the heating and cooling sys-tem as follows;1. Push the AUTO button. The indica-
tor light will come on and themodes, fan speeds, air intake andair-conditioning will be controlledautomatically by temperature set-ting.
2. Push the TEMP button to set thedesired temperature.If the temperature setting is LO (17°C/62°F), the air condition-ing system will operate continu-ously.
3. To turn the automatic operation off,press any button except tempera-ture control button and AMB but-ton. If you press the mode selec-tion button, air-conditioning button,defrost button, air intake controlbutton, fan speed button, theselected function will be controlledmanually while other functionsoperate automatically.
DRIVING YOUR VEHICLE
4-80
AUTO
✽✽ NOTICENever place anything over the sen-sor located on the instrument panelto ensure better control of the heat-ing and cooling system.
✽✽ NOTICEIf the battery has been dischargedor disconnected, the temperaturemode will reset as Centigradedegree.This is normal condition and youcan adjust the temperature modefrom Centigrade to Fahrenheit asfollows;Press the temperature down button3 seconds or more with the AMBbutton held down. The displayshows that the unit of temperatureis adjusted to Centigrade orFahrenheit.
BL-ENG (CAN)-4.qxd 7/28/05 5:55 PM Page 80

Manual Operation
The heating and cooling system canbe controlled manually as well bypushing buttons other than the AUTObutton. In this case, the systemsequentially works according theorder of buttons selected.The functions of the buttons whichare not selected will be controlledautomatically.Press the AUTO button in order toconvert to automatic control of thesystem.
Temperature ControlButton
The temperature will increase to themaximum HI (32°C/90°F) by pushingthe up button. Each push of the but-ton will cause the temperature toincrease by 0.5 °C (1°F).The temperature will decrease to theminimum LO (17°C/62°F) by pushingthe down button. Each push of thebutton will cause the temperature todecrease by 0.5°C (1°F).
Ambient Button
The ambient temperature will be dis-played for 5 seconds. before return-ing to the previous indication.If you press AMB button again, theprevious indication will be displayed.
DRIVING YOUR VEHICLE
4-81
TEMP AMB
BL-ENG (CAN)-4.qxd 7/28/05 5:55 PM Page 81

Fan Speed Control Button
The fan speed can be set to thedesired speed by pressing the appro-priate fan speed control button.The higher the fan speed is, the moreair is delivered.Pressing the “OFF” button turns offthe fan.
- Fan off- Low speed- Medium speed- High speed- Maximum speed
Air Flow Control Button
This is used to select outside (fresh)air position or recirculated air posi-tion.To change the air intake control posi-tion, push the control button.
Recirculated air position
The indicator light is illuminated whenthe air intake control is in recirculatedair position.With the recirculated air positionselected, air from passenger com-partment will be drawn through theheating system and heated or cooledaccording to the function selected.
Outside (fresh) air posi-tion
The indicator light on the button isilluminated when the air intake con-trol is set to the outside (fresh) airposition.With the outside (fresh) air positionselected, air enters the vehicle fromoutside and is heated or cooledaccording to the function selected.The system will automatically switchto the outside (fresh) air positionwhenever the ignition is turned ON.
To cancel the automatic outside(fresh) air selection, refer to the can-cel procedure in the windshielddefrosting and defogging section.
DRIVING YOUR VEHICLE
4-82
BL-ENG (CAN)-4.qxd 7/28/05 5:56 PM Page 82

Mode Selection Button
The mode selection button controlsthe direction of the air flow throughthe ventilation system.The air flow outlet port is same asmanual climate control system.
Face position Air flow is directed towardthe upper body and face.Additionally, each outletcan be controlled to directthe air discharged from theoutlet. (outlet port: , )
DRIVING YOUR VEHICLE
4-83
B D
MODE✽✽ NOTICEIt should be noted that prolongedoperation of the heating in recircu-lated air position will cause foggingof the windshield and side windowsand the air within the passengercompartment will become stale.In addition, prolonged use of the airconditioning with the “recirculatedair position” selected, will result inexcessively dry air in the passengercompartment.
CAUTIONContinued climate control sys-tem operation in the recirculat-ed air position may allowhumidity to increase insidevehicle which may fog the glassand obscure visibility.
WARNING Do not sleep in a vehicle with airconditioning system or heatingsystem on. It may cause seriousharm or death due to a drop inthe oxygen level and/or bodytemperature.
BL-ENG (CAN)-4.qxd 7/28/05 5:56 PM Page 83
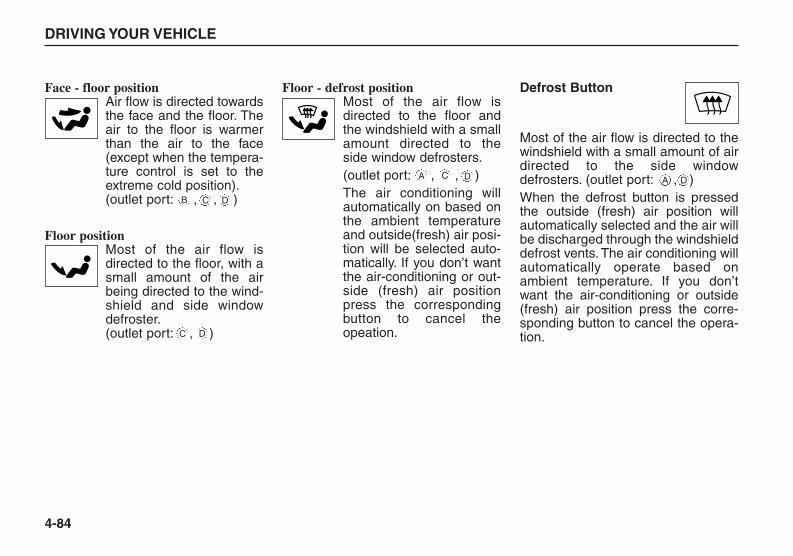
Face - floor position Air flow is directed towardsthe face and the floor. Theair to the floor is warmerthan the air to the face(except when the tempera-ture control is set to theextreme cold position).(outlet port: , , )
Floor position Most of the air flow isdirected to the floor, with asmall amount of the airbeing directed to the wind-shield and side windowdefroster.(outlet port: , )
Floor - defrost position Most of the air flow isdirected to the floor andthe windshield with a smallamount directed to theside window defrosters.(outlet port: , , )The air conditioning willautomatically on based onthe ambient temperatureand outside(fresh) air posi-tion will be selected auto-matically. If you don’t wantthe air-conditioning or out-side (fresh) air positionpress the correspondingbutton to cancel theopeation.
Defrost Button
Most of the air flow is directed to thewindshield with a small amount of airdirected to the side windowdefrosters. (outlet port: , )When the defrost button is pressedthe outside (fresh) air position willautomatically selected and the air willbe discharged through the windshielddefrost vents. The air conditioning willautomatically operate based onambient temperature. If you don’twant the air-conditioning or outside(fresh) air position press the corre-sponding button to cancel the opera-tion.
DRIVING YOUR VEHICLE
4-84
B
A C
C
C
D
D
D A D
BL-ENG (CAN)-4.qxd 7/28/05 5:56 PM Page 84

Air Conditioning Button
Push the A/C button to turn the airconditioning system on. The indicatorlight in the button will illuminate whenthe fan speed control knob is on.Push the button again to turn the airconditioning system off.
DRIVING YOUR VEHICLE
4-85
A/C
S1BLA217
BL-ENG (CAN)-4.qxd 7/28/05 5:56 PM Page 85

WINDSHIELD DEFROSTINGAND DEFOGGING (MANUAL TYPE)
To Defog Inside Windshield
1. Select the floor-defrost ( ) ordefrost ( ) position.
2. Select desired temperature.3. Select any fan speed except “0”.4. The outside (fresh) air will be
selected.If you don’t want the outside (fresh)air position press the correspondingbutton to cancel the operation.
To Defrost Outside Windshield
1. Select the defrost ( ) position.2. Set the fan speed to the “3” or “4”
position.3. Set the temperature to the extreme
hot position.4. The outside (fresh) air will be
selected.If you don’t want the outside (fresh)air position press the correspondingbutton to cancel the operation.
DRIVING YOUR VEHICLE
4-86
0
1 23
4
PUSH
PUSH
PUSHA/C
PUSHA/C
MAXA/C
MAXA/C
S4BLA473
PUSHA/C
PUSHA/C
0
1 23
4PUSH
MAXA/C
PUSHMAXA/C
S4BLA474
CAUTIONDo not use defrost or position during cooling opera-tion in extremely humid weath-er. The difference between thetemperature of the outside airand that of the windshield couldcause the outer surface of thewindshield to fog up, causingloss of visibility. In this case, setthe mode selection knob to the
position and fan speed con-trol knob to the lower speed.
BL-ENG (CAN)-4.qxd 7/28/05 5:56 PM Page 86

• For maximum defrosting, set thetemperature control knob to theextreme right/hot position and thefan speed control knob to the high-est speed.
• If warm air to the floor is desiredwhile defrosting or defogging, setthe mode selection knob to thefloor- defrost position.
• Before driving, clear all snow andice from the windshield, rear win-dow, outside rear view mirrors, andall side windows.
• Clear all snow and ice from thehood and air inlet in the cowl grill toimprove heater and defroster effi-ciency and to reduce the probabili-ty of fogging up inside of the wind-shield.
How to cancel automatic outside(fresh) air position in the Floor,Floor-Defrost and Defrost posi-tion:When you select the Floor, Floor-Defrost or Defrost position, the out-side (fresh) air position will be select-ed automatically.If you don’t want the outside (fresh)air position when operating in eitherof these modes, you can turn off theautomatic outside (fresh) air positionby performing the following:
1. Make sure the engine is running orthe ignition switch is in the ONposition.
2. Turn the fan speed control knob tothe “0” position.
3. Turn the mode selection knob tothe defrost ( ) position.
4. Push the air intake control button( ) at least 5 times within 3 sec-onds.Then the indicator light on the airintake control button will blink 3times with 0.5 second intervalsbetween blinks.
If you want to return to the automaticoutside (fresh) air position, repeat theprocedure above.
DRIVING YOUR VEHICLE
4-87
PUSHMAXA/C
PUSHMAXA/C
S4BLA475
BL-ENG (CAN)-4.qxd 7/28/05 5:56 PM Page 87

WINDSHIELD DEFROSTINGAND DEFOGGING (AUTOMATIC TYPE)
To Defog Inside Windshield
1. Press the defrost button ( ).2. Select desired temperature.3. Select any fan speed except OFF
( ) position.4. The air-conditioning will be turned
on according to the detected ambi-ent temperature and outside(fresh) air position will be selected.
If you don’t want the air-conditioningor outside (fresh) air position pressthe corresponding button to cancelthe operation.
To Defrost Outside Windshield
1. Press the defrost button ( ).2. Set the fan speed to the or
position.3. Set temperature to the extreme hot
(25°C~32°C) position.4. The air-conditioning will be turned
on according to the detected ambi-ent temperature and outside(fresh) air position will be selected.
If you don’t want the air-conditioningor outside (fresh) air position pressthe corresponding button to cancelthe operation.
DRIVING YOUR VEHICLE
4-88
S2BLA476
S2BLA477
CAUTIONDo not use defrost positionduring cooling operation inextremely humid weather. Thedifference between the temper-ature of the outside air and thatof the windshield could causethe outer surface of the wind-shield to fog up, causing loss ofvisibility. In this case, set themode selection knob to the position and fan speed controlknob to the lower speed.
BL-ENG (CAN)-4.qxd 7/28/05 5:56 PM Page 88

How to cancel forced air-condition-ing operation and outside (fresh)air position in floor-defrost anddefrost position ;When you select the Floor-Defrost orDefrost position, the system automat-ically turns on the air-conditioningsystem and the outside (fresh) airposition will be selected.If you don’t want air-conditioning andthe outside (fresh) air position whenoperating in either of these modes,you can turn off the air-conditioningsystem operation by performing thefollowing:
1. Make sure the engine is running orthe ignition switch is in the ONposition.
2. Select the defrost position press-ing the defrost ( ) button.
3. While holding the air conditioningbutton A/C depressed, depress therecirculated air position button( ) at least 5 times within 3 sec-onds.The indicator light in the recirculat-ed air position button ( ) willblink 3 times with 0.5 second ofinterval.
If you want to return to the automaticair conditioning system and outside(fresh) air position, repeat the proce-dure above.
Follow the same procedure if youwant to cancel or return to the forcedoutside (fresh) air position when youstart the engine with recirculated airposition selected manually before theengine off.
DRIVING YOUR VEHICLE
4-89
S2BLA478
BL-ENG (CAN)-4.qxd 7/28/05 5:56 PM Page 89

5-1
DRIVING TIPS
Fuel Requirements . . . . . . . . . . . . . . . . . . . . . . . . . . . . . . . . . 5-2Emission Control System . . . . . . . . . . . . . . . . . . . . . . . . . . . 5-3Tips on Driving Your Vehicle . . . . . . . . . . . . . . . . . . . . . . . . . 5-5Suggestions for Economical Operation . . . . . . . . . . . . . . . . 5-6Special Driving Conditions . . . . . . . . . . . . . . . . . . . . . . . . . . 5-8Using Four-Wheel Drive . . . . . . . . . . . . . . . . . . . . . . . . . . . . 5-14Weight of the Vehicle - with and without a Trailer . . . . . . . .5-32Trailer Towing . . . . . . . . . . . . . . . . . . . . . . . . . . . . . . . . . . . . 5-34Overloading . . . . . . . . . . . . . . . . . . . . . . . . . . . . . . . . . . . . . 5-43Label Information . . . . . . . . . . . . . . . . . . . . . . . . . . . . . . . . . 5-43
5
BL-ENG (CAN)-5.qxd 7/28/05 5:56 PM Page 1
FUEL REQUIREMENTSYour new Kia vehicle must useonly unleaded fuel having anoctane rating of at least 87.Your new Kia is designed to obtainmaximum performance withUNLEADED FUEL, as well as mini-mize exhaust emissions and sparkplug fouling.
Gasoline Containing Alcohol andMethanol
Gasohol, a mixture of gasoline andethanol (also known as grain alco-hol), and gasoline or gasohol con-taining methanol (also known aswood alcohol) are being marketedalong with or instead of leaded orunleaded gasoline.Do not use gasohol containing morethan 10% ethanol, and do not usegasoline or gasohol containing anymethanol. Either of these fuels maycause driveability problems and dam-age to the fuel system.Discontinue using gasohol of anykind if driveability problems occur.
Vehicle damage or driveability prob-lems may not be covered by the man-ufacturer’s warranty if they result fromthe use of:1. Gasohol containing more than
10% ethanol.2. Gasoline or gasohol containing
methanol.3. Leaded fuel or leaded gasohol.
DRIVING TIPS
5-2
✽✽ NOTICENEVER USE LEADED FUEL. Theuse of leaded fuel is detrimental tothe catalytic converter and willdamage the engine control system’soxygen sensor and affect emissioncontrol.Never add any fuel system cleaningagents to the fuel tank other thanwhat Kia has specified.(Consult an authorized Kia dealerfor details.)
✽✽ NOTICENever use gasohol which containsmethanol. Discontinue use of anygasohol product which impairs dri-veability.
BL-ENG (CAN)-5.qxd 7/28/05 5:56 PM Page 2
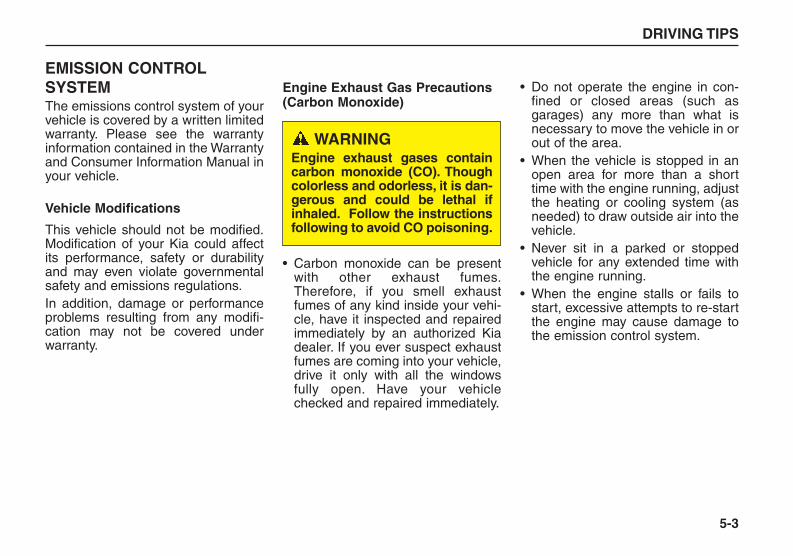
EMISSION CONTROLSYSTEMThe emissions control system of yourvehicle is covered by a written limitedwarranty. Please see the warrantyinformation contained in the Warrantyand Consumer Information Manual inyour vehicle.
Vehicle Modifications
This vehicle should not be modified.Modification of your Kia could affectits performance, safety or durabilityand may even violate governmentalsafety and emissions regulations.In addition, damage or performanceproblems resulting from any modifi-cation may not be covered underwarranty.
Engine Exhaust Gas Precautions(Carbon Monoxide)
• Carbon monoxide can be presentwith other exhaust fumes.Therefore, if you smell exhaustfumes of any kind inside your vehi-cle, have it inspected and repairedimmediately by an authorized Kiadealer. If you ever suspect exhaustfumes are coming into your vehicle,drive it only with all the windowsfully open. Have your vehiclechecked and repaired immediately.
• Do not operate the engine in con-fined or closed areas (such asgarages) any more than what isnecessary to move the vehicle in orout of the area.
• When the vehicle is stopped in anopen area for more than a shorttime with the engine running, adjustthe heating or cooling system (asneeded) to draw outside air into thevehicle.
• Never sit in a parked or stoppedvehicle for any extended time withthe engine running.
• When the engine stalls or fails tostart, excessive attempts to re-startthe engine may cause damage tothe emission control system.
DRIVING TIPS
5-3
WARNINGEngine exhaust gases containcarbon monoxide (CO). Thoughcolorless and odorless, it is dan-gerous and could be lethal ifinhaled. Follow the instructionsfollowing to avoid CO poisoning.
BL-ENG (CAN)-5.qxd 7/28/05 5:56 PM Page 3
Operating Precautions forCatalytic Converters
Your vehicle is equipped with a cat-alytic converter emission controldevice.Therefore, the following precautionsmust be observed:• Use only UNLEADED FUEL.• Do not operate the vehicle when
there are signs of engine malfunc-tion, such as misfire or a noticeableloss of performance.
• Do not misuse or abuse the engine.Examples of misuse are coastingwith the ignition off and descendingsteep grades in gear with the igni-tion off.
• Do not operate the engine at highidle speed for extended periods (5minutes or more).
• Do not modify or tamper with anypart of the engine or emission con-trol system. All inspections andadjustments must be made by aqualified technician.
Failure to observe these precautionscould result in damage to the catalyt-ic converter and to your vehicle.Additionally, such actions could voidyour warranties.
DRIVING TIPS
5-4
WARNINGYour Full-time Four-Wheel Drivevehicle must never be tested ona two-wheel dynamometer.Serious transmission damageand uncontrolled vehicle move-ment could result.
WARNING - FireA hot exhaust system can igniteflammable items under yourvehicle. Do not park the vehicleover or near flammable objects,such as dry grass, paper,leaves, etc.
BL-ENG (CAN)-5.qxd 7/28/05 5:56 PM Page 4

TIPS ON DRIVING YOURVEHICLEBefore Entering Vehicle:
• Be sure that all windows, outsidemirror(s), and outside lights areclean.
• Check the condition of the tires.• Check under the vehicle for any
sign of leaks.• Be sure there are no obstacles
behind you if you intend to back up.
Necessary Inspections
Fluid levels, such as engine oil,engine coolant, brake/clutch fluid,and washer fluid should be checkedon a regular basis, with the exactinterval depending on the fluid.Further details are provided in the“Maintenance” section.
Before Starting
• Close and lock all doors.• Position the seat so that all controls
are easily reached.• Adjust the inside and outside
rearview mirrors.• Be sure that all lights work.• Check all gauges.• Check the operation of warning
lights when the ignition switch isturned to the ON position.
• Release the parking brake andmake sure the brake warning lightgoes out.
For safe operation, be sure you arefamiliar with your vehicle and itsequipment.
DRIVING TIPS
5-5
WARNING- Driving Under the
Influence of Alcohol orDrugs
Drinking and driving is danger-ous. Drunk driving is the num-ber one contributor to the high-way death toll each year. Evena small amount of alcohol willaffect your reflexes, percep-tions and judgement.You are much more likely tohave a serious accident if youdrink and drive.If you are drinking or takingdrugs, don’t drive. Do not ridewith a driver who has beendrinking or taking drugs.Choose a designated driver orcall a cab.Driving while under the influ-ence of drugs is as dangerousor more dangerous than drivingdrunk.
BL-ENG (CAN)-5.qxd 7/28/05 5:56 PM Page 5

SUGGESTIONS FORECONOMICAL OPERATIONYour vehicle’s fuel economy dependsmainly on your style of driving, whereyou drive and when you drive.Each of these factors affects howmany miles (kilometers) you can getfrom a gallon (liter) of fuel. To operateyour vehicle as economically as pos-sible, use the following driving sug-gestions to help save money in bothfuel and repairs:• Avoid lengthy warm-up idling. Once
the engine is running smoothly,begin driving. Remember, enginewarm-up may take a little longer oncold days.
• Save fuel by accelerating slowlyafter stopping.
• Keep the engine in tune and followthe recommended periodic mainte-nance schedule. This will increasethe life of all parts and lower youroperating costs.
• Do not use the air conditionerunnecessarily.
• Slow down when driving on roughroads.
• For longer tire life and better fueleconomy, always keep the tiresinflated to the recommended pres-sures.
• Maintain a safe distance from othervehicles to avoid sudden stops.This will reduce wear on brake lin-ings and pads. Driving in such away will also save fuel becauseextra fuel is required to accelerateback to driving speed.
• Do not carry unnecessary weight inthe vehicle.
• Do not rest your foot on the brakepedal while driving. This can causeneedless wear, possible damage tothe brakes, and poor fuel economy.
• Improper wheel alignment resultsin faster tire wear and lower fueleconomy.
• Open windows at high speeds canreduce fuel economy.
• Fuel economy is less in crosswindsand headwinds. To help offsetsome of this loss, slow down whendriving in these conditions.
Keeping a vehicle in good operatingcondition is important both for econo-my and safety. Therefore, have anauthorized Kia dealer perform sched-uled inspections and maintenance.
DRIVING TIPS
5-6
BL-ENG (CAN)-5.qxd 7/28/05 5:56 PM Page 6
DRIVING TIPS
5-7
WARNING - Engine off During Motion
Never turn the engine off whilethe vehicle is in motion. Thepower steering and powerbrakes will not work with theengine off. Instead of coastingdownhill with the engine off,downshift to an appropriategear for engine braking effect.
BL-ENG (CAN)-5.qxd 7/28/05 5:56 PM Page 7

SPECIAL DRIVINGCONDITIONSHazardous Driving Conditions
When hazardous driving conditionsare encountered such as water,snow, ice, mud, sand, or similar haz-ards, follow these suggestions:• Drive cautiously and allow extra
distance for braking.• Avoid sudden movements in brak-
ing or steering.• When braking in the four-wheel
drive mode (if equipped), pump thebrake pedal with a light up-and-down motion until the vehicle isstopped.
• If stalled in snow, mud, or sand, usesecond gear or shift the transfercase (if equipped) into four-wheeldrive. Accelerate slowly to avoidspinning the drive wheels.
• Use sand, rock salt, tire chains, orother non-slip material under thedrive wheels to provide tractionwhen stalled in ice, snow, or mud.(If equipped, refer to “Using Four-Wheel Drive.’’)
DRIVING TIPS
5-8
✽✽ NOTICEDo not pump the brake pedal onABS equipped vehicle.
WARNING - DownshiftingOn slippery surfaces, down-shifting can cause an accident.The sudden change in tirespeed could cause the tires toskid. Be careful when down-shifting on slippery surfaces.Try to drive slowly enough soyou won’t have to make anysudden changes in gear or vehi-cle speed.
BL-ENG (CAN)-5.qxd 7/28/05 5:56 PM Page 8

Rocking the Vehicle
If it is necessary to rock the vehicle tofree it from snow, sand, or mud, firstturn the steering wheel right and leftto clear the area around your frontwheels. Then, shift back and forthbetween 1 (First) and R (Reverse) invehicles equipped with a manualtransmission or R (Reverse) and anyforward gear in vehicles equippedwith an automatic transmission. Donot race the engine, and spin thewheels as little as possible. If you arestill stuck after a few tries, have thevehicle pulled out by a tow vehicle toavoid engine overheating and possi-ble damage to the transmission,transfer case (if equipped), or differ-ential.
Driving at Night
Because night driving presents manymore hazards than driving in the day-light, here are some important tips toremember:• Slow down and keep more distance
between you and other vehicles, asit may be more difficult to see atnight, especially in areas wherethere may not be any street lights.
• Adjust your mirrors to reduce theglare from other driver’s headlights.
• Keep your headlights clean andproperly aimed. Dirty or improperlyaimed headlights will make it muchmore difficult to see at night.
• Avoid staring directly at the head-lights of oncoming vehicles. Youcould be temporarily blinded, and itwill take several seconds for youreyes to readjust to the darkness.
DRIVING TIPS
5-9
✽✽ NOTICEProlonged rocking may causeengine over-heating, transmissionor transfer case (if equipped) dam-age or failure, and tire damage.
WARNING- Spinning Tires
Do not spin the wheels, espe-cially at speeds more than 35mph (56 km/h). Spinning thewheels at high speeds when thevehicle is stationary couldcause a tire to overheat,explode and injure bystanders.
BL-ENG (CAN)-5.qxd 7/28/05 5:56 PM Page 9

Driving in the Rain
Rain and wet roads can make drivingdangerous, especially if you’re notprepared for the slick pavement. Hereare a few things to consider whendriving in the rain:• A heavy rainfall will make it harder
to see and will increase the dis-tance needed to stop your vehicle,so slow down.
• Keep your windshield wiping equip-ment in good shape. Replace yourwindshield wiper blades when theyshow signs of streaking or missingareas on the windshield.
• If your tires are not in good condi-tion, making a quick stop on wetpavement can cause a skid andpossibly lead to an accident. Besure your tires are in good shape.
• Turn on your headlights to make iteasier for others to see you.
• Driving too fast through large pud-dles can affect your brakes. If youmust go through puddles, try todrive through them slowly.
• If you believe your brakes may havebecome wet, apply them lightlywhile driving until normal brakingoperation returns.
Winter Driving
• We recommend that you carryemergency equipment, includingtire chains, a window scraper, wind-shield de-icer, a bag of sand or salt,flares, a small shovel and jumpercables.
• Make sure you have sufficient eth-ylene-glycol coolant in the radiator.
• Check the battery condition andcables. Cold temperatures reducethe capacity of any battery, so itmust be in excellent condition toprovide enough winter startingpower.
• Make sure the engine oil viscosityis suitable for cold weather.
• Check the ignition system for looseconnections and damage.
DRIVING TIPS
5-10
BL-ENG (CAN)-5.qxd 7/28/05 5:56 PM Page 10
• Use antifreeze-formulated wind-shield washer fluid. (Do not useengine coolant antifreeze.)
• Do not use the parking brake if itmight freeze. When parking, shift to1 (First) or R (Reverse) with a man-ual transmission or P (Park) with anautomatic transmission, and blockthe rear wheels.
Snow Tires
If you mount snow tires on your Kia,make sure they are radial tires of thesame size and load range as the orig-inal tires. Mount snow tires on all fourwheels to balance your vehicle’s han-dling in all weather conditions. Keepin mind that the traction provided bysnow tires on dry roads may not beas high as your vehicle’s originalequipment tires. You should drivecautiously even when the roads areclear. Check with the tire dealer formaximum speed recommendations.
Do not install studded tires withoutfirst checking local, provincial andmunicipal regulations for possiblerestrictions against their use.
DRIVING TIPS
5-11
WARNING- Snow Tire Size
Snow tires should be equivalentin size and type to the vehicle’sstandard tires. Otherwise, thesafety and handling of yourvehicle may be adversely affect-ed.
BL-ENG (CAN)-5.qxd 7/28/05 5:56 PM Page 11
Driving in Flooded Areas
Avoid driving through flooded areasunless you are sure the water is nohigher than the bottom of the wheelhub. Drive through any water slowly.Allow adequate stopping distancebecause brake performance may beaffected.After driving through water, dry thebrakes by gently applying them sev-eral times while the vehicle is movingslowly.
Reducing the Risk of a Rollover
This multi-purpose passenger vehicleis defined as a Sports Utility Vehicle(SUV). SUV’s have higher groundclearance and a narrower track tomake them capable of performing ina wide variety of off-road applica-tions. Specific design characteristicsgive them a higher center of gravitythan ordinary cars. An advantage ofthe higher ground clearance is a bet-ter view of the road, which allows youto anticipate problems. They are notdesigned for cornering at the samespeeds as conventional passengerdrive vehicles, any more than low-rid-ing sports cars are designed to per-form satisfactorily in off-road condi-tions. Due to this risk, driver and pas-sengers are strongly recommendedto buckle their seatbelts.
In a rollover crash, an unbelted per-son is more likely to die than a personwearing a seatbelt. There are stepsthat a driver can make to reduce therisk of a rollover. If at all possible,avoid sharp turns or abrupt maneu-vers, do not load your roof rack withheavy cargo, and never modify yourvehicle in any way.
DRIVING TIPS
5-12
BL-ENG (CAN)-5.qxd 7/28/05 5:56 PM Page 12

Rollover Warning Label
To remind you of the danger of therollover, a rollover warning labelwhich is now required by FederalSafety regulations is adhered to thedriver’s sunvisor.
To remind you of the danger of therollover, the rollover warning label isadhered to the driver’s sunvisor. Ifyou close the driver’s sunvisor, youcan see the rollover warning labellocated at the side of the air bagwarning label.
DRIVING TIPS
5-13
Avoid Abrupt Maneuversand Excessive Speed.
Always Buckle Up.
See Owner's ManualFor Further Information.
WARNING - Rollover As with other Sports UtilityVehicle (SUV), failure to operatethis vehicle correctly may resultin loss of control, an accident orvehicle rollover.• Specific design characteris-
tics (higher ground clearance,narrower track, etc.) give thisvehicle a higher center ofgravity than ordinary cars.
• An SUV is not designed forcornering at the same speedsas conventional 2-wheel drivevehicles.
• Avoid sharp turns or abruptmaneuvers.
• In a rollover crash, an unbelt-ed person is significantlymore likely to die than a per-son wearing a safety belt.Make sure everyone in thevehicle is properly buckledup.
BL-ENG (CAN)-5.qxd 7/28/05 5:56 PM Page 13

USING FOUR-WHEEL DRIVEDriving on Snow- or Ice-CoveredRoads (“4HI, 4LO” for Part-time4WD Operation or “AUTO” forFull-time 4WD Operation)
• Use snow tires. See “Tires” in thissection for more information.
• Keep an adequate distancebetween yourself and other vehi-cles.
• Avoid sudden braking, accelerationor steering. These actions cancause your vehicle to lose traction.
Driving in Sand or Mud (“4HI,4LO” for Part-time 4WD Operationor “AUTO” for Full-time 4WDOperation)
• Avoid sudden braking, accelerationor steering. These actions cancause your vehicle to get stuck inthe sand or mud.
• Drive at low speeds whenever pos-sible.
• You may need to get out of yourvehicle at times to check road con-ditions.
• If you get stuck in the sand or mud,try placing stones, wood or othersimilar materials under the tires toget traction, or move forward andbackward repeatedly to getunstuck.
DRIVING TIPS
5-14
WARNING - TractionMake sure that no one stands infront of or behind the tires whenmaterials are placed under thetires to get more traction. Thetires may cause loose materialsto fly out from under the vehi-cle, potentially causing seriousbodily injury or death.
✽✽ NOTICEProlonged rocking may causeengine damage, overheating, trans-mission differential or transfer casedamage or failure and tire damage.
BL-ENG (CAN)-5.qxd 7/28/05 5:56 PM Page 14

Driving on a Hill (“4LO” for Part-time 4WD Operation or “LOW” forFull-time 4WD operation)
• Use low gear when going uphill ordownhill and avoid sudden braking.
• Do not shift gears or use yourclutch when going downhill. Do notcoast downhill in Neutral.
Crossing a Ditch (“4LO” for Part-time 4WD Operation or “LOW” forFull-time 4WD operation)
• Avoid driving through ditches if pos-sible, especially if there is water inthe ditch. Your vehicle may stall ifthe electrical system gets wet. Ifyou must cross a ditch, shift thetransfer knob to 4LO or LOW.
• Avoid driving where the water levelis higher than the bottom of thewheel hub. If the water level risesabove this mark, your vehicle willneed to be serviced.
• Tap lightly on the brake pedal dur-ing and after driving through water.This will help keep the brakes dryand in proper working order.
• Do not shift gears while crossing aditch.
Tight Corner Brake Effect
This is called tight corner brakeeffect. Tight corner brake effect is aunique characteristic of four-wheeldrive vehicles caused by the differ-ence in tire rotation at the four wheelsand the zero-degree alignment of thefront wheels and suspension.Sharp turns at low speeds should becarried out with caution.
DRIVING TIPS
5-15
CAUTIONWhen turning sharply on a pavedroad at low speed while in four-wheel drive, steering control will bedifficult.
BL-ENG (CAN)-5.qxd 7/28/05 5:56 PM Page 15

Off-Road Driving with Your Four-Wheel Drive Vehicle
Off-road driving can be great fun. Butit has definite hazards. The greatestof these is the terrain itself.“Off-roading” means you’ve left thepaved road system behind. Trafficlanes are not marked. Curves are notbanked.There are no carefully engineeredroad signs to warn you of dangerousconditions or to advise you of a safespeed. You have to assess the envi-ronment yourself. Surfaces can beslippery, rough, uphill or downhill.Off-road driving involves learningnew skills. That’s why it’s importantthat you read and understand thissection.You’ll find useful driving infor-mation and suggestions. These willhelp make your off-road driving saferand more enjoyable.
Before you go Off-Roading
There are some things to do beforeyou leave the paved roads. Be sure tohave all necessary maintenance andservice work done beforehand. Besure to read all the information aboutyour four-wheel drive vehicle in thismanual. Is there enough fuel? Is thespare tire fully inflated? Are the fluidlevels at the proper levels? What arethe local laws that apply to off-road-ing where you’ll be driving? If youdon’t know, you should check withlaw enforcement people in the area.Will you be on someone’s privateland? If so, be sure to get the neces-sary permission.
DRIVING TIPS
5-16
WARNING - Rollover As with other Sports UtilityVehicles (SUVs), failure to oper-ate this vehicle correctly mayresult in loss of control, an acci-dent or vehicle rollover.• Specific design characteris-
tics (higher ground clearance,narrower track, etc.) give thisvehicle a higher center ofgravity than ordinary cars.
• A SUV is not designed for cor-nering at the same speeds asconventional 2-wheel drivevehicles.
• Avoid sharp turns or abruptmaneuvers.
• In a rollover crash, an unbelt-ed person is significantlymore likely to die than a per-son wearing a safety belt.Make sure everyone in thevehicle is properly buckledup.
BL-ENG (CAN)-5.qxd 7/28/05 5:56 PM Page 16

Loading your vehicle for Off-RoadDriving
There are some important items toremember about how to properly loadyour vehicle.• The heaviest things should be in
the cargo area and forward of yourrear axle. Place heavier items as farforward as you can.
• Be sure the load is properlysecured, so driving over off-roadterrain doesn’t shift your load orthrow items toward the driver orpassengers.
DRIVING TIPS
5-17
WARNING - Cargo• Cargo piled close to the
height of (or higher than) theseat backs can be thrown for-ward during a sudden stop oron downhill slopes. You oryour passengers could beseverely injured. Keep cargobelow the top of the seatbacks and, if possible, do notpile separate items.
• Unsecured cargo in the cargoarea can be tossed aboutwhen driving on the highwaysor over rough terrain. You oryour passengers can bestruck by flying objects andseverely injured. Secure thecargo properly.
(Continued)
(Continued)• Cargo should not be carried
on the roof without a properroof rack installed. The roofrack will hold a maximum of100 lbs. (45 kg). Heavy loadsin a roof rack raise the vehi-cle’s center of gravity, makingit more likely to roll over. Youcan be seriously or fatallyinjured if the vehicle rollsover. Do not load cargo on theroof while driving off-road, ifat all possible. Put heavyloads inside the cargo area,not on the roof or in a roofrack. Keep cargo in the cargoarea as far forward and low aspossible.
BL-ENG (CAN)-5.qxd 7/28/05 5:56 PM Page 17
Traveling to Remote Areas
It makes sense to plan your trip,especially when going to a remotearea. Know the terrain and plan yourroute. You are much less likely toencounter unwanted surprises. Getaccurate maps of trails.It’s also a good idea to travel with atleast one other vehicle. If somethinghappens to one of them, the othercan quickly help.
Getting Familiar with Off-RoadDriving
It’s necessary for you to practice in anarea that’s safe and close to homebefore you begin serious off-roaddriving. Off-road driving requires newand different driving skills.You need to tune your senses to dif-ferent kinds of signals. For example,constantly sweep the terrain withyour eyes looking for unexpectedobstacles. Listen for unusual tire,gear, or engine sounds. Feel andrespond to the vibrations of the vehi-cle with your hands, feet, and bodywhile still carefully controlling yourvehicle.You’ll also need to adjust yourexpectations and greatly lower thenumber of miles you expect to coverin an hour or a day.
Controlling your vehicle is the key tosuccessful off-road driving. One ofthe best ways to control your vehicleis to control your speed. Here aresome things to keep in mind whentraveling at higher speeds:• You approach things faster and you
have less time to scan the terrainfor obstacles.
• You have less time to react.• You have much more vehicle
bounce when you drive over obsta-cles, giving you less vehicle control.
• You’ll need more distance for brak-ing, especially since you’re on anunpaved surface. Such terrain willalways be more “slippery” than apaved road.
DRIVING TIPS
5-18
BL-ENG (CAN)-5.qxd 7/28/05 5:56 PM Page 18

Scanning the terrain
Off-road driving can take you overmany different kinds of terrain. Youneed to be familiar with the terrainand its many different features. Hereare some things to consider.
Surface conditionsOff-roading can take you over hard-packed dirt, gravel, rocks, grass,sand, mud, snow or ice. Each ofthese surfaces affects the steering,acceleration, and braking of yourvehicle in different ways.Depending upon the kind of surfaceyou are on, you may experience slip-ping, sliding, wheel spinning, delayedacceleration, poor traction, andlonger braking distances.
Surface obstaclesUnseen or hidden obstacles can behazardous. A rock, log, hole, rut, orbump can startle you if you’re not pre-pared. Often these obstacles are hid-den by grass, bushes, snow or eventhe rise and fall of the terrain itself.Here are some things to constantlyevaluate:• Is the path ahead clear?• Will the surface texture change
ahead?• Does the path take you uphill or
downhill?• Might you have to stop suddenly or
change direction quickly?When you drive over obstacles orrough terrain, it is critical that youkeep a firm grip on the steeringwheel. Ruts, troughs, or other surfacefeatures can force the wheel out ofyour hands if you’re not prepared.
DRIVING TIPS
5-19
WARNING- Off Road Driving
When you’re driving off-road,bouncing and quick changes indirection can easily throw youout of position. This couldcause you to lose control of thevehicle and crash. So, whetheryou are driving on or off theroad, you and your passengersshould always wear safetybelts.
BL-ENG (CAN)-5.qxd 7/28/05 5:56 PM Page 19
When you drive over bumps, rocks,or other obstacles, your wheels canleave the ground. If this happens,even with one or two wheels, youcan’t control the vehicle as well orperhaps at all. Because you will be onan unpaved surface, it’s especiallyimportant to avoid sudden accelera-tion, sudden turns, or sudden brak-ing. Any of these actions could causethe center of gravity of the vehicle toshift and destabilize the vehicle, lead-ing to a collision or rollover accident.Off-road driving requires a differentkind of alertness from driving onpaved roads and highways. There areno road signs, posted speed limits orsignal lights. You have to use yourown judgment about what is safe andwhat isn’t. Bad judgment in thisuncontrolled environment can befatal.
Driving on Off-Road Hills
Off-road driving often takes you up,down, or across a hill. Driving safelyon hills requires excellent judgmentand an understanding of what yourvehicle can and can’t do. There aresome hills that simply should not bedriven.
DRIVING TIPS
5-20
WARNING- Drinking & Driving
Drinking and driving, or druguse and driving can be verydangerous on any road. Thiscertainly remains true for off-road driving. At the very timeyou need special alertness anddriving skills, your reflexes, per-ceptions and judgement can beaffected by even a small amountof alcohol or drugs. You couldhave a serious - or even fatal -accident if you drink or takedrugs and drive or ride with adriver who has been drinking ortaking drugs.
BL-ENG (CAN)-5.qxd 7/28/05 5:56 PM Page 20

Approaching a hill
When you approach a hill, you needto decide if it’s one of those hills that’sjust too steep to climb, descend, orcross. Steepness can be difficult tojudge. On a very small hill, for exam-ple, there may be a smooth, constantincline with only a small change inelevation where you can easily seeall the way to the top. On a large hill,the incline may get steeper as younear the top, but you may not see thisbecause the crest of the hill is hiddenby bushes, grass, or shrubs.Here are some other things to con-sider as you approach a hill:• Is there a constant incline, or does
the hill get sharply steeper inplaces?
• Is there good traction on the hill-side, or will the surface cause tireslipping?
• Is there a straight path up or downthe hill so you won’t have to maketurning maneuvers?
• Are there obstructions on the hillthat can block your path (boulders,trees, logs or ruts)?
• What’s beyond the hill? Is there acliff, an embankment, a drop-off, ora fence? Get out of the vehicle andwalk the hill if you are unsure. It’sthe smart way to find out.
• Is the hill simply too rough? Steephills often have ruts, gullies,troughs, and exposed rocksbecause they are more susceptibleto the effects of erosion.
• How have weather conditionsaffected the terrain? Is there likelyto be mud, snow or ice on the hill?
• What time of day is it? Are temper-atures dropping so that wet sur-faces will start to freeze?
DRIVING TIPS
5-21
WARNING- Driving on Hills
Many hills are simply too steepfor any vehicle. If you drive upthem, you will stall. If you drivedown them, you can’t controlyour speed. In either case, youcould flip over. If you driveacross them, you will roll over.You could be seriously or fatal-ly injured. If you have any doubtabout the steepness, don’t driveup or down the hill, even if itmeans that you have to turnaround and find another route.Re-tracking is a normal part ofsafe off-roading.
BL-ENG (CAN)-5.qxd 7/28/05 5:56 PM Page 21
Driving uphill
Once you decide you can safely driveup the hill, you need to take somespecial steps.• Use a low gear and get a firm grip
on the steering wheel.• Get a smooth start up the hill and
try to maintain your speed. Don’tuse more power than you need,because you don’t want yourwheels to start spinning or sliding.
• Try to drive straight up the hill, if atall possible. If the path twists andturns, you may have to find anotherroute.
• Slow down as you approach the topof the hill.
• Attach a flag to the vehicle to makeyou more visible to approachingtraffic on trails or hills.
• Sound the horn as you approachthe top of the hill to let opposingtraffic know you’re there.
• Use your headlights even duringthe day. They make you more visi-ble to other drivers.
DRIVING TIPS
5-22
WARNING- Driving Across Hills
Turning or driving across steephills can be dangerous. Youcould lose traction, slide side-ways, or just reach an area toosteep to traverse. In any case, itcould cause you to roll over.Youcould be seriously or fatallyinjured. When driving up hills,always try to go as straight upas possible.
BL-ENG (CAN)-5.qxd 7/28/05 5:56 PM Page 22
Stalling while Driving Uphill
What should I do if my vehicle stalls,or is about to stall, and I can’t make itup the hill?If your vehicle stalls, or is about tostall while driving uphill, there aresome things you should do, and thereare some things you must not do.First, here’s what you should do:• Push the brake pedal to stop the
vehicle and keep it from rollingbackwards. Also, apply the parkingbrake.
• If your engine is still running, shiftthe transmission into reverse,release the parking brake, andslowly back down the hill in reverse.
• If your engine has stopped running,you’ll need to restart it. With thebrake pedal depressed and theparking brake still applied, shift amanual transmission to N (Neutral),or an automatic transmission to P(Park) and restart the engine. Then,shift to reverse, release the parkingbrake, and slowly back down thehill in reverse.
• As you are backing down the hill,put your left hand on the steeringwheel at the 12 o’clock position.This way, you’ll be able to tell if yourwheels are straight or turned to theleft or right as you back down.
DRIVING TIPS
5-23
WARNING - Driving overHills
Driving to the top (crest) of a hillat full speed can cause an acci-dent and result in serious orfatal injury. There could be adrop-off, embankment, cliff,another vehicle or people sit-ting on the ground. As you nearthe top of a hill, slow down andstay alert.
BL-ENG (CAN)-5.qxd 7/28/05 5:56 PM Page 23
Here are some things you must notdo if you stall, or are about to stall,when going up a hill.• Never attempt to prevent a stall by
depressing the clutch or shifting toN (Neutral) to “rev-up” the engineand regain forward momentum.This won’t work. Your vehicle willroll backwards very quickly and youcould go out of control or roll over.
Instead, apply the brake to stop thevehicle. Then apply the parkingbrake. Shift into reverse, release theparking brake, and slowly back down.
Stalled on a Steep Uphill
If your vehicle stalls and you can’tback down the hill, try this: Set theparking brake, put your transmissionin 1 (First) gear or P (Park), and turnthe engine off. Leave the vehicle andget some help. If your vehicle is at anangle to the slope of the hill, exit thevehicle on the uphill side and stayclear of the path the vehicle wouldtake if it rolled downhill. Leave it in 1(First) gear for manual transmissionor P (Park) for automatic transmis-sion.
DRIVING TIPS
5-24
CAUTIONNever attempt to turn around ifyou are about to stall whengoing up a hill. If the hill is steepenough to stall your vehicle, it’ssteep enough to cause you toroll over if you turn around. Ifyou can’t make it up, you mustback down the hill.
BL-ENG (CAN)-5.qxd 7/28/05 5:56 PM Page 24
Driving Downhill
When off-roading takes you downhill,you’ll want to consider many of thesame things you thought aboutbefore you went uphill. As a briefreminder, those include:• How steep is the downhill? Will I be
able to maintain vehicle control?• What’s the surface like? Smooth?
Rough? Slippery? Hard-packeddirt? Gravel?
• Are there hidden surface obsta-cles? Ruts? Logs? Boulders?
• What’s at the bottom of the hill? Isthere a hidden creek bank or evena river bottom with large rocks?
• Have changes in the weather con-ditions and their effect on the ter-rain since you went uphill madeyour task more difficult?
Once you have decided that you cango down a hill safely, try to keep yourvehicle headed straight down, anduse a low gear. This way, enginebraking can help your brakes so theywon’t have to do all the work.Descend slowly, keeping your vehicleunder control at all times.
DRIVING TIPS
5-25
WARNING- Exiting Vehicle
Getting out on the downhill(low) side of a vehicle stoppedacross an incline is dangerous.If the vehicle rolls over, youcould be crushed or fatallyinjured. Always get out on theuphill (high) side of the vehicleand stay well clear of therollover path.
WARNING - Leaving Vehicle
If you are going to leave yourvehicle, set the parking brakeand shift a manual transmissionto 1(First), or an automatictransmission to P (Park).
BL-ENG (CAN)-5.qxd 7/28/05 5:56 PM Page 25

Avoid turns that take you across theincline of the hill. A hill that’s not toosteep to drive down may be too steepto drive across. You could roll over ifyou don’t drive straight down.Never go downhill with the clutchpedal depressed. This is called “free-wheeling.” Your brakes will have to doall the work and could overheat andfade.
If your wheels lock up during downhillbraking, you may feel the vehiclestarting to slide sideways. To regainyour direction, just ease off thebrakes and steer to keep the front ofthe vehicle pointing straight downhill.
DRIVING TIPS
5-26
CAUTIONBefore beginning to go down-hill, it is critical that you ensurethat no cargo can shift forwardwhile you are heading downhill.Such shifting could eitherendanger you and your occu-pants, or interfere with yourability to control the vehicle.
WARNING - BrakingHeavy braking when goingdown a hill can cause yourbrakes to overheat and fade.This could cause loss of controland a serious accident. Applythe brakes lightly whendescending a hill and use a lowgear to keep vehicle speedunder control.
CAUTIONAvoid braking so hard that youlock the wheels when goingdownhill. If your front wheelsare locked, you can’t steer yourvehicle.
BL-ENG (CAN)-5.qxd 7/28/05 5:56 PM Page 26

Stalling downhillStalling is much more likely to hap-pen going uphill. But if it happensgoing downhill, here’s what to do.• Stop your vehicle by applying the
brakes. Then apply the parkingbrake.
• Move the shift lever to P (Park) inautomatic transmissions or shift toN (Neutral) in manual transmis-sions and, while still braking,restart the engine.
• Shift back to a low gear, release theparking brake, and drive straightdown.
• If the engine won’t start, get outand seek help. Exit on the uphillside of the vehicle and stay clear ofthe path the vehicle would take if itrolled downhill.
Driving across an inclineSooner or later, an off-road trail willprobably go across the incline of ahill. If this happens, you have todecide whether or not to try to driveacross the incline. Here are somethings to consider:• A hill that can be driven straight up
or down may be too steep to driveacross. When you go straight up ordown a hill, the length of the wheelbase (the distance from the frontwheels to the rear wheels) reducesthe likelihood the vehicle will tumbleend over end. But when you driveacross an incline, the much narrow-er track width (the distancebetween the left and right wheels)may not prevent the vehicle fromtilting and rolling over. Also, drivingacross an incline puts more weighton the downhill wheels. This couldcause a downhill slide or a rollover.
• Surface conditions can be a prob-lem when you drive across a hill.Loose gravel, muddy spots, or evenwet grass can cause your tires toslip sideways. If the vehicle slipssideways, it can hit something thatwill tip it (a rock, a rut, etc.) andcause it to roll over.
• Hidden obstacles can make thesteepness of the incline evenworse. If you drive across a rockwith the uphill wheels, or if thedownhill wheels drop into a rut ordepression, your vehicle can tilteven more.
For reasons like these, you need todecide carefully whether or not to tryto drive across an incline. Justbecause the trail goes across theincline doesn’t mean you have todrive it.
DRIVING TIPS
5-27
BL-ENG (CAN)-5.qxd 7/28/05 5:56 PM Page 27
If your vehicle slides downhillIf you feel your vehicle starting toslide sideways, turn downhill immedi-ately. This should help straighten outthe vehicle and prevent the side slip-ping. However, a much better way toprevent this is to get out and “walk thecourse” first so you know what thesurface is like before you drive it.
Stalling while crossing an inclineIf your vehicle stalls when you’recrossing an incline, be sure you (andyour passengers) get out on theuphill side, even if that door is harderto open. If you get out on the downhillside and the vehicle starts to roll over,you’ll be in its path.If you have to walk down the slope,stay out of the path the vehicle willtake if it does roll over.
DRIVING TIPS
5-28
WARNING - Roll OverDriving across an incline that’stoo steep will make your vehicleroll over.You could be seriouslyor fatally injured. If you haveany doubt about the steepnessof the incline, don’t drive acrossit. Find another route instead.
WARNING- Exiting Vehicle
Getting out on the downhill(low) side of a vehicle stoppedacross an incline is dangerous.If the vehicle rolls over, youcould be crushed or fatallyinjured. Always get out on theuphill (high) side of the vehicleand stay well clear of therollover path.
BL-ENG (CAN)-5.qxd 7/28/05 5:56 PM Page 28

Driving in Mud, Sand, Snow, or IceWhen you drive in mud, sand, snow,or ice, your wheels won’t get goodtraction. You can’t accelerate asquickly, turning is more difficult, andyou’ll need longer braking distances.It’s best to use a low gear whenyou’re in mud, the deeper the mud,the lower the gear. In extremely deepmud, the idea is to keep your vehiclemoving so you don’t get stuck.When you drive on sand, you’ll sensea change in wheel traction. But it willdepend upon how loosely packed thesand is. On loosely packed sand (ason beaches or sand dunes) your tireswill tend to sink into the sand.
This has an effect on steering, accel-erating, and braking.You may want toreduce the air pressure in your tiresslightly when driving on sand. Thiswill improve traction. Remember tore-inflate them the first chance thatyou have after you leave the looselypacked sand.
Hard-packed snow and ice offer theworst tire traction. On these surfaces,it’s very easy to lose control. On wetice, for example, the traction is sopoor that you will even have difficultyaccelerating. And if you do get mov-ing, poor steering and difficult brakingcan easily cause you to slide out ofcontrol.
DRIVING TIPS
5-29
✽✽ NOTICE• In case of loss of traction in mud,
loose soil, or sand, turn the steer-ing wheel rapidly from side-to-side. This can help generate addi-tional traction.
• Do not gun the engine. This willcause the tires to spin and digdown, not forward, and couldbury the vehicle to the frame.Smooth, easy power is better thantoo much power.
WARNING- Frozen Surfaces
Driving on frozen lakes, pondsor rivers can be dangerous.Underwater springs, currentsunder the ice, or sudden thawscan weaken the ice.Your vehiclecould fall through the ice andyou and your passengers coulddrown. Drive your vehicle onsafe surfaces only.
BL-ENG (CAN)-5.qxd 7/28/05 5:56 PM Page 29
Driving in Water
Light rain causes no special off-roaddriving problems. However, heavyrain can cause flash flooding, andflood waters demand extreme cau-tion.Find out how deep the water is beforeyou drive through it. If it’s deepenough to cover your wheel bearinghubs, axles, or exhaust pipe, don’t tryit. You probably won’t get through.Also, water that deep can damageyour axle and other vehicle parts.
If the water isn’t too deep, then drivethrough slowly. At fast speeds, watercan splash on your ignition systemand your vehicle can stall. Stallingcan also occur if your tailpipe goesunderwater. As long as your tailpipeis underwater, you will not be able tostart your engine. When you gothrough water, remember that it maytake you longer to stop when yourbrakes are wet.If you have driven through water thatwas deep enough to cover yourwheel bearing hubs, it may be a goodidea to have an authorized Kia dealerrepack your front wheel bearings andexamine your rear-end fluid for evi-dence of water.
After Off-Road Driving
Remove any brush or debris that hascollected on the underbody, chassisor under the hood. These accumula-tions can be a fire hazard.After driving in mud or sand, cleanand check the brake linings.Accumulation of mud or sand cancause glazing and uneven braking.Check the body structure, steering,suspension, wheels, tires, andexhaust system for damage. Also,check the fuel lines and cooling sys-tem for any leakage. Your vehicle willalso require more frequent servicedue to off-road use.
DRIVING TIPS
5-30
BL-ENG (CAN)-5.qxd 7/28/05 5:56 PM Page 30

DRIVING TIPS
5-31
WARNING - WaterDriving through rushing watercan be dangerous. Deep watercan sweep your vehicle down-stream and you and your pas-sengers could drown. If it’s onlyinches deep, it can still washaway the ground from underyour tires, and you could losetraction and roll the vehicle.Never drive through rushingwater.
BL-ENG (CAN)-5.qxd 7/28/05 5:56 PM Page 31

WEIGHT OF THE VEHICLE -WITH AND WITHOUT ATRAILERThis section will guide you in theproper loading of your vehicle and/ortrailer, to keep your loaded vehicleweight within its design rating capa-bility, with or without a trailer. Properlyloading your vehicle will provide max-imum return of the vehicle designperformance. Before loading yourvehicle, familiarize yourself with thefollowing terms for determining yourvehicle’s weight ratings, with or with-out a trailer, from the vehicle’sSpecifications and Tire InformationLabel:
Base Curb Weight
This is the weight of the vehicleincluding a full tank of fuel and allstandard equipment. It does notinclude passengers, cargo, or option-al equipment.
Vehicle Curb Weight
This is the weight of your new vehiclewhen you picked it up from your deal-er plus any aftermarket equipment.
Cargo Weight
This figure includes all weight addedto the Base Curb Weight, includingcargo and optional equipment. Whentowing, trailer tongue load or king pinweight also is part of the CargoWeight.
GAW (Gross Axle Weight)
This is the total weight placed oneach axle (front and rear) - includingvehicle curb weight and all payload.
GAWR (Gross Axle Weight Rating)
This is the maximum allowableweight that can be carried by a singleaxle (front or rear). These numbersare shown on Tire Information Labeland Specifications. The total load oneach axle must never exceed itsGAWR.
GVW (Gross Vehicle Weight)
This is the Base Curb Weight plusactual Cargo Weight plus passen-gers.
GVWR (Gross Vehicle WeightRating)
This is the maximum allowableweight of the fully loaded vehicle(including all options, equipment,passengers and cargo). The GVWRis shown on the Vehicle CertificationLabel located on the driver’s door pil-lar and Specifications table.
DRIVING TIPS
5-32
BL-ENG (CAN)-5.qxd 7/28/05 5:56 PM Page 32
GCW (Gross Combined Weight)
This is the weight of the loaded vehi-cle (GVW) plus the weight of the fullyloaded trailer.
GCWR (Gross Combined WeightRating)
This is the maximum allowableweight of the vehicle and the loadedtrailer - including all cargo and pas-sengers - that the vehicle can handlewithout risking damage. [Important:The towing vehicle’s braking systemis rated for operation at GVWR, notGCWR. Separate functional brakesshould be used for safe control oftowed vehicles and for trailers weigh-ing 1,650 lbs (750kg).] The GCWmust never exceed the GCWR.
Maximum Trailer Weight
This is the highest possible weight ofa fully loaded trailer the vehicle cantow. It assumes a vehicle with onlymandatory options, no cargo, and adriver. The weight of other optionalequipment, passengers and cargo inyour vehicle will reduce the maximumtrailer weight your vehicle can tow.
Calculating the load your vehiclecan tow
1. Use the appropriate maximumGCWR chart (in the Weight of theTrailer section in this chapter) foryour type of drive system andtransmission.
2. Weigh your vehicle.3. Subtract the weight of your vehicle
from the maximum GCWR in thechart. This is the maximum trailerweight your vehicle can tow. It mustbe below the maximum trailerweight shown in the chart. Notethat the maximum trailer weightyour vehicle can tow depends onthe total weight of any cargo, pas-sengers and available equipmentin the vehicle.
DRIVING TIPS
5-33
BL-ENG (CAN)-5.qxd 7/28/05 5:56 PM Page 33

TRAILER TOWING
Your vehicle can tow a trailer. To iden-tify what the vehicle trailering capaci-ty is for your vehicle, you should readthe information in “Weight of theTrailer’’ that appears later in this sec-tion. Remember that trailering is dif-ferent than just driving your vehicleby itself. Trailering means changes inhandling, durability, and fuel econo-my. Successful, safe trailering takescorrect equipment, and it has to beused properly.
This section contains many time-test-ed, important trailering tips and safe-ty rules. Many of these are importantfor your safety and that of your pas-sengers. Please read this sectioncarefully before you pull a trailer.Load-pulling components such as theengine, transmission, wheel assem-blies, and tires are forced to workharder against the load of the addedweight. The engine is required tooperate at relatively higher speedsand under greater loads. This addi-tional burden generates extra heat.The trailer also adds considerably towind resistance, further increasingthe pulling requirements.
If You Do Decide to Pull a Trailer
Here are some important points if youdecide to pull a trailer:• State, provincial, county and
municipal government have varyingtrailering laws. Make sure yourhitch, mirrors, lights and wiringarrangements are legal, not onlywhere you live, but also whereyou’ll be driving. A good source forthis information is provincial or locallaw enforcement agencies.
• Consider using a sway control. Youcan ask a hitch dealer about swaycontrol.
• After your odometer indicates 800km or more, you can tow a trailer.For the first 800 km that you tow atrailer, don’t drive over 80 km/h anddon’t make starts at full throttle.This helps your engine and otherparts of your vehicle “wear” in at theheavier loads.
• Always drive at a safe speed (lessthan 100 km/h) commensurate withroad conditions.
• Three important considerationshave to do with weight:
DRIVING TIPS
5-34
✽✽ NOTICEPulling a trailer improperly candamage your vehicle and result incostly repairs not covered by yourwarranty. To pull a trailer correct-ly, follow the advice in this section.
BL-ENG (CAN)-5.qxd 7/28/05 5:56 PM Page 34
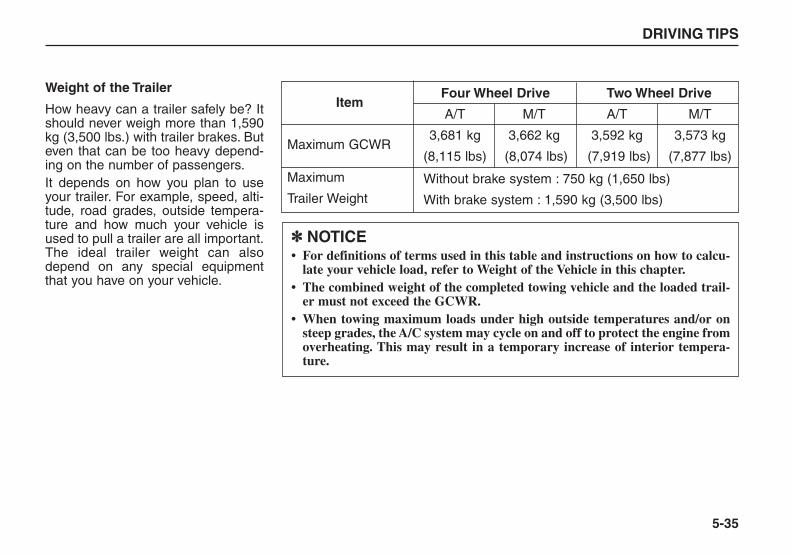
Weight of the Trailer
How heavy can a trailer safely be? Itshould never weigh more than 1,590kg (3,500 lbs.) with trailer brakes. Buteven that can be too heavy depend-ing on the number of passengers.It depends on how you plan to useyour trailer. For example, speed, alti-tude, road grades, outside tempera-ture and how much your vehicle isused to pull a trailer are all important.The ideal trailer weight can alsodepend on any special equipmentthat you have on your vehicle.
DRIVING TIPS
5-35
ItemFour Wheel Drive Two Wheel Drive
A/T M/T A/T M/T
Maximum GCWR3,681 kg 3,662 kg 3,592 kg 3,573 kg
(8,115 lbs) (8,074 lbs) (7,919 lbs) (7,877 lbs)
Maximum
Trailer Weight
✽✽ NOTICE• For definitions of terms used in this table and instructions on how to calcu-
late your vehicle load, refer to Weight of the Vehicle in this chapter.• The combined weight of the completed towing vehicle and the loaded trail-
er must not exceed the GCWR.• When towing maximum loads under high outside temperatures and/or on
steep grades, the A/C system may cycle on and off to protect the engine fromoverheating. This may result in a temporary increase of interior tempera-ture.
Without brake system : 750 kg (1,650 lbs)
With brake system : 1,590 kg (3,500 lbs)
BL-ENG (CAN)-5.qxd 7/28/05 5:56 PM Page 35

Weight of the Trailer Tongue
The tongue load of any trailer is animportant weight to measurebecause it affects the total grossvehicle weight (GVW) of your vehicle.This weight includes the curb weightof the vehicle, any cargo you maycarry in it, and the people who will beriding in the vehicle. And if you tow atrailer, you must add the tongue loadto the GVW because your vehicle willalso be carrying that weight.The trailer tongue should weigh amaximum of 10% of the total loadedtrailer weight. After you’ve loadedyour trailer, weigh the trailer and thenthe tongue, separately, to see if theweights are proper. If they aren’t, youmay be able to correct them simplyby moving some items around in thetrailer.
Too little tongue load can make thetrailer unstable and cause it to sway.Too much tongue load reduces front-tire traction and steering control.
DRIVING TIPS
5-36
WARNING• An improperly loaded trailer
can cause loss of control ofyour vehicle.
• Never load a trailer with moreweight in the rear than in thefront. The front should beloaded with approximately60% of the total trailer load;the rear should be loaded withapproximately 40% of the totaltrailer load.
• Never exceed the maximumweight limits of the trailer ortrailer towing equipment.Improper loading can result indamage to your vehicle and/orpersonal injury. Checkweights and loading at a com-mercial scale or highwaypatrol office equipped withscales.
BL-ENG (CAN)-5.qxd 7/28/05 5:56 PM Page 36

Total Weight on Your Vehicle’sTires
Be sure your vehicle’s tires are inflat-ed to the limit for cold tires. You’ll findthese numbers on the Tire Pressurelabel (or see “Label Information’’ inthe Index). Be sure not to exceed theGVW limit for your vehicle.
HitchesIt’s important to have the correct hitchequipment. Crosswinds, large trucksgoing by, and rough roads are a fewreasons why you’ll need the righthitch. Here are some rules to follow:• Will you have to make any holes in
the body of your vehicle when youinstall a trailer hitch? If you do, then be sure to seal theholes later when you remove thehitch. If you don’t seal them, deadlycarbon monoxide (CO) from yourexhaust can get into your vehicle,as well as dirt and water.
• The bumpers on your vehicle arenot intended for hitches. Do notattach rental hitches or otherbumper-type hitches to them. Useonly a frame-mounted hitch thatdoes not attach to the bumper.
Safety chainsYou should always attach chainsbetween your vehicle and your trailer.Cross the safety chains under thetongue of the trailer so that thetongue will not drop to the road if itbecomes separated from the hitch.Instructions about safety chains maybe provided by the hitch manufactur-er or by the trailer manufacturer.Follow the manufacturer’s recom-mendation for attaching safetychains. Always leave just enoughslack so you can turn with your trailer.And, never allow safety chains todrag on the ground.
DRIVING TIPS
5-37
S2BLD502A
BL-ENG (CAN)-5.qxd 7/28/05 5:56 PM Page 37

Trailer brakesIf your trailer weighs more than 750kg (1,650 pounds) loaded, then itneeds its own brakes – and they mustbe adequate. Be sure to read and fol-low the instructions for the trailerbrakes so you’ll be able to install,adjust and maintain them properly.• Don’t tap into your vehicle’s brake
system.• Do not use a trailer with its own
brakes unless you are absolutelycertain that you have properly setup the brake system. This is not atask for amateurs. Use an experi-enced, competent trailer shop forthis work.
Driving with a trailerTowing a trailer requires a certainamount of experience. Before settingout for the open road, you must get toknow your trailer. Acquaint yourselfwith the feel of handling and brakingwith the added weight of the trailer.And always keep in mind that thevehicle you are driving is now a gooddeal longer and not nearly so respon-sive as your vehicle is by itself.Before you start, check the trailerhitch and platform, safety chains,electrical connector(s), lights, tiresand mirror adjustment. If the trailerhas electric brakes, start your vehicleand trailer moving and then apply thetrailer brake controller by hand to besure the brakes are working. This letsyou check your electrical connectionat the same time.
During your trip, check occasionallyto be sure that the load is secure, andthat the lights and any trailer brakesare still working.
Following distanceStay at least twice as far behind thevehicle ahead as you would whendriving your vehicle without a trailer.This can help you avoid situationsthat require heavy braking and sud-den turns.
PassingYou’ll need more passing distance upahead when you’re towing a trailer.And, because you’re a good deallonger, you’ll need to go much fartherbeyond the passed vehicle beforeyou can return to your lane.
DRIVING TIPS
5-38
BL-ENG (CAN)-5.qxd 7/28/05 5:56 PM Page 38

Backing upHold the bottom of the steering wheelwith one hand. Then, to move thetrailer to the left, just move your handto the left. To move the trailer to theright, move your hand to the right.Always back up slowly and, if possi-ble, have someone guide you.
Making turnsWhen you’re turning with a trailer,make wider turns than normal. Dothis so your trailer won’t strike softshoulders, curbs, road signs, trees,or other objects. Avoid jerky or sud-den maneuvers. Signal well inadvance.
Turn signals when towing a trailerWhen you tow a trailer, your vehiclehas to have a different turn signalflasher and extra wiring.The green arrows on your instrumentpanel will flash whenever you signal aturn or lane change. Properly con-nected, the trailer lights will also flashto alert other drivers that you’re aboutto turn, change lanes, or stop.When towing a trailer, the greenarrows on your instrument panel willflash for turns even if the bulbs on thetrailer are burned out. Thus, you maythink drivers behind you are seeingyour signals when, in fact, they arenot. It’s important to check occasion-ally to be sure the trailer bulbs are stillworking. You must also check thelights every time you disconnect andthen reconnect the wires.
Do not connect a trailer lighting sys-tem directly to your vehicle’s lightingsystem.Use only an approved trailer wiringharness. Your authorized Kia dealercan assist you in installing the wiringharness.
DRIVING TIPS
5-39
WARNINGUsing an improper trailer wiringharness could lead to malfunc-tioning of your vehicles electri-cal system and a possible acci-dent.
BL-ENG (CAN)-5.qxd 7/28/05 5:56 PM Page 39

You must check the capacity of thelighting system and electrical equip-ment for a trailer before connectingthe wires.• Trailer accessory : 120W and below• Turn signal lamp : 27W × 2EA and
below (Total : 4.2 A and below)• Stop lamp : 27W × 2EA and below
(Total : 4.2 A and below)• Position lamp : 5W × 8EA and
below (Total : 3.65 A and below)
Driving on gradesReduce speed and shift to a lowergear before you start down a long orsteep downgrade. If you don’t shiftdown, you might have to use yourbrakes so much that they would gethot and no longer operate efficiently.On a long uphill grade, shift downand reduce your speed to around 45mph (70 km/h) to reduce the possibil-ity of engine and transmission over-heating.If your trailer weighs more than 1650lbs (750 kg) and you have an auto-matic transmission, you should drivein D (Drive) when towing a trailer.Operating your vehicle in D (Drive)when towing a trailer will minimizeheat buildup and extend the life ofyour transmission. If you have a man-ual transmission, drive in fourth gear(or, as you need to, a lower gear).
DRIVING TIPS
5-40
4 3 2 1
7 6 5
Trailer Connector
� Back up lamp� Position lamp� Trailer accessory� Turn signal lamp (LH)� Turn siganl lamp (RH)� Stop lamp Earth
Trailer Connector
S2BLA550
BL-ENG (CAN)-5.qxd 7/28/05 5:56 PM Page 40

Parking on hillsGenerally, you should not park yourvehicle, with a trailer attached, on ahill. People can be seriously or fatallyinjured, and both your vehicle and thetrailer can be damaged if they begin adownhill trajectory.
However, if you ever have to parkyour trailer on a hill, here’s how to doit:1. Apply your brakes, but don’t shift
into gear.2. Have someone place chocks
under the trailer wheels.3. When the wheel chocks are in
place, release the brakes until thechocks absorb the load.
4. Reapply the brakes. Apply yourparking brake, and then shift to R(Reverse) for a manual transmis-sion or P (Park) for an automatictransmission.
5. Be sure the transfer case (ifequipped) is fully engaged in adrive gear – not in N (Neutral).
6. Release the brakes.
DRIVING TIPS
5-41
WARNING- Parking on a Hill
Parking your vehicle on a hillwith an attached trailer couldcause serious injury or fatalinjury. If the brakes fail, thevehicle and trailer could rolldown hill and strike people orproperty.
WARNING- Parking Brake
Not setting the parking brakewhen leaving the vehicle couldlead to a serious accident.If you have left the engine run-ning, the vehicle can move sud-denly. Always set the parkingbrake and take the key with youto be sure your vehicle issecurely parked.
BL-ENG (CAN)-5.qxd 7/28/05 5:56 PM Page 41

When You Are Ready to LeaveAfter Parking on a Hill
1. With the manual transmission inNeutral or automatic transmissionin P (Park), apply your brakes andhold the brake pedal down whileyou:
• Start your engine;• Shift into gear; and• Release the parking brake.2. Slowly remove your foot from the
brake pedal.3. Drive slowly until the trailer is clear
of the chocks.4. Stop and have someone pick up
and store the chocks.
Maintenance When Trailer Towing
Your vehicle will need service moreoften when you regularly pull a trailer.Important items to pay particularattention to include engine oil, auto-matic transmission fluid, axle lubri-cant and cooling system fluid. Brakecondition is another important item tofrequently check. Each item is cov-ered in this manual, and the Index willhelp you find them quickly. If you’retrailering, it’s a good idea to reviewthese sections before you start yourtrip.Don’t forget to also maintain yourtrailer and hitch. Follow the mainte-nance schedule that accompaniedyour trailer and check it periodically.Preferably, conduct the check at thestart of each day’s driving. Mostimportantly, all hitch nuts and boltsshould be tight.
DRIVING TIPS
5-42
✽✽ NOTICEDue to higher load during trailerusage, overheating might occur inhot days or during uphill driving. Ifthe coolant gauge indicates over-heating, switch off the A/C and stopthe vehicle in a safe area to cooldown the engine.
BL-ENG (CAN)-5.qxd 7/28/05 5:56 PM Page 42
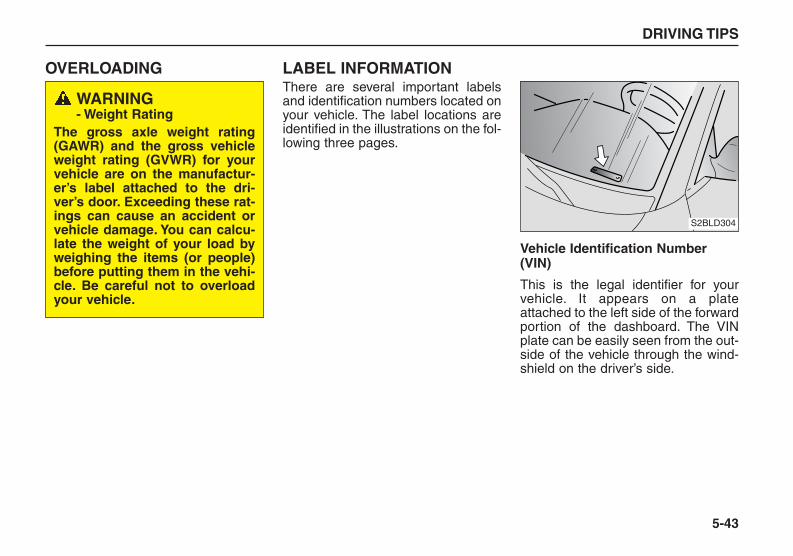
OVERLOADING LABEL INFORMATIONThere are several important labelsand identification numbers located onyour vehicle. The label locations areidentified in the illustrations on the fol-lowing three pages.
Vehicle Identification Number(VIN)
This is the legal identifier for yourvehicle. It appears on a plateattached to the left side of the forwardportion of the dashboard. The VINplate can be easily seen from the out-side of the vehicle through the wind-shield on the driver’s side.
DRIVING TIPS
5-43
S2BLD304
WARNING- Weight Rating
The gross axle weight rating(GAWR) and the gross vehicleweight rating (GVWR) for yourvehicle are on the manufactur-er’s label attached to the dri-ver’s door. Exceeding these rat-ings can cause an accident orvehicle damage. You can calcu-late the weight of your load byweighing the items (or people)before putting them in the vehi-cle. Be careful not to overloadyour vehicle.
BL-ENG (CAN)-5.qxd 7/28/05 5:56 PM Page 43
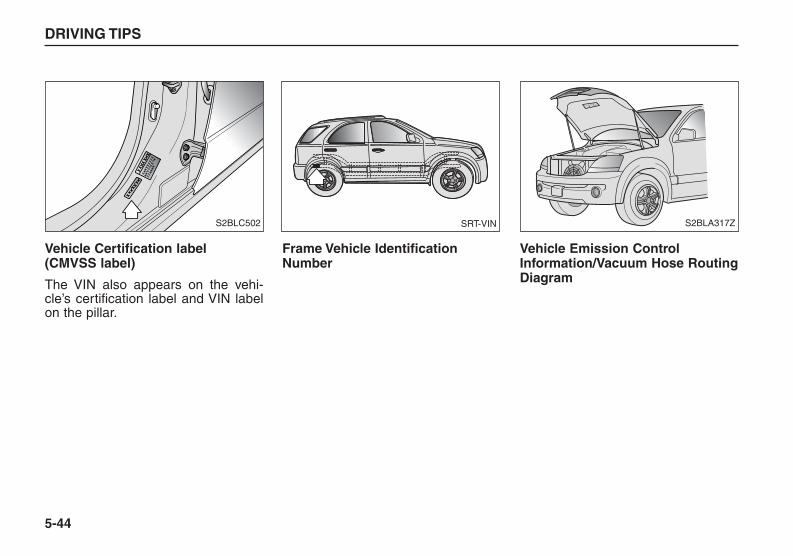
Vehicle Certification label (CMVSS label)
The VIN also appears on the vehi-cle’s certification label and VIN labelon the pillar.
Frame Vehicle IdentificationNumber
Vehicle Emission ControlInformation/Vacuum Hose RoutingDiagram
DRIVING TIPS
5-44
xxxxxxxx
xxxxxxxx
xxxxxxxx
S2BLA317ZSRT-VINS2BLC502
BL-ENG (CAN)-5.qxd 7/28/05 5:56 PM Page 44

Tire Information Label Engine Number
DRIVING TIPS
5-45
S2BLD502A 1GHA611
BL-ENG (CAN)-5.qxd 7/28/05 5:56 PM Page 45
6-1
IN CASE OF AN EMERGENCY
Road Warning . . . . . . . . . . . . . . . . . . . . . . . . . . . . . . . . . . . . . 6-2Overheating . . . . . . . . . . . . . . . . . . . . . . . . . . . . . . . . . . . . . . 6-3Emergency Starting . . . . . . . . . . . . . . . . . . . . . . . . . . . . . . . . 6-4Electrical Circuit Protection . . . . . . . . . . . . . . . . . . . . . . . . . . 6-7Towing . . . . . . . . . . . . . . . . . . . . . . . . . . . . . . . . . . . . . . . . . 6-13If You Have a Flat Tire . . . . . . . . . . . . . . . . . . . . . . . . . . . . . . 6-19
6
BL-ENG (CAN)-6.qxd 7/28/05 5:57 PM Page 1

ROAD WARNING
Hazard Warning Flasher
The hazard warning flasher servesas a warning to other drivers to exer-cise extreme caution when approach-ing, overtaking, or passing your vehi-cle. It should be used wheneveremergency repairs are being made,when the vehicle is stopped near theedge of a roadway, or whenever yourvehicle is in distress.
Depress the flasher switch to activateat any time. The flasher switch islocated in the center console switchpanel. All turn signal lights will flashsimultaneously.• The hazard warning flasher oper-
ates whether your vehicle is run-ning or not.
• The turn signals do not work whenthe hazard flasher is on.
• Care must be taken when the haz-ard warning flasher is used whilethe vehicle is being towed. Localregulations may prohibit using it inthis manner.
IN CASE OF AN EMERGENCY
6-2
AUTO AUTO AMB
OFF
TEMP
MODE
AMB
A/C
A/C
L R
HM PASSENGER AIRBAG OFF
5BLC601A
BL-ENG (CAN)-6.qxd 7/28/05 5:57 PM Page 2
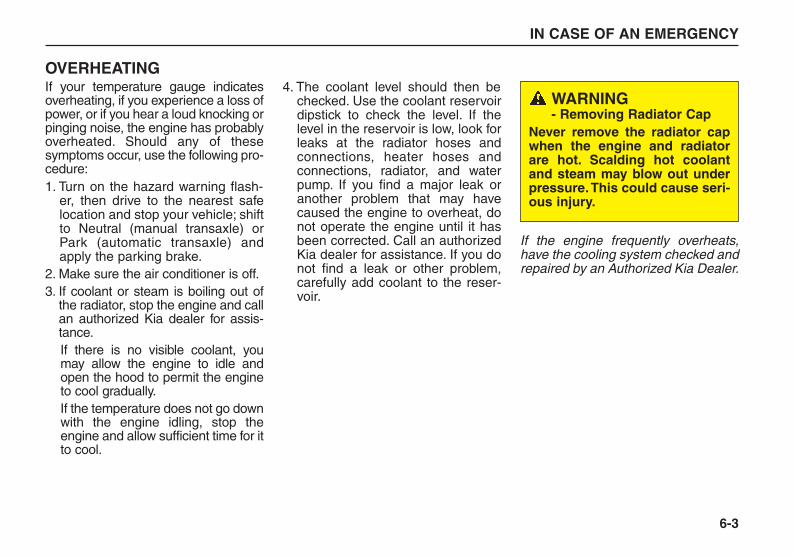
OVERHEATINGIf your temperature gauge indicatesoverheating, if you experience a loss ofpower, or if you hear a loud knocking orpinging noise, the engine has probablyoverheated. Should any of thesesymptoms occur, use the following pro-cedure:1. Turn on the hazard warning flash-
er, then drive to the nearest safelocation and stop your vehicle; shiftto Neutral (manual transaxle) orPark (automatic transaxle) andapply the parking brake.
2. Make sure the air conditioner is off.3. If coolant or steam is boiling out of
the radiator, stop the engine and callan authorized Kia dealer for assis-tance.If there is no visible coolant, youmay allow the engine to idle andopen the hood to permit the engineto cool gradually.If the temperature does not go downwith the engine idling, stop theengine and allow sufficient time for itto cool.
4. The coolant level should then bechecked. Use the coolant reservoirdipstick to check the level. If thelevel in the reservoir is low, look forleaks at the radiator hoses andconnections, heater hoses andconnections, radiator, and waterpump. If you find a major leak oranother problem that may havecaused the engine to overheat, donot operate the engine until it hasbeen corrected. Call an authorizedKia dealer for assistance. If you donot find a leak or other problem,carefully add coolant to the reser-voir.
If the engine frequently overheats,have the cooling system checked andrepaired by an Authorized Kia Dealer.
IN CASE OF AN EMERGENCY
6-3
WARNING- Removing Radiator Cap
Never remove the radiator capwhen the engine and radiatorare hot. Scalding hot coolantand steam may blow out underpressure.This could cause seri-ous injury.
BL-ENG (CAN)-6.qxd 7/28/05 5:57 PM Page 3

EMERGENCY STARTINGJump Starting
Jump starting can be dangerous ifdone incorrectly. Therefore, to avoidharm to yourself or damage to yourvehicle or battery, follow the jumpstarting procedures on this page. If indoubt, we strongly recommend thatyou have a competent technician ortowing service jump start your vehi-cle.
Jump starting procedure1. Make sure the booster battery is
12-volt and that its negative termi-nal is grounded.
2. If the booster battery is in anothervehicle, do not allow the vehicles totouch.
IN CASE OF AN EMERGENCY
6-4
✽✽ NOTICEUse only a 12-volt jumper system.You can damage a 12-volt startingmotor, ignition system, and otherelectrical parts beyond repair byuse of a 24-volt power supply(either two 12-volt batteries inseries or a 24-volt motor generatorset).
WARNING - BatteryNever attempt to check the elec-trolyte level of the battery asthis may cause the battery torupture or explode causing seri-ous injury.
WARNING - Battery• Keep all flames or sparks
away from the battery. Thebattery produces hydrogengas which may explode ifexposed to flame or sparks.
• Do not attempt to jump startthe vehicle if the dischargedbattery is frozen or if the elec-trolyte level is low; the batterymay rupture or explode.
BL-ENG (CAN)-6.qxd 7/28/05 5:57 PM Page 4
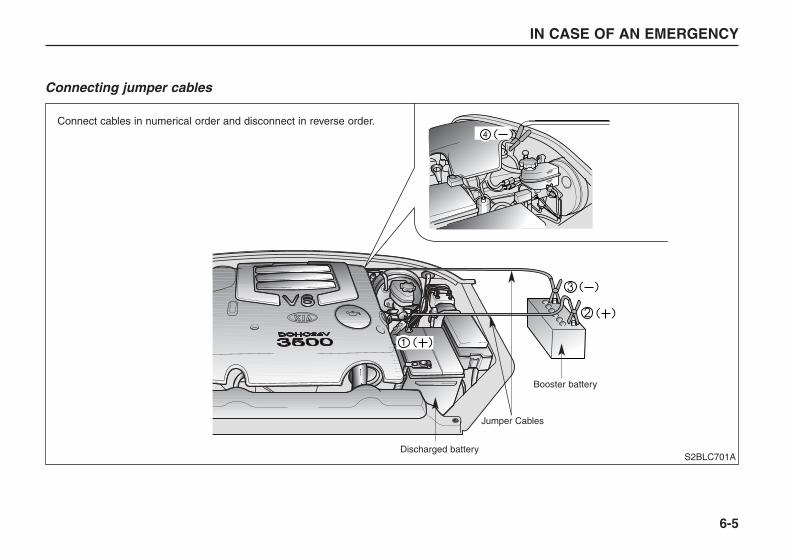
Connecting jumper cables
IN CASE OF AN EMERGENCY
6-5
S2BLC701A
Connect cables in numerical order and disconnect in reverse order.
Discharged battery
Jumper Cables
Booster battery
BL-ENG (CAN)-6.qxd 7/28/05 5:57 PM Page 5

3. Turn off all unnecessary electricalloads.
4. Connect the jumper cables in theexact sequence shown in the previ-ous illustration. First connect oneend of a jumper cable to the posi-tive terminal of the discharged bat-tery, then connect the other end tothe positive terminal on the boosterbattery. Proceed to connect oneend of the other jumper cable to thenegative terminal of the boosterbattery, then the other end to asolid, stationary, metallic point (forexample, the engine lifting bracket)away from the battery. Do not con-nect it to or near any part thatmoves when the engine is cranked.Do not connect the jumper cablefrom the negative terminal of thebooster battery to the negative ter-minal of the discharged battery. Donot allow the jumper cables to con-tact anything except the correctbattery terminals or the correctground. Do not lean over the bat-tery when making connections.
5. Start the engine of the vehicle withthe booster battery and let it run at2,000 rpm, then start the engine ofthe vehicle with the dischargedbattery.
If the cause of your battery dischargeis not apparent, you should have yourvehicle checked by an authorized Kiadealer.
Push-Starting
Your manual transmission-equippedvehicle should not be push-startedbecause it might damage the emis-sion control system. Vehiclesequipped with automatic transmis-sions cannot be push-started. Followthe directions for jump-starting in thismanual.
IN CASE OF AN EMERGENCY
6-6
CAUTIONNever tow a vehicle to start itbecause the sudden surge for-ward when the engine startscould cause a collision with thetow vehicle.
BL-ENG (CAN)-6.qxd 7/28/05 5:57 PM Page 6
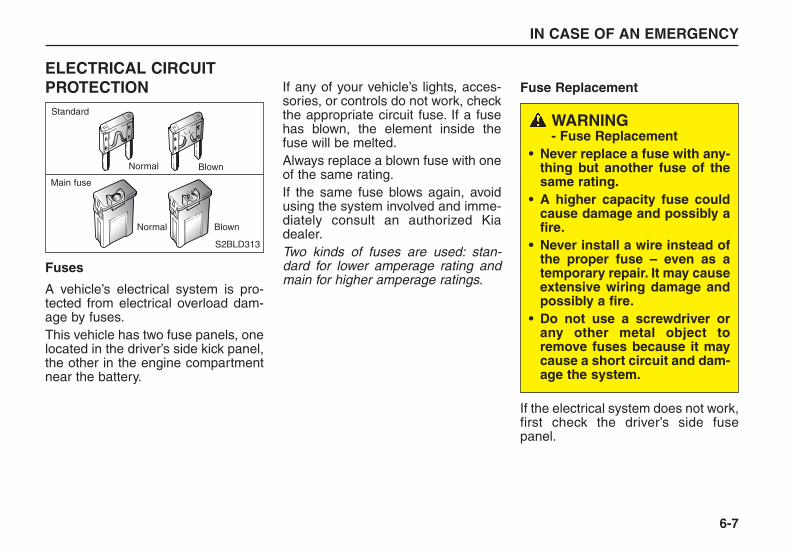
ELECTRICAL CIRCUITPROTECTION
Fuses
A vehicle’s electrical system is pro-tected from electrical overload dam-age by fuses.This vehicle has two fuse panels, onelocated in the driver’s side kick panel,the other in the engine compartmentnear the battery.
If any of your vehicle’s lights, acces-sories, or controls do not work, checkthe appropriate circuit fuse. If a fusehas blown, the element inside thefuse will be melted.Always replace a blown fuse with oneof the same rating.If the same fuse blows again, avoidusing the system involved and imme-diately consult an authorized Kiadealer.Two kinds of fuses are used: stan-dard for lower amperage rating andmain for higher amperage ratings.
Fuse Replacement
If the electrical system does not work,first check the driver’s side fusepanel.
IN CASE OF AN EMERGENCY
6-7
S2BLD313
Standard
Main fuse
Normal Blown
Normal Blown
WARNING- Fuse Replacement
• Never replace a fuse with any-thing but another fuse of thesame rating.
• A higher capacity fuse couldcause damage and possibly afire.
• Never install a wire instead ofthe proper fuse – even as atemporary repair. It may causeextensive wiring damage andpossibly a fire.
• Do not use a screwdriver orany other metal object toremove fuses because it maycause a short circuit and dam-age the system.
BL-ENG (CAN)-6.qxd 7/28/05 5:57 PM Page 7
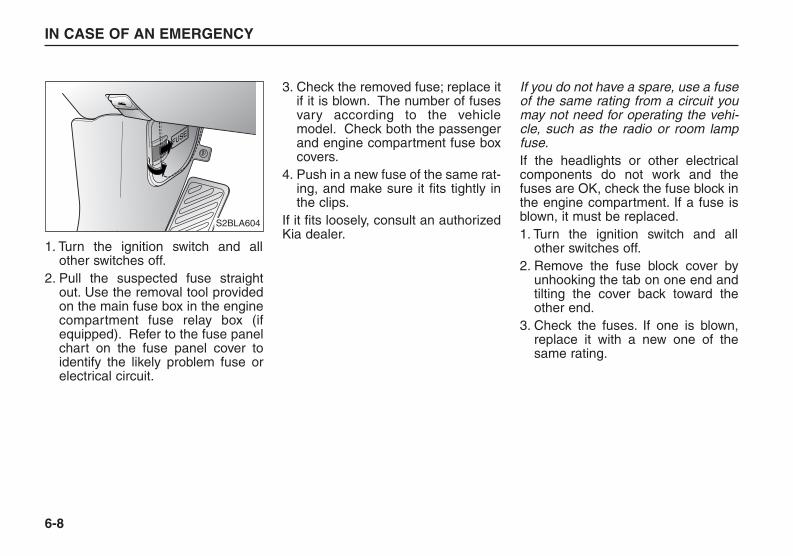
1. Turn the ignition switch and allother switches off.
2. Pull the suspected fuse straightout. Use the removal tool providedon the main fuse box in the enginecompartment fuse relay box (ifequipped). Refer to the fuse panelchart on the fuse panel cover toidentify the likely problem fuse orelectrical circuit.
3. Check the removed fuse; replace itif it is blown. The number of fusesvary according to the vehiclemodel. Check both the passengerand engine compartment fuse boxcovers.
4. Push in a new fuse of the same rat-ing, and make sure it fits tightly inthe clips.
If it fits loosely, consult an authorizedKia dealer.
If you do not have a spare, use a fuseof the same rating from a circuit youmay not need for operating the vehi-cle, such as the radio or room lampfuse.If the headlights or other electricalcomponents do not work and thefuses are OK, check the fuse block inthe engine compartment. If a fuse isblown, it must be replaced.1. Turn the ignition switch and all
other switches off.2. Remove the fuse block cover by
unhooking the tab on one end andtilting the cover back toward theother end.
3. Check the fuses. If one is blown,replace it with a new one of thesame rating.
IN CASE OF AN EMERGENCY
6-8
FUSE
S2BLA604
BL-ENG (CAN)-6.qxd 7/28/05 5:57 PM Page 8
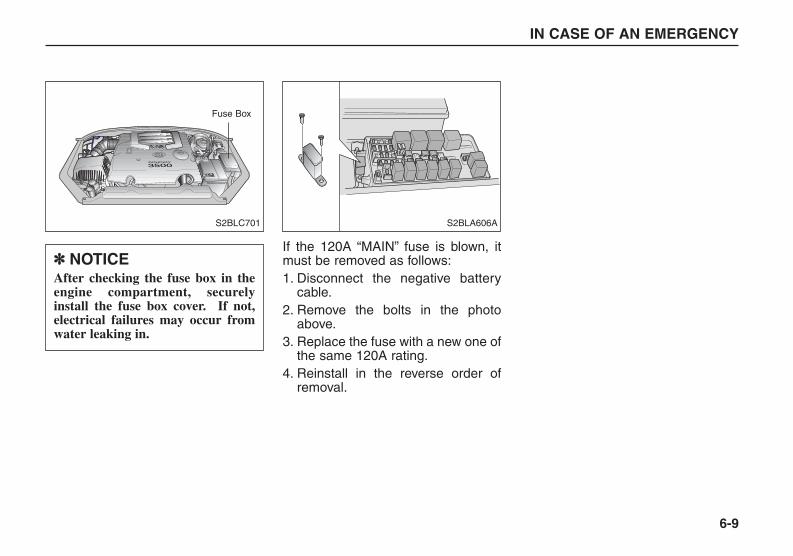
If the 120A “MAIN” fuse is blown, itmust be removed as follows:1. Disconnect the negative battery
cable.2. Remove the bolts in the photo
above.3. Replace the fuse with a new one of
the same 120A rating.4. Reinstall in the reverse order of
removal.
IN CASE OF AN EMERGENCY
6-9
3500DOHC24V
S2BLC701
Fuse Box
S2BLA606A
✽✽ NOTICEAfter checking the fuse box in theengine compartment, securelyinstall the fuse box cover. If not,electrical failures may occur fromwater leaking in.
BL-ENG (CAN)-6.qxd 7/28/05 5:57 PM Page 9

Fuse panel descriptionDriver-side kick panel
IN CASE OF AN EMERGENCY
6-10
( )
( )
( )( )
( )
( )
W/SHD15A
S/ROOF20A
( )PREMIUMAUDIO30A
( )S/WARMER20A
( )O/S MIRROR10A
( )RELAY COIL10A
START10A
METER10A
ENGINE10A
HAZARD15A
P/SCK(CTR)15A
CIGAR (FRT)15A
DRL/OBD-II10A
WIPER(FRT)20A
TCCS20A
ROOM LAMP10A
FOG (RR)15A
P/SCK(FRT,RR)
30A
STOP LAMP20A
TURN LAMP10A
A/BAG10A
( )TRAILER15A
WIPER(RR)10A
ACC10A
22 23 24
19 20 21
16 17 18
13 14 15
10 11 12
7 8 9
4 5 6
1 2 3
USE THE DESIGNATED FUSES ONLY.*( ) IS OPTION.
Description FUSE RATING PROTECTED OMPONENT1. W/SHD 15 A Defroster2. S/ROOF 20 A Sunroof3. START 10 A Starting system, PCM, ACC4. HAZARD 15 A Turn & Hazard flasher unit5. P/SCK(CTR) 15 A Center power socket6. CIGAR (FRT) 15 A Cigar lighter7. DRL/OBD-II 10 A Check connector8. WIPER (FRT) 20 A Wiper & Washer, Head light,
Front heater & Aircon, Cooling system, Defroster9. P/SCK (FRT, RR) 30 A Front and rear power socket10. RELAY COIL 10 A Relay coil11. WIPER (RR) 10 A Wiper & Washer, ETWIS, Heater & Aircon,
Trip computer, sunroof12. ACC 10 A Power mirror, Cigar lighter, Power Socket,
Clock, Keyless entry, Audio13. TCCS 20 A Transfer case control unit14. FOG (RR) 15 A Rear fog lamp15. O/S MIRROR 10 A Electric remote control mirror16. ROOM LAMP 10 A Instrument cluster, ETWIS, Head light, DRL,
Keyless entry, Room lamp, Sunvior lamp, Clock17. S/WARMER 20 A Seat warmer18. PREMIUM AUDIO 30 A Audio19. STOP LAMP 20 A Stop light20. TURN LAMP 10 A Turn & Hazard flasher unit21. A/BAG 10 A Airbag22. METER 10 A PCM, ACC, Trip computer, Stop light ,DRL,
ETWIS, Instrument cluster, Front heater & Aircon23. TRAILER 15 A Trailer accessory24. ENGINE 10 A PCM, Cooling, Speed sensor, Diagnosis connector,
ACC, Instrument cluster, ABS
BL-ENG (CAN)-6.qxd 7/28/05 5:57 PM Page 10

Engine compartment
IN CASE OF AN EMERGENCY
6-11
( )
MAIN 120A
HORN
20A
15A15A
25A
15A
10A
15A10A
10A25A
25A
15A
15A15A
15A10A
AUDIO HEAD(HI)
HEAD(LO)
INJECTOR
DEF
25A20A
15A10A
SPARE
SPARE
SPARE
SPARE
MEMORY
15A (F/FOG)
ILLUMI
P/TRN
P/W(LH)
O2(DN)
O2(UP)
P/W(RH) ECU
(EXT)
FUEL
FUSEPULLER START
RELAY
MAINRELAY
F/BLWRELAY
P/WINRELAY
C/FAN (L)RELAY
A/CONRELAY
USE THE DESIGNATED FUSES ONLY.*( ) FOR OPTION.
K52Y
C/F (H)RELAY
C/FAN (2)RELAYFUEL
RELAY
HORNRELAY
HEAD(LO)RELAY
HEAD(HI)RELAY
TNSRELAY
DEFRELAY
F/FOGRELAY
IGN 230A
BTN 340A
ABS 40A
C /FAN (1)40A
F/BLW30A
C/FAN (2)30A
BTN 140A
IGN 140A
BTN 230A
( )
( )
HORN 15 A HormP/TRN 10 A PCM, Main relayINJECTOR 15 A PCMAUDIO 20 A AudioHEAD (HI) 15 A Head LightILLUMI 10 A Key hole illuminationO2 (DN) 15 A PCMHEAD (LO) 15 A Head lightEXT 15 A DRL, License lamp, Tail lamp, Position lamp, Turn lampP/W (LH) 25 A Power windowO2 (UP) 15 A PCMDEF 25 A DefrosterFUEL 15 A Fuel pump relayP/W (RH) 25 A Power windowECU 10 A PCM, CoolingMEMORY 10 A Front heater & aircon, Etwis, Keyless entry systemF/FOG 15 A Front fog lampIGN 2 30 A Ignition switchBTN 3 40 A Turn & Hazard flasher unit, Power door lockABS 1 40 A ABSC/FAN (1) 40 A Cooling systemF/BLW 30 A Front heater & AirconC/FAN (2) 30 A Cooling systemBTN 1 40 A Cigar lighter, Power socketIGN 1 40 A Ignition switchBTN 2 30 A Power seat, PCM
BL-ENG (CAN)-6.qxd 7/28/05 5:57 PM Page 11
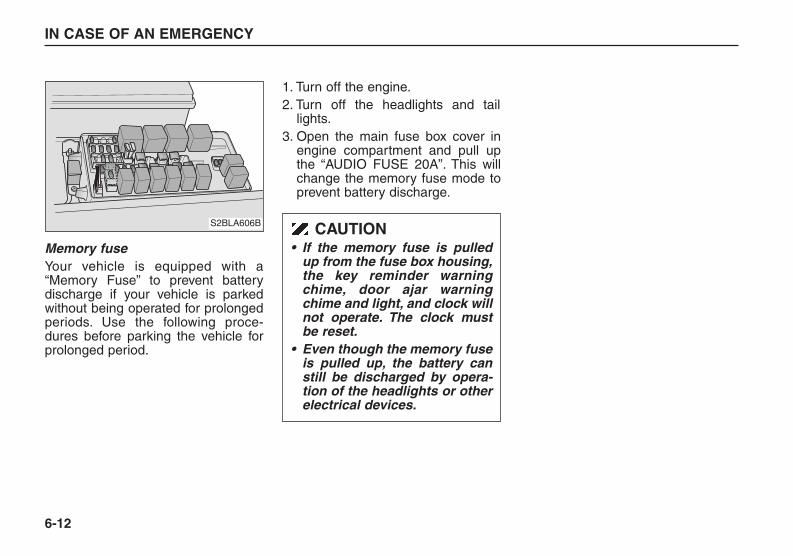
Memory fuseYour vehicle is equipped with a“Memory Fuse” to prevent batterydischarge if your vehicle is parkedwithout being operated for prolongedperiods. Use the following proce-dures before parking the vehicle forprolonged period.
1. Turn off the engine.2. Turn off the headlights and tail
lights.3. Open the main fuse box cover in
engine compartment and pull upthe “AUDIO FUSE 20A”. This willchange the memory fuse mode toprevent battery discharge.
IN CASE OF AN EMERGENCY
6-12
S2BLA606B CAUTION• If the memory fuse is pulled
up from the fuse box housing,the key reminder warningchime, door ajar warningchime and light, and clock willnot operate. The clock mustbe reset.
• Even though the memory fuseis pulled up, the battery canstill be discharged by opera-tion of the headlights or otherelectrical devices.
BL-ENG (CAN)-6.qxd 7/28/05 5:57 PM Page 12

TOWING If emergency towing is necessary, werecommend having it done by anAuthorized Kia Dealer or a commer-cial tow-truck service. Proper liftingand towing procedures are neces-sary to prevent damage to the vehi-cle. Provincial and local laws applica-ble to towing vehicles must be fol-lowed. As a general rule, towed vehi-cles should be pulled with the drivingwheels off the ground. If excessivedamage or other conditions preventtowing the vehicle with the drivingwheels of the ground, use wheel dol-lies.
On 4WD Vehicles, it is recommendedthat your vehicle be towed with awheel lift and dollies or flatbed equip-ment with all the wheels off theground.
It is recommended that your vehiclebe towed with a wheel lift or flatbedequipment. Do not tow with a sling-belt. Our company has not approveda slingbelt towing procedure.
IN CASE OF AN EMERGENCY
6-13
S4BLA609 S4BLA610
✽✽ NOTICE• Do not tow the vehicle forward
with the front wheels on theground as this may cause damageto the vehicle.
• Do not tow with sling-type equip-ment. Use wheel lift or flatbedequipment.
BL-ENG (CAN)-6.qxd 7/28/05 5:57 PM Page 13

On 2WD vehicles, it is acceptable totow the vehicle with the front wheelson the ground (without dollies) andthe rear wheels off the ground.When being towed by a commercialtow truck and wheel dollies are notused, the rear of the vehicle shouldalways be lifted, not the front.
When towing your vehicle in an emer-gency without wheel dollies (2WDVehicles or Part-time 4WD Vehicles):1. Set the ignition switch in the ACC
position.2. Place the transmission shift lever
in N (Neutral).3. Place the transfer shift knob for
part-time 4WD operation in the 2HIposition.
4. Release the parking brake. Tie-down hook (for flatbed towing)
IN CASE OF AN EMERGENCY
6-14
S4BLA630 S4BLA612B
✽✽ NOTICEFailure to place the transmissionshift lever in N (Neutral) and thetransfer shift knob for part-time4WD operation to 2HI may causeinternal damage to the transmis-sion.
CAUTIONDo not use the hook under therear of the vehicle for towingpurposes.The hook is designedONLY for transport tie-down. Ifthe tie-down hook is used fortowing, the tie-down hook willbe damaged and this could leadto serious injury.
Tie-down hook
BL-ENG (CAN)-6.qxd 7/28/05 5:57 PM Page 14
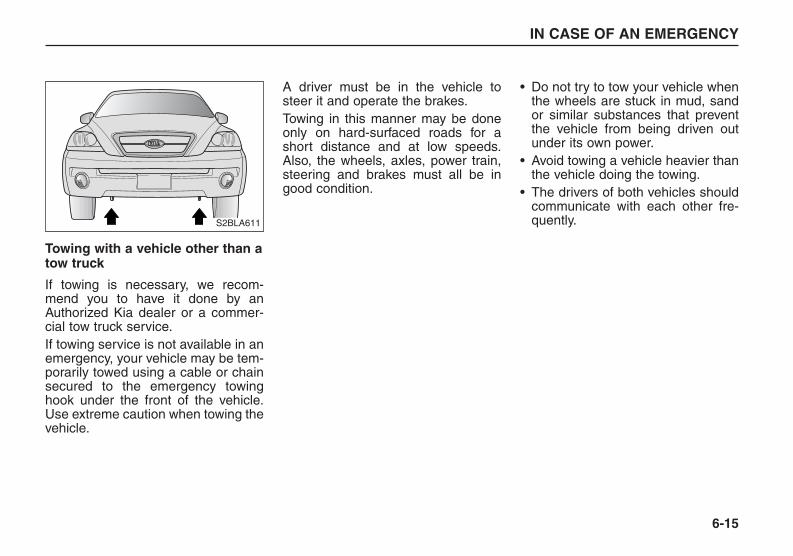
Towing with a vehicle other than atow truck
If towing is necessary, we recom-mend you to have it done by anAuthorized Kia dealer or a commer-cial tow truck service.If towing service is not available in anemergency, your vehicle may be tem-porarily towed using a cable or chainsecured to the emergency towinghook under the front of the vehicle.Use extreme caution when towing thevehicle.
A driver must be in the vehicle tosteer it and operate the brakes.Towing in this manner may be doneonly on hard-surfaced roads for ashort distance and at low speeds.Also, the wheels, axles, power train,steering and brakes must all be ingood condition.
• Do not try to tow your vehicle whenthe wheels are stuck in mud, sandor similar substances that preventthe vehicle from being driven outunder its own power.
• Avoid towing a vehicle heavier thanthe vehicle doing the towing.
• The drivers of both vehicles shouldcommunicate with each other fre-quently.
IN CASE OF AN EMERGENCY
6-15
S2BLA611
BL-ENG (CAN)-6.qxd 7/28/05 5:57 PM Page 15
• Before emergency towing, checkthat the hook is not broken or dam-aged.
• Fasten the towing cable or chainsecurely to the hook.
• Do not jerk the hook. Apply steadyand even force.
• To avoid damaging the hook, do notpull from the side or at a verticalangle. Always pull straight ahead.
IN CASE OF AN EMERGENCY
6-16
✽✽ NOTICE• Attach a towing strap to the tow
hook.• Using a portion of the vehicle
other than the tow hooks for tow-ing may damage the body of yourvehicle.
• Use only a cable or chain specifi-cally intended for use in towingvehicles. Securely fasten the cableor chain to the towing hook pro-vided.
CAUTIONUse extreme caution when tow-ing the vehicle.• Avoid sudden starts or erratic
driving maneuvers whichwould place excessive stresson the emergency towinghook and towing cable orchain. The hook and towingcable or chain may break andcause serious injury or dam-age.
• If the towing vehicle can hard-ly move, do not forcibly con-tinue the towing. Contact anAuthorized Kia dealer or acommercial tow truck servicefor assistance.
• Tow the vehicle as straightahead as possible.
• Keep away from the vehicleduring towing.
BL-ENG (CAN)-6.qxd 7/28/05 5:57 PM Page 16
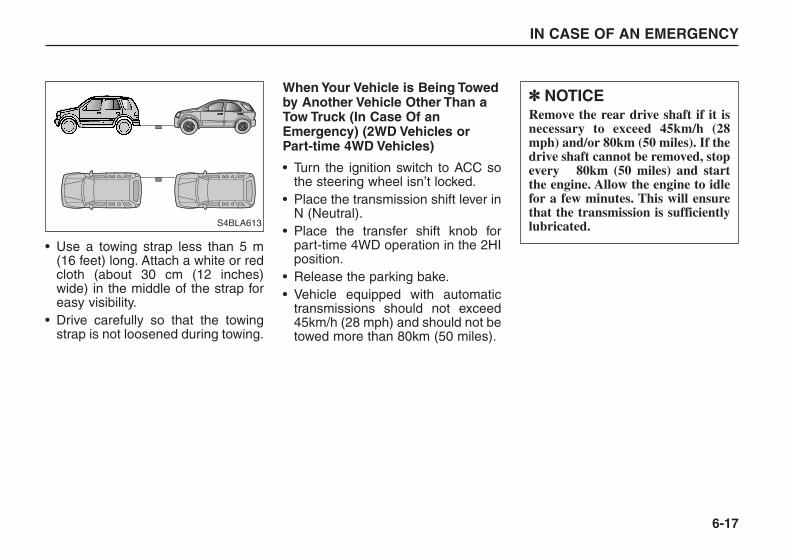
• Use a towing strap less than 5 m(16 feet) long. Attach a white or redcloth (about 30 cm (12 inches)wide) in the middle of the strap foreasy visibility.
• Drive carefully so that the towingstrap is not loosened during towing.
When Your Vehicle is Being Towedby Another Vehicle Other Than aTow Truck (In Case Of anEmergency) (2WD Vehicles orPart-time 4WD Vehicles)
• Turn the ignition switch to ACC sothe steering wheel isn’t locked.
• Place the transmission shift lever inN (Neutral).
• Place the transfer shift knob forpart-time 4WD operation in the 2HIposition.
• Release the parking bake.• Vehicle equipped with automatic
transmissions should not exceed45km/h (28 mph) and should not betowed more than 80km (50 miles).
IN CASE OF AN EMERGENCY
6-17
S4BLA613
✽✽ NOTICERemove the rear drive shaft if it isnecessary to exceed 45km/h (28mph) and/or 80km (50 miles). If thedrive shaft cannot be removed, stopevery 80km (50 miles) and startthe engine. Allow the engine to idlefor a few minutes. This will ensurethat the transmission is sufficientlylubricated.
BL-ENG (CAN)-6.qxd 7/28/05 5:57 PM Page 17

• Press the brake pedal with moreforce than normal since you willhave reduced brake performance.
• More steering effort will be requiredbecause the power steering systemwill be disabled.
• If you are driving down a long hill,the brakes may overheat and brakeperformance will be reduced. Stopoften and let the brakes cool off.
Tips for towing a stuck vehicle
The following methods are effectivewhen your vehicle is stuck in mud,sand or similar substances that pre-vent the vehicle from being driven outunder its own power.• Remove the soil and sand, etc.
from the front and the back of thetires.
• Place a stone or wood under thetires.
IN CASE OF AN EMERGENCY
6-18
✽✽ NOTICETo prevent internal damage to thetransmission, never tow your vehi-cle from the rear (backwards) withall four tires in contact with the sur-face.
BL-ENG (CAN)-6.qxd 7/28/05 5:57 PM Page 18

IF YOU HAVE A FLAT TIRE
Storing the Jack and Tools
Jack is stored in the compartment ofthe cargo area.Jack handle and wheel lug nutwrench are located in the cargo areafloor.
Removing the Spare Tire
Your spare tire is stored underneathyour vehicle, directly below the cargoarea.1. Assemble the wheel lug nut
wrench to the jack handle.2. Open the rear hatch.
3. Insert the jack handle into the holejust above the rear bumper. Theresistance to turning will be feltwhen properly engaged.
4. Turn the jack handle counter-clock-wise until the spare tire reachesthe ground. Turn the jack handle10~13 revolutions counter-clock-wise more after the spare tirereaches the ground, and draw thespare tire towards rear of vehicle.Never rotate the jack handle morethan 17 revolutions, otherwise thespare tire carrier may be damaged.
IN CASE OF AN EMERGENCY
6-19
S2BLA614C S2BLA628 S2BLA615C
WARNINGHold the handle firmly and turnit slowly to lower the spare tire.The separation of the wrenchfrom the handle could causeloss the control and personalinjury.
BL-ENG (CAN)-6.qxd 7/28/05 5:57 PM Page 19
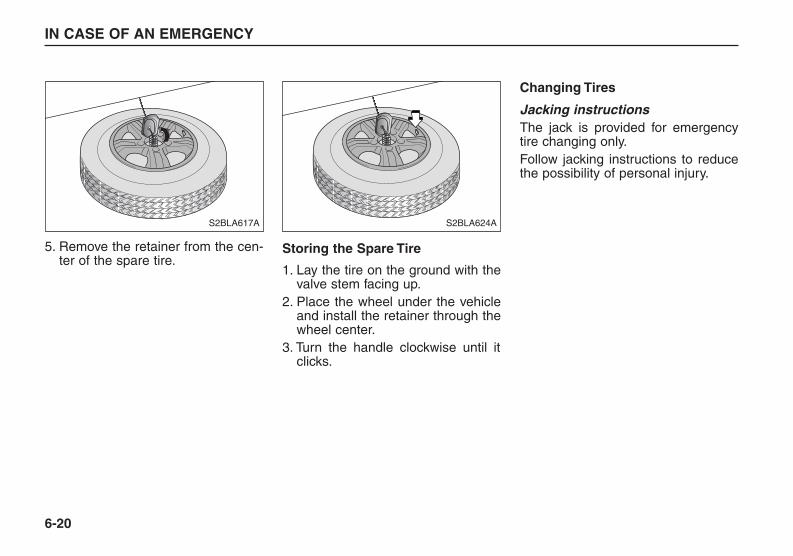
5. Remove the retainer from the cen-ter of the spare tire.
Storing the Spare Tire
1. Lay the tire on the ground with thevalve stem facing up.
2. Place the wheel under the vehicleand install the retainer through thewheel center.
3. Turn the handle clockwise until itclicks.
Changing Tires
Jacking instructions The jack is provided for emergencytire changing only.Follow jacking instructions to reducethe possibility of personal injury.
IN CASE OF AN EMERGENCY
6-20
S2BLA617A S2BLA624A
BL-ENG (CAN)-6.qxd 7/28/05 5:57 PM Page 20
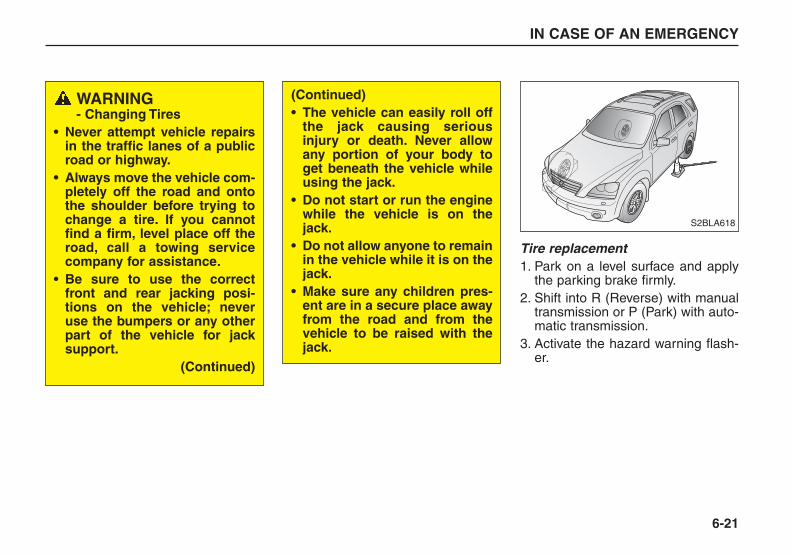
Tire replacement 1. Park on a level surface and apply
the parking brake firmly.2. Shift into R (Reverse) with manual
transmission or P (Park) with auto-matic transmission.
3. Activate the hazard warning flash-er.
IN CASE OF AN EMERGENCY
6-21
S2BLA618
WARNING- Changing Tires
• Never attempt vehicle repairsin the traffic lanes of a publicroad or highway.
• Always move the vehicle com-pletely off the road and ontothe shoulder before trying tochange a tire. If you cannotfind a firm, level place off theroad, call a towing servicecompany for assistance.
• Be sure to use the correctfront and rear jacking posi-tions on the vehicle; neveruse the bumpers or any otherpart of the vehicle for jacksupport.
(Continued)
(Continued)• The vehicle can easily roll off
the jack causing seriousinjury or death. Never allowany portion of your body toget beneath the vehicle whileusing the jack.
• Do not start or run the enginewhile the vehicle is on thejack.
• Do not allow anyone to remainin the vehicle while it is on thejack.
• Make sure any children pres-ent are in a secure place awayfrom the road and from thevehicle to be raised with thejack.
BL-ENG (CAN)-6.qxd 7/28/05 5:57 PM Page 21

4. Remove the wheel lug nut wrench,jack, jack handle, and spare tirefrom the vehicle.
5. Block both the front and rear of thewheel that is diagonally oppositethe jack position.
6. Loosen the wheel lug nuts counter-clockwise one turn each, but donot remove any nut until the tirehas been raised off the ground.
7. Place the jack at the front or rearjacking position closest to the tireyou are changing.
IN CASE OF AN EMERGENCY
6-22
S2BLA619A S2BLA620
WARNING - Changing Tires
To prevent vehicle movementswhile changing a tire, alwaysset the parking brake fully, andalways block the wheel diago-nally opposite the wheel beingchanged.
BL-ENG (CAN)-6.qxd 7/28/05 5:57 PM Page 22
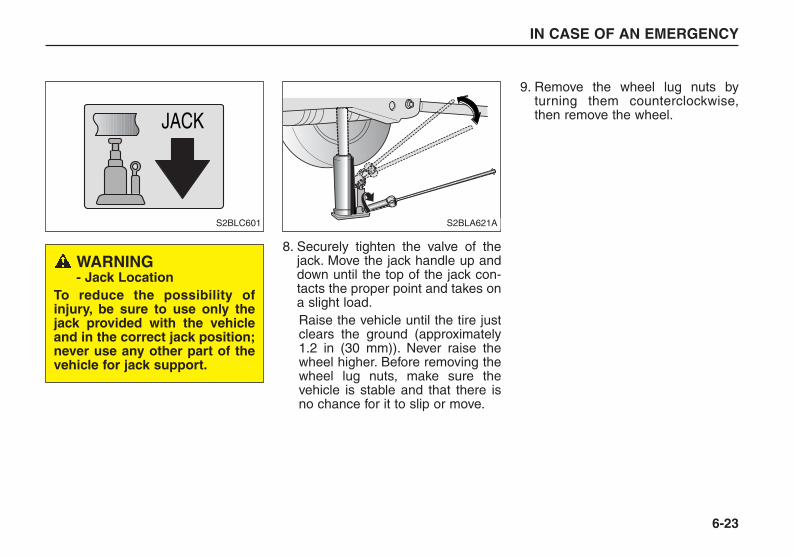
8. Securely tighten the valve of thejack. Move the jack handle up anddown until the top of the jack con-tacts the proper point and takes ona slight load.Raise the vehicle until the tire justclears the ground (approximately1.2 in (30 mm)). Never raise thewheel higher. Before removing thewheel lug nuts, make sure thevehicle is stable and that there isno chance for it to slip or move.
9. Remove the wheel lug nuts byturning them counterclockwise,then remove the wheel.
IN CASE OF AN EMERGENCY
6-23
JACK
S2BLC601 S2BLA621A
WARNING - Jack Location
To reduce the possibility ofinjury, be sure to use only thejack provided with the vehicleand in the correct jack position;never use any other part of thevehicle for jack support.
BL-ENG (CAN)-6.qxd 7/28/05 5:57 PM Page 23
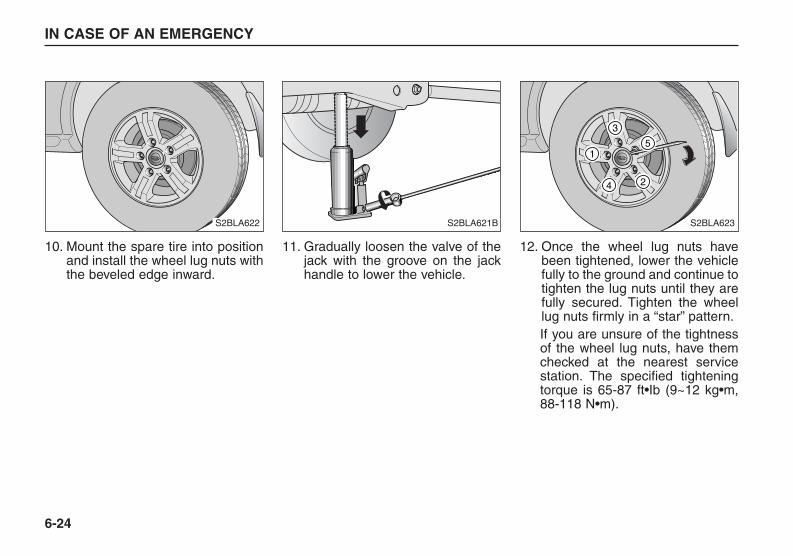
10. Mount the spare tire into positionand install the wheel lug nuts withthe beveled edge inward.
11. Gradually loosen the valve of thejack with the groove on the jackhandle to lower the vehicle.
12. Once the wheel lug nuts havebeen tightened, lower the vehiclefully to the ground and continue totighten the lug nuts until they arefully secured. Tighten the wheellug nuts firmly in a “star” pattern.If you are unsure of the tightnessof the wheel lug nuts, have themchecked at the nearest servicestation. The specified tighteningtorque is 65-87 ft•Ib (9~12 kg•m,88-118 N•m).
IN CASE OF AN EMERGENCY
6-24
S2BLA622 S2BLA621B
1
3
4 2
5
S2BLA623
BL-ENG (CAN)-6.qxd 7/28/05 5:57 PM Page 24

To prevent the jack, jack handle,wheel lug nut, wrench and spare tirefrom rattling while the vehicle is inmotion, store them properly. To storethe flat fire, refer to “Storing the sparetire” in this section.
IN CASE OF AN EMERGENCY
6-25
CAUTIONYour vehicle has metric threadson the wheel studs and nuts.Make certain during wheelremoval that the same nutsremoved are reinstalled - or, ifreplaced, that nuts with metricthreads and the same chamferconfiguration are used.Installation of a non-metricthread nut on a metric stud orvice-versa will not secure thewheel to the hub properly andwill damage the stud so that itmust be replaced.Note that most lug nuts do nothave metric threads. Be sure touse extreme care in checkingfor thread style before installingaftermarket lug nuts or wheels.If in doubt, consult anAuthorized Kia Dealer.
WARNING - Wheel StudsIf the studs are damaged, theymay lose their ability to retainthe wheel.This could lead to theloss of the wheel and a colli-sion.
✽✽ NOTICECheck the inflation pressures assoon as possible after installing thespare tire. Adjust it to the specifiedpressure, if necessary. Refer toSection 8, Specifications.
BL-ENG (CAN)-6.qxd 7/28/05 5:57 PM Page 25

7-1
MAINTENANCE
Maintenance Services . . . . . . . . . . . . . . . . . . . . . . . . . . . . . . 7-2Maintenance Schedule . . . . . . . . . . . . . . . . . . . . . . . . . . . . . 7-3Owner Maintenance . . . . . . . . . . . . . . . . . . . . . . . . . . . . . . . . 7-7Engine Compartment . . . . . . . . . . . . . . . . . . . . . . . . . . . . . . . 7-8Engine Oil and Oil Filter . . . . . . . . . . . . . . . . . . . . . . . . . . . . 7-9Engine Cooling System . . . . . . . . . . . . . . . . . . . . . . . . . . . . 7-11Brakes and Clutch . . . . . . . . . . . . . . . . . . . . . . . . . . . . . . . . 7-14Parking Brake . . . . . . . . . . . . . . . . . . . . . . . . . . . . . . . . . . . . 7-15Power Steering . . . . . . . . . . . . . . . . . . . . . . . . . . . . . . . . . . . 7-16Automatic Transmission . . . . . . . . . . . . . . . . . . . . . . . . . . . 7-17Lubricants and Fluids . . . . . . . . . . . . . . . . . . . . . . . . . . . . . 7-19Air Cleaner . . . . . . . . . . . . . . . . . . . . . . . . . . . . . . . . . . . . . . 7-20Wiper Blades . . . . . . . . . . . . . . . . . . . . . . . . . . . . . . . . . . . . 7-21Battery . . . . . . . . . . . . . . . . . . . . . . . . . . . . . . . . . . . . . . . . . 7-23Tires and Wheels . . . . . . . . . . . . . . . . . . . . . . . . . . . . . . . . . 7-26Bulb Replacement . . . . . . . . . . . . . . . . . . . . . . . . . . . . . . . . 7-33Lubricant Specifications . . . . . . . . . . . . . . . . . . . . . . . . . . . 7-41Exterior Care . . . . . . . . . . . . . . . . . . . . . . . . . . . . . . . . . . . . 7-43Interior Care . . . . . . . . . . . . . . . . . . . . . . . . . . . . . . . . . . . . . 7-47
7
BL-ENG (CAN)-7.qxd 7/28/05 5:58 PM Page 1
MAINTENANCE SERVICESYou should exercise the utmost careto prevent both damage to your vehi-cle and injury to yourself wheneverperforming any maintenance orinspection procedures.Should you have any doubts con-cerning the inspection or servicing ofyour vehicle, we strongly recommendthat you have an authorized KiaDealer perform this work.An authorized Kia dealer has factory-trained technicians and genuine Kiaparts to service your vehicle properly.For expert advice and quality service,see an authorized Kia dealer.Inadequate, incomplete or insufficientservicing may result in operationalproblems with your vehicle that couldlead to vehicle damage, an accident,or personal injury.
Owner’s Responsibility
You should retain documents thatshow proper maintenance has beenperformed on your vehicle in accor-dance with the scheduled mainte-nance service charts shown on thefollowing pages. You need this infor-mation to establish your compliancewith the servicing and maintenancerequirements of your Kia warranties.
Detailed warranty information is pro-vided in your Warranty andConsumer Information Manual.Repairs and adjustments required asa result of improper maintenance or alack of required maintenance are notcovered.
We strongly recommend that all vehi-cle maintenance be performed by anauthorized Kia dealer using genuineKia parts.
MAINTENANCE
7-2
✽✽ NOTICEMaintenance Service and RecordRetention are the owner’s responsi-bility.
BL-ENG (CAN)-7.qxd 7/28/05 5:58 PM Page 2

MAINTENANCE
7-3
MAINTENANCE SCHEDULE Engine control system
Kilometers or time in months, whichever comes first
× 1,000 km 8 16 24 32 40 48 56 64 72 80 88 96 104 112 120 128
# Months 4 8 12 16 20 24 28 32 36 40 44 48 52 56 60 64
Engine oil & engine oil filter (1) R R R R R R R R R R R R R R R R
Drive belts (tension) I I I I
Cooling system hoses & connections I I I I I
Engine coolant (1) I I I I I R I I I I I R I I I I
Fuel filter R R
Fuel tank cap, lines, EVAP canister and hoses I I
Fuel tank air filter I R I R I
Air cleaner element (2) I I I I I R I I I I I R I I I I
Ignition wires I I
Spark plugs R
PCV valve (if equipped) I I I I
Idle speed I I I I I
Engine timing belt R
MAINTENANCEINTERVALS
MAINTENANCE ITEM
BL-ENG (CAN)-7.qxd 7/28/05 5:58 PM Page 3

MAINTENANCE
7-4
MAINTENANCE SCHEDULE (CONTINUED)Chassis and body
Kilometers or time in months, whichever comes first
× 1,000 km 8 16 24 32 40 48 56 64 72 80 88 96 104 112 120 128
# Months 4 8 12 16 20 24 28 32 36 40 44 48 52 56 60 64
Air conditioner compressor operation & I I I I I
refrigerant amount (if equipped)
Exhaust pipes, heat shield & mountings I I I I I I I I
Transfer case oil (if equipped) I I I R I I I R I I I R I I I R
Front differential fluid (if equipped) I I I R I I I R I I I R I I I R
Rear differential fluid (if equipped) I I I R I I I R I I I R I I I R
Front suspension ball joints I I I I
Brakes/clutch fluid (1) I I I I I I I R I I I I I I I R
Front brake pads & discs (3) I I I I I I I I I I I I I I I I
Rear brake pads & discs/drums (3) I I I I I I I I I I I I I I I I
Parking brake I I I I I I I I
Brake lines & connections I I I I I
(including booster)
Manual transaxle oil (1) I I I R I I I R I I I R I I I R
Clutch & brake pedal free play I I I I I I I I I I I I I I I I
MAINTENANCEINTERVALS
MAINTENANCE ITEM
BL-ENG (CAN)-7.qxd 7/28/05 5:58 PM Page 4
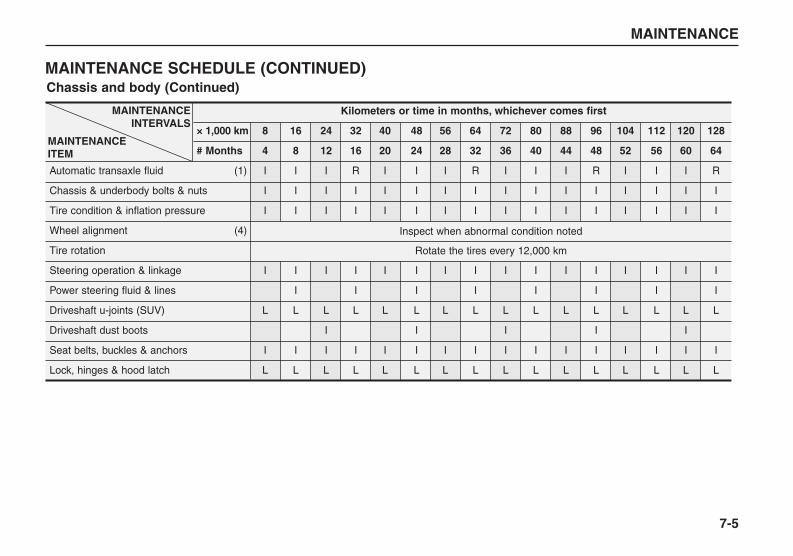
MAINTENANCE
7-5
MAINTENANCE SCHEDULE (CONTINUED)
Kilometers or time in months, whichever comes first
× 1,000 km 8 16 24 32 40 48 56 64 72 80 88 96 104 112 120 128
# Months 4 8 12 16 20 24 28 32 36 40 44 48 52 56 60 64
Automatic transaxle fluid (1) I I I R I I I R I I I R I I I R
Chassis & underbody bolts & nuts I I I I I I I I I I I I I I I I
Tire condition & inflation pressure I I I I I I I I I I I I I I I I
Wheel alignment (4)
Tire rotation
Steering operation & linkage I I I I I I I I I I I I I I I I
Power steering fluid & lines I I I I I I I I
Driveshaft u-joints (SUV) L L L L L L L L L L L L L L L L
Driveshaft dust boots I I I I I
Seat belts, buckles & anchors I I I I I I I I I I I I I I I I
Lock, hinges & hood latch L L L L L L L L L L L L L L L L
MAINTENANCEINTERVALS
MAINTENANCE ITEM
Inspect when abnormal condition noted
Rotate the tires every 12,000 km
Chassis and body (Continued)
BL-ENG (CAN)-7.qxd 7/28/05 5:58 PM Page 5

MAINTENANCE
7-6
Chart Symbols:
I- Inspect these items and their related parts. If necessary, correct, clean, refill, adjust of replace.R- Replace or changeL- Lubricate.
(1) Refer to the lubricant and coolant specifications in the Owner’s Manual(2) More frequent maintenance is required if driving under dusty conditions.(3) More frequent maintenance is required if the vehicle is operated under any of the following conditions:
a. Short-distance drivingb. Driving on dusty roads.c. Extensive idling or slow-speed driving in stop-and-go traffic.
(4) If necessary, rotate and balance the wheels.
* Note: Check the engine oil and coolant levels every week.
BL-ENG (CAN)-7.qxd 7/28/05 5:58 PM Page 6

OWNER MAINTENANCEOwner Maintenance Schedule
The owner should perform thesevehicle inspections at the indicatedintervals to ensure safe and depend-able operation.Bring any problem to the attention ofan authorized Kia dealer as soon aspossible.
When refueling, check the follow-ing:• Engine oil level• Engine coolant level
• Brake (and clutch, if equipped) fluidlevel
• Washer fluid level
Every month, check:• Tire inflation pressures (cold)• Coolant level in reservoir (cold
engine)
Every 6 months (for example,every spring and fall), check:• Power steering fluid level• Automatic transmission fluid level
MAINTENANCE
7-7
WARNINGBe careful when checking yourengine coolant level.The enginecompartment will be hot andyou could be burned.
WARNING- Engine Cooling Fans
Because your engine coolingfans are electronically con-trolled, they will run if the igni-tion switch is ON, even if theengine is not running. Thiscould cause serious injury. Toprevent this, be sure the igni-tion is OFF, unless you must runthe engine while performingmaintenance or an inspection.
BL-ENG (CAN)-7.qxd 7/28/05 5:58 PM Page 7

ENGINE COMPARTMENT
MAINTENANCE
7-8
3500DOHC24V
1. Engine coolant reservoir
2. Coolant reservoir cap
3. Engine oil filler cap
4. Auto transmission fluid dipstick
5. Brake / clutch fluid reservoir
6. Air cleaner
7. Windshield washer fluid reservoir
8. Power steering fluid reservoir
9. Engine oil dipstick
10. Battery
11. Fuse box
1 2 3 4 5
6 7 8 9 10 11
S2BLC701
BL-ENG (CAN)-7.qxd 7/28/05 5:58 PM Page 8

ENGINE OIL AND OILFILTERChecking the Engine Oil Level
1. Be sure the vehicle is on levelground.
2. Start the engine and allow it toreach normal operating tempera-ture.
3. Turn the engine off and wait a fewminutes for the oil to return to theoil pan.
4. Pull the dipstick out, wipe it clean,and re-insert it fully.
5. Pull the dipstick out again andcheck the level.The level should bebetween F and L.
If the level is near or at L, add enoughoil to bring the level to F. Do not over-fill.
Use only the specified engine oil.(Refer to “Recommended Lubricants’’later in this section.)
Changing the Engine Oil andFilter
Change engine oil and filter accord-ing to the Scheduled Maintenance atthe beginning of this section.
MAINTENANCE
7-9
OK
F L
S2BLC705A
WARNING - Engine OilContinuous contact with USEDengine oil has caused skin can-cer in laboratory mice. Protectyour skin by washing with soapand water. Keep all engine oilout of reach of children.
BL-ENG (CAN)-7.qxd 7/28/05 5:58 PM Page 9
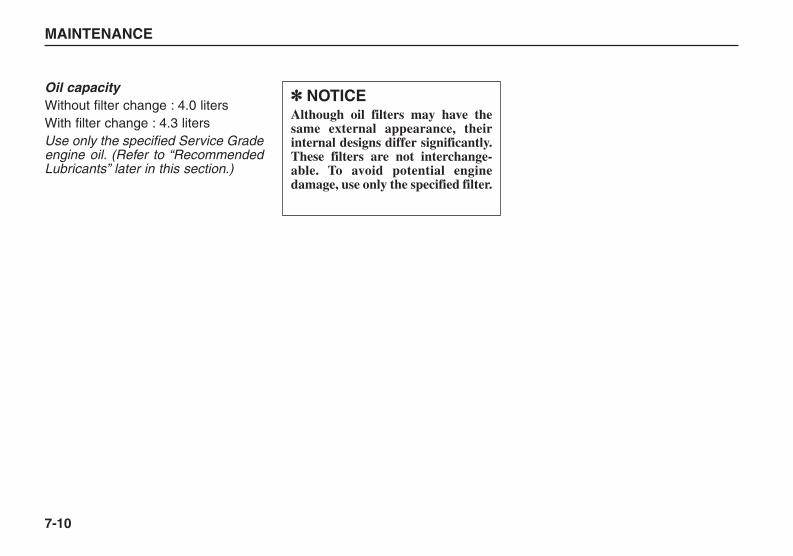
Oil capacityWithout filter change : 4.0 litersWith filter change : 4.3 litersUse only the specified Service Gradeengine oil. (Refer to “RecommendedLubricants” later in this section.)
MAINTENANCE
7-10
✽✽ NOTICEAlthough oil filters may have thesame external appearance, theirinternal designs differ significantly.These filters are not interchange-able. To avoid potential enginedamage, use only the specified filter.
BL-ENG (CAN)-7.qxd 7/28/05 5:58 PM Page 10

ENGINE COOLING SYSTEMThe high-pressure cooling systemhas a reservoir filled with year-roundantifreeze coolant. The reservoir isfilled at the factory.Check the antifreeze protection andcoolant level at least once a year, atthe beginning of the winter season,and before traveling to a colder cli-mate.
Checking the Coolant Level
MAINTENANCE
7-11
WARNING- Removing Radiator Cap
• Never attempt to remove theradiator cap while the engineis operating. Doing so mightlead to cooling system andengine damage and couldresult in serious personalinjury from escaping hotcoolant or steam. Turn theengine off and wait until it hascooled. Even then, useextreme care when removingthe radiator cap. Wrap a thicktowel around it, and turn itcounterclockwise slowly tothe first stop. Step back whilethe pressure is released fromthe cooling system. When youare sure all the pressure hasbeen released, press down onthe cap, using a thick towel,and continue turning counter-clockwise to remove it.
(Continued)
(Continued)• Even if the engine is not oper-
ating, do not remove the radi-ator cap or the drain plugwhile the engine and radiatorare hot. Hot coolant andsteam may still blow outunder pressure, causing seri-ous injury.
BL-ENG (CAN)-7.qxd 7/28/05 5:58 PM Page 11

Check the condition and connectionsof all cooling system hoses andheater hoses. Replace any swollen ordeteriorated hoses.The coolant level should be filledbetween MAX and MIN marked onthe coolant reservoir when theengine is cool.
If the coolant level is low, add enoughcoolant to bring the level to MAX, butdo not overfill. If frequent additionsare required, see an authorized Kiadealer for a cooling system inspec-tion.
Changing Coolant
Change coolant according to theScheduled Maintenance.• Use only soft (de-mineralized)
water in the coolant mixture.• The engine in your vehicle has alu-
minum engine parts and must beprotected by an ethylene-glycol-based coolant to prevent corrosionand freezing.
• DO NOT USE alcohol or methanolantifreeze or mix them with thespecified coolant.
• Do not use a solution that containsmore than 60% antifreeze or lessthan 35% antifreeze, which wouldreduce the effectiveness of thesolution.
MAINTENANCE
7-12
MAX
M I N
S2BLC702
BL-ENG (CAN)-7.qxd 7/28/05 5:58 PM Page 12

For mixture percentage, refer to thefollowing table
1. Turn the coolant reservoir capcounterclockwise to remove it.
2. Loosen the radiator drain plug anddrain the coolant into a suitablecontainer.
3. With the plug loose, flush the sys-tem with running water.
4. Drain the system completely andretighten the drain plug. Add thenecessary amount of ethylene-glycol-based coolant and water toprovide the required protectionagainst freezing and corrosion. Inextremely cold climates, add ethyl-ene-glycol based coolant in accor-dance with the instructions of themanufacturer.
5. Run the engine at idle with thecoolant reservoir cap off. Slowlyadd additional coolant as neces-sary.
6. At this point, wait until the enginereaches normal operating temper-ature. Depress the accelerator twoor three times; then add coolant asrequired. Be careful not to burnyourself.
7. Replace the coolant reservoir cap.Inspect all connections for leaksand recheck the coolant level in thereservoir. Recheck again after afew days and add coolant as nec-essary.
MAINTENANCE
7-13
-15°C (5°F) 35 65
-25°C (-13°F) 40 60
-35°C (-31°F) 50 50
-45°C (-49°F) 60 40
Ambient Temperature
Mixture Percentage(volume)
CoolantSolution
Water
CAUTIONTo prevent burning yourself, donot remove the radiator cap orloosen the drain plug while theengine is hot.
BL-ENG (CAN)-7.qxd 7/28/05 5:58 PM Page 13

BRAKES AND CLUTCHChecking Brake/Clutch FluidLevel
Check the fluid level in the reservoirperiodically. The fluid level should bebetween MAX and MIN indicators onthe side of the reservoir.
Before removing the reservoir capand adding brake fluid, clean thearea around the reservoir cap thor-oughly to prevent brake/clutch fluidcontamination.If the level is low, add fluid to the MAXlevel. The level will fall with accumu-lated mileage. This is a normal condi-tion associated with the wear of thebrake/clutch linings. If the fluid levelbecomes low frequently, have thebrake/clutch system checked by anauthorized Kia dealer.Use only the specified brake/clutchfluid. (Refer to “RecommendedLubricants’’ later in this section.)Never mix different types of fluid.
MAINTENANCE
7-14
S2BLC704
✽✽ NOTICEIn the event the brake/clutch sys-tem requires frequent additions offluid, the vehicle should be inspect-ed by an authorized Kia dealer.
WARNINGWhen changing and addingbrake/clutch fluid, handle itcarefully. Do not let it come incontact with your eyes. Ifbrake/clutch fluid should comein contact with your eyes,immediately flush them with alarge quantity of fresh tapwater. Have your eyes examinedby a doctor as soon as possi-ble.
BL-ENG (CAN)-7.qxd 7/28/05 5:58 PM Page 14
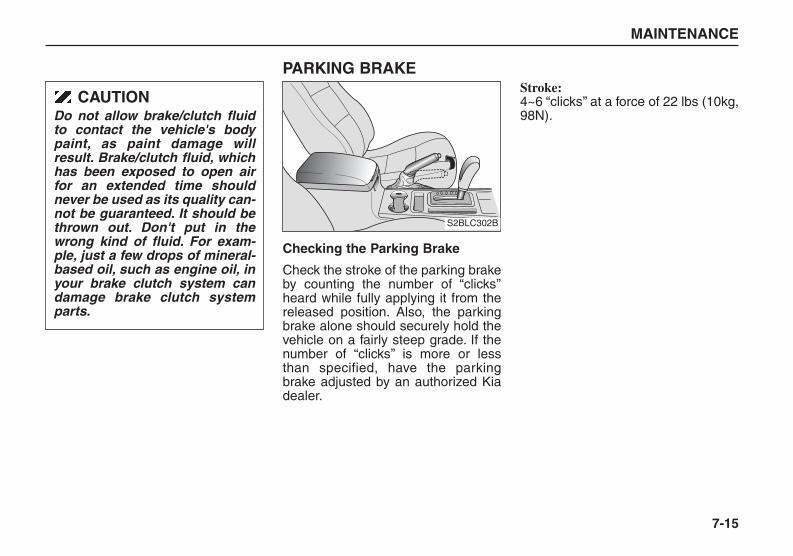
PARKING BRAKE
Checking the Parking Brake
Check the stroke of the parking brakeby counting the number of “clicks’’heard while fully applying it from thereleased position. Also, the parkingbrake alone should securely hold thevehicle on a fairly steep grade. If thenumber of “clicks’’ is more or lessthan specified, have the parkingbrake adjusted by an authorized Kiadealer.
Stroke:4~6 “clicks’’ at a force of 22 lbs (10kg,98N).
MAINTENANCE
7-15
S2BLC302B
CAUTIONDo not allow brake/clutch fluidto contact the vehicle's bodypaint, as paint damage willresult. Brake/clutch fluid, whichhas been exposed to open airfor an extended time shouldnever be used as its quality can-not be guaranteed. It should bethrown out. Don't put in thewrong kind of fluid. For exam-ple, just a few drops of mineral-based oil, such as engine oil, inyour brake clutch system candamage brake clutch systemparts.
BL-ENG (CAN)-7.qxd 7/28/05 5:58 PM Page 15

POWER STEERING
Checking the Power SteeringFluid Level
With the vehicle on level ground,check the fluid level in the powersteering reservoir periodically. Thefluid level should be between HIGHand LOW indicators on the side of thereservoir.Before adding power steering fluid,thoroughly clean the area around thereservoir cap to prevent power steer-ing fluid contamination.
If the level is low, add fluid to theHIGH level.
In the event the power steering sys-tem requires frequent addition offluid, the vehicle should be inspectedby an authorized Kia dealer.Use only the specified power steeringfluid. (Refer to “RecommendedLubricants’’ in this section.)
MAINTENANCE
7-16
HIG HL O W
S2BLC703
✽✽ NOTICETo avoid damage to the powersteering pump, do not operate thevehicle for prolonged periods with alow power steering fluid level.
BL-ENG (CAN)-7.qxd 7/28/05 5:58 PM Page 16

AUTOMATIC TRANSMISSION(IF EQUIPPED)
Checking the AutomaticTransmission Fluid Level
The automatic transmission fluid levelshould be checked regularly.
The volume of the transmission fluidchanges with temperature. Althoughit is best to check the level after hav-ing driven the vehicle for at least 30minutes, the level can be checkedafter warming the fluid using the pro-cedure below.
MAINTENANCE
7-17
S2BLC704
Automatic transmission fluid dipstick
✽✽ NOTICE• Low transmission fluid level
causes transmission slippage. Overfilling can cause foaming,loss of fluid and transmissionmalfunction.
• The use of a non-specified fluidcould result in transmission mal-function and failure.
WARNING- Parking Brake
To avoid sudden movement ofthe vehicle, set the parkingbrake and depress the brakepedal before moving the shiftlever.
BL-ENG (CAN)-7.qxd 7/28/05 5:58 PM Page 17

1. Park the vehicle on level groundand firmly set the parking brake.
2. Allow the engine to idle for about 2minutes.
3. Depress the brake pedal and movethe shift lever slowly through allranges then set it in P (Park).
4. With the engine still idling, pull outthe dipstick, wipe it clean and rein-sert it fully.
5. Pull out the dipstick again andcheck the fluid level.
5. Pull out the dipstick again andcheck the fluid level.
If the fluid has been warmed to nor-mal operating temperature of approx-imately 167°F (75°C), the fluid levelshould be between the 2 notchesmarked 75°C.
MAINTENANCE
7-18
25 C 75 C
S2BLA712A
LowOk
Ok
Full
Low
Cold fluid scale
Hot fluid scale
Full
✽✽ NOTICEThe notch on the 25°C scale is forreference only and should NOT beused to determine transmissionfluid level.
✽✽ NOTICENew automatic transaxle fluidshould be red. The red dye is addedso the assembly plant can identify itas automatic transaxle fluid anddistinguishes it from engine oil orantifreeze. The red dye, which is notan indicator of fluid quality, is notpermanent. As the vehicle is driven,the automatic transaxle fluid willbegin to look darker. The color mayeventually appear light brown.Therefore, have an Authorized Kiadealer change the automatictransaxle fluid according to theScheduled Maintenance at thebeginning of this section.
BL-ENG (CAN)-7.qxd 7/28/05 5:58 PM Page 18

LUBRICANTS AND FLUIDS
Checking the Washer Fluid Level
The reservoir is translucent so thatyou can check the level with a quickvisual inspection.Check the fluid level in the washerfluid reservoir and add fluid if neces-sary. Plain water may be used ifwasher fluid is not available. In coldclimates, use washer solvent withantifreeze to prevent freezing.
Body Lubrication
All moving points of the body, such asdoor hinges, hood hinges, and locks,should be lubricated each time theengine oil is changed. Use a non-freezing lubricant on locks duringcold weather.Make sure the engine hood second-ary latch keeps the hood from open-ing when the primary latch isreleased.
MAINTENANCE
7-19
HIG HL O W
S2BLC703
Washer fluid
WARNING• Do not use radiator coolant or
antifreeze in the washer fluidreservoir.
• Radiator coolant can severelyobscure visibility whensprayed on the windshieldand may cause loss of vehiclecontrol or damage to paintand body trim.
• Windshield washer fluidagents contain some amountsof alcohol and can be flamma-ble under certain circum-stances. Do not allow sparksor flame to contact the washerfluid or the washer fluid reser-voir. Damage to the vehicle orit's occupants could occur.
• Windshield washer fluid ispoisonous to humans andanimals. Do not drink andavoid contacting windshieldwasher fluid. Serious injury ordeath could occur.
BL-ENG (CAN)-7.qxd 7/28/05 5:58 PM Page 19

AIR CLEANER
Element Replacement
A viscous paper air cleaner filter isused. It must be replaced when nec-essary, and should not be cleanedand reused.1. Loosen the air cleaner cover
attaching clips and open the cover.
2. Wipe the inside of the air cleanerhousing with a clean, damp cloth.
3. Replace the air cleaner element.4. Lock the cover with the cover
attaching clips.
Replace the element according to theScheduled Maintenance Section.If the vehicle is operated in extremelydusty or sandy areas, replace theelement more often than the usualrecommended intervals.
MAINTENANCE
7-20
S2BLC706 S2BLC707
CAUTION• Do not drive with the air clean-
er removed; this will result inexcessive engine wear.
• Driving without an air cleanerencourages backfiring, whichcould cause a fire in theengine compartment.
• When removing the air clean-er element, be careful thatdust or dirt does not enter theair intake, or damage mayresult.
BL-ENG (CAN)-7.qxd 7/28/05 5:58 PM Page 20
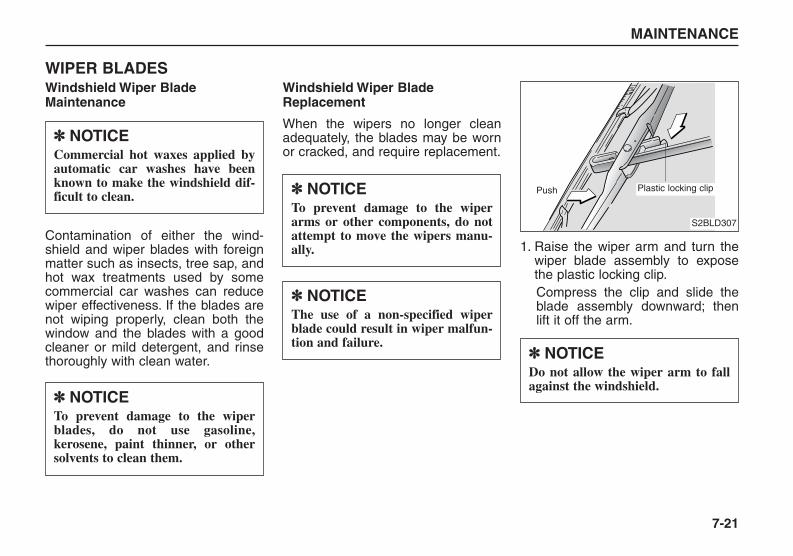
WIPER BLADESWindshield Wiper BladeMaintenance
Contamination of either the wind-shield and wiper blades with foreignmatter such as insects, tree sap, andhot wax treatments used by somecommercial car washes can reducewiper effectiveness. If the blades arenot wiping properly, clean both thewindow and the blades with a goodcleaner or mild detergent, and rinsethoroughly with clean water.
Windshield Wiper BladeReplacement
When the wipers no longer cleanadequately, the blades may be wornor cracked, and require replacement.
1. Raise the wiper arm and turn thewiper blade assembly to exposethe plastic locking clip.Compress the clip and slide theblade assembly downward; thenlift it off the arm.
MAINTENANCE
7-21
S2BLD307
Plastic locking clipPush
✽✽ NOTICECommercial hot waxes applied byautomatic car washes have beenknown to make the windshield dif-ficult to clean.
✽✽ NOTICETo prevent damage to the wiperblades, do not use gasoline,kerosene, paint thinner, or othersolvents to clean them.
✽✽ NOTICETo prevent damage to the wiperarms or other components, do notattempt to move the wipers manu-ally.
✽✽ NOTICEThe use of a non-specified wiperblade could result in wiper malfun-tion and failure.
✽✽ NOTICEDo not allow the wiper arm to fallagainst the windshield.
BL-ENG (CAN)-7.qxd 7/28/05 5:58 PM Page 21

2. Firmly grasp the end of the rubberblade and pull until the tabs arefree of the metal support.
3. Remove the metal retainers fromthe rubber blade and install them inthe new rubber blade.
4. Carefully insert a new rubber bladeand install the blade assembly.
Install the blade with the tabs facingtowards the bottom of the wiper arm.
MAINTENANCE
7-22
S2BLD308
Tabs
Metal support
Pull out
S2BLD309
Retainer
Retainer
S2BLD305
✽✽ NOTICEDo not bend the metal retainers.
BL-ENG (CAN)-7.qxd 7/28/05 5:58 PM Page 22

BATTERY
MAINTENANCE
7-23
WARNING - Battery dangers
Always read the follow-ing instructions carefullywhen handling a battery.
Keep lighted cigarettesand all other flames orsparks away from thebattery.
Hydrogen, which is ahighly combustible gas,is always present in bat-tery cells and mayexplode if ignited.
Keep batteries out of thereach of childrenbecause batteries con-tain highly corrosiveSULFURIC ACID. Do notallow battery acid tocontact your skin, eyes,clothing or paint finish.
(Continued)
(Continued)
If any electrolyte getsinto your eyes, flushyour eyes with cleanwater for at least 15 min-utes and get immediatemedical attention. If pos-sible, continue to applywater with a sponge orcloth until medical atten-tion is received.If electrolyte gets onyour skin, thoroughlywash the contacted area.If you feel a pain or aburning sensation, getmedical attention imme-diately.
Wear eye protectionwhen charging or work-ing near a battery.Always provide ventila-tion when working in anenclosed space.
(Continued)
(Continued)• When lifting a plastic-cased
battery, excessive pressureon the case may cause batteryacid to leak, resulting in per-sonal injury. Lift with a batterycarrier or with your hands onopposite corners.
• Never attempt to charge thebattery when the batterycables are connected.
• The electrical ignition systemworks with high voltage.Never touch these compo-nents with the engine runningor the ignition switched on.
BL-ENG (CAN)-7.qxd 7/28/05 5:58 PM Page 23
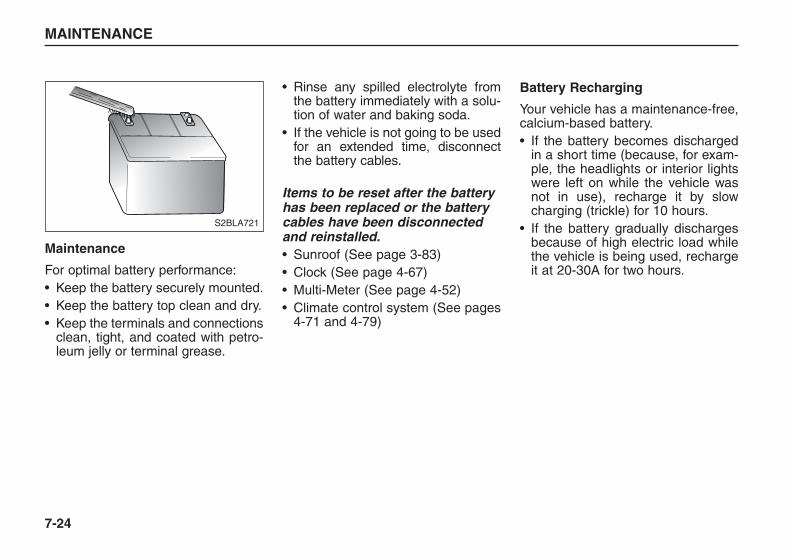
Maintenance
For optimal battery performance:• Keep the battery securely mounted.• Keep the battery top clean and dry.• Keep the terminals and connections
clean, tight, and coated with petro-leum jelly or terminal grease.
• Rinse any spilled electrolyte fromthe battery immediately with a solu-tion of water and baking soda.
• If the vehicle is not going to be usedfor an extended time, disconnectthe battery cables.
Items to be reset after the batteryhas been replaced or the batterycables have been disconnectedand reinstalled.• Sunroof (See page 3-83)• Clock (See page 4-67)• Multi-Meter (See page 4-52)• Climate control system (See pages
4-71 and 4-79)
Battery Recharging
Your vehicle has a maintenance-free,calcium-based battery.• If the battery becomes discharged
in a short time (because, for exam-ple, the headlights or interior lightswere left on while the vehicle wasnot in use), recharge it by slowcharging (trickle) for 10 hours.
• If the battery gradually dischargesbecause of high electric load whilethe vehicle is being used, rechargeit at 20-30A for two hours.
MAINTENANCE
7-24
S2BLA721
BL-ENG (CAN)-7.qxd 7/28/05 5:58 PM Page 24

MAINTENANCE
7-25
(Continued)• Disconnect the battery charg-
er in the following order.1. Turn off the battery charger
main switch.2. Unhook the negative clamp
from the negative batteryterminal.
3. Unhook the positive clampfrom the positive batteryterminal.
✽✽ NOTICE• Before performing maintenance
or recharging the battery, turnoff all accessories and stop theengine.
• The negative battery cable mustbe removed first and installed lastwhen the battery is disconnected.
WARNING - Recharging Battery
When recharging the battery,observe the following precau-tions:• The battery must be removed
from the vehicle and placed inan area with good ventilation.
• Do not allow cigarettes,sparks, or flame near the bat-tery.
• Watch the battery duringcharging, and stop or reducethe charging rate if the batterycells begin gassing (boiling)violently or if the temperatureof the electrolyte of any cellexceeds 120°F (49°C).
• Wear eye protection whenchecking the battery duringcharging.
(Continued)
BL-ENG (CAN)-7.qxd 7/28/05 5:58 PM Page 25

TIRES AND WHEELSTire Care
For proper maintenance, safety, andmaximum fuel economy, you mustalways maintain the recommendedtire inflation pressures and stay with-in the load limits and weight distribu-tion recommended for your vehicle.
Inflation Pressures
All tire pressures (including thespare) should be checked monthlywhen the tires are cold. “Cold Tires”means the vehicle has not been driv-en for at least three hours or drivenless than one mile (1.6 km).Recommended pressures must bemaintained for optimum vehicle han-dling, and minimum tire wear.The front and rear tires should be 30psi (2.1 kg/cm²). The full-size spareshould be inflated to 30 psi (2.1kg/cm²).
MAINTENANCE
7-26
S2BLD502A
WARNINGSevere underinflation (10 psi ormore) can lead to severe heatbuild-up, especially on hot daysand when driving at high speed.This can potentially cause treadseparation and other tire irregu-larities to appear that can resultin the loss of vehicle controlleading to severe injury ordeath.
BL-ENG (CAN)-7.qxd 7/28/05 5:58 PM Page 26

Tire Rotation
To equalize tread wear, it is recom-mended that the tires be rotatedevery 12,000 km (7,500 miles) orsooner if irregular wear develops.During rotation, check the tires forcorrect balance.When rotating tires, check for unevenwear and damage. Abnormal wear isusually caused by incorrect tire pres-sure, improper wheel alignment, out-of-balance wheels, severe braking orsevere cornering. Look for bumps orbulges in the tread or side of tire.Replace the tire if you find either ofthese conditions. Replace tires show-ing fabric or cord. After rotation, besure to bring the front and rear tirepressures to specification and checklug nut tightness.Refer to Section 8, Specifications.
MAINTENANCE
7-27
WARNING - Tire InflationOver inflation or under inflationcan reduce tire life, adverselyaffect vehicle handling, andlead to sudden tire failure. Youcould lose control and have aserious accident. Follow all theguidelines about proper tiremaintenance.• Warm tires normally exceed
recommended cold tire pres-sures by 4 to 6 psi (28 to 41kPa). Do not release air fromwarm tires to adjust the pres-sure.The tires will be underin-flated.
• Underinflation results inexcessive wear, poor han-dling, reduced fuel economy,and possibility of blowoutsfrom overheated tires. Also,low tire pressure can causepoor seating of the tire bead.If the tire pressure is exces-sively low, wheel deformationand/or tire separation is pos-sible.
(Continued)
(Continued)So keep you tire pressures atthe proper levels. If a tire fre-quently needs refilling, have itchecked by an authorized Kiadealer or a competent tireshop.
• Overinflation produces aharsh ride, handling prob-lems, excessive wear at thecenter of the tire tread, pro-longed braking distance and agreater possibility of damagefrom road hazards.
• Be sure to reinstall the tireinflation valve caps. Withoutthe valve cap, dirt or moisturecould get into the valve coreand cause air leakage. If thecap have been lost, installnew one as soon as possible.
BL-ENG (CAN)-7.qxd 7/28/05 5:58 PM Page 27

Disc brake pads and rear brakeshoes should be inspected for wearwhenever tires are rotated.
Tire Replacement
If the tire is worn evenly, a tread wearindicator will appear as a solid band12.7mm wide (1/2 inch) across thethe tread. This shows there is lessthan 1.6 mm (1/16 inch) of tread lefton the tire. Replace the tire when thishappens.Do not wait for the band to appearacross the entire tread before replac-ing the tire.
Wheel Alignment and Tire Balance
The wheels on your vehicle werealigned and balanced carefully at thefactory to give you the longest tire lifeand best overall performance.In most cases, you will not need tohave your wheels aligned again.However, if you notice unusual tirewear or your vehicle pulling one wayor the other, the alignment may needto be reset.If you notice your vehicle vibratingwhen driving on a smooth road, yourwheels may need to be rebalanced.
MAINTENANCE
7-28
✽✽ NOTICEImproper wheel weights can dam-age your vehicle’s aluminumwheels. Use only approved wheelweights.
S2BLA790A
With a full-size spare tire
Without a spare tire
Tread wear indicator
2GHA5032
S2BLA790
CBGQ0707A
Directional tires (if equipped)
BL-ENG (CAN)-7.qxd 7/28/05 5:58 PM Page 28

Wheel Replacement
When replacing the metal wheels forany reason, make sure the newwheels are equivalent to the originalfactory units in diameter, rim widthand offset.
MAINTENANCE
7-29
WARNING - Tire Inflation• Driving on worn-out tires or
mis-matched tires is very haz-ardous. Worn-out tires reducebraking effectiveness, steer-ing accuracy, and traction.You are also more likely tohave a blowout on a worn-outtire. Replace any tire showingsigns of being worn out.
• Your vehicle is equipped withtires designed to provide forsafe ride and handling capa-bility. Do not use a size andtype of tire and wheel that isdifferent from the one that isoriginally installed on yourvehicle. It can affect the safetyand performance of your vehi-cle, which could lead to han-dling failure or rollover andserious injury.
(Continued)
(Continued)When replacing the tires, besure to equip all four tires withthe tire and wheel of the samesize, type, tread, brand andload-carrying capacity. If younevertheless decide to equipyour vehicle with anytire/wheel combination notrecommended by Kia for offroad driving, you should notuse these tires for highwaydriving.
• The use of any other tire sizeor type may seriously affectride, handling, ground clear-ance, tire clearance, andspeedometer calibration.
• Replace all four tires at thesame time. Replacing tires inpart can seriously affect yourvehicle’s handling.
WARNINGA wheel that is not the correctsize may adversely affect wheeland bearing life, braking andstopping abilities, handlingcharacteristics, ground clear-ance, body-to-tire clearance,snow chain clearance,speedometer calibration, head-light aim and bumper height.
BL-ENG (CAN)-7.qxd 7/28/05 5:58 PM Page 29

Tire Size Designation
A tire’s sidewall is marked with a tiresize designation. You will need thisinformation when selecting replace-ment tires for your car. The followingexplains what the letters and num-bers in the tire size designation mean.Example tire size designation:P245/70R16 106H (these numbersare provided as an example only;your tire size designator could varydepending on your vehicle.)P – Applicable vehicle type (tires
marked with the prefix “P’’ areintended for use on passengercars or light trucks; however, notall tires have this marking).
245 – Tire width in millimeters.70 – Aspect ratio. The tire’s section
height as a percentage of itswidth.
R – Tire construction code (Radial).16 – Rim diameter in inches.
106 – Load Index, a numerical codeassociated with the maximumload the tire can carry.
H – Speed Rating Symbol. See thespeed rating chart in this sectionfor additional information.
Wheel Size Designation
Wheels are also marked with impor-tant information that you need if youever have to replace one. The follow-ing explains what the letters andnumbers in the wheel size designa-tion mean.Example wheel size designation:7.0JJ x 167.0 – Rim width in inches.J – Rim contour designation.16 – Rim diameter in inches.
Tire Speed Ratings
The chart below shows many of thedifferent speed ratings currentlybeing used for passenger car andlight truck tires. The speed ratingsymbol is part of the tire size desig-nation on the sidewall of the tire. Thissymbol corresponds to that tire’sdesigned maximum safe operatingspeed.
MAINTENANCE
7-30
S 180 km/h (112 mph)T 190 km/h (118 mph)H 210 km/h (130 mph)V 240 km/h (149 mph)Z Above 240 km/h (149 mph)
Maximum SpeedSpeedRatingSymbol
BL-ENG (CAN)-7.qxd 7/28/05 5:58 PM Page 30

Uniform Tire Quality Grading
The following information relates tothe tire grading system developed bythe Canadian Motor Vehicle SafetyStandard (CMVSS) for grading tiresby tread wear, traction and tempera-ture performance.
Tread WearThe tread wear grade is a compara-tive rating based on the wear rate ofthe tire when tested under controlledconditions on a specified governmenttest course. For example, a tire grad-ed 150 would wear one-and-a-halftimes as well on the governmentcourse as a tire graded 100.The relative performance of tiresdepends upon the actual conditionsof their use. However, performancemay differ from the norm because ofvariations in driving habits, servicepractices and differences in roadcharacteristics and climate.These grades are molded on theside-walls of passenger vehicle tires.The tires available as standard oroptional equipment on Kia vehiclesmay vary with respect to grade.
Traction – A, B & CThe traction grades, from highest tolowest, are A, B and C. The gradesrepresent the tire’s ability to stop onwet pavement as measured undercontrolled conditions on specifiedgovernment test surfaces of asphaltand concrete. A tire marked C mayhave poor traction performance.
Temperature – A, B & CThe temperature grades are A (thehighest), B and C. The grades represent thetire’s resistance to the generation ofheat and its ability to dissipate heatwhen tested under controlled condi-tions on a specified laboratory testwheel. Sustained high temperaturecan cause the material of the tire todegenerate and reduce tire life, andexcessive temperature can lead tosudden tire failure. Grades A and Brepresent higher levels of perform-ance on the laboratory test wheelthan the minimum required by thelaw.
MAINTENANCE
7-31
S2BLD306
Tread wear XXX Traction XTemperature X
BL-ENG (CAN)-7.qxd 7/28/05 5:58 PM Page 31
Checking a tire lifeIf any tires that are over 6 yearsbased on the manufacturing date, tirestrength and performance declinewith age naturally (even if the tiresare not used like a spare tire).Therefore, the tires should bereplaced by new ones including thespare tire. You can find the manufac-turing date on the tire sidewall (possi-bly only on the inside of the wheel),which has DOT marking. DOT is seri-al numbers on tires, which consist ofa combination of numbers andEnglish letters. You can check themanufacturing date to the last fourposition of the DOT.
DOT : XXXX XXXX OOOOThe front part of the DOT means aplant code number, tire size andtread pattern and the last four num-bers indicate week and year manu-factured.For example ;DOT XXXX XXXX 1602 representsthat the tire was produced in the 16thweek of 2002.
MAINTENANCE
7-32
WARNING- Tire Temperature
The temperature grade for thetire on your vehicle is estab-lished for a tire that is properlyinflated and not overloaded.Excessive speed, underinfla-tion, or excessive loading,either separately or in combina-tion, can cause heat build-upand possible sudden tire fail-ure.This can cause loss of vehi-cle control and serious injury ordeath.
WARNINGA tire more than 6 years old maycause separation of the cordlayers inside the tire leading toloss of vehicle or a seriousinjury. Therefore, make sure tocheck the manufacturing dateand replace the old tire in 6years after the tire manufactur-ing date.
BL-ENG (CAN)-7.qxd 7/28/05 5:58 PM Page 32

BULB REPLACEMENT Headlight Replacement
1. Open the hood.2. Remove the light assembly from
the body of the vehicle looseningthe bolts.
MAINTENANCE
7-33
S2BLA725A
� Headlight� Headlight� Front turn signal light
�
��
WARNING- Working on the lights
Prior to working on the light,firmly apply the parking brakeand ensure that the ignitionswitch is turned to the “LOCK”position to avoid sudden move-ment of the vehicle and burningyour fingers or receiving anelectric shock.
WARNING- Halogen Bulbs
• Halogen bulbs contain pres-surized gas that will produceflying pieces of glass if bro-ken.
• Always handle them carefully,and avoid scratches and abra-sions. If the bulbs are lit, avoidcontact with liquids. Nevertouch the glass with barehands. Residual oil may causethe bulb to overheat and burstwhen lit. A bulb should beoperated only when installedin a headlight.
• If a bulb becomes damaged orcracked, replace it immediate-ly and carefully dispose of it.
• Wear eye protection whenchanging a bulb. Allow thebulb to cool before handlingit.
BL-ENG (CAN)-7.qxd 7/28/05 5:58 PM Page 33

3. Disconnect the headlight mainelectrical connector.
4. Remove the headlight bulb coverby turning it counterclockwise.
5. Disconnect the headlight bulbsocket-connector.
6. Unsnap the headlight bulb retain-ing wire by depressing the end of itand pushing it upward.
MAINTENANCE
7-34
OPEN
OPEN
CLOSE
CLOSE
S2BLA726S2BLA726A
Headlight main electrical connector
S2BLA759
BL-ENG (CAN)-7.qxd 7/28/05 5:58 PM Page 34

7. Remove the bulb from the head-light assembly.
8. Install a new headlight bulb andsnap the headlight bulb retainingwire into position by aligning thewire with the groove on the bulb.
9. Connect the headlight bulb socket-connector.
10. Install the headlight bulb cover byturning it clockwise.
11. Connect the headlight main con-nector.
12. Reinstall the light assembly to thebody of the vehicle.
Front Turn Signal Light BulbReplacement
1. Open the hood.2. Remove the light assembly from
the body of the vehicle removingthe bolts.
3. Disconnect the front turn signallight electrical connector.
4. Remove the socket from theassembly by turning the socketcounter clockwise until the tabs onthe socket align with the slots onthe assembly.
5. Remove the bulb from the socketby pressing it in and rotating it untilthe tabs on the bulb align with theslot in the socket. Pull the bulb outof the socket.
MAINTENANCE
7-35
S2BLA729 S2BLA726C
Front turn signal lightelectrical connector
S2BLA726B
BL-ENG (CAN)-7.qxd 7/28/05 5:58 PM Page 35
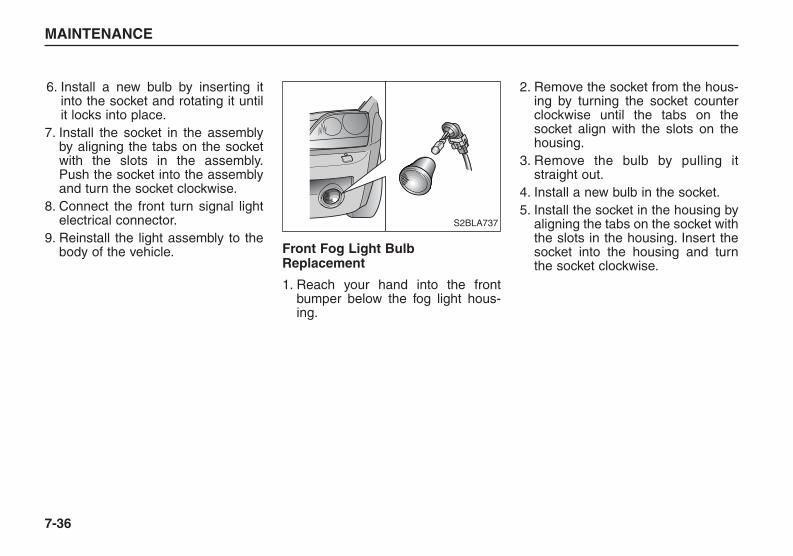
6. Install a new bulb by inserting itinto the socket and rotating it untilit locks into place.
7. Install the socket in the assemblyby aligning the tabs on the socketwith the slots in the assembly.Push the socket into the assemblyand turn the socket clockwise.
8. Connect the front turn signal lightelectrical connector.
9. Reinstall the light assembly to thebody of the vehicle. Front Fog Light Bulb
Replacement
1. Reach your hand into the frontbumper below the fog light hous-ing.
2. Remove the socket from the hous-ing by turning the socket counterclockwise until the tabs on thesocket align with the slots on thehousing.
3. Remove the bulb by pulling itstraight out.
4. Install a new bulb in the socket.5. Install the socket in the housing by
aligning the tabs on the socket withthe slots in the housing. Insert thesocket into the housing and turnthe socket clockwise.
MAINTENANCE
7-36
S2BLA737
BL-ENG (CAN)-7.qxd 7/28/05 5:58 PM Page 36

Interior Lights Bulb Replacement
1. Using a flat-blade screwdriver,gently pry the lens from the interiorlight housing.
2. Remove the bulb by pulling itstraight out.
3. Install a new bulb.4. Align the lens tabs with the interior
light housing notches and snap thelens into place.
MAINTENANCE
7-37
DOWN
PUSH
MODE/SET UP
S2BLA738A
OFF
DO
OR
ON
S2BLA739
OFFON
S2BLA740
S2BLA750� Doom light
� Map light � Rear cargo area light
� Door courtesy light
CAUTIONPrior to working on the InteriorLights, ensure that the “OFF”button is depressed to avoidburning your fingers or receiv-ing an electric shock.
BL-ENG (CAN)-7.qxd 7/28/05 5:58 PM Page 37

Vanity Mirror Light
1. Using a flat-blade screwdriver,gently pry the lens from the sunvi-sor.
2. Remove the bulb by pulling itstraight out.
3. Install a new bulb.4. Align the lens tabs with the light
housing notches and snap the lensinto place.
Center High-Mounted StoplightBulb Replacement
1. Open the rear hatch.2. Remove the trim from the rear
hatch after removing fasteners ofthe both sides on the trim.
3. Separate the socket and the lenspart by pulling the socket retainingtabs outward.
MAINTENANCE
7-38
S2BLA742 S2BLA743S2BLA752
BL-ENG (CAN)-7.qxd 7/28/05 5:58 PM Page 38

4. Remove the bulbs by pulling themstraight out.
5. Install new bulbs in the socket.6. Install the trim securely with the
fasteners.
License Plate Light
1. Loosen the lens retaining screwswith a cross-tip screwdriver.
2. Remove the lens.3. Remove the bulb by pulling it
straight out.4. Install a new bulb.5. Reinstall the lens securely with the
lens retaining screws.
Rear Combination Light BulbReplacement
1. Open the rear hatch.
MAINTENANCE
7-39
S2BLA746A
� Stop/Tail light� Turn signal light� Back up light� Side marker light
�
� �
�
S2BLA744A S2BLA745
BL-ENG (CAN)-7.qxd 7/28/05 5:58 PM Page 39

2. Loosen the light assembly retain-ing screws with a cross-tip screw-driver.
3. Slide the rear combination light outto disconnect the rear combinationlight assembly from the body of thevehicle.
4. Remove the socket from theassembly by turning the socketcounter clockwise until the tabs onthe socket align with the slots onthe assembly.
5. Remove the bulb from the socketby pressing it in and rotating it untilthe tabs on the bulb align with theslots in the socket. Pull the bulb outof the socket.
6. Insert a new bulb by inserting itinto the socket and rotating it untilit locks into place.
7. Install the socket in the assemblyby aligning the tabs on the socketwith the slots in the assembly.Push the socket into the assemblyand turn the socket clockwise.
8. Reinstall the light assembly to thebody of the vehicle.
9. Tighten the screws.
MAINTENANCE
7-40
S2BLA746C
OPEN
CLOSE
S2BLA747
BL-ENG (CAN)-7.qxd 7/28/05 5:58 PM Page 40

LUBRICANTSPECIFICATIONSRecommended Lubricants
To help achieve proper engine andpowertrain performance and durabili-ty, use only lubricants of the properquality. The correct lubricants alsohelp promote engine efficiency thatresults in improved fuel economy.Engine oils labeled EnergyConserving Oil are now available.Along with other additional benefits,they contribute to fuel economy byreducing the amount of fuel neces-sary to overcome engine friction.Often, these improvements are diffi-cult to measure in everyday driving,but in a year’s time, they can offer sig-nificant cost and energy savings.
MAINTENANCE
7-41
*¹ Refer to the recommended SAE viscosity numbers on the next page.
These lubricants and fluids are recommended for use in your vehicle.
Lubricant Classification
Engine oil *¹ API Service SJ, SL or above
ILSAC GF-3 or above
Manual transmission fluid API Service GL-4 (SAE 75W-85)
Automatic 30-40LEi MOBIL D-II
transmission fluid A5SR1 APOLLOIL ATF RED-1
4WD transfer case fluid DEXRON III
Front differential fluid API Service GL-5 (SAE 90)
Rear differential fluidwithout LSD API Service GL-5 (SAE 90)
with LSD API Service GL-5 (SAE 85W-90, INFILREX 33)
Power steering fluid PSF-III
Brake / clutch fluid FMVSS116 DOT-3 or DOT-4
BL-ENG (CAN)-7.qxd 7/28/05 5:58 PM Page 41
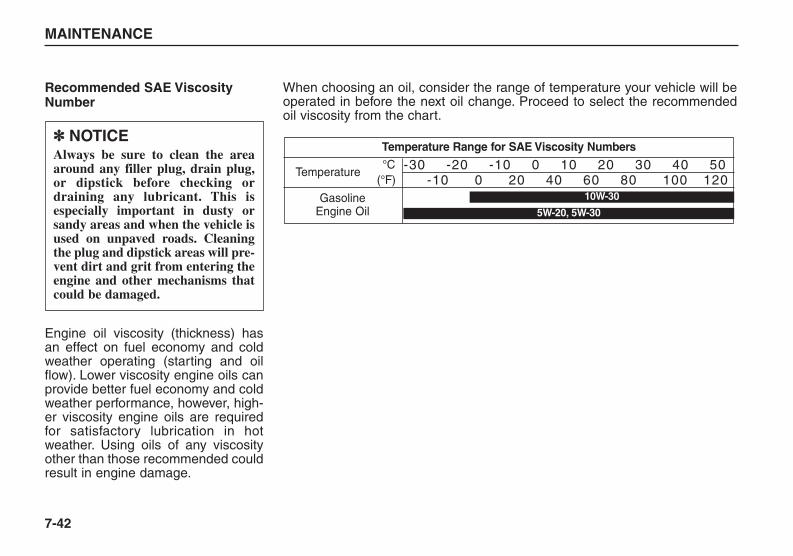
Recommended SAE ViscosityNumber
Engine oil viscosity (thickness) hasan effect on fuel economy and coldweather operating (starting and oilflow). Lower viscosity engine oils canprovide better fuel economy and coldweather performance, however, high-er viscosity engine oils are requiredfor satisfactory lubrication in hotweather. Using oils of any viscosityother than those recommended couldresult in engine damage.
MAINTENANCE
7-42
✽✽ NOTICEAlways be sure to clean the areaaround any filler plug, drain plug,or dipstick before checking ordraining any lubricant. This isespecially important in dusty orsandy areas and when the vehicle isused on unpaved roads. Cleaningthe plug and dipstick areas will pre-vent dirt and grit from entering theengine and other mechanisms thatcould be damaged.
When choosing an oil, consider the range of temperature your vehicle will beoperated in before the next oil change. Proceed to select the recommendedoil viscosity from the chart.
Temperature Range for SAE Viscosity Numbers
Temperature
Gasoline Engine Oil
°C(°F)
-30 -20 -10 0 10 20 30 40 50-10 0 20 40 60 80 100 120
10W-30
5W-20, 5W-30
BL-ENG (CAN)-7.qxd 7/28/05 5:58 PM Page 42
EXTERIOR CAREExterior General Caution
It is very important to follow the labeldirections when using any chemicalcleaner or polish. Read all warningand caution statements that appearon the label.
Finish Maintenance
WashingTo help protect your vehicle’s finishfrom rust and deterioration, wash itthoroughly at least once a month withlukewarm or cold water.Pay special attention to the removalof any accumulation of salt, dirt, mud,and other foreign materials. Makesure the drain holes in the loweredges of the doors and rocker panelsare kept clear and clean.Insects, tar, tree sap, bird droppings,industrial pollution and similardeposits can damage your vehicle’sfinish if not removed immediately.
Even prompt washing with plainwater may not completely remove allthese deposits. A mild soap, safe foruse on painted surfaces, may beused.After washing, rinse the vehicle thor-oughly with lukewarm or cold water.Do not allow soap to dry on the finish.
MAINTENANCE
7-43
✽✽ NOTICEDo not use strong soap, chemicaldetergents or hot water, and do notwash the vehicle in direct sunlightor when the body of the vehicle iswarm.
BL-ENG (CAN)-7.qxd 7/28/05 5:58 PM Page 43
WaxingWax the vehicle when water will nolonger bead on the paint.Always wash and dry the vehiclebefore waxing. Use good quality liq-uid or paste wax, and follow the man-ufacturer’s instructions. Wax all metaltrim to protect it and to maintain itsluster.Removing oil, tar, and similar materi-als with a spot remover will usuallystrip the wax from the finish. Be sureto re-wax these areas even if the restof the vehicle does not yet need wax-ing.
MAINTENANCE
7-44
WARNINGAfter washing the vehicle, testthe brakes while driving slowlyto see if they have been affectedby water. If braking performanceis impaired, dry the brakes byapplying them lightly whilemaintaining a slow forwardspeed.
WARNING- Water Washing in Engine
CompartmentWater washing in the enginecompartment may cause failureof electrical circuits. Systemsof your vehicle could fail whenyou need them. Wash yourengine compartment carefully.Check your vehicle’s featuresbefore driving again.
✽✽ NOTICE• Wiping dust or dirt off the body
with a dry cloth will scratch thefinish.
• Do not use steel wool, abrasivecleaners, or strong detergentscontaining high alkaline or caus-tic agents on chrome-plated oranodized aluminum parts. Thismay result in damage to the pro-tective coating and cause discol-oration or paint deterioration.
BL-ENG (CAN)-7.qxd 7/28/05 5:58 PM Page 44

Finish Damage Repair
Deep scratches or stone chips in thepainted surface must be repairedpromptly. Exposed metal will quicklyrust and may develop into a majorrepair expense.
Bright-Metal Maintenance
• To remove road tar and insects, usea tar remover, not a scraper orother sharp object.
• To protect the surfaces of bright-metal parts from corrosion, apply acoating of wax or chrome preserva-tive and polish to a high luster.
• During winter weather or in coastalareas, cover the bright metal partswith a heavier coating of wax orpreservative. If necessary, coat theparts with non-corrosive petroleumjelly or other protective compound.
Underbody Maintenance
Corrosive materials used for ice andsnow removal and dust control maycollect on the underbody. If thesematerials are not removed, accelerat-ed rusting can occur on underbodyparts such as the fuel lines, frame,floor pan and exhaust system, eventhough they have been provided withrust protection.Thoroughly flush the vehicle under-body and wheel openings with luke-warm or cold water once a month,after off-road driving (for four-wheeldrive vehicles) and at the end of eachwinter. It will do more harm than goodto wet down the road grime withoutremoving it. The lower edges ofdoors, rocker panels, and framemembers have drain holes thatshould not be allowed to clog withdirt; trapped water in these areas cancause rusting.
MAINTENANCE
7-45
✽✽ NOTICEIf your vehicle is damaged andrequires any metal repair orreplacement, be sure the body shopapplies anti-corrosion materials tothe parts repaired or replaced.
BL-ENG (CAN)-7.qxd 7/28/05 5:58 PM Page 45
Aluminum Wheel Maintenance
The aluminum wheels are coatedwith a clear protective finish.• Do not use any abrasive cleaner,
polishing compound, solvent, orwire brushes on aluminum wheels.They may scratch or
damage the finish.• Use only a mild soap or neutral
detergent, and rinse thoroughlywith water. Also, be sure to cleanthe wheels after driving on saltedroads.This helps prevent corrosion.
• Avoid washing the wheels withhigh-speed car wash brushes.
• Do not use any acid detergent Itmay damage and corrode the alu-minum wheels coated with a clearprotective finish.
MAINTENANCE
7-46
CAUTIONAfter washing the vehicle, testthe brakes while driving slowlyto see if they have been affectedby water.
BL-ENG (CAN)-7.qxd 7/28/05 5:58 PM Page 46

INTERIOR CAREInterior General Precautions
Prevent caustic solutions such asperfume and cosmetic oil from con-tacting the dashboard because theymay cause damage or discoloration.If they do contact the dashboard,wipe them off immediately. See theinstructions that follow for the properway to clean vinyl.
Cleaning the Upholstery andInterior Trim
VinylRemove dust and loose dirt fromvinyl with a whisk broom or vacuumcleaner. Clean vinyl surfaces with avinyl cleaner.
FabricRemove dust and loose dirt from fab-ric with a whisk broom or vacuumcleaner. Clean with a mild soap solu-tion recommended for upholstery orcarpets. Remove fresh spots immedi-ately with a fabric spot cleaner. Iffresh spots do not receive immediateattention, the fabric can be stainedand its color can be affected. Also, itsfire-resistant properties can bereduced if the material is not properlymaintained.
Cleaning the Lap/Shoulder BeltWebbing
Clean the belt webbing with any mildsoap solution recommended forcleaning upholstery or carpet. Followthe instructions provided with thesoap. Do not bleach or re-dye thewebbing because this may weaken it.
Cleaning the Interior WindowGlass
If the interior glass surfaces of thevehicle become fogged (that is, cov-ered with an oily, greasy or waxyfilm), they should be cleaned withglass cleaner. Follow the directionson the glass cleaner container.
MAINTENANCE
7-47
CAUTIONUsing anything but recom-mended cleaners and proce-dures may affect the fabric’sappearance and fire-resistantproperties. ✽✽ NOTICE
Do not scrape or scratch the insideof the rear window. This may resultin damage to the rear windowdefroster grid.
BL-ENG (CAN)-7.qxd 7/28/05 5:58 PM Page 47

8-1
SPECIFICATIONS
Specifications . . . . . . . . . . . . . . . . . . . . . . . . . . . . . . . . . . . . 8-2
8
BL-ENG (CAN)-8.qxd 7/28/05 5:59 PM Page 1
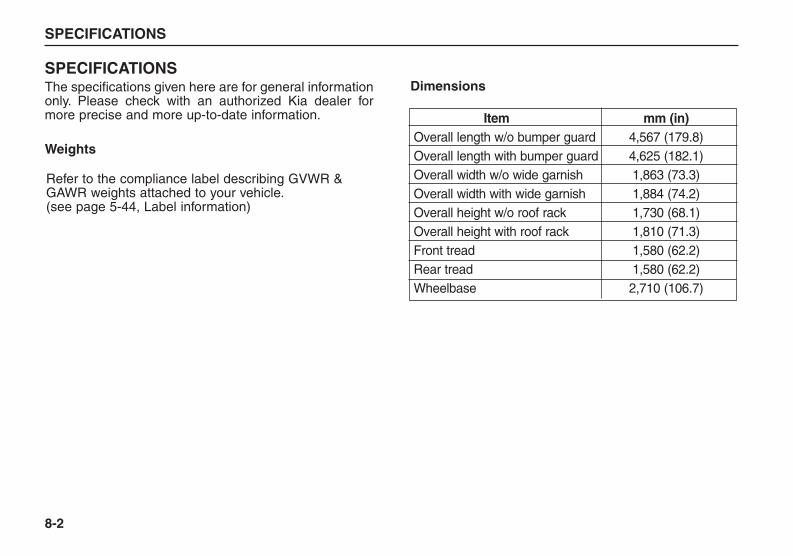
SPECIFICATIONSThe specifications given here are for general informationonly. Please check with an authorized Kia dealer formore precise and more up-to-date information.
SPECIFICATIONS
8-2
Item mm (in)Overall length w/o bumper guard 4,567 (179.8)Overall length with bumper guard 4,625 (182.1)Overall width w/o wide garnish 1,863 (73.3)Overall width with wide garnish 1,884 (74.2)Overall height w/o roof rack 1,730 (68.1)Overall height with roof rack 1,810 (71.3)Front tread 1,580 (62.2)Rear tread 1,580 (62.2)Wheelbase 2,710 (106.7)
Dimensions
Weights
Refer to the compliance label describing GVWR &GAWR weights attached to your vehicle.(see page 5-44, Label information)
BL-ENG (CAN)-8.qxd 7/28/05 5:59 PM Page 2
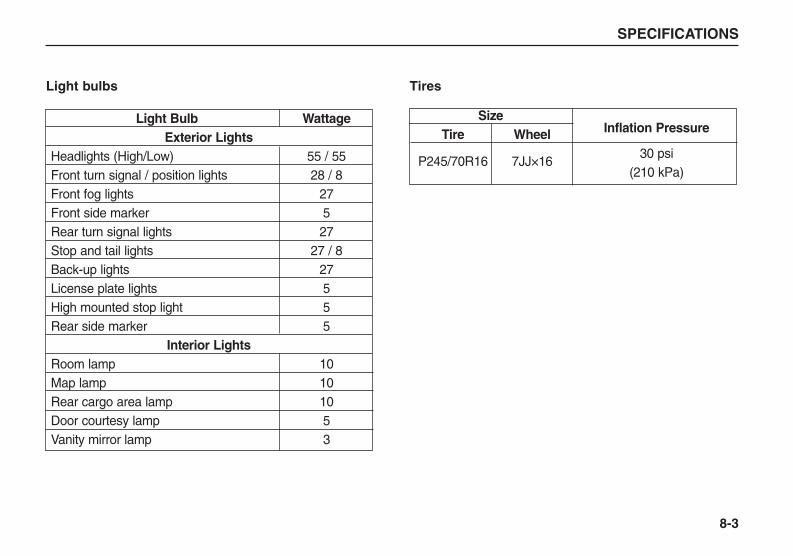
SPECIFICATIONS
8-3
Light bulbs Tires
Light Bulb WattageExterior Lights
Headlights (High/Low) 55 / 55Front turn signal / position lights 28 / 8Front fog lights 27Front side marker 5Rear turn signal lights 27Stop and tail lights 27 / 8Back-up lights 27License plate lights 5High mounted stop light 5Rear side marker 5
Interior LightsRoom lamp 10Map lamp 10Rear cargo area lamp 10Door courtesy lamp 5Vanity mirror lamp 3
SizeTire Wheel Inflation Pressure
P245/70R16 7JJ×1630 psi
(210 kPa)
BL-ENG (CAN)-8.qxd 7/28/05 5:59 PM Page 3

SPECIFICATIONS
8-4
Engine
Electrical System
Capacities
Item Gasoline EngineBoreXStroke 93 mm × 85.8 mm (3.66 in × 3.38 in)Displacement 3496 cc (213.3 cu.in)Compression Ratio 10.0
Size Gasoline Engine
Battery Type MF 70 AHCapacity 12V / 70AH
Alternator 13.5V / 120AStarter 12V-1.2KW
Gap 1.0 mm ~ 1.1 mmSpark Plug
SpecificationPFR5N-11,
RC10PYPB4
Lubricant Volume (l) Classification
Engine oil With filter 4.3 API Service SJ, SL or above,Without filter 4.0 ILSAC GF-3 or above
A/T30-40LEi 11.5 MOBIL D-II
Transmission A5SR1 10.0 APOLLOIL ATF RED-1oil
M/T2WD 3.2 API SERVICE GL-4 4WD 2.7 SAE 75W-85 (fill for-life)
Coolant 11.0Ethylene glycol base
for aluminum radiator
Brake fluid 0.35 SAE J1703, FMVSS116DOT-3 or DOT-4
Fuel 80 -
BL-ENG (CAN)-8.qxd 7/28/05 5:59 PM Page 4

9-1
INDEX
9
Index . . . . . . . . . . . . . . . . . . . . . . . . . . . . . . . . . . . . . . . . . . . . 9-2
BL-ENG (CAN)-9.qxd 7/28/05 5:59 PM Page 1
Air Bag - Supplemental Restraint System . . . . . 3-44Air Cleaner . . . . . . . . . . . . . . . . . . . . . . . . . . . . . 7-20Antenna . . . . . . . . . . . . . . . . . . . . . . . . . . . . . . . 3-86Automatic Climate Control System . . . . . . . . . . . 4-79Automatic Transmission . . . . . . . . . . . . . . . . . . . . 4-9Automatic Transmission . . . . . . . . . . . . . . . . . . . 7-17
Battery . . . . . . . . . . . . . . . . . . . . . . . . . . . . . . . 7-23Brake System . . . . . . . . . . . . . . . . . . . . . . . . . . . 4-30Brakes and Clutch . . . . . . . . . . . . . . . . . . . . . . . 7-14Bulb Replacement . . . . . . . . . . . . . . . . . . . . . . . 7-33
Cruise Control . . . . . . . . . . . . . . . . . . . . . . . . . . 4-38Cup Holder . . . . . . . . . . . . . . . . . . . . . . . . . . . . . 3-78
Defroster . . . . . . . . . . . . . . . . . . . . . . . . . . . . . . 4-65Door Locks . . . . . . . . . . . . . . . . . . . . . . . . . . . . . . 3-5
Electrical Circuit Protection . . . . . . . . . . . . . . . . . 6-7Electrical Power Outlet . . . . . . . . . . . . . . . . . . . . 3-82Emergency Starting . . . . . . . . . . . . . . . . . . . . . . . 6-4Emission Control System . . . . . . . . . . . . . . . . . . . 5-3Engine Compartment . . . . . . . . . . . . . . . . . . . . . . 7-8
Engine Cooling System . . . . . . . . . . . . . . . . . . . 7-11Engine Oil and Oil Filter . . . . . . . . . . . . . . . . . . . . 7-9Exterior Care . . . . . . . . . . . . . . . . . . . . . . . . . . . 7-43
Four Wheel Drive(4WD) . . . . . . . . . . . . . . . . . . . 4-20Front Seat . . . . . . . . . . . . . . . . . . . . . . . . . . . . . 3-13Fuel Filler Lid . . . . . . . . . . . . . . . . . . . . . . . . . . . 3-70Fuel Requirements . . . . . . . . . . . . . . . . . . . . . . . . 5-2
Gauges . . . . . . . . . . . . . . . . . . . . . . . . . . . . . . . 4-43
Hazard Warning Flasher . . . . . . . . . . . . . . . . . . 4-66Hood . . . . . . . . . . . . . . . . . . . . . . . . . . . . . . . . . 3-69How to Use This Manual . . . . . . . . . . . . . . . . . . . .1-2
If You Have a Flat Tire . . . . . . . . . . . . . . . . . . . . 6-19Ignition Switch . . . . . . . . . . . . . . . . . . . . . . . . . . . 4-2Immobilizer System . . . . . . . . . . . . . . . . . . . . . . . 3-3Instrument Cluster . . . . . . . . . . . . . . . . . . . . . . . 4-41Instrument Panel Overview . . . . . . . . . . . . . . . . . . 2-3Interior and Exterior Overview . . . . . . . . . . . . . . . 2-2Interior Care . . . . . . . . . . . . . . . . . . . . . . . . . . . . 7-47Interior Features . . . . . . . . . . . . . . . . . . . . . . . . . 4-67Interior Lights . . . . . . . . . . . . . . . . . . . . . . . . . . . 3-76
INDEX
9-2
BL-ENG (CAN)-9.qxd 7/28/05 5:59 PM Page 2

Keys . . . . . . . . . . . . . . . . . . . . . . . . . . . . . . . . . . 3-2
Label Information . . . . . . . . . . . . . . . . . . . . . . . . 5-41 Lighting . . . . . . . . . . . . . . . . . . . . . . . . . . . . . . . 4-58Limited Slip Differential . . . . . . . . . . . . . . . . . . . . 4-30Lubricant Specifications . . . . . . . . . . . . . . . . . . . 7-41Lubricants and Fluids . . . . . . . . . . . . . . . . . . . . . 7-19Luggage center box . . . . . . . . . . . . . . . . . . . . . . 3-88Luggage Net . . . . . . . . . . . . . . . . . . . . . . . . . . . 3-86
Maintenance Schedule . . . . . . . . . . . . . . . . . . . . 7-3Maintenance Services . . . . . . . . . . . . . . . . . . . . . 7-2Manual Climate Control System . . . . . . . . . . . . . 4-71Manual Transmission . . . . . . . . . . . . . . . . . . . . . . 4-7Mirrors . . . . . . . . . . . . . . . . . . . . . . . . . . . . . . . . 3-74Multi-Meter . . . . . . . . . . . . . . . . . . . . . . . . . . . . . 4-52
Overheating . . . . . . . . . . . . . . . . . . . . . . . . . . . . 6-3Overloading . . . . . . . . . . . . . . . . . . . . . . . . . . . . 5-43Owner Maintenance . . . . . . . . . . . . . . . . . . . . . . . 7-7
Parking Brake . . . . . . . . . . . . . . . . . . . . . . . . . . 7-15Power Steering . . . . . . . . . . . . . . . . . . . . . . . . . . 4-37Power Steering . . . . . . . . . . . . . . . . . . . . . . . . . . 7-16
Rear Hatch . . . . . . . . . . . . . . . . . . . . . . . . . . . . 3-67Rear Seat . . . . . . . . . . . . . . . . . . . . . . . . . . . . . . 3-21Road Warning . . . . . . . . . . . . . . . . . . . . . . . . . . . 6-2Roof Rack . . . . . . . . . . . . . . . . . . . . . . . . . . . . . 3-89
Safety Belts . . . . . . . . . . . . . . . . . . . . . . . . . . . . 3-25Special Driving Conditions . . . . . . . . . . . . . . . . . . 5-8Specifications . . . . . . . . . . . . . . . . . . . . . . . . . . . . 8-2Starting the Gasoline Engine . . . . . . . . . . . . . . . . 4-4Steering Wheel . . . . . . . . . . . . . . . . . . . . . . . . . . 3-72Storage Compartment . . . . . . . . . . . . . . . . . . . . 3-80Suggestions for Economical Operation . . . . . . . . . 5-6Sunglass Holder . . . . . . . . . . . . . . . . . . . . . . . . . 3-79Sunroof . . . . . . . . . . . . . . . . . . . . . . . . . . . . . . . 3-83
Tips on Driving Your Vehicle . . . . . . . . . . . . . . . . . 5-5Tires and Wheels . . . . . . . . . . . . . . . . . . . . . . . . 7-26Tonneau cover . . . . . . . . . . . . . . . . . . . . . . . . . . 3-87Towing . . . . . . . . . . . . . . . . . . . . . . . . . . . . . . . . 6-13Trailer Towing . . . . . . . . . . . . . . . . . . . . . . . . . . . 5-34
Using Four-Wheel Drive . . . . . . . . . . . . . . . . . . . 5-14
INDEX
9-3
BL-ENG (CAN)-9.qxd 7/28/05 5:59 PM Page 3
Vehicle Break-In Process . . . . . . . . . . . . . . . . . . .1-3Vehicle Handling Instruction . . . . . . . . . . . . . . . . . .1-3
Warnings and Indicators . . . . . . . . . . . . . . . . . . 4-45Weight of the Vehicle - with and without a trailer .. 5-32Windows . . . . . . . . . . . . . . . . . . . . . . . . . . . . . . 3-10Windshield Defrosting and Defogging
(Automatic type) . . . . . . . . . . . . . . . . . . . . . . . 4-88 Windshield Defrosting and Defogging
(Manual type) . . . . . . . . . . . . . . . . . . . . . . . . . 4-86Wiper Blades . . . . . . . . . . . . . . . . . . . . . . . . . . . 7-21Wipers and Washers . . . . . . . . . . . . . . . . . . . . . 4-62
INDEX
9-4
BL-ENG (CAN)-9.qxd 7/28/05 5:59 PM Page 4