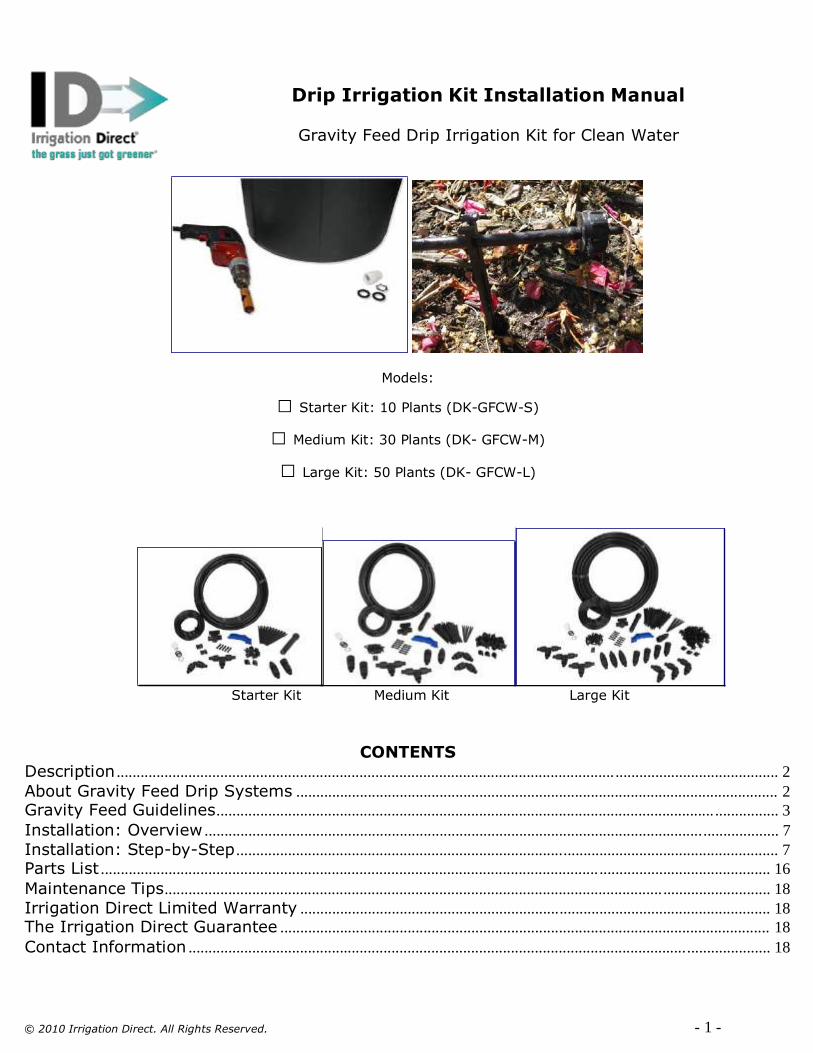
drip irrigation kit instruction manual gravity feed drip...about gravity feed drip systems drip...
TRANSCRIPT
- 1 - © 2010 Irrigation Direct. All Rights Reserved.
Drip Irrigation Kit Installation Manual
Gravity Feed Drip Irrigation Kit for Clean Water
Models:
□ Starter Kit: 10 Plants (DK-GFCW-S)
□ Medium Kit: 30 Plants (DK- GFCW-M)
□ Large Kit: 50 Plants (DK- GFCW-L)
Starter Kit Medium Kit Large Kit
CONTENTS Description ............................................................................................................................. ......................................... 2
About Gravity Feed Drip Systems ......................................................................................................................... 2
Gravity Feed Guidelines............................................................................................................................. ................ 3
Installation: Overview ................................................................................................................................................ 7
Installation: Step-by-Step ........................................................................................................................................ 7
Parts List ............................................................................................................................. ........................................... 16
Maintenance Tips............................................................................................................................. ........................... 18
Irrigation Direct Limited Warranty ...................................................................................................................... 18
The Irrigation Direct Guarantee ........................................................................................................................... 18
Contact Information .................................................................................................................................................. 18
- 2 - © 2010 Irrigation Direct. All Rights Reserved.
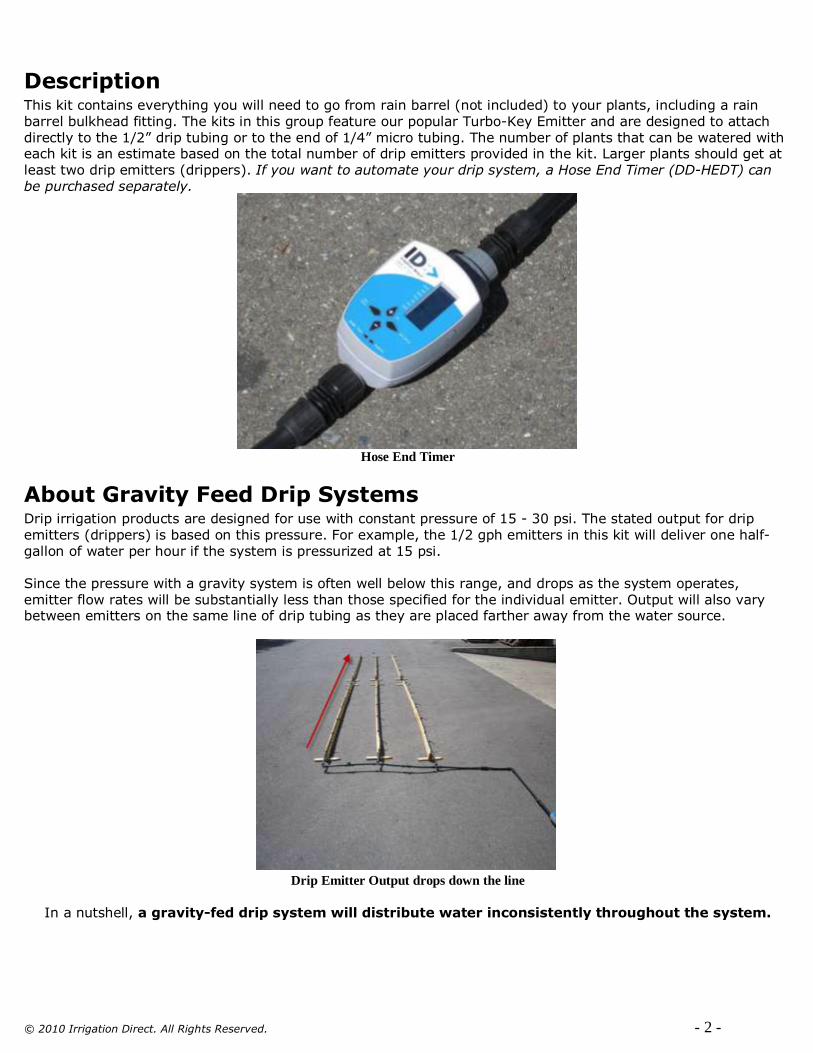
Description This kit contains everything you will need to go from rain barrel (not included) to your plants, including a rain barrel bulkhead fitting. The kits in this group feature our popular Turbo-Key Emitter and are designed to attach directly to the 1/2” drip tubing or to the end of 1/4” micro tubing. The number of plants that can be watered with each kit is an estimate based on the total number of drip emitters provided in the kit. Larger plants should get at least two drip emitters (drippers). If you want to automate your drip system, a Hose End Timer (DD-HEDT) can be purchased separately.
Hose End Timer
About Gravity Feed Drip Systems Drip irrigation products are designed for use with constant pressure of 15 - 30 psi. The stated output for drip emitters (drippers) is based on this pressure. For example, the 1/2 gph emitters in this kit will deliver one half- gallon of water per hour if the system is pressurized at 15 psi.
Since the pressure with a gravity system is often well below this range, and drops as the system operates, emitter flow rates will be substantially less than those specified for the individual emitter. Output will also vary between emitters on the same line of drip tubing as they are placed farther away from the water source.
Drip Emitter Output drops down the line
In a nutshell, a gravity-fed drip system will distribute water inconsistently throughout the system.
- 3 - © 2010 Irrigation Direct. All Rights Reserved.
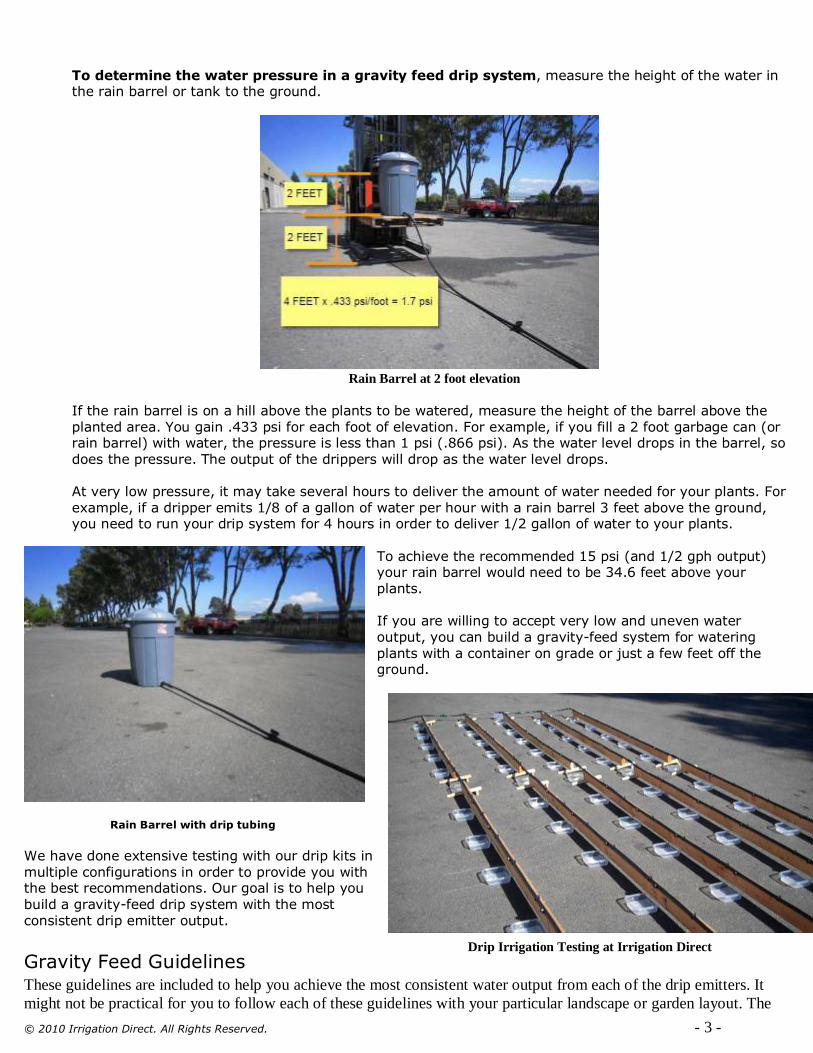
To determine the water pressure in a gravity feed drip system, measure the height of the water in the rain barrel or tank to the ground.
Rain Barrel at 2 foot elevation
If the rain barrel is on a hill above the plants to be watered, measure the height of the barrel above the planted area. You gain .433 psi for each foot of elevation. For example, if you fill a 2 foot garbage can (or rain barrel) with water, the pressure is less than 1 psi (.866 psi). As the water level drops in the barrel, so
does the pressure. The output of the drippers will drop as the water level drops.
At very low pressure, it may take several hours to deliver the amount of water needed for your plants. For example, if a dripper emits 1/8 of a gallon of water per hour with a rain barrel 3 feet above the ground, you need to run your drip system for 4 hours in order to deliver 1/2 gallon of water to your plants.
To achieve the recommended 15 psi (and 1/2 gph output) your rain barrel would need to be 34.6 feet above your plants.
If you are willing to accept very low and uneven water output, you can build a gravity-feed system for watering plants with a container on grade or just a few feet off the ground.
Rain Barrel with drip tubing
We have done extensive testing with our drip kits in
multiple configurations in order to provide you with the best recommendations. Our goal is to help you build a gravity-feed drip system with the most consistent drip emitter output.
Gravity Feed Guidelines
Drip Irrigation Testing at Irrigation Direct
These guidelines are included to help you achieve the most consistent water output from each of the drip emitters. It
might not be practical for you to follow each of these guidelines with your particular landscape or garden layout. The

- 4 - © 2010 Irrigation Direct. All Rights Reserved.
more of these guidelines that you incorporate into the design of your gravity feed drip system, the more consistent drip
emitter output you will achieve.
1. Emitter output drops off down the line as you move farther away from the supply line. The graph
below shows the emitter output for a single line of 1/2 gph drippers (DD-TTE5) attached to a rain barrel
(Starter Kit). In this example, the rain barrel is installed 2 ft above the ground and filled with 2 ft of water. Ten drip emitters were spaced every 24 inches along the 1/2” drip tubing (20 feet total). As you can see below, the individual emitter output decreases toward the end of the drip tubing.
Single 20 foot length of drip tubing - Mainline attached at end
2. Use short drip tubing runs & a grid layout. You will get better results with grid layouts of short tubing
lengths (20 ft or less) than with a long snaking drip tube.
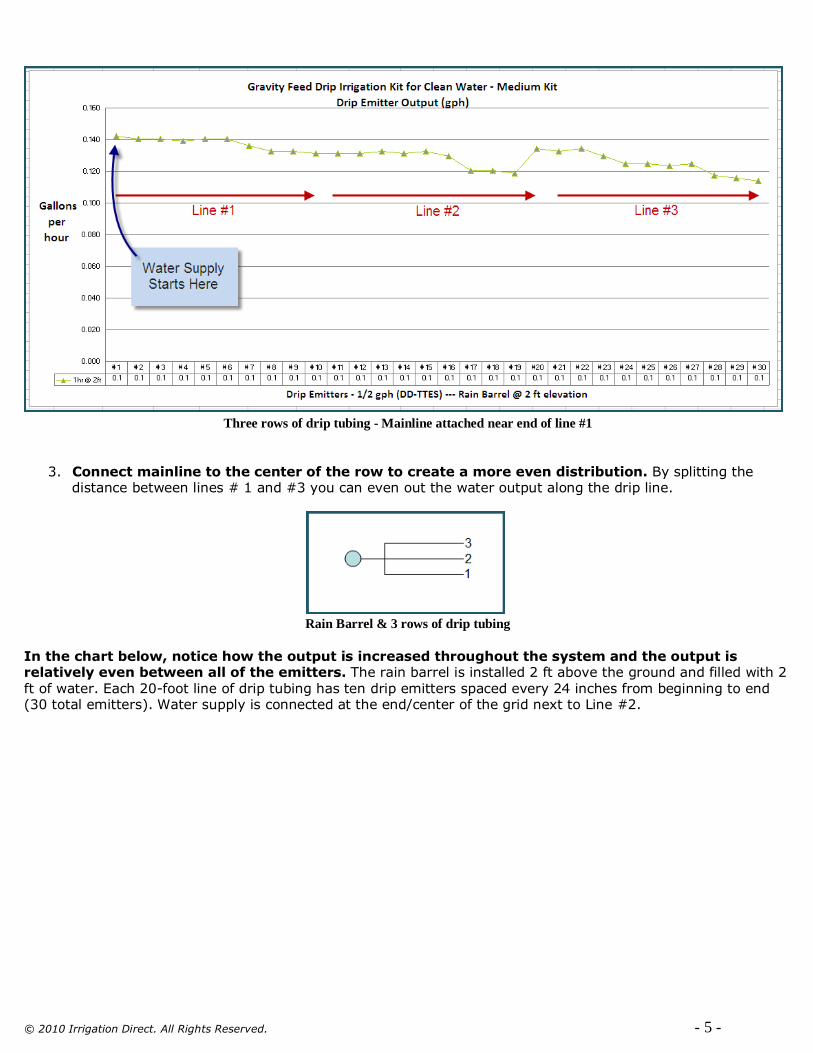
Blue circles are rain barrels
The chart below shows how the installation of short rows will reduce emitter output variance. This example results for three 20-foot rows. The rain barrel is installed 2 ft above the ground and filled with 2 ft of water. Each 20-foot line of drip tubing has ten drip emitters spaced every 24 inches from beginning to end (30 total emitters). Water supply is connected next to Line #1. If the total distance was covered by a single “snaking’ line of drip tubing, you would see a large drop in water output between the first and last emitter on the line (like the graph above).
- 5 - © 2010 Irrigation Direct. All Rights Reserved.
Three rows of drip tubing - Mainline attached near end of line #1
3. Connect mainline to the center of the row to create a more even distribution. By splitting the
distance between lines # 1 and #3 you can even out the water output along the drip line.
Rain Barrel & 3 rows of drip tubing
In the chart below, notice how the output is increased throughout the system and the output is relatively even between all of the emitters. The rain barrel is installed 2 ft above the ground and filled with 2 ft of water. Each 20-foot line of drip tubing has ten drip emitters spaced every 24 inches from beginning to end (30 total emitters). Water supply is connected at the end/center of the grid next to Line #2.
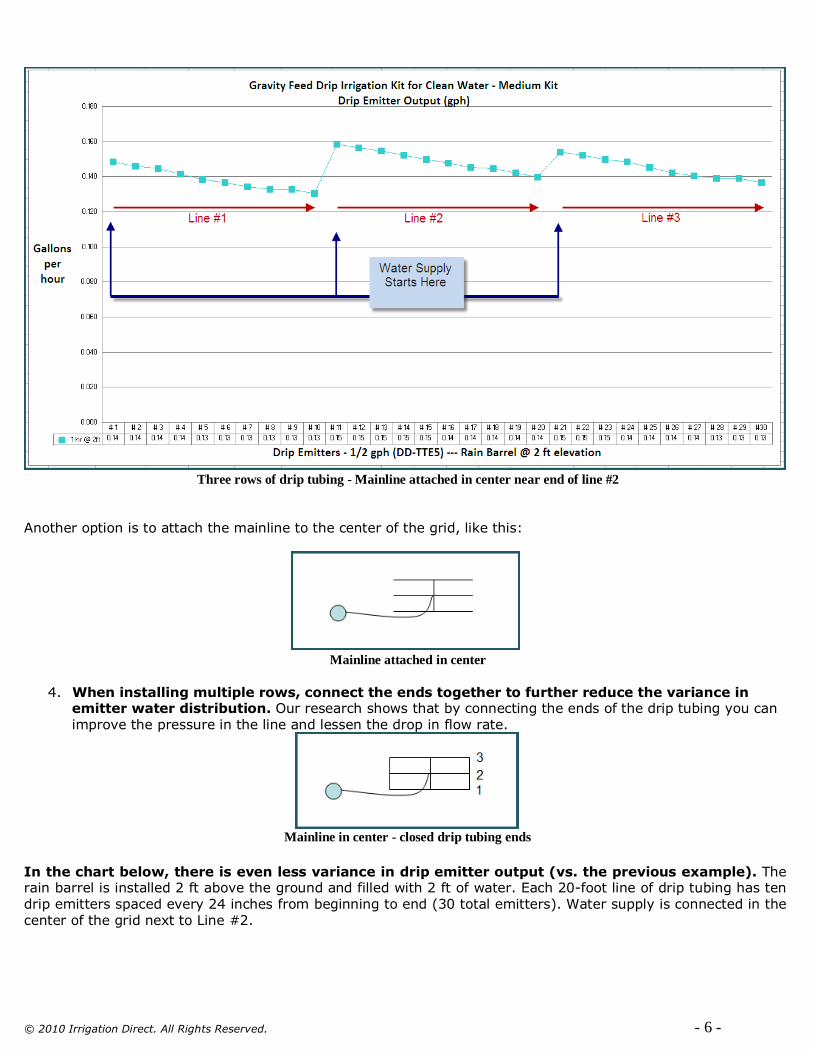
- 6 - © 2010 Irrigation Direct. All Rights Reserved.
Three rows of drip tubing - Mainline attached in center near end of line #2
Another option is to attach the mainline to the center of the grid, like this:
Mainline attached in center
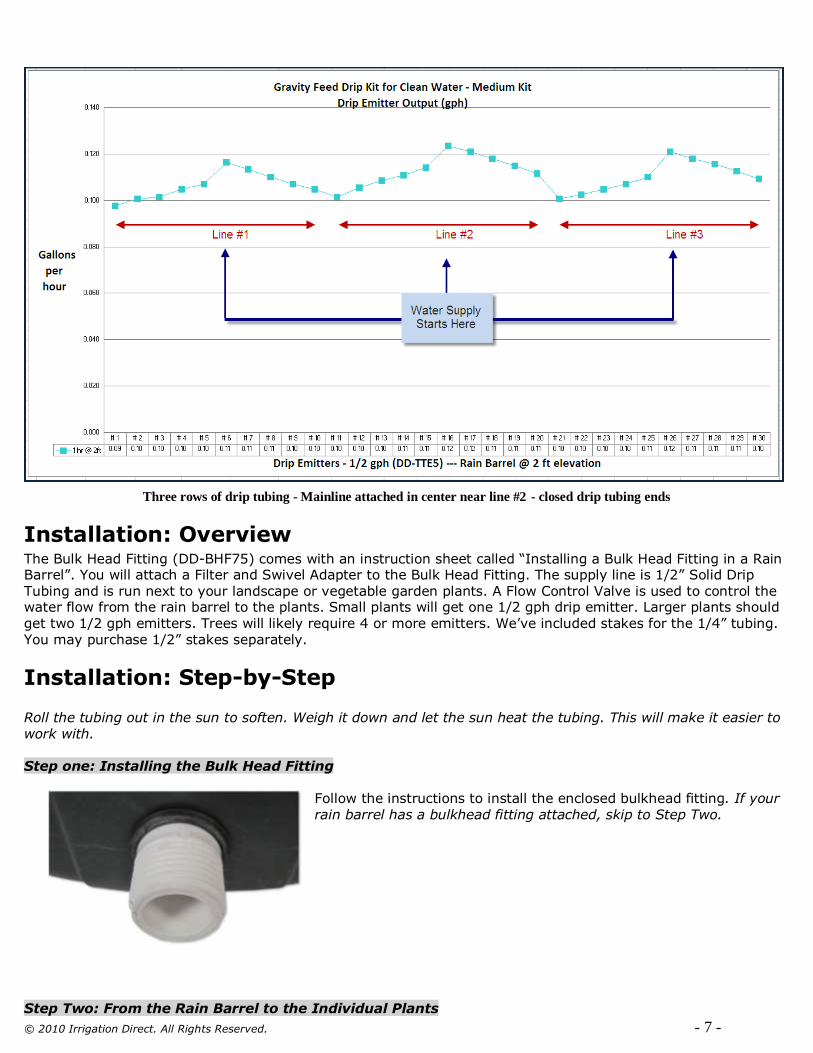
4. When installing multiple rows, connect the ends together to further reduce the variance in
emitter water distribution. Our research shows that by connecting the ends of the drip tubing you can improve the pressure in the line and lessen the drop in flow rate.
Mainline in center - closed drip tubing ends
In the chart below, there is even less variance in drip emitter output (vs. the previous example). The rain barrel is installed 2 ft above the ground and filled with 2 ft of water. Each 20-foot line of drip tubing has ten drip emitters spaced every 24 inches from beginning to end (30 total emitters). Water supply is connected in the center of the grid next to Line #2.
- 7 - © 2010 Irrigation Direct. All Rights Reserved.
Three rows of drip tubing - Mainline attached in center near line #2 - closed drip tubing ends
Installation: Overview The Bulk Head Fitting (DD-BHF75) comes with an instruction sheet called “Installing a Bulk Head Fitting in a Rain Barrel”. You will attach a Filter and Swivel Adapter to the Bulk Head Fitting. The supply line is 1/2” Solid Drip Tubing and is run next to your landscape or vegetable garden plants. A Flow Control Valve is used to control the water flow from the rain barrel to the plants. Small plants will get one 1/2 gph drip emitter. Larger plants should get two 1/2 gph emitters. Trees will likely require 4 or more emitters. We’ve included stakes for the 1/4” tubing. You may purchase 1/2” stakes separately.
Installation: Step-by-Step
Roll the tubing out in the sun to soften. Weigh it down and let the sun heat the tubing. This will make it easier to work with.
Step one: Installing the Bulk Head Fitting
Follow the instructions to install the enclosed bulkhead fitting. If your rain barrel has a bulkhead fitting attached, skip to Step Two.
Step Two: From the Rain Barrel to the Individual Plants

- 8 - © 2010 Irrigation Direct. All Rights Reserved.
1. Attach the Hose Inline Filter (DD-HIF75) to the male hose threads of the bulkhead fitting.
2. Screw the Direct-Loc Swivel Adapter (DL-FHS600) onto the hose inline filter.
3. Attach 1/2” Drip Tubing (DD-DH700) to the 1/2” swivel adapter and run it to your plants. It’s a good
idea to run it as close to each plant as possible. Layout tips: Read the Gravity Feed Guidelines above for tips on laying out your drip system for best dripper performance.
4. Add the 1/2” Flow Control Valve (DD-FCV-700) in a convenient location after the swivel adapter. This is the “on/off switch” for your gravity-fed drip system. Just cut the 700 poly tubing and insert the flow
control valve like a coupler (see below).

- 9 - © 2010 Irrigation Direct. All Rights Reserved.
5. Use 1/2” Direct-Loc Tees (DL-T600), Couplers (DL-C600), and Elbows (DL-L600) to create lateral lines and watering grids as needed.
- 10 - © 2010 Irrigation Direct. All Rights Reserved.
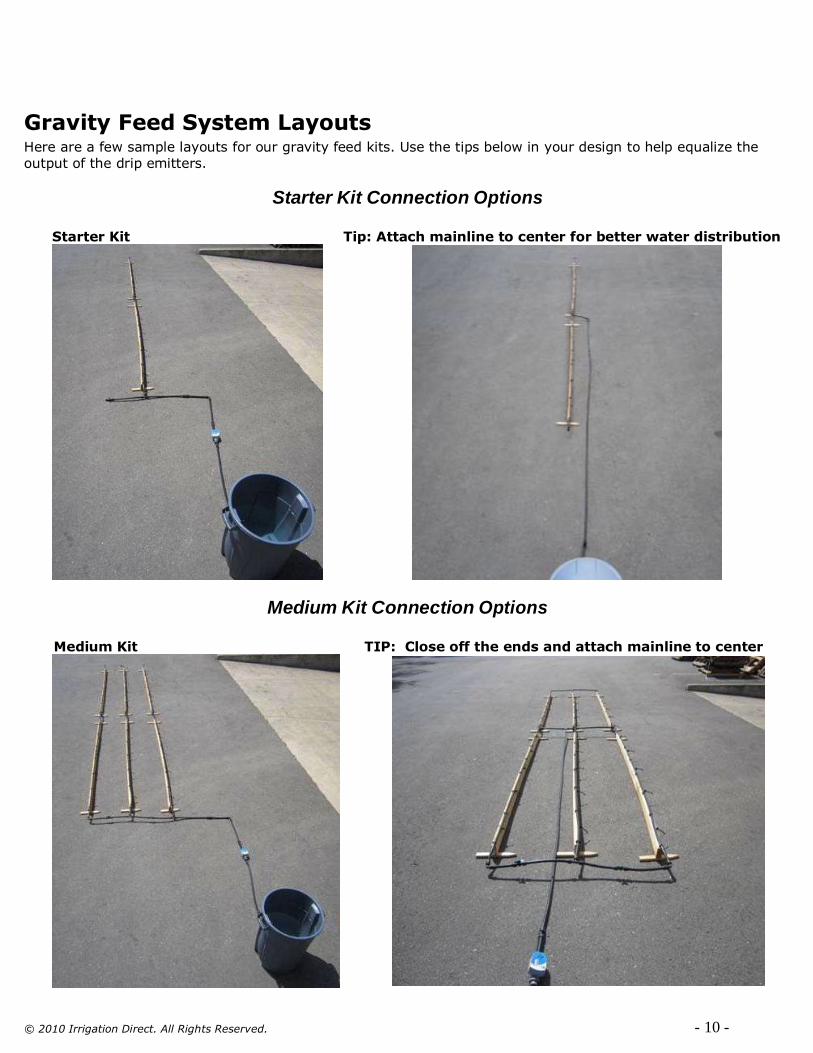
Gravity Feed System Layouts Here are a few sample layouts for our gravity feed kits. Use the tips below in your design to help equalize the
output of the drip emitters.
Starter Kit Connection Options
Starter Kit Tip: Attach mainline to center for better water distribution
Medium Kit Connection Options
Medium Kit TIP: Close off the ends and attach mainline to center
- 11 - © 2010 Irrigation Direct. All Rights Reserved.
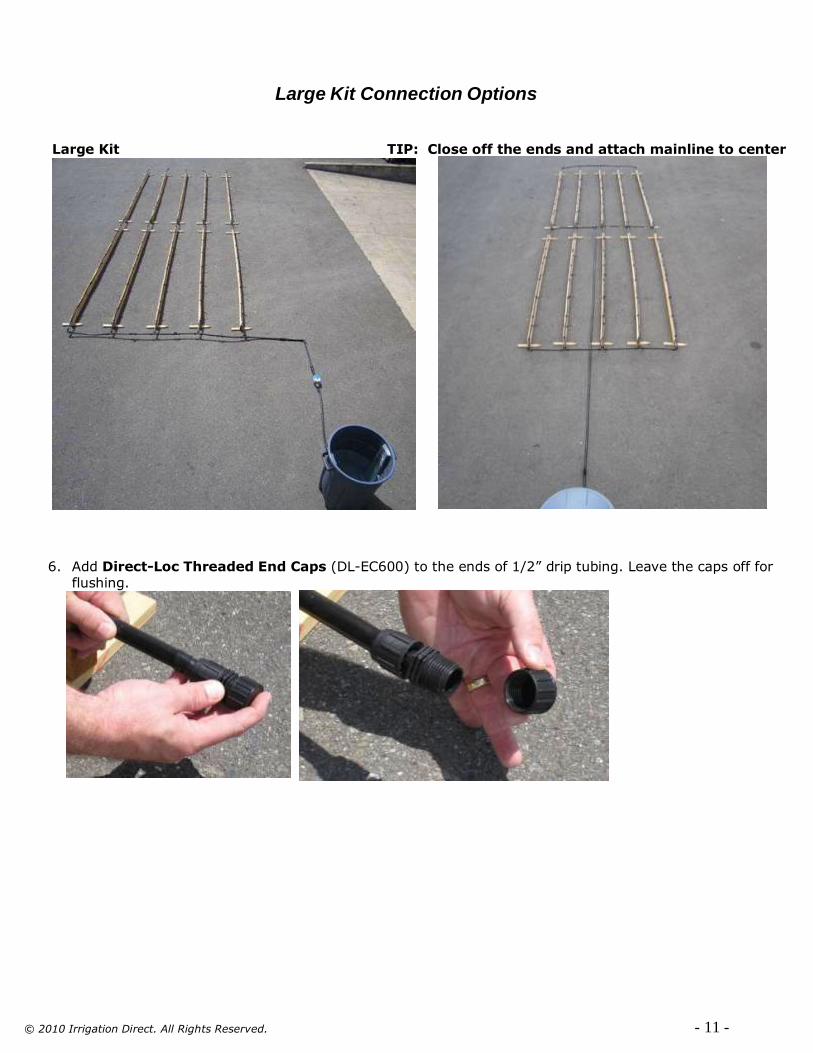
Large Kit Connection Options
Large Kit TIP: Close off the ends and attach mainline to center
6. Add Direct-Loc Threaded End Caps (DL-EC600) to the ends of 1/2” drip tubing. Leave the caps off for flushing.

- 12 - © 2010 Irrigation Direct. All Rights Reserved.
7. Open the Flow Control Valve to turn on the water and FLUSH THE LINE until all lines are clear of debris. Replace the 1/2” threaded end caps at the ends of the 1/2” drip tubing.
Step Three: Installing Drip Emitters
1. At each plant use the Deluxe Hole Punch (DD-HP250) to poke a hole in the 1/2” tubing.
2. Insert the Turbo-Key Drip Emitter - 1/2 gph (DD-TTE5) directly into the 1/2” tubing.

- 13 - © 2010 Irrigation Direct. All Rights Reserved.
3. If the plant is not next to the 1/2” tubing, insert a 1/4” Connector (DD-C250) into the 1/2” tubing.
Add a piece of 1/4” solid micro tubing (DD-DH250) to run from the connector to the plant.
Cut the tubing with scissors and push the Turbo-Key Emitter (DD-TTE5) into the open end of the 1/4” tubing.

- 14 - © 2010 Irrigation Direct. All Rights Reserved.
Stake it next to the plant with a Micro Tubing Stake (DD-S2).
4. Turn on your system and check each emitter for water output. Remember that some inconsistency of dripper output is to be expected with a gravity-fed drip system.

- 15 - © 2010 Irrigation Direct. All Rights Reserved.
• Goof Plugs (DD-GP) are used to plug holes in 1/2" drip poly tubing or cap off 1/4" micro tubing.
• The Direct-Loc Coupling (DL-C600) can be used to connect 1/2" solid drip tubing or for repairs in 1/2”
tubing that goof plugs can’t handle.

- 16 - © 2010 Irrigation Direct. All Rights Reserved.
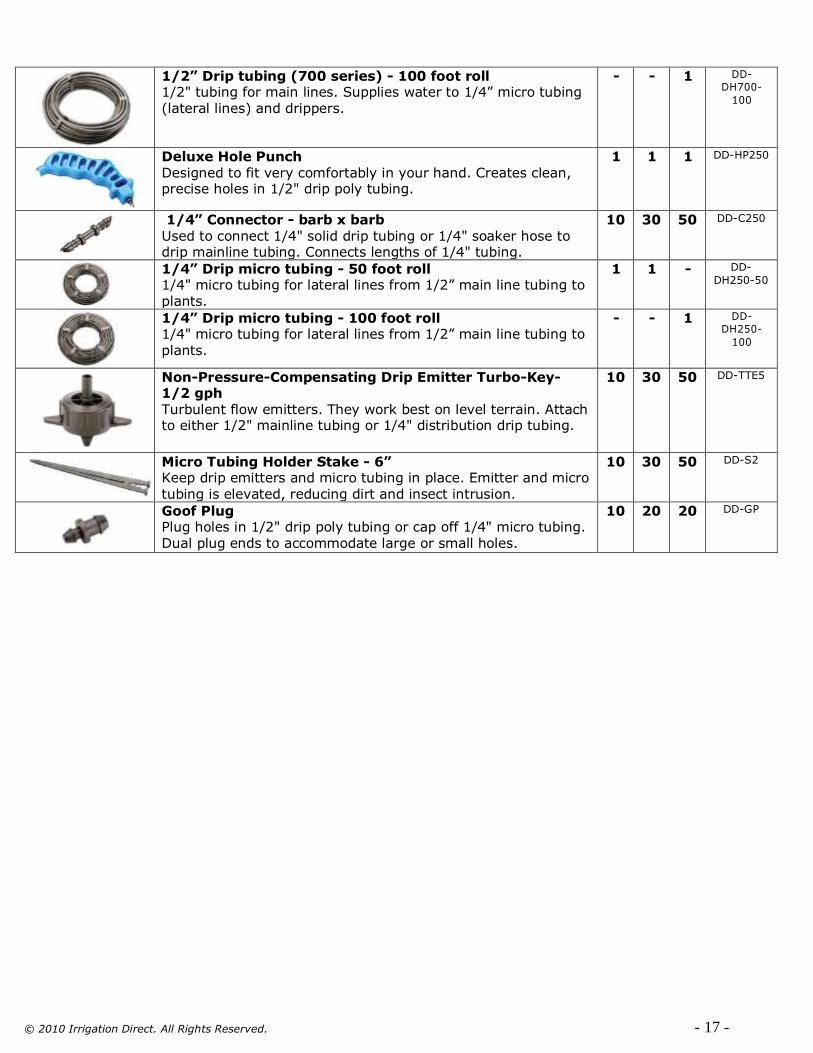
Parts List
ITEM Quantity PART # S M L
Bulk Head Fitting
Provides a threaded connection from the rain barrel (bucket) to your gravity feed drip irrigation kit. Requires a 7/8” hole saw (not included). Installation instructions included.
1 1 1 DD-BHF75
Hose Inline Filter
Installed between the hose vacuum breaker and the drip regulator. Protects drip emitters from impurities that may clog
them.
1 1 1 DD-HIF75
Direct-Loc Swivel Adapter with hose threads Connects 1/2" drip tubing to faucet, spigot, hose bibb.
Connects to 3/4" male hose threads. Screws onto a drip
regulator. Convenient removable fitting.
1 1 1 DL-
FHS600
Direct-Loc Tee Used to branch off and create lateral lines off of mainline drip
tubing. Convenient removable fitting.
1 2 4 DL-T600
Direct-Loc Coupling
Used to connect 1/2" solid drip tubing or for repairs in 1/2” tubing that goof plugs can’t handle. Convenient removable
fitting.
1 2 3 DL-C600
Direct-Loc Elbow
Used to make 90 degree turns in 1/2" drip tubing. Convenient removable fitting.
1 2 3 DL-L600
1/2” Flow Control Valve Adjust or stop the flow of water through 1/2" drip mainline tubing. Handy when isolating irrigated sections.
1 1 1 DD- FCV700
Direct-Loc Threaded End Cap Caps off the ends of 1/2” drip tubing. Threaded Cap allows for easy flushing and draining in winter. Convenient removable
fitting.
1 2 4 DL-EC600
1/2” Drip tubing (700 series) - 50 foot roll
1/2" tubing for main lines. Supplies water to 1/4” micro tubing
(lateral lines) and drippers.
1 1 DD- DH700-50
- 17 - © 2010 Irrigation Direct. All Rights Reserved.
1/2” Drip tubing (700 series) - 100 foot roll
1/2" tubing for main lines. Supplies water to 1/4” micro tubing (lateral lines) and drippers.
- - 1 DD- DH700-
100
Deluxe Hole Punch
Designed to fit very comfortably in your hand. Creates clean, precise holes in 1/2" drip poly tubing.
1 1 1 DD-HP250
1/4” Connector - barb x barb
Used to connect 1/4" solid drip tubing or 1/4" soaker hose to drip mainline tubing. Connects lengths of 1/4" tubing.
10 30 50 DD-C250
1/4” Drip micro tubing - 50 foot roll
1/4" micro tubing for lateral lines from 1/2” main line tubing to plants.
1 1 - DD-
DH250-50
1/4” Drip micro tubing - 100 foot roll
1/4" micro tubing for lateral lines from 1/2” main line tubing to
plants.
- - 1 DD- DH250-
100
Non-Pressure-Compensating Drip Emitter Turbo-Key-
1/2 gph
Turbulent flow emitters. They work best on level terrain. Attach to either 1/2" mainline tubing or 1/4" distribution drip tubing.
10 30 50 DD-TTE5
Micro Tubing Holder Stake - 6”
Keep drip emitters and micro tubing in place. Emitter and micro tubing is elevated, reducing dirt and insect intrusion.
10 30 50 DD-S2
Goof Plug
Plug holes in 1/2" drip poly tubing or cap off 1/4" micro tubing. Dual plug ends to accommodate large or small holes.
10 20 20 DD-GP
- 18 - © 2010 Irrigation Direct. All Rights Reserved.
Maintenance Tips WINTERIZING If you live where it freezes, it is a good idea to drain the water from your drip lines and the components connected to the water source. Here’s how:
1. Turn off the hose bibb. 2. If you have a hose-end timer installed, let the system run through a watering cycle. This will open the
timer and let any remaining water drain out of the timer and other components & into the drip tubing.
3. If you do not have a timer installed, unscrew the drip system from the hose bibb for a few minutes to let air into the line. Reattach the line after a minute or two.
4. Note: We do not recommend blowing compressed air though a drip system.
FLUSH THE LINE ANUALLY Since drip systems operate at low pressures, sediment can settle in the line over time.
1. Flush the line annually by unscrewing the end cap at the end of the line.
2. Check filter screen for debris and clean if necessary.
3. Turn on the hose bibb until the water runs clear from the end of the line.
4. Replace the cap. 5. Turn on the hose bibb and check the entire system for leaks.
REPAIR BREAKS & LEAKS 1. Small holes in the line can be plugged with a goof plug. 2. For larger breaks or holes in the 1/4” drip tubing, make a clean cut around the damaged area and
reconnect the lines with a 1/4” barbed connector (DD-C250) purchased separately.
3. For larger breaks or holes in the 1/2” drip tubing, make a clean cut around the damaged area and reconnect the lines with a 1/2” Direct-Loc coupling (DL-C600).
DRIP IRRIGATION TUTORIALS Visit our website for more tips, tricks, and expert advice
Irrigation Direct Limited Warranty
Irrigation Direct warrants to the original purchaser that the Irrigation Direct Product(s) is/are free from defects in material and workmanship under normal use and service. The warranty coverage lasts for a period of three (3) years starting from the date of purchase. For details visit the warranty page on our website.
The Irrigation Direct Guarantee
Our 100% satisfaction guarantee ensures that every item you purchase at Irrigation Direct meets your high standards—or you can return it for a replacement or refund. We want you to buy with confidence anytime you purchase products on the Irrigation Direct website. If you're ever dissatisfied with an item, contact us to return or exchange it.