dreamweaver cs4 – day 2 creating a website using … beyond...dreamweaver cs4 – day 2 creating a...
TRANSCRIPT
Dreamweaver CS4 – Day 2
Creating a Website using Div Tags, CSS, and Templates
What is a DIV tag? First, let’s recall that HTML is a “markup language.” Markup provides structure and order to a page. For example, the <p> tag breaks text up into paragraph blocks, the <h1> tag indicates a level 1 header, the <a> tag creates an anchor or link, and so on. Another markup tag of great importance is the <div> tag. A “div” divides a document into logical sections. What is CSS? A cascading style sheet (CSS) is a set of rules that define the appearance of a single web page or an entire website. When you create a style sheet, you specify rules to control the appearance of elements on your page, such as table width, link colors, page margins, and fonts. Style sheets give you more control over the appearance of your page and allow changes to be applied consistently across your site. Combining DIVs and CSS Creating a website using div tags and CSS helps keep a page’s structure separate from its appearance. This is an important principle of modern web design because it simplifies the design process and facilitates subsequent formatting modifications. It also allows for maximum flexibility in how your pages can be displayed and on what technologies. Remember: your page should make sense without CSS! Dreamweaver Templates (adapted from the Dreamweaver documentation) Templates enable web designers to control which page elements users--such as writers, graphic artists, or other web developers--can edit. One of the most powerful uses of templates is the ability to update multiple pages at once. A document that is created from a template remains connected to that template (unless you detach the document later). You can modify a template and immediately update the design in all documents based on it. Agenda
Define a new website. Create a new XHTML page. Mark up the page using div tags, one for each of the four primary areas of the page:
header, navigation, content, and footer. Modify the appearance of the page by linking to a cascading style sheet and modifying
some of its formatting rules. Save the page as a Dreamweaver Template. Use the template to create pages for our website. Publish the site to a web server. Modify the site and re-publish to the server
. Build the page structure or framework using div tags
U:\On-site\FCampana\dreamweaver8\Dreamweaver Beyond the basics_cs4.doc Page 2 of 21 © Computer Training & Support Services, Colorado State University
The first thing we need to do is create the div tags that will divide the content on our page. For training purposes, we will be using four main div tags. Keep in mind that websites can contain any number of div tags and/or nested div tags. The div tags we will create are:
header (will hold two graphic logos) content (will hold the main page content) navigation (will hold page navigation links) footer (will hold footer information)
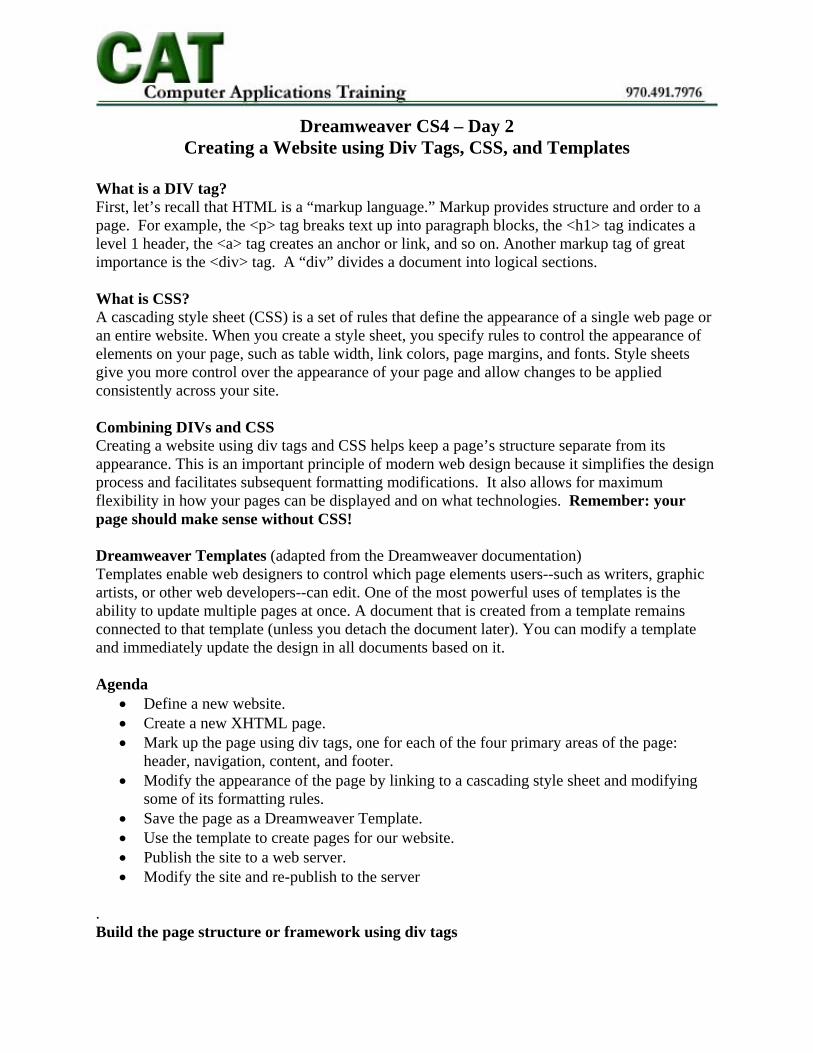
Div tags can be inserted in several ways. One method is to insert the div tag using Insert > Layout Objects > Div Tag. Another way is to click the Insert Div Tag button on the Layout Toolbar.
For this example, let’s use the Insert Div Tag button from the Layout Toolbar. Select the Insert Div Tag button and enter the following information in the dialog box: Insert: At insertion point ID: header Note: Each div tag on the page must have a unique identifier or “ID.” This ID is used to connect page elements with styling rules. IDs can also used by JavaScript to create interactive behaviors. Click on the OK button. Your page should look similar to this:

U:\On-site\FCampana\dreamweaver8\Dreamweaver Beyond the basics_cs4.doc Page 3 of 21 © Computer Training & Support Services, Colorado State University
From the Insert drop-down menu, select the “After tag” option and select <div id=”header”>. Enter “navigation” for the div ID.
Repeat for content and footer Insert the ”content” div tag after the navigation div. Insert the “footer” div tag after the content div Once all four divisions have been created, your canvas should look like the screen shot below:
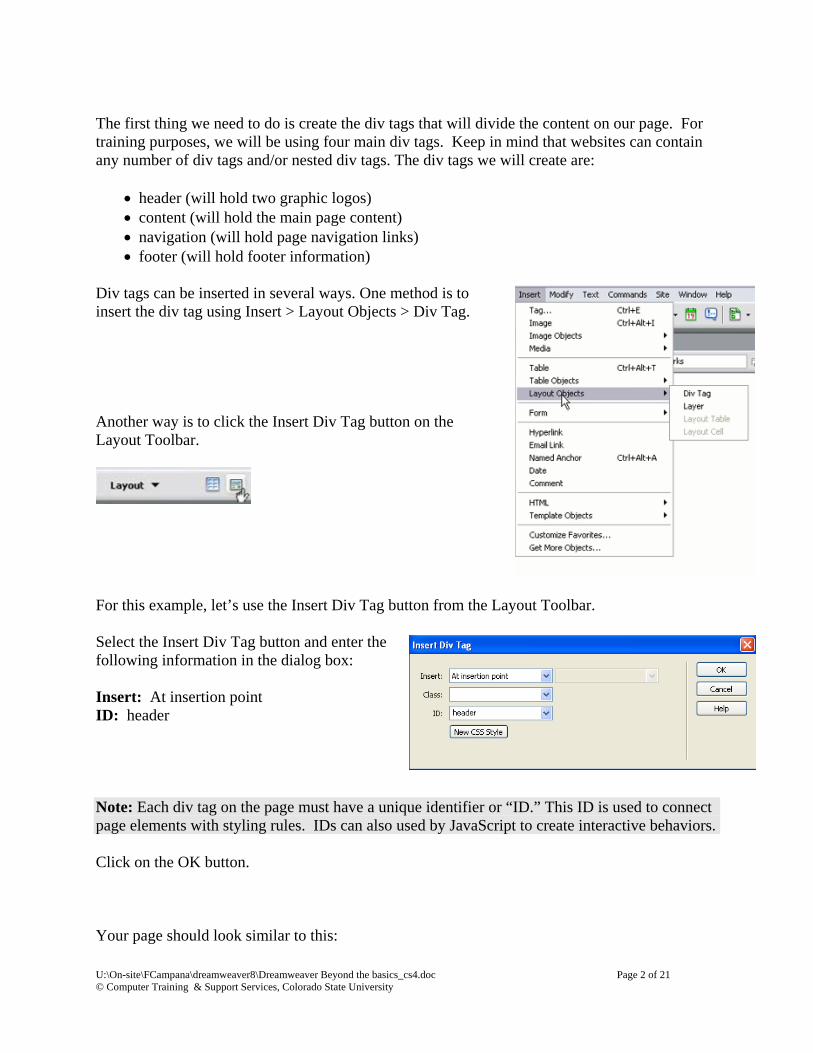
Adding Content to the Div Tags Navigation Div: Position the cursor in the navigation div tag and triple-click to select the contents.
U:\On-site\FCampana\dreamweaver8\Dreamweaver Beyond the basics_cs4.doc Page 4 of 21 © Computer Training & Support Services, Colorado State University
Services Staff Training FAQ Email Home
Type the navigation menu as follows:
Your navigation div should look similar to the following:
Select the navigation items and turn them into an unordered (bulleted) list. Use the Unordered list button in the Properties Inspector. Your navigation list should now look like the image below:

U:\On-site\FCampana\dreamweaver8\Dreamweaver Beyond the basics_cs4.doc Page 5 of 21 © Computer Training & Support Services, Colorado State University
Create Links for the Unordered List Items: Tip: if the web pages exist, use the Point to File tool to link the list items to their corresponding pages in the website. Start by selecting the text that will be used as the link, then select the Point to File icon (located to the right of the Link field), and drag the arrow over to the file to which it will link. Tip: You can create a link to a file that doesn’t yet exist. Type the name of the file and use the .htm extension. (Example: services.htm.) Remember to use the exact file name when you actually create the file so that the link will work. Footer Div: Position the cursor in the footer div tag and select the contents.
Open a browser and navigate to the CTSS home page. Copy the links contained in the footer. (CTSS home page URL: http://www.ctss.colostate.edu)
Return to Dreamweaver and paste the line of text into the footer div. Notice how Dreamweaver preserves the links for you.
Header Div: We need two graphics—the CTSS and CSU logos—to appear within the header div. To give each graphic its own formatting, we will wrap it in its own div tag. In other words, the header div will contain two new div tags, each with its own graphic logo.
Point to File tool
U:\On-site\FCampana\dreamweaver8\Dreamweaver Beyond the basics_cs4.doc Page 6 of 21 © Computer Training & Support Services, Colorado State University
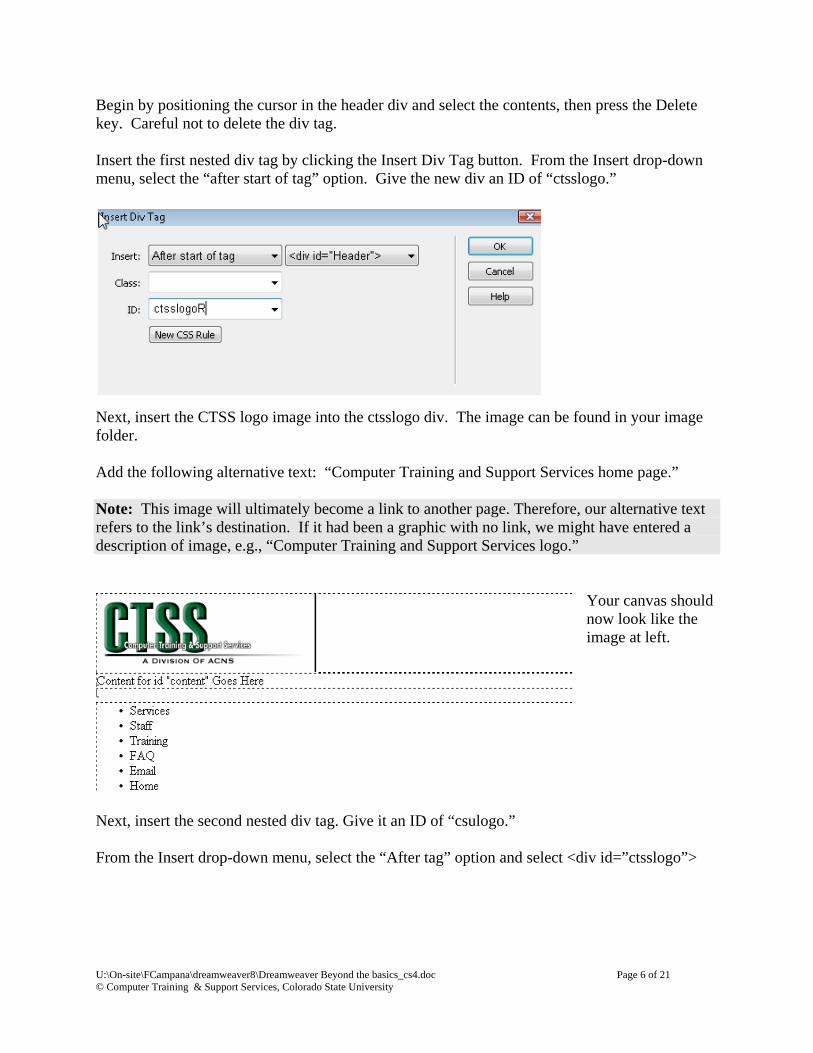
Begin by positioning the cursor in the header div and select the contents, then press the Delete key. Careful not to delete the div tag. Insert the first nested div tag by clicking the Insert Div Tag button. From the Insert drop-down menu, select the “after start of tag” option. Give the new div an ID of “ctsslogo.”
Next, insert the CTSS logo image into the ctsslogo div. The image can be found in your image folder. Add the following alternative text: “Computer Training and Support Services home page.” Note: This image will ultimately become a link to another page. Therefore, our alternative text refers to the link’s destination. If it had been a graphic with no link, we might have entered a description of image, e.g., “Computer Training and Support Services logo.”
Your canvas should now look like the image at left.
Next, insert the second nested div tag. Give it an ID of “csulogo.” From the Insert drop-down menu, select the “After tag” option and select <div id=”ctsslogo”>
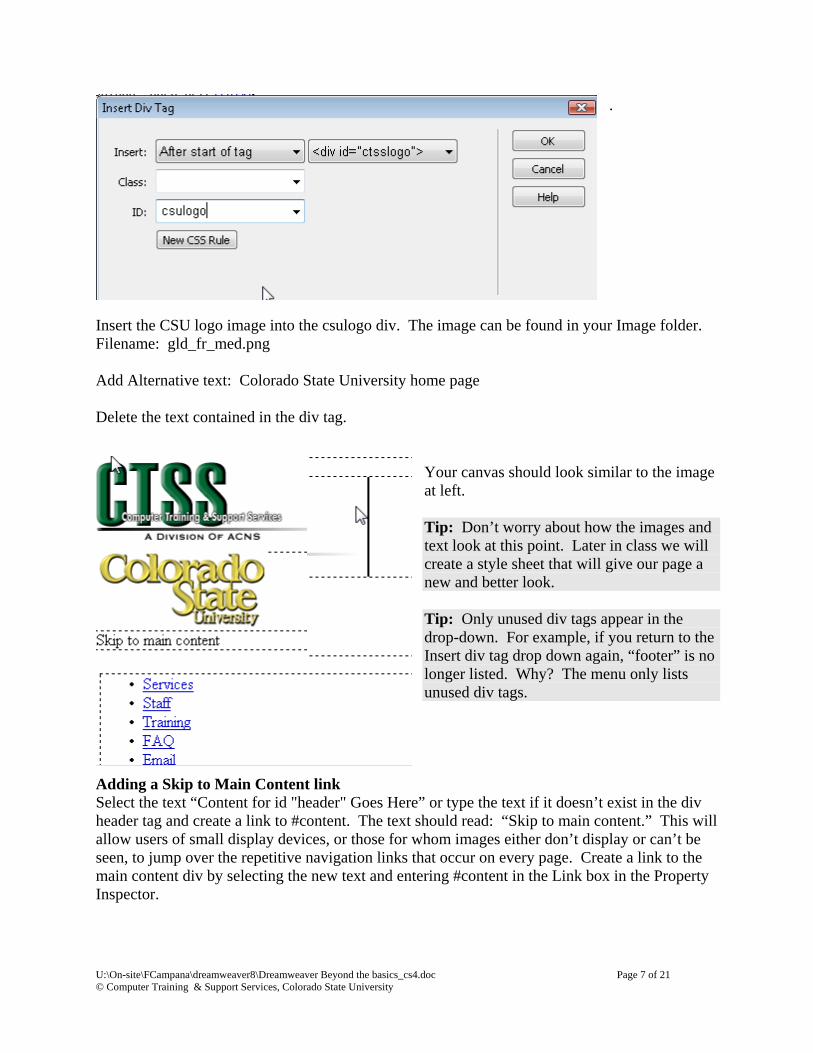
U:\On-site\FCampana\dreamweaver8\Dreamweaver Beyond the basics_cs4.doc Page 7 of 21 © Computer Training & Support Services, Colorado State University
.
Insert the CSU logo image into the csulogo div. The image can be found in your Image folder. Filename: gld_fr_med.png Add Alternative text: Colorado State University home page Delete the text contained in the div tag.
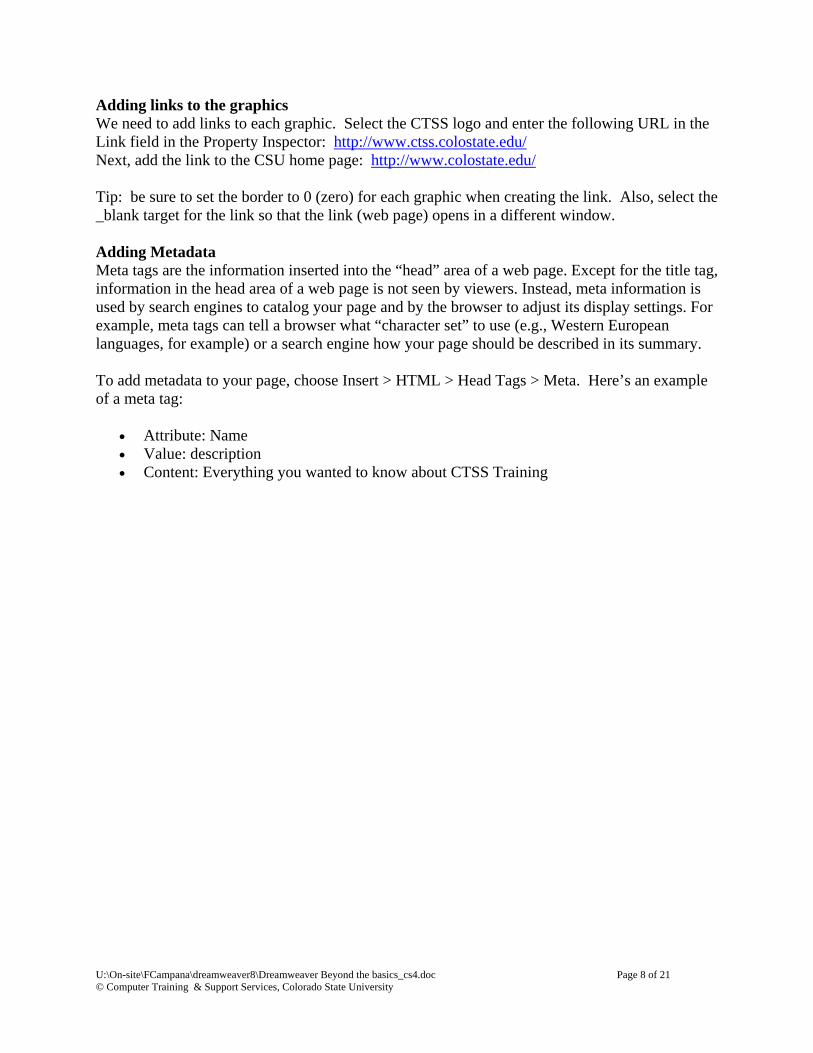
Your canvas should look similar to the image at left. Tip: Don’t worry about how the images and text look at this point. Later in class we will create a style sheet that will give our page a new and better look. Tip: Only unused div tags appear in the drop-down. For example, if you return to the Insert div tag drop down again, “footer” is no longer listed. Why? The menu only lists unused div tags.
Adding a Skip to Main Content link Select the text “Content for id "header" Goes Here” or type the text if it doesn’t exist in the div header tag and create a link to #content. The text should read: “Skip to main content.” This will allow users of small display devices, or those for whom images either don’t display or can’t be seen, to jump over the repetitive navigation links that occur on every page. Create a link to the main content div by selecting the new text and entering #content in the Link box in the Property Inspector.
U:\On-site\FCampana\dreamweaver8\Dreamweaver Beyond the basics_cs4.doc Page 8 of 21 © Computer Training & Support Services, Colorado State University
Adding links to the graphics We need to add links to each graphic. Select the CTSS logo and enter the following URL in the Link field in the Property Inspector: http://www.ctss.colostate.edu/ Next, add the link to the CSU home page: http://www.colostate.edu/ Tip: be sure to set the border to 0 (zero) for each graphic when creating the link. Also, select the _blank target for the link so that the link (web page) opens in a different window. Adding Metadata Meta tags are the information inserted into the “head” area of a web page. Except for the title tag, information in the head area of a web page is not seen by viewers. Instead, meta information is used by search engines to catalog your page and by the browser to adjust its display settings. For example, meta tags can tell a browser what “character set” to use (e.g., Western European languages, for example) or a search engine how your page should be described in its summary. To add metadata to your page, choose Insert > HTML > Head Tags > Meta. Here’s an example of a meta tag:
Attribute: Name Value: description Content: Everything you wanted to know about CTSS Training
U:\On-site\FCampana\dreamweaver8\Dreamweaver Beyond the basics_cs4.doc Page 9 of 21 © Computer Training & Support Services, Colorado State University
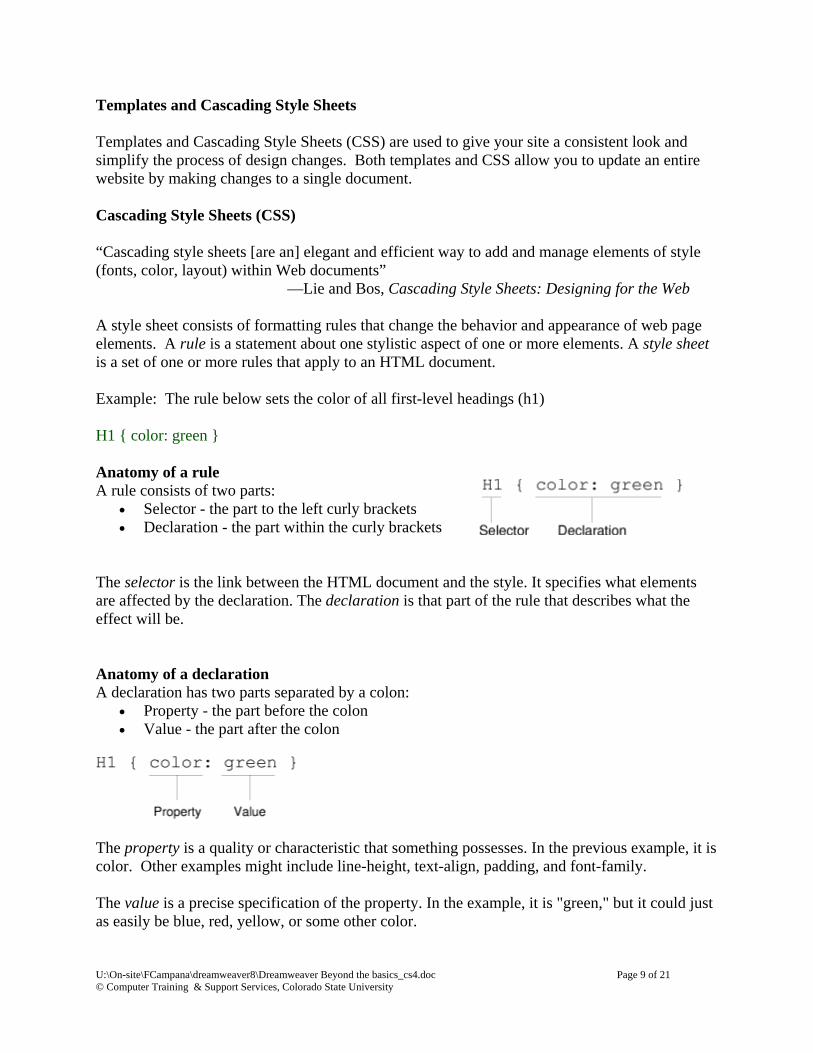
Templates and Cascading Style Sheets Templates and Cascading Style Sheets (CSS) are used to give your site a consistent look and simplify the process of design changes. Both templates and CSS allow you to update an entire website by making changes to a single document. Cascading Style Sheets (CSS) “Cascading style sheets [are an] elegant and efficient way to add and manage elements of style (fonts, color, layout) within Web documents” —Lie and Bos, Cascading Style Sheets: Designing for the Web A style sheet consists of formatting rules that change the behavior and appearance of web page elements. A rule is a statement about one stylistic aspect of one or more elements. A style sheet is a set of one or more rules that apply to an HTML document. Example: The rule below sets the color of all first-level headings (h1) H1 { color: green } Anatomy of a rule A rule consists of two parts:
Selector - the part to the left curly brackets Declaration - the part within the curly brackets
The selector is the link between the HTML document and the style. It specifies what elements are affected by the declaration. The declaration is that part of the rule that describes what the effect will be. Anatomy of a declaration A declaration has two parts separated by a colon:
Property - the part before the colon Value - the part after the colon
The property is a quality or characteristic that something possesses. In the previous example, it is color. Other examples might include line-height, text-align, padding, and font-family. The value is a precise specification of the property. In the example, it is "green," but it could just as easily be blue, red, yellow, or some other color.

U:\On-site\FCampana\dreamweaver8\Dreamweaver Beyond the basics_cs4.doc Page 10 of 21 © Computer Training & Support Services, Colorado State University
The diagram below shows all ingredients of a rule. The curly braces ({ }) and colon (:) make it possible for the browser to distinguish between the selector, property, and value.
.
Grouping selectors and rules In designing CSS, it was discovered that style sheets can be reduced in size by grouping selectors and declarations. For example, consider these three rules: H1 { font-weight: bold } H2 { font-weight: bold } H3 { font-weight: bold } All three rules have exactly the same declaration. H1 thru H3 are setting the font to be strong. Since all three declarations are identical, we can group the selectors into a comma-separated list and only list the declaration once, like this: H1, H2, H3 { font-style: strong } This rule will produce the same result as the first three. A selector may have more than one declaration. For example, we could write a style sheet with these two rules: H1 { color: green } H1 { text-align: center } In this case, we set all h1s to display with a text color of green and to be centered on the canvas. However, we can achieve the same effect more easily by grouping the declarations that relate to the same selector into a semicolon-separated list, like this: H1 { color: green; text-align: center; } All declarations must be contained within the pair of curly brackets. A semicolon separates the declarations and may also appear at the end of the last declaration (but it doesn’t have to).

U:\On-site\FCampana\dreamweaver8\Dreamweaver Beyond the basics_cs4.doc Page 11 of 21 © Computer Training & Support Services, Colorado State University
Tip: CSS rules can be embedded in a single document, or you can link to an external style sheet which controls the appearance of multiple pages. Page Properties CSS for CS3 Dreamweaver MX 2004/8/CS is set by default to embed CSS rules in each page rather write them to an external style sheet document. While this technique is an improvement over the previous practice of putting styling information in the HTML code (which violates our “separate structure from appearance” rule), it can cause problems if you want to control the appearance of your page from a central style sheet. This is because styles saved in a web page overrule those coming from an external source. Embedding CSS into a document takes away the advantages of using it as an external CSS sheet, where it can be linked to multiple documents. The solution is to turn off the “Use CSS instead of HTML tags” option in Dreamweaver’s preference settings. Choose Edit > Preferences and select the General category. Uncheck the appropriate checkbox, as shown below.
Best Practice: We recommend that you not create styles using the Properties Inspector. Tip: Styles embedded within a document can be exported into a separate style sheet for use in other documents. Choose File > Export > CSS Styles and save the CSS file to your computer. Caution: Keep in mind, when you export embedded styles within a document, it doesn’t remove the actual embedded styles within the document.

U:\On-site\FCampana\dreamweaver8\Dreamweaver Beyond the basics_cs4.doc Page 12 of 21 © Computer Training & Support Services, Colorado State University
Using the CSS Panel
The CSS Styles Panel can be used to create or manage style sheets. From the Design Panel Group choose the CSS Panel.
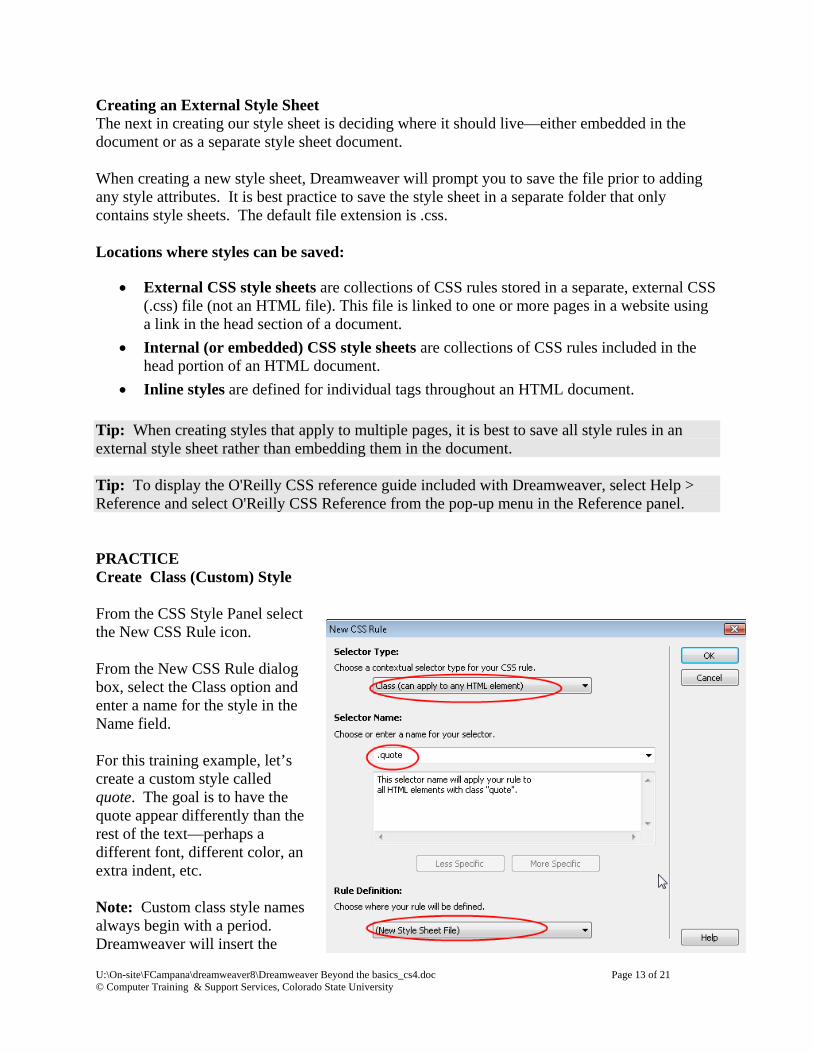
Create a new style by choosing the New CSS Rule icon from the bottom of the CSS Styles Panel.
Next, choose the Selector Type for the style you want to create from the New CSS Rule dialog box.
Selector Types (adapted from the Dreamweaver Help file)
You can define the following types of styles in Dreamweaver:
Class: Custom CSS rules, also called class styles, let you apply style attributes to any range or block of text. Custom class names always begin with a dot (period). Example: .quote. Classes can be applied to multiple elements on a page, unlike IDs, which must be unique (see Advanced, below).
Tag: HTML tag styles redefine the formatting for a particular tag, such
as <h1> or <body>. When you create or change a CSS style for the h1 tag, all text formatted with the h1 tag is immediately updated.
Advanced: CSS selector styles (advanced styles) redefine the formatting for a
particular combination of elements, or for other selector forms as allowed by CSS (for example, the selector “td h2” applies whenever an h2 header appears inside a table cell.) Advanced styles can also redefine the formatting for tags that contain a specific ID attribute (for example, #footer), and they are used with the so-called pseudo-classes (example, a:hover).
U:\On-site\FCampana\dreamweaver8\Dreamweaver Beyond the basics_cs4.doc Page 13 of 21 © Computer Training & Support Services, Colorado State University
Creating an External Style Sheet The next in creating our style sheet is deciding where it should live—either embedded in the document or as a separate style sheet document. When creating a new style sheet, Dreamweaver will prompt you to save the file prior to adding any style attributes. It is best practice to save the style sheet in a separate folder that only contains style sheets. The default file extension is .css. Locations where styles can be saved:
External CSS style sheets are collections of CSS rules stored in a separate, external CSS (.css) file (not an HTML file). This file is linked to one or more pages in a website using a link in the head section of a document.
Internal (or embedded) CSS style sheets are collections of CSS rules included in the head portion of an HTML document.
Inline styles are defined for individual tags throughout an HTML document.
Tip: When creating styles that apply to multiple pages, it is best to save all style rules in an external style sheet rather than embedding them in the document. Tip: To display the O'Reilly CSS reference guide included with Dreamweaver, select Help > Reference and select O'Reilly CSS Reference from the pop-up menu in the Reference panel. PRACTICE Create Class (Custom) Style From the CSS Style Panel select the New CSS Rule icon. From the New CSS Rule dialog box, select the Class option and enter a name for the style in the Name field. For this training example, let’s create a custom style called quote. The goal is to have the quote appear differently than the rest of the text—perhaps a different font, different color, an extra indent, etc. Note: Custom class style names always begin with a period. Dreamweaver will insert the

U:\On-site\FCampana\dreamweaver8\Dreamweaver Beyond the basics_cs4.doc Page 14 of 21 © Computer Training & Support Services, Colorado State University
period if you forget. Also, when typing the Style name to not use spaces or punctuation.
Example: .quote
Select the “Define in: (New Style Sheet File)” option. For classroom purposes, save the file to c:\userdata\assests\css AND name the file: default.css
Press OK to open the Style definition dialog box.
Select the formatting attributes for the style.
Select new values for font, weight, style, and color. Also, under the “Box” category, enter padding values of “3 ems” for the left and right padding.
Click OK when finished.
The new custom Class style appears in the CSS Style Panel.
Apply the Style to text by first highlighting the text and then selecting the style from the Style field that is located in the Properties Inspector. Remove a style by highlighting the text and then selecting the None style from the Style Field that is located in the Properties Inspector.
Redefine an Existing HTML Tag An HTML document consists of many different tags. The tags define the structure of the document (this refers to “markup,” explained previously). Using the CSS panel, you have the option of changing the behavior and/or appearance of each HTML tag. For example, a rule can be created for the <body> tag, changing the default text color from black to blue, or the default background color from white to black. The options are endless.
Create a new style by clicking on the New CSS Rule icon from the bottom of the CSS Styles Panel.
U:\On-site\FCampana\dreamweaver8\Dreamweaver Beyond the basics_cs4.doc Page 15 of 21 © Computer Training & Support Services, Colorado State University
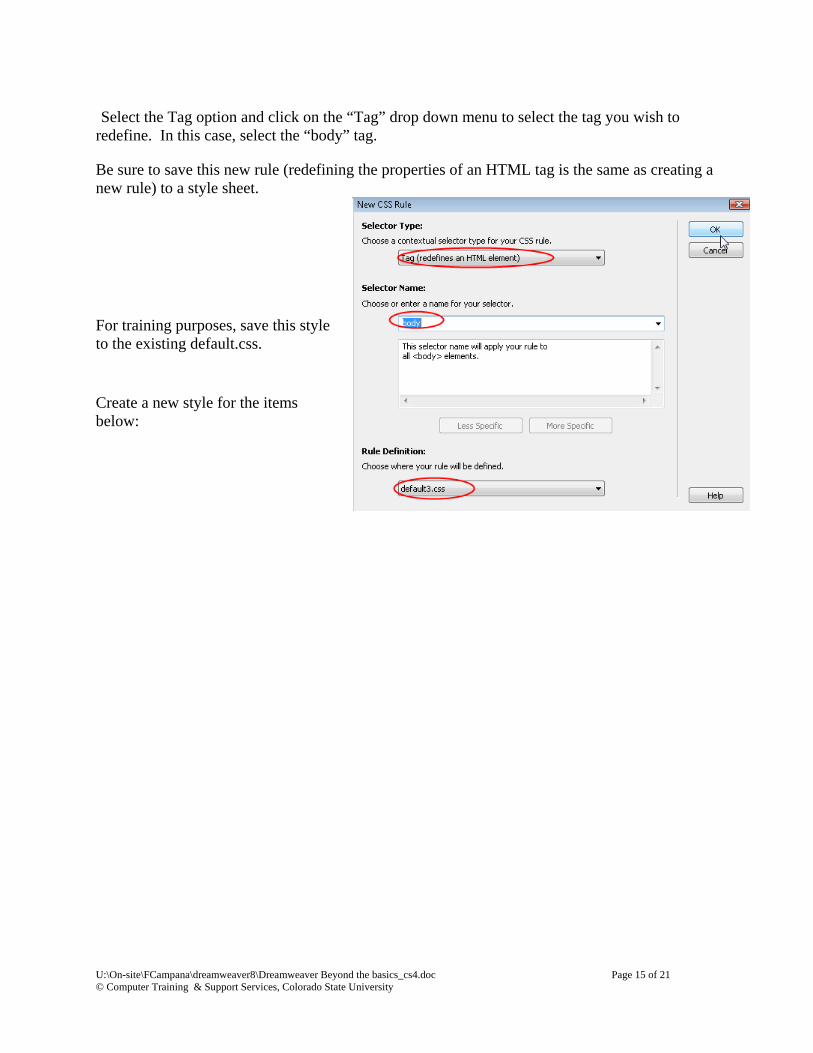
Select the Tag option and click on the “Tag” drop down menu to select the tag you wish to redefine. In this case, select the “body” tag.
Be sure to save this new rule (redefining the properties of an HTML tag is the same as creating a new rule) to a style sheet.
For training purposes, save this style to the existing default.css.
Create a new style for the items below:
U:\On-site\FCampana\dreamweaver8\Dreamweaver Beyond the basics_cs4.doc Page 16 of 21 © Computer Training & Support Services, Colorado State University
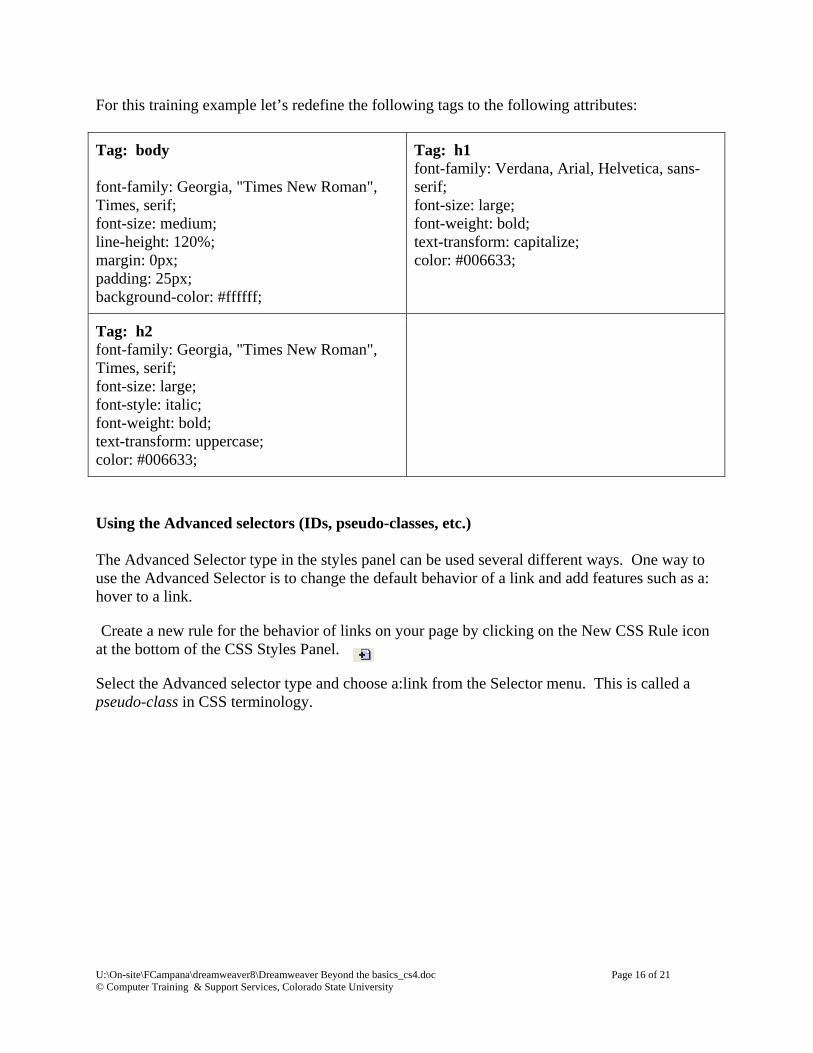
For this training example let’s redefine the following tags to the following attributes:
Tag: body font-family: Georgia, "Times New Roman", Times, serif; font-size: medium; line-height: 120%; margin: 0px; padding: 25px; background-color: #ffffff;
Tag: h1 font-family: Verdana, Arial, Helvetica, sans-serif; font-size: large; font-weight: bold; text-transform: capitalize; color: #006633;
Tag: h2 font-family: Georgia, "Times New Roman", Times, serif; font-size: large; font-style: italic; font-weight: bold; text-transform: uppercase; color: #006633;
Using the Advanced selectors (IDs, pseudo-classes, etc.) The Advanced Selector type in the styles panel can be used several different ways. One way to use the Advanced Selector is to change the default behavior of a link and add features such as a: hover to a link.
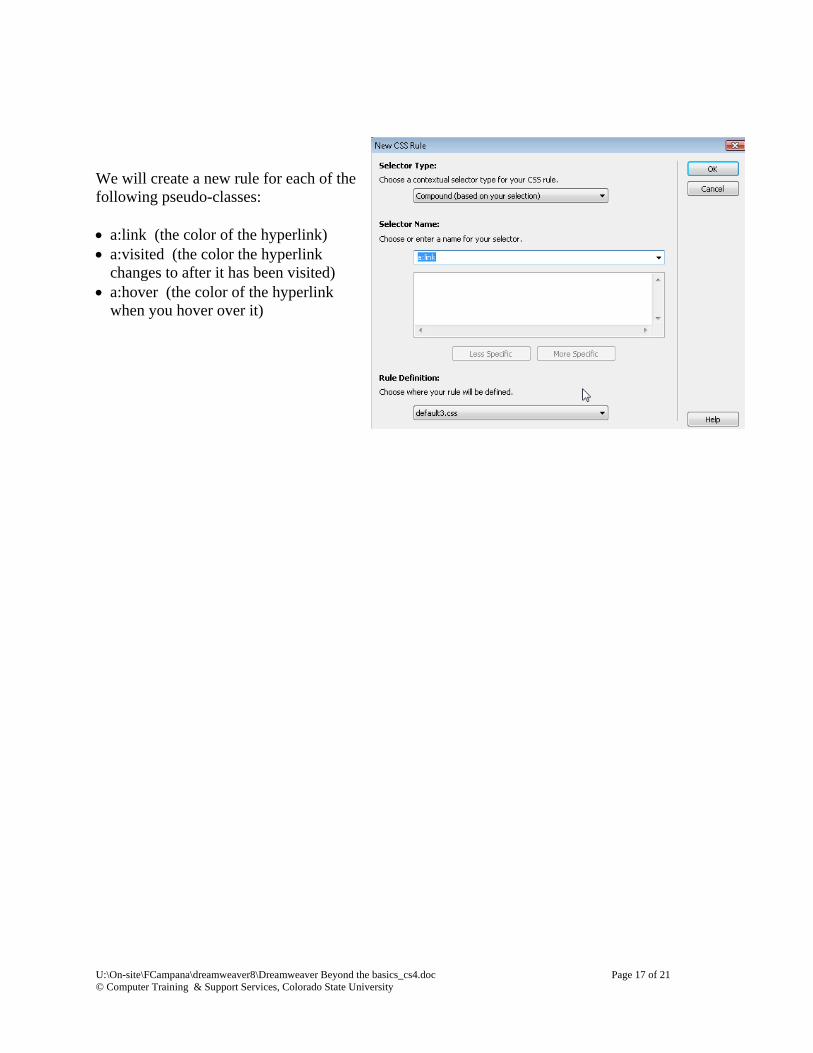
Create a new rule for the behavior of links on your page by clicking on the New CSS Rule icon at the bottom of the CSS Styles Panel.
Select the Advanced selector type and choose a:link from the Selector menu. This is called a pseudo-class in CSS terminology.
U:\On-site\FCampana\dreamweaver8\Dreamweaver Beyond the basics_cs4.doc Page 17 of 21 © Computer Training & Support Services, Colorado State University
We will create a new rule for each of the following pseudo-classes: a:link (the color of the hyperlink) a:visited (the color the hyperlink
changes to after it has been visited) a:hover (the color of the hyperlink
when you hover over it)
U:\On-site\FCampana\dreamweaver8\Dreamweaver Beyond the basics_cs4.doc Page 18 of 21 © Computer Training & Support Services, Colorado State University
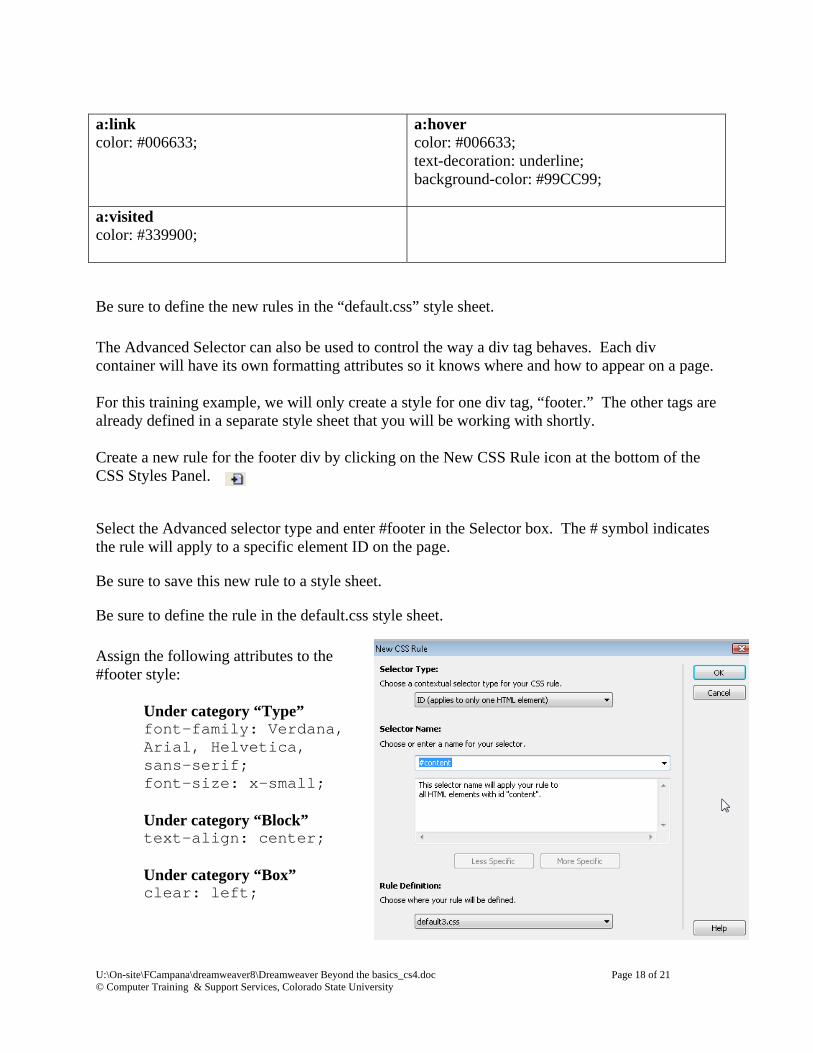
a:link color: #006633;
a:hover color: #006633; text-decoration: underline; background-color: #99CC99;
a:visited color: #339900;
Be sure to define the new rules in the “default.css” style sheet.
The Advanced Selector can also be used to control the way a div tag behaves. Each div container will have its own formatting attributes so it knows where and how to appear on a page. For this training example, we will only create a style for one div tag, “footer.” The other tags are already defined in a separate style sheet that you will be working with shortly. Create a new rule for the footer div by clicking on the New CSS Rule icon at the bottom of the CSS Styles Panel.
Select the Advanced selector type and enter #footer in the Selector box. The # symbol indicates the rule will apply to a specific element ID on the page.
Be sure to save this new rule to a style sheet.
Be sure to define the rule in the default.css style sheet.
Assign the following attributes to the #footer style:
Under category “Type” font-family: Verdana, Arial, Helvetica, sans-serif; font-size: x-small; Under category “Block” text-align: center; Under category “Box” clear: left;
U:\On-site\FCampana\dreamweaver8\Dreamweaver Beyond the basics_cs4.doc Page 19 of 21 © Computer Training & Support Services, Colorado State University
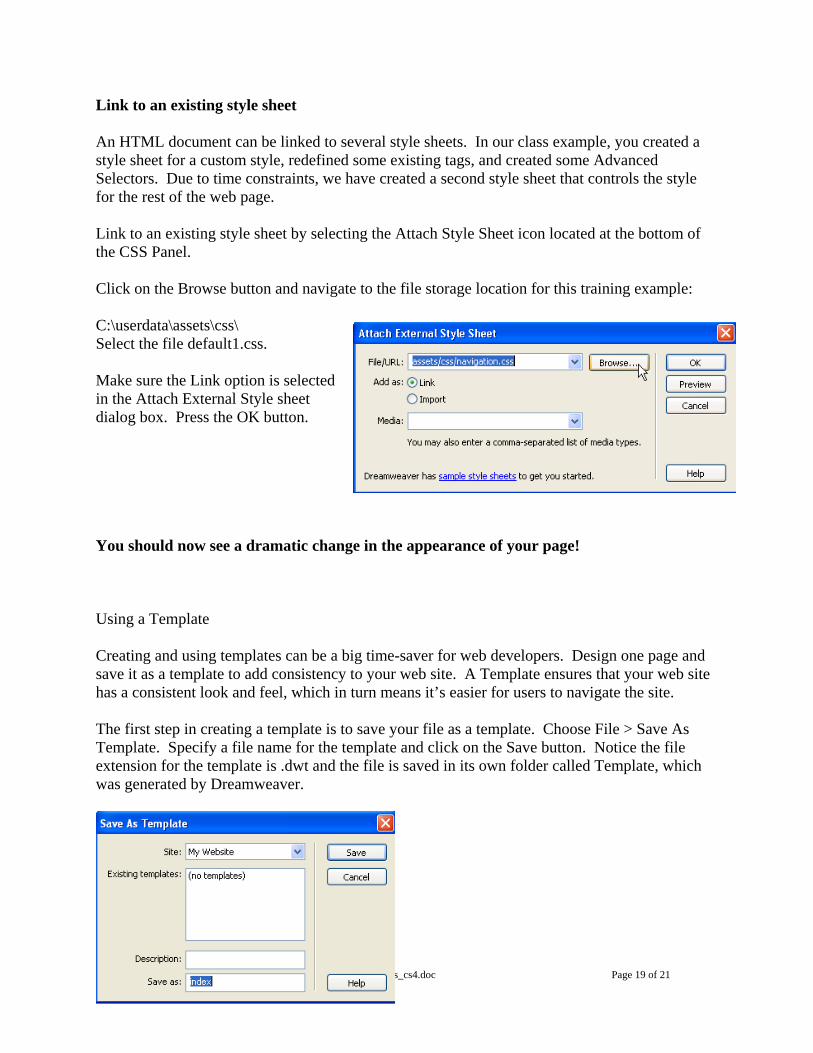
Link to an existing style sheet An HTML document can be linked to several style sheets. In our class example, you created a style sheet for a custom style, redefined some existing tags, and created some Advanced Selectors. Due to time constraints, we have created a second style sheet that controls the style for the rest of the web page. Link to an existing style sheet by selecting the Attach Style Sheet icon located at the bottom of the CSS Panel. Click on the Browse button and navigate to the file storage location for this training example: C:\userdata\assets\css\ Select the file default1.css. Make sure the Link option is selected in the Attach External Style sheet dialog box. Press the OK button. You should now see a dramatic change in the appearance of your page! Using a Template Creating and using templates can be a big time-saver for web developers. Design one page and save it as a template to add consistency to your web site. A Template ensures that your web site has a consistent look and feel, which in turn means it’s easier for users to navigate the site. The first step in creating a template is to save your file as a template. Choose File > Save As Template. Specify a file name for the template and click on the Save button. Notice the file extension for the template is .dwt and the file is saved in its own folder called Template, which was generated by Dreamweaver.
U:\On-site\FCampana\dreamweaver8\Dreamweaver Beyond the basics_cs4.doc Page 20 of 21 © Computer Training & Support Services, Colorado State University
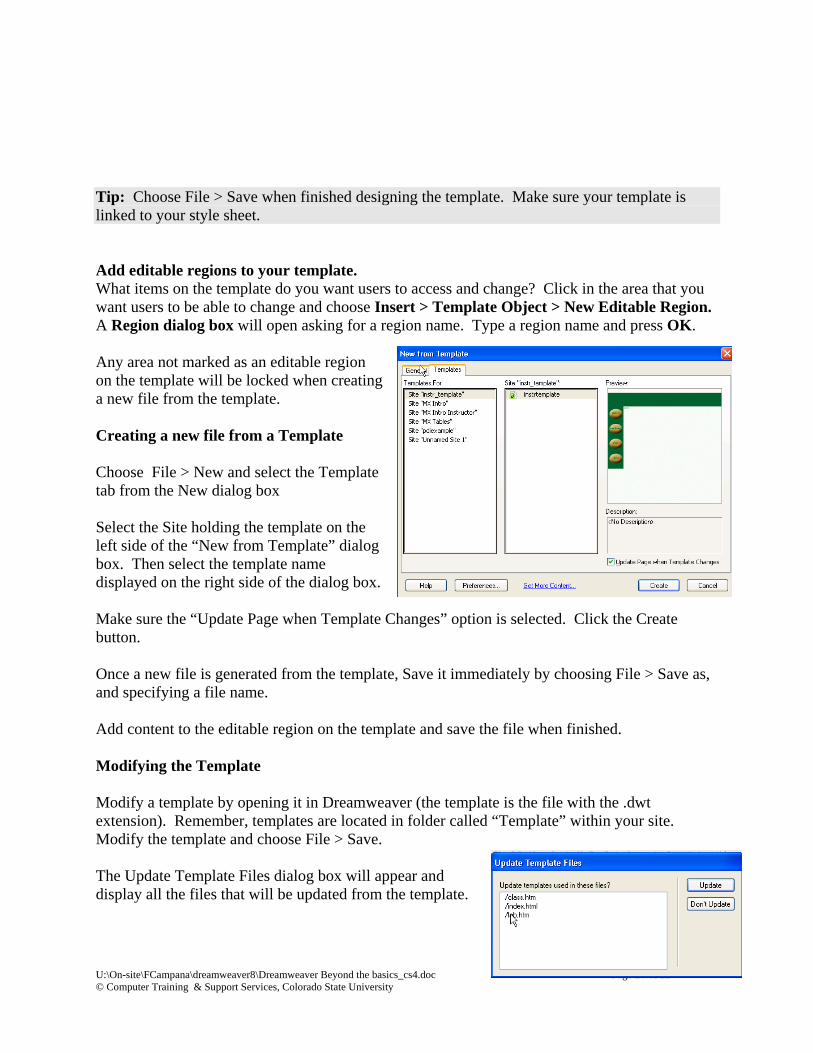
Tip: Choose File > Save when finished designing the template. Make sure your template is linked to your style sheet. Add editable regions to your template. What items on the template do you want users to access and change? Click in the area that you want users to be able to change and choose Insert > Template Object > New Editable Region. A Region dialog box will open asking for a region name. Type a region name and press OK. Any area not marked as an editable region on the template will be locked when creating a new file from the template. Creating a new file from a Template Choose File > New and select the Template tab from the New dialog box Select the Site holding the template on the left side of the “New from Template” dialog box. Then select the template name displayed on the right side of the dialog box. Make sure the “Update Page when Template Changes” option is selected. Click the Create button. Once a new file is generated from the template, Save it immediately by choosing File > Save as, and specifying a file name. Add content to the editable region on the template and save the file when finished. Modifying the Template Modify a template by opening it in Dreamweaver (the template is the file with the .dwt extension). Remember, templates are located in folder called “Template” within your site. Modify the template and choose File > Save. The Update Template Files dialog box will appear and display all the files that will be updated from the template.
U:\On-site\FCampana\dreamweaver8\Dreamweaver Beyond the basics_cs4.doc Page 21 of 21 © Computer Training & Support Services, Colorado State University
It is now time to publish your web site to the web server. Please see the handout on using the Dreamweaver FTP to copy files from your local computer to the web server (remote server).