dragon center user guide - storage-asset.msi.com · 4 about dragon center about dragon center y...
TRANSCRIPT

1
DRAGON CENTERUser Guide

2 Contents
ContentsAbout DRAGON CENTER ........................................................................................ 4Get Started ............................................................................................................. 5
System Requirements ............................................................................................ 5Supported Hardware .............................................................................................. 5Installing DRAGON CENTER ................................................................................... 5Launching DRAGON CENTER ................................................................................. 5
DRAGON CENTER Basics ....................................................................................... 6Main menu .............................................................................................................. 6
Game Optimization ................................................................................................ 7Gaming Mode .......................................................................................................... 7
Performance Settings ........................................................................................... 8Selecting Performance Preset ............................................................................... 8Setting Profile Options ............................................................................................ 8How to Check the Motherboard Information ......................................................... 9How to Check the CPU Information ..................................................................... 10How to Adjust the CPU Frequency........................................................................ 11How to Use Game Boost ....................................................................................... 12How to Use OC GENIE 4 ........................................................................................ 14How to Enable Fast Boot ...................................................................................... 15How to Adjust the Voltage ..................................................................................... 16How to Use the Warning Alert .............................................................................. 17How to Adjust the GPU and GPU Memory Clock .................................................. 18How to Adjust the DRAM Timing .......................................................................... 19How to Adjust the DRAM Voltage.......................................................................... 20Adjusting the Fan Speed ....................................................................................... 21
Hardware Monitor ............................................................................................... 23How to Use the Hardware Monitor ....................................................................... 23
EyeRest ................................................................................................................ 24Selecting EyeRest Preset ..................................................................................... 24Adjusting Customize Preset ................................................................................. 24
LAN Manager ....................................................................................................... 25Setting Network Speed ......................................................................................... 26Customizing Application Priorities ....................................................................... 27
LIVE UPDATE ........................................................................................................ 28How to Use the LIVE UPDATE ............................................................................... 28
Graphics Fan Tool ................................................................................................ 29

3Contents
Zero Frozr ............................................................................................................. 29Cooler Boost ......................................................................................................... 29
USB Speed Up ...................................................................................................... 30USB BOOST ........................................................................................................... 30STORAGE BOOST .................................................................................................. 30
VR Ready .............................................................................................................. 31Gaming Hotkey..................................................................................................... 32
Recording a Macro ................................................................................................ 32Enabling and Disabling the Macro ....................................................................... 33Creating, Editing a Macro ..................................................................................... 34Making Hotkeys for Windows OS .......................................................................... 35Making Hotkeys for Login ..................................................................................... 36Delete the Hotkeys ................................................................................................ 36
Voice Boost ........................................................................................................... 37Enabling Voice Boost ............................................................................................ 37
Notices ................................................................................................................. 38Copyright............................................................................................................... 38Revision History .................................................................................................... 38

4 About DRAGON CENTER
About DRAGON CENTER yOptimize game settings and enjoy a high quality gaming experience.
ySystem performance tuning, you can choose overclock or silent.
yMonitor system information.
yAdjust the color of the screen display and enjoy better visual effects.
yManage network connection settings.
yUse utilities to control special features.
ImportantThe software features in this user guide vary by product.
5Get Started
Get StartedSystem Requirements
yOperating System:
�Windows 10 32-bit
�Windows 10 64-bit
Supported Hardware yMotherboard:
� MSI Z390 series motherboards or newer
yGraphics card:
� MSI GAMING series graphics cards or newer
Installing DRAGON CENTER1. Start up your computer in Windows® operating system.
2. Insert MSI® Driver Disc into your optical drive.
3. Click the Select to choose what happens with this disc pop-up notification, then select Run DVDSetup.exe to open the installer. If you turn off the AutoPlay feature from the Windows Control Panel, you can still manually execute the DVDSetup.exe from the root path of the MSI Driver Disc.
4. Click the Utilities tab.
5. Select the DRAGON CENTER.
6. Click the Install button in the lower-right corner of the window.
7. The installation will then be in progress, after it has finished it will prompt you to restart.
8. Click OK button to finish.
9. Restart your computer.
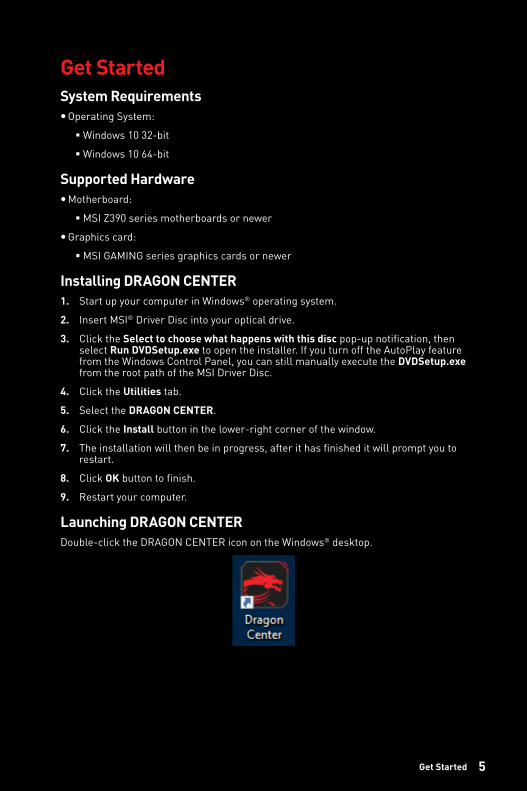
Launching DRAGON CENTERDouble-click the DRAGON CENTER icon on the Windows® desktop.
6 DRAGON CENTER Basics
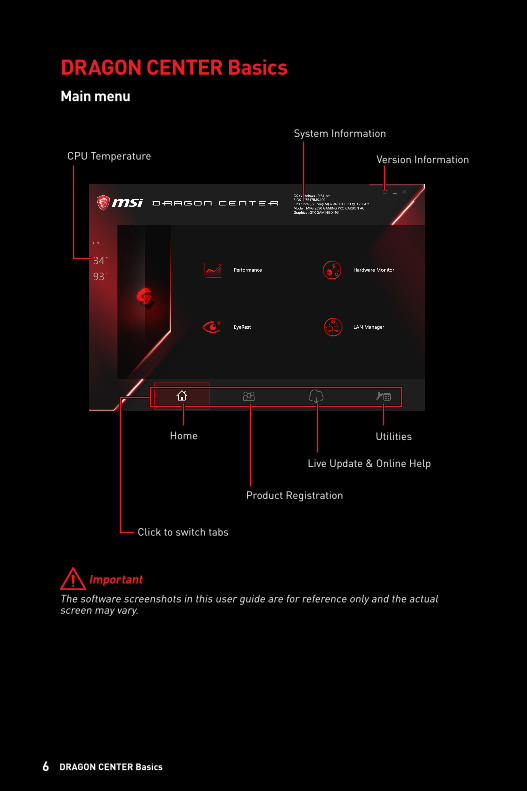
DRAGON CENTER BasicsMain menu
ImportantThe software screenshots in this user guide are for reference only and the actual screen may vary.
Home
Product Registration
Click to switch tabs
Live Update & Online Help
Utilities
System Information
CPU Temperature Version Information
7Game Optimization
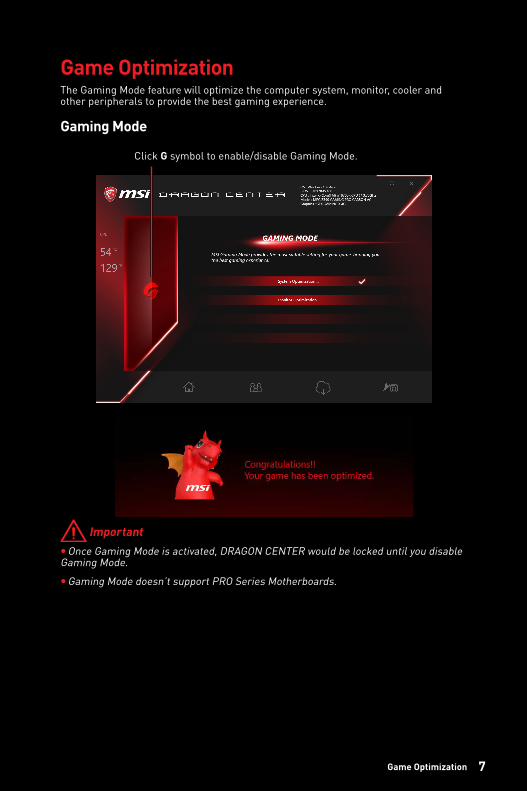
Game OptimizationThe Gaming Mode feature will optimize the computer system, monitor, cooler and other peripherals to provide the best gaming experience.
Gaming Mode
Click G symbol to enable/disable Gaming Mode.
Important yOnce Gaming Mode is activated, DRAGON CENTER would be locked until you disable
Gaming Mode.
yGaming Mode doesn’t support PRO Series Motherboards.
8 Performance Settings
Performance SettingsSelecting Performance PresetThe DRAGON CENTER has an OC, a silent and two customized preset options.
1. On the Home tab, click Performance. A dialog window will pop-up.
2. Select one of the options.
� Silent - low performance settings maintain low noise.
� OC - set the system for overclocking.
� Profile 1, Profile 2 - allows you to customize the settings.
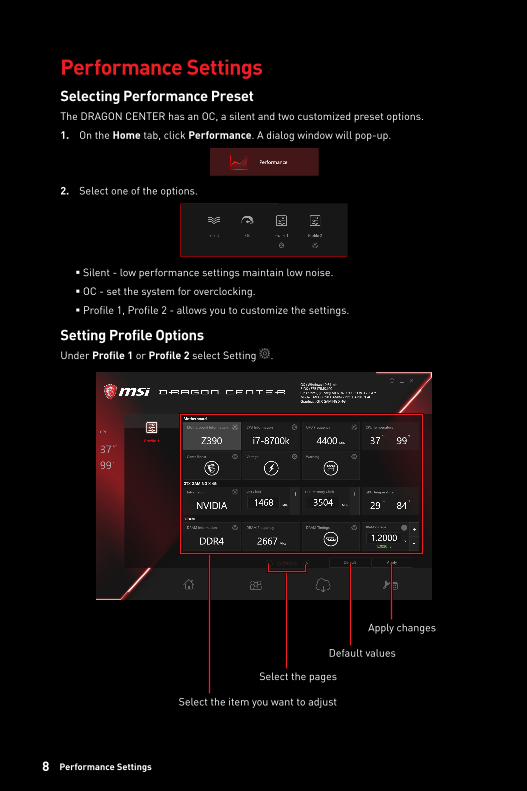
Setting Profile OptionsUnder Profile 1 or Profile 2 select Setting .
Select the item you want to adjust
Select the pages
Default values
Apply changes

9Performance Settings
How to Check the Motherboard Information
Click the Motherboard Information option

10 Performance Settings
How to Check the CPU Information
Click the CPU Information option

11Performance Settings
How to Adjust the CPU Frequency1. On Home tab > Performance > option dialog window, select Profile 1 or Profile 2.
2. Click the CPU Frequency setting .Click here
Click / to adjust CPU Ratio and Base Clock. You can also fill the value in the input box with your keyboard.
Select CPU core to adjust
Back
Current CPU frequency
Default values
Apply changes
12 Performance Settings
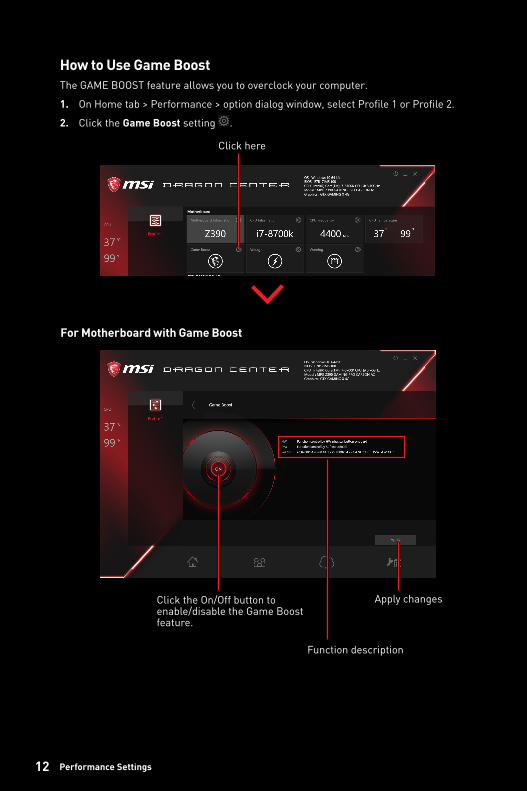
How to Use Game BoostThe GAME BOOST feature allows you to overclock your computer.
1. On Home tab > Performance > option dialog window, select Profile 1 or Profile 2.
2. Click the Game Boost setting .
Click here
For Motherboard with Game Boost
Click the On/Off button to enable/disable the Game Boost feature.
Apply changes
Function description
13Performance Settings
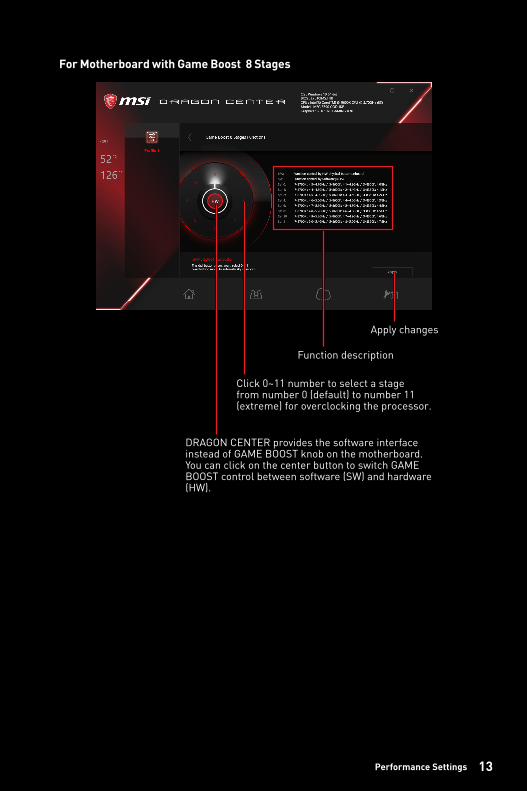
For Motherboard with Game Boost 8 Stages
Apply changes
Function description
DRAGON CENTER provides the software interface instead of GAME BOOST knob on the motherboard. You can click on the center button to switch GAME BOOST control between software (SW) and hardware (HW).
Click 0~11 number to select a stage from number 0 (default) to number 11 (extreme) for overclocking the processor.

14 Performance Settings
How to Use OC GENIE 4The OC GENIE 4 feature allows you to overclock your computer.
1. On Home tab > Performance > option dialog window, select Profile 1 or Profile 2.
2. Click the OC GENIE 4 setting .
Click here
Click the On/Off button to enable/disable the OC GENIE 4 feature.
Apply changes
Function description
15Performance Settings
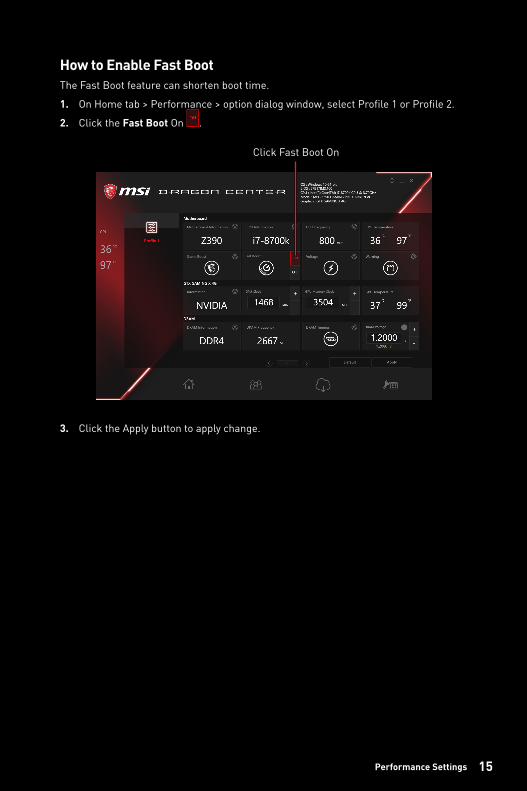
How to Enable Fast BootThe Fast Boot feature can shorten boot time.
1. On Home tab > Performance > option dialog window, select Profile 1 or Profile 2.
2. Click the Fast Boot On .
Click Fast Boot On
3. Click the Apply button to apply change.

16 Performance Settings
How to Adjust the Voltage1. On Home tab > Performance > option dialog window, select Profile 1 or Profile 2.
2. Click the Voltage setting .Click here
Click / to adjust the voltage. You can also fill the value in the input box with your keyboard.Back
Current voltage
Default values
Click to show the adjustment range
Apply changes

17Performance Settings
How to Use the Warning Alert1. On Home tab > Performance > option dialog window, select Profile 1 or Profile 2.
2. Click the Warning setting .Click here
3. Select warning items to receive alerts.
4. Enter the values for the warning and alert status.
5. Click the Apply button to apply change.
Back
Select AllOn/Off Alert Sound
Default values
Apply changes
Select the pages

18 Performance Settings
How to Adjust the GPU and GPU Memory Clock1. On Home tab > Performance > option dialog window, select Profile 1 or Profile 2.
2. Click / to adjust GPU Clock and GPU Memory Clock. You can also fill the value in the input box with your keyboard.
3. Click the Apply button to apply change.

19Performance Settings
How to Adjust the DRAM Timing1. On Home tab > Performance > option dialog window, select Profile 1 or Profile 2.
2. Click the DRAM Timings setting .Click here
Select the DRAM ChannelBack
Default values
Apply changes
Select the pages
Click to select an available value from the drop-down menu
20 Performance Settings
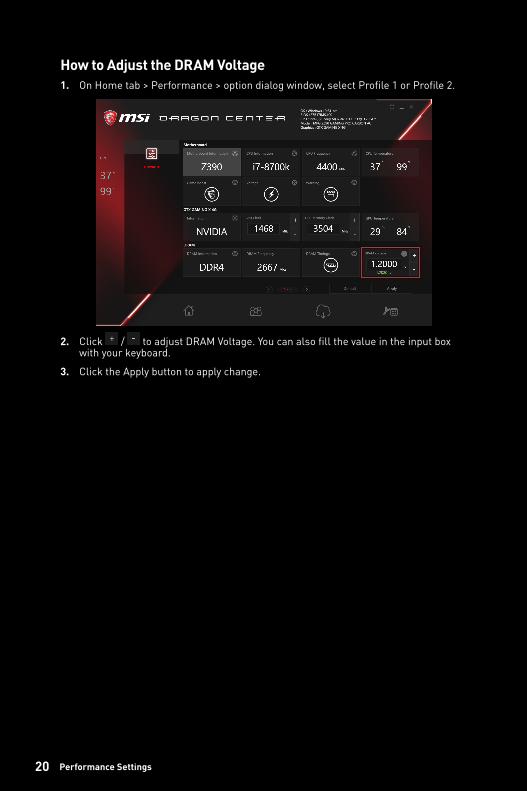
How to Adjust the DRAM Voltage1. On Home tab > Performance > option dialog window, select Profile 1 or Profile 2.
2. Click / to adjust DRAM Voltage. You can also fill the value in the input box with your keyboard.
3. Click the Apply button to apply change.

21Performance Settings
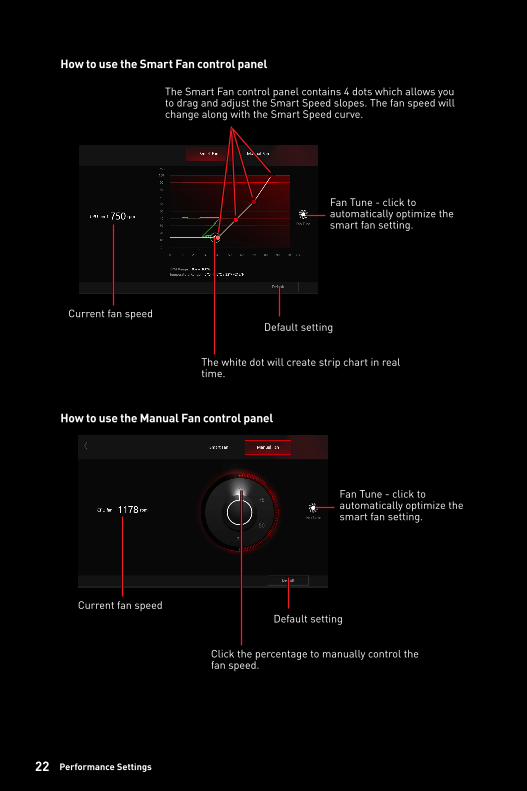
Adjusting the Fan SpeedFan speed control panel provides Smart Fan and Manual Fan. You can switch the control mode by clicking the Smart Fan and Manual Fan buttons on the top of the Fan control panel.
How to enter the fan speed control panel1. On Home tab > Performance > option dialog window, select Profile 1 or Profile 2.
2. You may need to click to switch to page 2.
3. Click the CPU Fan, PUMP Fan or SYS Fan setting .
Click to select one of the fans
22 Performance Settings
Current fan speed
Current fan speed
How to use the Smart Fan control panel
How to use the Manual Fan control panel
The Smart Fan control panel contains 4 dots which allows you to drag and adjust the Smart Speed slopes. The fan speed will change along with the Smart Speed curve.
The white dot will create strip chart in real time.
Click the percentage to manually control the fan speed.
Default setting
Default setting
Fan Tune - click to automatically optimize the smart fan setting.
Fan Tune - click to automatically optimize the smart fan setting.

23Hardware Monitor
Hardware MonitorHardware Monitor feature provides a custom hardware monitor gadget to display the system status.
How to Use the Hardware Monitor1. On the Home tab, click Hardware Monitor.
2. Select the item you want to display in the gadget.
3. Turn on the gadget and apply, the gadget will appear.
Select the item you want to display in the gadget
Select the pages
Select all items
Click to turn ON/OFF the gadget
Hardware Monitor Gadget
Apply changes

24 EyeRest
EyeRestEyeRest feature allows you to optimize the display on your monitor.
Selecting EyeRest PresetThe DRAGON CENTER has EyeRest, Game, Movie, Customize and Default preset options.
1. On the Home tab, click EyeRest.
2. Select one of the options.
� EyeRest - reduces blue light of your computer screen for eye care.
� Gaming - enhances the contrast of the screen.
� Movie - enhances the dynamic contrast of the screen.
� Customize - allows you to adjust gamma, contrast and color balance of your computer screen. Please refer to the instructions below.
� Default - uses the system default setting.
Adjusting Customize Preset
Apply changesSlide to adjust settingsReset
Click Customize to adjust settings
25LAN Manager
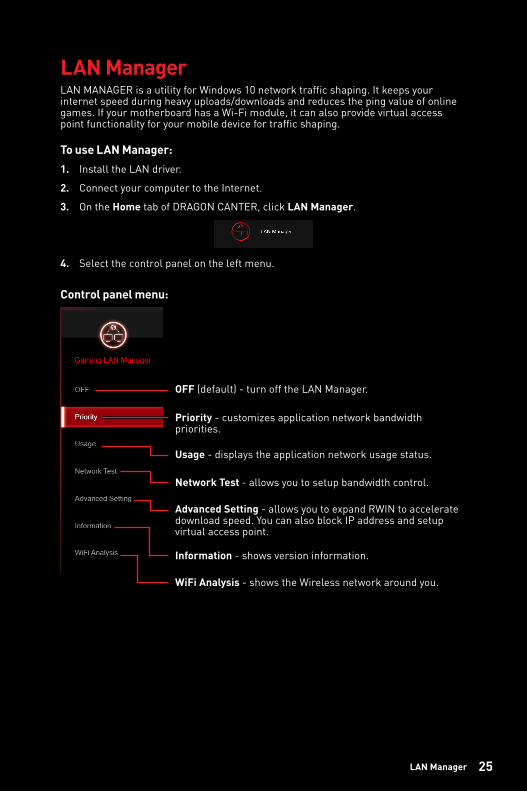
LAN ManagerLAN MANAGER is a utility for Windows 10 network traffic shaping. It keeps your internet speed during heavy uploads/downloads and reduces the ping value of online games. If your motherboard has a Wi-Fi module, it can also provide virtual access point functionality for your mobile device for traffic shaping.
To use LAN Manager:1. Install the LAN driver.
2. Connect your computer to the Internet.
3. On the Home tab of DRAGON CANTER, click LAN Manager.
4. Select the control panel on the left menu.
Control panel menu:
OFF (default) - turn off the LAN Manager.
Priority - customizes application network bandwidth priorities.
Usage - displays the application network usage status.
Network Test - allows you to setup bandwidth control.
Advanced Setting - allows you to expand RWIN to accelerate download speed. You can also block IP address and setup virtual access point.
Information - shows version information.
WiFi Analysis - shows the Wireless network around you.

26 LAN Manager
Setting Network Speed1. Select the Network Test control panel.
2. Click
3. cFos Speed Test web page will be opened.
4. Click to test Upload speed, and click to test Download speed.
5. Fill in the speed test results in the Upload speed and Download speed input boxes.
6. Check the Enable Bandwidth Control checkbox.

27LAN Manager
Customizing Application PrioritiesThe Priority control panel displays currently using network bandwidth applications.
1. Test and set the network speed as described previously.
2. Select the Priority control panel.
3. Use the category bar to filter the displayed applications categories.
4. Click the drop-down menu next to the application name to select the priority of the application.
Note: To stop some applications from using bandwidth, you can click to block the application.

28 LIVE UPDATE
LIVE UPDATELIVE UPDATE feature allows you to scan system and download the latest drivers, BIOS and utilities. With LIVE UPDATE, you don’t need to search the drivers on websites, and don’t need to know the models of motherboard and graphics cards. LIVE UPDATE will download the appropriate drivers automatically.
How to Use the LIVE UPDATE1. Click the Cloud on the tab bar.
Indicates the number of updatable
2. Click at the top. It may take several moments to complete the process.
3. When the download list appears, please select the items you intend to update.
4. Click Install button at the bottom. It may take several moments to complete the process.
5. Reboot your system.
29Graphics Fan Tool
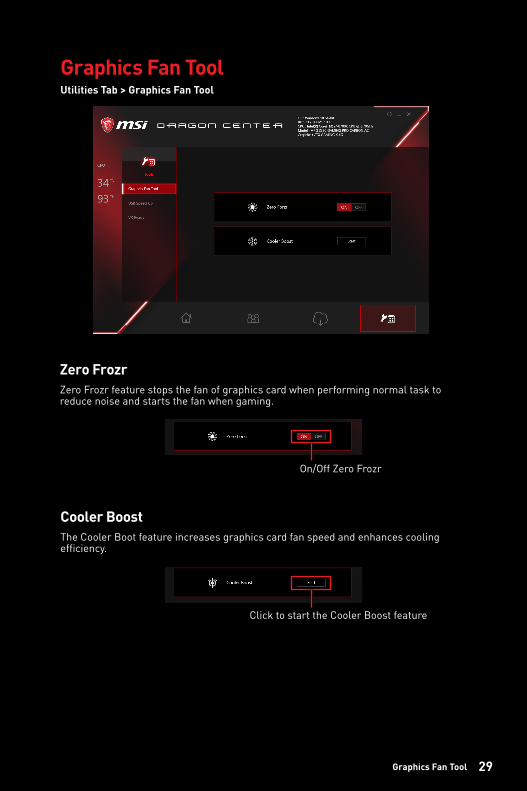
Graphics Fan ToolUtilities Tab > Graphics Fan Tool
On/Off Zero Frozr
Click to start the Cooler Boost feature
Cooler BoostThe Cooler Boot feature increases graphics card fan speed and enhances cooling efficiency.
Zero FrozrZero Frozr feature stops the fan of graphics card when performing normal task to reduce noise and starts the fan when gaming.
30 USB Speed Up
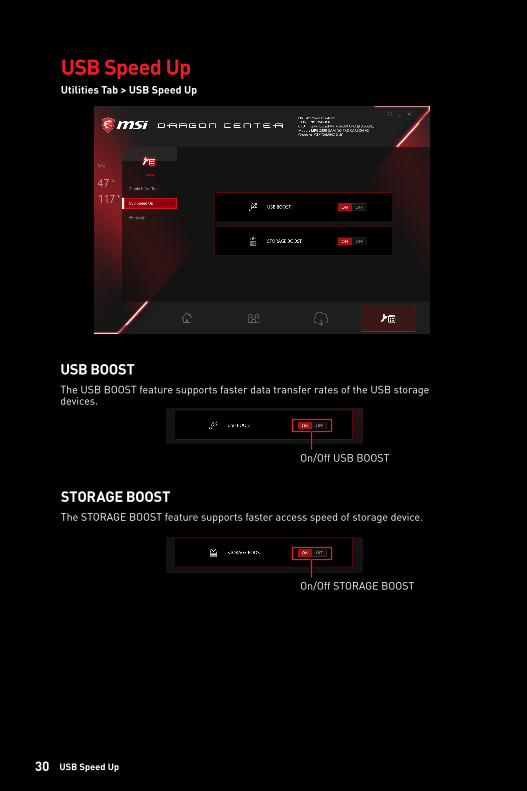
USB Speed UpUtilities Tab > USB Speed Up
On/Off USB BOOST
On/Off STORAGE BOOST
STORAGE BOOSTThe STORAGE BOOST feature supports faster access speed of storage device.
USB BOOSTThe USB BOOST feature supports faster data transfer rates of the USB storage devices.
31VR Ready
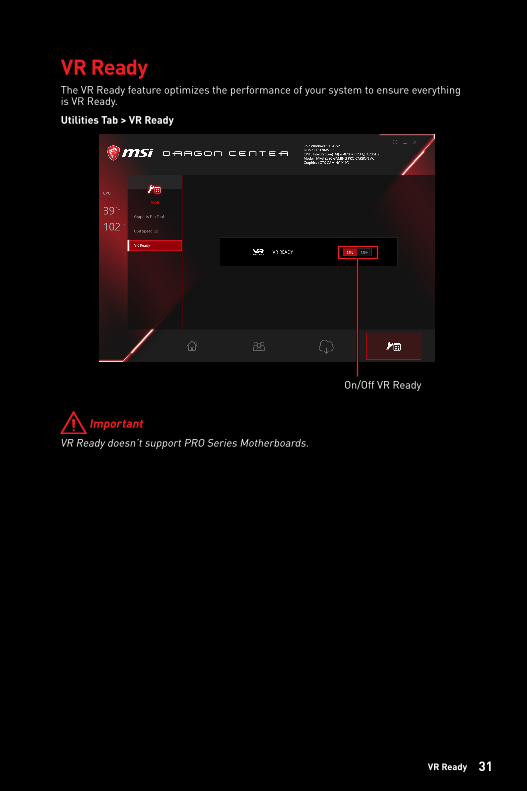
VR ReadyThe VR Ready feature optimizes the performance of your system to ensure everything is VR Ready.
Utilities Tab > VR Ready
On/Off VR Ready
ImportantVR Ready doesn’t support PRO Series Motherboards.

32 Gaming Hotkey
On/Off Gaming Hotkey
Click to select the Macro Genie, Windows Keys and Login Keys sub-menu.
Gaming HotkeyGaming Hotkey provides instant control of the system through user defined hotkeys.
Utilities Tab > Gaming Hotkey
ImportantGaming Hotkey doesn’t support PRO Series Motherboards.
Recording a Macro1. Enter Macro Genie sub-menu.
2. Click and then perform the actions to record the macro.
3. To stop recording the macro, click .
33Gaming Hotkey
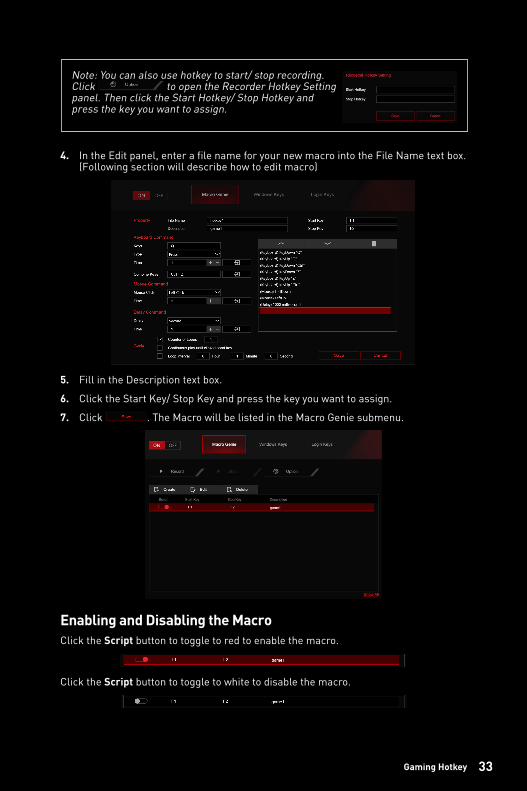
4. In the Edit panel, enter a file name for your new macro into the File Name text box. (Following section will describe how to edit macro)
5. Fill in the Description text box.
6. Click the Start Key/ Stop Key and press the key you want to assign.
7. Click . The Macro will be listed in the Macro Genie submenu.
Enabling and Disabling the MacroClick the Script button to toggle to red to enable the macro.
Click the Script button to toggle to white to disable the macro.
Note: You can also use hotkey to start/ stop recording. Click to open the Recorder Hotkey Setting panel. Then click the Start Hotkey/ Stop Hotkey and press the key you want to assign.
34 Gaming Hotkey
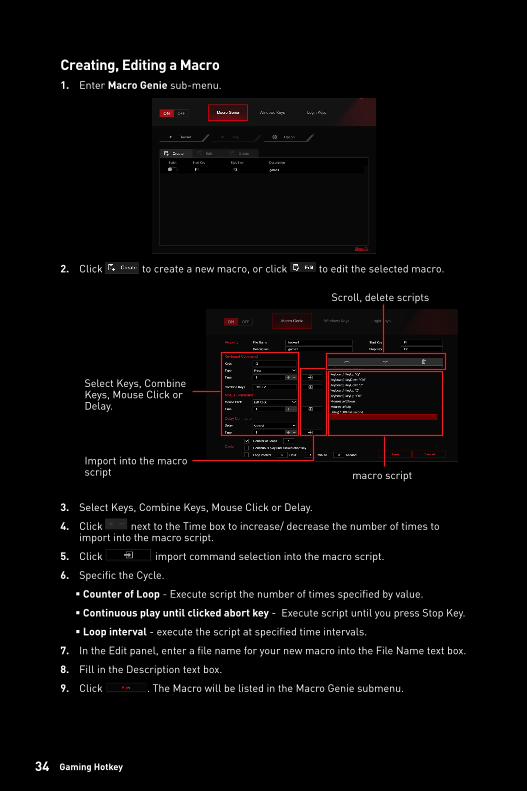
Creating, Editing a Macro1. Enter Macro Genie sub-menu.
2. Click to create a new macro, or click to edit the selected macro.
3. Select Keys, Combine Keys, Mouse Click or Delay.
4. Click next to the Time box to increase/ decrease the number of times to import into the macro script.
5. Click import command selection into the macro script.
6. Specific the Cycle.
� Counter of Loop - Execute script the number of times specified by value.
� Continuous play until clicked abort key - Execute script until you press Stop Key.
� Loop interval - execute the script at specified time intervals.
7. In the Edit panel, enter a file name for your new macro into the File Name text box.
8. Fill in the Description text box.
9. Click . The Macro will be listed in the Macro Genie submenu.
Select Keys, Combine Keys, Mouse Click or Delay.
Import into the macro script macro script
Scroll, delete scripts

35Gaming Hotkey
Making Hotkeys for Windows OS1. Enter Windows Keys sub-menu.
2. Click the input box in front of the action.
3. Press the key you want to assign to the action. For example, press F5 to open Mail as shown below. To cancel it, click .
4. Click to apply changes.
Assign Hotkey to open folder or file
Click to assign the hotkey Click to select folder / file

36 Gaming Hotkey
Making Hotkeys for LoginYou can create Hotkeys to automatically fill in the login page.
1. Enter Login Keys sub-menu.
2. Fill in these input boxes.
� Login info - the name of the Hotkey.
� Hotkey - assign a Hotkey.
� ID - the text for fill in the login ID.
� Tab - select the number of times to press the Tab key.
� Password - the text for fill in the password.
3. Click to apply changes.
Delete the Hotkeys
Select Hotkeys you want to delete Click to delete selected Hotkeys
37Voice Boost
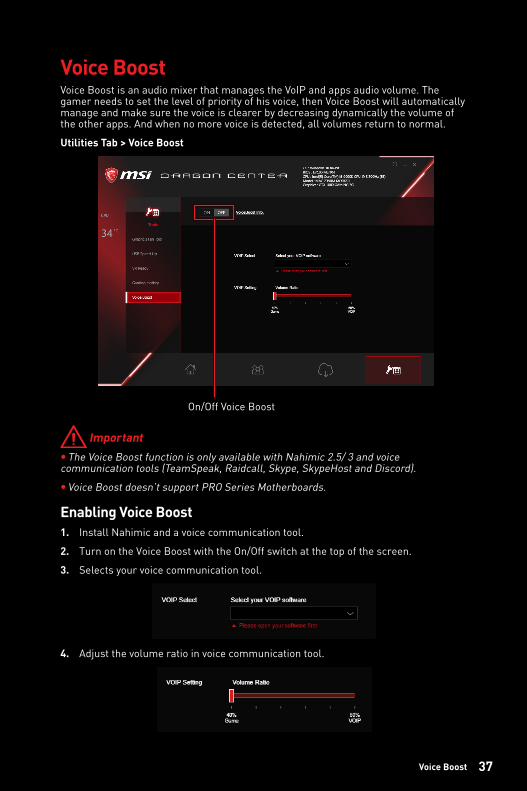
Voice BoostVoice Boost is an audio mixer that manages the VoIP and apps audio volume. The gamer needs to set the level of priority of his voice, then Voice Boost will automatically manage and make sure the voice is clearer by decreasing dynamically the volume of the other apps. And when no more voice is detected, all volumes return to normal.
Utilities Tab > Voice Boost
On/Off Voice Boost
Important yThe Voice Boost function is only available with Nahimic 2.5/ 3 and voice
communication tools (TeamSpeak, Raidcall, Skype, SkypeHost and Discord).
yVoice Boost doesn’t support PRO Series Motherboards.
Enabling Voice Boost1. Install Nahimic and a voice communication tool.
2. Turn on the Voice Boost with the On/Off switch at the top of the screen.
3. Selects your voice communication tool.
4. Adjust the volume ratio in voice communication tool.
38 Notices
Notices Micro-Star Int’l Co.,Ltd.
The MSI logo used is a registered trademark of Micro-Star Int’l Co., Ltd. All other marks and names mentioned may be trademarks of their respective owners. No warranty as to accuracy or completeness is expressed or implied. MSI reserves the right to make changes to this document without prior notice.
Copyright© Micro-Star Int’l Co.,Ltd. 2018 All rights reserved.
Revision HistoryVersion 2.0, 2018/09, First release
Version 2.1, 2018/09, Add Gaming Hotkey, Voice Boost