drag the hand over the contents page topics or a page number
TRANSCRIPT

Browsing this online guideDrag the hand over the Contents page topics or
a page number reference inside the guide.When the hand changes to a pointing finger,
click to jump to the topic or page.To go back to where you started, click the arrow
in the toolbar.

2
Contents
Quick start . . . . . . . . . . . . . . . . . . . . . . . . . . . . . . . . . . . . . . 4
Using this guide . . . . . . . . . . . . . . . . . . . . . . . . . . . . . . . . . . 6
Arranging for two-way wireless service . . . . . . . . . . . . . . . . 6
Using the Handspring Visor Handheld Computer . . . . . . . . 6
Using @ctiveLink . . . . . . . . . . . . . . . . . . . . . . . . . . . . . . . . . 7
Installing the AAA batteries . . . . . . . . . . . . . . . . . . . . . . . . . . 8Charging the backup battery . . . . . . . . . . . . . . . . . . . . . . . . . 9Turning the module on . . . . . . . . . . . . . . . . . . . . . . . . . . . . . 10
Responding to message alerts . . . . . . . . . . . . . . . . . . . . . . . 11
Installing the module . . . . . . . . . . . . . . . . . . . . . . . . . . . . . . . 12
Synchronizing module and handheld computer time . . . . . . 14
Reading the module indicator lights . . . . . . . . . . . . . . . . . . . 14Checking your network coverage status . . . . . . . . . . . . . . . . 15
Installing the two-way applications . . . . . . . . . . . . . . . . . . . . 16
Launching the @ctiveLink application . . . . . . . . . . . . . . . . . 16
Using the @ctiveLink screen . . . . . . . . . . . . . . . . . . . . . . . . 18
Setting up @ctiveLink . . . . . . . . . . . . . . . . . . . . . . . . . . . . . . 20
Setting up alerts . . . . . . . . . . . . . . . . . . . . . . . . . . . . . . . . . . 21Setting up information services . . . . . . . . . . . . . . . . . . . . . . 22
Setting up quiet time . . . . . . . . . . . . . . . . . . . . . . . . . . . . . . . 23
Looking up module information . . . . . . . . . . . . . . . . . . . . . . 24
Deleting all waiting incoming or outgoing messages . . . . . . 26
Looking up technical support . . . . . . . . . . . . . . . . . . . . . . . . 27
Removing the module . . . . . . . . . . . . . . . . . . . . . . . . . . . . . . 28Caring for the module . . . . . . . . . . . . . . . . . . . . . . . . . . . . . . 29

3
Turning the module off . . . . . . . . . . . . . . . . . . . . . . . . . . . . . 29
Getting started with BeamLink. . . . . . . . . . . . . . . . . . . . . . .30
Launching BeamLink . . . . . . . . . . . . . . . . . . . . . . . . . . . . . . 30
Reading a message . . . . . . . . . . . . . . . . . . . . . . . . . . . . . . . 31
Replying to a message . . . . . . . . . . . . . . . . . . . . . . . . . . . . . 32
Forwarding a message . . . . . . . . . . . . . . . . . . . . . . . . . . . . . 33Viewing saved messages . . . . . . . . . . . . . . . . . . . . . . . . . . . 34
Deleting saved messages . . . . . . . . . . . . . . . . . . . . . . . . . . 35
Starting a new message . . . . . . . . . . . . . . . . . . . . . . . . . . . . 36
Adding another address . . . . . . . . . . . . . . . . . . . . . . . . . . . . 37
Composing a message . . . . . . . . . . . . . . . . . . . . . . . . . . . . . 38
Adding a canned message . . . . . . . . . . . . . . . . . . . . . . . . . . 39Adding an attachment . . . . . . . . . . . . . . . . . . . . . . . . . . . . . . 40
Sending a message . . . . . . . . . . . . . . . . . . . . . . . . . . . . . . . 42
Getting started with InfoBeam . . . . . . . . . . . . . . . . . . . . . . .43
Registering to use InfoBeam . . . . . . . . . . . . . . . . . . . . . . . . 43
Viewing the InfoBeam services . . . . . . . . . . . . . . . . . . . . . . 44Using the InfoBeam main menu . . . . . . . . . . . . . . . . . . . . . . 45
Questions and answers . . . . . . . . . . . . . . . . . . . . . . . . . . . .46
Popup, error, and warning messages . . . . . . . . . . . . . . . . .48
Application messages . . . . . . . . . . . . . . . . . . . . . . . . . . . . . . 48
Module messages . . . . . . . . . . . . . . . . . . . . . . . . . . . . . . . . 50
Connection messages . . . . . . . . . . . . . . . . . . . . . . . . . . . . . 51Retrieval messages . . . . . . . . . . . . . . . . . . . . . . . . . . . . . . . 52
Sending messages . . . . . . . . . . . . . . . . . . . . . . . . . . . . . . . . 53

4
Quick startWelcome to @ctiveLink two-way messaging. This section gives you an overview of the steps you take to start using the @ctiveLink wireless messaging module.
If the Handspring Visor� Handheld computer is new to you, be sure to familiarize yourself with it by reading the guides included in the box before you begin using the @ctiveLink module. Become acquainted with the Handspring Visor Handheld home screen, and with Handspring Visor Handheld features such as the address book and Graffiti writing.
The diagram on the facing page shows the @ctiveLink module in the handheld computer. The diagram identifies @ctiveLink features.
� To get started with @ctiveLink
1 Install AAA batteries into the module (see page 8) and charge the @ctiveLink module backup battery (see page 9).
2 Turn the module on (see page 10).
3 Insert the module into the handheld computer (see page 12). The module automatically opens the @ctiveLink main screen and checks for stored messages to transmit.
4 Use the stylus to tap the screen to perform actions such as opening your two-way messages. Turn to page 7 for an introduction to handling two-way messages.
Use the stylus to create messages. Refer to the handheld computer guides to learn how to create text on the screen.
5 Tap the home icon to return to the handheld computer home screen.

5
@ctiveLink main screen
@ctiveButtonIndicator lights
@ctiveLink module
Handheld computerModule release button
Module battery status
Home icon
Alert icon
Network status
6
Using this guideUse the information in this guide to set up your @ctiveLink module and get acquainted with its features. Then use your new @ctiveLink module to stay in touch with your office, your family and friends, and the Internet.
Check the @ctiveLink website at www.glenayre.net/@ctiveLink for updates to this guide.
You can use your @ctiveLink module to:
• Launch the application manually (see page 16).• Read and send messages (see pages 31 and 42).• Check your network coverage (see page 15).• Respond to message alerts (see page 11).• Interpret the alerts and indicator lights (see pages11,14, and 15).
Arranging for two-way wireless serviceTo arrange for two-way wireless service, refer to the Activation Card that is included in the @ctiveLink package.
Networks may restrict the number of characters they transmit in a message, which can occasionally cause a message to be truncated. Ask your service provider about message length restrictions.
Using the Handspring Visor Handheld Computer
For information on using the Handspring Visor Handheld computer, refer to the guides that are provided with it.

7
Using
An alert on the @ctiveLink module announces the arrival of new messages. The alert can be a flashing green indicator light or a tone you can set (see page 21).
When the @ctiveLink module is out of the handheld computer, incoming messages are stored in the module. The module can store up to 150,000 characters of message text. Outgoing messages are stored in the handheld computer.
When you insert the module into the handheld computer, stored messages are immediately and automatically transmitted.
When the module is resident in the handheld computer, incoming and outgoing messages are immediately transmitted. As the module transmits incoming messages, the @ctiveLink application routes each one to the associated @ctiveLink registered application (registered applications are applications that @ctiveLink recognizes). The @ctiveLink main screen lists each application and the number of messages that are associated with it.
� To view a message• Tap an application name to open the application screen and see the list of
waiting messages.• Tap a message to open it.
8
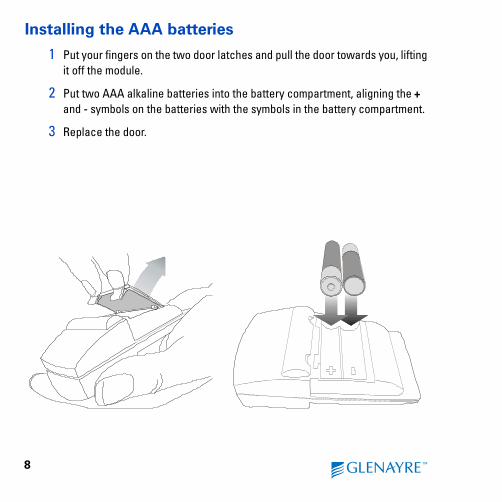
Installing the AAA batteries
1 Put your fingers on the two door latches and pull the door towards you, lifting it off the module.
2 Put two AAA alkaline batteries into the battery compartment, aligning the + and - symbols on the batteries with the symbols in the battery compartment.
3 Replace the door.

9
Charging the backup battery
Before you begin to use the @ctiveLink module, you must charge the backup Ni-Cad battery inside the module.
The Ni-Cad battery maintains module power and protects stored messages if the AAA batteries’ power becomes too low. The Ni-Cad battery also maintains module power while you replace the AAA batteries.
� To charge the backup battery
1 After you have installed the initial AAA batteries, turn the @ctiveLink module on (see page 10).
2 Leave the module on for two hours to charge the Ni-Cad battery.
3 When the battery is charged, turn the module off (see page 29).
4 Replace the two AAA batteries with two new batteries.
5 Turn the module on.
The @ctiveLink module is now ready to use.
When the module is in the handheld computer, an AAA battery status icon appears on the @ctiveLink main screen so that you can monitor AAA battery power (see page 5).
Note To prolong the life of the battery in the handheld computer, remove the @ctiveLink module when you are not using it.
Caution Remove the @ctiveLink module from the handheld computer before you replace the batteries in the handheld. If you try to replace the batteries with the module in, a “fatal error” occurs and you must reset the handheld computer as described in the handheld documentation.

10
Turning the module on
We recommend that you always keep the module turned on whether or not it is in the handheld computer.
• When the module is on, it receives and stores messages. • When the module is on, inserted in the handheld computer, and within the
Full Service area (page 15), outgoing messages are automatically transmitted to the wireless network, and incoming messages are transmitted to the handheld computer.
• When the module is off, it doesn’t receive, send, or store messages. Incoming messages are stored by your service provider until the module is turned on again.
� To turn the module on• Slide the power switch down.
To turn the module on, slide the switch down.
11
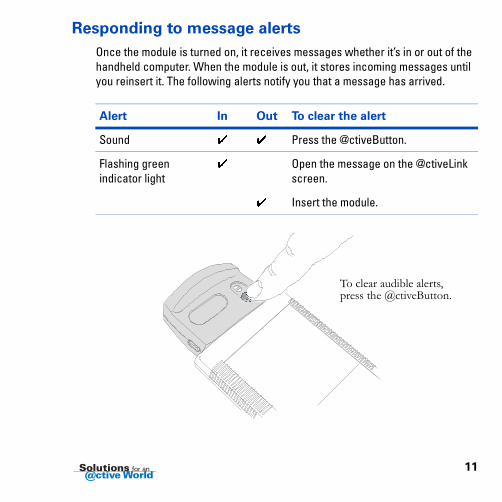
Responding to message alerts
Once the module is turned on, it receives messages whether it’s in or out of the handheld computer. When the module is out, it stores incoming messages until you reinsert it. The following alerts notify you that a message has arrived.
Alert In Out To clear the alert
Sound � � Press the @ctiveButton.
Flashing green indicator light
� Open the message on the @ctiveLink screen.
� Insert the module.
To clear audible alerts, press the @ctiveButton.

12
Installing the module
1 Remove the slot protector (or another module that you have been using) from the handheld.
.

13
2 Insert the @ctiveLink module into the Springboard� expansion slot until the connectors are secure. The @ctiveLink application opens automatically when the module is securely installed.
Note Wait until the handheld computer has completed its initialization before you insert the module for the first time. If you get a “fatal error” message because you inserted the module too soon, reset the handheld computer as described in the documentation that accompanies it.

14
Synchronizing module and handheld computer time
When you insert the @ctiveLink module into the handheld a window pops up with the message “@ctiveLink and Visor times are different. Update @ctiveLink time to hh:mm nm?”( n represents a or p as in am or pm) if the module time is different from the handheld computer time by more than 15 minutes.
• Tap Yes to synchronize module time and handheld computer time.• Tap No to maintain a different time in the module.
Reading the module indicator lights
The module displays the red and green indicator lights described in the following table. Additional indicators advise you of the status of your network connection when you press and hold the @ctiveButton (see pages 5 and 15).
Indicator light What it means
Short flashing green The module is on.
Fast flashing green A new message has arrived.
Flashing red There’s a problem; check for an error message on the @ctiveLink screen.
15
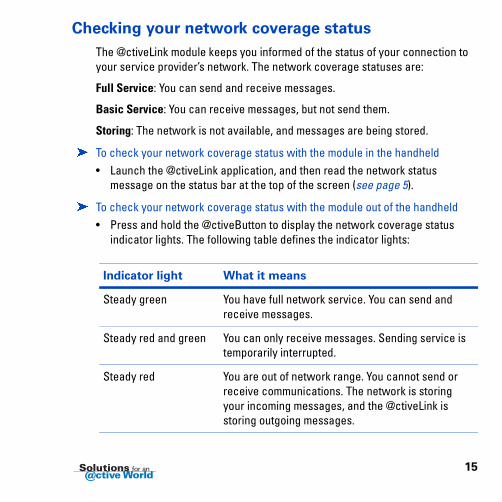
Checking your network coverage status
The @ctiveLink module keeps you informed of the status of your connection to your service provider’s network. The network coverage statuses are:
Full Service: You can send and receive messages.
Basic Service: You can receive messages, but not send them.
Storing: The network is not available, and messages are being stored.
� To check your network coverage status with the module in the handheld • Launch the @ctiveLink application, and then read the network status
message on the status bar at the top of the screen (see page 5).
� To check your network coverage status with the module out of the handheld • Press and hold the @ctiveButton to display the network coverage status
indicator lights. The following table defines the indicator lights:
Indicator light What it means
Steady green You have full network service. You can send and receive messages.
Steady red and green You can only receive messages. Sending service is temporarily interrupted.
Steady red You are out of network range. You cannot send or receive communications. The network is storing your incoming messages, and the @ctiveLink is storing outgoing messages.

16
Installing the two-way applications
Installing the @ctiveLink module the first time automatically installs:
• @ctiveLink application. Use the @ctiveLink application to manage your two-way messages. The @ctiveLink application remains in the handheld computer when the module is removed.
Installing the @ctiveLink module also installs:
• BeamLink� application. Use BeamLink to compose, read, and send two-way messages. The BeamLink application also remains in the handheld computer when the module is removed.
• InfoBeam� application. Use InfoBeam to request and receive information from the Internet about sports, the stock market, weather, and more. The InfoBeam application is automatically removed from the handheld computer when the @ctiveLink module is removed, and is reinstalled when the module is reinserted.
Launching the application
The @ctiveLink application launches automatically when you insert the module into the handheld computer.
You can launch the @ctiveLink application manually by:
• Pressing the @ctiveButton when the module is in the handheld computer (see page 5).
• Tapping the @ctiveLink icon on the home screen (see the facing page).
As @ctiveLink is launching, it checks for any unread messages in the module and automatically lists them on the screen with their associated applications.

17
@ctiveLink also transfers any waiting outgoing messages to the module for transmission to the network.
Handheld computer home screen
@ctiveLink icon
18
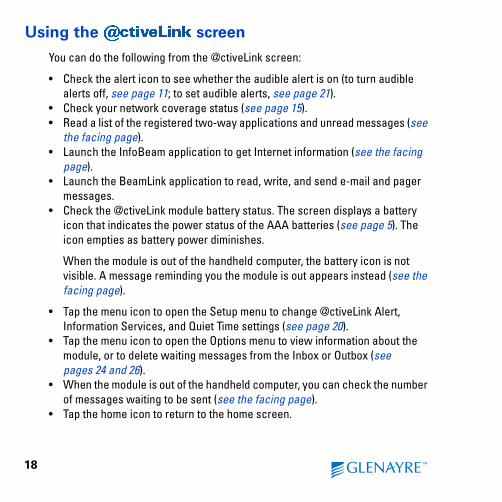
Using the screen
You can do the following from the @ctiveLink screen:
• Check the alert icon to see whether the audible alert is on (to turn audible alerts off, see page 11; to set audible alerts, see page 21).
• Check your network coverage status (see page 15). • Read a list of the registered two-way applications and unread messages (see
the facing page).• Launch the InfoBeam application to get Internet information (see the facing
page).• Launch the BeamLink application to read, write, and send e-mail and pager
messages.• Check the @ctiveLink module battery status. The screen displays a battery
icon that indicates the power status of the AAA batteries (see page 5). The icon empties as battery power diminishes.
When the module is out of the handheld computer, the battery icon is not visible. A message reminding you the module is out appears instead (see the facing page).
• Tap the menu icon to open the Setup menu to change @ctiveLink Alert, Information Services, and Quiet Time settings (see page 20).
• Tap the menu icon to open the Options menu to view information about the module, or to delete waiting messages from the Inbox or Outbox (see pages 24 and 26).
• When the module is out of the handheld computer, you can check the number of messages waiting to be sent (see the facing page).
• Tap the home icon to return to the home screen.
19
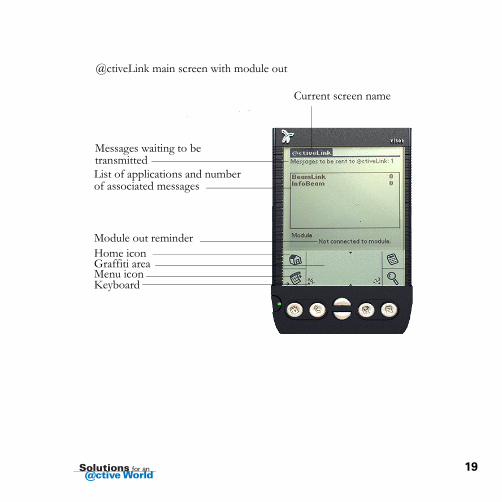
Messages waiting to be transmittedList of applications and number of associated messages
Module out reminder
Menu icon
Home icon
Keyboard
Graffiti area
@ctiveLink main screen with module out
Current screen name

20
Setting up
Setup options are available when the module is in the handheld computer. You can configure @ctiveLink to announce a new message with a sound, and to remain quiet during times when you don’t want to hear audible alerts (for example, during meetings or while you’re sleeping). You have a choice of sounds to play.
� To change @ctiveLink settings
1 Tap the @ctiveLink icon on the home screen, or press the @ctiveButton on the module to launch the @ctiveLink application.
2 Tap the menu icon to display the Setup/Options menu bar and the Setup menu.
Menu icon

21
Setting up alerts
� To set up alerts• Tap Alerts on the Setup menu to open the Alerts window.• Tap � beside Mute on the Alerts Window to insert or remove a checkmark �,
and turn the audible alerts in the module on and off.• Tap the down arrow � beside Message Alert to select a beep, tone, or musical
sound to play when a new message arrives.• Tap the down arrow � beside Re-beep Every to set the length of time between
the tones that announce a new message.• Tap the down arrow � beside Re-beep to set the number of times the tone
plays to announce a message. When your selections are complete, tap OK to save them.
Note Re-beep functions when the module is out of the handheld computer and a newly arrived message is stored in the module. When you reinsert the module, the message is immediately transmitted to the handheld computer and re-beep stops.

22
Setting up information services
Up to six information services, which are distinct from InfoBeam information services, are available through the @ctiveLink application. The available services (for example, online news services) are determined by your service provider.
� To set up information services• Display the Setup menu as described on page 20.• Tap Information Services on the Setup menu to open the Information
Services window.• Tap � in the Enabled column beside a listed information service to insert a
checkmark � and select the service.• Tap � in the LED column beside a service to insert a checkmark � to set up
an LED alert for the service.• Tap � opposite each service to display a list of audible alert types. Tap the
alert type you want. When your selections are complete, tap OK to save them.

23
Setting up quiet time
You can set up a quiet time when the alerts will not sound. The quiet time can be toggled on and off.
� To set up a quiet time• Display the Setup menu as described on page 20.• Tap Quiet Time on the Setup menu to open the Quiet Time screen.• Tap ON or OFF beside Quiet Time to activate or deactivate quiet time. Tap ON
to set up a quiet time.• Tap the time icon beside Quiet Time Start to open a popup window and set the
start time. Tap � and � on the popup window to adjust the time. • Tap the time icon beside Quiet Time End to open a popup window and set the
end time. Tap � and � on the popup window to adjust the time.• Tap � beside Alert at on time to insert a checkmark � to set up an alert
sound when quiet time ends.• Tap OK to save your settings. Tap Cancel to return to the former settings.
Time icon

24
Looking up module information
To get the following information about your @ctiveLink unit, look up Module Information on the Options menu.
• Your @ctiveLink unit serial number• @ctiveLink module software version• @ctiveLink application software version• Profile number (assigned by Glenayre)• Current power level of the AAA and Ni-Cad batteries
� To look up module information
1 Display the Setup/Options menu as described on page 20.
2 Tap Options to display the Options menu.
3 Tap Module Information to open the Module Information window.
4 Tap Done to close the window.

25
Options menu
Module Information window

26
Deleting all waiting incoming or outgoing messages
• Incoming messages that are stored in the @ctiveLink Inbox are listed on the @ctiveLink main screen with associated applications.
• Outgoing messages are located in the @ctiveLink Outbox. The @ctiveLink main screen shows how many messages the Outbox contains.
� To delete all waiting messages
1 Display the Options menu as described on page 24.
2 Tap Options on the menu bar.
3 Tap Delete messages to open the Delete messages window.
4 Tap Outbox to delete all messages waiting to be sent to the module.
5 Tap Inbox to delete unread messages. Tap Cancel to close without deleting.
Outbox messages you can delete.
Inbox messages you can delete.
27
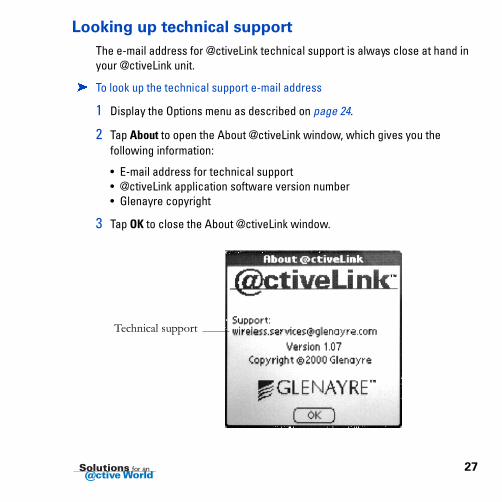
Looking up technical support
The e-mail address for @ctiveLink technical support is always close at hand in your @ctiveLink unit.
� To look up the technical support e-mail address
1 Display the Options menu as described on page 24.
2 Tap About to open the About @ctiveLink window, which gives you the following information:
• E-mail address for technical support• @ctiveLink application software version number• Glenayre copyright
3 Tap OK to close the About @ctiveLink window.
Technical support

28
Removing the module
1 Press and hold the module release button at the side of the module and pull the module out.
2 Insert either another module or the slot protector into the Springboard slot.
Caution Do not remove the module when it is uploading or downloading @ctiveLink messages.
Press module release button at the side of the module.

29
Caring for the module
The @ctiveLink module is designed to be used both in and out of the handheld computer. It doesn’t require any special care.
Turning the module off
Even when the @ctiveLink module is out of the handheld computer, it continues to receive and store messages as long as it is turned on and is in network range. It’s best to leave the module on unless:
• You are in an environment where wireless messaging is prohibited. • You won’t be using your wireless service for an extended period and wish to
conserve battery power.• You are out of range.
� To turn the @ctiveLink module off• Slide the power switch to the OFF position (see page 10).

30
Getting started with BeamLinkUse BeamLink to read, reply to, and compose new wireless messages. To download the complete BeamLink User Guide, go to the @ctiveLink website at www.glenayre.net/@ctiveLink, click Support, then click BeamLink User Guide.
Launching BeamLink
• Tap BeamLink on the @ctiveLink main screen (see page 19).• Tap the Beamlink icon on the home screen.
BeamLink icon
Handheld computer home screen
31
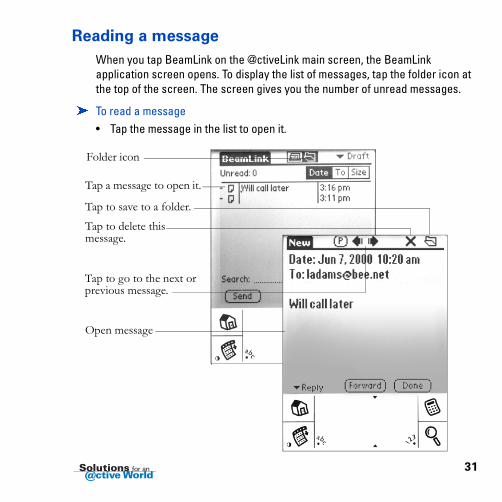
Reading a message
When you tap BeamLink on the @ctiveLink main screen, the BeamLink application screen opens. To display the list of messages, tap the folder icon at the top of the screen. The screen gives you the number of unread messages.
� To read a message• Tap the message in the list to open it.
Tap a message to open it.
Open message
Tap to delete this message.
Tap to save to a folder.
Tap to go to the next or previous message.
Folder icon

32
Replying to a message
1 Tap Reply on an open message. A list pops up in front of the open message and gives you two options for replying. You can select Custom reply (first item on the list) and compose your own message, or you can select a canned message.
2 Tap Custom reply or a canned message. If you choose Custom reply, the Compose screen opens and you can type a message (page 38) and add a canned message and attachments (page 40). If you choose a canned message, the Compose screen opens with your selected message in the message area, then you can add additional text and attachments.
[Reply] in the To field indicates that the reply message will be routed to the original sender. You can also add additional addresses (see page 37 ).
3 Tap Send to send the reply (see page 42).
Canned message inserted in reply
Custom reply and canned message list

33
Forwarding a message
1 Tap Forward on an open message to open the Compose screen (see page 38).
2 Add an address in the To field (see page 37 ).
3 Add text and a canned message if you wish (pages 38 to 40).
4 Tap Send to forward the message.

34
Viewing saved messages
• Tap the folder icon at the top of the BeamLink screen to see a list of messages in the current folder.
• Tap the down arrow � to display a drop-down list of message folder names.• Tap a folder name to display a list of saved messages in the folder.
Message folder icon Message folder drop-down list

35
Deleting saved messages
1 On the BeamLink screen, tap the down arrow � in the top right corner to open the list of folders.
2 Tap a folder to open a list of messages.
3 Tap the dash (-) beside a message you want to delete. The dash changes to a checkmark. Tap several dashes to delete several messages at a time.
4 Tap the menu icon (page 19) to open the Message menu, then tap Delete to delete the messages.
Deleted messages are moved to the Deleted folder.
� To purge messages from the Deleted folder• Tap Purge deleted items on the Message menu.

36
Starting a new message
Find the address you want, then tap it. The Compose screen automatically opens with your selected address in place, ready for you to compose your message. See the handheld computer user guide to add addresses to the address book.
� To find an address• Tap the address book icon to open the list of addresses.• Tap the Lookup field to place the cursor, then type a name to look up.• Tap � beside Lookup to change to Search, then type a search item.• Tap @ or P to open a list of e-mail or pager addresses.
Tap @ for a list of e-mail addresses.Tap P for a list of pager addresses.Tap @ and P for a list of e-mail and pager addresses.
Type an item to look up, then tap the icon.
Address book icon

37
Adding another address
� To add addresses to a message• Tap Lookup on the Compose screen to open a list of addresses.• Tap dashes (-) in the left column of a list to select multiple addresses.
The addresses you select are automatically added to the To field on the Compose screen.
• Type an address using the keyboard or Graffiti area.
Tap the dashes in left column to select multiple addresses.
Tap Compose to open the compose message screen.
Tap anywhere on a line to add one address.
Tap abc to open the keyboard.

38
Composing a message
You can type a message and you can include canned messages, which are brief prewritten messages that are available from a drop-down list on the Compose screen.
• On the Compose screen, write a message, select a canned message, or both.To write or type a message, write on the Graffiti area or tap abc below the Compose screen to display a keyboard.
• Tap the down arrow � to open the list of canned messages.• Tap the message area to position the cursor there and write a message.• Tap a canned message in the list to put it into the message area.
Tap abc to open the keyboard.
Write on the Graffiti area to enter text.
Compose screen
Address inserted from address list
Tap the down arrow for canned messages.Tap the message area to place the cursor and write a message.
Tap Clear to remove the address.

39
Adding a canned message
1 Tap the down arrow � on the Compose screen to open the canned message list.
2 Tap a canned message to put it into the message area and close the canned message list.
Canned messages
Canned message inserted in message area
40
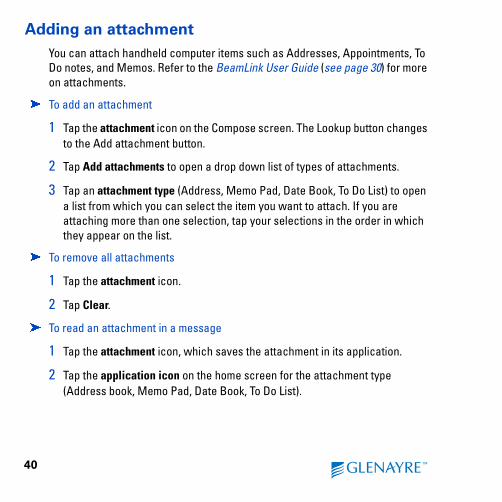
Adding an attachment
You can attach handheld computer items such as Addresses, Appointments, To Do notes, and Memos. Refer to the BeamLink User Guide (see page 30) for more on attachments.
� To add an attachment
1 Tap the attachment icon on the Compose screen. The Lookup button changes to the Add attachment button.
2 Tap Add attachments to open a drop down list of types of attachments.
3 Tap an attachment type (Address, Memo Pad, Date Book, To Do List) to open a list from which you can select the item you want to attach. If you are attaching more than one selection, tap your selections in the order in which they appear on the list.
� To remove all attachments
1 Tap the attachment icon.
2 Tap Clear.
� To read an attachment in a message
1 Tap the attachment icon, which saves the attachment in its application.
2 Tap the application icon on the home screen for the attachment type (Address book, Memo Pad, Date Book, To Do List).

41
Attachment icon
Attachments drop down list

42
Sending a message
Sent messages are stored in the @ctiveLink Outbox until they are sent to the @ctiveLink module.
� To send a message• Tap Send on the Compose screen.
Tap Send to send a message.
43
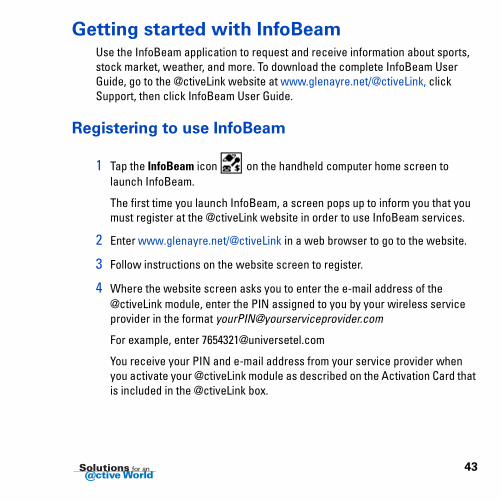
Getting started with InfoBeamUse the InfoBeam application to request and receive information about sports, stock market, weather, and more. To download the complete InfoBeam User Guide, go to the @ctiveLink website at www.glenayre.net/@ctiveLink, click Support, then click InfoBeam User Guide.
Registering to use InfoBeam
1 Tap the InfoBeam icon on the handheld computer home screen to launch InfoBeam.
The first time you launch InfoBeam, a screen pops up to inform you that you must register at the @ctiveLink website in order to use InfoBeam services.
2 Enter www.glenayre.net/@ctiveLink in a web browser to go to the website.
3 Follow instructions on the website screen to register.
4 Where the website screen asks you to enter the e-mail address of the @ctiveLink module, enter the PIN assigned to you by your wireless service provider in the format [email protected]
For example, enter [email protected]
You receive your PIN and e-mail address from your service provider when you activate your @ctiveLink module as described on the Activation Card that is included in the @ctiveLink box.

44
Viewing the InfoBeam services
The icons on the InfoBeam main menu represent the categories of services that are offered. Refer to the InfoBeam User Guide (see page 43) for instructions on using the services. Services are organized into the following categories.
Menu item Services
All All services
Directories Yellow pages, White pages, City search services
Money Stock, Indexes, co info services
News News service
Travel FltView, Route, FindFlt services
Weather Weather, Forecast services
Sports Sports service
Fun Lottery, Theater, Movies, Hscopes services
Packages FedEx, UPS, Airborne services
Misc BarPoint, Dining, Nearby, Contact services

45
Using the InfoBeam main menu
Three screens of services icons make up the InfoBeam main menu.
� To find a service• Tap an icon on the InfoBeam main menu.
� To view the next or previous InfoBeam menu screen• Tap � or �.
Tap arrows to go to next or previous page.

46
Questions and answersFor technical support, e-mail [email protected].
How can I tell if the module batteries are running low?
• The module battery icon on the @ctiveLink main screen is almost empty.
• A “Low battery alert” pops up on the @ctiveLink main screen.
Install new batteries using the procedure shown on pages 8 and 9.
Does my @ctiveLink module have to be turned on to receive messages?
Yes. When the @ctiveLink module is turned off, you can’t receive or send messages. Incoming messages are stored by your service provider.
What version of the Palm operating system do I need to use with the @ctiveLink?
The Palm operating system must be version 3.1 or later.
How can I find out more about BeamLink and InfoBeam?
Go to @ctiveLink’s website at www.glenayre.net/@ctiveLink and click the icons to download BeamLink and InfoBeam user guides.
Do I lose the applications in my handheld computer when I remove the @ctiveLink module?
When you remove the @ctiveLink module, the @ctiveLink and BeamLink applications stay in your handheld computer. InfoBeam is removed.
How do I type in a message? Use the abc keyboard or the Graffiti area (page 19). See also the handheld computer user guides.

47
How do I read attachments on my e-mail?
To read attachments, first save them by tapping the attachment icon in a message. The attachment is added to the appropriate application (Address Book, Memo Pad, Date Book, To Do List). Open the application to read the attachment.
Does the module have to be inserted to send a message?
Yes. The @ctiveLink application stores messages in the @ctiveLink Outbox if the module is out of the handheld computer. When the module is reinserted, the messages are automatically sent. (You can’t open the @ctiveLink Outbox to view waiting messages, but you can see the number of waiting messages on the @ctiveLink main screen.)
Should I turn off the @ctiveLink module before inserting it in the handheld?
Turn the module on before you insert it, and then leave it on. As soon as it’s inserted, it installs applications and begins to transmit messages.
Should I turn off the module when I’m not using it?
We recommend that you turn it off only on rare occasions in order to make sure that it can always receive messages (see page 29).
What does it mean when the module indicator lights show:
• Green flashes? The module power is on.
• Red flashes? There’s a problem; check for a popup message on the @ctiveLink main screen (see page 48).

48
Popup, error, and warning messagesPopup, error, and warning messages pop up at the bottom of the @ctiveLink screen.
The messages described in the following tables can appear when a problem occurs during an action. The messages themselves can suggest what to do, or the table provides a solution.
Application messages
The messages in the following table are associated with the @ctiveLink application and can appear when you insert the module or launch the @ctiveLink application. Message titles appear in the black bar at the top of the message windows.
Popup alert What it means and what to do
Low battery alert The battery has reached a level that is too low to function normally. Tap the alert to read the message. Replace the AAA batteries.
Message fail A message has failed to transmit. Resend the message.
Cannot transmit The module is out of range to transmit messages. Check the module service level.
Memory full The handheld computer memory is full. Delete some handheld computer applications.
49
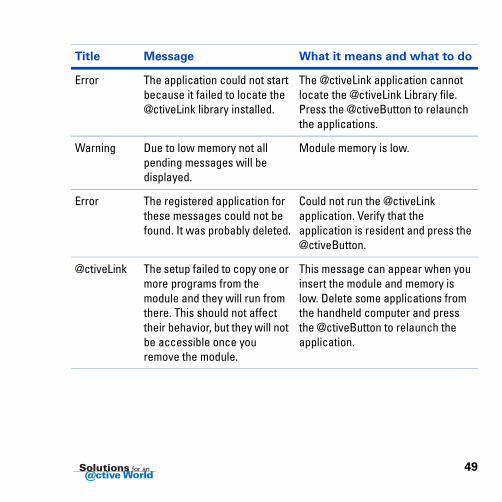
Title Message What it means and what to do
Error The application could not start because it failed to locate the @ctiveLink library installed.
The @ctiveLink application cannot locate the @ctiveLink Library file. Press the @ctiveButton to relaunch the applications.
Warning Due to low memory not all pending messages will be displayed.
Module memory is low.
Error The registered application for these messages could not be found. It was probably deleted.
Could not run the @ctiveLink application. Verify that the application is resident and press the @ctiveButton.
@ctiveLink The setup failed to copy one or more programs from the module and they will run from there. This should not affect their behavior, but they will not be accessible once you remove the module.
This message can appear when you insert the module and memory is low. Delete some applications from the handheld computer and press the @ctiveButton to relaunch the application.

50
Module messages
The messages in the following table appear when an action by the @ctiveLink module cannot be completed.
Title Message
Warning The @ctiveLink battery is low.
Warning Return @ctiveLink to manufacturer.
Warning Return @ctiveLink to reseller.
Warning Cannot complete the operation. Make sure that the @ctiveLink is connected to the handheld computer, and that @ctiveLink power is on.
@ctiveLink Error One of the message(s) failed during transmission. Resend the message.
@ctiveLink Error Unable to retrieve messages from @ctiveLink module. The handheld computer is out of memory.
Custom Alert Failure to copy critical component (“dbname, nnn“).

51
Connection messages
The following messages can appear when the module is unable to connect with the @ctiveLink application.
Title Message What it means and what to do
Connect failed Unable to open database
The @ctiveLink cannot open the library database. Module memory may be too low.
Connect failed Out of memory Handheld computer memory may be low. Delete some handheld applications and press the @ctiveButton.
Connect failed Error value: nnnn The connect action is encountering an error value. Press the @ctiveButton.
Error: Connect failed Canceled by user The user has interrupted the connection.
Connect failed Transaction failed. The connect action has been unable to connect after six tries. Remove and reinsert the @ctiveLink module.

52
Retrieval messages
The following messages can appear when the @ctiveLink application cannot retrieve messages.
Title Message What it means and what to do
Retrieve failed Out of memory Handheld computer memory is low. Delete some handheld applications.
Retrieve interrupted
Canceled by user The user has canceled the retrieve action.
Retrieve failed No response from device
The retrieve action stops after six tries to contact the module. Remove and reinsert the module.
Retrieve failed Transaction failed. The retrieve action returns an error value. Remove and reinsert the module.
Message corrupted
No message-id found The retrieve action cannot find the message ID.

53
Sending messages
The following error messages can appear when @ctiveLink is attempting to send messages.
Message What it means and what to do
Address nnnn is too long The message is too long. Check with your service provider and the application user guides for maximum message length.
Address nnnn: Invalid pager number
The pager number is invalid. Verify the pager number.
Message number is invalid! The reply message ID is invalid.
Send failed. Out of memory Handheld computer memory is low. Delete some handheld applications.
Send interrupted. Canceled by user.
The user has canceled the send action.
Transaction failed. The send action stops after six tries to connect. Remove and reinsert the module.
Module returned an error. Message may be too old to reply.
The reply has failed.

FCC compliance
This device complies with Part 15 of the FCC rules. Operation is subject to the following two conditions: (1) This device must not cause harmful interference and (2) this device must accept any interference received, including interference that may cause undesired operation.
Safety notice
The @ctiveLink module conforms to UL-913 hazardous and locations Class 1 and Groups A through D.
Warning: Substitution of components may impair intrinsic safety.
Warning: To prevent ignition of a hazardous atmosphere, batteries must only be changed in an area known to be nonhazardous.The @ctiveLink module is not designed, manufactured or intended for use in hazardous environments requiring fail-safe performance, such as in the operation of nuclear facilities, aircraft navigation or communication systems, high-risk medical situations, or military environments ("High Risk Activities"). Glenayre expressly disclaims any express or implied warranty of fitness for High Risk Activities.
Model @ctiveLink Certificate No. 12251 CANADA 522195688A12252 CANADA 522341116A

Conformité avec le FCC
Cet appareil est en conformité avec la partie 15 des règles du FCC. L’opération de tel appareil est sujet aux conditions suivants: (1) cet appareil ne doit pas causer d’interférence nuisible et (2) cet appareil doit accepter tout d’interférence tel que reçu, inclu selle causant l’opération anormal de l’équipement.
Sécurité
Le module @ctiveLink est conforme aux normes de sécurité UL-913 des emplacements dangereux Class 1 et de groupes A à D.
Le module @ctiveLink n’est pas conçu, fabriqué ou prévu pour une utilisation dans des emplacements dangereux nécessitant un système à sécurité intégrée, tel que dans l’exploitation d’installations nucléaires, de systèmes de communications ou de navigation aérienne, dans les situations médicales a resques élevés ou dans un environnement militaire (activités à risques élevés). Glenayre désavoue explicitement toute garantie de conformité formelle ou tacite pour des activités à risques élevés.
Avertissement: La substitution de composants peut compromettre la sécurité intrinsèque.Avertissement: Afin de prévenir l’inflammation d’atmosphères dangereuses, ne changer les batteries que dans des emplacements designés non dangereux.
Model @ctiveLink No. de certificat 12251 CANADA 522195688A12252 CANADA 522341116A
Copyrights
© 2000 Glenayre Electronics, Inc.
This document is copyrighted with all domestic and international rights reserved. No part of this document may be reproduced, stored in a retrieval system, or transmitted, in any form, by any means, without the prior written permission of Glenayre Electronics, Inc. No patent is assumed with respect to the use of the information contained in this document.
Disclaimer
Glenayre Electronics, Inc. assumes no responsibility for errors in this document, omissions, or their consequences. The information is subject to change without notice.
Trademarks
Glenayre, the Glenayre logo, Solutions for an @ctive World, the Solutions for an @ctive World logo, and @ctiveLink are trademarks of Glenayre Electronics, Inc. Visor and Springboard are trademarks of Handspring, Inc. InfoBeam and BeamLink are trademarks of JPSystems, Inc.
All brand names and product names are trademarks or registered trademarks of their respective companies and are used with the permission of their owners.
Website
http://www.glenayre.net/@ctiveLink
Glenayre Technical Communications PN9110.01417 Revision 1.1