downloadterminal pro · 3 table of content delivery content and accessories 2 connection and action...
TRANSCRIPT

www.fleet.vdo.com
Downloadterminal ProFlexible download of digital tachograph data

2
Delivery content and accessories
Delivery contentDownloadterminal ProMains adapter (100 - 240 V)RJ-45 network cable (Ethernet)USB cableFour seals for the lateral housing coverFour rubber feetInstallation and product CDBooklet (quick reference guide in 6 languages)AccessoriesCard cleaning clothCleaning card

3
Table of ContentDelivery content and accessories 2
Connection and action overview 4
Deutsch 5 - 18
Español 19 - 32
Français 33 - 46
English 47 - 60
Italiano 61 - 74
Nederlands 75 - 88
System requirements 89
Technical data, file extensions and drive folders 90
Disclaimer 91

4
Connection and action overview
App: Application SoftwareCOMC: TIS-Web® CommunicatorDC: Driver cardDLD: Download DeviceDLD SR: DLD Short Range IIDLD WR: DLD Wide Range IIDLK: Download KeyDLK Pro: Download Key ProDMM: TIS-Web® Data ManagementMAP TIS-Web® MappingMCR: Mobile Card ReaderRTM: Remote TCO ManagerSL: DTCO® SmartLink
https:
https:
https:
https:
https:
MTCODTCO
SL
https:
https:
GPRS data transfer
TIS-Web Server
Driver area Office
DC
send
DC
reports
Service provider(GPRS)
WLANdata transfer
TIS-WebCommServer
Database
WebServer
MCR
DLK
USBcable
USB
ScannerChip cardreader
TIS-Web RTM
Tools*
TIS-WebclientDMM
COMCMAP
USBstick
USBcable
DLK or DLKPro
DLKPro
DLD SR II DLD WR II
GPRSWLAN
ChartAnalyser
DLT Pro
DLK, DLKProor DC
App

5
D
Downloadterminal Pro, der erste KontaktDie neue Generation des Downloadterminal Pro ermöglicht Ihren Fahrern ein noch effizien-teres und informativeres Über-tragen digitaler Tachographen-daten.Sie erhalten nach selbstständigem Herunterladen eine Übersicht über• Aktivitäten,• Ereignisse und Störungen und • Fahrer- und Fahrzeuginforma-
tionen.Zu tun bleibt nur noch, die Daten auf Ihren PC zu übertragen; siehe ab Seite 17.
Hinweis: Bevor Sie das Downloadterminal Pro in Betrieb nehmen, müssen Sie
• die Einsatzvariante bestimmen, nach der das Downloadterminal Pro vornehmlich genutzt werden soll (siehe Seite 6),
• den Entladungsschutz von der Pufferbatterie entfernen (siehe Seite 6),
• die Konfigurationssoftware auf wenigstens einem Computer installieren (siehe Seite 7), und
• bei Anschluss über USB-Kabel den USB-Gerätetreiber instal-lieren (siehe Seite 7).
Hinweis: Ist in diesem Booklet vom Download Key oder vom Download Key Pro die Rede, so sind stets auch alle Varianten dieser Produkte gemeint, z. B. Inspection Key oder TIS-Compact.
TFT-Display zur Benutzerführung und zum Anzeigen von Daten der aktuell gesteckten Fahrerkarte oder des aktuell gesteckten Download Keys
SmartCard Kartenleser für Fahrer- und Unternehmenskarte
USB-Schnittstelle für USB-Stick oder Download Key
Scroll-Feld zur Navigation und Scroll-Funktion
Vier Pfeiltasten und OK-Taste zur Navigation und Bestätigung
Gehäuseabdeckung über der Puffer-batterie sowie den Strom- und Kommu-nikationsanschlüssen
RFID-Chip Leser zur automatisierten Führerscheinkontrolle
Netzwerkkabel (werkseitig montiert)
Stromversorgung mit Steckernetzteil (werkseitig montiert)
USB-Kabel für Verbindung zum Computer
Produkt-CD mit
• Konfigurationssoftware
• USB-Gerätetreiber
• Dienst zur automatischen Daten-übertragung

6
D
Einsatzvarianten und PufferbatterieFür das Datenmanagement sind die Daten vom Downloadterminal-Pro einfach abrufbar. Entscheiden Sie, welche Einsatzvariante für Sie in Frage kommt:• Stand-Alone Betrieb• Netzwerkkabel (Standard)• Verbindung über SFTP-Server• USB-Kabel (siehe Lieferumfang)• Crossover-Kabel (siehe Tipp).Ist die Pufferbatterie vom Ent-ladungsschutz befreit und das gewünschte Kabel installiert, müs-sen Sie das Downloadterminal Pro nur noch an die Stromversorgung anschließen.
Vorsicht: Ziehen Sie das Steckernetzteil aus der Steckdose, bevor Sie das Downloadterminal Pro öffnen.
Hinweis: Aufgrund der unabhängigen Stromversorgung bleibt das Downloadterminal Pro auch dann betriebsbereit und kann die Daten von Fahrerkarten und Download Keys speichern, wenn der Computer heruntergefahren ist.
Tipp: Wenn Sie statt des Netzwerkkabels ein Crossover-Kabel verwenden, können Sie das Downloadterminal Pro direkt an einen Computer anschließen. Vorausgesetzt, dieser verfügt über einen freien Netzwerkanschluss.
Im Stand-Alone Betrieb übertragen Sie die Konfiguration (siehe Seite 11) und die zwischengespeicherten Download-Dateien per USB-Stick (siehe Seite 18):
Variante für die Übertragung und Weiter-verarbeitung auf einem beliebigen Com-puter.
Mit dem Netzwerkkabel können Sie das Downloadterminal Pro an das haus-interne Netzwerk anschließen. Die Dateien werden per Dienst automatisch abgerufen und gespeichert (siehe Seite 17):
Variante bei großen Flotten mit hohem Datenaufkommen.
Für den direkten Anschluss an einen Computer wählen Sie das USB-Kabel.
Die Dateien werden per Dienst automa-tisch abgerufen und in einem Ordner Ihrer Wahl gespeichert (siehe Seite 8):
Variante für kleinere bis mittlere Flotten bei automatischer Datenübertragung.
Aktivieren der Pufferbatterie:
• Entfernen Sie die Schrauben der seit-lichen Abdeckung und ziehen Sie die Abdeckung vorsichtig heraus.
• Ziehen Sie die Pufferbatterie aus ihrer Halterung und entfernen Sie den Entla-dungsschutz.
• Setzen Sie die Pufferbatterie wieder ein (Plussymbol zeigt zum Gehäuseboden), und verschrauben Sie die seitliche Abdeckung.

7
D
Konfigurationssoftware und Dienst installierenDie Software ist für alle Einsatz-varianten zwingend erforderlich. Sie benötigen diese, um• das Downloadterminal Pro zu
konfigurieren.• den Dienst für die automa-
tische Datenübertragung zu installieren.
• ein Update der Firmware zu übertragen.
• einen USB-Stick für die Über-tragung der Konfiguration oder den Abruf der Daten vorzube-reiten (Stand-Alone Betrieb).
Hinweis: Die Software installieren Sie
• auf dem Computer, an den das Downloadterminal Pro über USB- oder Crossover-Kabel angeschlossen werden soll oder
• auf einem beliebigen Computer oder Server innerhalb Ihres Netzwerkes (Netzwerkbetrieb) oder
• auf einem Computer (Stand-Alone Betrieb), von dem aus die Konfiguration per USB-Stick vorbereitet werden soll.
Hinweis: Den Dienst müssen Sie installieren, wenn Sie das Downloadterminal Pro direkt an einen Computer oder in Ihrem Netzwerk anschließen wollen. Sie benötigen die Berechtigung zum Installieren und Starten von Diensten. Gegebenenfalls müssen Sie zum Installieren des Dienstes die Konfiguartions-software mit der Option „Als Administrator ausführen“ starten.
Hinweis: Mit der Konfigurationssoftware kann auch ein USB-Treiber für die Konfiguration und Kommunikation per USB installiert werden.
Installation der Software (Administra-tionsrechte erforderlich):
• Legen Sie die Produkt-CD in das CD-/DVD-Laufwerk.
Die Installation startet automatisch.
Sollte dies einmal nicht der Fall sein, starten Sie den Windows® Explorer, wechseln zum CD-/ DVD-Laufwerk und doppelklicken auf „setup.exe“.
• Folgen Sie dem Assistenten, der Sie durch die Installation führt.
Starten Sie die Software VDO Down-loadterminal Pro.
• Ein Hinweis zeigt an, dass der Dienst noch nicht gestartet oder installiert wurde. Bestätigen Sie diesen mit [OK].
• Wählen Sie für den USB- oder Netz-werkbetrieb Werkzeuge > Dienst installieren u. starten....
Wählen Sie Systemkonto verwenden oder ein Konto, von dem der Dienst automatisch gestartet werden soll. Klicken Sie auf [Installieren...], und bestätigen Sie den Hinweis mit [OK].Ob der Dienst aktiv ist, können Sie über [Start] > Systemsteuerung > Ver-waltung > Dienste und einem Doppelklick auf Downloadterminal Pro prüfen.

8
D
Konfigurationssoftware – ein erster ÜberblickDie Konfigurationssoftware bietet Ihnen unter anderem folgende Ein-stellmöglichkeiten:• Übertragung von Daten• Verbindung bei automatischer
Kommunikation• Wahl der Verzeichnisse für
Updates und heruntergeladene Dateien
• Grundeinstellungen des Downloadterminal Pro.
Zudem erhalten Sie Informationen zur Kommunikation mit dem Downloadterminal Pro.
Tipp: Wenn am Downloadterminal Pro einige Zeit keine Aktivitäten erfolgen, wird ein Bildschirmschoner gestartet. Die Zeitspanne bis zu dessen Start stellen Sie im Register Parameter II ein.
Wählen Sie im Menü Sprache die gewünschte Sprache.
Legen Sie im Register Terminalliste Ihre Downloadterminal Pro an.
Nehmen Sie in den Registern Parameter I – III die allgemeinen Einstellungen für das in der Terminal-liste ausgewählte oder neu angelegte Downloadterminal Pro vor.
Wählen Sie in den Registern Datenverbindung I – II die entspre-chenden Einstellungen zur automati-schen Kommunikation mit dem Downloadterminal Pro per USB- oder Netzwerkkabel.
Entscheiden Sie im Register Status & Service, was passieren soll, wenn der Computer das nächste Mal mit dem Downloadterminal Pro Kontakt aufnimmt; siehe auch Seite 17.
Im nächsten Schritt müssen Sie die Konfigurationsdaten nur noch auf das Downloadterminal Pro übertragen.
Je nach Einsatzvariante übertragen Sie die Daten
• per USB-Stick (Stand-Alone Betrieb oder Netzwerkbetrieb nach Änderung der IP-Adresse); siehe Seite 18.
• per Netzwerkkabel; siehe Seite 17.
• per USB- oder Crossover-Kabel; siehe Seite 17.

9
D
Datentransfer per Kabelanschluss konfigurieren Sie haben
• die Software installiert und gestartet,
• den Dienst installiert und gestartet und
• sich von Ihrem Netzwerkadmi-nistrator die Netzwerkadresse bestätigen lassen, eine neue vergeben oder diese per Server (DHCP) automatisch bezogen.
Wird die Netzwerkadresse geän-dert, müssen Sie die Konfiguration per USB-Stick übertragen; siehe Seite 11, ansonsten Seite 17.
Hinweis: In der Konfigurationssoftware sind für Netzwerk-adresse, Netzwerkmaske und Gateway standardmäßig Werte angegeben. Wenden Sie sich an Ihren Netzwerkadministrator, ob diese Werte verwendet werden können:
• IP-Adresse: 192.168.99.1
• Subnet-Maske: 255.255.255.0
• Default-Gateway: 0.0.0.0.
Tipp: Sie können noch weitere Einstellungen vornehmen; siehe dazu Seite 8.
Hinweis: Die Geräte-ID können Sie auch über das Menü Sup-port Ihres Downloadterminal Pro abfragen; siehe auch Seite 15.
Wählen Sie im Register Parameter I • [Neu], um ein neues oder weiteres
Downloadterminal Pro anzulegen oder
• [Ändern], um ein bereits angelegtes Downloadterminal Pro zu bearbeiten.
Geben Sie die Geräte-ID und die Bez-eichnung (z. B. einen Namen) für das Downloadterminal Pro ein.
Die Geräte-ID finden Sie auf der Boden-platte Ihres Downloadterminal Pro (siehe auch 2. Hinweis).
Wechseln Sie zum Register Datenverbindung I.
Wählen Sie die Betriebsart• Polling über Netzwerk, wenn Sie das
Netzwerkkabel anschließen möchten.
Deaktivieren Sie gegebenenfalls das Häkchen DHCP (automatisch beziehen), und geben Sie im Abschnitt TCP/IP-Konfiguration die IP-Adresse, Subnet-Maske und Default-Gateway ein; siehe auch Hinweis.
• Polling über USB, wenn Sie den USB-Treiber installiert und das USB-Kabel angeschlossen haben; siehe Seite 6.
Klicken Sie auf [Speichern].

10
D
Weitere Einstellungen zum Kabelanschluss vornehmen Sie haben in den Registern
• Parameter I – III und• Datenverbindung I – II
alle erforderlichen Angaben zur Kommunikation zwischen dem Downloadterminal Pro und Ihrer Computer-Umgebung vorge-nommen; siehe auch Seite 9.
Vor der Übertragung der Konfigu-ration bleibt dann nur noch, ein paar grundsätzliche Einstellungen vorzunehmen.
Hinweis: Im Netzwerkbetrieb und mit Hilfe einer USB-Kabel Verbindung erfolgt jegliche Datenübertragung vom oder zum Downloadterminal Pro automatisch durch den Dienst.
Hinweis: Wenn Sie das Downloadterminal Pro über USB-Kabel betreiben, müssen Sie keine IP-Adresse angeben.
Tipp: Denken Sie auch daran, dass Sie bei Verwendung einer Firewall ggf. eine Ausnahme für die Kommunikation des Termi-nal-Dienstes konfigurieren müssen.
Wählen Sie das Register Einstellungen (Global), und klicken Sie auf [Ändern].
Geben Sie unter Polling-Zyklus pro Terminal die Zeit an, nach der zum Downloadterminal Pro automatisch eine Verbindung aufgebaut werden soll.
Die Datenverbindung zu Ihrem Downloadterminal Pro wird auch dann aufgebaut, wenn Sie einmal Änderungen an der Konfiguration oder den hier beschriebenen Einstellungen vornehmen.
Einzige Ausnahme: Sie ändern die IP-Adresse für den Netzwerkbetrieb; siehe hierzu Seite 11.
Legen Sie das Verzeichnis fest, in dem
• neue Firmware für das nächste Update zwischengespeichert werden soll.
• vom Downloadterminal Pro über-tragene Daten gespeichert werden sollen, z. B. für die Archivierung unter TIS-Web®.
Ändern Sie ggf. die weiteren Angaben, und klicken Sie auf [Speichern].Mit der nächsten Verbindung wird die neue Konfiguration übertragen; siehe auch Seite 17.
Haben Sie die IP-Adresse geändert, fahren Sie fort mit Schritt auf Seite 11.

11
D
Datentransfer per Stand-Alone Betrieb konfigurieren Ein USB-Stick ist am Computer
gesteckt.
Die Konfiguration müssen Sie per USB-Stick übertragen, wenn Sie Ihr Downloadterminal Pro• im Stand-Alone Betrieb ver-
wenden oder • die IP-Adresse für den Netz-
werkbetrieb geändert haben; siehe dazu auch Seite 9.
Hinweis: Aktivieren Sie im Register Einstellungen (Global) das Kontrollkästchen Kennung für Upload auf USB-Stick verwenden, wenn Sie die Sicherheit der Daten beim Herunter-laden per USB-Stick erhöhen möchten.
Geben Sie eine frei bestimmbare Zeichenkette in das Feld Ken-nung für Upload auf USB-Stick ein, oder klicken Sie auf
, um die Zeichenkette per Zufallsgenerator zu erzeugen. Diese Zeichenkette wird vor dem nächsten Herunterladen von Tachographendaten abgeprüft.
Hinweis: Die Geräte-ID können Sie auch über das Menü Sup-port Ihres Downloadterminal Pro abfragen; siehe auch Seite 15.
Tipp: Nach Übertragen der Konfiguration und dem anschließen-den Systemneustart kann am Downloadterminal Pro die Sys-temzeit kontrolliert und ggf. manuell korrigiert werden.
Wählen Sie im Register Terminalliste
• [Neu], um ein neues oder weiteres Downloadterminal Pro anzulegen oder
• [Ändern], um ein bereits angelegtes Downloadterminal Pro zu bearbeiten.
Angezeigt wird das Register Parameter I, so dass Sie die gewünschten Eingaben oder Änderungen vornehmen können.
Geben Sie die Geräte-ID und die Bez-eichnung (z. B. einen Namen) für das Downloadterminal Pro ein.
Die Geräte-ID finden Sie auf der Boden-platte Ihres Downloadterminal Pro.
Wechseln Sie zum Register Datenverbindung I.
Wählen Sie für den Stand-Alone Betrieb die Betriebsart Stand-Alone über USB-Stick, und klicken Sie auf [Speichern].
Wählen Sie im Menü USB-Stick den Befehl Konfiguration auf USB-Stick speichern.
Wählen Sie in der Laufwerksauswahl den USB-Stick, und bestätigen Sie den Hinweis mit [OK].Nun müssen Sie den vorbereiteten USB-Stick nur noch in den USB-Port am Downloadterminal Pro stecken: Die Konfiguration wird automatisch über-tragen und das Downloadterminal Pro wird neu gestartet.

12
D
Datentransfer auf SFTP-Server oder mit LTE einrichten Die Zieladresse des SFTP-Ser-
vers ist vom Downloadterminal Pro zu erreichen, z. B. durch eine stati-sche IP-Adresse oder einen Domainnamen, und Schreibrechte auf das zu nutzende Verzeichnis sind vorhanden.
Das Downloadterminal Pro unter-stützt auch SSL-Verbindungen. Damit ist es möglich, zum automa-tischen Ablegen der gespeicherten Dateien auch externe Pfade mit gesicherter SFTP-Übertragung zu nutzen.
Tipp: Für die Anbindung über LTE-Terminals kann ein externer GSM-Router verwendet werden. Der Anschluss erfolgt dann über die Netzwerkverbindung des Terminals. Alle benötigten Daten müssen von dem Router über DHCP bereitgestellt wer-den. Das Downloadterminal Pro muss dementsprechend für die Verwendung von DHCP konfiguriert sein.
Wenn das Terminal über das LTE-Netz erreichbar sein soll, muss im Router eine entsprechende Port-Weiterleitung oder eine VPN-Verbindung konfiguriert sein. Das Downloadterminal Pro benutzt ansonsten die bereitgestellte Internet-Verbindung zum Ablegen der Daten auf einem SFTP-Server.
Hierzu muss die Betriebsart Verbindung über SFTP-Server ausgewählt sein. Auf dem SFTP-Server muss zudem ein Ver-zeichnis angelegt sein, dessen Name sich aus den Buchstaben „DLT“ und den letzten 5 Ziffern der Seriennummer des Downloadtermina Pro zusammen setzt, z. B. „DLT10793“.
Wählen Sie im Register Terminalliste
• [Neu], um ein neues oder weiteres Downloadterminal Pro anzulegen oder
• [Ändern], um ein bereits angelegtes Downloadterminal Pro zu bearbeiten.
Wechseln Sie zum Register Datenverbindung I.
Wählen Sie die Betriebsart Verbindung über SFTP-Server.
Wechseln Sie zum Register Datenverbindung II. und geben Sie im Abschnitt Datenübertragung zum SFTP-Server folgende Parameter für den Zugang zum SFTP-Server ein:
• Domainname / IP-Adresse
• Port für die Übertragung
• Benutzername
• Passwort
• Netzwerkpfad zum Stammverzeichnis. Wählen Sie hier ein beliebiges Ver-zeichnis auf dem Computer, auf dem der Terminal-Dienst installiert ist.
Klicken Sie auf [Speichern].Mit der nächsten Verbindung wird die neue Konfiguration übertragen; siehe auch Seite 17.
Haben Sie die IP-Adresse geändert, fahren Sie fort mit Schritt auf Seite 11.

13
D
Fahrerkarten oder Download Key auslesen Das Downloadterminal Pro ist
angeschlossen und konfiguriert.
Sie können nun• mit dem Herunterladen von
Dateien beginnen und• sich die gespeicherten Daten im
Display des Downloadterminal Pro anzeigen lassen. Sie müssen nach dem Download nur die Fahrerkarte oder den Download Key gesteckt lassen; siehe ab Seite 14.
Hinweis: Bei jedem Stecken einer Fahrerkarte oder eines Download Keys werden die entsprechenden Dateien herunter-geladen, sofern sich diese nicht bereits im Speicher des Downloadterminal Pro befinden.
Hinweis: Nach Übernahme der Download-Dateien in den Speicher Ihres Downloadterminal Pro wird die Meldung „Down-load beendet“ angezeigt. Warten Sie diese Meldung ab, bevor Sie die Fahrerkarte oder den Download Key entfernen.Im Anschluss können Sie die Führerscheinkontrolle durchfüh-ren; siehe auch Seite 16.
Tipp: Ist das Downloadterminal Pro über das Netzwerk einge-bunden, können Sie auch direkt auf dessen Speicher zugreifen. Wählen Sie im Menü Bearbeiten den Eintrag Zugriff auf den Speicherplatz des DLT PRO > Verbinden ....
Fahrerkarte in den Schacht des Chip-kartenlesers oder Download Key in den USB-Port stecken.
Im Display wird angezeigt, ob die Fahrer-karte oder der Download Key erkannt wurde.
Die Daten werden automatisch herunter-geladen und auf dem internen Speicher des Downloadterminal Pro gespeichert.
Zudem wird Ihnen im Display angezeigt für
• die Fahrerkarte der Fahrername.
• den Download Key der Fahrer- und/ oder der Fahrzeugname.
Das Ende des Downloads wird mit der Meldung „Download beendet“ bestätigt.
Sofern gewünscht, können Sie sich die heruntergeladenen Daten im Display des Downloadterminal Pro anzeigen lassen (siehe Seite 14). Im anderen Fall ent-fernen Sie die Fahrerkarte oder den Download Key.
Abschließend müssen Sie die Dateien nur noch vom Downloadterminal Pro auf den Computer übertragen, auf dem die Konfigurationssoftware installiert ist. Dies erfolgt gemäß Einsatzvariante ent-weder
• per Netzwerk- oder USB-Kabel (siehe Seite 17) oder
• per USB-Stick (siehe Seite 18).

14
D
Menü Downloadterminal Pro – Kalender Eine Fahrerkarte oder ein
Download Key ist gesteckt und der Download wurde erfolgreich abgeschlossen.
Sehen Sie sich im Kalender des Downloadterminal Pro die Down-load-Dateien von Fahrerkarten oder vom Download Key mit Bezug auf das Datum an.Navigieren Sie dazu ganz einfach über die Funktionstasten und das Scroll-Feld; siehe Tipp.
Tipp: Das Downloadterminal Pro ist mit Funktionstasten ausge-stattet, die bereits auf leichte Berührung reagieren. Tippen Sie beispielsweise auf eine Pfeil-Taste, so bewegen Sie sich im Menü einen Menüpunkt nach rechts, links, oben oder unten. Mit OK bestätigen Sie das ausgewählte Menü.
Über das Scroll-Feld können Sie in Listen hoch- oder runter-blättern oder im Kalender ein anderes Datum auswählen.
Mit der Pfeil-Taste nach links gelangen Sie in den Untermenüs wieder zurück zum vorhergehenden Menü; siehe auch Display.
Tipp: Ist das Downloadterminal Pro über das Netzwerk einge-bunden, können Sie auch direkt auf die Display-Anzeige zugrei-fen. Wählen Sie im Menü Bearbeiten den Eintrag VNC - Server für Support starten ... , und bestätigen Sie den Hinweis mit [JA].
Wählen Sie mit Hilfe der Funktionstasten das Symbol , und starten Sie die Funktion mit OK.
Ist ein Download Key gesteckt, auf dem sich auch Fahrerdateien befinden, so müssen Sie zunächst den Fahrer aus-wählen, dessen Download-Daten Sie sich ansehen möchten.
Im Display wird angezeigt:
• Ausgewählter Monat aus der Kalender-übersicht
• Name des Fahrers
• Datum und Uhrzeit des letzten Downloads
• Liste mit Summe der Zeiten der jewei-ligen Aktivitäten des ausgewählten Tages
• Kalenderübersicht. Bei fett markierten Datumseinträgen liegen Aktivitäten vor.
Über das Scroll-Feld können Sie in der Kalenderübersicht zwischen Datums-einträgen wechseln.
Wählen Sie OK, um sich Details zu den Aktivitäten des ausgewählten Datums anzuschauen.
Mit der Pfeil-Taste nach links wechseln Sie wieder zur Kalenderübersicht.

15
D
Menü Downloadterminal Pro – weitere InformationenEreignisse und Störungen sowie Fahrer- und Fahrzeuginforma-tionen sind nur bei gesteckter Fahrerkarte oder gestecktem Download Key farbig hervorge-hoben und somit anwählbar.
Wählen Sie mit den Navigations-tasten das gewünschte Menü und bestätigen Sie dieses mit OK – die wichtigsten Meldungen und Infor-mationen auf einen Blick.
Hinweis: Grundlage für die Berechnung der Fahrerinforma-tionen ist ein Download von der Fahrerkarte. Um zuverlässige Angaben zu verbleibenden Restlenkzeiten zu erhalten, sollte die Fahrerkarte zuvor am digitalen Tachographen gesteckt werden.
Hinweis: Ist ein Download Key gesteckt, auf dem sich auch Fahrerdateien befinden, so müssen Sie zunächst den Fahrer auswählen, dessen Download-Daten Sie sich ansehen möch-ten.
Hinweis: Die Download-Erinnerung erfolgt standardmäßig sieben Tage vor dem fälligen Download. Diese Zeitspanne kann nicht verändert werden.
Ereignisse und Störungen :
Ansicht zuletzt registrierter Ereignisse und Störungen.
Fahrerinformationen :
• Anzeige Dauer bis zur nächsten erforderlichen Pause
• Anzeige verbleibender Tages- und Wochenlenkzeit
• Verlängerte Lenkzeiten [Tag]
• Verkürzte Tagesruhezeiten [Tag].
Fahrzeuginformationen (nur Download Key) :
• Anzeige aktueller Kilometerstand
• Fahrer im Zeitraum von .. bis.
Download-Erinnerung :
• Name Fahrer/ Kennzeichen Fahrzeug
• Fälligkeit in „X Tagen“.
Konfiguration :
• Auswahl Sprache
• Signalton ein/ aus.
Support :
• Version und Geräte-ID
• IP-Adresse.
Info :
Information, die im Register Infotext (Global) der Konfigurationssoftware eingegeben wurde.

16
D
Führerscheinkontrolle durchführenJedes Unternehmen, das als Halter Dienstfahrzeuge zur Verfügung stellt, muss in regelmäßigen Abständen kontrollieren, ob die Fahrer einen gültigen Führerschein besitzen.
Wenn auf den gültigen Führer-scheinen Etiketten mit RFID-Chips aufgeklebt werden, kann die Füh-rerscheinkontrolle über das Downloadterminal Pro elektro-nisch durchgeführt werden.
Hinweis: Das RFID-Siegel darf nur auf einen gültigen Führer-schein angebracht werden. Überprüfen Sie zuerst den Führer-schein des Fahrers ob er noch gültig ist!.
Tipp: Finden Sie auf dem Führerschein eine geeignete Stelle für das Prüfsiegel. Beim EU-Führerschein empfiehlt sich die rechte, obere Ecke der Vorderseite. Die Schriftfelder auf der Rückseite dürfen nicht überklebt werden, auch wenn dort keine Eintragun-gen stehen!
Bei den älteren rosa oder grauen Führerscheinen sollte verhin-dert werden, dass das Siegel unbemerkt ausgeschnitten werden kann. Es sollte daher an einer Stelle positioniert werden, bei der sich auf der gegenüberliegenden Seite wichtige Eintragungen befinden.
Wird der Führerschein seinem Halter entzogen wird beim entfer-nen des Siegels durch die integrierte Sollbruchstelle das Siegel zerstört.
Aktivieren Sie im Register Parameter II die Option RFID-Leser.
Prüfen Sie im Register Status & Service, ob die Option Konfiguration übertragen aktiv ist.
Die geänderte Konfiguration wird auto-matisch an das Downloadterminal Pro übertragen und der RFID-Leser aktiviert.
Im Stand-Alone Betrieb müssen Sie die Konfiguration erneut per USB-Stick über-tragen; siehe auch Seite 11.
Nach Beendigung des Fahrerkarten-Downloads wird auf dem Display die Meldung Führerschein scannen ange-zeigt. Halten Sie dann den Führerschein vor den RFID-Leser an der linken, dun-kelgrauen Gehäuseseite.
Wenn der Führerschein erkannt wurde, wird auf dem Display die RFID-Tag-ID angezeigt.
Zusammen mit den anderen Download-Dateien werden die Führerscheindateien (Dateiformat EDK) im Zielverzeichnis abgelegt. Von dort können sie zur wei-teren Verarbeitung in ein Archivierungs-programm wie z. B. TIS-Web® DMM importiert werden.
Wird der mit RFID-Chip versehene Füh-rerschein an den Leser gehalten, solange die Fahrerkarte noch im Downloadterminal Pro gesteckt ist, so enthält die erstellte Führerscheindatei zusätzlich Angaben zum Fahrernamen und zur Fahrerkartennummer.

17
D
Dateien per USB-/ Netzwerk-Kabel übertragen Der Download von einer Fahrer-
karte oder einem Download Key wurde erfolgreich abgeschlossen.
Der Abruf der Download-Dateien vom Downloadterminal Pro erfolgt automatisch durch den Dienst.Sie können die Abrufintervalle selbst bestimmen und ein Ver-zeichnis wählen, in dem die Dateien gespeichert werden sollen.
Tipp: Wählen Sie im Register Status & Service die Optionen für nächste Verbindung, um zu bestimmen, ob bei der nächsten Verbindung mit dem Downloadterminal Pro Updates oder geänderte Konfigurationen übertragen werden sollen.
Hinweis: Um den Rahmen dieses Booklets zu wahren, konnten einige der Funktionen des Downloadterminal Pro nur angedeu-tet oder nur erwähnt werden wie zum Beispiel
• der Unternehmer-Modus, der u.a. Informationen zur Fahrer-verfügbarkeit liefert. Nach Authorisierung durch Unterneh-menskarte und PIN-Eingabe werden die zusätzlichen Funkti-onen freigegeben.
• die weiteren Befehle im Menü USB - Stick und deren unter-schiedliche Bedeutung. So kann beispielsweise ein USB-Stick dauerhaft zur Datenübertagung konfiguriert werden. Hierzu müssen über Datei > System login > 'tkdtkd' die Sys-temeinstellungen aktiviert werden.
Schließen Sie das Downloadterminal Pro – sofern noch nicht geschehen – per USB-Port an Ihren Computer oder über das Netzwerk (Hub oder Accesspoint) an.
Starten Sie die Konfigurationssoftware, und tragen Sie – sofern noch nicht geschehen (siehe Seite 9) – im Register Datenverbindung I die entsprechenden Daten ein.
Wählen Sie im Register Einstellungen (Global)• den Polling-Zyklus pro ‘Terminal‘,
um die Zeit vorzugeben, nach der eine Verbindung zum Donwloadterminal Pro hergestellt wird.
Nach Ablauf der eingestellten Zeit wird per Dienst automatisch die Verbindung
zum Downloadterminal Pro aufgebaut und die Dateien werden übertragen.
• die max. Einträge der Download Erin-nerung an die Terminals, um die Länge der Liste der Downloaderinne-rungen zu begrenzen.
• ein Verzeichnis für heruntergeladene Dateien, in dem die Dateien bei Abruf vom Downloadterminal Pro gespeichert werden sollen.
Die Dateien werden in dem gewählten Verzeichnis gespeichert.

18
D
Dateien im Stand-Alone Betrieb übertragen Der USB-Stick ist an dem
Computer gesteckt, auf dem die Konfigurationssoftware installiert ist.
Im Stand-Alone Betrieb müssen die heruntergeladenen und auf dem Downloadterminal Pro zwischen-gespeicherten Dateien per USB-Stick auf Ihren Computer übertra-gen werden.
Hinweis: Der USB-Stick zum Herunterladen von Daten muss grundsätzlich über den Menüpunkt USB-Stick konfiguriert werden, da die Dateien auf Ihrem Downloadterminal Pro vor unberechtigtem Zugriff geschützt sind.
Tipp: Durch das Einrichten einer zusätzlichen Kennzeichnung im Register Einstellungen (Global) kann diese Sicherheit noch weiter erhöht werden. Dies kann auf einem USB-Stick für einen einzigen als auch für permanenten Zugriff eingerichtet werden.
Tipp: Unter dem Menüpunkt USB-Stick finden Sie auch die Befehle zur Vorbereitung der Übertragung einer Konfigurations-datei (siehe Seite 9), der Firmware, der Protokolle oder zur Archiv-Aktivierung.
Wählen Sie das Register Terminalliste.
Markieren Sie in der Liste das Downloadterminal Pro, von dem Download-Dateien übertragen werden sollen.
Wählen Sie USB - Stick > USB-Stick für Terminal-Download vorbereiten ... .
Stecken Sie den USB-Stick in den USB-Port des Downloadterminal Pro.
Die Dateien werden automatisch vom Downloadterminal Pro auf den USB-Stick übertragen.
Schließen Sie den USB-Stick an einen Computer an, und speichern Sie die Dateien per Windows® Explorer im gewünschten Zielordner.
Sie können die Daten anschließend über das von Ihnen genutzte Archivierungs- und Auswertungsprogramm weiter verar-beiten, z. B. mit Hilfe von TIS-Web® DMM.

19
EDownloadterminal Pro, el primer contactoLa nueva generación del Downloadterminal Pro permite a sus conductores transferir los datos de los tacógrafos digitales de forma más eficiente e informativa.Tras la descarga, usted obtiene una vista general sobre• Actividades,• Eventos y Fallos, e • Información del conductor y del
vehículo.Ya sólo hay que transferir los datos a su PC; véase la página 31.
Nota: Antes de poner en servicio el Downloadterminal Pro, debe usted
• determinar la variante de utilización preferente que se le va a dar al Downloadterminal Pro (véase la página 20),
• retirar la protección contra descarga de la batería de reserva (véase la página 20) e
• instalar el software de configuración y el controlador del dispositivo USB al menos en un ordenador (véase la página 21).
Nota: Si en este documento se menciona el dispositivo Download Key o Download_Key Pro, el término hace referencia a todas las variantes de dicho producto, p. ej., Inspection Key o TIS-Compact.
Pantalla TFT para guiar al usuario y para mostrar los datos de la tarjeta Conductor o del Download Key insertados
Lector de tarjetas SmartCard para tarjetas de Conductor y Empresa
Interfaz USB para stick USB o Download Key
Campo de desplazamiento para las funciones de navegación y desplazamiento
Cuatro teclas de fecha y una tecla "OK" para navegar y confirmar
Tapa de la carcasa sobre la batería de reserva y las conexiones de alimentación eléctrica y comunicación
Lector de chip RFID para el control automático de permisos de conducción
Cable de red (montado de fábrica)
Alimentación eléctrica con fuente de alimentación (montada de fábrica)
Cable USB para la conexión al ordenador
CD del producto con
• Software de configuración• Controlador del dispositivo USB• Servicio para la transmisión
automática de datos

20
E Variantes de uso y batería de reservaPara la gestión de datos, resulta fácil consultar los datos del Downloadterminal Pro. Decida usted la variante de uso más adecuada en su caso:• Uso individual• Cable de red (predeterminado)• Conexión mediante servidor
SFTP• Cable USB (véase componentes
suministrados)• Cable cruzado (véase la
Sugerencia)Una vez retirada la protección de la batería y montado el cable deseado, sólo tiene que conectar el Downloadterminal Pro a la alimentación eléctrica.
Precaución: Desconecte el enchufe de la fuente de alimentación de la toma antes de abrir el Downloadterminal Pro.
Nota: Gracias a su alimentación eléctrica independiente, el Downloadterminal Pro puede mantenerse operativo y almacenar datos de tarjetas Conductor y Download Keys aunque el ordenador esté apagado.
Sugerencia: Si utiliza un cable cruzado (crossover) en vez del cable de red suministrado, también podrá conectar el Downloadterminal Pro directamente a un ordenador. Para ello, es imprescindible que este disponga de una conexión de red libre.
En el modo de uso individual, usted transfiere la configuración (véase la página 25) y los archivos de descarga almacenados temporalmente mediante el stick USB (véase la página 32):
Variante para la transferencia y pro-cesamiento de los datos en cualquier ordenador.
Con el cable de red puede conectar el Downloadterminal pro a su red interna. Un servicio se encarga de transferir y guardar los archivos automáticamente (véase la página 32):
Variante recomendable para grandes flotas con un elevado volumen de datos.
Para la conexión directa a un ordenador seleccione el cable USB. Un servicio
se encarga de transferir y guardar automáticamente los archivos en la carpeta que usted especifique (véase la página 22):
Variante para flotas pequeñas y medianas con transferencia automática de datos.
Activar la batería de reserva:
• Quite los tornillos de la tapa lateral y retire la tapa con cuidado.
• Extraiga la batería de su soporte y retire la protección contra descarga.
• Vuelva a introducir la batería de reserva (el símbolo positivo debe mirar hacia el fondo de la carcasa) y atornille la tapa lateral.

21
EInstalar el software de configuración y el servicioEl software es un requisito imprescindible para todas las variantes de uso. Es necesario para• configurar el Downloadterminal
Pro• instalar el servicio para la
transferencia automática de datos
• transferir una actualización del firmware
• preparar un stick USB para la transferencia de la configuración o la descarga de los datos (uso individual).
Nota: Instale el software
• en el ordenador al que va a conectar el Downloadterminal Pro mediante el cable USB o cable cruzado, o
• en cualquier ordenador o servidor de su red interna (uso en red), o
• en un ordenador (uso individual), desde el que vaya a preparar la configuración mediante stick USB.
Nota: Debe instalar el servicio si desea conectar el Downloadterminal Pro directamente a un ordenador o a su red. Necesita tener permiso para instalar e iniciar servicios. Para la instalación del servicio es posible que deba ejecutar el software de configuración con la opción "Ejecutar como administrador".
Nota: Con el software de configuración también puede ser instalado un controlador USB para la configuración y comunicación vía USB.
Instalación del software (son necesarios de derechos de administrador):
• Inserte el CD del producto en la unidad de CD / DVD.
La instalación se inicia automáticamente.
Si no fuese así, inicie el Explorador de Windows®, cambie a la unidad de CD / DVD y haga doble clic en "setup.exe".
• Siga las instrucciones del asistente, que le guiará durante la instalación.
Inicie el software VDO Downloadterminal Pro.• Un mensaje le informa de que el
servicio aún no ha sido iniciado o instalado. Confirme el mensaje pulsando [Aceptar].
• Para el uso con USB o en red, seleccione Herramientas > Instalar & Iniciar servicio....
Seleccione Utilizar cuenta del sistema o una cuenta desde la que se inicie automáticamente el servicio. Haga clic en [Instalar...] y confirme el mensaje con [Aceptar].Puede verificar si el servicio está activo desde [Inicio] > Panel de control > Herramientas administrativas > Servicios y haciendo doble clic en Downloadterminal Pro.

22
E Software de configuración – una primera vista generalEl software de configuración le ofrece, entre otras, las siguientes opciones de configuración:• Transferencia de datos• Conexión para comunicación
automática• Selección de los directorios para
actualizaciones y archivos descargados
• Configuración predeterminada del Downloadterminal Pro.
Además, ofrece información sobre la comunicación con el Downloadterminal Pro.
Sugerencia: Si el Downloadterminal Pro está inactivo durante un cierto tiempo, se iniciará un protector de pantalla (salva pantallas). En la pestaña Parámetro II puede usted ajustar el intervalo de tiempo para el inicio del mismo.
Seleccione el idioma deseado en el menú Language.
Cree una entrada para su Downloadterminal Pro en la pestaña Listado Equipos.
En las pestañas Parámetro I – III, puede configurar las opciones generales para el Downloadterminal Pro seleccionado o creado en Listado Equipos.
En las pestañas Conexión datos I – II, seleccione las opciones correspondientes para la comunicación automática con el Downloadterminal Pro mediante cable USB o cable de red.
En la pestaña Estado&Servicio, decida qué ocurrirá la próxima vez que el ordenador establezca contacto con el Downloadterminal Pro; véase también la página 34.
En el siguiente paso ya sólo tiene que transferir los datos de configuración al Downloadterminal Pro.
Según la variante de uso, los datos se transfieren
• mediante un stick USB (uso individual o uso en red después de modificar la dirección IP); véase la página 32.
• mediante el cable de red; véase la página 31.
• mediante cable USB o cable cruzado; véase la página 31.

23
EConfigurar la transferencia de datos – conexión de cable Usted ha
• instalado e iniciado el software,• instalado e iniciado el servicio y• ha confirmado con su
administrador de red la dirección de red, ha introducido una nueva o la ha obtenido automáticamente desde el servidor (DHCP).
Si se modifica la dirección de red, debe transferir la configuración mediante un stick USB; véase la página 25 o la página 31.
Nota: En el software de configuración aparecen, de forma predeterminada, valores para la dirección de red, máscara de red y gateway. Consulte a su administrador de red si pueden utilizarse dichos valores.
• Dirección IP: 192.168.99.1
• Máscara de red: 255.255.255.0
• Gateway por defecto: 0.0.0.0.
Sugerencia: Además, puede configurar otras opciones; véase también la página 22.
Nota: También puede consultar la ID del aparato desde el menú Soporte de su Downloadterminal Pro; véase también la página 32.
En la pestaña Parámetro I, seleccione
• [Nuevo] para agregar un Downloadterminal Pro nuevo o
• [Editar], para modificar un Downloadterminal Pro ya existente.
Introduzca la ID aparato y la Descripción (p. ej., un nombre) para el Downloadterminal Pro.
La ID del aparato aparece en la placa base del Downloadterminal Pro (véase también la 2ª Nota).
Cambie a la pestaña Conexión datos I.
Seleccione el Modo operativo• Polling mediante red, si desea
conectar un cable de red.
En caso necesario, desactive la casilla DHCP (recuperación automática) e introduzca en la sección Configuración TCP/IP los valores de Dirección IP, Máscara de red y Gateway por defecto; véase también la Nota.
• Polling mediante USB, si ha conectado el cable USB; véase la página 20.
Haga clic en [Salvar].

24
E Opciones adicionales – conexión de cable En las pestañas
• Parámetro I – III y• Conexión datos I – II
usted ya ha introducido los datos necesarios para la comunicación entre el Downloadterminal Pro y su entorno informático; véase también la página 23.
Antes de transferir la configuración, sólo hay que especificar una par de opciones básicas.
Nota: Tanto si se usa en red como mediante una conexión con cable USB, cualquier transferencia de datos desde o hacia el Downloadterminal Pro se realiza automáticamente a través del servicio.
Nota: Si utiliza el Downloadterminal Pro con un cable USB, no es necesario indicar una dirección IP.
Sugerencia: Piense también que, si utiliza un cortafuegos, puede que necesite configurar una excepción para la comunicación del servicio del terminal.
Seleccione la pestaña Opciones (Global) y haga clic en [Editar].
En el campo Intervalo descarga del 'Terminal', especifique el intervalo de tiempo para establecer automáticamente una conexión con el Downloadterminal Pro.
La conexión de datos con su Download-terminal Pro se establecerá también aunque modifique la configuración o las opciones aquí descritas.
La única excepción es si usted modifica la dirección IP para el uso en red; véase la página 25.
Especifique el directorio donde
• debe almacenarse temporalmente el firmware para la próxima actualización.
• deben guardarse los datos transferidos desde el Downloadterminal Pro, p. ej., para su archivo en TIS-Web®.
Modifique los otros datos en caso necesario y haga clic en [Salvar].La próxima vez que se establezca una conexión se transferirá la nueva configuración; véase también la página 31.
Si ha modificado la dirección IP, continúe con el paso en la página 25.

25
EConfigurar la transferencia de datos para uso individual Hay insertado un stick USB en el
ordenador.
Debe transferir la configuración mediante stick USB si el Downloadterminal Pro• se va a utilizar en modo de
uso individual o • si ha modificado la dirección
IP para el uso en red; véase también la página 23.
Nota: En la pestaña Opciones (Global), active la casilla de verificación Contraseña para la extracción de datos desde el Pen-drive, si desea aumentar la seguridad de los datos en caso de descarga mediante stick USB.
Introduzca una cadena de caracteres, que puede definir libremente, en el campo Identificador para cargar en USB-Stick o haga clic en , para generar la cadena de caracteres de forma aleatoria. Esta cadena de caracteres será verificada antes de la próxima descarga de datos de tacógrafos.
Nota: También puede consultar la ID del aparato desde el menú Soporte de su Downloadterminal Pro; véase también la página 29.
Sugerencia: Después de transferir la configuración y del subsiguiente reinicio del sistema es posible controlar la hora del sistema en el Downloadterminal Pro y corregirla manualmente si es necesario.
En la pestaña Listado Equipos, seleccione
• [Nuevo] para agregar un Downloadterminal Pro nuevo o
• [Editar], para modificar un Downloadterminal Pro ya existente.
Se muestra la pestaña Parámetro I para que pueda introducir los datos deseados o realizar las modificaciones oportunas.
Introduzca la ID aparato y la Descripción (p. ej., un nombre) para el Downloadterminal Pro.
La ID del aparato aparece en la placa base del Downloadterminal Pro.
Cambie a la pestaña Conexión datos I.
Para el uso individual, seleccione el modo operativo Uso individual mediante stick USB y haga clic en [Salvar].
En el menú USB-Stick, seleccione la opción Salvar configuración al USB.
En la ventana para seleccionar la letra de unidad, seleccione el stick USB y confirme el mensaje con [Aceptar].Ahora sólo tiene que conectar el stick USB ya preparado en el puerto USB del Downloadterminal Pro: la configuración será transferida automáticamente y se reiniciará el Downloadterminal Pro.

26
E Configuración de la transferencia de datos en el servidor SFTP o con LTE
El Downloadterminal Pro debe configurar la dirección de destino del servidor SFTP, p. ej. a través de una dirección IP estática o bien con un nombre de dominio, y la carpeta utilizada debe tener permiso de escritura.
El Downloadterminal Pro admite también conexiones SSL. Esto per-mite también el uso de rutas exter-nas con transferencia de datos SFTP protegida para el almacena-miento automático de los archivos guardados.
Sugerencia: Para la conexión mediante terminal LTE puede uti-lizarse un router GSM externo. La conexión se produce a través de la conexión de red del terminal. Todos los datos necesarios debe suministrarlos el router a través de DHCP. El Download-terminal Pro debe configurarse según corresponda para el uso de DHCP.
Si el terminal debe estar disponible a través de la red LTE, debe configurarse el correspondiente enrutamiento de puerto en el router o bien una conexión VPN. Si no, el Downloadterminal Pro utiliza la conexión a Internet disponible para guardar los datos en un servidor SFTP.
Para ello debe seleccionarse la conexión del modo operativo a través del servidor SFTP. En el servidor SFTP debe crearse además una carpeta cuyo nombre esté compuesto por las letras "DLT" más las últimas 5 cifras del número de serie del Down-loadterminal Pro, por ejemplo "DLT10793".
En la pestaña Listado Equipos, seleccione
• [Nuevo] para agregar un Downloadter-minal Pro nuevo o
• [Editar], para modificar un Download-terminal Pro ya existente.
Cambie a la pestaña Conexión datos I.
Seleccione el modo operativo de conexión a través del servidor SFTP.
Cambie a la pestaña Conexión de datos II e introduzca los siguientes parámetros para el acceso al servidor SFTP en la sección "Transferencia de datos al ser-vidor SFTP":
• Nombre de dominio / dirección IP
• Puerto para la transferencia
• Nombre de usuario
• Contraseña
• Ruta de red al directorio raíz. Selec-cione aquí el directorio de su ordenador en el que esté instalado el servicio de terminal.
Haga clic en [Salvar].La próxima vez que se establezca una conexión se transferirá la nueva configu-ración; véase también la página 31.
Si ha modificado la dirección IP, continúe con el paso en la página 25.

27
ELeer datos de una tarjeta Conductor o Download Key El Downloadterminal Pro está
conectado y configurado.
Ahora puede usted• empezar a descargar archivos y• ver los datos almacenados en la
pantalla del Downloadterminal Pro. Tras la descarga, sólo tiene que dejar insertada la tarjeta Conductor o el Download Key; véase la página 28.
Nota: Cada vez que se inserte una tarjeta Conductor o un Download Key se descargarán los archivos correspondientes, siempre que dichos archivos no estén ya en la memoria del Downloadterminal Pro.
Nota: Una vez transferidos los archivos de descarga a la memoria de su Downloadterminal Pro, se muestra el mensaje "Descarga finalizada". Espere hasta que aparezca dicho mensaje antes de extraer la tarjeta Conductor o el Download Key. A continuación puede efectuar el control de permiso de conducción, véase también la página 30.(No hay equivalente en español, si no hay no hacer la referencia a una página en alemán)
Sugerencia: Si el Downloadterminal Pro está conectado a la red, también puede acceder directamente a su memoria. Seleccione en el menú Edición la entrada Acceso al espacio de memoria del DLT PRO > Conexión ...
Inserte la tarjeta Conductor en la ranura del lector de tarjetas o el Download Key en el puerto USB.
En la pantalla se indica si se ha reconocido la tarjeta Conductor o el Download Key.
Los datos se descargan automáticamente y se guardan en la memoria interna del Downloadterminal Pro.
Además, en la pantalla se muestra
• el nombre del conductor correspondiente a la tarjeta Conductor
• el nombre del conductor y/o del vehículo correspondiente al Download Key
El final de la descarga se confirma mediante el mensaje "Descarga finalizada".
Si lo desea, puede ver los datos descargados en la pantalla del Downloadterminal Pro (véase la página 26). En caso contrario, extraiga la tarjeta Conductor o el Download Key.
Finalmente, sólo tiene que transferir los archivos del Downloadterminal Proal ordenador donde esté instalado el software de configuración. Según la variante de uso, la transferencia se realiza
• mediante el cable de red o cable USB (véase la página 31) o
• mediante un stick USB (véase la página 32).

28
E Menú Downloadterminal Pro – Calendario Hay insertada una tarjeta
Conductor o un Download Key y la descarga ha finalizado correctamente.
En el calendario del Downloadterminal Pro puede ver los archivos de descarga de la tarjeta Conductor o del Download Key por fechas.Para ello, navegue con las teclas de función y el campo de desplazamiento; véase la Sugerencia.
Sugerencia: El Downloadterminal Pro está equipado con teclas de función sensibles al más leve tacto. Por ejemplo, si pulsa en una tecla de fecha, se desplazará por los menús hacia la derecha o la izquierda, hacia arriba o hacia abajo. Con la tecla OK confirma la opción seleccionada en el menú.
Mediante el campo de desplazamiento puede hojear las listas hacia arriba o hacia abajo o seleccionar otra fecha en el calendario.
Con la tecla de flecha a la izquierda puede acceder a los submenús y volver al menú anterior; véase también Pantalla.
Sugerencia: Si el Downloadterminal Pro está conectado a la red, también puede acceder directamente a la indicación de pantalla. En el menú Editar, seleccione la opción Iniciar Servidor VNC para soporte... , y confirme el mensaje con [SÍ].
Con las teclas de función, seleccione el icono e inicie la función con la tecla OK.
Si hay insertado un Download Key con archivos de conductores, debe seleccionar primero el conductor cuyos datos de descarga desea ver.
En la pantalla aparece:
• Mes seleccionado en la vista de calendario
• Nombre del conductor
• Fecha y hora de la última descarga
• Lista con la suma de los tiempos de las actividades correspondientes del día seleccionado
• Vista de calendario. Las fechas resaltadas en negrita indican la presencia de actividades.
Mediante el campo de desplazamiento puede cambiar entre fechas en la vista de calendario.
Pulse la tecla OK para ver detalles sobre las actividades de la fecha seleccionada.
Con la tecla de flecha a la izquierda cambia de nuevo a la vista de calendario.

29
EMenú Downloadterminal Pro – información adicionalLos eventos y fallos, así como la información sobre conductores y vehículos, sólo aparecen marcados en color cuando hay una tarjeta Conductor o un Download Key insertado. Sólo así pueden seleccionarse.
Seleccione con las teclas de navegación el menú deseado y confirme con la tecla OK: la información y los mensajes más importantes en un vistazo.
Nota: La base para el cálculo de los datos del conductor es una descarga de la tarjeta Conductor. Para obtener datos fiables sobre los tiempos de conducción restantes debe insertarse previamente la tarjeta del conductor en el tacógrafo digital.
Nota: Si hay insertado un Download Key con archivos de conductores, debe seleccionar primero el conductor cuyos datos de descarga desea ver.
Nota: De forma predeterminada, el recordatorio de descarga se produce siete días antes de la descarga pendiente. Este periodo de tiempo no puede modificarse.
Eventos y Fallos :
Visualización de los últimos eventos y fallos registrados.
Información del conductor :
• Indicación del plazo hasta la siguiente descanso obligatorio
• Indicación del tiempo de conducción restante diario y semanal
• Tiempos de conducción alargados [Día]
• Tiempos de descanso acortados [Día].
Información del vehículo (sólo Download Key) :
• Indicación del kilometraje actual
• Conductor para el período de tiempo desde... hasta.
Recordatorio de descarga :
• Nombre del conductor / Matrícula del vehículo
• Descargas pendientes en "X días".
Configuración :
• Selección de idioma
• Aviso acústico activado / desactivado.
Soporte :
• Versión e ID del aparato
• Dirección IP
Info :
Información introducida en la pestaña Info texto (Global) del software de configuración.

30
E Efectuar el control de permisos de conducciónCada empresa que suministre a sus empleados vehículos de empresa deberá controlar en inter-valos regulares que los conducto-res están en posesión de un per-miso de conducción válido.
Al adherir una etiqueta con chip RFID en un permiso de conducción válido, es posible efectuar el control de permisos de conducción elec-trónicamente a través del Down-loadterminal Pro.
Nota: El sello RFID únicamente debe colocarse en permisos de conducción válidos. Compruebe en primer lugar si el permiso de conducción del conductor está en vigor.
Sugerencia: Busque en el permiso de conducción un lugar apropiado para estampar el sello de prueba. En los permisos de conducción de la UE se recomienda el uso de la esquina supe-rior derecha del anverso. ¡No estampe el sello en los campos de escritura de la página del reverso, incluso aunque estén vacíos!
En los permisos de conducción antiguos de color rosa o gris debe evitarse que el sello pueda recortarse accidentalmente. Para ello, deberá posicionarse en un lugar en cuya página de enfrente existan entradas importantes.
Si se le retira el permiso de conducción a su portador, al eliminar el sello en el punto de ruptura que lleva integrado para este fin, este se destruye.
En la pestaña Parámetros II, active la opción Lector RFID.
En la pestaña "Estado y servicio", com-pruebe si está activa la opción Configu-ración de transferencia. Los cambios en la configuración se transfieren inmediata-mente al Downloadterminal Pro y el lector RFID se activa. En el modo de uso indi-vidual deberá volver a transferir la confi-guración mediante un dispositivo USB, consulte la página 25.
Al finalizar la descarga de tarjetas de conductor, en la pantalla se muestra el mensaje "Escanear permiso de con-ducción". Sostenga el permiso de con-ducción frente al lector RFID en el lado izquierdo de color gris oscuro en la carcasa.
Si se reconoce el permiso de conducción, en la pantalla se muestra el ID de etiqueta de RFID. Junto con los demás archivos descargados, en el directorio de destino se almacenan los archivos del permiso de conducción (con formato EDK). Desde allí pueden importarse para su posterior procesamiento en un pro-grama de almacenamiento, por ejemplo TIS-Web® DMM.
Si el permiso de conducción provisto del chip RFID se mantiene en el lector, mientras la tarjeta del conductor siga estando insertada en el Download-terminal Pro, se añadirán al archivo creado para el permiso de conducción los datos adicionales del nombre del conductor y el número de tarjeta del conductor.

31
ETransferir archivos mediante cable USB / cable de red La descarga de una tarjeta
Conductor o un Download Key ha finalizado correctamente.
El servicio se encarga automáticamente de transferir los archivos de descarga del Downloadterminal Pro. Usted puede determinar los intervalos de descarga y seleccionar el directorio donde desea guardar los archivos.
Sugerencia: En la pestaña Estado&Servicio, seleccione las Opciones para la próxima conexión, para determinar si hay que transferir actualizaciones o configuraciones modificadas en la próxima conexión con el Downloadterminal Pro.
Nota: En el marco del presente documento, sólo podemos indicar o mencionar algunas de las funciones del Downloadterminal Pro, por ejemplo:
• el modo empresa que, entre otras cosas, proporciona información sobre la disponibilidad de los conductores. Después de la autorización a través de la tarjeta de empresa y la introducción de un PIN se habilitan las funciones adicionales.
• las otras opciones del menú USB - Stick y sus diferentes significados. Así por ejemplo puede configurarse un dispositivo USB para la transferencia permanente de datos. Para ello deben activarse los ajustes de sistema a través de Archivo > Inicio de sesión en el sistema > 'tkdtkd'.
Conecte el Downloadterminal Pro (si no lo ha hecho todavía) a través del puerto USB de su ordenador o de la red (concentrador o punto de acceso).
Inicie el software de configuración y, si no lo ha hecho todavía (véase la página 23), introduzca los datos correspondientes en la pestaña Conexión datos I.
En la pestaña Opciones (Global), seleccione
• Directorio archivos transferidos, donde deben guardarse los archivos transferidos desde el Downloadterminal Pro
• Intervalo descarga del 'Terminal', donde especifica el intervalo de tiempo para establecer una conexión con el Downloadterminal Pro.
Una vez transcurrido el tiempo especificado, el servicio establece automáticamente la conexión con el Downloadterminal Pro y se transfieren los archivos.
• el máximo de entradas de recordatorio de descarga al terminal a fin de limitar la longitud de la lista de recordatorios de descarga
Los archivos se guardarán en el directorio seleccionado.

32
E Transferir archivos en el modo de uso individual El stick USB está conectado al
ordenador donde está instalado el software de configuración.
En el modo de uso individual, se deben transferir los archivos descargados y almacenados temporalmente en el Downloadterminal Pro mediante un stick USB a su ordenador.
Nota: El stick USB para la descarga de datos debe configurarse usando el menú USB - Stick, ya que los archivos en su Downloadterminal Pro están protegidos contra el acceso no autorizado.
Sugerencia: Esta seguridad se puede aumentar especificando un identificador o una contraseña en la pestaña Opciones (Global). Esta protección se puede configurar en un stick USB para un único acceso o de forma permanente.
Sugerencia: En el menú UBS - Stick encontrará también las opciones para preparar la transferencia de un archivo de configuración (véase la página 23), del firmware, de los protocolos o para activar el archivo.
Seleccione la pestaña Listado Equipos.
Marque en la lista el Downloadterminal Pro desde el que se van a transferir los archivos de descarga.
Seleccione USB - Stick > Preparar el USB para la descarga del terminal ... .
Conecte el stick USB en el puerto USB del Downloadterminal Pro.
Los archivos se transfieren automáticamente desde el Downloadterminal Pro al stick USB.
Conecte el stick USB a un ordenador y guarde los archivos en la carpeta de destino deseada usando el Explorador de Windows®.
A continuación, puede procesar los datos con el programa de archivo y análisis que usted utilice, p. ej., con TIS-Web® o TIS-Office®.

33
FDownloadterminal Pro, première prise en mainLa nouvelle génération du Downloadterminal Pro permet à vos conducteurs un transfert encore plus efficace et détaillé des données numériques des chronotachygraphes.Une fois le téléchargement automatique effectué, vous obtenez un aperçu• des activités,• des événements et anomalies et • des informations sur le
conducteur et le véhicule.Il vous reste ensuite juste à transférer les données sur votre PC ; voir à partir de la page 45.
Remarque : avant de mettre en service le Downloadterminal Pro, vous devez
• déterminer la variante selon laquelle le Downloadterminal Pro sera principalement utilisé (voir page 34),
• retirer la protection contre les décharges de la batterie (voir page 34), et
• installer le logiciel de configuration et le pilote de l'appareil USB sur un ordinateur au minimum (voir page 35).
Remarque : lorsque la Download Key ou Download Key Pro est mentionnée dans cette brochure, toutes ses variantes sont aussi concernées, comme la clé Inspection Key et TIS-Compact.
Ecran TFT pour le guidage de l'utilisation et l'affichage des données de la carte conducteur ou de la Download Key actuellement enfichée
Lecteur de cartes SmartCard pour la carte conducteur et entreprise
Port USB pour clé USB ou Download Key
Zone de défilement pour la navigation et la fonction de défilement
Quatre touches fléchées et touche OK pour la navigation et la confirmation
Couvercle du boîtier au-dessus de la batterie tampon, des connexions électriques et raccords de communication
Lecteur de puce RFID pour contrôle automatisé du permis de conduire
Câble réseau (monté à l'usine)
Alimentation en courant avec bloc secteur (monté à l'usine)
Câble USB pour connexion avec l'ordinateur
CD du produit avec
• logiciel de configuration
• pilote de l'appareil USB
• service de transfert automatique des données

34
FVariantes d'utilisation et batterie tamponLes données du Downloadterminal Pro peuvent être très simplement téléchargées pour la gestion des données. Il vous suffit de décider la variante dont vous avez besoin :• Fonctionnement en indépendant• Connexion via serveur SFTP• Câble réseau (par défaut)• Câble USB (compris dans le kit)• Câble croisé (voir le conseil).Lorsque la protection contre les décharges de la batterie tampon a été retirée et que le câble souhaité est installé, vous devez uniquement raccorder le Downloadterminal Pro à l'alimentation en courant.
Attention : débranchez le bloc d'alimentation de la prise de courant avant d'ouvrir le Downloadterminal Pro.
Remarque : en raison de l’alimentation en courant indépendante, le Downloadterminal Pro reste opérationnel et peut enregistrer les données des cartes de conducteur et des Download Keys même lorsque l’ordinateur est arrêté.
Conseil : si vous utilisez un câble croisé au lieu du câble réseau, vous pouvez raccorder aussi directement le Downloadterminal Pro à un ordinateur, à condition que celui-ci dispose d’un port réseau libre.
En fonctionnement indépendant, vous transférez la configuration (voir page 39) et les données téléchargées enregistrées par clé USB (voir page 46) ;
variante pour le transfert et l'édition sur n'importe quel ordinateur.
Le câble réseau vous permet de raccorder le Downloadterminal Pro au réseau local. Les données sont appelées et enregistrées automatiquement par le biais d'un service (voir page 45)
variante pour les flottes importantes avec un volume important de données.
Pour une connexion directe à un ordinateur, sélectionner le câble USB. Les données sont appelées automatiquement par le biais d'un
service et enregistrées dans un dossier de votre choix (voir page 36) :
variante pour les flottes plus petites à moyennes avec un transfert automatique des données.
Activation de la batterie tampon :
• Retirez les vis du couvercle latéral et retirez ce dernier avec précaution.
• Retirez la batterie tampon de sa fixation et retirez la protection contre les décharges.
• Insérez de nouveau la batterie tampon (pôle positif tourné vers le fond) et vissez le couvercle latéral.

35
FInstallation du logiciel de configuration et du serviceLe logiciel est absolument nécessaire pour toutes les variantes d’utilisation. Vous en avez besoin pour• configurer le
Downloadterminal Pro.• installer le service pour le
transfert automatique des données.
• transférer une mise à jour du Firmware.
• préparer une clé USB pour le transfert de la configuration ou l'appel des données (fonctionnement indépendant).
Remarque : vous installez le logiciel
• sur l'ordinateur auquel le Downloadterminal Pro doit être connecté par le câble USB ou croisé ou
• sur n'importe quel ordinateur ou serveur au sein de votre réseau (fonctionnement réseau) ou
• sur un ordinateur (fonctionnement indépendant) depuis lequel la configuration par clé USB doit être préparée.
Remarque : vous devez installer le service lorsque vous voulez raccorder le Downloadterminal Pro directement à un ordinateur ou à votre réseau. Vous avez besoin des droits correspondants pour installer et démarrer les services. Le cas échéant, vous devez, pour installer le service, lancer le logiciel de configuration avec l'option " Exécuter en tant qu'administrateur ".
Remarque : Avec le logiciel de configuration, un pilote USB peut également être installé pour la configuration et la communication par USB.
Installation du logiciel (droits administrateur nécessaires) :
• Insérer le CD du produit dans le lecteur CD/DVD.
L'installation démarre automatiquement.
Dans le cas contraire, ouvrir l'explorateur Windows®, passer sur le lecteur CD/DVD et double-cliquer sur "setup.exe".
• Suivre l'assistant qui vous guide à travers l'installation.
Démarrer le logiciel VDO Downloadterminal Pro.
• Il vous est indiqué que le service n'a pas encore été lancé ou installé. Confirmer cette indication par [OK].
• Sélectionner pour le fonctionnement par USB ou réseau Outils > Installer & démarrer le service....
Sélectionner Utiliser un compte système ou un compte depuis lequel le service doit être lancé automatiquement. Cliquer sur [Installer...] et confirmer la remarque par [OK].Vous pouvez contrôler si le service est actif via [Démarrer] > Panneau de configuration > Outils d'administration > Services puis en double-cliquant sur Downloadterminal Pro.

36
FLogiciel de configuration – Un premier aperçuLe logiciel de configuration vous offre entre autres les possibilités de réglage suivantes :• Transfert des données ;• Connexion en cas de
communication automatique ;• Choix des répertoires pour les
mises à jour et les fichiers téléchargés ;
• Réglages de base du Downloadterminal Pro.
Vous obtenez en plus des informations pour la communication avec le Downloadterminal Pro.
Conseil : si pendant quelque temps, aucune activité n'a lieu sur le Downloadterminal Pro, un économiseur d'écran est activé. Vous paramétrez l'intervalle de temps au bout duquel il est activé dans l'onglet Paramètre II.
Sélectionner dans le menu Langue la langue souhaitée.
Créer dans l'onglet Liste des terminaux votre Downloadterminal Pro.
Procéder aux réglages généraux dans les onglets Paramètre I – III pour le Downloadterminal Pro sélectionné dans la liste des terminaux ou le nouveau Downloadterminal Pro créé.
Sélectionner dans les onglets Connexion I – II les réglages correspondants pour la communication automatique avec le Downloadterminal Pro par câble USB ou réseau.
Choisir dans l'onglet Etat & Service les options pour la prochaine connexion de l'ordinateur avec le Downloadterminal Pro ; voir aussi page 45.
Au cours de l'étape suivante, il vous reste juste à transférer les données de configuration sur le Downloadterminal Pro.
Selon la variante d'utilisation, vous transférez ces données
• par clé USB (fonctionnement indépendant ou mode réseau après modification de l'adresse IP) ; voir page 46.
• par câble réseau ; voir page 45.
• par câble USB ou croisé ; voir page 45.

37
FConfiguration du transfert de données – Connexion câblée
Vous avez• installé et démarré le logiciel,• installé et lancé le service, et• obtenu la confirmation de
l'adresse réseau par votre administrateur réseau, attribué une nouvelle adresse ou l'avez obtenu automatiquement via le serveur (DHCP).
Lorsque l'adresse réseau est modifiée, vous devez transférer la configuration par clé USB ; voir page 39 sinon, page 46.
Remarque : le logiciel de configuration comprend les valeurs par défaut de l'adresse réseau, du masque réseau et de la passerelle. Vous devez contacter l’administrateur réseau pour savoir si ces valeurs peuvent être utilisées :
• Adresse IP : 192.168.99.1
• Masque de sous-réseau : 255.255.255.0
• Passerelle par défaut : 0.0.0.0.
Conseil : Vous pouvez procéder à d'autres réglages ; voir pour cela page 36.
Remarque : vous pouvez obtenir l'ID de l'appareil également via le menu Aide de votre Downloadterminal Pro ; voir aussi page 43.
Sélectionner dans l'onglet Paramètre I • [Nouveau] afin de créer un nouveau
ou un autre Downloadterminal Pro ou
• [Modifier] afin d'éditer un Downloadterminal Pro déjà créé.
Entrer l'ID - appareil et la Description (par ex. un nom) pour le Downloadterminal Pro.
L'ID de l'appareil se trouve sur la plaque de fond de votre Downloadterminal Pro (voir aussi la 2e remarque).
Passer dans l'onglet Connexion I.
Sélectionner le Mode de communication• Polling via réseau lorsque vous
souhaitez raccorder le câble réseau.
Décocher le cas échéant la case DHCP (automatique) et entrer les données dans la section Configuration TCP/IP des champs Adresse IP, Masque de sous-réseau et Passerelle par défaut ; voir aussi la remarque.
• Polling parvia câble USB lorsque vous avez connecté le câble USB ; voir page 34.
Cliquer sur [Sauver].

38
FAutres réglages concernant la connexion câblée
Vous avez effectué dans les onglets• Paramètre I – III et• Connexion I – II
toutes les indications nécessaires pour la communication entre le Downloadterminal Pro et l'environnement de votre ordinateur ; voir aussi page 37.
Avant de transférer la configuration, il est encore nécessaire de procéder à quelques réglages essentiels.
Remarque : En mode réseau et à l'aide d'une connexion par câble USB, chaque transfert de données depuis ou vers le Downloadterminal Pro s'effectue automatiquement via le service.
Remarque : lorsque vous faites fonctionner le Downloadterminal Pro via un câble USB, vous ne devez pas entrer d'adresse IP.
Conseil : Veuillez également conserver à l'esprit qu'il vous faut éventuellement, en cas d'utilisation d'un pare-feu, configurer une exception pour la communication du service du terminal.
Passer dans l'onglet Paramètres (Global), et cliquer sur [Modifier].
Indiquer sous Intervalle de polling par terminal la durée au bout de laquelle le Downloadterminal Pro doit établir automatiquement une connexion.
La connexion de données avec votre Downloadterminal Pro sera aussi établie lorsque vous modifiez la configuration ou que vous procédez aux réglages décrits.
Exception unique : vous modifiez l'adresse IP pour le mode réseau ; voir pour cela page 39
Déterminer le répertoire dans lequel
• le nouveau Firmware doit être enregistré temporairement pour la mise à jour suivante.
• les données transférées par le Downloadterminal Pro doivent être enregistrées, par ex. pour l'archivage dans TIS-Web®.
Modifier le cas échéant les autres données et cliquer sur [Sauver].La nouvelle configuration est transférée lors de la connexion suivante ; voir aussi page 45.
Si vous avez modifié l'adresse IP, poursuivez avec l'étape à la page 39.

39
FConfiguration du transfert de données – Mode indépendant
Une clé USB est connectée sur l'ordinateur.
Vous devez transférer la configuration par clé USB lorsque vous utilisez votre Downloadterminal Pro• en fonctionnement indépendant
ou • lorsque vous avez modifié
l'adresse IP pour le mode réseau ; voir aussi pour cela page 37.
Remarque : cocher dans l'onglet Paramètres (Global) la case Identifiant pour le rapatriement sur clé USB lorsque vous souhaitez augmenter la sécurité des données lors du téléchargement par clé USB.
Entrer une chaîne de caractères pouvant être librement définie dans le champ Identifiant pour clé USB ou cliquer sur afin de générer la chaîne de caractères à l'aide d'un générateur de nombres aléatoires. Cette chaîne de caractères est contrôlée avant le téléchargement suivant des données du chronotachygraphe.
Remarque : vous pouvez obtenir l'ID de l'appareil également via le menu Aide de votre Downloadterminal Pro ; voir aussi page 43.
Conseil : Après le transfert de la configuration et le redémarrage consécutif, il est possible de contrôler l'heure système sur le Downloadterminal Pro et de la corriger manuellement si besoin est.
Sélectionner dans l'onglet Liste des terminaux
• [Nouveau] afin de créer un nouveau ou un autre Downloadterminal Pro ou
• [Modifier] afin d'éditer un Downloadterminal Pro déjà créé.
L'écran affiche l'onglet Paramètre I de sorte que vous pouvez procéder aux entrées ou aux modifications souhaitées.
Entrer l'ID - appareil et la description (par ex. un nom) pour le Downloadterminal Pro.
L'ID de l'appareil se trouve sur la plaque de fond de votre Downloadterminal Pro.
Passer dans l'onglet Connexion I.
Sélectionner pour le fonctionnement indépendant le mode de fonctionnement Clé USB et cliquer sur [Sauver].
Sélectionner dans le menu Clé USB la commande Sauver la configuration sur la clé USB.
Sélectionner le lecteur de la clé USB et confirmer le choix par [OK].Vous devez ensuite brancher la clé USB préparée sur le port USB sur le Downloadterminal Pro : la configuration est transférée automatiquement et le Downloadterminal Pro redémarre.

40
FInstallation du transfert de données sur le serveur SFTP ou avec LTE
L'adresse de destination du ser-veur SFTP doit pouvoir être contac-tée par le Downloadterminal Pro, par ex. via une adresse IP statique ou un nom de domaine, et des droits d'écriture sur le répertoire à utiliser existent.
Le Downloadterminal Pro supporte aussi des connexions SSL. Cela permet d'utiliser également des chemins externes avec transmis-sion SFTP sécurisée pour l'enre-gistrement automatique des données mémorisées.
Sugerencia: Pour la connexion via des terminaux LTE, il est possible d'utiliser un routeur GSM externe. Le raccordement s'effectue alors via la connexion réseau du terminal. Toutes les données requises doivent être mises à disposition par le routeur via DHCP. Le Downloadterminal Pro doit en conséquence être configuré pour l'utilisation de DHCP..
Pour que le terminal soit accessible via le réseau LTE, un trans-fert de port correspondant ou une connexion VPN doivent être configurés dans le routeur. Le Downloadterminal Pro utilise sinon la connexion Internet mise à disposition pour l’enregistre-ment des données sur un serveur SFTP.
Pour cela, il faut sélectionner le mode de fonctionnement Con-nexion via serveur SFTP. Il convient en outre de créer sur le ser-veur SFTP un répertoire dont le nom se compose des lettres " DLT " et de 5 derniers chiffres du numéro de série du Download-terminal Pro, par exemple " DLT10793 ".
Sélectionner dans l'onglet Liste des terminaux
• [Nouveau] afin de créer un nouveau ou un autre Downloadterminal Pro ou
• [Modifier] afin d'éditer un Downloadter-minal Pro déjà créé.
Passer dans l'onglet Connexion I.
Sélectionnez le mode Connexion via serveur SFTP.
Allez dans l'onglet Connexion de données II. et entrez dans la section Transmission de données vers serveur SFTP les paramètres suivants pour l'accès au serveur SFTP :
• Nom de domaine / Adresse IP
• Port pour la transmission
• Nom d'utilisateur
• Mot de passe
• Chemin du réseau vers répertoire racine. Sélectionnez ici un répertoire au choix sur l'ordinateur, sur lequel le service de terminal est installé.
Cliquer sur [Sauver].La nouvelle configuration est transférée lors de la connexion suivante ; voir aussi page 45.
Si vous avez modifié l'adresse IP, poursuivez avec l'étape à la page 39.

41
FLecteur des cartes conducteur ou de la Download Key
Le Downloadterminal Pro est connecté et configuré.
Vous pouvez désormais• commencer le téléchargement
des fichiers et• visualiser les données
enregistrées à l'écran du Downloadterminal Pro. Après le téléchargement, vous devez laisser enfichée la carte conducteur ou la Download Key ; voir à partir de la page 42.
Remarque : à chaque fois qu'une carte conducteur ou qu'une Download Key est enfichée, les fichiers correspondants sont téléchargés pour autant qu'ils ne soient pas déjà dans la mémoire du Downloadterminal Pro.
Remarque : lorsque les fichiers sont entièrement téléchargés dans la mémoire de votre Downloadterminal Pro, le message "Téléchargement terminé" s'affiche. Vous ne pouvez pas retirer la carte conducteur ou la Download Key tant que ce message ne s'est pas affiché. Vous pouvez ensuite procéder au contrôle du permis de conduire ; voir également page 44.
Conseil : si le Downloadterminal Pro est connecté via le réseau, vous pouvez accéder aussi directement à sa mémoire. Sélectionnez, dans le menu Éditer l'entrée, Accès à l'emplacement mémoire du DLT PRO > Connexion ...
Insérer la carte du conducteur dans le lecteur de cartes à puce ou brancher la Download Key sur le port USB.
L'écran indique si la carte conducteur ou la Download Key a été détectée.
Les données sont téléchargées automatiquement et enregistrées dans la mémoire interne du Downloadterminal Pro.
En outre, l'écran indique
• le nom du conducteur pour la carte conducteur.
• le nom du conducteur et/ou du véhicule pour la Download Key.
La fin du téléchargement est confirmée avec le message "Téléchargement terminé".
Si vous le souhaitez, vous pouvez obtenir l'affichage des données téléchargées à l'écran du Downloadterminal Pro (voir page 42). Sinon, retirer la carte conducteur ou la Download Key.
Vous devez ensuite encore transférer les fichiers du Downloadterminal Pro sur l'ordinateur sur lequel le logiciel de configuration est installé. Selon la variante d'utilisation, vous pouvez procéder
• par câble USB ou réseau (voir page 45) ou
• par clé USB (voir page 46).

42
FMenu Downloadterminal Pro – Calendrier
Une carte conducteur ou une Download Key est enfichée et le téléchargement est terminé et réussi.
Le calendrier du Downloadterminal Pro affiche les fichiers téléchargés des cartes conducteur ou de la Download Key en fonction de la date.La navigation s'effectue aisément via les touches de fonction et la zone de défilement ; voir sous Conseil.
Conseil : le Downloadterminal Pro est doté de touches de fonction qui réagissent à un simple effleurement. Si vous tapez par exemple sur une touche fléchée, vous naviguez dans le menu à travers les rubriques vers la droite, la gauche, le haut ou le bas. Vous confirmez le menu sélectionné par OK.
La zone de défilement vous permet de faire défiler la liste (vers le début ou la fin) ou de sélectionner une autre date dans le calendrier.
Avec la touche fléchée vers la gauche, vous accédez de nouveau depuis les sous-menus au menu précédent ; voir également l'écran.
Conseil : si le Downloadterminal Pro est connecté via le réseau, vous pouvez accéder aussi directement au contenu de son écran. Sélectionner dans le menu Modifier l'entrée Démarrer VNC pour le support... et confirmer la demande par [Oui].
A l'aide des touches de fonction, cliquer sur l'icône et démarrer la fonction avec OK.
Si une Download Key, contenant également des fichiers concernant des conducteurs, est enfichée, vous devez d'abord sélectionner le conducteur dont vous souhaitez visualiser les données téléchargées.
L'écran affiche :
• le mois sélectionné dans le calendrier
• le nom du conducteur
• la date et l'heure du dernier téléchargement
• la liste avec le cumul des durées de toutes les activités pour le jour sélectionné
• le calendrier ; aucune activité n'est présente au niveau des dates notées en gras
La zone de défilement vous permet de changer de date dans le calendrier.
Sélectionner OK pour visualiser les détails des activités pour la date choisie.
La touche fléchée vers la gauche permet de revenir au calendrier.

43
FMenu Downloadterminal Pro – Autres informationsLa carte conducteur ou la Download Key doit être enfichée pour pouvoir obtenir la mise en surbrillance en couleur des événements et des anomalies ainsi que des informations sur le conducteur et le véhicule et pouvoir les sélectionner.
Avec les touches de navigation, sélectionner le menu souhaité et confirmer par OK – vous obtenez en aucun coup d'oeil les messages et les informations les plus importants.
Remarque : le téléchargement de la carte conducteur est nécessaire pour calculer les informations lui correspondant. Pour obtenir des indications fiables sur les temps de conduite restants, il faut au préalable enficher la carte conducteur dans le tachygraphe numérique.
Remarque : si une Download Key, contenant également des fichiers concernant des conducteurs, est enfichée, vous devez d'abord sélectionner le conducteur dont vous souhaitez visualiser les données téléchargées.
Remarque : le rappel pour le téléchargement s'effectue par défaut sept jours avant l'échéance prévue. Cette période ne peut pas être modifiée.
Evénements et anomalies :
Vue des derniers événements et anomalies enregistrés
Informations sur le conducteur :
• Affichage de la durée jusqu'à la pause nécessaire suivante
• Affichage de la durée de conduite restante pour le jour et la semaine
• Durées de conduite prolongées [jour]
• Durées du repos journalier réduites [jour]
Informations sur le conducteur (uniquement via la Download Key) :
• Affichage du kilométrage actuel
• Conducteur dans la période de ... à ...
Rappel du téléchargement :
• Nom du conducteur / No Immatriculation
• Echéance dans "X" jours
Configuration :
• Sélection de la langue
• Activation/Désactivation du signal sonore
Aide :
• Version et ID appareil
• Adresse IP
Info :
Information entrée dans l'onglet Info texte (Global) du logiciel de configuration.

44
FExécution du contrôle du permis de conduireToute entreprise mettant, en qualité de détenteur, des véhicules de ser-vice à disposition, doit contrôler à intervalles réguliers si les conduc-teurs possèdent un permis de con-duire valide.
Dans le cas du collage d'étiquettes dotées de puces RFID sur le permis de conduire valide, le contrôle du permis de conduite peut être effec-tué électroniquement via le Down-loadterminal Pro.
Remarque : Le cachet RFID ne doit être apposé que sur un per-mis de conduire valide. Vérifiez d'abord que le permis de con-duire du conducteur est encore valide !
Conseil : Recherchez sur le permis de conduire un emplace-ment approprié pour le cachet d'approbation. Sur le permis de conduire de l'UE, il est conseillé de choisir le coin supérieur droit du recto. Il ne faut rien coller sur les cases au verso, même si rien n'y est inscrit.
Dans le cas des anciens permis rose ou gris, il faut éviter que le cachet puisse être découpé sans que l'on s'en rende compte. Il convient donc de le positionner en un point où des inscriptions importantes se trouvent en face.
Si le permis de conduite est retiré à son détenteur, le cachet est détruit lors de son retrait en raison de la zone de rupture pro-grammée.
Activez l'option Lecteur RFID dans le registre Paramètres II.
Vérifiez, dans le registre Statut & Service, si l'option Transfert de la confi-guration est active. La configuration modifiée est automatiquement transmise au Downloadterminal Pro et le lecteur RFID est activé. En fonctionnement indépendant, il vous faut transmettre à nouveau la configuration via une clé USB ; voir également page 39.
Une fois le téléchargement des cartes conducteur achevé, le message Scanner le permis de conduire s'affiche à l'écran. Maintenez le permis de conduire devant le lecteur RFID en le plaçant sur la face gauche, gris foncé, du boîtier.
Lorsque le permis de conduite a été détecté, l'étiquette/ID RFID s'affiche à l'écran.Les fichiers de permis de conduire (au format EDK) sont enregistrés dans le répertoire de destination avec les autres fichiers téléchargés. De là, ils peuvent être importés en vue du traitement dans un programme d'archivage, par ex. TIS-Web® DMM.
Si le permis de conduire doté de la puce RFID est maintenu sur le lecteur alors que la carte du conducteur est encore enfichée dans le Downloadterminal, le fichier de permis de conduire créé renferme en supplément des renseignements sur le nom du conducteur et le numéro de la carte du conducteur.

45
FTransfert des fichiers par câble USB / réseau
Le téléchargement d'une carte conducteur ou d'une Download Key a été effectué entièrement correctement.
L'appel des fichiers téléchargés du Downloadterminal Pro s'effectue automatiquement par le service. Vous pouvez déterminer les intervalles d'appel et sélectionner un répertoire dans lequel les fichiers doivent être enregistrés.
Conseil : sélectionner dans l'onglet Etat & Service les options pour la connexion suivante afin de déterminer si des mises à jour ou des configurations modifiées doivent être transférées lors de la connexion suivante avec le Downloadterminal Pro.
Remarque : pour conserver une présentation claire de cette brochure, quelques-unes des fonctions du Downloadterminal Pro seront juste mentionnées ou esquissées, par exemple
• le mode Entreprise qui fournit entre autres des informations sur la disponibilité des conducteurs. Après autorisation via la carte d'entreprise et entrée du code PIN, les fonctions supplémentaires sont débloquées.
• les autres commandes du menu Clé USB et leur signification. Il est ainsi possible, par exemple, de configurer une clé USB à demeure pour la transmission des données. Pour cela, il faut que les réglages système soient activés via Fichier > System login > 'tkdtkd'.
Raccorder le Downloadterminal Pro – si cela n'a pas encore été effectué – via le port USB à votre ordinateur ou via le réseau (répéteur ou point d'accès).
Démarrer le logiciel de configuration et entrer - si cela n'a pas encore été effectué (voir page 37) – onglet Connexion I les données correspondantes.
Sélectionner dans l'onglet Paramètres (Global)• un Répertoire pour les fichiers
téléchargés dans lequel les fichiers doivent être enregistrés lorsqu'ils sont transférés par le Downloadterminal Pro.
• l'Intervalle de polling par terminal afin de spécifier la durée au bout de laquelle une connexion doit être établie avec le Downloadterminal Pro.
Lorsque cette durée est écoulée, la connexion avec le Downloadterminal Pro est automatiquement établie via le service et les fichiers sont transférés.
• les entrées max. du rappel de téléchargement aux terminaux, pour limiter la longueur de la liste des rappels de téléchargement.
Les fichiers sont enregistrés dans le répertoire choisi.

46
FTransfert des fichiers en fonctionnement indépendant
La clé USB est enfichée sur l'ordinateur sur lequel le logiciel de configuration est installé.
En fonctionnement indépendant, les fichiers téléchargés et ceux enregistrés temporairement sur le Downloadterminal Pro doivent être transférés sur votre ordinateur via la clé USB.
Remarque : la clé USB pour le téléchargement des données doit être configurée absolument via la rubrique Clé USB puisque les fichiers sur votre Downloadterminal Pro sont protégées contre un accès non autorisé.
Conseil : en créant un identifiant supplémentaire dans l'onglet Paramètres (Global), vous pouvez augmenter davantage le niveau de sécurité. Cet identifiant peut être créé sur une clé USB pour un accès unique ou pour un accès permanent.
Conseil : le menu Clé USB comprend également les commandes pour la préparation du transfert d'un fichier de configuration (voir page 37), du Firmware, des procès-verbaux ou de l'activation des archives.
Sélectionner l'onglet Liste des terminaux
Marquer dans la liste le Downloadterminal Pro pour lequel les fichiers téléchargés doivent être transférés.
Sélectionner sous Clé USB > Préparer la clé USB pour le rapatriement ... .
Brancher la clé USB sur le port USB du Downloadterminal Pro.
Les fichiers sont transférés automatiquement du Downloadterminal Pro sur la clé USB.
Brancher la clé USB sur un ordinateur et enregistrer les fichiers dans le dossier souhaité par le biais de l’explorateur Windows®.
Vous pouvez ensuite éditer les données via le programme d'archivage et d'analyse que vous utilisez, par ex. avec TIS-Web®.

47
GB
Downloadterminal Pro, first contactThe new Downloadterminal Pro generation will enable your drivers to transfer digital tachograph data in a more efficient, more informative way.After the data is downloaded automatically you will receive a summary of • activities,• events and faults and • driver and vehicle information.The only thing left to do is to transfer the data to your PC. See page 59.
Note: Before starting the Downloadterminal Pro you must
• decide how the Downloadterminal Pro is mainly to be used (see page 48),
• remove the battery discharge prevention strip from the buffer battery (see page 48) and
• install the configuration software and the USB device driver on at least one computer (see page 49).
Note: If the Download Key or Download Key Pro is mentioned in this booklet, this always means all versions of this product, e.g. Inspection Key or TIS-Compact.
TFT display for the user interface and to display data from the currently inserted driver card or the currently inserted Download Key
SmartCard card reader for driver and company card
USB port for USB stick or Download Key
Function touchpad for navigation and scrolling
Four arrow buttons and OK button to navigate and confirm
Housing cover over the buffer battery and the power and communication connections
RFID chip reader for automated driving license check
Network cable (fitted at the factory)
Power supply with mains adapter (fitted at the factory)
USB cable for connecting to the computer
Product CD with
• Configuration software
• USB device driver
• Service for automatic data transfer

48
GB
Potential applications and buffer batteryData can easily be called up from the Downloadterminal Pro for data management purposes. Decide which way you want to use it:• Stand alone mode• Network cable (default)• Connection via SFTP server• USB cable (see del. schedule)• Crossover cable (see Tip)If the battery discharge prevention strip has been removed from the buffer battery and the required cable has been installed, you only have to connect the Download-terminal Pro to the power supply.
Caution: Unplug the power supply before opening the Downloadterminal Pro.
Note: Because it has an independent power supply, the Downloadterminal Pro also remains ready to operate and can save the data from driver cards and Download Keys if the computer has been shut down.
Tip: If you use a crossover cable rather than a network cable, you can connect the Downloadterminal Pro directly to a computer. This is on the assumption that it has a free network connection.
In stand-alone mode you transfer the configuration (see page 53) and the buffered download data with a USB stick (see page 60):
Use the stand-alone mode for transferring and further processing data on any computer.
You can connect the Downloadterminal Pro to the company's internal network with the network cable. The files are automatically called up and saved by the service (see page 59):
Use the network mode with large fleets with a high volume of incoming data.
Select the USB cable for direct connection to a computer. The files are automatically called up by the service and
saved in a folder of your choice (see page 50):
Use the USB option for small or medium-sized fleets with automatic data transfer.
Setting up the buffer battery:
• Undo the screws on the side cover and remove it carefully.
• Take the buffer battery out of its support and remove the battery discharge prevention strip.
• Insert the buffer battery again (plus symbol pointing towards the bottom of the housing) and screw up the side cover again.

49
GB
Installing the configuration software and the serviceThe software must be installed however the terminal is connected. You need it to• configure the Downloadterminal
Pro.• install the service for automatic
data transfer.• transfer a firmware update.• prepare a USB stick to transfer
the configuration or to prepare it to call up data (stand-alone mode).
Note: You install the software
• on the computer to which the Downloadterminal Pro is to be connected using the USB or crossover cable or
• on any computer or server within your network (network mode) or
• on a computer (stand-alone mode) which is to be used to prepare the configuration when using a USB stick.
Note: You must install the service if you want to connect the Downloadterminal Pro directly to a computer or your network. You need authorisation to install and start the services. You may need to start the configuration software with the option "Execute as administrator" for installation of the service.
Note: A USB driver for configuration and communication via USB can be installed with the configuration software.
Installing the software (Administrator rights required):
• Insert the product CD into the CD/DVD drive.
Installation starts automatically.
Should this not be the case, start Windows® Explorer, switch to the CD/ DVD drive and double click on "setup.exe".
• Follow the Wizard that will guide you through the installation.
Start the VDO Downloadterminal Pro software.
• A message indicates that the service has not yet been started or installed. Click on [OK] to confirm this.
• For USB or network mode select Tools > Install & start service....
Select Use System account or an account from which the service is to be started automatically. Click on [Install...] and then on [OK] to confirm the message.
You can check whether the service is running by going to [Start] > Control Panel > Administrative Tools > Services and double clicking on Downloadterminal Pro.

50
GB
Configuration software - an initial overviewAmongst other things the configuration software gives you the following setting options:• Data transfer• Connection with automatic
communication• Selection of directories for
updates and downloaded files• Basic Downloadterminal Pro
settingsYou will also be given information on communicating with the Downloadterminal Pro.
Tip: A screen saver will come on if there has been no activity on the Downloadterminal Pro for some time. You can set the time this takes to happen in the Parameter II tab.
Select the required language from the Language menu.
Create your Downloadterminal pro in the Terminal list tab.
In the Parameter I – III tabs configure the general settings for the selected or newly created Downloadterminal Pro in the Terminal list.
In the Data connection I – II tabs, make the appropriate settings for automatic communication with the Downloadterminal Pro via USB or network cable.
In the Status & Service tab decidewhat is to happen when the computer next makes contact with the Downloadterminal Pro. See also page 60.
Now you only have to transfer the configuration data to the Downloadterminal Pro.
Depending on the method that you have decided to use, transfer the data
• via a USB stick (stand-alone or network mode after changing the IP address). See page 60.
• via network cable. See page 59.
• via USB or crossover cable. See page 59.

51
GB
Configuring data transfer via cable connection You have
• installed and started the software,
• installed and started the service and
• had the network address confirmed by your network administrator or been allocated a new one or have obtained this automatically from the server (DHCP).
If the network address has changed, you must transfer the configuration via a USB stick. See page 53 or page 59.
Note: Default settings for the network address, the network mask and the gateway are given in the configuration software. Contact your network administrator to find out whether these settings can be changed:
• IP address: 192.168.99.1
• Subnet mask: 255.255.255.0
• Default gateway: 0.0.0.0.
Tip: You can make further settings. For this see page 50.
Note: You can find out the device ID for your Downloadterminal Pro from the Support menu. See also page 57.
In the Parameter I tab, click on
• [New] to create a new or another Downloadterminal Pro or
• [Change] to edit an already created Downloadterminal Pro.
Enter the Device ID and the Description (e.g. a name) for the Downloadterminal Pro.
You will find the device ID on the base plate of your Downloadterminal Pro (See also Note 2).
Switch to the Data connection I tab.
Select the Operating mode.
• Polling via the network if you want to connect the network cable.
If necessary, clear the DHCP (retrieve automatically) check box and under TCP/IP configuration enter the IP address, the Subnet mask and the Default gateway. See the note.
• Polling via USB if you have connected the USB cable. See page 48.
Click on [Save].

52
GB
Making further settings for cable connection In the
• Parameter I – III and• Data connection I – II tabs
you have entered all the required details for communication between the Downloadterminal Pro and your computer environment. See also page 51.
Before transferring the configuration you now only have to configure a few basic settings.
Note: Any data is transferred to or from the Downloadterminal Pro automatically by the service in network mode or when using a USB cable connection.
Note: If you are operating the Downloadterminal Pro with a USB cable, you do not have to enter an IP address.
Tip: Also remember that you may need to configure an exception for communication of the terminal service in any firewall you may use.
Select Settings (Global), and click on [Change].
In Polling interval per 'Terminal' enter the time after which the Downloadterminal Pro is to make an connection automatically.
The data connection to your Downloadterminal Pro is also established if you have made changes to the configuration or the settings described here.
One exception: You have changed the IP address for network mode. For this see page 53.
Specify the directory in which
• new firmware for the next update is to be buffered.
• data transferred from the Downloadterminal Pro is to be stored, e.g. for archiving in TIS-Web®.
If necessary, change other details and click on [Save].The new configuration is transferred when the next connection is made. See also page 59.
If you have changed the IP address, continue with step on page 53.

53
GB
Configuring data transfer in stand-alone mode A USB stick is inserted into the
computer.
You must transfer the configuration via a USB stick if you use the Downloadterminal Pro• in stand-alone mode or • if you have changed the
IP address for network mode. For this see page 51.
Note: In the Settings (Global) tab, select Use identifier for upload to USB stick if you want to increase data security when downloading with a USB stick.
In the Identifier for upload to USB stick box enter a freely definable character string or click on to have a character string created by a random generator. This character string will be checked before the next batch of tachograph data is downloaded.
Note: You can find out the device ID for your Downloadterminal Pro from the Support menu. See also page 57.
Tip: After transfer of the configuration and the subsequent system restart, the system time can be reviewed and manually corrected if necessary at the Downloadterminal Pro.
In the Terminal list tab, click on
• [New] to create a new or another Downloadterminal Pro or
• [Change] to edit an already created Downloadterminal Pro.
The Parameter I tab is displayed and you can make the required entries or changes.
Enter the Device ID and the Description (e.g. a name) for the Downloadterminal Pro.
You will find the device ID on the base plate of your Downloadterminal Pro.
Switch to the Data connection I tab.
For stand-alone mode select the USB stick operating mode and click on [Save].
In the USB stick menu select Save configuration to USB stick.
Select the USB stick from the drive selection list and click on [OK] to confirm the message.
Now all you have to do is insert the pre-pared USB stick into the USB port on the Downloadterminal Pro: The configuration is transferred automatically and the Downloadterminal Pro will restart..

54
GB
Setting up data transfer on SFTP server or with LTE The target address of the SFTP
server can be reached from the Downloadterminal Pro, e.g. via a static IP address or a domain name; writing rights for the directory to be used are present.
The Downloadterminal Pro also supports SSL connections. Thus, it is possible to use external paths with secured SFTP transmission as well for automatic filing of the saved files.
Tip: An external GSM router can be used for connection via LTE terminals. The connection shall then take place via the network connection of the terminal. All required data must be provided by the router via DHCP. The Downloadterminal Pro must be confi-gured accordingly for use of DHCP.
If the terminal is to be accessible via the LTE network, the router must have the corresponding port forwarding or a VPN connec-tion configured. Apart from this, the Downloadterminal Pro uses the provided internet connection to file the data on an SFTP ser-ver.
The operating mode connection via SFTP server must be selected. On the SFTP server, a directory also must be set up with a name made up of the letters "DLT" and the last 5 digits of the serial number of the Downloadterminal Pro, e.g. "DLT10793".
In the Terminal list tab, click on
• [New] to create a new or another Down-loadterminal Pro or
• [Change] to edit an already created Downloadterminal Pro.
Switch to the Data connection I tab.
Select the operating mode Connection via SFTP server.
Switch to the tab Data connection II. and enter the following parameters for access to the SFTP server in the section Data transmission:• Domain name / IP address
• Port for transmission
• User name
• Password
• Network path to the master directory. Select any directory on the computer on which the terminal service is installed for this.
Click on [Save].The new configuration is transferred when the next connection is made. See also page 59.
If you have changed the IP address, continue with step on page 53.

55
GB
Reading driver cards or the Download Key The Downloadterminal Pro is
connected and configured.
You can now • start downloading files and • display the saved data on the
Downloadterminal Pro screen. You only have to leave the driver card or Download Key inserted after downloading. See page 56.
Note: Each time a driver card or a Download Key is inserted the corresponding data is downloaded if it is not already in the Downloadterminal Pro's memory.
Note: The //"Download complete" message is displayed after the download files have been transferred to your Downloadterminal Pro's memory. Wait until this message has appeared before removing the driver card or Download Key. You can subsequently perform the driving license check; also see page 58.
Tip: If the Downloadterminal Pro is connected via the network, you can access its memory directly. In the menu Edit, select the entry Access to the storage location of the DLT PRO > Connect ....
Insert the driver card in the chip card reader slot or the Download Key in the USB port.
The display shows whether the driver card or the Download Key has been detected.
The data is downloaded automatically and saved in the Downloadterminal Pro's internal memory.
In addition, for the driver card, the display shows
• the driver's name.
• and for the Download Key the driver's and/or the vehicle's name.
The "Download complete" message confirms that the download has finished.
If required you can display the downloaded data on the Downloadterminal Pro screen. See page 56. Otherwise, remove the driver card or the Download Key.
Then you only have to transfer the files from the Downloadterminal Pro to the computer on which the configuration software is installed. Depending on the connection method used this is done either
• via the network or USB cable (see page 59) or
• via USB stick (see page 60).

56
GB
Downloadterminal Pro – Calendar A driver card or a Download Key
is inserted and the download was completed successfully.
In the Downloadterminal Pro calendar look at the download files from driver cards or from the Download Key for the specific date.Just browse using the function keys and the function touchpad. See Tip.
Tip: The Downloadterminal Pro is fitted with function keys that react to the slightest touch. For example, if you press an arrow key you move one menu item to the right, left, up or down in the menu. Click on OK to confirm the selected menu.
Using the funtion touchpad you can scroll up and down or select another date in the calendar.
If you use the left arrow key in a sub menu, you go back to the previous menu. See also Display.
Tip: If the Downloadterminal Pro is connected via the network, you can also access the display directly. In the Edit menu select Start VNC server for Support... and click on [YES] to confirm the message.
Select with the function keys and click on OK to start the function.
If a Download Key on which there are also driver files is inserted, you must first of all select the driver whose download data you want to view.
The display shows:
• the selected month from the calendar overview
• the driver's surname
• the date and time of the last download
• a list with the total time for the specific activities for the selected day
• the Calendar overview. There are activities entered for dates in bold.
You can switch between date entries in the calendar overview by using the function touchpad.
Select OK to view the details of the activities on the selected date.
Use the left arrow key to switch back to the calendar overview.

57
GB
Downloadterminal Pro menu – further informationEvents and faults and driver and vehicle information are only highlighted in colour when the driver card or Download Key is inserted. Only then can they be selected.
Select the required menu with the navigation keys and click on OK to confirm. You will obtain the most important messages and information at a glance.
Note: A driver card download is the basis for calculating driver information. To get reliable information on the remaining driving times, the driver card should be inserted into the digital tachograph first.
Note: If a Download Key on which there are also driver files is inserted, you must first of all select the driver whose download data you want to view.
Note: The download reminder appears by default seven days before the due download. This period cannot be changed.
Events and faults :
View of the last recorded events and faults.
Driver information :
• Display of time until the next required break
• Display of the remaining day's and week's driving time
• Extended driving times [Day]
• Reduced daily rest times [Day]
Vehicle information (only Download Key) :
• Display of current odometer reading
• Driver in period from .... to
Download reminder :
• Driver name/ Vehicle registration number
• Due in "X" days.
Configuration :
• Language selection
• Audible signal on/off
Support :
• Version and device ID
• IP address
Info :
Information that has been entered in the Infotext (Global) tab of the configuration software .

58
GB
Checking the driving licenceEvery company that provides com-pany cars as the car owner must check at regular intervals that the drivers have valid driving licenses.
If labels with RFID chips are stuck to the valid driving licenses, the dri-ving license check can take place electronically via the Downloadter-minal Pro.
Note: The RFID seal must only be applied to a valid driving license. First check that the driver's driving license is still valid.
Tip: Find a suitable location on the driving license for the test seal. For the EU driving license, the upper right corner on the front is recommended. The text fields on the reverse must not be covered over, even if there is nothing entered there!
For the older pink or grey driver's licenses, it should be ensured that the seal cannot be cut out unnoticed. Therefore, it should be put in a location where there is an important entry on the reverse.
If the driving license is withdrawn from its holder, the seal will be destroyed at the integrated predetermined breaking point when the seal is removed.
Activate the RFID reader option in the parameter II tab.
Check whether the option Transfer confi-guration is active in the Status & Service tab.The changed configuration is auto-matically transferred to the Downloadter-minal Pro and the RFID reader is activated.In standalone mode, you need to transfer the configuration again by USB stick; also see page 47.
After ending the driver's card download, the display shows the message "Scan driving license". Then hold the driving license in front of the RFID reader on the left, dark-grey housing side.
When the driving license has been recog-nised, the display shows the RFID tag-ID.The driving license files (file format EDK) are filed in the target folder together with the other download files. From there, they can be imported for further processing into an archiving program such as TIS-Web® DMM
If the driving license with an RFID-chip is held against the reader while the driver card is still inserted in the Downloadterminal Pro, the generated driver's license file contains additional information on the driver's name and the driver card number.

59
GB
Transferring files by USB or network cable A driver card or Download Key
has been successfully downloaded.
The download files are called up automatically from the Downloadterminal Pro by the service. You can set the call up intervals yourself and select a directory in which the files are to be saved.
Tip: In the Status & Service tab under Options for next connection select the options in order to define whether updates or modified configurations should be transferred when the next connection to the Downloadterminal Pro is established.
Note: In order to keep this booklet to a reasonable size, some of the functions of the Downloadterminal Pro could only be alluded to or mentioned, such as
• the employer mode that gives information on driver availability etc.The additional functions are released after authorisation via the company card and PIN input.
• the other commands on the USB stick menu and their different meanings.For example, a USB stick can be configured permanently for data transfer. For this, the system settings must be activated via File > System login > 'tkdtkd'.
If you have not already done so, connect the Downloadterminal Pro to your computer via the USB port or via the network (hub or access point).
Start the configuration software and, if you have not already done so (see page 51), enter the corresponding data in the Data connection I tab.
In the Settings (Global) tab select
• a Directory for the downloaded files in which the files are to be saved when they are called up from the Downloadterminal Pro.
• the Polling interval per 'Terminal' to set the time after which a connection is established with the Downloadterminal Pro.After the set time is up the service automatically connects with the Downloadterminal Pro and the files are transferred.
• the max. entries of the download reminder to the terminals in order to limit the length of the list of download reminders
The files are saved in the selected directory.

60
GB
Transferring files in stand-alone mode The USB stick is inserted
into the computer on which the configuration software is installed.
In stand-alone mode the files downloaded via the USB stick and buffered on the Downloadterminal Pro are transferred to your computer.
Note: The USB stick for downloading the data must basically be configured in the USB stick menu as the files on your Downloadterminal Pro must be protected from unauthorised access.
Tip: This security can be further increased by setting up an additional identifier in the Settings (Global) tab. This can be set up on a USB stick for just one access and also for permanent access.
Tip: In the USB stick menu you will also find the commands for preparing to transfer a configuration file (see page59), the firmware, the logs or archiving activation.
Select the Terminal list tab.
From the list select the Downloadterminal Pro from which the download files are to be transferred.
Select USB stick > Prepare USB stick for terminal download... .
Insert the USB stick into the Downloadterminal Pro USB port.
The files are automatically transferred from the Downloadterminal Pro to the USB stick.
Connect the USB stick to a computer and save the files in the required target folder by using Windows® Explorer.
You can then further process the data in the archiving and evaluation program that you use, e.g. TIS-Web®.

61
I
Downloadterminal Pro: il primo contattoLa nuova generazione del Downloadterminal Pro consente ai conducenti di effettuare il trasferimento dei dati del tachigrafo digitale in modo efficiente e informativo.Dopo aver scaricato da soli i dati, si dispone di una panoramica • delle attività,• degli eventi e degli errori e • delle informazioni sul
conducente e sul veicolo.A questo punto, non si deve far altro che trasferire i dati sul PC; consultare a partire da pagina 73.
Nota: prima di mettere in funzione il Downloadterminal Pro, è necessario
• definire il tipo di applicazione, in base al quale il Downloadterminal Pro va principalmente utilizzato (consultare pagina 62),
• rimuovere dalla batteria tampone la protezione antiscaricamento (consultare pagina 62) e
• installare il software di configurazione e i driver USB su almeno un PC (consultare pagina 63).
Nota: se nel presente booklet si parla di Download Key e di Download Key Pro, si intendono anche tutte le varianti di questo prodotto (ad es. Inspection Key o TIS-Compact).
Display TFT per la guida utente e per la visualizzazione dei dati della carta conducente attualmente inserita o del Download Key attualmente collegato
Lettore di smart card (carta conducente e carta azienda)
Interfaccia USB per lo stick USB o Download Key
Barra di scorrimento per la navigazione e la funzione di scorrimento
Quattro tasti di direzione e un tasto OK per la navigazione e la conferma
Coperchio di accesso alla batteria tampone e ai collegamenti di corrente e comunicazione
Lettore chip RFID per il controllo automatizzato della patente di guida
Cavo per rete (installato in fabbrica)
Alimentatore di corrente con cavo per rete (installato in fabbrica)
Cavo USB per il collegamento con il PC
CD con
• software di configurazione
• driver USB
• servizio automatico di trasferimento dati.

62
I
Tipi di applicazione e batteria tamponePer la gestione dati, i dati possono essere richiamati facilmente dal Downloadterminal Pro. Definire i tipi di applicazione richiesti:• modalità standalone• cavo per rete (standard)• Collegamento attraverso server
SFTP• Cavo USB (consultare
Dotazione)• Cavo crossover (consultare il
suggerimento)Dopo aver rimosso la protezione antiscaricamento dalla batteria tampone e installato il cavo desiderato, non rimane che collegare il Downloadterminal Pro all'alimentatore di corrente.
Attenzione: sfilare la spina dalla presa di corrente, prima di aprire il Downloadterminal Pro.
Nota: disponendo di un'alimentazione di corrente indipendente, il Downloadterminal Pro rimane pronto per l'uso e in grado di salvare dati di carte conducente e di Download Key, a PC spento.
Suggerimento: se al posto del cavo per rete si utilizza un cavo crossover, è possibile collegare il Downloadterminal Pro direttamente ad un PC, sempre che esso abbia una porta di connessione alla rete disponibile.
Nella modalità standalone avviene il trasferimento della configurazione (consultare pagina 67) e dei file di download salvati a mezzo stick USB (consultare pagina 74):
Tipo di applicazione per il trasferimento e l'ulteriore elaborazione su un PC a piacere.
Con il cavo per rete è possibile collegare il Downloadterminal Pro alla rete aziendale interna. Quindi i dati vengono richiamati automaticamente a mezzo servizio e salvati (consultare pagina 73):
Tipo di applicazione in caso di grandi flotte con elevato flusso di dati.
Per il collegamento diretto ad un PC, scegliere il cavo USB. Quindi i dati
vengono richiamati automaticamente a mezzo servizio e salvati in una cartella a scelta (consultare pagina 64):
Tipo di applicazione in caso di flotte di piccole-medie dimensioni con trasferimento automatico dei dati.
Attivazione della batteria tampone:
• Togliere le viti del coperchietto laterale e quindi, con dovuta cautela, estrarlo lateralmente.
• Estrarre la batteria tampone dal fissaggio e rimuovere la protezione antiscaricamento.
• Inserire di nuovo la batteria tampone (segno positivo rivolto verso il fondo del vano) e avvitare il coperchietto laterale.

63
I
Installazione del software di configurazione e del servizioIl software è assolutamente necessario per tutti i tipi di applicazione. Esso serve per• configurare il
Downloadterminal Pro• installare il servizio automatico
di trasferimento dati• trasferire un aggiornamento
del firmware.• preparare uno stick USB per
il trasferimento della configurazione o per il richiamo di dati (funzionamento standalone).
Nota: il software va installato
• sul PC, a cui è collegato il Downloadterminal Pro tramite cavo USB o crossover, oppure
• su un server o un PC a piacere all'interno della rete (modalità in rete), oppure
• su un PC (modalità standalone), dal quale dovrà essere preparata la configurazione per lo stick USB.
Nota: installare il servizio se si intende collegare il Downloadterminal Pro direttamente ad un PC o alla rete aziendale. Per installare e avviare i servizi è necessario avere l'autorizzazione. È possibile che per installare il servizio debba essere avviato il software di configurazione mediante l'opzione "Esegui come amministratore".
Nota: Con il software di configurazione può essere installato anche un driver USB per la configurazione e la comunicazione via USB.
Installazione del software (necessari i diritti di amministratore):
• Inserire IL CD nell'unità CD/DVD.
L'installazione si avvia automaticamente.
In caso contrario, avviare Windows® Explorer, passare all''unità CD/DVD e fare doppio clic su "setup.exe“.
• Seguire la procedura di installazione guidata.
Avviare il software VDO Downloadterminal Pro.
• Appare un messaggio indicante che il servizio non è stato installato o avviato. Confermare il messaggio premendo [OK].
• Per la modalità USB o rete, scegliere Strumenti> Installazione e avvio....
Scegliere Utilizza Account di Sistema esistente o un account dal quale verrà avviato automaticamente il servizio. Fare clic su [Installa...], e confermare il messaggio premendo [OK].Per vedere se il servizio è attivo, scegliere [Start] > Pannello di controllo > Strumenti di amministrazione > Servizi e fare doppio clic su Downloadterminal Pro.

64
I
Software di configurazione - Panoramica introduttiva Alcune delle impostazioni possibili offerte dal software di configurazione sono:• trasferimento di dati• connessione con comunicazione
automatica• scelta delle directory per
aggiornamenti e file scaricati• impostazioni di base del
Downloadterminal Pro.Inoltre si ricevono informazioni sulla comunicazione con il Downloadterminal Pro.
Suggerimento: Se non si utilizza il Downloadterminal Pro per determinato periodo di tempo, si avvia uno screensaver. Per definire tal periodo di tempo, usare la scheda Parametro II.
Nel menu Lingua scegliere una lingua a piacere.
Nella scheda Elenco terminali creare il Downloadterminal Pro.
Nelle schede Parametro I – III, effetture le impostazioni globali relative al Downloadterminal Pro appena creato o selezionato nella scheda Elenco terminali.
Nelle schede Connessioni dati I – II, effetture le impostazioni relative la comunicazione automatica con il Downloadterminal Pro tramite cavo USB o per rete.
Nella scheda Stato e servizio, definire l'operazione che dovrà aver luogo alla prossima connessione del PC con il Downloadterminal Pro; consultare anche pagina 73.
Quindi trasferire sul Downloadterminal Pro i dati di configurazione.
A secondo del tipo di applicazione, trasferire i dati mediante
• stick USB (modalità standalone o modalità rete dopo a ver modificato l'indirizzo IP); consultare pagina 74.
• cavo per rete; consultare pagina 73.
• cavo USB o crossover; consultare pagina 73.
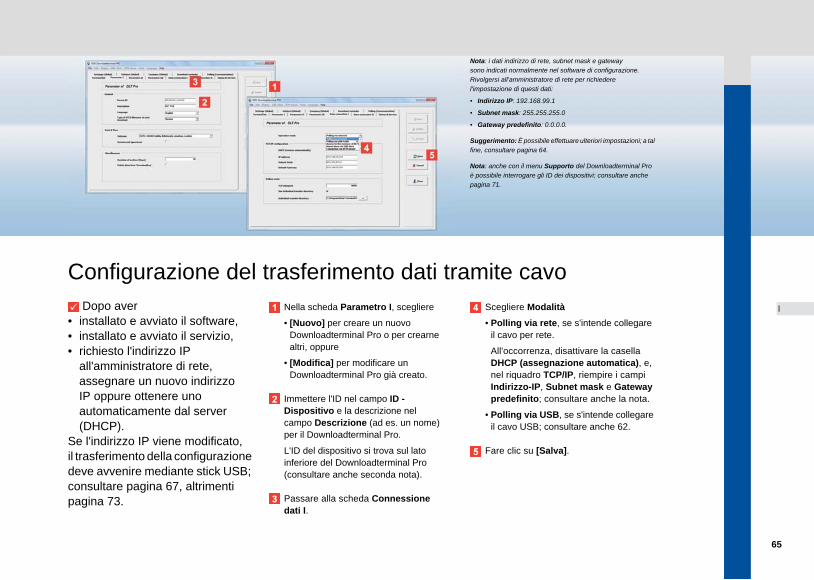
65
I
Configurazione del trasferimento dati tramite cavo Dopo aver
• installato e avviato il software,• installato e avviato il servizio,• richiesto l'indirizzo IP
all'amministratore di rete, assegnare un nuovo indirizzo IP oppure ottenere uno automaticamente dal server (DHCP).
Se l'indirizzo IP viene modificato, il trasferimento della configurazione deve avvenire mediante stick USB; consultare pagina 67, altrimenti pagina 73.
Nota: i dati indirizzo di rete, subnet mask e gateway sono indicati normalmente nel software di configurazione. Rivolgersi all'amministratore di rete per richiedere l'impostazione di questi dati:
• Indirizzo IP: 192.168.99.1
• Subnet mask: 255.255.255.0
• Gateway predefinito: 0.0.0.0.
Suggerimento: È possibile effettuare ulteriori impostazioni; a tal fine, consultare pagina 64.
Nota: anche con il menu Supporto del Downloadterminal Pro è possibile interrogare gli ID dei dispositivi; consultare anche pagina 71.
Nella scheda Parametro I, scegliere
• [Nuovo] per creare un nuovo Downloadterminal Pro o per crearne altri, oppure
• [Modifica] per modificare un Downloadterminal Pro già creato.
Immettere l'ID nel campo ID - Dispositivo e la descrizione nel campo Descrizione (ad es. un nome) per il Downloadterminal Pro.
L'ID del dispositivo si trova sul lato inferiore del Downloadterminal Pro (consultare anche seconda nota).
Passare alla scheda Connessione dati I.
Scegliere Modalità• Polling via rete, se s'intende collegare
il cavo per rete.
All'occorrenza, disattivare la casella DHCP (assegnazione automatica), e, nel riquadro TCP/IP, riempire i campi Indirizzo-IP, Subnet mask e Gateway predefinito; consultare anche la nota.
• Polling via USB, se s'intende collegare il cavo USB; consultare anche 62.
Fare clic su [Salva].

66
I
Ulteriori impostazioni per il collegamento tramite cavo Nelle schede
• Parametro I – III e• Connessione dati I – II
sono stati specificati tutti i dati necessari per la comunicazione tra il Downloadterminal Pro e il PC; consultare anche pagina 65.
Prima di trasferire la configurazione rimangono solo alcune impostazioni di base da effettuare.
Nota: in modalità rete e attraverso un collegamento tramite cavo USB avviene automaticamente il trasferimento dati dal/al Downloadterminal Pro a mezzo servizio.
Nota: per far funzionare il Downloadterminal Pro tramite cavo USB, non è necessario indicare un indirizzo IP.
Suggerimento: Si consideri anche che in caso di utilizzo di un firewall, occorrerà eventualmente configurare un'eccezione per la comunicazione del servizio al terminale.
Scegliere la cartella Impostazioni (Globali) e fare clic su [Modifica].Immettere un valore temporale nel campo Intervallo di 'Polling' [min], trascorso il quale viene stabilita una connessione automatica con il Downloadterminal Pro.
La connessione dati con il Download-terminal Pro viene stabilita anche se sono state apportate modifiche alla configu-razione o alle impostazioni qui descritte.
L'unica eccezione: è stato modificato l'indirizzo-IP per la modalità rete; consultare pagina 67,
Specificare la directory in cui salvare
• il nuovo firmware per il prossimo aggiornamento.
• i dati trasferiti dal Downloadterminal Pro (ad es. per l'archiviazione in TIS-Web®).
All'occorrenza, modificare altri dati e quindi fare clic su [Salva].Alla prossima connessione avviene il trasferimento della nuova configurazione; consultare anche pagina 73.
Se è stato modificato l'indirizzo-IP, procedere dal passo a pagina 67.

67
I
Configurazione del trasferimento dati - Modalità standalone Uno stick USB è collegato al PC.
La configurazione deve avvenire tramite stick USB quando il Downloadterminal Pro• il Downloadterminal Pro è
utilizzato in modalità standalone oppure
• l'indirizzo IP per la modalità rete è stata modificato; consultare anche pagina 65.
Nota: Nella scheda Impostazioni (Globale), attivare la casella Utilizza ID per scaricamento su stick USB per aumentare la sicurezza dati durante lo scaricamento dei dati su uno stick USB.
Immettere una stringa di caratteri a piacere nel campo Identificatore per scaricamento su stick USB o fare clic su
per generare in modo casuale una stringa di caratteri. Essa viene verificata prima di scaricare i dati del tachigrafo.
Nota: anche con il menu Supporto del Downloadterminal Pro è possibile interrogare gli ID dei dispositivi; consultare anche pagina 71.
Suggerimento: Dopo avere trasferito la configurazione e avere riavviato il sistema, è possibile controllare sul Downloadterminal Pro l'orario del sistema ed eventualmente correggerlo manualmente.
Nella scheda Elenco terminali, scegliere
• [Nuovo] per creare un nuovo Downloadterminal Pro o per crearne altri,
• [Modifica] per modificare un Downloadterminal Pro già creato.
Viene visualizzata la scheda Parametro I in cui è possibile effettuare le impostazioni o modificarle.
Immettere l'ID nel campo ID - Dispositivo e la descrizione nel campo Descrizione (ad es. un nome) per il Downloadterminal Pro.
L'ID del dispositivo si trova sul lato inferiore del Downloadterminal Pro.
Passare alla scheda Connessione dati I.
Per la modalità standalone, scegliere la modalità Standalone tramite stick USB e fare clic su [Salva].
Nel menu USB - Stick , scegliere la voce di menu Salva configurazione su stick USB.
Nella selezione di unità, scegliere lo stick USB e confermare il messaggio premendo [OK].Quindi collegare lo stick USB preparato alla porta USB del Downloadterminal Pro: la configurazione viene eseguita automaticamente il il Downloadterminal Pro viene riavviato.

68
I
Impostare il trasferimento dati sul server SFTP o con LTE L'indirizzo target del server
SFTP si ottiene dal Downloadtermi-nal Pro, ad esempio attraverso un indirizzo IP statico o un nome di dominio, e sono presenti i diritti di scrittura sulla directory da utiliz-zare.
Il Downloadterminal Pro supporta anche collegamenti SSL. In questo modo per la memorizzazione auto-matica dei dati registrati è possibile utilizzare anche percorsi esterni con trasmissione SFTP garantita.
Suggerimento: Per il collegamento attraverso terminali LTE può essere utilizzato un router GSM esterno. Il collegamento avviene attraverso l'allacciamento di rete del terminale. Tutti i dati richiesti devono essere resi disponibili al router attraverso il DHCP. Il Downloadterminal Pro deve essere configurato adegu-atamente per l'utilizzo del DHCP.
Se il terminale deve essere raggiungibile attraverso la rete LTE, sul router deve essere configurato un rispettivo inoltro alla porta o un collegamento VPN. Diversamente il Downloadterminal Pro utilizza il collegamento internet predisposto per la memorizzazi-one dei dati su un server SFTP.
In questo caso deve essere selezionata la modalità operativa di collegamento attraverso un server SFTP. Inoltre sul server SFTP deve essere predisposta una directory il cui nome sia composto dalle lettere "DLT" e le ultime 5 cifre del numero di serie del Downloadterminal Pro, ad esempio "DLT10793".
Nella scheda Elenco terminali, scegliere
• [Nuovo] per creare un nuovo Down-loadterminal Pro o per crearne altri, oppure
• [Modifica] per modificare un Download-terminal Pro già creato.
Passare alla scheda Connessione dati I.
Selezionare la modalità operativa Col-legamento attraverso server SFTP.
Passare al registro Collegamento dati II e nella sezione trasferimento dati al server SFTP inserire i seguenti parametri per l'accesso al server SFTP:
• Nome di dominio / Indirizzo-IP
• Porta per la trasmissione
• Nome utente
• Password
• Percorso di rete alla directory generale. Selezionare qui una cartella a piacere sul computer su cui è installato il ser-vizio del terminale.
Fare clic su [Salva].Alla prossima connessione avviene il trasferimento della nuova configurazione; consultare anche pagina 73.
Se è stato modificato l'indirizzo-IP, procedere dal passo a pagina 67.

69
I
Lettura delle carte conducente o dei Download Key Il Downloadterminal Pro è
collegato e configurato.
Quindi è possibile• iniziare lo scaricamento dei
file e• visualizzare i dati salvati sul
display del Downloadterminal Pro. Al termine del download, lasciare inserita solo la carta conducente o il Download Key; consultare pagina 70.
Nota: ogni volta che viene inserita una carta conducente o un Download Key, i corrispettivi dati vengono scaricati, a meno che essi non esistano già nella memoria del Downloadterminal Pro.
Nota: dopo che i dati di download sono stati trasferiti nella memoria del Downloadterminal Pro viene visualizzato il messaggio "Download completato". Attendere questo messaggio prima di rimuovere la carta conducente o il Download Key.Inoltre è possibile effettuare il controllo della patente di guida; vedere anche pagina 72.
Suggerimento: se il Downloadterminal Pro è collegato tramite rete, è possibile accedere anche direttamente alla sua memoria. Selezionare dal menù Elaborazione la voce Accesso allo spazio di memoria di DLT PRO > Collega …
Inserire la carta conducente nel vano del lettore di carte o collegare Download Key alla porta USB.
Sul display viene visualizzato se è avvenuto, o meno, il riconoscimento della carta conducente o del Download Key.
I dati vengono scaricati automaticamente e salvati sulla memoria interna del Downloadterminal Pro.
Inoltre sul display viene visualizzato
• il nome conducente (carta conducente)
• il nome conducente e/o il nome veicolo (Download Key).
Completato il dowload confermare il messaggio "Download completato“.
Volendo è possibile visualizzare sul display del Downloadterminal Pro i dati scaricati (consultare pagina 70). Altrimenti rimuovere la carta conducente o il Download Key.
A questo punto trasferire i file dal Downloadterminal Pro sul PC in cui è installato il software di configurazione. A secondo del tipo di applicazione, il trasferimento dati può avvenire
• tramite cavo per rete o cavo USB (consultare pagina 73) o
• tramite stick USB (consultare pagina 74).

70
I
Menu Downloadterminal Pro – Calendario È inserita una carta conducente
o è collegato un Download Key e il download è stato completato.
Visualizzare nel calendario del Downloadterminal Pro i file di download di carte conducente o Download Key in funzione della data.A tal fine, navigare utilizzando i tasti funzione e la barra di scorrimento; consultare il suggerimento.
Suggerimento: il Downloadterminal Pro è dotato di tasti funzione che rispondono al leggero sfioramento. Ad esempio, sfiorando un tasto di direzione si passa, all'interno di un menu, alla voce di menu a destra, a sinistra, in alto o in basso. Per confermare il menu selezionato, premere OK.
Tramite la barra di scorrimento è possibile sfogliare verso l'alto o il basso gli elenchi e selezionare un'altra data nel calendario.
Nei sottomenu, con il tasto di direzione verso sinistra si ritorna al menu precedente; consultare anche il display.
Suggerimento: se il Downloadterminal Pro è collegato tramite rete, è possibile accedere anche direttamente alla visualizzazione sul display. Nel menu Modifica, scegliere la voce di menu VNC - Avvia server per supporto ... e confermare il messaggio premendo [Sì].
Con i tasti funzione, scegliere l'icona e avviare la funzione premendo OK.
Se è collegato un Download Key contenente anche file conducente, è necessario selezionare dapprima il conducente del quale si desiderano visualizzare i dati di download.
Sul display sono visualizzati:
• il mese selezionato nella visualizzazione calendario
• il nome del conducente
• la data e l'ora dell'ultimo download
• l'elenco con il totale dei tempi delle attività del giorno selezionato
• Visualizzazione calendario. Le voci data in grassetto indicano la presenza di attività.
Con la barra di scorrimento è possibile passare da una voce data all'altra all'interno della visualizzazione calendario.
Scegliere OK per visualizzare i dettagli delle attività della data selezionata.
Per ritornare alla visualizzazione calendario, utilizzate il tasto di direzione verso sinistra.

71
I
Menu Downloadterminal Pro – Ulteriori informazioniGli eventi, gli errori e le informazioni sul conducente e sul veicolo sono evidenziati a colore (e quindi selezionabili), a carta conducente inserita o a Download Key collegato.
Con i tasti di navigazione, scegliere il menu desiderato e confermare la scelta premendo OK – i messaggi e le informazioni più importanti in sintesi.
Nota: per il calcolo delle informazioni utente è necessario un download della carta conducente. Per ricevere dati affidabili sui tempi di guida rimanenti occorre prima inserire la carta conducente nel tachigrafo digitale.
Nota: Se è collegato un Downloadk Key contenente anche file conducente, è necessario selezionare dapprima il conducente del quale si desiderano visualizzare i dati di download.
Nota: il promemoria download è emesso normalmente sette giorni prima del download in scadenza. Questo arco di tempo non può essere modificato.
Eventi ed errori :
Vista degli eventi e degli errori registrati per ultimi.
Informazioni sul conducente :
• Indicazione durata fino alla prossima pausa obbligatoria
• Indicazione del rimanente periodo di guida settimanale e giornaliero
• Periodi di guida prolungati [giorno]
• Periodi di guida accorciati [giorno].
Informazioni sul conducente (solo Download Key) :
• Indicazione del chilometraggio attuale
• Conducente nel periodo da .. a.
Promemoria download :
• Nome conducente/Targa veicolo
• Scadenza in "X giorni".
Configurazione :
• Selezione lingua
• Avviso acustico ON/OFF.
Supporto :
• Versione e ID dispositivo
• Indirizzo IP
Informazioni :
Le informazioni immesse nella scheda Testo informativo (globale) del software di configurazione.

72
I
Effettuare il controllo della patente di guidaOgni azienda che è titolare di veicoli di servizio e li mette a dispo-sizione deve controllare a intervalli regolari se i conducenti sono in possesso di una patente di guida valida.Se vengono applicate etichette con chip RFID sulla patente valida, il controllo della patente può essere effettuato elettronicamente attra-verso il Downloadterminal Pro.
Nota: Il sigillo RFID può essere apposto solo su una patente di guida valida. Controllare prima se la patente di guida del con-ducente è ancora valida!
Suggerimento: Trovare un punto adatto sulla patente dove apporre il sigillo di controllo. In una patente di guida UE si con-siglia l'angolo in alto a destra del lato frontale. I campi di inseri-mento sul retro non devono essere coperti anche se non sono compilati!
Per le vecchie patenti di guida rosa o grigie fare in modo che il sigillo non venga inavvertitamente tagliato. Deve pertanto essere apposto in un punto dove le informazioni importanti si trovino sulla pagina opposta.
Se la patente di guida viene ritirata dal suo possessore, rimuovendo il sigillo attraverso il punto integrato di rottura il sigillo viene distrutto.
Nel registro Parametri II, attivare l'opzione lettore RFID.
Controllare nel registro Stato e Servizio se l'opzione Trasferisci Configurazione è attiva. La configurazione modificata viene trasferita automaticamente al Downloadterminal Pro e il lettore RFID viene attivato. Nella modalità stand-alone occorre tras-ferire nuovamente la configurazione mediante una chiavetta USB; vedere anche pagina 67.
Dopo avere terminato il download della carta conducente sul display viene mostrato il messaggio Scannerizza patente. Tenere la patente davanti al lettore RFID sul lato grigio scuro a sinistra.
Quando la patente è stata riconosciuta sul display viene mostrato il tag ID RFID.Insieme agli altri file di download vengono memorizzati i file della patente (formato file RDK) nella cartella di destinazione. Da qui è possibile importarli per la suc-cessiva elaborazione in un programma di archiviazione come ad esempio TIS-Web® DMM.
Se la patente dotata di chip RFID viene tenuta sul lettore quando la carta conducente è ancora inserita nel Downloadterminal Pro, il file della patente creato conterrà anche i dati relativi al nome del conducente e al numero della carta conducente.

73
I
Trasferimento di file tramite cavo per rete o USB È stato completato il download di
una carta conducente o di un Download Key.
Il richiamo dei file di download dal Downloadterminal Pro avviene automaticamente a mezzo servizio. È possibile definire gli intervalli di richiamo e scegliere una directory in cui verranno salvati i file.
Suggerimento: Nella scheda Stato e servizio, scegliere le Opzioni per la connessione successiva al fine di definire se, alla prossima connessione con il Downloadterminal Pro, dovranno essere trasferiti gli aggiornamenti o le configurazioni modificate.
Nota: Ai fini dello scopo del presente booklet, alcune delle funzioni del Downloadterminal Pro sono state solo accennate o citate, ad es:
• la modalità azienda che fornisce, tra l'altro, informazioni sulla disponibilità del conducente. Con l'autorizzazione data dalla carta aziendale e attraverso l'inserimento del PIN vengono rese possibili ulteriori funzioni.
• le altre voci del menu USB - Stick e relativo significato. Ad esempio una chiavetta USB può essere configurata in modo permanente per la trasmissione dati. Per fare ciò occorre attivare le impostazioni di sistema andando su file > login sistema 'tkdtkd'.
Collegare il Downloadterminal Pro – qualora non lo sia – al PC tramite la porta USB oppure tramite la rete (hub o access point).
Avviare il software di configurazione ed immettere i dati nella scheda Connessione dati I, qualora non siano presenti (consultare pagina 65).
Nella scheda Impostazioni (Globale), scegliere
• una Directory per i file scaricati, in cui dovranno essere salvati i file per il richiamo dal Downloadterminal Pro.
• l'Intervallo di 'Polling' [min], per stabilire il tempo trascorso il quale viene stabilita una connessione con il Donwloadterminal Pro.
• Trascorso il tempo impostato viene instaurata automaticamente a mezzo servizio la connessione al Downloadterminal Pro e avviene il trasferimento dei file.
• Gli inserimenti massimi del promemoria di scarico al terminale per limitare la lunghezza dell'elenco dei promemoria di download.
I file vengono salvati nella directory scelta.

74
I
Trasferimento dei file in modalità standalone Lo stick USB è collegato al PC
sul quale è installato il software di configurazione.
Nella modalità standalone i file scaricati e salvati sul Downloadterminal Pro vanno trasferiti sul PC a mezzo stick USB.
Nota: Lo stick USB utilizzato per scaricare i dati va configurato fondamentalmente tramite la voce di menu USB - Stick, poichè i file presenti sul Downloadterminal Pro sono protetti contro l'accesso non autorizzato.
Suggerimento: Configurando un ulteriore identificazione nella scheda Impostazioni (Globale) è possibile aumentare ulteriormente il grado di sicurezza. Esso può essere configurato su uno stick USB, sia per un solo accesso che per un accesso permanente.
Suggerimento: il menu USB - Stick contiene anche le voci di menu necessarie per preparare il trasferimento di un file di configurazione (consultare pagina 65), del firmware, del protocollo o per attivare l'archivio.
Scegliere la scheda Elenco terminali.
Marcare nell'elenco il Downloadterminal Pro dal quale dovranno essere trasferiti i file di download.
Scegliere USB - Stick > Preparazione chiave USB ... .
Collegare lo stick USB alla porta USB del Downloadterminal Pro.
Avviene il trasferimento automatico dei file dal Downloadterminal Pro allo stick USB.
Collegare lo stick USB al PC e, in Windows® Explorer, salvare i file in una cartella di destinazione a piacere.
Quindi i dati possono essere elaborati ulteriormente tramite il software di valutazione e archiviazione utilizzato, ad es. con TIS-Web®.

75
NL
Downloadterminal Pro, de eerste kennismakingDe Downloadterminal Pro van de nieuwe generatie maakt de over-dracht van digitale tachograaf-gegevens voor uw bestuurders nog efficiënter en informatiever.U ontvangt hiermee, nadat het downloaden vanzelf is gebeurd, een overzicht over• activiteiten;• gebeurtenissen en fouten; • bestuurders- en
voertuiginformatie.Nu hoeven alleen nog de gegevens naar de pc te worden over-gedragen; zie vanaf pagina 87.
Opmerking: Alvorens u de Downloadterminal in bedrijf neemt, moet u
• de situatie bepalen waarin de downloadterminal voornamelijk gaat worden toegepast (zie pagina 76);
• de ontladingsbeveiliging van de bufferaccu losmaken (zie pagina 76);
• de configuratiesoftware en de USB-stuurprogramma's op tenminste één computer installeren (zie pagina 78).
Opmerking: Als er in deze aanwijzing over een Download Key of Download Key Pro wordt gesproken, zijn daarmee altijd ook alle andere modellen bedoeld, zoals de Inspection Key of TIS-Compact.
TFT-display voor de gebruikers-begeleiding en voor het weergeven van gegevens van de momenteel geplaatste bestuurderskaart of Download Key
SmartCard kaartlezer voor de bestuurders- of bedrijfskaart
USB-poorten voor USB-stick of Download Key
Scrollveld voor navigatie en de scrollfunctie
Vier pijltoetsen en een OK-toets voor navigatie en bevestiging
Behuizingsdeksel waar de bufferaccu en de stroom- en communicatiea-ansluitingen onder zitten
RFID-chiplezer voor de geautomatis-eerde controle van rijbewijzen
Netwerkkabel (af fabriek)
Stroomvoorziening met stekkervoeding (af fabriek)
USB-kabel voor verbinding met de computer
Product-cd met
• configuratiesoftware
• USB-stuurprogramma
• Service voor de automatische gegevensoverdracht

76
NL
Toepassingsvariaties en bufferaccuDe gegevens van de Downloadterminal Pro voor het datamanage-ment zijn eenvoudig op te vragen. Kies zelf welke toepassing voor u de beste is:• Standalone-toepassing• Netwerkkabel (standaard)• Verbinding via SFTP-server• USB-kabel (zie leveringsomvang)• Crossover-kabel (zie tip).Als de bufferaccu van de ontla-dingsbeveiliging is losgemaakt en de gewenste kabel is geïnstalleerd, moet de Downloadterm. Pro alleen nog maar aan de stroomvoor- ziening worden aangesloten.
Let op: Trek eerst de stekkervoeding uit het stopcontact, alvorens u de Downloadterminal Pro opent.
Opmerking: Omdat de stroomvoorziening onafhankelijk is, blijft de Downloadterminal Pro ingeschakeld en slaat deze de gegevens van de bestuurderskaarten en Download Keys verder op, ook al is de computer uit.
Tip: Als u in plaats van de meegeleverde netwerkkabel een crossover-kabel gebruikt, kunt u daarmee ook de Downloadterminal Pro direct aan een computer aansluiten. Als deze tenminste over een vrije netwerkaansluiting beschikt.
Bij standalone-toepassing dient u de configuratie (zie pagina 81) en de opgeslagen downloadgegevens per USB-stick over te dragen (zie pagina 88):
Variant voor de overdracht en verdere verwerking op een willekeurige computer.
Met de netwerkkabel kunt u de Downloadterminal Pro aan het lokale netwerk aansluiten. De bestanden worden via de service automatisch afgeroepen en opgeslagen (zie pagina 87):
Deze variant is voor grote wagenparken met een brede stroom aan gegevens.
Voor de directe aansluiting aan een computer kiest u de USB-kabel. De bestanden worden via de service
automatisch afgeroepen en in een map van uw keuze opgeslagen (zie pagina 78):
Variant voor kleine en middengrote wagenparken met automatische gegevensoverdracht
Bufferaccu activeren
• Verwijder de bouten van het deksel aan de zijkant en trek het er voorzichtig uit.
• Trek de bufferaccu uit zijn houder en maak de ontladingsbeveiliging los.
• Plaats de bufferaccu weer terug (plusteken in richting bodem) en schroef het deksel weer aan de zijkant vast.

77
NL
Configuratie en service installerenDe software is een absolute vereiste voor alle toepassingen. U heeft deze nodig om• de Downloadterminal Pro te
configureren;• de service voor de automatische
gegevensoverdracht te installeren;
• updates van de firmware over te dragen;
• een USB-stick voor de over-dracht van de configuratie of het afroepen van gegevens voor te bereiden (standalone-toepassing).
Opmerking: Installeer deze software
• op de computer waar de Downloadterminal Pro met USB- of crossover-kabel moet worden aangesloten, of
• op een willekeurige computer of server in uw netwerk (netwerktoepassing), of
• op een computer (standalone-toepassing) van waaruit de configuratie via USB-stick moet worden voorbereid.
Aanwijzing: De service moet worden geïnstalleerd, als u de Downloadterminal Pro direct aan een computer of aan uw netwerk wilt aansluiten. U dient gemachtigd te zijn services te installeren en te starten. Voor het installeren van de dienst moet u eventueel de configuratiesoftware starten met de optie "Als administrator uitvoeren".
Aanwijzing: Samen met de configuratiesoftware kan er tevens een USB-stuurprogramma voor de configuratie en communicatie via USB geïnstalleerd worden.
Software-installatie (administratormachtiging vereist):
• Plaats de product-cd in het cd/dvd-station.
De installatie start vanzelf.
Als dit niet het geval blijkt, start dan de Windows® Verkenner, ga naar het CD-/DVD station en dubbelklik op „setup.exe“.
• Volg de wizard die u tijdens de installatie begeleidt.
Start het programma VDO Downloadterminal Pro.
• Er volgt een mededeling dat de service nog niet is gestart of geïnstalleerd. Bevestig dit door op [OK] te drukken.
• Kies voor USB- of netwerkbedrijf Middelen > Installeren & start service....
Kies Gebruik System account of een andere account van waaruit de service automatisch moet worden gestart. Klik op [Installeren...] en bevestig de melding met [OK].Of de service actief is, kunt u controleren door naar [Start] > Configuratiescherm > Systeembeheer > Services te gaan en op Downloadterminal Pro te dubbelklikken.

78
NL
Configuratiesoftware – een beknopt overzichtDe configuratiesoftware biedt onder meer de volgende instellingsmogelijkheden:• gegevensoverdracht;• verbinding met automatische
communicatie;• keuze van mappen voor updates
en gedownloade bestanden;• basisinstellingen van
Downloadterminal Pro.Bovendien krijgt u informatie over de communicatie met de Downloadterminal Pro.
Tip: Als de Downloadterminal Pro een tijd lang geen activiteit meer herkent, zal de schermbeveiliging worden gestart. De tijdsperiode hiervoor kunt u op het tabblad Parameters II instellen.
Kies in het menu Taal de gewenste taal.
Richt op het tabblad Terminal lijst uw Downloadterminal Pro in.
Pas op de tabbladen Parameter I – III de algemene instellingen aan voor de in de terminallijst gekozen of aangemaakte Downloadterminal Pro.
Kies op de tabbladen Dataverbinding I – III de betreffende instellingen voor de automatische communicatie met de Downloadterminal Pro via USB- of netwerkkabel.
Leg op het tabblad Status & service vast wat er moet gebeuren als de computer de volgende keer met de Downloadterminal Pro contact krijgt; zie ook pagina 78.
In de volgende stap moet u de configuratiegegevens alleen nog maar naar de Downloadterminal Pro overdragen.
Afhankelijk van de toepassing worden de gegevens overgedragen
• via USB-stick (standalone-toepassing of toepassing in een netwerk als het IP-adres is gewijzigd); zie pagina 88;
• via netwerkkabel; zie pagina 87;
• via USB- of crossover-kabel; zie pagina 87.

79
NL
Gegevenstransfer via kabelaansluiting configureren U hebt
• de software geïnstalleerd en gestart;
• de service geïnstalleerd en gestart;
• het netwerkadres door de netwerkadministrator laten bevestigen, een nieuw adres toegekend of dit via de server (DHCP) automatisch verkregen.
Als het netwerkadres wordt gewijzigd, moet u de configuratie met een USB-stick overdragen; zie pagina 81, ofwel pagina 87.
Aanwijzing: In de configuratiesoftware zijn standaardwaarden aangegeven voor netwerkadres, netwerkmasker en gateway. Vraag uw netwerkadministrator of deze waarden zo kunnen worden gebruikt:
• IP-Adres: 192.168.99.1
• Subnet-Mask: 255.255.255.0
• Default-Gateway: 0.0.0.0.
Tip: U kunt nog andere instellingen aanpassen; zie hiervoor pagina 78.
Aanwijzing: De apparaat-ID kunt u ook via het menu Support van uw Downloadterminal Pro opvragen; zie ook pagina 85.
Selecteer op het tabblad Parameter I • [Nieuw] om een nieuwe of andere
Downloadterminal Pro aan te maken, of
• [Bewerk] om een reeds aangemaakte Downloadterminal Pro te bewerken.
Vul de Apparaat-ID en de Beschrijving (bijv. een naam) in voor de Downloadterminal Pro.
De apparaat-ID vindt u op het typeplaatje aan de onderkant van uw Downloadterminal Pro (zie ook 2e aanwijzing).
Ga naar het tabblad Dataverbinding I.
Kies de Bedrijfsmodus• Polling via netwerk als u het
netwerkkabel wilt aansluiten.
Deactiveer eventueel het haakje DHCP (automatisch) en voer dan in de box TCP/IP-Configuratie het IP-Adres, de Subnet-Mask en de Default-Gateway in; zie ook de aanwijzing.
• Polling via USB als u de USB-kabel hebt aangesloten; zie pagina 76.
Klik op [Opslaan].

80
NL
Verdere instellingen bij kabelaansluiting U hebt op de tabbladen
• Parameter I – III en• Dataverbinding I – II
alle vereiste gegevens voor de communicatie tussen de Downloadterminal Pro en uw computeromgeving ingevoerd; zie ook pagina 79.
Alvorens de configuratie kan worden overgedragen, hoeven nog maar enkele fundamentele instellingen te worden aangepast.
Aanwijzing: In de netwerktoepassing en bij gebruik van een verbinding via USB-kabel verloopt de gegevensoverdracht van en naar de Downloadterminal Pro altijd automatisch via de service.
Aanwijzing: Als u de Downloadterminal Pro via de USB-kabel gebruikt, hoeft u geen IP-adres in te voeren.
Tip: Denk er ook aan dat u bij gebruik van een firewall eventueel een uitzondering moet configureren voor de communicatie van de terminaldienst.
Selecteer het tabblad Instellingen (Global) en klik op [Bewerk].
Voer in het vakje Polling-interval per 'Terminal' de tijd in waarna automatisch een verbinding met de Downloadterminal Pro moet worden gemaakt.
De dataverbinding naar uw Downloadterminal Pro wordt altijd gemaakt, ook al heeft u de configuratie of de hier beschreven instellingen gewijzigd.
Enige uitzondering: u wijzigt het IP-adres voor de netwerktoepassing; zie hiervoor pagina 81.
Bepaal de map waarin de
• nieuwe firmware voor de volgende update tijdelijk moet worden opgeslagen.
• de gegevens moeten worden opgeslagen die vanuit de Download-terminal Pro zijn overgedragen, bijv. voor de archivering in TIS-Web®.
Wijzig eventueel nog de andere gegevens en klik op [Opslaan].Bij de volgende verbinding zal de nieuwe configuratie worden overgedragen; zie ook pagina 87.
Als u het IP-adres heeft gewijzigd, kunt u doorgaan met stap op pagina 81.

81
NL
Gegevensoverdracht configureren - standalone-toepassing Er is een USB-stick op de
computer aangesloten.
U moet de configuratie met een USB-stick overdragen als u uw Downloadterminal Pro• standalone gebruikt, of • u het IP-adres voor de
netwerktoepassing heeft gewijzigd; zie hiervoor pagina 79.
Aanwijzing: Vink op het tabblad Instellingen (Global) het vakje Gebruik beveiligingssleutel voor upload naar USB-stick aan, als u de gegevens bij het downloaden met de USB-stick beter wilt beveiligen.
Voer een vrij te bepalen tekenreeks in het veld Identifier for upload to USB-stick in, of klik op , om de tekenreeks met een toevalsgenerator te creëren. Deze tekenreeks zal bij de volgende download van tachograafgegevens worden geverifieerd.
Aanwijzing: De apparaat-ID kunt u ook via het menu Support van uw Downloadterminal Pro opvragen; zie ook pagina 85.
Tip: Na de overdracht van de configuratie en de daarop volgende herstart van het systeem kan de systeemtijd aan de Downloadterminal Pro worden gecontroleerd en eventueel handmatig gecorrigeerd.
Selecteer op het tabblad Terminal lijst • [Nieuw] om een nieuwe of andere
Downloadterminal Pro aan te maken, of
• [Bewerk] om een reeds aangemaakte Downloadterminal Pro te bewerken.
Het tabblad Parameter I verschijnt, zodat u de gewenste gegevens of wijzigingen kunt invoeren.
Vul de Apparaat-ID en de Beschrijving (bijv. een naam) in voor de Downloadterminal Pro.
De apparaat-ID vindt u op het typeplaatje aan de onderkant van uw Downloadterminal Pro.
Ga naar het tabblad Dataverbinding I.
Selecteer voor de standalone-toepassing de Operation mode Stand Alone via USB-stick en klik op [Opslaan].
Selecteer in het menu USB-Stick de optie Configuratie op USB-stick opslaan.
Selecteer de USB-stick in het selectiemenu voor de schijf en bevestig met [OK].Nu moet u de voorbereide USB-stick alleen nog maar in de USB-bus van de Downloadterminal Pro stoppen: De configuratie wordt automatisch overgedragen en de Downloadterminal Pro opnieuw opgestart.

82
NL
Gegevensoverdracht op SFTP-server of met LTE inrichten Het doeladres van de SFTP-ser-
ver is te bereiken door de Down-loadterminal Pro, bijv. door een sta-tisch IP-addres of een domeinnaam, en schrijfrechten voor de te gebruiken map zijn voor-handen.
De Downloadterminal Pro ondersteunt ook SSL-verbindingen. Daarmee kunnen voor het automa-tisch archiveren van de opgeslagen bestanden ook externe paden wor-den gebruikt met beveiligde SFTP-overdracht.
Tip: Voor de verbinding via LTE-terminals kan een externe GSM-router worden gebruikt. De aansluiting gebeurt dan via de netwerkverbinding van de terminal. Alle benodigde gegevens moeten dan door de router beschikbaar worden gesteld via DHCP. De Downloadterminal Pro moet dienovereenkomstig zijn geconfigureerd voor het gebruik van DHCP.
Wanneer de terminal bereikbaar moet zijn via het LTE-net, moet in de router een betreffende port-doorverbinding of een VPN-verbinding zijn geconfigureerd. De Downloadterminal Pro gebruikt anders de beschikbare internetverbinding voor het ops-laan van de gegevens op een SFTP-server.
Hiertoe moet de modus "verbinding via de SFTP-server" zijn gekozen. Er moet bovendien een map voorhanden zijn op de SFTP-server, waarvan de naam bestaat uit de letters "DLT" en de laatste 5 cijfers van het serienummer van de Downloadterminal Pro, bijv. "DLT10793".
Selecteer op het tabblad Terminal lijst• [Nieuw] om een nieuwe of andere
Downloadterminal Pro aan te maken, of
• [Bewerk] om een reeds aangemaakte Downloadterminal Pro te bewerken.
Ga naar het tabblad Dataverbinding I.
Kies de modus Verbinding via SFTP-server.
Schakel over naar het register Dataver-binding II en geef in het hoofdstuk gege-vensoverdracht aan de SFTP-server de volgende parameters in voor de toegang tot de SFTP-server:
• Domeinnaam / IP-adres
• Port voor de overdracht
• Gebruikersnaam
• Wachtwoord
• Netwerkpad voor de hoofdmap. Kies hier een willekeurige map in de com-puter, waarin de terminaldienst is geïnstalleerd.
Klik op [Opslaan].Bij de volgende verbinding zal de nieuwe configuratie worden overgedragen; zie ook pagina 87.
Als u het IP-adres heeft gewijzigd, kunt u doorgaan met stap op pagina 81.

83
NL
Bestuurderskaarten of Download Key uitlezen De Downloadterminal Pro is
aangesloten en geconfigureerd.
U kunt nu• beginnen met het downloaden
van bestanden;• de opgeslagen gegevens
op het display van de Downloadterminal Pro bekijken. U moet na het downloaden alleen de bestuurderskaart of Download Key laten zitten; zie vanaf pagina 82.
Aanwijzing: Als er een bestuurderskaart of een Download Key worden aangesloten, worden de betreffende bestanden gedownload, als deze tenminste niet al in het geheugen van de Downloadterminal Pro voorhanden zijn.
Aanwijzing: Als de downloadbestanden in het geheugen van uw Downloadterminal Pro zijn opgeslagen, verschijnt de melding „Download voltooid“ Wacht tot deze melding verschijnt, alvorens u de bestuurderskaart of Download Key verwijdert.U kunt vervolgens het rijbewijs controleren; zie ok pagina 86.
Tip: Als de Downloadterminal Pro in een netwerk is geïntegreerd, heeft u ook direct toegang tot zijn geheugen. Kies in het menu "bewerken" het menupunt "Toegang tot het geheugen van DLT PRO > verbinden ..."
Stop de bestuurderskaart in de chipkaartlezer of de Download Key in de USB-bus.
Op het display wordt weergegeven of de bestuurderskaart, ofwel de Download Key is herkend.
De gegevens worden automatisch gedownload en in het interne geheugen van de Downloadterminal Pro opgeslagen.
Bovendien verschijnt op het display
• de bestuurderskaart van de bestuurdersnaam;
• de Download Key van de bestuurder- en/of voertuignaam.
Een voltooide download wordt bevestigd met de melding „Download voltooid“.
Indien gewenst, kunt u de gedownloade gegevens op het display van de Downloadterminal Pro bekijken (zie pagina 84). In het andere geval kunt u de bestuurderskaart of de Download Key verwijderen.
Tot slot moet u de bestanden alleen nog maar van de Downloadterminal Pro naar de computer overdragen waar de configuratiesoftware op is geïnstalleerd. Afhankelijk van de toepassing gebeurt dit
• via USB- of netwerkkabel (zie pagina 87);
• via USB-stick (zie pagina 88).

84
NL
Menu Downloadterminal Pro – Kalender Er is een bestuurderskaart of
Download Key geplaatst en de download is met succes voltooid.
Bekijk m.b.v. de datums op de kalender in de Downloadterminal Pro de downloadbestanden van de bestuurderskaarten of de Download Key.Navigeer gewoon met de functietoetsen en het scrollveld; zie tip.
Tip: De Downloadterminal Pro heeft functietoetsen die op lichte aanraking reageren. Als u bijvoorbeeld een pijltoets aanraakt, dan gaat u in het menu een stap naar rechts, links, boven of onder. Met OK bevestigt u het gekozen menu.
In het scrollveld kunt u in lijsten omhoog of omlaag bladeren of op de kalender een andere datum uitkiezen.
Met de pijltoets naar links gaat u in de submenu's weer terug naar het vorige menu; zie ook het display.
Tip: Als de Downloadterminal Pro in een netwerk is geïntegreerd, heeft u ook direct toegang tot de displayweergave. Kies in het menu Bewerken de optie VNC - Server voor support starten ... en bevestig de melding met [JA].
Kies m.b.v. de functietoetsen het pictogram en start de functie met OK.
Als er een Download Key is geplaatst waar zich bestuurdersbestanden op bevinden, dan moet u eerst die bestuurder selecteren waarvan u de downloadgegevens wilt bekijken.
Op het display verschijnt:
• de gekozen maand van het kalenderoverzicht;
• naam van de chauffeur;
• datum en tijd van de laatste download;
• lijst met totaal van de tijden van de activiteiten van de geselecteerde dag.
• Kalenderoverzicht. De dik gemarkeerde datumvermeldingen zijn de dagen met activiteiten.
Via het scrollveld kunt u in het kalenderoverzicht van de ene datumvermelding naar de andere gaan.
Kies OK om de details van de activiteiten van de geselecteerde datum te bekijken.
Met de pijl-toets naar links gaat u weer naar het kalenderoverzicht terug.

85
NL
Menu Downloadterminal Pro – verdere informatieGebeurtenissen, storingen en bestuurders- en voertuiginformatie zijn alleen gekleurd gemarkeerd en dus geactiveerd als er een bestuurderskaart of Download Key is aangesloten.
Selecteer het gewenste menu met de navigatietoetsen en bevestig met OK - de belangrijkste meldingen en informatie in één oogopslag.
Aanwijzing: De download van de bestuurderskaart is de basis voor de berekening van de bestuurdersinformatie. Om betrouwbare gegevens over resterende rijtijden te verkrijgen, moet de bestuurderskaart vooraf in de digitale tachograaf worden gestoken.
Aanwijzing: Als er een Download Key is geplaatst waar zich bestuurdersbestanden op bevinden, dan moet u eerst die bestuurder selecteren waarvan u de downloadgegevens wilt bekijken.
Aanwijzing: De downloadherinnering verschijnt standaard zeven dagen voor de downloadtermijn. Deze periode kan niet worden veranderd.
Gebeurtenissen en fouten :
Weergave van de laatst geregistreerde gebeurtenissen en storingen.
Bestuurdersinformatie :
• Weergave tijdsduur tot de volgende verplichte pauze
• Weergave resterende dagelijkse en wekelijkse rijtijd
• Verlengde rijtijden [dag]
• Verkorte dagelijkse rusttijden [dag].
Voertuiginformatie (alleen Download Key) :
• Weergave actuele kilometerstand
• Bestuurder in tijdsperiode van .. t/m.
Downloadherinnering :
• Naam bestuurder / kenteken voertuig
• Vervalt in „X dagen“.
Configuratie :
• Taalselectie
• Signaaltoon aan / uit
Support :
• Versie en apparaat-ID
• IP-Adres.
Info :
Informatie die op het tabblad Informatietekst (Global) van de configuratiesoftware is ingevoerd.

86
NL
Rijbewijs controlerenLedere onderneming die als eigen-ares dienstvoertuigen ter beschik-king stelt, moet regelmatig contro-leren of de chauffeur een geldig rijbewijs bezitten.
Wanneer op de geldige rijbewijzen etiketten met RFID-chips worden geplakt, kan het rijbewijs elektro-nisch worden gecontroleerd via de Downloadterminal Pro.
Aanwijzing: Het RFID-zegel mag alleen op een geldig rijbewijs worden aangebracht. Controleer eerst of het rijbewijs van de bestuurder nog geldig is!.
Tip: Zoek voor de inspectiezegel een geschikte plaats op het rij-bewijs . Bij het EU-rijbewijs is de bovenste rechterhoek van de voorkant geschikt. De tekstvelden op de achterzijde mogen niet worden overplakt, ook al bevinden zich daar geen aantekenin-gen!
Bij de oudere rozekleurige of grijze rijbewijzen moet er worden verhinderd dat de zegel onopgemerkt wordt uitgesneden. Hij dient daarom op een plaats te worden aangebracht, op wiens tegenoverliggende zijde zich belangrijke aantekeningen bevin-den.
Wordt het rijbewijs ingetrokken, dan wordt de zegel bij het ver-wijderen ervan vernietigd op het geïntegreerde breekpunt.
Activeer in het register Parameter II de optie RFID-lezer.
Controleer in het register "Status & Service" of de optie "Configuratie" actief is overgedragen. De veranderde configu-ratie wordt automatisch aan de Down-loadterminal Pro doorgegegeven en de RFID-lezer geactiveerd.
In de standalone-toepassing moet u de configuratie opnieuw per USB-stick over-dragen; zie ook pagina 81.
Wanneer het downloaden van de chauf-feurskaarten is beëindigd, verschijnt op het display de melding "rijbewijs scannen". Houd dan het rijbewijs voor de donkergrijze linkerzijde van de RFID-lezer.
Wanneer het rijbewijs werd herkend, ver-schijnt de RFID-tag-ID op het display.
Samen met de andere download-bestanden worden de rijbewijsbestanden (bestandsformaat EKD) in de doelmap opgeslagen. Van daaruit kunnen ze voor de verdere verwerking worden ingevoerd in een archiveringsprogramma zoals bijv. TIS-Web® DMM.
Wanneer het van de RFID-chip voorziene rijbewijs tegen de lezer wordt gehouden - zolang de chauffeurskaart zich nog in de Downloadterminal Pro bevindt - bevat het gemaakte rijbewijsbestand bovendien gegevens over de chauffeursnaam en het nummer van de chauffeurskaart.

87
NL
Bestanden via USB-/netwerkkabel overdragen De download van een
bestuurderskaart of Download Key is met succes voltooid.
Het afroepen van downloadbestanden van de Downloadterminal Pro wordt automatisch door de service uitgevoerd. U kunt de afroepintervallen zelf bepalen en een map kiezen, waarin de bestanden moeten worden opgeslagen.
Tip: Selecteer op het tabblad Status & service de Opties voor de volgende verbinding om vast te leggen of de volgende keer dat er verbinding met de Downloadterminal Pro wordt gemaakt, updates of gewijzigde configuraties moeten worden overgedragen.
Aanwijzing: Om binnen het formaat van dit booklet te blijven, kunnen sommige functies van de Downloadterminal Pro slechts worden aangeduid, zoals
• de ondernemermodus, die onder meer informatie over de beschikbaarheid van bestuurders levert. Na autorisatie door bedrijfskaart en pininvoer worden de extra functies vrijgegeven.
• de andere opties in het menu USB - Stick en de betekenissen ervan. Zo kan bijvoorbeeld een USB-stick permanent worden geconfigureerd voor de gegevensoverdracht. Hiertoe moeten via Bestand > Systeem login > 'tkdtkd' de systeeminstellingen worden geactiveerd.
Sluit de Downloadterminal Pro – indien nog niet gebeurd – via de USB-poort van uw computer of via het netwerk (hub of access point) aan.
Start de configuratiesoftware en voer – indien nog niet gebeurd (zie pagina 79) – op het tabblad Dataverbinding I de betreffende gegevens in.
Selecteer op het tabblad Instellingen (Global)• een Map voor de gedownloade
bestanden waarin deze bij het afroepen van de Downloadterminal Pro moeten worden opgeslagen.
• de Polling-interval per ‘Terminal‘ voor de tijdsperiode waarna er verbinding met de Downloadterminal Pro wordt gemaakt.
Na afloop van de ingestelde tijd wordt via de service automatisch de verbinding met de Downloadterminal Pro gemaakt en de bestanden overgedragen.
• De max. aantekeningen van de download-herinnering aan de terminals om de lengte van de downloadherinneringen te beperken.
De bestanden worden in de gekozen map opgeslagen.

88
NL
Bestanden in een standalone-toepassing overdragen De USB-stick is aan de
computer aangesloten waar de configuratiesoftware op is geïnstalleerd.
Bij standalone-toepassing moeten de gedownloade en op de Downloadterminal Pro tijdelijk opgeslagen bestanden met een USB-stick naar de computer worden overgedragen.
Aanwijzing: De USB-stick voor de gegevensdownload moet altijd via de menuoptie USB-Stick worden geconfigureerd, omdat de bestanden op de Downloadterminal Pro tegen onbevoegde toegang zijn beveiligd.
Tip: Door een extra beveiligingssleutel op het tabblad Instellingen (Global) kan deze veiligheid nog worden verhoogd. Dit kan op een USB-stick voor enkele, alsook permanente toegang worden ingesteld.
Tip: In de menuoptie USB-Stick vindt u ook de opties voor de voorbereiding van de overdracht van een configuratiebestand (zie pagina 79), de firmware, de logbestanden, of de archiefactivering.
Selecteer het tabblad Terminal lijst.
Markeer de Downloadterminal Pro waarvan de downloadbestanden moeten worden overgedragen in de lijst.
Selecteer USB-Stick> Prepareer USB-Stick voor Terminal-Download ... .
Stop de USB-stick in de USB-poort aan van de Downloadterminal Pro.
De bestanden worden automatisch van de Downloadterminal Pro naar de USB-stick overgedragen.
sluit de USB-stick aan een computer aan en sla de gegevens m.b.v. de Windows® Verkenner in de gewenste map op.
U kunt de gegevens daarna met uw eigen archiverings- en evaluatieprogramma verder bewerken, bijv. met TIS-Web®.

89
System requirements
SoftwareOperating system Microsoft® Windows® Vista™, 7, 8 or 10
Microsoft® Windows® Server 2003, 2008, 2012 and 2012 R2 (with current Service Pack)32-bit or 64-bit operating system
Configuration software
VDO Downloadterminal Pro(only for DLT Pro)
HardwareDimensions L 155 x W 120 x H 70 mmTemperature ranges Storage: -40° to 85°; Operation: -10° to 60°Mains adapter 100 - 240 VType of protection IP 20Motherboard 32-bit or 64-bit technologyInterfaces Free USB port for configuration via USB stick
or connection via USB cableCable connections USB cable or network cable (optional)RFID chips for driver license control
Operating frequency 13,56 Mhz, NTAG213

90
Technical data, file extensions and drive folders
Downlodterminal ProMemory capacity 256 MB flash memory, of which 64 MB for
configuration and 192 MB for download files (corresponds to about 1000 complete mass memory downloads per quarter)
Battery Buffer battery for microprocessor clock (maximum storage life without power supply: 6 months)
Extensions (country-specific)Europe *.DDDFrance *.V1B, *.C1B, *.A1BSpain *.TGDDrive foldersARCHIVE Already transferred C_, M_ and S_ files,
archived by download dateNEW Newly downloaded files

91
DisclaimerHaftungsausschlussOriginalanleitung: Die Produzenten über-nehmen keine Haftung für Schäden, die durch die Benutzung der CD-ROM entstehen. Insbesondere nicht für Personen-, Sach- oder Vermögensschäden, die als Folgeschäden unmittelbar im Zusammenhang mit der Nutzung der CD-ROM in Verbindung stehen.Microsoft® und Windows® sind Marken der Microsoft® Corporation.DTCO® 1381, DLD® Wide Range, DLD® Short Range und TIS-Web® sind Marken der Continental Corporation.
Exclusión de responsabilidadTraducción del original en lengua alemana: Los productores no serán responsables de los daños derivados del uso del CD-ROM. En particular, queda excluida cualquier responsa-bilidad por daños personales, materiales o patrimoniales relacionados directamente con la utilización del CD-ROM.Microsoft® y Windows® son marcas registradas de Microsoft® Corporation.DTCO® 1381, DLD® Wide Range, DLD® Short Range y TIS-Web® son marcas registrades de Continental Corporation.
Clause d’exclusion de responsabilitéTraduction de l'original en allemand : Les producteurs ne sauraient être tenus responsables des éventuels dommages pouvant découler de l’utilisation du CD-ROM. Sont notamment exclus de leur responsabilité les dommages corporels, matériels ou pécuniaires consécutifs et en lien direct avec l’utilisation du CD-ROM.Microsoft® et Windows® sont des marques déposées de Microsoft® Corporation.DTCO® 1381, DLD® Wide Range, DLD® Short Range et TIS-Web® sont des marques déposées de Continental Corporation.
DisclaimerTranslation of the original German language version: The producers shall not accept any liability for damages resulting from using this CD-ROM. In particular, personal injuries, material damages or financial loss in the form of consequential damages arising directly from using this CD-ROM are excluded. Microsoft® and Windows® are registered trademarks of the Microsoft® Corporation.DTCO® 1381, DLD® Wide Range, DLD® Short Range and TIS-Web® are registered trademarks of the Continental Corporation.
Esclusione della responsabilitàTraduzione della documentazione originale in lingua tedesca: I produttori declinano qualsiasi responsabilità per i danni conseguenti all’utilizzo del CD-ROM, in particolare per lesioni personali o danni materiali direttamente o indirettamente riconducibili all’utilizzo del CD-ROM.Microsoft® e Windows® sono marchi registrati di Microsoft® Corporation.DTCO® 1381, DLD® Wide Range, DLD® Short Range e TIS-Web® sono marchi registrati di Continental Corporation.
Uitsluiting aansprakelijkheidVertaling van de Duitse originele tekst: De producenten zijn niet aansprakelijk voor schade die door het gebruik van de CD-ROM ontstaat. Vooral niet voor persoonlijke, materiële of financiële schade die rechtstreeks in verband staat met het gebruik van de CD-ROM.Microsoft® en Windows® zijn geregistreerde handelsmerken van de Microsoft® Corporation.DTCO® 1381, DLD® Wide Range, DLD® Short Range en TIS-Web® zijn geregistreede handelsmerken van de Continental Corporation.

Continental Automotive GmbHHeinrich-Hertz-Str. 4578052 Villingen-SchwenningenGermanyInternet www.fleet.vdo.comE-mail [email protected]
VDO – A Trademark of the Continental CorporationThe information contained in this documentation is subject to change without prior notice. In doing so, Continental Automotive GmbH do not enter into any obligation. The description is based on the information available at the time this documentation was printed. We reserve the right to change technical details in the description, information and illustration in this manual. Continental Automotive GmbH shall accept no liability for program errors and for incorrect information in the documentation or for any consequential damages arising from this.
© by Continental Automotive GmbHAll rights reserved.
A2C59513782 | Edition 01/2017