

What is the RemoteX ?Imagine a technology that lets you operate your PC remotely, from the comfort of anywhere in your home, even when your PC is off. It may sound like something from the future but it‟s not. With RemoteX All in 1, all you do is tap a button and your iPhone or iPod Touch becomes your personal computer‟s remote control. Click “…More” to learn why you should download this App today!
You turn on your media player and start your favorite playlist to help you relax after a hard day. The music is really working, too. All your muscles release their tension as you move from relaxed to sleepy. You really don‟t want to get up to turn off your computer bit it‟s not going to turn itself off. Or is it?
RemoteX is a beautiful little app that makes your computer as easy to use remotely as your TV. Set the sleep function, turn the computer on and off or control any or all of the 18 supported media players or added more players, all from wherever you happen to be and using only your iDevice. All you need is a WiFi connection and RemoteX.
【Players supported by RemoteX】
✓ CyberLink POWER DVD✓ FOOBAR2000✓ COWON JET AUDIO✓ MS Windows Media Player (version 11)✓ Nullsoft Winamp✓ XBMC✓ AIMP2✓ MS Power point (version 2003/2007)✓ GOM Player✓ KM Player✓ Daum P ot Player✓ Windows Media Center (Vista/7)✓ VideoLan VLC Media Player✓ iTunes - Music✓ Media Player Classic - Home Cinema✓ GOM AUDIO✓ TOK PLAYER✓ CHOCO PLAYER
The smooth as silk interface and highly sensitive touch pad puts super simple remote control at your fingertips. Automatically, RemoteX finds the optimum sensitivity suitable for your personal computers. That‟s right, this app can handle more than one. Just make sure that the server program is installed on each and they share the same wireless router that your iPhone or iPod Touch does. That‟s it, easy peasy. Just watch videos or enjoy your music, RemoteX will do all of the work for you. Don‟t get up, just relax and tap a button.
2

What is the RemoteX ?【Features】
✓ Control 18 applications for playing the music/video
✓ Add a new player in your PC
✓ PC power management - turn ON/off/sleep/reboot/hibernate/timer (In app purchase)
✓ Touch pad mouse
✓ Full screen keyboard (International language supported) and Full screen mouse pad (In app purchase)
✓ Number pad (In app purchase)
✓ Applications in PC management - Activate/Minimize/Maximize/Close (In app purchase)
✓ Processes in PC management - Terminate (In app purchase)
✓ Files in PC management - Run/Remove/Copy/Paste (In app purchase)
【Note】
✓ Server program supports ONLY Microsoft Windows XP/2003/Vista/7 32bit (64bit)
✓ No separate settings required for PC and iDevice
✓ Use Wake on Lan (WOL) function for iDevices and PC‟s connected to the same * LAN and router
✓ Server program can be downloaded and more technical information found at http://www.RemoteX.me
Have you figured out yet that this is the only remote control app of its kind?
Download RemoteX now and start enjoying all the benefits of the latest, unique technology available for remotely operating your PC.
It won‟t take you long to discover why they call it, Remote "X".
3
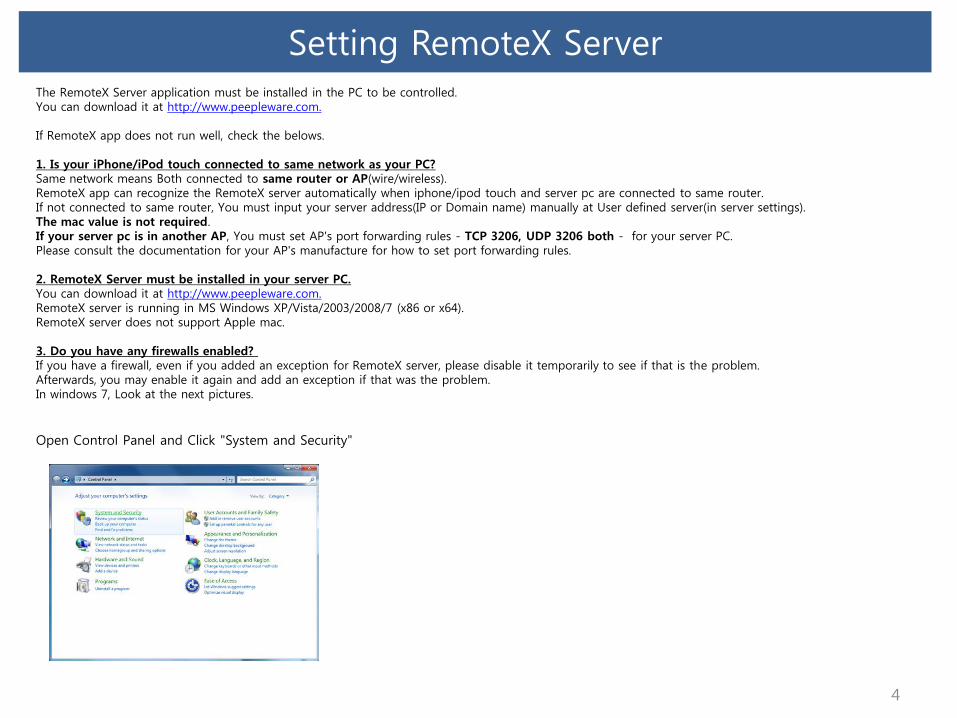
Setting RemoteX ServerThe RemoteX Server application must be installed in the PC to be controlled.You can download it at http://www.peepleware.com.
If RemoteX app does not run well, check the belows.
1. Is your iPhone/iPod touch connected to same network as your PC?Same network means Both connected to same router or AP(wire/wireless).RemoteX app can recognize the RemoteX server automatically when iphone/ipod touch and server pc are connected to same router.If not connected to same router, You must input your server address(IP or Domain name) manually at User defined server(in server settings). The mac value is not required.If your server pc is in another AP, You must set AP's port forwarding rules - TCP 3206, UDP 3206 both - for your server PC. Please consult the documentation for your AP's manufacture for how to set port forwarding rules.
2. RemoteX Server must be installed in your server PC.You can download it at http://www.peepleware.com.RemoteX server is running in MS Windows XP/Vista/2003/2008/7 (x86 or x64).RemoteX server does not support Apple mac.
3. Do you have any firewalls enabled?If you have a firewall, even if you added an exception for RemoteX server, please disable it temporarily to see if that is the problem.Afterwards, you may enable it again and add an exception if that was the problem.In windows 7, Look at the next pictures.
4
Open Control Panel and Click "System and Security"

Setting RemoteX Server
5
Next, Click "Allow a program through Windows Firewall" in Windows Firewall.
Check the "RemoteX" is allowed and checked.

Setting RemoteX Server
6
4. Do you have any antivirus software installed on your PC?If so, please disable it temporarily to see if that is blocking it.Afterwards, you may enable it again and add an exception it that was the problem.Please consult the documentation for your software for how to add an exception.
5. RemoteX uses TCP 3206 port and UDP 3206 port to communicate with PC through WIFI or 3G.You can change this port number to another for RemoteX app.RemoteX app - configuration - network - portYou can change this port number to another for RemoteX server.RemoteX server tray menu - config - portRemoteX server and app must have same port number.If your app's port number is 4444, It is update failure. Please remove RemoteX app and reinstall it.
6. Server protection password.You can change the connection password to another for RemoteX app.RemoteX app - configuration - network - passwordYou can change the connection password to another for RemoteX server.RemoteX server tray menu - config - password.RemoteX server and app must have same password.

Enabling WOL(Wake On Lan) for PCTo be able to use WOL, your PC must provide WOL support. You have to make changes to your PC to enable it to support WOL. The precise nature of thease changes will depend on the maker and model of your PC. We can only provide guidelines. You must refer to your PC documentation for details about your specific PC and set-up.
1. Setting up your PC.
Connect with Lan cable. (no wiress) Check that your PC's BIOS is enabled to support WOL.
Boot the PC and view the BIOS. Change the BIOS parameters to enable power management or advanced managent to support WOL. You will have to read the documentation that came with your PC for more information about accessing end editing the BIOS. Check next statement and enabling it.
Wake up on Lan WOL(PME) Form Soft-off PME Event Wake up PME# Event Wake up
7

Enabling WOL(Wake On Lan) for PC
8
2. Enable your network adapter.
Go to Control Panel, System, Device Manager and highlight the adapter in the Network adapters section. In the Controller Properties box, click on the Power Management tab. Place a checkmark in the box labelled, "Allow this device to bring the
computer out of standby.“It is recommended that you check the box labelled, "Only allow management stations to bring this computer out of standby." With this option checked, only Wake On LAN magic packets can turn on the computer. Otherwise, any network traffic will bring the computer out of stand by.

Running RemoteX

Running RemoteX
10
On running RemoteX, the dial-shaped remote control will load. Slide down from the top of the dial to reveal shortcut keys for the player
Config.
Player control
Frequently-used shortcut keys can be placed above.
Turn Player ON/OFF
Server Info
Shows selected player

Selecting the Player and PC Control
11
[Open/Close Player Selection View]
Slide from left to right to reveal the Player Selection View.
Open Player Selection View
Close Player Selection View
Open PC Control View
Close PC Control View
Slide from right to left to reveal the PC Control View.
Selecting the Mouse and Keyboard
12
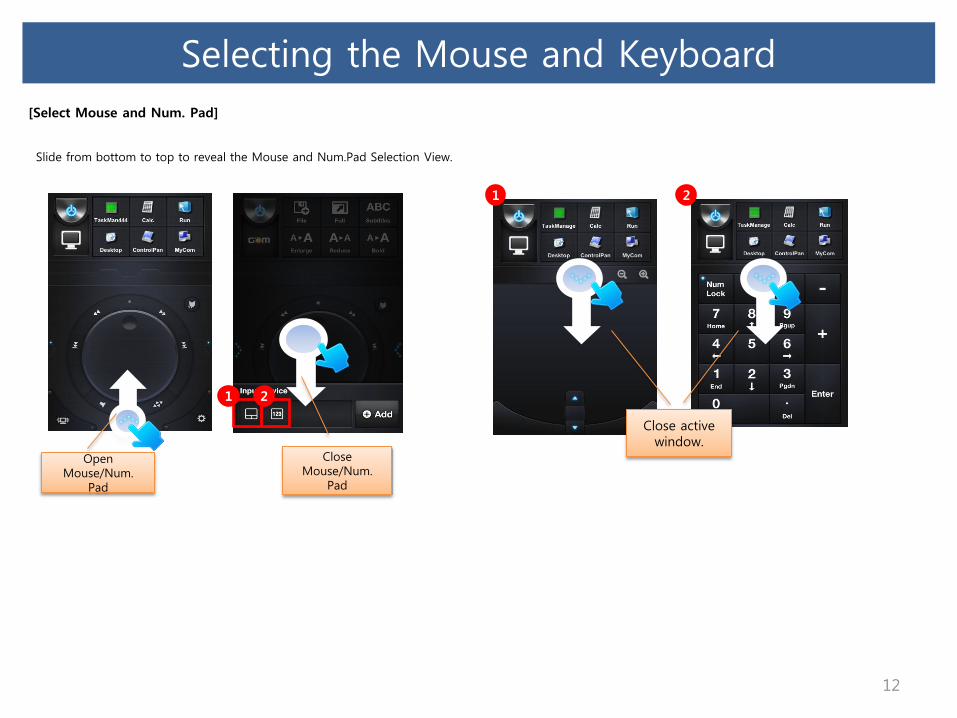
[Select Mouse and Num. Pad]
Slide from bottom to top to reveal the Mouse and Num.Pad Selection View.
Open Mouse/Num.
Pad
Close Mouse/Num.
Pad
1 2
21
Close active window.

Easy-to-Use Mouse and Keyboard
13
Turn iPhone to the left to display the touchpad (paid version).
Turn iPhone to the right to display the keyboard (paid version).
[Easy-to-Use Mouse and Keyboard]
English keyboard
Number keyboard
Shortcut keyboard
iPhone keyboard
Zoom in/out of the current view.

Dial Area
14
[Dial Area]
Tap
“Forward”
“Next File”
“Backward”
“Previous File”
“Play/Puse”
Tap
Turn left “decrease ”
Turn right “increase ”
Tap the center “mute”
Tap and turn on cuasor key
“TAB button”
“ESC button”
Play/Puse
Play area
Volume controll
Turn on cuasor key

Suporting Players

Various Players
16
RemoteX supports 18 players free of charge.
Gom Player Winmp
XBMC Media Player Classic Home Cinema
Windows Media Player Microsoft Power Point 2003/2007
KMPlayer Choco Player
AIMP2Gom Audio
Daum Pot Player Jet Audio
VLC Media player PowerDVD
iTunes TOCK
Windows Media Center (Vista/7) FooBar

Players Setting

Adding a New Player (within the App)
18
You can add another player if the default list does not include your desired player (ex. adding RealPlayer).
1
Step 1, Tap “Set” from the Player
Selection View.
Step 2, Tap “New Player” on the right.
2
Step 3, Type the name, description,
and the full system path to the
player‟s executable file.
Step 4, Your new player will show up on
the list.
3
* Name: RealPlayer* Description: RealPlayer* Path to Executable: c:\program files\ realPlayer \real\realPlayer.exe
4

Assigning a Shortcut Key to the Added Player (within the App)
19
After adding the player, users can personally assign a Shortcut Key (ex. assign a shortcut key for “Open (CTRL+O)” in Real Player)
Step 1, Check the shortcut key from the desired player. Step 2, Select the player, then proceed to the Shortcut Key Setup View.
Step 5, Activate the shortcut key by tapping “on”, then
tap “X” to confirm the added shortcut key.
Step 4, Add the attributes for the
shortcut key.Step 3, Tap Settings, then +.
1
4 5
3-1
3-2
2-1
2-2

Entering Command

Entering Command
21
When you set “shortkey”, you shoud to enter “shortkey” yourself.
There are 2 way entring command.
① General way (Tap and performance one action)- Please enter like this [Command=KEY,ALT,L ]
② Tap and performance two action.- Please enter like this [Command=KEYS,”KEY,ALT,L”,”KEY,L”]
[Surported KEY]
KEY Input KEY Input
Number 0,1,2,…. PageUP PGUP
A~Z A,B,C,… PageDown PGDW
F1~F12 function F1,F2,F3,… BackspaceBACKSPAC
E
Alt ALT ↑ UP
Ctrl CTRL ↓ DOWN
Shift SHIFT → RIGHT
Window WINDOW ← LEFT
Tab TAB . PERIOD
Space SPACE , COMMA
Enter ENTER + +
Insert INS - -
Delete DEL / /
Home HOME
End END

Other Keys
22
KEY Input Function
VOLUMEDN VOLUMEDN Lower the system volume
VOLUMEMUTE VOLUMEMUTE Mute the system volume
VOLUMEUP VOLUMEUP Raise the system volume
MAIL MAIL Show the Mail App
MEDIANEXTTRACK MEDIANEXTTRACK Play the next track
MEDIAPLAYPAUSE MEDIAPLAYPAUSE Play/Pause
MEDIAPREVTRACK MEDIAPREVTRACK Play the previous track
MEDIASELECT MEDIASELECT Select media
MEDIASTOP MEDIASTOP Stop media
BROWSERBACK BROWSERBACK View previous page
BROWSERFAVORITES BROWSERFAVORITES Add to Favorites
BROWSERHOME BROWSERHOME View Home page
BROWSERREFRESH BROWSERREFRESH Refresh page
BROWSERSEARCH BROWSERSEARCH Open Safari
BROWSERSTOP BROWSERSTOP Stop current search
BACK BACK Back

Adding a Shortcut Key

Adding a Shortcut Key to a Default Player (within the App)
24
In case the need arises, users can personally designate a custom shortcut key (ex. adding “Remove item(s)(Delete)” for WINAMP Player)
Step 1, Check the shortcut key to be added for the player. Step 2, Select the player, then proceed to the Shortcut Key Setup View.
1
3-1
3-2
3-1
3-2
Step 5, Activate the shortcut key by tapping “on”, then
tap “X” to confirm the added shortcut key.
Step 4, Add the attributes for the
shortcut key.
Step 3, Tap Settings, then +.

Exporting to PC

Exporting Added Players and Shortcuts to PC
26
Users can save newly added players and shortcut keys to the PC.
1
2
Step 1, Open the Player Selection View.
Select “Set”-> “Backup to Server”
Step 2, Tap “OK” from the alert popup.
The App writes to C:/Programs File/RemoteX/Players2/user (a new folder will be created for each player).
How do I share my .ini file with other users?
1. Send the newly created player file (ex. Real Player.ini) and the shortcut key file (ex. WINAMP.ini) to the other user.
2. The file recipient should save the received files in C:/Programs File/RemoteX/Players2 and run “Restore from Server” from their app.
Additional shortcut keys may be added without further configuration.
Note> Running “Restore from Server” will refresh the list with the players added from the Players2 folder.
Although you update RemoteX sever, player files are not changed in the players2 folder.
2-1 2-2 2-3

Player Settings File Structure

Player Settings File Structure
28
Step 1, Copy and paste any .ini file in C:/Programs File/RemoteX/Players2.
Players can manually write an .ini file if the default list of 18 players does not include the desired player.
(ex. adding “WINAMP Player”)
1
Edit with Notepad.
Step 2, Complete the following 11 items to add the new player
① Change the Player Name from „Daum Pot‟ to the desired player‟s name (in this case,
WINAMP).
② Go down to the [PLAYER] section.
③ Type = select the initial view to display (dial - 0, normal cursor - 1(Esc, Back keys), XBMC
Player cursor - 2)
④ Put “0” for Builtin.
⑤ Name = type in the name of the player (ex. WINAMP).
⑥ Description = briefly describe the player.
⑦ Path = write the full system path to the executable file in the PC (%~% is only possible
when Builtin equals 1)
⑧ Shutdown = check and type in the player‟s exit command shortcut.
⑨ Icon = type in the file name of the player‟s icon image among the installed files.
⑩ Use = type in whether or not to use the player (do not use – 0, use - 1)
⑪ Seq = order of the shortcut keys. Type in non-integer numbers (0,1,2,3,4…)
<Note>
C:/Programs File/RemoteX/Players2 folder structure
Players2 folder: .ini files received from other users
Default folder: .ini files created by the App distributor
User folder: .ini files created/modified in the App

Player Settings File Structure
29
Step 1, Check the shortcut key from the player. Step 2, open the .ini file from C:/Programs File/RemoteX/Players2. (ex. WINAMP.ini)
After adding the new player, users can personally setup shortcut keys (ex. adding “Delete” for WINAMP Player)
1
2
Edit with Notepad.
Type in the settings for the following 10 items in order to add a function:
① Copy “[FUNCTION. 1]~Sep=0” and paste at the end of the line
② Increment the FUNCTION number by ascending order. ([FUNCTION. 2])
③ Write the same number for the Code (“2” as in [FUNCTION. 2]).
④ Type in the Name (ex. File close).
⑤ Type in a brief Description (ex. File close).
⑥ Type in the name of the image file for the Icon (select from default provided image files)
⑦ Type in the shortcut key from Step 1 into the Command (Command =KEY, F4 (capitals))
⑧ Type in whether to change into the Cursor View.
(do not use - 0, cursors with Esc, Tab keys - 1, cursors with Back key - 2, mouse -3)
⑨ Type in one of the Dial Keys from below
(not applicable - 0, move far left-1, move left a little - 2, to the middle-3, move right a
little - 4, move far right - 5, decrease volume - 6, mute - 7, increase volume - 8)
⑩ Type in whether or not to Use the player (do not use – 0, use - 1)
⑪ Seq = order of the shortcut keys. Type in non-integer numbers (0,1,2,3,4…)

Importing into RemoteX

Importing Players and Settings into RemoteX
31
.ini files enable importing additional players and shortcut keys into the application.
1
2
Step 1, Open the Player Selection View and tap “Set”->
“Restore from Server”
Step 2, Tap “OK” from the alert popup.
Settings will be saved in C:/Programs File/RemoteX/Players2/user.
Step 3, The additional players and shortcut keys will be available in the application.
How do I share my .ini file with other users?
1. Send the newly created player file (ex. alsong.ini) and the shortcut key file (ex. DAUMPOT.ini) to
the other user.
2. The file recipient should save the received files in C:/Programs File/RemoteX/Players2 and run
“Import from Server” from their app.
Additional shortcut keys may be added without further configuration.
Note> Running “Import from Server” will refresh the list with the players added from the Players2 folder.
Although you update RemoteX sever, player files are not changed in the players2 folder.
2-1 2-2 2-3

Moving Player Shortcut Keys

Moving Player Shortcut Keys
33
Users can move frequently used shortcut keys to their desired location.
Step 1, Select the player to setup.
1
Step 2, Move to the Shortcut Key Setup View. Step 3, Tap the “Config” button on the top left corner.
2
3
Step 4, The shortcut key areas will turn
into a puzzle-like layout.
4
Step 5, Select and drag the shortcut key to move.
Step 6, An empty space will be generated at the desired
location, and the button will be placed. Tap the “Config”
button again to switch to normal mode.
6
5

PC Controll

Running PC Control
35
Users can conveniently control their PC without having to sit in front of it.
Open PC Control View
1
2
3
1 2
Users can view directories in their iPhone / iPod Touch.
Searched files can be directly opened/executed without having to return to the player.
3
Displays currentlyrunning applications inthe PC.Users can minimize /maximize / activate /close such programs.
The Task Manager will be displayed in the iPhone / iPod Touch.

Using the PC Control (MyComputer)
36
Programs and files searched in MyComputer can be played, copied, pasted and deleted directly.
1
Step 1, Open MyComputer. Step 2, Drill down to the pathof the media file.
ex. Playing a media file
Step 3, Select the media file and tap “Play” from the upper toolbar.
3-1
3-2
3-3
Step 4, Media will start playing in the default media player.

Using the PC Control (Applications)
37
A media file opened with MyCoumputer might be displayed under another window.Open the Application window to minimize unnecessary windows, rather than sitting in front of the PC to just close them.
1
Step 1, Open Applications.Step 2, Select the program to minimize / close
from the list of applications, and tap“MINI” or ”CLOSE”.
Step 3, Enjoy your movie by playing your media filein the default media application.

Managing PC ON/OFF

Turning your PC on/off indoors
Turning your PC on/off indoors(*Indoors : the network shared by the PC and iPhone/iPod Touch)
RemoteX will search for PCs installed with RemoteX Server applications on the same network as the iPhone/iPod Touch.You can control the power of one of the servers on the returned list.
[Notes for turning the PC ON]
The PC and LAN card must support WOL(Wake On Lan), and it must be activated by the user to remotely turn on your PC.(* Contact your PC manufacturer for WOL function support & activation.)
The PC to be controlled must be connected to a wired network. The iPhone/iPod Touch and the PC with the RemoteX Server application must be connected to the same network(wireless router). If the PC is abnormally shutdown and turned on, the application might not function as expected.
[Notes for turning the PC OFF]
The iPhone/iPod Touch and the PC with the RemoteX Server application must be connected to the same network.
39

Turning your PC ON/OFF outdoors
40
Turning your PC ON/OFF outdoors(Outdoors : 3G networks, cafés, corporate networks, etc.)
Turn on/off your PC outdoors where a network connection(3GS or public network) is available.
To use the ON/OFF function,① The user must enable Port Forwarding on their router. → See FAQ for Port Forwarding② You must add your PC to the servers list through the “Add Server” menu while your PC is turned ON. → See FAQ for Adding Servers
[Notes for turning the PC ON]
The PC and LAN card must support WOL(Wake On Lan), and it must be activated by the user to remotely turn on your PC.(* Contact your PC manufacturer for WOL function support & activation.)
The PC to be controlled must be connected to a wired network. The iPhone/iPod Touch and the PC with the RemoteX Server application must be connected to the same network(wireless router). If the PC is abnormally shutdown and turned on, the application might not function as expected. Only for IPTIME routers(firmware 6.xx+).
[Notes for turning the PC OFF]
The iPhone/iPod Touch and the PC with the RemoteX Server application must be connected to the same network.

Adding Servers

Adding Servers
42
Control outdoors PCs at home or at the office by adding servers. PCs must be turned ON when adding them to the servers list through the “Add Server” menu.
Step 1, Tap to view the add server menu.Step 2, Insert the name of the router or the IP address, the external port number, and tap “Apply”.Step 3, Tap “Connect” to check the power status of your newly registered PC.Step 4, The server(s) can now be controlled outdoors.
1
Type in the preset server key if any
The external port number for the router as set up
2
3
The external IP address or domain name (DDNS) goes here
4

Scheduled Shutdown

Setting Up Scheduled Shutdown
44
Setup your PC to be shutdown at a custom preset time.
Step 1, Tap .
Step 2, Select an appropriate time and tap “Apply”.
Step 3, Servers scheduled for shutdown will be displayed with this icon, and a schedule confirm message will show (Automatic
shutdown scheduled for 23:05[Today]).
1
2
3

1
2
Cancelling Scheduled Shutdown
45
[Notes for Scheduled Shutdown]
The time here is based on the PC.
*If the PC is setup at 12:30pm(today) for shutdown at 11:05 pm, the message will show “Automatic shutdown scheduled for 23:05[Today]”.
*If the PC is setup at 12:30pm(today) for shutdown at 02:00 am, the message will show “Automatic shutdown scheduled for 02:00[Tomorrow]”.
Step 1, To cancel scheduled shutdown, tap “Cancel”.Step 2, Tap the server name to deactivate. The icon will disappear.

All Servers
All Servers
47
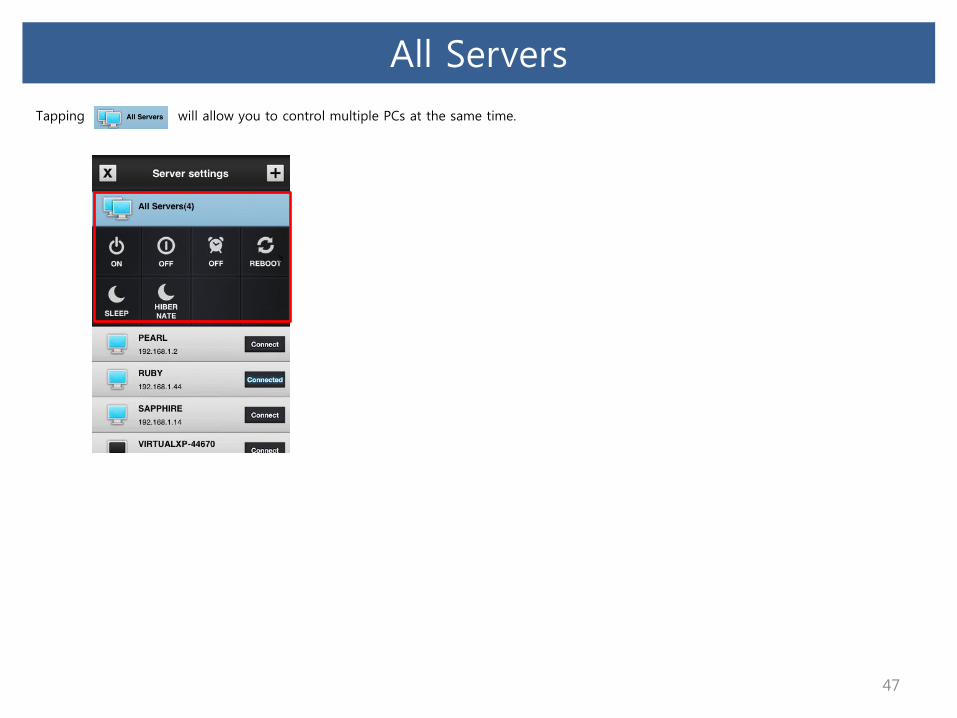
Tapping will allow you to control multiple PCs at the same time.

Deleting Servers

Deleting Servers
49
To delete servers from the list, simply swipe it off.Slightly touch anywhere next to the “Connect” button. Servers can be deleted one at a time.

Settings
Settings
51
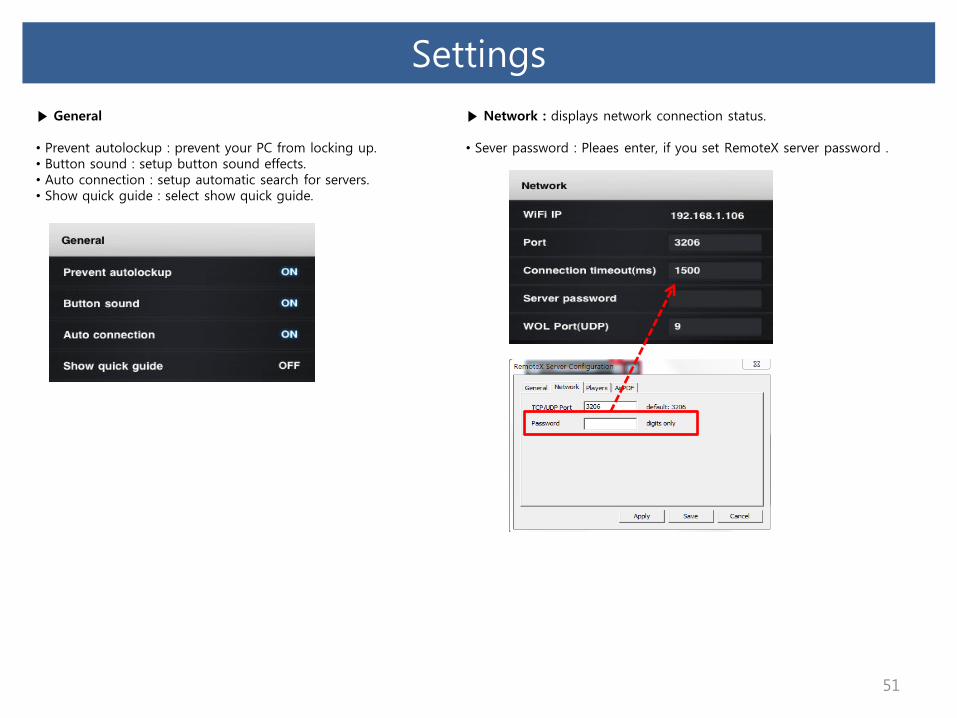
▶ General
• Prevent autolockup : prevent your PC from locking up.• Button sound : setup button sound effects.• Auto connection : setup automatic search for servers.• Show quick guide : select show quick guide.
▶ Network : displays network connection status.
• Sever password : Pleaes enter, if you set RemoteX server password .


