
Presenters: Stephen Marcino, PE and Micah Blate, EIT (JMT)
Structural Lining for Water Mains
2015 PA-AWWA Annual ConferenceThursday, April 23rd, 2015

1. Introduction
2. Purpose of Lining
3. Lining History
1. Spray-on
2. CIPP
4. Classifications of Liners
5. Spray-on Structural Liners
• Example Manufacturers
6. Cured-in-Place Pipe Liners
• Example Manufacturers
7. Conclusion
Agenda

• Aging infrastructure
• Alternate to open-cut methodology– Trenchless technology
• Limited resources and capital
• Structural Lining– Less intrusive
– Potentially less Cost
• Two primary types:– Spray-on
– Cured-in-place pipe
(CIPP)
Introduction
Image provided by NY Times
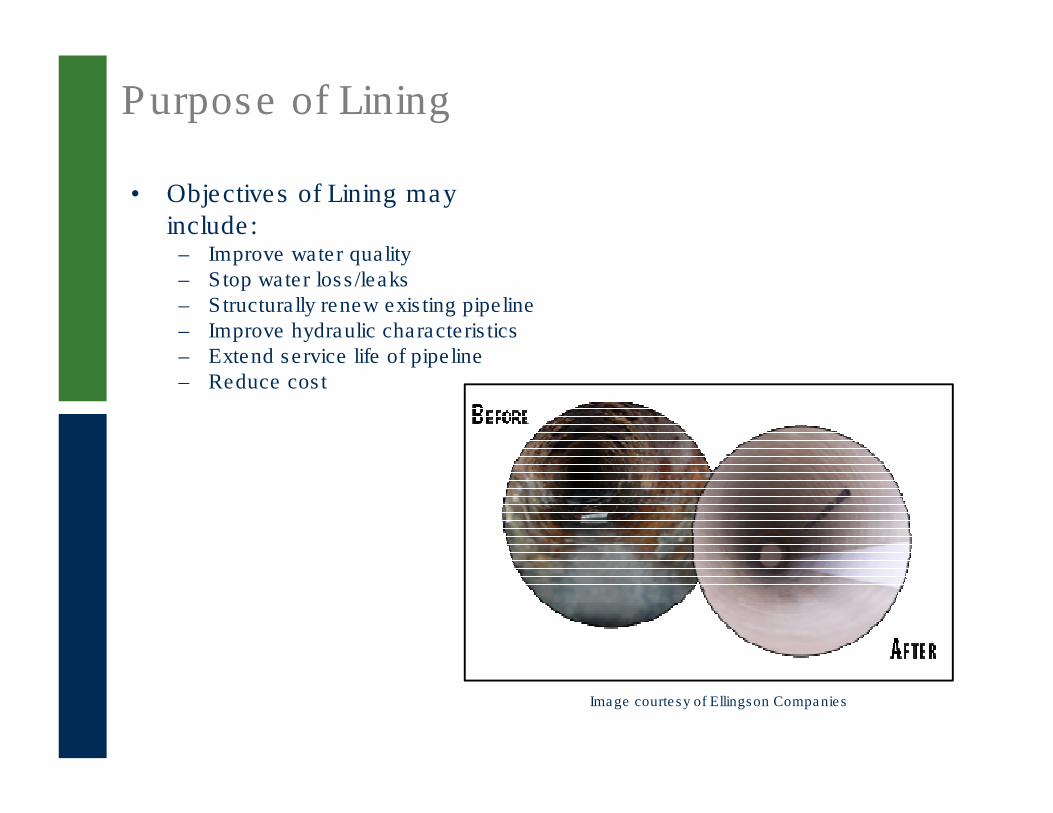
• Objectives of Lining may
include:– Improve water quality– Stop water loss/leaks– Structurally renew existing pipeline– Improve hydraulic characteristics– Extend service life of pipeline– Reduce cost
Purpose of Lining
Image courtesy of Ellingson Companies
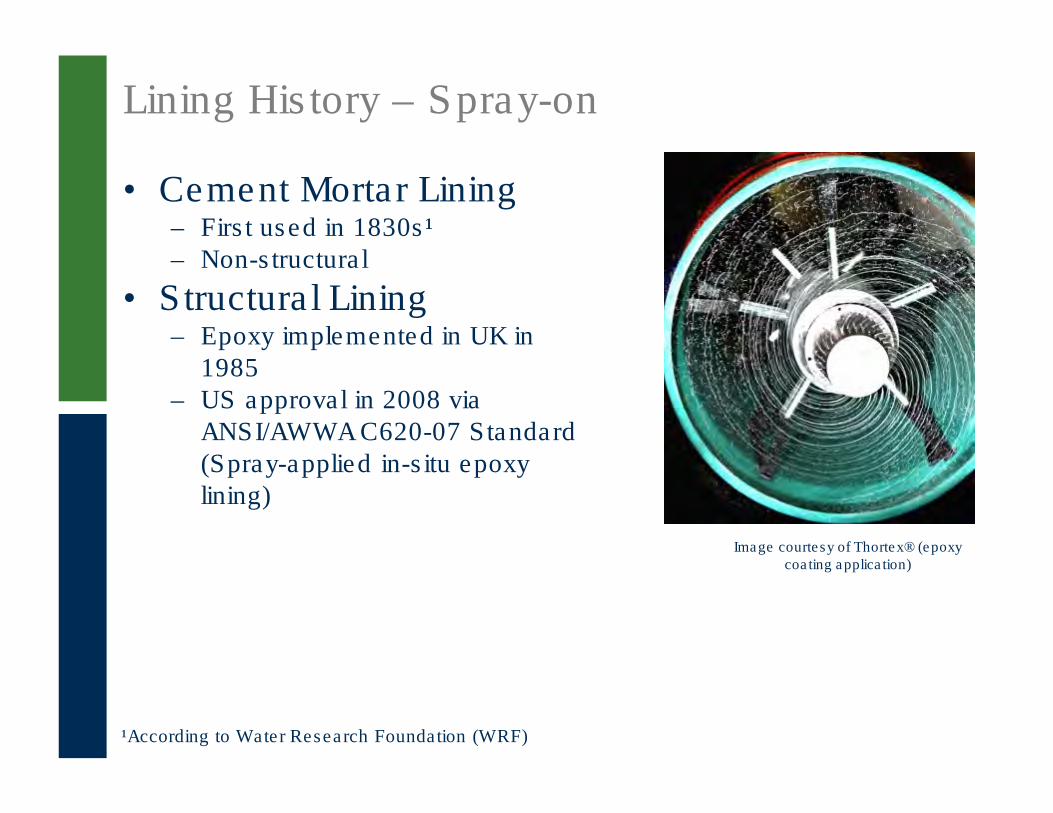
• Cement Mortar Lining– First used in 1830s¹
– Non-structural
• Structural Lining– Epoxy implemented in UK in
1985
– US approval in 2008 via
ANSI/AWWA C620-07 Standard
(Spray-applied in-situ epoxy
lining)
Lining History – Spray-on
¹According to Water Research Foundation (WRF)
Image courtesy of Thortex® (epoxy coating application)

• CIPP¹– Pipe within a pipe
– First implemented in 1971 in
London, named insit u form
(Latin for “form in place”)
– Originally felt tube saturated with
resin
– Patent issued 1977 and
commercialized by Insituform®
Technologies
– Patent expired in 1994
Lining History – CIPP
Image courtesy of GML Coatings, LLC
¹Artice: Evolution of Cured-in-Place Pipe Allows Structural Renewal of Drinking Water Pipe, David Kozman, PE

• AWWA developed classification system to
describe and differentiate among linings
– Class 1• Non-structural
• Coating/corrosion protection
– Class 2• Semi-structural – pressure transferred to host pipe
• Requires adhesion to host pipe
– Class 3 • Semi-structural – pressure transferred to host pipe
• Does not require adhesion to host pipe
– Class 4• Fully-structural
• Independent of host pipe
• Pipe within a pipe
Classifications of Liners

Spray-On Structural
Liners

• Process Overview– Pre-inspection– Isolate segment
– Requires two access points– Application rig pushed into position and
winched backwards while nozzle head
applies material to pipe
– Post-inspection
Spray-on Structural Liners
Image courtesy of trenchless-pipelining

• Advantages– Minimal effort to re-establish
service connections
– Minimize disruptions to community due to minimal
access pits compared to open-
cut
– Typical maintenance/repair
methods can be applied to
completed pipelines
• Limitations– Voids and blisters may form if
pipe is not properly prepared
– Potential for uneven liner due to
rig issues
– Material can slump on invert of
pipe
Spray-on Structural Liners
Image courtesy of Municipal Sewer and Water Magazine®

• Quest Inspar PipeArmor®– Installation sizes: 6 – 174 Inches (any pipe material)– Material
• 100% Polyurea
– Installed by Quest Inspar– >0.020 inch thickness– Design standards: ASTM D-192– AWWA class IV designation (fully structural)– Product Certifications: NSF/ANSI 61 Standard– Service Connections: Service connections are not blocked during the lining
process. – Maximum lining distance: 900 LF in each direction (upstream/downstream)
at one time
Spray-on Structural Liners – Example
Manufacturers
Image courtesy of Quest Inspar®

• 3M Skotchkote ™ Renewal Liner 2400– Installation sizes: 4 – 24 Inches (DI and CI)– Material
• 100% Polyurea
– Requires authorized applicator contractor– 0.05 inch to 0.3 inch thickness– Design Standards: ASTM F 1216-09, D638-08, D2990-08, and D1599-99
• Non-designated fully structural lining (designed to operational pressure and external
loads and conforming to above-referenced standards)
– Product Certifications: NSF/ANSI 61 Standard– Service Connections: Service connections are not typically blocked during the
lining process. If they are, a mechanical robot can reinstate them.– Maximum lining distance: 600 LF at one time
Spray-on Structural Liners – Example
Manufacturers
Image courtesy of 3M®
CIPP Structural
Liners

• Process Overview– Liner tube “wetted-out” with resin before inserted into host pipe– Cured utilizing hot water, steam, or UV
• Advantages– Minimum disturbance to community– Line through bends and non-circular shapes (oval, elliptical, etc.)– VOC free
• Disadvantages– Like spray-on, bypass or isolation of line required– Requires temperature monitoring of materials prior to installation– Typically requires certified installers
CIPP Structural Liners
Image courtesy of Trenchless International®

CIPP Liner – Example Manufacturers
• Aqua Pipe®– Installation sizes: 6 – 24 Inches (CI, Steel, or
DI)
– Materials, 3 layers:• Outer Layer: Semi-Porous synthetic woven polyester
(proprietary) • Propriety resin• Inside: Thermal Polyurethane Membrane
– Requires licensed installers. Licensing
includes rigorous training and equipment
purchase.
– Design Standards: ASTM F1216 and ASTM
1743
– AWWA Class IV Designation
– Product Certifications: NSF/ANSI Standard 61,
UL, NQ 3660-950, and WRAS¹¹ Approved
MaterialImage courtesy of Aqua Pipe®
¹ Water Regulations Advisory Scheme
CIPP Liner – Example Manufacturers
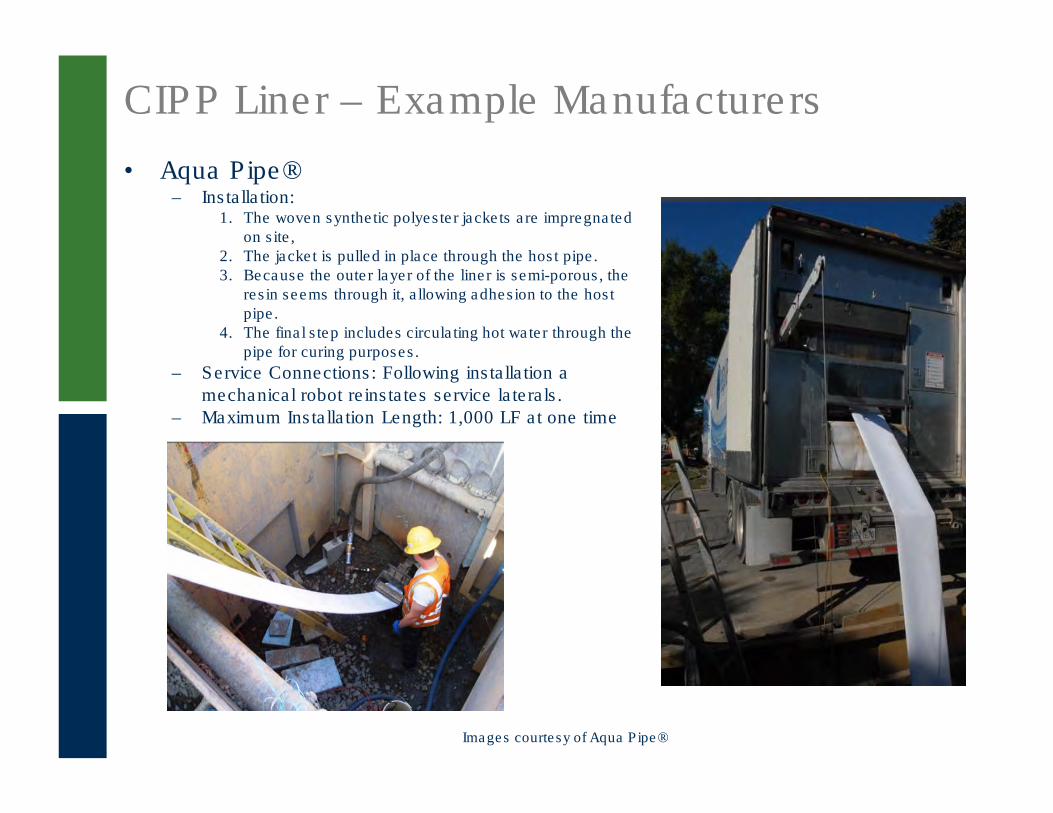
• Aqua Pipe®– Installation:
1. The woven synthetic polyester jackets are impregnated on site,
2. The jacket is pulled in place through the host pipe. 3. Because the outer layer of the liner is semi-porous, the
resin seems through it, allowing adhesion to the host pipe.
4. The final step includes circulating hot water through the pipe for curing purposes.
– Service Connections: Following installation a
mechanical robot reinstates service laterals.
– Maximum Installation Length: 1,000 LF at one time
Images courtesy of Aqua Pipe®
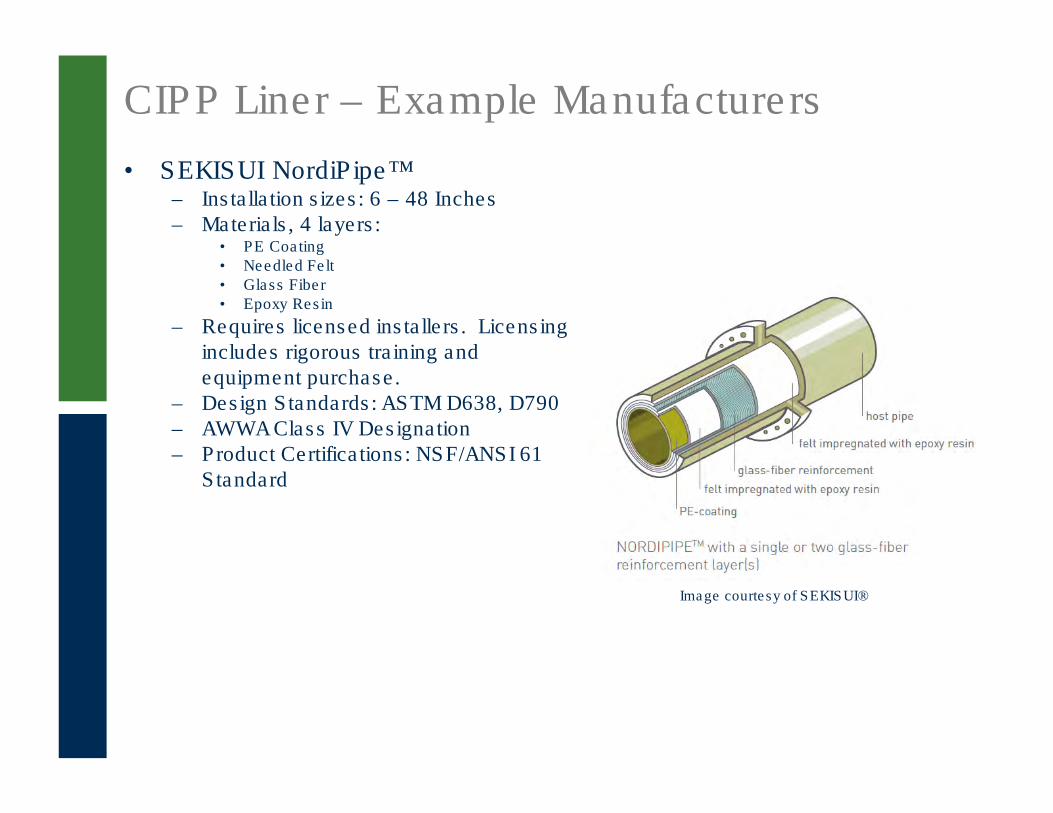
CIPP Liner – Example Manufacturers
• SEKISUI NordiPipe™ – Installation sizes: 6 – 48 Inches– Materials, 4 layers:
• PE Coating• Needled Felt
• Glass Fiber• Epoxy Resin
– Requires licensed installers. Licensing includes rigorous training and equipment purchase.
– Design Standards: ASTM D638, D790– AWWA Class IV Designation – Product Certifications: NSF/ANSI 61
Standard
Image courtesy of SEKISUI®
CIPP Liner – Example Manufacturers
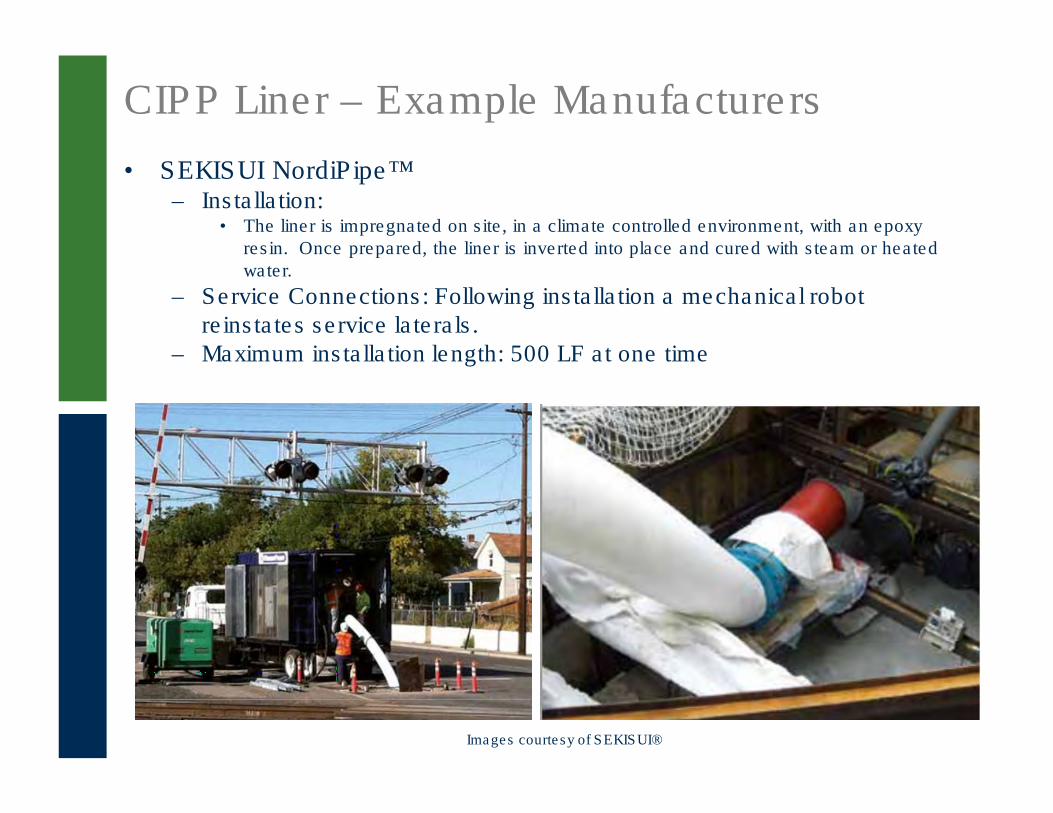
• SEKISUI NordiPipe™ – Installation:
• The liner is impregnated on site, in a climate controlled environment, with an epoxy
resin. Once prepared, the liner is inverted into place and cured with steam or heated
water.
– Service Connections: Following installation a mechanical robot
reinstates service laterals.
– Maximum installation length: 500 LF at one time
Images courtesy of SEKISUI®

CIPP Liner – Example Manufacturers
• Insituform InsituMain®
– Installation sizes: 6 – 60 Inches (CI, DI, Steel, Cement, RCP, Plastic)
– Materials, 3 layers:• Polyester Fiber• Fiberglass• Epoxy Resin
– Design Standards: ASTM F1216 and ASTM F1743
– AWWA Class IV Designation – Product Certifications: NSF/ANSI 61
Standard
Image courtesy of Insituform®

CIPP Liner – Example Manufacturers
• Insituform InsituMain®
– Installation: • The composite material is impreganated on or off-site with an epoxy resin. The pipe is installed into the pipe with
either an inverted or pull-in method (either direction). To cure the material, steam or heated water is circulated
through the pipe.
– Service Connections: Following installation a mechanical robot reinstates service laterals.
– Maximum installation length: 1,500 LF at one time
Image courtesy of Insituform®

Conclusion and Summary Table
Lining
Method
Example
Manufacturer
Pipe Size
(in.)
Approximate
Cost (Per LF)*Materials Benefits Disadvantages
CIPP
Lining
SEKISUI
Nordipipe®
(Class IV)
6 – 48 $100-$125
Woven
polyester and
polyurethane
• Fast installation
• Minimum surface
disruption
• Minimum annular space
between host pipe and
liner (no grouting required)
• Increased Hazen-Williams
C-factor
• VOC free
• Cost-effective
• Certified installers not
available in every area
• Internal pressure rating
limitations
• Materials need to be
monitored for
temperature
• Bend limitations
Aqua-Pipe®
(Class IV)6 – 24 $105-$125
Needled felt,
glass fiber,
epoxy resin
Insituform
InsituMain™
(Class IV)
6 – 60 $120-$140
Polyester fiber,
fiberglass,
epoxy resin
Spray-on
Lining
3m
Skotchtite™
(Class III)
4 – 24 $125-$140 Polyurea
• Quick cure-time
• Little to no effort required
for service connection re-
establishment
• Minimal surface disturbance
• Cost-effective
• Typical maintenance/repair
applicable following
installation
• Limited number of
installers/manufacturers
• Potential defects of liner
due to applicator issues
• Material may slump in
invert of pipeQuest Inspar
Pipe Armor®
(Class IV)
6 – 174 $120 – 135 Polyurea
* Approximate installed costs for 6-inch pipe designed to a structural level. Costs can vary greatly depending upon specific site
location, total length of pipe, condition of host pipe, installer, amount of bends and fittings and water service connections.
Questions?


