
UV lamp for A10 TOC monitor
Installation Guide
RephiLe Catalogue Number: RAA10UVM1
Description: UV lamp for A10 TOC monitor
Corresponding Millipore Part Numbers: ZFA10UVM1
This product is a direct replacement of Millipore corresponding UV lamp. Please refer to
Millipore’s User Manual for the detailed instruction of installation.
Introduction
Where used: . A10 TOC Monitor Standalone
. Century Milli-Q® systems
. Elix®20-100 systems
. Integral Platform systems
In the Shipping Box:
. 1 UV Lamp assembly with one UV lamp gasket and 2 spring clips
. 1 pair of gloves
Tools needed:
. Torx-10 screwdriver
. Torx-20 screwdriver (Century Milli-Q system)
. Flat head screwdriver
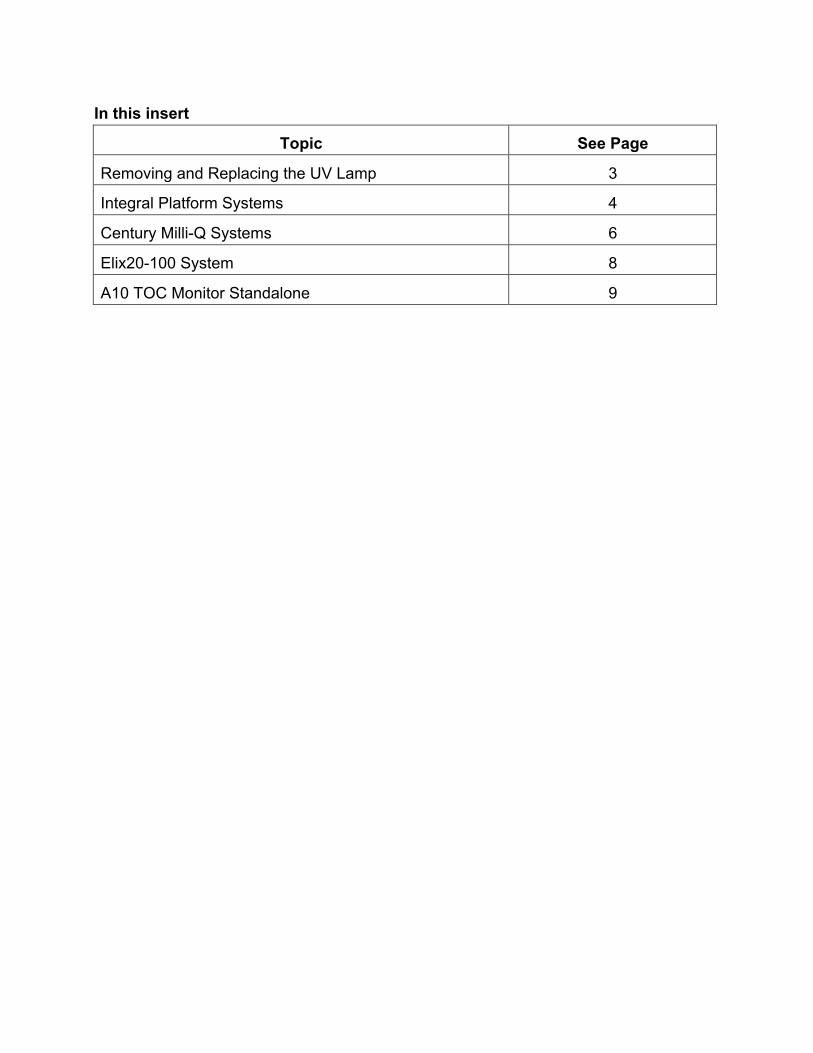
In this insert
Topic See Page
Removing and Replacing the UV Lamp 3
Integral Platform Systems 4
Century Milli-Q Systems 6
Elix20-100 System 8
A10 TOC Monitor Standalone 9

Removing and Replacing the UV Lamp
Procedure The procedure is identical for all systems listed above.
Step Action
1 Hold the UV lamp assembly and cover the metal upper spring with one hand,
insert the screwdriver blade into the notch immediately below the clip.
2 Gently twist the screwdriver to release the upper spring clip and remove it.
3 Remove the lower spring clip.
4 Grasp the UV lamp assembly by the finger guides and pull it out of its support.
5
Install the new UV lamp gasket on the UV lamp assembly.
Attention
Be careful not to touch the sensor cell inside the support.
6 Insert the new UV lamp assembly into its support.
7 Secure the UV lamp assembly in place using the two new spring clips.
Lower Spring Clip
Support
Notch to Insert Screwdriver and Twist
Sensor Cell
UV Lamp Gasket
UV Lamp Assembly

Integral Platform Systems
Replacing the UV Lamp Assembly
The procedure involves the replacement of the UV lamp assembly and then a reset of the
software timer.
Step Action
1 Place the system into STANDBY mode.
2 Depressurise the water system by pushing the Q-POD® plunger down and
releasing it. Do this again once water stops flowing out.
3 Unplug the power cord.
4 Remove the Quantum cartridge.
5 Remove the PC board cover.
6 Locate the UV lamp assembly behind the cartridge.
7 Remove and replace the UV lamp assembly using the procedure page 1 of 4.
8 Put the PC board cover back on.
9 Install the cartridge.
10 Plug in the power cord.
11 Place the system into the READY mode.
12 Start an A10 Cleaning.
Cartridge
PC Board Cover

Resetting the UV Lamp Timer Follow the steps below to reset the UV Lamp timer.
Step Action Display
1 Select the Maintenance menu.
2 Select the Install A10 UV Lamp menu. Press the
right arrow.
3 The location of the UV lamp assembly appears.
Press the right arrow.
4 Follow the LCD instructions.
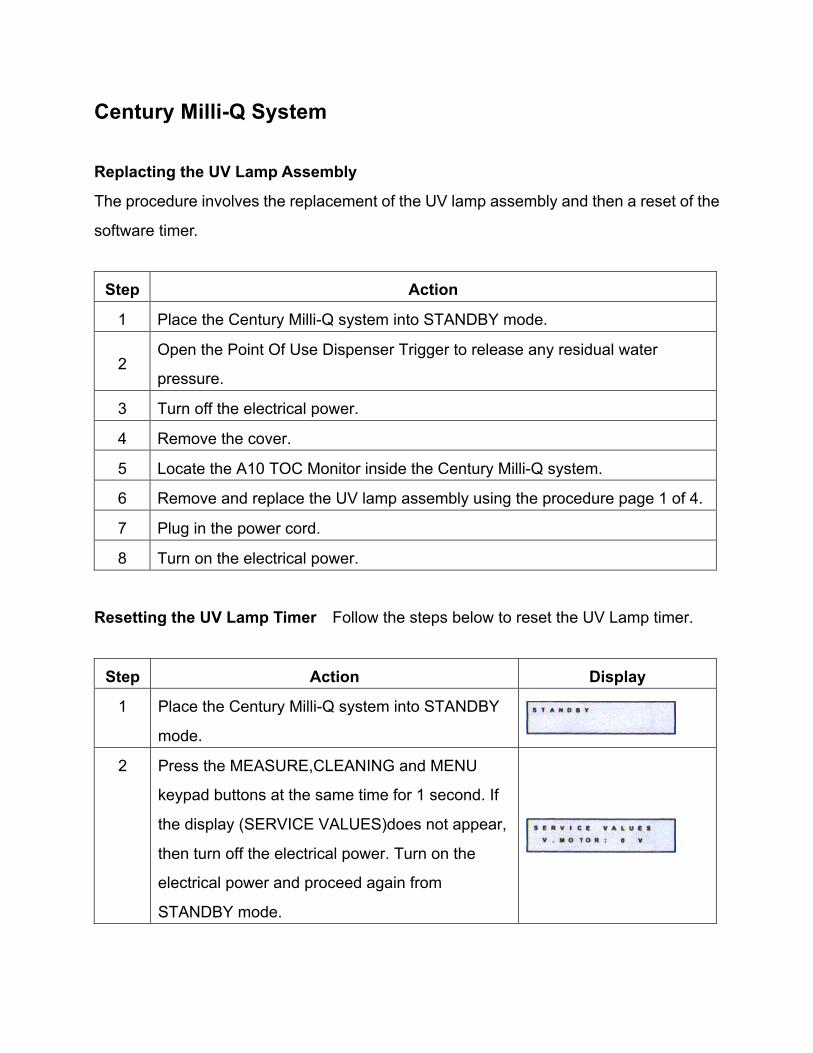
Century Milli-Q System
Replacting the UV Lamp Assembly
The procedure involves the replacement of the UV lamp assembly and then a reset of the
software timer.
Step Action
1 Place the Century Milli-Q system into STANDBY mode.
2 Open the Point Of Use Dispenser Trigger to release any residual water
pressure.
3 Turn off the electrical power.
4 Remove the cover.
5 Locate the A10 TOC Monitor inside the Century Milli-Q system.
6 Remove and replace the UV lamp assembly using the procedure page 1 of 4.
7 Plug in the power cord.
8 Turn on the electrical power.
Resetting the UV Lamp Timer Follow the steps below to reset the UV Lamp timer.
Step Action Display
1 Place the Century Milli-Q system into STANDBY
mode.
2 Press the MEASURE,CLEANING and MENU
keypad buttons at the same time for 1 second. If
the display (SERVICE VALUES)does not appear,
then turn off the electrical power. Turn on the
electrical power and proceed again from
STANDBY mode.

3 Press and release the MENU keypad button. If
you press the MENU keypad button too long, then
you go back to STANDBY mode. If this happens,
repeat the steps above.
4 Press the MENU keypad button three more times.
5 Press the OPERATE/STANDBY button once.
6 Press the MEASURE and CLEANING keypad
buttons at the same exact time for about one
second. The display shows "OK".
7 Press and hold the MENU keypad button for 2
seconds. Go back to STANDBY mode.
8 Leave the system in PRE OPERATE mode.

Elix 20-100 System
Changing the UV Lamp Assembly
The procedure involves the replacement of the UV lamp assembly and then a reset of a
software timer.
Step Action
1 Place the Large Elix system into STANDBY mode.
2 Turn off the electrical power.
3 Access the UV Lamp.
4 Remove and replace the UV lamp assembly using the procedure page 1 of 4.
5 Close the system.
6 Turn on the electrical power.
Resetting the UV Lamp Timer Follow the steps below to reset the UV Lamp timer.
Step Action Display
1 Go to the Field Service Software.
2 Go to RESET.
3 Press TOC LAMP for 2 to 3 seconds.
The display shows the message "TOC RESET
OK"
1
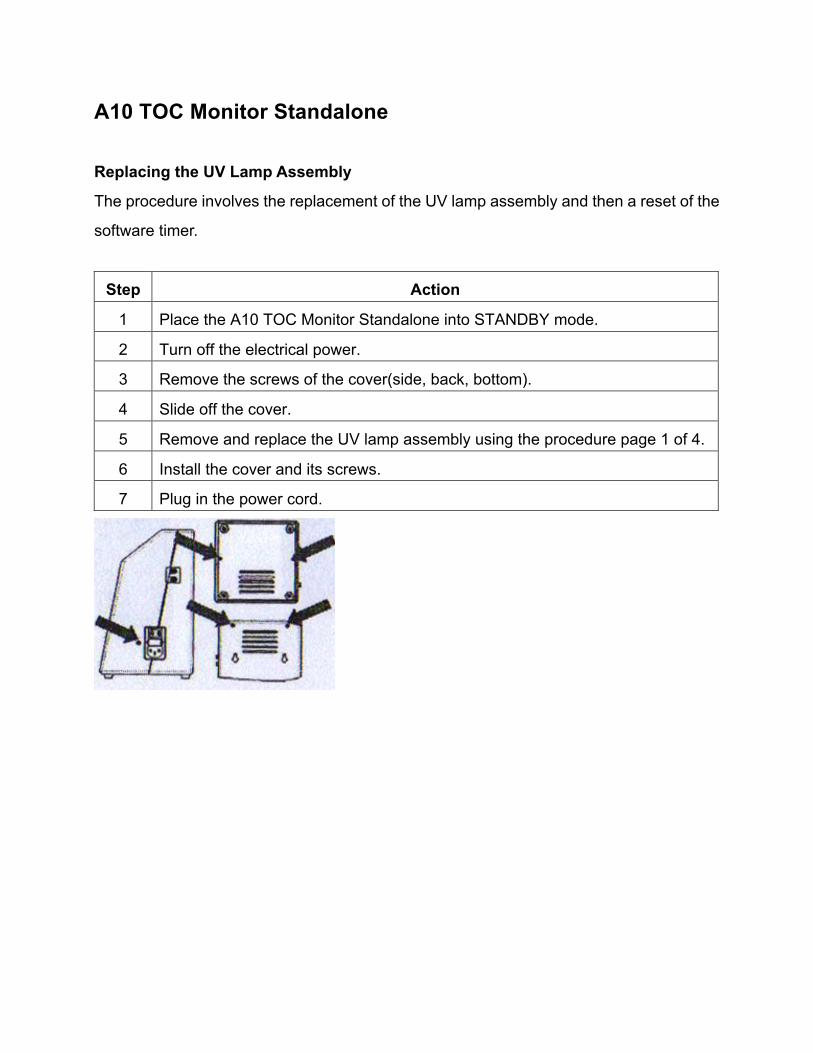
A10 TOC Monitor Standalone
Replacing the UV Lamp Assembly
The procedure involves the replacement of the UV lamp assembly and then a reset of the
software timer.
Step Action
1 Place the A10 TOC Monitor Standalone into STANDBY mode.
2 Turn off the electrical power.
3 Remove the screws of the cover(side, back, bottom).
4 Slide off the cover.
5 Remove and replace the UV lamp assembly using the procedure page 1 of 4.
6 Install the cover and its screws.
7 Plug in the power cord.

Resetting the UV Lamp Timer
Step Action
1 Press the green button while turning on the A10 TOC Monitor Standalone.
2
Press the green button of more than 3 seconds to
reset the UV Lamp timer. "Analysis" appears briefly
when the button is first pressed."Lamp hours reset"
appears to confirm that the UV lamp timer is reset.
3 Release the green button. The A10 TOC Monitor Standalone returns to the
self-cleaning operation.
4 Verify lamp operation through the lamp window. Allow it to run in Clean mode
for 1 minute.
5 Press the green button again to return to the Automatic Analysis Mode.
RephiLe is the trademarks of RephiLe Bioscience, Ltd.
© 2015. RephiLe Bioscience, Ltd. All rights reserved.
All other trademarks are trademarks of their respective manufacturers.


