
En
User’s Manual
Printed in JapanS2J00200401(11)
6MEA0911-04
En

ii
About This Manual
Thank you for your purchase of a Nikon D1H digital camera. This manual is designedto improve your enjoyment of this advanced single-lens reflex (SLR) digital camera.As you read through it, you will find explanations not only of how the camera works,but of how certain features can be used to take photographs in a variety of situa-tions. The manual is divided into the following sections:
• Getting Started .............................................................................. pp. 1–18The “Getting Started” section describes the symbols and conventions used inthis manual and provides a guide to the names and functions of camera controlsand icons.
• Tutorial ............................................................................................ pp. 19–50This section provides sufficient information to master simple “point-and-shoot”photography. After reading this section, you should know enough about yourcamera to enjoy the simplicity and immediacy of digital photography.
• Reference ........................................................................................ pp. 51–154Like the tutorial, the reference section covers the steps involved in shooting andplayback in the order most commonly followed when taking photographs, butcovers these topics in greater depth. Taking playback one step fur ther, it alsodescribes how to view photographs on a computer or television.
• Custom Settings and Other Menus .......................................... pp. 155–191This section details custom settings and provides an index to camera menus.
• Technical Notes ............................................................................. pp. 193–223Refer to this section for information on optional accessories, camera care, trouble-shooting, and specifications.

iii
• Overview ......................................................................... pp. 2–3
• Getting to Know the Camera ..................................... pp. 4–18
• First Steps ........................................................................ pp. 20–31
• Taking Photographs ....................................................... pp. 32–50
• Caring for Your Camera ............................................... pp. 194–197• Optional Accessories .................................................... pp. 198–207
• Troubleshooting ............................................................. pp. 208–211• Specifications .................................................................. pp. 212–219• Index ................................................................................. pp. 220–223
• Custom Settings ............................................................. pp. 156–185
• Other Camera Menus .................................................. pp. 186–191
• Advanced Photography ................................................. pp. 52–119
• Connecting Your Camera to a Computer ................ pp. 148–154
• For Your Safety ............................................................... iv–v
• Caring for the Camera and Battery .......................... vi–vii
• Notices ............................................................................. iii–xi
• Table of Contents .......................................................... xii–xiv
• Playback ............................................................................ pp. 120–147

iv
For Your Safety
To prevent damage to your Nikon product or injury to yourself or to others, readthe following safety precautions in their entirety before using this equipment. Keepthese safety instructions where all those who use the product will read them.
The consequences that could result from failure to observe the precautions listed inthis section are indicated by the following symbols:
This icon marks warnings, information that should be read before using yourNikon product to prevent possible injury.
WARNINGS
Do not look at the sun through the viewfinderViewing the sun or other strong light source through the viewfinder could cause permanentvisual impairment.
Turn off immediately in the event of malfunctionShould you notice smoke or an unusual smell coming from the equipment or from the ACadapter (available separately), unplug the AC adapter and remove the batteries immediately,taking care to avoid burns. Continued operation could result in injury. After removing thebatteries, take the equipment to a Nikon-authorized service center for inspection.
Do not use in the presence of flammable gasDo not use electronic equipment in the presence of flammable gas, as this could result inexplosion or fire.
Do not place camera strap around neckPlacing the camera strap around your neck could result in strangulation. Special care should betaken to avoid placing the strap around the neck of an infant or child.
Do not disassembleTouching the product’s internal parts could result in injury. In the event of a malfunction, theproduct should be repaired only by a qualified technician. Should the product break open asthe result of a fall or other accident, remove the battery and/or AC adapter and then take theproduct to a Nikon-authorized service center for inspection.

v
Observe due precaution when handling batteriesBatteries may leak or explode if improperly handled. Observe the following precautions whenhandling batteries for use in this product:• Be sure the product is off before inserting or removing the battery. If you are using an AC
adapter, be sure it is unplugged.• Foreign substances on the battery terminals—for example, sweat or oil—may cause an
interruption in current. Before installing the battery, clean it thoroughly with a soft, dry cloth.• When the product is used on battery power for an extended period, the battery may
become hot. Due caution should be observed when removing the battery.• Use only batteries approved for use in this equipment.• Do not expose the battery to flame or to excessive heat or moisture. Do not short-circuit
or disassemble the battery.
Use appropriate cablesWhen connecting cables to the input and output jacks, use only the cables provided or sold byNikon for the purpose, to maintain compliance with product regulations.
Keep out of reach of childrenParticular care should be taken to prevent infants from putting batteries or other small partsinto their mouths.
Removing memory cardsMemory cards may become hot during use. Observe due caution when removing memorycards from the camera.
CD-ROMsThe CD-ROMs on which the software and manuals are distributed should not be played backon audio CD equipment. Playing CD-ROMs on an audio CD player could cause hearing loss ordamage the equipment.
Observe caution when operating the flashUsing a flash in close proximity to the eyes of a human or animal subject could cause perma-nent visual impairment. Particular care should be observed when photographing infants, whenthe flash should be no less than one meter (39˝) from the subject.
Avoid contact with liquid crystalShould the monitor break, care should be taken to avoid injury due to broken glass and toprevent liquid crystal from the monitor touching the skin or entering the eyes or mouth.

vi
Do not dropThe camera and lens may malfunction if subjected to strong shocks or vibration.
Keep dryThis product is not waterproof, and may malfunction if immersed in water or exposed to highlevels of humidity. Rusting of the internal mechanism can cause irreparable damage.
Avoid sudden changes in temperatureSudden changes in temperature, such as occur when entering or leaving a heated building on acold day, can cause condensation inside the device. To prevent condensation, place the devicein its carrying case or a plastic bag before exposing it to sudden changes in temperature.
Keep away from strong magnetic fieldsDo not use or store this device in the vicinity of equipment that generates strong electromag-netic radiation or magnetic fields. Strong static charges or the magnetic fields produced byequipment such as radio transmitters could interfere with the monitor, damage data stored onthe memory card, or affect the product’s internal circuitry.
Do not touch the shutter curtainThe shutter curtain is constructed of extremely thin material that is easily damaged. Under nocircumstances should you exert pressure on the curtain, poke it with cleaning tools or otherimplements, or subject it to powerful air currents from a blower. These actions could scratch,deform, or tear the curtain.
Cleaning• When cleaning the camera body, use a blower to remove dust and lint, then wipe gently with
a soft, dry cloth. After using your camera at the beach or seaside, wipe off any sand or saltusing a cloth lightly dampened with pure water and then dry your camera thoroughly. In rareinstances, static electricity produced by a brush or cloth may cause the LCD displays to lightup or darken. This does not indicate a malfunction, and the display will shortly return tonormal.
• When cleaning the lens and mirror, remember that these elements are easily damaged. Dustand lint should be gently removed with a blower. When using an aerosol blower, keep thecan vertical (tilting the can could result in liquid being sprayed on the mirror). If you do geta fingerprint or other stain on the lens, apply a small amount of lens cleaner to a soft clothand wipe the lens carefully.
• See “Technical Notes: Caring for Your Camera” for information on cleaning the low-passfilter.
Storage• To prevent mold or mildew, store the camera in a dry, well-ventilated area. If you will not be
using the product for a long period of time, remove the battery to prevent leakage and storethe camera in a plastic bag containing a desiccant. Do not, however, store the camera casein a plastic bag, as this may cause the material to deteriorate. Note that desiccant graduallyloses its capacity to absorb moisture and should be replaced at regular intervals.
Caring for the Camera and Battery

vii
• Do not store the camera with naphtha or camphor moth balls, close to equipment thatproduces strong magnetic fields, or in areas subject to extremes of temperature, for examplenear a space heater or in a closed vehicle on a hot day.
• To prevent mold or mildew, take the camera out of storage at least once a month. Turn thecamera on and release the shutter a few times before putting the camera away again.
• Store the battery in a cool, dry place.• Before storing EN-4 battery packs that have been removed from the camera, replace the
cover that protects the terminals used for connection to a recharger.
Notes on the Monitor• The monitor may contain a few pixels that are always lit or that do not light. This is a
characteristic common to all TFT LCD monitors and does not indicate a malfunction. Im-ages recorded with the camera will not be affected.
• Images in the monitor may be difficult to see in a bright light.• Do not apply pressure to the monitor, as this could cause damage or malfunction. Dust or
lint adhering to the monitor can be removed with a blower brush. Stains can be removed byrubbing the surface lightly with a soft cloth or chamois leather.
• Should the monitor break, care should be taken to avoid injury due to broken glass and toprevent the liquid crystal from the monitor touching the skin or entering the eyes or mouth.
• Replace the monitor coverwhen transporting the cameraor leaving it unattended.
• Do not touch the battery terminals with other metal objects. Keep the battery terminalsclean.
Turn the product off before removing the battery or unplugging the AC adapterDo not unplug the product or remove the battery while the camera is on, or while images arebeing recorded or deleted from memory. Forcibly cutting power to the product in thesecircumstances could result in loss of data or in damage to the internal circuitry or memory. Toprevent an accidental interruption of power, avoid carrying the product from one location toanother while the AC adapter is connected.
Keep a fully-charged spare battery on handReady a spare battery and keep it fully charged when taking photographs on important occa-sions. Depending on your location, you may find it difficult to purchase replacement batterieson short notice.
On cold days, the capacity of batteries tends to decrease. Be sure the battery is fully chargedbefore taking photographs outside in cold weather. Keep a spare battery in a warm place andexchange the two as necessary. Once warmed, a cold battery may recover some of its charge.

viii
Notices
• No part of the manuals included with this product may be reproduced, transmit-ted, transcribed, stored in a retrieval system, or translated into any language in anyform, by any means, without Nikon’s prior written permission.
• Nikon reserves the right to change the specifications of the hardware and soft-ware described in these manuals at any time and without prior notice.
• Nikon will not be held liable for any damages resulting from the use of this prod-uct.
• While every effort has been made to ensure that the information in these manu-als is accurate and complete, we would appreciate it were you to bring any errorsor omissions to the attention of the Nikon representative in your area (addressprovided separately).
Notice for customers in Canada
CAUTIONThis class B digital apparatus meets all requirements of the Canadian InterferenceCausing Equipment Regulations.
ATTENTIONCet appareil numérique de la classe B respecte toutes les exigences du Règlementsur le matériel brouilleur du Canada.

ix
D1H
FOR HOME OR OFFICE USE
Tested To ComplyWith FCC Standards
Notice for customers in the U.S.A.
Federal Communications Commission (FCC) Radio Frequency Interference StatementThis equipment has been tested andfound to comply with the limits for aClass B digital device, pursuant to Par t15 of the FCC rules. These limits aredesigned to provide reasonable protec-tion against harmful interference in a residential installation. This equipment gener-ates, uses, and can radiate radio frequency energy and, if not installed and used inaccordance with the instructions, may cause harmful interference to radio communi-cations. However, there is no guarantee that interference will not occur in a particu-lar installation. If this equipment does cause harmful interference to radio or televi-sion reception, which can be determined by turning the equipment off and on, theuser is encouraged to try to correct the interference by one or more of the follow-ing measures:• Reorient or relocate the receiving antenna.• Increase the separation between the equipment and receiver.• Connect the equipment into an outlet on a circuit different from that to which
the receiver is connected.• Consult the dealer or an experienced radio/television technician for help.
CAUTIONSModificationsThe FCC requires the user to be notified that any changes or modifications made tothis device that are not expressly approved by Nikon Corporation may void theuser's authority to operate the equipment.
Interface CablesUse the interface cables sold or provided by Nikon for your equipment. Using otherinterface cables may exceed the limits of Class B Part 15 of the FCC rules.
Nikon Inc.,1300 Walt Whitman Road, Melville, New York11747-3064, U.S.A.Tel.: 631-547-4200

x
Notice Concerning Prohibition of Copying or Reproduction
Note that simply being in possession of material that has been digitally copied orreproduced by means of a scanner, digital camera or other device is punishable bylaw.
• Items prohibited by law from being copied or reproducedDo not copy or reproduce paper money, coins, securities, government bonds, orlocal government bonds, even if such copies or reproductions are stamped“Sample.”
The copying or reproduction of paper money, coins, or securities which are circu-lated in a foreign country is prohibited.
Unless the prior permission of the government has been obtained, the copying orreproduction of unused postage stamps or post cards issued by the governmentis prohibited.
The copying or reproduction of stamps issued by the government and of certi-fied documents stipulated by law is prohibited.
• Cautions on certain copies and reproductionsThe government has issued cautions on copies or reproductions of securitiesissued by private companies (shares, bills, checks, gift certificates, etc.), commuterpasses, or coupon tickets, except when a minimum of necessary copies are to beprovided for business use by a company. Also, do not copy or reproduce pass-ports issued by the government, licenses issued by public agencies and privategroups, ID cards, and tickets, such as passes and meal coupons.
• Comply with copyright noticesThe copying or reproduction of copyrighted creative works such as books, music,paintings, woodcut prints, maps, drawings, movies, and photographs is governedby national and international copyright laws. Do not use this product for thepurpose of making illegal copies or to infringe copyright laws.
Notices (continued)

xi
Trademark Information
Apple, the Apple logo, Macintosh, Mac OS, Power Macintosh, and PowerBook areregistered trademarks of Apple Computer, Inc. Finder and Power Mac are trade-marks of Apple Computer, Inc. IBM and IBM PC/AT are registered trademarks ofInternational Business Machines Corporation. microdrive is a trademark of Interna-tional Business Machines Corporation. PowerPC is a trademark of InternationalBusiness Machines Corporation, used under license. Microsoft is a registered trade-mark, and Windows, MS-Windows and Windows NT trademarks, of Microsoft Cor-poration. Pentium is a trademark of Intel Corporation. CompactFlash is a trade-mark of SanDisk corporation. All other trade names mentioned in this manual orthe other documentation provided with your Nikon product are trademarks orregistered trademarks of their respective holders.

xii
Table of Contents
About This Manual ............................................................................................................................. iiFor Your Safety ..................................................................................................................................... ivCaring for the Camera and Battery ......................................................................................... viNotices ..................................................................................................................................................... viii
Getting Started ................................................................................... 1
Overview ....................................................................................................................... 2
Getting to Know the Camera ................................................................................... 4
Tutorial ................................................................................................. 19
First Steps ..................................................................................................................... 20Step 1: Inserting a Battery ............................................................................................................ 22Step 2: Attaching a Lens ................................................................................................................ 24Step 3: Inserting a Memory Card ............................................................................................ 26Step 4: Choosing a Language ..................................................................................................... 28Step 5: Setting the Time and Date .......................................................................................... 30
Taking Photographs .................................................................................................... 32Step 0: Before You Begin ............................................................................................................... 34Step 1: Adjusting Camera Settings .......................................................................................... 36Step 2: Framing a Photograph ................................................................................................... 43Step 3: Focusing .................................................................................................................................. 44Step 4: Checking Exposure .......................................................................................................... 46Step 5: Shooting ................................................................................................................................. 47Step 6: Checking the Results ...................................................................................................... 48
Reference ............................................................................................. 51
Advanced Photography ............................................................................................... 52Shooting Modes .................................................................................................................................. 52Image Quality ........................................................................................................................................ 56Sensitivity (ISO Equivalency) ........................................................................................................ 62White Balance ...................................................................................................................................... 64Autofocus ................................................................................................................................................ 70

xiii
Focus Area Selection ........................................................................................................................ 73AF-Area Mode ..................................................................................................................................... 74Focus Lock .............................................................................................................................................. 78Getting Good Results with Autofocus ................................................................................... 80Manual Focus ........................................................................................................................................ 81Metering ................................................................................................................................................... 82Exposure Mode ................................................................................................................................... 84Auto-Exposure Lock ........................................................................................................................ 96Exposure Compensation ............................................................................................................... 98Auto Bracketing ................................................................................................................................... 100Self-Timer Mode ................................................................................................................................. 103Diopter Adjustment .......................................................................................................................... 104LCD Illuminators ................................................................................................................................. 105Depth-of-Field Preview ................................................................................................................... 106Focal Plane Position ........................................................................................................................... 107Through-the-Lens Flash Photography .................................................................................... 108Flash Contacts and Indicators ..................................................................................................... 109Flash Sync Modes ............................................................................................................................... 110Compatible Speedlights .................................................................................................................. 112The FUNC Button ............................................................................................................................. 116Sequential File Numbering ............................................................................................................ 117Taking Photographs with GPS ..................................................................................................... 118
Playback ......................................................................................................................... 120Playback Options ................................................................................................................................ 120Basic Playback ....................................................................................................................................... 122Playback Menu Options .................................................................................................................. 134Setup Menu Options ........................................................................................................................ 143Television Playback ............................................................................................................................. 146
Connecting to a Computer ...................................................................................... 148Software for the D1H ............................................................................................................................................... 150Reading Photographs from Memory Cards ........................................................................ 154

xiv
Custom Settings and Other Menus ................................................... 155
Custom Settings ........................................................................................................... 156
Other Camera Menus ................................................................................................ 186
Technical Notes ................................................................................... 193
Caring for Your Camera ............................................................................................. 194
Optional Accessories ................................................................................................. 198
Troubleshooting ........................................................................................................... 208
Specifications ................................................................................................................ 212
Index .............................................................................................................................. 220
Table of Contents (continued)

1
GETTING STARTED
About This Section
This section describes the symbols and conventions used in this manual and provides a guide tothe names and functions of camera controls and icons.
• Overview ................ pp. 2–3
• Getting to Know the Camera................................... pp. 4–18

2
GE
TT
ING
STA
RT
ED
—O
VE
RV
IEW
Overview
This manual is designed to help you enjoy taking digital photographs with an ad-vanced single-lens reflex (SLR) digital camera. The D1H offers:• A 2.74-million pixel, 23.7 mm × 15.6 mm (0.93˝ × 0.61˝) image-sensing charged-
coupled device (CCD) capable of capturing images of 2,000 × 1,312 pixels in size• Newly designed 3D digital matrix image control with 3D color matrix metering,
through-the-lens (TTL) white balance, and tone compensation for precise expo-sure control, adaptive auto white-balance control, and optimal color accuracy
• A choice of two color modes (one optimized for the sRGB color space, the otherfor the Adobe RGB color space), giving users the power to select a color spacesuited according to the their production work-flow
• An enhanced shooting speed of approximately five frames per second for up toforty consecutive shots (twenty-seven shots in RAW mode)
• A menu of 0–35 custom settings displayed on the camera monitor in your choiceof English, French, German, or Japanese
• Lossless compression of RAW image data to increase the number of images thatcan be stored on a single memory card and to enhance transfer speed, all withoutsacrificing image quality
Servicing Your Camera and Accessories
Your camera is a precision machine and requires regular servicing. We recommend that you haveyour camera inspected by your retailer or Nikon service representative once every one to twoyears, and that you have it serviced once every three to five years (note that fees are charged forthese services). Frequent inspection and servicing are particularly recommended if you use yourcamera professionally. When having your camera inspected or serviced, we recommend that youbring you bring any accessories regularly used with the camera, such as lenses and flash units.
Use Only Nikon Brand Electronic Accessories
Your camera is designed to the highest standards and includes complex electronic circuitry.Only Nikon brand electronic accessories (including battery chargers, batteries, and AC adapt-ers) certified by Nikon specifically for use with your Nikon digital camera are engineered andproven to operate within the operational and safety requirements of this electronic circuitry.THE USE OF NON-NIKON ELECTRONIC ACCESSORIES COULD DAMAGE YOUR CAMERA AND MAY VOID YOUR
NIKON WARRANTY.For more information about Nikon brand accessories, contact your local authorized Nikon dealer.
Replacing This Manual
Should you lose this manual, replacements can be ordered, for a fee, from any authorized Nikonservice representative.

3
GE
TT
ING
STA
RT
ED
—O
VE
RV
IEW
To make it easier to find the information you need, the following symbols and con-ventions are used:
This icon marks cautions, information that you should read before using yourcamera to prevent damage to the device.
This icon marks notes, information that you should read before using yourcamera.
This icon marks tips, additional information you may find helpful when usingyour camera.
This symbol marks camera settings that can be fine-tuned using the customsetting or settings indicated by the number following the symbol.
This icon indicates that more information is available elsewhere in this manual.
Take Test Photos
Before taking photographs on important occasions (for example, at weddings or before takingthe camera on a trip), take a test shot to ensure that the camera is functioning normally. Nikonwill not be held liable for costs or lost profits that may result from product malfunction.
Life-Long Learning
As part of Nikon’s “Life-Long Learning” commitment to ongoing product support and educa-tion, continually-updated information is available on-line at the following sites:• For users in the U.S.A.: http://www.nikonusa.com/• For users in Europe: http://www.nikon-euro.com/• For users in Asia, Oceania, the Middle East, and Africa: http://www.nikon-asia.com/Visit these sites to keep up-to-date with the latest product information and general advice ondigital imaging and photography.
For more information, please contact your nearest Nikon representative.
http://www.klt.co.jp/Nikon/Network/index.html
This symbol marks settings that can be adjusted using the camera menus.

4
GE
TT
ING
STA
RT
ED
—G
ET
TIN
G T
O K
NO
W T
HE
CA
ME
RA
Getting to Know the Camera
Take a few moments to familiarize yourself with camera controls.
Camera Body
1
2
3
4
56
7
89
10
11
12
1325
2423
2221
20
19
18
17
16
15
14

5
GE
TT
ING
STA
RT
ED
—G
ET
TIN
G T
O K
NO
W T
HE
CA
ME
RA
1 Focus-mode selector dial .............. pg. 70
2 Lens release button ........................ pg. 25
3 DC in, video out connector cover.......................................................... pg. 146
4 10-pin remote terminal ............... pg. 206
5 Self-timer lamp ............................... pg. 103
6 Sync terminal for external flash ... pg. 109
7 Mode dial lock release ................... pg. 13
8 Eyelet for camera strap ................. pg. 12
9 Mode dial .......................................... pg. 13
10 Auto-bracketing button ..... pg. 100, 217
11 Flash sync mode button .............. pg. 110
12 Sensitivity button ............................ pg. 62
13 Accessory shoe ............................. pg. 109
14 Depth-of-field preview button ... pg. 106
15 Sub-command dial ........................... pg. 14
16 Power switch .................................... pg. 23
17 Shutter-release button ...... pp. 44–47, 78
18 Exposure mode button ........... pp. 84–93Format button ................................. pg. 27
19 Exposure compensation button.................................................... pg. 98, 217
20 Eyelet for camera strap ................. pg. 12
21 Top control panel ............................... pg. 8
22 Metering selector lock button ..... pg. 82
23 Metering selector ............................ pg. 82
24 Focal plane indicator .................... pg. 107
25 Diopter adjustment knob ............ pg. 104

6
GE
TT
ING
STA
RT
ED
—G
ET
TIN
G T
O K
NO
W T
HE
CA
ME
RA
Getting to Know the Camera (continued)
Camera Body (continued)
FUNC
MENU
38
39
40
41
42
37
43
36
35
34
33
32
31
30
29
28
27
26
47
48
49
50
51
46
45
44

7
GE
TT
ING
STA
RT
ED
—G
ET
TIN
G T
O K
NO
W T
HE
CA
ME
RA
41 Multi selector .................... pg. 16, 73, 124
42 Multi selector lock .......................... pg. 73
43 Interface connector cover ... pg. 119, 148
44 Memory card access lamp ............. pg. 47
45 Cover for CompactFlash card slot .. pg. 26
46 Card slot cover release button(under cover) ................................... pg. 26
47 Shutter-release button(vertical shooting) ........................... pg. 43
48 Shutter-release button lock(vertical shooting) ........................... pg. 43
49 Main command dial(vertical shooting) ........................... pg. 14
50 AF start (AF-ON) button(vertical shooting) ........................... pg. 72
51 Tripod socket
26 Eyepiece shutter lever ................. pg. 103
27 Delete/Format button ............ pg. 27, 129
28 Monitor button ..................... pg. 120, 123
29 LCD monitor ..................... pg. vii, 17, 120
30 Battery pack latch ........................... pg. 22
31 MENU button .................................. pg. 17
32 FUNC button ........................... pg. 18, 116
33 Protect button ............................... pg. 132
34 Thumbnail button ......................... pg. 122
35 White-balance button .................... pg. 64
36 Rear control panel ............................. pg. 8
37 Viewfinder eyepiece
38 AE/AF lock button .................... pg. 78, 96
39 AF start (AF-ON) button ............. pg. 72
40 Main command dial ......................... pg. 14
8
GE
TT
ING
STA
RT
ED
—G
ET
TIN
G T
O K
NO
W T
HE
CA
ME
RA
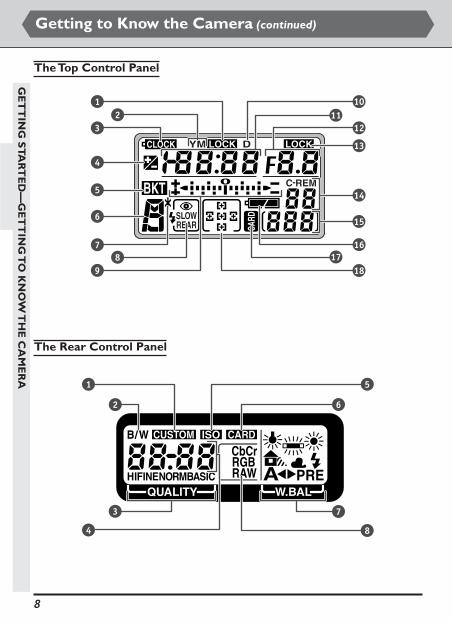
Getting to Know the Camera (continued)
The Rear Control Panel
The Top Control Panel
1 5
6
7
8
2
3
4
12
3
4
5
6
78
9
1011
12
13
14
15
1617
18

9
GE
TT
ING
STA
RT
ED
—G
ET
TIN
G T
O K
NO
W T
HE
CA
ME
RA
11 Shutter speed ............................. pg. 86, 91Exposure compensation ................ pg. 98Date and time ................................ pg. 217
12 Aperture display ........................ pg. 88, 91Playback indicator ......................... pg. 120
13 Aperture lock indicator ................. pg. 94
14 Number of exposures remaining ... pg. 34PC mode indicator ....................... pg. 149
15 Current frame number .................. pg. 27
16 Battery indicator ............................. pg. 23
17 CompactFlash Memory card indicator............................................................ pg. 27
18 Focus area ......................................... pg. 73
1 Shutter-speed lock indicator ........ pg. 94
2 Year/month indicator ................... pg. 217
3 Clock battery indicator ................. pg. 31
4 Exposure compensation indicator .. pg. 98
5 Bracketing indicator ..................... pg. 100
6 Exposure mode ........................ pp. 84–93
7 Flexible program indicator ............ pg. 85
8 Flash sync mode ............................ pg. 110
9 Electronic analog exposure display .. pg. 92Exposure compensation ................ pg. 98
10 Day indicator .................................. pg. 217GPS signal indicator ...................... pg. 118
5 Sensitivity indicator ....................... pg. 62
6 Memory card indicator .................. pg. 34
7 White-balance mode ...................... pg. 64
8 Image quality (image format) ........ pg. 60
1 Custom-settings indicator ........... pg. 159
2 Black-and-white mode ................... pg. 59
3 Image quality display ....................... pg. 59
4 Sensitivity .......................................... pg. 62Number of exposures remaining ... pg. 34File type ............................................. pg. 59Custom settings number ............. pg. 159

10
GE
TT
ING
STA
RT
ED
—G
ET
TIN
G T
O K
NO
W T
HE
CA
ME
RA
Getting to Know the Camera (continued)
The Viewfinder Display
1
2
3 4 5 6 7 8
14131211109

11
GE
TT
ING
STA
RT
ED
—G
ET
TIN
G T
O K
NO
W T
HE
CA
ME
RA
9 Metering system .............................. pg. 83Battery indicator ............................. pg. 23
10 Auto-exposure lock ....................... pg. 96
11 Shutter speed ............................. pg. 86, 91
12 Aperture ..................................... pg. 88, 91
13 Electronic analog exposure display .. pg. 92Exposure compensation ................ pg. 98
14 Frame counter ................................. pg. 34Exposures remaining in buffer ...... pg. 53Exposure compensation value ..... pg. 98
1 12-mm (0.47˝) reference circle forcenter-weighted metering ............. pg. 83
2 Focus brackets (focus areas) ........ pg. 73Spot-metering targets .................... pg. 83
3 Focus indicator ................................ pg. 45
4 Shutter-speed lock .......................... pg. 94
5 Aperture lock .................................. pg. 94
6 Exposure mode ........................ pp. 84–93
7 Exposure compensation indicator .. pg. 98
8 Flash-ready indicator .................... pg. 109

12
GE
TT
ING
ST
AR
TE
D—
GE
TT
ING
TO
KN
OW
TH
E C
AM
ER
A
Accessories
The following items are included with your camera:
BM-1 monitorcover
EG-D1 video cable AN-D1H camerastrap*
BF-1A body cap
Attaching the Camera StrapAttach the strap securely to the two eyelets on the camera body as shown below.
Getting to Know the Camera (continued)
* The camera strap contains leather, which may fade if abraded or left in contact with a dampobject for an extended period.
Nikon View CD Reference CD(contains Nikon ViewReference Manual)
D1H User’s Manual(this manual)
CD-ROM CD-RO
MC
D-ROMCD-ROMC
D-R
OM
CD-ROM CD-RO
MC
D-ROMCD-ROMC
D-R
OM
En
User's Manual

13
GE
TT
ING
STA
RT
ED
—G
ET
TIN
G T
O K
NO
W T
HE
CA
ME
RA
The Mode Dial
To select the operating mode, press the mode-dial lock but-ton and turn the mode dial to the desired setting.
Mode Description
pg. 103Self-timerUse this mode to reduce blurring caused by camera shake orto appear in photographs you take yourself.
pg. 52C
ContinuousPhotographs are taken one after the other while the shutter-release button is held down.
pg. 52S
Single-frameThe camera takes one photograph each time the shutter-release button is pressed.
pg. 120PLAY
PlaybackThis mode is used when viewing and deleting photographsstored on the camera’s memory card.
pg. 148PC
PC modeThis mode is used when the camera is connected to a com-puter.

14
GE
TT
ING
STA
RT
ED
—G
ET
TIN
G T
O K
NO
W T
HE
CA
ME
RA
and view
pg. 64
pg. 66
pg. 62
press rotate
Choose a white-balance setting
Fine-tune white balance/select a preset value for whitebalance
Set sensitivity (ISO equivalency)
To
Buttons and Command Dials
The main- and sub-command dials are used in combination with the buttons on thetop and rear of the camera to adjust a variety of settings. For ease of access whentaking photographs in tall (portrait) orientation, a dial that duplicates the functions ofthe main command dial has been placed close to the shutter-release button forportrait-orientation photographs.
WH
ITE
BA
LA
NC
ES
EN
SIT
IVIT
Y
Getting to Know the Camera (continued)
ISO button
Auto-bracketing button
Flash sync mode button
FUNC button
Sub-command dial
Exposure compensationbutton
Exposure mode button
Main command dial
White-balance button
Thumbnail button
MENU button

15
GE
TT
ING
STA
RT
ED
—G
ET
TIN
G T
O K
NO
W T
HE
CA
ME
RA
To
Choose a combination of aper-ture and shutter speed (pro-grammed auto exposure mode)
Choose a shutter speed (shut-ter-priority auto or manual ex-posure mode)
Choose an aperture (aperture-priority auto or manual expo-sure mode)
Set or cancel auto bracketing
Choose the number of expo-sures and exposure compensa-tion for auto bracketing
Choose the exposure mode
Choose a value for exposurecompensation
rotate and view
EX
PO
SU
RE
Set the flash sync mode (whenusing optional Nikon Speedlight)
FL
AS
H
press
MODE
—
—
—
pp.84–93
pg. 85
pg. 86,pg. 90
pg. 88,pg. 90
pg. 100
pg. 100
pg. 98
pg. 110

16
GE
TT
ING
STA
RT
ED
—G
ET
TIN
G T
O K
NO
W T
HE
CA
ME
RA
Getting to Know the Camera (continued)
Press
Highlight menu itemsTo highlight menu items or options, press the multi selector up or down.
Select menu itemsPress the multi selector to the right to select the highlighted menu item oroption (note that some menus do not allow you to make a selection bypressing the multi selector to the right). Selecting a menu item will some-times display a new sub-menu of options.
Operation
Using the Multi Selector
Press the multi selector up, down, left, or right to perform the following operations.
Choose the focus areaTo select any of the five focus areas, press the multi selector up, down, left, orright.
Highlight thumbnailsTo highlight a thumbnail in the thumbnail display or in a thumbnail menu,press the multi selector up, down, left, or right.
Return to the previous menu without making selectionTo return to the previous menu without making a selection, press the multiselector to the left (note that you can not exit from some menus by pressingthe multi selector to the left).

17
GE
TT
ING
STA
RT
ED
—G
ET
TIN
G T
O K
NO
W T
HE
CA
ME
RA
Using the Camera Menus
Changes to a variety of settings can be made with the help of menus that appear inthe camera monitor. Four menus are available, each of which controls a differentaspect of camera operation.
Menu
Viewing the MenusWhen the camera is on, the menus can be displayed by pressing the button.
DeleteSlide ShowProtectHide ImagePrint SetFolder DesignateDisplay Mode
D1H
PLAYBACK MENU
Function
Press the button a second time to exit the menu. If any images have beenrecorded to the memory card, the most recent image will be displayed. In single-frame,continuous, self-timer, and PC modes, pressing the shutter-release button halfway clearsthe menu from the screen and focuses the camera, readying it for the next shot.
Exiting from the Menu
In single-frame, continuous, self-timer and PC modes, pressing the shutter-release button halfwayclears the menu from the screen and focuses the camera, readying it for the next shot. Themenu can be cleared from the screen in all modes by pressing the button or turning thecamera off and then on again. When the camera is in playback mode, the menu can also becleared from the screen by selecting another mode.
PLAYBACKAdvanced playback operations, such as automated play-back (“slide shows”), deleting multiple images, andchoosing the folder for playback.
pp. 186-187
SHOOTING
Advanced shooting options, such as image quality andAF-area mode. Many of these functions can also beaccessed using the buttons and command dials. Thismenu is not available in playback mode.
pp. 188-189
CUSTOM Fine details of camera operation. This menu is not avail-able in playback mode. pp. 155-185
SETUP Basic camera setup (e.g., formatting memory cards, set-ting the time and date). pp. 190-191

18
GE
TT
ING
STA
RT
ED
—G
ET
TIN
G T
O K
NO
W T
HE
CA
ME
RA
Changes to settings take effect as soon as a selection is made. To go back one stepwithout making a selection, press the multi selector to the left.
NTSCEn– –
– –OFF
2
SET UP MENUFormatLanguageVideo OutputDateGPS InputLCD BrightnessMonitor Off
OKDeEnFr
Es
Language
EnglishDeutsch
Français
Español
SET UP MENU
The Playback Menu
The playback menu can only be displayed when a memory card is inserted in the camera.
Some menu items may not be available while images are being recorded to the memory card.If the selector can not be pressed to the right then please use the button to put yourchoice into effect and return to the main menu.
FormatLanguageVideo OutputDateGPS InputLCD BrightnessMonitor Off
NTSCEn– –
– –OFF
2
SET UP MENU
NTSCEn– –
– –OFF
2
SET UP MENUFormatLanguageVideo OutputDateGPS InputLCD BrightnessMonitor Off
If you have already highlighted an item in the menu, press the multi selector to theleft so that no item is highlighted, and then select another menu as described above.
Making a SelectionPress the multi selector up or down to highlight a menu item, then press the selector to theright. If more options are available for the selected item, a sub-menu will be displayed; pressthe multi selector up or down to highlight the desired option, then press the selector to theright or press the button to put your choice into effect and return to the main menu.
Choosing a MenuWhen the mode dial is set to PLAY, pressing the button displays the playbackmenu. In single-frame, continuous, self-timer, and PC modes, the shooting menu will bedisplayed. Unlock the multi selector and press the multi selector up or down to displayadditional menus. Press the multi selector to the right to enter the selected menu.
Getting to Know the Camera (continued)

19
TUTORIAL
About This Section
In this section, you will learn how to set up your camera for use and master the basics of simple“point-and-shoot” photography.
• First Steps ..........pp. 20–31
• Taking Photographs................................. pp.32–50

20
TU
TO
RIA
L—
FIR
ST
ST
EP
S
First Steps
Before using your camera for the first time, you will need complete the steps shownbelow. More information on the topics covered in this section may be found in thechapters “Custom Settings and Other Menus” and “Technical Notes.”
TUTORIAL: FIRST STEPS
Inserting a Battery ............................................................. pp. 22–23
STEP 1
Attaching a Lens ................................................................ pp. 24–25
STEP 2
Inserting a Memory Card ................................................ pp. 26–27
STEP 3
Choosing a Language ........................................................ pp. 28–29
STEP 4Setting the Time and Date ............................................... pp. 30–31
STEP 5

21
TU
TO
RIA
L—
FIR
ST
ST
EP
S
SEE ALSO
• Technical Notes: Specifications ..................................... pp. 212–219
• Custom Settings and Other Menus ............................ pp. 155–191
• Technical Notes: Optional Accessories ...................... pp. 198–207
• Technical Notes: Optional Accessories ...................... pp. 198–207
• Caring for the Camera and Battery ............................ vi–vii
• Technical Notes: Optional Accessories ...................... pp. 198–207

TU
TO
RIA
L—
FIR
ST
ST
EP
S
22
STEP 1
1—Inserting a Battery
In this step, you will insert a battery and check the battery level. Your camera uses arechargeable nickel-metal hydride (NiMH) power source, the EN-4 battery pack,which is available from Nikon for separate purchase. Contact a Nikon-authorizedretailer or representative for information on purchasing EN-4 battery packs.
1.1 Charge the battery packCharge the EN-4 before use for the first time.To maximize shooting time, battery packs shouldbe fully charged before use. The EN-4 can becharged in about ninety minutes using theMH-16 Quick Charger (available separately).
1.2 Insert the battery packTurn the camera off before inserting or removing the battery pack (A). Openthe battery pack latch (B) and insert the battery pack into the camera (C).
Removing Battery Packs
To remove the battery pack from the camera, unlatch the battery pack and slide it out. Do notremove the battery without first turning the power off.
Battery Chargers for the EN-4
In addition to the MH-16, the EN-4 can be recharged using the MH-17 Quick Charger (whichplugs into vehicle cigarette lighters), the MH-15 Quick Charger for F100 film cameras, and theEH-3 Quick Charger for E3/E3s digital cameras.
For more information on:
pg. 202 Optional accessories
A B C
1.3 Latch the battery pack

TU
TO
RIA
L—
FIR
ST
ST
EP
S
23
STEP 1
1.4 Check the amount of charge remainingTurn the camera on (A) and confirm the battery level in the control panel ontop of the camera (B).
Battery fully charged
Low batteryReady a fully-charged spare battery pack (the metering indicator [ ,
, ] in the viewfinder will blink to warn that the battery is low, andthe display in the viewfinder will turn off to save power when no opera-tions are performed).
Battery exhaustedNo photographs can be taken until the battery has been replaced.
or Battery can no longer be usedBattery performance has dropped due to repeated use and recharging.No photographs can be taken until the battery has been replaced witha fully-charged spare battery pack.
A B
Auto Power Off
If no operations are performed for about six seconds, all indicators in the viewfinder and rearcontrol panel will turn off, together with the shutter-speed and aperture displays in the controlpanel on top of the camera. Press the shutter-release button halfway to reactivate the display.Note that when using the portrait-mode shutter-release button, you will need to unlock thebutton using the lock release.
15—Auto Meter-Off Delay ( pg. 168)
The time delay for automatic meter switch-off can be set to four, six, eight, or sixteen secondsusing Custom Setting 15.

TU
TO
RIA
L—
FIR
ST
ST
EP
S
24
2—Attaching a Lens
To take full advantage of the complete range of camera features, we recommendthat you use a type G or D AF Nikkor CPU lens.
When attaching or removing the body cap or lenses, care should be observed to prevent dirtor other foreign substances from entering the camera body. The presence of foreign bodiesinside the camera could affect your photographs. When changing lenses or replacing the bodycap, hold the camera with the base down or tilted so that the lens mount faces the ground. Besure to replace the body cap when no lens is in place.
For more information on:
pg. 198 Compatible lenses
STEP 2
A
B
2.1 Attach a lens to the camera bodyTurn the camera off before attaching or removinglenses (A). Keeping the mounting mark on thelens aligned with the mounting mark on the cam-era body, position the lens in the camera’s bayonetmount and then, being careful not to press thelens-release button, rotate the lens counter-clock-wise until it locks into place (B).
If no lens is attached, or if the lens mounted on thecamera is not a CPU lens, will appear in theaperture display in the viewfinder and the controlpanel on top of the camera when the camera isturned on. If the exposure mode is set to programmed auto or shutter-priority auto, the exposure-mode indicator will blink to warn that the camerawill in fact function as though set to aperture-priority auto.
CPU lenses have CPUcontacts.
Type G lens Type D lens

TU
TO
RIA
L—
FIR
ST
ST
EP
S
25
When No Lens Is in Place
When no lens is in place, cover the lens mount with the BF-1Abody cap supplied with the camera. If the lens mount is notcovered, dust may find its way onto the mirror or viewfinderscreen.
22—Aperture Setting ( pg. 173)
By default, aperture is set automatically by the camera or (when the exposure mode is set tomanual or aperture-priority auto) using the sub-command dial. Custom Setting 22 allowsaperture to be set manually using the lens aperture ring.
2.2 Set the lens aperture to the minimum settingYou will not need to perform this step if you areusing a type G lens (type G lenses are not equippedwith an aper ture ring). If you are using anothertype of lens, set the lens aperture to the highest f-number (minimum aperture). If you do not intendto set aperture manually with the lens aperturering, lock aperture at this setting (B).
If the lens is not set to the minimum aperture whenthe camera is turned on, a blinking indicatorwill be displayed in the viewfinder and in the con-trol panel on top of the camera. Photographs cannot be taken while this indicator is displayed.
STEP 2
Detaching the Lens
After confirming that the camera is off, turn the lens clockwisewhile holding down the lens-release button.
A
B
22
ft m
28
70
50
3528
8510
5
22

TU
TO
RIA
L—
FIR
ST
ST
EP
S
26
3—Inserting a Memory Card
In place of film, your Nikon digital camera uses CompactFlash memory cards tostore photographs. This step provides instructions on inserting and formatting memorycards. When purchasing memory cards for use in your camera, refer to the list ofapproved cards in “Technical Notes: Optional Accessories.”
3.1 Open the card slot coverBefore inserting or removing memory cards, be sure that the camera is off(A). Open the door protecting the card-slot cover release button (B1) andpress the card-slot cover release button (B2) to open the card slot (B3).
Do not attempt to insert the memory card upside down or back to front, or use force wheninserting the card. Failure to observe these precautions could damage the camera or card.
For more information on:
pg. 203 Approved memory cards
STEP 3
A
3.2 Insert the memory cardSlide the memory card into the card slot (A), stopping when the card termi-nals are fully inser ted in the connectors at the back of the slot. The cardshould be inserted with the label facing the ▲ CARD indicator at the en-trance to the card slot. After the card is fully inserted, fold the eject buttonover and close the cover (B).
BA
B

TU
TO
RIA
L—
FIR
ST
ST
EP
S
27
Memory cards may be hot after use. Observe due caution during removal.
Format the memory card
Memory cards must be formatted before first use. To format the memory card, turn thecamera on (A) and hold the buttons down together for more than two seconds (B) (toexit without formatting the card, press any other button). A blinking For (format) indicator willappear in the control panel on top of the camera (C). To format the memory card, press the
buttons a second time. Note that formatting memory cards permanently deletes anydata they may contain. Before formatting a card, be sure to make copies of data you would liketo keep.
STEP 3
A B
B C
When formatting is complete, the frame-number display in the control panel on top of thecamera will show 1, and the maximum number of shots that can be stored on the card atcurrent settings will be shown in both control panels (if more than a hundred exposures can bestored on the card, the display will show FL).
Removing the Memory Card
Memory cards can be removedwithout loss of data when the cam-era is off. Turn the camera off andconfirm that the access lamp is off.Do not attempt to remove the cardwhile the access lamp is on; failureto observe this precaution couldresult in loss of data or in damage to the camera or card. Open the card slot cover, stand theeject button up (A), and press it down (B1) to eject the card (B2).
Format ( pg. 143)
Memory cards can also be formatted using the Format option in the setup menu.
A

TU
TO
RIA
L—
FIR
ST
ST
EP
S
28
NTSCEn– –
– –OFF
2
SET UP MENUFormatLanguageVideo OutputDateGPS InputLCD BrightnessMonitor Off
4—Choosing a Language
Camera menus and messages can be displayed in English, French, German, Japanese,and Spanish. Before setting the time and date, choose a language for the cameramenus as described below.
4.1 Display the camera menusTurn the camera on (A) and press the button (B). The menu for thecurrent operating mode will be displayed in the monitor (C).
4.2 Display the SETUP menuUnlock the multi selector and press it up or down (A) until the SETUP menuis displayed (B).
4.3 Highlight LanguagePress the multi selector to the right to enter the SETUP menu, then press themulti selector down until the second item from the top is highlighted (de-pending on the language currently selected, the second item from the top willinclude the word Language or LANG).
STEP 4
A200
NORM
OFFOFF
White BalISO
Image Quality
Assign FUNCAF Area ModeFile No. Seq.Command Lock
SHOOTING MENUA B C
FormatLanguageVideo OutputDateGPS InputLCD BrightnessMonitor Off
NTSCEn– –
– –OFF
2
SET UP MENUA B

TU
TO
RIA
L—
FIR
ST
ST
EP
S
29
4.4 Choose a languagePress the multi selector to the right to display the Language menu, thenpress the multi selector up or down until the desired language is highlighted.Press the multi selector to the right to put your choice into effect and returnto the SETUP menu.
STEP 4
OKDeEnFr
Es
Language
EnglishDeutsch
Français
Español
SET UP MENU

TU
TO
RIA
L—
FIR
ST
ST
EP
S
30
5—Setting the Time and Date
The time and date is recorded whenever a photograph is taken. To ensure that thecorrect information is recorded, set the camera’s internal clock-calendar to the cur-rent time and date before using the camera for the first time.
5.1 Display the camera menusTurn the camera on (A) and press the button (B). The menu for thecurrent operating mode will be displayed in the monitor (C).
NTSCEn– –
– –OFF
2
FormatLanguageVideo Output
GPS InputLCD BrightnessMonitor Off
SET UP MENU
Date
5.2 Display the SETUP menuUnlock the multi selector and press it up or down (A) until the setup menu isdisplayed (B).
5.3 Display the Date menuPress the multi selector to the right to enter the setup menu, then press themulti selector up or down to highlight Date. Press the multi selector to theright to display the Date menu.
STEP 5
DeleteSlide ShowProtectHide ImagePrint SetFolder DesignateDisplay Mode
D1H
PLAYBACK MENUA B C
FormatLanguageVideo OutputDateGPS InputLCD BrightnessMonitor Off
NTSCEn– –
– –OFF
2
SET UP MENUA B

TU
TO
RIA
L—
FIR
ST
ST
EP
S
31
5.4 Edit the date and timeEdit the selected item by pressing the multi selector up or down. Press themulti selector to the right to highlight the year, month, date, hour, minute, orsecond in blue.
5.5 Exit the Date menuTo save changes to settings and return to the SETUP menu, press the button.
STEP 5
The Clock Battery
The clock-calendar is powered by an independent battery with a life of about ten years. Whenno charge remains, the clock battery indicator ( )will appear in the control panel on topof the camera. This will not affect camera operation, but the correct time and date will nolonger be displayed. Take the camera to a Nikon-authorized service center, where the batterycan be replaced for a fee.
The time and date can also be set using the BKT and buttons in combination with the maincommand dial. For details, see “Technical Notes: Specifications.”
2001 01
00 00
01
00
Date
Y M
H M
D
S
SET OKFUNCFUNC
SET UP MENU

32
TU
TO
RIA
L—
TAK
ING
PH
OT
OG
RA
PH
S
Checking Exposure .......................................................... pg. 46
STEP 4
Focusing .............................................................................. pp. 44–45
STEP 3
Framing a Photograph ..................................................... pg. 43
STEP 2
Adjusting Camera Settings ............................................. pp. 36–42
STEP 1
Taking Photographs
Now that you have set up your camera, you are ready to take photographs. Thissection describes how to take photographs using autofocus and programmed auto-exposure for “point-and-shoot” photography that produces optimal results in mostsituations, with no delay between shots to adjust camera settings. Additional infor-mation is available in the “Reference” section, as shown in the following chart.
TUTORIAL: TAKING PHOTOGRAPHS
Checking the Results ....................................................... pp. 48–50
STEP 6
Shooting .............................................................................. pg. 47
STEP 5

33
TU
TO
RIA
L—
TAK
ING
PH
OT
OG
RA
PH
S
SEE ALSO
• Operating Mode .. pp. 52–55 • Image Quality .... pp. 56–61• Sensitivity .............. pp. 62–63 • White Balance .. pp. 64–69• Focus ...................... pp. 70–81 • Metering ............. pp. 82–83• Exposure ............... pp. 84–102
• Depth-of-Field Preview .................................................. pg. 106
• Technical Notes: Optional Accessories ..................... pp. 198–207
• Focus ................................................................................. pp. 70–81• Depth-of-Field Preview .................................................. pg. 106• Focal Plane Position ....................................................... pg. 107
• Metering ............................................................................ pp. 82–83
• Exposure .......................................................................... pp. 84–102
• Self-Timer Modes ........................................................... pg. 103
• Playback Options ............................................................ pp. 120–121• Basic Playback .................................................................. pp. 122–133• Playback Menu Options ................................................ pp. 134–142

34
TU
TO
RIA
L—
TAK
ING
PH
OT
OG
RA
PH
S
0—Before You Begin
Before taking a photograph with a new camera, be sure you have completed thefollowing steps:
0.1 Turn the camera on and check the battery levelWhen the camera is turned on (A), the battery level is shown in the controlpanel on top of the camera (B). Check the battery level as described in Step 1of “First Steps” ( pg. 36).
A B
STEP 0
0.2 Check the number of exposures remainingThe number of photographs that can be stored on the memory card at cur-rent settings is shown in the top.
When this number reaches zero, the Cd (card) indicator in the viewfinderand the CARD icons in the top and rear control panels will blink. Before youwill be able to take more photographs, you will need to delete some photosor insert another memory card. You may also be able to take additionalphotographs at a different image-quality setting.

35
TU
TO
RIA
L—
TAK
ING
PH
OT
OG
RA
PH
S
Reset camera settings
When using the camera for the first time, you may want to clearchanges to camera and custom settings made by previous users.After turning the camera on, you can restore settings to defaultsby holding the and buttons down together for morethan two seconds (two-button reset). For more information onperforming a two-button reset, see “Custom Settings and OtherCamera Menus: Two-Button Reset” ( pg. 184).
Frame Count
The frame number shown in the frame count display in the control panel on top of the cameracorresponds to the number of photos in the current folder on the memory card. The framecount returns to 1 when a new folder is created.
35—Rear Control Panel Display ( pg. 183)
When Frame Count is selected for Custom Setting 35,the number of exposures remaining will also be shown inthe rear control panel.
STEP 0
0.3 Adjust viewfinder diopterYour Nikon camera is equipped with diopter ad-justment to accommodate individual differences invision. To adjust viewfinder diopter, pull the diopterknob out (1) and rotate it (2) until the focus brack-ets in the viewfinder are in sharp focus. Once youhave adjusted diopter to your satisfaction, push thediopter knob back into the body of the camera.
For more information on:
pg. 23 Checking the battery levelpg. 184 Resetting camera settingspg. 104 Adjusting viewfinder diopterpg. 140 Creating new folderspg. 129 Deleting imagespg. 56 Image quality
36
TU
TO
RIA
L—
TAK
ING
PH
OT
OG
RA
PH
S
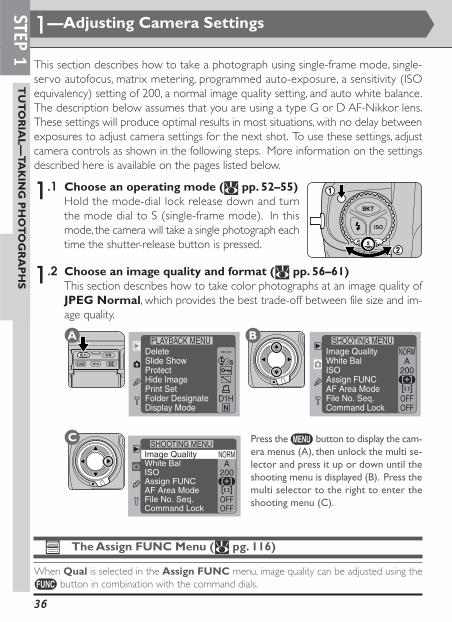
1—Adjusting Camera Settings
This section describes how to take a photograph using single-frame mode, single-servo autofocus, matrix metering, programmed auto-exposure, a sensitivity (ISOequivalency) setting of 200, a normal image quality setting, and auto white balance.The description below assumes that you are using a type G or D AF-Nikkor lens.These settings will produce optimal results in most situations, with no delay betweenexposures to adjust camera settings for the next shot. To use these settings, adjustcamera controls as shown in the following steps. More information on the settingsdescribed here is available on the pages listed below.
1.1 Choose an operating mode ( pp. 52–55)Hold the mode-dial lock release down and turnthe mode dial to S (single-frame mode). In thismode, the camera will take a single photograph eachtime the shutter-release button is pressed.
STEP 1
1.2 Choose an image quality and format ( pp. 56–61)This section describes how to take color photographs at an image quality ofJPEG Normal, which provides the best trade-off between file size and im-age quality.
The Assign FUNC Menu ( pg. 116)
When Qual is selected in the Assign FUNC menu, image quality can be adjusted using the button in combination with the command dials.
A BDeleteSlide ShowProtectHide ImagePrint SetFolder DesignateDisplay Mode
D1H
PLAYBACK MENU
A200
NORM
OFFOFF
White BalISO
Image Quality
Assign FUNCAF Area ModeFile No. Seq.Command Lock
SHOOTING MENU
Press the button to display the cam-era menus (A), then unlock the multi se-lector and press it up or down until theshooting menu is displayed (B). Press themulti selector to the right to enter theshooting menu (C).
C
White BalISO
Image Quality
Assign FUNCAF Area ModeFile No. Seq.Command Lock
A200
NORM
OFFOFF
SHOOTING MENU

37
TU
TO
RIA
L—
TAK
ING
PH
OT
OG
RA
PH
S
Image QualityQuality
HighJPEG FineJPEG Normal OKJPEG Basic
SHOOTING MENU
ColorQuality
Image Quality
NORM
SHOOTING MENU
Highlight Quality (F) and press the multi selector to the right to display the Qualitymenu (G).
G
STEP 1
Highlight Image Quality (D) and press the multi selector to the right to display theImage Quality menu (E).
Highlight JPEG Normal (H) and press the multi selector to the right to put yourchoice into effect and return to the Image Quality menu (I).
D E
F
H I
ColorQuality
Image Quality
NORM
SHOOTING MENU
White BalISO
Image Quality
Assign FUNCAF Area ModeFile No. Seq.Command Lock
A200
NORM
OFFOFF
SHOOTING MENU
ColorQuality
Image Quality
NORM
SHOOTING MENUImage QualityQuality
HighJPEG FineJPEG Normal OKJPEG Basic
SHOOTING MENU

38
TU
TO
RIA
L—
TAK
ING
PH
OT
OG
RA
PH
S
1—Adjusting Camera Settings (continued)
STEP 1
1.3 Adjust sensitivity (ISO equivalency) ( pp. 62–63)Holding the ISO button down (A), turn the main command dial (B) until 200is shown in the top and the rear control panel (C). This sets the sensitivity (thedigital equivalent of film speed) to a value roughly equivalent to ISO 200.
A B
Highlight Color (L) and press the multi selector to the right to put your choice intoeffect and return to the Image Quality menu (M). Press the button to return tothe shooting menu.
Repeat C–D to display the Image Quality menu, then highlight Color (J) and pressthe multi selector to the right to display the Color menu (K).
ColorQuality
Image Quality
NORM
SHOOTING MENU
ColorQuality
Image Quality
NORM
SHOOTING MENUL M
OK
Image QualityColor
Color
B&W
SHOOTING MENU
ColorQuality
Image Quality
NORM
SHOOTING MENUJ K
C

39
TU
TO
RIA
L—
TAK
ING
PH
OT
OG
RA
PH
S
1.4 Choose a white-balance setting ( pp. 64–69)Holding the button down (A), turn the main command dial (B) until A(auto white balance) is shown in the rear control panel (C). At this setting, thecamera will automatically adjust white balance to produce good results formost common light sources.
A B C
1.5 Choose a focus mode ( pp. 70–71)Turn the focus-mode selector until it clicks into placepointing to S (single-servo autofocus). The camerawill automatically focus on the subject in the se-lected focus area when the shutter-release buttonis pressed halfway. Photographs can only be takenwhen the camera is in focus. Do not attempt toadjust focus using the lens focusing ring.
STEP 1

40
TU
TO
RIA
L—
TAK
ING
PH
OT
OG
RA
PH
S
1—Adjusting Camera Settings (continued)
STEP 1
1.6 Choose the AF-area mode ( pp. 74–77)Set the AF-area mode to single-area AF using the shooting menu as describedbelow.
Highlight AF Area Mode (D) and press the multi selector to the right to display theAF Area Mode menu (E).
Highlight Single Area AF (F) and press the multi selector to the right to put yourchoice into effect and return to the shooting menu (G). Press the button toclear the menu from the monitor.
DeleteSlide ShowProtectHide ImagePrint SetFolder DesignateDisplay Mode
D1H
PLAYBACK MENU
OK
AF Area Mode
Dynamic Area AF
Single Area AF
SHOOTING MENU
A200
NORM
OFFOFF
White BalISO
Image Quality
Assign FUNCAF Area ModeFile No. Seq.Command Lock
SHOOTING MENU
A
A200
NORM
OFFOFF
White BalISO
Image Quality
Assign FUNCAF Area ModeFile No. Seq.Command Lock
SHOOTING MENUB
D E
A200
NORM
OFFOFF
White BalISO
Image Quality
Assign FUNCAF Area ModeFile No. Seq.Command Lock
SHOOTING MENU
OK
AF Area Mode
Dynamic Area AF
Single Area AF
SHOOTING MENUF G
Press the button to display the cam-era menus (A), then unlock the multi se-lector and press it up or down until theshooting menu is displayed (B). Press themulti selector to the right to enter theshooting menu (C).
C
White BalISO
Image Quality
Assign FUNCAF Area ModeFile No. Seq.Command Lock
A200
NORM
OFFOFF
SHOOTING MENU

41
TU
TO
RIA
L—
TAK
ING
PH
OT
OG
RA
PH
SSTEP 1
1.7 Select a focus area ( pg. 73)Unlock the multi selector (A) and press it up and down, left and right until thecenter focus area is selected in the viewfinder and the control panel on top ofthe camera (B). Return the multi selector lock to the locked position.
A B
1.8 Choose a metering method ( pp. 82–83)Keeping the metering-selector lock-release held down (A-1), turn the meter-ing selector to (matrix metering; A-2). The matrix-metering indicator willappear in the viewfinder (B). Matrix metering uses information from all areasof the frame to determine exposure, producing the best possible exposurefor the entire frame.
A B
The Assign FUNC Menu ( pg. 116)
When AF Area is selected in the Assign FUNC menu, AF-area mode can be adjusted usingthe button in combination with the main command dial.
42
TU
TO
RIA
L—
TAK
ING
PH
OT
OG
RA
PH
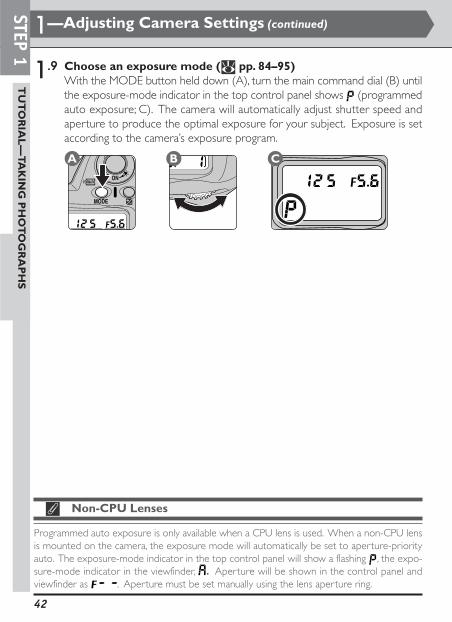
SSTEP 1
1.9 Choose an exposure mode ( pp. 84–95)With the MODE button held down (A), turn the main command dial (B) untilthe exposure-mode indicator in the top control panel shows (programmedauto exposure; C). The camera will automatically adjust shutter speed andaperture to produce the optimal exposure for your subject. Exposure is setaccording to the camera’s exposure program.
A B C
Non-CPU Lenses
Programmed auto exposure is only available when a CPU lens is used. When a non-CPU lensis mounted on the camera, the exposure mode will automatically be set to aperture-priorityauto. The exposure-mode indicator in the top control panel will show a flashing , the expo-sure-mode indicator in the viewfinder, . Aperture will be shown in the control panel andviewfinder as . Aperture must be set manually using the lens aperture ring.
1—Adjusting Camera Settings (continued)

43
TU
TO
RIA
L—
TAK
ING
PH
OT
OG
RA
PH
S2—Framing a Photograph
When framing photographs, hold the camera as shown below, with your elbowpropped lightly against your torso for support. Hold the hand-grip in your right handand cradle the camera or lens with your left. The shutter-release button for portraitphotographs can be used when the camera is in vertical shooting (B).
The recommended stance for taking photographs is with one foot a half-pace infront of the other and your upper body in a stable position.
A B
Avoid taking photographs with the camera focused on the sun or other strong light source.Intense light may cause deterioration in the charge-coupled device (CCD) that the camerauses in place of film. It may also produce a white blur effect in the final photograph.
Shutter Speed and Camera Shake
To prevent blurring caused by camera shake, the shutter speed should be faster than theinverse of the focal length of the lens, in seconds (for example, if the lens has a focal length of50 mm, shutter speed should be faster than 1/50 s). Use of a tripod is recommended whenshooting at slower shutter speeds.
STEP 2
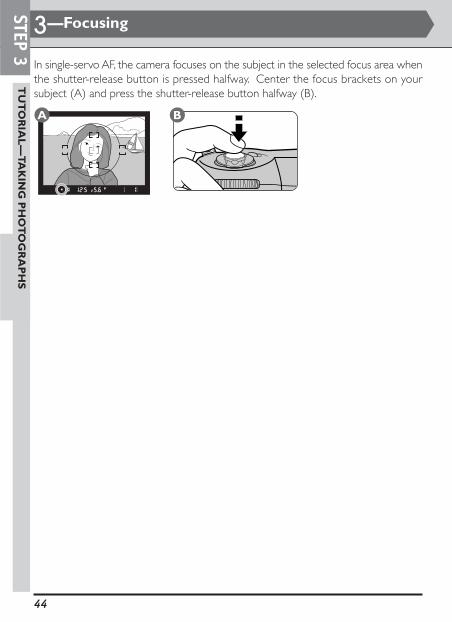
44
TU
TO
RIA
L—
TAK
ING
PH
OT
OG
RA
PH
S
3—Focusing
In single-servo AF, the camera focuses on the subject in the selected focus area whenthe shutter-release button is pressed halfway. Center the focus brackets on yoursubject (A) and press the shutter-release button halfway (B).
A B
STEP 3

45
TU
TO
RIA
L—
TAK
ING
PH
OT
OG
RA
PH
S
The camera will adjust focus automatically, and the results of the autofocus opera-tion will be displayed in the viewfinder.
Viewfinder Display
●
The viewfinder shows approximately 96% of the image actually exposed on the CCD. The areathat appears in the final photo will be slightly larger than the scene visible through the viewfinder.
For more information on:
pg. 73 Focus-area selectionpg. 78 Focus lockpg. 104 Viewfinder diopter
STEP 3
Meaning
The camera is focused on an area between camera andsubject.
The subject is in focus.
The camera is focused on an area behind the subject.
The focus indicator flashes to warn that the camera is unableto focus using autofocus. For more information on what todo when the camera can not focus using autofocus, see“Getting Good Results with Autofocus” ( pg. 80).

46
TU
TO
RIA
L—
TAK
ING
PH
OT
OG
RA
PH
S
4—Checking Exposure
When the shutter-release button is pressed halfway, thecamera will automatically adjust shutter speed and ap-erture for optimal results. Check the shutter speed andaperture indicators in the viewfinder before shooting. Ifthe photo will be over- or under-exposed, one of thefollowing indicators will appear in the viewfinder and inthe control panel on top of the camera.
2—EV Steps for Exposure Control ( pg. 161)
By default, aper ture and shutter speed are shown in the smallest possible increments. UseCustom Setting 2 to change the size of the increments used when displaying aperture, shutterspeed, and exposure compensation.
Indicator
Lo
HI
STEP 4
Meaning
Photo will be underexposed. Use a flash.
Photo will be overexposed. Use a neutral density (ND) filter.

47
TU
TO
RIA
L—
TAK
ING
PH
OT
OG
RA
PH
S5—Shooting
Press the shutter-release button smoothly all the waydown to take a photograph.
While the photograph is being recorded to the memory card, the card access lampwill light. Do not eject the memory card, turn the camera off, remove the battery, orunplug the AC adapter (available separately) until the lamp has stopped blinking.Removing the card or cutting power in these circumstances could result in loss ofdata.
Your camera is equipped with a combined electronic (CCD) and mechanical shutter. Thisshutter operates on a different principle from the mechanical shutters found in film cameras.As a result, the interval between the sounds made by the shutter and mirror will not decreasepast a certain point, even at high shutter speeds.
1—Image Review ( pg. 161)
Using this setting, you can choose whether images are displayed automatically in the LCDmonitor while they are recorded to the memory card, or if images are only displayed when the
button is pressed.
STEP 5

48
TU
TO
RIA
L—
TAK
ING
PH
OT
OG
RA
PH
S
6—Checking the Results
Photographs stored on the memory card can be displayed at the touch of a button,even when the camera is not in playback mode. This allows the results of a photo-graph to be confirmed almost instantly. If you are not satisfied with the photograph,you can adjust settings and take another shot. Any shots you do not want to keepcan be deleted immediately.
6.1 Turn the monitor onPress the button to turn the monitor on (A). The most recent photo-graph will be displayed in the monitor (B).
A B
STEP 6The Button
If you press the button to turn the monitor on after taking a photograph, the most recentphotograph will be displayed. If you turned the monitor off with the menus displayed, however,the menus will be displayed when you next turn the monitor on.
18—Monitor Off Delay ( pg. 170)
By default, the monitor will turn off automatically to save power if no operations are performedfor twenty seconds. Custom Setting 18 can be used to adjust the length of time before themonitor turns off automatically.
If the memory card contains no photographs, the message, “No image in cur-rent folder” will be displayed. Press the button to turn the monitor off.
6.2 Select a photographTo view the other photographs in memory, press the multi selector up ordown. Press up to view photographs taken before the current photograph,down to view photographs taken after the current photograph. Keep themulti selector pressed to scroll rapidly to the desired frame number. When thelast photograph taken is selected, pressing the multi selector down will displaythe first photograph on the memory card. Pressing the selector up when thefirst image in memory is selected will display the most recent photograph.

49
TU
TO
RIA
L—
TAK
ING
PH
OT
OG
RA
PH
S
6.3 Zoom in on the selected photographTo zoom in on the selected thumbnail or on the photograph displayed insingle-frame review, press the button (A). The center por tion of thephotograph will be enlarged to fill the monitor (B).
To view other areas of the photo, press the multi selector. To cancel zoom andreturn to normal review, press the button a second time.
STEP 6
If the card contains multiple images, you may find it convenient to select theimage you wish to view from a menu of thumbnail images, rather than scroll-ing through the photos one frame at a time. Turn the main command dialwhile holding down the button to cycle through views as follows: single-frame ↔ four-thumbnail display ↔ nine-thumbnail display ↔ single-frame.
A
B
➔
For approximately two seconds after you press the button to zoom inon the image, or after you press the multi selector to scroll the image, athumbnail showing your current position in the image will appear in the bot-tom right corner of the display.

50
TU
TO
RIA
L—
TAK
ING
PH
OT
OG
RA
PH
S
6.5 Delete undesired photographsIn single-frame or thumbnail review, pressing the button (A) selects thecurrent image for deletion. A confirmation dialog will be displayed (B), press
a second time to delete the photograph and return to single-frame orthumbnail review. Pressing any other button cancels the delete operation,leaving the selected photograph untouched.
A
Delete Images?YES
B
6.6 Return to shooting modePressing the button at any time during review turns the monitor off andreturns the camera to shooting mode. Pressing the shutter-release buttonhalfway also turns the monitor off and readying it for the next shot.
STEP 6
6—Checking the Results (continued)
6.4 View photo information on the selected photographTo view photo information on an image displayed in single-frame review, pressthe multi selector right or left (to learn more about the photo informationdisplay, see “Reference: Playback”).
A B

51
REFERENCE
About This Section
This section covers details of photography, playback, and connecting your camera to a com-puter.
• Advanced Photography..........................pp. 52–119
• Playback ................ pp. 120–147
• Connecting to a Computer.................................... pp. 148–154

52
Shooting Speed (Continuous Mode)
The rate of approximately five frames per second quoted above is the average obtained at atemperature of 20 °C (68 °F) using continuous-servo AF, manual exposure, a shutter speed of1/250 s or faster, and an aperture smaller than the maximum aperture.
Shooting Modes
Using the mode dial, you can choose between single-frame, continuous, and self-timer modes.
To choose an operating mode, press the mode-dial lock but-ton and turn the mode dial to the desired setting.
AD
VA
NC
ED
PH
OT
OG
RA
PH
Y—
SH
OO
TIN
G M
OD
ES
Mode Description
CContinuous
Photographs are taken at a maximum rate of approximately five framesper second while the shutter-release button is held down. Photographsare stored in a temporary memory buffer, which can hold a maximum offorty photographs. Additional photographs can be taken as soon as suf-ficient memory is available in the buffer. A maximum of forty photo-graphs (or twenty-seven images at an image-quality setting of RAW) canbe taken before the buffer fills.
Self-timerUse this mode to reduce blurring caused by camera shake or to appearin photographs you take yourself.
SSingle-frame
The camera takes one photograph each time the shutter-release buttonis pressed. The card access lamp will light while photographs are beingrecorded to the memory card. While photographs are being saved, anynew photographs will be stored in a temporary memory buffer beforebeing saved to the card. When this buffer is full, the shutter release willbe disabled until enough memory is available in the buffer for the nextphotograph.
The following modes are available for shooting photographs:

53
AD
VA
NC
ED
PH
OT
OG
RA
PH
Y—
SH
OO
TIN
G M
OD
ES
Remaining Exposures (Continuous Mode)
When the shutter-release button is pressed halfway in continu-ous mode, the number of consecutive photographs that can betaken before the buffer fills is displayed in the control panel ontop of the camera. This indicator shows forty when the buffer isempty, and is reduced by one for each photograph in the buffer.Note that depending on the amount of memory remaining onthe memory card, the maximum number of photographs thatcan be taken in a single sequence may be less than forty. Insingle-frame mode, this indicator shows the number of expo-sures remaining.

54
Turning the Camera Off
Do not remove the memory card from the camera while images are being transferred from thebuffer to the card (if the buffer contains forty photographs, at least 55 seconds will be required).Failure to observe this precaution could result in loss of data or in damage to the camera or thecard. If power switch is turned to the off position while data remain in the buffer, the camerawill turn off once the image that is currently being written to the card has been saved. Anyother images remaining in the buffer will be lost. If the battery is exhausted while photo-graphs are being shot in continuous mode, the shutter release will be disabled and all photo-graphs in the buffer will be recorded to the memory card.
The length of time required to record photographs to a Nikon EC-96CF (96-MB) CompactFlashcard is shown in the following table:
Shooting Modes (continued)
*The rate at which images are recorded varies with the make of memory card used.
AD
VA
NC
ED
PH
OT
OG
RA
PH
Y—
SH
OO
TIN
G M
OD
ES
JPEG (1 : 4)
JPEG (1 : 8)
File format
JPEG (1 : 16)
High
JPEG Fine
JPEG Normal
JPEG Basic
Image quality
RGB-TIFF
YCbCr-TIFF
RAW (uncompressed)
RAW (compressed)
Approximaterecording time
230 s (17 frames)
235 s (12 frames)
235 s (23 frames)
180 s (23 frames)
130 s (40 frames)
85 s (40 frames)
55 s (40 frames)
55
25—C-Mode Shooting Speed ( pg. 176)
The rate the camera takes photographs in continuous mode can be adjusted using CustomSetting 25.
26—C-Mode Max Shots ( pg. 176)
Using Custom Setting 26, the maximum number of shots that can be taken in a single sequencein continuous mode can be set to any value between one and for ty (or between one andtwenty-seven in RAW mode).
AD
VA
NC
ED
PH
OT
OG
RA
PH
Y—
SH
OO
TIN
G M
OD
ES

56
Image Quality
The image quality setting controls image quality and image format, which includesimage type (color or black-and-white).
Image quality settings can be chosen from the image-qualitysub-menu, which can be displayed by highlighting ImageQuality in the shooting menu and pressing the multi selec-tor to the right.
AD
VA
NC
ED
PH
OT
OG
RA
PH
Y—
IMA
GE
QU
AL
ITY
Image QualityQuality/High
YCbCrRGB OKNEF (RAW)
SHOOTING MENU
ColorQuality
Image Quality
NORM
SHOOTING MENU
Image QualityQuality
HighJPEG FineJPEG Normal OKJPEG Basic
SHOOTING MENU
The following options are available:
Option Description
Color Choose whether images will be recorded in color or in black-and-white.
Quality
Choose the amount photographs will be compressed. Four options areavailable: High, JPEG Fine, JPEG Normal, and JPEG Basic. Selecting Highgives you a further choice of two or (depending on the option selectedin Custom Setting 28) three file formats: YCbCr-TIFF, RGB-TIFF, and RAW.
Choosing the Compression Ratio
Highlighting Quality in the image-quality menu and pressingthe multi selector to the right displays a menu of image qual-ity (compression ratio) settings.
The Quality menu contains the options listed below.
HighHighlighting High in the image-quality menu and pressingthe multi selector to the right displays a menu of file-formatoptions. HI-quality images can be stored as uncompressedTIFF or RAW data or (depending on the option selectedusing Custom Setting 28) as RAW data compressed using a“lossless” algorithm that has no effect on image quality.
For more information on:
pg. 188 The shooting menu

57
AD
VA
NC
ED
PH
OT
OG
RA
PH
Y—
IMA
GE
QU
AL
ITY
Option Description
RGBImages are saved in uncompressed RGB-TIFF. This file format is sup-ported in a wide variety of imaging applications.
NEF (RAW)Raw 12-bit data from the CCD are saved directly to the memory card inNikon Electronic Image Format (NEF). Files of this type can only beviewed using Nikon View or Nikon Capture 3.
YCbCr
Images are saved in uncompressed YCbCr-TIFF format, where the pic-ture data is represented in one luminence (Y) and two color channels(Cb and Cr). The two color channnels occupy the same space as theluminance channnel and the file size is therefore two-thirds of the sizeof an RGB-TIFF file. YCbCr is a more efficient mode of image represen-tation than RGB and has the same quality but occupies less space. UseYCbCr if seeking the best combination of high quality and lowest filesize in an uncompressed finished file. This file type can be viewed usingNikon View or Nikon Capture 3.
JPEG FineImages are JPEG-compressed at a ratio of approximately 1 : 4.
JPEG NormalImages are JPEG-compressed at a ratio of approximately 1 : 8.
JPEG BasicImages are JPEG-compressed at a ratio of approximately 1 : 16.
After highlighting an image-quality or file-format option, press the multi selector tothe right to return to the Image Quality menu. Press the button to return tothe shooting menu.
28—NEF(RAW) Image Save ( pg. 178)
A setting of RAW is only available if Uncompressed or Compressed has been chosenfrom the NEF(RAW) Image Save menu (Custom Setting 28). If Compressed is chosen,RAW images will be compressed from fifty to sixty percent.
The following options are available:

58
Image Quality (continued)
OK
Image QualityColor
Color
B&W
SHOOTING MENU
Choosing the Image Type
Highlighting Color in the image-quality menu and pressingthe multi selector to the right displays the menu of coloroptions shown at right. Highlight Color (for color images)or B&W (for black-and-white) by pressing the multi selec-tor up or down. Your choice will have no effect on the num-ber of images that can be recorded to the memory card. TheColor menu is not available at a setting of High > NEF (RAW).
Once you have chosen the image type, pressing the multi selector to the right willreturn you to the Image Quality menu.
Understanding the Image-Quality DisplayThe current image-quality setting is displayed in therear control panel as shown at right. An image-qual-ity setting of JPEG Normal is shown as NORM, a fileformat of YCbCr-TIFF as CbCr, and an image typeof black-and-white as B/W.
AD
VA
NC
ED
PH
OT
OG
RA
PH
Y—
IMA
GE
QU
AL
ITY
File formatImage quality
Image type (black-and-white images only)

59
AD
VA
NC
ED
PH
OT
OG
RA
PH
Y—
IMA
GE
QU
AL
ITY
JPEG (1 : 4)
JPEG (1 : 8)
Image Quality and File SizeThe approximate number of images that can be stored on a 96-MB memory card atdifferent combinations of image quality and file format is shown in the following table(image type has no effect on file size and hence bears no relation to the number ofimages that can be stored on a memory card).
File formatApprox. number of
images (96 MB card)*Approx.file size
5.0 MB 17
* The actual file size (and hence number of images that can be stored on the memorycard) JPEG-compressed image will depend on the particular subject and composition. Ingeneral the more detail present in an image, the larger the resulting JPEG file.
** Compressed fifty to sixty percent over RAW (uncompressed)† Although the number of exposures remaining shown in the control panels is the same as
for RAW (uncompressed), images are compressed as they are saved, with the result thata larger number of images can be stored on the memory card.
JPEG (1 : 16)
7.5 MB 12
23†
1.3 MB 66
640 KB 132
320 KB 265
3.8 MB
**
High
JPEG Fine
JPEG Normal
JPEG Basic
Image quality
RGB-TIFF
YCbCr-TIFF
RAW (uncompressed)
RAW (compressed)

60
Using the Button to Set Image QualityWhen Qual is chosen in the Assign FUNC sub-menu, image quality will be as-signed to the button, allowing you to adjust image quality without having toaccess the camera menus.
1Pressing the button (A), rotate the main command dial (B) until the desiredimage quality (compression ratio) setting is showing in the rear control panel (C).
A
AD
VA
NC
ED
PH
OT
OG
RA
PH
Y—
IMA
GE
QU
AL
ITY
For more information on:
pg. 116 The Assign FUNC sub-menupg. 8 The rear control panel display (image quality)
B C
A B C
2Pressing the button, rotate the sub-command dial until the desired combi-nation of file format (High image quality only) and image type is shown in the rearcontrol panel.
As the main command dial is rotated, settings will change in the order shownbelow (an image quality of JPEG Normal appears in the rear control panel asNORM).
HI FINE NORM BASIC
Image Quality (continued)

61
AD
VA
NC
ED
PH
OT
OG
RA
PH
Y—
IMA
GE
QU
AL
ITY
RAW
An image type of black-and-white is shown in the rear control panel as B/W. Ifno indicator appears, the image type is color.
As the sub-command dial is rotated, image format settings—file format (Highimage quality only) and image type—will change in the order shown below (a fileformat of YCbCr-TIFF is shown in the rear control panel as CbCr).
Image File Names
Photographs taken with cameras in the D1 series are saved as image files with a file name of theform “DSC_nnnn.xxx”, where “nnnn” is a four-digit number from 0001 to 9999 assigned auto-matically by the camera and “xxx” is a three letter extension (“NEF” for RAW images, “TIF” forRGB-TIFF or YCbCr-TIFF, and “JPG” for JPEG images created at settings of JPEG Fine, JPEGNormal, or JPEG Basic).
28—NEF(RAW) Image Save ( pg. 178)
A setting of RAW is only available if Uncompressed or Compressed has been chosenfrom the NEF(RAW) Image Save menu (Custom Setting 28).
RGBRGBB/W CbCr
CbCrB/W
HIGH Image Quality
No indicator(Color)
B/W
FINE, NORMAL, BASIC Image Quality

62
Sensitivity (ISO Equivalency)
If desired, sensitivity can be altered from the default setting, which is roughly equiva-lent to ISO 200. Sensitivity can be raised to take photographs in poor light.
Adjusting Sensitivity with the ButtonThe sensitivity (ISO equivalency) setting can be adjusted by pressing the ISO button(A) and rotating the main command dial (B). The current sensitivity setting is shownin the top and the rear control panel (C) while the ISO button is pressed.
AD
VA
NC
ED
PH
OT
OG
RA
PH
Y—
SE
NS
ITIV
ITY
(ISO
EQ
UIV
AL
EN
CY
)
OK
ISO
200250320400500
SHOOTING MENU
A B
As the main command dial is rotated, settings will change in the order shown below.
For more information on:
pg. 188 The shooting menu
Adjusting Sensitivity from the Shooting MenuSensitivity can also be set to ISO equivalents of approximatelyISO 200 to ISO 1600 using the ISO option in the shootingmenu. In the shooting menu, highlight ISO and press themulti selector to the right to display a menu of sensitivitysettings. Press the multi selector up or down to highlight thedesired setting, then press the selector to the right to putyour choice into effect and return to the shooting menu.
C

63
AD
VA
NC
ED
PH
OT
OG
RA
PH
Y—
SE
NS
ITIV
ITY
(ISO
EQ
UIV
AL
EN
CY
)
1/2-step increments
1-step increments
Increased Sensitivity Settings
Note that raising sensitivity increases the amount of “noise” visible in the final photograph.
20—ISO Step Value ( pg. 172)
By default, adjustments to sensitivity are made in increments equivalent to 1/3 EV (1/3 step).Custom Setting 20 can be used to set the size of the increments to 1/2 or 1 step.
Sensitivity raised by roughly twosteps (2 EV) over ISO 1600
Sensitivity raised by roughly onestep (1 EV) over ISO 1600
If possible, the current value for sensitivity is maintained when a new ISO step value is selected.If the value currently selected for sensitivity is not available at the new ISO step value, sensitivitywill be rounded up to the nearest available setting.
31—ISO Boost ( pg. 180)
Sensitivity can be raised by roughly one or two steps over ISO 1600 equivalent. If ISO isselected for Custom Setting 35, or if the ISO button is pressed when Frame Count is se-lected, the rear control panel will show (sensitivity increased by approximately one stepover ISO 1600 equivalent) or (sensitivity increased by approximately two steps overISO 1600 equivalent).

64
White Balance
Although the color of light reflected by an object varies with the color of the lightsource, the human brain is able to adapt to changes in lighting, ensuring that we seewhite objects as white under most lighting conditions. A digital camera is able tomimic this adjustment so that colors that appear white to the human eye also appearwhite in your photographs. This adjustment is known as “white balance.”
To choose a white balance setting for the current light source, press the button(A) and rotate the main command dial (B). The current white balance setting will bedisplayed in the rear control panel (C) while the button is pressed.
AD
VA
NC
ED
PH
OT
OG
RA
PH
Y—
WH
ITE
BA
LA
NC
E
A B C
As the main command dial is rotated, settings will change in the order shown below.
A PRE
AAuto
Incandescent
Fluorescent
Direct sunlight
Flash
Cloudy
Shade
PREPreset
Setting
4,200–7,000 K(approx.)
3,000 K(approx.)
4,200 K(approx.)
5,200 K(approx.)
5,400 K(approx.)
6,000 K(approx.)
8,000 K(approx.)
—
Color temp.
White balance adjustment based on color tempera-ture information from a 1,005-pixel CCD sensor.
Use when taking photographs indoors under incan-descent light.
Use when taking photographs indoors under fluores-cent light.
Use this setting when taking photographs in direct sun-light (daylight).
Use this setting with Nikon Speedlights. With otherflashes, use preset white balance.
Use when taking photographs under overcast skies(daylight).
Use when taking photographs in the shade under sunnyskies (daylight).
Use this setting to match white balance to the lightsource. The camera can store up to three settings.
Description

65
AD
VA
NC
ED
PH
OT
OG
RA
PH
Y—
WH
ITE
BA
LA
NC
E
Auto white balance (A) can be used with most common light sources. To matchwhite balance to a specific light source, select the appropriate setting from the listabove. If desired, these white-balance settings (with the exception of preset whitebalance) can be fine tuned to match a particular light source ( pg. 66). Alterna-tively, preset white balance ( pg. 67) can be used to set white balance to a mea-sured value.
Auto White Balance
Auto white balance is adjusted when the shutter-release button is pressed halfway. If you pressthe shutter-release button all the way down in a single motion, white balance for the firstphotograph may not accurately match the light source.
White Balance Measurements
White-balance measurements are performed using a through-the-lens metering system. Evenif the subject and camera are under different lighting, the camera will be able to adjust whitebalance to suit the subject when auto or preset white balance is used.
Color Temperature
The perceived color of a light source varies with the viewer and other conditions. Colortemperature is an objective measure of the color of a light source, defined with reference tothe temperature to which an object would have to be heated to radiate light in the samewavelengths. While light sources with a color temperature in the neighborhood of 5,000–5,500°K appear to be white, light sources with a lower color temperature, such as incandescentlight bulbs, appear to be slightly yellow or red. Light sources with a higher color temperatureseem to be tinged with blue.

66
White Balance (continued)
AD
VA
NC
ED
PH
OT
OG
RA
PH
Y—
WH
ITE
BA
LA
NC
E
Fine-Tuning White Balance
At settings other than PRE (preset), white balance can be fine-tuned by pressing the button (A) and rotating the sub-command dial (B). Adjustments of from –3 to
+3 can be made in increments of one.
A B C
White Bal
AutoIncandescentFluorescentDirect SunlightFlash
SHOOTING MENU
00 OK
White BalFine Tune WB
SHOOTING MENU
Lowering white balance gives images a reddish cast, while raising white balance givesimages a bluish cast. At settings other than ±0, a indicator appears in the rearcontrol panel display.
Adjusting White Balance from the Shooting Menu
White balance can adjusted using the White Bal option inthe shooting menu. In the shooting menu, highlight WhiteBal and press the multi selector to the right to display thewhite-balance menu. Press the multi selector up or down tohighlight the desired setting.
Except in the case of WB Preset (preset white balance),highlighting a white balance setting and pressing the multiselector to the right displays a dialog where you can fine-tunethe chosen setting. Press the multi selector up or down tochoose the amount white balance will be adjusted, then pressthe multi selector to the right to put your selection into ef-fect and return to the shooting menu.
For more information on:
pg. 188 The shooting menu

67
AD
VA
NC
ED
PH
OT
OG
RA
PH
Y—
WH
ITE
BA
LA
NC
E
White Bal
AutoIncandescentFluorescentDirect SunlightFlash
SHOOTING MENU
OK
White BalSHOOTING MENU
WB Preset
SetPreset-1Preset-2Preset-3
Preset White Balance
Preset white balance is useful when taking photographs with colored light sourcesand under other unusual lighting conditions.
Recording a Preset White Balance Setting
1 In the shooting menu, highlight White Bal and press themulti selector to the right to display the white-balancemenu.
3Highlight Set and press the multi selector to the right.The message, “Please release the shutter” will be displayed.
Please releasethe shutter
SHOOTING MENUWhite BalWB Preset
2Highlight WB Preset and press the multi selector to theright. The menu shown at right will be displayed.

68
White Balance (continued)
AD
VA
NC
ED
PH
OT
OG
RA
PH
Y—
WH
ITE
BA
LA
NC
E
OK
Preset/Save to
Preset-1Preset-2Preset-3Repeat releaseCancel
SHOOTING MENU
4Under the lighting that will be used in the actual photograph, frame a white orneutral gray object so that it fills the viewfinder and then press the shutter-releasebutton all the way down. The shutter will be released and the measured value forwhite balance stored in camera memory, but no image will be recorded to thememory card.
Note that when performing this operation, it will be necessary to focus the cam-era using the lens focus ring in manual focusing mode. At a setting of single-servoautofocus, lack of contrast will prevent the camera from focusing on the targetobject and the shutter release will be disabled. Similarly, auto-exposure (expo-sure mode P, S, or A) should be used to prevent extreme over- or under-expo-sure that could interfere with an optimal white balance measurement. Whitebalance can also be set using manual exposure (exposure mode M); note, how-ever, that exposure settings that would produce extreme over- or under-expo-sure can prevent the camera from setting white balance.
5The menu shown at right will be displayed in the monitor.The measured value for preset white balance can be savedas your choice of Preset-1, Preset-2, or Preset-3; highlightthe desired option and press the multi selector to theright to record the white balance setting and return tothe shooting menu. Select Repeat release to measurewhite balance again, or Cancel to return to the shooting menu without savingthe new value for white balance.
Measuring White Balance
When measuring white balance under studio lighting, we recommend that a neutral gray objectbe used as the target. When using a white object, select a setting for exposure that wouldcause the object to appear gray when photographed to prevent mis-reading caused by overex-posure.

69
AD
VA
NC
ED
PH
OT
OG
RA
PH
Y—
WH
ITE
BA
LA
NC
E
OK
White BalSHOOTING MENU
WB Preset
SetPreset-1Preset-2Preset-3
Recalling Preset White Balance• Recalling preset white balance using the button
Choose a white-balance setting of Preset ( pg. 67), then press the WB button(A) and rotate the sub-command dial (B) until the desired setting is displayed inthe rear control panel (C).
A B C
A setting of is equivalent to Preset-1, to Preset-2, and to Pre-set-3.
• Recalling preset white balance from the shooting menuHighlight WB Preset in the white-balance menu andpress the multi selector to the right. The menu shown atright will be displayed; highlight the desired setting andpress the multi selector to the right to put your choiceinto effect and return to the shooting menu.

70
Autofocus
AD
VA
NC
ED
PH
OT
OG
RA
PH
Y—
AU
TO
FO
CU
S
For more information on:
pg. 81 Manual focus
The Focus-Mode Selector
When the focus mode selector (A) is set to S (single-servo autofocus) or C (con-tinuous-servo autofocus), the camera focuses automatically when the shutter-re-lease button is pressed halfway (B).
A B
When your subject is stationary, single-servo AF allows you to lock focus on thesubject by keeping the shutter-release button pressed halfway (or either of the AF-ON buttons pressed). The camera remains focused at the distance of the originalsubject as long as the shutter-release button is pressed halfway (or either or the AF-ON buttons held down), even if you re-frame the photograph so that the subject isno longer in the selected focus area. To ensure a sharp image, the shutter can only bereleased when the camera is in focus.
Continuous-servo AF can be used with moving subjects to allow the camera tocontinually reassess the distance to the subject in the focus area and adjust focus asnecessary. The shutter can be released even when the camera is not in focus (re-lease priority).
In both single-servo and continuous-servo AF, the focus target is selected from oneof five focus areas using the multi selector.
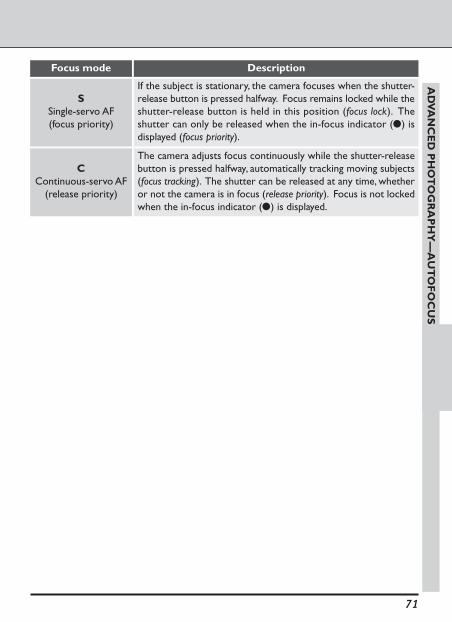
71
Focus mode Description
CContinuous-servo AF
(release priority)
The camera adjusts focus continuously while the shutter-releasebutton is pressed halfway, automatically tracking moving subjects(focus tracking). The shutter can be released at any time, whetheror not the camera is in focus (release priority). Focus is not lockedwhen the in-focus indicator (●) is displayed.
SSingle-servo AF(focus priority)
If the subject is stationary, the camera focuses when the shutter-release button is pressed halfway. Focus remains locked while theshutter-release button is held in this position (focus lock). Theshutter can only be released when the in-focus indicator (●) isdisplayed (focus priority).
AD
VA
NC
ED
PH
OT
OG
RA
PH
Y—
AU
TO
FO
CU
S

72
The AF-ON Buttons
An alternative means of activating autofocus is to press the AF-ON button (A) or,when the shutter-release button for vertical shooting is unlocked, the AF-ON buttonfor vertical shooting (B). Either operation has the same effect as pressing the shut-ter-release button halfway.
4—AF Activation ( pg. 162)
Using this setting, the camera can be programmed so that an autofocus operation can only beperformed using the AF-ON buttons to avoid accidental shutter release.
Autofocus (continued)
AD
VA
NC
ED
PH
OT
OG
RA
PH
Y—
AU
TO
FO
CU
S
A B

73
AD
VA
NC
ED
PH
OT
OG
RA
PH
Y—
FO
CU
S-A
RE
A S
EL
EC
TIO
N
The focus area can be fixed at the chosen setting by rotating the multi selector lockto the locked position.
The focus area can not be changed while images are displayed in the monitor.
Focus-area selection can be used with any type of viewfinder focusing screen.
6—Focus Area Select ( pg. 163)
At default settings, focus-area selection can only move from the center focus area to the fourouter focus areas and back, so that, for example, pressing the multi selector up when the topfocus area is selected has no effect. This can be changed so that focus area selection “wrapsaround,” allowing you to shift the focus area from top to bottom or from right to left withoutchanging the position of your finger on the multi selector.
For more information on:
pg. 78 Focus lock
Focus Area Selection
Your Nikon digital camera is equipped with five focus areas that together cover awide area of the frame. By choosing a focus area according to your composition andthe position of your subject, you can focus on an off-center subject without usingfocus lock.
Unlock the multi selector (A) and use it to choose a focus area. The selected focusarea is displayed in the control panel on top of the camera (B) and is briefly high-lighted in red in the viewfinder (C).
A B C

74
AF-Area Mode
When autofocus is in effect, you can select the AF-area mode depending on whetheryou want the camera to focus on the subject in a single focus area (single-area AF),or to follow the subject as it shifts from one focus area to the next (dynamic AF).
In single-area AF, the choice of focus area is in your hands. If your subject is movingerratically, or if you are experimenting with a variety of compositions, it may howeverbe difficult or impossible to select the focus area using the multi selector. In casessuch as these, dynamic AF can be used to give the camera control over selection ofa new focus point.
When dynamic AF is used with single-servo autofocus, the focus area can not beselected using the multi selector. Instead, the camera continually assesses the dis-tance to the objects in all five focus areas, and automatically chooses the focus areacontaining the object closest to the camera. This combination is useful when yoursubject is always positioned closest to the camera but you are trying out a number ofdifferent camera positions to find the best composition.
When dynamic AF is used in combination with continuous-servo autofocus, thecamera measures the distance to the subject in the selected focus area when theshutter-release button is pressed halfway to initiate autofocus. It will continue tofocus on this subject as it moves from one focus area to the next. The multi selectorcan be used at any time to choose a new focus area. This combination is useful whenyour subject is moving erratically and manual focus area selection is too slow orcumbersome.
Selecting the AF-Area Mode
In the shooting menu, highlight AF Area Mode and pressthe multi selector to the right. The menu shown at right willbe displayed. Highlight the desired option and press the multiselector to the right to put your choice into effect and returnto the shooting menu.
AD
VA
NC
ED
PH
OT
OG
RA
PH
Y—
AF
-AR
EA
MO
DE
OK
AF Area Mode
Dynamic Area AF
Single Area AF
SHOOTING MENU
For more information on:
pg. 188 The shooting menu

75
AD
VA
NC
ED
PH
OT
OG
RA
PH
Y—
AF
-AR
EA
MO
DE
The current AF-area mode is indicated by the display in the top control panel.
The following options are available:
Using the Button to Select the AF-Area ModeWhen AF Area is chosen in the Assign FUNC sub-menu, AF-area mode will beassigned to the button, allowing you to select the AF-area mode without ac-cessing the camera menus. Pressing the button (A), rotate the main commanddial (B) until the desired AF-area mode is showing in the control panel on top of thecamera (C).
A B C
DescriptionOptionIcon
When the autofocus system is initiated by pressingthe shutter-release button halfway or by pressing ei-ther of the AF-ON buttons, the camera focuses onthe subject in the active focus area. The camera thencontinuously scans all five focus areas to maintain fo-cus as the subject moves into other focus areas. Thismode is useful when it is difficult to predict wherethe subject will be at the moment of exposure. Un-less the focus area is changed using the multi selector,the focus area originally selected will be used as thefocus target the next time you initiate autofocus.
Dynamic Area AF
Single Area AFThe camera focuses on the subject in the selectedfocus area. This mode is effective when focusing onsubjects that are relatively motionless.

76
Closest-Subject Priority
Closest-subject priority is available when dynamic AF is selected. When this optionis in effect, the camera assesses the distance to the subjects in each of the five focusareas and selects the area containing the subject closest to the camera. It then tracksthis subject as it moves from one focus area to the next. As a result the cameramaintains focus on the target through to the time when the shutter-release button ispressed. Note that when the subject is poorly lit or a telephoto lens is used, thecamera may fail to select the focus area containing the subject closest to the camera.Single-area AF is recommended in these cases.
When closest-subject priority is in effect, no focus-area indicators are shown in theviewfinder or in the control panel on top of the camera.
Advanced Options for Dynamic AF
If desired, closest-subject priority can be deactivated when using dynamic AF with single-servoautofocus, allowing the multi selector to be used to select the focus area. Closest-subjectpriority can be activated when using dynamic AF with continuous-servo autofocus, causing thecamera to re-focus on the closest subject should it lose track of the original subject. Theseoptions are only recommended for advanced users who have made the necessary prepara-tions to allow them to take advantage of these combinations.
9—Dynamic AF, Single-Servo ( pg. 165)
In single-servo autofocus, the default setting for dynamic AF is closest-subject priority on. Toturn it off, use Custom Setting 9.
10—Dynamic AF, Continuous-Servo ( pg. 165)
In continuous-servo autofocus, the default setting for dynamic AF is closest-subject priority off.To turn it on, use Custom Setting 10.
For more information on:
pg. 116 The Assign FUNC sub-menu
AF-Area Mode (continued)
AD
VA
NC
ED
PH
OT
OG
RA
PH
Y—
AF
-AR
EA
MO
DE

77
The focus area can not be selected manually when closest-subject priority is in effect(in closest-subject priority, the camera selects the focus area automatically), and con-sequently focus area indicators are not displayed in the viewfinder or in the controlpanel on top of the camera. The relationship between AF-area mode and the focusarea display is shown in the following table.
Focus areaselection
Focusmode
AF-areamode
Closest-subjectpriority
Controlpanel
display
Focus areashown in
viewfinder?
Manual
S-AF
SingleArea AF
Yes
DynamicArea AF
No
Yes
Manual
C-AF
SingleArea AF
— Yes
Manual
DynamicArea AF
Off(default)
Yes
AutomaticOn (Custom Setting 10
set to ClosestSubject)
No
—
On(default)
Off (Custom Setting 9set to Select AF
Area)
Automatic
Manual
AD
VA
NC
ED
PH
OT
OG
RA
PH
Y—
AF
-AR
EA
MO
DE

78
Focus Lock
Focus lock can be used in combination with autofocus to focus on a subject that isnot in any of the five focus areas, or on other occasions when the camera would nototherwise be able to focus using autofocus ( pg. 80).
Focus lock differs depending on whether you are using single- or continuous-servoAF. Follow the steps below.
1Position the subject in the selected focus area (A) and press the shutter-releasebutton halfway (B).
AD
VA
NC
ED
PH
OT
OG
RA
PH
Y—
FO
CU
S L
OC
K
A B
2 Lock focus when the in-focus indicator (●) appears in the viewfinder.
• In single-servo autofocus:Once the in-focus indicator has appeared in theviewfinder, focus will lock when the shutter-re-lease button is pressed halfway, and remain lockedwhile the button is held in this position. Focuscan also be locked by pressing the AE-L/AF-L but-ton (see below).
• In continuous-servo autofocus:After the in-focus indicator appears in theviewfinder, press the AE-L/AF-L button to lock bothfocus and exposure. Focus will remain locked whilethe AE-L/AF-L button is pressed, even if you re-move your finger from the shutter-release button.
For more information on:
pg. 96 Auto-exposure lock
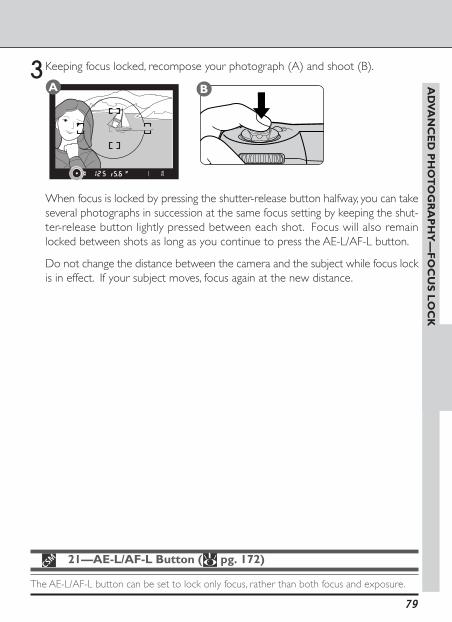
79
AD
VA
NC
ED
PH
OT
OG
RA
PH
Y—
FO
CU
S L
OC
K
3Keeping focus locked, recompose your photograph (A) and shoot (B).
A B
When focus is locked by pressing the shutter-release button halfway, you can takeseveral photographs in succession at the same focus setting by keeping the shut-ter-release button lightly pressed between each shot. Focus will also remainlocked between shots as long as you continue to press the AE-L/AF-L button.
Do not change the distance between the camera and the subject while focus lockis in effect. If your subject moves, focus again at the new distance.
21—AE-L/AF-L Button ( pg. 172)
The AE-L/AF-L button can be set to lock only focus, rather than both focus and exposure.

80
Getting Good Results with Autofocus
Autofocus does not perform well under the conditions listed below. In these casesyou can focus manually ( pg. 81) or use autofocus as detailed below.
The subject is poorly litUse a Speedlight with an AF-assist illuminator, such as theSB-28DX or SB-50DX (available separately) and select thecenter focus area.
AD
VA
NC
ED
PH
OT
OG
RA
PH
Y—
GE
TT
ING
GO
OD
RE
SU
LTS
WIT
H A
UT
OF
OC
US
The focus area contains regions of sharply differing brightnessThe camera may not be able to focus using autofocus when,for example, the subject is half in the shade. Use manualfocus ( pg. 81).
The subject is dominated by regular geometrical patternsRegular geometrical patterns—for example, a row of win-dows in a skyscraper—can interfere with autofocus. Usemanual focus ( pg. 81).
The focus area contains objects at different distances fromthe cameraFor example, autofocus may not perform well when thesubject is inside a cage. Use focus lock ( pg. 78) to focuson another subject at the same distance and then recom-pose your photograph.
There is little or no contrast between the subject and the back-groundLack of contrast—for example, a subject that is the samecolor as the background—can interfere with autofocus. Usefocus lock ( pg. 78) to focus on another subject at thesame distance and then recompose your photograph.

81
AD
VA
NC
ED
PH
OT
OG
RA
PH
Y—
MA
NU
AL
FO
CU
SManual Focus
Manual focus can be used with lenses that do not support autofocus (non-AF Nikkorlenses) or in situations in which autofocus will not produce the desired results.
Adjusting Focus in the ViewfinderTo use manual focus, turn the focus-mode selector (A) all the way to M and turn thelens focusing ring (B) until the image displayed on the clear matte field in the viewfinderis in focus. Photographs can be taken even when the in-focus indicator (●) does notappear in the viewfinder.
Using the Electronic Range FinderWhen a lens with a maximum aperture of f/5.6 orfaster is used in manual focus mode, the in-focus indi-cator (●) can be used to confirm focus in any of thefive focus areas. With the focus-mode selector set toM, press the shutter-release button halfway. Beforethe focus indicator in the viewfinder disappears, rotatethe lens focusing ring (A) until the in-focus indicator(●) is displayed in the viewfinder (B). If the indica-tor is displayed, the camera is focused on a point be-tween the camera and the subject. If the ndicatorappears, the camera is focused on a point behind thesubject.
A B
For more information on:
pg. 80 Getting good results with autofocuspg. 73 Focus-area selection
A
B

82
Metering
D1H offers a choice of three metering methods, which can be chosen according tohow your subject is lit. Note that depending on the lens used, some meteringmethods may not be available.
To choose a metering method, press the metering selectorlock release (1) while rotating the metering selector to thedesired setting (2).
AD
VA
NC
ED
PH
OT
OG
RA
PH
Y—
ME
TE
RIN
G
14—Center Weight Area ( pg. 168)
This option is used to set the size of the area assigned the greatest weight in center-weightedmetering to 6 mm (0.24˝), 10 mm (0.39˝), 13 mm (0.51˝), or to the average of the entire frame.
For more information on:
pg. 198 Compatible lenses

83
AD
VA
NC
ED
PH
OT
OG
RA
PH
Y—
ME
TE
RIN
G
The following options are available:
Method Description
3D color matrix/Color matrix
Metering is performed by a CCD sensor with 1,005 metering pixels(67 vertical, 15 horizontal), which sets exposure based on a variety ofinformation from all areas of the frame. This system demonstrates itseffectiveness most dramatically where bright (white or yellow) ordark (black or dark green) colors occupy most of the frame, when itproduces results approaching what is seen by the human eye. 3Dcolor matrix metering, which makes use of range information fromthe lens when adjusting exposure, is only available when a type G orD lens is used. When lenses of other types are attached, color matrixmetering is used. This setting is not recommended when using auto-exposure lock or exposure compensation; use center-weighted orspot metering instead.
Center-weighted
The camera measures light over the entire frame, but assigns thegreatest weight to a circular area in the center of the frame 8 mm(0.31˝) in diameter (use the 12 mm/0.47˝ circle in the center of theviewfinder as a reference for center-weighted metering).
Spot
The camera measures light in a circle 3 mm (0.12˝) in diameter cen-tered on the current focus area, occupying approximately two per-cent of the frame. Spot metering is recommended for backlit sub-jects, compositions that contains areas of high contrast, and otheroccasions when you want to limit metering to an area about the sizeof the focus brackets. Because metering is linked to the current focusarea, we recommend that you arrange your composition so that themain subject falls in one of the focus areas and then select that focusarea using the multi selector. Note, however, that when closest-sub-ject priority is used or a non-CPU lens attached, metering will beperformed in the center focus area only.
For more information on:
pg. 96 Auto-exposure lockpg. 98 Exposure compensationpg. 73 Focus area selectionpg. 76 Closest-subject priority

84
AD
VA
NC
ED
PH
OT
OG
RA
PH
Y—
EX
PO
SU
RE
MO
DE
Exposure Mode
D1H offers a choice of four manual exposure modes: programmed auto, shutter-priority auto, aperture-priority auto, and manual.
Programmed Auto
In programmed auto, the camera automatically adjusts shutter speed and apertureaccording to the exposure program (see opposite) to produce optimal results. Thisexposure mode is recommended for snapshots and other unplanned situations thatrequire a quick response. Programmed auto can also be used with program shift,auto bracketing ( pg. 100), and exposure compensation ( pg. 98) for moredemanding shooting situations. Programmed auto is only available with CPU lenses.
To take photographs in programmed auto:
1Pressing the MODE button, rotate the main commanddial until is displayed in the control panel on top of thecamera.
2 Frame a photograph and shoot.
Lens Aperture Ring
If the lens aperture ring has not been set to the minimum aperture, the viewfinder and controlpanel on top of the camera will show a blinking , and the shutter release will be disabled.This does not apply in the case of type G lenses, which do not have an aperture ring.
Non-CPU Lenses
If programmed auto is selected when a non-CPU lens is attached, the exposure mode willautomatically be set to aperture-priority auto (A). The aperture display in the viewfinder andthe control panel on top of the camera will show the in the control panel on top of thecamera will blink, and the exposure-mode display in the viewfinder will show to indicate thataperture must be set manually using the lens aperture ring.
Exposure Indicators
If the subject is too bright or too dark to allow correct exposure, one of the following indica-tors will appear in the viewfinder and the control panel on top of the camera:
Subject too bright; use an ND filter.
Subject too dark; use a flash.

85
AD
VA
NC
ED
PH
OT
OG
RA
PH
Y—
EX
PO
SU
RE
MO
DE
Flexible Program
Programmed auto offers multiple combinations of shutter speed and aperture, each of whichwill produce the correct exposure, giving you a degree of control over shutter speed andaperture while leaving the camera to set exposure. To choose a new combination of shutterspeed and aperture, rotate the command dial (A). While flexible program is in effect, anasterisk (“*”) will appear next to the exposure-mode indicator in the control panel on top ofthe camera (B). To restore the default shutter speed and aperture settings, rotate the com-mand dial until the asterisk is no longer displayed. Flexible program is also cancelled when thecamera is turned off or a two-button reset ( pg. 184) is performed.
Exposure Program
The following graph shows the exposure program for programmed auto.
A B
ISO 200, lens with maximum aperture of f/1.4 andminimum aperture of f/16 (e.g., AF 50 mm f/1.4D)
The maximum and minimum values for EV vary with sensitivity (ISO equivalency). Matrixmetering reduces to 171/3 any EV that exceeds 171/3 at a sensitivity of ISO 200 equivalent.
Aperture
-4 -3 12 13-2 -1 0 1 2 3 4 5 6 7 8 9 10 11
F1.4
F1
F2
F2.8
F4
F5.6
F8
F11
F16
F22
F3230" 15" 8" 4" 2" 1" 2 4 8 15 30 60 125 250 500 1000 2000 4000 8000 16000
22
2120
19
18
17
16
1514
[EV]
23
171 /3
Metering Range: EV 1–21
ISO 200, lens with maximum aperture of f/1.4 andminimum aperture of f/16 (e.g., AF 50 mm f/1.4D)
Shutter speed

86
AD
VA
NC
ED
PH
OT
OG
RA
PH
Y—
EX
PO
SU
RE
MO
DE
Exposure Mode (continued)
Shutter-Priority Auto
In shutter-priority auto, the user sets the shutter speed, while the camera automati-cally adjusts aperture to produce the optimal exposure. Shutter speed can be set tovalues between thirty and 1/16,000 seconds. Use high shutter speeds to “freeze”motion, low shutter speeds to blur moving objects. Shutter-priority auto is onlyavailable with CPU lenses.
To take photographs in shutter-priority auto:
1Pressing the MODE button, rotate the main commanddial until is displayed in the control panel on top ofthe camera.
Lens Aperture Ring
If the lens aperture ring has not been set to the minimum aperture, the viewfinder and controlpanel on top of the camera will show a blinking , and the shutter release will be disabled.This does not apply in the case of type G lenses, which do not have an aperture ring.
Non-CPU Lenses
If shutter-priority auto is selected when a non-CPU lens is attached, the exposure mode willautomatically be set to aperture-priority auto (A). The aperture display in the viewfinder andthe control panel on top of the camera will show , the in the control panel on top of thecamera will blink, and the exposure-mode display in the viewfinder will show to indicate thataperture must be set manually using the lens aperture ring.
3 Frame a photograph and shoot.
2Rotate the main command dial to choose a shutterspeed.

87
AD
VA
NC
ED
PH
OT
OG
RA
PH
Y—
EX
PO
SU
RE
MO
DE
Subject too bright; choose a faster shutter speed or use an ND filter.
Subject too dark; choose a lower shutter speed or use a flash.
Long Time-Exposures
Noise may appear in photographs taken at speeds of approximately one second or slower.
Exposure Indicators
If the subject is too bright or too dark to allow correct exposure, the electronic analog expo-sure display will flash and one of the following indicators will appear in the viewfinder and thecontrol panel on top of the camera:
Shutter-Speed Lock
Shutter speed can be locked at the selected setting ( pg. 94).
2—EV Steps for Exposure Control ( pg. 161)
By default, adjustments to shutter speed are made in increments equivalent to 1/3 EV (1/3 step).If desired, the size of the increments can be increased to 1/2 or 1 step.
12—Assign Command Dial ( pg. 166)
This setting can be used to reverse the roles of the command dials so that the main commanddial controls aperture while shutter speed is assigned to the sub-command dial.

88
AD
VA
NC
ED
PH
OT
OG
RA
PH
Y—
EX
PO
SU
RE
MO
DE
Exposure Mode (continued)
Aperture-Priority Auto
In aperture-priority auto, the user sets the aperture, while the camera automaticallyadjusts shutter speed to produce the optimal exposure. Small apertures (high f/-numbers) can be used to increase depth of field, bringing both the main subject andthe background into focus. Large apertures (low f/-numbers) soften backgrounddetails and allow more light into the camera, increasing the range of the flash andmaking photographs less susceptible to blurring.
To take photographs in aperture-priority auto:
1Pressing the MODE button, rotate the main commanddial until is displayed in the control panel on top ofthe camera.
Lens Aperture Ring
If the lens aperture ring has not been set to the minimum aperture, the viewfinder and controlpanel on top of the camera will show a blinking , and the shutter release will be disabled.This does not apply in the case of type G lenses, which do not have an aperture ring.
Non-CPU Lenses
If aperture-priority auto is selected when a non-CPU lens is attached, the aperture display inthe viewfinder and the control panel on top of the camera will show to indicate thataperture must be set manually using the lens aperture ring.
3 Frame a photograph and shoot.
2Rotate the sub-command dial to choose an aperturebetween the minimum and maximum values for thelens.
89
AD
VA
NC
ED
PH
OT
OG
RA
PH
Y—
EX
PO
SU
RE
MO
DE
Subject too bright; choose a higher f/-number or use an ND filter.
Subject too dark; choose a lower f/-number or use a flash.
Exposure Indicators
If the subject is too bright or too dark to allow correct exposure, the electronic analog expo-sure display will flash and one of the following indicators will appear in the viewfinder and thecontrol panel on top of the camera:
Aperture Lock
Aperture can be locked at the selected setting ( pg. 94).
2—EV Steps for Exposure Control ( pg. 161)
By default, adjustments to aperture are made in increments equivalent to 1/3 EV (1/3 step). Ifdesired, the size of the increments can be increased to 1/2 or 1 step.
12—Assign Command Dial ( pg. 166)
This setting can be used to reverse the roles of the command dials so that the main commanddial controls aperture while shutter speed is assigned to the sub-command dial.
22—Aperture Setting ( pg. 173)
Use this setting when you want to adjust aperture using the lens aperture ring. Note thataperture for type G lenses is always set using the command dials, regardless of the optionchosen for Custom Setting 22.

90
AD
VA
NC
ED
PH
OT
OG
RA
PH
Y—
EX
PO
SU
RE
MO
DE
Exposure Mode (continued)
Manual
In manual exposure, the user controls both aperture and shutter speed. The shuttercan be held open indefinitely for a long time-exposure (bulb) or shutter speed set toa fixed value between thirty and 1/16,000 seconds. Aperture can be set to valuesbetween the minimum and maximum for the lens. Using the electronic analog expo-sure display in the viewfinder or the control panel on top of the camera as yourguide, you can adjust exposure to suit shooting conditions and the task at hand.
To take photographs in manual exposure mode:
1Pressing the MODE button, rotate the main commanddial until is displayed in the control panel on top ofthe camera.
Lens Aperture Ring
If the lens aperture ring has not been set to the minimum aperture, the viewfinder and controlpanel on top of the camera will show a blinking , and the shutter release will be disabled.This does not apply in the case of type G lenses, which do not have an aperture ring.
Non-CPU Lenses
If aperture-priority auto is selected when a non-CPU lens is attached, the aperture display inthe viewfinder and the control panel on top of the camera will show to indicate thataperture must be set manually using the lens aperture ring.
Long Time-Exposures
At a shutter-speed setting of , the shutter will remain open as long as the shutter-release button is held down. Note that if the shutter is open for more than approximately onesecond at any setting, noise may appear in the final photograph.

91
AD
VA
NC
ED
PH
OT
OG
RA
PH
Y—
EX
PO
SU
RE
MO
DE
2Rotate the main command dial to choose a shutter speed (A). Aperture is set byrotating the sub-command dial (B).
A B
2—EV Steps for Exposure Control ( pg. 161)
By default, adjustments to aperture and shutter speed are made in increments equivalent to1/3 EV (1/3 step). If desired, the size of the increments can be increased to 1/2 or 1 step.

92
AD
VA
NC
ED
PH
OT
OG
RA
PH
Y—
EX
PO
SU
RE
MO
DE
3 Frame a photograph and shoot.
Exposure Mode (continued)
Check exposure in the electronic analog exposure displays in the viewfinder andin the control panel on top of the camera as shown below (the illustration belowshows the display that appears in the control panel on top of the camera). Adjustshutter speed and aperture until the desired exposure is achieved. If the limits ofthe camera’s metering system are exceeded, the electronic analog exposure dis-plays will flash.
Optimal exposure Optimal exposure Optimal exposure
Underexposed by 1/3 EV Underexposed by 1/2 EV Underexposed by 1 EV
Overexposed by morethan 2 EV
Overexposed by morethan 3 EV
Overexposed by morethan 3 EV
Custom Setting 2 (EVsteps for exposure
control) set to 1/3 Step
Custom Setting 2 (EVsteps for exposure
control) set to 1/2 Step
Custom Setting 2 (EVsteps for exposure
control) set to 1 Step

93
AD
VA
NC
ED
PH
OT
OG
RA
PH
Y—
EX
PO
SU
RE
MO
DE
AF Micro Nikkor Lenses
When the sub-command dial is used to set aperture, the exposure ratio need not be takeninto account provided that an external exposure meter is used. Compensation that takes theexposure ratio into account is only necessary when the lens aperture ring is used.
Shutter-Speed and Aperture Lock
Shutter-speed and aperture can be locked at the selected setting ( pg. 94).
12—Assign Command Dial ( pg. 166)
This setting can be used to reverse the roles of the command dials so that the main commanddial controls aperture while shutter speed is assigned to the sub-command dial.
22—Aperture Setting ( pg. 173)
Use this setting when you want to adjust aperture using the lens aperture ring. Note thataperture for type G lenses is always set using the command dials, regardless of the optionchosen for Custom Setting 22.

94
AD
VA
NC
ED
PH
OT
OG
RA
PH
Y—
EX
PO
SU
RE
MO
DE
Exposure Mode (continued)
Shutter-Speed and Aperture Lock
In shutter-priority auto and manual exposure modes, you can lock shutter speed atthe selected value. In aperture-priority auto and manual exposure modes, you canlock aperture at the selected f/-number. Lock is not available in programmed auto.For ease of access, you can assign lock to the button by selecting Lock in theAssign FUNC sub-menu of the shooting menu.
Shutter-Speed LockIf lock has been assigned to the button, shutter speed can be locked at theselected value by pressing the button (A) and rotating the main command dial(B) until the shutter-speed lock icons appear in the viewfinder and the control panelon top of the camera (C). To unlock shutter speed, press the button and rotatethe main command dial until the lock icons disappear from the displays.
Aperture LockIf lock has been assigned to the button, aperture can be locked at the selectedvalue by pressing the button (A) and rotating the sub-command dial (B) untilthe aperture lock icons appear in the viewfinder and the control panel on top of thecamera (C). To unlock aperture, press the button and rotate the sub-com-mand dial until the lock icons disappear from the displays.
A B C
A B C

95
AD
VA
NC
ED
PH
OT
OG
RA
PH
Y—
EX
PO
SU
RE
MO
DE
OK
Command Lock
OFFShutter-SpeedApertureBoth
SHOOTING MENU
The Command Lock MenuShutter-speed and aperture can also be locked from the com-mand-lock sub-menu. In the shooting menu, highlight Com-mand Lock and press the multi selector to the right todisplay command-lock options. Highlight the desired optionand press the multi selector to the right to put your choiceinto effect and return to the shooting menu.
The following options are available:
Option Description
Shutter-SpeedOnly shutter speed is locked. This option is not available in aper-ture-priority auto and programmed auto exposure modes.
ApertureOnly aperture is locked. This option is not available in shutter-priority auto and programmed auto exposure modes.
BothBoth shutter speed and aperture are locked. This option is onlyavailable in manual exposure mode.
OFF Locks that apply in the current exposure mode are released.
For more information on:
pg. 116 The Assign FUNC sub-menupg. 188 The shooting menu

96
AD
VA
NC
ED
PH
OT
OG
RA
PH
Y—
AU
TO
-EX
PO
SU
RE
LO
CK
Auto-Exposure Lock
Auto-exposure lock makes it possible to use spot or center-weighted metering tomeasure exposure for a subject that will not be in the metering area in the finalcomposition. With the subject positioned in the metering area, press the AE-L/AF-Lbutton to measure exposure. Exposure will be fixed at this setting while the buttonis pressed, allowing you to maintain the metered value for exposure while recom-posing the photograph.
To use auto-exposure lock:
1Press the metering selector lock release (1) and rotatethe metering selector (2) to select center-weighted orspot metering. Matrix metering, which measures expo-sure for the entire frame, will not produce the desiredresults when used with auto-exposure lock.
2After positioning the subject in the focus area (select the center focus area whenusing center-weighted metering), press the shutter-release button halfway andconfirm that the in-focus indicator (●) appears in the viewfinder (A). Keepingthe shutter-release button pressed halfway, press and hold the AE-L/AF-L button(B).
When spot metering is in effect, the camera measures exposure in the selectedfocus area (or in the center focus area when a non-CPU lens is in place or closestsubject priority is in effect). When center-weighted metering is selected, thecamera measures lighting conditions in the entire frame but assigns the greatestweight to an 8-mm circle in the center of the viewfinder.
Exposure will remain locked while the AE-L/AF-L button is pressed. In single-servo or continuous-servo autofocus, both focus and exposure will be lockedwhile the AE-L/AF-L button is pressed. While auto-exposure lock is in effect, anEL indicator will be displayed in the viewfinder.
A B

97
AD
VA
NC
ED
PH
OT
OG
RA
PH
Y—
AU
TO
-EX
PO
SU
RE
LO
CK
3With the AE-L/AF-L button held down, recompose your photograph (A) andshoot (B).
Adjusting Shutter Speed and Aperture
While auto-exposure lock is in effect, you can:
Exposure mode
Programmed auto
Operation
Choose a new combination of aperture and shutter speed us-ing flexible program ( pg. 84)
Shutter-priority auto Adjust shutter speed
Aperture-priority auto Adjust aperture
These operations will not affect the metered value for exposure. The adjusted values will bedisplayed in the viewfinder and the control panel on top of the camera.
Metering can not be adjusted while auto-exposure lock is in effect. Any changes to meteringwill only take effect after the AE-L/AF-L button is released.
7—AE Lock ( pg. 164)
This setting can be used to assign auto-exposure lock to the shutter-release button.
14—Center Weight Area ( pg. 168)
This option is used to set the size of the area assigned the greatest weight in center-weightedmetering to 6 mm (0.24˝), 10 mm (0.39˝), 13 mm (0.51˝), or to the average of the entire frame.
21—AE-L/AF-L Button ( pg. 172)
Using this option, the AE-L/AF-L button can be set to lock focus and exposure, focus only, orexposure only, or to lock exposure when pressed and maintain this setting until pressed asecond time or until the shutter is released.
A B
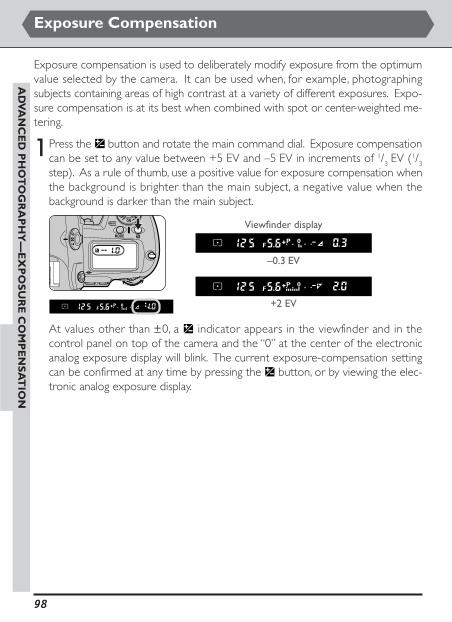
98
AD
VA
NC
ED
PH
OT
OG
RA
PH
Y—
EX
PO
SU
RE
CO
MP
EN
SA
TIO
N
Exposure Compensation
Exposure compensation is used to deliberately modify exposure from the optimumvalue selected by the camera. It can be used when, for example, photographingsubjects containing areas of high contrast at a variety of different exposures. Expo-sure compensation is at its best when combined with spot or center-weighted me-tering.
1Press the button and rotate the main command dial. Exposure compensationcan be set to any value between +5 EV and –5 EV in increments of 1/
3EV (1/
3
step). As a rule of thumb, use a positive value for exposure compensation whenthe background is brighter than the main subject, a negative value when thebackground is darker than the main subject.
Viewfinder display
–0.3 EV
+2 EV
At values other than ±0, a indicator appears in the viewfinder and in thecontrol panel on top of the camera and the “0” at the center of the electronicanalog exposure display will blink. The current exposure-compensation settingcan be confirmed at any time by pressing the button, or by viewing the elec-tronic analog exposure display.

99
AD
VA
NC
ED
PH
OT
OG
RA
PH
Y—
EX
PO
SU
RE
CO
MP
EN
SA
TIO
N
2—EV Steps for Exposure Control ( pg. 161)
This setting can be used to set the increments for exposure compensation to 1/2 or 1 step.
13—Easy Exposure Compensation ( pg. 167)
This setting can be used to allow exposure to be set with the command dials alone.
2 Frame the photograph, focus, and shoot.
Normal exposure can be restored by setting exposure compensation to zero, or byperforming a two-button reset. Exposure compensation is not reset when the cam-era is turned off.

100
AD
VA
NC
ED
PH
OT
OG
RA
PH
Y—
AU
TO
BR
AC
KE
TIN
G
Auto Bracketing
When auto bracketing is in effect, the camera varies exposure automatically witheach shot (to a maximum of three shots), raising or lowering exposure by a pre-determined amount (up to ±2 EV) relative to the value selected by the camera orchosen using exposure compensation. Auto bracketing is available in all exposuremodes.
1 Pressing the BKT button (A), ro-tate the main command dial un-til BKT is displayed in the con-trol panel on top of the camera(B).
2Pressing the BKT button (A), rotate the sub-command dial (B) to choose a brack-eting program (C).
The exposure settings affected by auto bracketing depend on the exposure mode.
Exposure mode Camera sets exposure by varying
Aperture-priority auto Shutter speed
Programmed auto Shutter speed and aperture
Shutter-priority auto Aperture
Manual Shutter speed
A B C
2—EV Steps for Exposure Control ( pg. 161)
This setting controls the size of the increments for auto bracketing.
11—AE/Flash Bracketing ( pg. 166)
If a Speedlight is used in combination with auto bracketing, both the flash level (TTL level forthe main subject) and exposure will vary with each shot. Using Custom Setting 11, you canprogram the camera so that bracketing affects only the flash level or only the exposure value.
A B

101
AD
VA
NC
ED
PH
OT
OG
RA
PH
Y—
AU
TO
BR
AC
KE
TIN
G
The bracketing programs available depend on the size of the EV steps selected usingCustom Setting 2.
Custom Setting 2 Set to 1/3 Step
OptionExposure
display
–2F1.0
–2F0.7
–2F0.3
+2F1.0
+2F0.7
+2F0.3
–3F1.0
–3F0.7
–3F0.3
+3F1.0
+3F0.7
+3F0.3
3F1.0
3F0.7
3F0.3
Custom Setting 2 Set to 1/2 Step
Option
–2F1.0
–2F0.5
+2F1.0
+2F0.5
–3F1.0
–3F0.5
+3F1.0
+3F0.5
3F1.0
3F0.5
Exposuredisplay
Bracketingorder
0 / –1.0
0 / –0.5
0 / +1.0
0 / +0.5
–1.0/ –2.0 /0
–0.5/ –1.0 /0
+1.0/ 0 /+2.0
+0.5/ 0 /+1.0
0/ –1.0 /+1.0
0/ –0.5 /+0.5
Bracketingorder
0 / –1.0
0 / –0.7
0 / –0.3
0 / +1.0
0 / +0.7
0 / +0.3
–1.0/ –2.0 /0
–0.7/ –1.3 /0
–0.3/ –0.7 /0
+1.0/ 0 /+2.0
+0.7/ 0 /+1.3
+0.3/ 0 /+0.7
0/ –1.0 /+1.0
0/ –0.7 /+0.7
0/ –0.3 /+0.3
Custom Setting 2 Set to 1 Step
Option
–2F1.0
+2F1.0
–3F1.0
+3F1.0
3F1.0
Exposuredisplay
Bracketingorder
0 / –1.0
0 / +1.0
–1.0/ –2.0 /0
+1.0/ 0 /+2.0
0/ –1.0 /+1.0

102
AD
VA
NC
ED
PH
OT
OG
RA
PH
Y—
AU
TO
BR
AC
KE
TIN
G
3To take the first photograph in the series, compose the photograph, focus, andshoot. If the shutter-release button is held down with the mode dial set to C(continuous mode), shooting will end automatically once the number of shotsspecified in the bracketing program (two or three) has been taken. In single-frame and self-timer modes, one photograph is taken each time the shutter-release button is fully pressed. To cancel bracketing before all photographs in theseries have been taken, press the BKT button and rotate the main command dialuntil BKT is no longer displayed in the control panel on top of the camera. Theprogram selected at the time auto bracketing was cancelled will be restored thenext time auto bracketing is used.
During shooting, the camera shows the modified values for shutter speed and aperture.
Bracketing can be combined with exposure compensation to produce compensation valuesgreater than +2.0 or less than –2.0 while bracketing is in effect.
If the camera is turned off before all photographs in the sequence have been taken, bracketingwill resume from the next shot in the sequence when the camera is turned on. If the memorycard fills up before all photographs in the sequence have been taken, shooting can be resumedfrom the next shot in the sequence after images have been deleted or a new memory cardinserted.
3—Bracketing Order ( pg. 162)
This setting can be used to change the bracketing order so that bracketing proceeds fromunderexposure to overexposure.
For more information on:
pg. 103 Using the self-timerpg. 98 Exposure compensation
Auto Bracketing (continued)

103
AD
VA
NC
ED
PH
OT
OG
RA
PH
Y—
SE
LF
-TIM
ER
MO
DE
Self-Timer Mode
The self-timer can be used to reduce camera shake or for self-portraits. The camerashould be placed on a stable, level surface; use of a tripod is recommended.
To take photographs using the self-timer:
1Press the mode dial lock release (1) and rotate the modedial (2) to select (self-timer mode).
2 Frame the photograph and focus. When using single-servo autofocus, confirmthat the in-focus indicator (●) is displayed in the viewfinder, as otherwise theshutter can not be released. If the exposure mode is not set to manual (M), closethe shutter that covers the viewfinder eyepiece (A) to prevent light enteringthrough the eyepiece from affecting auto-exposure. After focusing the camera,press the shutter-release button all the way down to start the self-timer (B). Theself-timer lamp on the front of the camera will start to blink (C), stopping ap-proximately two seconds before the shutter is released automatically to take thephotograph.A B C
Do not stand in front of the lens to start the timer when autofocus is in effect.
If the shutter speed is set to in self-timer mode, shutter speed will be set to approxi-mately 1/4 s.
To turn the self-timer off before a photograph is taken, turn the mode dial to another setting.
16—Self-timer Delay ( pg. 169)
Self-timer delay can be set to 10 (the default setting), 2, 5, or 20 seconds using this option.

104
AD
VA
NC
ED
PH
OT
OG
RA
PH
Y—
DIO
PT
ER
AD
JUS
TM
EN
T
Diopter Adjustment
The viewfinder is equipped with diopter adjustment to accommodate individualdifferences is vision.
To adjust viewfinder diopter, pull the diopter knob outand rotate it until the focus brackets in the viewfinderare in sharp focus. Diopter can be adjusted in the rangebetween –3 m–1 and +1 m–1. Corrective lenses (avail-able separately) allow diopters of –3 m–1 to +2 m–1.Once you have adjusted diopter to your satisfaction, pushthe diopter knob back into the body of the camera.
When operating the diopter knob, be careful to avoid injuring your eye with your finger orfingernail.
For more information on:
pg. 198 Optional accessories
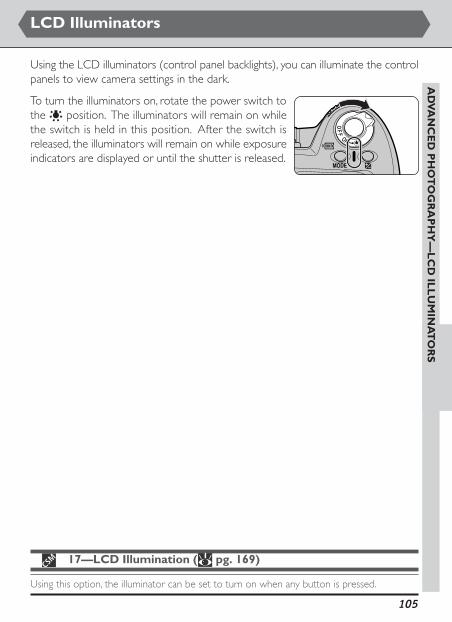
105
17—LCD Illumination ( pg. 169)
Using this option, the illuminator can be set to turn on when any button is pressed.
AD
VA
NC
ED
PH
OT
OG
RA
PH
Y—
LC
D IL
LU
MIN
AT
OR
SLCD Illuminators
Using the LCD illuminators (control panel backlights), you can illuminate the controlpanels to view camera settings in the dark.
To turn the illuminators on, rotate the power switch tothe position. The illuminators will remain on whilethe switch is held in this position. After the switch isreleased, the illuminators will remain on while exposureindicators are displayed or until the shutter is released.

106
AD
VA
NC
ED
PH
OT
OG
RA
PH
Y—
DE
PT
H-O
F-F
IEL
D P
RE
VIE
W
Depth-of-Field Preview
To check depth of field for the current aperture setting, press and hold the depth-of-field preview button.
The lens will be stopped down to the aperture selectedby the camera in programmed auto or shutter-priorityauto exposure modes, or to the value selected by theuser in aperture-priority or manual modes. The viewthrough the viewfinder provides an approximation ofthe depth of field that can be obtained at the currentaperture setting.

107
AD
VA
NC
ED
PH
OT
OG
RA
PH
Y—
FO
CA
L P
LA
NE
PO
SIT
ION
Focal Plane Position
The position of the focal plane inside the camera is indicated by a mark on thecamera body.
The distance between the camera and the subject shouldbe measured from this mark whenever distance is mea-sured manually. The distance between the lens mount-ing flange and the focal plane is 46.5 mm (1.83˝).

108
Through-the-Lens Flash Photography
To use TTL flash control, connect an SB-80DX, SB-50DX, or SB-28DX Speedlight tothe camera and set the flash to D-TTL auto-flash mode. Depending on the type oflens used, one or more of the following TTL flash modes will be available. TTL flashcontrol is available only with the SB-80DX, SB-50DX, and SB-28DX.
3D Multi-Sensor Balanced Fill-Flash for Digital SLRMulti-Sensor Balanced Fill-Flash for Digital SLRThis mode is available when a CPU Nikkor lens is attached. Based on informationfrom the matrix metering system, flash output is adjusted to maintain a balancebetween the main subject and ambient background lighting. When the shutter-release button is pressed, the Speedlight emits a series of nearly invisible preflashes(monitor preflashes) immediately before the shutter opens. The monitor preflashesare reflected from objects in all areas of the frame and picked up by the camera’sTTL multi sensor, where they are analyzed instantaneously in combination with infor-mation on the current sensitivity (ISO equivalency) setting, aperture, lens focal length,and exposure compensation value. The results of this analysis are used to balanceflash output with ambient light. When a type G or D lens is used, distance informa-tion is included in the calculation for still more precise flash control (3D multi-sensorbalanced fill flash).
Center-Weighted Fill-Flash for Digital SLRThis mode is used with non-CPU lenses. When a non-CPU lens is attached, thecamera automatically chooses center-weighted metering, allowing flash output to beroughly balanced with ambient lighting for the main subject and background. Thecamera may be unable to adjust exposure correctly if the frame includes a highlyreflective object, or if the background is non-reflective. Standard TTL flash control isrecommended in such cases. Standard TTL flash control is activated automaticallywhen spot metering is selected.
Standard TTL Flash for Digital SLRStandard TTL flash control is available with lenses of all types. Standard TTL flashcontrol does not take the brightness of the background into account, instead adjust-ing flash output to ensure that the main subject is correctly exposed. This makes itsuited to photographs in which the main subject is emphasized at the expense ofother details, or when exposure compensation is used. This mode is also activatedautomatically when spot metering is selected.
AD
VA
NC
ED
PH
OT
OG
RA
PH
Y—
TH
RO
UG
H-T
HE
-LE
NS
FL
AS
H P
HO
TO
GR
AP
HY

109
AD
VA
NC
ED
PH
OT
OG
RA
PH
Y—
FL
AS
H C
ON
TAC
TS
AN
D IN
DIC
AT
OR
SFlash Contacts and Indicators
Your Nikon digital camera is equipped with an accessory shoe for attaching Speed-lights directly to the camera and a sync terminal that allows Speedlights to be con-nected via a sync cable. When a Speedlight is connected, the flash-ready indicator inthe viewfinder shows whether the flash is fully charged and ready for use.
Accessory ShoeA variety of Nikon Speedlights, including the SB-80DX,SB-50DX, SB-28DX, SB-28, SB-27, SB-26, SB-25, SB-24,SB-23, SB-22s, SB-29s, and SB-29, can be attached di-rectly to the accessory shoe without the need for a synccable. The accessory shoe is equipped with a safety lockthat keeps Speedlights equipped with a locking pin (theSB-80DX, SB-28DX, SB-28, SB-27, SB-26, SB-25, SB-22s, SB-29s, and SB-29) in place.
Sync TerminalA sync cable can be connected to the sync terminal asrequired. Do not attach another Speedlight via a synccable when performing rear-curtain sync flash photog-raphy with an SB-80DX, SB-50DX, SB-28DX, SB-28, SB-27, SB-26, SB-25, SB-24, SB-23, SB-22s, SB-29s, or SB-29Speedlight attached to the accessory shoe.
Flash-Ready Indicator
When an SB-80DX, SB-50DX, SB-28DX, SB-28, SB-27, SB-26, SB-25, SB-24, SB-23,SB-22s, SB-29s, or SB-29 Speedlight is connected, the flash-ready indicator will lightto show that the flash is fully charged and ready for use. If the indicator blinks forapproximately three seconds immediately after a photograph is taken in D-TTL ornon-TTL auto flash mode, the flash has fired at full output and the photograph maynot have been correctly erexposed. Check the results in the monitor. If the photo-graph is underexposed, adjust the distance to the subject, aperture, shutter speed, orflash range and try again.

110
The camera will cycle through the available flash-sync modes in the order shownbelow.
When red-eye reduction is used, there is a one-second delay between your fully pressing theshutter-release button and the shutter being released. Be careful not to move the camera or tolet your subject move during this time. Red-eye reduction works best when your subject is wellwithin the range of the flash and is fully turned to face the camera.
To prevent blurring caused by camera shake, use of a tripod is recommended with slow sync orred-eye reduction with slow sync.
Rear-curtain sync can not be used with a studio flash system.
Flash Sync Modes
Five sync modes are available. To set the flash sync mode, press the flash modebutton (A) while turning the main command dial (B).
BA
AD
VA
NC
ED
PH
OT
OG
RA
PH
Y—
FL
AS
H S
YN
C M
OD
ES
* In programmed auto and aperture-priority auto modes, the mode icon shown atright will be displayed when the flash mode button is released.
*

111
The flash is combined with shutter speeds as slow as 30 s, tak-ing ambient lighting into account to bring out background de-tails. In programmed auto and aperture-priority auto expo-sure modes, the shutter speed chosen automatically by the cam-era is usually 1/500–
1/60 s.Slow sync
Use this mode to suggest motion by creating a stream of lightthat appears to follow moving objects. When this mode is com-bined with programmed auto or aperture-priority auto, shut-ter speed is slowed to achieve the same effect as slow sync.When using the SB-26, SB-25, or SB-24, set the Speedlight syncmode selector to REAR.
Rear-curtain sync
This mode combines red-eye reduction with slow sync (avail-able only with SB-80DX, SB-28DX, SB-28, SB-27, and SB-26).Set the exposure mode to programmed auto or aperture-pri-ority auto.
Red-eye reduction withslow sync
This mode is recommended in most situations. When usingthe SB-26, SB-25, or SB-24, set the sync mode selector on theSpeedlight to NORMAL.Front-curtain sync
The following flash-sync modes are available:
Flash sync mode Description AD
VA
NC
ED
PH
OT
OG
RA
PH
Y—
FL
AS
H S
YN
C M
OD
ES
In this mode (available only with SB-80DX, SB-28DX, SB-28,SB-27, and SB-26), a red-eye reduction pre-flash lights for ap-proximately one second before the main flash, causing the pu-pils in your subjects’ eyes to contract and reducing the “red-eye” effect a flash can sometimes cause.
Red-eye reduction

112
Compatible Speedlights
Your Nikon digital camera can be used with the optional Speedlights shown below.
AD
VA
NC
ED
PH
OT
OG
RA
PH
Y—
CO
MPA
TIB
LE
SP
EE
DL
IGH
TS
StandardTTL2
Non-TTLauto
TTL1 A
Flash mode
Balancedfill-flashLensSpeedlight
SB-80DXSB-50DX13
SB-28DX
✔4 ✔ ✔5
✔7 ✔ ✔5
✔8 ✔ ✔9, 13
All types — — ✔
All types — — ✔
All types — — ✔
All types — — ✔
All types — — ✔
Type G or D Nikkor3
Other CPU Nikkor6
Other Nikkor lens
SB-28
SB-27
SB-2610
SB-25
SB-24
All types — — —SB-23/SB-21B11/SB-29s/SB-29
All types — — ✔SB-1112/SB-14
All types — — ✔SB-22s/SB-22/SB-20/SB-16B/
SB-15
1 Can only be used when an SB-80DX, SB-50DX, or SB-28DX is attached. When otherSpeedlights are attached and set to TTL, the shutter-release button will lock and nophotographs can be taken.
2 When spot metering is used, this setting is treated as “standard D-TTL flash control”(see above).
3 IX-Nikkor excluded.4 3D multi-sensor balanced fill-flash for the D1 series.5 Auto aperture (AA).6 Excluding AF Nikkor lenses for the F3AF.7 Multi-sensor balanced fill-flash for the D1 series.8 Center-weighted fill-flash for the D1 series.

113
AD
VA
NC
ED
PH
OT
OG
RA
PH
Y—
CO
MPA
TIB
LE
SP
EE
DL
IGH
TS
Flash mode
Repeatingflash
Rear-curtainsync
Red-eyereduction
ManualFP high-
speed sync
M REAR
✔13 ✔ ✔13✔ ✔13
✔13 ✔ ✔13✔ ✔13
✔13 ✔ ✔13✔ ✔13
✔ ✔ ✔✔ ✔
— ✔ ✔✔ —
✔ ✔ ✔✔ ✔
✔ ✔ —✔ ✔
✔ ✔ —✔ —
✔ ✔ —✔ —
— ✔ —✔ —
— ✔ —✔ —
9 Non-TTL auto flash (A).10 The SB-26 can be set to slave mode for wireless slave flash photography. When the
wireless slave selector is set to D, shutter speed will be set to a value under 1/200 sec.11 Autofocus can only be used with the SB-21B, SB-29s, or SB-29 when a AF-Micro lens
(60 mm, 105 mm, 200 mm) is attached.12 When using the SB-11 or SB-14 in A or M mode, connect the SC-13 using the SU-2.
While the SB-11 and SB-14 can be connected using the SC-11 or SC-15, the flash-readyindicator will not appear in the viewfinder display and shutter speed will not be adjustedautomatically.
13 The SB-50DX Speedlight, (available separately,) can not be used with Non TTL auto, FPhigh-speed sync, Repeating flash, or Red-eye reduction.

114
Compatible Speedlights (continued)
AD
VA
NC
ED
PH
OT
OG
RA
PH
Y—
CO
MPA
TIB
LE
SP
EE
DL
IGH
TS
Refer to your Speedlight manual for detailed instructions. In the table of different camera typesgiven in the SB-28DX manual, your Nikon digital camera is classified as type A.
The shutter will synchronize with the flash when set to speeds of 1/500 sec. or slower.
If the flash-ready indicator blinks for about three seconds after a photograph is taken with theSB-80DX, SB-50DX, or SB-28DX set to D-TTL, the photograph may be underexposed. Checkthe photograph in the monitor. If it is underexposed, adjust the focus distance, aperture, orflash range and try again.
The underexposure warning may not be displayed when Speedlights other than the SB-80DX,SB-50DX, or SB-28DX are used with a shutter speed of 1/500 s. Should you find that images areunderexposed even when no warning has appeared in the viewfinder, set the shutter speed to1/250 s and try again.
EV steps for exposure control are set to 1/3 increments on the Speedlight exposure display.
Therefore when the display on the camera body is set to 1/2 increments (using Custom Setting20), the Speedlight exposure display will not show the correct ISO value. This does not affectthe actual exposure value which will be set as displayed on the camera body.
Sensitivity settings available for D-TTL flash photography are ISO 200, 250, 320, 400, 500, 640,800, 1000, 1250 and 1600 equivalent. If Sensitivity Boost (Custom Setting 31) is used, the flashmay not produce appropriate lighting, depending on the aperture or distance to the subject.
In the case of Speedlights equipped with an AF-Assist Illuminator, the illuminator will only lightwhen the center focus area is used.
When the exposure mode is set to programmed auto, the maximum aperture varies withsensitivity, as shown below:
Sensitivity (ISO equivalent)
Maximum aperture
For each increase in sensitivity, aperture is stopped down by half a step. If the lens has a smallermaximum aperture than that given above, the maximum aperture will be the maximum aper-ture for the lens.
200
4.8
250
5
320
5.3
400
5.6
500
6
640
6.3
Sensitivity (ISO equivalent)
Maximum aperture
800
6.7
1,000
7.1
1250
7.6
1600
8
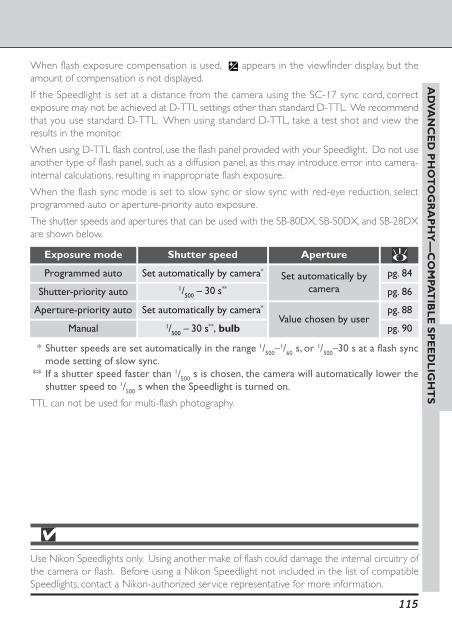
115
AD
VA
NC
ED
PH
OT
OG
RA
PH
Y—
CO
MPA
TIB
LE
SP
EE
DL
IGH
TS
Use Nikon Speedlights only. Using another make of flash could damage the internal circuitry ofthe camera or flash. Before using a Nikon Speedlight not included in the list of compatibleSpeedlights, contact a Nikon-authorized service representative for more information.
* Shutter speeds are set automatically in the range 1/500–1/60 s, or 1/500–30 s at a flash sync
mode setting of slow sync.** If a shutter speed faster than 1/500 s is chosen, the camera will automatically lower the
shutter speed to 1/500 s when the Speedlight is turned on.
TTL can not be used for multi-flash photography.
Set automatically bycamera
Aperture
Value chosen by user
Set automatically by camera*
1/500 – 30 s**
Shutter speed
Set automatically by camera*
1/500 – 30 s**, bulb
Programmed auto
Shutter-priority auto
Exposure mode
Aperture-priority auto
Manual
When flash exposure compensation is used, appears in the viewfinder display, but theamount of compensation is not displayed.
If the Speedlight is set at a distance from the camera using the SC-17 sync cord, correctexposure may not be achieved at D-TTL settings other than standard D-TTL. We recommendthat you use standard D-TTL. When using standard D-TTL, take a test shot and view theresults in the monitor.
When using D-TTL flash control, use the flash panel provided with your Speedlight. Do not useanother type of flash panel, such as a diffusion panel, as this may introduce error into camera-internal calculations, resulting in inappropriate flash exposure.
When the flash sync mode is set to slow sync or slow sync with red-eye reduction, selectprogrammed auto or aperture-priority auto exposure.
The shutter speeds and apertures that can be used with the SB-80DX, SB-50DX, and SB-28DXare shown below.
pg. 84
pg. 86
pg. 88
pg. 90

116
pg. 56Image quality can be set using the button andthe command dials.
pg. 156Custom settings can be selected using the button and the command dials.
The FUNC Button
By assigning image quality, custom settings, command lock, or AF-area mode to the button, you can adjust the selected setting using the command dial while con-
firming changes to settings in the rear control panel.
To assign a new function to the button, highlight As-sign FUNC in the shooting menu and press the multi selec-tor to the right to display the controls menu. Highlight thedesired setting and press the multi selector to the right toreturn to the shooting menu.
The following options are available:
AD
VA
NC
ED
PH
OT
OG
RA
PH
Y—
TH
E F
UN
C B
UT
TO
N
Option Description
OK
Assign FUNC
QualCSMAF AreaLock
SHOOTING MENU
For more information on:
pg. 188 The shooting menu
AF-area mode can be selected using the but-ton.
pg. 74
pg. 94The can be used with the command dials tolock shutter speed and/or aperture.
Qual
CSM
AF Area
Lock

117
AD
VA
NC
ED
PH
OT
OG
RA
PH
Y—
SE
QU
EN
TIA
L F
ILE
NU
MB
ER
ING
OK
File No. Seq.
OFFON
Reset
SHOOTING MENU
Sequential File Numbering
When sequential file numbering is in effect, file and folder numbers will continue tobe assigned sequentially in ascending order from the last number used wheneveryou create a new folder, insert a new memory card in the camera, or format theexisting memory card. For more information on sequential file numbering, see Cus-tom Setting 29, File Number Sequence ( pg. 179).
To choose a file-numbering option, highlight File No. Seq. inthe shooting menu and press the multi selector to the right.The menu shown at right will be displayed. Highlight thedesired setting and press the multi selector to the right toreturn to the shooting menu.
The following options are available:
OFF
ON
Reset
Option
Continuous sequential file numbering off.
Continuous sequential file numbering on.
Sequential numbering begins again from the lowest numberavailable in the current folder.
Description
29—File Number Sequence ( pg. 179)
File numbering can also be controlled using Custom Setting 29.

118
Taking Photographs with GPS
The camera is equipped with an RS-232C serial interface that can be used for con-nection to a Global Positioning System (GPS) device, allowing information about thecamera’s current position to be recorded when photographs are taken.
The GPS Input sub-menu can be used to ready the camera’sRS-232C interface for connection to a GPS device. In thesetup menu, highlight GPS Input and press the multi selec-tor to the right. The menu shown at right will be displayed.Highlight the desired option and press the multi selector tothe right to return to the setup menu.
The GPS Input menu contains the following options:
AD
VA
NC
ED
PH
OT
OG
RA
PH
Y—
TAK
ING
PH
OT
OG
RA
PH
S W
ITH
GP
S
Option
OK
GPS Input
ON
OFF
SET UP MENU
Description
ON Configures the serial interface for connection to a GPS device.
Data transfer between the camera and GPS device will not take place in playback mode, evenwhen GPS is selected in the GPS Input menu.
When communication is established with the GPS device, theletter “D” will appear in the control panel on top of the camera,remaining until the exposure indicators in the control panel turnoff automatically or the camera is turned off. Once the letter“D” is displayed, information on the camera’s current positionreceived while the camera is in communication with the GPSdevice will be stored with the image data for each photograph,even if the communication between the camera and the device is later interrupted.
GPS data will be included in the photo information for any photographs taken while the letter“D” is displayed in the control panel.
When using a GPS device to record the camera's position, check to be sure that the letter “D”is displayed in the control panel on top of the camera before taking any photographs. Particu-larly immediately after the GPS device is turned on, the position will not be recorded if yourelease the shutter in one motion, without first pressing the shutter-release button halfway andwaiting for the camera to focus.
For more information on using and connecting GPS devices, see the manual provided with thedevice.
OFF Disables the serial port connection.

119
AD
VA
NC
ED
PH
OT
OG
RA
PH
Y—
TAK
ING
PH
OT
OG
RA
PH
S W
ITH
GP
S
Connecting a GPS Device
When connecting a GPS device via a serial cable, be sure that the cable is connected to thecamera’s RS-232C serial interface terminal and that a 2.5-mm stero mini-jack is used for con-nection to the camera. Using another type of connector or inserting the connector intoanother terminal could damage the camera or cable.
Compatible GPS Devices
GARMIN or MAGELLAN GPS devices compatible with the NMEA0183 ver. 2.01 protocol canbe used with you camera. (NMEA=National Marine Electronics Association)Operation has been confirmed with the following GPS devices:
• GARMIN GPS III
• MAGELLAN COLORTRAK
Because cables for connecting GPS devices to the camera are not available from Nikon, the usermust supply a suitable cable. The RS-232 terminal on the camera is designed to fit a 2.5 mmstereo mini-jack. To connect the camera and the GPS device, a GND line and Data-Out line(Data-Out here refers to the GPS device) are required. The GND line from the GPS devicemust be connected to the GND line from the 2.5 mm stereo mini-jack. The Data-Out line fromthe GPS device must be connected to the Data-In line from the 2.5 mm stereo mini-jack.
For more information on:
pg. 190 The setup menupg. 124 Photo information
DATA-IN(Connect lead to GPS
device DATA-OUT lead)
(Not used)
GND(Connect lead to GPSdevice ground lead)

120
Quick Review
In single-frame, continuous, self-timer or PC mode, images stored on the memorycard can be viewed at the touch of a button, without setting the mode dial to PLAY.Press the button (B) to view the last photograph taken (if the camera is in sleepmode, with no aperture or shutter-speed indicators displayed, first press the shutter-release button halfway (A) to reactivate the camera).
Playback Options
Photographs can be played back by turning the mode dial to PLAY (playback mode),by pressing the monitor button in single-frame, continuous, self-timer or PC mode(quick review), or using “image review” to view photographs in the monitor auto-matically as they are recorded to the memory card.
Playback Mode
Playback mode is used only for playing images back, not for taking photographs.Playback mode can be selected by pressing the mode dial lock release and rotatingthe mode dial to PLAY.
PL
AY
BA
CK
—P
LA
YB
AC
K O
PT
ION
S
BA
If the memory card is empty when playback or quick review mode is selected, the message “Noimages in current folder” will be displayed.

121
PL
AY
BA
CK
—P
LA
YB
AC
K O
PT
ION
S
Image Review
In single-frame, continuous, self-timer, and PC modes, photographs can be viewed asthey are recorded to the memory card. Photographs will not be displayed in themonitor in PC mode when the camera is connected to a computer running NikonCapture 3 Camera Control.
1 Select On in the Image Review menu (Custom Setting 1; pg. 161).
2Take a photograph with the mode dial set to S (single-frame), C (continuous), (self-timer) or PC.
While the photograph is recorded to the memory card, the monitor will turn onautomatically and the photograph you have just taken will be displayed. In single-frame and self-timer modes, one photograph will be displayed each time theshutter is released. In continuous mode, the photographs in each sequence willbe displayed in order when shooting is complete. Review begins when you re-lease the shutter button.
If additional photographs are taken while images are on display, preview will beinterrupted.
In playback and quick review modes, or when using image review in continuous mode, photo-graphs can be displayed one at a time or in “contact sheets” of four or nine thumbnail images(see “Choosing the Number of Images Displayed,” below).

122
Basic Playback
The playback operations described below can be used in playback, quick-review, andrecord-and-review modes.
Choosing the Number of Images Displayed
During playback, images can be viewed one at a time or in “contact sheets” of four ornine thumbnail images. To choose the number of images displayed, press the button (A) while rotating the main command dial (B).
PL
AY
BA
CK
—B
AS
IC P
LA
YB
AC
K
If card contains fewer than the selected number of images in thumbnail playback, thumbnailswill be displayed at the top left corner of the monitor.
Single frame Four thumbnails
Nine thumbnails
BA

123
PL
AY
BA
CK
—B
AS
IC P
LA
YB
AC
K
For more information on:
pg. 170 Custom Setting 18
The setting chosen applies in playback, quick-review, and, when shooting in continu-ous mode, record-and-review modes.
Turning the Monitor Off
The monitor turns off if:• No operations are performed in the time specified in Custom Setting 18 (Moni-
tor Off Delay).• The button is pressed.• The shutter-release button is pressed halfway in single-frame, continuous, self-
timer mode, or in PC mode if the camera is not connected to a computer run-ning Nikon Capture 3 Camera Control.

124
PL
AY
BA
CK
—B
AS
IC P
LA
YB
AC
K
Basic Playback (continued)
In playback and quick-review modes, the first and last images in memory are linked.Pressing the multi selector down when the most recent image is displayed will takeyou to the oldest photograph in memory. Pressing the multi selector up when theoldest photograph is displayed will take you to the most recent photograph.
To view information on the current photograph, press the multi selector to the rightor left to cycle through photo information as shown below.
For more information on:
pg. 142 The Display Mode sub-menupg. 118 Connecting a GPS device
Page 6 (image histogram) and Page 7 (image highlights) are only shown if the appro-priate option has been selected in the Display Mode sub-menu of the playbackmenu. Page 5 is only shown if a GPS unit was connected when the photograph wastaken. Depending on the lens used, some information may not be displayed.
Single-Frame Playback
Unlock the multi selector and press it upor down to view additional images.
Page 1(starting screen)
Page 2
Page 5Page 8
Page 3 Page 4
Page 7 Page 6
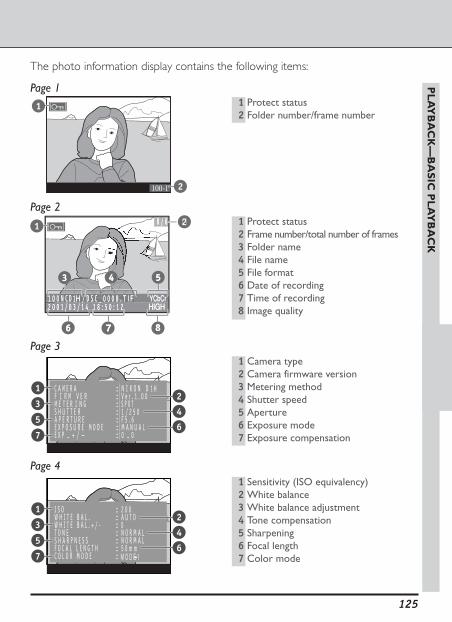
125
The photo information display contains the following items:
Page 11 Protect status2 Folder number/frame number
Page 21 Protect status2 Frame number/total number of frames3 Folder name4 File name5 File format6 Date of recording7 Time of recording8 Image quality
Page 31 Camera type2 Camera firmware version3 Metering method4 Shutter speed5 Aperture6 Exposure mode7 Exposure compensation
Page 41 Sensitivity (ISO equivalency)2 White balance3 White balance adjustment4 Tone compensation5 Sharpening6 Focal length7 Color mode
PL
AY
BA
CK
—B
AS
IC P
LA
YB
AC
K
21
12
4
6
3
5
7
12
4
6
3
5
7
1
2

126
1 Latitude2 Longitude3 Altitude* Only shown for images taken with a GPS
unit attached.
Page 8 (Image Only)No photo information is displayed.
Page 5 (GPS Data)*
Basic Playback (continued)
PL
AY
BA
CK
—B
AS
IC P
LA
YB
AC
K
1
2
3
Page 6 (Histogram)*
The histogram takes the form of a bar graph,with pixel brightness on the horizontal axisand the vertical axis showing the number ofpixels of each brightness in the image.
* Only shown when histogram display isselected in the playback Display Modemenu.
Page 7 (Image Highlights)*
The brightest portions of the image (imagehighlights) blinking on and off.
* Only shown when highlight display is se-lected in the playback Display Modemenu.

127
PL
AY
BA
CK
—B
AS
IC P
LA
YB
AC
K
Thumbnail Playback
When thumbnails are displayed, the desired frame can be highlighted using the multiselector.
To scroll through thumbnails a page at a time, press the button while rotatingthe sub-command dial.
PL
AY
BA
CK
—B
AS
IC P
LA
YB
AC
K
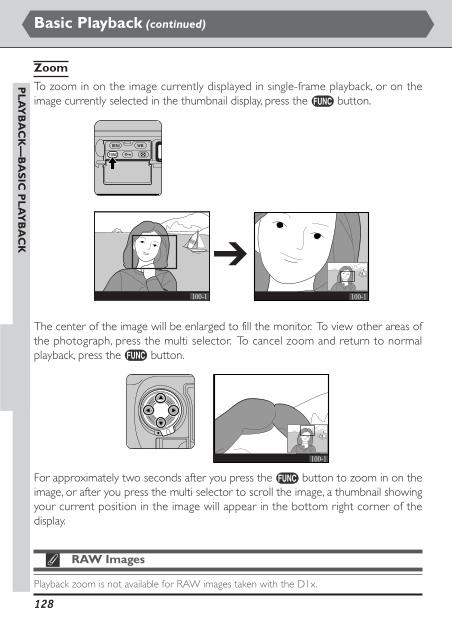
128
PL
AY
BA
CK
—B
AS
IC P
LA
YB
AC
K
Basic Playback (continued)
The center of the image will be enlarged to fill the monitor. To view other areas ofthe photograph, press the multi selector. To cancel zoom and return to normalplayback, press the button.
Zoom
To zoom in on the image currently displayed in single-frame playback, or on theimage currently selected in the thumbnail display, press the button.
➔
For approximately two seconds after you press the button to zoom in on theimage, or after you press the multi selector to scroll the image, a thumbnail showingyour current position in the image will appear in the bottom right corner of thedisplay.
RAW Images
Playback zoom is not available for RAW images taken with the D1x.

129
Delete Images?YES
Deleting Individual Photographs
The photograph on display in single-frame playback, or the imagecurrently selected in thumbnail playback, can be deleted using the
button (to delete several images at once, use the Delete op-tion in the playback menu). Once deleted, images can not be recov-ered.
1Display the image you want to delete (single-frame playback), or highlight theimage in the thumbnail display (thumbnail playback).
2Press the button (A). A confirmation dialog will be displayed (B).
BA
3Press the button a second time to delete the photograph and return toplayback or review mode. To exit without deleting the photograph, press the
button.
Delete Images?YES
PL
AY
BA
CK
—B
AS
IC P
LA
YB
AC
K

130
Deleting Photographs: The Delete Menu
The Delete option in the playback menu can be used to delete selected photo-graphs or all photographs on the memory card, and to cancel print-order files cre-ated with the Print Set option.
To display the Delete sub-menu, highlight Delete in theplayback menu and press the multi selector to the right. High-light the desired option and press the multi selector to theright to put your choice into effect.
The Delete sub-menu contains the following options:
DeletePLAYBACK MENU
SelectedAllPrint Set
Selected
Option
All
Print Set
Select the photo or photos to be deleted from a menu of thumb-nail images.
Description
Delete all images on the memory card. Images that have beenhidden or protected are not affected.
Cancel the print order (delete the print-order file) created withthe Print Set option ( pg. 139).
PL
AY
BA
CK
—B
AS
IC P
LA
YB
AC
K
Depending on the number of folders and images files on the card, it may take half an hour ormore to delete all images on the card using the All option in the Delete sub-menu.
Basic Playback (continued)

131
Deleting Selected ImagesChoosing Selected in the Delete sub-menu displays a menuof thumbnail images. Highlight the images to be deleted us-ing the multi selector. To return to the playback menu at anytime without deleting images, press the button. 00-11001110111010
100-4100-400-000-41000-00 -4-4000-
00-200-210010010000110
100-5
100-300-000-30101101001000
00-610010000000-0000000000-00-000000
SET OKPLAYBACK MENU
FUNCFUNC OKNOYES
PLAYBACK MENUSelected
Delete5 images
To select an image for deletion, highlight it and press the button. The image will be marked with a icon (to deselectan image, highlight it and press the button a second time).Repeat until all the images you wish to delete have beenselected, then press the button. The confirmation dia-log shown at right will be displayed; highlight YES and pressthe button to delete the selected images. To exit without deleting the images,highlight NO and press the button.
PL
AY
BA
CK
—B
AS
IC P
LA
YB
AC
K

132
For more information on:
pg. 186 The playback menu
PL
AY
BA
CK
—B
AS
IC P
LA
YB
AC
K
Basic Playback (continued)
Protecting Images from Deletion
The photograph on display in single-frame playback, or the image currently selectedin thumbnail playback, can be protected from accidental deletion using the button (to protect several images at once, use the Protect option in the playbackmenu).
1Display the image you want to protect (single-frame playback), or highlight theimage in the thumbnail display (thumbnail playback).
2Press the button (A). The selected image or thumbnail will be marked by a icon (B).
BA
Protected status can be removed at any time to allow an image to be deleted. Toremove protected status from an image, display the image (single-frame play-back) or highlight it in the thumbnail display (thumbnail playback) and press the
button.
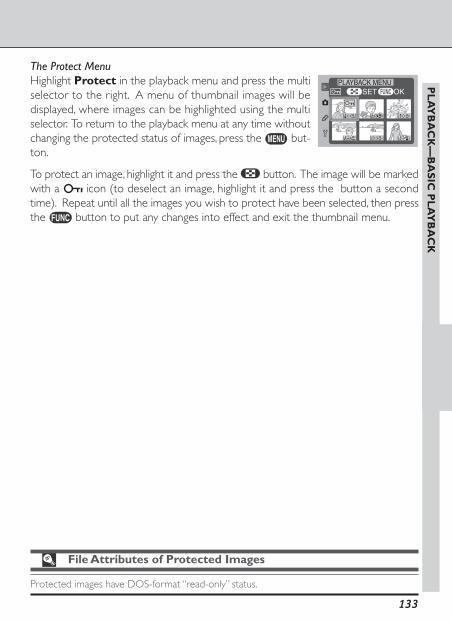
133
File Attributes of Protected Images
Protected images have DOS-format “read-only” status.
The Protect MenuHighlight Protect in the playback menu and press the multiselector to the right. A menu of thumbnail images will bedisplayed, where images can be highlighted using the multiselector. To return to the playback menu at any time withoutchanging the protected status of images, press the but-ton.
To protect an image, highlight it and press the button. The image will be markedwith a icon (to deselect an image, highlight it and press the button a secondtime). Repeat until all the images you wish to protect have been selected, then pressthe button to put any changes into effect and exit the thumbnail menu.
00-11001110111010
100-4100-400-000-41000-00 -4-4000-
00-200-2100100100001010
100-5
100-300-000-30101101001000
100-610010000000-0000000000-000-000000
SET OKPLAYBACK MENU P
LA
YB
AC
K—
BA
SIC
PL
AY
BA
CK

134
Start
Option
Frame Intvl
Start the slide show.
Description
Specify the length of time each image will be displayed.
Slide ShowPLAYBACK MENU
Start
Frame Intvl
2Highlight the desired option and press the multi selector to the right. The follow-ing options are available:
3To start the slide show, highlight Start and press the multiselector to the right. Pressing the button pauses theslide show and displays the menu shown in Step 4. Pressthe button at any time during the slide show toreturn to the playback menu.
Playback Menu Options
In addition to the delete and protect items described above, the playback menucontains options for automated playback, hiding images during playback, creatingdigital “print orders,” creating new folders and specifying the folders from whichimages will be played back, and controlling the information included in the photoinformation display.
Automated Playback: The Slide-Show Menu
The slide-show option in the playback menu allows automated sequential playback.
1Highlight Slide Show in the playback menu and pressthe multi selector to the right. The menu shown at rightwill be displayed.
PL
AY
BA
CK
—P
LA
YB
AC
K M
EN
U O
PT
ION
S

135
4Once the slide show comes to an end, or after you havepaused or stopped the slide show, the menu shown atright will be displayed. Using the multi selector, highlightthe desired option and press the multi selector to theright to put your choice into effect. Press the multi selec-tor to the left or press the button to end the slideshow and return to the playback menu.
The following options are available:
OK
Slide ShowPLAYBACK MENU
Frame Intvl
235
10
ssss
Option Description
For more information on:
pg. 186 The playback menu
OKRestartFrame Intvl
Changing the Display IntervalSelecting Frame Intvl from the slide show menu or whilethe slide show is paused will display the menu of intervalsettings shown at right. To change the length of time eachimage is displayed, highlight the desired option and press themulti selector to the right. The slide show will start or re-sume from the point it was interrupted.
Restart Restart the slide show from the image currently displayed.
Frame Intvl Change the length of time each image is displayed.
PL
AY
BA
CK
—P
LA
YB
AC
K M
EN
U O
PT
ION
S

136
Hiding Images During Playback: The Hide-Image Menu
When preparing a slide show or showing photographs to an audience, you maywant to use the Hide Image option to hide some of the images on the memorycard. Hidden images can only be viewed from the Hide Image menu, and can notbe deleted using the button or Delete menu.
Highlight Hide Image in the playback menu and press themulti selector to the right. A menu of thumbnail images willbe displayed, where images can be highlighted using the multiselector. You can select any number of images to be hiddenor revealed before pressing the button to put changesinto effect and exit the thumbnail menu. To return to theplayback menu at any time without changing the hidden status of images, press the button.
To hide an image, highlight it and press the button. The image will be markedwith and icons (to deselect an image, highlight it and press the buttona second time). Repeat until all the images you wish to hide have been selected, thenpress the button to put any changes into effect and exit the thumbnail menu.
00-11001110111010
100-4100-400-000-41000-00 -4-4000-
00-200-2100100100001010
100-5
100-300-000-30101101001000
100-610010000000-0000000000-000-000000
SET OKPLAYBACK MENU
For more information on:
pg. 186 The playback menu
Playback Menu Options (continued)
PL
AY
BA
CK
—P
LA
YB
AC
K M
EN
U O
PT
ION
S

137
File Attributes of Hidden Images
Hidden images have DOS-format “hidden” and “read-only” status.
File Numbering for Hidden Images
Although hidden images are only displayed in the Hide Image menu, they are assigned filenumbers, allowing the presence of hidden images to be ascertained from discontinuities in thefile-numbering sequence during playback.
PL
AY
BA
CK
—P
LA
YB
AC
K M
EN
U O
PT
ION
S

138
Preparing Photographs for Printing: The Print-Set Menu
The Print Set option in the playback menu is used to create a digital “print order”specifying the photographs to be printed, the number of prints, and the informationto be included with each print. This information is stored on the memory card inDigital Print Order Format (DPOF). The card can then be removed from the cam-era and inserted in a DPOF-compatible device—whether your personal photo printeror a photofinisher’s print system—and the specified images printed directly from thecard. Note, however, that images taken at an image-quality setting of RAW can notbe printed in this fashion.
Highlight Print Set in the playback menu and press the multiselector to the right. A menu of thumbnail images will bedisplayed, where images can be highlighted using the multiselector. To return to the playback menu at any time withoutchanging the print order, press the button.
00-11001110111010
100-4100-400-000-41000-00 -4-4000-
00-200-2100100100001010
100-5
100-300-000-30101101001000
100-610010000000-0000000000-000-000000
SET OKPLAYBACK MENU
After Creating a Print Order
• Do not use a another device, such as a computer, to delete images from the memory cardafter creating a print order.
• Do not change the hidden status of images currently included in the print order.
Exif Version 2.2
The D1H supports Exif (Exchangeable Image File Format for Digital Still Cameras) version 2.2,a standard that allows information stored with photographs to be used for optimal colorreproduction when images are output on Exif-compliant printers.
For more information on:
pg. 186 The playback menu
Playback Menu Options (continued)
PL
AY
BA
CK
—P
LA
YB
AC
K M
EN
U O
PT
ION
S To add an image to the print order, highlight it and press the button. The imagewill be marked with a icon (to deselect an image, highlight it and press the buttona second time). Repeat until all the images you wish to print have been selected,then press the button to display the menu of print options shown opposite.

139
Print OptionsOnce you have selected the images you want to print andpressed the button, the menu of options shown at rightwill be displayed. Highlight the desired option using the multiselector. Print options apply to all photographs in the printorder.
OK
Print SetPLAYBACK MENU
Done
Imprint DateCopies1
Done
Option
Complete changes to the print order and exit the print setmenu.
Description
Copies
Selecting this option displays the dia-log shown at right. Press the multi se-lector up or down to select the num-ber of copies of all images that will beprinted. Press the multi selector tothe right to put your selection into ef-fect and return to the print options menu.
Print SetPLAYBACK MENU
Copies
1 OK
Imprint DateIf this box is checked, the date will of recording will be printedon all the selected photographs. To select or deselect this op-tion, highlight it and press the multi selector to the right.
Digital Print Order Format
Digital Print Order Format (DPOF) is an industry-wide standard that allows photographs takenwith a digital camera to be printed on a DPOF-compatible device, whether it be a personalphoto printer or a commercial print system. Before printing, check that the device or printservice supports DPOF. When taking photographs that will be printed directly from the card,we recommend that you set the color mode (Custom Setting 32) to I (sRGB).
For more information on:
pg. 181 Custom Setting 32
The following options are available:
PL
AY
BA
CK
—P
LA
YB
AC
K M
EN
U O
PT
ION
S

140
Folder Options: The Folder Designate Menu
The Folder Designate menu is used to create new folders with user-specified foldernumbers, and to select the folder or folders from which images will be played back.
In the playback menu, highlight Folder Designate and pressthe multi selector to the right. The menu shown at right willbe displayed. New
Folder Select
Folder DesignatePLAYBACK MENU
The following options are available:
Option Description
Folder SelectSelecting this option displays the menu shown on the oppositepage.
New
When this option is selected, a dialogwill appear prompting you to select afolder number. Press the multi selec-tor up or down to select a folder num-ber, then press the multi selector tothe right to create a new folder namebeginning with the specified numberand ending in “NCD1H.” Subsequent photographs will be storedin the new folder. Press the the button to put settingsinto effect and return to the Folder Select sub-menu.
For more information on:
pg. 186 The playback menu
Playback Menu Options (continued)
PL
AY
BA
CK
—P
LA
YB
AC
K M
EN
U O
PT
ION
S
101 OK
NewFolder DesignatePLAYBACK MENU

141
Choosing a Folder for PlaybackSelecting Folder Select from the Folder Designate menudisplays the options shown at right. Highlight the desireditem and press the multi selector to the right to put yourchoice into effect and return to the Folder Designate sub-menu.
The following options are available:
OK
Folder Select
NCD1HAllCurrent
Folder DesignatePLAYBACK MENU
Option Description
ALLImages in all folders that conform to the Design Rule for Cam-era File Systems (DCF)–most digital cameras and all Nikon cam-eras– will be visible during playback.
NCD1HImages in all folders created by cameras in the D1H will bevisible during playback.
CurrentOnly images in the current folder will be visible during play-back.
Creating Multiple Folders
If you create several folders in succession using the New option and then choose Currentfrom the Folder Select menu, only photographs in the most recently created folder will bedisplayed. You can not choose another folder for playback when using a camera in the D1H.
For example, suppose you create three folders in succession, 101NCD1H, 102NCD1H, and103NCD1H. If you then choose Current, only photographs in 103NCD1H will be displayed.To view photographs in the other folders, you would need to choose NCD1H or ALL in theFolder Select menu.
Creating a New Folder at Startup
If you turn the camera on while pressing the button, a new folder will be created. Afterperforming this operation, be sure that “1” is showing in the frame number display in thecontrol panel on top of the camera before taking a photograph. If you take a photographbefore the frame number display shows “1,” the photograph will be recorded in the last folderin use before the new folder was created. Note that no new folder will be created if thememory card already contains an empty folder. An error will occur if the camera is turned onwith the button held down when the current folder is numbered 999. If such an erroroccurs, the letters will blink on and off in the control panel display on top of the camera.
PL
AY
BA
CK
—P
LA
YB
AC
K M
EN
U O
PT
ION
S
In the Folder Select sub-menu, press the button to return to the playback menu.

142
Displaying Histograms and Highlights: The Display Mode Menu
The options selected in this menu determine whether a histogram and highlightdisplay are included in photograph information when an image is played back.
In the playback menu, highlight Display Mode and press themulti selector to the right. The menu shown at right will bedisplayed. Highlight the desired option and press the multiselector to the right to put your choice into effect and returnto the playback menu.
OKImage onlyHistogramHighlightsBoth
Display ModePLAYBACK MENU
The following options are available:
Option Description
Image onlyHistogram and highlights information are not included in thephoto-information display.
HistogramA page including a histogram showing the distribution of tonesin the image is added to the photo-information display.
HighlightsA page showing image highlights is added to the photo-infor-mation display. Highlights (brighter areas of the image) are in-dicated by a flashing border.
BothTwo pages are added to the photo-information display, oneshowing a histogram and the other image highlights.
For more information on:
pg. 186 The playback menupg. 126 Histogram and highlights displays
Playback Menu Options (continued)
PL
AY
BA
CK
—P
LA
YB
AC
K M
EN
U O
PT
ION
S

143
Setup Menu Options
The setup menu contains options for formatting memory cards and controlling videooutput and monitor settings.
Formatting Memory Cards: The Format Menu
To format memory cards for use in your Nikon digital cam-era, highlight Format in the setup menu and press the multiselector to the right. The menu shown at right will be dis-played. Highlight the desired option and press the but-ton to put your choice into effect.
The following options are available:
FUNCFUNC OK
Format
NOYES
Warning!All images will be deleted
SET UP MENU
Option Description
NOSelect this option to return to the setup menu without format-ting the memory card.
YES
Formatting begins as soon as the button is pressed toselect this option; the operation can not be cancelled. Onceformatting is complete, the message “No Images in currentfolder” will be displayed. Press the button to return tothe setup menu.
PL
AY
BA
CK
—S
ET
UP
ME
NU
OP
TIO
NS

144
Setup Menu Options (continued)
PL
AY
BA
CK
—S
ET
UP
ME
NU
OP
TIO
NS
Choosing the Video Standard: The Video Output Menu
The Video Output menu is used to select the standard for video output when thecamera is connected to a television or VCR. The default setting is NTSC. Whenconnecting the camera to PAL device, the setting must be changed.
In the setup menu, highlight Video Output and press themulti selector to the right. The menu shown at right will bedisplayed. Highlight the desired option and press the multiselector to the right to put your choice into effect and returnto the setup menu.
OKNTSC
PAL
Video OutputSET UP MENU
At a video-mode setting of PAL, the number of pixels in the video output will be selectivelyreduced, with the result that images displayed on any PAL-compliant video device to which thecamera is connected will show a drop in resolution.
For more information on:
pg. 190 The setup menu
The following options are available:
Option Description
PAL
NTSCSelect this option when connecting the camera to NTSC de-vices.
Adjusting Monitor Brightness: The LCD Brightness Menu
This option controls monitor brightness. In the setup menu,highlight LCD Brightness and press the multi selector tothe right. The menu shown at right will be displayed. Thereare five levels of brightness to choose from; press the multiselector up to increase brightness, or down to decrease bright-ness. The number indicates the amount of brightness, with 5being the brightest setting. Press the multi selector to the right to put your choiceinto effect and return to the setup menu.
2
LCD BrightnessSET UP MENU
Select this option when connecting the camera to PAL devices.

145
PL
AY
BA
CK
—S
ET
UP
ME
NU
OP
TIO
NS
When the camera is powered by an AC adapter (available separately), the monitor remains onfor ten minutes when no operations are performed, regardless of the setting in the MonitorOff menu.
Restoring the Monitor Display
To turn the monitor on again after it has turned off automatically, press the button.
18—Monitor Off Delay ( pg. 170)
The time until the monitor turns off automatically can also be adjusted using this setting.
The Monitor Off Menu
When the camera is operated on battery power, the monitor turns off automaticallyif no operations are performed for twenty seconds. This time limit can be changedusing the Monitor Off menu.
In the setup menu, highlight Monitor Off and press the multiselector to the right. The menu shown at right will be dis-played. Highlight the desired option and press the but-ton or press the multi selector to the right to put your choiceinto effect and return to the setup menu.
Monitor OffSET UP MENU
OK2010
15
10
ss
minminmin

146
Connect this endof the cable to the
video device
Television Playback
Your Nikon digital camera can be connected to a television or video cassette re-corder (VCR) using the video cable provided, allowing the monitor display to beviewed on a television screen or recorded on video tape.
Open the cover protecting the camera’s VIDEO OUT and DC-IN connectors.
PL
AY
BA
CK
—T
EL
EV
ISIO
N P
LA
YB
AC
K
Video-out connector
DC-in connector
Connect the camera to the video device as shown below.
Connect this endof the cable to the
camera
147
PL
AY
BA
CK
—T
EL
EV
ISIO
N P
LA
YB
AC
K
While the video cable is connected, the camera functions normally in all respects.The image in the monitor will be displayed on the television screen while the moni-tor is on. We recommend that the camera be powered with an AC adapter (avail-able separately) during television playback to avoid draining the battery. For infor-mation on connecting an AC adapter, see the documentation provided with theadapter. When connected to AC adapter, the monitor will power off automatically ifno operations are peformed for ten minutes, regardless of the setting in the Moni-tor Off Delay (Custom Setting 18; pg. 170) or Monitor Off ( pg. 145)menus.
The default setting is NTSC. When connecting the camera to PAL device, the settingmust be changed.
Connecting and Disconnecting the Video Cable
Be sure the camera is off before connecting or disconnecting the video cable.
At a video-mode setting of PAL, the number of pixels in the video output will be selectivelyreduced, with the result that images displayed on any PAL-compliant video device to which thecamera is connected will show a drop in resolution.
Video Output ( pg. 144)
The Video Output option in the setup menu offers a choice of NTSC and PAL video stan-dards for output to video devices.

148
Connecting to a Computer
Your Nikon digital camera is equipped with an IEEE 1394 interface, allowing it to beconnected to a computer via an IEEE 1394 cable (available separately). Using NikonView, you can transfer photographs to your computer and list the transferred imagesas small thumbnail previews, perform minor enhancements, and print them. In addi-tion to these functions, Nikon Capture 3 (available separately) supports more ad-vanced image editing options, including batch processing of multiple photographs.
Before You BeginBefore connecting the camera to a computer :• Be sure that you have completed installation of the necessary software and have
read the software manuals thoroughly• Check that your system satisfies the requirements listed in the software manuals• Turn the camera off and ensure that a battery is inserted or the camera con-
nected to an AC adapterTo ensure a continuous supply of power while the camera is connected, we recom-mend that you use an AC adapter (available separately).
Connecting the Camera to a Computer
1When connecting the camera to a computer via the IEEE 1394 interface, use anIEEE 1394 cable (available separately). Open the cover protecting the camera’sIEEE 1394 connector and connect the devices as shown below.
CO
NN
EC
TIN
G T
O A
CO
MP
UT
ER
For information on connecting IEEE 1394 devices, see the documentation pro-vided with your computer or IEEE 1394 expansion board or card. IEEE 1394devices can be connected or disconnected when the computer and the deviceare still on (so-called “hot plug” or “hot connect/disconnect”) without the needto turn off either device or restart the computer system.

149
CO
NN
EC
TIN
G T
O A
CO
MP
UT
ER
2To allow data to be transferred between the com-puter and the camera, turn the camera mode dial toPC. The computer will not recognize the camera ifthe mode dial is set to any other position.
Note that the “hot plug” support provided by the IEEE 1394 interface makes itpossible to reverse steps 1 and 2 by turning the camera on and setting the modedial to PC before connecting the device to the computer.
If the camera is properly connected and Nikon Cap-ture 3 Camera Control is running, PC will be displayedin the control panel on top of the camera (PC will notbe displayed when Nikon View Nikon Transfer is run-ning). If continuous shooting mode is selected whileNikon Capture 3 is running and the camera shutter-release button is held down, the rate at which photographs are taken may slow.
If neither Nikon View Nikon Transfer nor Nikon Capture 3 Camera Control isrunning when the camera is connected, the camera will function normally. Theonly exception is that if the mode dial is set to PC, the shooting mode (single-frame or continuous) must be set using Custom Setting 30 ( pg. 180).
3To terminate the connection between the camera and computer, exit NikonView or Nikon Capture 3 and turn the camera mode dial to another setting. Ifyou are using Nikon Capture 3, wait until PC is no longer displayed in the controlpanel before disconnecting the cable.
Do not turn the camera off while data transfer is in progress.
Shooting Speed (Nikon Capture 3)
The shooting speed may drop when the camera shutter-release button is used to take photo-graphs with the camera connected to a computer running Nikon Capture 3.
For more information on:
pg. 180 Custom Setting 30

150
Software for the D1H
CO
NN
EC
TIN
G T
O A
CO
MP
UT
ER
—S
OF
TW
AR
E F
OR
TH
E D
1H
Software specifications are subject to change without notice. For the latest information andsoftware upgrades, visit the following web-sites:• For the U.S.A.: http://www.nikonusa.com/• For Europe: http://www.nikon-euro.com/• For Asia, Oceania, the Middle East, and Africa: http://www.nikon-asia.com/
Nikon View
Using Nikon View, you can transfer images from the camera memory card to yourcomputer. Once transferred, your pictures can be viewed, printed, or saved to re-movable media for delivery to a photofinisher.
System Requirements for Nikon View
Windows
* Required if the camera is to be connected to the computer. The camera may not func-tion as expected when connected to an IEEE 1394 hub. For information on IEEE 1394expansion boards or cards that have been tested and approved for use with your Nikondigital camera, see the web-sites listed below.
OSPre-installed versions of Windows XP Home Edition, Windows XPProfessional, Windows 2000 Professional, Windows Millennium Edi-tion (Me), Windows 98 Second Edition (SE)
CPU 300 MHz Pentium or better
RAM 64 MB (128 MB or more recommended)
Hard diskspace
60 MB required for installation, with additional free disk space of 10 MBplus an amount equal to double the capacity of camera memory cardavailable on system disk when Nikon View is running.
Videoresolution
800 × 600 pixels or more with 16-bit color (High Color). 24-bit color(True Color) recommended.
Miscellaneous• CD-ROM drive required for installation• OHCI-compliant IEEE 1394 interface*• Internet connection required when uploading pictures to the Web
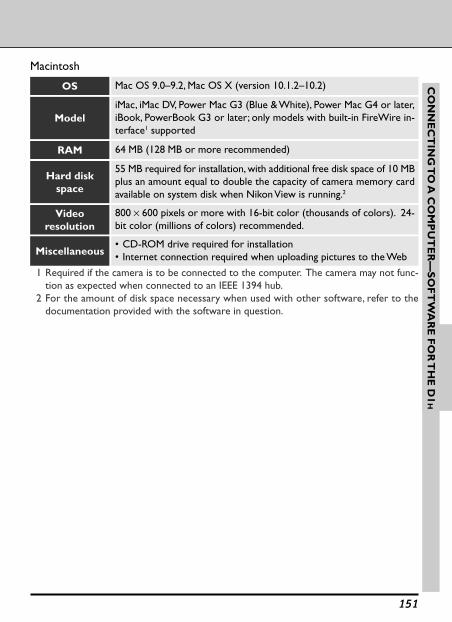
151
CO
NN
EC
TIN
G T
O A
CO
MP
UT
ER
—S
OF
TW
AR
E F
OR
TH
E D
1H
Macintosh
1 Required if the camera is to be connected to the computer. The camera may not func-tion as expected when connected to an IEEE 1394 hub.
2 For the amount of disk space necessary when used with other software, refer to thedocumentation provided with the software in question.
Miscellaneous
Videoresolution
• CD-ROM drive required for installation• Internet connection required when uploading pictures to the Web
800 × 600 pixels or more with 16-bit color (thousands of colors). 24-bit color (millions of colors) recommended.
RAM 64 MB (128 MB or more recommended)
Hard diskspace
55 MB required for installation, with additional free disk space of 10 MBplus an amount equal to double the capacity of camera memory cardavailable on system disk when Nikon View is running.2
ModeliMac, iMac DV, Power Mac G3 (Blue & White), Power Mac G4 or later,iBook, PowerBook G3 or later; only models with built-in FireWire in-terface1 supported
OS Mac OS 9.0–9.2, Mac OS X (version 10.1.2–10.2)

152
Software for the D1H (continued)
CO
NN
EC
TIN
G T
O A
CO
MP
UT
ER
—S
OF
TW
AR
E F
OR
TH
E D
1H
Nikon Capture 3
Using Nikon Capture 3 (available separately), you can control the camera from yourcomputer. Photographs can be recorded directly to the computer hard disk via anIEEE 1394 connection, or captured into Nikon Capture 3 and processed beforebeing saved to disk. Nikon Capture 3 supports Nikon Electronic Image Format(NEF), allowing you to save photographs taken at an image-quality setting of NEF(RAW) to the computer hard disk, process them for use in another applications, andsave them in a third-party format under a different name. Nikon Capture 3 alsosupports batch processing, simplifying studio photography.
System Requirements for Nikon Capture 3
Windows
1 Depending on the number of images captured, more may be required.2 Required if the camera is to be connected to the computer. The camera may not func-
tion as expected when connected to an IEEE 1394 hub. For information on IEEE 1394expansion boards or cards that have been tested and approved for use with your Nikondigital camera, see the web-sites listed at right.
OSPre-installed versions of Windows XP Home Edition, Windows XPProfessional, Windows 2000 Professional, Windows Millennium Edi-tion (Me), Windows 98 Second Edition (SE)
CPU 300 MHz Pentium or better
RAM(Nikon
Capture 3)
• Windows XP: 128 MB (256 MB or more recommended)• Other platforms: 64 MB or more recommended (128 MB or more
recommended when handling RAW images)
Hard diskspace
200 MB required for installation, with additional free disk space of 10 MBplus an amount equal to double the capacity of camera memory cardavailable on system disk when Nikon Capture 3 is running.1
Videoresolution
800 × 600 pixels or more with 16-bit color (High Color). 24-bit color(True Color) recommended.
Miscellaneous• CD-ROM drive required for installation• OHCI-compliant IEEE 1394 interface2
• Internet connection required when uploading pictures to the Web
RAM(Nikon View)
64 MB (128 MB with RAW images) or more recommended.
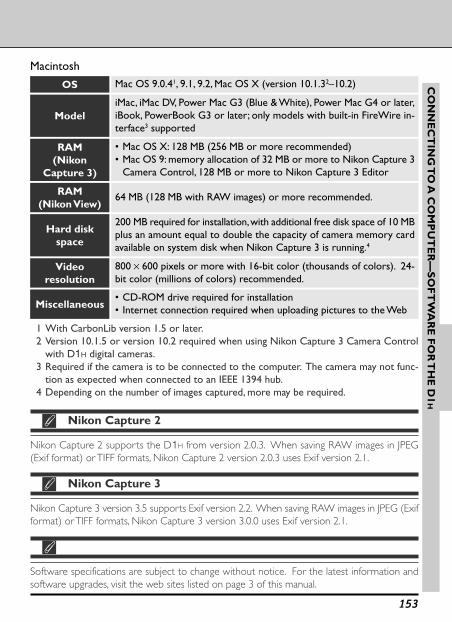
153
CO
NN
EC
TIN
G T
O A
CO
MP
UT
ER
—S
OF
TW
AR
E F
OR
TH
E D
1H
Nikon Capture 2
Nikon Capture 2 supports the D1H from version 2.0.3. When saving RAW images in JPEG(Exif format) or TIFF formats, Nikon Capture 2 version 2.0.3 uses Exif version 2.1.
Nikon Capture 3
Nikon Capture 3 version 3.5 supports Exif version 2.2. When saving RAW images in JPEG (Exifformat) or TIFF formats, Nikon Capture 3 version 3.0.0 uses Exif version 2.1.
Software specifications are subject to change without notice. For the latest information andsoftware upgrades, visit the web sites listed on page 3 of this manual.
Macintosh
1 With CarbonLib version 1.5 or later.2 Version 10.1.5 or version 10.2 required when using Nikon Capture 3 Camera Control
with D1H digital cameras.3 Required if the camera is to be connected to the computer. The camera may not func-
tion as expected when connected to an IEEE 1394 hub.4 Depending on the number of images captured, more may be required.
Miscellaneous
Videoresolution
• CD-ROM drive required for installation• Internet connection required when uploading pictures to the Web
800 × 600 pixels or more with 16-bit color (thousands of colors). 24-bit color (millions of colors) recommended.
ModeliMac, iMac DV, Power Mac G3 (Blue & White), Power Mac G4 or later,iBook, PowerBook G3 or later; only models with built-in FireWire in-terface3 supported
RAM(Nikon
Capture 3)
• Mac OS X: 128 MB (256 MB or more recommended)• Mac OS 9: memory allocation of 32 MB or more to Nikon Capture 3
Camera Control, 128 MB or more to Nikon Capture 3 Editor
Hard diskspace
200 MB required for installation, with additional free disk space of 10 MBplus an amount equal to double the capacity of camera memory cardavailable on system disk when Nikon Capture 3 is running.4
RAM(Nikon View)
64 MB (128 MB with RAW images) or more recommended.
OS Mac OS 9.0.41, 9.1, 9.2, Mac OS X (version 10.1.32–10.2)

154
Reading Photographs from Memory Cards
When a memory card is inserted in an EC-AD1 PC-card adapter (available sepa-rately), its contents can be viewed using any card slot or PC card reader that sup-ports PCMCIA type-II ATA memory cards.
1Remove the memory card from the computer andinsert it in the PC card adapter as shown at right.
CO
NN
EC
TIN
G T
O A
CO
MP
UT
ER
—R
EA
DIN
G P
HO
TO
GR
AP
HS
FR
OM
ME
MO
RY C
AR
DS
2 Insert the adapter in a computer equipped with a card slot or PC card readerthat supports ATA memory cards. For detailed instructions, see the documenta-tion provided with your computer or card reader.
3The card will function as a disk. Photographs recorded at settings of FINE, NOR-MAL, or BASIC can be viewed using any application that supports JPEG. Imagesrecorded at a setting of HIGH/RGB-TIFF can be opened in applications that sup-port the TIFF format. Nikon View or Nikon Capture 3 is required to view photo-graphs taken at settings of HIGH/RAW or HIGH/YCbCr-TIFF.
CompactFlash Card TM
EC-64CF
MB
CompactFlash Card TM
EC-AD1
ADAPTER
Com
pact
Flas
h C
ard T
M
TM
EC
-AD
1
PC
Car
d A
dapt
erP
C C
ard
Ada
pter
Depending on your operating environment, it may be necessary to install drivers, register thecard with the system, or adjust settings to configure the computer to read microdrivesCompactFlash memory cards. For details, see the documentation provided with your com-puter or operating system.

155
CUSTOM SETTINGSAND OTHER MENUS
About This Section
This section describes the options available in the custom settings menu and provides an indexto the shooting, playback, and setup menus.
• Custom Settings....................... pp. 156–185
• Other Camera Menus............................... pp. 186–191

156
CU
ST
OM
SE
TT
ING
S A
ND
OT
HE
R M
EN
US
—C
US
TO
M S
ET
TIN
GS
A200
NORM
OFFOFF
White BalISO
Image Quality
Assign FUNCAF Area ModeFile No. Seq.Command Lock
SHOOTING MENU
01234
A
ONOFFOFF
OFF
56
N
Bank SelectImage ReviewEV StepBKT OrderAF ActivationAnti-mirrorFocus Area
CSM MENU
Custom Settings
Your Nikon digital camera is equipped with a menu of custom settings (CustomSettings 0–35), which can be used to customize many aspects of camera operation.The Custom Settings Menu can be used when the camera is in single-frame, continu-ous, self-timer or PC mode.
Choosing a Custom Settings Bank
Before adjusting custom settings, choose the settings bank that will be used to storethe changes. The camera can store settings in “banks” that can be recalled at anytime, allowing you to create up to four combinations of settings for common tasks orshooting situations and recall them quickly as desired.
By default, any changes to custom settings are saved in Bank A. To select anothersettings bank:
1Display the camera menusTurn the camera on (A) and press the button (B). The menu for the currentoperating mode will be displayed in the monitor (C).
A B C
A B
2Display the CSM MENUUnlock the multi selector and press it up or down (A) until the custom settingsmenu is displayed (B).

157
CU
ST
OM
SE
TT
ING
S A
ND
OT
HE
R M
EN
US
—C
US
TO
M S
ET
TIN
GS
Using the Function Button to Adjust Custom Settings
If CSM is selected in the Assign FUNC sub-menu, the button can be used to select the custom settings bank. Keep-ing the button pressed, rotate the main command dialuntil custom setting 0 appears in the rear control panel. Thecurrently selected bank will be displayed following the customsettings number. To select a new settings bank, rotate the sub-command dial while pressing the button. Release the
button to put your selection into effect.
3Display the Custom Setting Bank menuPress the multi selector to the right to enter the custom settings menu, thenpress the multi selector up or down to highlight F0 Custom Setting Bank.Press the multi selector to the right to display the menu shown below.
OK
CustomSetting Bank
Bank ABank BBank CBank D
F0 CSM MENU
4Choose a custom settings bankPress the multi selector up or down to highlight the desired settings bank, thenpress the multi selector to the right to put your choice into effect and return tothe custom settings menu.
Settings stored in the selected bank will automatically be put into effect when thebank is chosen. Any changes to custom settings made after the bank is selected willbe saved in the selected bank.
For more information on:
pg. 116 The Assign FUNC sub-menu
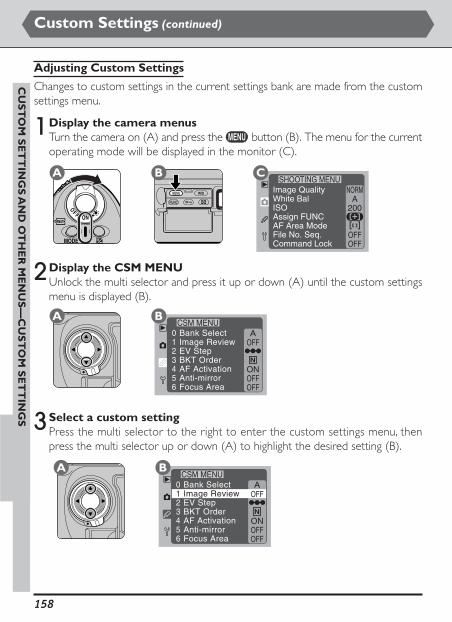
158
CU
ST
OM
SE
TT
ING
S A
ND
OT
HE
R M
EN
US
—C
US
TO
M S
ET
TIN
GS
A200
NORM
OFFOFF
White BalISO
Image Quality
Assign FUNCAF Area ModeFile No. Seq.Command Lock
SHOOTING MENU
01234
A
ONOFFOFF
OFF
56
N
Bank SelectImage ReviewEV StepBKT OrderAF ActivationAnti-mirrorFocus Area
CSM MENU
3Select a custom settingPress the multi selector to the right to enter the custom settings menu, thenpress the multi selector up or down (A) to highlight the desired setting (B).
A B C
A B
2Display the CSM MENUUnlock the multi selector and press it up or down (A) until the custom settingsmenu is displayed (B).
Adjusting Custom Settings
Changes to custom settings in the current settings bank are made from the customsettings menu.
1Display the camera menusTurn the camera on (A) and press the button (B). The menu for the currentoperating mode will be displayed in the monitor (C).
Custom Settings (continued)
01234
A
ONOFFOFF
OFFBank SelectImage ReviewEV StepBKT OrderAF Activation
5 Anti-mirror6 Focus Area
CSM MENU
N
A B

159
CU
ST
OM
SE
TT
ING
S A
ND
OT
HE
R M
EN
US
—C
US
TO
M S
ET
TIN
GSUsing the Function Button to Adjust Custom Settings
If CSM is selected in the Assign FUNC sub-menu, the button can be used to make changes to custom settings. Keep-ing the button pressed, rotate the main command dialuntil the desired settings number appears in the rear controlpanel. Adjust the selected setting by rotating the sub-com-mand dial while pressing the button. Release the button to put your selection into effect.
4Choose an option for the selected settingPress the multi selector to the right (A) to display a menu of options for theselected setting (B).
For more information on:
pg. 116 The Assign FUNC sub-menu
OK
F1 Image Review
OFF
ON
CSM MENUA B
Press the multi selector up or down to highlight the desired option, then pressthe selector to the right to put your choice into effect and return to the customsettings menu. To return to the custom settings menu without changing settings,press the multi selector to the left.
When custom settings for the current settings bankare modified from their default values, the CUSTOMindicator will be displayed in the rear control panel.

160
CU
ST
OM
SE
TT
ING
S A
ND
OT
HE
R M
EN
US
—C
US
TO
M S
ET
TIN
GS
Custom Setting Options
The pages that follow list the options available in the custom settings menu and thesettings available for each option. Options are listed together with the setting andoption numbers that appear in the rear control panel when custom settings areadjusted using the button.
Custom Setting 0: Custom Setting BankThe camera can store up to four banks of custom settings,Bank A, Bank B, Bank C, and Bank D. To activate the settingsin a settings bank, select the desired bank from the CustomSetting Bank menu. Any changes to settings are stored inthe currently selected bank.
Custom Settings (continued)
OK
CustomSetting Bank
Bank ABank BBank CBank D
F0 CSM MENU
For more information on:
pg. 159 Using the button to adjust custom settings
Description
Settings Bank A selected
Settings Bank B selected
Settings Bank C selected
Settings Bank D selected
No.Option
Bank A(default)
Bank B
Bank C
Bank D
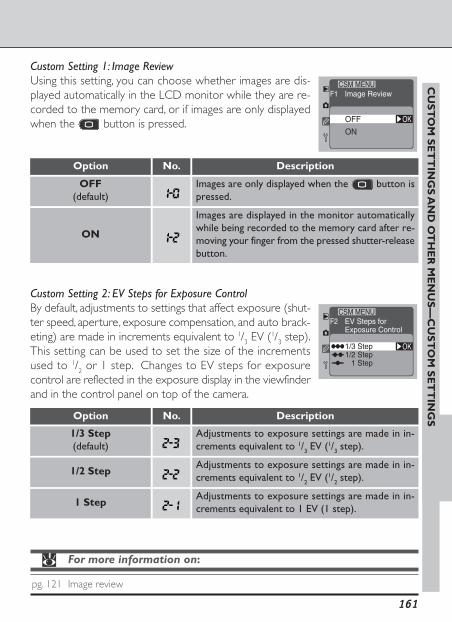
161
CU
ST
OM
SE
TT
ING
S A
ND
OT
HE
R M
EN
US
—C
US
TO
M S
ET
TIN
GS
Custom Setting 1: Image ReviewUsing this setting, you can choose whether images are dis-played automatically in the LCD monitor while they are re-corded to the memory card, or if images are only displayedwhen the button is pressed. OK
F1 Image Review
OFF
ON
CSM MENU
Description
Images are only displayed when the button ispressed.
For more information on:
pg. 121 Image review
Custom Setting 2: EV Steps for Exposure ControlBy default, adjustments to settings that affect exposure (shut-ter speed, aperture, exposure compensation, and auto brack-eting) are made in increments equivalent to 1/3 EV (1/3 step).This setting can be used to set the size of the incrementsused to 1/2 or 1 step. Changes to EV steps for exposurecontrol are reflected in the exposure display in the viewfinderand in the control panel on top of the camera.
OK
EV Steps for Exposure Control
1/3 Step
1 Step1/2 Step
F2 CSM MENU
Description
Adjustments to exposure settings are made in in-crements equivalent to 1/3 EV (1/3 step).
Adjustments to exposure settings are made in in-crements equivalent to 1/2 EV (1/2 step).
Adjustments to exposure settings are made in in-crements equivalent to 1 EV (1 step).
No.
No.Option
OFF(default)
Option
1/3 Step(default)
1/2 Step
1 Step
Images are displayed in the monitor automaticallywhile being recorded to the memory card after re-moving your finger from the pressed shutter-releasebutton.
ON

162
CU
ST
OM
SE
TT
ING
S A
ND
OT
HE
R M
EN
US
—C
US
TO
M S
ET
TIN
GS
Custom Setting 3: Bracketing OrderBy default, auto bracketing proceeds in the order given in thereference section ( pg. 100). If desired, the camera can beprogrammed to perform bracketing in order from the low-est exposure value (underexposure) to the highest exposurevalue (overexposure).
OK
Bracketing OrderF3
MTR>Under>Over
Under>MTR>Over
CSM MENU
Custom Setting 4: AF ActivationBy default, both the shutter-release button and the AF-ONbuttons can be used activate autofocus. If you prefer, you canset the camera so that an autofocus operation is only per-formed when one of the AF-ON buttons is pressed. OK
F4 AF Activation
Shutter/AF-ON
OFF
ON
AF-ON only
CSM MENU
Description
Autofocus can only be performed using the AF-ONbuttons.
Custom Settings (continued)
Autofocus can be performed using the AF-ON but-tons or by pressing the shutter-release button half-way.
Option
AF-ON only
Shutter/AF-ON(default)
No.
Description
Bracketing performed in the order given in the ref-erence section ( pg. 101).
Bracketing performed in order from lowest to high-est value.
Option
MTR>Under>Over(default)
Under>MTR>Over
No.
For more information on:
pg. 100 Auto bracketing

163
CU
ST
OM
SE
TT
ING
S A
ND
OT
HE
R M
EN
US
—C
US
TO
M S
ET
TIN
GS
Custom Setting 5: Anti-mirror-shock modeBy default, the mirror is raised out of the way of the CCD atthe same time that the shutter opens to create an exposure.To minimize camera shake, exposure can be delayed untilafter the mirror has been raised and any vibrations have diedaway.
OK
F5 Anti-mirror-shock mode
OFF
ON
CSM MENU
Description
Custom Setting 6: Focus Area SelectAt default settings, the focus-area display is bounded by thefour outer focus areas. Thus, for example, pressing the multiselector up when the top focus area is selected will have noeffect. This can be changed so that focus-area selection “wrapsaround” from top to bottom and right to left. In this case,pressing the multi selector up when the top focus area ishighlighted selects the bottom focus area, while pressing it down when the bottomfocus area is highlighted selects the top focus area. Similarly, pressing the multi selec-tor to the right when the right area is highlighted selects the left focus area.
OK
F6 Focus Area Select
No Wrap
ON
OFF
Wrap
CSM MENU
Description
Wrap-around in effect.
Wrap-around disabled.
No.
No.
Option
Option
Wrap
No Wrap(default)
For more information on:
pg. 73 Focus-area selection
The shutter is released as soon as the mirror israised.
OFF(default)
Exposure is delayed until after mirror is raised tominimize camera shake for situations in which veryslight vibrations can blur photographs, such as mi-croscope photography.
ON

164
CU
ST
OM
SE
TT
ING
S A
ND
OT
HE
R M
EN
US
—C
US
TO
M S
ET
TIN
GS
Custom Setting 7: AE LockBy default, exposure is locked by pressing the AE-L/AF-L but-ton. This can be changed so that exposure is locked by press-ing the shutter-release button halfway.
F7 AE Lock
AE-L/AF-L Buttom
ON
OFF
+ Shutter Button
CSM MENU
OK
Description
Pressing the AE-L/AF-L button locks exposure.
Exposure is locked while the shutter-release buttonis pressed halfway.
Custom Setting 8: Mirror Lock-up for CCD CleaningThis option is used to lock the mirror in the up position whileinspecting or cleaning the low-pass filter that covers the CCD.See “Technical Notes: Caring for Your Camera” ( pg. 196).
OK
F8 Mirror Lock-upfor CCD Cleaning
OFF
ON
OFF
CCD Cleaning
CSM MENU
Description
Custom Settings (continued)
No.
No.
Option
AE-L/AF-L Button(default)
+ Shutter Button
Option
Mirror not locked in up position.OFF
(default)
Mirror locked in up position. To ensure that poweris available to lower the mirror after cleaning, thisoption only takes effect when the camera is pow-ered by an EH-4 AC adapter (available separately).
CCD Cleaning
For more information on:
pg. 96 Auto-exposure lock

165
CU
ST
OM
SE
TT
ING
S A
ND
OT
HE
R M
EN
US
—C
US
TO
M S
ET
TIN
GS
Custom Setting 10: Dynamic AF, Continuous-ServoThis option is used to enable or disable closest-subject prior-ity when dynamic AF is used with continuous-servo autofocus. F10 Dynamic AF,
Continuous-Servo
Select AF Area
ON
OFF
Closest Subject
CSM MENU
OK
Description
Camera focuses on the subject in the selected focusarea.
Camera assesses distance to subjects in each focusarea and selects the subject closest to the camera.
Custom Setting 9: Dynamic AF, Single-ServoThis option is used to disable or enable closest-subject prior-ity when dynamic AF is used with single-servo autofocus. F9 Dynamic AF,
Single-Servo
Closest Subject
OFF
ON
Select AF Area
CSM MENU
OK
DescriptionNo.Option
Option
Select AF Area(default)
Closest Subject
No.
Camera assesses distance to subjects in each focusarea and selects the subject closest to the camera.
Closest Subject(default)
Camera focuses on the subject in the selected focusarea.
Select AF Area
2—EV Steps for Exposure Control ( pg. 161)
By default, adjustments to aperture and shutter speed are made in increments equivalent to1/3 EV (1/3 step). If desired, the size of the increments can be increased to 1/2 or 1 step.
For more information on:
pg. 74 AF-area mode

166
CU
ST
OM
SE
TT
ING
S A
ND
OT
HE
R M
EN
US
—C
US
TO
M S
ET
TIN
GS
Custom Setting 11: AE/Flash BracketingBy default, both auto-exposure and flash exposure changewith each shot taken while auto bracketing is in effect. Thisoption can be used to change camera settings so that brack-eting affects only one of auto-exposure and flash exposure. OK
AE/Flash Bracketing
F11CSM MENU
AE & FlashAE OnlyFlash Only
Description
Both auto-exposure and flash exposure change witheach shot.
Only auto-exposure changes with each shot; flashexposure remains fixed.
Custom Setting 12: Assign Command DialBy default, the main command dial controls shutter speed(shutter-priority auto and manual exposure modes) while thesub-command dial controls aperture (aperture-priority andmanual exposure modes). This relationship can be reversedusing this option.
F12 AssignCommand Dial
Main=S, Sub=A
ON
OFF
Main=A, Sub=S
CSM MENU
OK
Description
No.
No.
Option
AE & Flash(default)
AE Only
Option
Main command dial controls shutter speed, sub-com-mand dial aperture.
Main=S, Sub=A(default)
Main command dial controls aperture, sub-commanddial shutter speed.
Main=A, Sub=S
For more information on:
pg. 100 Auto bracketing
Custom Settings (continued)
Only flash exposure changes with each shot; auto-exposure remains fixed.
Flash Only

167
CU
ST
OM
SE
TT
ING
S A
ND
OT
HE
R M
EN
US
—C
US
TO
M S
ET
TIN
GS
Custom Setting 13: Easy Exposure CompensationIf desired, exposure compensation can be set with the com-mand dials alone, without pressing the button. Exposurecompensation can be set to values between –5 EV and + 5EV.
F13 Easy ExposureCompensation
[+/–] & CMD Dial
ON
OFF
CMD Dial only
CSM MENU
OK
DescriptionNo.Option
Exposure compensation is set by pressing the button while rotating the main command dial.
[+/–] & CMD Dial(default)
2—EV Steps for Exposure Control ( pg. 161)
By default, adjustments to aperture and shutter speed are made in increments equivalent to1/3 EV (1/3 step). If desired, the size of the increments can be increased to 1/2 or 1 step.
For more information on:
pg. 98 Exposure compensation
Exposure compensation is set using one of the com-mand dials. The command dial used to set exposurecompensation varies with the exposure mode andthe option chosen in Custom Setting 12.
CMD Dial only Expo
sure mo
de
Custom Setting 12
P
S
A
M
Main=S, Sub=A
Sub-command dial
Sub-command dial
Main command dial
–
Main=A, Sub=S
Sub-command dial
Main command dial
Sub-command dial
–

168
CU
ST
OM
SE
TT
ING
S A
ND
OT
HE
R M
EN
US
—C
US
TO
M S
ET
TIN
GS
Custom Setting 14: Center Weight AreaWhen determining exposure, center-weighted metering as-signs the greatest weight to a circle in the center of the frame.This option is used to set the size of the circle as shownbelow. OK
Center WeightArea
F14
Ø8mmØ6mm
Ø10mmØ13mmAverage
CSM MENU
Metering area
Custom Setting 15: Auto Meter-Off DelayThis setting is used to set the length of time exposure indica-tors are displayed in the control panel on top of the cameraafter the camera is turned on or after the shutter-releasebutton is pressed halfway. Note that increasing the time forauto meter-off delay reduces battery performance.
OK
Auto Meter-OffDelay
F15
64
816
ss
ss
CSM MENU
Time indicators remain active (approx.)
No.
No.
Option
Option
For more information on:
pg. 82 Metering
Greatest weight assigned to a 10 mm (0.39”) circleφ10 mm
Custom Settings (continued)
Greatest weight assigned to a 6 mm (0.24”) circleφ6 mm
Greatest weight assigned to an 8 mm (0.32”) circleφ8 mm (default)
Exposure based on the average for the entire frameAverage
Greatest weight assigned to a 13 mm (0.51”) circleφ13 mm
Sixteen seconds16 s
Eight seconds8 s
Six seconds6 s (default)
Four seconds4 s

169
CU
ST
OM
SE
TT
ING
S A
ND
OT
HE
R M
EN
US
—C
US
TO
M S
ET
TIN
GS
Custom Setting 17: LCD IlluminationBy default, the control panels are illuminated when the powerswitch is turned to . If desired, the camera can be set sothat the control panels light when any button is pressed.
F17 LCD Illumination
Lamp On Switch
ON
OFF
Any Button
CSM MENU
OK
Description
Control panels are illuminated only when powerswitch is turned to .
Control panels are illuminated when any button ispressed.
Custom Setting 16: Self-timer DelayThis setting is used to specify the length of the delay from thetime the shutter-release button is pressed to the time theshutter is released in self-timer mode.
OK
Self-timer DelayCSM MENU
F16
25
1020
ssss
Shutter release delayed by (approx.)No.Option
Option
Lamp On Switch(default)
Any Button
No.
Two seconds2 s
For more information on:
pg. 103 Using the self-timer
Five seconds5 s
Ten seconds10 s (default)
Twenty seconds20 s

170
CU
ST
OM
SE
TT
ING
S A
ND
OT
HE
R M
EN
US
—C
US
TO
M S
ET
TIN
GS
Custom Setting 18: Monitor Off DelayThis item controls the length of time the monitor remains onwhen no operations are performed. Note that increasingthe monitor off delay reduces battery life.
OK
F18 Monitor Off DelayCSM MENU
2010
15
10
ss
minminmin
Monitor stays on for (approx.)No.Option
One minute1 min
Custom Settings (continued)
Ten seconds10 s
Twenty seconds20 s (default)
Five minutes5 min
Ten minutes10 min
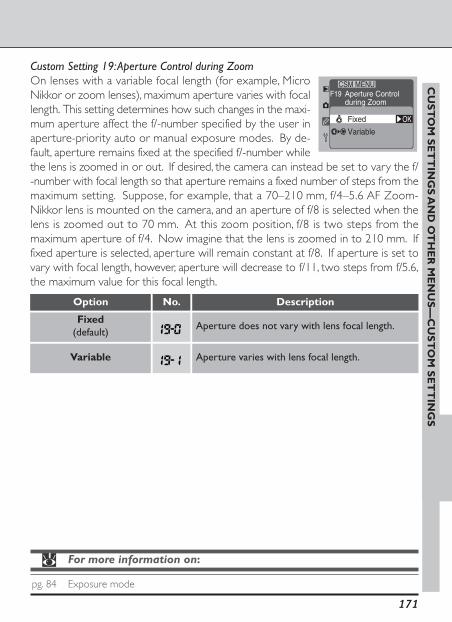
171
CU
ST
OM
SE
TT
ING
S A
ND
OT
HE
R M
EN
US
—C
US
TO
M S
ET
TIN
GS
Custom Setting 19: Aperture Control during ZoomOn lenses with a variable focal length (for example, MicroNikkor or zoom lenses), maximum aperture varies with focallength. This setting determines how such changes in the maxi-mum aperture affect the f/-number specified by the user inaperture-priority auto or manual exposure modes. By de-fault, aperture remains fixed at the specified f/-number whilethe lens is zoomed in or out. If desired, the camera can instead be set to vary the f/-number with focal length so that aperture remains a fixed number of steps from themaximum setting. Suppose, for example, that a 70–210 mm, f/4–5.6 AF Zoom-Nikkor lens is mounted on the camera, and an aperture of f/8 is selected when thelens is zoomed out to 70 mm. At this zoom position, f/8 is two steps from themaximum aperture of f/4. Now imagine that the lens is zoomed in to 210 mm. Iffixed aperture is selected, aperture will remain constant at f/8. If aperture is set tovary with focal length, however, aperture will decrease to f/11, two steps from f/5.6,the maximum value for this focal length.
OK
F19 Aperture Controlduring Zoom
Fixed
Variable
CSM MENU
DescriptionNo.Option
Aperture does not vary with lens focal length.Fixed
(default)
Variable
For more information on:
pg. 84 Exposure mode
Aperture varies with lens focal length.

172
CU
ST
OM
SE
TT
ING
S A
ND
OT
HE
R M
EN
US
—C
US
TO
M S
ET
TIN
GS
Custom Setting 20: ISO Step ValueBy default, adjustments to sensitivity (ISO equivalency) aremade in increments equivalent to 1/3 EV (1/3 step). This settingcan be used to set the size of the increments to 1/2 or 1 step.
OK
ISO Step Value
1/3 Step
1 Step1/2 Step
F20CSM MENU
Custom Setting 21: AE-L/AF-L ButtonBy default, both focus and exposure are locked while theAE-L/AF-L button is pressed. Custom Setting 21 controls thebehavior of this button as shown below.
AE-L/AF-L Button
AE Lock onlyAF Lock onlyAE Lock hold
AE/AF lock
F21CSM MENU
OK
Description
Custom Settings (continued)
Option No.
Description
Adjustments to sensitivity are made in incrementsequivalent to 1/3 EV (1/3 step).
Adjustments to sensitivity are made in incrementsequivalent to 1/2 EV (1/2 step).
Option
1/3 Step(default)
1/2 Step
No.
Adjustments to sensitivity are made in incrementsequivalent to 1 EV (1 step).
1 Step
Both focus and exposure are locked while the AE-L/AF-L button is pressed.
AE/AF Lock(default)
Pressing the AE-L/AF-L button locks exposure. Ex-posure remains locked until the button is pressedagain or the shutter is released.
AE Lock hold
For more information on:
pg. 62 Sensitivity (ISO equivalency)pg. 78 Focus lock
Exposure is locked while the AE-L/AF-L button ispressed. Focus is not locked.
AE Lock only
Focus is locked while the AE-L/AF-L button ispressed. Exposure is not locked.
AF Lock only

173
CU
ST
OM
SE
TT
ING
S A
ND
OT
HE
R M
EN
US
—C
US
TO
M S
ET
TIN
GS
Custom Setting 22: Aperture SettingBy default, aperture can only be adjusted by means of thesub-command dial, not the aperture ring on the lens. Usingthis item, you can instead set the camera so that aperture canonly be adjusted using the lens aperture ring, not the sub-command dial.
F22 Aperture Setting
Sub-Command Dial
ON
OFF
Aperture Ring
CSM MENU
OK
Description
Aperture can only be adjusted using the sub-com-mand dial.
No.Option
Sub-Command Dial(default)
For more information on:
pg. 96 Auto-exposure lockpg. 88 Aperture selectionpg. 166 Custom Setting 12
Aperture can only be adjusted using the lens aper-ture ring. When this option is in effect, the aperturedisplay in the control panel shows aperture in incre-ments of one step. Note that even if aperture se-lection is assigned to the main command dial inCustom Setting 12, aperture can only be adjustedusing the lens aperture ring.
Aperture Ring

174
CU
ST
OM
SE
TT
ING
S A
ND
OT
HE
R M
EN
US
—C
US
TO
M S
ET
TIN
GS
Custom Settings (continued)
Custom Setting 23: Image SharpeningBy default, the camera processes photographs to increasesharpness, making edges more distinct. This setting controlsthe amount of sharpening performed.
Image Sharpening
LowHighNone
Normal
F23CSM MENU
OK
Description
Image is processed to increase sharpness, makingedges in the image more distinct.
No.Option
Normal(default)
Image is still processed to increase sharpness, butthe amount of sharpening is less than default level.
Low
Image is processed to increase sharpness beyonddefault level.
High
No sharpening is performed.None

175
CU
ST
OM
SE
TT
ING
S A
ND
OT
HE
R M
EN
US
—C
US
TO
M S
ET
TIN
GS
Custom Setting 24: Tone CompensationAs photographs are saved to the memory card, the cameraadjusts tones in the image to optimize contrast. This adjust-ment is performed by means of tone curves that define therelationship between the tone distribution in the original im-age and the compensated result. Using Custom Setting 24,you can select a curve suited to the subject and the device onwhich the image will be printed or displayed.
OK
Tone Compensation
NormalAuto
Less contrastMore contrastCustom
F24CSM MENU
DescriptionNo.Option
Custom
The Custom tone compensation curve is downloaded to the camera using Nikon Capture 3Camera Control software (available separately). Nikon Capture 3 can not be used to define acustom curve under Mac OS X version 10.1.4 or earlier, as these versions of Mac OS X do notsupport Camera Control when used with the D1H .
For more information on:
pg. 152 Nikon Capture 3
When matrix metering is selected, the camera au-tomatically optimizes contrast by selecting a curveequivalent to “Normal,” “Less Contrast,” or “MoreContrast.” When another metering method is se-lected, this option is equivalent to Normal.
Auto(default)
A standard curve is used. This curve is suitable formost scenes, ranging from dark through to bright.
Normal
Use this curve to achieve a softer image, for ex-ample, with portraits shot in direct sunlight, whenyour subject’s features would otherwise tend to be“washed out.”
Less contrast
This curve enhances detail, making it suited to mistylandscape shots and other low-contrast subjects.
More contrast
A user-defined curve downloaded to the camerafrom Nikon Capture 3 is used. If no curve has beendownloaded to the camera, this option is equivalentto Normal.
Custom

176
CU
ST
OM
SE
TT
ING
S A
ND
OT
HE
R M
EN
US
—C
US
TO
M S
ET
TIN
GS
Custom Settings (continued)
Custom Setting 26: C-Mode Max ShotsUsing this item, the user can specify the maximum number ofphotographs that can be stored in the temporary memorybuffer when shooting in continuous mode. Options rangefrom one to forty shots; the default setting is forty. Note,however, that no more than twenty-seven RAW images canbe stored in the buffer at a time, even when the maximumchosen using this setting is twenty-seven or higher.
04 OK
C-Mode Max ShotsF26CSM MENU
Custom Setting 25: C-Mode Shooting SpeedThis item sets the rate at which photographs are taken incontinuous mode.
OK
C-Mode Shooting Speed
3 fps
5 fps4 fps
2 fps1 fps
F25CSM MENU
DescriptionNo.Option
Photographs are taken at a rate of three frames persecond.
3 fps
Photographs are taken at a rate of two frames persecond.
2 fps
For more information on:
pg. 52 Continuous mode
Photographs are taken at a rate of one frame persecond.
1 fps
Photographs are taken at a rate of four frames persecond.
4 fps
Photographs are taken at a rate of five frames persecond.
5 fps(default)

177
CU
ST
OM
SE
TT
ING
S A
ND
OT
HE
R M
EN
US
—C
US
TO
M S
ET
TIN
GS
Custom Setting 27: Display ModeThis item determines whether additional pages showing a his-togram or image highlights are included in the photo informa-tion display when photographs are played back in the moni-tor. This setting can also be adjusted using the Display Modeitem in the playback menu.
OK
Display Mode
Image onlyHistogramHighlightsBoth
F27CSM MENU
Description
Only photograph and standard photo informationdisplayed.
No.Option
Image only(default)
For more information on:
pg. 126 Histogram and highlights displayspg. 142 The Display Mode sub-menu
A page showing image highlights is included in thephoto information display.
Highlights
Two pages are added to the photo information dis-play, one showing a histogram and the other high-lights.
Both
A page with a histogram showing the distribution oftones in the image is added to the photo informa-tion display.
Histogram

178
CU
ST
OM
SE
TT
ING
S A
ND
OT
HE
R M
EN
US
—C
US
TO
M S
ET
TIN
GS
Custom Settings (continued)
Custom Setting 28: NEF(RAW) Image SaveThis item determines whether the RAW image format is avail-able at an image quality setting of High, and whether RAW-format images will be compressed. Note that Nikon View orNikon Capture 3 is required when viewing RAW images on acomputer.
OK
NEF (RAW)Image Save
OFFUncompressedCompressed
F28CSM MENU
DescriptionNo.Option
RAW images are saved without compression.Uncompressed
(default)
RAW images are compressed using a “lossless” al-gorithm that reduces file size from around fifty tosixty percent without affecting image quality.
Compressed
High-quality images can only be saved in TIFF for-mat.
OFF
For more information on:
pg. 56 Image qualitypg. 150 Nikon Viewpg. 152 Nikon Capture 3pg. 140 The Folder Designate menupg. 117 The File No. Seq. menu
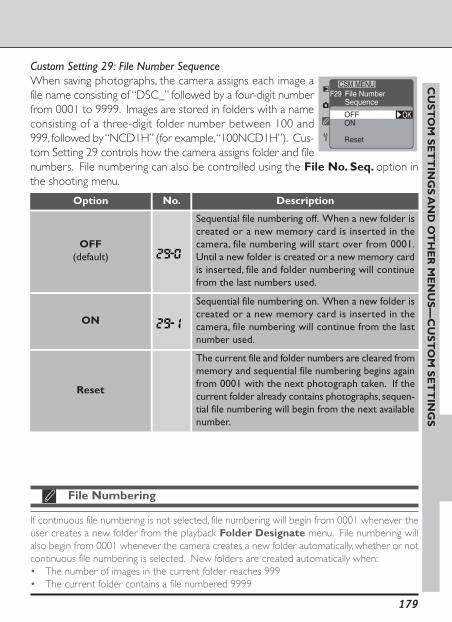
179
CU
ST
OM
SE
TT
ING
S A
ND
OT
HE
R M
EN
US
—C
US
TO
M S
ET
TIN
GS
OK
File Number Sequence
OFFON
Reset
F29CSM MENU
DescriptionNo.Option
Sequential file numbering on. When a new folder iscreated or a new memory card is inserted in thecamera, file numbering will continue from the lastnumber used.
ON
Sequential file numbering off. When a new folder iscreated or a new memory card is inserted in thecamera, file numbering will start over from 0001.Until a new folder is created or a new memory cardis inserted, file and folder numbering will continuefrom the last numbers used.
OFF(default)
File Numbering
If continuous file numbering is not selected, file numbering will begin from 0001 whenever theuser creates a new folder from the playback Folder Designate menu. File numbering willalso begin from 0001 whenever the camera creates a new folder automatically, whether or notcontinuous file numbering is selected. New folders are created automatically when:• The number of images in the current folder reaches 999• The current folder contains a file numbered 9999
Custom Setting 29: File Number SequenceWhen saving photographs, the camera assigns each image afile name consisting of “DSC_” followed by a four-digit numberfrom 0001 to 9999. Images are stored in folders with a nameconsisting of a three-digit folder number between 100 and999, followed by “NCD1H” (for example, “100NCD1H”). Cus-tom Setting 29 controls how the camera assigns folder and filenumbers. File numbering can also be controlled using the File No. Seq. option inthe shooting menu.
The current file and folder numbers are cleared frommemory and sequential file numbering begins againfrom 0001 with the next photograph taken. If thecurrent folder already contains photographs, sequen-tial file numbering will begin from the next availablenumber.
Reset

180
CU
ST
OM
SE
TT
ING
S A
ND
OT
HE
R M
EN
US
—C
US
TO
M S
ET
TIN
GS
Custom Settings (continued)
Custom Setting 31: ISO BoostThis setting is used to raise sensitivity (ISO equivalency) roughlyone to two steps (1–2 EV) above the maximum setting, whichis approximately equivalent to IS0 1600. This option is inde-pendent of the setting chosen with the ISO button or shoot-ing menu. Sensitivity boost can be used to obtain higher shut-ter speeds at night-time sporting events, for example, or toprevent underexposure when photographing poorly-lit subjects. Note, however,that sensitivity boost increases the amount of “noise” (a mottling effect similar to theeffects of grain in high-speed film) that appears in the final photograph.
OK
ISO Boost
OFF1 step over 16002 steps over 1600
F31CSM MENU
DescriptionNo.Option
Sensitivity boost can not be used.OFF
(default)
For more information on:
pg. 148 Connecting the camera to a computerpg. 62 Sensitivity (ISO equivalency)
Sensitivity raised roughly one step (1 EV) over ISO1600 equivalent. Rear control panel shows HI-1.
1 step over 1600
Sensitivity raised roughly two steps (2 EV) over ISO1600 equivalent. Rear control panel shows HI-2.
2 steps over 1600
Custom Setting 30: PC Shooting ModeWhen the camera is in PC mode, the mode dial can not beused to choose between single-frame and continuous modes.This setting determines the shooting mode when the camerais connected to a computer. OK
F30 PC Shooting Mode
Single
Continuous
CSM MENU
DescriptionNo.Option
Camera takes a single photograph each time theshutter-release button is pressed.
Single(default)
Photographs are taken one after the other whilethe shutter-release button is held down.
Continuous

181
CU
ST
OM
SE
TT
ING
S A
ND
OT
HE
R M
EN
US
—C
US
TO
M S
ET
TIN
GS
Custom Setting 32: Color ModeYour Nikon digital camera offers you a choice of color modesfor recording digital photographs. Choose a setting suited toyour production work-flow and the task at hand. When open-ing photographs in an application that supports color man-agement, select a color profile that matches the color settingin effect at the time the photograph was taken. Note that ifyou convert the image to a different color space when opening it, you will notachieve exactly the same colors as the original. If the image is converted to a colorspace with a narrower gamut, tonal discontinuities may be observed.
OK
Color ModeF32CSM MENU
(sRGB)
(AdobeRGB)
DescriptionOption No.
This setting is adapted to the sRGB color space,which reproduces colors as seen with little or noediting. It is particularly suited to human portraitsubjects.
I (sRGB)(default)
Images recorded in this mode are adapted to theAdobe RGB color space. This color space is ca-pable of expressing a wider range colors than thesRGB color space, making it the preferred choice instudio settings and commercial production work-flows.
II (Adobe RGB)
Color Mode II
Photographs taken in Mode II include an embedded ICC profile, ensuring that the correctcolor-space settings can be selected automatically when the images are opened in AdobePhotoshop or in other applications that support color management (see the documentationprovided with the application for details). Note, however, that while the system for recordingMode II images is based on Exif and DCF, it is not in strict conformity with these standards.Mode I is recommended when taking photographs that will be viewed on other cameras orExif/DCF-compatible devices, or that will be printed using ExifPrint, the direct printing optionon some household printers, or kiosk printing or other commercial print services. For informa-tion on whether your printer or print service supports ExifPrint, refer to the documentationprovided with your printer or speak to your photofinisher. For best results, use Nikon View orNikon Capture 3, which make excellent additions to any imaging workflow. Nikon Capture 3 isunique in its ability to directly edit NEF files without affecting the image quality of the original,and belongs at the first stage of any production workflow involving image editing software.
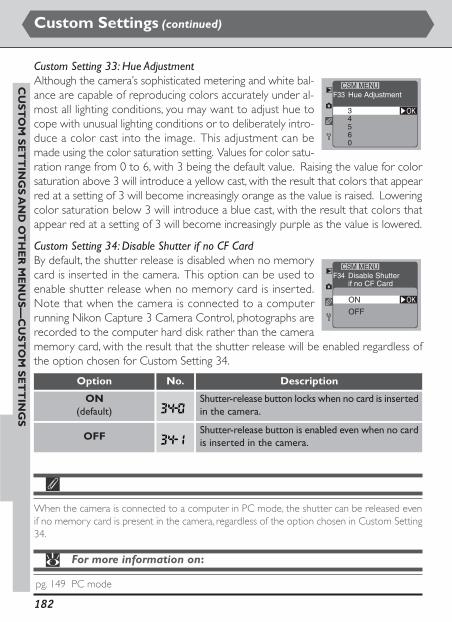
182
CU
ST
OM
SE
TT
ING
S A
ND
OT
HE
R M
EN
US
—C
US
TO
M S
ET
TIN
GS
Custom Settings (continued)
Custom Setting 33: Hue AdjustmentAlthough the camera’s sophisticated metering and white bal-ance are capable of reproducing colors accurately under al-most all lighting conditions, you may want to adjust hue tocope with unusual lighting conditions or to deliberately intro-duce a color cast into the image. This adjustment can bemade using the color saturation setting. Values for color satu-ration range from 0 to 6, with 3 being the default value. Raising the value for colorsaturation above 3 will introduce a yellow cast, with the result that colors that appearred at a setting of 3 will become increasingly orange as the value is raised. Loweringcolor saturation below 3 will introduce a blue cast, with the result that colors thatappear red at a setting of 3 will become increasingly purple as the value is lowered.
Custom Setting 34: Disable Shutter if no CF CardBy default, the shutter release is disabled when no memorycard is inserted in the camera. This option can be used toenable shutter release when no memory card is inserted.Note that when the camera is connected to a computerrunning Nikon Capture 3 Camera Control, photographs arerecorded to the computer hard disk rather than the cameramemory card, with the result that the shutter release will be enabled regardless ofthe option chosen for Custom Setting 34.
OK
Hue Adjustment
43
560
F33CSM MENU
OK
F34 Disable Shutterif no CF Card
ON
OFF
CSM MENU
Description
Shutter-release button locks when no card is insertedin the camera.
No.Option
ON(default)
Shutter-release button is enabled even when no cardis inserted in the camera.
OFF
When the camera is connected to a computer in PC mode, the shutter can be released evenif no memory card is present in the camera, regardless of the option chosen in Custom Setting34.
For more information on:
pg. 149 PC mode

183
CU
ST
OM
SE
TT
ING
S A
ND
OT
HE
R M
EN
US
—C
US
TO
M S
ET
TIN
GS
Custom Setting 35: Rear Control Panel DisplayThis setting determines whether the display in the rear con-trol panel indicates the current sensitivity (ISO equivalency)setting or the number of exposures remaining.
OKISO
F35 Rear Control Panel Display
ISO
Frame Count
CSM MENU
DescriptionOption No.
Rear control panel shows the number of exposuresremaining. Sensitivity is displayed only while the ISObutton is pressed.
Frame Count
Rear control panel shows current sensitivity setting.ISO
(default)

184
CU
ST
OM
SE
TT
ING
S A
ND
OT
HE
R M
EN
US
—C
US
TO
M S
ET
TIN
GS
Restoring Default Settings (Two-Button Reset)
By pressing the and buttons simultaneously,you can reset camera settings to their default values. Press-ing the buttons together twice resets both camera set-tings and custom settings for the current settings bank.
Custom Settings (continued)
Setting Setting DefaultDefault
Autobracketing
Off
Flash syncmode
Front-curtain sync
Exposurecompensation
±0.0
Auto-exposurelock
Off
Aperture lock Off
Shutter-speedlock
Off
Flexibleprogram
Off
Exposuremode
Programmed auto
Focus area Center
AF-area mode Single Area AF
Sensitivity ISO 200 equivalent
Image type Color
Image quality JPEG Normal
White balance Auto
White balanceadjustment
±0
Restoring Camera Settings to Default ValuesTo clear camera settings, hold the and buttons down together for morethan two seconds. The following settings will be restored to their default values:

185
CU
ST
OM
SE
TT
ING
S A
ND
OT
HE
R M
EN
US
—C
US
TO
M S
ET
TIN
GS
Restoring Custom Settings to Default ValuesDefault settings for the current settings bank can be restored by holding the and buttons down together for more than two seconds. The CUSTOMindicator in the rear control panel will start to blink. Release both buttons while theindicator is blinking and then press both buttons again. All settings in the currentsettings bank, together with the camera settings listed above, will be reset to defaultvalues. Settings in other banks are not affected.

186
CU
ST
OM
SE
TT
ING
S A
ND
OT
HE
R M
EN
US
—O
TH
ER
CA
ME
RA
ME
NU
S
Other Camera Menus
DeleteSlide ShowProtectHide ImagePrint SetFolder DesignateDisplay Mode
D1H
PLAYBACK MENU
The pages that follow provide an index to the options available in the shooting,playback, and setup menus.
The Playback Menu
The playback menu, which can be accessed in all operating modes,contains the playback options shown opposite.
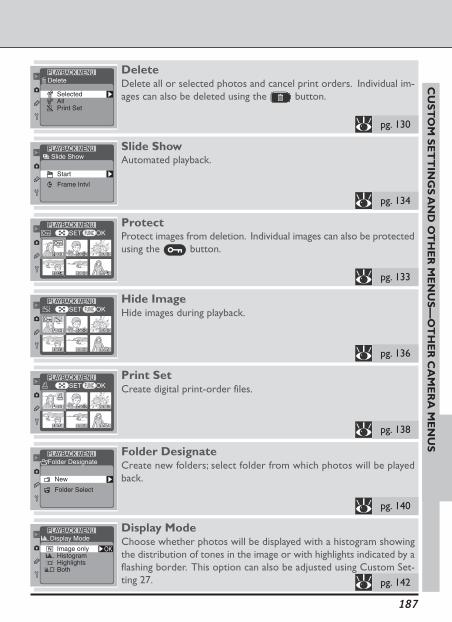
187
CU
ST
OM
SE
TT
ING
S A
ND
OT
HE
R M
EN
US
—O
TH
ER
CA
ME
RA
ME
NU
S
DeleteDelete all or selected photos and cancel print orders. Individual im-ages can also be deleted using the button.
DeletePLAYBACK MENU
SelectedAllPrint Set
Slide ShowAutomated playback.Slide Show
PLAYBACK MENU
Start
Frame Intvl
ProtectProtect images from deletion. Individual images can also be protectedusing the button.
00-11001110111010
100-4100-400-000-41000-00 -4-4000-
00-200-2100100100001010
100-5
100-300-000-30101101001000
100-610010000000-0000000000-000-000000
SET OKPLAYBACK MENU
Hide ImageHide images during playback.
00-11001110111010
100-4100-400-000-41000-00 -4-4000-
00-200-2100100100001010
100-5
100-300-000-30101101001000
100-610010000000-0000000000-000-000000
SET OKPLAYBACK MENU
Print SetCreate digital print-order files.
00-11001110111010
100-4100-400-000-41000-00 -4-4000-
00-200-2100100100001010
100-5
100-300-000-30101101001000
100-610010000000-0000000000-000-000000
SET OKPLAYBACK MENU
Folder DesignateCreate new folders; select folder from which photos will be playedback.New
Folder Select
Folder DesignatePLAYBACK MENU
Display ModeChoose whether photos will be displayed with a histogram showingthe distribution of tones in the image or with highlights indicated by aflashing border. This option can also be adjusted using Custom Set-ting 27.
OKImage onlyHistogramHighlightsBoth
Display ModePLAYBACK MENU
pg. 130
pg. 134
pg. 133
pg. 136
pg. 138
pg. 140
pg. 142

188
CU
ST
OM
SE
TT
ING
S A
ND
OT
HE
R M
EN
US
—O
TH
ER
CA
ME
RA
ME
NU
S
Other Camera Menus (continued)
A200
NORM
OFFOFF
White BalISO
Image Quality
Assign FUNCAF Area ModeFile No. Seq.Command Lock
SHOOTING MENU
The Shooting Menu
The shooting menu controls shooting settings in single-frame,continuous, self-timer, and PC modes. Many of the options inthe shooting menu can also be accessed using the buttons andcommand dials.

189
CU
ST
OM
SE
TT
ING
S A
ND
OT
HE
R M
EN
US
—O
TH
ER
CA
ME
RA
ME
NU
S
Image QualityChoose image quality (compression ratio) and format (color and size). Atan image quality of High, a further menu of file format options is available.This operation can also be performed using the button and com-mand dials.
ColorQuality
Image Quality
NORM
SHOOTING MENU
White BalSet white balance according to the light source. White balance canalso be adjusted using the button.
White Bal
AutoIncandescentFluorescentDirect SunlightFlash
SHOOTING MENU
ISOChoose a sensitivity (ISO equivalency) setting. Sensitivity can also beadjusted using the ISO button and the main command dial.
OK
ISO
200250320400500
SHOOTING MENU
Assign FUNCSelect the function assigned to the button in shooting mode.
OK
Assign FUNC
QualCSMAF AreaLock
SHOOTING MENU
AF Area ModeSet the camera to focus on the subject in a single focus area (single-area AF) or to track the subject as it moves from one focus area tothe next (dynamic AF). This operation can also be performed usingthe button and the main command dial.
OK
AF Area Mode
Dynamic Area AF
Single Area AF
SHOOTING MENU
File No. Seq.Control how the camera assigns file names to photographs. File-name assignment can also be controlled using Custom Setting 29( pg. 179).
OK
File No. Seq.
OFFON
Reset
SHOOTING MENU
Command LockLock shutter speed and/or aperture. This operation can also be per-formed using the button and command dials.
OK
Command Lock
OFFShutter-SpeedApertureBoth
SHOOTING MENU
pg. 56
pg. 64
pg. 62
pg. 116
pg. 74
pg. 117
pg. 95

190
CU
ST
OM
SE
TT
ING
S A
ND
OT
HE
R M
EN
US
—O
TH
ER
CA
ME
RA
ME
NU
S
FormatLanguageVideo OutputDateGPS InputLCD BrightnessMonitor Off
NTSCEn– –
– –OFF
2
SET UP MENU
The Setup Menu
The setup menu is used to adjust basic camera settings andperform such tasks as formatting memory cards.
Other Camera Menus (continued)

191
CU
ST
OM
SE
TT
ING
S A
ND
OT
HE
R M
EN
US
—O
TH
ER
CA
ME
RA
ME
NU
S
Monitor OffSpecify how long the monitor will remain on when no operations areperformed. This option can also be adjusted using Custom Setting 18.
Monitor OffSET UP MENU
OK2010
15
10
ss
minminmin
FormatFormat memory cards for use in your Nikon digital camera. Thisoperation can also be performed using two buttons.
FUNCFUNC OK
Format
NOYES
Warning!All images will be deleted
SET UP MENU
LanguageChoose the language in which menus and messages are displayed.
OKDeEnFr
Es
Language
EnglishDeutsch
Français
Español
SET UP MENU
Video OutputSelect the standard used for video output when the camera is con-nected to a television or VCR.OKNTSC
PAL
Video OutputSET UP MENU
DateSet the date and time. The date and time can also be set using theBKT and buttons ( pg. 217).2001 01
00 00
01
00
Date
Y M
H M
D
S
SET OKFUNCFUNC
SET UP MENU
GPS InputAdjust serial-port settings for connection to a Global Positioning Sys-tem (GPS) device.OK
GPS Input
ON
OFF
SET UP MENU
LCD BrightnessAdjust monitor brightness.
2
LCD BrightnessSET UP MENU
pg. 145
pg. 143
pg. 28
pg. 144
pg. 30
pg. 118
pg. 144

192

193
TECHNICAL NOTES
About This Section
This section describes how to care for your Nikon digital camera to ensure that it remains ingood working order, and explains what to do if the camera does not function as expected. Italso lists the accessories available for your camera and details camera specifications.
• Caring for Your Camera....................... pp. 194–197
• Optional Accessories............................. pp. 198–207
• Troubleshooting ......... pp. 208–211
• Specifications .................. pp. 212–219
• Index..................................... pp. 220–223

194
TE
CH
NIC
AL
NO
TE
S—
CA
RIN
G F
OR
YO
UR
CA
ME
RA
Caring for Your Camera
Replacing the Focusing Screen
Your Nikon digital camera is supplied with a type B BriteView focusing screen. Atype E clear-matte Fresnel screen for cameras in the D1 series, with a grid suitablefor tracing and architectural photography, is available for separate purchase.
To change focusing screens:
1After turning the camera off, remove the lens (A). Using the tweezers suppliedwith the focusing screen, pull the focusing screen latch towards you (B). Thescreen holder will spring open.
2Remove the existing screen, using the tweezers supplied and being careful tohandle the screen by the tab to avoid scratches (A). Using the tweezers to holdthe screen by the tab, set the replacement screen in the holder (B). Push thefront edge of the holder upward until it clicks into place (C).
22
ft m
28
70
50
3528
8510
5
22A B
Do not touch the mirror or the surfaces of the focusing screens.
Use only focusing screens designated for use with cameras in the D1 series.
CBA

195
TE
CH
NIC
AL
NO
TE
S—
CA
RIN
G F
OR
YO
UR
CA
ME
RA
Servicing Your Camera and Accessories
Your camera is a precision machine and requires regular servicing. We recommend that youhave your camera inspected by your retailer or Nikon service representative once every oneto two years, and that you have it serviced once every three to five years (note that fees arecharged for these services). Frequent inspection and servicing are particularly recommendedif you use your camera professionally. When having your camera inspected or serviced, werecommend that you bring you bring any accessories regularly used with the camera, such aslenses and flash units.
Should the monitor break, care should be taken to avoid injury due to broken glass and toprevent liquid crystal touching the skin or entering the eyes or mouth.
In rare instances, static electricity from a brush or cloth may cause the control panels to brightenor darken. This does not indicate a malfunction; the display will shortly return to normal.
Cleaning
When cleaning the camera body, lens, mirror, viewfinder, and monitor, follow theprecautions listed in the table below.
Camera Body
Use a blower to remove dust and lint, then wipe gently with a soft, drycloth. After using the camera at the beach or seaside, wipe off anysand or salt with a cloth lightly dampened with pure water and thendry thoroughly.
Lens, Mirror,Viewfinder
These elements are made of glass and are easily damaged. Removedust and lint with a blower. If using an aerosol blower, keep the canvertical (tilting the can could result in liquid being sprayed on lens,mirror, or viewfinder). To remove fingerprints and other stains, apply asmall amount of lens cleaner to a soft cloth and clean the lens withcare.
MonitorRemove dust and lint with a blower. To remove fingerprints and otherstains, wipe the surface lightly with a soft cloth or chamois leather. Donot apply pressure, as this could result in damage or malfunction.

196
TE
CH
NIC
AL
NO
TE
S—
CA
RIN
G F
OR
YO
UR
CA
ME
RA
Caring for Your Camera (continued)
Cleaning the low-pass filterThe charge-coupled device (CCD) that acts as the camera’s picture element is fittedwith a low-pass filter to prevent moiré. Although this filter prevents dirt from adher-ing directly the CCD, under certain shooting conditions dirt or dust on the filter mayappear in photographs. In this case it will be necessary to clean the filter.
Determining Whether the Filter Requires CleaningThe following two methods are available for determining whether the filter requirescleaning:
1To ensure that the shutter is not damaged, this procedure requires that the cam-era be powered by an EH-4 AC adapter (available separately). Turn the cameraoff and connect the adapter.
2Remove the lens and turn the camera on.
3Press the button and press the multi selector up ordown to select the custom settings menu. 0
1234
A
ONOFFOFF
OFF
56
N
Bank SelectImage ReviewEV StepBKT OrderAF ActivationAnti-mirrorFocus Area
CSM MENU
OK
F8 Mirror Lock-upfor CCD Cleaning
OFF
ON
OFF
CCD Cleaning
CSM MENU4After pressing the multi selector to the right to enter thecustom settings menu, press the multi selector up or downto highlight Custom Setting 8 (Mirror Lock-up for CCDCleaning) and then press the multi selector to the rightto display the menu of options shown at right.
5Highlight CCD Cleaning and press the multi selector to the right. The mirrorwill be raised to the cleaning position and the shutter curtain will open, revealingthe low-pass filter.
6Holding the camera so that light falls on the low-passfilter, examine it for dir t or dust. Should you find aforeign object on the filter, clean it as described below.If there is no dirt on the filter, display the Mirror Lock-up for CCD Cleaning sub-menu as described insteps 3 and 4 and select the OFF option. The mirrorwill return to the down position and the shutter curtain will close.

197
TE
CH
NIC
AL
NO
TE
S—
CA
RIN
G F
OR
YO
UR
CA
ME
RA
Cleaning the FilterThe low-pass filter is extremely delicate and easily damaged. It is recommended thatyou have the filter cleaned by Nikon-authorized service personnel. Should you chooseto ignore this warning and clean the filter yourself, follow the steps below.
1Raise the mirror as described in the first five steps of “Determining Whether theFilter Requires Cleaning.” Note that an EH-4 AC adapter (sold separately) isrequired for this operation; if no adapter is available, you will need to take thecamera to a Nikon-authorized service center for cleaning.
2Remove dirt and dust from the filter with a blower.Do not use a blower-brush, as the bristles could dam-age the filter. Dirt that can not be removed with ablower can only be removed by Nikon-authorized per-sonnel. Under no circumstances should you touch orwipe the filter.
3Display the Mirror Lock-up for CCD Cleaning sub-menu as described aboveunder steps 3 and 4 of “Determining Whether the Filter Requires Cleaning” andselect the OFF option. The mirror will return to the down position and theshutter curtain will close.
4Turn the camera off and replace the lens or body cover, then unplug the ACadapter.

198
TE
CH
NIC
AL
NO
TE
S—
OP
TIO
NA
L A
CC
ES
SO
RIE
S
Compatible Lenses
Nikon recommends CPU lenses for use in your Nikon digital camera. Type G or Dlenses are particularly recommended due to the fact that it is only with lenses ofthese types that you will have access to the full range of shooting options availablefor your camera. The lenses that can be used with cameras in the D1 series are listedbelow.
Optional Accessories
LensExposure mode
CPU
lenses
1 With electronic range finder.2 Metering area corresponds to selected focus area ( pg. 73).3 The camera’s exposure metering and flash control system do not work properly when
shifting and/or tilting the lens, or when an aperture other than the maximum aperture isused.
4 Without shifting and/or tilting.5 Compatible with all AF-S and AF-I Nikkor lenses except the AF-S 17–35 mm f/2.8D IF-
ED and AF-S 28–70 mm f/2.8D IF-ED.6 With maximum effective aperture of f/5.6 or faster.7 With maximum aperture of f/5.6 or faster.8 Some lenses can not be used ( pg. 200).
MASP
✔✔✔✔Type G or D AF Nikkor, AF-S, AF-I Nikkor
✔3———PC Micro Nikkor 85 mm F2.8D
✔✔✔✔AF-I Teleconverter5
✔✔✔✔AF Nikkor other than type G or D(except lenses for F3AF)
✔✔✔✔AI-P Nikkor
Non-C
PU lenses
✔
✔
✔
✔10
✔
✔
—
✔
✔9
✔
—
—
—
—
—
—
—
—
—
—
AI-type Nikkor
AI-modified Nikkor
Reflex-Nikkor8
PC-Nikkor8
AI-type Teleconverter
✔13✔13——PB-6 Bellows Focusing Attachment12
✔✔——Auto extension rings (PK 11A, 12, 13, PN-11)

199
TE
CH
NIC
AL
NO
TE
S—
OP
TIO
NA
L A
CC
ES
SO
RIE
S
Focusing Exposure metering mode
Autofocus Manual1 Matrix Center-weighted Spot
9 Exposure determined by presetting lens aperture. AE lock must also be performed be-fore shifting.
10 Exposure determined by presetting lens aperture. Exposure must also be determinedbefore shifting.
11 Exposure compensation required with some lenses (refer to instruction manual providedwith teleconverter).
12 Auto Extension Ring PK-11A, 12, or 13 required.13 Exposure determined by presetting lens aperture on bellows. Release shutter after ex-
posure metering.
A variety of AF Nikkor lenses, including wide-angle, telephoto, zoom, micro, defocusimage control (DC), and regular lenses with focal lengths of 16–600 mm, are cur-rently available for use with cameras in the D1 series. Contact your retailer or localNikon representative for details.
✔ ✔ ✔ (3D color) ✔ ✔2
— ✔4 ✔3 (3D color) ✔3 ✔2,3
✔6 ✔6 ✔ (3D color) ✔ ✔2
✔ ✔✔
(Color)✔ ✔2
— ✔7 ✔ (Color) ✔ ✔
— ✔7 — ✔ ✔
— ✔7 — — —
— — — ✔ ✔
— ✔4 — ✔9 ✔9
— ✔6 — ✔11 ✔11
— ✔6 — ✔ ✔
— ✔6 — ✔ ✔

200
TE
CH
NIC
AL
NO
TE
S—
OP
TIO
NA
L A
CC
ES
SO
RIE
S
Optional Accessories (continued)
Incompatible Lenses
The following non-CPU lenses can NOT be used with cameras in the D1 series:• TC-16AS AF Teleconverter• Non-AI lenses• Lenses that require the AU-1 focusing unit (400 mm f/4.5, 600 mm f/5.6, 800 mm f/8,
1200 mm f/11)• Fisheye (6 mm f/5.6, 8 mm f/8, OP10 mm f/5.6)• 21 mm f/4 (old type)• K2 ring• ED 180–600 mm f/8 (serial numbers 174041–174180)• ED 360–1200 mm f/11 (serial numbers 174031–174127)• 200–600 mm f/9.5 (serial numbers 280001–300490)• Lenses for the F3AF (80 mm f/2.8, 200 mm f/3.5, TC-16S Teleconverter)• PC 28 mm f/4 (serial number 180900 or earlier)• PC 35 mm f/2.8 (serial numbers 851001–906200)• PC 35 mm f3.5 (old type)• 1000 mm f/6.3 Reflex (old type)• 1000 mm f/11 Reflex (serial numbers 142361–143000)• 2000 mm f/11 Reflex (serial numbers 200111–200310)
Identifying Type G or D Nikkor Lenses with Built-in CPUsCPU lenses (A) can be identified by the CPU contacts. In addition, type G AF-Nikkorlenses have a “G” mark on the lens (B), while type D AF-Nikkor lenses are indicatedby a “D” mark (C).
A B C
Nikkor lens with built inCPU (CPU lens)
Type G AF-Nikkor lens Type D AF-Nikkor lens
Type G lenses are not equipped with an aperture ring. Unlike other lens types, thereis no need to lock the aperture ring at the minimum aperture setting (maximum f/-number) when using type G lenses with this camera.

201
TE
CH
NIC
AL
NO
TE
S—
OP
TIO
NA
L A
CC
ES
SO
RIE
S
Using a Non-CPU Lens
When using a non-CPU lens, choose center-weighted or spot metering and set the exposuremode to aperture-priority auto or manual. Even if you choose programmed auto or shutter-priority auto, the camera will automatically select aperture-priority auto with center-weightedmetering, and the exposure mode indicator (P or S) in the control panel on top of the camerawill blink to show that aperture-priority auto is in effect (the viewfinder display will show A).Regardless of the exposure mode selected, aperture can only be set using the lens aperturering; the sub-command dial can not be used to set aperture. The aperture indicators in theviewfinder and in the control panel on top of the camera will show F--.
Lens Focal Length and Picture AngleThe size of the area exposed with a 35-mm camera is 24 × 36 mm. In the case ofthe D1H, however, it is 15.6 × 23.7 mm. Consequently, the picture angle of photo-graphs taken with the D1H will differ from the picture angle for 35-mm cameras,even when the focal length of the lens and the distance to the subject are the same.
25.5D1H 30 36 42 52.5 75 90 127.5
1735-mm film camera 20 24 28 35 50 60 85
Picture angleApproximate Focal length (mm) in 35-mm format
(modified for picture angle)
157.5D1H 202.5 270 300 450 600 750 900
10535-mm film camera 135 180 200 300 400 500 600
Picture angleApproximate Focal length (mm) in 35-mm format
(modified for picture angle)
The diagonal picture angle of a 35-mm camera is roughly 1.5 times that of the D1H.Consequently when a lens of a given focal length is attached to the D1H, the corre-sponding focal length in 35mm format at the D1H’s picture angle can be calculatedby multiplying the focal length of the lens by 1.5. The following chart shows someexamples:
Picture size (D1H)
Picture size (35-mm format)
LensPicture diagonal
Picture angle (35-mm format)
Picture angle (D1H)
(24 mm × 36 mm)
(15.6 mm × 23.7 mm)

202
TE
CH
NIC
AL
NO
TE
S—
OP
TIO
NA
L A
CC
ES
SO
RIE
S
Optional Accessories (continued)
Other Accessories
At the time of writing, the following accessories were available for your Nikon digitalcamera. Contact your retailer or local Nikon representative for details.
EN-4 Rechargeable Battery PackThe EN-4 is a rechargeable nickel-metal hydride (Ni-MH) battery pack designedexclusively for use in D1-series cameras.
MH-16 Quick-ChargerThe MH-16 can be used to recharge EN-4 battery packs.
MH-17 Quick-ChargerThe MH-17, which plugs into vehicle cigarette lighters, can be used to recharge EN-4battery packs while on the road.
EH-4 AC AdapterThe EH-4 can be used with AC power sources of 100–120 V or 220–240 V and 50–60 Hz. Separate power cables are available for use in North America, the UnitedKingdom, Europe, Australia, and Japan.
Focusing ScreensIn addition to the type B BriteView focusing screen supplied with your camera, youcan use the type E clear matte Fresnel focusing screen for cameras in the D1 series.The type E screen is etched with a grid (see right), making it suitable for copying andarchitectural photography. Best results are achieved with PC-Nikkor lenses. A typeB BriteView focusing screen is supplied with all cameras in the D1 series.
Buying Camera Accessories
Your camera is optimized for use with Nikon-brand accessories. Accessories sold by othermanufacturers may not be made to Nikon specifications and could damage your camera. Nikoncan not guarantee performance when the camera is used with non-Nikon accessories.
Type E focusing screenType B focusing screen

203
TE
CH
NIC
AL
NO
TE
S—
OP
TIO
NA
L A
CC
ES
SO
RIE
S
EC-CF CompactFlash Memory CardsThese cards can be inserted in the D1H and used to record photographs. Theirsmall size makes them extremely portable.
Compatible CompactFlash and Microdrive cardsNikon EC-CF CompactFlash memory cards are available for cameras in the D1series. In addition, the CompactFlash memory cards and microdrives listed belowhave been tested and approved for use in the D1H.
• SanDisk SDCFB-16, SDCFB-32, SDCFB-48, SDCFB-64, SDCFB-96, SDCFB-128CompactFlash memory cards
• Lexar Media 10x USB 128 MB and 160 MB; 8x USB 8 MB, 16 MB, 32 MB, 48 MB,64 MB, and 80 MB; 4x USB 8 MB, 16 MB, 32 MB, 48 MB, 64 MB, and 80 MBCompactFlash memory cards
• IBM DSCM-10512 and DSCM-11000 microdrivesContact the manufacturer for more information on the functions of and recom-mended uses for the above memory cards.
EC-AD1 PC Card AdapterUsing the PC card adapter, CompactFlash memory cards can be read by computersequipped with PCMCIA card slots configured for ATA memory cards.
Memory Cards
• Memory cards may be hot after use. Observe due caution when removing cards from thecamera.
• Format memory cards before first use.• Do not remove memory cards from the camera during formatting. Failure to observe this
precaution could render the card unfit for use.• Do not remove the memory card from the camera, turn the camera off, remove the
batteries, or unplug the AC adapter while data are being recorded to, or deleted from, thememory card or while data are being transferred to a computer. Failure to observe thisprecaution could result in loss of data or in damage to the camera or card.
• Do not touch the terminals with your fingers or metal objects.• Do not apply force to the card cover. Failure to observe this precaution could result in
damage to the card.• Do not bend, drop, or subject to strong physical shocks.• Do not expose to water, high levels of humidity, or direct sunlight.

204
TE
CH
NIC
AL
NO
TE
S—
OP
TIO
NA
L A
CC
ES
SO
RIE
S
DK-14 Antifog Finder EyepiecesThese viewfinder eyepieces prevent fogging in humid or cold conditions.
DK-2 Rubber Eye CupPrevents eye fatigue by making it easier to see the image in the viewfinder.
Diopter-Adjustment Viewfinder LensesTo accommodate individual differences in vision, nine types of viewfinder lenses areavailable with diopters of –3, –2, 0, +1, and +2.
DR-4 Right-Angle Viewing Attachment/DK-7 Eyepiece AdapterThe DR-4 attaches at a right angle to the viewfinder eyepiece, allowing you to viewthe image in the viewfinder from above. The DK-7 is used when attaching the DR-3 Right-Angle Viewing Attachment or the DG-2 Eyepiece Magnifier to cameras inthe D1 series.
FiltersNikon filters can be divided into three types: screw-in, drop-in and rear-interchange.With the exception of the R60, exposure compensation need not be adjusted whena Nikon filter is attached (in the case of the R60, set exposure compensation to +1).Filters manufactured by other makers may interfere with autofocus or electronicrange-finding.
Cameras in the D1 series can not be used with Polar polarizing filters. Use the C-PLcircular polarizing filter instead.
If you are using a filter to protect the lens, it is recommended that you use an NC orL37C filter.
When shooting with a filter attached, moiré may be observed when shooting asubject against a bright light, or when a strong light source is in the frame. In theseconditions, it is recommended that you remove the filter before shooting.
Optional Accessories (continued)

205
TE
CH
NIC
AL
NO
TE
S—
OP
TIO
NA
L A
CC
ES
SO
RIE
S
Nikon SB-28DX SpeedlightThis Speedlight has a guide number of 50 (manual mode, 35-mm zoom-head posi-tion, ISO 200 m, 20 °C/68 °F) and is powered with four alkaline batteries (otherpower sources for the SB-28DX include the SD-6, SD-7, SD-8A, and SK-6 powerbracket—all available separately). When attached to cameras in the D1 series, itsupports D-3D multi-sensor balanced fill-flash for natural, balanced light, even whenthe scene contains highly reflective objects or the background is very far from thecamera. The SB-28DX is equipped with an AF-Assist Illuminator, allowing autofocusto be used when shooting very dark subjects. It also boasts auto power zoom thatchanges the flash angle according to the focal length of the lens, and supports SlowSync, Rear-Curtain Sync, non-TTL auto, Manual, Repeating, and FP High-Speed Syncflash modes.
Speedlight Accessories for the SB-28DX
When using the following Speedlight accessories with the SB-28DX, be aware that these acces-sories exist in two varieties (old and new), each with a different type of connector:• SD-6 battery stack/SD-7 C-cell battery pack
The SC-16 power cable supplied with older models of these products can not be con-nected to the SB-28DX. The SC-16A power cable supplied with newer models is alsoavailable for separate purchase, and can be used to connect old-model SD-6 and SD-7power sources to the SB-28DX.
• SK-6 power bracketThe connector on old-model SK-6 power-brackets can not be used with the SB-28DX.Owners of old-model SK-6 power-brackets are advised to contact the Nikon service rep-resentative in their area.
• SD-8 power-assist packThe SD-8 can not be used with the SB-28DX. Owners of the SD-8 are advised to contactthe Nikon service representative in their area. Note that the new model, the SD-8A, canbe used with the SB-28DX.

206
TE
CH
NIC
AL
NO
TE
S—
OP
TIO
NA
L A
CC
ES
SO
RIE
S
22
ft m
28
70
50
3528
8510
5
22
Optional Accessories (continued)
Nikon SB-80DX SpeedlightThis high-performance Speedlight has a Guide Number of 53 (manual mode, 35-mm zoom-head position, ISO 200, 20 °C/68 °F) and accepts four LR6 (AA) alkalinebatteries or SD-7, SD-8A, and SK-6 power sources (all available separately). Forbounce-flash or close-up photography, the flash head can be rotated through 90 °up, 7 ° down, 180 ° left, and 90 ° right. Light from the flash can be diffused for wide-angle photography by using the SB-80DX in combination with a wide panel or bounceadapter, producing soft lighting that balances the foreground subject with the back-ground in close-ups and bounce-flash photography. The SB-80DX is equipped withan illuminator to assist in adjusting settings in the dark. Custom settings allow you tofine-tune all aspects of flash operation.
Nikon SB-50DX SpeedlightThis Speedlight has a guide number of 32 (manual mode, 35-mm zoom-head posi-tion, ISO 200 m, 20 °C/68 °F) and is powered with two CR123A or DL123A type3V lithium batteries. When attached to cameras in the D1 series, it supports D-3Dmulti-sensor balanced fill-flash for natural, balanced light, even when the scene con-tains highly reflective objects or the background is very far from the camera. The SB-50DX is equipped with an AF-Assist Illuminator, allowing autofocus to be used whenshooting very dark subjects. It also boasts auto power zoom that changes the flashangle according to the focal length of the lens, and supports Slow Sync, Rear-CurtainSync, Manual flash modes. It offers a tilt position of –18°, allowing the flash to beused at ranges as close as 30 cm (11.8˝).
Accessories for the Remote TerminalYour Nikon digital camera is equipped with a ten-pin re-mote terminal for remote-control photography, automaticphotography, and connection to other devices. The ter-minal is provided with a cap, which protects the contactswhen the terminal is not is use. The following accessoriescan be connected:

207
TE
CH
NIC
AL
NO
TE
S—
OP
TIO
NA
L A
CC
ES
SO
RIE
S
SoftwareTwo software packages are available for the D1H: Nikon View, which allows thecontents of the camera’s memory to be viewed when the camera is connected tothe computer via its IEEE 1394 interface, and Nikon Capture 3, which offers remotecontrol and image enhancement features. Both packages are available in Windowsand Macintosh versions.
MC-25Adapter Cord
ML-2 ModuliteRemote
Control Set
ML-3 ModuliteRemote
Control Set
MC-30Remote Cord
Ten-pin to two-pin adapter cord for connection to the MW-2Radio Control Set, the MT-2 Intervalometer, the ML-2 ModuliteControl Set, and other devices with two-pin terminals.
Allows infrared remote control with a range of up to 100 m(328´). Remote control over greater distances can beachieved with multiple units. Requires MC-25 Adapter Cord.
Allows infrared remote control with a range of up to 8 m(26.2´).
Remote shutter release; can be used to reduce camera shake.Can be used to lock the shutter-release button during atime exposure.
20 cm/0.7´
—
—
80 cm/2.6´
Accessory
MC-21Extension
Cord
MC-22Remote Cord
MC-23Connecting
Cord
MC-20Remote Cord
Can be connected to the MC-20, MC-22, MC-25, or MC-30.
Remote shutter release with blue, yellow, and black terminalsfor connection to a remote shutter-triggering device, making itpossible to control the camera via sound or electronic signals.
Allows simultaneous operation of two D1Hs.
Description
Remote shutter release; can be used to reduce camera shake.It is equipped with time-exposure and timer features, emit-ting a beep once a second while the shutter is open.
3 m/9.8´
1 m/3.3´
40 cm/1.3´
Length(approx.)
80 cm/2.6´

208
TE
CH
NIC
AL
NO
TE
S—
TR
OU
BL
ES
HO
OT
ING
Problem Solution
Troubleshooting
This section lists the indicators and messages that appear in the viewfinder, controlpanels, and monitor when there is a problem with the camera. Consult the listbelow before contacting your retailer or Nikon representative.
Control Panel and Viewfinder Indicators
Indicator
Controlpanel
View-finder
Lens not attached, or at-tached lens not Nikkorlens with built-in CPU
Use CPU Nikkor lens (IX-Nikkor excepted), or setexposure mode to A or Mand use lens aperture ringto set aperture
pg. 24,pg. 88,pg. 90,pg. 198
Camera can not focus us-ing autofocus
Focus manually pg. 81
Battery exhausted Replace battery pg. 23††
Low batteryReady fully-charged sparebattery
pg. 23†
Lens aperture ring is notset to minimum aperture
Set ring to minimum ap-erture (largest f/-number)
pg. 25(blinking) (blinking)
Subject too bright; photowill be overexposed
In exposure mode:P—use ND filterS—increase shut ter
speed; if indicator per-sists, use ND filter
A—choose a smaller ap-erture (higher f/-num-ber); if indicator per-sists, use ND filter
pg. 86,pg. 88
† Indicators in viewfinder are only visible when a button is pressed. In addition, the meter-ing-method indicater ( , , ) flashes to warn that the battery is low.
†† Indicators in viewfinder and rear control panel turn off to save power.
(blinking)
▼ ▲

209
TE
CH
NIC
AL
NO
TE
S—
TR
OU
BL
ES
HO
OT
ING
Problem Solution
Indicator
Controlpanel
View-finder
Subject too dark; photowill be underexposed
In exposure mode:P—use flashS—lower shutter speed;
if indicator persists,use flash
A—choose a larger aper-ture (lower f/-num-ber); if indicator per-sists, use flash
pg. 86,pg. 88
Shutter speed of bulb (longtime-exposure) selectedin shutter-priority auto
Choose another shutterspeed or switch to manualexposure
pg. 86,pg. 90(blinking) (blinking)
Exposure mode P or S se-lected and either:• no lens in place, or• non-CPU lens in place
Use CPU Nikkor lens orselect exposure mode Aor M
pg. 24,pg. 88,pg. 90,pg. 198
or (blinking)
Shutter speed faster thanlens sync speed (exposuremode S and M)
Shutter speed automati-cally set to 1/500 s
pg. 114Shutterspeedblinks
500
If indicator blinks for 3 safter flash fires, photo maybe underexposed
Check photo in monitor;if underexposed, adjustexposure and try again
pg. 115
Camera malfunction
Release shutter. If indica-tor persists or appearsfrequently, consult withNikon-authorized servicerepresentative
—(blinking) (blinking)
Flash does not supportred-eye reduction andflash-sync mode is either:• red-eye reduction, or• slow sync with red-eye
reduction
Choose different syncmode or use flash thatsupports red-eye reduc-tion
pg. 110–113

210
TE
CH
NIC
AL
NO
TE
S—
TR
OU
BL
ES
HO
OT
ING
Problem Solution
Troubleshooting (continued)
MessageControl
panel
Monitor Error Messages
Problems that occur during playback are indicated by messages that appear super-imposed on the image in the monitor. An indicator may also appear in the control-panel display on top of the camera.
pg. 26Camera can not de-tect memory card
Turn camera off andconfirm that card iscorrectly inserted
No card present
pg. 203
Camera can not ac-cess memory card,or card is not cor-rectly formatted
Replace memorycard with Nikon-ap-proved card
This card cannotbe used
pg. 143Memory card hasnot been formattedfor use in camera
Format memorycard
Card is notformatted
pg. 26,pp. 56–
61,pp. 129–
131
Card is full, or num-ber of files has ex-ceeded maximum thatcan be handled bycamera or all file num-bers have been used
Delete photos orchoose a lower im-age-quality setting orsmaller image size orrep lace memorycard
Out of memoryCard is full
pg. 26,pg. 140
• The memory cardcontains no images
• Folder selected forplayback containsno images
• Insert a memorycard containingphotographs
• No images can beplayed back untilfolder containingimages is selectedf rom p l ayb a ckFolder Desig-nate menu
No images incurrent folder

211
TE
CH
NIC
AL
NO
TE
S—
TR
OU
BL
ES
HO
OT
ING
Problem SolutionMessageControl
panel
A Note on Electronically Controlled Cameras
In extremely rare instances, unusual characters may appear in the control panels and the cam-era may stop functioning. In most cases, this phenomenon is caused by a strong external staticcharge. Turn the camera off, remove and replace the battery pack, and turn the camera onagain.
pp. 148–154
• F i le format nolonger conforms toDCF standard be-cause image hasbeen edited in animaging applicationo r o t h e r w i s emodifying using acomputer
• File corrupted
When saving imagesafter editing in acomputer applica-tion, do not over-write original file onmemory card
File does notcontain image
data
pg. 136All photos in currentfolder have been hid-den
No images can beplayed back untilHide Image com-mand has been usedto allow at least oneimage to be displayed
All images arehidden

212
TE
CH
NIC
AL
NO
TE
S—
SP
EC
IFIC
AT
ION
S
Specifications
Type
Operatingenvironment
Temperature
Humidity
Single-lens reflex digital camera with interchangeable lenses
0 – 40 °C (32 – 104 °F)
Less than 85% (no condensation)
Storage
Compression • HI image quality: uncompressed YCbCr-TIFF (8-bit), RGB-TIFF(8-bit), or RAW data (12-bit); compressed RAW data (12-bit,lossless compression algorithm compresses data approximately50% – 60%)
• FINE, NORMAL, or BASIC image quality: JPEG baseline-compli-ant (approximate compression ratios 1:4, 1:8, 1:16 respectively)
Media Type I/II CompactFlash cards; microdrives (512 MB, 1 GB)
Approximatecapacity (96 MBmedia)
High/RAW (uncompressed) 23
High/YCbCr-TIFF 17
High/RGB-TIFF 12
JPEG Fine (1 : 4) 66
JPEG Normal (1 : 8) 132
JPEG Basic (1 : 16) 265
Image sensor 23.7 × 15.6 mm, 12-bit RGB CCD; total pixels: 2.74 million pixels
Operating modes Single frame, image-preview mode availableContinuous, approx. 5 fps, max. 40 consecutive shotsSelf-timer mode; delay can be specified by userPlayback mode with playback menuPC mode; data-transfer to computer
SC
PLAYPC
Image size 2,000 × 1,312 pixels
White balance • Auto (TTL control with 1,005-pixel CCD)• Six manual modes with fine tuning• Preset
Sensitivity 200 – 1600 (ISO equivalent) in steps of 1/3, 1/2, or 1 EV
Playback Single-frame playback, thumbnail playback (4 or 9 images),slideshow, histogram, and highlight point display
Image deletion Card format, delete all images, delete selected images
File system Design Rule for Camera File Systems, Digital Print-Order Format(DPOF) compliant
Effective pixels 2.7 million

213
TE
CH
NIC
AL
NO
TE
S—
SP
EC
IFIC
AT
ION
S
Video output Can be selected from NTSC or PAL
External interface IEEE 1394 (designed for speeds of up to 400 Mbps); RS-232Cconnection for GPS unit (GPS units not available from Nikon)
Compatible lenses
Type G or DAF Nikkor
All camera functions supported
Other type G orD Nikkor
All camera functions except autofocus supported
Other AF Nikkor All camera functions except 3D color matrix metering and 3Dmulti-sensor balanced fill-flash for the D1 series supported
AI-P Nikkor All camera functions except 3D color matrix metering, 3D multi-sensor balanced fill-flash for the D1 series, and autofocus sup-ported
Other Other lenses can be used in aperture-priority or manual modewith center-weighted or spot metering; electronic range-findercan be used with lenses with a maximum aperture of f/5.6 orfaster.
Lens mount Nikon F mount (with AF coupling and AF contacts)
Picture angle Equivalent in 35 mm (135) format is approximately 1.5 times lensfocal length
Viewfinder
Focusing screen Type B BriteView clear matte screen Mark III; optional type Escreen for D1 series cameras (with grid) can also be used
Eyepoint 22 mm (at –1.0 m–1)
Type Optical fixed eye-level pentaprism with diopter adjustment of –3to +1 m–1, equipped with eyepiece shutter
Frame coverage Vertical and horizontal frame coverage approximately 96% of lens
Magnification 0.8 × with 50-mm lens set to infinity and –1.0 m–1
Reflex mirror Quick-return
Lens aperture Instant return with depth-of-field preview
* Unless otherwise stated, all figures are for a camera with a fully-charged battery oper-ated at an ambient temperature of 20°C (68°F).
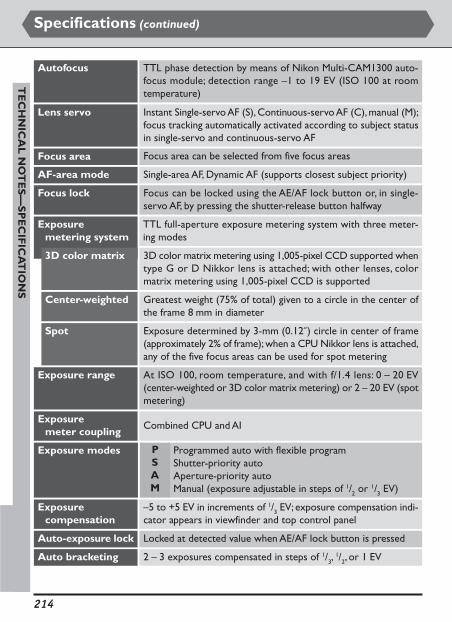
214
TE
CH
NIC
AL
NO
TE
S—
SP
EC
IFIC
AT
ION
S
Autofocus TTL phase detection by means of Nikon Multi-CAM1300 auto-focus module; detection range –1 to 19 EV (ISO 100 at roomtemperature)
Lens servo Instant Single-servo AF (S), Continuous-servo AF (C), manual (M);focus tracking automatically activated according to subject statusin single-servo and continuous-servo AF
Focus area Focus area can be selected from five focus areas
AF-area mode Single-area AF, Dynamic AF (supports closest subject priority)
Focus lock Focus can be locked using the AE/AF lock button or, in single-servo AF, by pressing the shutter-release button halfway
TTL full-aperture exposure metering system with three meter-ing modes
Exposuremetering system
3D color matrix 3D color matrix metering using 1,005-pixel CCD supported whentype G or D Nikkor lens is attached; with other lenses, colormatrix metering using 1,005-pixel CCD is supported
Center-weighted Greatest weight (75% of total) given to a circle in the center ofthe frame 8 mm in diameter
Spot Exposure determined by 3-mm (0.12˝) circle in center of frame(approximately 2% of frame); when a CPU Nikkor lens is attached,any of the five focus areas can be used for spot metering
Exposure range At ISO 100, room temperature, and with f/1.4 lens: 0 – 20 EV(center-weighted or 3D color matrix metering) or 2 – 20 EV (spotmetering)
Exposuremeter coupling
Combined CPU and AI
Exposure modes Programmed auto with flexible programShutter-priority autoAperture-priority autoManual (exposure adjustable in steps of 1/2 or 1/3 EV)
PSAM
Exposurecompensation
–5 to +5 EV in increments of 1/3 EV; exposure compensation indi-cator appears in viewfinder and top control panel
Auto-exposure lock Locked at detected value when AE/AF lock button is pressed
Auto bracketing 2 – 3 exposures compensated in steps of 1/3, 1/2, or 1 EV
Specifications (continued)

215
TE
CH
NIC
AL
NO
TE
S—
SP
EC
IFIC
AT
ION
S
Self-timer Electronically controlled timer, duration 2–20 seconds
Combined electronic (CCD) and mechanical shutterShutter
Speed 30–1/16,000 sec. (1/3 increments), long time-exposure (bulb)
Flash
Sync contact X-contact only; flash synchronization at speeds of up to 1/500
s
Flash sync modes Front curtain (normal) sync, red-eye reduction, red-eye reduc-tion with slow sync, slow sync, rear curtain
Flash-ready light Lights when SB-80DX, SB-50DX, SB-28DX, SB-28, SB-27, or SB-22s isfully charged; blinks for three seconds after being fired at full output
Accessory shoe Standard ISO hot-shoe contact with safety lock
Sync terminal Standard JIS terminal with locking screw
Depth-of-fieldpreview button
Lens aperture stopped down when pressed
Remote control Remote control via 10-pin remote terminal or IEEE 1394 inter-face (designed for speeds of up to 400 Mbps)
Monitor 2˝, 130,000-dot, low-temperature polysilicon TFT LCD with ad-justable white LED backlight and brightness adjustment
Power source EN-4 Ni-MH Battery Pack, 7.2 V DC (can be recharged with op-tional MH-17, MH-16 or MH-15 Quick Chargers); EH-4 AC adapter(sold separately), 100 – 240 V AC
Tripod socket 1/4˝ (JIS)
Dimensions(W × H × D)
Approximately 157 × 153 × 85 mm (6.2˝ × 6.1˝ × 3.4˝)
Weight Approximately 1,100 g (2.5 lbs) excluding battery
Flash control • Automatic balanced fill-flash controlled by five-segment TTLmulti-sensor with single-component IC- 3D multi-sensor balanced fill-flash for D1 series (SB-80DX,
SB-50DX, or SB-28DX with type G or D Nikkor lens)- Multi-sensor balanced fill-flash (SB-80DX, SB-50DX, or SB-28DX
with AI-P Nikkor or Nikkor lens of a type other than type G or D)• Auto-aperture (AA) flash (SB-80DX, SB-50DX, or SB-28DX with
CPU Nikkor lens)• Non-TTL auto flash (with SB-80DX, SB-28DX, SB-28, SB-27,
SB-22s, and other Speedlights)

216
TE
CH
NIC
AL
NO
TE
S—
SP
EC
IFIC
AT
ION
S
Specifications (continued)
The following can reduce battery life:• Using the monitor• Keeping the shutter-release button pressed halfway• Repeated autofocus operations• Taking photographs at an image quality of High• Slow shutter speeds
To ensure that you get the most from EN-4 rechargeable batteries:
To ensure that you get the most from EN-4 rechargeable batteries:• Keep the battery contacts clean. Soiled battery contacts can reduce battery performance.• Use batteries immediately after charging. Batteries will lose their charge if left unused.• “Memory” effects can result in reduced battery performance. Should this occur, use the
“refresh” button on the battery charger to discharge and recharge the battery.
* Nikon reserves the right to change the specifications of the hardware and softwaredescribed in these manuals at anytime without prior notice. Nikon will not be held liablefor damages resulting from any mistakes which may be contained in this manual.

217
TE
CH
NIC
AL
NO
TE
S—
SP
EC
IFIC
AT
ION
S
LCD Illuminators
The LCD illuminators (control panel backlights) will dim gradually over time. This is normal; ifdesired, the illuminator can be replaced for a fee by a Nikon-authorized technician.
Frame Count
The frame number shown in the control panel on top of the camera corresponds to thenumber of photographs in the current folder, and returns to one when a new folder is created.New folders are created when:• The number of photographs in the current folder reaches the maximum of 999• File numbering reaches 9999 in sequential-numbering mode• A new folder is created using the New option in the playback Folder Designate menu
Viewing the Time and Date
When the BKT and buttons are pressed simultaneously (A), the year will be shown in thecontrol panel on top of the camera (B). Press the button once to display the month andday, and a second time to view the hour and minute. Pressing the button a third time will clearthe time and date from the display.
A B
To set the time and date, hold the BKT and buttons down together for more than twoseconds. The year indicator in the control panel will flash. Use the main command dial to setthe year, and then press the button to view and set the month. Repeat this process to setthe hour and minute. To save changes to the time and date and return to normal operation,press the button while the minute is displayed. To exit without saving changes, press theshutter-release button halfway. If no operations are performed for three minutes, any changeswill be saved automatically, clearing the time and date from the display.

218
TE
CH
NIC
AL
NO
TE
S—
SP
EC
IFIC
AT
ION
S
Specifications (continued)
Fine-Tuning White Balance
The color temperatures associated with fine adjustments to white balance at each setting areshown in the following table.
Adjustment Incandescent Direct sunlight**Fluorescent*
Approximate color temperature
+3 2,700 K 4,800 K2,700 K
+2 2,800 K 4,900 K3,000 K
+1 2,900 K 5,000 K3,700 K
±0 3,000 K 5,200 K4,200 K
–1 3,100 K 5,300 K5,000 K
–2 3,150 K 5,400 K6,500 K
–3 3,250 K 5,600 K7,200 K
* Fluorescent white balance can be fine-tuned to accommodate a wide variety of artificiallighting, from stadium lighting with low color temperatures to mercury-vapor lightingwith high color temperatures. Users of the D1 should note that the color temperaturesthat result when fluorescent white-balance is fine tuned differ widely from the valuesused in the D1H.
** daylight

219
TE
CH
NIC
AL
NO
TE
S—
SP
EC
IFIC
AT
ION
S
Flash Cloudy** Shade**Adjustment
Approximate color temperature
4,800 K 5,400 K 6,700 K +3
5,000 K 5,600 K 7,100 K +2
5,200 K 5,800 K 7,500 K +1
5,400 K 6,000 K 8,000 K ±0
5,600 K 6,200 K 8,400 K –1
5,800 K 6,400 K 8,800 K –2
6,000K 6,600 K 9,200 K –3

220
TE
CH
NIC
AL
NO
TE
S—
IND
EX
Index
Symbols3D color matrix metering. See Metering3D multi-sensor balanced fill-flash for
digital SLR. See Flash photography
AA (Aperture-priority auto exposure
mode). See Exposure modeA (Auto white balance). See White
balanceAC adapter .................................................. 202Accessories, optional ....................... 198-207Accessory shoe .......................................... 109AF area mode ......................................... 74-77
dynamic AF .................................................... 74-77single area AF ............................................... 74-77
AF lock. See Focus lockAnti-mirror-shock mode ......................... 163Aperture .................................................. 88-91
lock ............................................................................. 94maximum ............................................................... 88minimum ............................................. 25, 88, 200
Aperture-priority auto exposure mode.See Exposure mode
Auto bracketing ................................ 100-102Auto exposure lock .............................. 96-97Autofocus ................................................ 70-80Autofocus assist illuminator
................................................ 114, 205, 206Auto meter off delay ................................ 168Auto Off ....................................................... 145
BBasic. See Image qualityBattery ................................. vi-vii, 22-23, 202
battery indicator ..................................... 23, 208clock .......................................................................... 31installing ............................................................ 22-23
Body cap ......................................................... 25Bulb .................................................................. 90
CC (continuous servo autofocus). See
AutofocusC (continuous shooting mode). See
Continuous shooting modeCard slot .................................................. 26-27Center-weighted fill-flash for digital SLR.
See Flash photographyCenter-weighted metering. See MeteringClock calendar ............................... 30-31, 217Closest subject priority ....................... 76-77Color mode ................................................. 181Color temperature. See White balanceContinuous servo AF. See Focus modeContinuous shooting mode
............................................ 13, 52, 120-121Custom settings ................................ 156-185
Bank A, B, C, D ......................... 156-157, 160menu ................................................... 17, 160-183resetting to default values ............... 184-185
DData transfer. See PC modeDate and time. See Clock calendarDCF. See Design Rule for Camera File
SystemsDelete ......................................... 130-131, 187Deleting photographs ............... 50, 129-131Depth of field ....................................... 88, 106Depth-of-field preview ............................. 106Design Rule for Camera File Systems
................................................................... 141Digital Print Order Format ..................... 139Display Mode .................................... 124, 142Distance information ......................... 83, 108Diopter adjustment. See Viewfinder
diopterDPOF. See Digital Print Order Format

221
TE
CH
NIC
AL
NO
TE
S—
IND
EX
EEH-4 AC adapter. See AC adapterElectronic analog exposure display ......... 92Electronic range finder ........................ 45, 81EN-4 NiMH battery pack. See BatteryExposure compensation ....................... 98-99Exposure mode ............................... 42, 84-95
aperture priority auto .............................. 88-89manual ............................................................... 90-93programmed auto ............................. 42, 84-85shutter-priority auto ................................. 86-87
FFine. See Image qualityFlash bracketing ................................ 100, 166Flash photography ............................ 108-115
flash sync mode ..................................... 110-111front-curtain sync ................................. 110-111rear-curtain sync ................................... 110-113red-eye reduction ................................ 110-113red-eye reduction with slow sync
....................................................... 110-111, 115slow sync ....................................... 110-111, 115TTL flash control ...................... 108, 112-113
Flash ready indicator ................................. 109Flexible program .......................................... 85Focus area ................................................ 73-77Focus lock ................................................ 78-79Focus mode ...................................... 70-71, 81
continuous servo AF ................................ 70-71manual ...................................................................... 81single servo AF ............................................ 70-71
Focus tracking ............................................... 71Focusing screen ................................ 194, 202Folder Select ............................................... 140Format. See Memory cardFrame Interval .................................... 134-135
GGPS ....................................................... 118-119
HHigh. See Image qualityHide Image .......................................... 136-137Highlights ........................................... 126, 142Histogram .......................................... 126, 142
IIEEE1394 interface. See PC modeImage quality .............................. 36-38, 56-61Image review ............................................... 121ISO equivalency. See Sensitivity
JJPEG ........................................................... 56-61
LLanguage ......................................................... 28LCD illuminator ............................... 105, 169Lens ......................................... 24-25, 198-201
Attaching ......................................................... 24-25cleaning ...................................................................... vicompatibility ............................................ 198-201CPU Nikkor .................................... 24, 198-200D-Type AF Nikkor .............. 24-25, 198-200G-Type AF Nikkor .............. 24-25, 198-200non-CPU .......................... 24, 84-90, 198-201removing ................................................................. 25
Long time exposure ............................ 87, 90

222
TE
CH
NIC
AL
NO
TE
S—
IND
EX
MManual exposure mode. See Exposure
modeManual focus. See Focus modeMatrix metering. See MeteringMemory card ........................ 26-27, 143, 203
formatting .................................................... 27, 143Metering ............................................ 41, 82-83
3D color matrix ................................................. 83and flash modes .............................................. 108center-weighted ................................................. 83matrix ............................................................... 41, 83spot ............................................................................ 83
MH-16 quick charger ......................... 22, 202Mirror ..................................................... vi, 163
mirror up ....................................... 164, 196-197Mode dial ............... 13, 52-53, 120-121, 149Monitor pre-flash ....................................... 108Multi-sensor balanced fill-flash for digital
SLR. See Flash photography
NNEF. See Raw dataNikon Capture 3 ............................... 152-153Nikon View ........................................ 150-151NTSC. See Video OutputNormal. See Image quality
PPAL. See Video OutputPC mode ...................................................... 149Picture angle ................................................ 201Playback ............................................... 120-147Playback menu ............................ 17, 134-142PRE. See White balancePre-flash .............................................. 108, 111Print Set ............................................... 138-139Programmed auto exposure mode. See
Exposure modeProtect ................................................. 132-133
QQuick review .............................................. 120
RRAW data ....................................... 56-61, 178Rear-curtain sync. See Flash photographyRed-eye reduction. See Flash photographyRed-eye reduction with slow sync. See
Flash photographyRGB. See Image qualityRGB-TIFF ................................................. 56-61RS-232C interface. See GPS
Index (continued)

223
TE
CH
NIC
AL
NO
TE
S—
IND
EX
SS (Shutter-priority auto exposure mode).
See Exposure modeS (Single-frame shooting). See Single-
frame shooting modeS (Single-servo AF). See Focus mode,
single-servo AFSelf-timer ...................... 13, 52, 103, 120-121Sensitivity .......................................... 38, 62-63
Sensitivity Boost ................................................. 63Setup menu ................ 17, 143-145, 190-191Shooting menu ............................ 17, 188-189Shutter speed
lock ...................................................................... 94-95synchronized ..................................................... 114
Shutter-priority auto exposure mode. SeeExposure mode
Single-frame shooting mode............................................ 13, 52, 120-121
Single-frame playback ....... 49, 122, 124-126Single-servo AF. See AutofocusSlide Show .......................................... 134-135Slow sync. See Flash photographySpeedlight .......................... 108-115, 205-206
See also Flash photographySpot metering. See meteringStandard TTL flash for digital SLR. See
Flash photographySync terminal .............................................. 109
TThumbnail .................................... 49, 122-123Time exposure. See Long time exposureTone compensation .................................. 175Two-button reset ............................. 184-185
VVideo Output ............................ 144, 146-147Viewfinder diopter .................................... 104
WWhite balance ................ 39, 64-69, 218-219
YYCbCr. See Image qualityYCbCr-TIFF ............................................. 56-61

En
User’s Manual
Printed in JapanSB3C00200501(11)
6MEA0911-05
En


