
1
Government of Tripura
Works & Billing
User Manual
Version 1.0
Prepared By
Centre For Development of Advanced Computing
e-Governance Solutions Group
Pune

2
Works & Billing System ..................................................................................................... 5
1. Introduction ............................................................................................................. 5
2. Objective ................................................................................................................. 5
3. Functionalities ......................................................................................................... 5
4. Flow Diagram ......................................................................................................... 6
5. Login ..................................................................................................................... 11
6. Master Details ....................................................................................................... 14
6.1 Authority Master ................................................................................................ 14
6.2 Work Types ........................................................................................................ 16
6.3 Work Sub Types ................................................................................................ 18
6.4 Proposer Types................................................................................................... 19
6.5 Programs ............................................................................................................ 21
6.6 Repair Types ...................................................................................................... 22
6.7 Schemes ............................................................................................................. 24
6.8 Scopes ................................................................................................................ 25
6.9 Tender Types ..................................................................................................... 27
6.10 User Department ................................................................................................ 29
6.11 Contractor Class ................................................................................................. 31
7. Proposal Work ...................................................................................................... 33
7.1. Work Information .............................................................................................. 33
7.2. Split Works Information .................................................................................... 37
8. Approvals .............................................................................................................. 39
8.1. AA & ES Details ................................................................................................ 39
8.2. TS Details........................................................................................................... 42
9. Tendering .............................................................................................................. 44
9.1. BoQ Details ........................................................................................................ 44
9.2. Schedule A Details ............................................................................................. 48
9.3. Work Scope ........................................................................................................ 51
9.4. Recapitulation Entry .......................................................................................... 53
9.5. Tender Details .................................................................................................... 55
9.6. PBC Details ........................................................................................................ 57
9.7. Quotation Details ............................................................................................... 59
9.8. Awarding of Contract ........................................................................................ 62
9.9. Negotiation Details ............................................................................................ 64
10. Execution ........................................................................................................... 66
10.1. Work Extension Details ..................................................................................... 66
10.2. Close Work ........................................................................................................ 68
10.3. Close Split Works .............................................................................................. 70
11. Work Reports ..................................................................................................... 72
11.1. Report Options ................................................................................................... 72
11.1.1. Show Work List ............................................................................................ 72
11.1.2. Split Works List ............................................................................................ 73
11.1.3. Works With AA ............................................................................................ 73
11.1.4. Works with No AA ....................................................................................... 74
11.1.5. Administrative Approval Register ................................................................ 75
11.1.6. Work with TS ................................................................................................ 75
11.1.7. Works with No TS ........................................................................................ 76
11.1.8. Technical Sanction Register ......................................................................... 76

3
11.1.9. Works with TS and No BoQ ......................................................................... 76
11.1.10. Works with TS and BoQ ........................................................................... 77
11.1.11. BoQ ........................................................................................................... 77
11.1.12. Works with TS, BoQ and No Tender ........................................................ 78
11.1.13. Works with TS, BoQ and Tender ............................................................. 78
11.1.14. Works with TS, BoQ & Tender but No Participation ............................... 79
11.1.15. Works with TS, BoQ, Tender and Participation ....................................... 79
11.1.16. Works with TS, BoQ, Tender & Participation & Not Award ................... 80
11.1.17. Works with TS, BoQ, Tender, Participation & Awarding ........................ 80
11.1.18. Agreement Register .................................................................................. 81
11.1.19. Works Awarded but No RA Bill Raised ................................................... 81
11.1.20. Works Awarded & RA Bill is Raised ....................................................... 82
11.1.21. Closed Split Works ................................................................................... 83
11.1.22. Closed Works ............................................................................................ 83
11.1.23. Agreement Details .................................................................................... 84
11.1.24. Show Duration Between Stages ................................................................ 84
11.1.25. Quotation Comparison Statement ............................................................. 85
11.1.26. Quotation Details ...................................................................................... 86
11.1.27. Schedule A Details .................................................................................... 87
11.2. Monthly Progress Report ................................................................................... 88
11.3. Scopewise Progress Report ................................................................................ 89
12. Billing ................................................................................................................ 90
12.1. Recovery Master ................................................................................................ 90
12.2. RA Bill Details ................................................................................................... 92
12.3. Bill Items ............................................................................................................ 94
12.4. Royalty Calculations .......................................................................................... 97
12.5. Bill Recoveries ................................................................................................. 100
12.6. MB Record ....................................................................................................... 102
12.7. Extra Items Details ........................................................................................... 104
12.8. Item Measurement For AE............................................................................... 106
12.9. Item Measurement For Auditor ....................................................................... 107
12.10. Item Measurement For DAO ........................................................................... 108
12.11. Item Measurement For EE ............................................................................... 109
13. Billing Reports ................................................................................................. 110
13.1. First & Final Bill .............................................................................................. 110
13.2. RA Bill Report ................................................................................................. 114
13.3. Royalty Calculation ......................................................................................... 118
13.4. Deviation Statement ......................................................................................... 119
13.5. Measurements .................................................................................................. 120
13.6. Extra Items ....................................................................................................... 121
14. Schedule of Rates ............................................................................................. 122
14.1. Masters ............................................................................................................. 122
14.1.1. Chapter Master ............................................................................................ 122
14.1.2. Category Master .......................................................................................... 124
14.1.3. Material Master ........................................................................................... 126
14.1.4. Labour Master ............................................................................................. 128
14.1.5. Machinery Master ....................................................................................... 130
14.1.6. Civil SR Master........................................................................................... 132
14.1.7. Electrical SR Master ................................................................................... 134

4
14.1.8. Non SR Master ............................................................................................ 136
14.1.9. Rate Analysis .............................................................................................. 138
14.1.10. Search SR Item ....................................................................................... 140
14.1.11. Copy Breakup ......................................................................................... 142
14.1.12. Zone Master ............................................................................................ 143
14.2. Rate Details ...................................................................................................... 144
14.2.1. Item Rate ..................................................................................................... 144
14.2.2. SR Item Rate ............................................................................................... 146
14.2.3. Copy Item Rate ........................................................................................... 148
14.2.4. Copy SR Item Rate ..................................................................................... 149
14.3. Revision ........................................................................................................... 150
14.3.1. Generate SR ................................................................................................ 150
14.3.2. Update Item Rates ....................................................................................... 151
14.3.3. Update SR Item Rates ................................................................................. 152
14.4. SR Reports ....................................................................................................... 153
14.4.1. Index List .................................................................................................... 153
14.4.2. Item List ...................................................................................................... 153
14.4.3. SR List ........................................................................................................ 154
14.4.4. Rate Analysis .............................................................................................. 154
14.4.5. Comparison Statement ................................................................................ 155
15. Estimates .......................................................................................................... 156
15.1. Master Details .................................................................................................. 156
15.1.1. Rate Affecting Factor .................................................................................. 156
15.2. Estimate............................................................................................................ 158
15.2.1. Estimate Master .......................................................................................... 158
15.2.2. Measurement ............................................................................................... 160
15.2.3. Used Estimates ............................................................................................ 162
15.3. Report ............................................................................................................... 163
15.3.1. Measurement Report ................................................................................... 163
15.3.2. Abstract Sheet Report ................................................................................. 164
15.3.3. Estimate Details Report .............................................................................. 165
15.3.4. Project Cost Report ..................................................................................... 166
15.3.5. Used Estimate Report ................................................................................. 167
16. Figure Index ..................................................................................................... 168

5
Works & Billing System 1. Introduction
The Works & Billing System is developed by Center for Development of
Advanced Computing (C-DAC) for the Public Works Department (PWD), Government
of Tripura.
The system is developed with the aim of computerizing all the activities
related to PW Department across the Tripura State. It is a very comprehensive
application deployed at centralized location and addresses all the activities carried
out by Technical Section at the Divisional Offices. The system is interlinked with the
other modules like Accounts and Budget Management System for extracting and
producing the data.
The system has 'Graphical User Interface' which facilitates easy operations.
The system authenticates the user and after successful authentication an interface is
shown with navigation options on left hand side. The interface has links for
navigation through records and screens, buttons to save/update/delete the records,
shortcut keys for buttons, help-text for icons, context sensitive help for all the
screens. Appropriate messages for errors, successful operations and failed operations
are displayed. Guidelines are given at appropriate stages. Selection lists are provided
wherever appropriate to reduce typographical errors. And it is consistent with the
standard user interface.
2. Objective
It facilitates PWD, Divisional Offices to enter and monitor the different Works
from initiation to execution of the work. Also progress of on going works and
completed works executed by that office are maintained.
3. Functionalities
Login
Add, Edit, Delete Master data for works.
Add, Edit, Delete, Filter for the works.
Add, Edit, Delete and various transactions for Administrative Approvals,
Technical Sanction, BoQ, Tendering, Quotations, Awarding and Execution of
Works.
Show, Export functionalities for various Work reports.

6
4. Flow Diagram
Start
Enter Login User
and Password
Is User Valid?
Select Works
Module
Prepare following master data
(as applicable) –
8. Work Type
9. Work Sub Type
10. Program Types
11. Repair Types
12. Tender Types
13. Proposer Types
14. Schemes
15. Contractor Class
16. User Department 17. Authority
Enter Work
Information Details
Yes
No
A
Enter Split Works
Information Details

7
Enter Schedule A
Details
Enter Recapitulation
Details
Enter BoQ Details
Enter Administrative
Approval Details
A
Enter Technical
Sanction Details
Enter Tender
Details
Enter PBC
Details
Enter Quotation Details
Enter Negotiation
Details
Inspection Note
Details
Work Extension
Details
Close Works
Details
B
Enter Awarding of
Contract Details
Close Split Works
Details
Enter Scope
Details
C
C
D

8
Billing Phase
RA Bill Details
RA Bill Items
Schedule A Items
MB Record
Following reports are
generated (as applicable) –
1. First & Final Bill Report
2. RA Bill Report
3. Royalty Calculation
4. Deviation Statement
5. Measurements 6. Extra Item
Stop
Reports
B
Royalty Calculations
Bill Recoveries
Extra Items

9
Schedule of Rates
Zone, Chapters &
Categories Master
Civil, Electrical &
Non SR Items
Master
Rate Analysis for
Civil, Electrical & Non SR Items
D
Rates Entry for
Labour, Material & Machinery Items
Labour, Material &
Machinery Items Master
Rate Updation for
Labour, Material & Machinery Items
Rate Updation for
Civil, Electrical & Non SR Items

10
Start
Rate Affecting
Factor Master
Measurement Report
Abstract Report
Estimate Report
Project Cost Report
Used Estimate Report
Used
Estimates
Measurement
Details
Estimate
Master
Stop
Estimates

11
5. Login
Logon with login credentials provided for the concerned users for each office.
The link provided acts as the entry point for the Works & Billing System.
For login the screen is displayed as shown below.
Figure 1: Login Screen
Enter the username and password in the fields provided for login.
On successful login the main screen is displayed with various modules
available for the user. Links for the screens/modules are enabled only for the users
who have rights on the respective screens/modules; the other screens/modules for
which the user doesn‟t have rights will be disabled. The screen is displayed as shown
below.

12
Figure 2: Home screen

13
After clicking on any link in the Works or Billing module, the user is directed
to the corresponding module with navigation links on left side. The sample screen is
displayed as shown below.
Figure 3: Main screen for Works
The logged in Username and Office name are displayed to the user.
User can click on any link available on left side under „Works‟ module to start
using the application.
To select any other module, click on the link „Home‟ where different modules
for the user are displayed.
To logout from the application, click on the link „Logout‟.

14
6. Master Details
To start using the „Works‟ application the user has to first enter the Master
details like Authority, Work Types, Work Sub Types, Proposer Types, Programs,
Repair Types, Schemes, Scopes, Tender Types, User Department, Contractor Class,
Contractors details etc. as applicable.
6.1 Authority Master
By selecting Works -> Masters -> Authority Master, displays the Authority
Master Screen. This screen is used to create the authorized persons.
Figure 4: Authority Master Screen
Figure 5: Authority Master Entry Screen

15
Note: 1) To add new entry click on the “Add” link.
2) To edit the details click on the “Edit” link.
3) To save the entered values click on the “Save” button.
4) To save the modified values click on the “Update” button.
5) To cancel the entry or the modification click on the “Cancel” link.
6) To delete the entry click on the “Delete” link.
7) To view the list of authorities entered click on the “View” link.
8) You must have the privileges to add/edit/delete the records otherwise the
corresponding options will be disabled.
Field Description:
Authority Name: Enter the authority name.

16
6.2 Work Types
By selecting Works -> Masters -> Work Type, displays the Work Type Screen.
This screen is used to create the work types.
Figure 6: Work Type Master Screen
Figure 7: Work Type Master Entry Screen
Field Description:
Work Type: Enter the work type.

17
Note: 1) To add new entry click on the “Add” link.
2) To edit the details click on the “Edit” link.
3) To save the entered values click on the “Save” button.
4) To save the modified values click on the “Update” button.
5) To cancel the entry or the modification click on the “Cancel” link.
6) To delete the entry click on the “Delete” link.
7) You must have the privileges to add/edit/delete the records otherwise the
corresponding options will be disabled.

18
6.3 Work Sub Types
By selecting Works -> Masters -> Work Sub Type, displays the Work Sub
Type Screen. This screen is used to create the work sub types.
Figure 8: Work Sub Type Master Screen
Figure 9: Work Sub Type Master Entry Screen
Note: 1) To add new entry click on the “Add” link.
2) To edit the details click on the “Edit” link.
3) To save the entered values click on the “Save” button.
4) To save the modified values click on the “Update” button.
5) To cancel the entry or the modification click on the “Cancel” link.
6) To delete the entry click on the “Delete” link.
7) You must have the privileges to add/edit/delete the records otherwise the
corresponding options will be disabled.
Field Description:
Work Type: Select the work type.
Work Sub Type: Enter the work type.
Sub Type Code: Enter the sub type code.

19
6.4 Proposer Types
By selecting Works -> Masters -> Proposer Type, displays the Proposer Type
Screen. This screen is used to create the proposer types.
Figure 10: Proposer Type Master Screen
Figure 11: Proposer Type Master Entry Screen
Field Description:
Proposer Name: Enter the name of the proposer..

20
Note: 1) To add new entry click on the “Add” link.
2) To edit the details click on the “Edit” link.
3) To save the entered values click on the “Save” button.
4) To save the modified values click on the “Update” button.
5) To cancel the entry or the modification click on the “Cancel” link.
6) To delete the entry click on the “Delete” link.
7) You must have the privileges to add/edit/delete the records otherwise the
corresponding options will be disabled.

21
6.5 Programs
By selecting Works -> Masters -> Programs, displays the Program Screen.
This screen is used to create the program types.
Figure 12: Program Master Screen
Figure 13: Program Master Entry Screen
Note: 1) To add new entry click on the “Add” link.
2) To edit the details click on the “Edit” link.
3) To save the entered values click on the “Save” button.
4) To save the modified values click on the “Update” button.
5) To cancel the entry or the modification click on the “Cancel” link.
6) To delete the entry click on the “Delete” link.
7) You must have the privileges to add/edit/delete the records otherwise the
corresponding options will be disabled.
Field Description:
Program Name: Select the program name.

22
6.6 Repair Types
By selecting Works -> Masters -> Repair Types, displays the Repair Type
Screen. This screen is used to create the repair types.
Figure 14: Repair Type Master Screen
Figure 15: Repair Type Master Entry Screen
Field Description:
Program Name: Select the program name.
Repair Description: Enter the repair description.

23
Note: 1) To add new entry click on the “Add” link.
2) To edit the details click on the “Edit” link.
3) To save the entered values click on the “Save” button.
4) To save the modified values click on the “Update” button.
5) To cancel the entry or the modification click on the “Cancel” link.
6) To delete the entry click on the “Delete” link.
7) You must have the privileges to add/edit/delete the records otherwise the
corresponding options will be disabled.

24
6.7 Schemes
By selecting Works -> Masters -> Schemes, displays the Schemes Screen.
This screen is used to create the schemes.
Figure 16: Scheme Master Screen
Figure 17: Scheme Master Entry Screen
Note: 1) To add new entry click on the “Add” link.
2) To edit the details click on the “Edit” link.
Field Description:
Sponsor Name: Select the sponsor name.
Scheme Description: Enter the scheme description.

25
3) To save the entered values click on the “Save” button.
4) To save the modified values click on the “Update” button.
5) To cancel the entry or the modification click on the “Cancel” link.
6) To delete the entry click on the “Delete” link.
7) To search any entry, select the scope and enter scheme and then click on
the “Filter” button.
8) To clear the search contents click on the “Clear” button.
9) You must have the privileges to add/edit/delete the records otherwise the
corresponding options will be disabled.
6.8 Scopes
By selecting Works -> Masters -> Scope, displays the Scope Screen. This
screen is used to create the Scopes.

26
Figure 18: Scopes Master Screen
Figure 19: Scope Master Entry Screen
Note: 1) To add new entry click on the “Add” link.
Field Description:
Work Type: Select the work type.
Scope Description: Enter the scope description.
Unit: Select the required unit.

27
2) To edit the details click on the “Edit” link.
3) To save the entered values click on the “Save” button.
4) To save the modified values click on the “Update” button.
5) To cancel the entry or the modification click on the “Cancel” link.
6) To delete the entry click on the “Delete” link.
7) To search any entry, select the work type and enter scope description and
then click on the “Filter” button.
8) To clear the search contents click on the “Clear” button.
9) You must have the privileges to add/edit/delete the records otherwise the
corresponding options will be disabled.
6.9 Tender Types
By selecting Works -> Masters -> Tender Type, displays the Tender Type
Screen. This screen is used to create the new tender types.

28
Figure 20: Tender Type Master Screen
Figure 21: Tender Type Master Entry Screen
Note: 1) To add new entry click on the “Add” link.
2) To edit the details click on the “Edit” link.
3) To save the entered values click on the “Save” button.
4) To save the modified values click on the “Update” button.
5) To cancel the entry or the modification click on the “Cancel” link.
6) To delete the entry click on the “Delete” link.
7) You must have the privileges to add/edit/delete the records otherwise the
corresponding options will be disabled.
Field Description:
Tender Name: Enter the tender name.
Tender Type: Select the tender type.

29
6.10 User Department
By selecting Works -> Masters -> User Department, displays the User
Department Screen. This screen is used to create the new user departments.
Figure 22: User Department Master Screen
Figure 23: User Department Master Entry Screen
Field Description:
User Department Name: Enter the user department name.
Demand Number: Enter the demand number.

30
Note: 1) To add new entry click on the “Add” link.
2) To edit the details click on the “Edit” link.
3) To save the entered values click on the “Save” button.
4) To save the modified values click on the “Update” button.
5) To cancel the entry or the modification click on the “Cancel” link.
6) To delete the entry click on the “Delete” link.
7) You must have the privileges to add/edit/delete the records otherwise the
corresponding options will be disabled.

31
6.11 Contractor Class
By selecting Works -> Masters -> Contractor Class, displays the Contractor
Class Screen. This screen is used to create the new contractor classes.
Figure 24: Contractor Class Master Screen
Figure 25: Contractor Class Master Entry Screen
Note: 1) To add new entry click on the “Add” link.
2) To edit the details click on the “Edit” link.
3) To save the entered values click on the “Save” button.
Field Description:
Contractor Class: Enter the contractor class.

32
4) To save the modified values click on the “Update” button.
5) To cancel the entry or the modification click on the “Cancel” link.
6) To delete the entry click on the “Delete” link.
7) You must have the privileges to add/edit/delete the records otherwise the
corresponding options will be disabled.

33
7. Proposal Work
7.1. Work Information
By selecting Works Proposal Work Work Information, “Work Information”
screen is displayed which shows all the Works for the current logged-in division.
The screen is shown as below:
Figure 26: Work Information Entry Screen
Figure 27: Work Information Screen

34
Figure 28: Heads Selection Screen

35
Field Description:
Work Number: Enter a unique Work Number for the work to be added. Default auto
generated number will be shown to the user.
Work Category: Select the category of work to be added as Own
Departmental/Other Departmental /Deposit/Salary.
Work Description: Enter the name of the Work.
Sub Division Name: Select the Sub Division Office executing the work.
District: Select the District for the work to be added.
Taluka: Select the Taluka for the work to be added.
Village: Select the Village for the work to be added.
Habitation: Select the Habitation for the work to be added.
MLA Constituency: Select the MLA Constituency for the work to be added.
Proposer Type: Select the Proposer Type who has given the work.
Department: Select the Department Name from which the work has come.
Scheme: Select the Scheme under which the work is to be executed
Project Cost: Enter the estimated cost for the work.
Charged/Voted: Select Charged/Voted for the work.
Category: Select the TSP/SCSP/General for the work.
Backlog: Select the Backlog/Non-Backlog for the work.
Demand Number: Select the Demand Number under which the Budget is allocated
Scheme: Select the Scheme as CSP/SP/CP/NP
Sector: Select the Sector as State/District for CSP/SP/CP
Heads: Select the Budget Heads under which the budget is allocated from the
Dropdowns or through Tree view.
Budget Month: Select the Budget Month for the Work
Budget Year: Select the Budget Year for the Work
Program Name: Select the Program Name for the Non-Plan Work
Repair Type: Select the Repair Type for the Non-Plan Work
Work Type: Select the Work Type as Roads/Buildings/Bridges etc
Work Sub Type: Select the Work Sub Type as NH/SH/Admin/Office etc
Asset: Select the Asset Name for which the Work is being created
New/Upgrade: Select whether it’s a New/Upgrade Work
Chainage From: Enter the start chainage of the work
Chainage To: Enter the end chaiange of the work
Remarks: Enter the remarks if any

36
Note: 1) To add new entry click on the “Add” button.
2) To edit the details click on the “Edit” link.
3) To save the entered values click on the “Save” button.
4) To save the modified values click on the “Update” button.
5) To cancel the entry or the modification click on the “Cancel” button.
6) To delete the entry click on the “Delete” link.
7) To view the list of Works click on the “View” link.
8) To filter the details of the Works based on “Choose Head” and/or “Work
Description” click on “Filter” button to filter data and “Clear” button to clear filter.
9) You must have the privileges to view/add/edit/delete the records otherwise
the corresponding options will be disabled.

37
7.2. Split Works Information
By selecting Works Proposal Work Split Works Information, “Split Works
Information” screen is displayed which shows the list of splitted works for the
selected work.
Figure 29: Split Works Entry Screen
Figure 30: Split Works Information Screen
Figure 31: Works Search Screen

38
Note: 1) To add new entry click on the “Split” button.
2) To edit the details click on the “Edit” link.
3) To save the modified values click on the “Update” button.
4) To cancel the entry or the modification click on the “Cancel” link.
5) To delete the entry click on the “Delete” link.
6) To delete all the split Works entries click on the “Delete All” button.
7) To view the list of split Works select the Work through search screen.
8) You must have the privileges to view/add/edit/delete the records otherwise
the corresponding options will be disabled.
Field Description:
Split Work Number: Displays the Split Work Number auto-generated based on the
entry of the Parent Work Number
Split Work Desc: Displays the Split Work Description as entered in the Parent Work
Description to be updated as per requirement

39
8. Approvals
8.1. AA & ES Details
Selecting Works -> Approvals -> AA & ES Details, displays ‘AA & ES Details’
screen. This is the Screen for filling Administrative Approval Details for the selected
work. The Administrative Approvals for each work can be entered through this
screen. The first entry is considered as the „Original‟ Administrative Approval and
subsequently the rest of the entries are considered as „Revised‟ approvals.
Figure 32: Administrative Approval Entry Screen
Figure 33: Administrative Approval Details Screen

40
Figure 34: Office Selection Screen
Field Description:
AA Number: Enter the AA Number for the work.
AA Date: Select the AA approval date
Authority: Select the Approving Authority
AA Office: Select the Approving Office Name
ES Amount: Enter the ES amount for work.
Demand No: Enter the demand Number.
Scheme (Plan/Non Plan): Enter the Scheme as Plan or Non Plan.
Major Head: Enter the major head.
Sub Major Head: Enter the Sub major head.
Minor Head: Enter the minor head.
Sub Minor Head: Enter the Sub minor head.
Detail Head: Enter the detail head.
Object Head: Enter the object head.
JOB Number: Enter the job number.
Remarks: Enter the remarks for Administrative approval

41
Note: 1) To add new entry click on the “Add” link.
2) To edit the details click on the “Edit” link.
3) To save the entered values click on the “Save” button.
4) To save the modified values click on the “Update” button.
5) To cancel the entry or the modification click on the “Cancel” link.
6) To delete the entry click on the “Delete” link.
7) To view the list of AA/ES entries click on the “View” link.
8) To view the details of the AA/ES select the Work through the “Search” link.
9) You must have the privileges to view/add/edit/delete the records otherwise
the corresponding options will be disabled.

42
8.2. TS Details
Selecting Works -> Approvals -> TS Details, displays „Technical Sanction
Details‟ screen. This is the screen is used for filling the Technical Sanction Details for
the selected work.
The Technical Sanction for each work can be entered through this screen. The
first entry is considered as the „Original‟ Technical Sanction and subsequently the
rest of the entries are considered as „Revised‟ TS approvals.
Figure 35: Technical Sanction Entry Screen
Figure 36: Technical Sanction Details Screen

43
Note: 1) To add new entry click on the “Add” link.
2) To edit the details click on the “Edit” link.
3) To save the entered values click on the “Save” button.
4) To save the modified values click on the “Update” button.
5) To cancel the entry or the modification click on the “Cancel” link.
6) To delete the entry click on the “Delete” link.
7) To view the list of TS entries click on the “View” link.
8) To view the details of the TS select the Work through “Search” link.
9) You must have the privileges to view/add/edit/delete the records otherwise
the corresponding options will be disabled.
Field Description:
TS Number: Enter the Technical Sanction Number for the work.
TS Date: Select the approval date
TS Office: Select the TS Approving Office Name
TS Authority: Select the TS Approving Authority
TS SR Year: Select TS SR year
Zone: Select Zone for SR rates
Specification: Select specification as MORD/MORTH/CPWD/State PWD
Time Period: Enter the time period in months.
Land: Select if land used.
Tools & Plants: Select if tools and plants used.
TS Amount: Enter the approved TS amount for the work.
Method: Enter the method to be used.
Remarks: Enter the remarks for technically sanction details.

44
9. Tendering
9.1. BoQ Details
Selecting Works -> Tendering -> BoQ Details, displays „BoQ Details‟ screen.
This screen is used to prepare the Bill of Quantity (BoQ) for the selected Work.
(Note: -Before entering BoQ Details, user has to enter the technical sanction details.)
Figure 37: BoQ Entry Screen
Figure 38: BoQ Details Screen

45
The SR Items can be searched and added in the Bill of Quantity through the
SR Item Search screen.
Figure 39: Search SR Items Screen
Adding multiple SR Items in one go and specifying the Measurements or the
Quantity for each item can prepare the Bill of Quantity.
Figure 40: Adding Multiple Items in BoQ Screen
The Bill of Quantity can be prepared by copying Bill Items from other works
for which the Items are similar.

46
Figure 41: Copy BoQ Screen
Field Description:
Item Type: Select the SR Item Type from the list populated
Item: Select the SR Item from the list populated
Item Description: Displays the Item Description for the selected Item.
Unit: Unit of the selected SR Item will be shown.
Rate: Displays the SR Item rate
Quantity/Measurement: Select whether entering Quantity or Measurement.
Quantity: Enter the Quantity to be executed for the Work.
Measurement: Enter the Measurements as Number, Length, Breadth & Depth.
Scope: Select the scope for the selected SR Item.
Remarks: Enter remarks if any.

47
Note: 1) To add new entry click on the “Add” link.
2) To add multiple SR Items in one go click on the “Add Multiple Items” link.
3) To copy the BoQ Items from other works click on the “Copy BoQ” link.
4) To edit the details click on the “Edit” link.
5) To save the entered values click on the “Save” button.
6) To save the modified values click on the “Update” button.
7) To cancel the entry or the modification click on the “Cancel” link.
8) To delete the entry click on the “Delete” link.
9) To delete all the BoQ Items click on the “Delete All” link.
10) To view the list of BoQ entries click on the “View” link.
11) To view the details of the BoQ select the Work through “Search” link.
12) You must have the privileges to view/add/edit/delete the records
otherwise the corresponding options will be disabled.

48
9.2. Schedule A Details
Selecting Works -> Tendering -> Schedule A Details, displays „Schedule A
Details‟ screen. This Screen is used for filling the Schedule “A” details for the
Materials provided by the Department to the Contractor for execution of the selected
work.
Figure 42: Schedule A Entry Screen
Figure 43: Schedule A Details Screen

49
Figure 44: Item Search Screen
Note: 1) To add new entry click on the “Add” link.
2) To edit the details click on the “Edit” link.
3) To save the entered values click on the “Save” button.
4) To save the modified values click on the “Update” button.
5) To cancel the entry or the modification click on the “Cancel” link.
6) To delete the entry click on the “Delete” link.
Field Description:
Item: Select the item to be provided to the contractor.
Unit: When item is selected its unit gets entered automatically.
Rate: Modify the item rate for the selected item if required.
Quantity: Enter the quantity to be issued to the contractor.
Remarks: Enter the remarks if any.

50
7) To view the list of Schedule A entries click on the “View” link.
8) To view the details of the Schedule A select the Work through “Search” link.
9) You must have the privileges to view/add/edit/delete the records otherwise
the corresponding options will be disabled.

51
9.3. Work Scope
Selecting Works -> Tendering -> Work Scope, displays „Work Scope screen.
This screen is used to enter the planning dates for the selected work. Based on these
planned dates the Physical and Financial Scope will be calculated. The scopes for the
work are shown from the scopes mapped in the BoQ.
Figure 45: Work Scope Entry Screen
Figure 46: Work Scope Screen
Field Description:
Select: Select the Check Box for which the entries are to be made
Scope: Displays the name of the Scope
Planned Start Date: Select the Planned Start Date for the selected Scope
Planned End Date: Select the Planned End Date for the selected Scope

52
Note: 1) To add new entry click on the “Add” link.
2) To edit the details click on the “Edit” link.
3) To save the entered values click on the “Save” button.
4) To save the modified values click on the “Update” button.
5) To cancel the entry or the modification click on the “Cancel” link.
6) To delete the entry click on the “Delete” link.
7) To view the list of Scope entries click on the “View” link.
8) To view the details of the Scope select the work through “Search” link.
9) You must have the privileges to view/add/edit/delete the records otherwise
the corresponding options will be disabled.

53
9.4. Recapitulation Entry
Selecting Works -> Tendering -> Recapitulation Entry, displays „Recapitulation
Details‟ screen. This Screen is used to enter recapitulation details for the selected
work.
Figure 47: Recapitulation Entry Screen
Figure 48: Recapitulation Details Screen

54
Note: 1) To add new entry click on the “Add” link.
2) To edit the details click on the “Edit” link.
3) To save the entered values click on the “Save” button.
4) To save the modified values click on the “Update” button.
5) To cancel the entry or the modification click on the “Cancel” link.
6) To delete the entry click on the “Delete” link.
7) To view the list of Recapitulation entries click on the “View” link.
8) To view the details of the Recapitulation select the Work through “Search”
link.
9) You must have the privileges to view/add/edit/delete the records otherwise
the corresponding options will be disabled.
Field Description:
Work Portion: Displays the Work Portion amount for the Work from TS
Contingency: Enter contingency amount in percentage
Turnover Tax: Enter Turnover Tax amount in percentage
Work Charges: Enter Work Charges amount in percentage
Quality Control: Enter Quality Control amount in percentage
Other Charges: Enter Other Charges amount in percentage
Sub Total: Sub Total amount is calculated as sum of above calculations
Centage Charges – Calculated on the (Work Portion + Sub Total)
Establishment: Enter Establishment Charges amount in percentage
Tools and Plants: Enter Tools and Plants Charges amount in percentage
Audit: Enter Audit and Accounts Charges amount in percentage
Secretariat: Enter Secretariat Charges amount in percentage
Pensionery: Enter Pensionery Charges amount in percentage
Grand Total: Total amount will be calculate based on the above calculations

55
9.5. Tender Details
Selecting Works -> Tendering -> Tender Details, displays „Tender Details‟
screen. This screen is used to enter the Tender information for the selected work.
Figure 49: Tender Details Entry Screen
Figure 50: Tender Details Screen

56
Note: 1) To add new entry click on the “Add” link.
2) To edit the details click on the “Edit” link.
3) To save the entered values click on the “Save” button.
4) To save the modified values click on the “Update” button.
5) To cancel the entry or the modification click on the “Cancel” link.
6) To delete the entry click on the “Delete” link.
7) To view the list of Tender entries click on the “View” link.
8) To view the details of the Tender select the work through “Search” link.
9) You must have the privileges to view/add/edit/delete the records otherwise
the corresponding options will be disabled.
Field Description:
Tender Type: Select the tender type.
Estimate Amount: Enter the Tender Amount, calculated from the BoQ
Tender Opening Date: Select the Tender Opening Date
Contractor Class: Select the contractor class
Approving Authority: Select the Tendering authority
Bid Type: Select Single Bid/Double Bid.
Remarks: Enter the remarks if any

57
9.6. PBC Details
Selecting Works -> Tendering -> PBC Details, displays „PBC Details‟ screen.
This screen is used to enter the details for the Pre Bid Conference held before the
tender opening of the selected work.
Figure 51: PBC Details Entry Screen
Figure 52: PBC Details Screen

58
Note: 1) To add new entry click on the “Add” link.
2) To edit the details click on the “Edit” link.
3) To save the entered values click on the “Save” button.
4) To save the modified values click on the “Update” button.
5) To cancel the entry or the modification click on the “Cancel” link.
6) To delete the entry click on the “Delete” link.
7) To view the list of PBC entries click on the “View” link.
8) To view the details of the PBC select the work through “Search” link.
9) You must have the privileges to view/add/edit/delete the records otherwise
the corresponding options will be disabled.
Field Description:
Conference Date: Select conference date
Venue: Enter venue details
PWD Attendees: Enter the name of PWD representative
Contractor Representatives: Enter the name of contractor’s representatives
Nit Conditions Modified: Select whether the Nit condition modified or not.
Minutes Issue Date: Select minutes issue date

59
9.7. Quotation Details
Selecting Works -> Tendering -> Quotation Details, displays „Quotation
Details‟ screen. This screen is used to enter the details of the quotations submitted
by the contractors for the selected work. The user must fill this entry before going
further. Contractor simply quotes the amount, difference percentage will calculate
automatically.
Figure 53: Quotation Entry Screen (Percentage)
Figure 54: Quotation Entry Screen (Item Rate)

60
Figure 55: Quotation Details Screen
Field Description:
Percentage
Contractor: Select the name of the Contractor for whom the quotation is being
entered
Work Cost: Displays the Amount of the Work from Tender
Quotation in Amount/Percentage: Select whether the Quotation is in amount or the
percentage
Quoted Amount: Enter the Quoted amount of the Contractor or displays the quoted
amount calculated from the Quoted Percentage
Quoted Percentage: Displays the Quoted Percentage calculated from the Quoted
amount or enter the Quoted Percentage
Above/Below: Displays whether the Quoted amount is above or below the Work
amount
Item Rate
Contractor: Select the name of the Contractor for whom the quotation is being
entered
Item Description: Displays the BoQ Item for which the quoted amount is to be
entered
Item Unit: Displays the BoQ Item Unit
Rate: Displays the BoQ Rate for the Item
Quantity: Displays the Quantity of the BoQ Item
Contractor Rate: Enter the Quoted Rate of the Contractor for the BoQ Item
Above/Below: Displays whether the Quoted amount is above or below the BoQ
amount

61
Note: 1) To add new entry click on the “Add” link.
2) To edit the details click on the “Edit” link.
3) To save the entered values click on the “Save” button.
4) To save the modified values click on the “Update” button.
5) To cancel the entry or the modification click on the “Cancel” link.
6) To delete the entry click on the “Delete” link.
7) To view the list of Quotation entries click on the “View” link.
8) To view the details of the Quotation select the work through “Search” link.
9) You must have the privileges to view/add/edit/delete the records otherwise
the corresponding options will be disabled.

62
9.8. Awarding of Contract
Selecting Works -> Tendering -> Awarding of Contract, displays „Awarding of
Contract‟ screen. This screen is used to enter the details of the award given to the
contractor for the selected work.
Figure 56: Awarding of Contract Entry Screen
Figure 57: Awarding of Contract Screen

63
Note: 1) To add new entry click on the “Add” link.
2) To edit the details click on the “Edit” link.
3) To save the entered values click on the “Save” button.
4) To save the modified values click on the “Update” button.
5) To cancel the entry or the modification click on the “Cancel” link.
6) To delete the entry click on the “Delete” link.
7) To view the list of Awarding entries click on the “View” link.
8) To view the details of the Awarding select the work through “Search” link.
9) You must have the privileges to view/add/edit/delete the records otherwise
the corresponding options will be disabled.
Field Description:
Contractor: Select the contractor to whom the contract is to be awarded
Agreement No: Enter the agreement number
Work Order No: Enter the work order number
Agreement Date: Select agreement date
Accepting Authority: Select accepting authority
Date of Actual Commencement: Select date of actual commencement
Work Period in Months: Enter work period in months
Stipulated Date Of Completion: Select stipulated date of completion
Agreement Type: Select the Agreement Type
Work Cost: Displays the Work Cost as per the Tender
Quoted Amount: Displays the Quoted Amount of the Contractor
Accepted Tender Other Than Lowest: Select option whether accepted tender other
than lower
Whether Excess Involved: Select whether excess involved or not
Whether Negotiation Done: Select whether negotiation being done or not
Accepted Percentage: Enter the negotiated percentage (only for Percentage Type)
Negotiated %: Displays the negotiated percentage is above/below or at par
Remarks: Enter the remarks if any

64
9.9. Negotiation Details
Selecting Works -> Tendering -> Awarding of Contract, displays „Awarding of
Contract‟ screen. If the negotiation is selected then the Negotiation link will be
enabled for entering the negotiation amount. This screen is used to enter the details
of the negotiations done with the contractors for the selected work.
Figure 58: Negotiation Entry Screen
Figure 59: Negotiation Details Screen

65
Note: 1) To enter the negotiation details click on the “Negotiation” link.
2) To save the entered values click on the “Update” button.
3) To cancel the entry or the modification click on the “Cancel” link.
4) To cancel the negotiation click on the “edit” link and select “No” for
Negotiation.
5) You must have the privileges to view/add/edit/delete the records otherwise
the corresponding options will be disabled.
Field Description:
Item Rate
Contractor: Displays the name of the Contractor with whom the negotiation is being
done
Item Description: Displays the BoQ Item for which the quoted amount is to be
entered
Item Unit: Displays the BoQ Item Unit
Rate: Displays the BoQ Rate for the Item
Quantity: Displays the Quantity of the BoQ Item
Contractor Rate: Displays the Quoted Rate of the Contractor for the BoQ Item
Negotiation Rate: Enter the Negotiation Rate
Above/Below: Displays whether the Negotiation amount is above or below the BoQ
amount

66
10. Execution
10.1. Work Extension Details
Selecting Works -> Execution -> Work Extension Details, displays „Work
Extension Details‟ screen. This screen is used to enter the details of the extensions
given to the contractors for the selected work.
This screen is used in cases where the work gets extended due to some
unavoidable reasons. Number of extensions can be given to a single work as per the
requirement of the Department.
Figure 60: Work Extension Entry Screen
Figure 61: Work Extension Details Screen

67
Note: 1) To add new entry click on the “Add” link.
2) To edit the details click on the “Edit” link.
3) To save the entered values click on the “Save” button.
4) To save the modified values click on the “Update” button.
5) To cancel the entry or the modification click on the “Cancel” link.
6) To delete the entry click on the “Delete” link.
7) To view the list of extension entries click on the “View” link.
8) To view the details of the extensions select the Work through “Search” link.
9) You must have the privileges to view/add/edit/delete the records otherwise
the corresponding options will be disabled.
Field Description:
Extension Number: Enter a unique extension number
Stipulated Date of Completion: This date gets automatically selected but you can
change this date.
Extension Upto Date: Select extension given up to date
Value of Work Completed within Time (%): Enter value of work completed within
time in percentage
Value of Remaining Work (%): Enter value of remaining work in percentage.
Extension if any Granted with the value of work completed during the said
period of Extension of Time Limit: Enter the value of work completed during the
extension period
Extension now applied for by the Contractor (Ref. of Contractors letter to be
given): Enter the reference letter no of the contractor for the extension
Detailed Reason For Extension: Enter the detail reasons for extension given

68
10.2. Close Work
Selecting Works -> Execution -> Close Work, displays „Close Work‟ screen.
This screen is used to enter the closing date for the selected work. After entering the
closing date for the work, this work will not be displayed in Budget, Billing and
Accounting modules for entry but will be available only for reporting purpose. Also,
the Split Works if any will be closed based on the closing of the Parent Work.
Figure 62: Close Work Entry Screen
Figure 63: Close Work Screen
Field Description:
Select Option: Select the check box for the work, which is to be closed.
Closing Date: Enter the closing date.

69
Note: 1) To close new works click on the “Add” link.
2) To edit the details of closed works click on the “Edit” link.
3) To save the entered values click on the “Save” button.
4) To save the modified values click on the “Update” button.
5) To cancel the entry or the modification click on the “Cancel” link.
6) To view the list of closed works click on the “View” link.
7) To view the details of the closed work select the Work through “Search”
link.
8) You must have the privileges to view/add/edit/delete the records otherwise
the corresponding options will be disabled.

70
10.3. Close Split Works
Selecting Works -> Execution -> Close Split Works, displays „Close Split
Works‟ screen. This screen is used to enter the closing date for the selected split
work. After entering the closing date for the split work, this work will not be
displayed in Budget, Billing and Accounting modules for entry but will be available for
reporting purpose. Closing of a split work will not close the other split works for the
same parent work.
Figure 64: Close Split Work Entry Screen
Figure 65: Close Split Work Screen
Field Description:
Select Option: Select the check box for the split work, which is to be closed.
Closing Date: Enter the closing date.

71
Note: 1) To close new works click on the “Add” link.
2) To edit the details of closed works click on the “Edit” link.
3) To save the entered values click on the “Save” button.
4) To save the modified values click on the “Update” button.
5) To cancel the entry or the modification click on the “Cancel” link.
6) To view the list of closed split works click on the “View” link.
7) To view the details of the closed split work select the Split Work through
“Search” link.
8) You must have the privileges to view/add/edit/delete the records otherwise
the corresponding options will be disabled.

72
11. Work Reports
This section provides various reports required by the Division to monitor the
various works being executed.
11.1. Report Options
By selecting Works -> Reports -> Report Options, displays “Report Options”
screen. This screen is used to show generate various reports required by the
Divisions.
Figure 66: Option Report Screen
11.1.1. Show Work List
By selecting Works -> Reports -> Report Options -> Work List, displays the
report showing the list of Works with the Division for execution.
Based on selected filters Work Type, Scheme, District, Taluka and
Constituency the list of works can be populated.

73
Figure 67: Works List Report
11.1.2. Split Works List
By selecting Works -> Reports -> Report Options -> Split Works List, displays
the report showing the list of Split Works with the Division for execution.
Based on selected Work the list of split works are populated and shown in the
report.
Figure 68: Works List Report
11.1.3. Works With AA
By selecting Works -> Reports -> Report Options Works With AA, displays
the report showing the list of Works, for which Administrative Approval has been
entered.
Based on AA Date Administrative approval report is generated for the Works
getting the AA in the selected month and year.

74
Figure 69: Administratively Approved Works Report
11.1.4. Works with No AA
By selecting Works -> Reports -> Report Options Works with No AA,
displays the report showing the list of Works, for which the Administrative Approval
has not been entered.
Figure 70: Works without Administrative Approval Report

75
11.1.5. Administrative Approval Register
By selecting Works -> Reports -> Report Options Administrative Approval
Register, displays the Administrative Approval Register report.
Figure 71: Administrative Approval Register Report
11.1.6. Work with TS
By selecting Works -> Reports -> Report Options Work With TS, displays
the report showing the list of Works for which Technical Sanction has been entered.
Based on TS Date Technical Sanction report is generated for the Works
getting the TS in the selected month and year.
Figure 72: Technical Sanctioned Works Report

76
11.1.7. Works with No TS
By selecting Works -> Reports -> Report Options Show Works with No TS,
displays the report showing the list of Works for which there is no entry for Technical
Sanction.
Figure 73: Works with No TS Report
11.1.8. Technical Sanction Register
By selecting Works -> Reports -> Report Options Technical Sanction
Register, displays the report showing the details of Technical Sanction Register for
various works. Select TS Month and TS Year to display the report.
Figure 74: Technical Sanction Register Report
11.1.9. Works with TS and No BoQ
By selecting Works -> Reports -> Report Options Works with TS and No
BoQ, displays the report showing the list of Works with Technical Sanction but no
entry for Bill of Quantity (BoQ). Enter the TS Month and TS Year to display the
report.

77
Figure 75: Works with TS and No BoQ Report
11.1.10. Works with TS and BoQ
By selecting Works -> Reports -> Report Options Works with TS & BoQ,
displays the report showing the list of Works with Technical Sanction and BoQ
entries. Enter the TS Month and TS Year to display the record.
Figure 76: Works with TS & BoQ Report
11.1.11. BoQ
By selecting Works -> Reports -> Report Options BoQ, displays the report
showing the list of Bill of Quantity (BoQ) Items for the selected Work.

78
Figure 77: BoQ Report
11.1.12. Works with TS, BoQ and No Tender
By selecting Works -> Reports -> Report Options Works with TS & BoQ and
No Tender, displays the report showing the list of Works with Technical Sanction and
BoQ entries but no Tender entry. Enter TS Month and TS Year to display the report.
Figure 78: Works with TS & BoQ and No Tender Report
11.1.13. Works with TS, BoQ and Tender
By selecting Works -> Reports -> Report Options Works with TS, BoQ and
Tender, displays the report showing the list of Works for which the Technical
Sanction, BoQ and Tender entries are done. Enter TS Month, TS Year, Tender Month,
Tender Year and Tender Type to display the report.

79
Figure 79: Works with TS, BoQ and Tender Report
11.1.14. Works with TS, BoQ & Tender but No Participation
By selecting Works -> Reports -> Report Options Works with TS, BoQ,
Tender but No Participation, displays the report showing the list of Works for which
the Technical Sanction, BoQ and Tender is entered but no Quotation entries done.
Enter TS Month, TS Year, TENDER Month, TENDER Year and TENDER TYPE to display
the report.
Figure 80: Works with TS, BoQ, Tender and No Quotation Report
11.1.15. Works with TS, BoQ, Tender and Participation
By selecting Works -> Reports -> Report Options Works with TS, BoQ,
Tender and Participation, displays the report showing the list of Works for which the
Technical Sanction, BoQ, Tender and Quotation entries are done. Enter TS Month, TS
Year, TENDER Month, TENDER Year and TENDER TYPE to display the report.

80
Figure 81: Works with TS, BoQ, Tender and Participation Report
11.1.16. Works with TS, BoQ, Tender & Participation & Not Award
By selecting Works -> Reports -> Report Options Works with TS, BoQ,
Tender & Participation but Not Award, displays the report showing the list of works
for which Technical Sanction, BoQ, Tender & Quotation has been entered but the
contract is not awarded.
Figure 82: Works with TS, BoQ, Tender & Participation but Not Awarded
Report
11.1.17. Works with TS, BoQ, Tender, Participation & Awarding
By selecting Works -> Reports -> Report Options Works with TS, BoQ,
Tender, Participation & Awarding, displays the report showing the list of works for
which the Technical Sanction, BoQ, Tender, Quotation and contract awarding has
been entered.

81
Figure 83: Works with TS, BoQ, Tender, Participation and Awarding Report
11.1.18. Agreement Register
By selecting Works -> Reports -> Report Options Agreement Register,
displays the report showing the details of the Agreement Register. Select Awarding
Month and Awarding Year to display the report.
Figure 84: Agreement Register Report
11.1.19. Works Awarded but No RA Bill Raised
By selecting Works -> Reports -> Report Options Works Awarded but No RA
Bill Raised, displays the report showing the list of works for which the Technical
Sanction, BoQ, Tender, Quotation and contract awarding has been entered but there
is no RA Bill generated.

82
Figure 85: Works Awarded and No RA Bill Raised Report
11.1.20. Works Awarded & RA Bill is Raised
By selecting Works -> Reports -> Report Options Works Awarded & RA Bill
is Raised, displays the report showing the list of works for which the Technical
Sanction, BoQ, Tender, Quotation, contract awarding along with the RA Bill is
generated.
Figure 86: Works Awarded and RA Bill Raised Report

83
11.1.21. Closed Split Works
By selecting Works -> Reports -> Report Options Closed Split Works,
displays the report showing the list of split works, which have been completed or
closed.
Figure 87: Closed Split Works Report
11.1.22. Closed Works
By selecting Works -> Reports -> Report Options Closed Works, displays
the report showing the list of works, which are completed or closed.
Figure 88: Closed Works Report

84
11.1.23. Agreement Details
By selecting Works -> Reports -> Report Options Agreement Details,
following screen is displayed showing agreement details regarding particular work.
Figure 89: Duration Between Stages Report
11.1.24. Show Duration Between Stages
By selecting Works -> Reports -> Report Options Show Duration Between
Stages, following screen is displayed showing the duration between various stages of
the life cycle of the work.
This report displays the duration taken between various stages of works.

85
Figure 90: Duration Between Stages Report
11.1.25. Quotation Comparison Statement
By selecting Works -> Reports -> Report Options Quotation Comparison
Statement, following screen is displayed showing the comparison of quotation
filed by 3 contractor for a particular work.

86
Figure 91: Quotation Comparison Statement Report
11.1.26. Quotation Details
By selecting Works -> Reports -> Report Options Quotation Details,
following screen is displayed showing quotation filed by a contractor for a
work
Figure 92: Quotation Details Report

87
11.1.27. Schedule A Details By selecting Works -> Reports -> Report Options Schedule A Details,
following screen is displayed showing Schedule A Details of the work.
Figure 93: Schedule A Details Report
Note: 1) You must have the privileges to view the reports.

88
11.2. Monthly Progress Report
By selecting Works -> Reports -> Monthly Progress Report, screen is
displayed. This screen is used to view Monthly Progress report of the works at a
glance.
Based on selected filters Work Type, Scheme, District, Taluka and
Constituency Monthly Progress report is generated.
Figure 94: Monthly Progress Report Screen
Note: 1) You must have the privileges to view the reports.

89
11.3. Scopewise Progress Report
By selecting Works -> Reports -> Scopewise Progress Report, screen is
displayed. This screen is used to view Scopewise Progress report of the works at a
glance.
Figure 95: Scope wise Progress Report Screen
Note: 1) You must have the privileges to view the reports.

90
12. Billing
12.1. Recovery Master
Selecting Billing -> Masters -> Recovery Master, displays „Recovery Master‟
screen. This screen is used to enter the details of the recoveries that are required
during the bill recoveries.
Figure 96: Recovery Master Screen
Figure 97: Recovery Master Entry Screen

91
Note: 1) To add new entry click on the “Add” link.
2) To edit the details click on the “Edit” link.
3) To save the entered values click on the “Save” button.
4) To save the modified values click on the “Update” button.
5) To cancel the entry or the modification click on the “Cancel” link.
6) To delete the entry click on the “Delete” link.
8) You must have the privileges to add/edit/delete the records otherwise the
corresponding options will be disabled.
Field Description:
Recovery Type: Select the recovery type.
Contractor Class / Bill Amount / Flat: Select Contractor Class/Bill Amount/Flat.
Contractor Class: If Contractor Class checkbox is checked then select required
contractor class.
Bill Amount Range: If Bill Amount checkbox is checked enter Bill Amount Range.
Percentage/Amount: Select whether percentage or amount is required.
Percentage: If percentage checkbox is checked enter the percentage.
Amount: If amount checkbox is checked enter the amount.

92
12.2. RA Bill Details
Selecting Billing -> Bill Info -> RA Bill Details, displays „RA Bill Details‟ screen.
This screen is used to enter the details of the RA Bills generated for the work
completed by the contractors for the selected work.
This screen is used to generate the RA Bills based on the measurements
taken by the Junior Engineer for the volume of work completed. The entries for the
Bill will be done first by the Junior Engineer (JE) and after finalization of the Bill by JE
the bill will be presented to Assistant Engineer (AE) for verification and after
finalization at AE level, the bill will be presented to Auditor. After finalization at
Auditor level the bill will be presented to Divisional Accountant (DA). After DA
finalizes the bill the bill will be presented to Executive Engineer (EE) for final
approval. Once the Executive Engineer (EE) finalizes the bill the bill is considered to
be ready for Payment. In RA Bill reports there will be a message displayed as
“Preparation Mode” until the Executive Engineer finalizes the bill.
Figure 98: RA Bill Entry Screen
Figure 99: RA Bill Details Screen

93
Note: 1) To add new entry click on the “Add” link.
2) To edit the details click on the “Edit” link.
3) To save the entered values click on the “Save” button.
4) To save the modified values click on the “Update” button.
5) To cancel the entry or the modification click on the “Cancel” link.
6) To delete the entry click on the “Delete” link.
7) To view the latest Bill entry click on the “View” link.
8) To view the details of the RA Bill select the Work through “Search” link.
9) To view or enter the Bill Items for the RA Bill click on “Bill Items” link.
10) To view or enter the Royalty for the RA Bill click on “Royalty Calculation”
link.
11) To view or enter the Recoveries for the RA Bill click on “Recoveries” link.
12) To view or enter the MB details for the RA Bill click on “MB Record” link.
13) To finalize the RA Bill click on the “Finalize” link.
14) You must have the privileges to view/add/edit/delete the records
otherwise the corresponding options will be disabled.
Field Description:
RA Bill No: Enter the RA Bill Number (default auto generated number is displayed)
RA Bill Date: Select the date of RA Bill
Whether Final Bill: Select whether the Bill is First & Final, RA or RA & Final
Remarks: Enter the remarks if any.

94
12.3. Bill Items
Selecting Billing -> Bill Info -> Bill Items, displays „Bill Items‟ screen. By
selecting the link “Bill Items” the screen-displayed can be used for entering the
details of the BoQ Items executed in the current bill for the selected work.
This screen is used to enter the upto date quantity or executed quantity or
upto measurements or executed measurements for the selected BoQ Items in the
current bill.
Figure 100: Bill Items Selection Screen

95
Figure 101: Bill Items Entry Screen
Figure 102: Bill Items Details Screen

96
Note: 1) To add new entry click on the “Add” link.
2) To edit the details click on the “Edit” link.
3) To save the entered values click on the “Save” button.
4) To save the modified values click on the “Update” button.
5) To cancel the entry or the modification click on the “Cancel” link.
6) To delete the entry click on the “Delete” link.
7) To view the list of items entered click on the “View” link.
8) To view the details of the bill select the Work through “Search” link.
9) To add more items in the bill click on “Add More” button.
10) To delete all items from the bill click on “Delete All” button.
11) To view the bill click on “Back” button.
12) You must have the privileges to view/add/edit/delete the records
otherwise the corresponding options will be disabled.
Field Description:
Item Description: Displays the Item Description for which the quantity is being
entered
Executed / Upto Date: Select whether entering Executed or Upto Date Quantity or
Measurement
Measurement / Quantity: Enter the Executed or Upto date Measurement or Quantity
for the BoQ item
Rate: Displays the awarded rate for calculation of the amount of the bill
Amount: Displays the amount calculated for the item as (upto date quantity * rate).
Remarks: Enter remarks if any

97
12.4. Royalty Calculations
Selecting Billing -> Bill Info -> Royalty Calculations, displays „Royalty
Calculations‟ screen. This screen is used to calculate the Royalty to be applied on the
material used as per the Rate Analysis of the Bill of Quantity (BoQ) Item in the
current bill for the selected Work.
The material coefficients are automatically added in the Bill based on the BoQ
Items Rate Analysis entered in the Schedule of Rates module.
Figure 103: Royalty Calculations Entry for Item Screen

98
Figure 104: Royalty Calculation for Item Screen
Figure 105: Royalty Calculation Screen
Field Description:
Chapter: Select the Chapter for the Item
Category: Select the Category of the Item
Item Name: Select the Item Name for which the Coefficient needs to be entered
Unit: Unit of the selected Item will be shown.
Rate: Displays the Item rate
Coefficient: Enter the Coefficient for the Item.

99
Note: 1) To add new entry click on the “Add” link.
2) To edit the details click on the “Edit” link.
3) To save the entered values click on the “Save” button.
4) To save the modified values click on the “Update” button.
5) To cancel the entry or the modification click on the “Cancel” link.
6) To delete the entry click on the “Delete” link.
7) To view the list of Items entries click on the “Edit” link.
8) To view the details of the Royalty Calculations select the Work through
“Search” link.
9) You must have the privileges to view/add/edit/delete the records otherwise
the corresponding options will be disabled.

100
12.5. Bill Recoveries
Selecting Billing -> Bill Info -> Bill Recoveries, displays „Bill Recoveries‟
screen. This screen is used to enter the recovery details to be recovered from the
Contractor from the current bill for the selected Work.
Figure 106: Bill Recoveries Entry Screen
Figure 107: Bill Recoveries Screen

101
Note: 1) To add new entry click on the “Add” link.
2) To edit the details click on the “Edit” link.
3) To save the entered values click on the “Save” button.
4) To save the modified values click on the “Update” button.
5) To cancel the entry or the modification click on the “Cancel” link.
6) To delete the entry click on the “Delete” link.
7) To view the list of Recoveries entries click on the “View” link.
8) To view the details of the Recoveries select the Work through “Search” link.
9) You must have the privileges to view/add/edit/delete the records otherwise
the corresponding options will be disabled.
Field Description:
Recovery Type: Select the Recovery Type to be entered
Recovery Column: Select the Column in which the Recovery needs to be displayed
in RA Bill Reports
Recovery Option: Displays the various calculations based on the master entry.
Select the option, which is required to be recovered from the bill

102
12.6. MB Record
Selecting Billing -> Bill Info -> MB Record, displays „MB Record‟ screen. By
selecting the link “MB Records” the screen-displayed can be used for entering the
details of the Measurement Book (MB) for the selected work.
This screen is used to enter the details of Measurement Book Number, Page
Numbers, Names of Junior Engineer, Assistant Engineer and Executive Engineer who
have verified the current bill.
Figure 108: MB Record Entry Screen
Figure 109: MB Record Details Screen

103
Note: 1) To add new entry click on the “Add” link.
2) To edit the details click on the “Edit” link.
3) To save the entered values click on the “Save” button.
4) To save the modified values click on the “Update” button.
5) To cancel the entry or the modification click on the “Cancel” link.
6) To delete the entry click on the “Delete” link.
7) To view the list of items entered click on the “View” link.
8) To view the details of the bill select the Work through “Search” link.
9) To view the bill click on “RA Bill Details” link.
10) You must have the privileges to view/add/edit/delete the records
otherwise the corresponding options will be disabled.
Field Description:
Person Recording the Measurement: Select the name of the person taking the
measurements (Junior Engineer)
Record Date: Select the date on which measurements where taken
Measurement Book Details: Enter the MB Number and the Page Numbers in which
entries are made (Multiple MB Numbers and Page Numbers can be entered)
Checked Date (AE): Select the date on which measurements where checked by AE
Checked by (Assistant Engineer): Select the name of Deputy/Assistant Engineer
Checked Date (EE): Select the date on which measurements where checked by EE
Checked by (Executive Engineer): Select the name of the Executive Engineer
Remarks: Enter the remarks if any

104
12.7. Extra Items Details
Selecting Billing -> Bill Info -> Extra Items, displays „Extra Items‟ screen.
This screen is used to add extra items in the Bill of Quantity (BoQ) for the selected
Work after the work is awarded or the execution of the work is started.
Figure 110: Extra Items Entry Screen
Figure 111: Extra Items Screen

105
Note: 1) To add new entry click on the “Add” link.
2) To edit the details click on the “Edit” link.
3) To save the entered values click on the “Save” button.
4) To save the modified values click on the “Update” button.
5) To cancel the entry or the modification click on the “Cancel” link.
6) To delete the entry click on the “Delete” link.
7) To view the list of Extra Items entries click on the “View” link.
8) To view the details of the Extra Items select the Work through “Search”
link.
9) You must have the privileges to view/add/edit/delete the records otherwise
the corresponding options will be disabled.
Field Description:
Item Type: Select the SR Item Type from the list populated
Item: Select the SR Item from the list populated
Item Description: Displays the Item Description for the selected Item.
Unit: Unit of the selected SR Item will be shown.
Rate: Displays the SR Item rate
Quantity/Measurement: Select whether entering Quantity or Measurement.
Quantity: Enter the Quantity to be executed for the Work.
Measurement: Enter the Measurements as Number, Length, Breadth and Depth.
Scope: Select the scope for the selected SR Item.
Remarks: Enter remarks if any.

106
12.8. Item Measurement For AE
Selecting Billing -> Bill Info -> Item Measurement For AE, displays bill details as
seen by AE.
Figure 112: Item Measurement For AE Screen
Note: 1) To see the details of the Bill click on the “Details” link.
2) To cancel the bill click on the “Cancel” link.
3) To finalize the bill click on the “Finalize” link.
4) You must have the privileges to cancel/finalize the records otherwise the
corresponding options will be disabled.
Field Description:
Work Number: Shows the Work Number of the work.
Work Description: Displays the Work Description for the selected work.
RA Bill No: Shows the RA Bill Number filed for the work.
RA Bill Date: Shows the date when the RA Bill date was filed.
.

107
12.9. Item Measurement For Auditor
Selecting Billing -> Bill Info -> Item Measurement For Auditor, displays bill
details as seen by Auditor.
Figure 113: Item Measurement For Auditor Screen
Note: 1) To see the details of the Bill click on the “Details” link.
2) To cancel the bill click on the “Cancel” link.
3) To finalize the bill click on the “Finalize” link.
4) You must have the privileges to cancel/finalize the records otherwise the
corresponding options will be disabled.
Field Description:
Work Number: Shows the Work Number of the work.
Work Description: Displays the Work Description for the selected work.
RA Bill No: Shows the RA Bill Number filed for the work.
RA Bill Date: Shows the date when the RA Bill date was filed.
.

108
12.10. Item Measurement For DAO
Selecting Billing -> Bill Info -> Item Measurement For DAO, displays bill details
as seen by Divisional Officer.
Figure 114: Item Measurement For DAO Screen
Note: 1) To see the details of the Bill click on the “Details” link.
2) To cancel the bill click on the “Cancel” link.
3) To finalize the bill click on the “Finalize” link.
4) You must have the privileges to cancel/finalize the records otherwise the
corresponding options will be disabled.
Field Description:
Work Number: Shows the Work Number of the work.
Work Description: Displays the Work Description for the selected work.
RA Bill No: Shows the RA Bill Number filed for the work.
RA Bill Date: Shows the date when the RA Bill date was filed.
.

109
12.11. Item Measurement For EE
Selecting Billing -> Bill Info -> Item Measurement For EE, displays bill details as
seen by Executive Engineer.
Figure 115: Item Measurement For EE Screen
Note: 1) To see the details of the Bill click on the “Details” link.
2) To cancel the bill click on the “Cancel” link.
3) To finalize the bill click on the “Finalize” link.
4) You must have the privileges to cancel/finalize the records otherwise the
corresponding options will be disabled.
Field Description:
Work Number: Shows the Work Number of the work.
Work Description: Displays the Work Description for the selected work.
RA Bill No: Shows the RA Bill Number filed for the work.
RA Bill Date: Shows the date when the RA Bill date was filed.
.

110
13. Billing Reports
13.1. First & Final Bill
By selecting Billing -> Reports -> First & Final Bill, “First & Final Bill” screen is
displayed. This screen is used to download/view First & Final Bill report.
Based on selected Work Number and Part option as “Part-1”, First & Final Bill
report is generated showing details for the selected work.
Based on selected Work Number and Part option as “Part-2”, First & Final Bill
report is generated showing Item details & recoveries for the selected work.
Based on selected Work Number and Part option as “Part-3”, First & Final Bill
report is generated showing Measurement Book details for the selected work.
Figure 116: First & Final Bill Selection Screen

111
Figure 117: First & Final Bill – Part I Report

112
Figure 118: First & Final Bill – Part II Report

113
Figure 119: First & Final Bill – Part III Report
Note: 1) You must have the privileges to view the reports.
2) To view the report on the screen click on “Show” button.
3) To generate the „PDF‟ file of the report for Printing click on “Export” button.

114
13.2. RA Bill Report
By selecting Billing -> Reports -> RA Bill Report, “RA Bill Report” screen is
displayed. This screen is used to download/view RA Bill report.
Based on selected Work Number, Bill Number and Part option as “Part-1”, RA
Bill report is generated showing details for the selected work.
Based on selected Work Number, Bill Number and Part option as “Part-2”, RA
Bill report is generated showing Item Measurement details for the selected work.
Based on selected Work Number, Bill Number and Part option as “Part-3”, RA
Bill report is generated showing Measurement Book details for the selected work.
Based on selected Work Number, Bill Number and Part option as “Part-4”, RA
Bill report is generated showing Bill Calculations for the selected work.
Figure 120: RA Bill Report Selection Screen

115
Figure 121: RA Bill – Part I Report

116
Figure 122: RA Bill – Part II Report
Figure 123: RA Bill – Part III Report

117
Figure 124: RA Bill – Part IV Report
Note: 1) You must have the privileges to view the reports.
2) To view the report on the screen click on “Show” button.
3) To generate the „PDF‟ file of the report for Printing click on “Export” button.

118
13.3. Royalty Calculation
By selecting Billing -> Reports -> Royalty Calculation, “Royalty Calculation”
screen is displayed. This screen is used to download/view Royalty Calculation report.
Based on selected Work Number and Bill Number Royalty Calculation report is
generated showing the details of the calculations.
Figure 125: Royalty Calculation Report
Note: 1) You must have the privileges to view the reports.
2) To view the report on the screen click on “Show” button.
3) To generate the „PDF‟ file of the report for Printing click on “Export” button.

119
13.4. Deviation Statement
By selecting Billing -> Reports -> Deviation Statement, “Deviation
Statement” screen is displayed. This screen is used to download/view Deviation
Statement report.
Based on selected Work Number Deviation Statement report is generated
showing the details of the deviations as per the Bill of Quantity (BoQ).
Figure 126: Deviation Statement Report
Note: 1) You must have the privileges to view the reports.
2) To view the report on the screen click on “Show” button.
3) To generate the „PDF‟ file of the report for Printing click on “Export” button.

120
13.5. Measurements
By selecting Billing -> Reports -> Measurements, “Measurements” screen is
displayed. This screen is used to download/view Measurements report.
Based on selected Work Number, Bill Number and Part as JE, AE, Auditor, DA
or EE the Measurements report is generated showing the details of the
measurements entered at each level.
Figure 127: Measurements Report
Note: 1) You must have the privileges to view the reports.
2) To view the report on the screen click on “Show” button.
3) To generate the „PDF‟ file of the report for Printing click on “Export” button.

121
13.6. Extra Items
By selecting Billing -> Reports -> Extra Items, “Extra Items” screen is
displayed. This screen is used to download/view Extra Items report.
Based on selected Work Number the Extra Items report is generated showing
the details of the extra items added in the Bill of Quantity (BoQ).
Figure 128: Extra Items Report
Note: 1) You must have the privileges to view the reports.
2) To view the report on the screen click on “Show” button.
3) To generate the „PDF‟ file of the report for Printing click on “Export” button.

122
14. Schedule of Rates
14.1. Masters
14.1.1. Chapter Master
By selecting Schedule of Rates -> Masters -> Chapter Master, displays the
Chapter Master Screen. This screen is used to create the various chapters for Labour,
Machinery, Material and SR. The Miscellaneous Items are also added through this
screen.
Figure 129: Chapter Master Screen
Figure 130: Chapter Master Entry Screen

123
Note: 1) To add new entry click on the “Add” link.
2) To edit the details click on the “Edit” link.
3) To save the entered values click on the “Save” button.
4) To save the modified values click on the “Update” button.
5) To cancel the entry or the modification click on the “Cancel” link.
6) To delete the entry click on the “Delete” link.
7) To view the list of chapters entered click on the “View” link.
8) To view the chapters data select the “Chapter Type” & “Year” and click on
“Show” button.
9) You must have the privileges to view/add/edit/delete the records otherwise
the corresponding options will be disabled.
Field Description:
Chapter Type: Select the Chapter Type from the list populated
Year: Select the Year under which the Chapter is to be created from the list
Chapter Name: Enter the chapter name.

124
14.1.2. Category Master
By selecting Schedule of Rates -> Masters -> Category Master, displays the
Category Master Screen. This screen is used to create the various categories under
the selected chapters for Labour, Machinery, Material and SR.
Figure 131: Category Master Screen
Figure 132: Category Master Entry Screen
Field Description:
Chapter Type: Select the Chapter Type from the list populated
Year: Select the Year
Chapter Name: Select the chapter name under which the Category is to be created.
Category Name: Enter the category name.

125
Note: 1) To add new entry click on the “Add” link.
2) To edit the details click on the “Edit” link.
3) To save the entered values click on the “Save” button.
4) To save the modified values click on the “Update” button.
5) To cancel the entry or the modification click on the “Cancel” link.
6) To delete the entry click on the “Delete” link.
7) To view the list of category entered click on the “View” link.
8) To view the categories data select the “Chapter Type”, “Year” & “Chapter”
and click on “Show” button.
9) You must have the privileges to view/add/edit/delete the records otherwise
the corresponding options will be disabled.
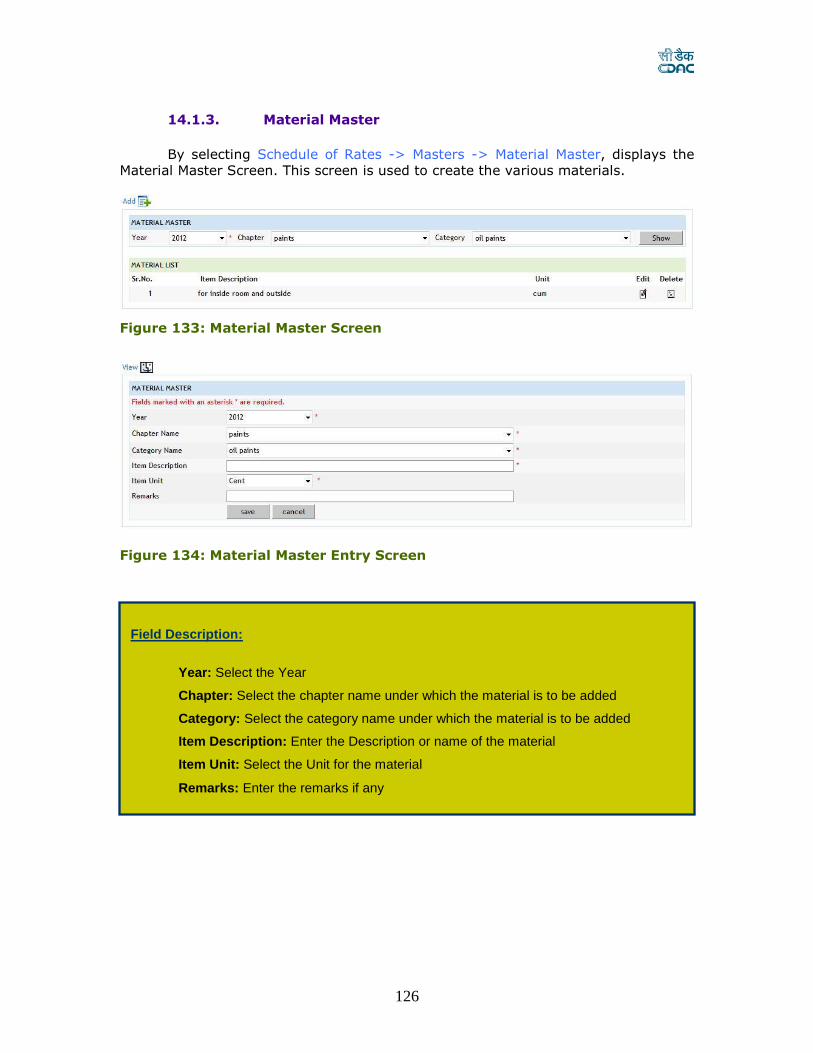
126
14.1.3. Material Master
By selecting Schedule of Rates -> Masters -> Material Master, displays the
Material Master Screen. This screen is used to create the various materials.
Figure 133: Material Master Screen
Figure 134: Material Master Entry Screen
Field Description:
Year: Select the Year
Chapter: Select the chapter name under which the material is to be added
Category: Select the category name under which the material is to be added
Item Description: Enter the Description or name of the material
Item Unit: Select the Unit for the material
Remarks: Enter the remarks if any

127
Note: 1) To add new entry click on the “Add” link.
2) To edit the details click on the “Edit” link.
3) To save the entered values click on the “Save” button.
4) To save the modified values click on the “Update” button.
5) To cancel the entry or the modification click on the “Cancel” link.
6) To delete the entry click on the “Delete” link.
7) To view the list of materials entered click on the “View” link.
8) To view the materials data select the “Year”, “Chapter” & “Category” and
click on “Show” button.
9) You must have the privileges to view/add/edit/delete the records otherwise
the corresponding options will be disabled.

128
14.1.4. Labour Master
By selecting Schedule of Rates -> Masters -> Labour Master, displays the
Labour Master Screen. This screen is used to create the various labours.
Figure 135: Labour Master Screen
Figure 136: Labour Master Entry Screen

129
Note: 1) To add new entry click on the “Add” link.
2) To edit the details click on the “Edit” link.
3) To save the entered values click on the “Save” button.
4) To save the modified values click on the “Update” button.
5) To cancel the entry or the modification click on the “Cancel” link.
6) To delete the entry click on the “Delete” link.
7) To view the list of labours entered click on the “View” link.
8) To view the labours data select the “Year”, “Chapter” & “Category” and click
on “Show” button.
9) You must have the privileges to view/add/edit/delete the records otherwise
the corresponding options will be disabled.
Field Description:
Year: Select the Year
Chapter: Select the chapter name under which the labour is to be added
Category: Select the category name under which the labour is to be added
Item Description: Enter the Description or name of the labour
Item Unit: Select the Unit for the labour
Remarks: Enter the remarks if any

130
14.1.5. Machinery Master
By selecting Schedule of Rates -> Masters -> Machinery Master, displays the
Machinery Master Screen. This screen is used to create the various machineries.
Figure 137: Machinery Master Screen
Figure 138: Machinery Master Entry Screen
Field Description:
Year: Select the Year
Chapter: Select the chapter name under which the machinery is to be added
Category: Select the category name under which the machinery is to be added
Item Description: Enter the Description or name of the machinery
Item Unit: Select the Unit for the machinery
Remarks: Enter the remarks if any

131
Note: 1) To add new entry click on the “Add” link.
2) To edit the details click on the “Edit” link.
3) To save the entered values click on the “Save” button.
4) To save the modified values click on the “Update” button.
5) To cancel the entry or the modification click on the “Cancel” link.
6) To delete the entry click on the “Delete” link.
7) To view the list of machinery entered click on the “View” link.
8) To view the machinery data select the “Year”, “Chapter” & “Category” and
click on “Show” button.
9) You must have the privileges to view/add/edit/delete the records otherwise
the corresponding options will be disabled.

132
14.1.6. Civil SR Master
By selecting Schedule of Rates -> Masters -> Civil SR Master, displays the
Civil SR Master Screen. This screen is used to create various Schedule of Rate Items
for Civil.
Figure 139: Civil SR Master Screen
Figure 140: Civil SR Master Entry Screen

133
Note: 1) To add new entry click on the “Add” link.
2) To edit the details click on the “Edit” link.
3) To save the entered values click on the “Save” button.
4) To save the modified values click on the “Update” button.
5) To cancel the entry or the modification click on the “Cancel” link.
6) To create a sub item click on the “Sub Item” link for the parent item.
7) To delete the entry click on the “Delete” link.
8) To view the list of SR Item entered click on the “View” link.
9) To view the SR Item data select the “Year”, “Chapter” & “Category” and
click on “Show” button.
10) To enter or view the Rate Analysis for the SR Item click on “Breakup” link.
11) To copy the Rate Analysis from one SR Item to another click on “Copy
Breakup” link.
12) You must have the privileges to view/add/edit/delete the records
otherwise the corresponding options will be disabled.
Field Description:
Year: Select the Year
Chapter: Select the chapter name under which the item is to be added
Category: Select the category name under which the item is to be added
Item Code: Enter a Unique Code for the Item
Item Description: Enter the Description or name of the item
Short Description: Enter the Short Description for the item
Item Unit: Select the Unit for the item
Calculation For: Enter the value for which the calculation is being done
Remarks: Enter the remarks if any

134
14.1.7. Electrical SR Master
By selecting Schedule of Rates -> Masters -> Electrical SR Master, displays
the Electrical SR Master Screen. This screen is used to create various Schedule of
Rate Items for Electrical.
Figure 141: Electrical SR Master Screen
Figure 142: Electrical SR Master Entry Screen

135
Note: 1) To add new entry click on the “Add” link.
2) To edit the details click on the “Edit” link.
3) To save the entered values click on the “Save” button.
4) To save the modified values click on the “Update” button.
5) To cancel the entry or the modification click on the “Cancel” link.
6) To create a sub item click on the “Sub Item” link for the parent item.
7) To delete the entry click on the “Delete” link.
8) To view the list of SR Item entered click on the “View” link.
9) To view the SR Item data select the “Year”, “Chapter” & “Category” and
click on “Show” button.
10) To enter or view the Rate Analysis for the SR Item click on “Breakup” link.
11) To copy the Rate Analysis from one SR Item to another click on “Copy
Breakup” link.
12) You must have the privileges to view/add/edit/delete the records
otherwise the corresponding options will be disabled.
Field Description:
Year: Select the Year
Chapter: Select the chapter name under which the item is to be added
Category: Select the category name under which the item is to be added
Item Code: Enter a Unique Code for the Item
Item Description: Enter the Description or name of the item
Short Description: Enter the Short Description for the item
Item Unit: Select the Unit for the item
Calculation For: Enter the value for which the calculation is being done
Remarks: Enter the remarks if any

136
14.1.8. Non SR Master
By selecting Schedule of Rates -> Masters -> Non SR Master, displays the
Non SR Master Screen. This screen is used to create Items, which are not added in
the Schedule of Rates or created after the publication of the Schedule of Rates.
Figure 143: Non SR Master Screen
Figure 144: Non SR Master Entry Screen

137
Note: 1) To add new entry click on the “Add” link.
2) To edit the details click on the “Edit” link.
3) To save the entered values click on the “Save” button.
4) To save the modified values click on the “Update” button.
5) To cancel the entry or the modification click on the “Cancel” link.
6) To create a sub item click on the “Sub Item” link for the parent item.
7) To delete the entry click on the “Delete” link.
8) To view the list of SR Item entered click on the “View” link.
9) To view the SR Item data select the “Year”, “Chapter” & “Category” and
click on “Show” button.
10) To enter or view the Rate Analysis for the SR Item click on “Breakup” link.
11) To copy the Rate Analysis from one SR Item to another click on “Copy
Breakup” link.
12) You must have the privileges to view/add/edit/delete the records
otherwise the corresponding options will be disabled.
Field Description:
Year: Select the Year
Chapter: Select the chapter name under which the item is to be added
Category: Select the category name under which the item is to be added
Item Code: Enter a Unique Code for the Item
Item Description: Enter the Description or name of the item
Short Description: Enter the Short Description for the item
Item Unit: Select the Unit for the item
Calculation For: Enter the value for which the calculation is being done
Remarks: Enter the remarks if any

138
14.1.9. Rate Analysis
By selecting Schedule of Rates -> Masters -> SR Master, displays the Civil,
Electrical or Non SR Master Screen as click on the link. After clicking on the Breakup
link the screen is displayed to prepare / view the Rate Analysis of SR Items.
Figure 145: Rate Analysis Entry Screen

139
Note: 1) To add new entry click on the “Add” link of the required item like Labour,
Material, Machinery, SR or Miscellaneous.
2) To edit the details click on the “Edit” link of the respective item.
3) To save the entered values click on the “Submit” button.
4) To save the modified values click on the “Update” button.
5) To cancel the entry or the modification click on the “Cancel” button.
6) To delete the entry click on the “Delete” link.
7) To view the Rate Analysis Calculation of SR Item for a particular Zone select
the Zone and click on the “Go” button.
8) To view the Rate Analysis of another SR Item click on “Search Item” link.
9) To view the SR Item list click on “Back” button.
10) You must have the privileges to view/add/edit/delete the records
otherwise the corresponding options will be disabled.
Field Description:
Chapter: Select the chapter name from which the Items are to be selected
Category: Select the category name from which the Items are to be selected
Item: Select the Item, which needs to be added in the Rate Analysis
Rate: Displays the rate of the selected Item
Quantity: Enter the Quantity of the Item in the Rate Analysis
Remarks: Enter the remarks if any
Miscellaneous
Chapter: Select the Miscellaneous Item from the list
Percentage/Amount: Select whether Percentage or Amount will be entered
Percentage/Amount: Enter the Value as per the Percentage or Amount selected
Remarks: Enter the remarks if any

140
14.1.10. Search SR Item
By selecting Schedule of Rates -> Masters -> SR Master, displays the Civil,
Electrical or Non SR Master Screen as click on the link. After clicking on the Breakup
link the screen is displayed to prepare / view the Rate Analysis of SR Item. On
clicking the “Search Item” link the Search SR Item screen is displayed.
Figure 146: Search SR Item Screen

141
Note: 1) To search the items based on the criteria specified click on the “Search”
button.
2) To reset the search criteria click on the “Reset” button.
3) You must have the privileges to view/add/edit/delete the records otherwise
the corresponding options will be disabled.
Field Description:
Year: Select the Year
Chapter: Select the chapter name from which the Items are to be searched
Category: Select the category name from which the Items are to be searched
Item Desc: Enter brief Item Description, which needs to be searched
Select: Click to select the Item for displaying the Rate Analysis
Item Code: Displays the Item Code for the searched Items
Item Description: Displays the Item Description for the searched Items
Unit: Displays the Unit for the searched Items

142
14.1.11. Copy Breakup
By selecting Schedule of Rates -> Masters -> SR Master, displays the Civil,
Electrical or Non SR Master Screen as click on the link. After clicking on the Copy
Breakup link the screen is displayed to copy the Rate Analysis of one SR Item to
another SR Item. The copy facility can be used to generate the Rate Analysis for an
SR Item from another SR Item for which the Rate Analysis is filled and is similar.
Figure 147: Copy Breakup Screen
Note: 1) To copy the rate analysis click on the “Copy” button.
2) To reset the selection click on the “Reset” button.
3) You must have the privileges to view/add/edit/delete the records otherwise
the corresponding options will be disabled.
Field Description:
Year: Select the Year
Chapter: Select the chapter name from which the Items are to be selected
Category: Select the category name from which the Items are to be selected
From Item: Select the Item from which the Rate Analysis is to be copied
To Item: Select the Item to which the Rate Analysis is to be copied

143
14.1.12. Zone Master
By selecting Schedule Of Rates -> Masters -> Zone Master, displays the Zone
Master Screen. This screen is used to create the zones.
Figure 148: Zone Master Screen
Figure 149: Zone Master Entry Screen
Note: 1) To add new entry click on the “Add” link.
2) To edit the details click on the “Edit” link.
3) To save the entered values click on the “Save” button.
4) To save the modified values click on the “Update” button.
5) To cancel the entry or the modification click on the “Cancel” link.
6) To delete the entry click on the “Delete” link.
7) You must have the privileges to add/edit/delete the records otherwise the
corresponding options will be disabled.
Field Description:
Zone Code: Enter the Zone code.
Zone Name: Enter the zone name.

144
14.2. Rate Details
14.2.1. Item Rate
By selecting Schedule of Rates -> Rate Details -> Item Rate, displays the
Item Rate Screen. This screen is used to enter the rates for Labour, Machinery, and
Material Items for various zones.
Figure 150: Item Rate Screen
Field Description:
Chapter Type: Select the Chapter Type from the list populated
Year: Select the Year for which the rates are to be updated
Chapter: Select the chapter name
Category: Select the category name
Zone: Select the Zone for which the rates are to be updated
Item Name: Displays the Item Name
Item Rate: Enter or Displays the Item Rate
Select: Click to update the Item Rate

145
Note: 1) To enter the rates click on the “Select” check boxes for the Items.
2) To update the rates click on the “Update” button.
3) To copy the rates click on the “Copy Item Rates” link.
4) You must have the privileges to view/add/edit/delete the records otherwise
the corresponding options will be disabled.

146
14.2.2. SR Item Rate
By selecting Schedule of Rates -> Rate Details -> SR Item Rate, displays the
SR Item Rate Screen. This screen is used to enter the rates for Civil, Electrical, and
Non SR Items for various zones.
Figure 151: SR Item Rate Screen
Field Description:
Chapter Type: Select the Chapter Type from the list populated
Year: Select the Year for which the rates are to be updated
Chapter: Select the chapter name
Category: Select the category name
Zone: Select the Zone for which the rates are to be updated
Item Code: Displays the Item Code
Item Name: Displays the Item Name
Item Rate: Enter or Displays the Item Rate
Select: Click to update the Item Rate

147
Note: 1) To enter the rates click on the “Select” check boxes for the Items.
2) To update the rates click on the “Update” button.
3) To copy the rates click on the “Copy SR Item Rates” link.
4) You must have the privileges to view/add/edit/delete the records otherwise
the corresponding options will be disabled.

148
14.2.3. Copy Item Rate
By selecting Schedule of Rates -> Rate Details -> Copy Item Rate, displays
the Copy Item Rate Screen. This screen is used to copy the rates for Labour,
Material, and Machinery Items from one zone to another zone.
Figure 152: Copy Item Rate Screen
Note: 1) To copy the rates click on the “Copy” button.
2) To reset the selection click on the “Reset” button.
3) You must have the privileges to view/add/edit/delete the records otherwise
the corresponding options will be disabled.
Field Description:
Chapter Type: Select the Chapter Type from the list populated
Year: Select the Year for which the rates are to be updated
Chapter: Select the chapter name
Category: Select the category name
From Zone: Select the Zone from which the rates are to be copied
To Zone: Select the Zone from which the rates are to be copied

149
14.2.4. Copy SR Item Rate
By selecting Schedule of Rates -> Rate Details -> Copy SR Item Rate,
displays the Copy SR Item Rate Screen. This screen is used to copy the rates for
Civil, Electrical, and Non SR Items from one zone to another zone.
Figure 153: Copy SR Item Rate Screen
Note: 1) To copy the rates click on the “Copy” button.
2) To reset the selection click on the “Reset” button.
3) You must have the privileges to view/add/edit/delete the records otherwise
the corresponding options will be disabled.
Field Description:
Chapter Type: Select the Chapter Type from the list populated
Year: Select the Year for which the rates are to be updated
Chapter: Select the chapter name
Category: Select the category name
From Zone: Select the Zone from which the rates are to be copied
To Zone: Select the Zone from which the rates are to be copied

150
14.3. Revision
14.3.1. Generate SR
By selecting Schedule of Rates -> Revision -> Generate SR, displays the
Generate SR Screen. This screen is used to generate the SR for the next selected
year based the selected SR year. Using this screen the Chapters, Categories, Labour,
Material, Machinery, Civil SR, Electrical SR and Non-SR Items are copied from the
selected year to the new selected year.
Figure 154: Generate SR Screen
Note: 1) To generate the SR click on the “Generate” button.
2) You must have the privileges to view/add/edit/delete the records otherwise
the corresponding options will be disabled.
Field Description:
From Year: Select the Year from which the SR is to be generated
To Year: Select the Year to which the SR is to be generated

151
14.3.2. Update Item Rates
By selecting Schedule of Rates -> Revision -> Update Item Rates, displays
the Update Item Rate Screen. This screen is used to update the Labour, Material and
Machinery Items rates, which are copied from the previously selected year.
Figure 155: Update Item Rates Screen
Note: 1) To update the rates click on the “Update” button.
2) To rest the selection click on the “Reset” button.
3) You must have the privileges to view/add/edit/delete the records otherwise
the corresponding options will be disabled.
Field Description:
Chapter Type: Select the Chapter Type from the list populated
Year: Select the Year for which the rates are to be updated
Chapter: Select the chapter name
Category: Select the category name
Item: Select the category name
Zone: Select the Zone from which the rates are to be copied
Old Item Rate: Select the Zone from which the rates are to be copied
Add/Subtract: Select the category name
Percentage/Amount/Final Rate: Select the category name
Percentage/Amount: Select the category name

152
14.3.3. Update SR Item Rates
By selecting Schedule of Rates -> Revision -> Update SR Item Rates, displays
the Update SR Item Rate Screen. This screen is used to update the Civil, Electrical
and Non SR Items rates, which are copied from the previously selected year.
Figure 156: Update SR Item Rates Screen
Note: 1) To update the rates click on the “Update” button.
2) To rest the selection click on the “Reset” button.
3) You must have the privileges to view/add/edit/delete the records otherwise
the corresponding options will be disabled.
Field Description:
Chapter Type: Select the Chapter Type from the list populated
Year: Select the Year for which the rates are to be updated
Chapter: Select the chapter name
Category: Select the category name
SR Item: Select the category name
Zone: Select the Zone from which the rates are to be copied

153
14.4. SR Reports
14.4.1. Index List
By selecting Schedule of Rates -> Reports -> Index List, displays the Index
List Report Screen. This report screen is used to generate the Labour, Machinery,
Material, Civil, Electrical and Non SR Items index List.
Figure 157: Index List Report
Note: 1) To view the report on screen click on the “Show” button.
2) To export the report in PDF file click on the “Export” button.
3) You must have the privileges to view/add/edit/delete the records otherwise
the corresponding options will be disabled.
14.4.2. Item List
By selecting Schedule of Rates -> Reports -> Item List, displays the Item List
Report Screen. This report screen is used to generate the Labour, Machinery and
Material Items List.
Figure 158: Item List Report
Note: 1) To view the report on screen click on the “Show” button.
2) To export the report in PDF file click on the “Export” button.
3) You must have the privileges to view/add/edit/delete the records otherwise
the corresponding options will be disabled.

154
14.4.3. SR List
By selecting Schedule of Rates -> Reports -> SR List, displays the SR List
Report Screen. This report screen is used to generate the Civil, Electrical and Non SR
Items List.
Figure 159: SR List Report
Note: 1) To view the report on screen click on the “Show” button.
2) To export the report in PDF file click on the “Export” button.
3) You must have the privileges to view/add/edit/delete the records otherwise
the corresponding options will be disabled.
14.4.4. Rate Analysis
By selecting Schedule of Rates -> Reports -> Rate Analysis, displays the Rate
Analysis Report Screen. This report screen is used to generate the Rate Analysis for
Civil, Electrical and Non SR Items.
Figure 160: Rate Analysis Report
Note: 1) To view the report on screen click on the “Show” button.
2) To export the report in PDF file click on the “Export” button.
3) You must have the privileges to view/add/edit/delete the records otherwise
the corresponding options will be disabled.

155
14.4.5. Comparison Statement
By selecting Schedule of Rates -> Reports -> Comparison Statement, displays
the Comparison Statement Report Screen. This report screen is used to generate the
Comparison Statement of Rates for Civil, Electrical and Non SR Items.
Figure 161: Comparison Statement Report
Note: 1) To view the report on screen click on the “Show” button.
2) To export the report in PDF file click on the “Export” button.
3) You must have the privileges to view/add/edit/delete the records otherwise
the corresponding options will be disabled.

156
15. Estimates
15.1. Master Details
15.1.1. Rate Affecting Factor
By selecting Estimates -> Masters -> Rate Affecting Factor, displays the
Rate Affecting Factor Screen. This screen is used to create the new rate affecting
factors.
Figure 162: Rate Affecting Master Screen
Figure 163: Rate Affecting Master Entry Screen
Field Description:
Rate Affecting Factor: Enter the rate affecting factor.
Rate: Enter the rate.

157
Note: 1) To add new entry click on the “Add” link.
2) To edit the details click on the “Edit” link.
3) To save the entered values click on the “Save” button.
4) To save the modified values click on the “Update” button.
5) To cancel the entry or the modification click on the “Cancel” link.
6) To delete the entry click on the “Delete” link.
7) You must have the privileges to add/edit/delete the records otherwise the
corresponding options will be disabled.

158
15.2. Estimate
15.2.1. Estimate Master
By selecting Estimates -> Estimate-> Estimate Master, displays the
Estimate Master Screen. This screen is used to create the new estimates.
Figure 164: Estimate Master Entry Screen
Figure 165: Estimate Main Screen
Figure 166: Copy Estimate Screen

159
Note: 1) To add new entry click on the “Add” link.
2) To edit the details click on the “Edit” link.
3) To save the entered values click on the “Save” button.
4) To save the modified values click on the “Update” button.
5) To cancel the entry or the modification click on the “Cancel” link.
6) To delete the entry click on the “Delete” link.
7) To copy the entry click on the “Copy” link.
8) To view the entry click on the “View” link.
9) You must have the privileges to view/add/edit/delete the records otherwise
the corresponding options will be disabled.
Field Description:
Estimate Number: Enter the estimate number.
Estimate Description: Enter the estimate description.
Estimate For: Enter the estimate for details.
Estimate Date: Enter the estimate date.
SR Year: Enter the SR Year.
Zone: Enter the zone.
Rate Affecting Factor: Enter the rate affecting factor.
Prepared By: Enter the prepared by details.
Checked By: Enter the checked by details.
Remarks: Enter the remarks.

160
15.2.2. Measurement
By selecting Estimates -> Estimate-> Measurement, displays the Estimate
Measurement Screen. This screen is used to create the measurement of SR items.
Figure 167: Measurement Master Entry Screen
Figure 168: Measurement Main Screen

161
Note: 1) To add new entry click on the “Add” link.
2) To edit the details click on the “Edit” link.
3) To save the entered values click on the “Save” button.
4) To save the modified values click on the “Update” button.
5) To cancel the entry or the modification click on the “Cancel” link.
6) To delete the entry click on the “Delete” link.
7) To copy the entry click on the “Copy” link.
8) To view the entry click on the “View” link.
9) You must have the privileges to view/add/edit/delete the records otherwise
the corresponding options will be disabled.
Field Description:
Items Description: Enter the item description
Heading: Enter the heading.
Sub Heading: Enter the Sub heading.
Item No: Enter the item no.
Quant?: Select if quantity or measurement.
Quantity: Enter the quantity.
Length: Enter the length.
Breadth: Enter the breadth.
Height: Enter the height.
Floor No: Enter the floor No.

162
15.2.3. Used Estimates By selecting Estimates -> Estimate-> Used Estimates, displays the used
Estimate Screen. This screen is used to create used estimates.
Figure 169: Used Estimate Main Screen
Figure 170: Copy Estimate Screen
Note: 1) To add new entry click on the “Add” link.
2) To edit the details click on the “Edit” link.
3) To save the entered values click on the “Save” button.
4) To save the modified values click on the “Update” button.
5) To cancel the entry or the modification click on the “Cancel” link.
6) To delete the entry click on the “Delete” link.
7) To copy the entry click on the “Copy” link.
8) To view the entry click on the “View” link.
9) You must have the privileges to view/add/edit/delete the records otherwise
the corresponding options will be disabled.

163
15.3. Report
15.3.1. Measurement Report
By selecting Estimates -> Reports -> Measurement Report, displays
“Measurement report” screen. Select Estimate Number to display the report.
Figure 171: Measurement Report Screen
Note: 1) You must have the privileges to view the reports.
2) To view the report on the screen click on “Show” button.
3) To generate the „PDF‟ file of the report for Printing click on “Export” button.

164
15.3.2. Abstract Sheet Report
By selecting Estimates -> Reports -> Abstract Sheet, displays “Abstract Sheet
report” screen. Select Estimate Number to display the report.
Figure 172: Abstract Sheet Report Screen
Note: 1) You must have the privileges to view the reports.
2) To view the report on the screen click on “Show” button.
3) To generate the „PDF‟ file of the report for Printing click on “Export” button.

165
15.3.3. Estimate Details Report
By selecting Estimates -> Reports -> Estimate Details Report, displays
“Estimate Details report” screen. Select Estimate Number to display the report.
Figure 173: Estimate Details Report Screen
Note: 1) You must have the privileges to view the reports.
2) To view the report on the screen click on “Show” button.
3) To generate the „PDF‟ file of the report for Printing click on “Export” button.

166
15.3.4. Project Cost Report
By selecting Estimates -> Reports -> Project Cost Report, displays “Project
Cost report” screen. Select Estimate Number to display the report.
Figure 174: Project Cost Report Screen
Note: 1) You must have the privileges to view the reports.
2) To view the report on the screen click on “Show” button.
3) To generate the „PDF‟ file of the report for Printing click on “Export” button.

167
15.3.5. Used Estimate Report
By selecting Estimates -> Reports -> Used Estimate Report, displays “Used
Estimate report” screen. Select Estimate Number to display the report.
Figure 175: Used Estimate Report Screen
Note: 1) You must have the privileges to view the reports.
2) To view the report on the screen click on “Show” button.
3) To generate the „PDF‟ file of the report for Printing click on “Export” button.

168
16. Figure Index
Figure 1: Login Screen...................................................................................................... 11
Figure 2: Home screen ...................................................................................................... 12
Figure 3: Main screen for Works ...................................................................................... 13
Figure 4: Authority Master Screen ................................................................................... 14
Figure 5: Authority Master Entry Screen.......................................................................... 14
Figure 6: Work Type Master Screen ................................................................................. 16
Figure 7: Work Type Master Entry Screen ....................................................................... 16
Figure 8: Work Sub Type Master Screen ......................................................................... 18
Figure 9: Work Sub Type Master Entry Screen ................................................................ 18
Figure 10: Proposer Type Master Screen.......................................................................... 19
Figure 11: Proposer Type Master Entry Screen ................................................................ 19
Figure 12: Program Master Screen ................................................................................... 21
Figure 13: Program Master Entry Screen ......................................................................... 21
Figure 14: Repair Type Master Screen ............................................................................. 22
Figure 15: Repair Type Master Entry Screen ................................................................... 22
Figure 16: Scheme Master Screen .................................................................................... 24
Figure 17: Scheme Master Entry Screen .......................................................................... 24
Figure 18: Scopes Master Screen ...................................................................................... 26
Figure 19: Scope Master Entry Screen ............................................................................. 26
Figure 20: Tender Type Master Screen ............................................................................ 28
Figure 21: Tender Type Master Entry Screen................................................................... 28
Figure 22: User Department Master Screen...................................................................... 29
Figure 23: User Department Master Entry Screen ............................................................ 29
Figure 24: Contractor Class Master Screen ...................................................................... 31
Figure 25: Contractor Class Master Entry Screen ............................................................ 31
Figure 26: Work Information Entry Screen ...................................................................... 33
Figure 27: Work Information Screen ................................................................................ 33
Figure 28: Heads Selection Screen ................................................................................... 34
Figure 29: Split Works Entry Screen ................................................................................ 37
Figure 30: Split Works Information Screen ...................................................................... 37
Figure 31: Works Search Screen....................................................................................... 37
Figure 32: Administrative Approval Entry Screen ........................................................... 39
Figure 33: Administrative Approval Details Screen ......................................................... 39
Figure 34: Office Selection Screen ................................................................................... 40
Figure 35: Technical Sanction Entry Screen .................................................................... 42
Figure 36: Technical Sanction Details Screen .................................................................. 42
Figure 37: BoQ Entry Screen ............................................................................................ 44
Figure 38: BoQ Details Screen ......................................................................................... 44
Figure 39: Search SR Items Screen .................................................................................. 45
Figure 40: Adding Multiple Items in BoQ Screen ............................................................ 45
Figure 41: Copy BoQ Screen ............................................................................................ 46
Figure 42: Schedule A Entry Screen ................................................................................. 48
Figure 43: Schedule A Details Screen .............................................................................. 48
Figure 44: Item Search Screen .......................................................................................... 49
Figure 45: Work Scope Entry Screen ............................................................................... 51
Figure 46: Work Scope Screen ......................................................................................... 51
Figure 47: Recapitulation Entry Screen ............................................................................ 53

169
Figure 48: Recapitulation Details Screen ......................................................................... 53
Figure 49: Tender Details Entry Screen ............................................................................ 55
Figure 50: Tender Details Screen ..................................................................................... 55
Figure 51: PBC Details Entry Screen ............................................................................... 57
Figure 52: PBC Details Screen ......................................................................................... 57
Figure 53: Quotation Entry Screen (Percentage) .............................................................. 59
Figure 54: Quotation Entry Screen (Item Rate) ................................................................ 59
Figure 55: Quotation Details Screen ................................................................................. 60
Figure 56: Awarding of Contract Entry Screen ................................................................ 62
Figure 57: Awarding of Contract Screen .......................................................................... 62
Figure 58: Negotiation Entry Screen ................................................................................ 64
Figure 59: Negotiation Details Screen .............................................................................. 64
Figure 60: Work Extension Entry Screen ......................................................................... 66
Figure 61: Work Extension Details Screen ....................................................................... 66
Figure 62: Close Work Entry Screen ................................................................................ 68
Figure 63: Close Work Screen ......................................................................................... 68
Figure 64: Close Split Work Entry Screen ....................................................................... 70
Figure 65: Close Split Work Screen ................................................................................ 70
Figure 66: Option Report Screen ...................................................................................... 72
Figure 67: Works List Report ........................................................................................... 73
Figure 68: Works List Report ........................................................................................... 73
Figure 69: Administratively Approved Works Report ..................................................... 74
Figure 70: Works without Administrative Approval Report ............................................ 74
Figure 71: Administrative Approval Register Report ....................................................... 75
Figure 72: Technical Sanctioned Works Report ............................................................... 75
Figure 73: Works with No TS Report ............................................................................... 76
Figure 74: Technical Sanction Register Report ................................................................ 76
Figure 75: Works with TS and No BoQ Report ............................................................... 77
Figure 76: Works with TS & BoQ Report ........................................................................ 77
Figure 77: BoQ Report...................................................................................................... 78
Figure 78: Works with TS & BoQ and No Tender Report ............................................... 78
Figure 79: Works with TS, BoQ and Tender Report ........................................................ 79
Figure 80: Works with TS, BoQ, Tender and No Quotation Report ................................ 79
Figure 81: Works with TS, BoQ, Tender and Participation Report .................................. 80
Figure 82: Works with TS, BoQ, Tender & Participation but Not Awarded Report ....... 80
Figure 83: Works with TS, BoQ, Tender, Participation and Awarding Report ................ 81
Figure 84: Agreement Register Report ............................................................................. 81
Figure 85: Works Awarded and No RA Bill Raised Report ............................................. 82
Figure 86: Works Awarded and RA Bill Raised Report................................................... 82
Figure 87: Closed Split Works Report .............................................................................. 83
Figure 88: Closed Works Report ...................................................................................... 83
Figure 89: Duration Between Stages Report .................................................................... 84
Figure 90: Duration Between Stages Report .................................................................... 85
Figure 91: Quotation Comparison Statement Report........................................................ 86
Figure 92: Quotation Details Report ................................................................................. 86
Figure 93: Schedule A Details Report .............................................................................. 87
Figure 94: Monthly Progress Report Screen ..................................................................... 88
Figure 95: Scope wise Progress Report Screen ................................................................ 89
Figure 96: Recovery Master Screen .................................................................................. 90

170
Figure 97: Recovery Master Entry Screen ........................................................................ 90
Figure 98: RA Bill Entry Screen ....................................................................................... 92
Figure 99: RA Bill Details Screen .................................................................................... 92
Figure 100: Bill Items Selection Screen ........................................................................... 94
Figure 101: Bill Items Entry Screen ................................................................................. 95
Figure 102: Bill Items Details Screen ............................................................................... 95
Figure 103: Royalty Calculations Entry for Item Screen .................................................. 97
Figure 104: Royalty Calculation for Item Screen ............................................................. 98
Figure 105: Royalty Calculation Screen ........................................................................... 98
Figure 106: Bill Recoveries Entry Screen ...................................................................... 100
Figure 107: Bill Recoveries Screen ................................................................................ 100
Figure 108: MB Record Entry Screen ............................................................................ 102
Figure 109: MB Record Details Screen .......................................................................... 102
Figure 110: Extra Items Entry Screen ............................................................................. 104
Figure 111: Extra Items Screen....................................................................................... 104
Figure 112: Item Measurement For AE Screen .............................................................. 106
Figure 113: Item Measurement For Auditor Screen ....................................................... 107
Figure 114: Item Measurement For DAO Screen ........................................................... 108
Figure 115: Item Measurement For EE Screen............................................................... 109
Figure 116: First & Final Bill Selection Screen.............................................................. 110
Figure 117: First & Final Bill – Part I Report ................................................................. 111
Figure 118: First & Final Bill – Part II Report ............................................................... 112
Figure 119: First & Final Bill – Part III Report .............................................................. 113
Figure 120: RA Bill Report Selection Screen ................................................................. 114
Figure 121: RA Bill – Part I Report ................................................................................ 115
Figure 122: RA Bill – Part II Report .............................................................................. 116
Figure 123: RA Bill – Part III Report ............................................................................. 116
Figure 124: RA Bill – Part IV Report ............................................................................. 117
Figure 125: Royalty Calculation Report ......................................................................... 118
Figure 126: Deviation Statement Report ........................................................................ 119
Figure 127: Measurements Report .................................................................................. 120
Figure 128: Extra Items Report....................................................................................... 121
Figure 129: Chapter Master Screen ................................................................................ 122
Figure 130: Chapter Master Entry Screen ...................................................................... 122
Figure 131: Category Master Screen .............................................................................. 124
Figure 132: Category Master Entry Screen ................................................................... 124
Figure 133: Material Master Screen ............................................................................... 126
Figure 134: Material Master Entry Screen...................................................................... 126
Figure 135: Labour Master Screen ................................................................................. 128
Figure 136: Labour Master Entry Screen........................................................................ 128
Figure 137: Machinery Master Screen ............................................................................ 130
Figure 138: Machinery Master Entry Screen .................................................................. 130
Figure 139: Civil SR Master Screen ............................................................................... 132
Figure 140: Civil SR Master Entry Screen ..................................................................... 132
Figure 141: Electrical SR Master Screen ........................................................................ 134
Figure 142: Electrical SR Master Entry Screen .............................................................. 134
Figure 143: Non SR Master Screen ................................................................................ 136
Figure 144: Non SR Master Entry Screen ...................................................................... 136
Figure 145: Rate Analysis Entry Screen ......................................................................... 138

171
Figure 146: Search SR Item Screen ................................................................................ 140
Figure 147: Copy Breakup Screen .................................................................................. 142
Figure 148: Zone Master Screen ..................................................................................... 143
Figure 149: Zone Master Entry Screen ........................................................................... 143
Figure 150: Item Rate Screen ......................................................................................... 144
Figure 151: SR Item Rate Screen .................................................................................... 146
Figure 152: Copy Item Rate Screen ................................................................................ 148
Figure 153: Copy SR Item Rate Screen .......................................................................... 149
Figure 154: Generate SR Screen ..................................................................................... 150
Figure 155: Update Item Rates Screen .......................................................................... 151
Figure 156: Update SR Item Rates Screen ..................................................................... 152
Figure 157: Index List Report ......................................................................................... 153
Figure 158: Item List Report........................................................................................... 153
Figure 159: SR List Report ............................................................................................. 154
Figure 160: Rate Analysis Report ................................................................................... 154
Figure 161: Comparison Statement Report..................................................................... 155
Figure 162: Rate Affecting Master Screen ..................................................................... 156
Figure 163: Rate Affecting Master Entry Screen ........................................................... 156
Figure 164: Estimate Master Entry Screen ..................................................................... 158
Figure 165: Estimate Main Screen .................................................................................. 158
Figure 166: Copy Estimate Screen ................................................................................. 158
Figure 167: Measurement Master Entry Screen ............................................................. 160
Figure 168: Measurement Main Screen .......................................................................... 160
Figure 169: Used Estimate Main Screen ........................................................................ 162
Figure 170: Copy Estimate Screen ................................................................................. 162
Figure 171: Measurement Report Screen ....................................................................... 163
Figure 172: Abstract Sheet Report Screen ...................................................................... 164
Figure 173: Estimate Details Report Screen ................................................................... 165
Figure 174: Project Cost Report Screen.......................................................................... 166
Figure 175: Used Estimate Report Screen ...................................................................... 167


