
Dual Dash CamerasUser Manual

Contents
English 01 - 12
Italiano 51 - 62
Deutsch 13 - 24
Français 25 - 37
Español 38 - 50
日本語 63 - 74

- 01 -
Thank you for purchasing the AUKEY DR02 D Dual Dash Cameras. Please read this
user manual carefully and keep it for future reference. If you need any assistance,
please contact our support team with your product model number and Amazon
order number.
Package Contents Dual Dash Cameras (front and rear camera)
Dual-Port USB Car Charger
4m / 13ft USB Mini-B Cable
6m / 20ft USB Mini-B Cable
Two Sticker Mounts
Six 3M Stickers
Six Cable Clips
User Manual
Warranty Card
Optional Accessory: The AUKEY External GPS Antenna provides accurate position
and speed data to the DR02 D that is saved and displayed on recorded videos.
This extended information may support your case in any driving disputes or incidents.
Note: Please use a Class 10 micro SD memory card (Max 128 GB) for reliable
recording and performance. Format the micro SD card in the dash camera
before first use.
Visit www.aukey.com/downloads to download the latest firmware.

- 02 -
Product DiagramFront Camera
USB Mini-B Power Input
GPS Input
USB Mini-B AV Input
Mount Locking Clip
Lens
MicrophoneOutward LED StatusIndicator
Reset Button
Micro SD Card Slot

- 03 -
Screen
Control Buttons
Inward LED Status Indicator
Screen Indicator1080P+1080P 00:01:14
2049/08/13 22:15:06
USB Mini-B AV Output
Outward LED Status Indicator
Lens
Mount Locking Clip
Rear Camera

- 04 -
SpecificationsModel
Image Sensor
CPU
Screen
Angle of View
Aperture
Exposure Value
Recording Resolutions
Image Format
Sound Recording
Recording Modes
Gravity Sensor Sensitivity
Micro SD Card
Input
Operating Temperature
Materials
Dimensions
DR02 D
Sony Exmor IMX323 2.3 MegapixelCMOS Sensor
NT96663
1.5” LCD
Front camera: 170°Rear camera: 152°
Front camera: f/1.8Rear camera: f/2.0
-1.0, -2/3, -1/3, +0.0, +1/3, +2/3, +1.0
Dual camera: 1080p (30fps)Front camera only: 1080p (30fps),720p (60fps), 720p (30fps), WVGA, VGA
JPEG
On / off
Loop, Motion Detection, Time-Lapse,and Emergency Recording
Low / Middle / High sensitivity
Class 10 or higher, 128GB Max
DC 5V 1A-2A
-30°C – 75°C (-22°F – 167°F)
ABS, PC, glass
Front camera: 77 x 51 x 37mm / 3” x 2” x 1.45”Rear camera: 54 x 50 x 28mm / 2.1” x 2” x 1.1”
- 05 -
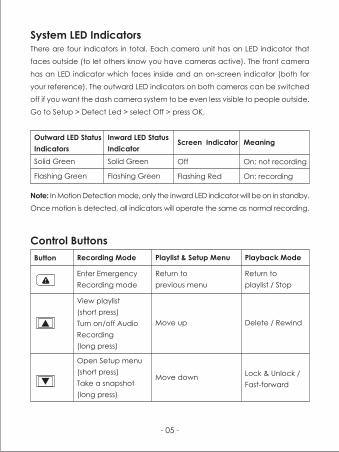
System LED IndicatorsThere are four indicators in total. Each camera unit has an LED indicator that
faces outside (to let others know you have cameras active). The front camera
has an LED indicator which faces inside and an on-screen indicator (both for
your reference). The outward LED indicators on both cameras can be switched
off if you want the dash camera system to be even less visible to people outside.
Go to Setup > Detect Led > select Off > press OK.
Outward LED StatusIndicatorsSolid Green
Flashing Green
Inward LED StatusIndicatorSolid Green
Flashing Green
Screen Indicator
Off
Flashing Red
Meaning
On; not recording
On; recording
Note: In Motion Detection mode, only the inward LED indicator will be on in standby.
Once motion is detected, all indicators will operate the same as normal recording.
Button Recording Mode
Enter Emergency Recording mode
View playlist(short press)Turn on/off Audio Recording(long press)
Open Setup menu(short press)Take a snapshot (long press)
Playlist & Setup Menu
Return to previous menu
Move up
Move down
Playback Mode
Return to playlist / Stop
Delete / Rewind
Lock & Unlock /Fast-forward
Control Buttons

- 06 -
Toggle screenview and turnoff the screen
Enter / Confirm Play / Pause
ResetButton Short press to restart the device (this won’t affect saved files)
There are 3 screen view options– Dual view, front camera, and rear camera.
When dash camera is powered on, press the OK button to switch views or switch
off the screen (recording continues). ‘Screen Saver’ setting can also be used to
automatically switch off the screen after 1 or 3 minutes.
Using a Micro SD CardThe camera doesn’t include internal storage and requires a micro SD card (Class
10+ recommended and 128GB Max supported) to function. A 128GB micro SD
card should store around 20 hours of 1080p recordings. Use a high-quality, branded
card for maximum reliability. Insert a micro SD card into the front camera micro
SD card slot. Later, when the camera is powered on, format it (‘Format’ option
in Dash Camera ‘Setup’) to prepare the card for first use in the dash camera.
Formatting will permanently erase any data on the micro SD card. For best
performance, format periodically (after backing up any important files). ‘Format
Warning’ in ‘Settings’ can be switched on to remind you to do this.
Installation & Powering On/OffThe diagram below shows the parts and exact way the cables must be connected.
You may wish to connect and test the dash camera system before proper, long-term
installation in your vehicle. For convenient testing in your home, a power bank
or wall charger with 1A or 2A USB port can be used instead of the car charger.

- 07 -
4m / 13ft USB M
ini-B Cable
6m / 20ft USB M
ini-B Cable
Dual-Port USB C
ar Charger
Front Cam
eraRear C
amera
1080P+1080P 00:01:14
2049/08/1322:15:06

- 08 -
1. For optimal performance, install the AUKEY DR02 D front/rear camera in the
top-center of your front/rear windshield, facing directly ahead/behind. Lens
direction can be adjusted up and down
2. Use the 6m/20ft Mini-B Cable (with an L-shaped connector at one end) to
connect the two cameras. The L-shaped mini-B connector plugs into the Mini-B
AV Input of the front camera and the other end into the Mini-B AV Output of
the rear camera
3. Connect the 4m/13ft USB Mini-B Cable (with a standard USB-A connector at
one end) to one of the car charger ports and to the front camera Mini-B
Power Input
4. Cable routing should be as shown in the following two diagrams. Use the cable
clips to help fix the two cables conveniently and safely. Careful placement of
the cables and use of existing trim and carpeting to conceal them will give a
tidier finish
①
②

- 09 -
Caution: AUKEY is not responsible for any damage caused to or by the air bag
due to incorrect placement of the device or its cables.
5. To power on, insert the car charger into your car’s 12V socket. After powering
on each time you start your car, the system will start recording automatically.
To power off, disconnect the car charger or connected mini-B cable
Note: Use the included cables to ensure optimum performance of AUKEY DR02 D.
Video RecordingSeparate files are created for the recordings from front and rear camera, so you
can view each camera’s footage separately and at full size. The recordings are
unaffected by choice of screen view or switching the screen off.
● Loop Recording: Recording will begin automatically after powering on with a
micro SD card in the device. Each recorded file is up to ten minutes long, with
old footage being replaced when micro SD card storage is full
Windshield Best mounting location
Connect to carcharger
● Motion Detection Recording: Switch on motion detection in ‘Setup.’ This function
is designed to monitor when you’ve parked and left your vehicle but requires
a continuous power supply. It will record video each time motion is detected
by the front or rear camera
● Time-Lapse Recording: Switch on time-lapse recording in ‘Setup.’ This function
will capture a picture per second to make a video played at 30fps
Emergency Recording● Manual File BackupPress to back up the current file so that it won’t be overwritten. A icon
will appear in the top left of the LCD screen to indicate a protected emergency
recording is in progress
● Auto File BackupOnce the G-sensor is activated by a sudden impact, the device will automatically
make a recording and protect it from being overwritten. Adjust G-sensor sensitivity
in the ‘Setup’ menu
Note: Enter the playlist or setup menu (or disconnect power) to end emergency
recording mode.
Snapshot● Hold down for 3 seconds to take a snapshot while in recording mode
● The snapshot files are located in the \AUKEY\PHOTO folder on the micro
SD card
● The icon will be shown after you take a snapshot. This won’t interrupt the
video recording
Audio RecordingTurn on/off audio recording by long-pressing when in recording mode (or
by adjusting in ‘Setup’ menu). When audio recording is on, in-car audio will be
recorded during video recording. Voicing details of possible hazards that may
develop, especially when off-camera, may provide useful information. You can
even use it to record car license plate numbers that may not be captured on
the video.
USB File Transfer1. Connect the Dash Camera (with card inside) to your computer using your own
USB mini-B data cable (the included cable is for power only). It should be
recognized as a removable device (with a USB connector image displayed
on-screen)
2. Find the video recording files located in the \AUKEY\MOVIE folder (or \AUKEY\
PHOTO for snapshots)
3. Copy the files to your computer
Micro SD Card File Transfer1. Shut down the device (by disconnecting the power cable) and eject the
micro SD card
2. Insert the micro SD card into a computer micro SD card slot or reader and
your computer will automatically detect the micro SD card
3. Find the video recording files located in the \AUKEY\MOVIE folder (or \AUKEY\
PHOTO for snapshots)
4. Copy the files to your computer
Viewing Photos and Videos1. Press to enter the playlist
2. View photos or videos by choosing either ‘Photo File’ or ‘Video File’
3. Select the file you want to view and press
4. For videos, press again to begin playback
Deleting and Locking/Unlocking Photos and Videos● Press to delete or to lock/unlock a photo or video file after selecting
it from the playlist. If a video is being played, press to stop it and then
press to delete or to lock/unlock
● Once deleted, photos and videos can’t be recovered
● If you lock a photo or video, it will be protected and not overwritten
Product Care & Use● Ensure camera and mount are firmly fixed in place before use to avoid falls
● Keep away from liquids, extreme heat, and strong magnetic fields
● Avoid touching the lens surface. It may be cleaned with a cotton swab or lens
cleaning paper. If any dirt is difficult to remove, a non-abrasive glasses lens
cleaner may be used. Don’t use corrosive solutions
● Keep important videos and photos backed up elsewhere to protect against
file corruption or loss caused by any SD card issues
Warranty & Customer SupportFor questions, support, or warranty claims, please contact us at the address below
that corresponds with your region. Please include your Amazon order number
and product model number.
Amazon US orders: [email protected]
Amazon EU orders: [email protected]
Amazon CA orders: [email protected]
Amazon JP orders: [email protected]
*Please note, AUKEY can only provide after sales service for products purchased directly from AUKEY. If you have purchased from a different seller, please contact them directly for service or warranty issues.

- 10 -
Caution: AUKEY is not responsible for any damage caused to or by the air bag
due to incorrect placement of the device or its cables.
5. To power on, insert the car charger into your car’s 12V socket. After powering
on each time you start your car, the system will start recording automatically.
To power off, disconnect the car charger or connected mini-B cable
Note: Use the included cables to ensure optimum performance of AUKEY DR02 D.
Video RecordingSeparate files are created for the recordings from front and rear camera, so you
can view each camera’s footage separately and at full size. The recordings are
unaffected by choice of screen view or switching the screen off.
● Loop Recording: Recording will begin automatically after powering on with a
micro SD card in the device. Each recorded file is up to ten minutes long, with
old footage being replaced when micro SD card storage is full
● Motion Detection Recording: Switch on motion detection in ‘Setup.’ This function
is designed to monitor when you’ve parked and left your vehicle but requires
a continuous power supply. It will record video each time motion is detected
by the front or rear camera
● Time-Lapse Recording: Switch on time-lapse recording in ‘Setup.’ This function
will capture a picture per second to make a video played at 30fps
Emergency Recording● Manual File BackupPress to back up the current file so that it won’t be overwritten. A icon
will appear in the top left of the LCD screen to indicate a protected emergency
recording is in progress
● Auto File BackupOnce the G-sensor is activated by a sudden impact, the device will automatically
make a recording and protect it from being overwritten. Adjust G-sensor sensitivity
in the ‘Setup’ menu
Note: Enter the playlist or setup menu (or disconnect power) to end emergency
recording mode.
Snapshot● Hold down for 3 seconds to take a snapshot while in recording mode
● The snapshot files are located in the \AUKEY\PHOTO folder on the micro
SD card
● The icon will be shown after you take a snapshot. This won’t interrupt the
video recording
Audio RecordingTurn on/off audio recording by long-pressing when in recording mode (or
by adjusting in ‘Setup’ menu). When audio recording is on, in-car audio will be
recorded during video recording. Voicing details of possible hazards that may
develop, especially when off-camera, may provide useful information. You can
even use it to record car license plate numbers that may not be captured on
the video.
USB File Transfer1. Connect the Dash Camera (with card inside) to your computer using your own
USB mini-B data cable (the included cable is for power only). It should be
recognized as a removable device (with a USB connector image displayed
on-screen)
2. Find the video recording files located in the \AUKEY\MOVIE folder (or \AUKEY\
PHOTO for snapshots)
3. Copy the files to your computer
Micro SD Card File Transfer1. Shut down the device (by disconnecting the power cable) and eject the
micro SD card
2. Insert the micro SD card into a computer micro SD card slot or reader and
your computer will automatically detect the micro SD card
3. Find the video recording files located in the \AUKEY\MOVIE folder (or \AUKEY\
PHOTO for snapshots)
4. Copy the files to your computer
Viewing Photos and Videos1. Press to enter the playlist
2. View photos or videos by choosing either ‘Photo File’ or ‘Video File’
3. Select the file you want to view and press
4. For videos, press again to begin playback
Deleting and Locking/Unlocking Photos and Videos● Press to delete or to lock/unlock a photo or video file after selecting
it from the playlist. If a video is being played, press to stop it and then
press to delete or to lock/unlock
● Once deleted, photos and videos can’t be recovered
● If you lock a photo or video, it will be protected and not overwritten
Product Care & Use● Ensure camera and mount are firmly fixed in place before use to avoid falls
● Keep away from liquids, extreme heat, and strong magnetic fields
● Avoid touching the lens surface. It may be cleaned with a cotton swab or lens
cleaning paper. If any dirt is difficult to remove, a non-abrasive glasses lens
cleaner may be used. Don’t use corrosive solutions
● Keep important videos and photos backed up elsewhere to protect against
file corruption or loss caused by any SD card issues
Warranty & Customer SupportFor questions, support, or warranty claims, please contact us at the address below
that corresponds with your region. Please include your Amazon order number
and product model number.
Amazon US orders: [email protected]
Amazon EU orders: [email protected]
Amazon CA orders: [email protected]
Amazon JP orders: [email protected]
*Please note, AUKEY can only provide after sales service for products purchased directly from AUKEY. If you have purchased from a different seller, please contact them directly for service or warranty issues.

- 11 -
Caution: AUKEY is not responsible for any damage caused to or by the air bag
due to incorrect placement of the device or its cables.
5. To power on, insert the car charger into your car’s 12V socket. After powering
on each time you start your car, the system will start recording automatically.
To power off, disconnect the car charger or connected mini-B cable
Note: Use the included cables to ensure optimum performance of AUKEY DR02 D.
Video RecordingSeparate files are created for the recordings from front and rear camera, so you
can view each camera’s footage separately and at full size. The recordings are
unaffected by choice of screen view or switching the screen off.
● Loop Recording: Recording will begin automatically after powering on with a
micro SD card in the device. Each recorded file is up to ten minutes long, with
old footage being replaced when micro SD card storage is full
● Motion Detection Recording: Switch on motion detection in ‘Setup.’ This function
is designed to monitor when you’ve parked and left your vehicle but requires
a continuous power supply. It will record video each time motion is detected
by the front or rear camera
● Time-Lapse Recording: Switch on time-lapse recording in ‘Setup.’ This function
will capture a picture per second to make a video played at 30fps
Emergency Recording● Manual File BackupPress to back up the current file so that it won’t be overwritten. A icon
will appear in the top left of the LCD screen to indicate a protected emergency
recording is in progress
● Auto File BackupOnce the G-sensor is activated by a sudden impact, the device will automatically
make a recording and protect it from being overwritten. Adjust G-sensor sensitivity
in the ‘Setup’ menu
Note: Enter the playlist or setup menu (or disconnect power) to end emergency
recording mode.
Snapshot● Hold down for 3 seconds to take a snapshot while in recording mode
● The snapshot files are located in the \AUKEY\PHOTO folder on the micro
SD card
● The icon will be shown after you take a snapshot. This won’t interrupt the
video recording
Audio RecordingTurn on/off audio recording by long-pressing when in recording mode (or
by adjusting in ‘Setup’ menu). When audio recording is on, in-car audio will be
recorded during video recording. Voicing details of possible hazards that may
develop, especially when off-camera, may provide useful information. You can
even use it to record car license plate numbers that may not be captured on
the video.
USB File Transfer1. Connect the Dash Camera (with card inside) to your computer using your own
USB mini-B data cable (the included cable is for power only). It should be
recognized as a removable device (with a USB connector image displayed
on-screen)
2. Find the video recording files located in the \AUKEY\MOVIE folder (or \AUKEY\
PHOTO for snapshots)
3. Copy the files to your computer
Micro SD Card File Transfer1. Shut down the device (by disconnecting the power cable) and eject the
micro SD card
2. Insert the micro SD card into a computer micro SD card slot or reader and
your computer will automatically detect the micro SD card
3. Find the video recording files located in the \AUKEY\MOVIE folder (or \AUKEY\
PHOTO for snapshots)
4. Copy the files to your computer
Viewing Photos and Videos1. Press to enter the playlist
2. View photos or videos by choosing either ‘Photo File’ or ‘Video File’
3. Select the file you want to view and press
4. For videos, press again to begin playback
Deleting and Locking/Unlocking Photos and Videos● Press to delete or to lock/unlock a photo or video file after selecting
it from the playlist. If a video is being played, press to stop it and then
press to delete or to lock/unlock
● Once deleted, photos and videos can’t be recovered
● If you lock a photo or video, it will be protected and not overwritten
Product Care & Use● Ensure camera and mount are firmly fixed in place before use to avoid falls
● Keep away from liquids, extreme heat, and strong magnetic fields
● Avoid touching the lens surface. It may be cleaned with a cotton swab or lens
cleaning paper. If any dirt is difficult to remove, a non-abrasive glasses lens
cleaner may be used. Don’t use corrosive solutions
● Keep important videos and photos backed up elsewhere to protect against
file corruption or loss caused by any SD card issues
Warranty & Customer SupportFor questions, support, or warranty claims, please contact us at the address below
that corresponds with your region. Please include your Amazon order number
and product model number.
Amazon US orders: [email protected]
Amazon EU orders: [email protected]
Amazon CA orders: [email protected]
Amazon JP orders: [email protected]
*Please note, AUKEY can only provide after sales service for products purchased directly from AUKEY. If you have purchased from a different seller, please contact them directly for service or warranty issues.

- 12 -
Caution: AUKEY is not responsible for any damage caused to or by the air bag
due to incorrect placement of the device or its cables.
5. To power on, insert the car charger into your car’s 12V socket. After powering
on each time you start your car, the system will start recording automatically.
To power off, disconnect the car charger or connected mini-B cable
Note: Use the included cables to ensure optimum performance of AUKEY DR02 D.
Video RecordingSeparate files are created for the recordings from front and rear camera, so you
can view each camera’s footage separately and at full size. The recordings are
unaffected by choice of screen view or switching the screen off.
● Loop Recording: Recording will begin automatically after powering on with a
micro SD card in the device. Each recorded file is up to ten minutes long, with
old footage being replaced when micro SD card storage is full
● Motion Detection Recording: Switch on motion detection in ‘Setup.’ This function
is designed to monitor when you’ve parked and left your vehicle but requires
a continuous power supply. It will record video each time motion is detected
by the front or rear camera
● Time-Lapse Recording: Switch on time-lapse recording in ‘Setup.’ This function
will capture a picture per second to make a video played at 30fps
Emergency Recording● Manual File BackupPress to back up the current file so that it won’t be overwritten. A icon
will appear in the top left of the LCD screen to indicate a protected emergency
recording is in progress
● Auto File BackupOnce the G-sensor is activated by a sudden impact, the device will automatically
make a recording and protect it from being overwritten. Adjust G-sensor sensitivity
in the ‘Setup’ menu
Note: Enter the playlist or setup menu (or disconnect power) to end emergency
recording mode.
Snapshot● Hold down for 3 seconds to take a snapshot while in recording mode
● The snapshot files are located in the \AUKEY\PHOTO folder on the micro
SD card
● The icon will be shown after you take a snapshot. This won’t interrupt the
video recording
Audio RecordingTurn on/off audio recording by long-pressing when in recording mode (or
by adjusting in ‘Setup’ menu). When audio recording is on, in-car audio will be
recorded during video recording. Voicing details of possible hazards that may
develop, especially when off-camera, may provide useful information. You can
even use it to record car license plate numbers that may not be captured on
the video.
USB File Transfer1. Connect the Dash Camera (with card inside) to your computer using your own
USB mini-B data cable (the included cable is for power only). It should be
recognized as a removable device (with a USB connector image displayed
on-screen)
2. Find the video recording files located in the \AUKEY\MOVIE folder (or \AUKEY\
PHOTO for snapshots)
3. Copy the files to your computer
Micro SD Card File Transfer1. Shut down the device (by disconnecting the power cable) and eject the
micro SD card
2. Insert the micro SD card into a computer micro SD card slot or reader and
your computer will automatically detect the micro SD card
3. Find the video recording files located in the \AUKEY\MOVIE folder (or \AUKEY\
PHOTO for snapshots)
4. Copy the files to your computer
Viewing Photos and Videos1. Press to enter the playlist
2. View photos or videos by choosing either ‘Photo File’ or ‘Video File’
3. Select the file you want to view and press
4. For videos, press again to begin playback
Deleting and Locking/Unlocking Photos and Videos● Press to delete or to lock/unlock a photo or video file after selecting
it from the playlist. If a video is being played, press to stop it and then
press to delete or to lock/unlock
● Once deleted, photos and videos can’t be recovered
● If you lock a photo or video, it will be protected and not overwritten
Product Care & Use● Ensure camera and mount are firmly fixed in place before use to avoid falls
● Keep away from liquids, extreme heat, and strong magnetic fields
● Avoid touching the lens surface. It may be cleaned with a cotton swab or lens
cleaning paper. If any dirt is difficult to remove, a non-abrasive glasses lens
cleaner may be used. Don’t use corrosive solutions
● Keep important videos and photos backed up elsewhere to protect against
file corruption or loss caused by any SD card issues
Warranty & Customer SupportFor questions, support, or warranty claims, please contact us at the address below
that corresponds with your region. Please include your Amazon order number
and product model number.
Amazon US orders: [email protected]
Amazon EU orders: [email protected]
Amazon CA orders: [email protected]
Amazon JP orders: [email protected]
*Please note, AUKEY can only provide after sales service for products purchased directly from AUKEY. If you have purchased from a different seller, please contact them directly for service or warranty issues.

- 13 -
Vielen Dank für Ihren Kauf von AUKEY DR02 D Dual Dashcams. Lesen Sie bitte diese
Bedienungsanleitung sorgfältig durch und bewahren Sie sie für zukünftige Referenz
auf. Sollten Sie jegliche Unterstützung brauchen, kontaktieren Sie bitte unser
Support-Team mit Ihrer Produktmodellnummer und Amazon-Bestellnummer.
LieferumfangDual Dashcams (Front- und Rückkamera)
Dual-Port USB Kfz-Ladegerät
4m / 13ft USB Mini-B-Kabel
6m / 20ft USB Mini-B-Kabel
Zwei Aufkleber-Halterungen
Sechs 3M Aufkleber
Sechs Kabelklemmen
Bedienungsanleitung
Garantiekarte
Optionales Zubehör: Die AUKEY Externe GPS-Antenne liefert genaue Positions-
und Geschwindigkeitsdaten für das DR02 D, und die Daten wird gespeichert
und auf aufgezeichneten Videos angezeigt. Diese erweiterten Informationen
können Ihren Fall bei allen Streitigkeiten oder Zwischenfällen unterstützen.
Hinweis: Verwenden Sie bitte eine Class 10+ Micro SD-Karte (max. 128G) für
zuverlässige Aufnahme und Leistung. Formatieren Sie die MicroSD-Karte vor dem
ersten Gebrauch.
Besuchen Sie bitte www.aukey.com/downloads, um die neuste Firmware
herunterzuladen.

- 14 -
Produkt-DiagrammFrontkamera
USB Mini-B Port
GPS-Eingang
USB Mini-B AV-Eingang
Befestigungsplatte
Objektiv
MikrofonÄußere LED-Anzeige
Zurücksetzen-Taste
MicroSD-Karte-Slot

- 15 -
1080P+1080P 00:01:14
2049/08/13 22:15:06 Display
Steuertasten
Innere LED-Anzeige
Bildschirmanzeige
USB Mini-B AV-Ausgang
Äußere LED-Anzeige
Objektiv
Befestigungsplatte
Rückkamera

- 16 -
SpezifikationenModell
Bildsensor
CPU
Display
Weitwinkel-Objektiv
Irisblende
Belichtungswert
Aufnahme-Auflösungen
Bildformat
Sound-Aufnahme
Aufnahmemodi
Sensitivität des G-Sensors
Micro SD-Karte
Eingang
Betriebstemperatur
Materialien
Abmessungen
DR02 D
Sony Exmor IMX323 2,3 MegapixelCMOS Sensor
NT96663
1,5" LCD
Frontkamera: 170°Rückkamera: 152°
Frontkamera: f/1,8Rückkamera: f/2,0
-1,0, -2/3, -1/3, +0,0, +1/3, +2/3, +1,0
Dual Kameras: 1080p (30fps)Nur Frontkamera: 1080p (30fps), 720p (60fps), 720p (30fps), WVGA, VGA
JPEG
Ein / Aus
Loop, Bewegungserkennung,Zeitraffer, Notaufnahme
Niedrig / Mittel / Höhe
Class 10 oder höher, 128GB Max
DC 5V 1A-2A
-30°C – 75°C (-22°F – 167°F)
ABS, PC, Glas
Frontkamera: 77 x 51 x 37mm / 3” x 2” x 1,45”Rückkamera: 54 x 50 x 28mm / 2,1” x 2” x 1,1”

- 17 -
System-LED-AnzeigeEs gibt insgesamt vier Indikatoren. Jede Kamera hat eine LED-Anzeige, die nach
außen zeigt (damit andere wissen, dass Ihre Kamera aktiv ist). Die Frontkamera
hat eine LED-Anzeige, die nach innen zeigt und eine On-Screen-Anzeige (beide
für Ihre Referenz). Äußere LED-Anzeige beider Kameras können ausgeschaltet
werden. Falls Sie wollen, dass das Dashcam-System für die Menschen draußen
nicht sichtbar ist. Treten Sie zu Setup ein > Detect Led > wählen Sie Off > drücken
Sie OK.
ÄußereLED-Anzeige
Grün
Grün blinkt
InnereLED-Anzeige
Grün
Grün blinkt
Screen Indicator
Aus
Rot blinkt
Bedeutung
Auf; Nichtaufnahmen
Auf; Aufnahmen
Hinweis: Im Bewegungserkennung-Modus ist nur die inner LED im Standby. Sobald
die Bewegung erkannt wird, funktionieren alle Indikatoren wie die normale Aufnahme.
Taste Aufnahmemodus
In den Notaufnahme-Modus gehen
Playlist ansehen(kurz drücken)Audio-Aufnahme ein/ ausschalten (lang drücken)
Setup-Menü öffnen(kurz drücken)Snapshot erstellen(lang drücken)
Playlist &Setup-Menü
Zurück zumvorherigen Menü
Nach oben
Nach unten
Wiedergabe-Modus
Zurück zumPlaylist / Stop
Löschen /Rücklauf
Sperren &Entsperren /Schnell-Vorlauf
Steuertasten

- 18 -
Bildschirmansichtumschalten und Displayein/ausschalten
Enter / Bestätigen Play / Pause
Zurücksetzen-Taste
Drücken diese Taste kurz, um das Gerät zurückzusetzen und neuzu starten (Dies wirkt sich nicht auf gespeicherte Dateien aus)
Hinweis: Bevor zum Playlist oder Einstellungsmenü eintreten, gibt es eine kurze Pause, um aktuelle Aufnahme zu speichern
Es gibt 3 Optionen von Bildschirmansicht - Dual-View, Frontkamera und Rückkamera. Wenn die Dashcam eingeschaltet ist, drücken Sie OK-Taste, um die Bildschirmansicht zu wechseln und den Bildschirm (Die Aufnahme wird fortgesetzt) auszuschalten. Sie können auch das ”Screen Saver” einstellen, um den Bildschirm nach 1 oder 3 Minuten automatisch auszuschalten.
Benutzung der Micro SD-KarteDie Kamera erhält keinen internen Speicher und erfordert eine MicroSD-Karte
(Class 10+ wird empfohlen, und bis zu max. 128GB unterstützt) zum Funktionieren.
Eine 128GB-Micro SD-Karte kann 20 Stunden mit 1080p Aufnahmen speichern.
Verwenden Sie bitte eine hochwertige und Marken-Karte für maximale Zuverlässigkeit.
Stecken Sie die MicroSD-Karte in den MicroSD-Karte-Slot von Frontkamera ein.
Als die Kamera eingeschaltet wird, formatieren Sie die Karte (“Format” Option
in “Einstellungen” der Dashcam) um die Karte für den ersten Gebrauch in der
Dashcam vorzubereiten. Die Formatierung löscht permanent alle Daten auf der
MicroSD-Karte. Für die beste Leistung formatieren Sie bitte regelmäßig die Karte
(nachdem Sie alle wichtige Dateien sichern). “Format-Warnung” in “Einstellungen”
wird Sie erinnern, um dies zu tun.
Installation & Ein/AusschaltenDas folgende Diagramm zeigt die Teile und die genaue Art der Verbindung der
Kabel. Verbinden und testen Sie das Bindestrich-Kamerasystem vor der passenden

- 19 -
und langfristigen Installation in Ihrem Auto. Für bequeme Tests in Ihrem Haus, kann
eine Power Bank oder Wand-Ladegerät mit 1A oder 2A USB-Port als der KFZ-Ladegerät
ersetzt werden.
1080P+1080P 00:01:14
2049/08/1322:15:06
4m / 13ft USB M
ini-B-Kabel6m
/ 20ft USB Mini-B-Kabel
Dual-Port USB
Kfz-Ladegerät
Frontkamera
Rückkamera

- 20 -
1. Um eine optimale Leistung zu bekommen, installieren Sie die AUKEY DR02 D Front-/ Rückkamera in der obersten Mitte der vorderen / hinteren Windschutzscheibe, die Kamera sollt in Richtung auf vorne / hinten sein. Die Objektiv kann nach oben und unten eingestellt werden
2. Verwenden Sie das 6m / 20ft Mini-B-Kabel (mit einem L-förmigen Stecker an einem Ende), um die beiden Kameras anzuschließen. Der L-förmige Mini-B-Stecker steckt in den Mini-B AV-Eingang der Frontkamera und das andere Ende in den Mini-B AV-Ausgang der Rückkamera
3. Verbinden Sie das 4m / 13ft USB Mini-B Kabel (mit einem Standard USB-A Stecker an einem Ende) mit einem der KFZ Ladekabel und der Frontkamera Mini-B Power Input
4. Die Kabelführung sollte wie in den folgenden beiden Diagrammen dargestellt sein. Verwenden Sie die Kabelclips, um die beiden Kabel bequem und sicher zu befestigen. Montieren Sie sorgfältige das Kabel und die Verwendung von vorhandenem Trimm- und Teppichboden, um alles in Ordnung zu halten.
①
②

- 21 -
Achtung: AUKEY übernimmt keine Haftung für Schäden, die aufgrund von dem
Airbag oder von falscher Platzierung des Geräts oder dessen Kabel.
5. Zum Einschalten, stecken das Kfz-Ladegerät in die 12V-Buchse Ihres Fahrzeugs
ein. Wenn Sie Ihr Auto starten, startet das System automatisch die Aufnahme.
Nach jedem Einschalten wird das System sich die Aufnahme automatisch
starten. Zum Ausschalten, trennen Sie das Mini-B-Kabel
Hinweis: Verwenden Sie das mitgelieferten Kabel, um eine optimale Leistung von
AUKEY DR02 D zu gewährleisten.
Video aufnehmen Getrennte Dateien werden von der Front- und Rückkamera selbstständig aufnahmen,
so dass Sie jedes Filmmaterial separat und in voller Größe ansehen können. Die
Aufnahmen werden nicht durch die Wahl der Bildschirmansicht oder durch das
Ausschalten der Bildschirm beeinträchtigt.
Windschutzscheibe Beste Montagelage auf
Windschutzscheibe
Verbindung zumKFZ-Ladegerät

- 22 -
● Loop-Aufnahme: Die Aufnahme wird sich nach dem Einschalten mit einer
MicroSD-Karte im Gerät automatisch starten. Jede Aufnahmedaten ist bis zu
zehn Minuten lang, alte Aufnahme wird ersetzt, wenn der Micro-SD-Kartenspeicher
voll ist
● Bewegungserkennung-Aufnahme: Schalten die Bewegungserkennung in “Setup”
ein. Die Kamera wird die Video-Aufnahme starten, wenn die Dashcam die
Bewegung in der Front detektiert, und die Aufnahme wird stoppen, wenn
keine Bewegung mehr detektiert wird
● Zeitraffer-Aufnahme: Schalten die Zeitraffer-Aufnahme in “Setup” ein. Die Kamera
wird ein Bild per Sekunde erfassen, um ein Video bei 30fps zu schaffen
Notaufnahme● Daten manuell BackupDrückenum die aktuelle Daten zu backup, sodass es nicht überschrieben
wird. Das Symbol wird auf der oberen linken Ecke des LCD-Displays erscheinen,
um anzuzeigen, dass eine geschützte Notfall-Aufnahme ausgeführt wird.
● Daten Auto-BackupSobald der G-Sensor durch einen plötzlichen Stoß aktiviert wird, wird das Gerät
die Aufnahme automatisch starten und vor Überschreiben schützen. Stellen die
Sensitivität des G-Sensors im “Setup” Menü ein
Hinweis: Geben Sie die Playlist oder das Setup-Menü ein (oder Stromausfall), um
den Notaufnahme-Modus zu beenden.
Snapshot● Halten ffür 3 Sekunden lang gedrückt, um ein Snaphot beim Aufnahmemodus
zu erstellen
● Die Snapshot-Daten befinden sich im Ordner \AUKEY\PHOTO auf der MicroSD-Karte
● Das Symbol wird erscheinen, nachdem Sie ein Snapshot erstellen. Es wird
die Videoaufnahme nicht unterbrechen

- 23 -
Audio aufnehmenHalten beim Aufnahmemodus (oder bei der Einstellung im “Setup” Menü) gedrückt, um die Audio-Aufnahme ein/auszuschalten. Wenn die Audio-Aufnahme eingeschaltet ist, wird die In-Car-Audio während der Video-Aufnahme aufgenommen. Ton-Details der möglichen Gefahren, die Ihnen helfen könnten, vor allem beim Ausschalten der Kamera, es könnte nützliche Informationen versorgen. Sie können sogar mit dem das Auto-Nummernschild aufzeichnen, das möglicherweise nicht im Video aufgenommen werden kann.
USB-Dateiübertragung1. Verbinden Sie die Dashcam (mit Karte innen) mit Ihrem Computer durch Ihren eigenen USB-Mini-B Kabel (das mitgelieferte Kabel ist nur für Aufladung). Es wird als ein abnehmbares Gerät erkannt (mit einem USB-Anschlussbild auf dem Bildschirm angezeigt)2. Finden die Videoaufnahme-Daten, die befinden sich im Ordner \AUKEY\MOVIE (oder \AUKEY\PHOTO für Snapshots)3. Kopieren die Daten auf Ihren Computer
Daten aus Micro SD-Karte übertragen 1. Schalten das Gerät(das Stromkabel trennen) aus und entnehmen die MicroSD-Karte2. Stecken die MicroSD-Karte in einen Computer- MicroSD-Karte-Slot oder Leser, und Ihr Computer wird die MicroSD-Karte automatisch erkennen3. Finden die Videoaufnahme-Daten, die befinden sich im Ordner \AUKEY\MOVIE (oder \AUKEY\PHOTO für Snapshots)4. Kopieren die Daten auf Ihren Computer
Photos und Video ansehen1. Drücken , um in das Playlist zu gehen2. Photos oder Videos durch das Auswählen von “Photo File” oder “Video File” ansehen 3. Wählen eine File aus, die Sie ansehen möchten und drücken4. Für Videos, drücken nochmal zum Starten der Wiedergabe

- 24 -
Photos und Videos löschen und sperren/entsperren● Nach der Auswahl im Playlist, drücken zum Löschen oder zum
Sperren / Entsperren den Photo-oder Video-Daten. Wenn eine Video abgespielt
wird, drücken zum Aufhören, und dann drücken zum Löschen oder
zum Sperren / Entsperren
● Sobald gelöscht, können Fotos und Videos nicht wiederhergestellt werden
● Wenn Sie ein Photo oder Video sperren, wird es geschützt und nicht überschrieben
Produktpflege & Nutzung● Stellen Sie vor der Verwendung sicher, dass die Kamera und Halterung im Ort fest montiert sind, um das Ausfallen zu vermeiden● Halten von Flüssigkeiten, extremer Hitze, und starken magnetischen Feldern fern● Berühren Sie nicht die Oberfläche des Objektivs. Es kann mit Wattestäbchen oder Objektiv-Reinigungspapier reinigt werden. Wenn der Schmutz nur schwer zu entfernen ist, kann ein abriebfester Gläser-Objektivreiniger verwendet werden. Verwenden Sie keine ätzenden Lösungen● Machen Sie Datensicherung der wichtiges Videos und Fotos, um gegen Datei-Korruption oder Verlust zu schützen, der wegen irgendwelcher SD-Kartenprobleme verursacht wird
Garantie & KundendienstFür Fragen, Hilfen, Unterstützungen, oder Garantieansprüche, kontaktieren Sie
bitte uns per die folgende E-Mail-Adresse. Bitte geben Sie uns dabei Ihre
Produktmodellnummer und Amazon-Bestellnummer.
Amazon EU Bestellungen: [email protected]
*Achten Sie bitte darauf, dass AUKEY nur Kundendienst nach Verkauf für die Produkte anbieten kann, die direkt von AUKEY verkauft werden. Wenn Sie von anderem Verkäufer gekauft haben, kontaktieren Sie mit dem direkt für Dienst oder Garantieansprüche.

- 25 -
Merci d’avoir acheté AUKEY DR02 D Caméras de Voiture. Veuillez lire attentivement
ce mode d’emplois et le conserver pour référence future. Si vous avez besoin
des aides, veuillez contacter notre équipe de service client avec le numéro du
modèle et votre numéro de commande Amazon.
Contenu de l’EmballageDouble Caméra de Voiture (caméra avant et arrière)
Chargeur de Voiture avec Double USB Port
Câble Mini-B USB 4m / 13ft
Câble Mini-B USB 6 m / 20 ft
Deux supports autocollants
Six autocollants 3M
Six clips de câble
Mode d’Emploi
Carte de garantie
Accessoire optionnel: L'antenne GPS externe AUKEY fournit des données précises
de position et de vitesse aux vidéos enregistrées par DR02 D. Cette information
étendue peut soutenir votre cas dans tous les conflits de conduite ou incidents.
Nota bene: Utilisez une carte mémoire micro SD de classe 10 (Max 128 GB) pour
un enregistrement et des performances fiables. Formatez la carte micro SD avant
la première utilisation.
Veuillez visiter www.aukey.com/downloads pour télécharger la dernière version

- 26 -
Diagramme du ProduitCaméra Avant
Entrée d'alimentation USB Mini-B
Entrée GPS
Entrée AV USB Mini-B
Clip de verrouillage demontage
Lentille
MicrophoneIndicateur d'état deLED à l'extérieur
Bouton de réinitialisation
Cran pour carte micro SD

- 27 -
Sortie AV USB Mini-B
Indicateur d'état LED àl'extérieur
Lentille
Clip de verrouillage demontage
1080P+1080P 00:01:14
2049/08/13 22:15:06 Écran
Boutons de Contrôle
Indicateur d'Etat de LEDà l'IntérieurIndicateur d'Ecran
Caméra Arrière

- 28 -
SpécificationsModèle
Capteur d’Image
CPU
Écran
Objectif Grand angle
Ouverture
Valeur d'Exposition
Résolutiond’Enregistrement
Format d’Image
Enregistrement du Son
Modesd’Enregistrement
Sensibilité du CapteurGravifique
Carte Micro SD
Entrée
Température d’Opération
Matériaux
Dimensions
DR02 D
Sony Exmor IMX323 capteur CMOS de2,3 mégapixels
NT96663
1,5” LCD
Caméra Avant: 170 °Caméra Arrière: 152 °
Caméra Avant: f/1,8Caméra Arrière: f/2,0
-1,0, -2/3, -1/3, +0,0, +1/3, +2/3, +1,0
Double Caméra: 1080p (30fps)Seulement Caméra avant: 1080p (30fps),720p (60fps), 720p (30fps), WVGA, VGA
JPEG
Allumer / Éteindre
Circulation,Détection de Mouvement,Enregistrement Temporisateur,Enregistrement d’Urgence
Faible / Moyen / Haute
Classe 10 ou supérieure, 128 GB au maximum
DC 5V 1A-2A
-30°C – 75°C (-22°F – 167°F)
ABS, PC, verre
Caméra Avant: 77 x 51 x 37mm / 3” x 2” x 1,45”Caméra Arrière: 54 x 50 x 28mm / 2,1” x 2” x 1,1”

- 29 -
Système de l’Indicateurs LED Il y a quatre indicateurs au total. Chaque caméra a un indicateur LED à l'extérieur
(pour annoncer aux autres que votre caméra marche ). La caméra avant a un
indicateur LED à l'intérieur et un indicateur à l'écran (également pour votre référence).
Les voyants LED à l'extérieur sur les deux caméras peuvent être éteints si vous
souhaitez que le système de la caméra soit encore invisible pour les personnes
extérieures. Allez dans la Configuration> Détecter Led> sélectionner éteindre >
appuyer sur OK.
Indicateur d'Etatde LED à l'Extérieur
Vert Reste
Vert Clignote
Indicateur d'Etatde LED à l'Intérieur
Vert Reste
Vert Clignote
Indicateur d'Ecran
Éteint
Rouge Clignote
Sens
Marche ; Ne pasenregistrerMarche ; Ne pasenregistrer
Note: En Mode Détection de mouvement, seul l’indicateur LED à l’intérieur s'allume en mode de veille. Une fois que le mouvement est détecté, tous les indicateurs fonctionneront comme l'enregistrement normal.
BoutonModed'enregistrement
Entrer en moded’urgence
Voir la liste de lecture(appuyer brièvement)Allumer / Éteindrel’EnregistrementAutomatique(appuyer longuement)
Liste de lecture &Menu de Réglage
Retourner au menuprécédent
Déplacer vers le haut
Mode de rejeu
Retourner à la listede lecture / Arrêter
Supprimer /Rembobiner
Boutons de Contrôle

- 30 -
Note: Une petite pause permet de sauvegarder l'enregistrement en cours avant d'entrer dans la liste de lecture ou le menu de Configuration.
Il existe 3 options de vue d'écran: vue double, caméra avant et caméra arrière. Lorsque la caméra de voiture marche, appuyez sur le bouton OK pour changer de vues ou éteigner l'écran (l'enregistrement continue). Le réglage "Garde d'écran" peut également être utilisé pour éteindre automatiquement l'écran après 1 ou 3 minutes.
Utiliser une Carte Micro SDLa caméra n'inclut pas la mémoire interne et nécessite une carte micro SD (classe
10+ recommandée et soutient 128 GB au maximum). Une carte micro SD de 128
GB devrait stocker environ 20 heures d'enregistrements de 1080p. Utilisez une
carte de haute qualité pour une fiabilité maximale. Insérez une carte micro SD
dans la fente pour la carte micro SD de l'appareil photo avant. Ensuite, lorsque
l'appareil photo est en charge, formatez-le (option 'Format' dans «Paramètres» de
la Dash Caméra ) pour préparer la carte pour une première utilisation dans la
caméra tablée. Le formatage effacera en permanence toutes les données sur
la carte micro SD. Pour une meilleure performance, formatez périodiquement
(après avoir sauvegardé des fichiers importants). La fonction «Mise en forme
d'avertissement» dans «Paramètres» peut être activée pour vous rappeler de le faire.
Ouvrir le menu de réglage(appuyer brièvement)Prendre un instantané(appuyer longuement)
Activer / désactiverl'écran
Déplacer vers le bas
Entrer / Confirmer
Verrouiller &Déverrouiller/Avancer rapide
Jouer / Pauser
Bouton deRéinitialisation
Appuyer brièvement pour redémarrer l’appareil (Celan'affectera pas les fichiers sauvegardés)

- 31 -
Installation & Allumer/ ÉteindreLe diagramme ci-dessous montre les pièces et la manière exacte dont les câbles
doivent être connectés. Vous voudriez peut-être connecter et tester le système
de la Dash Caméra avant l'installation correcte à long terme dans votre véhicule.
Pour faciliter des tests pratiques dans votre maison, vous pouvez utiliser une batterie
d'alimentation ou un chargeur mural avec un port USB 1A ou 2A au lieu du chargeur
de voiture.
1080P+1080P 00:01:14
2049/08/1322:15:06
Chargeur d
e voitureUSB avec d
ouble PortC
améra arrière
Câble M
ini-B USB 4m / 13ft
Câble M
ini-B USB 6 m / 20 ft
Cam
éra avant

- 32 -
1. Pour une performance optimale, installez la caméra avant / arrière AUKEY
DR02 D en haut de votre pare-brise avant / arrière, vers l’avant / l’arrière. La
direction de l'objectif peut être réglée de haut en bas
2. Utilisez le câble Mini-B de 6 m / 20 ft (avec un connecteur en forme de L à une
extrémité) pour connecter les deux caméras. Le connecteur mini-B en forme
de L se branche dans l'entrée AV Mini-B de la caméra avant et l'autre extrémité
dans la sortie AV Mini-B de la caméra arrière
3. Connectez le câble Mini-B USB de 4 m / 13 ft (avec un connecteur USB-A
standard à une extrémité) à l'un des ports du chargeur de voiture et à l'entrée
de l'alimentation Mini-B de l'appareil avant.
4. Le routage des câbles doit être indiqué dans les deux diagrammes suivants.
Utilisez les clips de câble pour fixer les deux câbles d’une manière pratique et
en toute sécurité. Placer attentivement des câbles et utiliser des garnitures et
des moquettes existantes pour les dissimuler. De cette façon, vous aurez une
décoration plus délicate
①
②

- 33 -
Attention: Nous ne sommes pas responsables aux dommages causés ou par le
coussin gonflable en raison d'une installation incorrecte de l'appareil ou son
câble.
5. Pour allumer, insérez le chargeur de voiture dans la prise 12V de votre voiture.
Après avoir allumé l’appareil chaque fois, le système commencera à enregistrer
automatiquement. Pour éteindre, débranchez le chargeur de voiture ou le
câble mini-B connecté
Note: Utilisez les câbles inclus pour assurer une performance optimale d'AUKEY
DR02 D.
Enregistrement de la vidéoDes fichiers séparés sont créés pour les enregistrements de la caméra avant et
arrière, afin que vous puissiez visualiser les images de chaque caméra séparément
et en pleine taille. Les enregistrements ne sont pas affectés par le choix de la vue
d'écran ou la désactivation de l'écran.
Pare-briseLe meilleur emplacementde montage
Connecter à laChargeur de voiture

- 34 -
● Enregistrement de Circulation: l'enregistrement commencera automatiquement
après avoir inséré une Carte Micro SD dans l'appareil. Chaque fichier enregistré
peut durer jusqu'à dix minutes, les images anciennes seront remplacées
lorsque le stockage de la Carte Micro SD est plein
● Enregistrement de Détection de Mouvement: Activez la détection de mouvement
en mode <<Setup>>. Cette fonction est conçue pour surveiller votre voiture
lorsque vous l’avez stationnée et laissé votre véhicule, mais elle nécessite une
alimentation continue. L’appareil enregistrera la vidéo chaque fois que le
mouvement est détecté par la caméra avant ou arrière
● Enregistrement Temporisateur: Activez l'enregistrement Temporisateur dans
<<Setup>>. Cette fonction capturera une image par seconde pour faire une
vidéo à 30fps
Enregistrement d'Urgence● Copie de Sauvegarde Manuelle des FichiersAppuyez sur le bouton pour la copie de sauvegarde des fichiers de sorte
qu'ils ne soient pas écrasés. Vous verrez une icône en haut à gauche de
l'écran LCD. Cela signifie qu’il y a un fichier d'urgence en cours d'enregistrement.
● Copie de Sauvegarde AutomatiqueUne fois que le G-Capteur est activé par un choc soudain, l'appareil effectuera
automatiquement un enregistrement et le protégera contre les écrasements.
Réglez la sensibilité du G-Capteur dans le menu <<Setup>>
Note: Entrez dans la liste de lecture ou le menu de configuration (ou débranchez
l'alimentation) pour mettre fin au mode d'enregistrement d'urgence.
Instantané● Maintenez le bouton pendant 3 secondes pour prendre un instantané
en mode d'enregistrement.

- 35 -
● Les fichiers instantanés sont situés dans le dossier \AUKEY\PHOTO de la carte
Micro SD.
● L'icône sera affichée après que vous prenez un instantané. Cela ne
perturbera pas le mode d'enregistrement vidéo.
Enregistrement AudioActivez / désactivez l'enregistrement audio en appuyant longuement sur
en mode d'enregistrement (ou régler le menu <<Setup>> ). Lorsque l'enregistrement
audio est activé, l'audio dans voiture sera enregistré pendant l'enregistrement
vidéo. Vous pouvez lire les détails sur les dangers possibles, en particulier en dehors
de la caméra, qui peuvent fournir des informations utiles. Vous pouvez même
l'utiliser pour enregistrer des numéros d'immatriculation des voitures qui ne peuvent
pas être capturés sur la vidéo.
Transfert de Fichiers USB1. Connectez le Dashcam (avec la carte à l'intérieur) à votre ordinateur en utilisant
votre propre câble de données USB mini-B (le câble fourni est uniquement
pour l'alimentation). Il devrait être reconnu comme un périphérique amovible
(avec une image de connecteur USB affichée à l'écran).
2. Trouvez les fichiers d'enregistrement vidéo qui sont situés dans le dossier \
AUKEY\MOVIE (ou \AUKEY\PHOTO pour instantanés).
3. Copiez les fichiers sur votre ordinateur.
Transférez les Fichiers de Carte Micro SD1. Éteignez le dispositif (par débrancher le câble d'alimentation)et éjectez la
Carte Micro SD.
2. Insérez la Carte Micro SD dans une fente de Carte Micro SD d’un ordinateur
ou lecture et votre ordinateur détectera automatiquement la Carte Micro SD.

- 36 -
3. Trouvez les fichiers d'enregistrement vidéo qui sont situés dans le dossier \
AUKEY\MOVIE (ou \AUKEY\PHOTO pour instantanés).
4. Copiez les fichiers sur votre ordinateur.
Voir les Vidéos ou Photos1. Appuyez sur le bouton pour accéder à la liste de lecture
2. Voyez les photos ou les vidéos en choisissant ‘Photo File’ ou ‘Video File’
3. Choisissez le fichier que vous souhaitez voir et appuyez sur le bouton
4. Pour les vidéos, appuyez sur le bouton encore une fois pour commencer
à rejouer.
Supprimer /Verrouiller / Déverrouiller les Photos et Vidéos● Appuyez sur pour effacer ou pour verrouiller / déverrouiller un fichier
de photo ou fichier vidéo après l’avoir sélectionné dans la liste de lecture. Si
une vidéo est en cours de jouer, appuyez sur pour l’arrêter, puis appuyez
sur pour la supprimer ou pour verrouiller / déverrouiller
● Une fois être supprimées, les photos et les vidéos ne peuvent pas être récupérées
● Si vous verrouillez une photo ou une vidéo, elle sera protégée et non écrasée
Entretien & Utilisation du Produit ● Assurez-vous que la caméra et le support sont solidement fixés sur place avant
l'utilisation pour éviter les chutes
● Veuillez le tenir loin des liquides, de la chaleur extrême et des endroits avec
des champs fort magnétiques
● Veuillez assurer que la température de travail est dans la gamme: -30°C - 75°C
(-22°F - 167°F)
● Évitez de toucher la surface de l’objectif. Il faut un coton-tige ou un papier
pour nettoyer la lentille. S’il y a une saleté est difficile à enlever, un nettoyant
non-abrasif pour verres peut être utilisé. Ne pas utiliser des produits corrosifs

- 37 -
Garantie & Service ClientPour des questions, l'assistance, le soutien et les demandes de garanties, veuillez
nous contacter à l'adresse ci-dessous qui correspond à votre région. Veuillez
inclure le numéro de commande Amazon et le numéro de modèle du produit.
Amazon EU commandes: [email protected]
*Veuillez noter que, AUKEY ne peut fournir le service après-vente que pour les produits achetés directement chez AUKEY. Si vous avez acheté auprès d'un vendeur différent, veuillez le contacter pour tous services et garanties.

- 38 -
Gracias por comprar el AUKEY DR02 D Dual Dash Cámaras. Lea atentamente
este manual usuario y guárdelo para futuras consultas. Si necesita alguna ayuda,
póngase en contacto con nuestro equipo de servicio con el número de modelo
de su producto y el número de orden de Amazon.
Contenidos del Paquete Dual Dash Cámaras (cámara frontal y trasera)
Dual-Puertos USB Cargador de Coche
USB Mini-B Cable de 4m / 13ft
USB Mini-B Cable de 6m / 20ft
Dos Pegatinas de Montaje
Seis Pegatinas de 3M
Seis Clips de Cable
Manual Usuario
Tarjeta de Garantía
Accesorio Opcional: La AUKEY GPS Antena externa proporciona los datos exactos
de posición y de velocidad al DR02 D que se guarda y se muestra en los videos
grabados. Esta información extendida puede apoyar su caso en cualquier disputa
de conducción o incidentes.
Nota: Utilice una tarjeta de memoria micro SD de clase 10 (Máximo 128 GB) para
una grabación y un rendimiento fiables. Formatee la tarjeta micro SD en la dash
cámara antes de usarla por primera vez.
Visite www.aukey.com/downloads para descargar el firmware más reciente.

- 39 -
Diagrama del ProductoCámara Frontal
USB Mini-B Entrada de Alimentación
Entrada GPS
Entrada USB Mini-B AV
Clip de Bloqueo deMontaje
Lente
MicrófonoIndicador LED de EstadoExterior
Botón de Reinicio
Ranura para TarjetaMicro SD

- 40 -
Salida de USB Mini-B AV
LED Indicador de EstadoExterior
Lente
Clip de Bloqueo deMontaje
Cámara Trasera
1080P+1080P 00:01:14
2049/08/13 22:15:06 Pantalla
Botones de Control
Indicador LED de EstadoInterno
Indicador de Pantalla

- 41 -
EspecificacionesModelo
Sensor de Imagen
CPU
Pantalla
Punto de Vista
Abertura
Valor de Exposición
Recording Resolutions
Formato de Imagen
Grabación de Sonido
Modos de Grabación
Sensibilidad del Sensorde Gravedad
Tarjeta Micro SD
Entrada
Temperatura deFuncionamiento
Materiales
Dimensiones
DR02 D
Sony Exmor IMX323 CMOS Sensorde 2,3 megapíxeles
NT96663
1,5” LCD
Cámara frontal: 170°Cámara trasera: 152°
Cámara frontal : f/1.8Cámara traser: f/2.0
-1.0, -2/3, -1/3, +0.0, +1/3, +2/3, +1.0
Dual Cámaras: 1080p (30fps)Sólo cámara frontal: 1080p (30fps), 720p (60fps),720p (30fps), WVGA, VGA
JPEG
Encendido / Apagado
Bucle, Detección de Movimiento, TiempoTranscurrido y Grabación de Emergencia
Sensibilidad Baja / Media / Alta
Clase 10 o Superior, 128GB Máximo
DC 5V 1A-2A
-30°C – 75°C (-22°F – 167°F)
ABS, PC, Vaso
Cámara frontal: 77 x 51 x 37mm / 3 "x 2" x 1,45 "Cámara trasera: 54 x 50 x 28mm / 2,1" x 2" x 1,1"

- 40 -
Salida de USB Mini-B AV
LED Indicador de EstadoExterior
Lente
Clip de Bloqueo deMontaje
Cámara Trasera
1080P+1080P 00:01:14
2049/08/13 22:15:06 Pantalla
Botones de Control
Indicador LED de EstadoInterno
Indicador de Pantalla

- 42 -
LED Indicadores del SistemaHay cuatro indicadores en total. Cada unidad de cámara tiene un indicador
LED que orienta hacia la afuera (para que otros sepan que tiene cámaras activas).
La cámara delantera tiene un indicador LED que orienta hacia el dentro y un
indicador en la pantalla (ambos para su referencia). Los LED indicadores que
orienta hacia afuera de las ambas cámaras se pueden apagar si desea que el
sistema de la cámara de trazos sea menos visible para las personas exteriores.
Vaya a Setup> Detect Led> seleccione Off> pulse OK.
Indicadores LEDExteriores de Estado
Verde Solido
Verde Intermitente
Indicadores LEDInterno de Estado
Verde Solido
Verde Intermitente
Indicador de laPantalla
Apagado
Rojo Intermitente
Sentido
Encendido;Sin grabarEncendido;grabando
Nota: En el modo de detección de movimiento, sólo el indicador LED interno estará encendido en el modo de espera. Una vez que se esté detectado el movimiento, todos los indicadores operarán igual que la grabación normal.
Botón Modo de Grabación
Entrar en modode grabaciónemergencia
Ver lista dereproducción(pulse brevemente)Activar / desactivar lagrabación de audio(pulse largamente)
Lista de Reproducción &Menú de Configuración
Volver al menú anterior
Mover hacia arriba
Modo deReproducción
Volver a la lista dereproducción /Stop
Eliminar /Retroceder
Botones de Control

- 43 -
Nota: Se existe una pausa breve para guardar la grabación actual antes de entrar en la lista de reproducir o la configuración de menúHay tres opciones de visualización de la pantalla–Dual vista, cámara frontal y cámara trasera. Cuando la cámara está encendida, presione el botón OK para cambiar de las vistas o apagar la pantalla (la grabación continúa). El ajuste 'Screen Saver' también se puede usar para apagar automáticamente la pantalla después de 1 o 3 minutos.
Uso de Una Tarjeta Micro SDLa cámara no incluye el almacenamiento interno y se requiere una tarjeta micro SD( la de clase 10 se recomentado y se soporta el máximo 128GB) para funcionar. Una tarjeta micro SD de 128 GB se debe almacenar alrededor de 20 horas de grabaciones de 1080p. Se utilice una tarjeta de marca de alta calidad para una máxima fiabilidad. Inserte una tarjeta micro SD en la ranura para tarjeta micro SD de la cámara frontal. Luego, formáteela (opción 'Format' en Dash Camera 'Setup') para preparar la tarjeta para su primer uso en la cámara de trazos, cuando la cámara se esté encendida . El formateo borrará permanentemente todos los datos de la tarjeta micro SD. Para obtener el más mejor rendimiento, formatee periódicamente (despuésde realizar las copias de seguridad de los archivos importantes). ‘Format Warning’ en ‘Settings’ se puede encender para recordarle hacer esto.
Abrir el menú deconfiguración(pulsa brevemente)Toma una foto(pulse largamente)
Cambiar la vista dpantalla y apagarla pantalla
Mover hacia abajo
Entrar / Confirmar
Bloquear &Desbloquear /Avanzarrápidamente
Reproducir /Pausar
Botón deReinicio
Pulse brevemente para reiniciar el dispositivo (esto no afectaráa los archivos guardados)

- 44 -
Instalación & Encendido / ApagadoEl siguiente diagrama muestra las partes y la forma exacta en que se deben
conectar los cables. Es posible que desee conectar y probar el sistema de la
dash cámara antes de la instalación adecuada y de largo plazo en su vehículo.
Para realizar las pruebas cómodas en su hogar, se puede utilizar un banco
de alimentación o un cargador de pared con un puerto USB de 1A o 2A en
lugar del cargador de coche.
Dual-Puertos USB
Cargad
or de C
ocheC
ámara Trasera
USB Mini-B C
able de 4 m
/ 13 ft6m
/ 20 ft USB Mini-B C
able
Cám
ara Frontal
1080P+1080P 00:01:14
2049/08/1322:15:06

- 45 -
1. Para un rendimiento óptimo, instale la AUKEY DR02 D cámara frontal / trasera
en el centro superior de su parabrisas frontal / trasero, mirando hacia delante /
atrás. La dirección de la lente se puede ajustar hacia la arriba y el abajo
2. Utilice el Cable Mini-B de 6m / 20ft (con un conector en forma de L en un
extremo) para conectar las dos cámaras. El conector mini-B en forma de L se
conecta en la entrada Mini-B AV de la cámara frontal y el otro extremo en la
salida Mini-B AV de la cámara trasera
3. Conecte el Cable USB Mini-B de 4m / 13ft (con un conector USB-A estándar
en un extremo) a uno de los puertos del cargador del coche y a la entrada
de alimentación Mini-B de la cámara frontal
4. El enrutamiento del cable debe ser mostrado como los dos diagramas siguientes.
Utilice los clips de cable para ayudar a fijar los dos cables de forma cómoda
y segura. La cuidadosa colocación de los cables y el uso de los acabados y
alfombras existentes para ocultarlos darán un acabado más ordenado
①
②

- 46 -
Precaución: AUKEY no es responsable de ningún daño causado al o por el airbag
debido a la colocación incorrecta del dispositivo o sus cables.
5. Para encenderla, inserte el cargador de coche en el enchufe de 12V de su
coche. Después de encender cada vez que enciende su coche usted, el
sistema comenzará a grabar automáticamente. Para apagarla, desconecte
el cargador del coche o el cable mini-B conectado
Nota: Utilice los cables incluidos para garantizar un rendimiento óptimo de
AUKEY DR02 D.
Grabación de VídeoSe crean los archivos independientes para la grabación de la cámara frontal y
trasera, por eso puede ver las imágenes de cada cámara por separado y a un
tamaño completo. Las grabaciones no se ven afectadas por la elección de la
vista de pantalla o apagando la pantalla.
Parabrisas Mejor ubicaciónde montaje
Conectar alcargador del coche

- 47 -
● Grabación en Bucle: La grabación comenzará automáticamente después
de encenderlo con una tarjeta micro SD en el dispositivo. Cada archivo
grabado tiene una duración de hasta diez minutos, las imágenes antiguas
se reemplazarán cuando el almacenamiento de la tarjeta micro SD está lleno
● Registro de detección de movimiento: Active la detección de movimiento
en 'Setup'. Esta función está diseñada para supervisar cuando ha aparcado
y salido de su vehículo, pero se requiere una fuente de alimentación continua.
Graba video cada vez que se detecta los movimientos por la cámara frontal
o trasera
● Grabación con lapso de tiempo: Active la grabación con lapso de tiempo
en 'Setup'. Esta función capturará una imagen por segundo para hacer que
un vídeo reproducido a 30 fps
Grabación de Emergencia● Copiar de seguridad manualmente los archivos Presione para hacer una copia de seguridad del archivo actual para que
no se sobrescriba. Un icono se aparecerá en la parte superior izquierda de la
pantalla LCD para indicar que se está realizando una grabación protegida de
emergencia
● Copiar de seguridad automáticamente de los archivosUna vez que el G-sensor sea activado por un impacto repentino, el dispositivo grabará automáticamente y protejerla de ser sobrescribida. Ajustar la sensitividad del G-sensor en en menú ‘Setup’
Nota: Ingrese al menú de lista de reproducción o configuración (o desconecte la alimentación) para finalizar el modo de grabación de emergencia.
Instantánea● Mantenga presionado durante 3 segundos para tomar una instantánea
mientras que está en el modo de grabación

- 48 -
● Los archivos de instantáneas se encuentran en la carpeta \AUKEY\PHOTO
de la tarjeta micro SD
● El icono se mostrará después de tomar una instantánea. Esto no interrumpirá
la grabación del vídeo
Grabación del AudioEncienda la grabación del audio presionando largamente cuando está
en el modo de grabar (o a través de adjustar en el menú ‘Setup’). Cuando la
grabación del audio se está activada, se grabará el audio en-coche durante
la grabación del vídeo. Los detalles de los posibles peligros que pueden surgir,
especialmente en cuando están fuera de la cámara, pueden proporcionar
información útil. Incluso puede utilizarlo para grabar los números de matrículas
de vehículos que no pueden capturarse en el video.
USB Transferencia de Archivos 1. Conecte la Dash cámara (con la tarjeta interno) a su computadora usando
su propio cable de datos USB mini-B (el cable incluido es para la alimentación
solamente). Debe reconocerse como un dispositivo extraíble (con una imagen
de USB conector que se muestra en la pantalla)
2. Encuentre los archivos de la grabación de vídeo ubicados en la carpeta \
AUKEY\MOVIE(o \AUKEY\PHOTO para Instantáneas)
3. Copie los archivos en su computadora
Transferencia de Archivos de la Tarjeta Micro SD1. Apague el dispositivo (desconectando el cable de alimentación) y expulse
la tarjeta micro SD
2. Inserte la tarjeta micro SD en una ranura para micro tarjetas de la computadora
o un lector y su computadora detectará automáticamente la tarjeta micro
SD3. Encuentre los archivos de grabación de vídeo ubicados en la carpeta \
AUKEY\MOVIE (o \AUKEY\PHOTO para instantáneas)

- 49 -
3. Copie los archivos en su computadora
Visualización de Fotos y Vídeos1. Presione a entrar en la lista de reprodección
2. Para ver fotos o vídeos, seleccione ‘Photo File’ or ‘Video File’
3. Seleccione el archivo que quiere ver y presione
4. Para videos, presione de nuevo para iniciar la reproducción
Eliminación y Bloqueo / Desbloqueo de los Fotos y Vídeos● Presione para eliminar or para bloquear / desbloquear los archivos
de fotos o de vídeos después de selecsionarlo en la lista de reproducir. Si se
está reproduciendo un video, presione para detenerlo y luego presione
para elimanar o para bloquear / desbloquear
● Las fotos y los videos no se pueden recuperar una vez que sea eliminados
● Si se bloquea una foto o un video, se protegerá y no se sobrescribirá
Cuidado & Uso del Producto● Asegúrese de que la cámara y el soporte estén fijados firmemente en el lugar
antes de usarla para evitar las caídas
● Mantener alejado de los líquidos, calores extremos y fuertes campos magnéticos
● Evite tocar la superficie de la lente. Se puede limpiar con un bastoncillo de
algodón o un papel de limpieza para lentes. Si es difícil a quitarse cualquier
suciedad, se puede usar un limpiador no-abrasivo de lentes de gafas . No
utilice unas cosas corrosivas
● Mantenga las copias de seguridad de los videos y las fotos importantes en
otros lugares para protegerse de la corrupción de los archivos o la pérdida
causada por cualquier problema de tarjeta SD

- 50 -
Garantía & Apoyo al Cliente Para preguntas, soportes o reclamaciones de garantía, póngase en contacto
con nosotros en la dirección que se correspondan con su región. Inclúyase por
favor su número de orden de Amazon y número de modelo del producto.
Pedidos de Amazon EU: [email protected]
*Observe por favor, AUKEY puede proporcionar solamente el servicio after-sales para los productos comprados directamente de AUKEY. Si usted ha comprado de un vendedor diferente, póngase en contacto con ellos directamente por cuestiones de servicio o garantía por favor.

- 51 -
Grazie per aver acquistato AUKEY DR02 D Videocamere per Auto. Si prega di
leggere attentamente il manuale d’uso e di conservarlo per le consultazioni in
futuro. Se ha bisogno di qualsiasi assistenza, si prega di contattare il nostro gruppo
di supporto con il numero del modello del Suo prodotto e il numero d'ordine di
Amazon.
Contenuti del PaccoDue Videocamere per Auto (Videocamera anteriore e posteriore)
Cavo Mini-B USB da 4m / 13ft
Cavo Mini-B USB da 6m / 20ft
Due Adesivi di Montaggio
Sei Adesivi di 3M
Sei Fermagli di Cavo
Manuale d’Uso
Certificato di Garanzia
Accessorio Opzionale: AUKEY GPS Antenna Esterna provvede la posizione precisa
e i dati di velocità alla DR02 D che vengono conservati e mostrati sui video registrati.
Questa informazione aggiuntiva può supportare il Suo caso per controversia o
incidenti di guida.
Nota: si prega di utilizzare una scheda di memoria micro SD di classe 10 (Max 128GB)
per una registrazione affidabile e presentazioni. Formattare la scheda micro SD
prima del primo utilizzo.

- 52 -
Diagramma del ProdottoVideocamera Anteriore
Ingresso d’Alimentazione Mini-B USB
Ingresso GPS
Ingresso AV USB Mini-B
Clip del Montaggiodi Blocco
Lente
MicrofonoIndicatore LED di Esterno
Pulsante di Reset
Fessura della SchedaMicro SD

- 53 -
Uscita AV USB Mini-B AV
Indicatore LED di Esterno
Lente
Clip del Montaggiodi Blocco
Videocamera Posteriore
1080P+1080P 00:01:14
2049/08/13 22:15:06 Schermo
Pulsanti di Controllo
Indicatore LED di Interno
Indicatore di Schermo

- 54 -
SpecificazioniModello
Sensore d’Immagine
CPU
Schermo
Angolo di Visione
Apertura
Valore d’Esposizione
Risoluzioni di Registrazione
Formato d’Immagine
Registrazione di Suono
Modalità di Registrazione
Sensibilità del Sensoredi Gravità
Scheda Micro SD
Ingresso
Temperatura d’Operazione
Materiali
Dimensioni
DR02 D
Sony Exmor IMX323 2,3 MegapixelCMOS Sensore
NT96663
1.5” LCD
Videocamera anteriore: 170°Videocamera posteriore: 152°
Videocamera anteriore: f/1.8Videocamera posteriore: f/2.0
-1.0, -2/3, -1/3, +0.0, +1/3, +2/3, +1.0
Due videocamere: 1080p (30fps)Solo videocamera anteriore: 1080p (30fps),720p (60fps), 720p (30fps), WVGA, VGA
JPEG
Acceso / Spento
Ciclo, Rilevamento di Movimento, Time-Lapse,Registrazione d’Emergenza
Basso / Medio / Alta sensibilità
Classe 10 o più alto, 128GB Max
DC 5V 1A-2A
-30°C – 75°C (-22°F – 167°F)
ABS, PC, Vetro
Videocamera anteriore: 77 x 51 x 37mm /3” x 2” x 1,45”Videocamera posteriore: 54 x 50 x 28mm /2,1” x 2” x 1,1”

- 55 -
Sistema d’Indicatore LEDCi sono quattro indicatori in totale. Ogni videocamera ha un indicatore LED
che si affaccia all'esterno (per far sapere agli altri che le videocamere sono attive).
La videocamera anteriore ha un indicatore LED che si affaccia all'interno e un
indicatore sullo schermo (sia per il proprio riferimento).
Gli indicatori LED esterni su entrambe videocamere possono essere spenti, se si
desidera che il sistema di videocamere sia ancora meno visibile alle persone
esterne. Andare su Setup> Rileva Led> selezionare Off> premere OK.
Indicatore LEDdi Esterno
Verde Fisso
VerdeLampeggiante
Indicatore LEDdi Interno
Verde Fisso
VerdeLampeggiante
Indicatore diSchermo
Spento
RossoLampeggiante
Senso
Acceso; non inregistrazioneAcceso; inregistrazione
Nota: In modalità Rilevazione Movimento, solo l'indicatore LED interno si attiva in
standby. Una volta rilevato il movimento, tutti gli indicatori funzioneranno come
la normale registrazione.
PulsanteModalità diRegistrazione
Entrare in Modalitàdi Registrazioned’Emergenza
Vedere il playlist(premere brevemente)Accendere / Spegnerela Registrazione d’Audio(premere a lungo)
Playlist & Menud’Installazione
Tornare al menuprecedente
Muovere Su
Modalità diPlayback
Tornare al playlist /Fermata
Cancellare /Riavvolgere
Pulsanti di Controllo

- 56 -
Aprire il menud’Installazione(premere brevemente)Scattare un’istantanea(premere a lungo)
Cambiare la vistadi schermo/ Spegnerelo schermo
Muovere Giù
Entrata /Conferma
Bloccare &Sbloccare /Avanti Veloce
Gioco / Pausa
Pulsantedi Reset
Premere brevemente per riavviare il dispositivo (questo noninfluisce sui file salvati)
Nota: C'è una breve pausa per salvare la registrazione corrente prima di entrare nella playlist o nel menu di setup. Esistono 3 opzioni di visualizzazione dello schermo - Doppia vista, videocamera anteriore, e video camera posteriore. Quando la videocamera è accesa, premere il pulsante OK per spostare le visualizzazioni o disattivare lo schermo (la registrazione continua). L'impostazione 'Screen Saver' può essere utilizzata anche per spegnere automaticamente lo schermo dopo 1 o 3 minuti.
Utilizzo di Scheda Micro SDLa videocamera non include la memoria interna e richiede una scheda micro SD (classe 10+ consigliata e 128 GB Max supportata) per funzionare. Una scheda micro SD da 128 GB dovrebbe memorizzare circa 20 ore di registrazioni da 1080p. Utilizza una scheda ad alta qualità per la massima affidabilità.Inserire una scheda micro SD nell'alloggiamento della scheda micro SD di videocamera anteriore. In seguito, formattare la videocamera (opzione 'Formato' in Dash Camera 'Setup') per preparare la scheda per il primo utilizzo nella videocamera a crivello. La formattazione uccide cancellare tutti i dati sulla scheda micro SD. Per ottenere prestazioni migliori, formattare periodicamente (dopo aver eseguito il backup di tutti i file importanti). 'Formato avviso' in 'Impostazioni' può essere attivato per ricordarvi di farlo

- 57 -
Installazione & Acceso / SpentoIl diagramma seguente mostra le parti ed il modo esatto che i cavi devono essere
collegati. Potresti desiderare di collegare e verificare il sistema della videocamera
a scatto prima di installare correttamente e a lungo termine nel veicolo. Per comodi
test in casa, invece di caricare l'auto, è possibile utilizzare una banca di potenza
o un caricatore a parete con porta USB da 1A o 2A.
Caricabatteria d
a Auto
USB con Due Porte
Vid
eocamera Posteriore
Cavo M
ini-B USB da 4m
/ 13ftC
avo Mini-B USB d
a 6m / 20ft
Vid
eocamera A
nteriore
1080P+1080P 00:01:14
2049/08/1322:15:06

- 58 -
1. Per ottenere prestazioni ottimali, installare la videocamera anteriore / posteriore AUKEY DR02 D nella parte superiore centrale del parabrezza anteriore / posteriore, rivolta direttamente davanti / dietro. La direzione di lente può essere regolata su e giù
2. Utilizzare il cavo Mini-B 6m / 20ft (con un connettore a forma di L ad una estremità) per collegare le due videocamere. Il connettore mini-B a forma di L si inserisce nell'ingresso AV Mini-B della videocamera anteriore e l'altra estremità nell'uscita AV Mini-B della videocamera posteriore
3. Collegare il cavo Mini-B USB da 4m / 13ft (con un connettore standard USB-A ad una estremità) ad una delle porte di caricabatteria e all’ingresso d’alimentazione Mini-B della videocamera anteriore
4. Il routing del cavo deve essere come mostrato nei due diagrammi seguenti. Utilizzate i clip di cavo per fissare i due cavi in modo comodo e sicuro. L'accurata collocazione dei cavi e l'utilizzo di finiture e moquette esistenti per nascondere che darà una finitura più nitida
①
②

- 59 -
Attenzione: AUKEY non è responsabile di eventuali danni causati dal sacco d'aria
a causa di un errato posizionamento del dispositivo o dei suoi cavi.
5. Per accenderlo, inserire il caricatore dell'automobile nella presa 12V della
Sua auto. Dopo l'accensione ogni volta che si avvia la vettura, il sistema avvia
la registrazione automaticamente. Per spegnere, scollegare il caricabatteria
da auto o il cavo mini-B collegato
Nota: Utilizzare i cavi inclusi per garantire prestazioni ottimali di AUKEY DR02 D.
Registrazione di VideoI file separati vengono creati per le registrazioni dalla videocamera anteriore e
posteriore, in modo da poter visualizzare separatamente le immagini di ciascuna
videocamera a pieno formato. Le registrazioni sono influenzati dalla scelta di
visualizzazione a schermo o spegnere lo schermo.
Parabrezza Migliore posizionedi montaggio
connettersi alcaricabatteria per auto

- 60 -
● Registrazione di Ciclo: La registrazione s’inizia automaticamente dopo l’accensione con una Scheda Micro SD nel dispositivo. Ogni file di registrazione è fino a dieci minuti, con vecchi filmati sostituiti quando la Scheda Micro SD è piena● Registrazione di Rilevamento di Movimento: Accendere il rilevamento di movimento in ‘Setup’. Questa funzione inizia a registrare il video quando la videocamera rileva il movimento di fronte e ferma la registrazione quando il movimento non viene rilevato più● Registrazione di Time-Lapse: Accendere la registrazione di time-lapse in ‘Setup’. Questa funzione cattura una foto ogni secondo per fare un video riprodotto a 30fps
Registrazione d’Emergenza● Copia di File ManualePremere per copiare il file attuale affinché il file non venga sovrascritto.
Un’icona appare in alto a sinistra dello schermo LCD per indicare una registrazione
d’emergenza progettata è in corso
● Copia di File AutomaticoQuando il G-sensore è attivato da un impatto improvviso, il dispositivo effettua
automaticamente una registrazione e la protegga da essere sovrascritta. Regolare
la sensibilità del G-sensore nel menu ‘Setup’
Nota: Entrare playlist o menu di setup (o scollegare l'alimentazione) per terminare
la modalità di registrazione di emergenza.
Istantanea● Tenere premuto per 3 secondi per scattare un’istantanea durante la
modalità di registrazione
● I fili d’istantanea si trovano nella cartella \AUKEY\PHOTO sulla Scheda Micro SD
● L’icona viene mostrato dopo che un’istantanea viene presa. Questo
non interrompe la registrazione di video

- 61 -
Registrazione d’AudioAccendere / Spegnere la registrazione d’Audio da premere a lungo durante la modalità di registrazione (o da regolare nel menu ‘Setup’). Quando la registrazione d’audio è accesa, l’audio in-auto viene registrata durante la registrazione di video. Le indicazioni vocali dei dettagli dei pericoli possibili che possono accadere, specialmente quando la videocamera è spenta, possono provvedere informazioni utili. Lei può anche usarla per registrare i numeri della targa d’auto che forse non vengono catturati nel video.
Trasferimento di File USB1. Collegare il Dash Cam (con scheda interna) al computer utilizzando il proprio
cavo dati mini-B USB (cavo incluso è solo per l'alimentazione). Dovrebbe essere
riconosciuto come un dispositivo rimovibile (con un'immagine di connettore
USB mostra sullo schermo)
2. Trovare i fili della registrazione di video nella cartella \AUKEY\MOVIE (o \AUKEY\
PHOTO per istantanee)
3. Copiare i fili al Suo computer
Trasferimento di File della Scheda Micro SD1. Spegnere il dispositivo (da scollegare il cavo d’alimentazione) ed estrarre la
Scheda Micro SD
2. Inserire la Scheda Micro SD in una fessura di scheda Micro SD del computer o
un lettore e il Suo computer rileva automaticamente la Scheda Micro SD
3. Trovare i fili della registrazione di video nella cartella \AUKEY\MOVIE (o \AUKEY\
PHOTO per istantanee)
4. Copiare i fili al Suo computer
Vedere Foto e Video1. Premere per entrare nel playlist2. Vedere foto o video da scegliere sia ‘Photo File’ o ‘Video File’

- 62 -
3. Scegliere il file che si vuole vedere e premere 4. Per i video, premere di nuovo per iniziare il playback
Cancellare e Bloccare / Sbloccare Foto e Video● Premere per cancellare o per bloccare / sbloccare una foto o un video dopo averlo scelto dal playlist. Se si riproduce un video, premere per fermarlo e poi premere per cancellare o per bloccare / sbloccare● Quando è cancellato, le foto e i video non possono essere ricuperati● Se Lei blocca una foto o un video, esso viene progettata e non può essere sovrascritto
Cura di Prodotto & Uso● Assicurarsi che la videocamera e il supporto siano fissati saldamente in posizione prima dell’uso per evitare cadute● Allontanarsi dai liquidi, dal calore estremo e dai forti campi magnetici● Evitare di toccare la superficie di lente. Può essere pulito con un tampone di cotone o una carta per la pulizia di lente. Se è difficile rimuovere eventuali sporcizia, è possibile utilizzare un detergente non abrasivo. Non utilizzare soluzioni corrosive● Mantiene importanti video e foto in altre parti protette contro la corruzione di file o la perdita causata da eventuali problemi con la scheda SD
Garanzia & Assistenza ai ClientiPer domande, supporto, o richieste di garanzia, si prega di contattarci al seguente indirizzo che corrisponde alla Sua regione. Si prega d’inserire il Suo numero d’ordine di Amazon e di modello dei prodotti.
Ordini di Amazon EU: [email protected]
*Si prega di notare che AUKEY può offrire solo il servizio di post-vendita per i prodotti acquistati direttamente da AUKEY. Se ha acquistato da un venditore diverso, si prega di contattarlo direttamente per problemi di servizio o di garanzia.

- 63 -
この度AUKEY DR02 D 車載ドライブレコーダーをご購入いただき、誠にありがとうございます。ご使用前にこの取扱説明書をよくお読みください。また、お手元に置き、いつでも確認できるようにしておいてください。何かの不明なところがございましたら、品番とアマゾンの注文番号を記入した上、お気軽に弊社のお客様サービスセンターにお問い合わせください。
パッケージ内容ドライブレコーダー(前後カメラ各1個)2ポートUSBカーチャージャー4M USBミニBケーブル6M USBミニBケーブルステッカーマウント2個3Mステッカー6枚ケーブルクリップ6個マニュアル保証書
オプションのアクセサリ:別途で外付けるようGPSアンテナは、本体に正確な位置と速度のデータを提供し、また録画したデータはビデオに保存されます。 これは、運転中の紛争や事故においてお客様のケースをサポートできます。(注:本製品にはGPSアンテナを付属しておりません、別途に購入してください。)
ご注意:より正確な記録を得るには、クラス10以上のマイクロSDメモリカード(最大128GB)を使用してください。最初使用する前に、まず利用したいマイクロSDカードをフォーマットしてください。
https://jp.aukey.com/downloadsに登録して、最新のファームウェアをダウンロードできます。

- 64 -
製品図前置カメラ
USB ミニB電源入力GPS入力
USBミニB AV入力
マウントロック
レンズ
マイク外向きLEDインジケータ
リセットボタン
マイクロSDカードスロット

- 65 -
USBミニB AV出力
LEDインジケータ
レンズ
マウントロック
後置カメラ
1080P+1080P 00:01:14
2049/08/13 22:15:06 スクリーン
操作ボタン
内向きLEDインジケータ
スクリーンインジケータ

- 66 -
製品仕様型番
画像センサー
CPU
スクリーン
視角
絞り
EV値
解像度
画像フォーマット
録音
録画モード
Gセンサー
マイクロSDカード
入力
動作温度
材質
寸法
DR02 D
Sony Exmor IMX323 2.3メガピクセル CMOS センサー
NT96663
1.5” LCD
前置カメラ: 170°後置カメラ: 152°
前置カメラ: f/1.8後置カメラ: f/2.0
-1.0, -2/3, -1/3, +0.0, +1/3, +2/3, +1.0
前後カメラ: 1080p (30fps)前置カメラだけ: 1080p (30fps), 720p (60fps), 720p (30fps), WVGA, VGA
JPEG
オン/オフ
ループ録画、緊急録画、モーション検知録画タイムラプス録画
低/中/高 感度
クラス10或いは以上、最大128GB
DC 5V 1A-2A
-30°C ‒ 75°C
ABS、PC、ガラス
前置カメラ: 77 x 51 x 37mm 後置カメラ: 54 x 50 x 28mm

- 67 -
LEDインジケータ共に4つLEDインジケータがあります。 前後カメラの取付側にLEDインジケータは各1個ずつがあります。この二つインジケータはカメラが正常運作中を表示します。そして、前置カメラスクリーンの上と画面の左上にインジケータが二つあります。ドライブレコーダーが運作中ことを人々に見せたくない場合は、前置カメラ外向きのLEDインジケータをオフする方法は次のようにしてください。設定> Detect Led > オフを選択し、OKを押します。
外向きのLEDインジケー
緑灯常に明るく
緑灯点滅
内向きのLEDインジケー
緑灯常に明るく
緑灯点滅
スクリーンインジケータ
紅灯オフ
紅灯点滅
意味
オン、録画していない
オン、録画している
ご注意:モーション検知モードでは、スタンバイ状態で内向きのLEDインジケータのみが点灯します。動きが検出されると、すべてのインジケーターは通常の録画と同じように動作します。
ボタン 録画モード
緊急モードに入る
再生リストに入る(短押し)音声録音オン/オフ(長押し)
設定メニューに入る(短押し)スナップショットを撮る(長押し)
カメラを転換、スクリーンをオン / オフする
プレイリスト/ 設置
前の画面に戻る
上向き
下向き
エンター/確認
再生モード
再生リストに戻る/ビデオを停止する
削除/巻き戻し
ロック&ロック解除/早送り
一時停止/再開
リセットボタン 短押して、デバイスをリーセットする(保存したファイルに影響なし)
操作ボタン

- 68 -
ご注意:再生リストや設定メニューに入る前、現在の記録を保存するため、短い停頓があります。
ドライブレコーダーの電源が入れた時、OKボタンを押せば、デュアルカメラ、前置カメラ、後置カメラの3つ画面を順番的に切り替えます。再度OKボタンを押す場合、画面をオフになります。(但し録画が継続します)。 「スクリーンセーバー」機能を設定すれば、1分あるいは3分後に自動的画面をオフとなります。または、画面をオフしたくない場合、「スクリーンセーバー」の画面でオフを選択してください。
マイクロSDカードの使用方法カメラにはマイクロSDカード(クラス10或いはそれ以上、最大128GB)が必要です。 128GBのマイクロSDカードには約20時間の1080pの録画を保存できます。 よく使用できるため、高品質のブランドカードを利用してください。 マイクロSDカードを前置カメラのマイクロSDカードスロットに挿入します。 電源がオンした次第、ドライブレコーダーを使用始める前に、まずマイクロSDカードをフォーマットしてください(「設定」の「フォーマット」を選択します)。フォーマットすると、マイクロSDカードのデータは完全に削除されます。最高のパフォーマンスを得るには、定期的にフォーマットしてください(重要なファイルのバックアップを注意してください)。 「設定」にある「フォーマット警告」を利用すれば、定期的にリマインダされます。
ご注意:本製品にはSDメモリカードは付属しておりません。
取付&電源オン/オフ下記の図はケーブルを接続するため、必要な部品と正確な方法を表示しております。お客様の車に本製品を適切なインストールする前に、ドライブレコーダーをテストすることに役立ちます。 家で簡単なテストする際、カーチャージャーの代わりに、1Aや2AのUSBウォールチャージャーを使用してください。

- 69 -
4M USBミ
ニBケーブル
6M USBミ
ニBケーブル
カーチャージャー
前置カメラ
後置カメラ
1080P+1080P 00:01:14
2049/08/1322:15:06

- 70 -
1.最適な性能を得るために、AUKEY DR02 D前/後カメラを、フロント/リアガラスの真中に 設置してください。レンズの向きは上下に調整できます。
2.6M USBミニBケーブル(一端にL字型コネクター付き)を使用して、2台のカメラを接続し ます。 L字型ミニBコネクタは、前置カメラのUSBミニB AV入力に挿して、もう一端は後置 カメラのミニB AV出力に接続します。
3.4M USBミニBケーブル(一方の端に標準のUSB-Aコネクタ付き)をカーチャージャーと前置 カメラのUSB ミニB電源入力に挿します。
4.ケーブル配線は、下記2つ図に示すようにしてください。 ケーブルクリップを使用し、2本 のケーブルを便利な且つ安全に固定します。慎重にケーブルを配置した後、装飾品とカ ーペットを利用して、それらを隠してください。そうすると、よりきれいな仕上がりができ ます。
①
②

- 71 -
ご注意:弊社は誤ったインストールによってエアバッグなどの損害に責任を負いません。
5.車の12Vのカーチャージャーに挿入して電源が入れます。 電源を入れたまま際、車を起 動すると、カメラは自動的に録画を始めます。電源を切るには、カーチャージャー或いは USB ミニB電源入力からケーブルを外してください。
ご注意:付属のケーブルを使用して、AUKEY DR02 Dの最適な性能を確保できます。
ビデオ録画前置カメラと後置カメラの録画は別々のファイルが作成されるので、各カメラの映像を別々に見ることができます。 画面の切り替えは録画に影響しません。
● ループ録画:デバイスにマイクロSDカードと電源を入れて録画が自動的に開始します。 記録された各ファイルの長さは最長で10分間です。マイクロSDカードは容量上限に達 する際、古いファイルが置き換えられます。● モーション検知録画:「設定」でモーション検知をオンにします。この機能は、駐車した或 いは車から離れる時を監視するように使用となり、そして前置カメラと後置カメラで撮っ たビデオが記録されます。電源の継続が必要です。
フロントガラス 最高の設置位置
カーチャージャーと接続
● タイムラプス録画:「設定」で「タイマー経過」をオンにします。この機能は、1秒あたりの 映像をキャプチャして、30fpsでビデオを再生させます。
緊急録画● 手動ファイルをバックアップ を押して、現在のビテオをロックされ、バックアップにします。保護された緊急録画中を示す マークが画面の左上に表示されます。
● 自動ファイルをバックアップ突然の衝撃を受け、Gセンサーが感知すると、デバイスは自動的に録画して、ロックされます。 「設定」でGセンサー感度を調整できます。
ご注意:再生リストや設定に入り(或いは電源を切る)、緊急記録モードを終了できます。
スナップショット● 録画モードの場合に、 を3秒に長押して、スナップショットを撮ります。● スナップショットファイルはフォルダの/AUKEY/PHOTOにあります。● スナップショットを撮った後に、 マークを表示します。録画に影響が与えません。
音声録音録画モードで を長押すと、音声録音機能をオン/オフできます(或いは、「設定」メニューの「録画な音声」に入り、オン/オフにします)。音声録音機能をオンにすると、録画する際に音声も録音できます。音声で周りの危険を記録し、特にスクリーンオフする時、役に立ち情報を提供できます。お客様はカメラで捕捉されない車ナンバーなどを言い出し、音声録音機能で記録できます。
USBファイル転送1. 自分のUSB ミニBデータケーブル(付属のケーブルは電源用だけ)を使用して、ドライブ レコーダー(SDカードは本体に挿している場合)をパソコンと接続します。リムーバブル デバイスとして認識される必要があります(USBコネクタが画面に表示されます)。
2. /AUKEY/MOVIEフォルダ(スナップショットの場合は /AUKEY/PHOTO)にビデオ録画ファ イルを検索します。3. ファイルをパソコンに保存されます。
マイクロSDカードファイル転送1. デバイスをオフにして(電源ケーブルを外して)、マイクロSDカードを取り出します。2. マイクロSDカードをパソコンのマイクロSDカードスロットまたはリーダーに挿入すると、 パソコンは自動的にマイクロSDカードを検出します。3. /AUKEY/MOVIEフォルダ(スナップショットの場合は /AUKEY/PHOTO)にビデオ録画ファ イルを検索します。4. ファイルをパソコンに保存されます。
写真/ビテオ再生1. を押して再生リストに入ります。2. 「ビデオファイル」/「写真ファイル」を選択してビデオファイルリスト/写真ファイルリスト に入ります。3. ファイルを選択し、 を押します。4. ビデオの場合は、もう一度 を押して再生を開始します。
ビデオ・写真の削除とロック/ロック解除● 再生リストでビデオ・写真を選択した後、 を押すと、ビデオ・写真を削除できます。 を押すと、ビデオ・写真をロック/ロック解除できます。再生中に、 を押して上 記の操作に戻ります。再生を停止しないと、削除とロック/ロック解除できません。● 一度削除すると、写真やビデオを復元することはできません。● 写真やビデオをロックすれば保護されます、マイクロSDカード容量の上限に達しても 置き換えることができません。
お勧め● 落下を防ぐため、使用前にカメラがしっかり固定されていることを確認してください。● 液体、高温及び強磁場から離れてください。
● レンズの表面に触らないでください。綿棒やレンズクリーニングペーパーできれいにす ることが必要です。汚れを取り除くことが困難な場合は、研磨剤なしクリーナーを利用し て、腐食性がある物を使用しないでください。● SDカードの問題によるファイルの破損や損失を防ぐため、重要なビデオや写真を他の 場所にバックアップしてください。
保証期間とお客様サポート何かご問題・ご質問などがございましたら、品番と注文番号を記入した上で、下記のメールアドレスまでお問い合わせください。最も早い営業日にご返信を差し上げます。
アマゾンジャパンの注文:[email protected]
*当社は、AUKEY公式ショップ、または当社が認める小売業者から購入された製品に対してのみ、アフターサービスと製品保証を提供しております。他の小売業者から購入された製品の交換、返品、返金に関しましては購入先へお問い合わせ下さい。

- 72 -
ご注意:弊社は誤ったインストールによってエアバッグなどの損害に責任を負いません。
5.車の12Vのカーチャージャーに挿入して電源が入れます。 電源を入れたまま際、車を起 動すると、カメラは自動的に録画を始めます。電源を切るには、カーチャージャー或いは USB ミニB電源入力からケーブルを外してください。
ご注意:付属のケーブルを使用して、AUKEY DR02 Dの最適な性能を確保できます。
ビデオ録画前置カメラと後置カメラの録画は別々のファイルが作成されるので、各カメラの映像を別々に見ることができます。 画面の切り替えは録画に影響しません。
● ループ録画:デバイスにマイクロSDカードと電源を入れて録画が自動的に開始します。 記録された各ファイルの長さは最長で10分間です。マイクロSDカードは容量上限に達 する際、古いファイルが置き換えられます。● モーション検知録画:「設定」でモーション検知をオンにします。この機能は、駐車した或 いは車から離れる時を監視するように使用となり、そして前置カメラと後置カメラで撮っ たビデオが記録されます。電源の継続が必要です。
● タイムラプス録画:「設定」で「タイマー経過」をオンにします。この機能は、1秒あたりの 映像をキャプチャして、30fpsでビデオを再生させます。
緊急録画● 手動ファイルをバックアップ を押して、現在のビテオをロックされ、バックアップにします。保護された緊急録画中を示す マークが画面の左上に表示されます。
● 自動ファイルをバックアップ突然の衝撃を受け、Gセンサーが感知すると、デバイスは自動的に録画して、ロックされます。 「設定」でGセンサー感度を調整できます。
ご注意:再生リストや設定に入り(或いは電源を切る)、緊急記録モードを終了できます。
スナップショット● 録画モードの場合に、 を3秒に長押して、スナップショットを撮ります。● スナップショットファイルはフォルダの/AUKEY/PHOTOにあります。● スナップショットを撮った後に、 マークを表示します。録画に影響が与えません。
音声録音録画モードで を長押すと、音声録音機能をオン/オフできます(或いは、「設定」メニューの「録画な音声」に入り、オン/オフにします)。音声録音機能をオンにすると、録画する際に音声も録音できます。音声で周りの危険を記録し、特にスクリーンオフする時、役に立ち情報を提供できます。お客様はカメラで捕捉されない車ナンバーなどを言い出し、音声録音機能で記録できます。
USBファイル転送1. 自分のUSB ミニBデータケーブル(付属のケーブルは電源用だけ)を使用して、ドライブ レコーダー(SDカードは本体に挿している場合)をパソコンと接続します。リムーバブル デバイスとして認識される必要があります(USBコネクタが画面に表示されます)。
2. /AUKEY/MOVIEフォルダ(スナップショットの場合は /AUKEY/PHOTO)にビデオ録画ファ イルを検索します。3. ファイルをパソコンに保存されます。
マイクロSDカードファイル転送1. デバイスをオフにして(電源ケーブルを外して)、マイクロSDカードを取り出します。2. マイクロSDカードをパソコンのマイクロSDカードスロットまたはリーダーに挿入すると、 パソコンは自動的にマイクロSDカードを検出します。3. /AUKEY/MOVIEフォルダ(スナップショットの場合は /AUKEY/PHOTO)にビデオ録画ファ イルを検索します。4. ファイルをパソコンに保存されます。
写真/ビテオ再生1. を押して再生リストに入ります。2. 「ビデオファイル」/「写真ファイル」を選択してビデオファイルリスト/写真ファイルリスト に入ります。3. ファイルを選択し、 を押します。4. ビデオの場合は、もう一度 を押して再生を開始します。
ビデオ・写真の削除とロック/ロック解除● 再生リストでビデオ・写真を選択した後、 を押すと、ビデオ・写真を削除できます。 を押すと、ビデオ・写真をロック/ロック解除できます。再生中に、 を押して上 記の操作に戻ります。再生を停止しないと、削除とロック/ロック解除できません。● 一度削除すると、写真やビデオを復元することはできません。● 写真やビデオをロックすれば保護されます、マイクロSDカード容量の上限に達しても 置き換えることができません。
お勧め● 落下を防ぐため、使用前にカメラがしっかり固定されていることを確認してください。● 液体、高温及び強磁場から離れてください。
● レンズの表面に触らないでください。綿棒やレンズクリーニングペーパーできれいにす ることが必要です。汚れを取り除くことが困難な場合は、研磨剤なしクリーナーを利用し て、腐食性がある物を使用しないでください。● SDカードの問題によるファイルの破損や損失を防ぐため、重要なビデオや写真を他の 場所にバックアップしてください。
保証期間とお客様サポート何かご問題・ご質問などがございましたら、品番と注文番号を記入した上で、下記のメールアドレスまでお問い合わせください。最も早い営業日にご返信を差し上げます。
アマゾンジャパンの注文:[email protected]
*当社は、AUKEY公式ショップ、または当社が認める小売業者から購入された製品に対してのみ、アフターサービスと製品保証を提供しております。他の小売業者から購入された製品の交換、返品、返金に関しましては購入先へお問い合わせ下さい。

- 73 -
ご注意:弊社は誤ったインストールによってエアバッグなどの損害に責任を負いません。
5.車の12Vのカーチャージャーに挿入して電源が入れます。 電源を入れたまま際、車を起 動すると、カメラは自動的に録画を始めます。電源を切るには、カーチャージャー或いは USB ミニB電源入力からケーブルを外してください。
ご注意:付属のケーブルを使用して、AUKEY DR02 Dの最適な性能を確保できます。
ビデオ録画前置カメラと後置カメラの録画は別々のファイルが作成されるので、各カメラの映像を別々に見ることができます。 画面の切り替えは録画に影響しません。
● ループ録画:デバイスにマイクロSDカードと電源を入れて録画が自動的に開始します。 記録された各ファイルの長さは最長で10分間です。マイクロSDカードは容量上限に達 する際、古いファイルが置き換えられます。● モーション検知録画:「設定」でモーション検知をオンにします。この機能は、駐車した或 いは車から離れる時を監視するように使用となり、そして前置カメラと後置カメラで撮っ たビデオが記録されます。電源の継続が必要です。
● タイムラプス録画:「設定」で「タイマー経過」をオンにします。この機能は、1秒あたりの 映像をキャプチャして、30fpsでビデオを再生させます。
緊急録画● 手動ファイルをバックアップ を押して、現在のビテオをロックされ、バックアップにします。保護された緊急録画中を示す マークが画面の左上に表示されます。
● 自動ファイルをバックアップ突然の衝撃を受け、Gセンサーが感知すると、デバイスは自動的に録画して、ロックされます。 「設定」でGセンサー感度を調整できます。
ご注意:再生リストや設定に入り(或いは電源を切る)、緊急記録モードを終了できます。
スナップショット● 録画モードの場合に、 を3秒に長押して、スナップショットを撮ります。● スナップショットファイルはフォルダの/AUKEY/PHOTOにあります。● スナップショットを撮った後に、 マークを表示します。録画に影響が与えません。
音声録音録画モードで を長押すと、音声録音機能をオン/オフできます(或いは、「設定」メニューの「録画な音声」に入り、オン/オフにします)。音声録音機能をオンにすると、録画する際に音声も録音できます。音声で周りの危険を記録し、特にスクリーンオフする時、役に立ち情報を提供できます。お客様はカメラで捕捉されない車ナンバーなどを言い出し、音声録音機能で記録できます。
USBファイル転送1. 自分のUSB ミニBデータケーブル(付属のケーブルは電源用だけ)を使用して、ドライブ レコーダー(SDカードは本体に挿している場合)をパソコンと接続します。リムーバブル デバイスとして認識される必要があります(USBコネクタが画面に表示されます)。
2. /AUKEY/MOVIEフォルダ(スナップショットの場合は /AUKEY/PHOTO)にビデオ録画ファ イルを検索します。3. ファイルをパソコンに保存されます。
マイクロSDカードファイル転送1. デバイスをオフにして(電源ケーブルを外して)、マイクロSDカードを取り出します。2. マイクロSDカードをパソコンのマイクロSDカードスロットまたはリーダーに挿入すると、 パソコンは自動的にマイクロSDカードを検出します。3. /AUKEY/MOVIEフォルダ(スナップショットの場合は /AUKEY/PHOTO)にビデオ録画ファ イルを検索します。4. ファイルをパソコンに保存されます。
写真/ビテオ再生1. を押して再生リストに入ります。2. 「ビデオファイル」/「写真ファイル」を選択してビデオファイルリスト/写真ファイルリスト に入ります。3. ファイルを選択し、 を押します。4. ビデオの場合は、もう一度 を押して再生を開始します。
ビデオ・写真の削除とロック/ロック解除● 再生リストでビデオ・写真を選択した後、 を押すと、ビデオ・写真を削除できます。 を押すと、ビデオ・写真をロック/ロック解除できます。再生中に、 を押して上 記の操作に戻ります。再生を停止しないと、削除とロック/ロック解除できません。● 一度削除すると、写真やビデオを復元することはできません。● 写真やビデオをロックすれば保護されます、マイクロSDカード容量の上限に達しても 置き換えることができません。
お勧め● 落下を防ぐため、使用前にカメラがしっかり固定されていることを確認してください。● 液体、高温及び強磁場から離れてください。
● レンズの表面に触らないでください。綿棒やレンズクリーニングペーパーできれいにす ることが必要です。汚れを取り除くことが困難な場合は、研磨剤なしクリーナーを利用し て、腐食性がある物を使用しないでください。● SDカードの問題によるファイルの破損や損失を防ぐため、重要なビデオや写真を他の 場所にバックアップしてください。
保証期間とお客様サポート何かご問題・ご質問などがございましたら、品番と注文番号を記入した上で、下記のメールアドレスまでお問い合わせください。最も早い営業日にご返信を差し上げます。
アマゾンジャパンの注文:[email protected]
*当社は、AUKEY公式ショップ、または当社が認める小売業者から購入された製品に対してのみ、アフターサービスと製品保証を提供しております。他の小売業者から購入された製品の交換、返品、返金に関しましては購入先へお問い合わせ下さい。

- 74 -
ご注意:弊社は誤ったインストールによってエアバッグなどの損害に責任を負いません。
5.車の12Vのカーチャージャーに挿入して電源が入れます。 電源を入れたまま際、車を起 動すると、カメラは自動的に録画を始めます。電源を切るには、カーチャージャー或いは USB ミニB電源入力からケーブルを外してください。
ご注意:付属のケーブルを使用して、AUKEY DR02 Dの最適な性能を確保できます。
ビデオ録画前置カメラと後置カメラの録画は別々のファイルが作成されるので、各カメラの映像を別々に見ることができます。 画面の切り替えは録画に影響しません。
● ループ録画:デバイスにマイクロSDカードと電源を入れて録画が自動的に開始します。 記録された各ファイルの長さは最長で10分間です。マイクロSDカードは容量上限に達 する際、古いファイルが置き換えられます。● モーション検知録画:「設定」でモーション検知をオンにします。この機能は、駐車した或 いは車から離れる時を監視するように使用となり、そして前置カメラと後置カメラで撮っ たビデオが記録されます。電源の継続が必要です。
● タイムラプス録画:「設定」で「タイマー経過」をオンにします。この機能は、1秒あたりの 映像をキャプチャして、30fpsでビデオを再生させます。
緊急録画● 手動ファイルをバックアップ を押して、現在のビテオをロックされ、バックアップにします。保護された緊急録画中を示す マークが画面の左上に表示されます。
● 自動ファイルをバックアップ突然の衝撃を受け、Gセンサーが感知すると、デバイスは自動的に録画して、ロックされます。 「設定」でGセンサー感度を調整できます。
ご注意:再生リストや設定に入り(或いは電源を切る)、緊急記録モードを終了できます。
スナップショット● 録画モードの場合に、 を3秒に長押して、スナップショットを撮ります。● スナップショットファイルはフォルダの/AUKEY/PHOTOにあります。● スナップショットを撮った後に、 マークを表示します。録画に影響が与えません。
音声録音録画モードで を長押すと、音声録音機能をオン/オフできます(或いは、「設定」メニューの「録画な音声」に入り、オン/オフにします)。音声録音機能をオンにすると、録画する際に音声も録音できます。音声で周りの危険を記録し、特にスクリーンオフする時、役に立ち情報を提供できます。お客様はカメラで捕捉されない車ナンバーなどを言い出し、音声録音機能で記録できます。
USBファイル転送1. 自分のUSB ミニBデータケーブル(付属のケーブルは電源用だけ)を使用して、ドライブ レコーダー(SDカードは本体に挿している場合)をパソコンと接続します。リムーバブル デバイスとして認識される必要があります(USBコネクタが画面に表示されます)。
2. /AUKEY/MOVIEフォルダ(スナップショットの場合は /AUKEY/PHOTO)にビデオ録画ファ イルを検索します。3. ファイルをパソコンに保存されます。
マイクロSDカードファイル転送1. デバイスをオフにして(電源ケーブルを外して)、マイクロSDカードを取り出します。2. マイクロSDカードをパソコンのマイクロSDカードスロットまたはリーダーに挿入すると、 パソコンは自動的にマイクロSDカードを検出します。3. /AUKEY/MOVIEフォルダ(スナップショットの場合は /AUKEY/PHOTO)にビデオ録画ファ イルを検索します。4. ファイルをパソコンに保存されます。
写真/ビテオ再生1. を押して再生リストに入ります。2. 「ビデオファイル」/「写真ファイル」を選択してビデオファイルリスト/写真ファイルリスト に入ります。3. ファイルを選択し、 を押します。4. ビデオの場合は、もう一度 を押して再生を開始します。
ビデオ・写真の削除とロック/ロック解除● 再生リストでビデオ・写真を選択した後、 を押すと、ビデオ・写真を削除できます。 を押すと、ビデオ・写真をロック/ロック解除できます。再生中に、 を押して上 記の操作に戻ります。再生を停止しないと、削除とロック/ロック解除できません。● 一度削除すると、写真やビデオを復元することはできません。● 写真やビデオをロックすれば保護されます、マイクロSDカード容量の上限に達しても 置き換えることができません。
お勧め● 落下を防ぐため、使用前にカメラがしっかり固定されていることを確認してください。● 液体、高温及び強磁場から離れてください。
● レンズの表面に触らないでください。綿棒やレンズクリーニングペーパーできれいにす ることが必要です。汚れを取り除くことが困難な場合は、研磨剤なしクリーナーを利用し て、腐食性がある物を使用しないでください。● SDカードの問題によるファイルの破損や損失を防ぐため、重要なビデオや写真を他の 場所にバックアップしてください。
保証期間とお客様サポート何かご問題・ご質問などがございましたら、品番と注文番号を記入した上で、下記のメールアドレスまでお問い合わせください。最も早い営業日にご返信を差し上げます。
アマゾンジャパンの注文:[email protected]
*当社は、AUKEY公式ショップ、または当社が認める小売業者から購入された製品に対してのみ、アフターサービスと製品保証を提供しております。他の小売業者から購入された製品の交換、返品、返金に関しましては購入先へお問い合わせ下さい。

Model: DR02 D
Made in China
AUKEY International Ltd. www.aukey.com | [email protected], Building P09, Electronics Trade CenterHuanan City, Pinghu Town, Longgang DistrictShenzhen, Guangdong, 518111, CN


