
2011
USER GUIDE Building a Contact Management System

1
Table of Contents Contact Management Sample Database ...................................................................................................... 2
Creating the Database in Windows Azure ................................................................................................ 2
Installing the Contact Management Database ......................................................................................... 3
Baseline Web App ......................................................................................................................................... 7
Customizing the Baseline Application ........................................................................................................... 8
Changing the Menu Structure ................................................................................................................... 8
Customizing Addresses Controller .......................................................................................................... 10
Fields ................................................................................................................................................... 10
Views ................................................................................................................................................... 10
Customizing Customers Controller ......................................................................................................... 13
Fields ................................................................................................................................................... 13
Views ................................................................................................................................................... 14
Customizing Contacts Controller ............................................................................................................ 17
Fields ................................................................................................................................................... 17
Views ................................................................................................................................................... 18
Customizing Contact Activities Controller .............................................................................................. 21
Fields ................................................................................................................................................... 22
Views ................................................................................................................................................... 22
Creating References Page ....................................................................................................................... 24
Customizing Home Page ......................................................................................................................... 25
Creating the Chart Views .................................................................................................................... 25
Adding Chart Views to the Home Page ............................................................................................... 26
Finished Web App ....................................................................................................................................... 27

2
Contact management systems allow users to easily store and find contact information, such as names,
addresses, and phone numbers. This tutorial will teach you how to create a new database in Windows
Azure, deploy Contact Management to this database, add membership and roles support, and customize
the application to fit your needs.
Contact Management Sample Database The Contact Management sample database has been kindly offered for free by Microsoft at
http://msdn.microsoft.com/en-us/express/bb403186. We have made a few modifications to the sample
to make it play better with Code On Time Generator. The database schema can be seen below.
The primary table in this database is Contacts. Contacts belong to specific customers, and have various
activities attached to them. The primary pages we will want to display in our application will be
Activities, Contacts, Customers, Addresses, and list all the reference tables on the last page of
References.
Creating the Database in Windows Azure
This tutorial uses SQL Azure to host the database. Any other database hosting service can be used,
including your own computer. For sake of the tutorial, we will assume that you are using SQL Azure. You
can create a free account and create a database server by following the instructions in this tutorial.

3
Installing the Contact Management Database
At this point, you should have a database server with an empty database. Run Code On Time Generator, and create a new Web Site Factory project. Give this project the name of “ContactManagement”, in the language of your choice.
Press Create to create the project. Leave the namespace default and press Next. You should be on the Database Connection page. Click on the “…” button next to Connection String field. Enter your server name and authentication information (If you need help finding the server name, view page 11 of the Azure Factory tutorial). Enter the name of the database you created under Database. In our server, we used the name “Contact Management”.

4
Under Sample Tables dropdown, select “Contact Management”, and press Install.
This will create all the necessary tables and sample data for the application to be generated successfully. You will also need to add membership to this application. Under Membership, press Add.

5
Press OK, and press Next until you reach the Reporting page. Enable reporting by checking the checkbox.
Proceed to the Authentication and Membership page. Click on the Login Window item in the list box, and check the box next to “Enable a dedicated login page”. This will force users to navigate to a dedicated login page to get to the home page.

6
Navigate to the Features page. In the Page Header textbox, write “Contact Management”.
In the list box on the left side, select Permalinks and History. Enable both checkboxes on that page.
Continue pressing Next, then press Generate. Wait until the web page loads with the baseline web app.

7
Baseline Web App The baseline web app provides a feature-rich basis for your application to start at. While this application
is ready to use, it will take some more work to perfect and optimize.
First of all, the home page will need to be rearranged to display the most relevant information to the end user. You will put several charts of data and a list of activities, viewable at first glance. Next, the menu structure will have to be changed. The structure will first have Contacts page, then Activities, Customers, Addresses, and then all reference fields moved under a new Reference page.
If you navigate through the rest of the pages, you will see that various grid views, create forms, and edit forms would benefit from some customization. Let’s use the create form for Customers as an example, shown below. The first field, “Organisation or Person”, appears as just a text box, when it should only display two options – Organisation or Person. You can assume that organisations don’t have first and last names, and people don’t have organization names – we will add conditional visibility rules to this page to make these fields exclusive. It would also be convenient if the Date Became Customer field showed today’s date by default, and Other Customer Details was a larger text box.

8
Customizing the Baseline Application
The following chapter will give you instructions on how to customize the generated application.
Changing the Menu Structure
First things first – let’s rearrange the pages in a more logical format. Select the project name in Code On Time Generator, and press Design. Switch to the All Pages tab. Mouse over Contacts, activate the dropdown menu, and press Edit. Change the Index to “1005” and Path to “Contacts”. Index determines the order of the pages, while Path determines the menu location. Press Save.
Also make the following changes as in the table below. References will be a new page. Delete all pages starting with Ref_ and Customer_Addresses.
Page Index Title Path Roles
Contact_Activities 1008 Activities Activities
Addresses 1015 Addresses Addresses
References 1020 References References
Ref_Contact_Status DELETE
Ref_Activity_Outcomes DELETE
Ref_Activity_Types DELETE
Customer_Addresses DELETE

9
Your All Pages tab should look like the picture below.

10
Customizing Addresses Controller
Fields
Switch to the All Controllers tab. Let’s start with the Addresses controller. Click on its name and switch to the Fields tab. Change the labels of the following fields to make the page easier to understand.
Field Label
state_providence_county State / Providence / County
other_address_details Details
Your field list should appear as shown below.
Views
Switch to the Views tab. Select createform1, and switch to the Data Fields tab. Change the number of
columns and rows to improve field legibility.
Data Field Cols Rows
line_1 40
line_2 40
line_3 40
city 15
zip_postcode 10

11
state_providence_county 15
country 15
other_address_details 40 3
Your page should look as below.
Under the words Project Designer, press the Back icon. Select editForm1 from the list of Views, and
switch to Data Fields tab. Perform the edits listed in the table below.
Data Field Cols Rows
line_1 40
line_2 40
line_3 40
city 15
zip_postcode 10
state_providence_county 15
country 15
other_address_details 40 3

12
Your page should look as follows.
If you press Quick View on the action bar, you will see the changes in action when creating or editing an
address.

13
Customizing Customers Controller
Fields
Go back to the list of All Controllers, select Customers, and switch to the Fields tab. Select
date_became_customer. In the Code Default field, write “DateTime.Now”, so that the field will display
the current date and time by default.
Creating a Calculated Field
Currently, the web app uses the “organisation_or_person” field as the primary field in grid view. It
would make much more sense to use a unique name as the selectable link, but the table uses separate
fields for organisation name and first/last name.
In this situation, we will have to create a calculated field that is computed at run-time using an SQL
expression. This expression will display either the organization name or first and last name, depending
on the customer type. In the Designer, press New | New Field. Use the following properties:
Property Definition
Name CustomerName
Type String
The value of this field is computed at run-time
SQL Formula case
when customers.organisation_or_person = 'ORG'
then
organisation_name
else
first_name + ' ' + last_name
end
Label Customer Name
Values of this field cannot be edited
Press OK to save the field.

14
Specifying a List of Field Options
Next, let’s make the organisation_or_person field display two options in a radio button list. Select the
organisation_or_person field. Uncheck “Allow null values” and change Items Style to “Radio Button List”.
Press OK, and click on the organisation_or_person field again. Switch to the Items tab. Create the
following items.
Value Text
ORG Organisation
PERSON Person
Views
Next, we will need to modify the presentation of the fields and bind a Customer Name data field for
each view. Switch to the Views tab. Select grid1, and switch to Data Fields. Create a new data field with
the following settings:
Property Definition
Field Name CustomerName
Values of this field cannot be edited
Save the data field, and move the data field to the top of the list by clicking on the dropdown next to its
field name, and pressing Make First.
Exclusive Categories with Conditional Visibility
Go back to the list of views. Select createForm1. It would be nice if organisation name and first/last
name fields were exclusive – this can be done with separate categories and conditional visibility. Switch
to the Categories tab. Create two new categories, with the settings below.
Header Text Description Floating
Organisation Name Insert the organization name below. N/A
Customer Name Insert the first and last name below. Yes
Click on Organisation Name category and switch to Data Fields tab. Add a data field with the following
settings.
Property Definition
Field Name organisation_name
Columns 20
Save the data field, and switch to the Visibility tab. Create a new visibility expression, which will make
organisation_name appear when the organisation_or_person field is set to “Organisation”:
Property Definition
Expression [organisation_or_person]=="ORG"

15
Go back to the list of categories. Select Customer Name category, and switch to the Data Fields tab.
Create two new data fields, with the following settings.
Field Name Columns
first_name 15
last_name 15
Switch to the Visiblity tab, and create a new expression.
Property Definition
Expression [organisation_or_person]=="PERSON"
This way, the relevant fields will only appear when the correct item is select in the Organisation or
Person field. As you cannot have a single field displayed multiple times, Code On Time Generator will
automatically remove the data field from other categories.
You will need to perform the same changes to editForm1 view. Go back to the list of views and select
editForm1. Switch to Categories and create two new categories.
Header Text Description Floating
Organisation Name The organisation name is shown below. N/A
Customer Name First and last name is shown below. Yes
Click on Organisation Name category and switch to Data Fields tab. Add a data field with the following
settings.
Property Definition
Field Name organisation_name
Columns 20

16
Save the data field, and switch to the Visibility tab. Create a new visibility expression:
Property Definition
Expression [organisation_or_person]=="ORG"
Go back to the list of categories. Select Customer Name category, and switch to the Data Fields tab.
Create two new data fields, with the following settings.
Field Name Columns
First Name 15
Last Name 15
Switch to the Visibility tab, and create a new expression.
Property Definition
Expression [organisation_or_person]=="PERSON"

17
Customizing Contacts Controller Go back to the list of All Controllers, and select Contacts. Switch to the Fields tab.
Fields In the list of fields, make a few edits, detailed below.
Field Name Label Allow Nulls
status_status_description Status No
contact_name Contact Name No
cell_mobile_phone Mobile Phone Yes
other_contact_details Details Yes
Select the customer_id field, and make the following changes, which will make customer_id use
CustomerName as the displayed and selected text.
Property Definition
Items Style Lookup
Items Data Controller Customers
Data Value Field customer_id
Data Text Field CustomerName
Creating a Reference to a Virtual (Calculated) Field
Instead of displaying organisation_or_person field as a reference to Customers table, it would make more sense to use CustomerName, the calculated field you made earlier. However, the Customers table may be defined differently in this controller. Select the Contacts controller, and switch to the Commands tab. Select command1, and have a look at the command. Copying it over to notepad may make viewing easier. If you look at the joins at the end of the command, you can see a reference to Customers table. The command is shown below.
select
"Contacts"."contact_id" "contact_id"
,"Contacts"."customer_id" "customer_id"
,"customer_"."organisation_or_person" "customer_organisation_or_person"
,"Contacts"."status_code" "status_code"
,"status_"."status_description" "status_status_description"
,"Contacts"."email_address" "email_address"
,"Contacts"."web_site" "web_site"
,"Contacts"."salutation" "salutation"
,"Contacts"."contact_name" "contact_name"
,"Contacts"."job_title" "job_title"
,"Contacts"."department" "department"
,"Contacts"."work_phone" "work_phone"
,"Contacts"."cell_mobile_phone" "cell_mobile_phone"
,"Contacts"."fax_number" "fax_number"
,"Contacts"."other_contact_details" "other_contact_details"
from "dbo"."Contacts" "Contacts"
left join "dbo"."Customers" "customer_" on "Contacts"."customer_id" =
"customer_"."customer_id"
left join "dbo"."Ref_Contact_Status" "status_" on "Contacts"."status_code" =
"status_"."status_code"

18
The Customers table is referred to as “customer_”, so this is the name that must be used when creating the SQL formula for the calculated field.
left join "dbo"."Customers" "customer_" on "Contacts"."customer_id" =
"customer_"."customer_id"
Cancel out of the command details, and switch to Fields tab. Create a new field, with the settings below.
Property Definition
Name CustomerName
The value of this field is computed at run-time
SQL Formula case
when customer_.organisation_or_person = 'ORG'
then
customer_.organisation_name
else
customer_.first_name + ' ' +
customer_.last_name
end
Label Customer Name
Values of this field cannot be edited Allow Query-by-Example Allow Sorting
Save the field.
Data Validation on Phone Fields
Most real applications require you to insert a phone number properly, and convert them into a uniform
format. The Contact Management database uses format 123-456-7890, so the regular expressions you
will use will convert data fields to this format. Select the work_phone field, and switch to the Validators
tab. Create two new validators with the settings below.
Regular Expression Error Message / Replacement Pattern
^(\d{3}).*?(\d{3}).*?(\d{4})$ $1-$2-$3
^(\d{3})-(\d{3})-(\d{4})$ The phone number must be in the correct format 123-456-7890.
The first validator will convert any set of numbers into the proper dashed format. If the field contains
letters and other characters at time of validation, then the second validator will throw an error message.
All validation occurs just-in-time, and any extraneous characters will be truncated.
Go back to the list of fields, and perform the same operations on the cell_mobile_phone and
fax_number fields.
Views
Next, let’s optimize the appearance of the various views of this controller. Switch to the Views tab, and
select grid1. Switch to Data Fields tab. Make the following changes described below (and make the fields
follow the order below). Delete salutation.

19
Field Name Alias
contact_name N/A
status_code status_status_description
customer_id CustomerName
job_title N/A
department N/A
work_phone N/A
cell_mobile_phone N/A
email_address N/A
web_site N/A
Your list of data fields should look like the picture below.
Breaking Data Fields into Separate Categories
Go back to the list of views, and select createForm1. Switch to Categories tab. Currently, the create form
lists all fields in a row. Let’s break the fields into different categories: general information under New
Contacts, Personal Info for information about the contact, and Business Info for job related info.
Create two new Categories.
Header Text Description
Personal Info Insert personal information below.
Business Info Insert business information below.
Select the New Contacts category, switch to Data Fields, and make the following changes.

20
Field Name Cols Rows Alias
customer_id CustomerName
status_code status_status_description
other_contact_details 40 3
Go back to the list of categories, and select Personal Info. Switch to Data Fields and add the following
fields:
Field Name Cols
contact_name 25
salutation 10
email_address 30
cell_mobile_phone 15
Go back to the list of categories, and select Business Info. Add the following Data Fields:
Field Name Cols
job_title 15
department 20
work_phone 15
fax_number 15
web_site 25
You will need to perform the same changes to editForm1. Go back to the list of views, and select
editForm1. Switch to Categories tab. Create two new Categories.
Header Text Description
Personal Info View personal information below.
Business Info View business information below.
Select the Contacts category, switch to Data Fields, and make the following changes.
Field Name Cols Rows Alias
customer_id CustomerName
status_code status_status_description
other_contact_details 40 3
Go back to the list of categories, and select Personal Info. Switch to Data Fields and add the following
fields:
Field Name Cols
contact_name 25

21
salutation 10
email_address 30
cell_mobile_phone 15
Go back to the list of categories, and select Business Info. Add the following Data Fields:
Field Name Cols
job_title 15
department 20
work_phone 15
fax_number 15
web_site 25
Customizing Contact Activities Controller
Adding Annotations
Go back to the list of All Controllers, and select Contact_Activities. For some activities, you may want to
attach relevant files and notes. On the Controller tab, change Allow Annotations to “Yes”. Press OK to
save.

22
Fields
Click on the Contact_Activities controller again. Switch to the Fields tab.
Currently, the primary clickable field on the Activities page is Contact Status Code. As this doesn’t make
much sense in this context, we would like to display the name of the contact that the activity was done
with. Create a new field with the following properties. (The SQL Formula uses the definition of the
contact table reference found in command1. This process is described in further detail under
Customizing Contacts Controller.)
Property Definition
Name ContactName
The value of this field is computed at run-time SQL Formula "contact_"."contact_name"
Label Contact Name
Values of this field cannot be edited Allow Query-by-Example Allow Sorting
Save, and select date_activity. In the Code Default field, write “DateTime.Now”, to make sure today’s
date is inserted by default.
Save the field, and make the following changes to the rest of the fields. The “g” Format String for
date_activity forces the field to display both date and time.
Field Name Label Items Style Format
contact_customer_organisation_or_person Customer Type
contact_status_status_description Contact Type
activity_type_activity_type_description Type
outcome_code Outcome Code Drop Down List
outcome_outcome_description Outcome
date_activity Date of Activity g
other_details Details
Views
Let’s customize the views of this controller. Switch to the Views tab. Select grid1. It would make more
sense if the activities were sorted by most recent, so write “date_activity desc” under Sort Expression,
and press OK.
Select grid1 again, and switch to Data Fields. Make the following changes (and list the fields in the
following order).
Field Name Alias
contact_id ContactName
date_activity

23
activity_type_code activity_type_activity_type_description
outcome_code outcome_outcome_description
other_details
contact_customer_organisation_or_person DELETE
contact_status_status_description DELETE
Go back to the list of views, and select createForm1. Switch to Data Fields, and make the following
changes and in this order.
Field Name Cols Rows Alias
contact_id ContactName
date_activity 10
activity_type_code activity_type_activity_type_description
outcome_code outcome_outcome_description
other_details 40 3
Go back to the list of views, and select editForm1. Make the changes described in the order below.
Field Name Cols Rows Alias
contact_id ContactName
date_activity 10
activity_type_code activity_type_activity_type_description
outcome_code outcome_outcome_description
other_details 40 3
contact_customer_organisation_or_person 8
contact_status_status_description

24
Creating References Page The References page is designed to show all reference tables not integral to the application. You will
need to add the data controllers to the page. Go back to the list of controllers, and switch to the All
Pages tab. Select the References page, and switch to the Containers tab. Create a new container, leave
the default settings, and press OK.
Switch to the Data Views tab. Create several data views with the settings below.
Container Controller View Activator Text
c100 Ref_Activity_Outcomes grid1 Tab Activity
c100 Ref_Activity_Types grid1 Tab Activity Types
c100 Ref_Contact_Status grid1 Tab Contact Status
c100 Customer_Addresses grid1 Tab Customer Addresses
This way, all references tables can be easily accessed using the different tabs on the Reference page, as
shown below.

25
Customizing Home Page On the home page, it would be nice to have various charts displaying data about recent activity going
on, as well as a list of the most recent activities. This way, you can easily keep on top of what’s
happening in your application. First thing you will have to do is create the chart views.
Creating the Chart Views
Go back to the list of All Pages, and switch to the All Controllers list. Select Contact_Activities and switch
to Views tab. Create three new views with the following settings.
Id Type Command Label Header Text
Show In View Selector
Filter Expression
chart1 Chart command1 This Week Activity
This Week Activity
$ThisWeek(date_activity)
chart2 Chart command1 Activity Types
Activity Types
$ThisWeek(date_activity)
chart3 Chart command1 Activity Outcomes
Contact Status
$ThisWeek(date_activity)
Select chart1 and switch to Data Fields. Add the following data fields. A Data Format String of “d” will
force display of the date only. Use “X, Days” to display a date field, with a value marking every day. This
chart will display a count of how many activities were occurring on each day, using a line.
Field Name Data Format String Aggregate Function Chart
date_activity d None X, Days
activity_id Count Line
Select chart2 and add the data fields below. This chart will display a count of different activity types that
occurred, using cylinders.
Field Name Aggregate Function Chart
activity_type_activity_type_description None X
activity_id Count Bar (Cylinder)
Select chart3 and add the following data fields. This chart displays a count of different outcomes using
cylinders.
Field Name Aggregate Function Chart
outcome_outcome_description None X
activity_id Count Column (Cylinder)

26
Adding Chart Views to the Home Page
You will have to add several containers to the home page, and place the charts inside these containers.
Go back to the list of All Controllers, and switch to the All Pages tab. Select the Home page, and switch
to Containers. Make the following changes.
Id Flow Width CSS Style Properties
container1 DELETE
container2 DELETE
N/A New Column
300px border:solid 1px silver;padding:4px;margin-bottom:4px;margin-right:8px
N/A New Column
300px border:solid 1px silver;padding:4px;margin-bottom:4px;margin-right:8px
N/A New Column
300px border:solid 1px silver;padding:4px;margin-bottom:4px;margin-right:8px
N/A New Row
Switch to the Data Views tab, and create the following views.
Container Controller View Text
c100 Contact_Activities chart1 Activity Outcomes
c101 Contact_Activities chart2 Activity Types
c102 Contact_Activities chart3 Contact Status
c103 Contact_Activities grid1
For all four views, make sure to uncheck Show Action Bar, Show View Description, Show View Selector,
Show Search Bar, Show Quick Find, and Show Pager. Check Show Modal Forms.
Now that customizations have been finished, you can view your optimized application. Press Exit, and
press Generate.

27
Finished Web App When the web app opens, the first thing you see is the dedicated login page. Enter the administrative credentials (by default, admin|admin123%) to access the application.
Pressing Log In will lead you to the home page. You can see that the home page hosts an impressive array of charts and a list of the most recent activity. This was done by placing several containers on the page and data views within these containers. At first glance, you can immediately see what’s going on in your database.

28
You can also open activity records and view the details by clicking on the contact names. The details will be presented in a modal form. Use the arrows next to lookup fields to access the relevant data. You can also edit or delete activities.
Press Close to go back to the home page. Using the menu system at the top of the page, navigate to
Contacts. The field order in grid view now makes much more sense, with the contact name as the
clickable field, and relevant information listed as well. This was accomplished by rearranging data fields
in grid1 view. Clicking on the row of a contact will display related contact activities below.

29
If you edit or create a new contact, you can see that the fields in the form are now segregated according to data type. General info is displayed at the top, while personal info and business info are separated into two categories below. This was done with the help of placing the correct data fields into separate categories. The phone fields all have validation conditions – when you tab out of any of the phone fields, the number will convert to ###-###-####. If there is an incorrect character, an error message will appear.
Let’s navigate to the Activities page. Create a new activity by pressing New on the action bar. Select a contact name and activity type. The date, by default, is today (by using DateTime.Now in the Code Default property). Select an outcome using the dropdown, and enter details. Press OK. The combination of various item styles increases ease of using the application for end users.
30
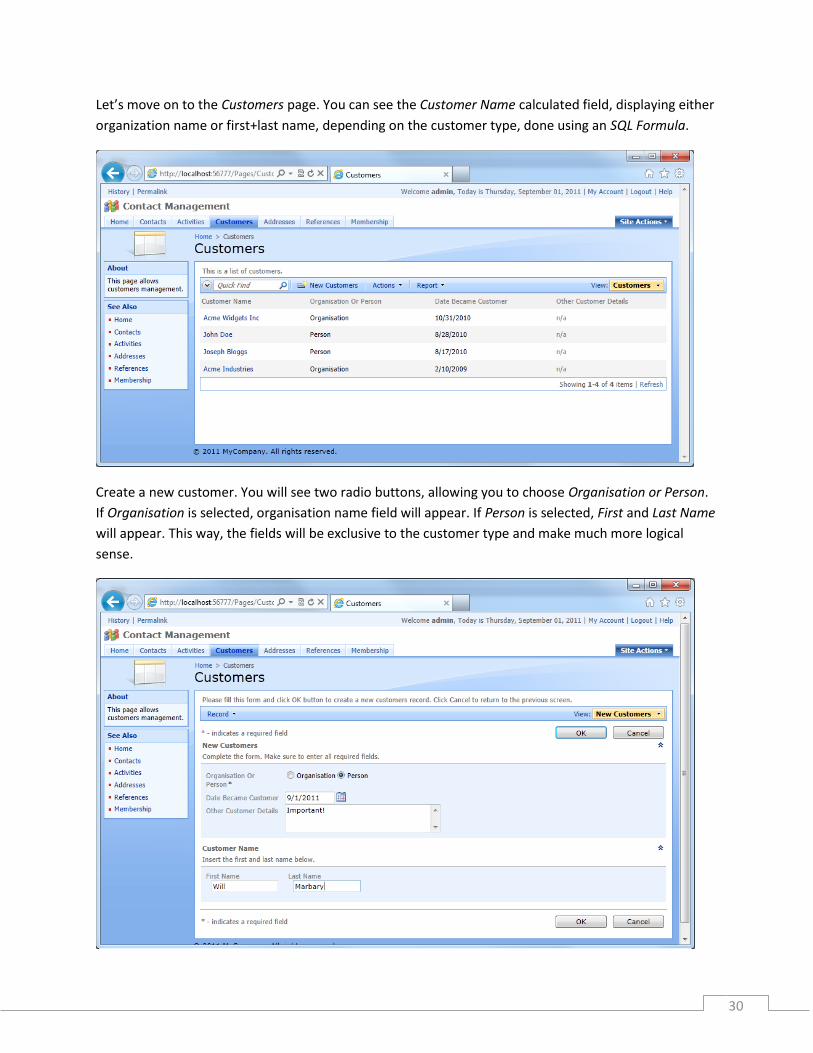
Let’s move on to the Customers page. You can see the Customer Name calculated field, displaying either
organization name or first+last name, depending on the customer type, done using an SQL Formula.
Create a new customer. You will see two radio buttons, allowing you to choose Organisation or Person.
If Organisation is selected, organisation name field will appear. If Person is selected, First and Last Name
will appear. This way, the fields will be exclusive to the customer type and make much more logical
sense.

31
Navigate to the Addresses page. This page allows you to find, enter, edit, and delete addresses.
References displays all the reference tables, and allows you to edit the necessary fields. The tables are
displayed on different tabs.


