31 Mar 2017
Short Position Reporting System (SPRS)
User Account Management User Guide Version 1.0

SPRS User Guide – User Account Management Version 1.0
P a g e | 2
TABLE OF CONTENTS
TABLE OF CONTENTS ............................................................................................................. 2
1. ABOUT THIS GUIDE ........................................................................................................ 3
2. HOW TO LOG IN TO SPRS ............................................................................................... 4
3. HOW TO USE 2FA ........................................................................................................... 6
4. HOW TO MANAGE DELEGATION..................................................................................... 7
5. HOW TO MANAGE USER PROFILE ................................................................................. 10
6. HOW TO CHANGE SPRID ACCOUNT PASSWORD ............................................................ 12
7. FORGOT SPRID ACCOUNT PASSWORD .......................................................................... 14
8. FORGOT SPRID ............................................................................................................. 17
9. HOW TO DEACTIVATE ACCOUNT .................................................................................. 20

SPRS User Guide – User Account Management Version 1.0
P a g e | 3
1. ABOUT THIS GUIDE This is a step-by-step guide on how to manage your SPRS user account. There are two login methods available for SPRS:
SingPass – for SingPass users
Short Position Reporting ID (“SPRID”) – for foreign users without a SingPass account
After logging in to your SPRS account, you can perform the following functions online. To better protect your personal data, 2nd Factor Authentication (“2FA”) is required to perform these functions.
Manage delegation You can appoint another registered user to report short positions on your behalf. To do so, you must add your reporting agent’s SPRID to your delegation list.
Manage user profile You can update your user profile if there is a change in your personal details (e.g. change in address or contact number).
Change SPRID account password You can change your SPRID account password online. This is applicable to foreign users without a SingPass account.
Reset SPRID account password If you have forgotten your SPRID account password, you can reset your password online. This is applicable to foreign users without a SingPass account.
Retrieve SPRID If you have forgotten your SPRID after registration, you can have your SPRID sent to your registered email address.
Deactivate account If you no longer require your SPRS user account, you can deactivate it.
SPRS User Guide – User Account Management Version 1.0
P a g e | 4
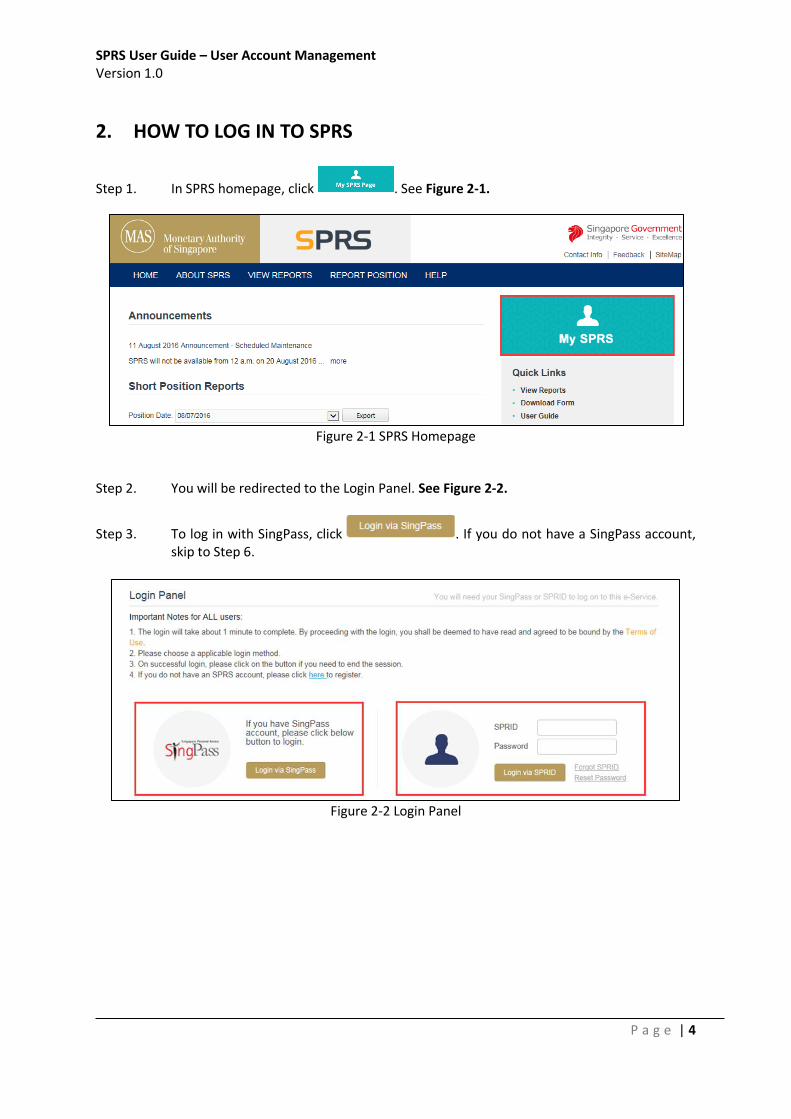
2. HOW TO LOG IN TO SPRS
Step 1. In SPRS homepage, click . See Figure 2-1.
Figure 2-1 SPRS Homepage
Step 2. You will be redirected to the Login Panel. See Figure 2-2.
Step 3. To log in with SingPass, click . If you do not have a SingPass account, skip to Step 6.
Figure 2-2 Login Panel

SPRS User Guide – User Account Management Version 1.0
P a g e | 5
Step 4. You will be redirected to the SingPass login page. See Figure 2-3. Enter your credentials to log in to SingPass.
NOTE
Please refer to the SingPass website at http://www.singpass.gov.sg for queries related to SingPass.
Step 5. After SingPass verification is completed, proceed to Step 8.
Figure 2-3 SingPass Login page
Step 6. To log in with SPRID, enter your SPRID and account password. See Figure 2-4.
Step 7. Click .
Figure 2-4 SPRID login
Step 8. After successful SingPass/SPRID authentication, you will be directed to the SPRS
homepage.

SPRS User Guide – User Account Management Version 1.0
P a g e | 6
3. HOW TO USE 2FA Step 1. When accessing account-related functions, SPRS will direct you to perform 2FA. See
Figure 3-1.
NOTE
You only need to perform 2FA once if you are accessing account-related functions in the same login session.
Figure 3-1 2FA page
Step 2. An SMS with a One-Time Password (“OTP”) will be sent to your registered mobile number.
If you did not receive an OTP the first time, click . See Figure 3-1.
Figure 3-1 Last 6 digits of OneKey SMS OTP
Step 3. Enter the last 6 digits of the OTP in the field provided.
Step 4. Click . Step 5. Upon successful authentication, you will be redirected back to the target page, and will
be given access to the account-related function.

SPRS User Guide – User Account Management Version 1.0
P a g e | 7
4. HOW TO MANAGE DELEGATION
Step 1. Click under in the main menu. See Figure 4-1.
Figure 4-1 SPRS Homepage
Step 2. You will be redirected to the 2FA login page if you have not logged in to 2FA. Refer to
Section 3 – How to use 2FA for login steps.
Step 3. Enter the Reporting Agent’s SPRID in the field provided. Click . See Figure 4-2.
NOTE
Only a registered account can be added as a delegated agent. The delegated agent can be an Individual or a Company account.
Figure 4-2 Manage Delegation page
SPRS User Guide – User Account Management Version 1.0
P a g e | 8
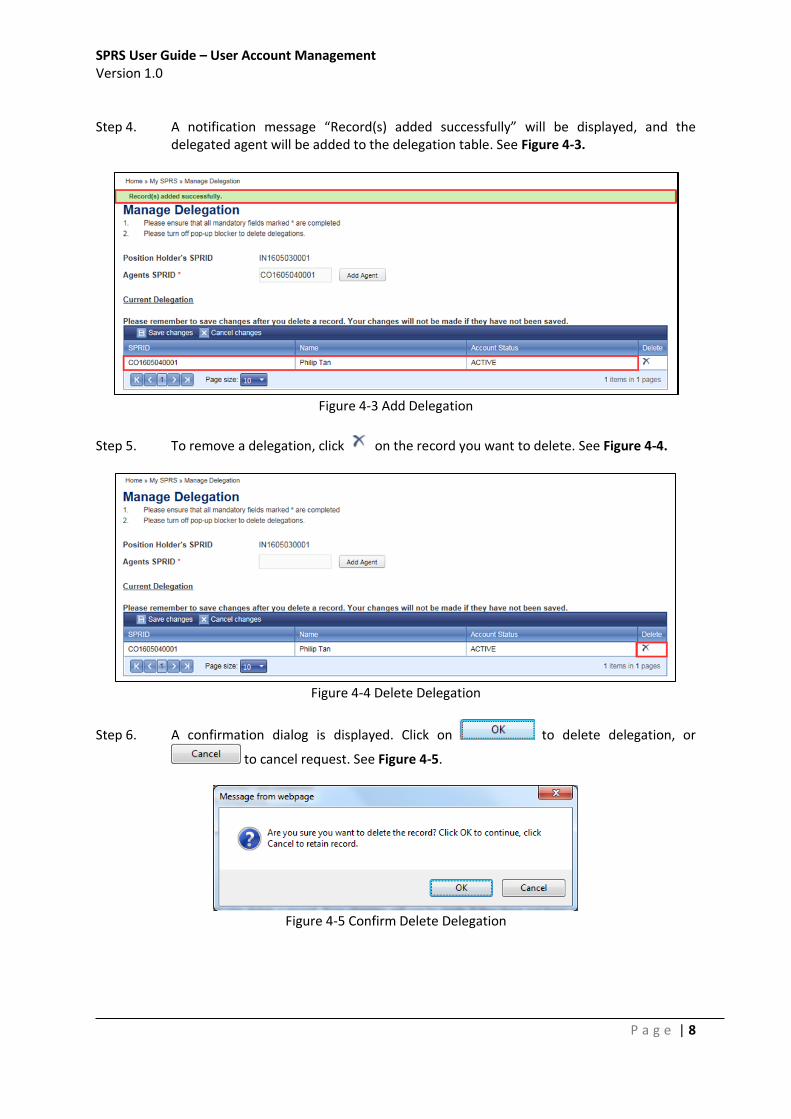
Step 4. A notification message “Record(s) added successfully” will be displayed, and the delegated agent will be added to the delegation table. See Figure 4-3.
Figure 4-3 Add Delegation
Step 5. To remove a delegation, click on the record you want to delete. See Figure 4-4.
Figure 4-4 Delete Delegation
Step 6. A confirmation dialog is displayed. Click on to delete delegation, or
to cancel request. See Figure 4-5.
Figure 4-5 Confirm Delete Delegation

SPRS User Guide – User Account Management Version 1.0
P a g e | 9
Step 7. The deleted record is removed from the delegation table. Click to save the changes made. See Figure 4-6.
Figure 4-6 Save Delegation
SPRS User Guide – User Account Management Version 1.0
P a g e | 10
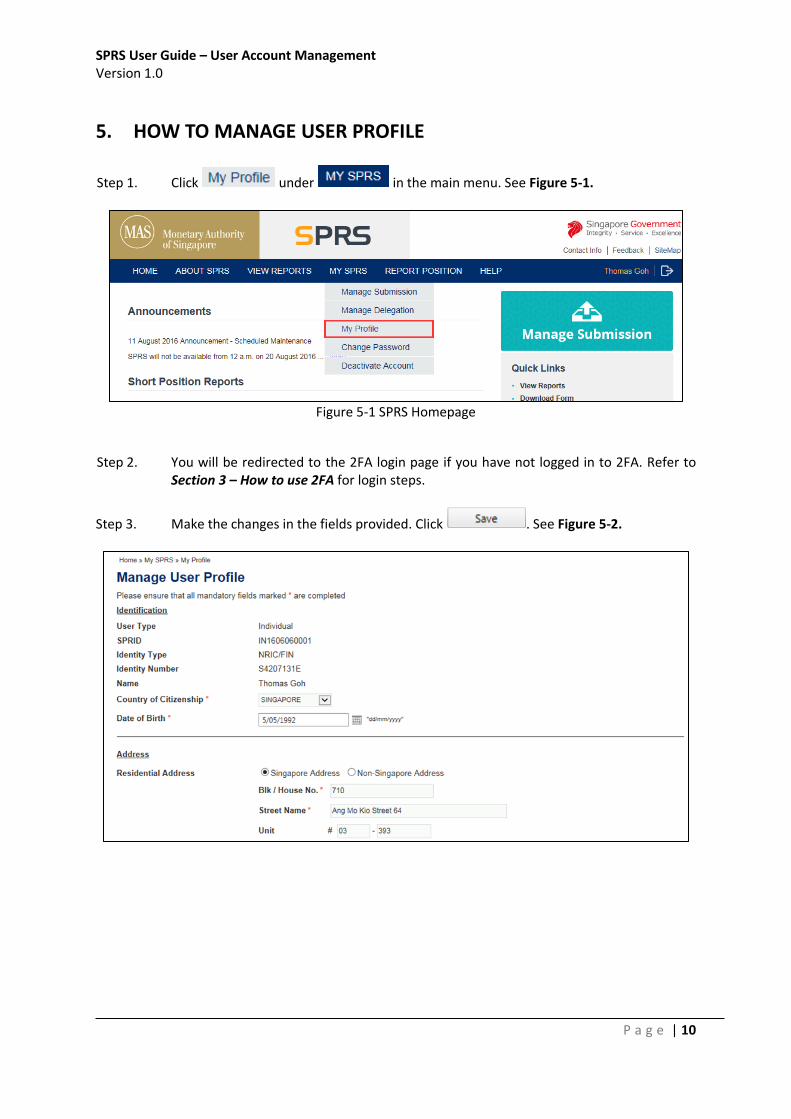
5. HOW TO MANAGE USER PROFILE
Step 1. Click under in the main menu. See Figure 5-1.
Figure 5-1 SPRS Homepage
Step 2. You will be redirected to the 2FA login page if you have not logged in to 2FA. Refer to Section 3 – How to use 2FA for login steps.
Step 3. Make the changes in the fields provided. Click . See Figure 5-2.

SPRS User Guide – User Account Management Version 1.0
P a g e | 11
Figure 5-2 Manage User Profile page
Step 4. A notification message “Record(s) updated successfully” will be displayed, indicating that the changes made are saved. See Figure 5-3.
Figure 5-3 Manage User Profile page

SPRS User Guide – User Account Management Version 1.0
P a g e | 12
6. HOW TO CHANGE SPRID ACCOUNT PASSWORD
NOTE
This function only applies to non-SingPass users who log in to SPRS using SPRID.
If you are a SingPass user and wish to reset your SingPass password, please use the SingPass online request service.
Step 1. Click under in main menu. See Figure 6-1.
Figure 6-1 SPRS Homepage
Step 2. You will be redirected to the 2FA login page if you have not logged in to 2FA. Refer to
Section 3 – How to use 2FA for login steps.
Step 3. Fill in the “Current Password”, “New Password” and “Confirm New Password” fields. See Figure 6-2.
Step 4. Enter the Captcha verification code (case-sensitive) and click .
Figure 6-2 Change Password page

SPRS User Guide – User Account Management Version 1.0
P a g e | 13
Step 5. You will be redirected to an OTP authentication page. See Figure 6-3.
Step 6. Refer to Section 3 – How to use 2FA for authentication steps.
Figure 6-3 OTP Authentication page
Step 7. An acknowledgement page will be displayed after the password has been updated successfully. See Figure 6-4.
Figure 6-4 Acknowledgement page
SPRS User Guide – User Account Management Version 1.0
P a g e | 14
7. FORGOT SPRID ACCOUNT PASSWORD
NOTE
This function only applies to non-SingPass users who log in to SPRS using SPRID.
If you are a SingPass user, please use the SingPass online request service.
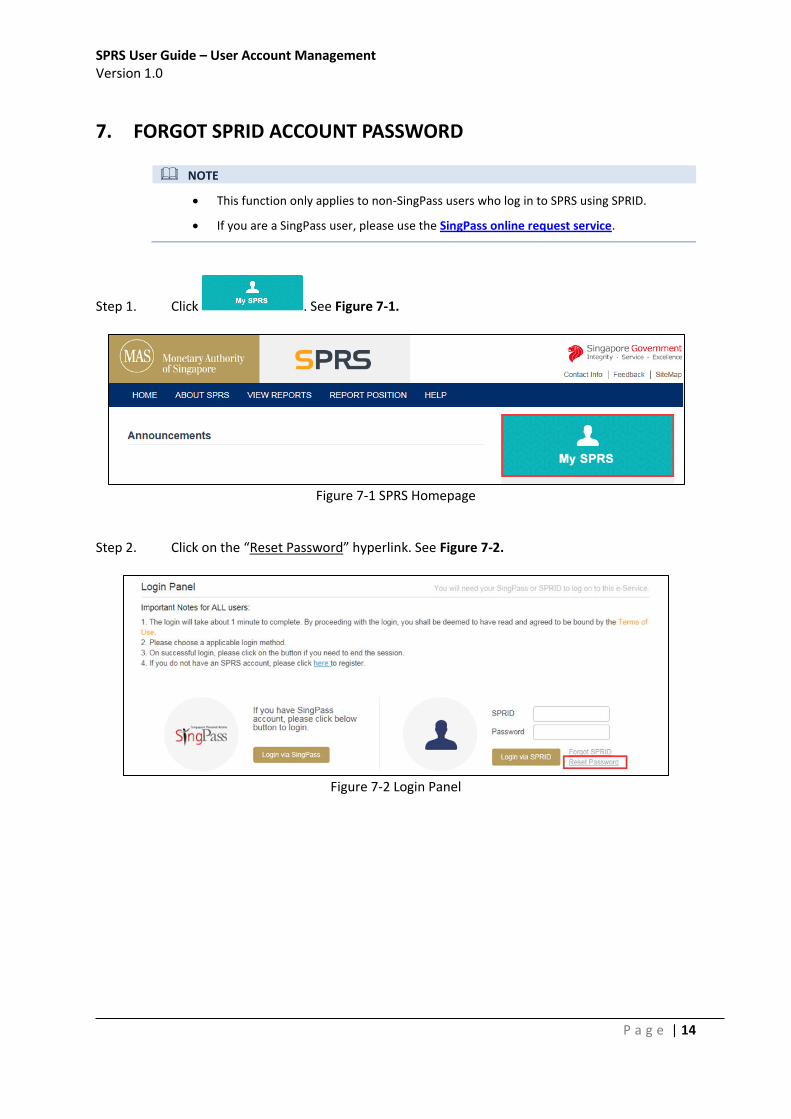
Step 1. Click . See Figure 7-1.
Figure 7-1 SPRS Homepage
Step 2. Click on the “Reset Password” hyperlink. See Figure 7-2.
Figure 7-2 Login Panel
SPRS User Guide – User Account Management Version 1.0
P a g e | 15
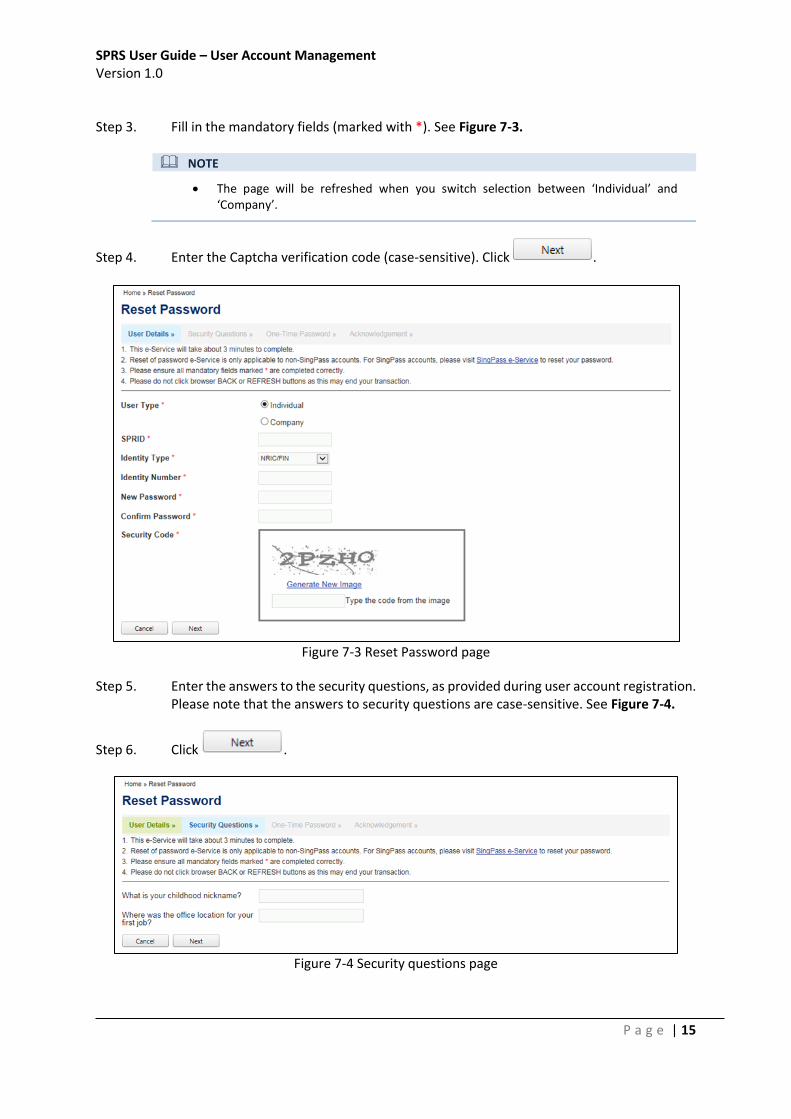
Step 3. Fill in the mandatory fields (marked with *). See Figure 7-3.
NOTE
The page will be refreshed when you switch selection between ‘Individual’ and ‘Company’.
Step 4. Enter the Captcha verification code (case-sensitive). Click .
Figure 7-3 Reset Password page
Step 5. Enter the answers to the security questions, as provided during user account registration. Please note that the answers to security questions are case-sensitive. See Figure 7-4.
Step 6. Click .
Figure 7-4 Security questions page

SPRS User Guide – User Account Management Version 1.0
P a g e | 16
Step 7. You will be redirected to an OTP authentication page. See Figure 7-5.
Step 8. Refer to Section 3 – How to use 2FA for authentication steps.
Figure 7-5 OTP Authentication page
Step 9. An acknowledgement page will be displayed after the password has been reset successfully. See Figure 7-6.
Figure 7-6 Acknowledgement page

SPRS User Guide – User Account Management Version 1.0
P a g e | 17
8. Forgot SPRID
Step 1. Click . See Figure 8-1.
Figure 8-1 SPRS Homepage
Step 2. Click on the “Forgot SPRID” hyperlink. See Figure 8-2.
Figure 8-2 Login Panel

SPRS User Guide – User Account Management Version 1.0
P a g e | 18
Step 3. Fill in the mandatory fields (marked with *). See Figure 8-3.
NOTE
The page will be refreshed when you switch selection between ‘Individual’ and ‘Company’.
Step 4. Enter the Captcha verification code (case-sensitive). Click .
Figure 8-3 Forgot SPRID page
Step 5. You will be redirected to an OTP authentication page. See Figure 8-4.
Step 6. Refer to Section 3 – How to use 2FA for authentication steps.
Figure 8-4 OTP Authentication page

SPRS User Guide – User Account Management Version 1.0
P a g e | 19
Step 7. An acknowledgement page will be displayed after the SPRID has been emailed to your registered email address successfully. See Figure 8-5.
Figure 8-5 Acknowledgement page

SPRS User Guide – User Account Management Version 1.0
P a g e | 20
9. HOW TO DEACTIVATE ACCOUNT
Step 1. Click under in main menu. See Figure 9-1.
Figure 9-1 SPRS Homepage
Step 2. You will be redirected to the 2FA login page if you have not logged in to 2FA. Refer to Section 3 – How to use 2FA for login steps.
Step 3. Enter the reason for deactivation and click . See Figure 9-2.
Figure 9-2 Deactivate Account page
Step 4. A confirmation dialog is displayed. Click to deactivate account or
to cancel request. See Figure 9-3.
Figure 9-3 Confirm Deactivation
![ExtremeWare 6.0 Quick Reference Guide - Extreme · PDF file · 2017-09-29ExtremeWare 6.0 Quick Reference Guide ... create account [admin | user] {} Creates a user account. ... console](https://cdn.vdocuments.us/doc/165x107/5aa058427f8b9a62178dfcd5/extremeware-60-quick-reference-guide-extreme-2017-09-29extremeware-60.jpg)


