
1 | P a g e Return to TOC
USA Test Prep
How-To Teacher Guide
Hoosier Academies
Last Update:
December 15, 2014

2 | P a g e Return to TOC
Table of ContentsPart I: Basic Class Management
I. Create a class
II. Add & Delete students to an Existing Class
III. Locate student login credentials and history
Part II: Assignments
I. Individual Assignments
II. Grouped Assignments
III. Shared Assignments
IV. Assignment Settings
V. Assignment Results
Part III: Benchmarks
I. What are Benchmarks?
II. Basic v. Custom Benchmark
III. Creating a Basic Benchmark
IV. Creating a Custom Benchmark
V. Assigning a Benchmark
VI. Benchmark Results
Part IV: Gradebook & Student Scores
I. Gradebook Tips
II. Grades for Grouped Assignments
III. Resetting Attempt Counter for Assignments
& Benchmarks
IV. Multiple Result Fixes
Part V: Data & Analysis
I. Locating Results
II. Individual Results
III. Individual Grid
IV. Item Analysis
V. Compare Benchmarks
VI. Remediation based on Benchmarks
VII. Correlation Scores from Basic Benchmarks
Part VI: Instructional Resources (IP)
I. Student List View
II. Class Party
III. Class Games
IV. Daily Resources
V. Printable Resources
Part VII: How-To Guides for Students (IP)
I. Finding ID Number
II. Finding Assignments
III. Joining a Class
IV. Joining a Class Party
V. Checking Progress
VI. Re-doing an Assigned Skill
VII. Extra Practice
Part VIII: End of Semester Duties
I. Export USATP Gradebook
II. Delete USATP Classes
III. Un-Assign Assignments to Students
Part IX: Troubleshooting & FAQ’s (IP)
I. USATP Help
II. Feedback & Connect Button
III. FAQ’s & Solutions

3 | P a g e Return to TOC
Part I: Basic Class Management
I. Create a Class
Once you’ve logged into your USATP account, you can create a class from your teacher homepage.
1. Navigate to Class tab at the bottom of the page.
2. Click “Create New Class”.
3. Give your course a title. *TIP: Include your name in the title.*
4. Select the type of test your class is associated with. You are able to select more than one, if needed.
5. Click continue.
6. Add students to your class by clicking search. Navigate to the correct name and click “+Add”
7. Be sure to click “Save and Manage Class”!

4 | P a g e Return to TOC
II. Add & Delete Students to a Class after Initial Class Creation
1. Navigate to classes page on main menu.
2. Locate the class you to add or delete students from and click
3. Click the button on the top right.
4. Click on tab “2. Add/Remove Students”.
a. ADD A STUDENT: Click to +Search to find student by name and then +Add
i. A window will pop up asking if you want to assign any old assignments to the new
students. Click any that apply and then continue.
b. DELETE A STUDENT: Locate the student’s name in the list on left. Click purple X.
5. Be sure to click Save and Manage Class when you’re done!
III. Locate Student Login Credentials & View Activity 1. Navigate to classes page on main menu.
2. Locate the class you want to view activity/get login in for and click
3. The class roster view offers information about each individual student. To View Login Info: Click on the student name. Info will appear in a new window.
-OR- Click the “Show Login” next to the student
-OR- Click the “Password Card” button and copy/paste into a kmail.
This screen also shows you the number of times the student has logged in and the last date they logged in.

5 | P a g e Return to TOC
Part II: Assignments
Assignments expire two months after due date! If you want assignments open for the whole semester, the due date must be within 2 months of semester end date.
I. Individual Assignments 1. Navigate to Assignments tab from teacher homepage.
2. Click “Create New Assignment”
3. To assign a 1-task assignment, such as a Do Now, Exit Ticket, Benchmark, etc., click single assignment.
4. You must assign it to a class with students in it in order to create it. You can change the class later under
assignment settings.
5. Give the assignment a name and choose the particular task you wish to assign.
6. Click continue to access the assignment settings.
7. Choose a start and end date
START DATE NOTE: Assigning a start date in the future will not display the assignment for the
student until that date.
END DATE NOTE: Assignments will still be visible to students after the end date and students
will still be able to submit them. The scores will appear in a different color in the gradebook and
will say past due on the student dashboard.
8. Select other settings. If you’re requiring a minimum score, it’s recommended that you allow unlimited
attempts.
9. Save Assignment!
II. Grouped Assignments
Group assignments are a great way to assign multiple activities for students. This feature allows you to select different
start and end dates for specific activities and order the assignments as you wish. It’s a great tool to assign weekly
assignments.
Special Notes:
You can start a group assignment and finish it later.
Assignments in a group can have different start and end dates.
Group assignments can include quizzes or tests in addition to videos.
Group assignments are a great way to assign for the entire week and keep the student dashboard as organized
as possible.

6 | P a g e Return to TOC
Steps to Create:
1. Navigate to Assignments tab from teacher homepage.
2. Click “Create New Assignment”
3. Click “Grouped Assignment”
4. Select a class. *It must be a class that has one student enrolled.*
5. Click continue.
6. Give the group assignment a name, such as
“Algebra Wk 1: Equations”.
7. Choose the test that the assignment
corresponds to.
8. Select tests to include in group assignments.
Small, medium, large, & full tests all
refer to the summative test that the
practice is based off of.
Standard Test: Randomly creates
assessment based on indicators from
a specific standard. (All multiple
choice)
Benchmark Test: An assessment that
you created under benchmark tab.
(More help in Benchmark section)
Combined Assessment: Select from a
list of standards. Assessment contains all question types, including free response.
9. Select Practice.
Select the strand you want to practice.
The key allows you to see where your class struggles the most. It is based on past benchmarks
and will continually change through the semester.
You can preview the videos, performance tasks, puzzles and games before you assign them.
Questions: Random 5-10 questions practice on that specific indicator.

7 | P a g e Return to TOC
Vocabulary: flashcard type practice of the key words. These are typically the same for every
indicator in the strand.
10. You can add more practice from additional strands with +Add More Practice.
11. Click Continue.
12. On the Settings tab, you can set different due dates for different assignments, reorder the assignments,
and other preferences.
Start Date: You can pick any date for assignments to start. Each assignment can have a different
day or “copy first row” will give all the assignments the same start date. *Students won’t see the
assignment until the start date occurs*
End Date: Date the assignment is “due.” The assignment will still be accessible to the student
past this date. It will appear in red in your gradebook if completed after the due date.
Multiple Attempts: You can select how many times you want the students to try the
assignment. Not available for videos.
Min Score Required: Set a minimum score students must achieve in order to get credit for
assignment.
SPECIAL NOTE: If using minimum score, set multiple attempts to unlimited.
Completion Order:
In Specific Order students have to complete the assignment in sequential order
as listed on the settings screen. Only one assignment is open at a time.
Student View- Specific Order

8 | P a g e Return to TOC
Any Order opens all assignments at the same time and lets the student choose which
assignments to complete first.
Student View- Any Order
Share Assignment: Click “YES” if you’d like other teachers at your school to view your
assignment and possibly assign it to their class.
III. Shared Assignments Shared assignments are a great way to share best practices with other teachers at your school and work as a
team to create and implements assignments and benchmarks. You can change the share option after you’ve
created an assignment too!
Special Note on Shared Assignments: If you are assigning a benchmark test in a shared assignment, the
benchmark test MUST be shared as well. See Share a Benchmark for steps on how to share a saved benchmark.
How to Share an Individual Shared Assignment: 1. Create a new assignment (see Individual Assignments)
2. One the settings page, select YES to share.
3. Click save assignment

9 | P a g e Return to TOC
How Share a Group Assignment:
1. Create a new group assignment (see Grouped Assignments)
2. On the settings page, select YES to share.
3. Click Save Assignment.
Sharing an Existing Assignment:
1. Locate assignment under assignment tab from home page.
2. Under options, click share.
3. Select YES to turn sharing on or NO to turn sharing off.
4. Be sure to click Save Sharing!

1 0 | P a g e Return to TOC
IV. Assignment Settings
Assignment settings is a great place to change options after you’ve created an assignment. Once one student starts
any part of the assignment the only place you can edit the assignment without losing data or having to reassign to
every student is under the settings option.
1. Navigate to Assignments tab from home page and locate the assignment you’d like to change.
2. Click Options, then Settings.
3. In the new window you can edit the name of the assignment, change the due dates, reset attempt counters
for students, assign and un-assign the assignment to students, and change the completion order.
Completion Order: See
Completion Order.
Start/End Date: Edit the
dates the assignment
starts and ends.
Students: Assign it new
students, only assign to
STI students, etc by click
the box to the right of the
student name.
Reset Attempt Counter:
Resets the assignment for
the student to take it
again. This does NOT
erase the results from the
first attempt. See Multple
Result Fixes
Remember to scroll all the way to the bottom and click SAVE Assignment!!!!

1 1 | P a g e Return to TOC
V. Assignment Results
1. Navigate to Assignments tab on home page and locate the specific assignment.
2. Click Grades. A new window will open displaying the grades and questions missed.
3. If it’s a grouped assignment there will be a + next to the title to get results for specific assignments.

1 2 | P a g e Return to TOC
4. In a group assignment, to get grades for the entire assignment, click and this will open:
5. If you want grades for a specific part of a group assignment, click and all results show, including
option to the questions that specific students missed.

1 3 | P a g e Return to TOC
Part III: Benchmarks
Like assignments, assigned benchmarks expire two months after start date. If you’d like to leave a benchmark open for longer than 8 weeks, you can change the end date
under the assignment settings.
I. What are Benchmarks?
Benchmarks are customized assessments created by teachers to gauge student progress at the test, Standard, and
Indicator level.
Creating a Benchmark is a simple process. After entering your information and selecting your testing settings,
choose whether you want randomly-generated questions or the freedom to browse all questions. You also have the
option to add interactive performance task items and free response questions. Save your benchmark once you are
happy with it, and you can either give students the unique Benchmark Code or assign it to them directly.
Wait for student results to come in and then analyze the data to identify both class and individual student strength
and weakness areas. Benchmarks are an excellent tool for diagnostic testing and remediation.
II. Basic v. Custom Benchmark
Basic Benchmarks
A basic benchmark is a test that uses the parameters of your state standardized test blueprints that USA
Test Prep used to create the program. To view these parameters:
1. Navigate to the specific test from the top navigation bar.
2. Select the test from the drop down menu.
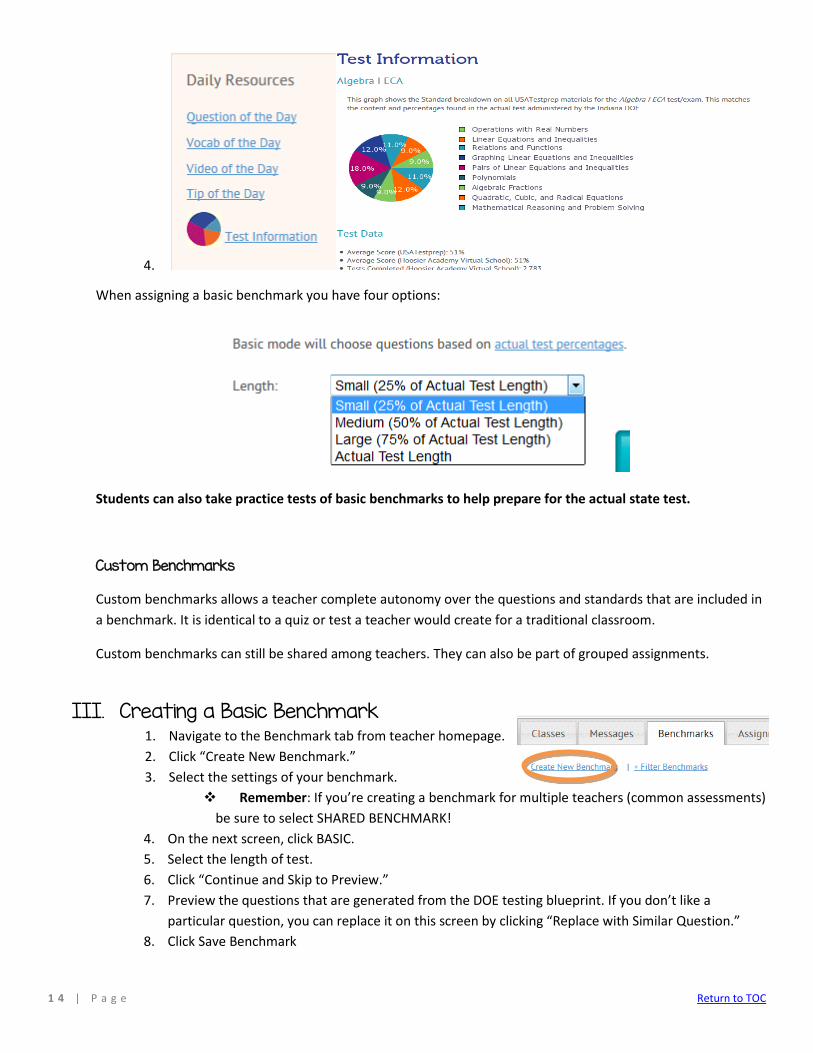
3. Under Daily Resources, click Test Information. It opens up a pie chart with the breakdowns.
1 4 | P a g e Return to TOC
4.
When assigning a basic benchmark you have four options:
Students can also take practice tests of basic benchmarks to help prepare for the actual state test.
Custom Benchmarks
Custom benchmarks allows a teacher complete autonomy over the questions and standards that are included in
a benchmark. It is identical to a quiz or test a teacher would create for a traditional classroom.
Custom benchmarks can still be shared among teachers. They can also be part of grouped assignments.
III. Creating a Basic Benchmark 1. Navigate to the Benchmark tab from teacher homepage. 2. Click “Create New Benchmark.” 3. Select the settings of your benchmark.
Remember: If you’re creating a benchmark for multiple teachers (common assessments)
be sure to select SHARED BENCHMARK! 4. On the next screen, click BASIC.
5. Select the length of test.
6. Click “Continue and Skip to Preview.”
7. Preview the questions that are generated from the DOE testing blueprint. If you don’t like a
particular question, you can replace it on this screen by clicking “Replace with Similar Question.”
8. Click Save Benchmark

1 5 | P a g e Return to TOC
IV. Creating a Custom Benchmark 1. Navigate to the Benchmark tab from teacher homepage.
2. Click “Create New Benchmark.”
3. Select the settings of your benchmark.
Remember: If you’re creating a benchmark for multiple teachers (common assessments)
be sure to select SHARED BENCHMARK!
4. On the next screen, click CUSTOM.
5. Choose Standard, then Indicator to preview questions
Features on Question Selection Page:
SORT: Filter questions using options in drop down menu.
STATS: Hover over graph icon to get question stats since as DOK, times students
have answered the question (national data), % correct
FEEDBACK: Provide INSTANT feedback to USATP about a question
6. Continue to add questions from different standard strands by clicking at the bottom of the page.
TIP: If you see a question you like, but not sure if it meshes with other questions already
selected, SELECT IT!! You can easily remove it on the preview screen.
7. Click continue.
8. Favorites- Questions you’ve starred or content you’ve added yourself.
9. Performance Tasks- Tasks that are technology enhanced items.
IMPORTANT NOTE: Benchmarks that contain performance tasks CAN NOT be compared
with other benchmarks using the Compare feature.
10. Preview: Shows the student view for all questions as multiple choice or short answer.
Replace with Similar Question: USATP generates 5 alternate options that address the same
standards
Remove Question
Bonus Question: USATP will automatically calculated percentages!
11. Click SAVE!!
V. Sharing a Benchmark Sharing a benchmark is much like sharing an assignment. You can create a shared benchmark when you first
create it and you can also change the share settings after you’ve saved it.
Share While Creating 1. Navigate to the Benchmark tab from teacher homepage.
2. Click “Create New Benchmark”
3. On the first screen select shared benchmark.

1 6 | P a g e Return to TOC
Share After Saving
1. Navigate to Benchmark tab from teacher homepage. 2. Locate Benchmark you’d like to share. 3. Click Options menu and select Settings.
4. Select Yes or No for Sharing feature.
5. Click Save Benchmark!

1 7 | P a g e Return to TOC
VI. Assigning a Benchmark You can assign benchmarks right after you create them or from the benchmark tab. All shared benchmarks
can also be assigned from the benchmark tab.
Assign as You Create Once you save the benchmark, on the confirmation screen click “Assign This Benchmark” and it will auto
generate the assignment for you.
Assign Later or Benchmark Created by another Teacher
1. Navigate to Benchmark tab on teacher homepage.
2. Locate the desired benchmark to assign.
3. From the options menu select assign.
4. Select the settings for your class and press SAVE!
Important Note: The primary teacher needs to assign the benchmark to their classes to ensure data is
reported correctly and scores appear in the correct gradebook.
1 8 | P a g e Return to TOC
VII. Benchmark Results
Once students have taken benchmarks, USATP has mountains of data you can use to provide remediation and
drive instruction. Benchmark results offer a wealth of information.
Where to Find Results
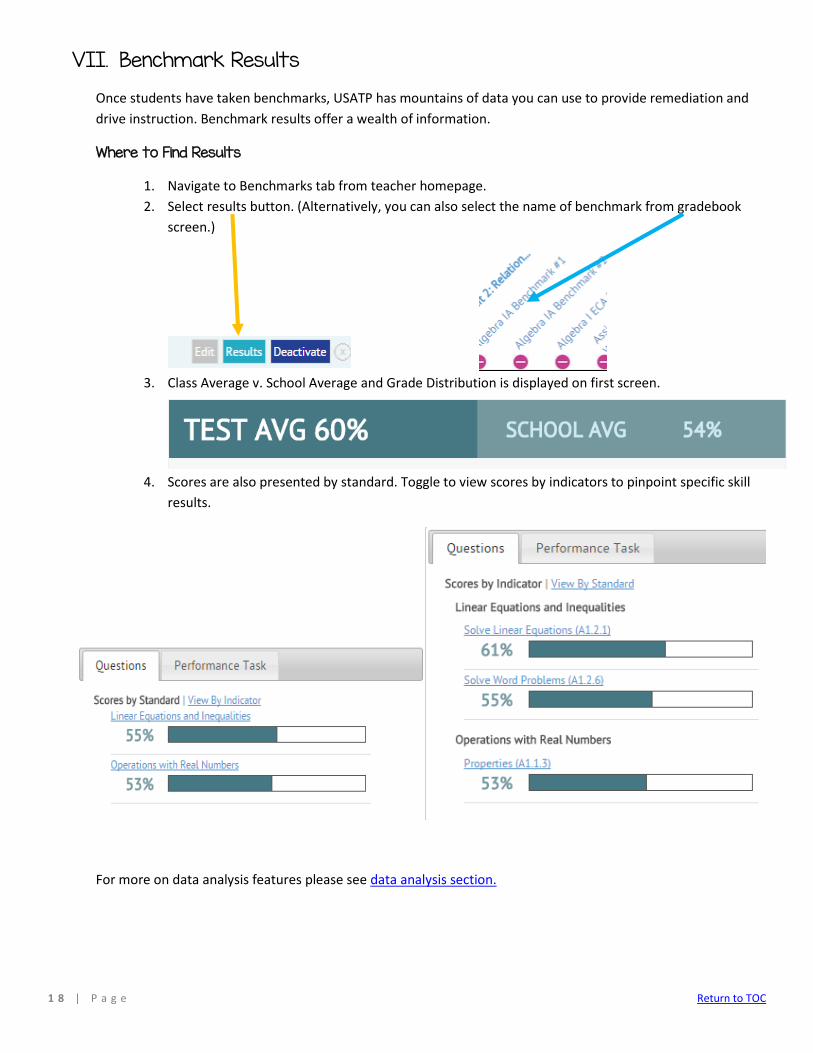
1. Navigate to Benchmarks tab from teacher homepage.
2. Select results button. (Alternatively, you can also select the name of benchmark from gradebook
screen.)
3. Class Average v. School Average and Grade Distribution is displayed on first screen.
4. Scores are also presented by standard. Toggle to view scores by indicators to pinpoint specific skill
results.
For more on data analysis features please see data analysis section.

1 9 | P a g e Return to TOC
Part IV: Gradebook & Student Scores
I. Gradebook Tips II. Grades for Grouped Assignments III. Resetting Attempt Counter for Assignments & Benchmarks
Once you have deleted the score for the benchmark under benchmark results, you need to un-assign
and re-assign the benchmark so the program refreshes the assignment. Failure to do this still will result
in the student seeing a 0% on the assignment and not being able to retake the test.
1. Navigate to Assignments tab.
2. Locate the assignment. Click the to the right of the assignment and select Settings.
3. Edit Assignment Settings will appear. Scroll down to the specific student and check “Reset Attempt
Counter.”

2 0 | P a g e Return to TOC
4. Scroll all the way to the bottom of “Edit Assignment Settings” window and click “Save Assignment.
Not doing this will not save your settings!
5. It is recommended to log in as the student to verify that the assignment does reappear for them to
retake it again.
IV. Multiple Result Fixes

2 1 | P a g e Return to TOC
Part V: Data & Analysis
I. Locating Results
A. Individual Results 1. From the Benchmark Results screen, click the individual Students tab to view student results
and submission data for each student.
You can do a great many things from this screen!
Export Data: Export all scores or specific students to an Excel spreadsheet. Click export
at top of list
View Full Results: Each students specific answer responses are visible by clicking the
link. *Great for 1:1 sessions!*
Teacher/Class: You can edit the teacher/class assignment from this page if an
association error occurs or if the student switches classes. Be sure to scroll back up to
save changes!
Submission Data: Provides data the test was taken and how long the student spent in
the test.
Multiple Attempt Counter: Multiple attempts are recorded individually. If a student
attempts a benchmark more than once it will be recorded as Sample, Student (1) to help
the teacher see how the score changed with subsequent attempts.
TIP: Use the CTRL F function to search for (1) when trying to eliminate multiple
scores.
Delete Selected Results: VERY useful when students use the benchmark code more than
once or if a student accidently hits submit instead of save. Select the box next to
individual results and then scroll back up to delete selected results.

2 2 | P a g e Return to TOC
B. Student Grid
The student grid provides a one glance look at how students performed on each standard. The
colored circles provide how close the student is to mastering the standard. To view the breakdowns
for the colors click Instructions in the top right to view
C. Item Analysis
D. Compare Feature
II. Individual Results
III. Individual Grid
IV. Item Analysis
V. Compare Benchmarks
Compare benchmarks feature is a great way to see student growth and class growth between benchmark
assessments.
1. Navigate to the Benchmark tab from teacher homepage.
2. Find the OLDEST test you want to compare.
3. Click settings.
4. Click compare.
5. Select the NEWER benchmark from the list provided. Then click compare at the bottom of the screen.
6. Results open in new window. Whole class comparison is default setting. Individual growth available under
individual scores tab.
Important Notes about Comparing Benchmarks

2 3 | P a g e Return to TOC
In order to see growth, you must start with the older benchmark first. For example, if you want to see growth
during the first quarter of school, you would select the compare option from the settings of the initial diagnostic
test.
You can compare any benchmarks that have at least two standards in common.
Administrators can do this for the whole school under the Benchmark tab under their Admin privileges.
Benchmarks with Performance Tasks can NOT be compared.
VI. Remediation based on Benchmarks
VIII. Correlation Scores Based on Basic Benchmarks
One great advantage of using the basic benchmarks USA Test Prep creates is that they produce a correlation score to
the state ECA test. You will need to provide this information to USA Test Prep, but it’s a great way to put a realistic
spin on a student’s score (and it gives great predictive pass rate data). Instructions on how to assign a basic
benchmark in the Benchmark section of this document.
Steps to Locating a Student’s Correlation Score:
1. Navigate to Benchmark tab on teacher homepage.
2. Click the tab for the benchmark that you’d like the correlation score for. 3. Results will open in new window. Scroll half way down and select Individual Results. 4. Navigate to the student you’d like a correlation score for. Click View Full Results.
5. Correlation score is listed under raw percentage.
Important Notes about Correlation Scores
While USATP does provide correlation scores for every benchmark assigned in the program, the correlation
score is calibrated on the basic full test benchmark. Correlation scores from other benchmarks may not be
accurate.
As of November 2014, there is not a report or class view feature for correlation scores. You’ll need to click each
student to view their correlation scores.

2 4 | P a g e Return to TOC
Part VI: Instructional Resources
I. Student List View
Student List View is a great way for students, learning coaches, and teachers to see a student’s progress on
standards and to retry certain skills.
II. Class Party
III. Class Games
IV. Daily Resources
VI. Printable Resources VII. Student Progress Reports

2 5 | P a g e Return to TOC
Part VII: How-To Guides for Students
I. Finding ID Number
You can find your Student ID in My Info under the student's School tab. (Must use the Learning Coach Logon to access myinfo.k12.com)
1. Login to myinfo.k12.com using your LC username and password or select the My Info Quick Link from your Online School Home Page
2. Select your student's name 3. Go to the School tab
II. Finding Assignments
Once you’re logged into your account, all your assignments will be displayed on the right. Click the blue BEGIN or
CONTINUE button to start the assignments.
If you’re enrolled in multiple USA Test Prep classes, you can filter your view so you only see certain classes or
activities.

2 6 | P a g e Return to TOC
III. Joining a Class
IV. Joining a Class Party
V. Checking Progress
VI. Re-doing an Assigned Skill
VIII. Extra Practice

2 7 | P a g e Return to TOC
Part VIII: End of Semester Duties
I. Export Gradebook for All Classes
1. From the teacher home page, click gradebook next to the class name.
2. Ensure you’re displaying all grades. Click “Filter Grades”
3. Select “Show All Dates.”
4. Then click “GO”
5. Once gradebook updates, click export.
6. Save Excel file using the naming conventions
Coursename_SectionNumber_Term_USATP_TeacherFirstInitialTeacherLastName
7. Upload your USATP gradebook to Engyte as you do your final course gradebook.
II, Delete USATP Classes
1. Click the red X to the right of the course.

2 8 | P a g e Return to TOC
III. Remove Assignments from Student Accounts
**DO NOT COMPLETE THIS PROCESS FOR DIAGNOSTICS, BENCHMARKS, OR POST-ASSESSMENTS.**
1. Select Assignments tab.
2. Click Filter Assignments.
3. Click All Dates from drop down menu.
4. Select Go.
5. Select Options menu for the assignment and select Settings.
6. Select Uncheck All for all classes and cohorts.

2 9 | P a g e Return to TOC
7. Scroll to the bottom of settings window and select Save Group.
8. Repeat this process for EVERY assignment in USATP.
**DO NOT COMPLETE THIS PROCESS FOR DIAGNOSTICS, BENCHMARKS, OR POST-ASSESSMENTS.**


