Timing Chain, Camshaft, Replace (Z 22 SE)
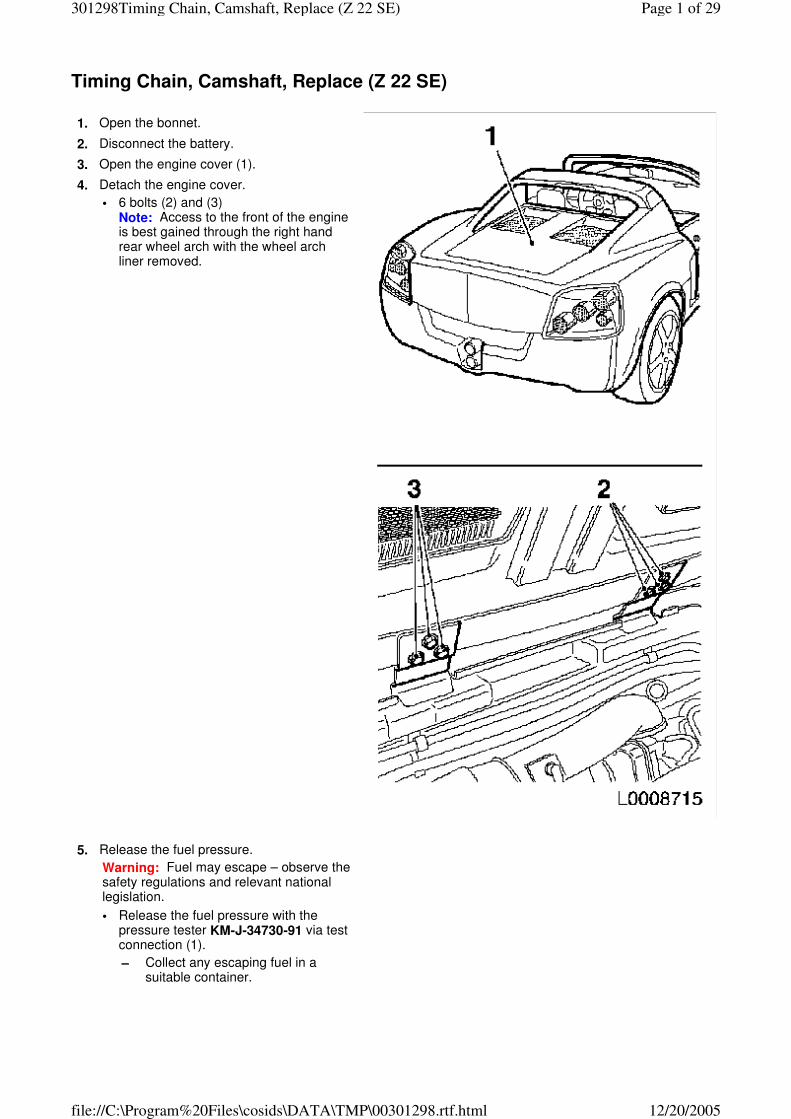
1. Open the bonnet.
2. Disconnect the battery.
3. Open the engine cover (1).
4. Detach the engine cover.
• 6 bolts (2) and (3) Note: Access to the front of the engine is best gained through the right hand rear wheel arch with the wheel arch liner removed.
5. Release the fuel pressure.
Warning: Fuel may escape – observe the safety regulations and relevant national legislation.
• Release the fuel pressure with the pressure tester KM-J-34730-91 via test connection (1).
– Collect any escaping fuel in a suitable container.
Page 1 of 29301298Timing Chain, Camshaft, Replace (Z 22 SE)
12/20/2005file://C:\Program%20Files\cosids\DATA\TMP\00301298.rtf.html
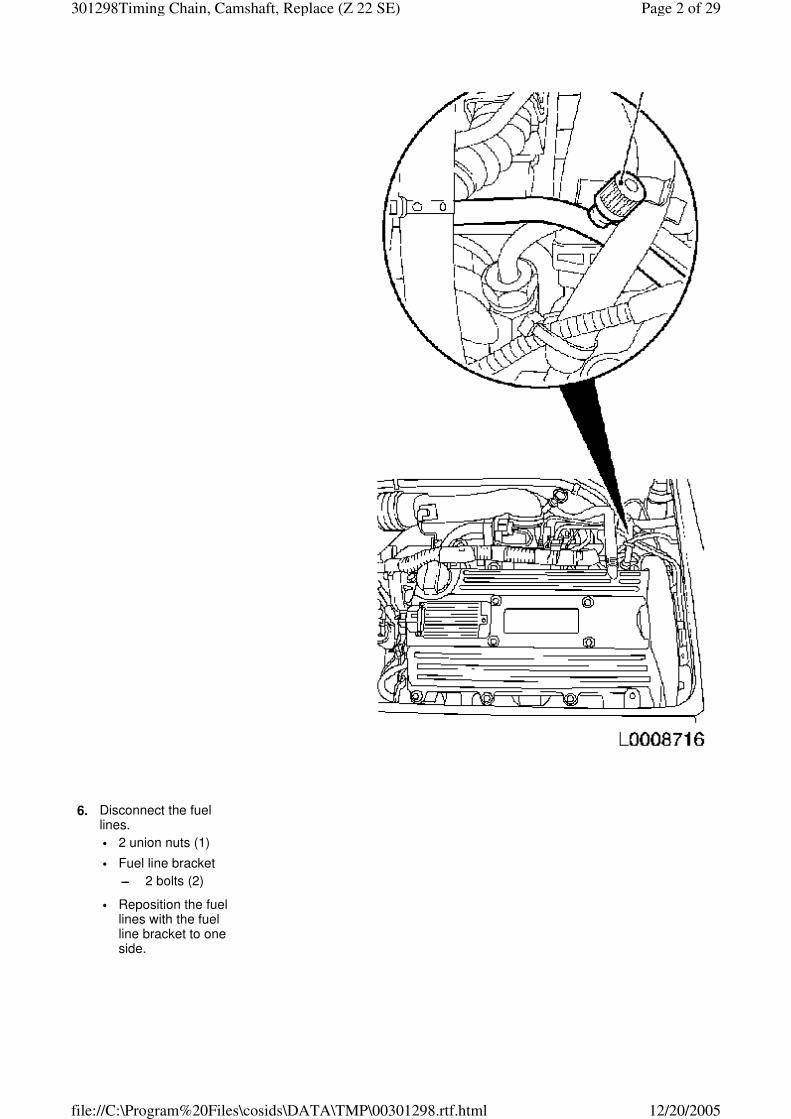
6. Disconnect the fuel lines.
• 2 union nuts (1)
• Fuel line bracket
– 2 bolts (2)
• Reposition the fuel lines with the fuel line bracket to one side.
Page 2 of 29301298Timing Chain, Camshaft, Replace (Z 22 SE)
12/20/2005file://C:\Program%20Files\cosids\DATA\TMP\00301298.rtf.html

7. Detach the ignition module (1).
• Release and detach the wiring harness connector.
• 4 bolts (2)
Page 3 of 29301298Timing Chain, Camshaft, Replace (Z 22 SE)
12/20/2005file://C:\Program%20Files\cosids\DATA\TMP\00301298.rtf.html
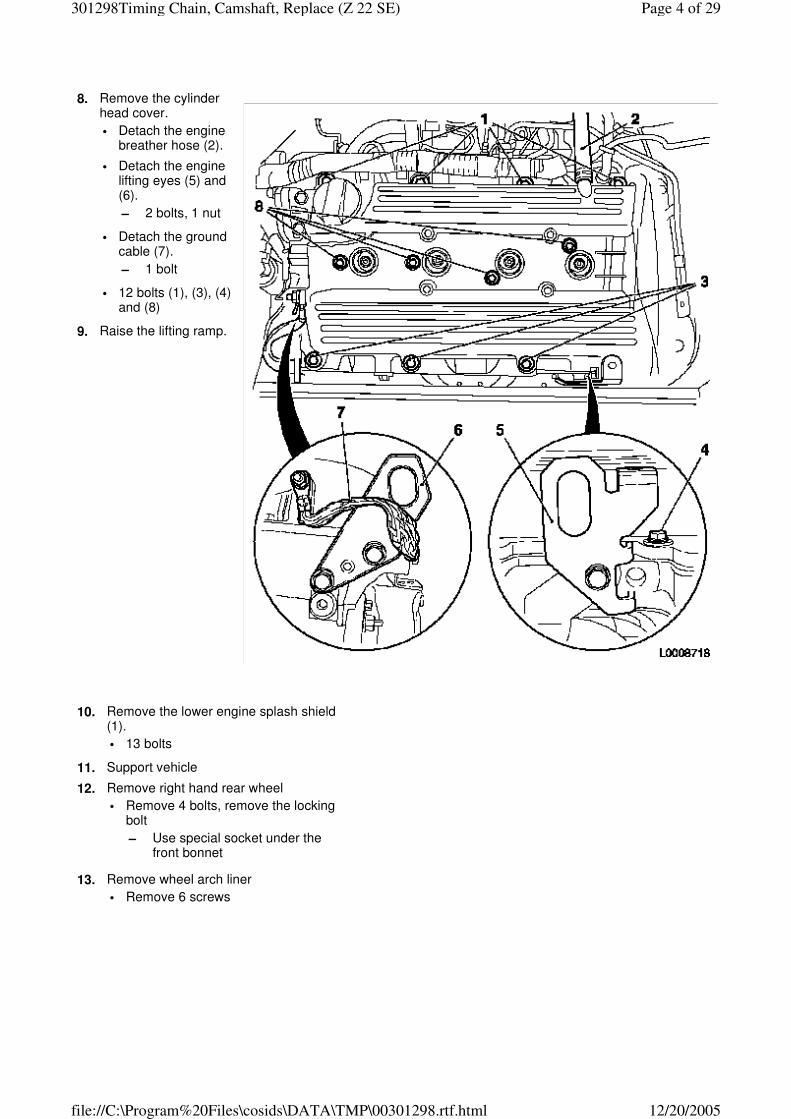
8. Remove the cylinder head cover.
• Detach the engine breather hose (2).
• Detach the engine lifting eyes (5) and (6).
– 2 bolts, 1 nut
• Detach the ground cable (7).
– 1 bolt
• 12 bolts (1), (3), (4) and (8)
9. Raise the lifting ramp.
10. Remove the lower engine splash shield (1).
• 13 bolts
11. Support vehicle
12. Remove right hand rear wheel
• Remove 4 bolts, remove the locking bolt
– Use special socket under the front bonnet
13. Remove wheel arch liner
• Remove 6 screws
Page 4 of 29301298Timing Chain, Camshaft, Replace (Z 22 SE)
12/20/2005file://C:\Program%20Files\cosids\DATA\TMP\00301298.rtf.html
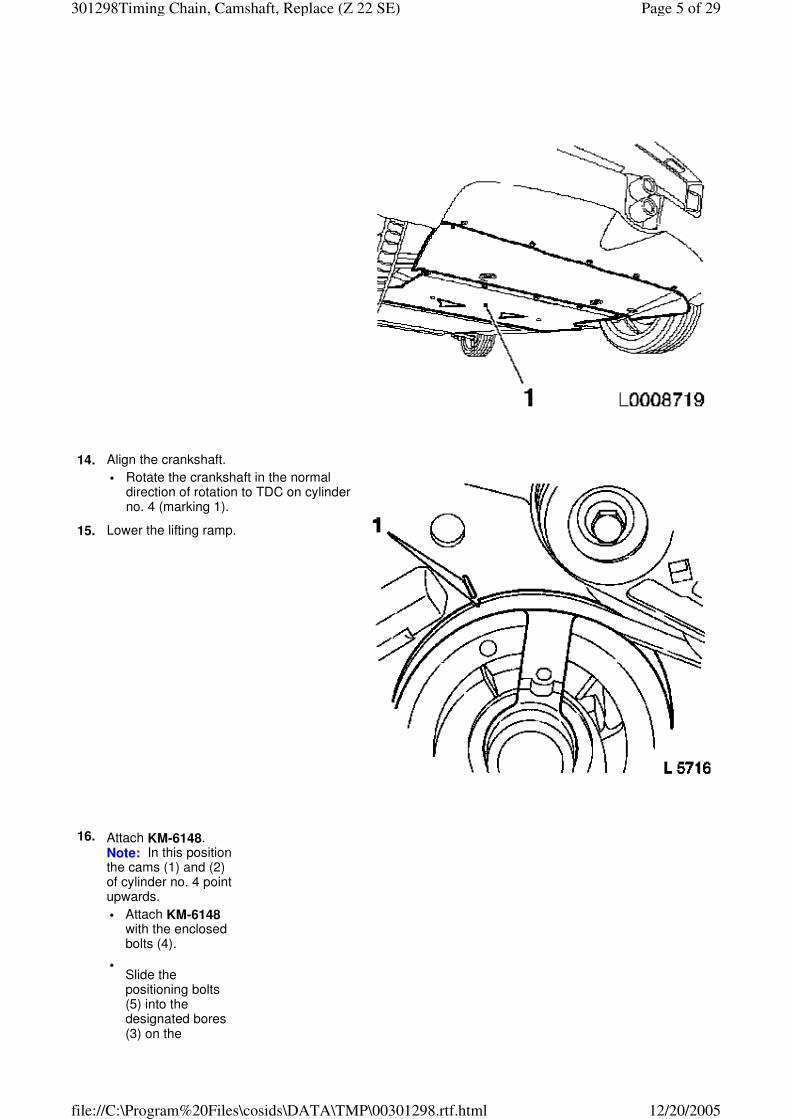
14. Align the crankshaft.
• Rotate the crankshaft in the normal direction of rotation to TDC on cylinder no. 4 (marking 1).
15. Lower the lifting ramp.
16. Attach KM-6148. Note: In this position the cams (1) and (2) of cylinder no. 4 point upwards.
• Attach KM-6148 with the enclosed bolts (4).
• Slide the positioning bolts (5) into the designated bores (3) on the
Page 5 of 29301298Timing Chain, Camshaft, Replace (Z 22 SE)
12/20/2005file://C:\Program%20Files\cosids\DATA\TMP\00301298.rtf.html
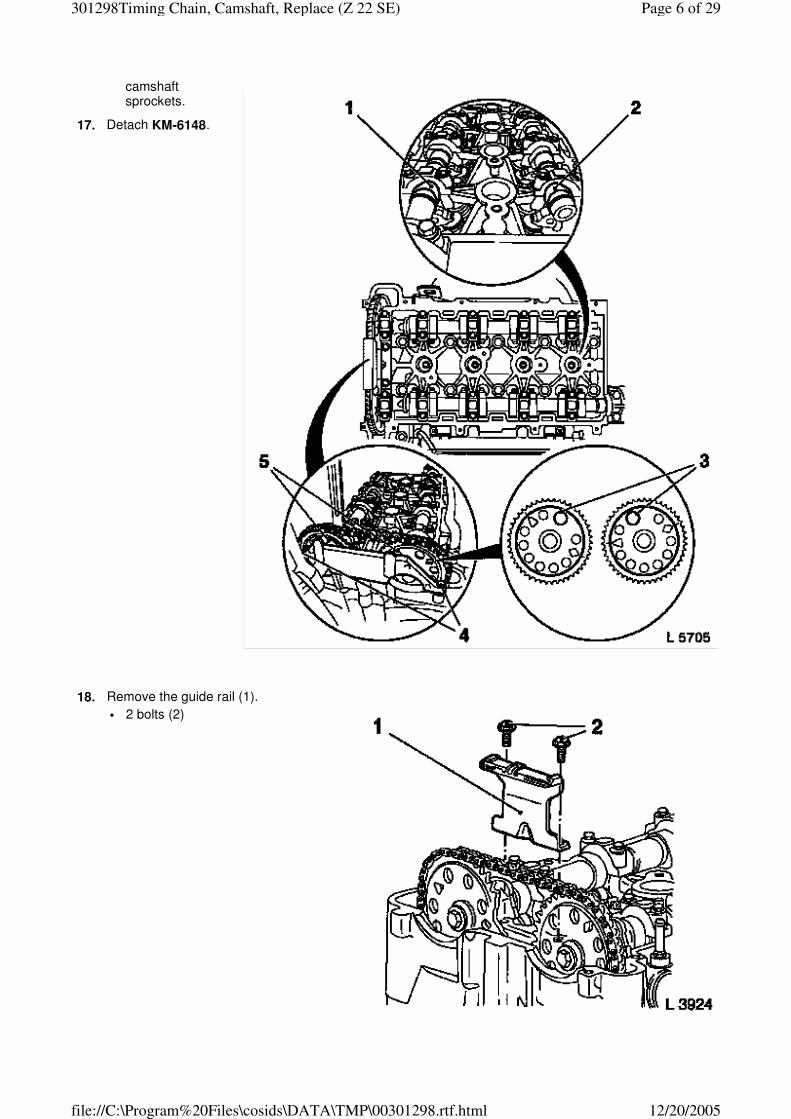
camshaft sprockets.
17. Detach KM-6148.
18. Remove the guide rail (1).
• 2 bolts (2)
Page 6 of 29301298Timing Chain, Camshaft, Replace (Z 22 SE)
12/20/2005file://C:\Program%20Files\cosids\DATA\TMP\00301298.rtf.html
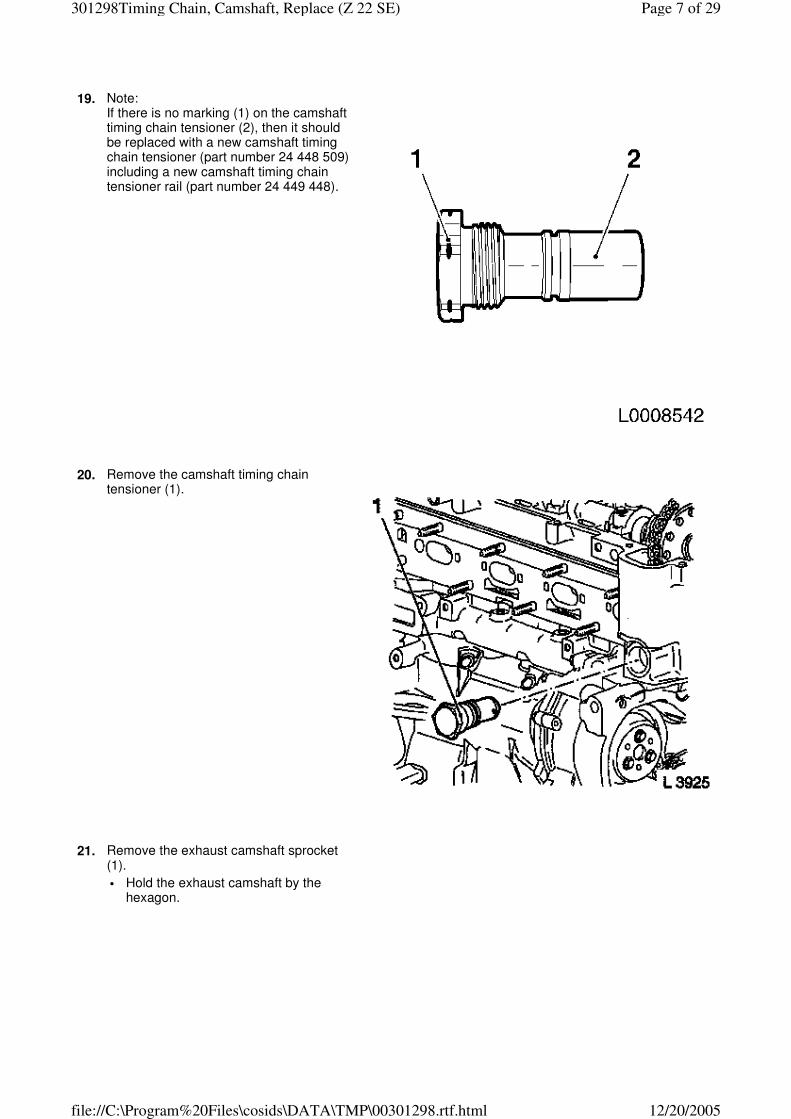
19. Note: If there is no marking (1) on the camshaft timing chain tensioner (2), then it should be replaced with a new camshaft timing chain tensioner (part number 24 448 509) including a new camshaft timing chain tensioner rail (part number 24 449 448).
20. Remove the camshaft timing chain tensioner (1).
21. Remove the exhaust camshaft sprocket (1).
• Hold the exhaust camshaft by the hexagon.
Page 7 of 29301298Timing Chain, Camshaft, Replace (Z 22 SE)
12/20/2005file://C:\Program%20Files\cosids\DATA\TMP\00301298.rtf.html
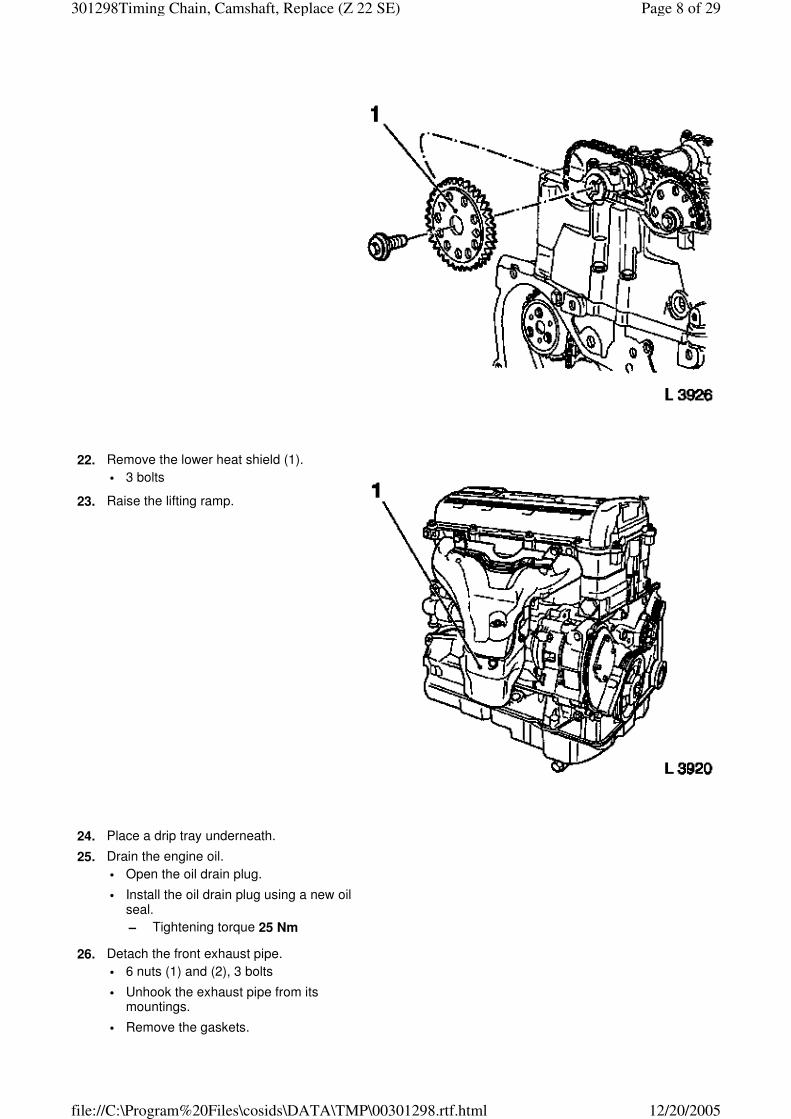
22. Remove the lower heat shield (1).
• 3 bolts
23. Raise the lifting ramp.
24. Place a drip tray underneath.
25. Drain the engine oil.
• Open the oil drain plug.
• Install the oil drain plug using a new oil seal.
– Tightening torque 25 Nm
26. Detach the front exhaust pipe.
• 6 nuts (1) and (2), 3 bolts
• Unhook the exhaust pipe from its mountings.
• Remove the gaskets.
Page 8 of 29301298Timing Chain, Camshaft, Replace (Z 22 SE)
12/20/2005file://C:\Program%20Files\cosids\DATA\TMP\00301298.rtf.html

27. Remove the ribbed V–belt.
• Mark the running direction of the ribbed V–belt.
• Tension the ribbed V–belt tensioner in the direction of the arrow with KM-6151.
– Take out the ribbed V–belt.
Page 9 of 29301298Timing Chain, Camshaft, Replace (Z 22 SE)
12/20/2005file://C:\Program%20Files\cosids\DATA\TMP\00301298.rtf.html
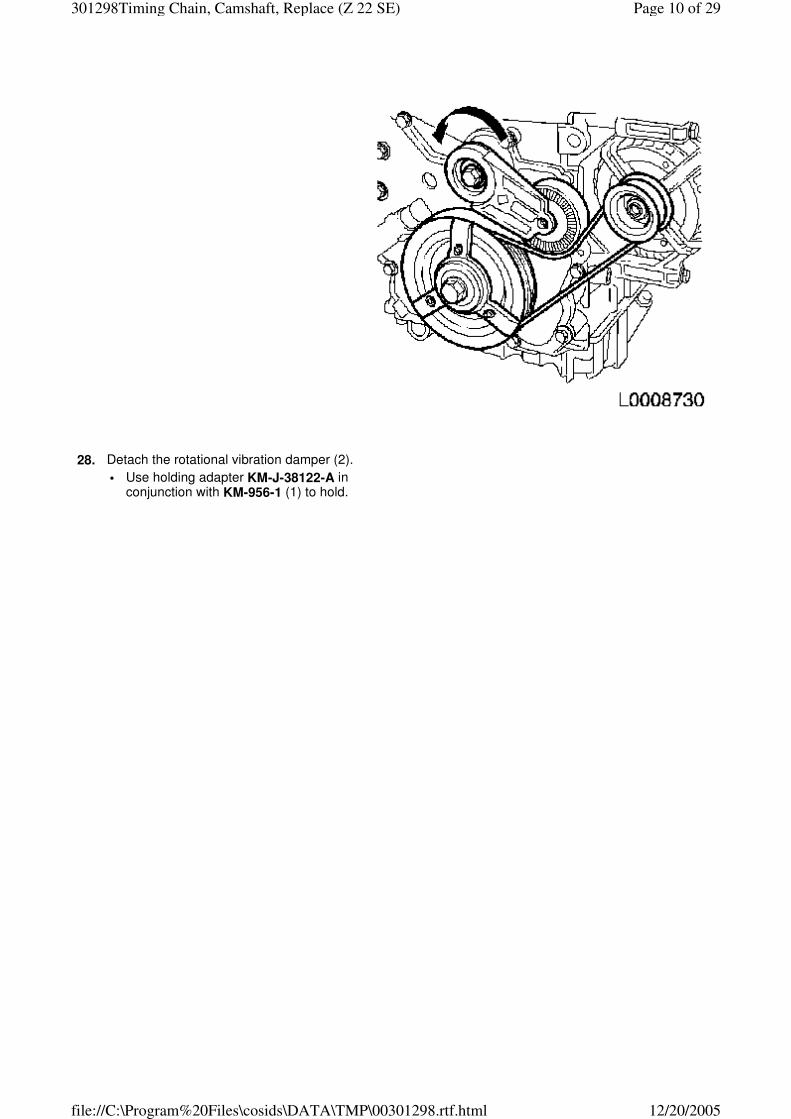
28. Detach the rotational vibration damper (2).
• Use holding adapter KM-J-38122-A in conjunction with KM-956-1 (1) to hold.
Page 10 of 29301298Timing Chain, Camshaft, Replace (Z 22 SE)
12/20/2005file://C:\Program%20Files\cosids\DATA\TMP\00301298.rtf.html
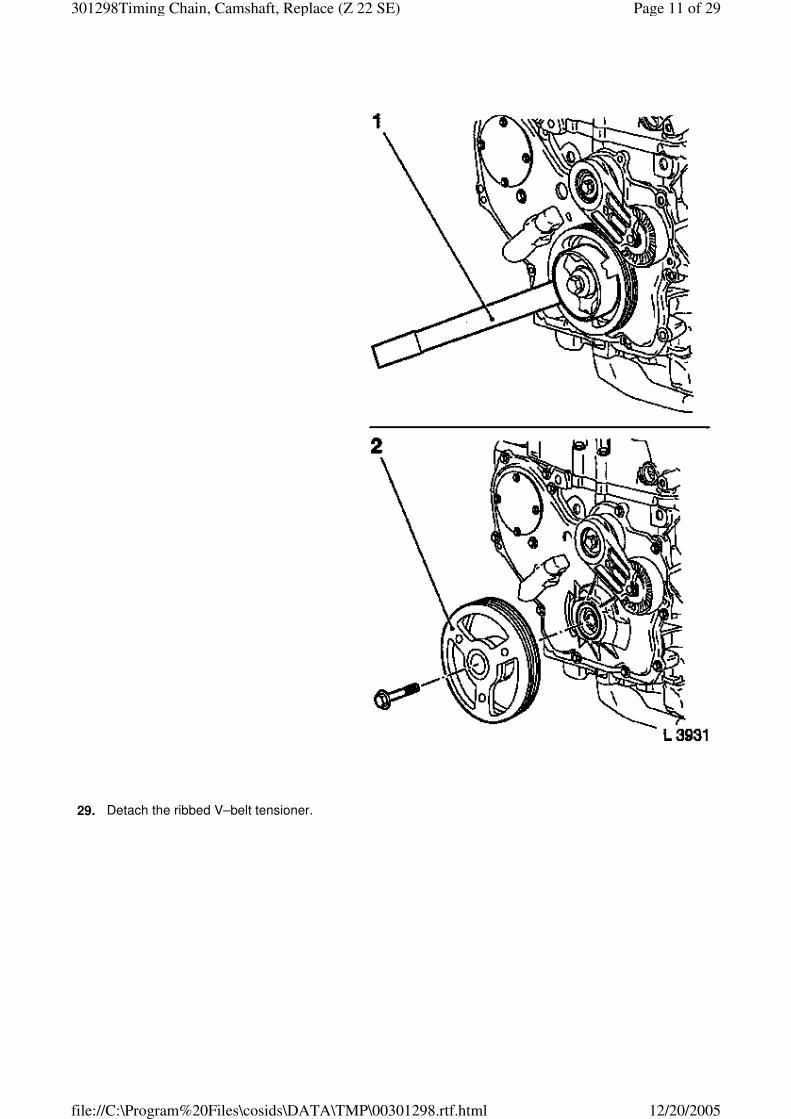
29. Detach the ribbed V–belt tensioner.
Page 11 of 29301298Timing Chain, Camshaft, Replace (Z 22 SE)
12/20/2005file://C:\Program%20Files\cosids\DATA\TMP\00301298.rtf.html
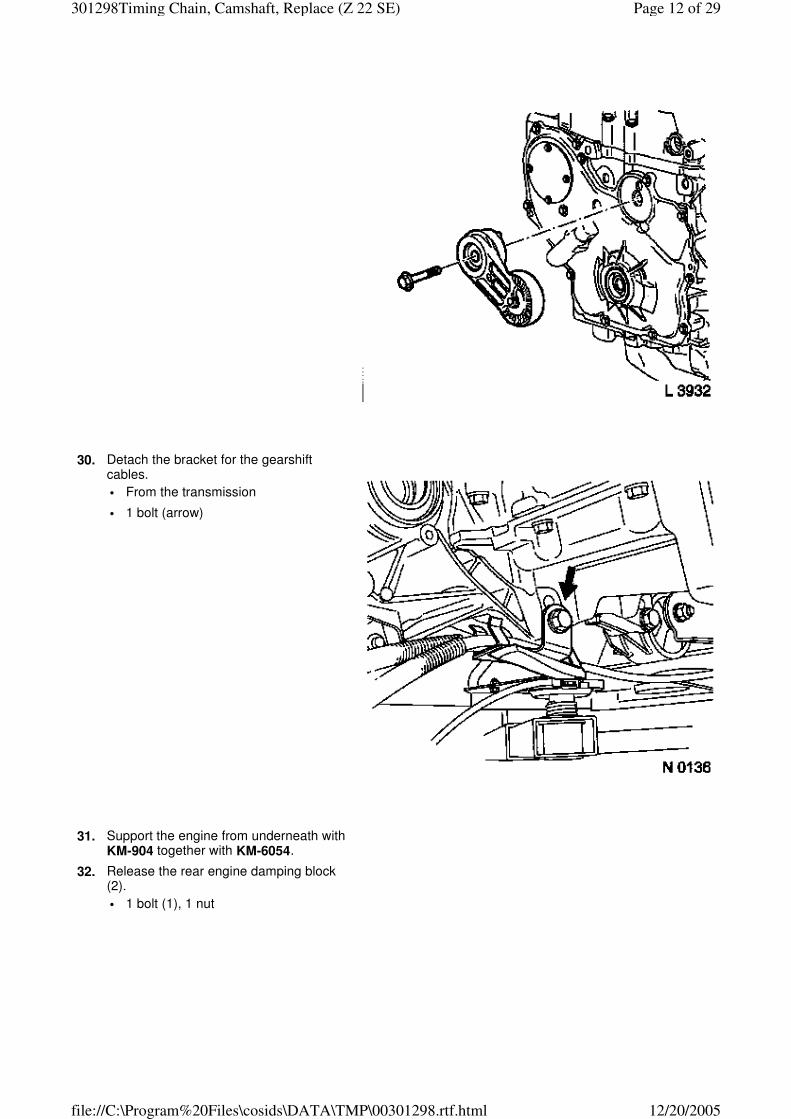
30. Detach the bracket for the gearshift cables.
• From the transmission
• 1 bolt (arrow)
31. Support the engine from underneath with KM-904 together with KM-6054.
32. Release the rear engine damping block (2).
• 1 bolt (1), 1 nut
Page 12 of 29301298Timing Chain, Camshaft, Replace (Z 22 SE)
12/20/2005file://C:\Program%20Files\cosids\DATA\TMP\00301298.rtf.html

33. Undo the bolts on the right–hand engine damping block bracket.
• 3 bolts (1)
34. Undo the bolts on the right–hand engine damping block.
• 1 nut (arrow)
35. Take out the engine damping block bracket together with the right–hand engine damping block.
Page 13 of 29301298Timing Chain, Camshaft, Replace (Z 22 SE)
12/20/2005file://C:\Program%20Files\cosids\DATA\TMP\00301298.rtf.html
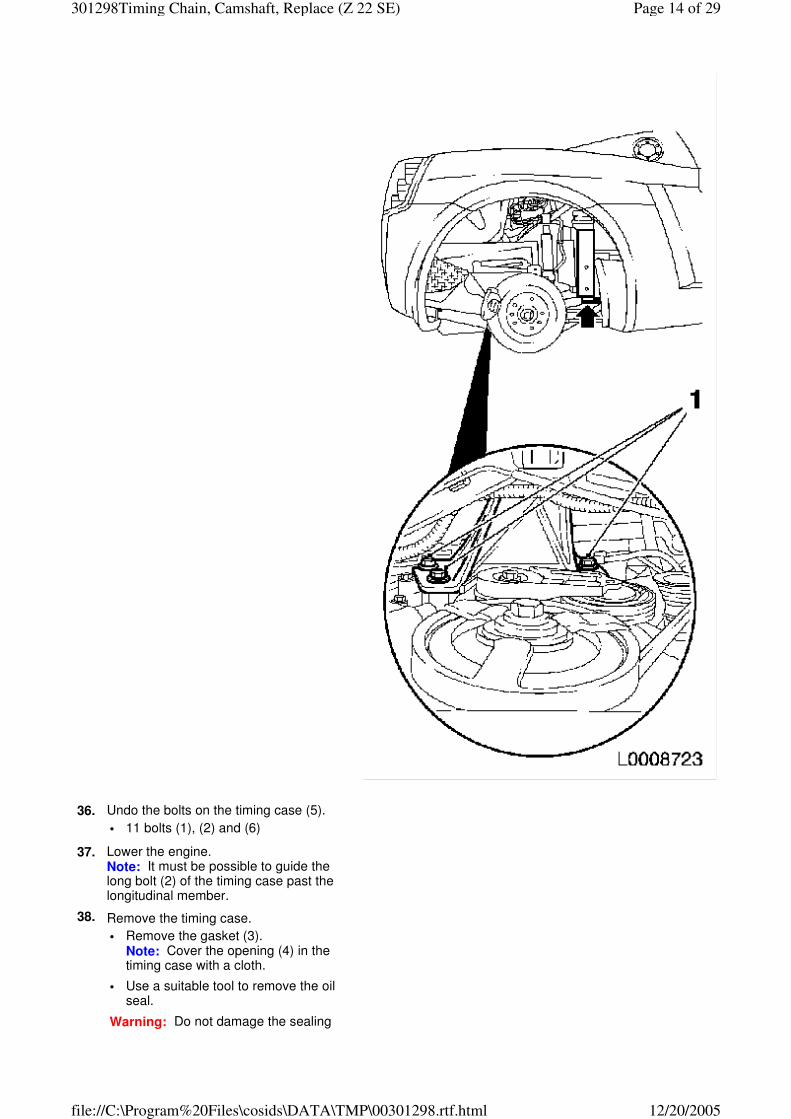
36. Undo the bolts on the timing case (5).
• 11 bolts (1), (2) and (6)
37. Lower the engine. Note: It must be possible to guide the long bolt (2) of the timing case past the longitudinal member.
38. Remove the timing case.
• Remove the gasket (3). Note: Cover the opening (4) in the timing case with a cloth.
• Use a suitable tool to remove the oil seal.
Warning: Do not damage the sealing
Page 14 of 29301298Timing Chain, Camshaft, Replace (Z 22 SE)
12/20/2005file://C:\Program%20Files\cosids\DATA\TMP\00301298.rtf.html

surfaces.
• Clean the sealing surfaces.
39. Remove the camshaft timing chain guide rail (1).
• Remove the screw plug (1).
• 1 bolt (2)
40. Remove the camshaft timing chain guide rail (1).
• 1 bolt (2)
Page 15 of 29301298Timing Chain, Camshaft, Replace (Z 22 SE)
12/20/2005file://C:\Program%20Files\cosids\DATA\TMP\00301298.rtf.html
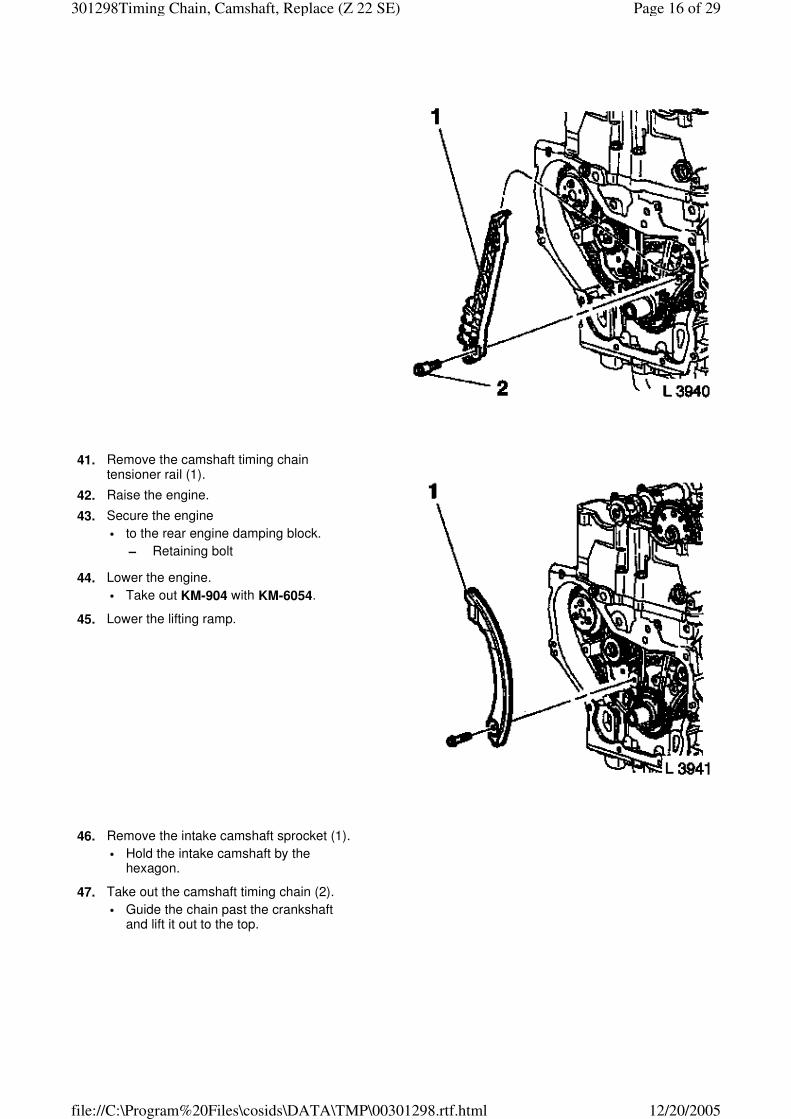
41. Remove the camshaft timing chain tensioner rail (1).
42. Raise the engine.
43. Secure the engine
• to the rear engine damping block.
– Retaining bolt
44. Lower the engine.
• Take out KM-904 with KM-6054.
45. Lower the lifting ramp.
46. Remove the intake camshaft sprocket (1).
• Hold the intake camshaft by the hexagon.
47. Take out the camshaft timing chain (2).
• Guide the chain past the crankshaft and lift it out to the top.
Page 16 of 29301298Timing Chain, Camshaft, Replace (Z 22 SE)
12/20/2005file://C:\Program%20Files\cosids\DATA\TMP\00301298.rtf.html
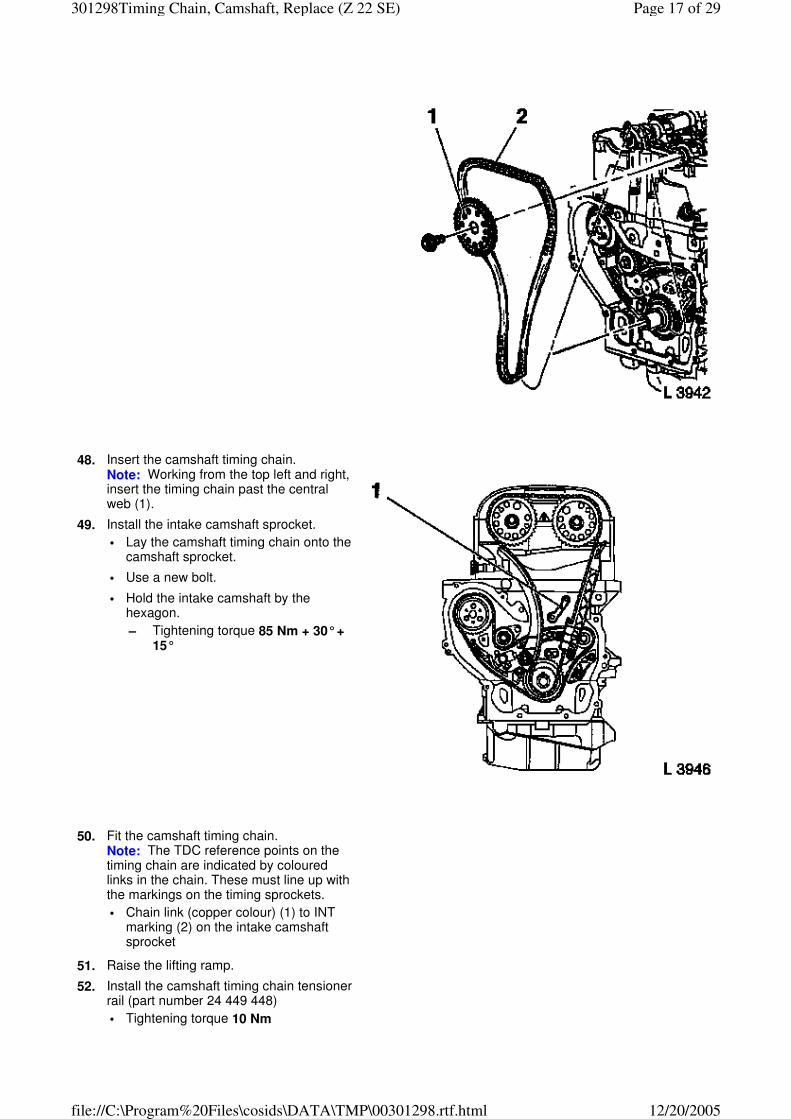
48. Insert the camshaft timing chain. Note: Working from the top left and right, insert the timing chain past the central web (1).
49. Install the intake camshaft sprocket.
• Lay the camshaft timing chain onto the camshaft sprocket.
• Use a new bolt.
• Hold the intake camshaft by the hexagon.
– Tightening torque 85 Nm + 30° + 15°
50. Fit the camshaft timing chain. Note: The TDC reference points on the timing chain are indicated by coloured links in the chain. These must line up with the markings on the timing sprockets.
• Chain link (copper colour) (1) to INT marking (2) on the intake camshaft sprocket
51. Raise the lifting ramp.
52. Install the camshaft timing chain tensioner rail (part number 24 449 448)
• Tightening torque 10 Nm
Page 17 of 29301298Timing Chain, Camshaft, Replace (Z 22 SE)
12/20/2005file://C:\Program%20Files\cosids\DATA\TMP\00301298.rtf.html
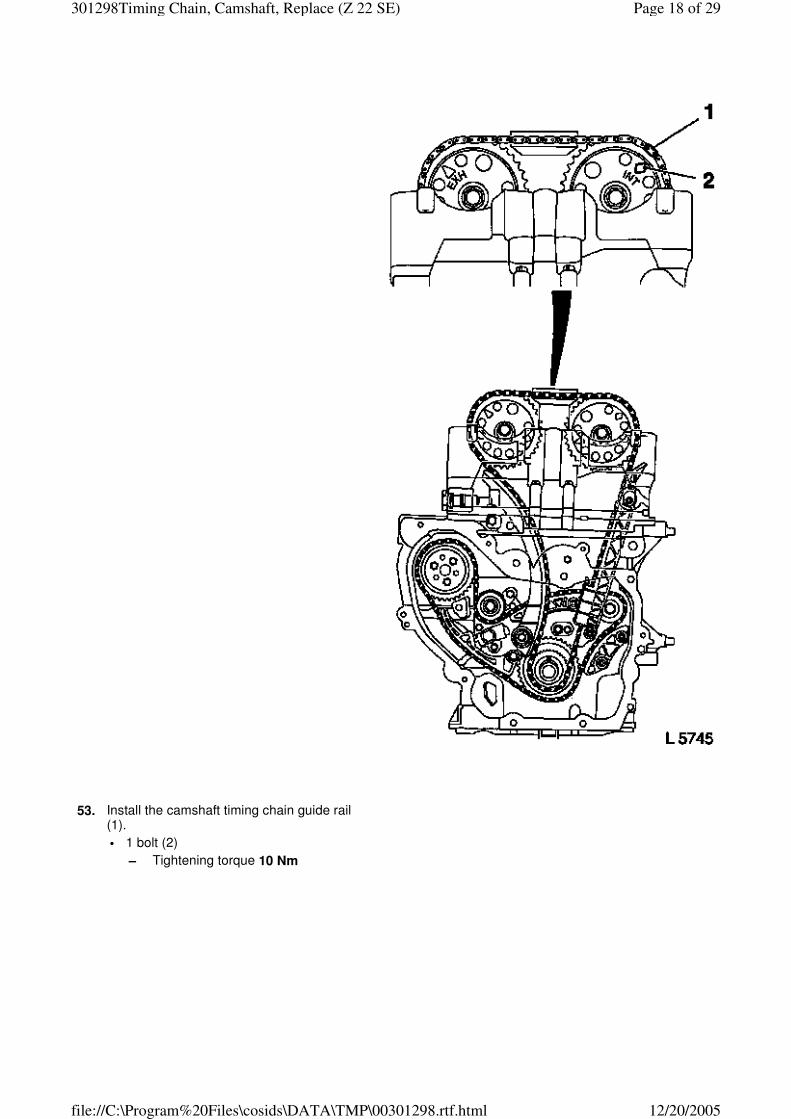
53. Install the camshaft timing chain guide rail (1).
• 1 bolt (2)
– Tightening torque 10 Nm
Page 18 of 29301298Timing Chain, Camshaft, Replace (Z 22 SE)
12/20/2005file://C:\Program%20Files\cosids\DATA\TMP\00301298.rtf.html

54. Secure the camshaft timing chain.
• Important: Check that the TDC reference points line up. Secure the chain link (1) with a plastic wedge at the marking on the camshaft timing chain sprocket
55. Lower the lifting ramp.
Page 19 of 29301298Timing Chain, Camshaft, Replace (Z 22 SE)
12/20/2005file://C:\Program%20Files\cosids\DATA\TMP\00301298.rtf.html

56. Install the camshaft timing chain guide rail.
• 1 bolt (2)
– Tightening torque 10 Nm
• Install the screw plug (1).
– Tightening torque 65 Nm
Page 20 of 29301298Timing Chain, Camshaft, Replace (Z 22 SE)
12/20/2005file://C:\Program%20Files\cosids\DATA\TMP\00301298.rtf.html
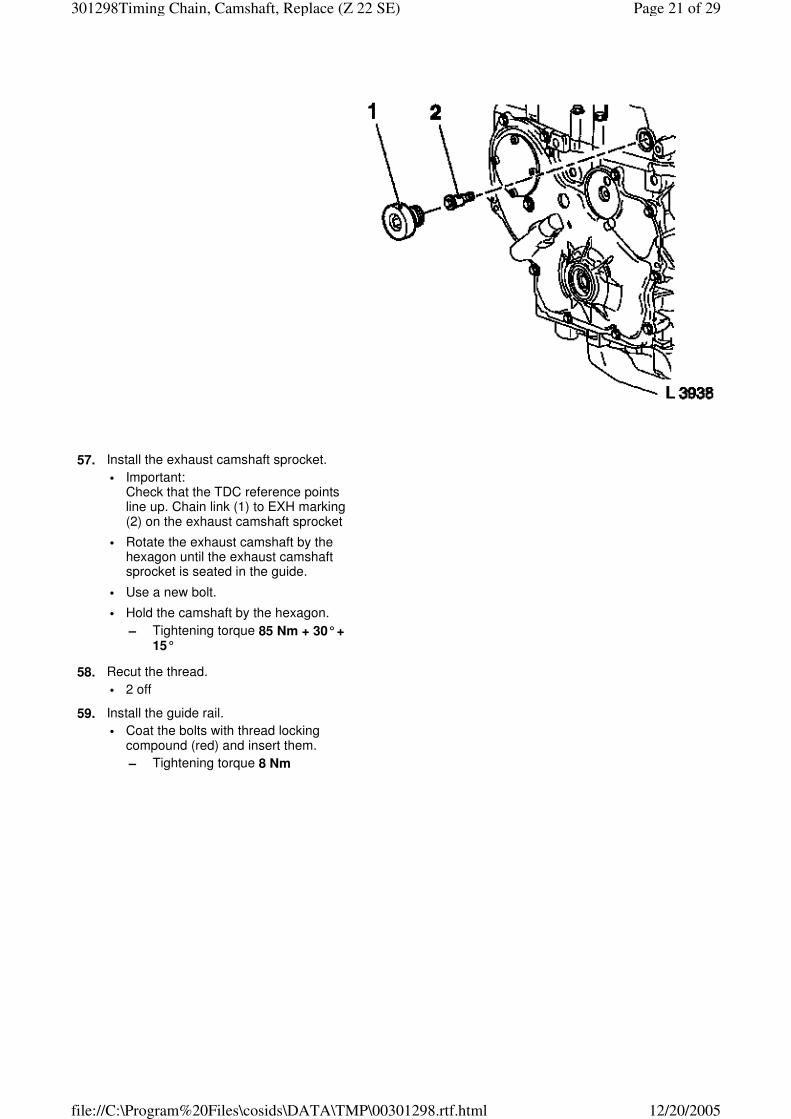
57. Install the exhaust camshaft sprocket.
• Important: Check that the TDC reference points line up. Chain link (1) to EXH marking (2) on the exhaust camshaft sprocket
• Rotate the exhaust camshaft by the hexagon until the exhaust camshaft sprocket is seated in the guide.
• Use a new bolt.
• Hold the camshaft by the hexagon.
– Tightening torque 85 Nm + 30° + 15°
58. Recut the thread.
• 2 off
59. Install the guide rail.
• Coat the bolts with thread locking compound (red) and insert them.
– Tightening torque 8 Nm
Page 21 of 29301298Timing Chain, Camshaft, Replace (Z 22 SE)
12/20/2005file://C:\Program%20Files\cosids\DATA\TMP\00301298.rtf.html
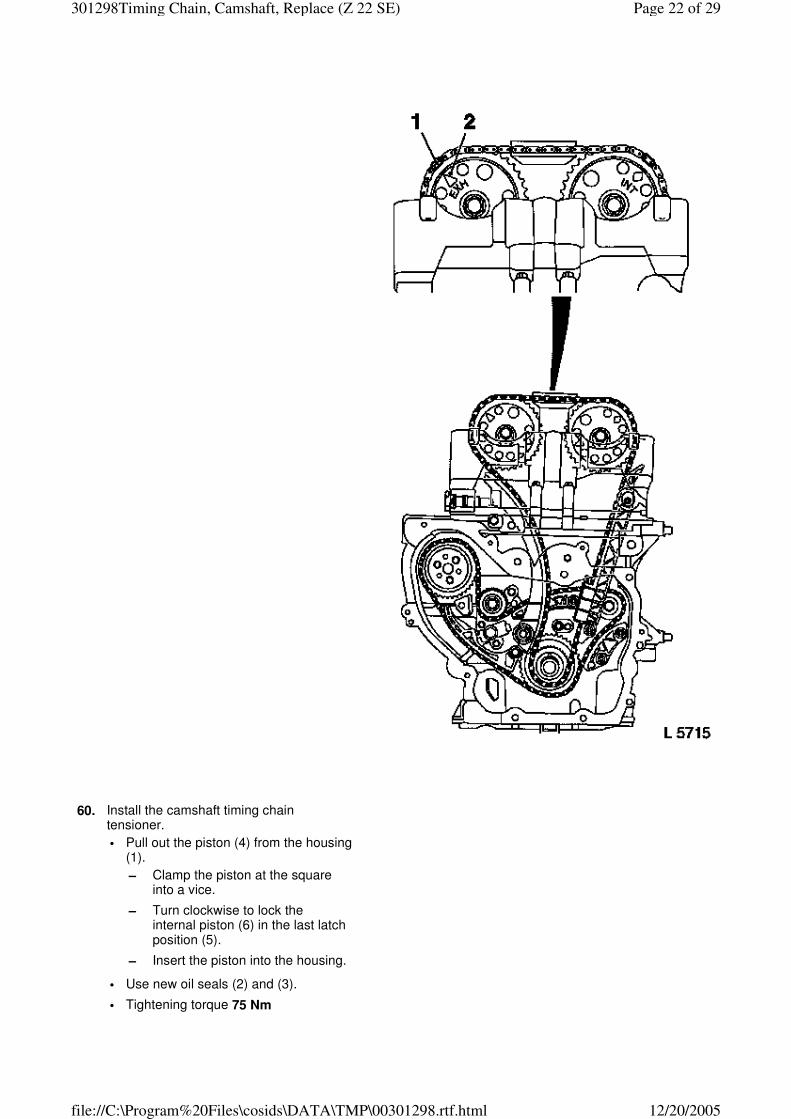
60. Install the camshaft timing chain tensioner.
• Pull out the piston (4) from the housing (1).
– Clamp the piston at the square into a vice.
– Turn clockwise to lock the internal piston (6) in the last latch position (5).
– Insert the piston into the housing.
• Use new oil seals (2) and (3).
• Tightening torque 75 Nm
Page 22 of 29301298Timing Chain, Camshaft, Replace (Z 22 SE)
12/20/2005file://C:\Program%20Files\cosids\DATA\TMP\00301298.rtf.html
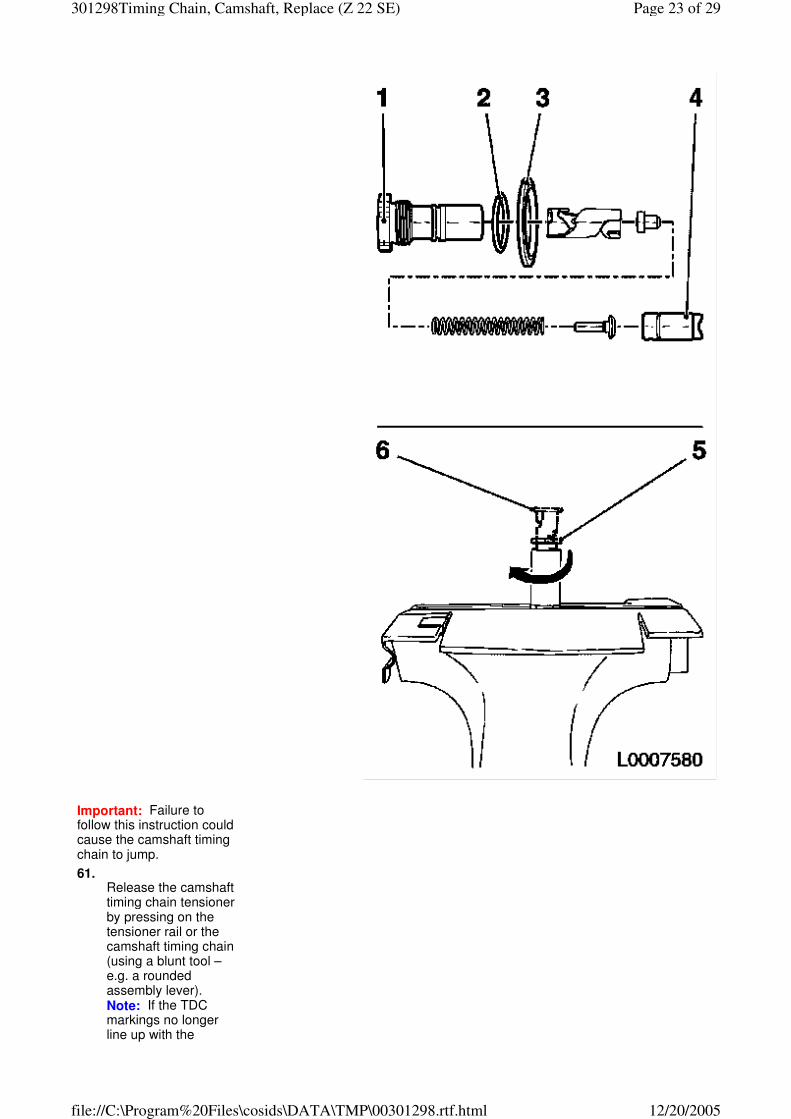
Important: Failure to follow this instruction could cause the camshaft timing chain to jump.
61. Release the camshaft timing chain tensioner by pressing on the tensioner rail or the camshaft timing chain (using a blunt tool – e.g. a rounded assembly lever). Note: If the TDC markings no longer line up with the
Page 23 of 29301298Timing Chain, Camshaft, Replace (Z 22 SE)
12/20/2005file://C:\Program%20Files\cosids\DATA\TMP\00301298.rtf.html

coloured chain links, refit the camshaft timing chain. Once the crankshaft has been rotated once again they will no longer line up.
62. Raise the lifting ramp.
63. Support the engine from underneath with KM-904 together with KM-6054.
64. Remove the retaining bolt from the engine damping block.
• 1 retaining bolt
65. Lower the engine.
66. Install the timing case. Note: Remove the cloth from the opening in the timing case.
• Use a new gasket.
• Tightening torque 21 Nm
• Install a new crankshaft front oil seal (2).
– Slide protective sleeve (1) from KM-6105 (3) onto the connecting rod journal.
– Coat the sealing lips with silicone grease (white).
– Slide the oil seals over the protective sleeve onto the connecting rod journal.
– Use KM-6105 to press the oil seal into the timing case.
– Use bolt (4) of the rotational vibration damper.
– Take out KM-6105.
Page 24 of 29301298Timing Chain, Camshaft, Replace (Z 22 SE)
12/20/2005file://C:\Program%20Files\cosids\DATA\TMP\00301298.rtf.html

67. Raise the engine.
68. Insert the right–hand engine damping block together with the engine damping block bracket.
69. Attach the right–hand engine damping block.
• 1 nut
– Tightening torque 45 Nm
70. Attach the right–hand engine damping block bracket.
• 3 bolts
– Tightening torque 85 Nm
71. Attach the rear engine damping block.
• 1 bolt, 1 nut
– Tightening torque 49 Nm
72. Lower the engine.
• Remove the lifting device KM-904 with KM-6054.
73. Attach the bracket for the gearshift cables.
• To the transmission
• 1 bolt
– Tightening torque 22 Nm
74. Attach the rotational vibration damper (2).
• Use holding adapter KM-J-38122-A in conjunction with KM-956-1 (1) to hold.
• Use a new bolt.
– Tightening torque 100 Nm + 75° + 15°
Page 25 of 29301298Timing Chain, Camshaft, Replace (Z 22 SE)
12/20/2005file://C:\Program%20Files\cosids\DATA\TMP\00301298.rtf.html
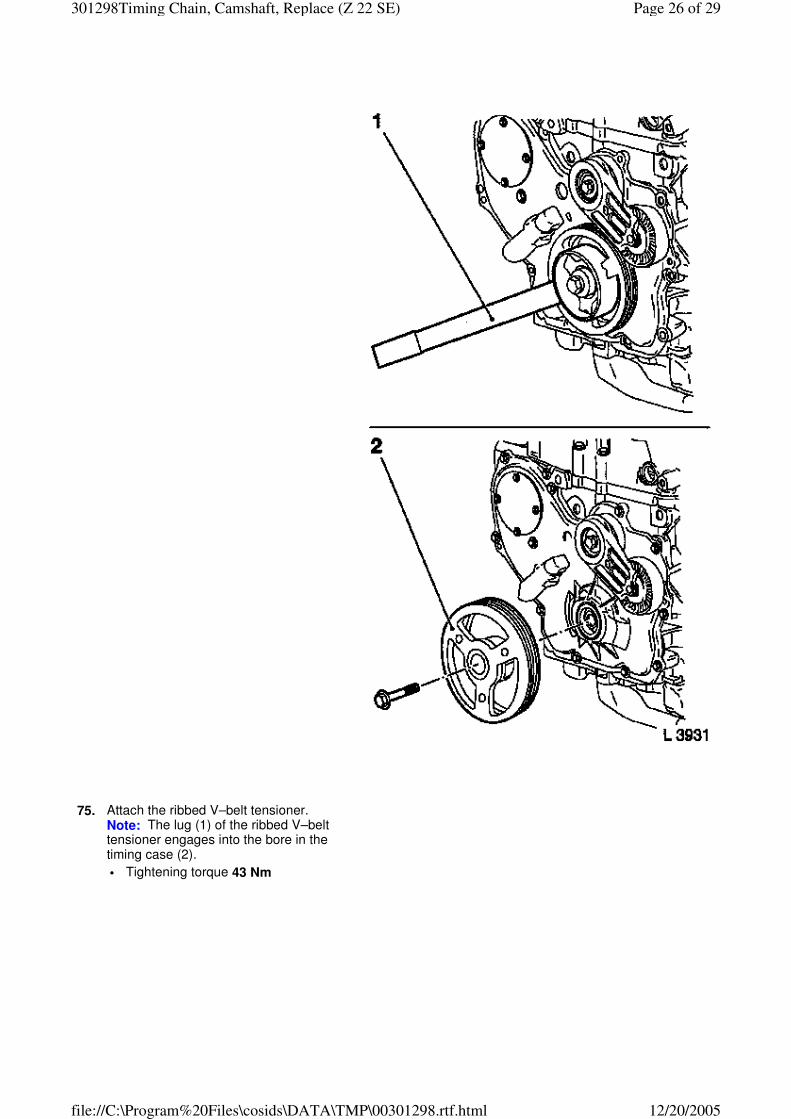
75. Attach the ribbed V–belt tensioner. Note: The lug (1) of the ribbed V–belt tensioner engages into the bore in the timing case (2).
• Tightening torque 43 Nm
Page 26 of 29301298Timing Chain, Camshaft, Replace (Z 22 SE)
12/20/2005file://C:\Program%20Files\cosids\DATA\TMP\00301298.rtf.html
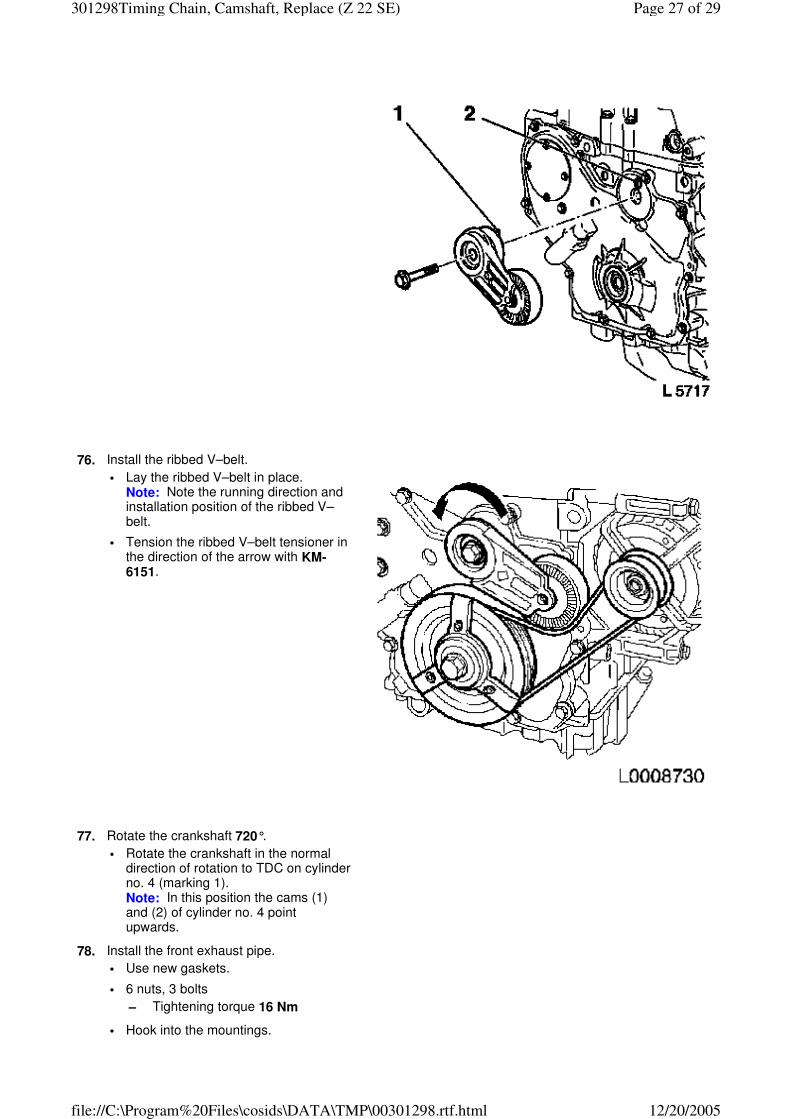
76. Install the ribbed V–belt.
• Lay the ribbed V–belt in place. Note: Note the running direction and installation position of the ribbed V–belt.
• Tension the ribbed V–belt tensioner in the direction of the arrow with KM-6151.
77. Rotate the crankshaft 720°.
• Rotate the crankshaft in the normal direction of rotation to TDC on cylinder no. 4 (marking 1). Note: In this position the cams (1) and (2) of cylinder no. 4 point upwards.
78. Install the front exhaust pipe.
• Use new gaskets.
• 6 nuts, 3 bolts
– Tightening torque 16 Nm
• Hook into the mountings.
Page 27 of 29301298Timing Chain, Camshaft, Replace (Z 22 SE)
12/20/2005file://C:\Program%20Files\cosids\DATA\TMP\00301298.rtf.html

79. Install wheel arch liner
• Install 6 screws
80. Install rear wheel
• Install 4 bolts, install locking bolt 90 Nm
81. Remove support
82. Install the lower engine splash shield
• 13 bolts
83. Lower the lifting ramp.
84. Attach KM-6148. Note: In this position the cams (1) and (2) of cylinder no. 4 point upwards.
• Attach KM-6148 with the enclosed bolts (4).
• Slide the positioning bolts (5) into the designated bores (3) on the camshaft sprockets.
85. Detach KM-6148.
Page 28 of 29301298Timing Chain, Camshaft, Replace (Z 22 SE)
12/20/2005file://C:\Program%20Files\cosids\DATA\TMP\00301298.rtf.html
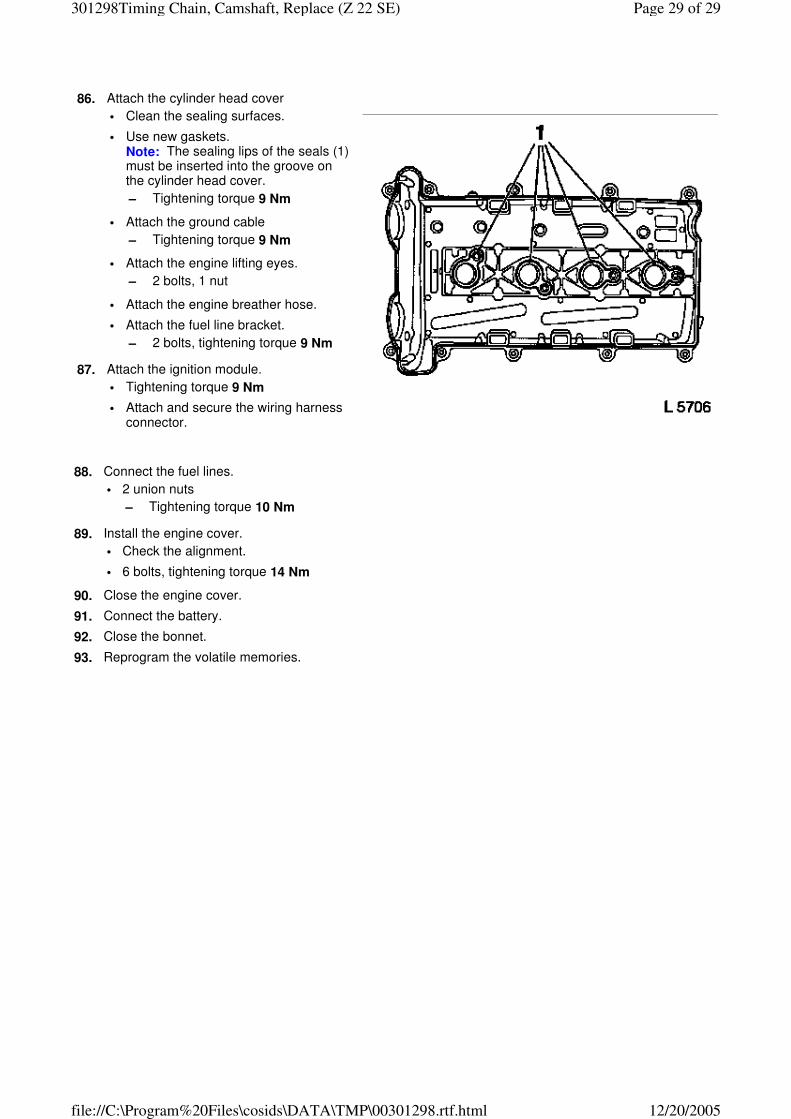
86. Attach the cylinder head cover
• Clean the sealing surfaces.
• Use new gaskets. Note: The sealing lips of the seals (1) must be inserted into the groove on the cylinder head cover.
– Tightening torque 9 Nm
• Attach the ground cable
– Tightening torque 9 Nm
• Attach the engine lifting eyes.
– 2 bolts, 1 nut
• Attach the engine breather hose.
• Attach the fuel line bracket.
– 2 bolts, tightening torque 9 Nm
87. Attach the ignition module.
• Tightening torque 9 Nm
• Attach and secure the wiring harness connector.
88. Connect the fuel lines.
• 2 union nuts
– Tightening torque 10 Nm
89. Install the engine cover.
• Check the alignment.
• 6 bolts, tightening torque 14 Nm
90. Close the engine cover.
91. Connect the battery.
92. Close the bonnet.
93. Reprogram the volatile memories.
Page 29 of 29301298Timing Chain, Camshaft, Replace (Z 22 SE)
12/20/2005file://C:\Program%20Files\cosids\DATA\TMP\00301298.rtf.html


