
The Bug Out Bag Guide
Essential SurvivalSkills amp Tactics
Learn how to survive amp thrive - no matter what
made with
1 5 BasicSurvival SkillsYou Need WhenBugging Out
2 Learn To BuildShelter For AnySurvival Situation
3 Learn How ToHarvest WaterFrom NaturalSources
4 6 Ways ToMake FireWithout Matches
5 What IsBushcraftSurvival SkillsTools amp How ToLearn
6 BushcraftSkills Foragingfor food
7 Learn TheseMap ReadingSkills To NeverGet Lost Again
8 How ToPredict TheWeather In TheWilderness
9 Want More
Table of Contents
As we mentioned in our How to Make a Bug Out Plan post the more skills you
have the more self reliant you are and the higher your chances for survival
become Here we are going to discuss some basic survival skills and teach you how
to best utilize them to protect yourself and your loved ones when disaster strikes
Basic Survival Skills
When you are out on your own without the support net of a healthy society these
are the traits and basic survival skills you need to master in order to succeed
1 Positive Mental Attitude
This is actually more important than any of the other basic survival skills because
when you are relying on your ability to wring survival from your surroundings once
you give up hope you are done There are many amazing stories of people who
have survived avalanches fires floods and being isolated for extended periods and
making it through thanks to an undying will to survive They are ordinary people
5 Basic Survival Skills YouNeed When Bugging Outby Chris Ruiz
who would simply not quit Keeping a positive mental attitude will give you the
strength to never give up on yourself no matter the circumstances
Some ways to instill this mentality are
Set goals for yourself - These may be daily or even hourly goals such as making
it to the next hilltop or obtaining a meal from your surroundings Make sure
they are achievable and objective based Every goal you accomplish will be a
psychological boost for you and will build confidence in your basic survival
skills
Focus on what you can change - If a major disaster has struck focusing on the
unfairness of the resulting situation or the loss that has occurred will not help
you However focusing on building a shelter or staying dry will help immensely
Concentrating your efforts to make your situation better will help you both in
the long and short term Ignore the big picture and focus on improving your
immediate situation
Keep hydrated and nourished - This will give you the energy to persevere in the
face of adversity A steady water and food supply are extremely important You
will not be looking to feast daily but meeting your basic calorie and hydration
needs will be enough to keep you going 2400-3600 Calories per day is a good
amount to aim for Additionally if this requirement is squared away it will allow
you to focus more on recovery efforts or finding help
Be outwardly positive - Positivity creates more positivity Showing fellow
survivors that you are with that you have a positive mental attitude will prevent
the group being dragged down under the weight of the disaster Be the seed
that grows into higher morale for your team
2 Water
Beyond your own internal fortitude water is the most important resource you
require Finding it and knowing how to make it fit for consumption are two of of
the most important basic survival skills you can learn
Know how to look for signs of water This may be looking where plants are
growing where terrain slopes or contours into a natural water trap or observing
animal movements to see where they are finding their water supply
If you are able to map a route as a part of your Bug Out Plan identifying likely
sources for water along the way will be a massive boon
Understand how to treat water to make it fit for consumption Drinking
contaminated water can be deadly
Filtration - this consists of passing water through very fine membranes to
remove particles and some pathogens Some viruses may still make it through
even the finest filters available
Purification - treating water with either chemicals such as iodine or UV light
sources This neutralizes all pathogens but does not eliminate particles
Boiling - This is a type of purification as it kills all pathogens but does not
remove particles Water should be kept at a rolling boil for at least 1 minute to
sterilize it
Because of the separate benefits of both filtration and purification it is
recommended that you use both methods to be 100 sure of water safety The
most basic way to do this is to pour water through a cloth and then boil it
However a more effective approach is to pass it through a filter device such as
the MSR MiniWorks EX Microfilter and then purify it using tablets or a SteriPen
These items should be considered mandatory requirements for any list of Bug
Out Bag Essentials
Be able to exploit rainfall if possible This may include catching it in a poncho or
container if available
Utilize a Solar Still - This can be purchased here or fashioned out of your
survival gear A Solar Still uses the suns heat to evaporate liquid and then
recapture it as clean water
Understand how much water you need - A person can survive 72 hours without
water It is however recommended that someone who is active consumes 75
of their weight in ounces daily So if you weigh 150 lbs then you should be
drinking about 113 ounces (331 liters) of water per day
A Home Made Solar Still
3 Food
Hiking with your Bug Out Bag loaded with essential survival gear will cause you
to burn 400-500 calories in an hour To keep your body working as an efficient
machine it is important to keep it fueled up
First off ration what food you have with you You are concentrating on survival
not feasting Eat small portions when you are hungry but do not over do it
Supplement your rations with foraged sustenance from your surroundings This
means you will need to learn what edible plants are around and how to harvest
them Also learn where these plants grow Does a particular berry grow around
water holes Does a high calorie plant prefer the shade Learn these aspects to
understand where to look for sustenance Some plants are only edible after
cooking or boiling learn what you need to do with your local flora to make it
palatable Additionally learn what is hazardous or poisonous to eat to avoid
making yourself sick
Understand what types of animals inhabit your area This includes possible
predators to avoid and prey to seek out Learn what environments these
animals inhabit Is there a particular fish that likes eddies and whirlpools Target
these spots to find them Does an animal in your area like to eat a particular
plant Placing snares in the vicinity of these plants would be ideal If you do not
know how to operate a firearm a sling shot may be a good option for you
There are many options for sling shots you can purchase one here or learn how
to make one here Also learn how to prepare these animals for cooking This
includes skinning and butchering animals and filleting fish
4 Shelter
A well prepared person will have a means of sheltering themselves from the
elements as a part of their Bug Out Contents List However a TOTALLY prepared
person will also have learned survival shelter building as one of their basic survival
skills A survival shelter does not need to be complicated or fancy but it should
keep rainsnow out keep heat inside and be easily cobbled together from local
materials
A survival shelter can be built from most anything - debris from collapsed
buildings trees and leaves animal hides or a tarp or poncho
Consider bringing paracord and a saw or hatchet when building your Bug Out
Bag Contents List as these can be your best friends when building a shelter
With these items you can make a survival shelter out of just about anything in
very little time
If you do not have paracord zip ties duct tape or another binding material
primitive rope can be improvised from strips of tree bark small green saplings or
branches and vines
A basic survival shelter could consist of building a frame from long rigid
materials such as tree branches or 2x4s and laying a poncho or tarp over it
If you cannot use your poncho or tarp for this layer brush on to the frame
sloping away towards the ground to insulate for warmth and keep moisture out
See the picture below for a general idea of this
5 Fire
Fire can provide many things when in a survival situation and both building and
maintaining one are essential basic survival skills A fire will give a morale boost
provide heat and light and enable you to purify water and cook food
The basic requirements to build any fire are to give it air fuel and an ignition
source
Air - A fire consumes air hungrily and it is important to build it in a way that
allows air to flow into the combustion Do not smother a fire by putting too
much fuel onto it
Fuel - This is what actually burns in a fire and can be sourced from many places
If a branch or stick snaps cleanly it is dry and will burn well If it bends and
splinters it is still green and will smoke and smother a fire
Ignition Source - this can be a lighter matches or a fire starter that you bring
with you You should however learn more primitive means of fire starting as one
of your basic survival skills in the event that these items cannot be sourced See
the video below for one simple method
A fire is build in successive layers of increasingly larger wood You start with
tinder which is very small dry and catches easily Examples of tinder are tree
bark dryer lint coconut husk and pine needles From tinder you go up to
kindling which is generally twigs up to the diameter of your little finger Next is
fuel wood which is in sizes up to your thumb Continue to add more wood
gradually until you have a fire large enough to ignite logs These logs are what
will produce the majority of your coals in a fire pit
The opposite technique is to build what is known as an Upside Down Fire This
has large logs at the bottom and tapers to fuel wood kindling and then tinder
at the top An upside down fire allows you to build your cooking fire and then
let it burn down without having to babysit it and can be great in makky outdoors
situation Check out my in-depth instructional guide to learn how to build an
Upside Down Fire here
Learn how to use a fire to cook food Coals are a far better method of cooking
food than a naked flame Coals will produce a more even heat and allow you to
control the rate at which your food cooks rather than having some parts seared
with the inside raw A naked flame is however better at boiling water
The most commonly used types of fires are called a Teepee and a Log Cabin
which are pictured below
A Dakota Fire Pit is another type that is less widely used than these but more
efficient See the image below for how a Dakota Fire Pit works
Basic Survival Skills Dakota Fire Pit
Conclusion
There is no doubt that learning basic survival skills will significantly increase your
chances of success Putting in some time now to teach yourself these basic survival
skills will make you better prepared and help you provide for yourself and your
family when disaster strikes As with your bug out bag contents or bug out plan
you should tailor your survival skill set to match your environment To learn what
you need to master in order to survive in a cold weather setting have a look at our
article on cold weather survival tips We mentioned several survival tools in this
article that partnered with your skills will make your struggle far less daunting
including paracord a hatchet saw and fire starter To see how these items will
affect your overall survival kit and see what other items you can add to your Bug
Out Bag list check out our Free Bug Out Bag Planning Tool Remember chance
favors the well prepared
Summers right
around the corner and for many people that means getting back to the great
outdoors whether it be for a day hike or a weekend camping trip This summer
take advantage of your time outdoors to practice the invaluable skill of building
survival shelter Thats right you need to step out of your comfort zone leave your
four-person tent and goose-down sleeping bag and try to construct adequate
shelter with only the items that would be available to you in a disaster scenario
Its the perfect time because if something does go wrong you can always retreat
back into your tent and try again the next night The summer camping months
provide the perfect opportunity to hone your survival shelter skills however keep
in mind that when the need arises to bug out you wont have the luxury of
choosing what time of year it is Practice building survival shelters year-round
especially if you live in a four-season climate where summer and winter present
drastically different survival scenarios
Why Learn to Build a Survival Shelter
Food water shelter - the essential elements of survival Shelter can protect you
Learn To Build Shelter ForAny Survival Situationby Chris Ruiz
from the elements and wildlife as well as keep you warm or dry finding
appropriate shelter can literally mean the difference between living and dying in a
survival situation No matter what your circumstances you want to be sure you can
prepare suitable survival shelter for you and your loved ones
Your shelter
doesnt have to be fancy - it just needs to keep you warm and dry
Possible situations that may require impromptu or planned shelter include bugging
out get-home scenarios getting lost while hiking or exploring tending to an
injured person while hiking or exploring or getting caught in a storm Depending
on your situation your survival shelter needs may differ
For instance in a get-home scenario you may only need short-term shelter for a
few hours or a night whereas when bugging out you may be indefinitely on your
own The need for building a lean-to can arise when you least expect it so learn
how to build a survival shelter in a number of different locales and with different
resources
Choosing the Best Location for Your SurvivalShelter
Choosing the best location for building your survival shelter will be dependent on
how long you intend to be using it - needs for short-term shelter will differ from
those required for long-term shelter
Take
advantage of the landscape when building a survival shelter
When searching for immediate short-term shelter look for trees (especially fallen
trees) rocky overhangs and caves Trees are an obvious source of shelter and have
many useful parts for building shelter including the trunk - which can be used as a
support the branches - which can be used as framework and foliage - which can
be used as insulating material
Rocky overhangs and caves make excellent areas to take cover but depending on
your locale or the time of year may not be an option Dont panic whether youre
stranded in desert terrain or its the middle of winter you can still put together an
effective survival shelter
In desert terrain with little to no trees consider using the slope of the land to seek
protection and the steep side of a dune for shelter - keep in mind that the gradual
side indicates the direction the prevailing wind is coming from and therefore the
steep side will provide natural refuge
If its the middle of winter and all available building supplies are frozen or buried
under snow remember that snow will have the same insulating effect as a stick-
built shelter For more cold weather survival tips CLICK HERE Additionally always
seek out shelter where the ground is dry If it is raining waterways may overflow
their banks and ravines and washes may form
If youre in it for the long haul you will need to consider substantially more factors
than sheltering for the short-term When searching for long-term shelter look for
areas in proximity to water and food sources as well as civilization (if applicable)
and for an area that provides adequate visibility for you to see whats happening
around you and for others to see you In some case staying hidden may be more
beneficial to your survival
Types of Survival Shelters
Simple Frame and Tarp Method
If you happen to have the good fortune of having supplies with you (out
backpacking or have bug-out gear) you may be in possession of a tarp that can be
used in conjunction with a simple frame to create shelter for the night To create a
frame lean poles against a lower branch or tree trunk in a manner that will fit
under your tarp
Make sure to remove any sharp edges from the wood or wrap leaves at the corners
to ensure you dont puncture the tarp If you happen to be lucky enough to have
cordage with you tie it at an angle between two trees and drape your tarp over
top placing rocks on the sides to hold the tarp in place
In an emergency you can forgo the frame and simply wrap yourself and your gear
in a poncho and huddle amongst the crook of a tree or other sheltered spot until
morning
A tarp makes
an excellent short-term shelter but you may need to upgrade eventually
Simple Body Heat Shelter
This shelter is fairly straight forward and easy to build - it is useful for short-term or
unexpected situations and can comfortably accommodate one possibly two
people
To build a simple body heat shelter use debris from the ground such as dirt leaves
and twigs to create a mound and use larger sticks to frame it Clear a hole just big
enough to crawl into and cover the opening to block air flow and limit the open
space Your body heat will be trapped inside the shelter keeping you warm
throughout the night
If you are seeking shelter in the winter and the ground is covered in snow use the
snow to build your mound Even though the snow is cold it will still serve the
purpose of insulating you from the elements outside and trapping your body heat
Sheltering
under the snow will insulate you from the cold and preserve your body heat
Open Shelter or Lean-To
The benefits of an open shelter or lean-to are that it offers extra protection against
the elements such as wind and rain and can accommodate up to four people (for a
typical lean-to however they can be constructed as large as resources allow)
We built this lean-to using two tripods instead of trees for support Zip ties made
quick work of building the grid
Depending on the supply of materials available the construction can take
anywhere from two to five hours Start by looking for downed trees that have
branches low enough to support the topmost point known as the ridgepole If you
only locate one tree use it as the ridgepole - lashing in place if necessary - but if
you locate two downed trees near one another lay a sturdy branch between them
Gather approximately five to six poles to lean against the ridgepole at roughly a 45-
60 degree angle enough to create a comfortable space to fit your team and gear
underneath This will serve as your grid To create the grid frame attach 5 to 6
poles across the frame Weave flexible boughs between poles at right angles and
then use bark or leafy branches to thatch the roof starting from the bottom and
moving upwards
Use the grid to weave foliage to create a weather barrier
You can add additional walls for further protection using the same method Should
you be lucky enough to have a tarp or mylar survival blanket you can hang it from
the opening to act as a curtain
A-Frame Shelter
The A-Frame shelter is constructed in much the same way as the lean-to the only
difference is that the ridgepole starts on the ground and extends up into tree
lashed at a height that allows enough space to sit underneath In this way two
sides are constructed to create the A-frame shape providing additional protection
from weather or cold temperatures For added warmth locate your fire pit near the
opening
Square lashings are used throughout the A-frame shelter
Side view of square lashing
Teepee Variations
A teepee can stand alone or be built around the slender trunk of a tree In some
cases it may be easier to use a slim tree as your center support lashing poles
around it to create a cone-shaped shelter which will provide a sturdy frame but
also limit your interior space
Its up to you whether you choose to completely enclose the exterior and create an
opening in the top for ventilation or keep the top secure from rain and leave an
open doorway Always make sure you account for ventilation especially if you
intend on building a small fire inside
For stand alone teepees start with three long straight poles and use a tripod
lashing to join them Try to locate a long pole with a Y-shaped joint at one end This
will provide the frame with stability as the next pole can rest within the Y-shape
To build the teepee continually add pairs of similar sized poles and join them
together at the top leaving the base wide enough to curl up in and tall enough to
sit comfortably
This technique can be the framework for a teepee or provide ridgepole support for
building a lean-to
Once the frame is constructed fill in the gaps using whatever materials are
available to you including leafy branches vines mud and grass Work your way up
from the bottom - as you would with roofing tiles - so that the rain will drip down
the overlapping layers instead of into your teepee
Subterranean Survival Shelter
This
fallen tree can provide adequate shelter - just watch out for critters
For short-term shelter a subterranean survival shelter can simply be hollowed out
of a mound of earth creating a warm place to sleep An optimal location is the root
base of fallen trees as the roots provide structure and prevent caving in
For a longer-term shelter substantial planning and effort will be required A long-
term subterranean survival shelter is something you would build in preparation for
when SHTF as opposed to building in the aftermath while bugging out Those who
choose to build a long-term subterranean survival shelter either build one on their
property or an offsite location Designs can range from simple cellar-style rooms to
complex homes that are fully outfitted with a power supply furnished with
necessities and comfort items and have functioning defense systems
Long-Term Log Cabin
If a crisis or disaster situation truly descends into chaos and its TEOTWAWKI (the
end of the world as we know it) you may find yourself in the position where you
need to build a solid and dependable home using only what the land provides
Obviously this type of survival shelter requires a tremendous amount of time
resources and energy - therefore itll save you time and aggravation to learn the
basics beforehand
If you are
permanently relocating a log cabin may be the way to go
A long-term log cabin is built using a similar method as Lincoln Logs you may have
played with as a child the general idea is to lay a frame of logs that interlock at the
corners to form a rectangle Before beginning you will need to clear the ground of
grass level it and top it with a layer of gravel for drainage Locate large rocks that
can serve as stilts to keep your cabin off the ground and place them at all four
corners as well as every three to four feet
After the rocks are placed locate the base layer of logs the sill logs which will
need to be larger than those used for the walls - about 12 inches in diameter Once
the sill logs are in place you can add floorboards or skip ahead to building up the
walls
This notching pattern will help shed water away from the joints
For the walls look for trees that are seven to ten inches in diameter and cut them
to fit the dimensions of your floor plan To prepare the logs for the walls flatten
the top and bottom so that they sit flush and notch the ends to interlock them and
form a sturdy corner - additionally cutting a notch in the top log only will avoid
pooling water in the joints while in wetter climates
Once you reach your desired wall height begin using logs in diminishing lengths on
either end to create the peak Notch and lay two long logs perpendicular across the
length of the cabin to act as supports for the roof Depending on the items you
have available in terms of tools and lumber you can construct your roof with split
logs cut shingles or sod
Survival Supplies Beneficial to Have on Hand
Undoubtedly youve included tools and materials in both your bug-out and get-
home bags that will lend themselves to building shelter however its important to
consider what tools are must-haves if an unexpected need to shelter arises such as
during a hiking or backpacking expedition
To ensure you have the proper tools take inventory of the various tasks you will
need to perform when building shelter such as cutting de-branching notching
lashing digging and weaving Consider what tools could help with these tasks (and
all the better if one tool can address several tasks) and make sure they are in your
bug-out and get-home bags as well as on your person while youre out exploring
Here is our list of the top survival supplies that are crucial to have on-hand when
building survival shelter
Wilderness Precautions
No matter where you choose to set up shelter always be cognizant of what wildlife
may be around If youve found a great location you are no doubt not the first to
have discovered it so make sure to survey the land for wildlife such as snakes in
leaf piles or under fallen trees
To stir up any creatures that may be hiding in brush or bushes use a stick to prod
the area before proceeding with your hands Additionally store any food you have
tied up high in a tree to avoid attracting unwanted critters to your dwelling
In terms of the wilderness itself avoid any foliage that has a chalky white
appearance as this is a mold that could spread through your shelter and impact
your health Also if a tree contains a lot of lacey leaves that indicates it is
probably infested with insects and best to be avoided For more information on
plants and foraging CLICK HERE
Conclusion
Now that you have the basic skills necessary to plan and build your shelter the
next step is to get outside and get practicing While techniques such as weaving
and lashing can be practiced in your backyard when it comes to building an
effective survival shelter theres no substitute for the real deal As youre
practicing make sure to take note of pertinent factors such how long it takes you
to gather materials and construct your shelter - knowing this timing can be life-
saving in a real disaster scenario
Be creative be resourceful and most of all - have fun
Imagine your mind a complete fog your body unable to lift itself due to extreme
dizziness and nausea and cramping so bad you can barely move This is what
happens to your body after only three days without water - its called dehydration
While symptoms and severity can vary the chances of survival after three days
without water are slim
In civilized society droughts are thought of more as an inconvenience than a
threat however in a disaster scenario the threat of a drought - especially in times
of extreme heat - becomes much more real when clean drinking water is a scarce
resource
No matter how thorough your prepping there is a limit to the amount of water you
are able to store In a long-term survival situation sooner or later youll need to
find a natural water source suitable for drinking The good news is even in the
driest of times there are always ways of harvesting water both above and below
the ground
Learn How To Harvest WaterFrom Natural Sourcesby Chris Ruiz
In this article were going to take you through the various methods you can use to
harvest water in the wild teach you to identify and find signs of water and show
you ways to purify harvested water so its suitable for drinking
3 Key Methods for Harvesting Water
When the pipes run dry will you be able to harvest water from natural sources
Solar Still
A great way to extract water straight from the ground is by using a solar still To
build one you will need the following
Collection bucket (this can be any type of wide-brimmed container to collect the
water basically anything water-tight In a pinch even a plastic bag will work as
long as it can be secured so it will not tip and spill the water)
Large sheet of plastic
Rocks
Long straw (optional)
Once youve collected your items choose a sunny spot and dig a wide hole at the
base of the hole dig a fitted spot large enough for your collection bucket to rest in
If there is any leafy green vegetation around place it in the hole around the
opening of the bucket this will enhance your water collection rate by drawing
moisture from the plants as well as the air
Next lay the sheet of plastic over the top of the hole and use your rocks to secure
it firmly in place Place a small stone in the center of the plastic to create a low-
joint point just above the top of the bucket to allow condensation to collect and
drip into the bucket Even in the desert a solar still can collect up to a quart of
water per day To access the water without disturbing your still use a long straw or
piece of tubing
Solar Still Design Make sure the plastic sheet overlaps the edge of the hole
enough to lay the rocks
Rainwater
Although water falling from the sky may seem like a lottery win to someone
suffering from dehydration be aware that rainwater is not technically safe for
drinking due to pollutants in the air (such as arsenic) that make their way into the
rainwater There are ways to purify this polluted water to make it safe for drinking
several strategies are discussed later in this article
If you are in the wilderness collecting rainwater is as simple as setting up as many
containers as you can Be sure to place your containers in unobscured locations in
order to obtain rainwater directly from the sky and not water that has dripped off
plants
Water dripping off plants can contain debris and pollutants so collect rain away
from foliage
Harvesting rainwater from your home is accomplished by setting up rain barrels
below your roof gutters to catch the runoff However be aware that in addition to
pollutants water from roofs will also typically have bugs and bird feces and not be
particularly suitable for consumption
There are some barrels available with built-in filtration systems that will remove
solid waste allowing the rain to rinse the roof for about 10 minutes before
connecting your barrel will also help decrease the amount of debris and
contamination
Plant Sources
If there are green plants there is water to be harvested There are several ways to
extract water from plants just be sure to choose the non-poisonous ones
Transpiration Bag
Plants take up water in the process of photosynthesis and during transpiration
water is one of the by-products released into the air To capture this water place a
clear plastic bag over the end of a leafy branch and secure it with a cord Within a
few hours several ounces of water will be available
Before consuming water from natural sources we recommend purifying it for
safety
Directly Off the Leaves
Plants have many adaptations for surviving a drought In desperate times plants
that have leaves with a natural cup shape can be a source of water The leaves
specifically grow in that shape to funnel rainwater towards the trunk and act like a
natural scoop Look for plants with leaves growing directly from the base of the
stem or trees that have clusters of leaves growing out of the trunk The Travelers
Tree can hold several pints of water this way
Plants are good at storing water to survive a drought A refreshing drink may be
waiting in the leaves
Tapping Into the Trunk
In a tree trunk xylem transport water from the roots to the leaves in a vertical
fashion this water can be collected similar to how sap is collected from maple
trees To do this you will need a strong tubular stick about the diameter of your
thumb (alternatively a hollowed out length of bamboo works as well) or a drip
stick a means of cutting a notch and hammering in the drip stick and a collection
reservoir
Sap is simply sugar water and it can save your life
Sharpen the tube at one end and gently tap it into the trunk at a 70 degree angle -
you do not need to drive it in more than a few inches - and set up a collection
reservoir below to catch the dripping water Your collection reservoir can be a
plastic bag large leaf or ideally a bucket Collection will take a while but the
water collected is safe to drink
From the Roots
While the roots of plants do contain water it is quite a laborious task to extract it
To harvest water from plant roots start by cutting a large root and stripping the
bark Then use rocks to mash the root into a pulp this will produce droplets of
water and the root pulp can be pressed into a collection container for
consumption If you happen to be bugging-out in Australia blood woods water
trees and desert oaks are known for a high yield of root water
The inside of a barrel cactus can also be mashed and drained to yield water
Bamboo Plants
Bamboo plants serve as a great source for water as they store it in the cavities
between their joints When looking for bamboo plants look for those that are most
yellow as these typically have more water Once youve found a piece of bamboo
tap and listen for a low thud indicating it is not hollow then locate a section with
water cut a notch just above the lower joint and collect the water that runs out
While this water is safe to drink directly we recommend purifying in order to
protect against disease
Vines
While vines can be a source of water caution must be taken in choosing which to
use as those with milky sap tend to be poisonous If there is no milky substance in
the vine you chose proceed by cutting a deep notch in the top of the vine Then
cut off the tip of the vine to allow water to flow and continue to work your way up
the vine cutting sections and collecting water until no more water flows Its
important to notch the topmost part of the plant first otherwise it will respond by
drawing all the water in the vine back towards the base of the plant
Surviving A Drought By Extracting Water From the Air
It is possible to extract water from the air and World War Water a must-have
survival resource will teach you how Click here to order your copy
Searching for Water - 4 Key Signs You Must LookFor
Surviving a drought involves knowing how water behaves in nature
Growing Vegetation
Even if the landscape you are looking out at seems barren and devoid of water
take a closer look for small trees bushes or clusters of tall grass If this vegetation
is growing in a line there is likely to be an underground stream sustaining it To
confirm dig a small hole at the base of a group of plants
Following Insects and Birds
Following insects and birds can lead you directly to water Bees in particular need
fresh water to survive and will typically build their hive no more than a few miles
from a fresh water supply should you find a hive immediately start looking for
other signs of water
Signs of life can lead you to water if you know how to read them
Mosquitos as pesky as they might be are good to follow as they breed in pools of
standing water The mason fly can lead you to underground springs as it uses mud
to build and therefore seeks out moist soil for this purpose
Another reliable water indicator is wild pigeons after feeding on grain all day they
seek out water at dusk Pigeons that are flying low and swift are typically headed
towards a watering hole while flying from tree to tree is a sign they are returning
from the water hole The added weight of water in their stomach slows them down
and causes them to use more caution to avoid predators Carefully observing the
activities of wildlife is key for finding signs of water
Following Animal Tracks
Grazing animals need to drink in the morning and the evening to digest their diet of
grass If you come across a hoof print look downhill to locate where their water
source might be You may be lucky enough to find more tracks to follow but also
look for snapped twigs scat scraped bark and other signs of larger animals
Often the path to the water hole is heavily trodden and clear of obstacles the
careful eye can pick up signs of wear on the ground indicating the trail
Mark any animals signs you find and carefully scan the area for more
Terrain Indicators
The ground itself can serve as an excellent roadmap in locating water Water obeys
gravity flowing downward and therefore your best chance of finding water is to
seek low ground Walking parallel to a mountain gives you a good chance of finding
an outlet of fresh water or at least a dry stream bed
While a dry stream bed itself is of no use to someone whos parched there may be
water accessible beneath the surface The ideal stream bed to investigate will have
dark green vegetation along it but any vegetation is still a good sign Examine the
stream bed for dark patches of earth or dampness the outer side of a bend or
natural depressions in the dirt - these are ideal places to dig
A stream like this may not look like it has much water but with a little digging it can
be your key to surviving a drought
Underground water can be harvested by digging a seep - a hole two to three feet
in diameter and at least one foot deep After digging your seep groundwater
should slowly start to seep into the hole and by lining the bottom with rocks you
will prevent much of the sediment from stirring up
Fresh groundwater is considered safe to drink but we always recommend
sterilization as its better to be safe than sorry additionally leaving your hole
unattended may invite wildlife to share in your water supply so purification is a
must
Essential Water Purification Techniques
If youve been able to harvest enough water to drink using your drought survival
skills theres still the problem of purifying to ensure its safe to drink The following
are our suggestions for the best water purification techniques when surviving a
drought
Filtration
To filter water pour it through a bandanna to get rid of any sediment You can
layer charcoal sand and dried grass in a sock or another piece of fabric then pour
murky water through it and collect what seeps through in a container you may
need to repeat this a few times to achieve clear water Its important to remember
that this water will have sediment removed but not microscopic contaminants
such as bacteria and viruses
Gypsy Filter
If you happen to come across a pool of water but have no means of purifying it dig
a hole deeper than the pool about one foot away from its edge this will cause
water to flow in The initial water will be muddy and should be discarded but
eventually after being drawn through the layers of sediment between the pool and
your hole the water will be filtered
DIY Charcoal Straw Filter
To build a charcoal straw filter first find a hollow reed or other tube Then stuff in
some dry grass followed by a layer of crushed charcoal and top it off with more
dried grass to hold the charcoal in place Pack it firmly but not so tight that air cant
be pulled through and then using it as a straw draw water up through the filtering
layers
Steripen
A Steripen uses UV light to sterilize water Before treating water should be filtered
and clear Once your water has been filtered turn on the steripen and stir in your
water until the indicator light turns green The UV light targets the DNA of
microorganisms rendering them unable to reproduce and thus unable to infect you
A steripen is 999 effective at destroying pathogens
LifeStraw
When it comes to surviving a drought a LifeStraw not only filters water but also
removes 95 of the bacteria as well They are easy to use very portable and allow
you to drink directly from the water source without having to pre-filter or sterilize
Each straw filters up to 1000 liters of water
Boiling
To boil your water first remove any sediment and bring your water to a rolling boil
for one minute (three minutes at altitudes above 5000 ft) this will kill any
pathogenic bacteria and viruses Allow the water to cool and transfer any water for
storage to a clean container that can be tightly sealed
UV Purification
UV purification can be accomplished using clear plastic PET bottles or glass
containers First filter your water to get rid of sediment then fill the bottles and
seal tightly using a lid or improvised material Second lay the bottles out in the sun
for six hours (or two days if the weather is overcast) to allow the UV rays from the
sun to kill any bacteria The water can continue to be stored or consumed straight
from the bottle
If nothing else is available you can use the sun to purify your water
Unscented Chlorine Bleach
Unscented chlorine bleach can be used to disinfect water using the following
ratios
Add the bleach to the water and allow to sit for 30 minutes There will be a slight
chlorine odor and if there isnt repeat the dosage Allowing the water to stand for
a few hours in a clean container will reduce the taste and smell of chlorine
Purification Tablets
Purification tablets are similar to using chlorine but easier to carry with you one
tablet treats two quarts of water To use simply drop a tablet into your water and
allow to sit for 30 minutes
Perfecting Your Drought Survival Skills
Now that you know the basics of harvesting finding and purifying water to survive
a drought its time to take your knowledge to the next level In order to be fully
versed in drought survival skills there are two resources you need to be familiar
with The first is The Bug Out Bag Guides Survival Skills article which builds on
the information in this article to provide a holistic guide to surviving in the wild
The second a resource no prudent prepper should be without is World War
Water a fascinating read that discusses the oncoming drought our world is facing
and presents novel harvesting methods to ensure you dont run out of water Click
here to get your very own copy
Conclusion
The devastating effects of dehydration are something no one wants to be faced
with it is essential for your survival that you learn water-harvesting techniques to
sustain yourself during a drought Remember - the human body can only survive for
three days without water and what a grueling three days they are
To build your water-harvesting knowledge consider researching local plant life in
your area to find out which types are likely to be the best sources for water Also
remember to ensure your bug-out-bag is stocked with plenty of supplies that will
allow you to purify any found water While you may (literally) be so thirsty you
could die safety first always protect yourself from illness and never consume
water without first treating it
In a survival situation being able to start a fire can mean the difference between
life and death Hopefully your bug out bag has a fire starting kit that will enable you
to start a fire quickly and reliably But what if this gets wet lost or used up Then
you will need some primitive fire skills to build your fire Primitive fire making is a
bushcraft discipline that uses simple tools and natural materials to create fire
Having this in your bushcraft tool kit is an integral aspect of wilderness survival
By being able to make fires quickly and effectively in any weather conditions you
will be better prepared for emergency situations In this article I am going to show
you how to start a fire using primitive skills as well as compare and contrast the
various methods to help you decide which one is best for you to learn first
Primitive Fire Making Techniques
Flint and Steel
6 Ways To Make FireWithout Matchesby Chris Ruiz
This is the easiest of all bushcraft fire starting methods All that is required is a flint
and a piece of carbon steel (such as your survival knife) Flint and carbon steel
should be a part of every wilderness survival kit as it will allow for easy primitive
fire starting in virtually any conditions
1 The friction formed by striking the steel against the flint will form sparks
2 You want to strike the steel against the flint with a loose wrist It may take a bit
of practice to get the technique down
3 Have tinder ready to ignite as the sparks start to fly from the flint
4 Gently blow on the sparks that land in the tinder or char cloth until it ignites
5 Make sure you have your kindling nearby and ready to add to the tinder once it
catches
This method of bushcraft fire starting is relatively easy to execute It requires the
least amount of physical strength and energy to perform and can be done with only
two items However you may find yourself in a situation without carbon steel or a
flint available which is why its important to know as many primitive fire making
techniques as possible This will better perfect your wilderness survival skills
preparing you for all situations
Fire Plough
This is the simplest form of primitive fire making using only natural materials It is
essentially an optimized way to rub two sticks together with the base board being
one and the plow stick being the other
Start by procuring a flat piece of hardwood at least a couple of inches thick to use
as your baseboard
1 On the flat side cut a straight line down the center using your survival knife
2 Hollow out this line to create a shallow thin groove about frac14-inch wide
3 Find a softwood stick at least 1-inch thick Use your bushcraft knife to carve
the end of the stick to a rounded point with the tip being small enough to fit
into the groove on your board
4 To cause enough friction to generate sufficient heat to ignite a fire we will now
rub the two crafted parts together
5 Applying continuous force rub the stick through the groove in the wood
starting at one end and going toward the other
6 This will require a bit of strength in order to create the friction necessary to
form a spark
7 As the stick rubs against the baseboard wood will slowly shave off
8 The friction you are causing will create heat and tiny embers which will ignite
the wood shavings
9 Have your kindling ready and as before gently blow on the sparks within the
tinder to ignite a flame
The fire plough method of primitive fire making is simplistic in design allowing it
the versatility to be applied in virtually any location Its an ideal wilderness survival
tactic due to sheer simplicity
Nonetheless it does require quite a bit of physical force and energy to create the
spark someone who is weakened by starvation or exposure may have difficulty
getting the fire plough to work As with all primitive fire starting methods it is
essential to practice in order to perfect the technique
Hand Drill
A hand drill is a bushcraft technique that is simpler to build than the bow drill but it
will require greater energy patience and skill to implement All that is required is a
drill and a fireboard The stick being used for the drill is spun between two hands
(instead of using a bow to spin the drill) to generate enough friction to create
embers
1 In the same way as the bow drills drill was constructed find a softwood stick
and carve one side to a rounded point
2 Cut a small hole in the softwood fireboard about an inch from the edge of the
board
3 Cut a v-shaped notch connecting the hole and the edge of the board with the
point of the v connecting with the hole
4 Fill the v-shaped notch with tinder Position the point of the drill into the hole
on the fireboard
5 Place both palms flat on either side of the drill Press your hands in firmly and
rub them back and forth Apply downward pressure as you spin the drill for
added friction
6 Continue to spin the drill in the fireboard until smoke and embers form
7 As with the bow drill once the embers start to make the tinder smolder gently
blow to develop a flame
This method is easy to construct in a pinch making it a valuable bushcraft skill Be
sure to practice often because it can be difficult to implement Persistence and
endurance are required to make it work
Bow Drill
This method is more complicated to build than either of the previously mentioned
methods However once a bow drill is built it requires less exertion to create a
usable ember Lets take a look at how to build a bow drill fire starter
1 Start by finding a piece of hardwood rock or bone that contains a divot or
shallow depression This will serve as the socket that the drill rests in
2 Next find straight stick that will serve as your drill The drill will need to be a
piece of hardwood about frac34-inch thick One end should be blunt and the other
end will be chiseled to a rounded point
3 Make a flat piece of softwood at least 1-inch thick to use as a fireboard Cut a
tiny hole into the board about one inch from the side barely big enough for the
tip of the drill to rest in
4 Cut a triangular notch connecting the hole to the side of the board with the
point of the triangle connecting to the hole in the board
5 Find a bendable green stick to craft into a bow
6 Tightly tie a piece of sinew or paracord to the bent ends of the bow
7 Place your tinder into the triangular notch in the fireboard in step 4 This is
where the sparks will form
8 Place your foot firmly on the fireboard to hold it in place Loop the bowstring
around the drill and place the point of the drill into the hole in the fireboard
Grab your socket from step 1 and place the depression in the socket on top of
the drill to hold it firmly in place
9 Pull the bow back and forth rapidly As you do so this will drive the drill into the
wood creating friction
10 As the embers begin dropping into your tinder nest gently blow until it ignites
Although a bow drill is more difficult to build than a fire plough it should create fire
faster and with less effort If you are able to make your tools you can use them
multiple times making your investment pay off again and again
Pump Fire Drill
The pump fire drill is the most difficult to construct of all the primitive fire starting
tools This is due to its more mechanically complicated nature This is compensated
however by requiring nearly no effort to generate embers and a fire once the pump
fire drill is constructed Lets take a look at how to build one
1 Find a round piece of hardwood and cut a small hole in the center Using sinew
cordage or paracord attach a sharp rock or arrow to the end of a hardwood
stick
2 Drill a hole through a rock at the same width of the stick and push the stick
through the hole with the arrow resting about one to two inches below the
rock The rock should fit snugly without moving
3 Find a slightly curved piece of hardwood and drill a hole through the center the
same width as the stick
4 Insert the curved piece of wood onto the stick an inch above the rock so the
bow in the wood is facing upward It should fit loosely so the device will easily
rotate inside of it
5 Etch two notches on the ends of each side of the bowed wood so that a string
can be tied around easily Tie a piece of sinew cordage or paracord to connect
the edge of each side of the bowed wood to the tip of the stick in the direction
away from the arrow
6 Grab the bow wood as a handle Press the arrow to the hole in the firewood
and spin the device to wind it up
7 Allow the device to unwind itself As the arrow is driven into the fireboard
embers will form
This bushcraft fire starting technique requires almost no effort to create a fire and
is great for people of smaller stature and strength However the pump fire drill
itself will take some time to build so it should be practiced or built ahead of time
and then brought out when needed
Fire Piston
The fire piston is a primitive fire starting technique that is a bit more complicated to
make requiring the use of hardware to build The fire piston uses the pressure
created by quickly ramming the piston down a chamber to generate enough heat
and pressure to ignite a piece of charcloth or other tinder
1 You will need a piece of copper or strong plastic pipe about 10 centimeters
long Sand the ends so they are smooth
2 Plug one end using a brass end cap piece of metal or wood Glue the cap on so
it fits snug
3 Take a 10-millimeter thick wooden piston and cut it so that it is a couple of
centimeters longer than the tube
4 Insert the piston into a power drill Run a file on the end of the piston a couple
of millimeters from the end and run the drill until the file carves a smooth
indented line around the piston
5 Insert a 10-millimeter rubber ring around the ring in the piston Drill a 5-
millimeter hole into the end of the piston on the side with the rubber ring
6 Apply a thin layer of glue to the end of the piston to clog the pores of the wood
Drill a 10-millimeter hole into a cylindrical wooden knob and glue the bare end
of the piston into the knob
7 Fill the hole at the end of the piston with charcloth
8 Lubricate the rubber ring and insert the piston into the copper tube Forcefully
push the piston into the tube quickly pulling it back out immediately
9 Do this repeatedly until the charcloth ignites then transfer the ignited charcloth
to your tinder
While the fire piston method does require some effort to build creating a fire with
it is incredibly easy Although it cant be built out in the woods with simple tools it
is still useful to learn Once a fire piston is built its a light weight and compact
addition to any fire starting kit
Bonus Method The EverStryke Fire Starter
So this is not a primitive fire making method but it is something worth mentioning
The EverStryke Match integrates a magnesium fire starter with a wick that is
soaked in lighter fluid The lighter fluid is stored in a flask that is integrated into the
tool itself
It is lightweight good for up to 15000 strikes and when lit burns at over 600
degrees Fahrenheit more than enough to light damp tinder on fire
Best of all the EverStryke is extremely inexpensive Deals can be found online
where you only pay for shipping and handling essentially getting the EverStryke
for free Here is one of these deals if you are interested
What is the best primitive fire making method
In an ideal world we could just go out and master all of these 6 techniques and be
ready to build a fire no matter the circumstances However not everybody has time
to master all these survival skills What I suggest is picking one or 2 at most and
practicing it until you can create a fire using it in your sleep Picking which method
to learn comes down to several factors including
What resources are available
How much time you have
How much energy you want to expend
Feel free to try out all 6 methods to find which is the best for you Once you have
that figured out practice practice practice The time invested improving your
primitive fire starting skills will pay huge dividends if you ever need to start a fire
without matches Always remember Chance Favors The Well Prepared
The old
saying goes The more skills you have the less gear you need This is a great
mindset to have and it provides a clear path on the journey to preparedness Today
I am going to share with you a set of skills and tools that all add up to the overall
field known as Bushcraft If you are an old hand at wilderness survival or are just
asking What is Bushcraft this article will show you what skills to learn and tools
to use when growing your bushcraft knowledge and survival abilities
What Is Bushcraft
Bushcraft is the art of using the resources provided by our natural environment to
survive and thrive in the great outdoors It combines the knowledge of how to best
use the plants and animals at your disposal with some basic bushcraft tools to
make outdoor living easier and more efficient In learning bushcraft skills we
benefit in many ways including
1 Increasing our ability to adapt to new challenges
What Is Bushcraft SurvivalSkills Tools amp How To Learnby Chris Ruiz
2 Becoming more self sufficient
3 Growing our confidence
4 Increasing our survival skills
5 Becoming better prepared to face unforeseen problems
Bushcraft is not just one thing to learn It is a group of related skills that help you
survive and adapt to overcome obstacles Although traditional bushcraft is focused
on wilderness survival its mindset of using the world around you can easily be
applied to an urban or suburban setting
Learning bushcraft survival skills will go a long way in making you better prepared
the next time a disaster strikes Many of the skills and projects within the field of
bushcraft can be directly applied to survival situations and are immensely useful to
learn
What Are Bushcraft Skills
Bushcraft encompasses several primitive skills to shape the world around you and
meet your survival needs In this article I am going to focus on the fundamental
bushcraft skills that are most related to survival
Food Foraging
Trapping and Hunting Game
Water Gathering and Purification
Shelter Building
Fire Building
Now we have discussed many aspects of these skills in other articles ( such as this
one) but remember bushcraft teaches you how to do all these things with just a
basic tool and the knowledge in your head Each of these bushcraft skills have
many smaller subsets of tasks and abilities that make them up Lets take a look at
what you need to learn to become proficient at these fundamental bushcraft
survival skills
Food Foraging
Knowledge of local plants
Camp cooking
Avoidance of toxic plants
How to efficiently harvest
Trapping and Hunting
Tracking and stalking game
Reading animal signs
Building snares
Using lures
Hiding human scent
Tying knots
Making cordage
Cleaning and cooking game
Water Gathering and Purification
Foraging for water
Making a water filter
Purifying water
Fire building (for boiling)
Container making (for carrying water)
Shelter Building
Felling trees
Batoning branches
Harvesting other materials
Thatching or weaving grass or bark
Knot tying
Making cordage
Natural insulation and waterproofing
Fire Building
Collecting wood
Gathering tinder
Batoning branches
Building a bow drill fire plough or other device
Building a fire pit
Types of fires and their uses
How Long Does It Take To Learn Bushcraft Skills
As you can see there is a lot to learn While becoming a bushcraft master can take
several years or longer the good news in that there are many small skills that can
be quickly learned to get you started Additionally some of the more basic skills
like making cordage and batoning branches have many uses and can be applied to
more than one discipline
If you are just starting out
If you are starting with no base of bushcraft knowledge it is best to begin with one
of the easier skills to learn Many of these can be learned in a matter of hours and
be further developed whenever you have the time to practice Some basic
bushcraft skills to start out with are
Batoning wood
Carving simple tools
Lashing basic camp structures such as a tripod
Knot tying
Basic fire starting
If you have a basic knowledge already
With some basic bushcraft knowledge under your belt you can start to learn some
of the more intermediate skills such as
Foraging for food
Primitive fire building (no matches or lighter)
Shelter building
Basic snares and trapping
Water purification
For the pros
If you have a working knowledge of survival or outdoor living you can start to take
on some of the more advanced bushcraft projects and skills such as
Making rope and cordage
Advanced structure building (camp oven beds thatching)
Advanced foraging and trapping
Land navigation
Tracking
What Are Bushcraft Tools
At its most basic level bushcraft is the art of going out into the woods and
surviving with nothing more than the clothes on your back and an edged tool
Nearly every skill and most bushcraft projects use a bushcraft tool to make your
labor easier
A solid bushcraft
toolkit will make most projects easier and faster
Bushcraft Knife
A fixed blade knife is the most common bushcraft tool Finding the best bushcraft
knife (Check out my guide for picking the best fixed blade knife here ) for your kit
will make many camp tasks easier and faster Bushcraft knives are best suited for
light and medium duty tasks
Batoning branches smaller than your wrist
Carving or whittling wood
Skinning game
Making snares and traps
Preparing food
Here are my favorite knives for bushcraft
Tomahawk or Hatchet
As I discussed in my article How To Choose The Best Tomahawk ( check it out
here) a small axe is a highly versatile bushcraft tool Generally the design of a
bushcraft axe makes it best suited for heavier duty tasks
Chopping wood
Felling trees
Splitting logs
Butchering large game
Digging
Hammering stakes or posts
Here are some of my favorite bushcraft axes and tomahawks
Machete
Functionally a machete is a hybrid between a large knife and small axe It can be
used for many of the tasks I mentioned above The long heavy blade of a machete
is best used for medium to heavy cutting jobs
Clearing Brush
Batoning large branches
Chopping wood
Digging
Saw
The saw is a more specialized bushcraft tool as it is only used for cutting branches
It is however highly efficient at this task This advantage should be considered if
you are planning on working on any bushcraft projects that will require you to cut
lots of wood such as building a
Platform
Hut
Camp table or chair
Bush ladder
Bushcraft Backpack
Lastly we have the pack that you carry all your bushcraft tools and other gear in As
highlighted in my article on how to choose a backpack (read it here) make sure you
pick a comfortable bag that matches your body type and that you can comfortably
carry It is also important that your bushcraft backpack is waterproof and has
multiple compartments rather than one large sack This makes it far easier to
efficiently organize and then find your gear when you want to use it
OK but what is the BEST bushcraft tool
Any of the bushcraft tools mentioned above can be used for nearly every bushcraft
project or task Remember that one of the core ideas of bushcraft is to be
adaptable in approaching problems The best bushcraft tool is really whatever you
have with you Nearly every bushcraft project can be made easier by using a knife
hatchet or saw at some point so either choose your favorite or bring more than
one
The best tool is the one in your hand
Think about what you are going to try and accomplish as well as what the trees and
other resources are in the area you will be working Will you be doing lots of heavy
chopping Make sure to bring an axe Will you be doing detailed carving for snares
and traps Having the best bushcraft knife will be an essential tool
If you have time to plan your bushcraft project out it never hurts to carry all the
items you think you will need It is better to have a piece of equipment with you
than wish you had brought it along
What beginner bushcraft projects I can try
As you can see from the bushcraft skills list above there is a huge range of tasks to
learn and try Starting off with some simple bushcraft projects is a great way to get
your feet wet and start learning some useful new skills Lets take a look at a
beginner bushcraft project from each of the 5 skills we talked about earlier
Food Foraging Bushcraft Project
Go out in the woods and try to forage one edible plant Make sure you read up on
what local plants are edible and palatable and then give it a try
Trapping and Hunting Bushcraft Project
Find and identify one set of animal tracks Again read up on animals in your area
and where they tend to travel Focus on common animals to increase your chances
of success
Water Gathering and Purification Bushcraft Project
Learn and practice one water purification method This can be boiling building a
solar still filtering or any other The important thing is that you actually practice
doing it Note for this beginner bushcraft project I suggest practicing with bottled
water just to be safe
Shelter Building Bushcraft Project
Build a basic shelter such as a debris hut This is an extremely useful bushcraft
survival skill and can save your life if you are ever caught outside overnight Pour a
bottle of water on the completed shelter to judge whether to not it would keep
you dry Extra bonus points if you actually sleep in your shelter to test it out
Fire Building
Build a small fire This encompasses many important fire building skills including
gathering wood finding and preparing tinder and actually building your fire If you
already know how to build a basic fire try building an upside down fire (how to
article here)
Good luck
Good luck with your bushcraft projects If you choose to do any or all of these you
will be well on your way to growing your bushcraft survival skills and making
yourself more prepared Get out there and take action
More Bushcraft Resources
As you can see bushcraft is a huge field with many skills and activities to learn I
have provided a basic overview to answer the question of What is Bushcraft but
there are lots of great resources out there to help you explore further
Bushcraft Books
Bushcraft Community and Instructional Sites
Bushcraft UK - A supportive helpful forum You do not need to live in the UK
to join
Ray Mears Blog - One of the big personalities in the bushcraft realm Really
knows his stuff
Dryad Bushcraft - Lots of FAQ and How To Articles about skills and techniques
Bushcraft And Survival Skills Blog - How to articles and gear reviews
Conclusion What is Bushcraft
Bushcraft is a diverse and extremely useful skill set to add to your survival arsenal
This guide should help get you started but there is no teacher better than
experience I challenge you to go out into the world and practice your bushcraft
skills You will make yourself more confident adaptable and better prepared for
whatever fate throws your way Always remember Chance Favors The Well
Prepared
Feeding yourself off the land can be a challenge even in favorable conditions and is
one of the most important bushcraft skills to learn It takes a good knowledge of
local plants and animals as well as the ability to actually catch or gather them to
make a meal The field of bushcraft has lots of ways to make this easier For more
basic information on getting started with Bushcraft check out our article HERE
Bushcraft Skills Foraging for edible plants
Being able to forage for your dinner requires an in depth knowledge of the plants
in your area You need to know not only what you CAN eat but also what you
CANT eat
Bushcraft Skills Foraging forfoodby Chris Ruiz
What to look for
Roots and tubers Roots and tubers are found in the soil underneath the vine or
stalk of a plant They are very nutritious but usually require cooking or boiling
Potatoes yams and onions are all either roots or tubers
Grasses The young whitish tips of many grasses are edible and often palatable
They can be eaten raw
Seeds amp Nuts The seeds and nuts of many plants are edible and provide a good
source of nutrition If you taste a seed or nut and it has a bitter or acidic quality
it is probably not safe to eat Frequently seeds and nuts can be made safe to eat
by soaking them for 12 hours in water or boiling
Fruit amp Berries We are used to seeing fruit in our supermarkets on a regular
basis but it is important to note that the apples pears and bananas we consume
are the product of thousands of years of cultivation by farmers Many berries
and fruits found in the wild can be harmful if eaten Generally any fruit that is
red in color should be avoided Unless you are sure a fruit or berry is safe to eat
these are best avoided
Leaves The leaves of many plants are edible both raw and after boiling Some
palatable ones to seek out are watercress and nettles (be careful when picking
nettles as they can sting) both of which often grow near freshwater streams
Beware leaves that have a strong bitter taste
Things to avoid
An important part of bushcraft foraging is knowing what to avoid Remember that
there are exceptions to every rule so it is best to educate yourself about your local
plants as much as possible Here are some general guidelines to follow
Bad smelling plants - If a plant or fruit has an off putting smell it is probably not
ideal to eat Out sense of smell has evolved over thousands of years to warn us
against dangerous foods Avoid anything that smells distasteful
Taste of almond - This is usually an indication of the presence of prussic acid which
is toxic to humans It can sometimes be removed by boiling the plant If you can no
longer taste the almond bitterness after boiling or soaking it is probably safe Be
sure to safely discard the water you boiled the plant in
Acidity or Bitterness - Any plant that tasted extremely bitter or hot should be
avoided This is a typical sign that it will make you sick or worse
The Color Red - Seeing red leaves or fruit is a likely sign that a plant is dangerous
to us There are some exceptions of course (strawberries apples) but unless you
KNOW a red plant or fruit is safe avoid it at all costs
Fungus - There are some mushrooms out there that are edible and even tasty
However these can be hard to differentiate between their lookalike toxic cousins
Again unless you are SURE a mushroom is edible it is best to not eat them at all
But what if
If you are uncertain if something is edible or not and out of options the general
approach is to taste a small bite of it WITHOUT swallowing it If it tastes OK (no
bitterness or strong acidity) then swallow a small sample and wait 1 hour If not
unpleasant reaction occurs it is safe to eat more Again this approach is a last
resort You are better off to keep on searching if you have any doubt in your mind
Also remember that cooking or boiling can reduce or remove bitter tastes and in
some cases toxins as well Again it is essential to gain knowledge over your local
plants to be able to use this option
Bushcraft SkillsTrapping and Hunting Game
Foraging Plants vs Animals
When every calorie counts theres no question Eating animals is the most efficient
path to survival Plants can offer additional nutrients flavor and supporting
calories but generally wont contain enough calories to sustain you on their own
Most leafy plants will only offer 30-50 calories per ounce of weight Contrast this
with the 200 calories available from a small freshwater fish and 500 calories
provided by a single fat squirrel The numbers grow exponentially for larger game
Nuts to be fair do offer a respectable caloric payoff in the neighborhood of 150-
200 calories per ounce Most acorns will need a lot of preparation but walnuts
beechnuts and butternuts can be eaten fresh or kept for a few days after being
dried in the sun
Finding Food
Food sources are all around us no less so when were in the backwoods
Regardless of your geographic location you can rest assured there are plenty of
indigenous wild edibles One of your regular bushcraft projects should be to
practice identifying and gathering some of these food items
When moving in the woods look constantly for animal sign Scat tracks and eaten
plants or nutshells are all indicators of recent animal activity Gather convenient
plants while youre moving on other tasks dont devote valuable time to seeking
out these lower calorie foods
Traps and Snares
If youre in a situation that calls for feeding yourself youre likely to have a lot of
work to do to stay alive Moving toward safety tending a fire (learn how to make a
self feeding fire HERE) securing water and treating injuries take time and calories
Dont waste either of those precious commodities on actively hunting for one
animal at a time Use snares and traps to multiply yourself Snares will require wire
or cordage Keeping a few good sections of thin wire in your bushcraft backpack or
survival kit is a good idea and can be one of the more valuable bushcraft tools in a
survival scenario
When placing trap and snare sets designs are limited only by your imagination A
few of the most common sets are
1 Figure-4 deadfall (video below)
2 Basic peg trigger for spring-tree snare (picture above)
3 Fish funnel
4 Squirrel pole (video also below)
When setting traps the key is to placing the trigger or snare loop where an animal
is likely to hit it Game trails particularly those that lead to water or dens are
excellent locations Place snares directly in the trail with the snare loop a couple
inches off the ground at the height of a likely target animals head Traps with
baited triggers like the Figure-4 Deadfall (see the video below) should have some
tasty bait rubbed on the bait stick Food wrappers or mashed up fish or frog parts
work well for this
Be sure to check your sets regularly Remember youre not the only predator in the
forest A handy rabbit in a snare would make quite a good meal for a scavenging
coyote
Cleaning and Cooking Game
Once your carefully set traps have secured some food dont ruin the payoff with
poor processing Its important to cleanly skin and gut game to adequately cook and
minimize spoiling of the meat Squirrels and rabbits are easily skinned with just a
few knife strokes Fish can generally be filleted and de-scaled in about the time it
takes to peel an apple
Cooking is a pretty simple affair Roasting meat on a spit is simple and gets the job
done Fish is generally best grilled on a flat rock facing a fire If you luck into
enough meat to last for longer than one or two meals consider smoking and drying
the meat on a tipi-shaped rack made of green wood and covered with bark If you
want to hone your primitive fire making skills you can check out our How-To
article HERE
Bushcraft Tools for Wild Edibles
An ounce of prevention is worth a pound of cure When youre going into the
wilderness make sure an EPIRB is in your bushcraft backpack From there a
quality knife plenty of snare wire a primary and backup fire starter and a small
fabric bag for holding foraged food are all near-necessities
One of my
favorite Bushcraft Tools the Gerber LMF II
Conclusion
If youre navigating through unfamiliar terrain a map is as valuable as gold dust
You may have planned your routes by them and will be relying on them throughout
the course of your expedition or bug out However a map is next to worthless if
you dont know how to decipher it Map reading and land navigation is are vital
skills that can be applied to many survival situations This article will outline the
basics to help you sharpen up your map reading skills
Map Reading Skills Using A Maps Scale
First your map should be at a scale which is useful For instance having a small-
scale detailed map will be of no use to you if you simply plan to drive through an
area In the same way if you are on foot then having a less detailed map can be
next to useless It is also important to understand the scale bar This bar will show
Learn These Map ReadingSkills To Never Get LostAgainby Roman
the size at which a kilometer or mile is shown on the map and is usually expressed
as a ratio For instance 150000 means that each measure on the map is 50000
times smaller than the true distance This will allow you to use the map to
determine distances for land navigation
Map Reading Skills Reading Contour Lines
A thorough understanding of reading contour lines is an extremely useful tool to
add to your arsenal of map reading skills Because a map is 2D different heights of
terrain must be indicated using contour lines These show the altitudes of the land
and are recorded at regular intervals - usually 50ft (15m) Each point on a contour
lines ring is hypothetically at the same height which is indicated with a number (in
feet or meters) This tells you how high above sea level the terrain is In general
contour lines which are closer together indicate a steeper gradient However its
important to bear in mind the scale of your map so that you dont over or
underestimate the gradient
Map Reading Skills Reading A Maps Key
The key will explain what the symbols used on the map refer to These will
represent a range of manmade and natural structures types of land (woodland
swaps or beaches for example) rivers and water There are some features which
are not depicted to scale For instance roads paths and waterways will often have
a standard width which may not represent their exact measurements
Map Reading Skills Understanding Map Grids
Maps will have horizontal and vertical grid lines which divide the map into squares
This division is either based on longitude and latitude or may be individual to the
particular mapping authority Grids will allow you to more quickly determine
distances since they are usually at a comprehensive scale (for example the
distance from left to right is often 1 kilometer)
Map Reading Skills Orientating Your Map
Important to remember is that the grids on a map do not necessarily indicate north
and south though they may provide a rough indication of this You will need to
also be aware that your compass does not point to true north but to magnetic
north Most maps will also indicate magnetic north The deviations between these
can help you map-read your way across a landscape as can taking note of your
surroundings in relation to features on the map
Map Reading Skills Conclusion
Hopefully our crash course has helped you sharpen up your map reading skills If
you ever have to execute your bug out plan or evacuate unexpectedly knowing
how to use a map and compass will greatly increase your chances to make it to
your rally point or bug out location As with any basic survival skill it is important to
practice using your map reading and land navigation skills to find your way Master
these and you will never be lost
Author Bio
Roman is a former EMT living in NYC and co-founder of Ready To Go Survival
When hes not working on the next big thing for preppers he likes to go camping
shoot stuff at the range archery and ride his bicycle excruciating distances
Typically we count on weather services and electronic devices to know what to
expect from the sky We may alter travel plans make a quick trip to the store or
simply pack an umbrella in reaction to an impending storm However these
services will likely come to a halt if disaster strikes and alternative means of
monitoring weather conditions will be necessary For those that opt to head for the
hills it will become vastly more important to know how to predict the weather in
the wilderness
Nature itself provides many clues as to what is in store The clouds plants animals
insects and the moon have been used for centuries to predict precipitation
droughts and floods Farmers fishermen sailors and others who spend long
periods of time outdoors and whose livelihood depends heavily on the weather
patterns have devised ways to foresee the weather in order to prepare
themselves
How To Predict The WeatherIn The Wildernessby Chris Ruiz
Having the skills to read the warning signs that nature provides has short-term and
long-term benefits that can greatly increase your chances of survival in a bug-out
scenario Whether a major storm is brewing and you need to prepare to build a
shelter in for the day or if the likelihood of flooding doubles and you need to
reconsider your location for the season learning how to predict the weather using
nature is a valuable survival skill
Observing The Sky To Predict The Weather
The most intuitive way to predict the weather is to look to the sky The clouds
wind direction air pressure and even the moon are directly related to incoming
weather Paying close attention to the changes in the sky and knowing how to
interpret what you see gives you advance warning of what is to come and enables
you to prepare
A red rising sun
warns of rain to come
There is an old saying ldquoRed sky at night a sailors delight Red sky morn sailors take
warn At sunset the red sky is caused by sun rays passing through dust particles
which accumulate at the forefront of a high pressure system However in the
morning a red sky occurs when a low pressure system carrying moisture is on the
way Therefore a brilliant red sunset usually precedes a clear day but a red sunrise
is a warning that a storm is coming
A red sky as the
sun sets in the west is a sign of clear skies
Another colorful way to predict the weather is the formation of rainbows In the
northern hemisphere a morning rainbow in the east indicates rain is on the way as
weather generally moves east to west
Reading Clouds
Cloud identification is a science in itself but there are some simple indicators that
can prove very useful especially when trying to predict the weather in the
wilderness
When you see
cumulus clouds its a good day for traveling foraging and other outdoor activities
White fluffy clouds sitting high in the sky are non-threatening as they pass
overhead When the cloud cover is low and dark a storm is building and
appropriate measures should be taken to prepare your camp Gathering extra
firewood and storing it in a protected location will ensure that you have dry fuel to
burn during and after the storm
Low dark cloud
cover is a sure sign that a storm is building Make sure your shelter is ready to
withstand rain and wind
To give yourself more time to prepare there are two easily identified types of
clouds that form prior to storm clouds mares tails and mackerel skies Mares tails
are wispy cirrus clouds that are somewhat hazy and undefined as the tail of a
galloping mare The same conditions that cause them to form also cause airplane
trails to linger in the sky
Cirrus clouds
precede incoming frontal systems and indicate changing weather Image credit
k4dordy on flickr
Mackerel skies are altocumulus clouds and are also a sign of rising moisture levels
Independently these each warn of rain coming within a few days but seen
together rain will typically fall within 24 hours
Mackerel skies are
named for their resemblance to the scales of a mackerel fish
While clouds are often thought of as bringers of rain they also act as a layer of
insulation On an overcast night the radiant heat from the earth is trapped by the
cloud layer leading to a higher temperature in the morning When the sky is clear
at night the radiant heat escapes and the morning will be cooler as a result
Detecting Air Pressure
Though air pressure is less noticeable than cloud cover it is a very dependable
indicator of incoming weather conditions Low atmospheric pressure leads to cloud
formation and precipitation High pressure systems are associated with rising air
and clear dry skies
One way to detect the current air pressure conditions is to observe the smoke from
a campfire If the smoke is rising steadily in vertical column the air pressure is high
but if it is sinking and swirling the air pressure is low and precipitation may soon
follow
Studying how to
predict the weather turns your campfire into a barometer
What The Wind Tells About The Weather
Wind is named for the direction it comes from so an easterly wind blows from east
to west A gentle prevailing wind or light variable winds are signs of clear weather
Strong winds occur when two fronts with different temperatures meet and usually
mean that a storm is forming
An awareness of the surrounding climates will also help you read the wind For
instance if a desert lies to the east of your location wind coming from the east will
typically carry dry warm desert air Mountains also play a role in that air flowing
over a mountain will usually release precipitation as it rises along the side facing
the wind and will move down the opposite side with dry air
ldquoCircle Around The Moon Rain Or Snow Soon
People have long looked to the moon to provide insight into atmospheric
conditions As the old saying states when the moon has a hazy ring around it
precipitation is on its way The ring is caused by the presence of dust particles
building up in the atmosphere It means that a low pressure system is on its way
bringing rain or snow with it As it passes through the low pressure system will
push the particles along
You can see how
the moonlight reflects on the particles in the air forming a hazy ring
When the moon appears clearly defined and bright it is due to an absence of
particles and moisture This is characteristic of a high pressure system and the next
day has a high chance of being dry In the short-term this is a simple and effective
way to predict the weather
When the outline
of the moon is clearly defined fair weather can be expected
For long-term or seasonal weather predictions the phases of the moon can reveal
clues When two full moons occur in the same month there is a higher chance of
flooding It is also said that when the tips of a crescent moon point upward and the
moon looks like a bowl that can hold water a dry spell is coming When the new
moon looks like a frown or a bowl that water would spill out of a wet spell is
predicted
This bowl-shaped
moon is often associated with a period of dry weather
Weather Signs In Nature
The natural world is built to survive and living things will make adjustments in
order to maintain life and produce offspring Sometimes the changes are so subtle
they can hardly be detected but there are some common plant and animal
behaviors that reveal clues about the weather When bugging out you can use
these clues to increase your own chances of survival
How To Predict The Weather Using Plants
Upon waking take a close look at the ground Morning dew on the plants while
itself is wet can actually be a sign of a dry day to come A lack of morning dew can
occur when dry winds have been pushed through ahead of a storm system bringing
rain close behind Of course if it rained the night before this will be more difficult
to observe and you will need to look for additional signs in order to predict the
weather
A dewy morning
can mean that a dry day is in store
The phrase ldquoit smells like rain has some truth to it The moist air of a low pressure
system brings out the scents of plants as they release their waste under this
condition so the air will smell more pungent just before a rain Swamps will also
release gases during a low pressure system making for a telltale sign that a storm is
moving in
Visual signs that it is time to prepare for wet weather are readily apparent in trees
The leaves of deciduous trees will curl upward in anticipation of a rainstorm Pine
cones will open their scales in dry air but close them in high humidity
The increase in
humidity prior to a storm causes deciduous leaves to curl upward
It looks like a dry
sunny day for this pine tree
Plants also have the ability to foresee more long-term conditions and will adjust
their growth accordingly Crops such as onions and corn will grow thicker husks
when a harsher winter is predicted in order to provide more protection to their
seeds Similarly evergreens will produce larger more robust pine cones and
acorns will form thicker shells- all to provide the seeds with a better chance of
surviving extreme winter conditions If you notice these signs be prepared for a
cold long winter
A thicker husk
provides the seeds with better insulation against extreme temperatures
How To Predict The Weather Using Animals
The combination of heightened senses and well-developed instincts makes animals
highly adept at sensing bad weather conditions Be on the lookout for changes in
feeding patterns behavior and sound level that may indicate rain is on the way
Here are some specific examples of animal behavior that can be used to predict
when a storm is coming
Fish will feed voraciously at the surface prior to a storm so that they can ride it
out in deeper water where food is scarce so an excellent day of fishing usually
means you should seek shelter and be prepared to cook the days catch in the
rain
Turtles begin to seek higher ground 1-2 days before a large rainstorm so you
may see them on roads or other areas above normal water levels
If birds are flying high the weather will likely be clear for a few days Birds will
fly lower in dropping pressure systems because the change in pressure hurts
their ears They will also exhibit frenzied feeding Squabbles at the bird feeder
can mean that a storm is coming and birds are stocking up in preparation of
riding out the storm in their nest
Along coastlines seagulls will take shelter before a storm and birds in general
become very quiet
Squirrels similar to birds will aggressively stock up on food prior to a pending
storm
Cats ears are very sensitive and they do not tend to wash them but a change in
pressure may cause your cat to rub at its ears indicating a drop in pressure and
a storm on the way
Horses and cows are known to exhibit similar ear sensitivity behaviors when the
pressure changes
Herd animals such as cattle will group tightly together usually facing the same
direction when a storm is approaching They also tend to head for high ground
In addition to predicting major storms animals can also sense long-term threats in
the weather pattern This information is highly valuable when preparing your bug
out camp to withstand low temperatures and difficult conditions A harsh winter
means that food will be scarce and opportunities for foraging and hunting will be
limited
Depending on the amount of snow cover it may be challenging to gather firewood
Keeping a fire going will be vital and your bug out party will need as many warm
layers as you are able to find or make All of these preparations take time so the
sooner you know the better
In general if you notice extra thick coats of fur on domestic animals or local
wildlife expect dropping temperatures Conversely when their fur comes off in
tufts warmer temperatures are right around the corner
If birds begin migrating earlier than usual it is a sign of harsh winter to come The
brown section in the middle of a woolly bears body is also used to predict how
harsh the upcoming winter will be the thinner the brown stripe the harsher the
winter is expected to be While there is not much research to back it up a 70-80
success rate is pretty good for an old wives tale
The Isabella Tiger
Moth caterpillar often referred to as the woolly bear is an age-old predictor of
winter conditions The one on the left (photo credit Sheila Sund on flickr) is
thought to indicate a short winter while the one on the right (photo credit USFWS
on flickr) shows a harsh winter is in store
Farmers have even used cow fertility rates to predict whether there will be a
drought the following year- a drop in fertility occurs in anticipation of a future
water shortage
Want MoreDid you find this ebook useful
Check out our comprehensive guide on making the BESTEvery Day Kit and adopting the EDC Mindset to your
everyday life
Learn More
made with
Do cows know
how to predict the weather Many animals will make similar adjustments in
breeding in response to foreseen conditions
Resources On How To Predict The Weather
To futher explore the topic of how to predict the weather using nature check out
these excellent resources on clouds weather navigating and storms
Conclusion
Plants and animals have been ldquobugging out and surviving in nature since the
beginning of time There is much to gain by observing their weather predicting
skills and honing our own When living in the natural world a simple thunderstorm
can be catastrophic if you are not prepared for it Anticipating a harsh winter can
help you ration supplies and apply your energy effectively so you have adequate
food and fuel stored Knowing how to predict the weather will help you to make
wise decisions in favor of your survival
- Essential Survival Skills amp Tactics
- Table of Contents
- 5 Basic Survival Skills You Need When Bugging Out
-
- Basic Survival Skills
-
- 1 Positive Mental Attitude
-
- Some ways to instill this mentality are
-
- 2 Water
- 3 Food
- 4 Shelter
- 5 Fire
-
- Conclusion
-
- Learn To Build Shelter For Any Survival Situation
-
- Why Learn to Build a Survival Shelter
- Choosing the Best Location for Your Survival Shelter
- Types of Survival Shelters
-
- Simple Frame and Tarp Method
- Simple Body Heat Shelter
- Open Shelter or Lean-To
- A-Frame Shelter
- Teepee Variations
- Subterranean Survival Shelter
- Long-Term Log Cabin
-
- Survival Supplies Beneficial to Have on Hand
-
- Learn How To Harvest Water From Natural Sources
-
- Wilderness Precautions
- Conclusion
- 3 Key Methods for Harvesting Water
-
- Solar Still
- Rainwater
- Plant Sources
-
- Transpiration Bag
- Directly Off the Leaves
- Tapping Into the Trunk
- From the Roots
- Bamboo Plants
- Vines
-
- Surviving A Drought By Extracting Water From the Air
-
- Searching for Water - 4 Key Signs You Must Look For
-
- Growing Vegetation
- Following Insects and Birds
- Following Animal Tracks
- Terrain Indicators
-
- Essential Water Purification Techniques
-
- Filtration
- Gypsy Filter
- DIY Charcoal Straw Filter
- Steripen
- LifeStraw
- Boiling
- UV Purification
- Unscented Chlorine Bleach
- Purification Tablets
-
- Perfecting Your Drought Survival Skills
- Conclusion
-
- 6 Ways To Make Fire Without Matches
-
- Primitive Fire Making Techniques
-
- Flint and Steel
- Fire Plough
- Hand Drill
- Bow Drill
- Pump Fire Drill
- Fire Piston
-
- Bonus Method The EverStryke Fire Starter
- What is the best primitive fire making method
-
- What Is Bushcraft Survival Skills Tools amp How To Learn
-
- What Is Bushcraft
- What Are Bushcraft Skills
-
- Food Foraging
- Trapping and Hunting
- Water Gathering and Purification
- Shelter Building
- Fire Building
-
- How Long Does It Take To Learn Bushcraft Skills
-
- If you are just starting out
- If you have a basic knowledge already
- For the pros
-
- What Are Bushcraft Tools
-
- Bushcraft Knife
- Tomahawk or Hatchet
- Machete
- Saw
- Bushcraft Backpack
- OK but what is the BEST bushcraft tool
-
- What beginner bushcraft projects I can try
-
- Food Foraging Bushcraft Project
- Trapping and Hunting Bushcraft Project
- Water Gathering and Purification Bushcraft Project
- Shelter Building Bushcraft Project
- Fire Building
- Good luck
-
- More Bushcraft Resources
-
- Bushcraft Books
- Bushcraft Community and Instructional Sites
-
- Conclusion What is Bushcraft
-
- Bushcraft Skills Foraging for food
-
- Bushcraft Skills Foraging for edible plants
-
- What to look for
- Things to avoid
-
- But what if
-
- Bushcraft Skills Trapping and Hunting Game
-
- Foraging Plants vs Animals
- Finding Food
- Traps and Snares
- Cleaning and Cooking Game
- Bushcraft Tools for Wild Edibles
-
- Conclusion
-
- Learn These Map Reading Skills To Never Get Lost Again
-
- Map Reading Skills Using A Maps Scale
- Map Reading Skills Reading Contour Lines
- Map Reading Skills Reading A Maps Key
- Map Reading Skills Understanding Map Grids
- Map Reading Skills Orientating Your Map
- Map Reading Skills Conclusion
-
- Author Bio
-
- How To Predict The Weather In The Wilderness
-
- Observing The Sky To Predict The Weather
-
- Reading Clouds
- Detecting Air Pressure
- What The Wind Tells About The Weather
- ldquoCircle Around The Moon Rain Or Snow Soon
-
- Weather Signs In Nature
-
- How To Predict The Weather Using Plants
- How To Predict The Weather Using Animals
-
- Want More
-
- Resources On How To Predict The Weather
- Conclusion
-
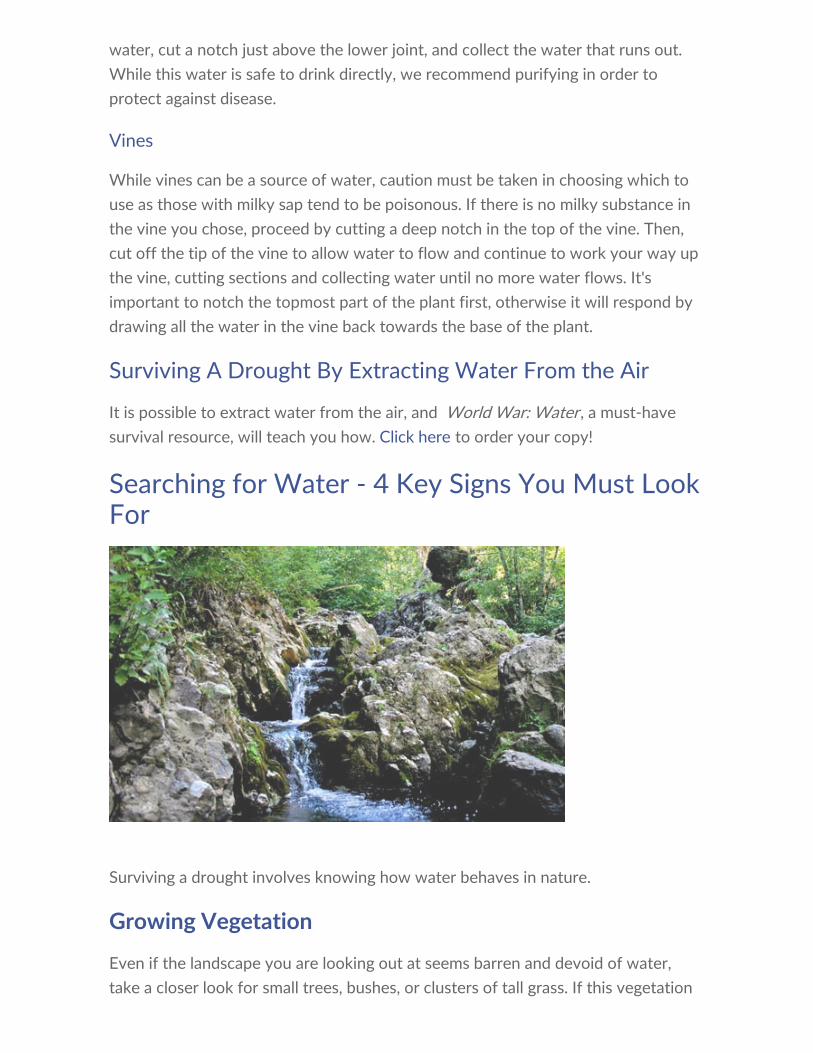
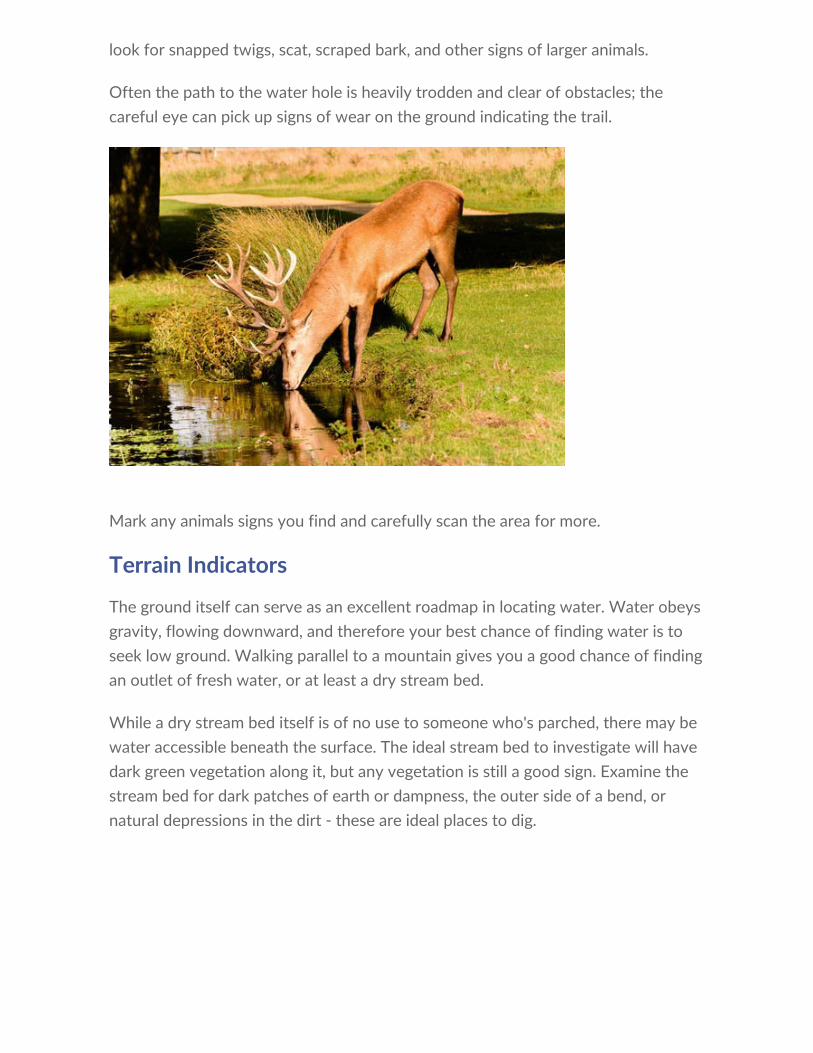

Fire Building
Collecting wood
Gathering tinder
Batoning branches
Building a bow drill fire plough or other device
Building a fire pit
Types of fires and their uses
How Long Does It Take To Learn Bushcraft Skills
As you can see there is a lot to learn While becoming a bushcraft master can take
several years or longer the good news in that there are many small skills that can
be quickly learned to get you started Additionally some of the more basic skills
like making cordage and batoning branches have many uses and can be applied to
more than one discipline
If you are just starting out
If you are starting with no base of bushcraft knowledge it is best to begin with one
of the easier skills to learn Many of these can be learned in a matter of hours and
be further developed whenever you have the time to practice Some basic
bushcraft skills to start out with are
Batoning wood
Carving simple tools
Lashing basic camp structures such as a tripod
Knot tying
Basic fire starting
If you have a basic knowledge already
With some basic bushcraft knowledge under your belt you can start to learn some
of the more intermediate skills such as
Foraging for food
Primitive fire building (no matches or lighter)
Shelter building
Basic snares and trapping
Water purification
For the pros
If you have a working knowledge of survival or outdoor living you can start to take
on some of the more advanced bushcraft projects and skills such as
Making rope and cordage
Advanced structure building (camp oven beds thatching)
Advanced foraging and trapping
Land navigation
Tracking
What Are Bushcraft Tools
At its most basic level bushcraft is the art of going out into the woods and
surviving with nothing more than the clothes on your back and an edged tool
Nearly every skill and most bushcraft projects use a bushcraft tool to make your
labor easier
A solid bushcraft
toolkit will make most projects easier and faster
Bushcraft Knife
A fixed blade knife is the most common bushcraft tool Finding the best bushcraft
knife (Check out my guide for picking the best fixed blade knife here ) for your kit
will make many camp tasks easier and faster Bushcraft knives are best suited for
light and medium duty tasks
Batoning branches smaller than your wrist
Carving or whittling wood
Skinning game
Making snares and traps
Preparing food
Here are my favorite knives for bushcraft
Tomahawk or Hatchet
As I discussed in my article How To Choose The Best Tomahawk ( check it out
here) a small axe is a highly versatile bushcraft tool Generally the design of a
bushcraft axe makes it best suited for heavier duty tasks
Chopping wood
Felling trees
Splitting logs
Butchering large game
Digging
Hammering stakes or posts
Here are some of my favorite bushcraft axes and tomahawks
Machete
Functionally a machete is a hybrid between a large knife and small axe It can be
used for many of the tasks I mentioned above The long heavy blade of a machete
is best used for medium to heavy cutting jobs
Clearing Brush
Batoning large branches
Chopping wood
Digging
Saw
The saw is a more specialized bushcraft tool as it is only used for cutting branches
It is however highly efficient at this task This advantage should be considered if
you are planning on working on any bushcraft projects that will require you to cut
lots of wood such as building a
Platform
Hut
Camp table or chair
Bush ladder
Bushcraft Backpack
Lastly we have the pack that you carry all your bushcraft tools and other gear in As
highlighted in my article on how to choose a backpack (read it here) make sure you
pick a comfortable bag that matches your body type and that you can comfortably
carry It is also important that your bushcraft backpack is waterproof and has
multiple compartments rather than one large sack This makes it far easier to
efficiently organize and then find your gear when you want to use it
OK but what is the BEST bushcraft tool
Any of the bushcraft tools mentioned above can be used for nearly every bushcraft
project or task Remember that one of the core ideas of bushcraft is to be
adaptable in approaching problems The best bushcraft tool is really whatever you
have with you Nearly every bushcraft project can be made easier by using a knife
hatchet or saw at some point so either choose your favorite or bring more than
one
The best tool is the one in your hand
Think about what you are going to try and accomplish as well as what the trees and
other resources are in the area you will be working Will you be doing lots of heavy
chopping Make sure to bring an axe Will you be doing detailed carving for snares
and traps Having the best bushcraft knife will be an essential tool
If you have time to plan your bushcraft project out it never hurts to carry all the
items you think you will need It is better to have a piece of equipment with you
than wish you had brought it along
What beginner bushcraft projects I can try
As you can see from the bushcraft skills list above there is a huge range of tasks to
learn and try Starting off with some simple bushcraft projects is a great way to get
your feet wet and start learning some useful new skills Lets take a look at a
beginner bushcraft project from each of the 5 skills we talked about earlier
Food Foraging Bushcraft Project
Go out in the woods and try to forage one edible plant Make sure you read up on
what local plants are edible and palatable and then give it a try
Trapping and Hunting Bushcraft Project
Find and identify one set of animal tracks Again read up on animals in your area
and where they tend to travel Focus on common animals to increase your chances
of success
Water Gathering and Purification Bushcraft Project
Learn and practice one water purification method This can be boiling building a
solar still filtering or any other The important thing is that you actually practice
doing it Note for this beginner bushcraft project I suggest practicing with bottled
water just to be safe
Shelter Building Bushcraft Project
Build a basic shelter such as a debris hut This is an extremely useful bushcraft
survival skill and can save your life if you are ever caught outside overnight Pour a
bottle of water on the completed shelter to judge whether to not it would keep
you dry Extra bonus points if you actually sleep in your shelter to test it out
Fire Building
Build a small fire This encompasses many important fire building skills including
gathering wood finding and preparing tinder and actually building your fire If you
already know how to build a basic fire try building an upside down fire (how to
article here)
Good luck
Good luck with your bushcraft projects If you choose to do any or all of these you
will be well on your way to growing your bushcraft survival skills and making
yourself more prepared Get out there and take action
More Bushcraft Resources
As you can see bushcraft is a huge field with many skills and activities to learn I
have provided a basic overview to answer the question of What is Bushcraft but
there are lots of great resources out there to help you explore further
Bushcraft Books
Bushcraft Community and Instructional Sites
Bushcraft UK - A supportive helpful forum You do not need to live in the UK
to join
Ray Mears Blog - One of the big personalities in the bushcraft realm Really
knows his stuff
Dryad Bushcraft - Lots of FAQ and How To Articles about skills and techniques
Bushcraft And Survival Skills Blog - How to articles and gear reviews
Conclusion What is Bushcraft
Bushcraft is a diverse and extremely useful skill set to add to your survival arsenal
This guide should help get you started but there is no teacher better than
experience I challenge you to go out into the world and practice your bushcraft
skills You will make yourself more confident adaptable and better prepared for
whatever fate throws your way Always remember Chance Favors The Well
Prepared
Feeding yourself off the land can be a challenge even in favorable conditions and is
one of the most important bushcraft skills to learn It takes a good knowledge of
local plants and animals as well as the ability to actually catch or gather them to
make a meal The field of bushcraft has lots of ways to make this easier For more
basic information on getting started with Bushcraft check out our article HERE
Bushcraft Skills Foraging for edible plants
Being able to forage for your dinner requires an in depth knowledge of the plants
in your area You need to know not only what you CAN eat but also what you
CANT eat
Bushcraft Skills Foraging forfoodby Chris Ruiz
What to look for
Roots and tubers Roots and tubers are found in the soil underneath the vine or
stalk of a plant They are very nutritious but usually require cooking or boiling
Potatoes yams and onions are all either roots or tubers
Grasses The young whitish tips of many grasses are edible and often palatable
They can be eaten raw
Seeds amp Nuts The seeds and nuts of many plants are edible and provide a good
source of nutrition If you taste a seed or nut and it has a bitter or acidic quality
it is probably not safe to eat Frequently seeds and nuts can be made safe to eat
by soaking them for 12 hours in water or boiling
Fruit amp Berries We are used to seeing fruit in our supermarkets on a regular
basis but it is important to note that the apples pears and bananas we consume
are the product of thousands of years of cultivation by farmers Many berries
and fruits found in the wild can be harmful if eaten Generally any fruit that is
red in color should be avoided Unless you are sure a fruit or berry is safe to eat
these are best avoided
Leaves The leaves of many plants are edible both raw and after boiling Some
palatable ones to seek out are watercress and nettles (be careful when picking
nettles as they can sting) both of which often grow near freshwater streams
Beware leaves that have a strong bitter taste
Things to avoid
An important part of bushcraft foraging is knowing what to avoid Remember that
there are exceptions to every rule so it is best to educate yourself about your local
plants as much as possible Here are some general guidelines to follow
Bad smelling plants - If a plant or fruit has an off putting smell it is probably not
ideal to eat Out sense of smell has evolved over thousands of years to warn us
against dangerous foods Avoid anything that smells distasteful
Taste of almond - This is usually an indication of the presence of prussic acid which
is toxic to humans It can sometimes be removed by boiling the plant If you can no
longer taste the almond bitterness after boiling or soaking it is probably safe Be
sure to safely discard the water you boiled the plant in
Acidity or Bitterness - Any plant that tasted extremely bitter or hot should be
avoided This is a typical sign that it will make you sick or worse
The Color Red - Seeing red leaves or fruit is a likely sign that a plant is dangerous
to us There are some exceptions of course (strawberries apples) but unless you
KNOW a red plant or fruit is safe avoid it at all costs
Fungus - There are some mushrooms out there that are edible and even tasty
However these can be hard to differentiate between their lookalike toxic cousins
Again unless you are SURE a mushroom is edible it is best to not eat them at all
But what if
If you are uncertain if something is edible or not and out of options the general
approach is to taste a small bite of it WITHOUT swallowing it If it tastes OK (no
bitterness or strong acidity) then swallow a small sample and wait 1 hour If not
unpleasant reaction occurs it is safe to eat more Again this approach is a last
resort You are better off to keep on searching if you have any doubt in your mind
Also remember that cooking or boiling can reduce or remove bitter tastes and in
some cases toxins as well Again it is essential to gain knowledge over your local
plants to be able to use this option
Bushcraft SkillsTrapping and Hunting Game
Foraging Plants vs Animals
When every calorie counts theres no question Eating animals is the most efficient
path to survival Plants can offer additional nutrients flavor and supporting
calories but generally wont contain enough calories to sustain you on their own
Most leafy plants will only offer 30-50 calories per ounce of weight Contrast this
with the 200 calories available from a small freshwater fish and 500 calories
provided by a single fat squirrel The numbers grow exponentially for larger game
Nuts to be fair do offer a respectable caloric payoff in the neighborhood of 150-
200 calories per ounce Most acorns will need a lot of preparation but walnuts
beechnuts and butternuts can be eaten fresh or kept for a few days after being
dried in the sun
Finding Food
Food sources are all around us no less so when were in the backwoods
Regardless of your geographic location you can rest assured there are plenty of
indigenous wild edibles One of your regular bushcraft projects should be to
practice identifying and gathering some of these food items
When moving in the woods look constantly for animal sign Scat tracks and eaten
plants or nutshells are all indicators of recent animal activity Gather convenient
plants while youre moving on other tasks dont devote valuable time to seeking
out these lower calorie foods
Traps and Snares
If youre in a situation that calls for feeding yourself youre likely to have a lot of
work to do to stay alive Moving toward safety tending a fire (learn how to make a
self feeding fire HERE) securing water and treating injuries take time and calories
Dont waste either of those precious commodities on actively hunting for one
animal at a time Use snares and traps to multiply yourself Snares will require wire
or cordage Keeping a few good sections of thin wire in your bushcraft backpack or
survival kit is a good idea and can be one of the more valuable bushcraft tools in a
survival scenario
When placing trap and snare sets designs are limited only by your imagination A
few of the most common sets are
1 Figure-4 deadfall (video below)
2 Basic peg trigger for spring-tree snare (picture above)
3 Fish funnel
4 Squirrel pole (video also below)
When setting traps the key is to placing the trigger or snare loop where an animal
is likely to hit it Game trails particularly those that lead to water or dens are
excellent locations Place snares directly in the trail with the snare loop a couple
inches off the ground at the height of a likely target animals head Traps with
baited triggers like the Figure-4 Deadfall (see the video below) should have some
tasty bait rubbed on the bait stick Food wrappers or mashed up fish or frog parts
work well for this
Be sure to check your sets regularly Remember youre not the only predator in the
forest A handy rabbit in a snare would make quite a good meal for a scavenging
coyote
Cleaning and Cooking Game
Once your carefully set traps have secured some food dont ruin the payoff with
poor processing Its important to cleanly skin and gut game to adequately cook and
minimize spoiling of the meat Squirrels and rabbits are easily skinned with just a
few knife strokes Fish can generally be filleted and de-scaled in about the time it
takes to peel an apple
Cooking is a pretty simple affair Roasting meat on a spit is simple and gets the job
done Fish is generally best grilled on a flat rock facing a fire If you luck into
enough meat to last for longer than one or two meals consider smoking and drying
the meat on a tipi-shaped rack made of green wood and covered with bark If you
want to hone your primitive fire making skills you can check out our How-To
article HERE
Bushcraft Tools for Wild Edibles
An ounce of prevention is worth a pound of cure When youre going into the
wilderness make sure an EPIRB is in your bushcraft backpack From there a
quality knife plenty of snare wire a primary and backup fire starter and a small
fabric bag for holding foraged food are all near-necessities
One of my
favorite Bushcraft Tools the Gerber LMF II
Conclusion
If youre navigating through unfamiliar terrain a map is as valuable as gold dust
You may have planned your routes by them and will be relying on them throughout
the course of your expedition or bug out However a map is next to worthless if
you dont know how to decipher it Map reading and land navigation is are vital
skills that can be applied to many survival situations This article will outline the
basics to help you sharpen up your map reading skills
Map Reading Skills Using A Maps Scale
First your map should be at a scale which is useful For instance having a small-
scale detailed map will be of no use to you if you simply plan to drive through an
area In the same way if you are on foot then having a less detailed map can be
next to useless It is also important to understand the scale bar This bar will show
Learn These Map ReadingSkills To Never Get LostAgainby Roman
the size at which a kilometer or mile is shown on the map and is usually expressed
as a ratio For instance 150000 means that each measure on the map is 50000
times smaller than the true distance This will allow you to use the map to
determine distances for land navigation
Map Reading Skills Reading Contour Lines
A thorough understanding of reading contour lines is an extremely useful tool to
add to your arsenal of map reading skills Because a map is 2D different heights of
terrain must be indicated using contour lines These show the altitudes of the land
and are recorded at regular intervals - usually 50ft (15m) Each point on a contour
lines ring is hypothetically at the same height which is indicated with a number (in
feet or meters) This tells you how high above sea level the terrain is In general
contour lines which are closer together indicate a steeper gradient However its
important to bear in mind the scale of your map so that you dont over or
underestimate the gradient
Map Reading Skills Reading A Maps Key
The key will explain what the symbols used on the map refer to These will
represent a range of manmade and natural structures types of land (woodland
swaps or beaches for example) rivers and water There are some features which
are not depicted to scale For instance roads paths and waterways will often have
a standard width which may not represent their exact measurements
Map Reading Skills Understanding Map Grids
Maps will have horizontal and vertical grid lines which divide the map into squares
This division is either based on longitude and latitude or may be individual to the
particular mapping authority Grids will allow you to more quickly determine
distances since they are usually at a comprehensive scale (for example the
distance from left to right is often 1 kilometer)
Map Reading Skills Orientating Your Map
Important to remember is that the grids on a map do not necessarily indicate north
and south though they may provide a rough indication of this You will need to
also be aware that your compass does not point to true north but to magnetic
north Most maps will also indicate magnetic north The deviations between these
can help you map-read your way across a landscape as can taking note of your
surroundings in relation to features on the map
Map Reading Skills Conclusion
Hopefully our crash course has helped you sharpen up your map reading skills If
you ever have to execute your bug out plan or evacuate unexpectedly knowing
how to use a map and compass will greatly increase your chances to make it to
your rally point or bug out location As with any basic survival skill it is important to
practice using your map reading and land navigation skills to find your way Master
these and you will never be lost
Author Bio
Roman is a former EMT living in NYC and co-founder of Ready To Go Survival
When hes not working on the next big thing for preppers he likes to go camping
shoot stuff at the range archery and ride his bicycle excruciating distances
Typically we count on weather services and electronic devices to know what to
expect from the sky We may alter travel plans make a quick trip to the store or
simply pack an umbrella in reaction to an impending storm However these
services will likely come to a halt if disaster strikes and alternative means of
monitoring weather conditions will be necessary For those that opt to head for the
hills it will become vastly more important to know how to predict the weather in
the wilderness
Nature itself provides many clues as to what is in store The clouds plants animals
insects and the moon have been used for centuries to predict precipitation
droughts and floods Farmers fishermen sailors and others who spend long
periods of time outdoors and whose livelihood depends heavily on the weather
patterns have devised ways to foresee the weather in order to prepare
themselves
How To Predict The WeatherIn The Wildernessby Chris Ruiz
Having the skills to read the warning signs that nature provides has short-term and
long-term benefits that can greatly increase your chances of survival in a bug-out
scenario Whether a major storm is brewing and you need to prepare to build a
shelter in for the day or if the likelihood of flooding doubles and you need to
reconsider your location for the season learning how to predict the weather using
nature is a valuable survival skill
Observing The Sky To Predict The Weather
The most intuitive way to predict the weather is to look to the sky The clouds
wind direction air pressure and even the moon are directly related to incoming
weather Paying close attention to the changes in the sky and knowing how to
interpret what you see gives you advance warning of what is to come and enables
you to prepare
A red rising sun
warns of rain to come
There is an old saying ldquoRed sky at night a sailors delight Red sky morn sailors take
warn At sunset the red sky is caused by sun rays passing through dust particles
which accumulate at the forefront of a high pressure system However in the
morning a red sky occurs when a low pressure system carrying moisture is on the
way Therefore a brilliant red sunset usually precedes a clear day but a red sunrise
is a warning that a storm is coming
A red sky as the
sun sets in the west is a sign of clear skies
Another colorful way to predict the weather is the formation of rainbows In the
northern hemisphere a morning rainbow in the east indicates rain is on the way as
weather generally moves east to west
Reading Clouds
Cloud identification is a science in itself but there are some simple indicators that
can prove very useful especially when trying to predict the weather in the
wilderness
When you see
cumulus clouds its a good day for traveling foraging and other outdoor activities
White fluffy clouds sitting high in the sky are non-threatening as they pass
overhead When the cloud cover is low and dark a storm is building and
appropriate measures should be taken to prepare your camp Gathering extra
firewood and storing it in a protected location will ensure that you have dry fuel to
burn during and after the storm
Low dark cloud
cover is a sure sign that a storm is building Make sure your shelter is ready to
withstand rain and wind
To give yourself more time to prepare there are two easily identified types of
clouds that form prior to storm clouds mares tails and mackerel skies Mares tails
are wispy cirrus clouds that are somewhat hazy and undefined as the tail of a
galloping mare The same conditions that cause them to form also cause airplane
trails to linger in the sky
Cirrus clouds
precede incoming frontal systems and indicate changing weather Image credit
k4dordy on flickr
Mackerel skies are altocumulus clouds and are also a sign of rising moisture levels
Independently these each warn of rain coming within a few days but seen
together rain will typically fall within 24 hours
Mackerel skies are
named for their resemblance to the scales of a mackerel fish
While clouds are often thought of as bringers of rain they also act as a layer of
insulation On an overcast night the radiant heat from the earth is trapped by the
cloud layer leading to a higher temperature in the morning When the sky is clear
at night the radiant heat escapes and the morning will be cooler as a result
Detecting Air Pressure
Though air pressure is less noticeable than cloud cover it is a very dependable
indicator of incoming weather conditions Low atmospheric pressure leads to cloud
formation and precipitation High pressure systems are associated with rising air
and clear dry skies
One way to detect the current air pressure conditions is to observe the smoke from
a campfire If the smoke is rising steadily in vertical column the air pressure is high
but if it is sinking and swirling the air pressure is low and precipitation may soon
follow
Studying how to
predict the weather turns your campfire into a barometer
What The Wind Tells About The Weather
Wind is named for the direction it comes from so an easterly wind blows from east
to west A gentle prevailing wind or light variable winds are signs of clear weather
Strong winds occur when two fronts with different temperatures meet and usually
mean that a storm is forming
An awareness of the surrounding climates will also help you read the wind For
instance if a desert lies to the east of your location wind coming from the east will
typically carry dry warm desert air Mountains also play a role in that air flowing
over a mountain will usually release precipitation as it rises along the side facing
the wind and will move down the opposite side with dry air
ldquoCircle Around The Moon Rain Or Snow Soon
People have long looked to the moon to provide insight into atmospheric
conditions As the old saying states when the moon has a hazy ring around it
precipitation is on its way The ring is caused by the presence of dust particles
building up in the atmosphere It means that a low pressure system is on its way
bringing rain or snow with it As it passes through the low pressure system will
push the particles along
You can see how
the moonlight reflects on the particles in the air forming a hazy ring
When the moon appears clearly defined and bright it is due to an absence of
particles and moisture This is characteristic of a high pressure system and the next
day has a high chance of being dry In the short-term this is a simple and effective
way to predict the weather
When the outline
of the moon is clearly defined fair weather can be expected
For long-term or seasonal weather predictions the phases of the moon can reveal
clues When two full moons occur in the same month there is a higher chance of
flooding It is also said that when the tips of a crescent moon point upward and the
moon looks like a bowl that can hold water a dry spell is coming When the new
moon looks like a frown or a bowl that water would spill out of a wet spell is
predicted
This bowl-shaped
moon is often associated with a period of dry weather
Weather Signs In Nature
The natural world is built to survive and living things will make adjustments in
order to maintain life and produce offspring Sometimes the changes are so subtle
they can hardly be detected but there are some common plant and animal
behaviors that reveal clues about the weather When bugging out you can use
these clues to increase your own chances of survival
How To Predict The Weather Using Plants
Upon waking take a close look at the ground Morning dew on the plants while
itself is wet can actually be a sign of a dry day to come A lack of morning dew can
occur when dry winds have been pushed through ahead of a storm system bringing
rain close behind Of course if it rained the night before this will be more difficult
to observe and you will need to look for additional signs in order to predict the
weather
A dewy morning
can mean that a dry day is in store
The phrase ldquoit smells like rain has some truth to it The moist air of a low pressure
system brings out the scents of plants as they release their waste under this
condition so the air will smell more pungent just before a rain Swamps will also
release gases during a low pressure system making for a telltale sign that a storm is
moving in
Visual signs that it is time to prepare for wet weather are readily apparent in trees
The leaves of deciduous trees will curl upward in anticipation of a rainstorm Pine
cones will open their scales in dry air but close them in high humidity
The increase in
humidity prior to a storm causes deciduous leaves to curl upward
It looks like a dry
sunny day for this pine tree
Plants also have the ability to foresee more long-term conditions and will adjust
their growth accordingly Crops such as onions and corn will grow thicker husks
when a harsher winter is predicted in order to provide more protection to their
seeds Similarly evergreens will produce larger more robust pine cones and
acorns will form thicker shells- all to provide the seeds with a better chance of
surviving extreme winter conditions If you notice these signs be prepared for a
cold long winter
A thicker husk
provides the seeds with better insulation against extreme temperatures
How To Predict The Weather Using Animals
The combination of heightened senses and well-developed instincts makes animals
highly adept at sensing bad weather conditions Be on the lookout for changes in
feeding patterns behavior and sound level that may indicate rain is on the way
Here are some specific examples of animal behavior that can be used to predict
when a storm is coming
Fish will feed voraciously at the surface prior to a storm so that they can ride it
out in deeper water where food is scarce so an excellent day of fishing usually
means you should seek shelter and be prepared to cook the days catch in the
rain
Turtles begin to seek higher ground 1-2 days before a large rainstorm so you
may see them on roads or other areas above normal water levels
If birds are flying high the weather will likely be clear for a few days Birds will
fly lower in dropping pressure systems because the change in pressure hurts
their ears They will also exhibit frenzied feeding Squabbles at the bird feeder
can mean that a storm is coming and birds are stocking up in preparation of
riding out the storm in their nest
Along coastlines seagulls will take shelter before a storm and birds in general
become very quiet
Squirrels similar to birds will aggressively stock up on food prior to a pending
storm
Cats ears are very sensitive and they do not tend to wash them but a change in
pressure may cause your cat to rub at its ears indicating a drop in pressure and
a storm on the way
Horses and cows are known to exhibit similar ear sensitivity behaviors when the
pressure changes
Herd animals such as cattle will group tightly together usually facing the same
direction when a storm is approaching They also tend to head for high ground
In addition to predicting major storms animals can also sense long-term threats in
the weather pattern This information is highly valuable when preparing your bug
out camp to withstand low temperatures and difficult conditions A harsh winter
means that food will be scarce and opportunities for foraging and hunting will be
limited
Depending on the amount of snow cover it may be challenging to gather firewood
Keeping a fire going will be vital and your bug out party will need as many warm
layers as you are able to find or make All of these preparations take time so the
sooner you know the better
In general if you notice extra thick coats of fur on domestic animals or local
wildlife expect dropping temperatures Conversely when their fur comes off in
tufts warmer temperatures are right around the corner
If birds begin migrating earlier than usual it is a sign of harsh winter to come The
brown section in the middle of a woolly bears body is also used to predict how
harsh the upcoming winter will be the thinner the brown stripe the harsher the
winter is expected to be While there is not much research to back it up a 70-80
success rate is pretty good for an old wives tale
The Isabella Tiger
Moth caterpillar often referred to as the woolly bear is an age-old predictor of
winter conditions The one on the left (photo credit Sheila Sund on flickr) is
thought to indicate a short winter while the one on the right (photo credit USFWS
on flickr) shows a harsh winter is in store
Farmers have even used cow fertility rates to predict whether there will be a
drought the following year- a drop in fertility occurs in anticipation of a future
water shortage
Want MoreDid you find this ebook useful
Check out our comprehensive guide on making the BESTEvery Day Kit and adopting the EDC Mindset to your
everyday life
Learn More
made with
Do cows know
how to predict the weather Many animals will make similar adjustments in
breeding in response to foreseen conditions
Resources On How To Predict The Weather
To futher explore the topic of how to predict the weather using nature check out
these excellent resources on clouds weather navigating and storms
Conclusion
Plants and animals have been ldquobugging out and surviving in nature since the
beginning of time There is much to gain by observing their weather predicting
skills and honing our own When living in the natural world a simple thunderstorm
can be catastrophic if you are not prepared for it Anticipating a harsh winter can
help you ration supplies and apply your energy effectively so you have adequate
food and fuel stored Knowing how to predict the weather will help you to make
wise decisions in favor of your survival
- Essential Survival Skills amp Tactics
- Table of Contents
- 5 Basic Survival Skills You Need When Bugging Out
-
- Basic Survival Skills
-
- 1 Positive Mental Attitude
-
- Some ways to instill this mentality are
-
- 2 Water
- 3 Food
- 4 Shelter
- 5 Fire
-
- Conclusion
-
- Learn To Build Shelter For Any Survival Situation
-
- Why Learn to Build a Survival Shelter
- Choosing the Best Location for Your Survival Shelter
- Types of Survival Shelters
-
- Simple Frame and Tarp Method
- Simple Body Heat Shelter
- Open Shelter or Lean-To
- A-Frame Shelter
- Teepee Variations
- Subterranean Survival Shelter
- Long-Term Log Cabin
-
- Survival Supplies Beneficial to Have on Hand
-
- Learn How To Harvest Water From Natural Sources
-
- Wilderness Precautions
- Conclusion
- 3 Key Methods for Harvesting Water
-
- Solar Still
- Rainwater
- Plant Sources
-
- Transpiration Bag
- Directly Off the Leaves
- Tapping Into the Trunk
- From the Roots
- Bamboo Plants
- Vines
-
- Surviving A Drought By Extracting Water From the Air
-
- Searching for Water - 4 Key Signs You Must Look For
-
- Growing Vegetation
- Following Insects and Birds
- Following Animal Tracks
- Terrain Indicators
-
- Essential Water Purification Techniques
-
- Filtration
- Gypsy Filter
- DIY Charcoal Straw Filter
- Steripen
- LifeStraw
- Boiling
- UV Purification
- Unscented Chlorine Bleach
- Purification Tablets
-
- Perfecting Your Drought Survival Skills
- Conclusion
-
- 6 Ways To Make Fire Without Matches
-
- Primitive Fire Making Techniques
-
- Flint and Steel
- Fire Plough
- Hand Drill
- Bow Drill
- Pump Fire Drill
- Fire Piston
-
- Bonus Method The EverStryke Fire Starter
- What is the best primitive fire making method
-
- What Is Bushcraft Survival Skills Tools amp How To Learn
-
- What Is Bushcraft
- What Are Bushcraft Skills
-
- Food Foraging
- Trapping and Hunting
- Water Gathering and Purification
- Shelter Building
- Fire Building
-
- How Long Does It Take To Learn Bushcraft Skills
-
- If you are just starting out
- If you have a basic knowledge already
- For the pros
-
- What Are Bushcraft Tools
-
- Bushcraft Knife
- Tomahawk or Hatchet
- Machete
- Saw
- Bushcraft Backpack
- OK but what is the BEST bushcraft tool
-
- What beginner bushcraft projects I can try
-
- Food Foraging Bushcraft Project
- Trapping and Hunting Bushcraft Project
- Water Gathering and Purification Bushcraft Project
- Shelter Building Bushcraft Project
- Fire Building
- Good luck
-
- More Bushcraft Resources
-
- Bushcraft Books
- Bushcraft Community and Instructional Sites
-
- Conclusion What is Bushcraft
-
- Bushcraft Skills Foraging for food
-
- Bushcraft Skills Foraging for edible plants
-
- What to look for
- Things to avoid
-
- But what if
-
- Bushcraft Skills Trapping and Hunting Game
-
- Foraging Plants vs Animals
- Finding Food
- Traps and Snares
- Cleaning and Cooking Game
- Bushcraft Tools for Wild Edibles
-
- Conclusion
-
- Learn These Map Reading Skills To Never Get Lost Again
-
- Map Reading Skills Using A Maps Scale
- Map Reading Skills Reading Contour Lines
- Map Reading Skills Reading A Maps Key
- Map Reading Skills Understanding Map Grids
- Map Reading Skills Orientating Your Map
- Map Reading Skills Conclusion
-
- Author Bio
-
- How To Predict The Weather In The Wilderness
-
- Observing The Sky To Predict The Weather
-
- Reading Clouds
- Detecting Air Pressure
- What The Wind Tells About The Weather
- ldquoCircle Around The Moon Rain Or Snow Soon
-
- Weather Signs In Nature
-
- How To Predict The Weather Using Plants
- How To Predict The Weather Using Animals
-
- Want More
-
- Resources On How To Predict The Weather
- Conclusion
-
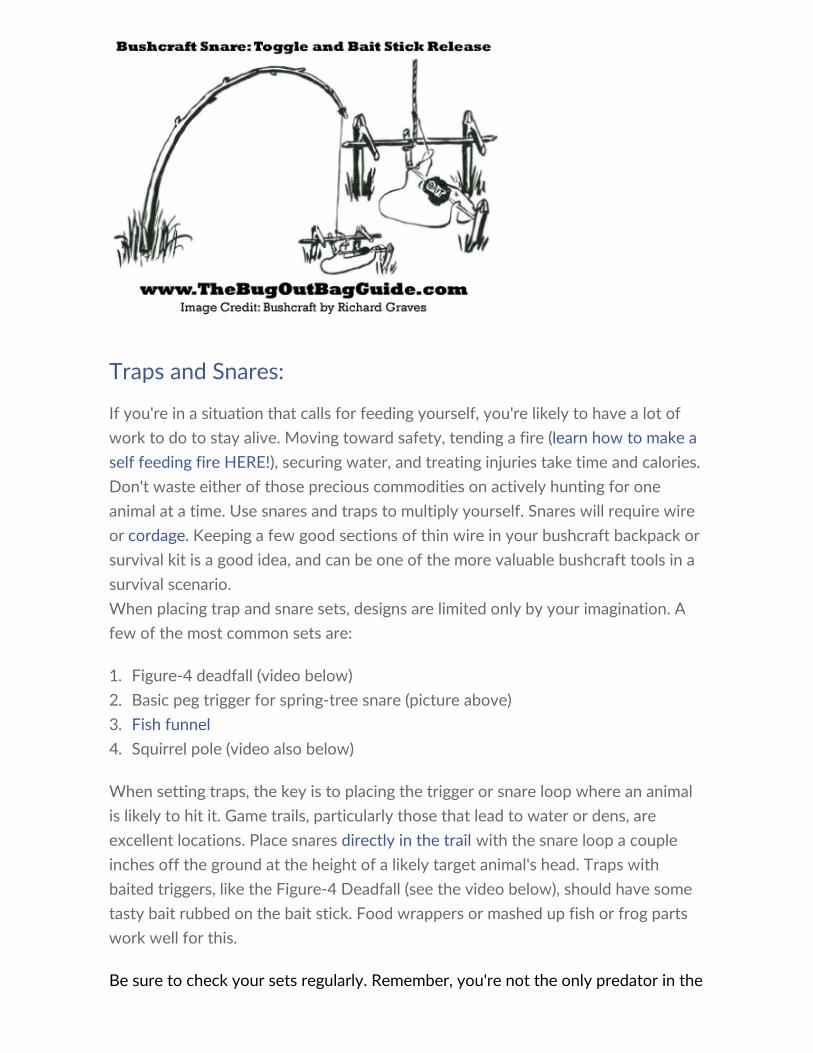
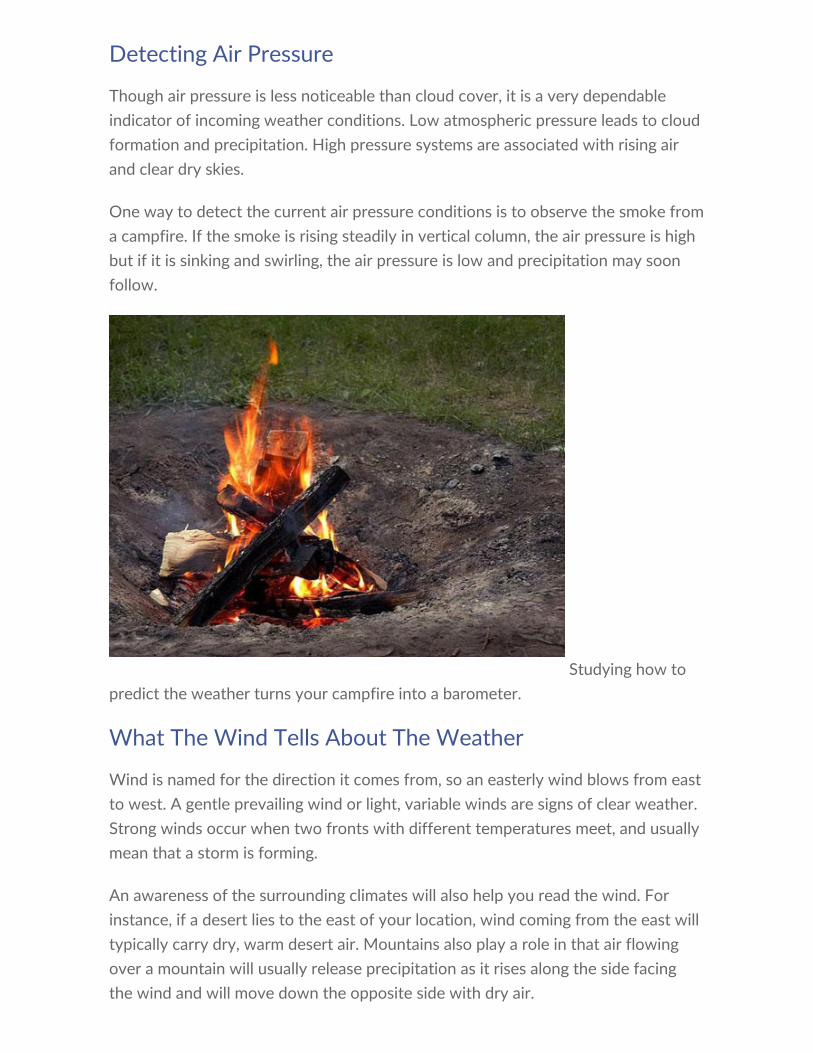


