
SEVIS User Guide
Contents
General Information 1
Create I-20 for Change of Education Level 2
Program 4
Education Level* 4
The CIP (Classification of Instructional Programs) Picker 5
Major Code 1* 6
Major Code 2* 6
Minor Code* 6
New Program Start Date* 7
New Program End Date* 7
Initial Session Start Date* 7
English Proficiency* 7
Financial 8
Estimate costs and funding for *___ months 9
Expenses 10
Funding 10
Remarks about the Student 11
Submit Change of Education Level 11
Cancel Change of Education Level 12
Icon Guide 14
Document Revision History 14
General Information
Students often begin a new program of study at the same school. The designated
school official (DSO) uses the Change Education Level link to create a new
Form I-20, Certificate of Eligibility for Nonimmigrant Student Status, for a student
who is changing education levels to start a new program of study at the same
school/campus; for example, a student moving from Bachelor’s to Master’s. Chan
ge
Educa
tion L
evel
Change Education Level
SEVIS User Guide
June 30, 2016 2
Changing a student’s education level creates a new Initial record. This is in addition to the
student’s current Active record. You should continue to update the Active record, as necessary,
until the student has completed his/her current education level. When the student has enrolled at
the new education level, you must register the student using the Initial record. Once the student
is registered for the new education level, you will no longer be able to update the record for the
previous education level.
If you only need to correct the student’s education level, because of an error on the
student’s Form I-20, use the Update Program Information function. See the Update
Program Information User Guide for further details.
Create I-20 for Change of Education Level
To change a student’s education level in SEVIS:
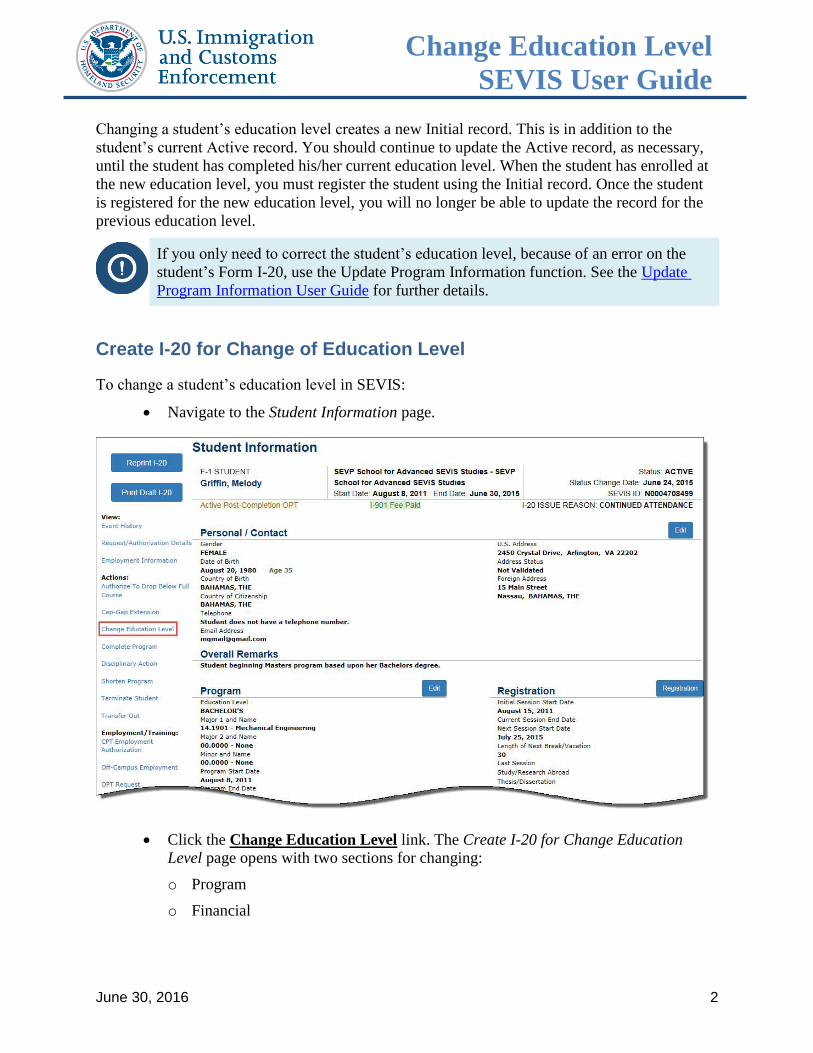
Navigate to the Student Information page.
Click the Change Education Level link. The Create I-20 for Change Education
Level page opens with two sections for changing:
o Program
o Financial
Change Education Level
SEVIS User Guide
June 30, 2016 3
Change Education Level
SEVIS User Guide
June 30, 2016 4
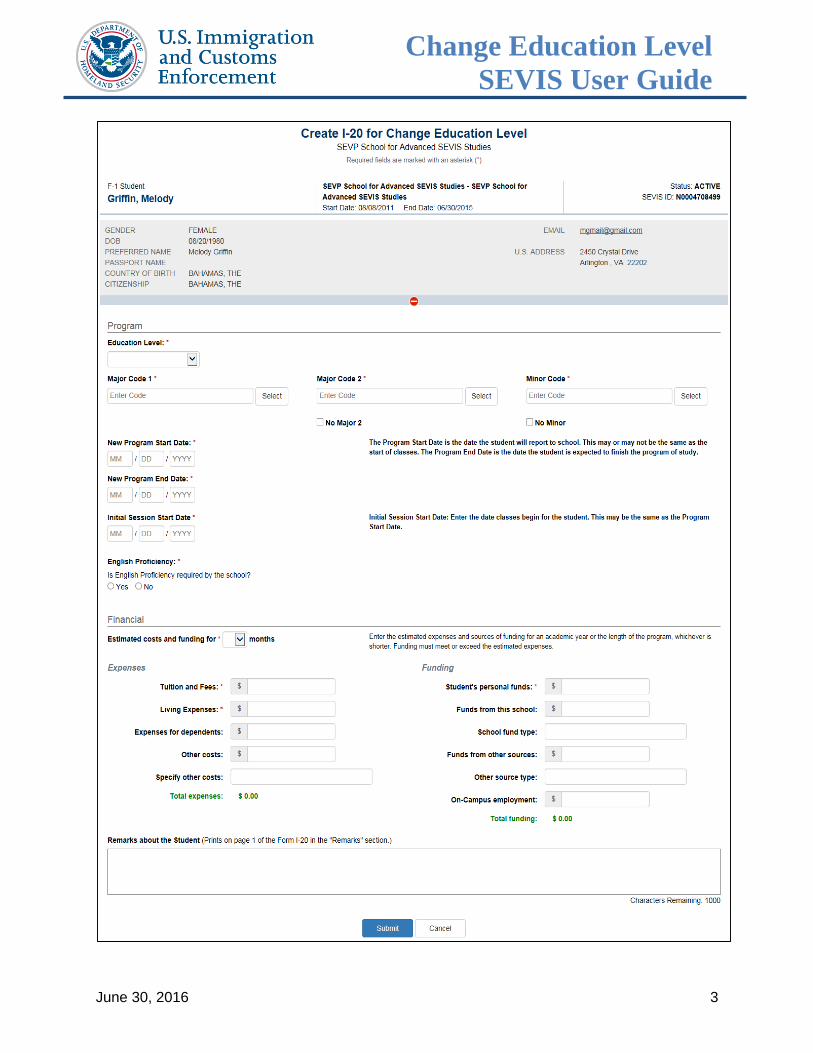
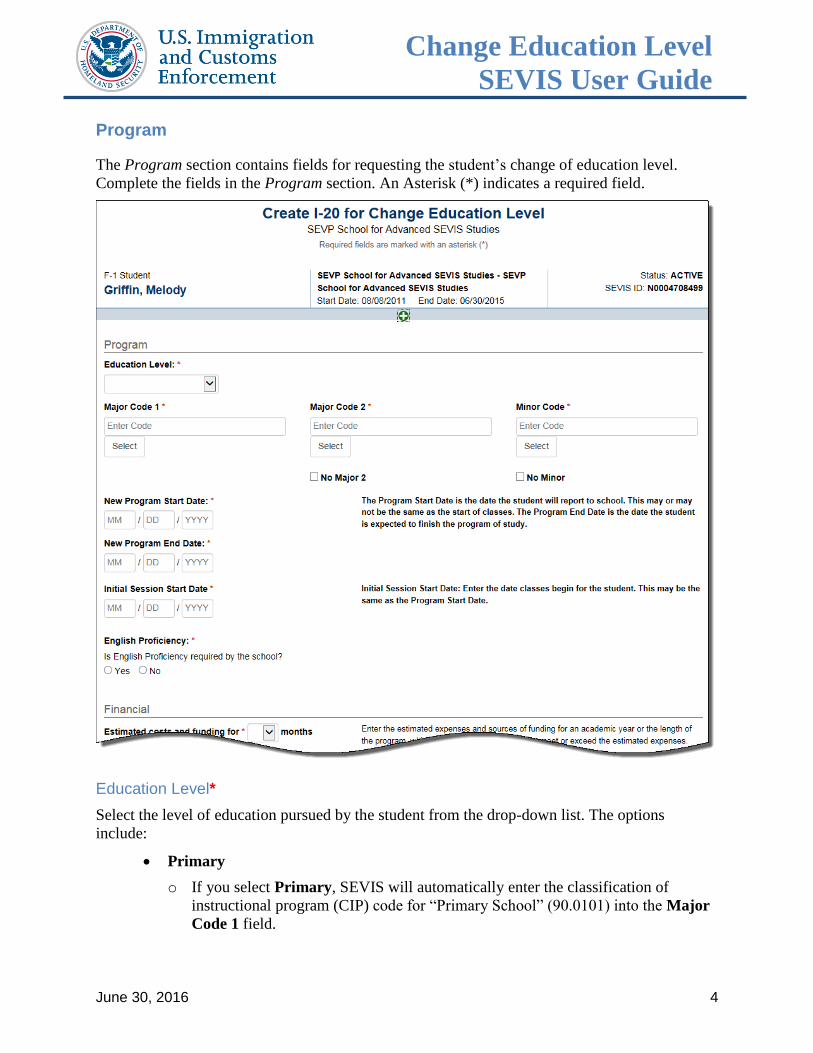
Program
The Program section contains fields for requesting the student’s change of education level.
Complete the fields in the Program section. An Asterisk (*) indicates a required field.
Education Level*
Select the level of education pursued by the student from the drop-down list. The options
include:
Primary
o If you select Primary, SEVIS will automatically enter the classification of
instructional program (CIP) code for “Primary School” (90.0101) into the Major
Code 1 field.
Change Education Level
SEVIS User Guide
June 30, 2016 5
o The Primary School CIP code cannot be edited.
Secondary
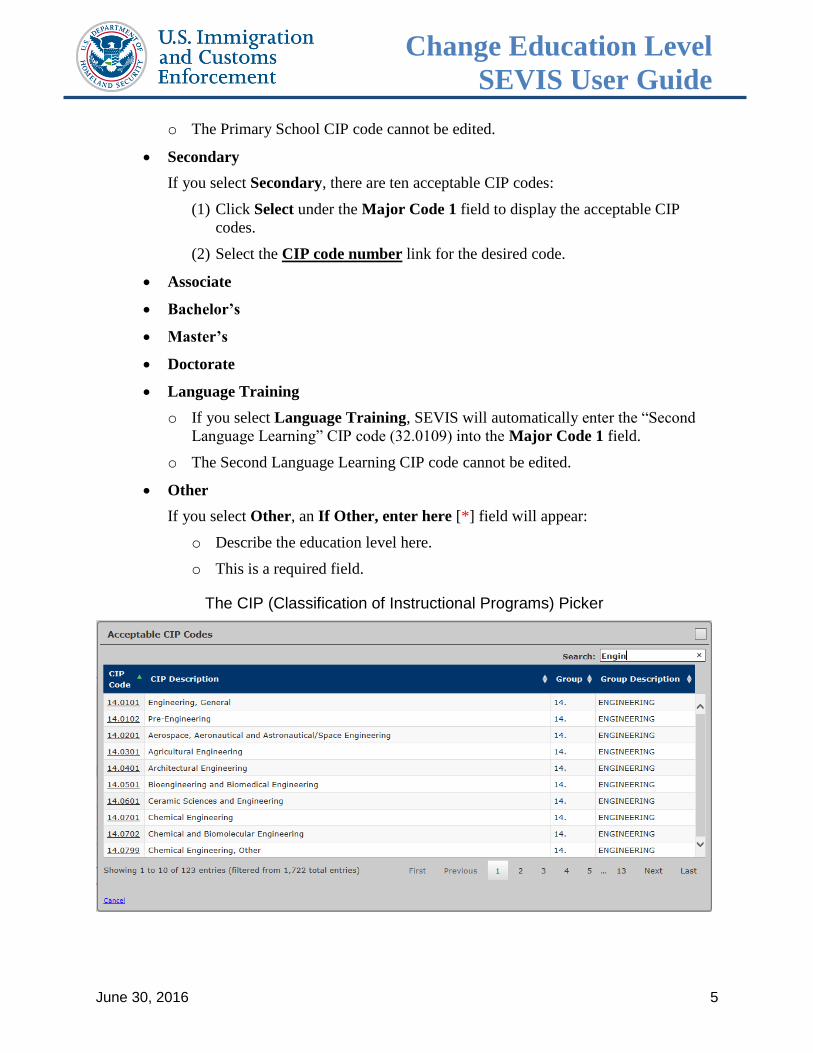
If you select Secondary, there are ten acceptable CIP codes:
(1) Click Select under the Major Code 1 field to display the acceptable CIP
codes.
(2) Select the CIP code number link for the desired code.
Associate
Bachelor’s
Master’s
Doctorate
Language Training
o If you select Language Training, SEVIS will automatically enter the “Second
Language Learning” CIP code (32.0109) into the Major Code 1 field.
o The Second Language Learning CIP code cannot be edited.
Other
If you select Other, an If Other, enter here [*] field will appear:
o Describe the education level here.
o This is a required field.
The CIP (Classification of Instructional Programs) Picker

Change Education Level
SEVIS User Guide
June 30, 2016 6
Major Code 1*
Enter the CIP code of the student’s primary major, or click Select to open the
Acceptable CIP Codes window. Search for the CIP code by either:
o Entering search terms to find the appropriate CIP code; for example,
Communications, Business, Engineering, etc.
o Entering the CIP code family number, for example, “14.” for the Engineering
programs.
Select the CIP code by clicking the code number. The Acceptable CIP Codes
window closes.
After selecting a code, SEVIS enters the CIP code in the Major Code 1 field.
This is a required field.
Note: You must select an Education Level before you can enter the Major Code.
Major Code 2*
Some students have a secondary major, usually in a related field. Use this field for the
secondary major CIP code.
Enter the CIP code of the student’s primary major, or click Select to open the
Acceptable CIP Codes window. Search for the CIP code by either:
o Entering search terms to find the appropriate CIP code, for example,
Communications, Business, Engineering, etc.
o Entering the CIP code family number, for example, “14.” for the Engineering
programs.
Select the code by clicking the code number. The Acceptable CIP Codes window
closes.
After selecting a code, SEVIS will enter the CIP code in the Major Code 2 field.
If the student does not have a second major, click the No Major 2 checkbox.
This is a required field.
Minor Code*
Enter the CIP code of the student’s minor, or use the search tool by clicking Select.
The Acceptable CIP Codes window opens. Search for the CIP code by either:
o Entering search terms to find the appropriate CIP code, for example,
Communications, Business, Engineering, etc.
o Entering the CIP code family number, for example, “14.” for the Engineering
programs.
After selecting a code, SEVIS will enter the CIP code in the Minor Code field.

Change Education Level
SEVIS User Guide
June 30, 2016 7
If the student does not have a minor, click the No Minor checkbox.
This is a required field.
New Program Start Date*
Enter the date on which the student will begin his or her program.
This may be the date of any required orientations or other activities before the start
of classes.
This is a required field.
Note: Entering an invalid date will result in the following message: Program Start Date must
be on or after today and no more than a year from today.
Note: Schools can choose to enter the New Program Start Date and the Initial Session Start
Date as the same date. If the dates differ, the Program Start Date cannot be more than 30 days
before the Initial Session Start Date.
New Program End Date*
Enter the expected date of completion of the academic or vocational program.
Do not consider grace periods or any future employment authorizations.
This is a required field.
Initial Session Start Date*
Enter the date that the student will begin classes.
This date cannot be more than 30 days from the Program Start Date.
This is a required field.
Note: Registration alerts are tied to this date.
English Proficiency*
In the English Proficiency section, answer the question “Is English proficiency required by
the school?” Click either the Yes or No radio button:
Yes – Requires a further Yes or No confirmation that the student has the required
English skills.

Change Education Level
SEVIS User Guide
June 30, 2016 8
No – Requires an explanation on why the school does not require the student to be
proficient in English.
Financial
F-1 or M-1 students must prove they have the financial resources to live and study in the United
States. Enter the student’s expenses and funding for the length of the program in the Expenses
and Funding sections under the Financial section of the page.

Change Education Level
SEVIS User Guide
June 30, 2016 9
Note: All dollar amounts must be entered in the Expenses and Funding sections without
commas and periods, and should be rounded to the nearest dollar. For example, $25,057.89
should be entered as 25058.
Estimate costs and funding for *___ months
Enter the number of months for either the academic year or the length of the program,
whichever is shorter:

Change Education Level
SEVIS User Guide
June 30, 2016 10
Use the drop-down list in the Estimated costs and funding for*__ months field
to select the number of months for estimating expenses and sources of funding.
This is a required field.
Expenses
Enter the student’s expenses for one academic term:
Tuition and Fees*
o Enter the amount for the student’s tuition and fees.
o This is a required field.
Living Expenses*
o Enter the amount for the student’s living expenses.
o This is a required field.
Expenses for Dependents
o Enter the amount of expenses for any dependents.
o The number of dependents currently associated with the student displays by the
field name.
o This is a required field.
Other Costs – Enter any other costs for the months of estimated expenses.
Specify Other Costs – Enter the reason for any other costs.
Total Expenses – SEVIS calculates the costs and displays the total expenses at the
bottom of the Expenses section.
Funding
Enter the student’s funding for the number of months specified:
Student’s Personal Funds*
o Enter the amount of the student’s personal funds.
o This is a required field.
Funds from this School – Enter the amount of any funding offered by your school.
School Fund Type – Enter the type of school fund offered by your school, for
example, an academic scholarship.
Funds from Other Sources – Enter the amount of any funding from any other
sources.
Other Source Type – Enter the type of funding from any other sources, for
example, a private grant.

Change Education Level
SEVIS User Guide
June 30, 2016 11
On-Campus Employment – Enter the amount of the student’s on-campus
employment.
Total Funding – SEVIS calculates and displays the student’s total funds at the
bottom of the Funding section.
The student’s total funds must meet or exceed the expenses, before the DSO may issue
the student’s Initial Certificate of Eligibility (Form I-20).
Remarks about the Student
Enter any applicable comments about the student in the Remarks about the Student field:
This field has a 1,000-character limit with a Characters Remaining counter.
Comments entered in any Remarks field throughout the Form I-20 will append to
any existing remarks and print on page 1 of the Form I-20.
Submit Change of Education Level
After entering any necessary information, submit the request to SEVIS:
1. After completing the fields, click either the Submit or Cancel button:
Submit – Creates a new Form I-20 for the new education level. The student will
now have two records: one Initial and one Active, under the same SEVIS ID.
Cancel – Cancels the action without making any changes and return to the
Student Information page.
2. If Submit was selected, the Create Successful page displays with two options, View
Record or Print I-20.
View Record – Returns the user to the Student Information page.

Change Education Level
SEVIS User Guide
June 30, 2016 12
Print I-20 – Generates the PDF of the Form I-20 that can be printed.
You cannot edit the Initial record of a student who is requesting a change of education
level from their original Active record. Any changes would be made through the new
Initial record.
Cancel Change of Education Level
You cannot cancel the Initial record of a student who is requesting a change of education level.
You must cancel the change of education level request through the Active record. Perform the
following steps to cancel a student’s change of education level request:
1. Perform a search to locate the appropriate student’s Active record. (See the SEVIS
Help Hub for information on F/M Nonimmigrant Searches.)
2. Click the appropriate link in the Surname/Primary Name column to access the
student’s Active record. The Student Information page opens.
3. Click the Cancel Change Education Level link in the Actions menu. The Cancel
Change Education Level page opens.

Change Education Level
SEVIS User Guide
June 30, 2016 13
4. Enter any applicable comments in the Remarks field.
5. Click either the Cancel Change Education Level, Reset Values, or Cancel button:
Cancel Change Education Level – Cancels the student’s change of education
level request. An Update Successful page opens with two options, Return to
View Record or Print I-20:
o Return to View Record – Returns to the Student Information page. The
student’s Initial record (for the new education level) is now in Deactivated
status.
o Print I-20– Generates the PDF of the Form I-20 that can be printed.
Reset Values – Clears any entries made in the Remarks field.
Cancel – Returns to the Student Information page without taking any action on
the student’s record.

Change Education Level
SEVIS User Guide
June 30, 2016 14
Icon Guide
See the SEVIS Help Icons on the SEVIS Help Hub for a quick-reference of the icons used in
this user guide.
Document Revision History
Date Revision Summary
June 30, 2016 Initial Release


