
www.rock-chips.com
Classification Level: Top secret ( ) Secret ( ) Internal ( ) Public (√)
Rockchip User Guide RKNN-Toolkit EN
(Technology Department, Graphic Display Platform Center)
Mark:
[ ] Editing
[√] Released
Version V1.2.1
Author Rao Hong
Completed Date 2019-09-26
Reviewer Randall
Reviewed Date 2019-09-26
福州瑞芯微电子股份有限公司
Fuzhou Rockchip Electronics Co., Ltd
(Copyright Reserved)

www.rock-chips.com
2
Revision History
Version Modifier Date Modify description Reviewer
V0.1 Yang Huacong 2018-08-25 Initial version Randall
V0.9.1 Rao Hong 2018-09-29
Added user guide for RKNN-Toolkit,
including main features, system
dependencies, installation steps, usage
scenarios, and detailed descriptions
of each API interface.
Randall
V0.9.2 Randall 2018-10-12 Optimize the way of performance
evaluation Randall
V0.9.3 Yang Huacong 2018-10-24 Add instructions of connection to
development board hardware Randall
V0.9.4 Yang Huacong 2018-11-03 Add instructions of docker image Randall
V0.9.5 Rao Hong 2018-11-19
1. Add an npy file as a usage specification
for the quantized rectified data
2. The instructions of pre-compile
parameter in build interface
3. Improve the instructions of
reorder_channel parameter in the config
interface
Randall
V0.9.6 Rao Hong 2018-11-24
1. Add the
instructions of get_perf_detail_on_hardwa
re and get_run_duration interfaces
2. Update the instructions of RKNN
initialization interface
Randall

www.rock-chips.com
3
Version Modifier Date Modify description Reviewer
V0.9.7 Rao Hong 2018-12-29
1. Interface optimization: delete the
instructions
of get_run_duration, get_perf_detail_on_h
ardware
2. Rewrite the instructions of
eval_ perf interface
3. Rewrite the instructions
of RKNN() interface
4. Add instructions of
the init_runtime interface
Randall
V0.9.7.1 Rao Hong 2019-01-11
1. Solve the bug that the program may
hang after multiple calls to inference
2. Interface adjustment: init_runtime does
not need to specify host, the tool will
automatically determine
Randall
V0.9.8 Rao Hong 2019-01-30
1. New feature:if set verbose parameter
to True when init RKNN object, users
can fetch detailed log information.
Randall
V0.9.9 Rao Hong 2019-03-06
1. New feature: add eval_memory
interface to check memory usage
when model running.
2. Optimize inference interface;
Optimize error message.
3. Add description for API interface:
get_sdk_version.
Randall

www.rock-chips.com
4
Version Modifier Date Modify description Reviewer
V1.0.0 Rao Hong 2019-05-06
1. Add async mode for init_runtime
interface.
2. Add input passthrough mode for
inference interface.
3. New feature: hybrid quantization.
4. Optimize initialize time of pre-
compiled model. Pre-compiled model
generated by RKNN-Toolkit-v1.0.0
can not run on device installed old
driver (NPU driver version < 0.9.6),
and pre-compiled model generated by
old RKNN-Toolkit (version < 1.0.0)
can not run on device installed new
NPU driver (NPU drvier version ==
0.9.6).
5. Adjust the shape of the inference
results: Before version 1.0.0, if the
output of the original model is
arranged in "NHWC" (such as
TensorFlow models), the tool will
convert the result to "NCHW"; starting
from version 1.0.0, this conversion
will not be done, but keep consistent
with the original model.
Randall
V1.1.0 Rao Hong 2019-06-28
1. Support TB-RK1808S0 AI Compute
Stick.
2. New interface: list_devices, used to
query devices connected to PC or
RK3399Pro Linux development board.
3. Support run on ARM64 platform with
python 3.5.
4. Support run on Windows / Mac OS X.
Randall

www.rock-chips.com
5
Version Modifier Date Modify description Reviewer
V1.2.0 Rao Hong 2019-08-21
1. Add support for model with multiple
inputs.
2. New feature: batch inference.
3. New feature: model segmentation.
4. New feature: custom op.
Randall
V1.2.1 Rao Hong 2019-09-26
1. New feature: load_rknn interface
supports direct loading of RKNN in
NPU.
2. Adjust the default value of batch_size
and epochs in config interface.
3. Bug fix.
Randall

www.rock-chips.com
6
Table of Contents
1 Overview ............................................................................................................................................ 1
2 Requirements/Dependencies ............................................................................................................ 4
3 User Guide ......................................................................................................................................... 5
3.1 Installation .................................................................................................................................. 5
3.1.1 Install by pip command .......................................................................................................... 5
3.1.2 Install by the Docker Image.................................................................................................... 6
3.2 Usage of RKNN-Toolkit ............................................................................................................. 7
3.2.1 Scenario 1: Inference for Simulation on PC ........................................................................... 7
3.2.2 Scenario 2: Inference on RK3399Pro (or RK1808 or TB-RK1808S0 AI Compute Stick)
connected with PC ..................................................................................................................................... 10
3.2.3 Scenario 3: Inference on RK3399Pro Linux development board .......................................... 11
3.3 Hybrid Quantization .................................................................................................................. 11
3.3.1 Instructions of hybrid quantization ....................................................................................... 12
3.3.2 Hybrid quantization profile .................................................................................................. 12
3.3.3 Usage flow of hybrid quantization ........................................................................................ 13
3.4 Model Segmentation ................................................................................................................. 15
3.5 Example .................................................................................................................................... 16
3.6 RKNN-Toolkit API description ................................................................................................ 19
3.6.1 RKNN object initialization and release ................................................................................ 19
3.6.2 Loading non-RKNN model ................................................................................................... 20
3.6.3 RKNN model configuration .................................................................................................. 23
3.6.4 Building RKNN model .......................................................................................................... 25
3.6.5 Export RKNN model ............................................................................................................. 27
3.6.6 Loading RKNN model........................................................................................................... 27

www.rock-chips.com
7
3.6.7 Initialize the runtime environment ........................................................................................ 28
3.6.8 Inference with RKNN model ................................................................................................. 29
3.6.9 Evaluate model performance ................................................................................................ 32
3.6.10 Evaluating memory usage ................................................................................................ 35
3.6.11 Get SDK version ............................................................................................................... 37
3.6.12 Hybrid Quantization ......................................................................................................... 38
3.6.13 Export a segmentation model ........................................................................................... 40
3.6.14 List Devices ...................................................................................................................... 41
3.6.15 Register Custom OP ......................................................................................................... 42

1
1 Overview
RKNN-Toolkit is a software development kit for users to perform model conversion, inference
and performance evaluation on PC, RK3399Pro, RK1808, TB-RK1808S0 AI Compute Stick or
RK3399Pro Linux development board users can easily complete the following functions through the
provided python interface:
1) Model conversion: support to convert Caffe、TensorFlow、TensorFlow Lite、ONNX、Darknet
model to RKNN model, support RKNN model import/export, which can be used on hardware
platform later.
2) Quantization: support to convert float model to quantization model, currently support quantized
methods including asymmetric quantization (asymmetric_quantized-u8) and dynamic fixed point
quantization (dynamic_fixed_point-8 and dynamic_fixed_point-16). Starting with V1.0.0,
RKNN-Toolkit began to support hybrid quantization. For a detailed description of hybrid
quantization, please refer to Section 3.3.
3) Model inference: able to simulate running model on PC and obtain the inference results. Also
able to run model on specific hardware platform RK3399Pro (or RK3399Pro Linux development
board), RK1808, TB-RK1808 AI Compute Stick and obtain the inference results.
4) Performance evaluation: able to simulate running on PC and obtain the total time consumption
and each layer’s time consumption of the model. Also able to run model with on-line debugging
method on specific hardware platform RK3399Pro, RK1808, TB-RK1808 AI Compute Stick or
directly run on RK3399Pro Linux development board to obtain the total time consumption and
each layer’s time consumption when the model runs completely once on the hardware.
5) Memory evaluation: Evaluate system and NPU memory consumption at runtime of the model. It
can obtain the memory usage through on-line debugging method when the model is running on
specific hardware platform such as RK3399Pro, RK1808, TB-RK1808 AI Compute Stick or
RK3399Pro Linux development board.

2
6) Model pre-compilation: with pre-compilation techniques, model loading time can be reduced,
and for some models, model size can also be reduced. However, the pre-compiled RKNN model
can only be run on a hardware platform with an NPU, and this feature is currently only supported
by the x86_64 Ubuntu platform. RKNN-Toolkit supports the model pre-compilation feature from
version V0.9.5, and the pre-compilation method has been upgraded in V1.0.0. The upgraded
precompiled model is not compatible with the old driver.
7) Model segmentation: This function is used in a scenario where multiple models run
simultaneously. A single model can be divided into multiple segments to be executed on the NPU,
thereby adjusting the execution time of multiple models occupying the NPU, and avoiding other
models because one model occupies too much execution time. RKNN-Toolkit supports this
feature from version 1.2.0. This feature must be used on hardware with an NPU and the NPU
driver version is greater than 0.9.8.
8) Custom OP: If the model contains an OP that is not supported by RKNN-Toolkit, it will fail
during the model conversion phase. At this time, you can use the custom layer feature to define
an unsupported OP so that the model can be converted and run normally. RKNN-Toolkit supports
this feature from version 1.2.0. Please refer to the <Rockchip_Developer_Guide_RKNN_-
Toolkit_Custom_OP_CN> document for the use and development of custom OP.
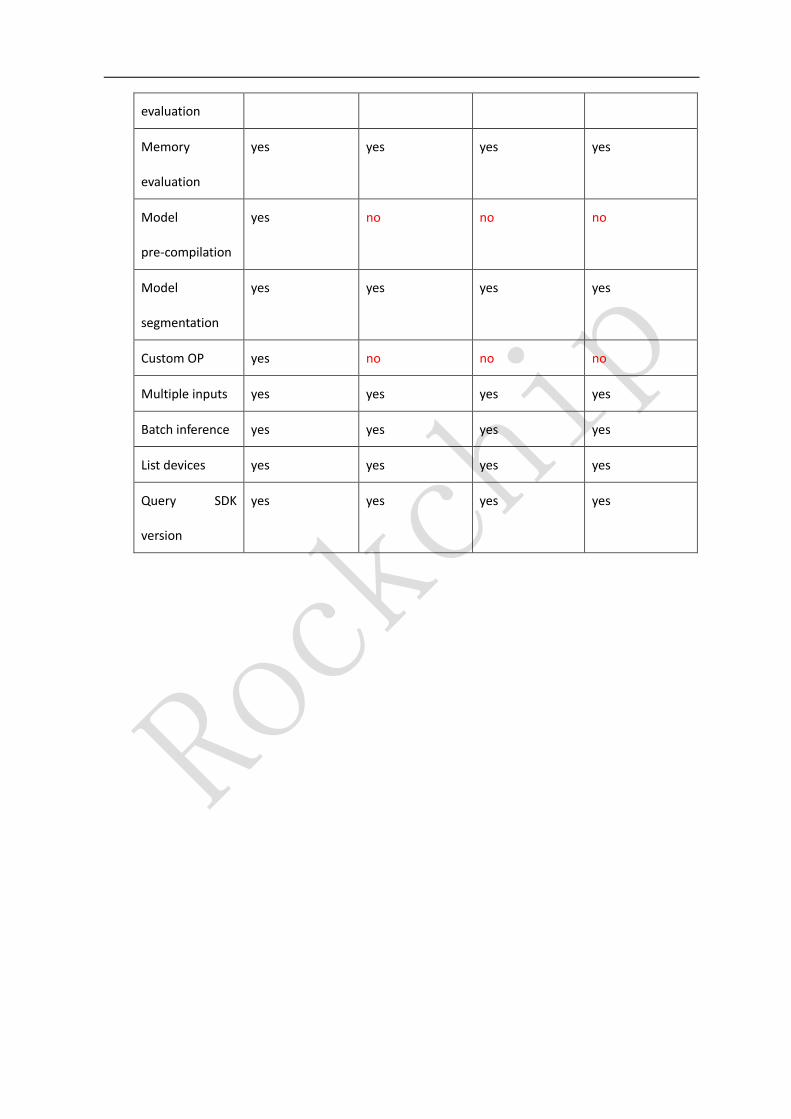
Note: Some features are limited by the operating system or chip platform and cannot be used on some
operating systems or platforms. The feature support list of each operating system (platform) is as follows:
Ubuntu
16.04/18.04
Windows 7/10 Debian 9.8 (ARM
64)
MacOS Mojave
Model
conversion
yes yes yes yes
Quantization yes yes yes yes
Model inference yes yes yes yes
Performance yes yes yes yes
3
evaluation
Memory
evaluation
yes yes yes yes
Model
pre-compilation
yes no no no
Model
segmentation
yes yes yes yes
Custom OP yes no no no
Multiple inputs yes yes yes yes
Batch inference yes yes yes yes
List devices yes yes yes yes
Query SDK
version
yes yes yes yes

4
2 Requirements/Dependencies
This software development kit supports running on the Ubuntu, Windows, Mac OS X or Debian
operating system. It is recommended to meet the following requirements in the operating system
environment:
Table 1 Operating system environment
Operating system
version
Ubuntu16.04(x64)or later
Windows 7 (x64) or later
Mac OS X 10.13.5 (x64) or later
Debian 9.8 (x64) or later
Python version 3.5/3.6
Python library
dependencies
'numpy >= 1.16.1'
'scipy >= 1.1.0'
'Pillow >= 3.1.2'
'h5py >= 2.7.1'
'lmdb >= 0.92'
'networkx == 1.11'
'flatbuffers == 1.9',
'protobuf >= 3.5.2'
'onnx == 1.4.1'
'onnx-tf == 1.2.1'
'flask >= 1.0.2'
'tensorflow >= 1.11.0'
'dill==0.2.8.2'
'opencv-python>=3.4.3.18'
'ruamel.yaml==0.15.82'
'psutils>=5.6.2'
Note:
1. Windows and Mac OS only support Python 3.6 currently.
2. This document mainly uses Ubuntu 16.04 / Python3.5 as an example. For other operating
systems, please refer to the corresponding quick start guide:
<Rockchip_Quick_Start_RKNN_Toolkit_V1.2.1_EN.pdf>.

5
3 User Guide
3.1 Installation
There are two ways to install RKNN-Toolkit: one is via pip install command, the other is running
docker image with full RKNN-Toolkit environment. The specific steps of the two installation ways are
described below.
PS: The method of install RKNN-Toolkit on RK3399Pro Linux Develop Board is introduced on this
link:
http://t.rock-chips.com/wiki.php?mod=view&id=36
3.1.1 Install by pip command
1. Create virtualenv environment. If there are multiple versions of the Python environment in the
system, it is recommended to use virtualenv to manage the Python environment.
sudo apt install virtualenv
sudo apt-get install libpython3.5-dev
sudo apt install python3-tk
virtualenv -p /usr/bin/python3 venv
source venv/bin/activate
2. Install dependent libraries: TensorFlow and opencv-python
# Install tensorflow gpu
pip install tensorflow-gpu
# Install tensorflow cpu. Only one version of tensorflow can be installed.
pip install tensorflow
# Install opencv-python
pip install opencv-python
Note: RKNN-Toolkit itself does not rely on opencv-python, but the example will use this library
to load image, so the library is also installed here.
3. Install RKNN-Toolkit

6
pip install package/rknn_toolkit-1.2.1-cp35-cp35m-linux_x86_64.whl
Please select corresponding installation package (located at the package/ directory) according to
different python versions and processor architectures:
⚫ Python3.5 for x86_64:rknn_toolkit-1.2.1-cp35-cp35m-linux_x86_64.whl
⚫ Python3.5 for arm_x64:rknn_toolkit-1.2.1-cp35-cp35m-linux_aarch64.whl
⚫ Python3.6 for x86_64:rknn_toolkit-1.2.1-cp36-cp36m-linux_x86_64.whl
⚫ Python3.6 for arm_x64: rknn_toolkit-1.2.1-cp36-cp36m-linux_aarch64.whl
⚫ Python3.6 for Windows x86_64: rknn_toolkit-1.2.1-cp36-cp36m-win_amd64.whl
⚫ Python3.6 for Mac OS X: rknn_toolkit-1.2.1-cp36-cp36m-macosx_10_9_x86_64.whl
3.1.2 Install by the Docker Image
In docker folder, there is a Docker image that has been packaged for all development requirements,
Users only need to load the image and can directly use RKNN-toolkit, detailed steps are as follows:
1. Install Docker
Please install Docker according to the official manual:
https://docs.docker.com/install/linux/docker-ce/ubuntu/
2. Load Docker image
Execute the following command to load Docker image:
docker load --input rknn-toolkit-1.2.1-docker.tar.gz
After loading successfully, execute “docker images” command and the image of rknn-toolkit
appears as follows:
REPOSITORY TAG IMAGE ID CREATED SIZE
rknn-toolkit 1.2.1 afa50891bb31 1 hours ago 2.18GB
3. Run image

7
Execute the following command to run the docker image. After running, it will enter the bash
environment.
docker run -t -i --privileged -v /dev/bus/usb:/dev/bus/usb rknn-
toolkit:1.2.1 /bin/bash
If you want to map your own code, you can add the “-v <host src folder>:<image dst folder>”
parameter, for example:
docker run -t -i --privileged -v /dev/bus/usb:/dev/bus/usb -v
/home/rk/test:/test rknn-toolkit:1.2.1 /bin/bash
4. Run demo
cd /example/mobilenet_v1
python test.py
3.2 Usage of RKNN-Toolkit
Depending on the type of model and device, RKNN-Toolkit can be used in the following three kinds
of scenarios, the usage flow in each scenario is described in detail in the following sections.
Note: for a detailed description of all the interfaces involved in the flow, refer to Section 3.4.
3.2.1 Scenario 1: Inference for Simulation on PC
In this scenario, RKNN-Toolkit is running on PC. Users perform simulation for RK1808 with the
model provided by the users to complete inference or performance evaluation.
Depending on the type of model, this scenario can be divided into two sub-scenarios: one scenario is
that the model is a non-RKNN model, i.e. Caffe, TensorFlow, TensorFlow Lite, ONNX, Darknet model,
and the other scenario is that the model is an RKNN model which is a proprietary model of Rockchip with
the file suffix “rknn”.
Note: This scenario only supported on x86_64 Linux.

8
3.2.1.1 Sub-scenario 1: run the non-RKNN model
When running a non-RKNN model, the RKNN-Toolkit usage flow is shown below:
Start
Create RKNN object to initialize RKNN
SDK environment
Call config interface to set pre-processing
parameters of model
Call load_caffe, load_tensorflow,
load_tflite, load_onnx, load_darknet
interface to load original Caffe,
TensorFlow, TensorFlow Lite, ONNX or
Darknet model
Call build interface to build RKNN model
Call export_rknn
interface to export
RKNN model
Call inference interface to
perform inference with input
to get results
Call eval_perf interface to
evaluate performance of model to
get the running time of each layer
and total running time of model
Call init_runtime interface
to initialize the runtime
environment
End
Call release interface to release RKNN
object
Call eval_memory interface
to get memory useage when
model running.
Figure 1 Usage flow of RKNN-Toolkit when running a non-RKNN model on PC
Note:
1. The above steps should be performed in order.
2.The model exporting step marked in the blue box is not necessary. If you exported, you can use
load_rknn to load it later on.
3. The order of model inference, performance evaluation and memory evaluation steps marked in red
box is not fixed, it depends on the actual demand.
4. Only when the target hardware platform is RK1808, TB-RK1808S0 AI Compute Stick, RK3399Pro
or RK3399Pro Linux, we can call eval_memory interface.

9
3.2.1.2 Sub-scenario 2: run the RKNN model
When running an RKNN model, users do not need to set model pre-processing parameters, nor do
they need to build an RKNN model, the usage flow is shown in the following figure.
Call load_rknn interface to load RKNN
model
Call init_runtime interface to initialize the
runtime environment
Start
Create RKNN object to initialize RKNN
SDK environment
End
Call inference interface to
perform inference with
input to get results
Call eval_perf interface to evaluate
performance of model to get the
running time of each layer and total
running time of model
Call release interface to release RKNN
object
Call eval_memory interface
to get the memory usage
when model running.
Figure 2 Usage flow of RKNN-Toolkit when running an RKNN model on PC
Note:
1. The above steps should be performed in order.
2. The order of model inference, performance evaluation and memory evaluation steps marked in red
box is not fixed, it depends on the actual demand.
3. We can call eval_memory only when the target hardware platform is RK3399Pro, RK1808 or
RK3399Pro Linux or TB-RK1808 AI Compute Stick.

10
3.2.2 Scenario 2: Inference on RK3399Pro (or RK1808 or TB-RK1808S0 AI Compute
Stick) connected with PC
In this Scenario, PC is connected to the development board through USB interface, RKNN-Toolkit
transfers the built or exported RKNN model to RK3399Pro (or RK1808 or TB-RK1808S0 AI Compute
Stick) and performs the model inference to obtain result and performance information from RK3399Pro
(or RK1808 or TB-RK1808S0 AI Compute Stick).
If the model is a non-RKNN model (Caffe, TensorFlow, TensorFlow Lite, ONNX, Darknet), the usage
flow and precautions of RKNN-Toolkit are the same as the sub-scenario 1 of the scenario 1(see Section
3.2.1.1).
If the model is an RKNN model (file suffix is “rknn”), the usage flow and precautions of RKNN-
Toolkit are the same as the sub-scenario 2 of the scenario 1(see Section 3.2.1.2).
In addition, in this scenario, we also need to complete the following two steps:
1. Make sure the USB OTG of development board is connected to PC, and call list_devices interface
will show the device. More information about “list_devices” interface can see Scction 3.5.13.
2. “Target” parameter and “device_id” parameter need to be specified when calling “init_runtime”
interface to initialize the runtime environment, where “target” indicates the type of hardware, optional
values are “rk1808” and “rk3399pro”. When multiple devices are connected to PC, “device_id” parameter
needs to be specified. It is a string which can be obtained by calling “list_devices” interface, for example:
all device(s) with adb mode:
[]
all device(s) with ntb mode:
['TB-RK1808S0', '515e9b401c060c0b']
Runtime initialization code is as follows:
# RK3399Pro
ret = init_runtime(target='rk3399pro', device_id='VGEJY9PW7T')
……
# RK1808

11
ret = init_runtime(target='rk1808', device_id='515e9b401c060c0b')
# TB-RK1808S0 AI Compute Stick
ret = init_runtime(target='rk1808', device_id='TB-RK1808S0')
Note: Currently, RK1808, TB-RK1808S0 AI Compute Stick support ADB or NTB. When we use
multiple devices on PC or RK3399Pro Linux Development Board, all devices should use same mode, both
are ADB or both are NTB.
3.2.3 Scenario 3: Inference on RK3399Pro Linux development board
In this scenario, RKNN-Toolkit is installed in RK3399Pro Linux system directly. The built or imported
RKNN model runs directly on RK3399Pro to obtain the actual inference results or performance information
of the model.
For RK3399Pro Linux development board, the usage flow of RKNN-Toolkit depends on the type of
model. If the model is a non-RKNN model, the usage flow is the same as that in the sub-scenario 1 of
scenario 1(see Section 3.2.1.1), otherwise, please refer to the usage flow in the sub-scenario 2 of
scenario1(see Section 3.2.1.2).
3.3 Hybrid Quantization
RKNN-Toolkit supports hybrid quantization from version 1.0.0.
Before version 1.0.0, the quantization feature can minimize model accuracy based on improved model
performance. But for some models, the accuracy has dropped a bit. In order to allow users to better balance
performance and accuracy, we add new feature hybrid quantization from version 1.0.0. Users can decide
which layers to quantize or not to quantize. Users can also modify the quantization parameters according
to their own experience.
Note:
1. The example directory provides a hybrid quantization example named ssd_mobilenet_v2, which
can be referenced to this example for hybrid quantification practice.
2. Multiple inputs model can not do hybrid quantization currently.
12
3.3.1 Instructions of hybrid quantization
Currently, we have three kind of ways to use hybrid quantization:
1. Convert quantized layer to non-quantized layer. This way may improve accuracy, but
performance will drop.
2. Convert non-quantized layer to quantized layer. This way may improve performance, but
accuracy may drop.
3. Modify quantization parameters of pointed quantized layer. This way may improve accuracy or
reduce accuracy, it has no effect on performance.
PS: Only one method can be used at a time.
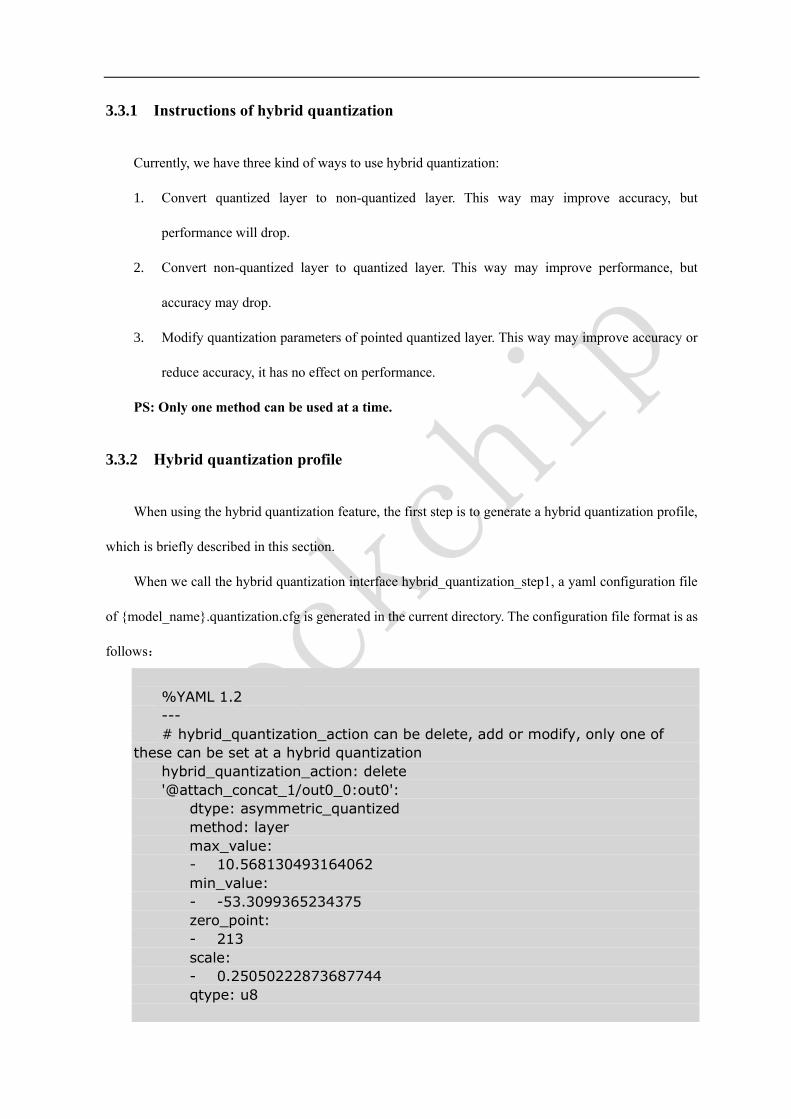
3.3.2 Hybrid quantization profile
When using the hybrid quantization feature, the first step is to generate a hybrid quantization profile,
which is briefly described in this section.
When we call the hybrid quantization interface hybrid_quantization_step1, a yaml configuration file
of {model_name}.quantization.cfg is generated in the current directory. The configuration file format is as
follows:
%YAML 1.2
---
# hybrid_quantization_action can be delete, add or modify, only one of
these can be set at a hybrid quantization
hybrid_quantization_action: delete
'@attach_concat_1/out0_0:out0':
dtype: asymmetric_quantized
method: layer
max_value:
- 10.568130493164062
min_value:
- -53.3099365234375
zero_point:
- 213
scale:
- 0.25050222873687744
qtype: u8

13
……
'@FeatureExtractor/MobilenetV2/Conv/Conv2D_230:bias':
dtype: None
First line is the version of yaml. Second line is separator. Third line is comment. Followed by the main
content of the configuration file.
The first line of the body of the configuration file is the operation when using hybrid quantization.
When using the hybrid quantization function, the user needs to indicate which way to use the hybrid
quantization, that is, the three ways mentioned in the previous section. The corresponding actions are:
"delete", "add", and "modify". The default value is "delete".
Next is a list of model layers, each layer is a dictionary. The key of each dictionary is composed of
@{layer_name}_{layer_id}:[weight/bias/out{port}], where layer_name is the name of this layer and
layer_id is an identification of this layer. We usually quantize weight/bias/out when do quantization, and
use multiple out0, out1, etc. for multiple outputs. The value of the dictionary is the quantization parameter.
If the layer is not be quantized, there is only “dtype” item, and the value of “dtype” is None.
3.3.3 Usage flow of hybrid quantization
When using the hybrid quantization function, it can be done in four steps.
Step1, load the original model and generate a quantize configuration file, a model structure file and a
model weight bias file. The specific interface call process is as follows:

14
Start
Create RKNN object to initialize RKNN SDK environment
Call config interface to set pre-processing parameters of model
Call load_caffe、load_tensorflow、load_tflite、load_onnx or
load_darknet et interface to load original Caffe、TensorFlow、
TensorFlow Lite、ONNX or Darknet model
Call hybrid_quantization_step1 interface to generate quantization profile({model_name}.quantization.c
fg), model structure file({model_name}.json), model
weight bias file({model_name}.data)
Call release interface to release RKNN object
End
Figure 3 call process of hybrid quantization step 1
Step 2, Modify the quantization configuration file generated in the first step.
⚫ If some quantization layer is changed to a non-quantization layer, find the layer that is not to be
quantized, and delete the out item of its input node and the weight/bias item of this layer from
the quantization configuration file.
⚫ If some layers are changed from non-quantization to quantization, change the value of the
hybrid_quantization_action item in the quantization configuration file to "add", then find the
layer in the quantization configuration file and change its dtype from None to
asymmetric_quantized or dynamic_fixed_point. Note: dtype needs to be consistent with other
quantization layers
⚫ If the quantization parameter is to be modified, the value of the hybrid_quantization_action item
in the quantization configuration file is changed to "modify", and then the quantization parameter

15
of the specified layer can be directly modified.
Step 3, generate hybrid quantized RKNN model. The specific interface call flow is as follows:
Start
Create RKNN object to initialize RKNN SDK environment
Call config interface to set pre-processing parameters of model
Call hybrid_quantization_step2 interface to build hybrid quantized
RKNN model
Call release interface to release RKNN object
End
Call export_rknn interface to export RKNN model
Figure 4 call process of hybrid quantization step 3
Step 4, use the RKNN model generated in the previous step to inference.
3.4 Model Segmentation
RKNN-Toolkit supports model segmentation from version 1.2.0. This feature is used in a scenario
where multiple models run simultaneously. A single model can be divided into multiple segments to be
executed on the NPU, thereby adjusting the execution time of multiple models occupying the NPU,
avoiding that one model occupies too much execution time, while other model was not implemented in
time.
The chance of each segment preempting the NPU is equal. After a segment execution is completed, it
will take the initiative to give up the NPU, if the model has the next segment, it will be added to the end of
the command queue again. At this time, if there are segments of other models waiting to be executed,

16
segmentation of other models will be performed in the order of the command queue. Note: The model that
does not have model segmentation enabled is by default a segment.
The ordinary RKNN model can be divided into multiple segments by calling the
export_rknn_sync_model interface. For the detailed usage of this interface, please refer to section 3.7.13.
If you are in a single model running scenario, you need to turn it off, just do not use a segmentation
RKNN model. Because turning on model segmentation reduces the efficiency of single model execution,
however, the multi-model running scene does not reduce the efficiency of model execution. Therefore, it
is only recommended to use this feature in scenarios where multiple models are running at the same time.
3.5 Example
The following is the sample code for loading TensorFlow Lite model (see the example/mobilenet_v1
directory for details), if it is executed on PC, the RKNN model will run on the simulator.
import numpy as np
import cv2
from rknn.api import RKNN
def show_outputs(outputs):
output = outputs[0][0]
output_sorted = sorted(output, reverse=True)
top5_str = 'mobilenet_v1\n-----TOP 5-----\n'
for i in range(5):
value = output_sorted[i]
index = np.where(output == value)
for j in range(len(index)):
if (i + j) >= 5:
break
if value > 0:
topi = '{}: {}\n'.format(index[j], value)
else:
topi = '-1: 0.0\n'
top5_str += topi
print(top5_str)
def show_perfs(perfs):
perfs = 'perfs: {}\n'.format(outputs)
print(perfs)
if __name__ == '__main__':

17
# Create RKNN object
rknn = RKNN()
# pre-process config
print('--> config model')
rknn.config(channel_mean_value='103.94 116.78 123.68 58.82',
reorder_channel='0 1 2')
print('done')
# Load tensorflow model
print('--> Loading model')
ret = rknn.load_tflite(model='./mobilenet_v1.tflite')
if ret != 0:
print('Load mobilenet_v1 failed!')
exit(ret)
print('done')
# Build model
print('--> Building model')
ret = rknn.build(do_quantization=True, dataset='./dataset.txt')
if ret != 0:
print('Build mobilenet_v1 failed!')
exit(ret)
print('done')
# Export rknn model
print('--> Export RKNN model')
ret = rknn.export_rknn('./mobilenet_v1.rknn')
if ret != 0:
print('Export mobilenet_v1.rknn failed!')
exit(ret)
print('done')
# Set inputs
img = cv2.imread('./dog_224x224.jpg')
img = cv2.cvtColor(img, cv2.COLOR_BGR2RGB)
# init runtime environment
print('--> Init runtime environment')
ret = rknn.init_runtime()
if ret != 0:
print('Init runtime environment failed')
exit(ret)
print('done')
# Inference
print('--> Running model')
outputs = rknn.inference(inputs=[img])
show_outputs(outputs)

18
print('done')
# perf
print('--> Begin evaluate model performance')
perf_results = rknn.eval_perf(inputs=[img])
print('done')
rknn.release()
Where dataset.txt is a text file containing the path of the test image. For example, if we now have a
picture of dog_224x224.jpg in the example/mobilenet_v1 directory, then the corresponding content in
dataset.txt is as follows:
dog_224x224.jpg
When performing model inference, the result of this demo is as follows:
-----TOP 5-----
[156]: 0.8837890625
[155]: 0.0677490234375
[188 205]: 0.00867462158203125
[188 205]: 0.00867462158203125
[263]: 0.0057525634765625
When evaluating model performance, the result of this demo is as follows (since it is executed on
PC, the result is for reference only).
==============================================
Performance
==============================================
Layer ID Name Time(us)
0 tensor.transpose_3 72
44 convolution.relu.pooling.layer2_2 363
59 convolution.relu.pooling.layer2_2 201
45 convolution.relu.pooling.layer2_2 185
60 convolution.relu.pooling.layer2_2 243
46 convolution.relu.pooling.layer2_2 98
61 convolution.relu.pooling.layer2_2 149
47 convolution.relu.pooling.layer2_2 152
62 convolution.relu.pooling.layer2_2 120
48 convolution.relu.pooling.layer2_2 116
63 convolution.relu.pooling.layer2_2 101
49 convolution.relu.pooling.layer2_2 185
64 convolution.relu.pooling.layer2_2 101
50 convolution.relu.pooling.layer2_2 111
65 convolution.relu.pooling.layer2_2 109

19
51 convolution.relu.pooling.layer2_2 213
66 convolution.relu.pooling.layer2_2 109
52 convolution.relu.pooling.layer2_2 213
67 convolution.relu.pooling.layer2_2 109
53 convolution.relu.pooling.layer2_2 213
68 convolution.relu.pooling.layer2_2 109
54 convolution.relu.pooling.layer2_2 213
69 convolution.relu.pooling.layer2_2 109
55 convolution.relu.pooling.layer2_2 213
70 convolution.relu.pooling.layer2_2 109
56 convolution.relu.pooling.layer2_2 174
71 convolution.relu.pooling.layer2_2 219
57 convolution.relu.pooling.layer2_2 353
58 fullyconnected.relu.layer_3 110
Total Time(us): 4772
FPS(800MHz): 209.56
==============================================
3.6 RKNN-Toolkit API description
3.6.1 RKNN object initialization and release
The initialization/release function group consists of API interfaces to initialize and release the
RKNN object as needed. The RKNN() must be called before using all the API interfaces of RKNN-
Toolkit, and call the release() method to release the object when task finished.
When we init RKNN object, we can set verbose and verbose_file parameters, used to show detailed
log information of model loading, building and so on. The data type of verbose parameter is bool. If we
set the value of this parameter to True, the RKNN Toolkit will show detailed log information on screen.
The data type of verbose_file is string. If we set the value of this parameter to a file path, the detailed log
information will be written to this file (the verbose also need be set to True).
The sample code is as follows:
# Show the detailed log information on screen, and saved to
# mobilenet_build.log
rknn = RKNN(verbose=True, verbose_file='./mobilenet_build.log')
# Only show the detailed log information on screen.
rknn = RKNN(verbose=True)
…
rknn.release()

20
3.6.2 Loading non-RKNN model
RKNN-Toolkit currently supports Caffe, TensorFlow, TensorFlow Lite, ONNX, Darknet five kinds of
non-RKNN models. There are different calling interfaces when loading models, the loading interface of
these five models is described in detail below.
3.6.2.1 Loading Caffe model
API load_caffe
Description Load Caffe model
Parameter model: The path of Caffe model structure file (suffixed with “.prototxt” ).
proto: Caffe model format (valid value is ‘caffe’ or ‘lstm_caffe’). We use ‘lstm_caffe’ when
the model is RNN model.
blobs: The path of Caffe model binary data file (suffixed with “.caffemodel”).
Return
Value
0: Import successfully
-1: Import failed
The sample code is as follows:
# Load the mobilenet_v2 Caffe model in the current path
ret = rknn.load_caffe(model='./mobilenet_v2.prototxt',
proto='caffe',
blobs='./mobilenet_v2.caffemodel')
3.6.2.2 Loading TensorFlow model
API load_tensorflow
Description Load TensorFlow model
Parameter tf_pb: The path of TensorFlow model file (suffixed with “.pb”).
inputs: The input node of model, input with multiple nodes is supported now. All the input
node string are placed in a list.

21
input_size_list: The size and number of channels of the image corresponding to the input
node. As in the example of mobilenet_v1 model, the input_size_list parameter should be
set to [224,224,3].
outputs: The output node of model, output with multiple nodes is supported now. All the
output nodes are placed in a list.
predef_file: In order to support some controlling logic, a predefined file in npz format needs
to be provided. This predefined fie can be generated by the following function call:
np.savez(‘prd.npz’, [placeholder name]=prd_value)。If there are / in placeholder name, use
# to replace.
mean_values: The mean values of the input. This parameter needs to be set only if the
imported model is a quantized model, and three channels of input of model have the same
mean value.
std_values: The scale value of the input. This parameter needs to be set only if the imported
model is a quantized model.
Return
value
0: Import successfully
-1: Import failed
The sample code is as follows:
# Load ssd_mobilenet_v1_coco_2017_11_17 TF model in the current path
ret = rknn.load_tensorflow(
tf_pb='./ssd_mobilenet_v1_coco_2017_11_17.pb',
inputs=['FeatureExtractor/MobilenetV1/MobilenetV1/Conv2d_0
/BatchNorm/batchnorm/mul_1'],
outputs=['concat', 'concat_1'],
input_size_list=[[300, 300, 3]])
3.6.2.3 Loading TensorFlow Lite model
API load_tflite
Description Load TensorFlow Lite model.

22
Note:
RKNN-Toolkit uses the tflite schema commits as in link:
https://github.com/tensorflow/tensorflow/commits/master/tensorflow/lite/schema/sche
ma.fbs
commit hash:
0c4f5dfea4ceb3d7c0b46fc04828420a344f7598
Because the tflite schema may not compatible with each other, tflite models in older or
newer schema may not be imported successfully.
Parameter model: The path of TensorFlow Lite model file (suffixed with “.tflite”).
Return
Value
0: Import successfully
-1: Import failed
The sample code is as follows:
# Load the mobilenet_v1 TF-Lite model in the current path
ret = rknn.load_tflite(model = './mobilenet_v1.tflite')
3.6.2.4 Loading ONNX model
API load_onnx
Description Load ONNX model
Parameter model: The path of ONNX model file (suffixed with “.onnx”)
Return
Value
0: Import successfully
-1: Import failed
The sample code is as follows:
# Load the arcface onnx model in the current path
ret = rknn.load_onnx(model = './arcface.onnx')

23
3.6.2.5 Loading Darknet model
API load_darknet
Description Load Darknet model
Parameter model: The path of Darknet model structure file (suffixed with “.cfg”).
weight: The path of weight file (suffixed with “.weight”).
Return
Value
0: Import successfully
-1: Import failed
The sample code is as follows:
# Load the yolov3-tiny darknet model in the current path
ret = rknn.load_darknet(model = './yolov3-tiny.cfg',
weight= './yolov3.weights')
3.6.3 RKNN model configuration
Before the RKNN model is built, the model needs to be configured first through the config interface.
API config
Description Set model parameters
Parameter batch_size: The size of each batch of data sets. The default value is 100. When quantifying,
the amount of data fed in each batch will be determined according to this parameter to
correct the quantization results.
channel_mean_value: It is a list contains four value (M0, M1, M2, S0), where the first three
value are all mean parameters, the latter value is a scale parameter. If the input data is
three-channel data with (Cin0, Cin1, Cin2), after preprocessing, the shape of output data is
(Cout0, Count1, Count2), calculated as follows:
Cout0 = (Cin0 - M0)/S0
Cout1 = (Cin1 - M1)/S0
Cout2 = (Cin2 - M2)/S0
Note: for three-channel input only, other channel formats can be ignored.

24
For example, if input data needs to be normalized to [-1,1], this parameter should be set to
(128 128 128 128). If input data needs to be normalized to [-1,1], this parameter should be
set to (0 0 0 255). If there are multiple inputs, the corresponding parameters for each input
is split with ‘#’, such as ’128 128 128 128#128 128 128 128’.
epochs: Number of iterations in quantization. Quantization parameter calibration is
performed with specified data at each iteration. Default value is -1, in this situation, the
number of iteration is automatically calculated based on the amount of data in the dataset.
reorder_channel: A permutation of the dimensions of input image (for three-channel input
only, other channel formats can be ignored). The new tensor dimension i will correspond
to the original input dimension reorder_channel[i]. For example, if the original image is
RGB format, ‘2 1 0’ indicates that it will be converted to BGR.
If there are multiple inputs, the corresponding parameters for each input is split with ‘#’,
such as ’0 1 2#0 1 2’.
Note: each value of reorder_channel must not be set to the same value.
need_horizontal_merge: Indicates whether to merge horizontal, the default value is False.
If the model is inception v1/v3/v4, it is recommended to enable this option, it can improve
the performance of inference.
quantized_dtype: Quantization type, the quantization types currently supported are
asymmetric_quantized-u8,dynamic_fixed_point-8,dynamic_fixed_point-16. The default
value is asymmetric_quantized-u8.
Return
Value
None
The sample code is as follows:
# model config
rknn.config(channel_mean_value='103.94 116.78 123.68 58.82',
reorder_channel='0 1 2',
need_horizontal_merge=True)

25
3.6.4 Building RKNN model
API build
Description Build corresponding RKNN model according to imported model (Caffe, TensorFlow,
TensorFlow Lite, etc.).
Parameter do_quantization: Whether to quantize the model, optional values are True and False.
dataset: A input data set for rectifying quantization parameters. Currently supports text file
format, the user can place the path of picture( jpg or png ) or npy file which is used for
rectification. A file path for each line. Such as:
a.jpg
b.jpg
or
a.npy
b.npy
If there are multiple inputs, the corresponding files are divided by space. Such as:
a.jpg a2.jpg
b.jpg b2.jpg
or
a.npy a2.npy
b.npy b2.npy
pre_compile: If this option is set to True, it may reduce the size of the model file, increase
the speed of the first startup of the model on the device. However, if this option is enabled,
the built model can be only run on the hardware platform, and the inference or
performance evaluation cannot be performed on simulator. If the hardware is updated, the
corresponding model need to be rebuilt.
Note:

26
1. we can not use pre compile on RK3399Pro Linux development board or Windows PC
or Mac OS X PC.
2. Pre-compiled model generated by RKNN-Toolkit-v1.0.0 or later can not run on device
installed old driver (NPU driver version < 0.9.6), and pre-compiled model generated
by old RKNN-Toolkit (version < 1.0.0) can not run on device installed new NPU driver
(NPU drvier version >= 0.9.6). We can call get_sdk_version interface to fetch driver
version.
3. If there are multiple inputs, this option needs to be set to False.
rknn_batch_size:batch size of input, default is 1. If greater than 1, NPU can inference
multiple frames of input image or input data in one inference. For example, original input
of MobileNet is [1, 224, 224, 3], output shape is [1, 1001]. When rknn_batch_size is set to
4, the input shape of MobileNet becomes [4, 224, 224, 3], output shape becomes [4, 1001].
Note:
1. The adjustment of rknn_batch_size does not improve the performance of the general
model on the NPU, but it will significantly increase memory consumption and
increase the delay of single frame.
2. The adjustment of rknn_batch_size can reduce the consumption of the ultra-small
model on the CPU and improve the average frame rate of the ultra-small model.
(Applicable to the model is too small, CPU overhead is greater than the NPU
overhead)
3. The value of rknn_batch_size is recommended to be less than 32, to avoid the
memory usage is too large and the reasoning fails.
4. After the rknn_batch_size is modified, the shape of input and output will be
modified. So the inputs of inference should be set to correct size. We also need to
process the returned outputs on post processing.

27
Return
value
0: Build successfully
-1: Build failed
The sample code is as follows:
# Build and quantize RKNN model
ret = rknn.build(do_quantization=True, dataset='./dataset.txt')
3.6.5 Export RKNN model
In order to make the RKNN model reusable, an interface to produce a persistent model is provided.
After building RKNN model, export_rknn() is used to save an RKNN model to a file. If you have an
RKNN model now, it is not necessary to call export_rknn() interface again.
API export_rknn
Description Save RKNN model in the specified file (suffixed with “.rknn”).
Parameter export_path: The path of generated RKNN model file.
Return
Value
0: Export successfully
-1: Export failed
The sample code is as follows:
# save the built RKNN model as a mobilenet_v1.rknn file in the current
# path
ret = rknn.export_rknn(export_path = './mobilenet_v1.rknn')
3.6.6 Loading RKNN model
API load_rknn
Description Load RKNN model
Parameter path: The path of RKNN model file.
load_model_in_npu: Whether to load RKNN model in NPU directly. The path parameter
should fill in the path of the model in NPU. It can be set to True only when RKNN-Toolkit

28
run on RK3399Pro Linux or NPU device(RK3399Pro, RK1808 or TB-RK1808 AI Compute
Stick) is connected. Default value is False.
Return
Value
0: Load successfully
-1: Load failed
The sample code is as follows:
# Load the mobilenet_v1 RKNN model in the current path
ret = rknn.load_rknn(path='./mobilenet_v1.rknn')
3.6.7 Initialize the runtime environment
Before inference or performance evaluation, the runtime environment must be initialized. This
interface determines which type of runtime hardware is specified to run model.
API init_runtime
Description Initialize the runtime environment. Set the device information (hardware platform, device
ID). Determine whether to enable debug mode to obtain more detailed performance
information for performance evaluation.
Parameter target: Target hardware platform, now supports “rk3399pro”, “rk1808”. The default value
is “None”, which indicates model runs on default hardware platform and system.
Specifically, if RKNN-Toolkit is used in PC, the default device is simulator, and if RKNN-Toolkit
is used in RK3399Pro Linux development board, the default device is RK3399Pro. The
“rk1808” includes TB-RK1808 AI Compute Stick.
device_id: Device identity number, if multiple devices are connected to PC, this parameter
needs to be specified which can be obtained by calling “list_devices” interface. The default
value is “None “.
Note: Mac OS X platform does not supple multiple devices.
perf_debug: Debug mode option for performance evaluation. In debug mode, the running
time of each layer can be obtained, otherwise, only the total running time of model can be

29
given. The default value is False.
eval_mem: Whether enter memory evaluation mode. If set True, we can call eval_memory
interface later to fetch memory usage of model running. The default value is False.
async_mode: Whether to use asynchronous mode. When calling the inference interface, it
involves setting the input picture, model running, and fetching the inference result. If the
asynchronous mode is enabled, setting the input of the current frame will be performed
simultaneously with the inference of the previous frame, so in addition to the first frame,
each subsequent frame can hide the setting input time, thereby improving performance.
In asynchronous mode, the inference result returned each time is the previous frame. The
default value for this parameter is False.
Return
Value
0: Initialize the runtime environment successfully
-1: Initialize the runtime environment failed
The sample code is as follows:
# Initialize the runtime environment
ret = rknn.init_runtime(target='rk1808', device_id='012345789AB')
if ret != 0:
print('Init runtime environment failed')
exit(ret)
3.6.8 Inference with RKNN model
This interface kicks off the RKNN model inference and get the result of inference.
API inference
Description Use the model to perform inference with specified input and get the inference result.
Detailed scenarios are as follows:
1. If RKNN-Toolkit is running on PC and the target is set to " rk3399pro " or " rk1808 " when
initializing the runtime environment, the inference of model is performed on the specified
hardware platform. The “rk1808” includes TB-RK1808 AI Compute Stick.

30
2. If RKNN-Toolkit is running on PC and the target is not set when initializing the runtime
environment, the inference of model is performed on the simulator.
3. If RKNN-Toolkit is running on RK3399Pro Linux development board, the inference of
model is performed on the actual hardware.
Parameter inputs: Inputs to be inferred, such as images processed by cv2. The object type is ndarray
list.
data_type: The numerical type of input data. Optional values are ’float32’, ‘float16’, ‘int8’,
‘uint8’, ‘ing16’. The default value is ’uint8’.
data_format: The shape format of input data. Optional values are “nchw”, “nhwc”. The
default value is ‘nhwc’.
outputs: The object to store final output data, the object type is ndarray list. The shape and
dtype of outputs are consistent with the return value of this interface. The default value is
None, which indicates the dtype of return value is float32.
inputs_pass_through: Pass the input transparently to the NPU driver. In non-transparent
mode, the tool will reduce the mean, divide the variance, etc. before the input is passed to
the NPU driver; in transparent mode, these operations will not be performed. The value of
this parameter is an array. For example, to pass input0 and not input1, the value of this
parameter is [1, 0]. The default value is None, which means that all input is not transparent.
Return
Value
results: The result of inference, the object type is ndarray list。
Note: Versions prior to 1.0.0 will convert output shape from "NHWC" to "NCHW".
Starting from version 1.1.0, the shape of the output will be consistent with the original
model, and no longer convert from "NHWC" to "NCHW". Please pay attention to the
location of the channel when performing post processing.
The sample code is as follows:
For classification model, such as mobilenet_v1, the code is as follows (refer to example/mobilenet_v1
for the complete code):

31
# Preform inference for a picture with a model and get a top-5 result
……
outputs = rknn.inference(inputs=[img])
show_outputs(outputs)
……
The result of top-5 is as follows:
-----TOP 5-----
[156]: 0.8837890625
[155]: 0.0677490234375
[188 205]: 0.00867462158203125
[188 205]: 0.00867462158203125
[263]: 0.0057525634765625
For object detection model, such as mobilenet-ssd, the code is as follows (refer to example/ mobilent-
ssd for the complete code):
# Perform inference for a picture with a model and get the result of object
# detection
……
outputs = rknn.inference(inputs=[image])
……
After the inference result is post-processed, the final output is shown in the following picture (the
color of the object border is randomly generated, so the border color obtained will be different each time):

32
Figure 3 mobilenet-ssd inference result
3.6.9 Evaluate model performance
API eval_perf
Description Evaluate model performance.
Detailed scenarios are as follows:
1. If running on PC and not setting the target when initializing the runtime environment,
the performance information is obtained from simulator, which contains the running time
of each layer and the total running time of model.
2. If running on RK3399Pro or RK1808 or TB-RK1808 AI Compute Stick which connected to
PC and setting perf_debug to False when initializing runtime environment, the
performance information is obtained from RK3399Pro or RK1808, which only contains the
total running time of model. And if the perf_debug is set to True, the running time of each
33
layer will also be captured in detail.
3. If running on RK3399Pro Linux development board and setting perf_debug to False when
initializing runtime environment, the performance information is obtained from
RK3399Pro, which only contains the total running time of model. And if the perf_debug is
set to True, the running time of each layer will also be captured in detail.
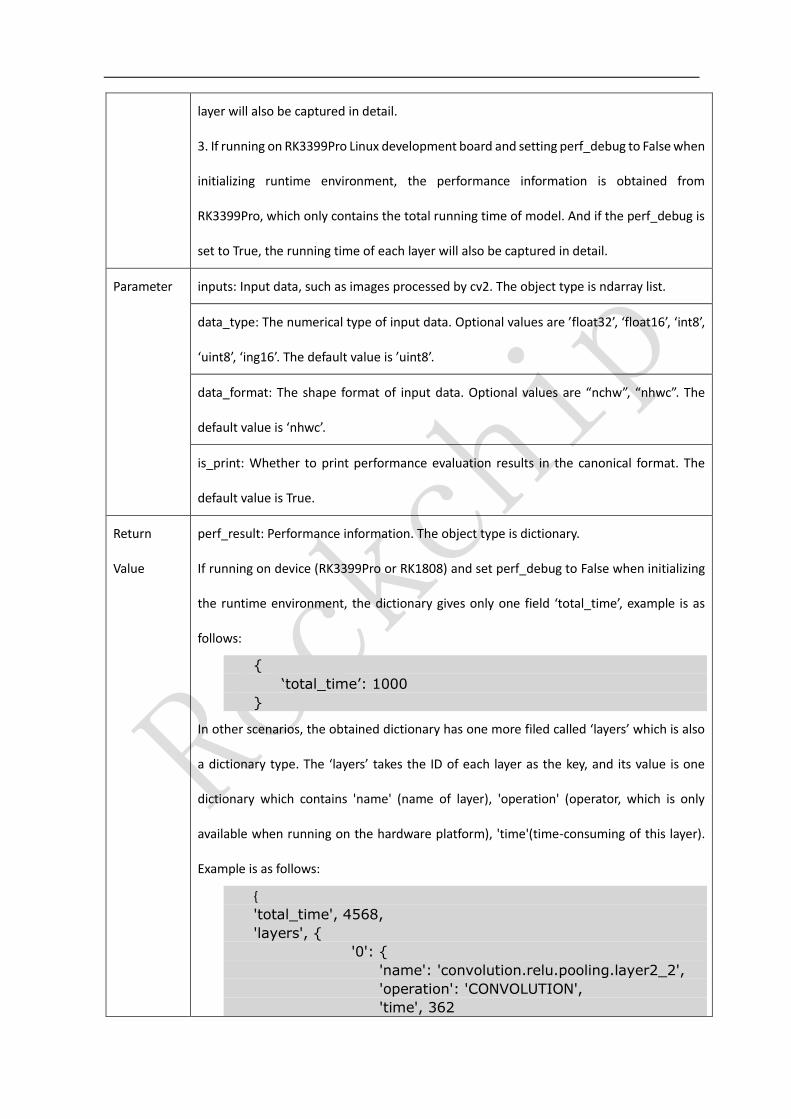
Parameter inputs: Input data, such as images processed by cv2. The object type is ndarray list.
data_type: The numerical type of input data. Optional values are ’float32’, ‘float16’, ‘int8’,
‘uint8’, ‘ing16’. The default value is ’uint8’.
data_format: The shape format of input data. Optional values are “nchw”, “nhwc”. The
default value is ‘nhwc’.
is_print: Whether to print performance evaluation results in the canonical format. The
default value is True.
Return
Value
perf_result: Performance information. The object type is dictionary.
If running on device (RK3399Pro or RK1808) and set perf_debug to False when initializing
the runtime environment, the dictionary gives only one field ‘total_time’, example is as
follows:
{
‘total_time’: 1000
}
In other scenarios, the obtained dictionary has one more filed called ‘layers’ which is also
a dictionary type. The ‘layers’ takes the ID of each layer as the key, and its value is one
dictionary which contains 'name' (name of layer), 'operation' (operator, which is only
available when running on the hardware platform), 'time'(time-consuming of this layer).
Example is as follows:
{
'total_time', 4568,
'layers', {
'0': {
'name': 'convolution.relu.pooling.layer2_2',
'operation': 'CONVOLUTION',
'time', 362

34
}
'1': {
'name': 'convolution.relu.pooling.layer2_2',
'operation': 'CONVOLUTION',
'time', 158
}
}
}
The sample code is as follows:
# Evaluate model performance
……
rknn.eval_perf(inputs=[image], is_print=True)
……
For mobilenet-ssd in example directory, the performance evaluation results are printed as
follows(The following is the result obtained on the PC simulator. The details obtained when connecting the
hardware device are slightly different from the result.):
==============================================
Performance
==============================================
Layer ID Name Time(us)
0 tensor.transpose_3 125
71 convolution.relu.pooling.layer2_3 325
105 convolution.relu.pooling.layer2_2 331
72 convolution.relu.pooling.layer2_2 437
106 convolution.relu.pooling.layer2_2 436
73 convolution.relu.pooling.layer2_2 223
107 convolution.relu.pooling.layer2_2 374
74 convolution.relu.pooling.layer2_2 327
108 convolution.relu.pooling.layer2_3 533
75 convolution.relu.pooling.layer2_2 201
109 convolution.relu.pooling.layer2_2 250
76 convolution.relu.pooling.layer2_2 320
110 convolution.relu.pooling.layer2_2 250
77 convolution.relu.pooling.layer2_2 165
111 convolution.relu.pooling.layer2_2 257
78 convolution.relu.pooling.layer2_2 319
112 convolution.relu.pooling.layer2_2 257
79 convolution.relu.pooling.layer2_2 319
113 convolution.relu.pooling.layer2_2 257
80 convolution.relu.pooling.layer2_2 319
114 convolution.relu.pooling.layer2_2 257
81 convolution.relu.pooling.layer2_2 319

35
115 convolution.relu.pooling.layer2_2 257
82 convolution.relu.pooling.layer2_2 319
83 convolution.relu.pooling.layer2_2 181
27 tensor.transpose_3 48
84 convolution.relu.pooling.layer2_2 45
28 tensor.transpose_3 6
116 convolution.relu.pooling.layer2_3 297
85 convolution.relu.pooling.layer2_2 233
117 convolution.relu.pooling.layer2_2 311
86 convolution.relu.pooling.layer2_2 479
87 convolution.relu.pooling.layer2_2 249
35 tensor.transpose_3 29
88 convolution.relu.pooling.layer2_2 30
36 tensor.transpose_3 5
89 convolution.relu.pooling.layer2_2 125
90 convolution.relu.pooling.layer2_3 588
91 convolution.relu.pooling.layer2_2 96
41 tensor.transpose_3 10
92 convolution.relu.pooling.layer2_2 11
42 tensor.transpose_3 5
93 convolution.relu.pooling.layer2_2 31
94 convolution.relu.pooling.layer2_3 154
95 convolution.relu.pooling.layer2_2 50
47 tensor.transpose_3 6
96 convD_2 6
48 tensor.transpose_3 4
97 convolution.relu.pooling.layer2_2 17
98 convolution.relu.pooling.layer2_3 153
99 convolution.relu.pooling.layer2_2 49
53 tensor.transpose_3 5
100 convolution.relu.pooling.layer2_2 6
54 tensor.transpose_3 4
101 convolution.relu.pooling.layer2_2 10
102 convolution.relu.pooling.layer2_2 21
103 fullyconnected.relu.layer_3 13
104 fullyconnected.relu.layer_3 8
Total Time(us): 10462
FPS(800MHz): 95.58
==============================================
3.6.10 Evaluating memory usage
API eval_memory
Description Fetch memory usage when model is running on hardware platform.
Model must run on RK3399Pro, RK1808, TB-RK1808 AI Compute Stick or RK3399Pro Linux.

36
Note: When we use this API, the driver version must on 0.9.4 or later. We can get driver
version via get_sdk_version interface.
Parameter is_print: Whether to print performance evaluation results in the canonical format. The
default value is True.
Return
Value
memory_detail:Detail information of memory usage. Data format is dictionary.
Data shows as below:
{
'system_memory', {
'maximum_allocation': 128000000,
'total_allocation': 152000000
},
'npu_memory', {
'maximum_allocation': 30000000,
'total_allocation': 40000000
},
'total_memory', {
'maximum_allocation': 158000000,
'total_allocation': 192000000
}
}
⚫ The ‘system_memory’ means memory usage of system.
⚫ The ‘npu_memory’ means memory usage inside the NPU.
⚫ The ‘total_memory’ means the sum of system and npu`s memory usage.
⚫ The ‘maximum_allocation’ filed means the maximum memory usage(unit: Byte) from
start the model to dump the information. It is the peak memory usage.
⚫ The ‘total_allocation’ means the accumulation memory usage(unit: Byte) of allocate
memory from start the model to dump the information.
The sample code is as follows:
# eval memory usage
……
memory_detail = rknn.eval_memory()
……
For mobilenet_v1 in example directory, the memory usage when model running on RK1808 is printed
as follows:

37
==============================================
Memory Profile Info Dump
==============================================
System memory:
maximum allocation : 41.53 MiB
total allocation : 43.86 MiB
NPU memory:
maximum allocation : 34.53 MiB
total allocation : 34.54 MiB
Total memory:
maximum allocation : 76.06 MiB
total allocation : 78.40 MiB
INFO: When evaluating memory usage, we need consider
the size of model, current model size is: 4.10 MiB
==============================================
3.6.11 Get SDK version
API get_sdk_version
Description Get API version and driver version of referenced SDK.
Note: Before we use this interface, we must load model and initialize runtime first. And this
API can only used on RK3399Pro、RK1808 or TB-RK1808 AI Compute Stick.
Parameter None
Return
Value
sdk_version:API and driver version. Data type is string.
The sample code is as follows:
# Get SDK version
……
sdk_version = rknn.get_sdk_version()
……
The SDK version looks like below:
==============================================
RKNN VERSION:
API: 1.2.0 (1190a71 build: 2019-09-25 12:39:14)

38
DRV: 1.2.0 (6897f97 build: 2019-09-25 10:17:41)
==============================================
3.6.12 Hybrid Quantization
3.6.12.1 hybrid_quantization_step1
When using the hybrid quantization function, the main interface called in the first phase is
hybrid_quantization_step1, which is used to generate the model structure file ({model_name}.json), the
weight file ({model_name}.data), and the quantization configuration file ({model_name}.quantization.
Cfg). Interface details are as follows:
API hybrid_quantization_step1
Description Corresponding model structure files, weight files, and quantization profiles are generated
according to the loaded original model.
Parameter dataset: A input data set for rectifying quantization parameters. Currently supports text file
format, the user can place the path of picture( jpg or png ) or npy file which is used for
rectification. A file path for each line. Such as:
a.jpg
b.jpg
or
a.npy
b.npy
Return
Value
0: success
-1: failure
The sample code is as follows:
# Call hybrid_quantization_step1 to generate quantization config
……
ret = rknn.hybrid_quantization_step1(dataset='./dataset.txt')

39
……
3.6.12.2 hybrid_quantization_step2
When using the hybrid quantization function, the primary interface for generating a hybrid quantized
RKNN model phase call is hybrid_quantization_step2. The interface details are as follows:
API hybrid_quantization_step2
Description The model structure file, the weight file, the quantization profile, and the correction data
set are received as inputs, and the hybrid quantized RKNN model is generated.
Parameter model_input: The model structure file generated in the first step, which is shaped like
"{model_name}.json". The data type is a string. Required parameter.
data_input: The model weight file generated in the first step, which is shaped like
"{model_name}.data". The data type is a string. Required parameter.
model_quantization_cfg: The modified model quantization profile, whick is shaped like
"{model_name}.quantization.cfg". The data type is a string. Required parameter.
dataset: A input data set for rectifying quantization parameters. Currently supports text file
format, the user can place the path of picture( jpg or png ) or npy file which is used for
rectification. A file path for each line. Such as:
a.jpg
b.jpg
or
a.npy
b.npy
pre_compile: If this option is set to True, it may reduce the size of the model file, increase
the speed of the first startup of the model on the device. However, if this option is enabled,
the built model can be only run on the hardware platform, and the inference or
performance evaluation cannot be performed on simulator. If the hardware is updated, the

40
corresponding model need to be rebuilt.
Note:
1. we can not use pre compile on RK3399Pro Linux development board or Windows PC
or Mac OS X PC.
2. Pre-compiled model generated by RKNN-Toolkit-v1.0.0 or later can not run on device
installed old driver (NPU driver version < 0.9.6), and pre-compiled model generated
by old RKNN-Toolkit (version < 1.0.0) can not run on device installed new NPU driver
(NPU drvier version >= 0.9.6). We can call get_sdk_version interface to fetch driver
version.
3. If there are multiple inputs, this option needs to be set to False.
Return
Value
0: success
-1: failure
The sample code is as follows:
# Call hybrid_quantization_step2 to generate hybrid quantized RKNN model
……
ret = rknn.hybrid_quantization_step2(
model_input='./ssd_mobilenet_v2.json',
data_input='./ssd_mobilenet_v2.data',
model_quantization_cfg='./ssd_mobilenet_v2.quantization.cfg',
dataset='./dataset.txt')
……
3.6.13 Export a segmentation model
The function of this interface is to convert the ordinary RKNN model into a segment model, and the
position of the segment is specified by the user.
API export_rknn_sync_model
Description Insert a sync layer after the user-specified layer to segment the model and export the
segmented model.
Parameter input_model: the model which need segment. Data type is string, required.
41
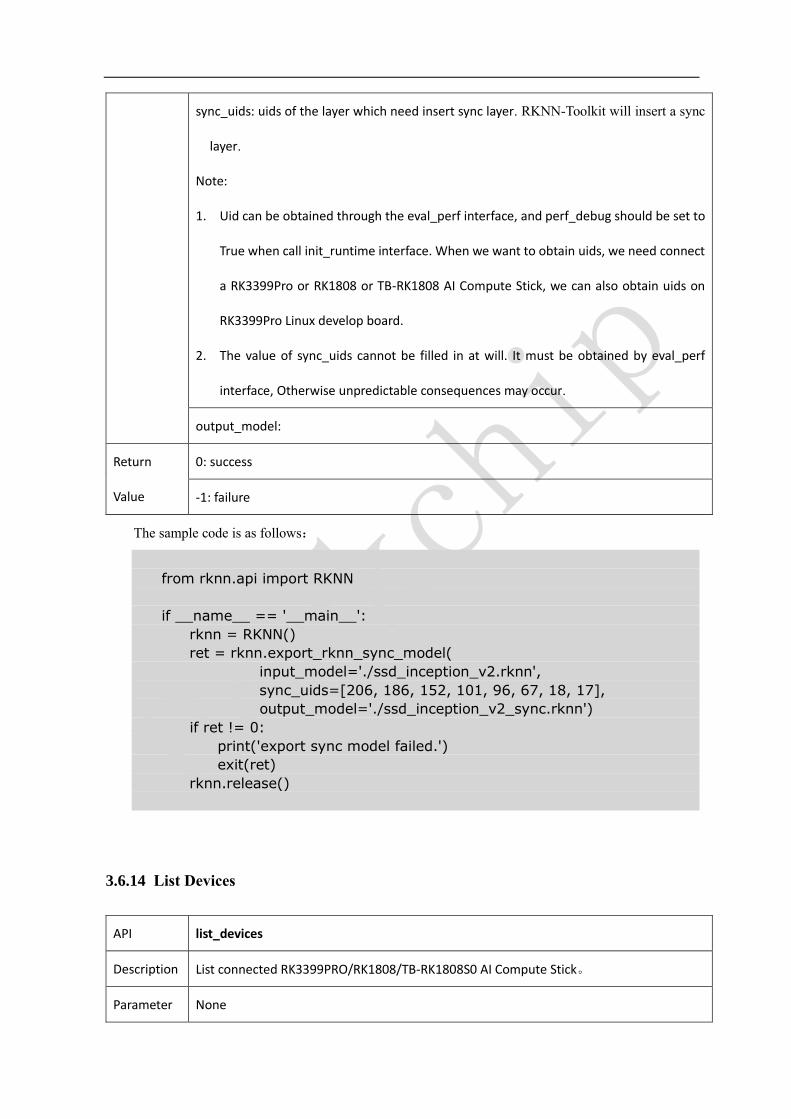
sync_uids: uids of the layer which need insert sync layer. RKNN-Toolkit will insert a sync
layer.
Note:
1. Uid can be obtained through the eval_perf interface, and perf_debug should be set to
True when call init_runtime interface. When we want to obtain uids, we need connect
a RK3399Pro or RK1808 or TB-RK1808 AI Compute Stick, we can also obtain uids on
RK3399Pro Linux develop board.
2. The value of sync_uids cannot be filled in at will. It must be obtained by eval_perf
interface, Otherwise unpredictable consequences may occur.
output_model:
Return
Value
0: success
-1: failure
The sample code is as follows:
from rknn.api import RKNN
if __name__ == '__main__':
rknn = RKNN()
ret = rknn.export_rknn_sync_model(
input_model='./ssd_inception_v2.rknn',
sync_uids=[206, 186, 152, 101, 96, 67, 18, 17],
output_model='./ssd_inception_v2_sync.rknn')
if ret != 0:
print('export sync model failed.')
exit(ret)
rknn.release()
3.6.14 List Devices
API list_devices
Description List connected RK3399PRO/RK1808/TB-RK1808S0 AI Compute Stick。
Parameter None

42
Return
Value
Return adb_devices list and ntb_devices list. If there are no devices connected to PC, it will
return two empty list.
For example, there are two TB-RK1808 AI Compute Sticks connected to PC, it`s return looks
like below:
adb_devices = []
ntb_devices = ['TB-RK1808S0', '515e9b401c060c0b']
The sample code is as follows:
from rknn.api import RKNN
if __name__ == '__main__':
rknn = RKNN()
rknn.list_devices()
rknn.release()
The devices list looks like below:
*************************
all device(s) with adb mode:
['515e9b401c060c0b', 'XGOR2N4EZR']
*************************
3.6.15 Register Custom OP
API register_op
Description Register custom op。
Parameter op_path: rknnop file path of custom op build output
Return
Value
Void
The sample code is as follows. Note that this interface need be called before model converted. Please
refer to the "Rockchip_Developer_Guide_RKNN_Toolkit_Custom_OP_CN" document for the use and
development of custom operators.
rknn.register_op('./resize_area/ResizeArea.rknnop')

43
rknn.load_tensorflow(…)


