Download - Rainbow Lily Petals - Robert Kaufman

Just KissesDesigned by Robert Kaufman Fabricswww.robertkaufman.com
Featuring
RAINBOW LILY PETALS
For questions about this pattern, please email [email protected].
Finished quilt measures: 70” x 90”

page 2
Fabric and Supplies Needed
Color Fabric Name/SKU Yardage
SRK-17080-39 WILLOW
SRK-17080-346 LIMELIGHT
SRK-17080-369 GOLDFISH
SRK-17080-129 MARIGOLD
SRK-17080-234 WISTERIA
SRK-17080-107 PETAL
SRK-17080-302 POPPY
SRK-17079-63 SKY
K001-1387 WHITE
SRK-17078-246 WATER
SRK-17080-19 ORCHID
SRK-17080-220 PANSY
SRK-17080-26 PETUNIA
SRK-17080-82 BLUE JAY
SRK-17080-270 MEADOW
Color Fabric Name/SKU Yardage
Fabric amounts based on yardage that is 42” wide.
A
B
C
D
E
F
G
H
I
J
K
L
M
N
O
1-7/8 yards
4 yards
1/4 yard
1/4 yard
1/4 yard
3/8 yard
3/8 yard
3/8 yard
1/2 yard
3/8 yard
3/8 yard
3/8 yard
3/8 yard
1/4 yard
1/4 yard
3/4 yards
Copyright 2017, Robert KaufmanFor individual use only - Not for resale
You will also need:5-1/2 yards for backing
SRK-17078-246 WATER
*Also used for Fabric C
Binding*
page 3
From Fabric A, cut:thirty-two of Template 1sixty of Template 2
From Fabric B, cut:one hundred ninety-two of Template 2
From Fabric C, cut:three 1-1/8” x WOF strips. Sucbut:sixty-three 1-1/8” squares
From Fabric D, cut:eight of Template 1
From Fabric E, cut:twelve of Template 1
From Fabric F, cut:sixteen of Template 1
From Fabric G, cut:twenty of Template 1
From Fabric H, cut:twenty-four of Template 1
From Fabric I, cut:twenty-eight of Template 1
From Fabric J, cut:twenty-six of Template 1
From Fabric K, cut:twenty-six of Template 1
From Fabric L, cut:twenty of Template 1
Cutting Instructions
- Read through all of the instructions before beginning.- All of the seam allowances are 1/4” unless otherwise noted.- Press seam allowances open unless otherwise noted. - Width of fabric (WOF) is equal to at least 42” wide.- Right sides together has been abbreviated to RST.- Remember to measure twice and cut once!
Notes Before You Begin

page 4
From Fabric M, cut:sixteen of Template 1
From Fabric N, cut:twelve of Template 1
From Fabric O, cut:twelve of Template 1
From the Binding Fabric, cut:nine 2-1/2” x WOF strips
Note: This sample shows the fi rst block. The remaining blocks are made with the same construction method, but use different fabrics. Refer to the Quilt Assembly Diagram for fabric placement. Consider checking off each block in the diagram as you complete it!
Assemble the Blocks
Step 1: Gather: Two Fabric A/Template 1 pieces Three Fabric A/Template 2 pieces Two Fabric D/Template 1 pieces One Fabric B/Template 2 piece One Fabric C/square (referred to in the instructions as the center square)
Arrange as shown in the Block Assembly Diagram. Sew two Template 2 units to opposite edges of the center square. Press.
Step 2: The pieces that remain will be in two sets of three. Sew the three pieces together (one Template 1 piece sewn to each side of a Template 2 piece) to form a corner unit.
Block Assembly Diagram
Match and pin the straight edges at the ends, then pin once or twice between the ends. Sew. Clip the seam allowance around the curve, if needed, taking care not to clip the stitches. Press the seam to one side.
Step 3: Match a Step 2 unit to the curved edge of the Step 1 unit.
Match and pin the straight edges at the ends and at the center square seams, then pin once or twice in between. Sew. Clip the seam allowance around the curve, if needed, taking care not to clip the stitches. Press the seam to one side. Repeat with the remaining Step 2 unit.
page 5
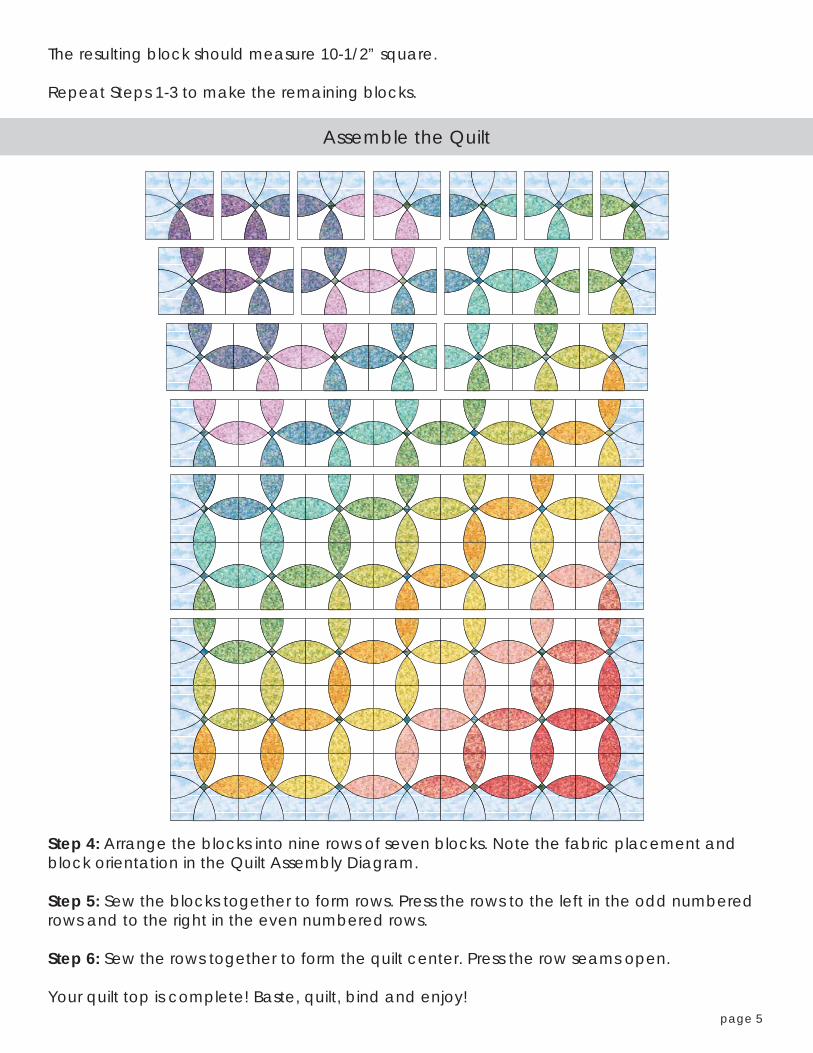
The resulting block should measure 10-1/2” square.
Repeat Steps 1-3 to make the remaining blocks.
Step 4: Arrange the blocks into nine rows of seven blocks. Note the fabric placement and block orientation in the Quilt Assembly Diagram.
Step 5: Sew the blocks together to form rows. Press the rows to the left in the odd numbered rows and to the right in the even numbered rows.
Step 6: Sew the rows together to form the quilt center. Press the row seams open.
Your quilt top is complete! Baste, quilt, bind and enjoy!
Assemble the Quilt

page 6
Print at 100%. Check printing accuracy using 1” test square.
Templates
1” box for scale
RAINBOW LILY PETALS
TEMPLATE 1
RAINBOW LILY PETALS
TEMPLATE 2


